JacquesCousteau
-
Posts
1,391 -
Joined
-
Last visited
Content Type
Profiles
Forums
Gallery
Events
Everything posted by JacquesCousteau
-
 It's been a while since the last update, but I've finally been able to make progress again, and I'm in the home stretch. First, as mentioned earlier, the grapnel anchor I had used turned out to be inaccurate, so while visiting family for Thanksgiving, I ordered a different anchor. Unfortunately, given shipping times and prices, I was only able to get one with a wooden stock, while photos make it clear that they used metal stocks. That said, everything I've read says that Britannia metal is pretty soft, and that's been my experience with filing off flash, so I decided to see if I could modify it to fit a metal stock. The anchor kit with the wooden stock. Like the grapnel, it's 20mm long. Unlike the grapnel, it came pre-blackened, although I painted everything in the end anyway. Drilling a new hole in the shaft by hand was a very slow process. It doesn't help that most of my cheap drill bits have a totally flat rather than a pointed tip, which is fine if you're drilling into basswood but seems to slow things and makes the drill bit slip easily when drilling into metal. I had to use a larger, sharp-tipped drill bit to mark the initial hole. It was also tricky finding the right pressure to place, as you do need some to make the bit cut into the metal. I learned how fragile drill bits can be: my thinnest one abruptly bent under the pressure. Alas, poor drill bit. Nonetheless, after what seemed like a very long time, I finally got a hole through the shaft. I was then able to superglue a length of brass rod in place to make the new stock. The whole anchor was then painted. Finally, I removed the grapnel and affixed the new anchor to the end of the chain. I'm sure I can find a use for the grapnel on another build. I'm pleased with how the anchor turned out, it looks much more accurate. Compare with the anchor in this photo: Source: https://memoricamexico.gob.mx/swb/memorica/Cedula?oId=g_ts2osBVs6S4R6nsc0d Besides the anchor, I was also finally able to find some large coffee filters, and have begun work on the sail. The end of the build is in sight!


-
Best of luck with the project! One question: why not borrow the lines of an existing pilot cutter? There are a number of hull plans available in books like Greenhill and Mannering's Inshore Craft that would lend themselves to a plank-on-bulkhead build, and it would be entirely possible to come up with your own deck arrangement to personalize the build. Just a thought.
-
After a very relaxing family visit, I’m looking forward to getting back to the build. But first: by now I've discussed why the lancha chilota developed, how it changed over time, and some variations in hull form, but I haven't yet written much about how the type developed. The reason is because I have more suggestive leads and intriguing possibilities than clear answers. Despite that, I still think it's worth at least putting some thoughts and notes down, even if what follows rambles a bit. Broadly, while I don’t think it’s possible to plot out a direct line of development for the lancha chilota, what is clear is that 1) European shipwrights played a prominent role in the 19th-century shipbuilding industry in Chiloé and in Chile more generally, 2) Chilean boatyards and shipyards built large numbers of sloops, schooners, and other gaff-rigged, frame-built coastal traders, and 3) by the late 19th century, Chilean shipwrights increasingly focused their attention on smaller vessels due to economic changes. Given this context, we can understand how the lancha chilota came about in general terms. As I’ve mentioned earlier, the lancha chilota originated in the area of the Chiloé archipelago in the late 1800s, alongside other vessels like the open, double-ended chalupa and the partially-decked chalupón. These vessels drew on Euro-American boatbuilding techniques, which came to replace the sewn-plank construction method that previously dominated the region. It's difficult to be more specific than that, though, or to point to more direct routes of influence that created the lancha, as there’s a lot about its origin that’s unclear. A lot of existing writing is vague on the issue if not of dubious accuracy. For example, Hollander and Mertes, in The Last Sailors, describe the lancha as a direct descendant of the conquistadors' caravels. This strikes me as implausible given the vast differences in hull form and rig, and, crucially, given that chilote boatbuilders seem to have preferred sewn-plank dalcas over European-style vessels for centuries, making it unclear how they would have maintained a building tradition that would have allowed the caravel to slowly develop into the lancha over centuries. Meanwhile, José A. Garnham's Lanchas chilotas: un patrimonio histórico y cultural de Chile (Santiago: Ricaaventura, 2017) fortunately has its first chapter, about the origins of the lancha, digitally available as a sample ( https://www.ricaaventura.cl/catalogo/lanchas-chilotas-un-patrimonio-historico-y-cultural-de-chile-2/ ). Although the chapter contains some interesting hints, Garnham has to admit that the lancha's origins are unclear. Some writers, he reports claimed that the lancha developed from the dalca. Although they clearly fulfilled similar functions, a straightforward line of development strikes me as unlikely due to the absence of shared techniques or hull forms between the two vessels. Others, Garnham writes, suggested that the lancha drew more on European examples and maritime traditions. One chilote reported that a French research group thought the lancha looked similar to Breton vessels of the 18th Century. It's not clear to me, though, how such vessels would have been transmitted to Chiloé, which was an isolated outpost of the Spanish empire at the time. Others suggested that it developed from Galician small craft, as the early Spanish colonists were Galician. This is perhaps more plausible as it suggests a clear route of transition, yet it's unclear how this theory comports with the clear dominance of the dalca for centuries. Still others pointed to the brief Dutch occupations of Chiloé in 1600 and 1643 to suggest Dutch influence, claiming that the lancha was similar to the botter. But it's unclear whether the Dutch even built vessels locally during their very brief occupations. As a point of compsarison, while the Dutch may have influenced the Saveiro of Bahia in Brazil, a different type of coasting vessel, their occupation of Northeast Brazil lasted 24 years and involved a substantial number of people. It was a far deeper-reaching enterprise than their brief occupations of Chiloé. Not to mention that the lancha does not strike me as being all that similar to the botter, other than both being small gaff-rigged sloops with fairly flattened bottoms. In any case, none of these are really conclusive, and Garnham concludes the chapter reflecting on the type's uniqueness (Garnham, pg. 17-19). I agree that we can't draw a straight line to the lancha from any particular European vessel. Small vessels, many of them decked with transom sterns and gaff rigs, were common all around the European Atlantic coast but in uncountably diverse forms, reflecting both local boatbuilding traditions as well as broader influences, at times leading to cases of convergent evolution. For instance, to follow up on the possible Galician influence mentioned in Garnham, the northern coast of Spain has long been a hotbed of maritime activity, and a number of distinct local types had emerged by the late 1800s. One of these, the galeón gallego (not to be confused with the galleon of the 1500s), shares similarities with the lancha chilota, being a capacious, decked, gaff-rigged sloop of similar dimensions and similar purposes, one which was also often beached by the tide for cargo handling. Yet there are clear differences, as well--notably, the galeón generally had a round rather than a transom stern. Rather than a case of direct influence from galeón to lancha, the two vessels seem to be a case of convergent evolution, with boatbuilders drawing on similar elements in order to build somewhat similar vessels for similar conditions. (For a brief history of the galeón gallego and related vessels, amply illustrated by photos, see the link in the photo source below). Below: A galeón gallego, a type of Galician coasting sloop. Source: https://bluscus.es/historia-de-los-galeones-gallegos-industriales-y-practicos/ Yet this doesn't answer the question of how European-style boatbuilding techniques and rigs replaced other, more local styles in Chiloé. To understand potential routes of influence, I turned to other sources. The most useful source—one which I only found after spending a good bit of time combing through census records and early lithographs of ports—was Valeria Maino Prado’s La navegacieon del Maule. Una vía de conexión con el exterior, 1794-1898 (Talca, Chile: Editorial Universidad de Talca, 1996). (The book is available in full for download from the Chilean National Library here: https://www.memoriachilena.gob.cl/602/w3-propertyvalue-128835.html ). Although it focuses on the Maule region, which is several hundred miles to the north of Chiloé, and it doesn’t much discuss the specifics of boatbuilding, it’s an extremely useful source for understanding broader Chilean shipbuilding and coastal trade from the colonial period to the late 19th century. The book doesn’t explicitly tell us how the lancha chilota developed, but it provides a lot of information that helps contextualize it, helping propose a way of understanding its emergence. According to Maino Prado European shipwrights played an important role in 19th century Chile. During the colonial era, European-style shipbuilding in Chile languished until the Bourbon reforms of the late 1700s, when Spanish authorities sought to improve the productivity of their empire to better compete with France and Britain. Spanish expeditions had determined that Chile had good sources of lumber for shipbuilding, and with new laws allowing free trade between Spanish ports and the empire, a small number of shipbuilders from the north of Spain—Basques, Galicians, and Asturians—arrived in Chile, setting up shop especially near the Maule river and beginning to build a number of vessels, some of them quite sizeable ocean-going ships (Maino Prado, 16-21). The wars of independence opened Chile to trade with the rest of the world and led to foreign shipwrights immigrating to the country to establish shipyards and boatyards. Among them were British (some of whom came with former Royal Navy officer Thomas Cochrane when he led the Chilean insurgent fleet), French, Germans, Americans, and Italians. In fact, as Maino Prado makes clear, the Chilean shipbuilding industry was marked by the prominent presence of foreigners. From the mid-1830s to the mid-1840s, for example, there were just two Chilean-origin shipwrights in the important Maule port of Constitución, along with six British shipbuilders, three Germans, and one Frenchman (Maino Prado, 37). Foreign shipwrights brought with them the latest in European ship design and techniques, and actively sought to adapt them to local conditions—in Constitución, for instance, Maino Prado details their efforts to create shallow-draft vessels that could easily pass over the bar at the Maule River’s mouth (Maino Prado, 28-29). Maino Prado and other sources further highlight the important role of foreigners in Chiloé’s maritime sector, as well, beyond Chile as a whole. Although it’s not the focus of her book, Maino Prado notes that Chiloé also became a major center in the Chilean shipbuilding industry in the 19th century, building nearly as many registered vessels as Maule shipwrights did in 1849-1858, for example (Maino Prado, 42). As elsewhere in Chile, foreign shipwrights played an important role. In the period 1850-1866, for example, Chiloé had one British, four French, and ten Chilean-origin shipwrights (Maino Prado, 48). As a side note, Maino Prado thus paints a rather different picture of Chiloé than that given by Anton Daughters in Memories of Earth and Sea (an ethnographic work on Chiloé history and identity that I’ve discussed earlier). While Daughters emphasizes Chiloé’s isolation in the nineteenth century, Maino Prado shows that Chiloé was an important center of national shipbuilding and that foreign shipwrights played an important role. Census records from 1875, 1885, and 1895, which I also examined, suggest how both scholars have a point. To Daughters’ point about Chiloé’s isolation and the continuation of small-scale, near-subsistence level economic activities among many Chilotes, census data makes it clear that Chiloé had very few foreigners overall—just 217 in 1875, out of a province-wide population of 64,536—and that labor specialization was only in its infancy in the period. While other sources make it clear that Chilotes regularly engaged in fishing for subsistence and for small-scale trade, for instance, there were only 18 people in 1875 who gave their profession as fishermen, meaning that most fishing was done as a supplemental activity by people who combined fishing with other activities (mostly farming on small farms, the most common “profession” given in the census). Much the same could be said of coastal trade—despite other sources being clear that the archipelago was linked by a thriving coastal trade, which was only growing with the expanding timber industry of the late 1800s, only 206 people gave their occupation as “sailors” in 1875, so many Chilote coastal traders would have been people who viewed sailing as a supplemental activity. On the other hand, foreigners were clearly concentrated in maritime industries. It’s difficult to track shipbuilders, as censuses seem to have lumped many under the generic “carpenter” category (in 1875 a single person was listed as a “calafate,” a term generally referring to a small-scall boatbuilder and caulker/repairer, and one person was similarly labeled a “naval constructor” in 1885), but of the 206 sailors in 1875, 70 of them were foreigners, many of them American, British, German, and Spanish. All of which is to say that, while Chiloé was indeed marked by the continuation of small-scale landholding and unspecialized labor systems (allowing for the cultural continuities Daughters identifies), the maritime sector was nonetheless particularly marked by the presence of foreigners, which helps us to understand how the lancha chilota developed with foreign influence even if we can’t fully trace specific influences. (I should also note that the nearby mainland province of Llaniquihue had many more foreigners, especially Germans, including a number in the port city of Puerto Montt, although it's not clear from the census how involved they were in shipbuilding and coastal trade). Finally, Maino Prado and other sources also highlight that there was a thriving Chilean coastal trade carried out in hundreds of relatively small vessels in the nineteenth century, many of which were locally built in Chile following European-style designs. Although she doesn’t provide the particulars of ship design due to a lack of sources, Maino Prado uses registries to trace ship and boat construction, general type, and tonnage. There was a great deal of variety, but in general, while Chilean shipwrights in the first half of the 1800s regularly built everything from small sloops (balandras) of 20 tons or so, up to full-rigged ships of several hundred tons, Maino Prado notes that there was a shift toward smaller coasting vessels—especially schooners, which rapidly overtook brigs and sloops, likely for the same efficiency reasons that US coastal trade underwent the same change—in the later 1800s. This had a number of causes, including the difficulties that Chilean shipwrights (who built with wood) had in competing with large metal-hulled foreign steamships that became more prominent in oceanic trade with the construction of the Suez Canal, the expansion of coastal trade routes and small-scale coastal trade in response to the Spanish blockade of major Chilean ports in 1866, and the growing need for coastal trade to supply the expanding nitrate industry (Maino Prado, 52, 63-68, 79-80). In any case, Chilean shipwrights increasingly concentrated on smaller vessels, until by the late 1800s most were largely focused on building harbor lighters and similar craft (which, concurrently, became increasingly large in this period due to the growth of oceanic trading ships) along with some coastal traders. Chiloé was hardly immune to such developments, building a large number of European-style vessels. The 1875 census, for instance, records that the port of Ancud in Chiloé had a yearly entry of 132 ships averaging around 570 tons each, and that the province’s lumber trade and local commerce in that year involved some 20 schooners of 120-130 tons each and 213 sloops of 40-50 tons each (tonnages that should be treated as very rough estimates--I should also note that it's unclear to me whether is counting all coasting vessels that passed through, or just ones that were registered in Chiloé province). Maino Prado also includes, on the basis of admittedly incomplete data, registries for a number of vessels built in Chiloé in the 19th century for local and national owners, ranging from sloops in the 20-40 ton range, schooners in the 40-50 ton range, up to a few ships of several hundred tons. Details, unfortunately, are few and far between about such coastal traders, in Chiloé and elsewhere in Chile. I haven’t had much luck finding anything specific in early images of Chilean ports (for an interesting blog post on early images of Puerto Montt, including on lithographers’ practice of adding fictional generic vessels to harbor scenes in order to promote ports, see: https://ceph-puerto-montt.blogspot.com/2011/03/nuevo-orden-cronologico-primeras.html?m=1 ). Nonetheless, a couple points are clear and have important implications for the development of the lancha chilota. First, Chiloé’s (and Chile as a whole’s) maritime sector had a high degree of foreign, especially European, influence from the early 1800s onward, and a wide variety of vessels were built in Chilean shipyards and boatyards. There were clearly many paths, then, through which European techniques could take root in Chiloé, allowing for the development of the lancha chilota. Second, Chilean shipbuilding over time developed to specialize in the production of smaller vessels, including open harbor lighters and decked 1- and 2-masted, gaff-rigged coastal traders. Aspects of both types may have influenced the lancha chilota, which could plausibly be seen as either a decked and rigged version of an open launch, or as a miniaturized version of a coastal trading sloop. This tendency toward producing smaller vessels would have especially met the needs of Chilotes for small, cheap, but capacious and seaworthy vessels to link together the archipelago’s scattered towns and farms. All of which is to say: it’s likely impossible to trace an exact route by which the lancha chilota came to be. Barring further information, such as shipwrights’ memoirs, extensive shipbuilding plans, or other sources that likely don’t even exist today (although I’d love to see more research on this), we can’t plot out a straight line from, say, some particular European coastal sloop to the lancha chilota. But we can see how the lancha chilota developed and replaced the sewn-plank dalca in the context of extensive European influence in ship- and boat-building, and a general economic-driven trend in Chilean shipbuilding to focus on ever-smaller vessels.

- 312 replies
-
- 3
-

-
- Chile
- Latin America
- (and 6 more)
-
Very nice job, the added keel really brings it to life and differentiates it from other peapod builds.
- 44 replies
-
- 2
-
-

-
- maine peapod
- peapod
- (and 4 more)
-
Very well done! Were the fish included in the kit? They're a nice touch.
- 18 replies
-
- 4
-
-
- grand banks dory
- BlueJacket Shipcrafters
- (and 1 more)
-
Congratulations, you really elevated this simple model kit. It looks great!
- 38 replies
-
- 2
-
-
-
- Chesapeake Bay Flattie
- Model Shipways
- (and 2 more)
-
My apologies for re-opening a finished thread, but I wanted to ask, what are the dimensions of the finished model? I can't find the size on the NRG page, and am considering whether these plans would be a good candidate for rescaling to 1:32 scale. Not only does the model look fantastic, by the way--love the natural wood color!--but the case is also great.
-
Unfortunately, the camber issue remains a problem. I had miscounted while measuring, and the current camber isn't actually of 7 inches (at full scale), but closer to a foot, on a vessel just under 13 feet wide. This is very excessive--if I were to try to use sanding alone to reduce it to 3-4 inches, I would need to remove 1/4 inch of material from the bulkheads! I'm also concerned that adding 1/16-inch shims to the edges won't work very well, as I've realized that it will completely throw off the sheer line, especially at the bow. Viewed from the front, the sheer line should rise somewhat to a point at the prow, which it currently does to a degree that I think looks appropriate. Adding shims to raise the edge seems like it will likely destroy this. Raising the prow is a possible response, but it will significantly change the proportions of the hull. Possibly I could shim the bulkhead edges by 1/16 inch at the lowest point of the sheer and add smaller shims fore and aft to create a new smooth sheer, but this would require a lot of work and I'm not sure whether it would still throw off the sheer/hull proportions too much. But, maybe I'm overthinking it. It's a bit hard to judge, but my sense is that the vessel shown below (from 1940) has a relatively pronounced camber, and it may be that the amount of camber varied significantly. Perhaps I don't actually need to reduce the camber to 3 inches, although I still definitely need to reduce it somewhat. That said, this may simply be very motivated reasoning on my part. Source: https://www.bibliotecanacionaldigital.gob.cl/bnd/629/w3-article-613543.html In any case, I will be setting aside modeling for a couple weeks while I travel for Thanksgiving, although I may post a bit more on historical context.


- 312 replies
-
- 7
-
-
- Chile
- Latin America
- (and 6 more)
-
I'm considering how far to go with it, especially given my very rudimentary metalworking skills (and the rather limited space and budget I have for this). Some of the simpler wire hooks seem pretty doable, at least. On the camber issue, after some searching I've seen some posts suggesting 1/4-inch of height for every 1 foot across the deck as a rule of thumb. So, for a 12.67-foot wide vessel, the camber should be just over 3 inches. What I have now represents a camber of 7 inches. If I add 1/16‐inch shims to the sides of the bulkhead tops and can sand down 1/32‐inch from the centerline, I'll have a camber of about 4 inches, which I think would be close enough without totally throwing off the hull shape. I'll have to think about it.
- 312 replies
-
- 4
-
-
- Chile
- Latin America
- (and 6 more)
-
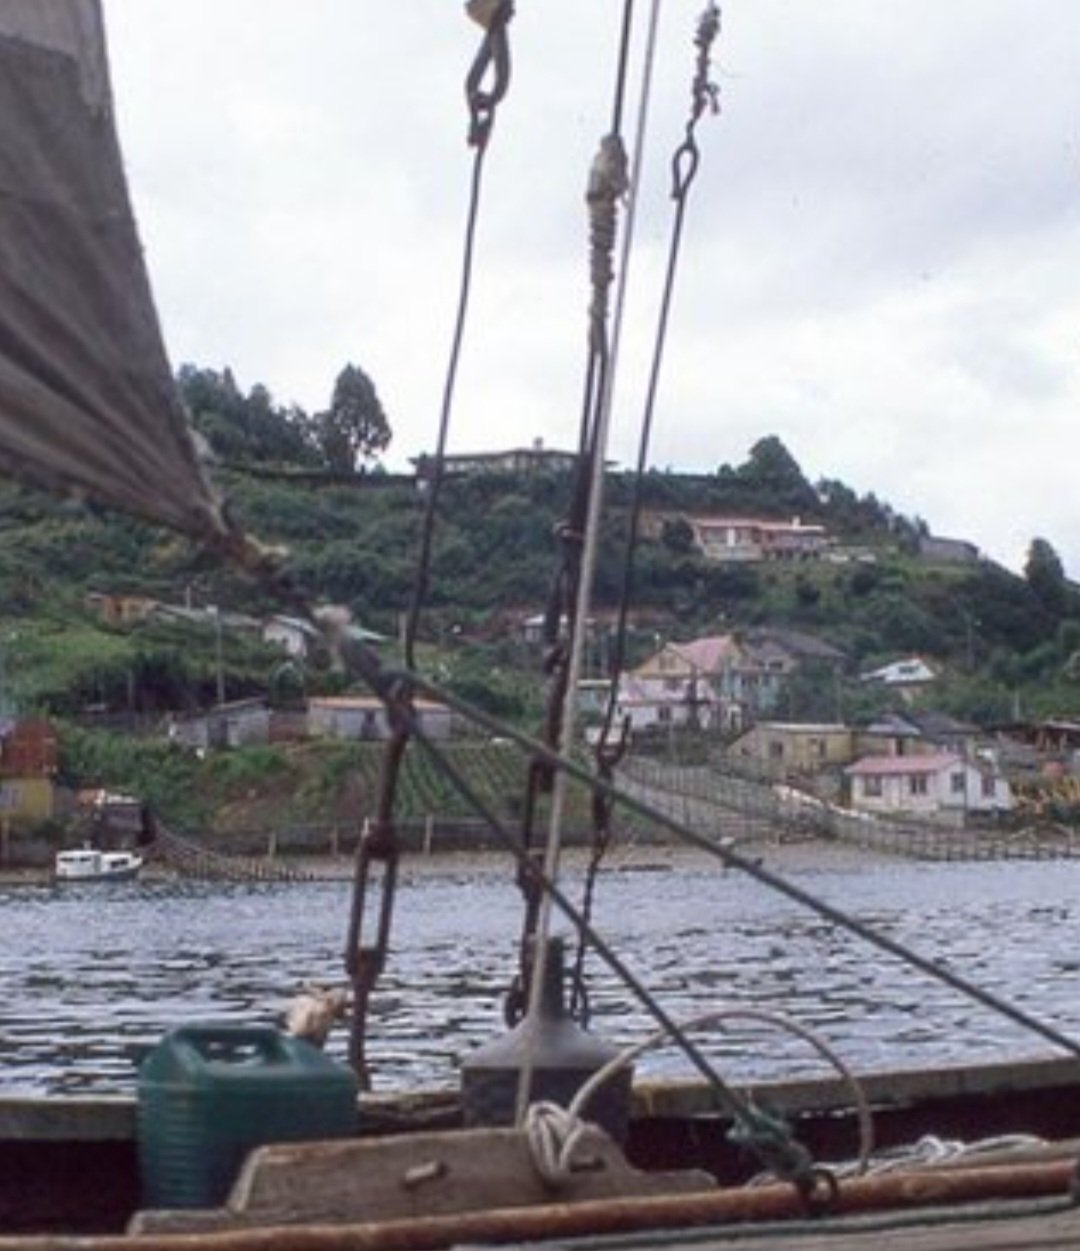
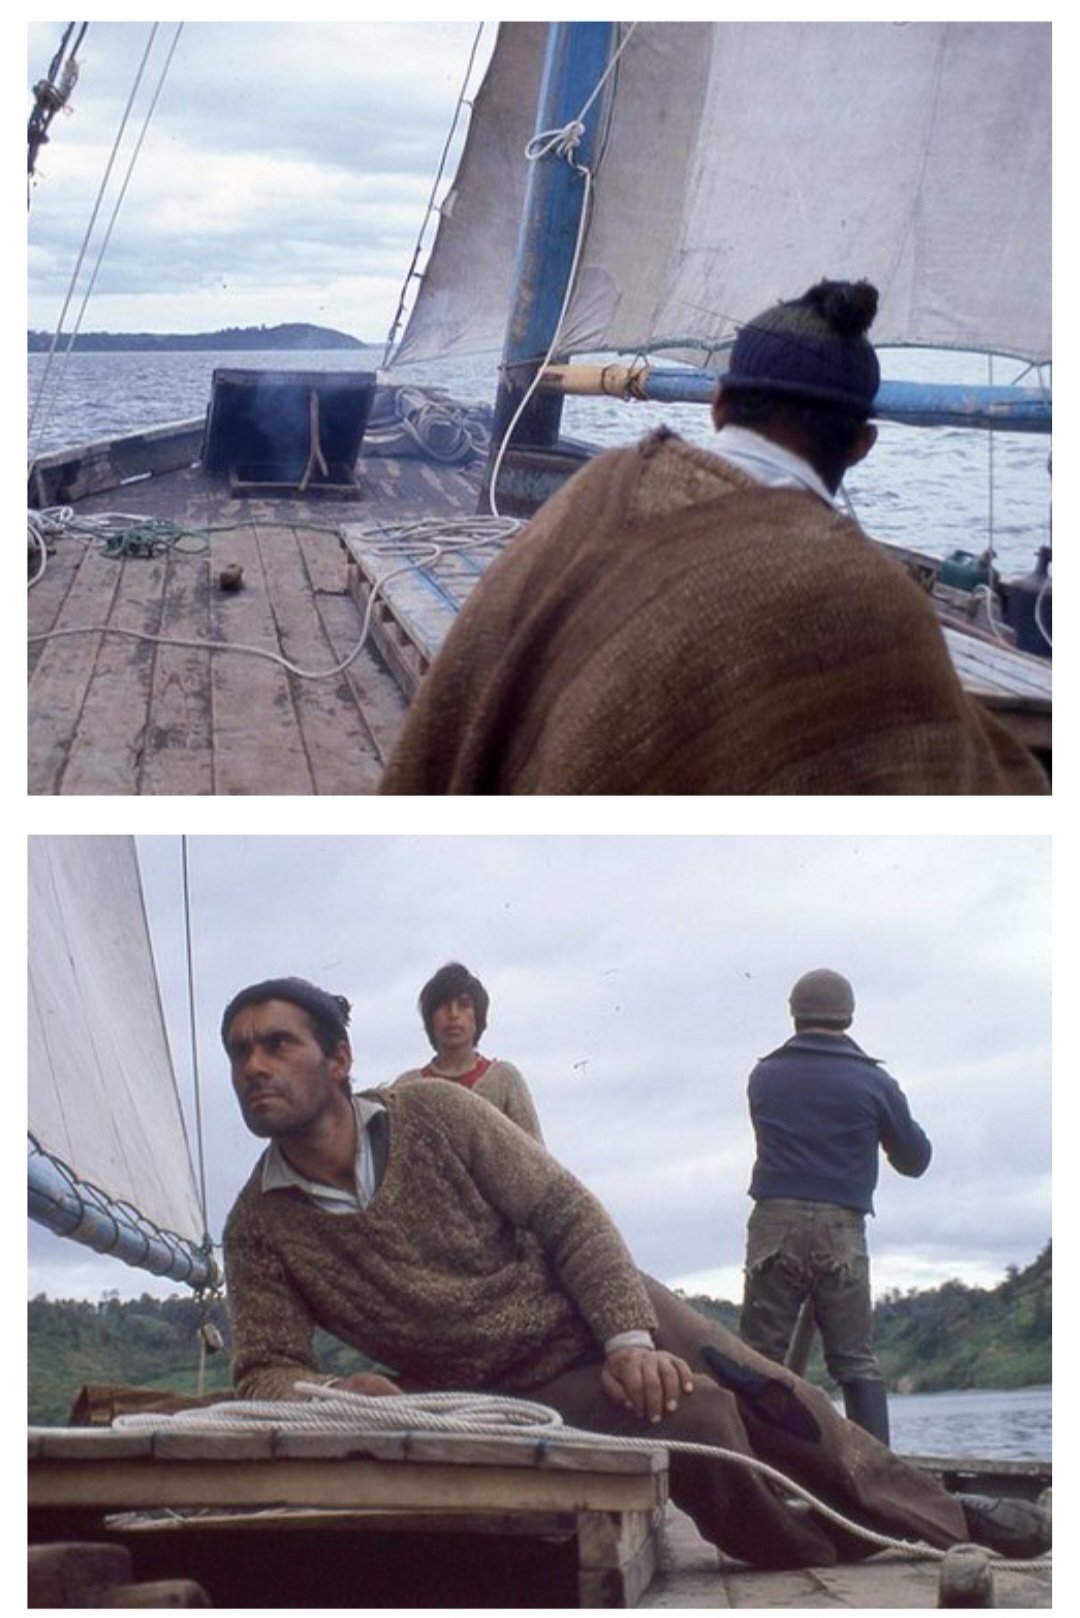
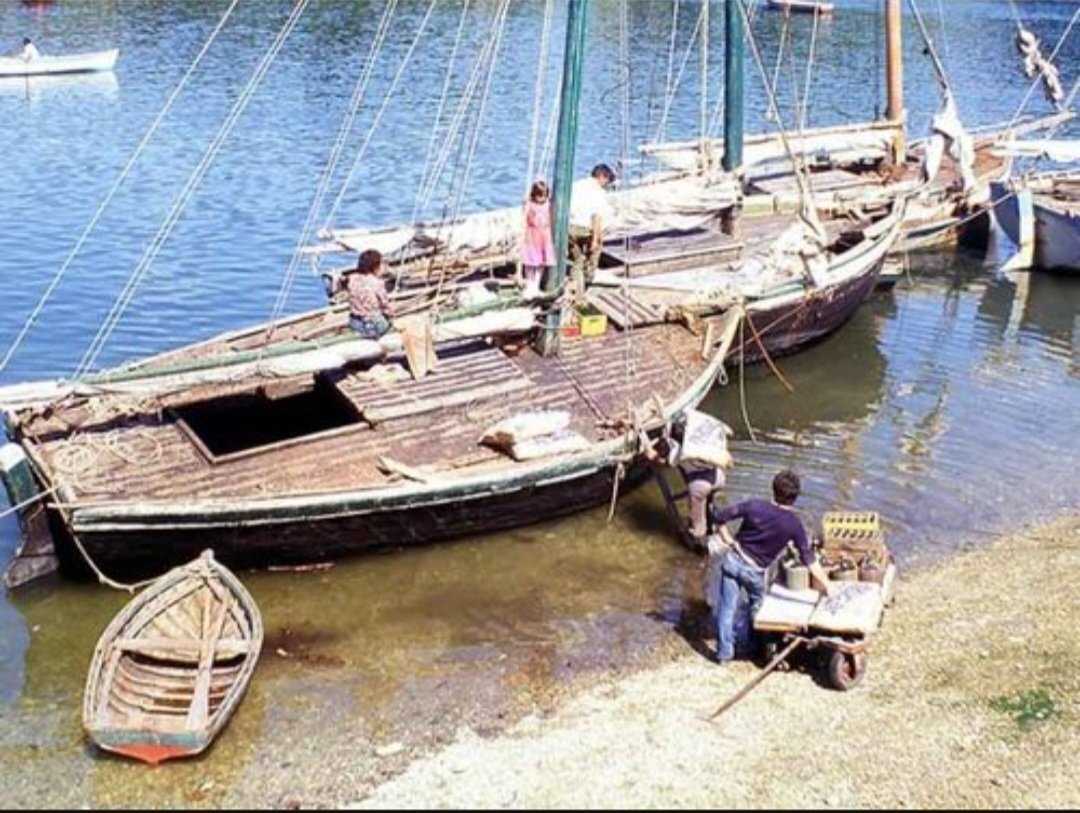
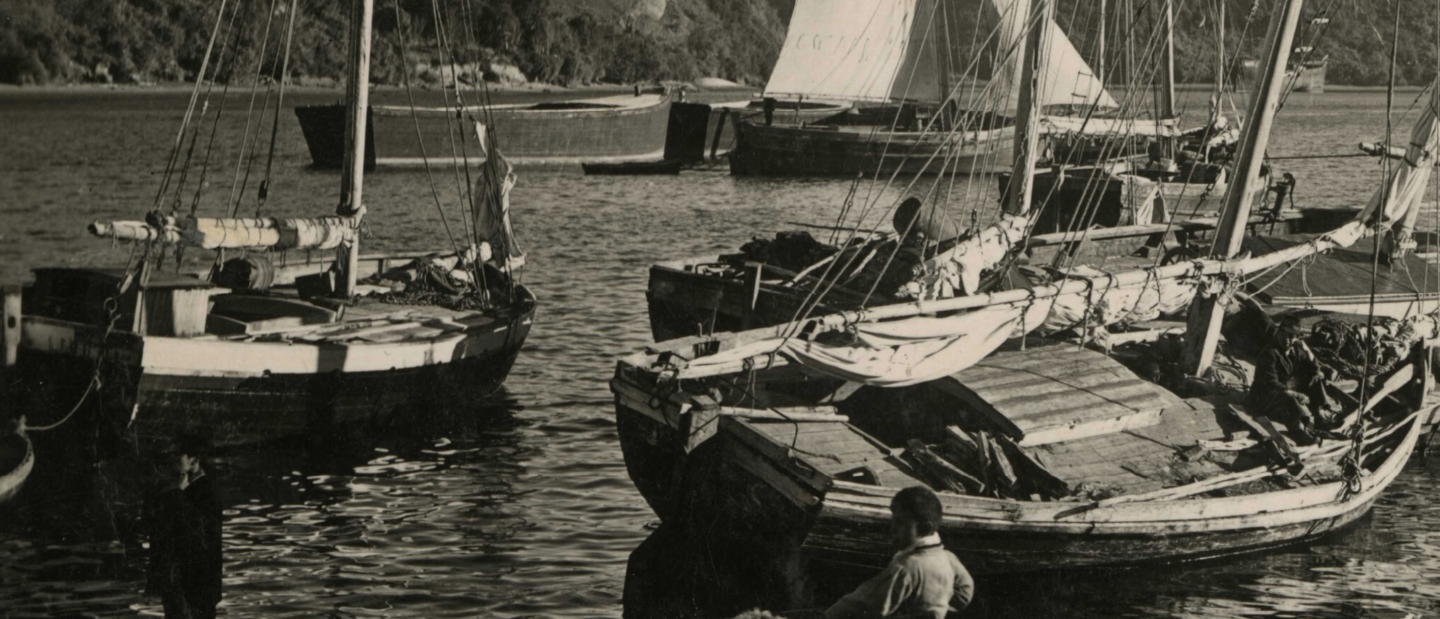
Thanks, glad to hear I'm not the only one in this boat (so to speak). There's such a variety across small boats. The plans didn't look like too much camber on the page, but now seem a bit excessive. At the widest point in the hull, the model has a beam of about 12 ft 8 inches (4.75 inches at scale, and not counting hull planking), and a camber of about 7 inches (7/32 inch at scale). I'm considering whether I can just add a 1/16-inch shim at the edges of the bulkheads and not throw off the sheer line too much. Thanks, definitely! There's clearly quite a bit of making do with what they had. For example, this photo shows some of the details on the shrouds, which the plans show as just attached with turnbuckles. Source: https://www.carlosvairo.com/galeria-puerto-montt-lanchas-chilotas Instead, the first two shrouds have turnbuckles down low, followed by, in one case, a length of wire that hooks onto what looks like a thicker wire for the shroud, and in the second case, what looks like a shorter loop of wire attached to the thicker wire. The last shroud doesn't seem to have a turnbuckle, just several lengths of wire hooked and looped together. It's also notable that the running rigging appears to be white and green. Photos from earlier, like the one below from 1956, also show complex rigging arrangements. Source: https://ceph-puerto-montt.blogspot.com/2009/02/album-del-recuerdo-imagenes-de-nuestra_22.html?m=1 From what I can tell, the foremost shroud has a turnbuckle low down, a big knot or something connecting it to what looks like length of multistrand twisted wire, then a big knot connecting that to what looks like a single deadeye or something similar (a heart?) that connects to either a wire or rope shroud. The second shroud, in contrast, has what looks like a big metal hook low down, with a shroud looped on to that. Photos like these really highlight that these vessels were made and used by people with limited access to resources in remote areas. Rigging, and repairs to it, had to be made with whatever was available that could be made to work. When it comes time to rigging, I'll have to consider to what degree I want to follow this. Also worth noting, Paul, that I'm seeing internally-stropped blocks in the 1980s Vairo photos, but possibly externally stropped ones in earlier photos. If I go with internally stopped blocks, I will definitely be following your recent example in your sharpie build.

- 312 replies
-
- 7
-
-
- Chile
- Latin America
- (and 6 more)
-
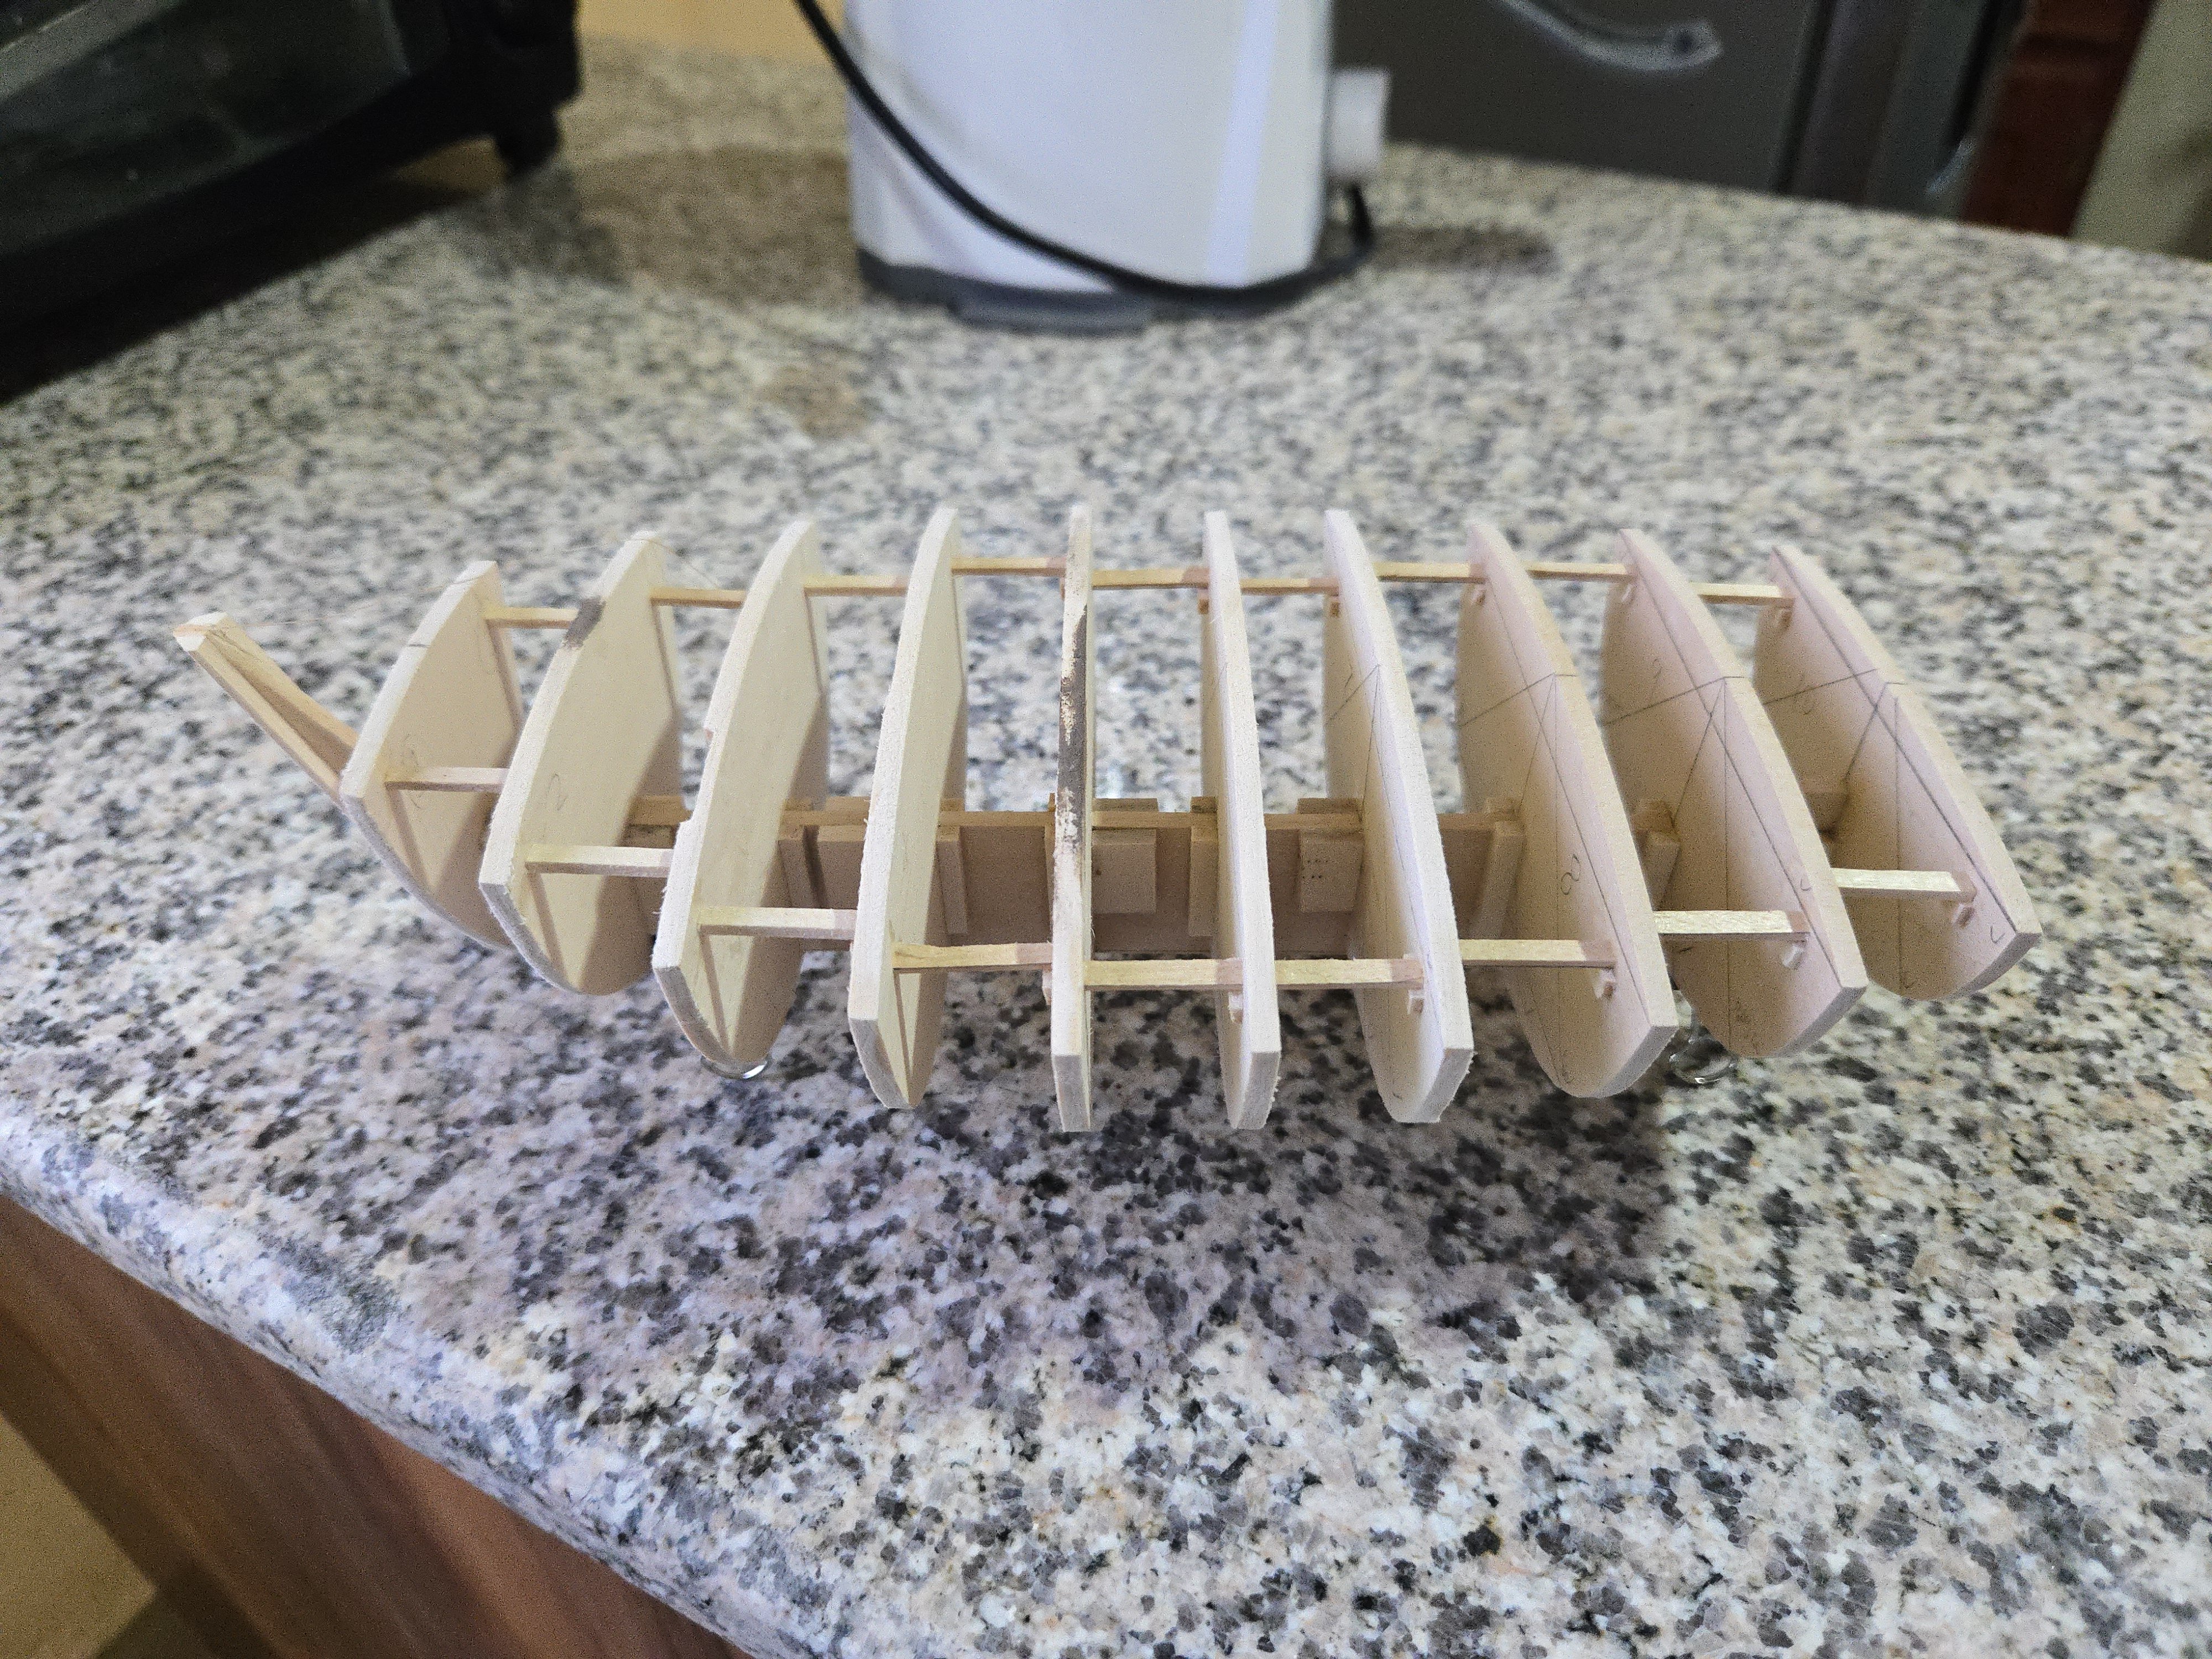
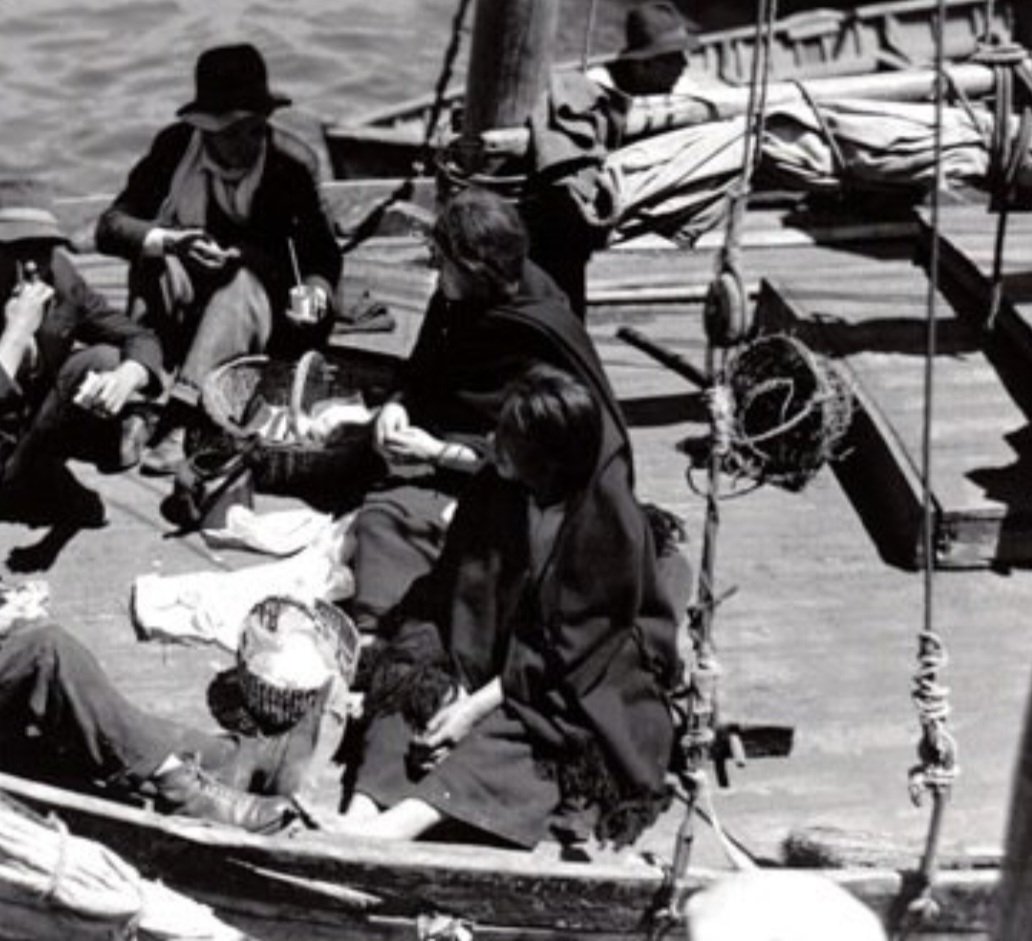
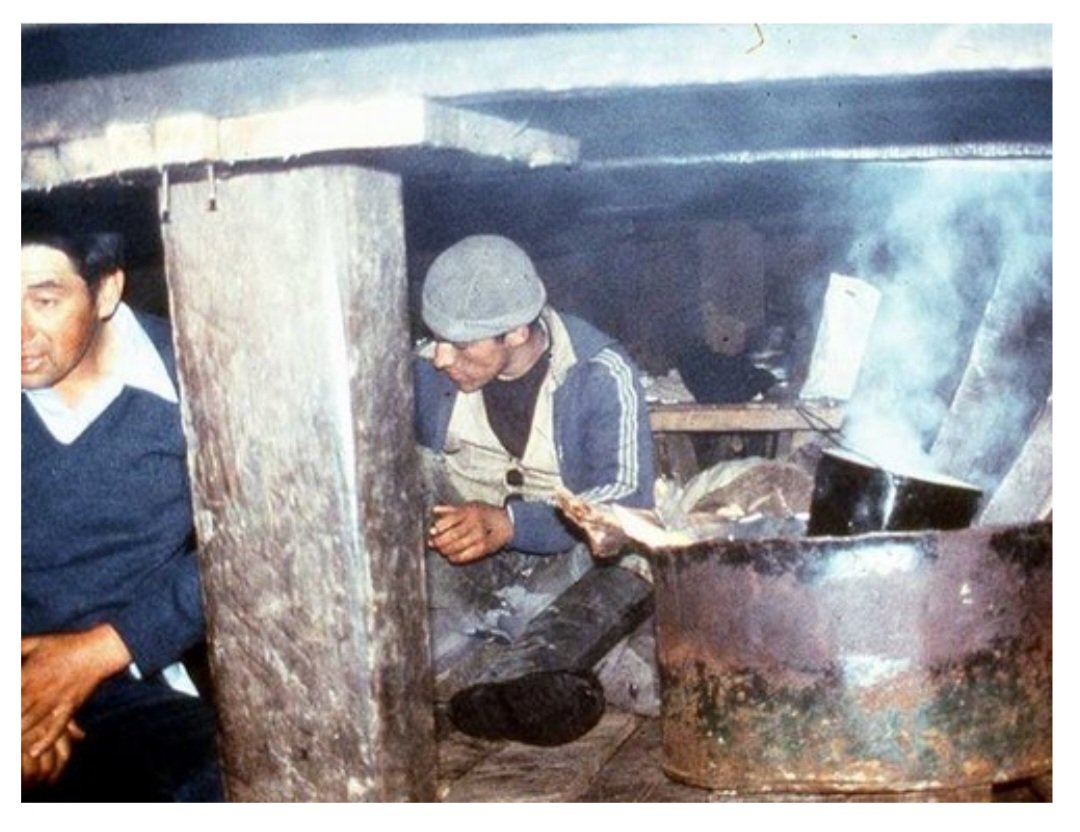
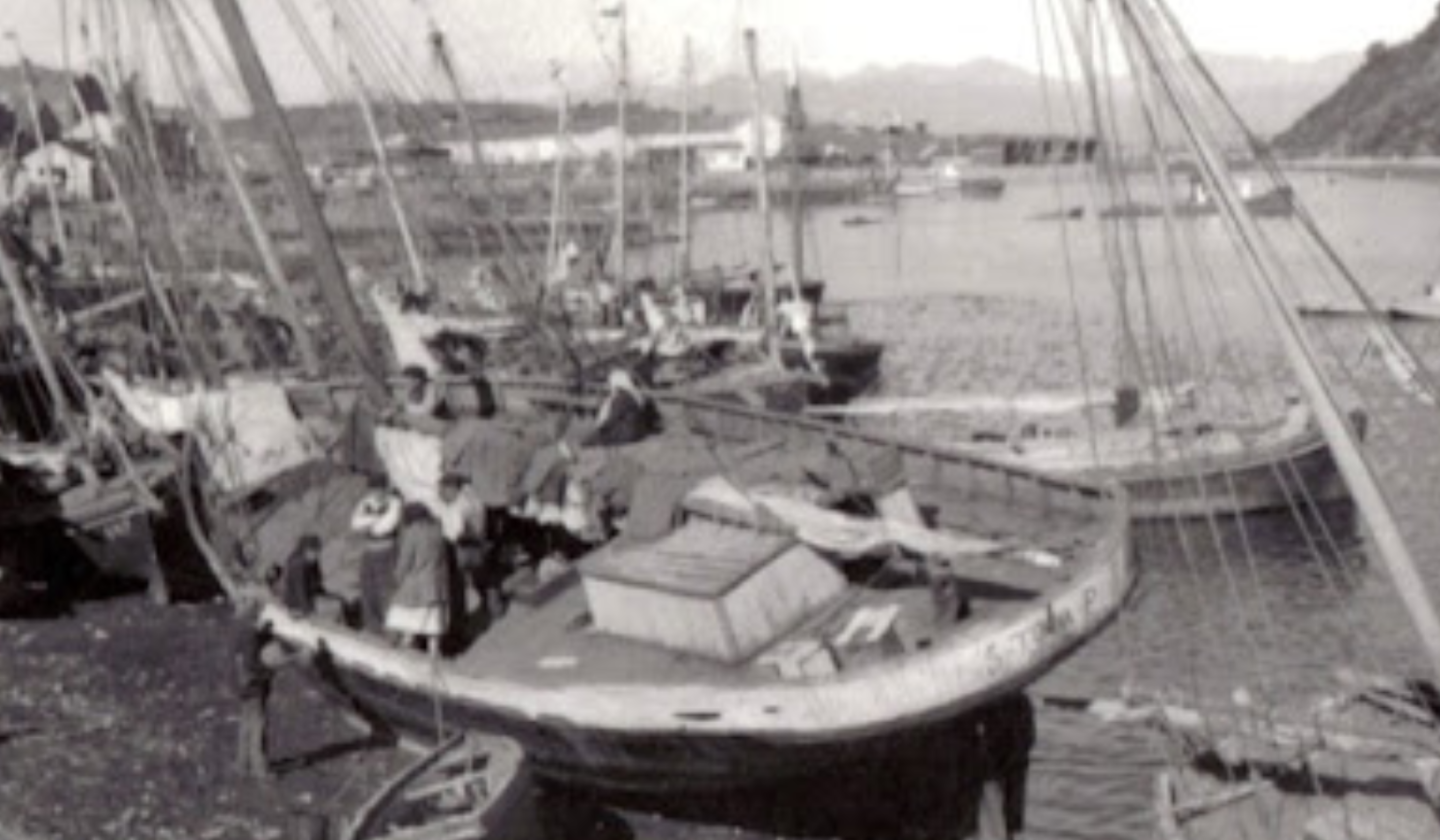
Thanks for the likes and kind comments! I'm continuing research on the lancha, and wanted to share an interesting site I saw several months ago, then lost the link to, and then found again today. Carlos Pedro Vairo, an Argentine maritime ethnographer, documented the lancha chilota for a 1986 article in Navegar. (Available online at: https://issuu.com/museomaritimoushuaia/docs/chiloe ) Not only is the article a useful source, but his website also includes a large number of color photos documenting the final years of the lancha. These will definitely be useful images going forward, showing a lot of details otherwise little documented. For instance, one image below shows the cramped quarters crammed in the bow (leaving most of the hull for cargo space) and the brazier that was almost always kept burning while under way to keep warm against the chill. (One wonders how many lanchas were lost to fire). Other images, like the second and third below, show details of the rigging. And still others show details of lanchas beached for loading and unloading, as in the last photo. The photos are fascinating and worth taking a look at. Site Link: https://www.carlosvairo.com/galeria-puerto-montt-lanchas-chilotas Changing gears: fairing is slow going. I think I have the sides basically ready, so I'm going to set that aside for the moment while I focus on the top. I'm planning on adding a subdeck in 1/32‐inch thick basswood before planking the sides, so it's important to get the top right before I proceed. Fairing the top has been quite tricky. Part of the challenge is that the top of the bulkheads isn't quite lined up. To check the sheer line, I placed a strip of chart tape around the corners of the bulkheads, as seen below: Doing so reveals some discrepencies--some are too high, and others are too low, like the third bulkhead in the photo below: A batten down the centerline also shows some bulkheads are a little off. So, I've been sanding a lot along the top and building up low spots. Part of the challenge is that the plans provide for quite a bit of deck camber. I followed the plans for cutting out the bulkheads, but have now realized that I think the camber is excessive. Looking at the photos by Carlos Vairo from deck level, for instance, the camber is apparent but not as much as on the bulkheads. I can reduce the camber a little with judicious sanding, but going too far would force me to also trim the stem shorter and would throw off the overall shape of the hull. Building up the outer top edges of the bulkheads to reduce the camber in that way would in turn throw off the sheer line. In any case, I don't think it's the end of the world if the camber is a little excessive, but this is a good warning of the dangers of blindly following plans.


- 312 replies
-
- 11
-
-
- Chile
- Latin America
- (and 6 more)
-
Very nice job on a tricky repair! You mention being unhappy with it, but I think it looks much better and is work to be proud of.
- 84 replies
-
- 1
-
-
- half hull planking project
- NRG
- (and 2 more)
-
Glad to see you picking this build up again! Good idea to use filler on the hull interior, I thought the planks were too uneven on the interior of my peapod build.
- 44 replies
-
- 2
-
-
-
- maine peapod
- peapod
- (and 4 more)
-
Very nicely done on what looks ike a surprisingly tricky kit! The natural wood color looks great.
-
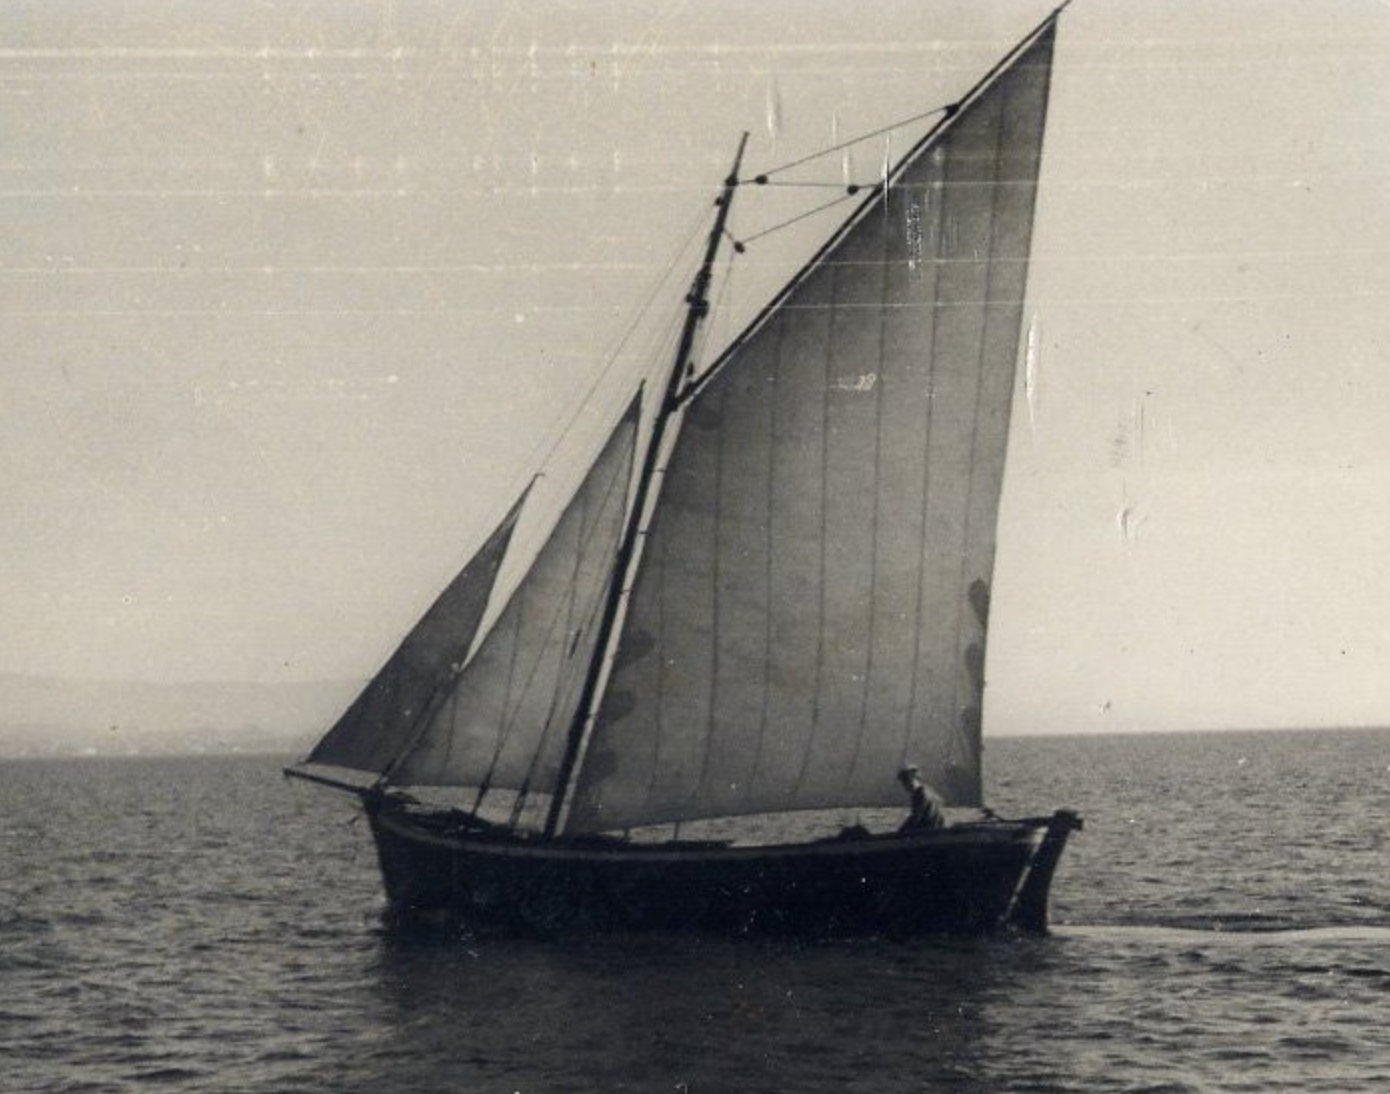
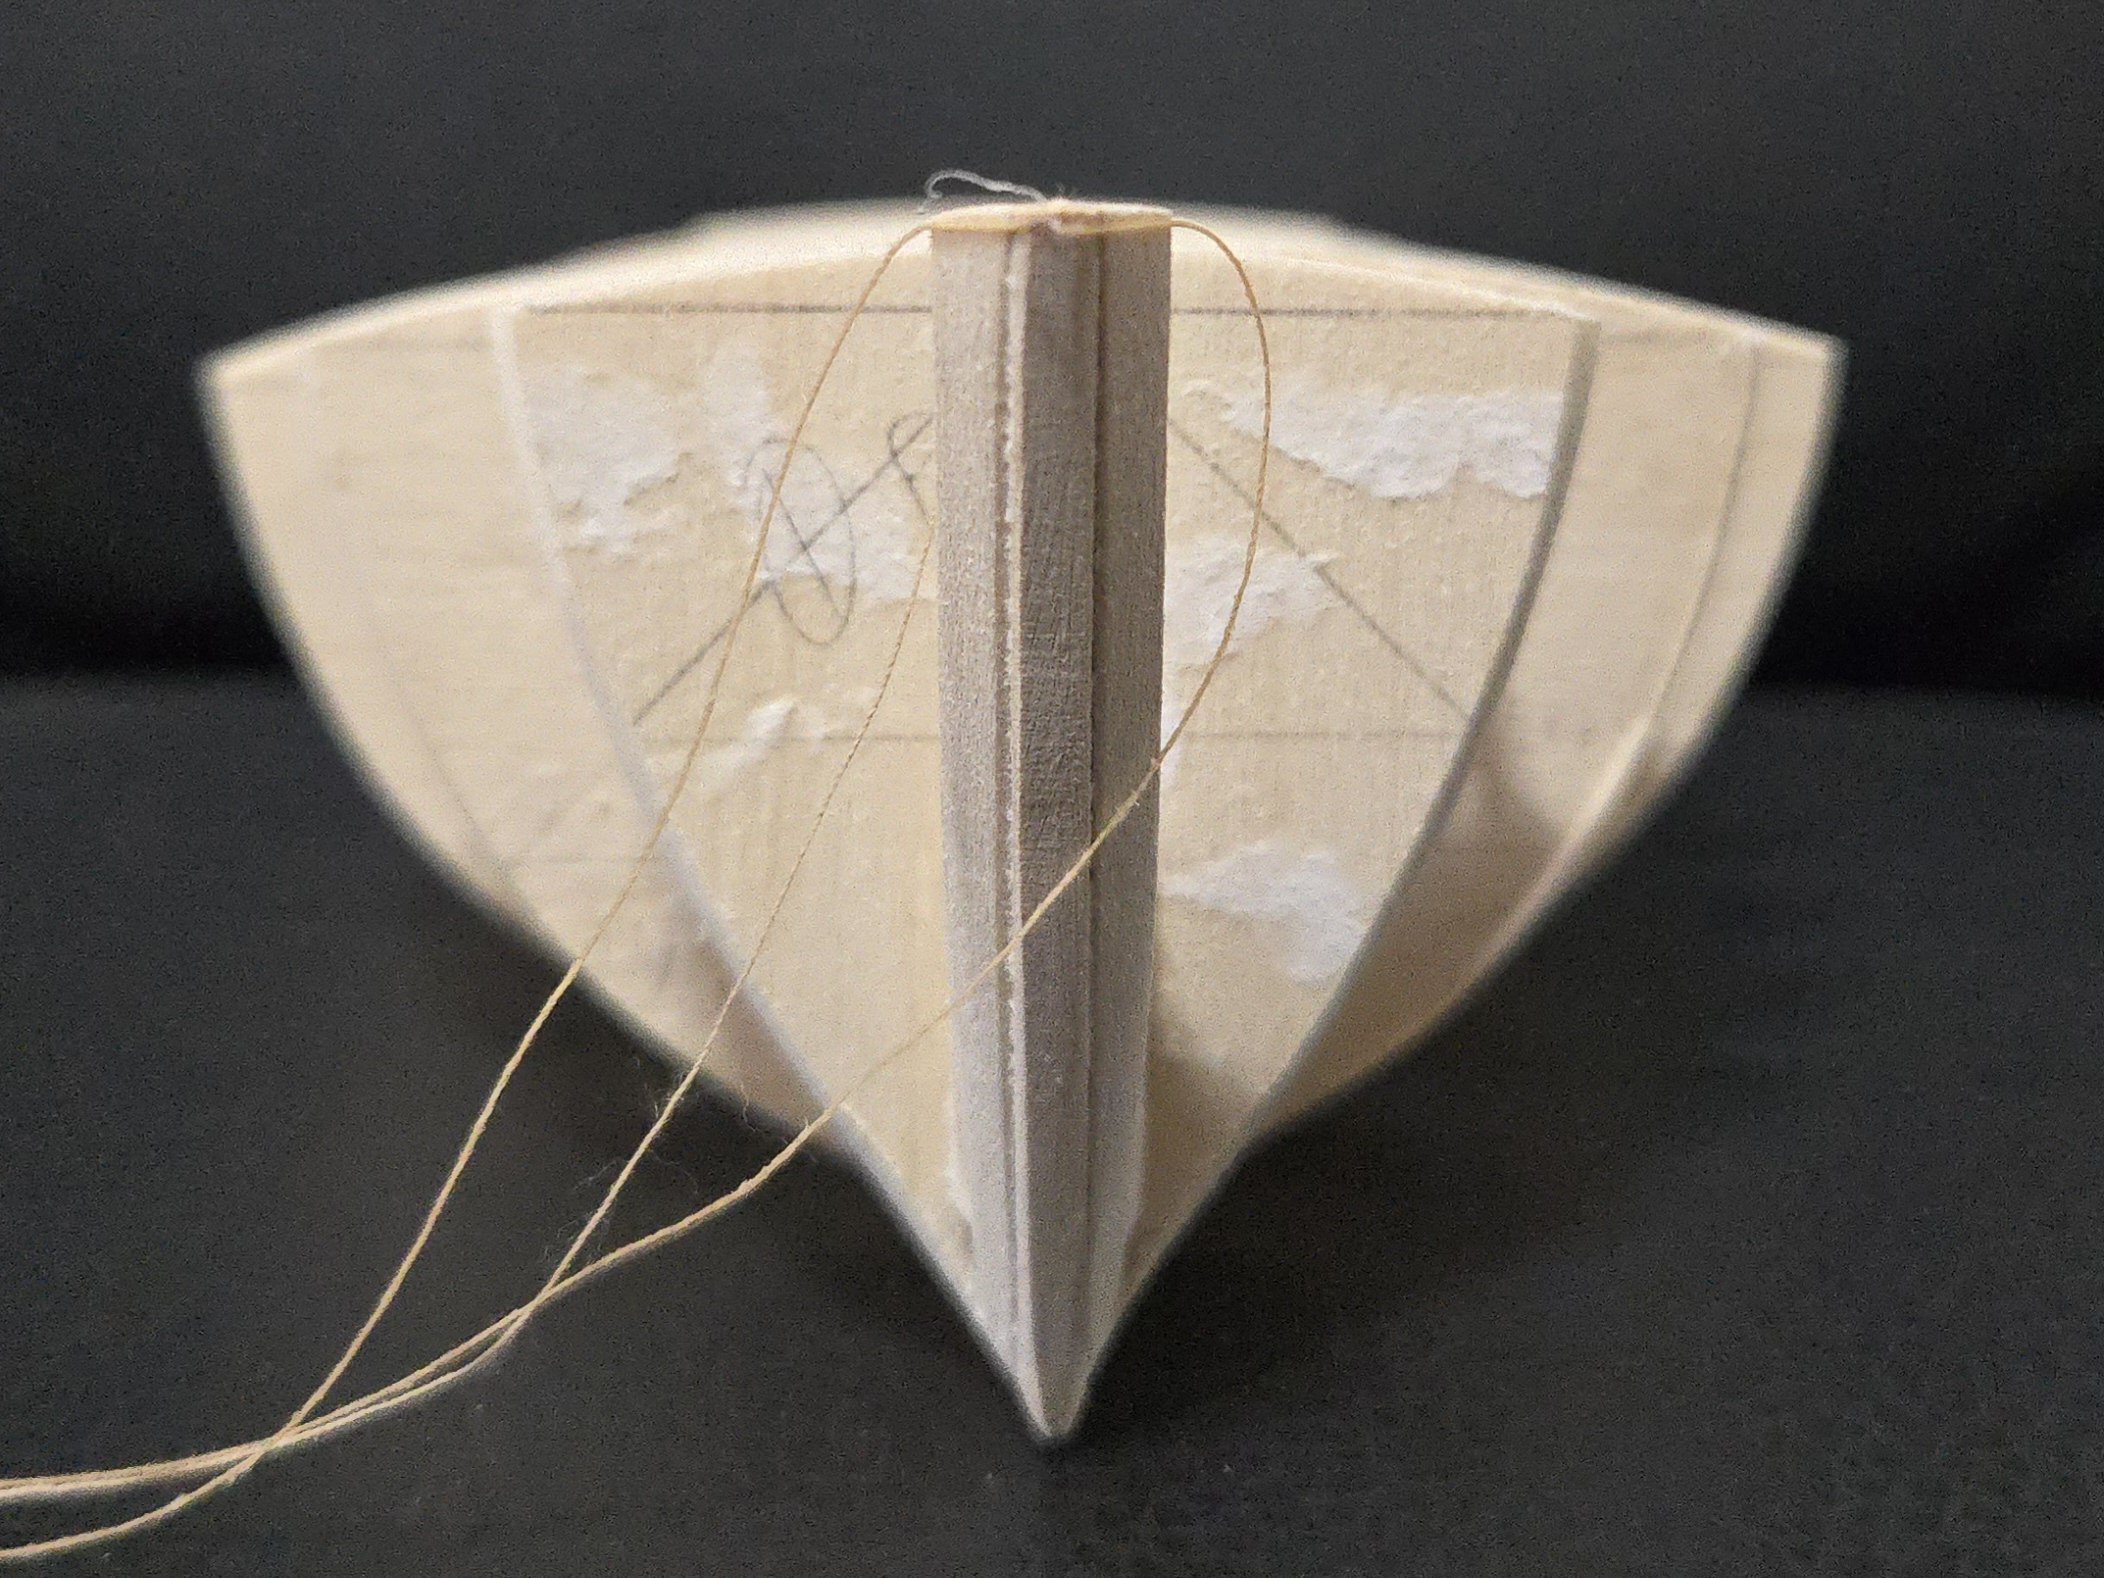
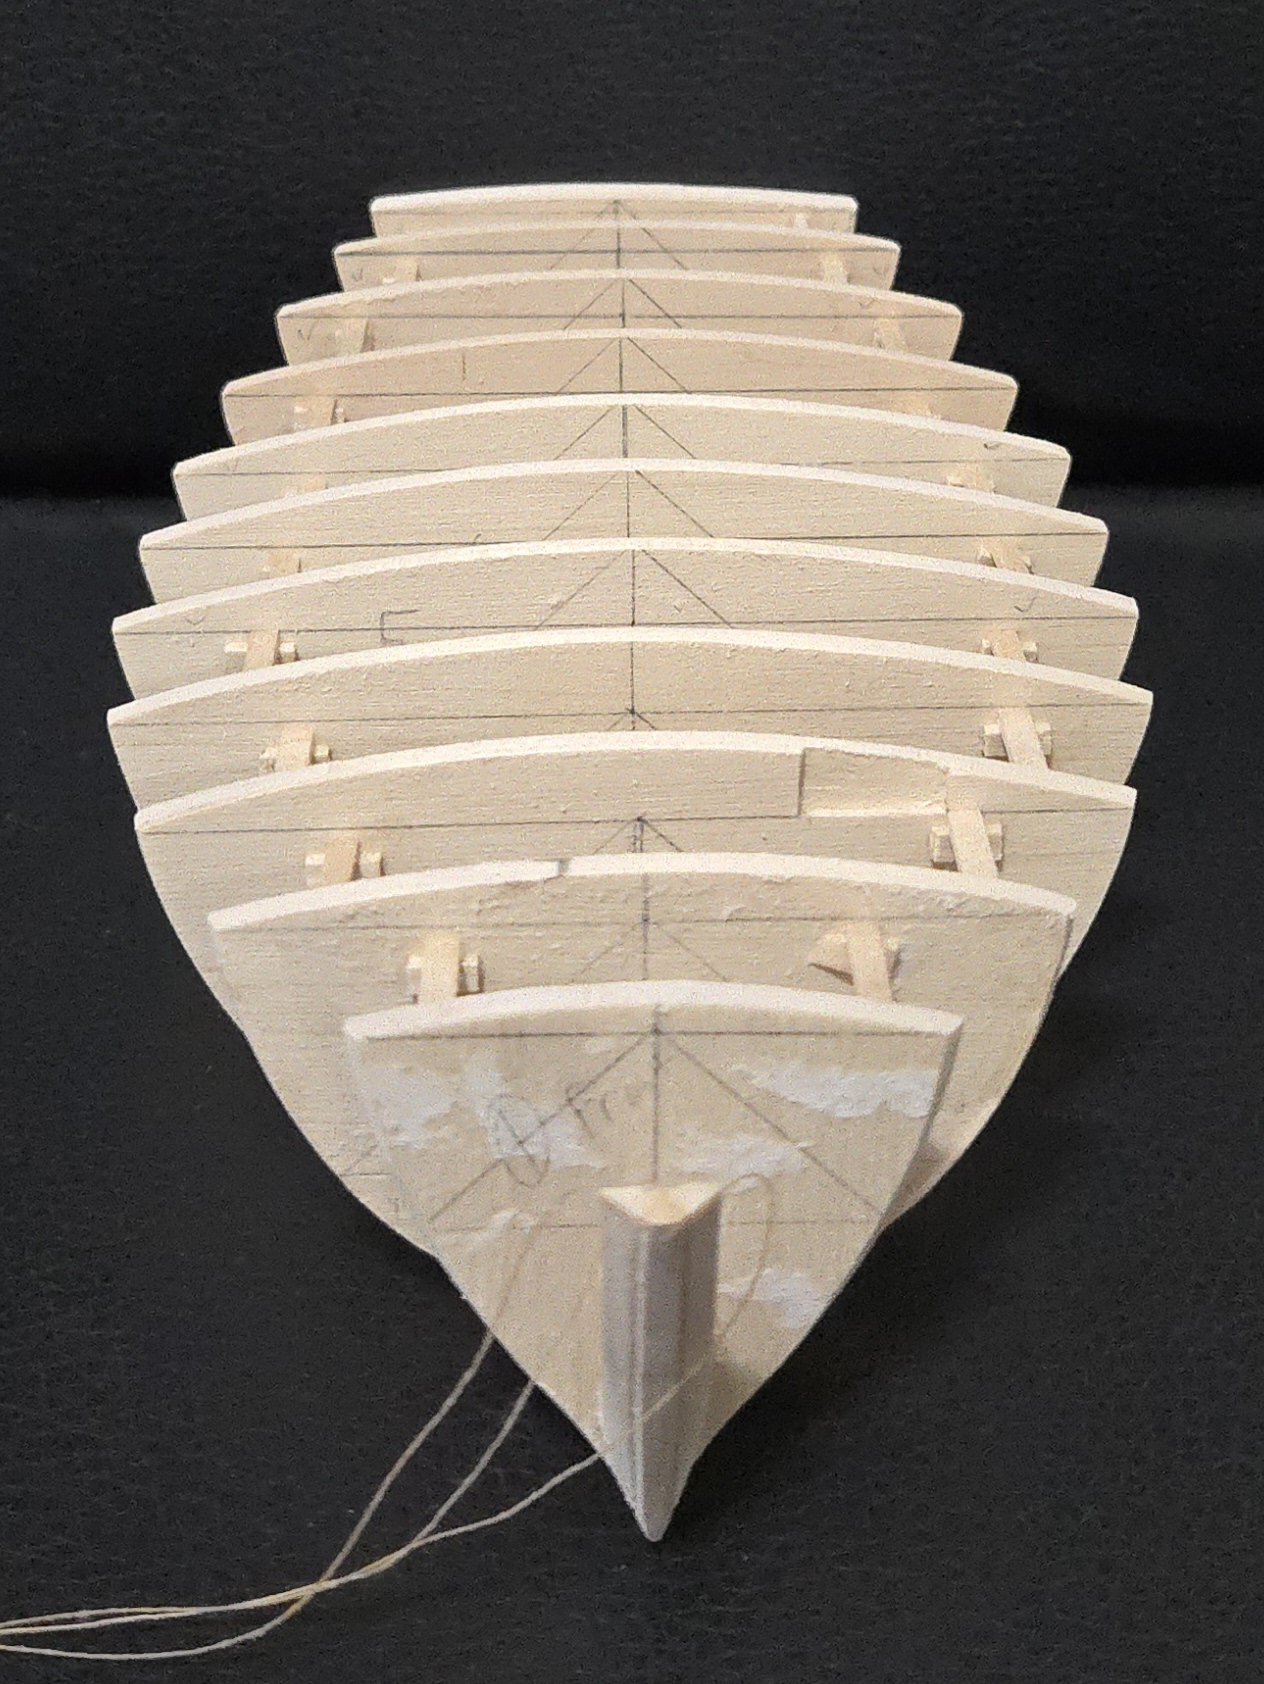
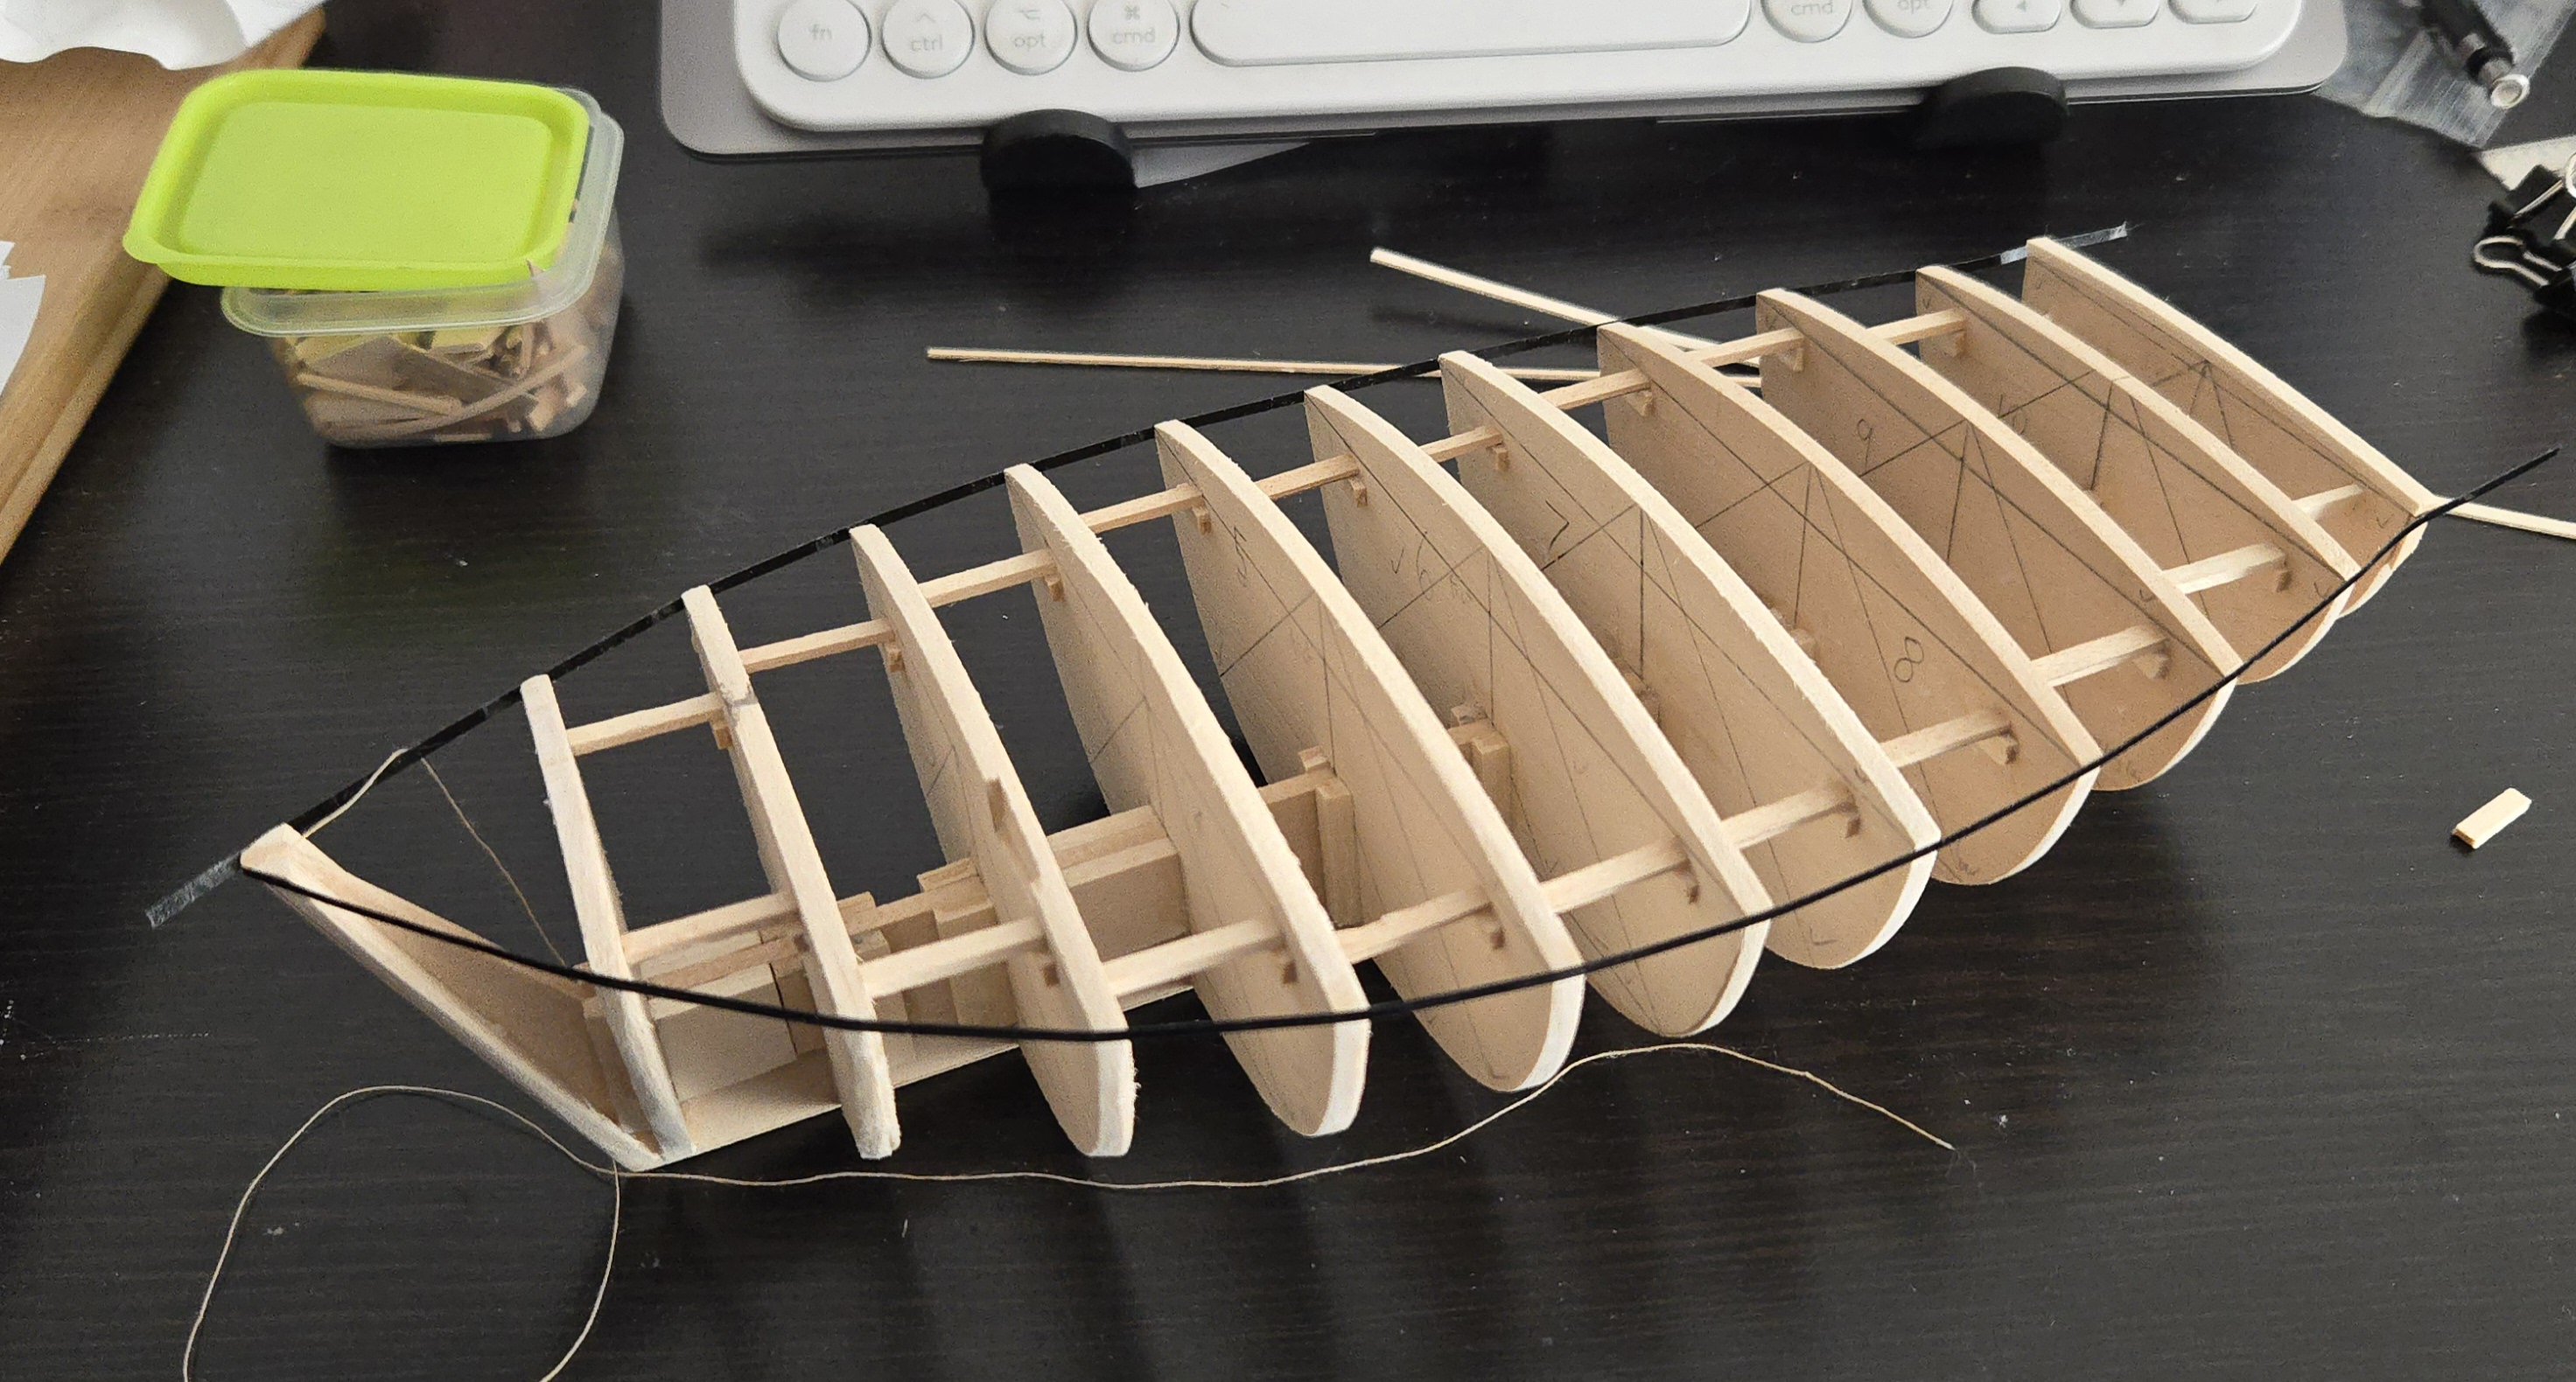
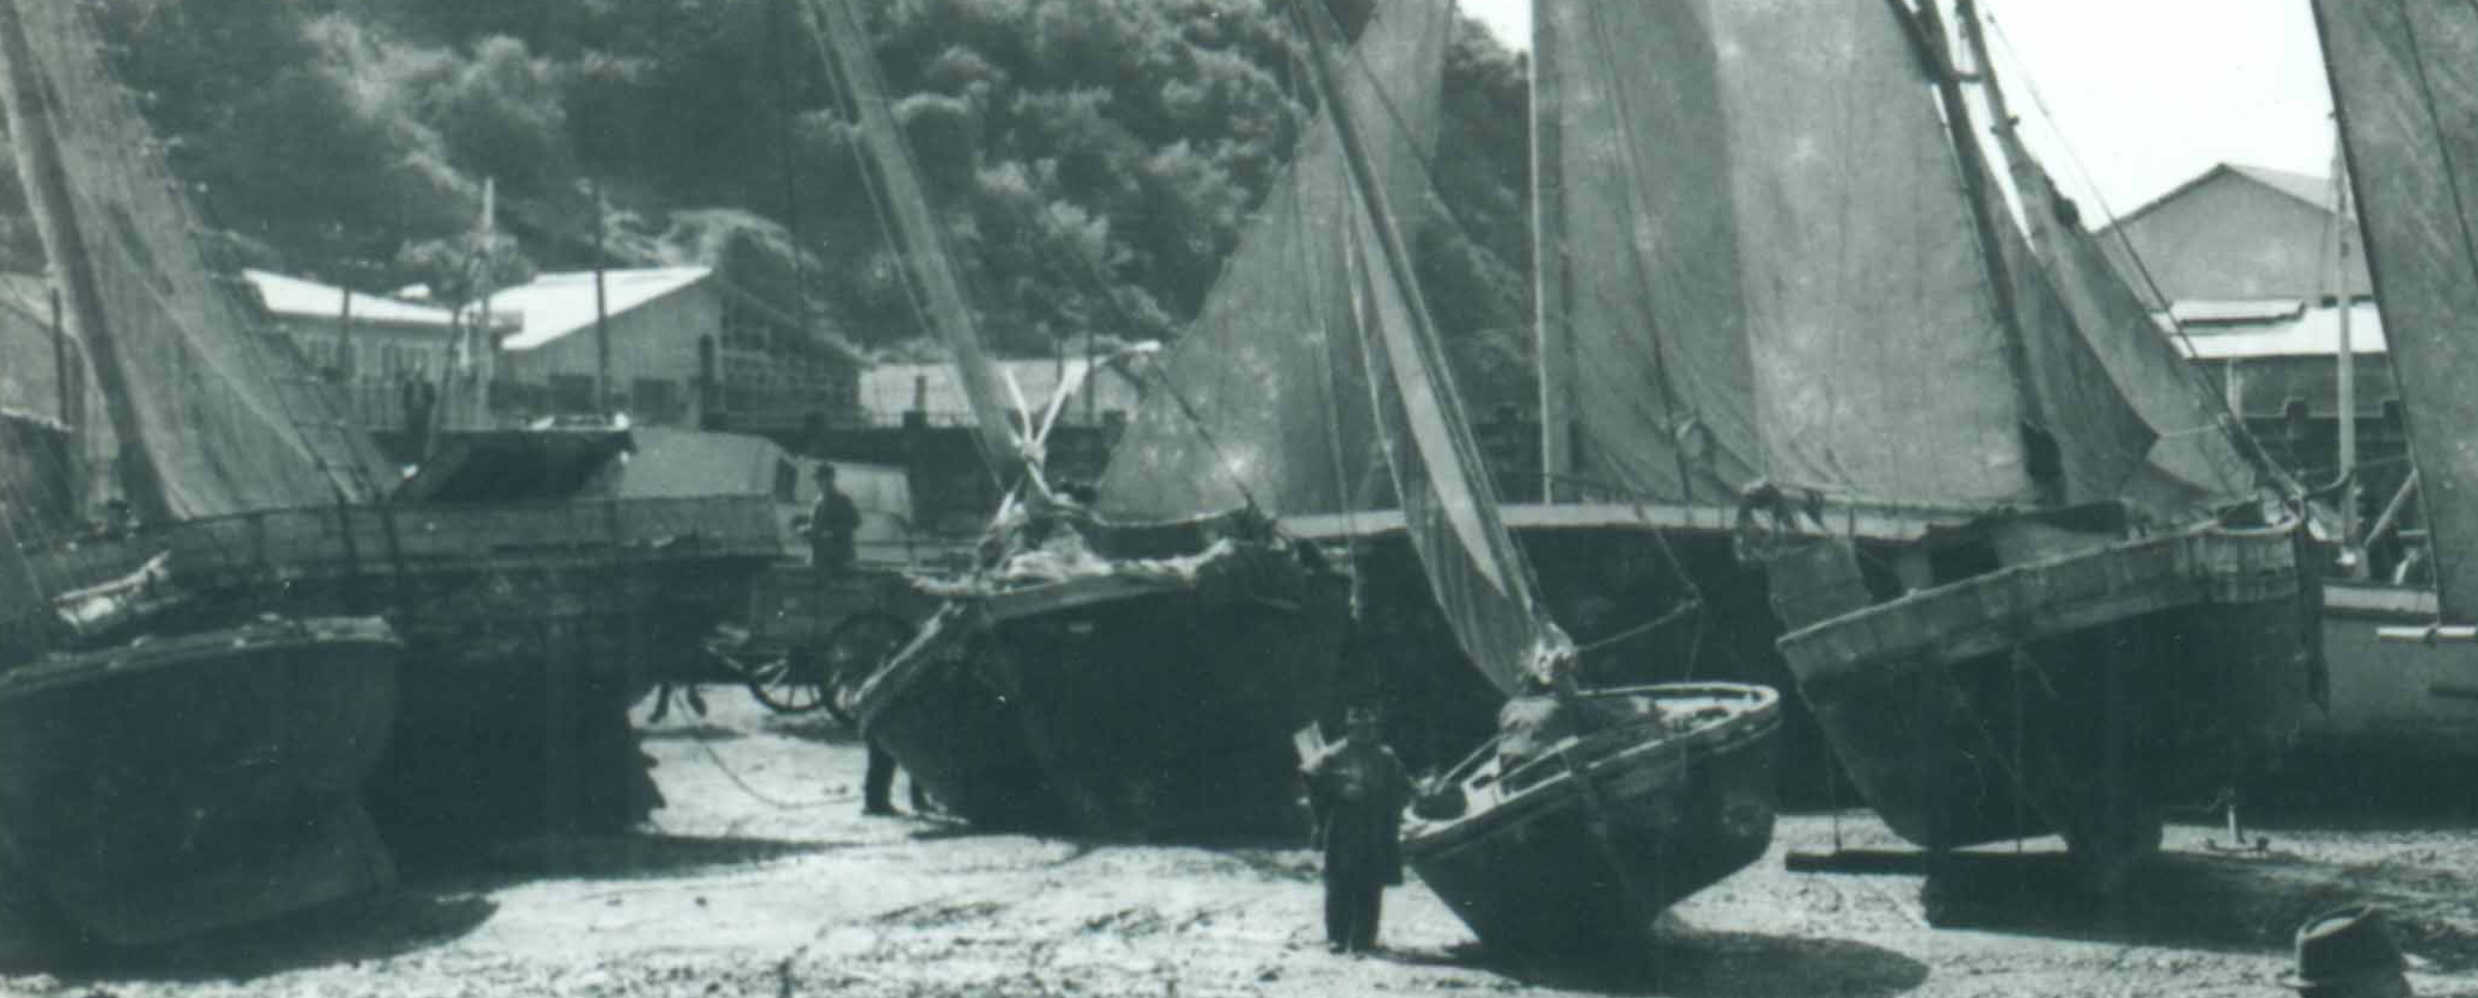
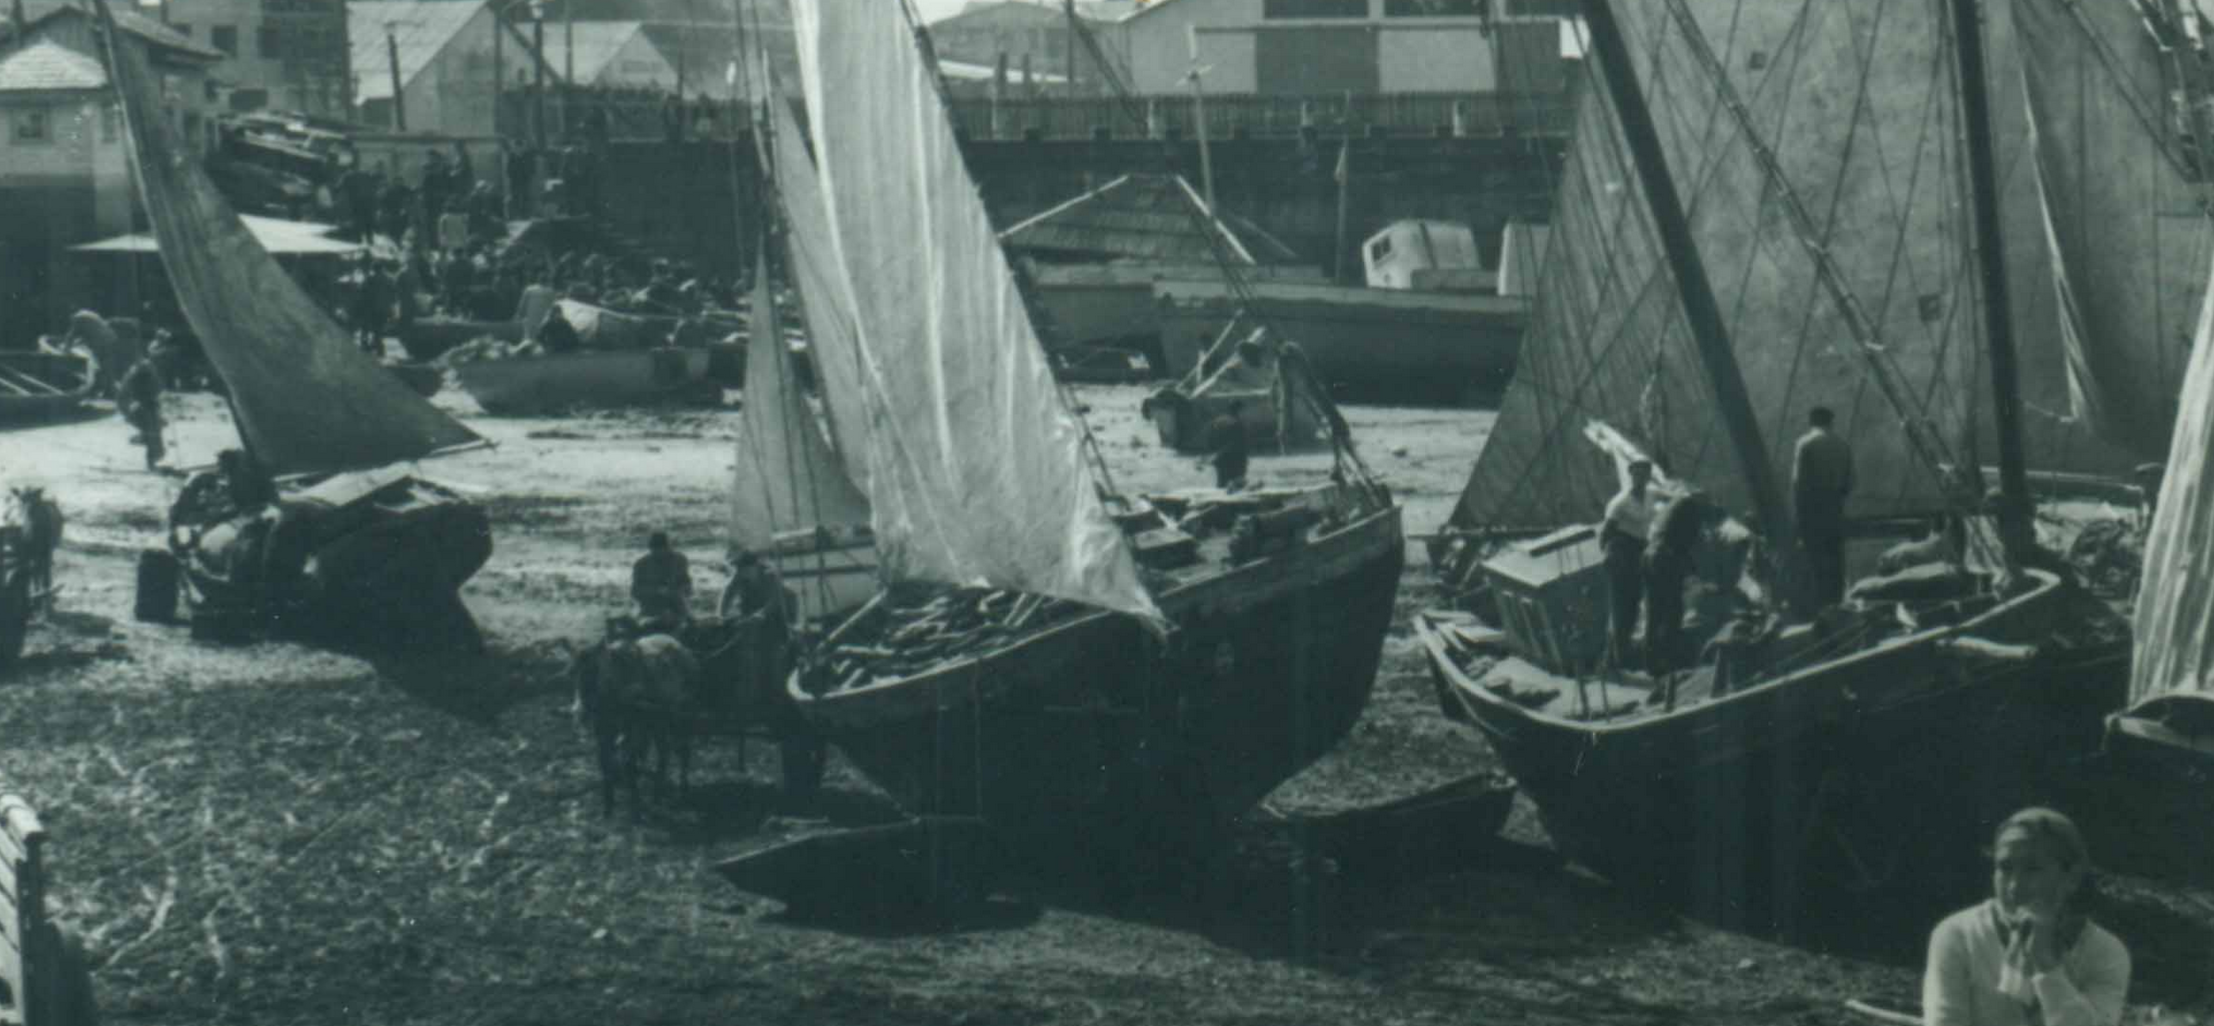
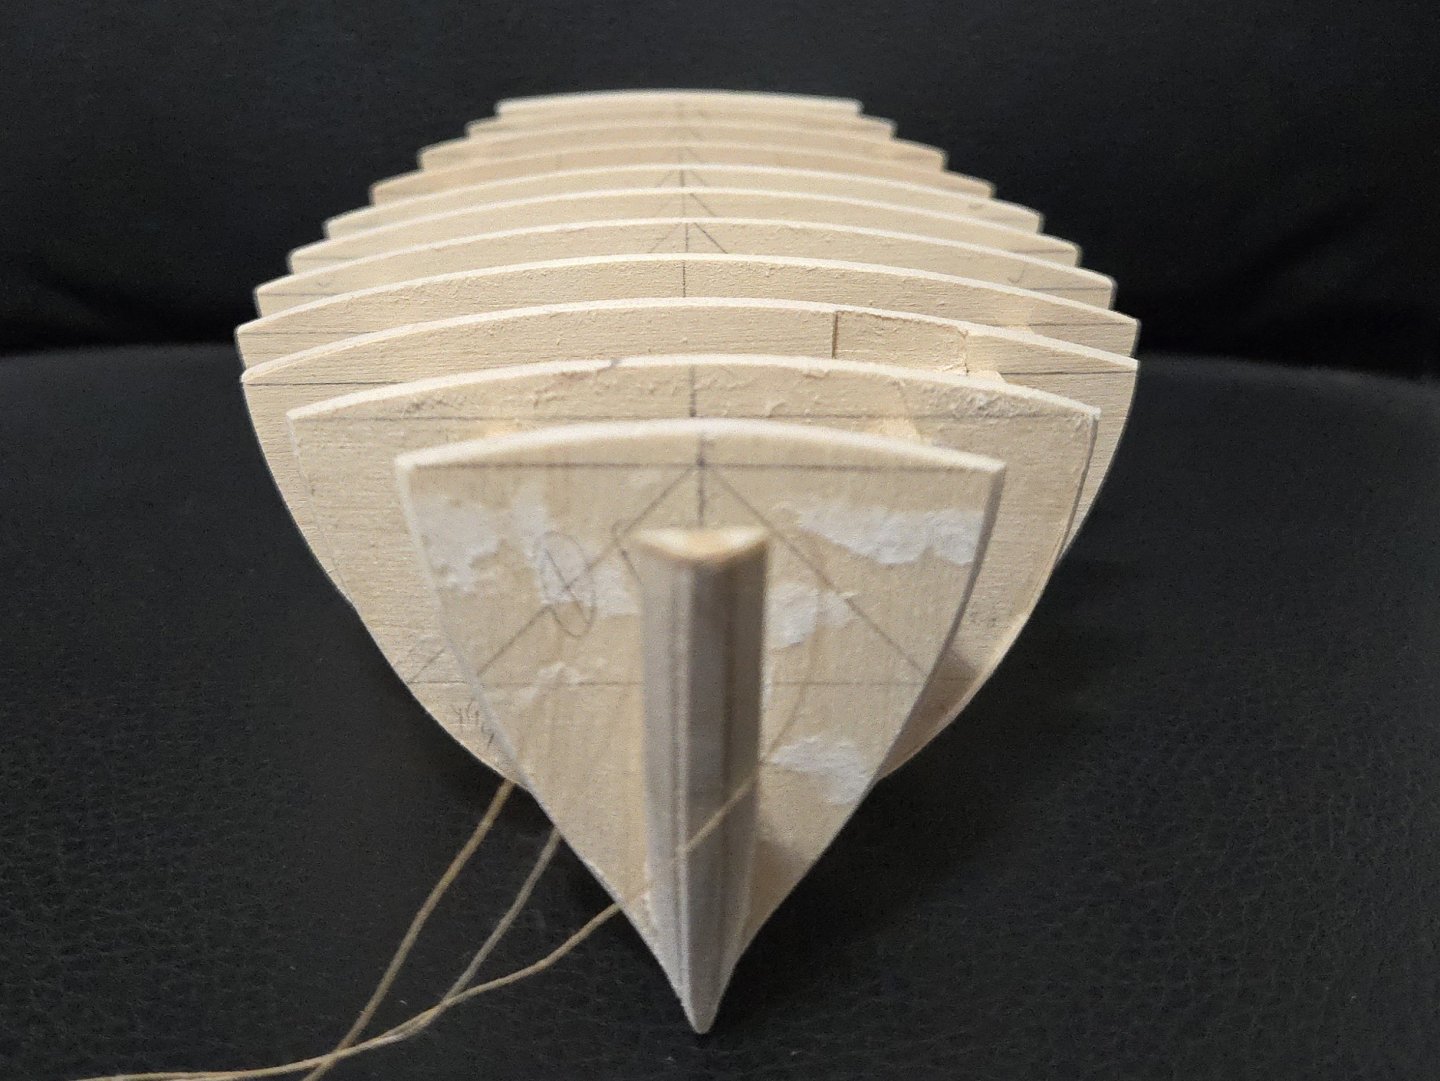
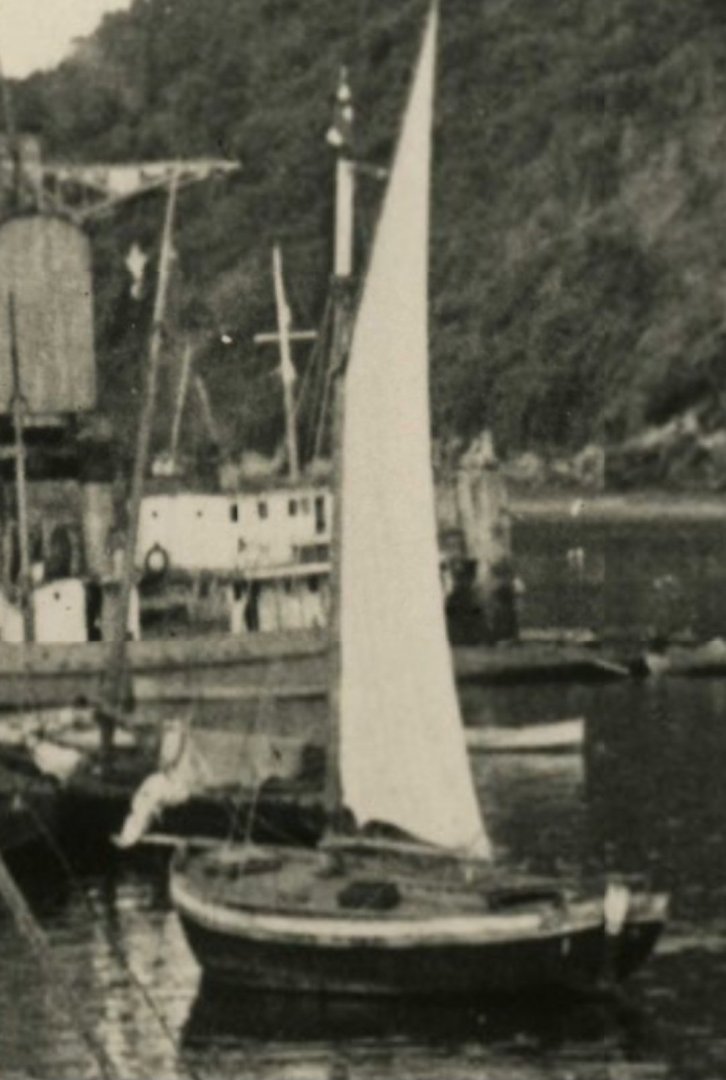
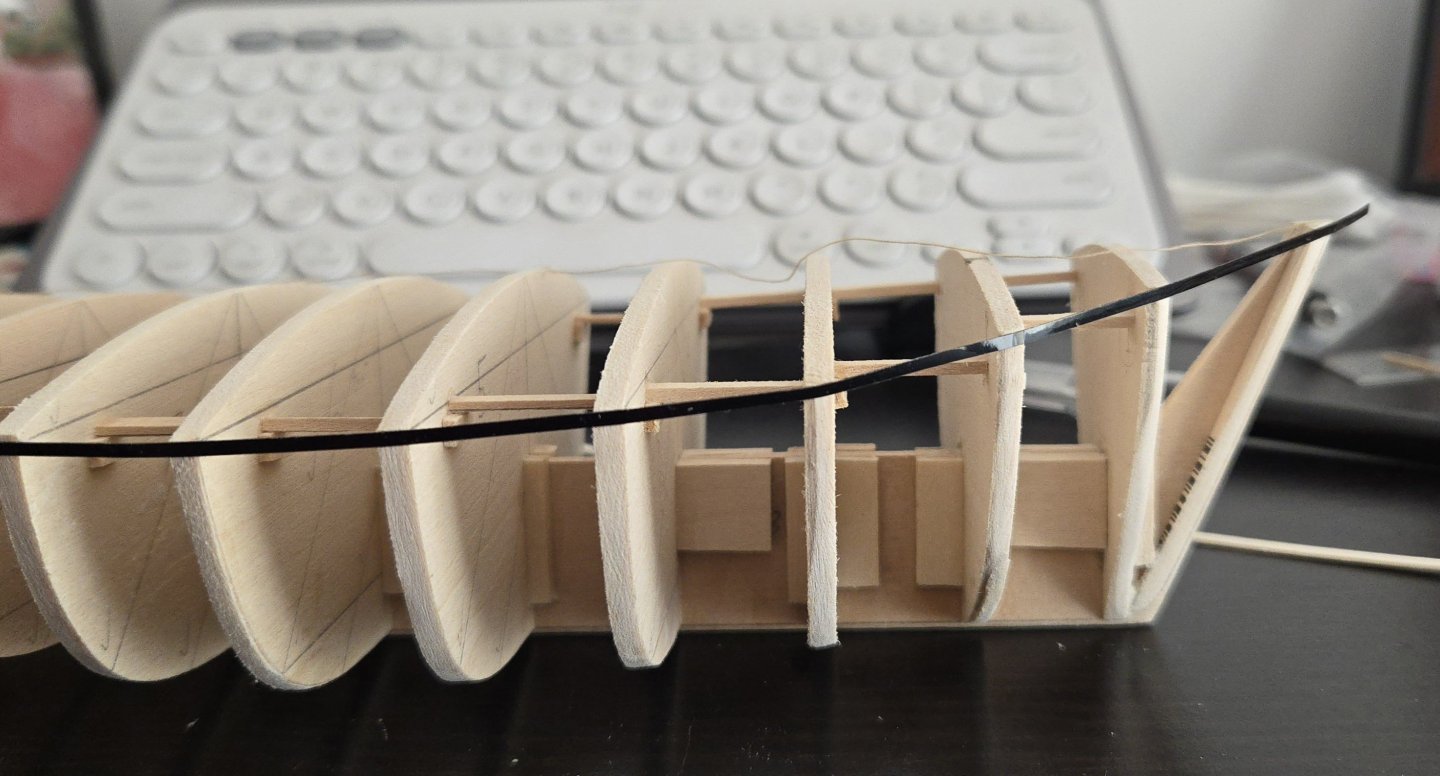
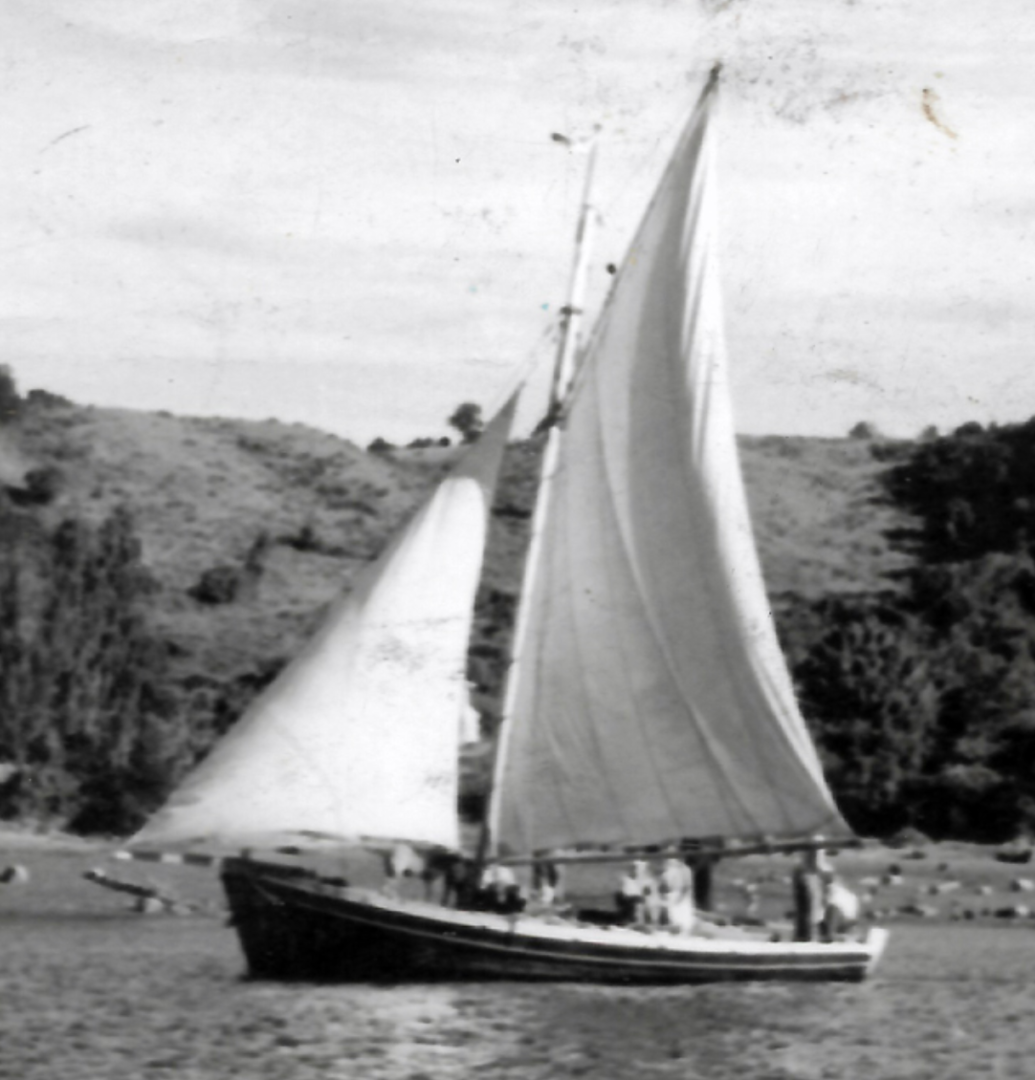
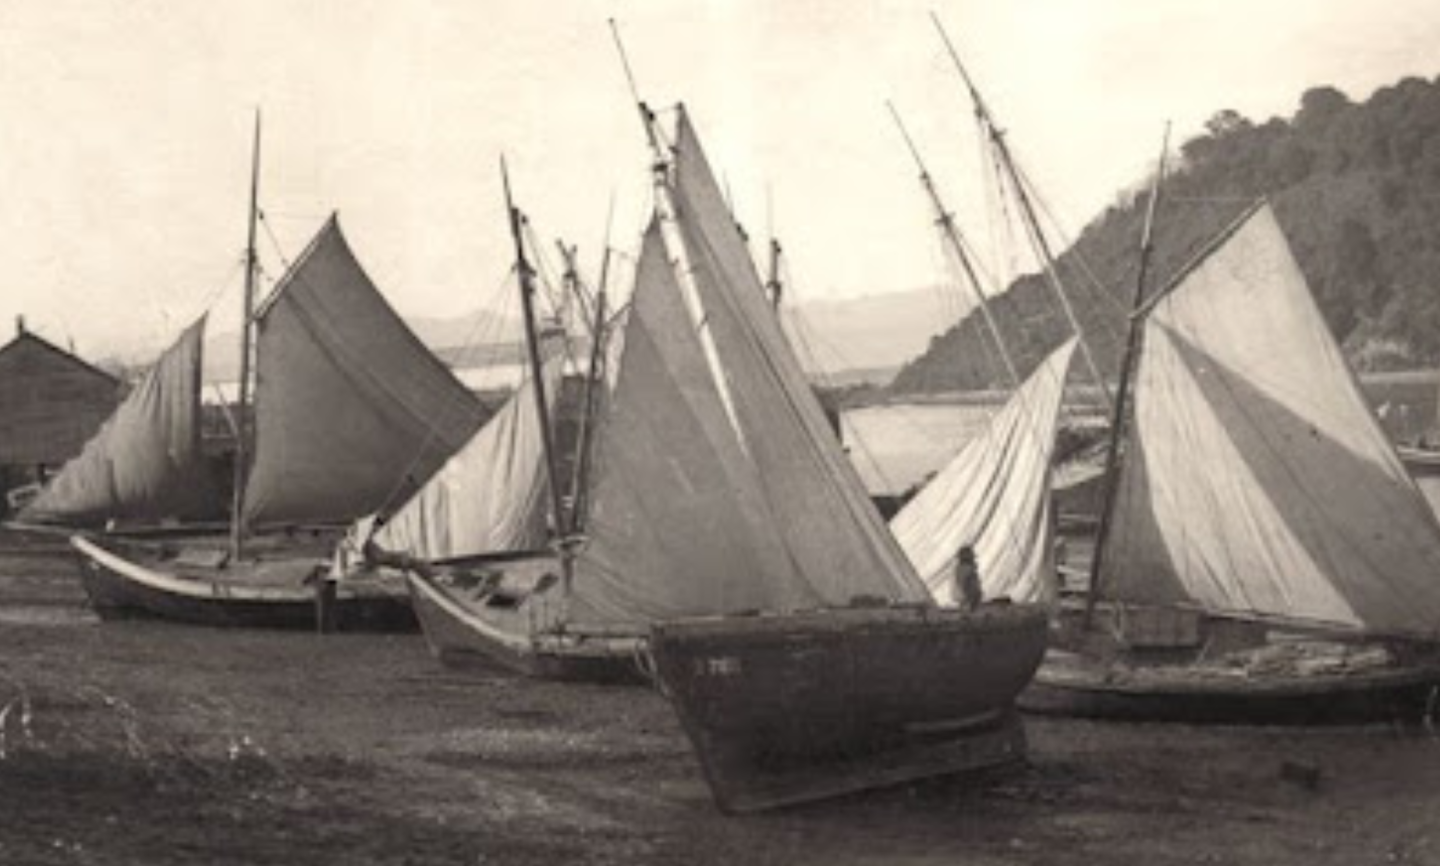
A bit more on the build, plus more context on the history of the lancha chilota. I'm making progress on the hull fairing. One lesson that I learned from the Half Hull model was the importance of fairing well, so I've been taking my time with it, fairing a bit here and there and checking regularly with a batten. I've shimmed the second and sixth bulkhead, which seems to have mostly fixed the alignment issues I was having, and think I'm nearly there. A major challenge has been the lower portion of the bow, where the planking needed to take a sharp turn around the foremost bulkhead while also twisting sharply. I ended up sanding the bulkhead down beyond what the plans call for, because I couldn't find any other way to get a smooth curve there. A batten still doesn't quite form a smooth curve there, but a piece of curved, spiled wood (a bow plank I ended up discarding from the Half Hull) does seem to fit pretty well. Given the broad hull form, I think this model will be a bit tricky to plank well. With the hull nearly faired, I finally added the transom. I didn't have any way to really square this up, so I basically eyeballed it while holding it in place. After it mostly dried, I checked the distance between the transom and the bulkhead ahead of it on each side. The port side was about 1/3mm closer than the starboard, so I propped it to the correct shape with the extra support beam I added. Once this is dry, I can finish the hull fairing and add the stempost. Not a particularly exciting build log entry so far, I have to admit, which brings me to... The Lancha Chilota's Development: Design Characteristics In post #10, I wrote a bit about how the Lancha Chilota developed because of a combination of factors in the late nineteenth century: the growing availability of milled lumber and iron/steel tools and furnishings, the growing demand for trade, and some degree of foreign influence. All that's well and good, but it leaves out the question of how the lancha chilota itself changed over time and space. To start to answer this question, José A. Garnham's website says, on the basis on information from locals, that the lancha did change over time, if only subtly, in hull form and rig. These differences were subtle enough that some informants stated that there was no variation, but I feel that photos do demonstrate some changes. (Source: https://lanchaschilotas.com/diferencias-entre-la-lancha-chilota-antigua-y-la-calbucana/ ) Early lanchas, according to Garnham's informants, were rigged with a relatively short gaff and long boom well overhanging the stern. Their bowsprits were angled upward following the curve of the sheer, and their prows were relatively angled projecting forward. Over time, though, he writes, lanchas changed over to a new design called the Calbucana, as it first developed in the port of Calbuco. The lancha calbucana used a longer gaff that was more sharply angled upward and a shorter boom. The bowsprit was more horizontal, and the prow was more vertical. These changes made the calbucana a more weatherly craft than earlier lanchas. The higher-aspect-ratio gaff sail was more efficient to windward, while the deeper bow and lower bowsprit helped the vessel point upwind. Based on photos, the earlier type was practically superseded by the calbucana--although I have to note that I personally can only distinguish the difference in mainsail shape and don't really see the difference in the prow or bowsprit in the photos. Below: Early-style lanchas with their sails hung to dry at Angelmó, Puerto Montt, in the 1920s. The short gaff and long boom are noticeable. The same source link also includes other photos of 1920s lanchas that show similar rigs. Source: http://ceph-puerto-montt.blogspot.com/2009/02/album-del-recuerdo-imagenes-de-nuestra_22.html Below: A lancha calbucana in 1964. The changes in the mainsail's shape are apparent, if the purported differences in the prow and bowsprit are less so. Source: https://www.memoriasdelsigloxx.cl/601/w3-article-124898.html All of which is to say, the lancha chilota developed over time into a more weatherly, efficient vessel. As with most working vessels, describing them as "traditional" can paper over a rich history of changes over time. Beyond that, lanchas were highly variable in a number of respects. While some had nearly vertical sides, others had more dish-like hull forms. The depth/prominence of the keel also varied, as did the degree of sheer, the sharpness of the bow, and the breadth of the transom. Some degree of variation in form can be seen in the photos below. It's unclear to me whether these differences in hull form reflected regional differences, differences between builders' techniques, different design purposes, or a combination of these factors. Source: https://www.memoriasdelsigloxx.cl/601/w3-article-86076.html Source: https://www.memoriasdelsigloxx.cl/601/w3-article-86073.html Moreover, while nearly all lanchas had flat transom sterns, at least some had overhanging and/or rounded sterns. In this respect, these vessels resembled the larger two-masted schooners (also usually referred to as lanchas) that operated in the region and which I'll be writing a bit about in a future post. Below: a large single-masted lancha in 1950 with a notably rounded stern, quite distinct from typical lanchas. Source: http://ceph-puerto-montt.blogspot.com/2009/02/album-del-recuerdo-imagenes-de-nuestra_22.html Related to design, I've been trying to work out the location for the wale, and have concluded that there were a wide range of possibilities. Some vessels seem to have had a wale or rubbing strip at about the level of the deck, just under the scuppers at the bottom of the bulwark, like the vessel on the right in the photo below, or a bit lower (as given in the plans). Others, like the lancha on the left in the photo below, don't seem to have had visually distinct wales at all. Source: https://www.bibliotecanacionaldigital.gob.cl/bnd/629/w3-article-613545.html Still others, like this vessel here, seem to have had a thick wale at deck level with a bulwark of equal thickness above, and a thin wale (or a rubbing strip?) below. Source: https://www.memoriasdelsigloxx.cl/601/w3-article-86081.html So, I think I have a lot of flexibility in plotting out the wales. More broadly, all of these variations in hull design, and the fact that there's very little we know about the "why" behind them, suggests why local history is important in part to preserve local traditions of knowledge that are threatened by the homogenizing effects of development. At the same time, the lancha chilota itself owes its existence to a similar process by which it replaced the dalca.


- 312 replies
-
- 9
-
-
- Chile
- Latin America
- (and 6 more)
-
Good luck on the repair! If nothing else, it will be good practice. I know I've seen a few build logs where people had to replace planks after accidentally wearing through them on the final sanding, so I know it can be done, but it certainly looks challenging.
- 84 replies
-
- 4
-
-
- half hull planking project
- NRG
- (and 2 more)
-
Very nice job painting the hull. The minimalist approach really highlights the fine lines, and the green is a nice touch.
- 47 replies
-
- 2
-
-
- Erycina
- Vanguard Models
- (and 1 more)
-
Nice job! I definitely had to deepen the bow rabbet on mine. Getting the curves right at the bow and stern is a challenge, but now you'll have a better idea of what to expect for future builds.
- 84 replies
-
- 4
-
-
- half hull planking project
- NRG
- (and 2 more)
-
Welcome! I agree that it would be helpful to hear more about your specific interests. Basswood is very commonly used in kits and in scratchbuilding, as it's cheap, readily available, and easy to work with. There are a lot of techniques for smooth finishes, and you can find plenty of discussions about that topic if you search for them. Build logs are also useful resources. Finally, you mention waterproofing, but you don't have to worry about that unless you're making a remote control model. Best of luck!
-
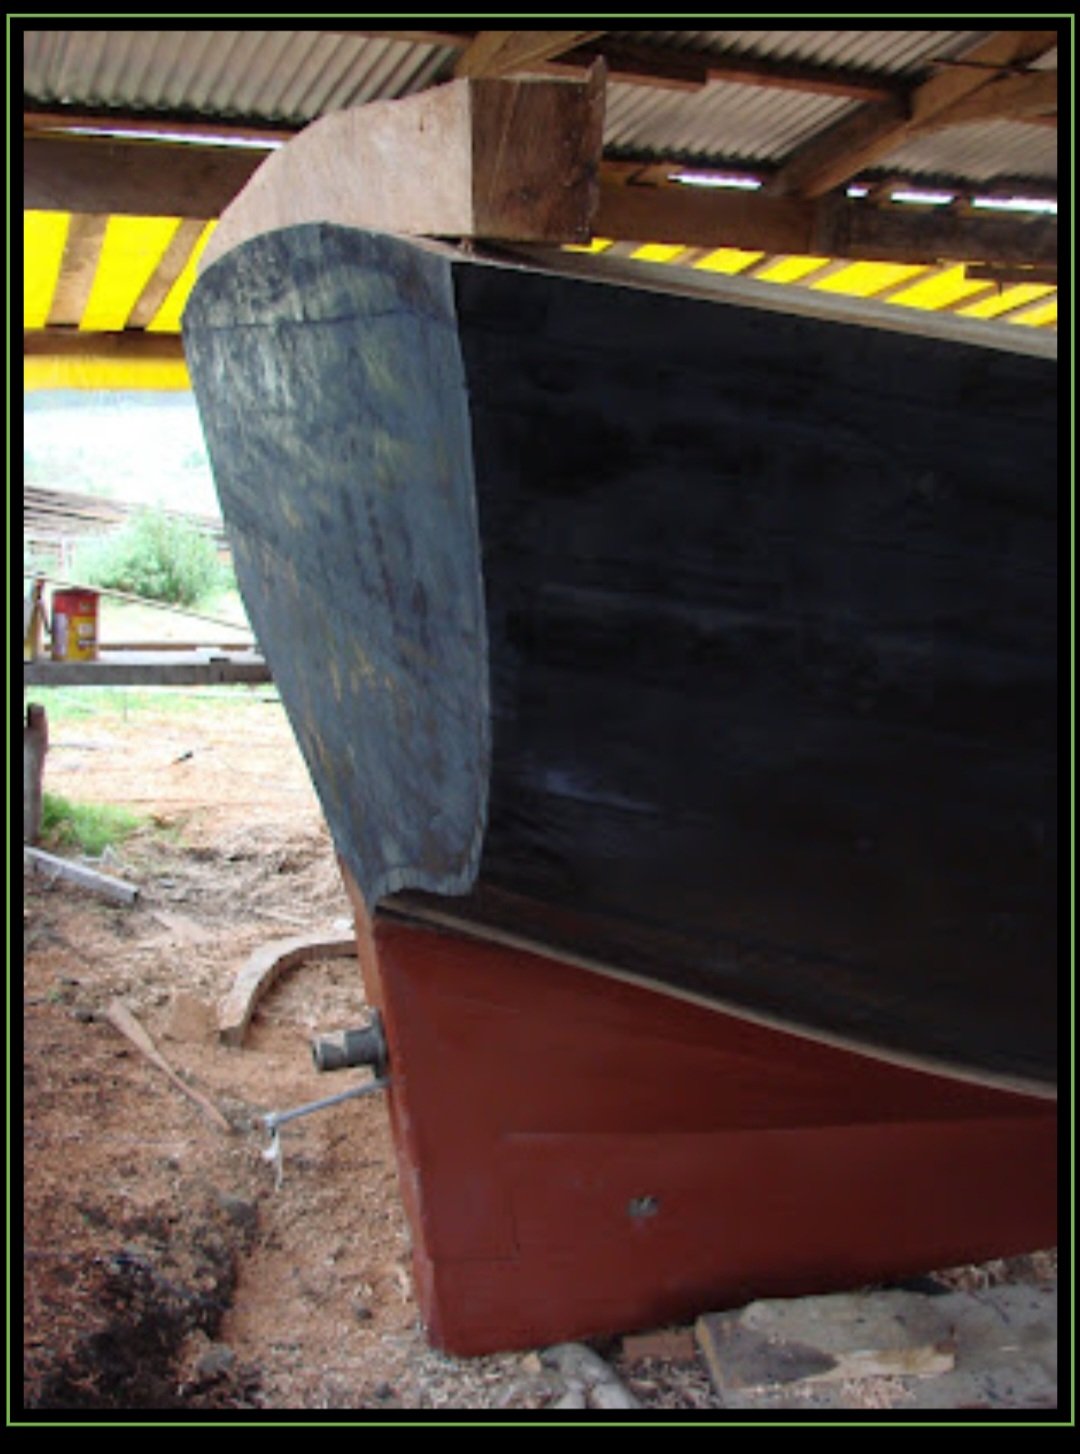
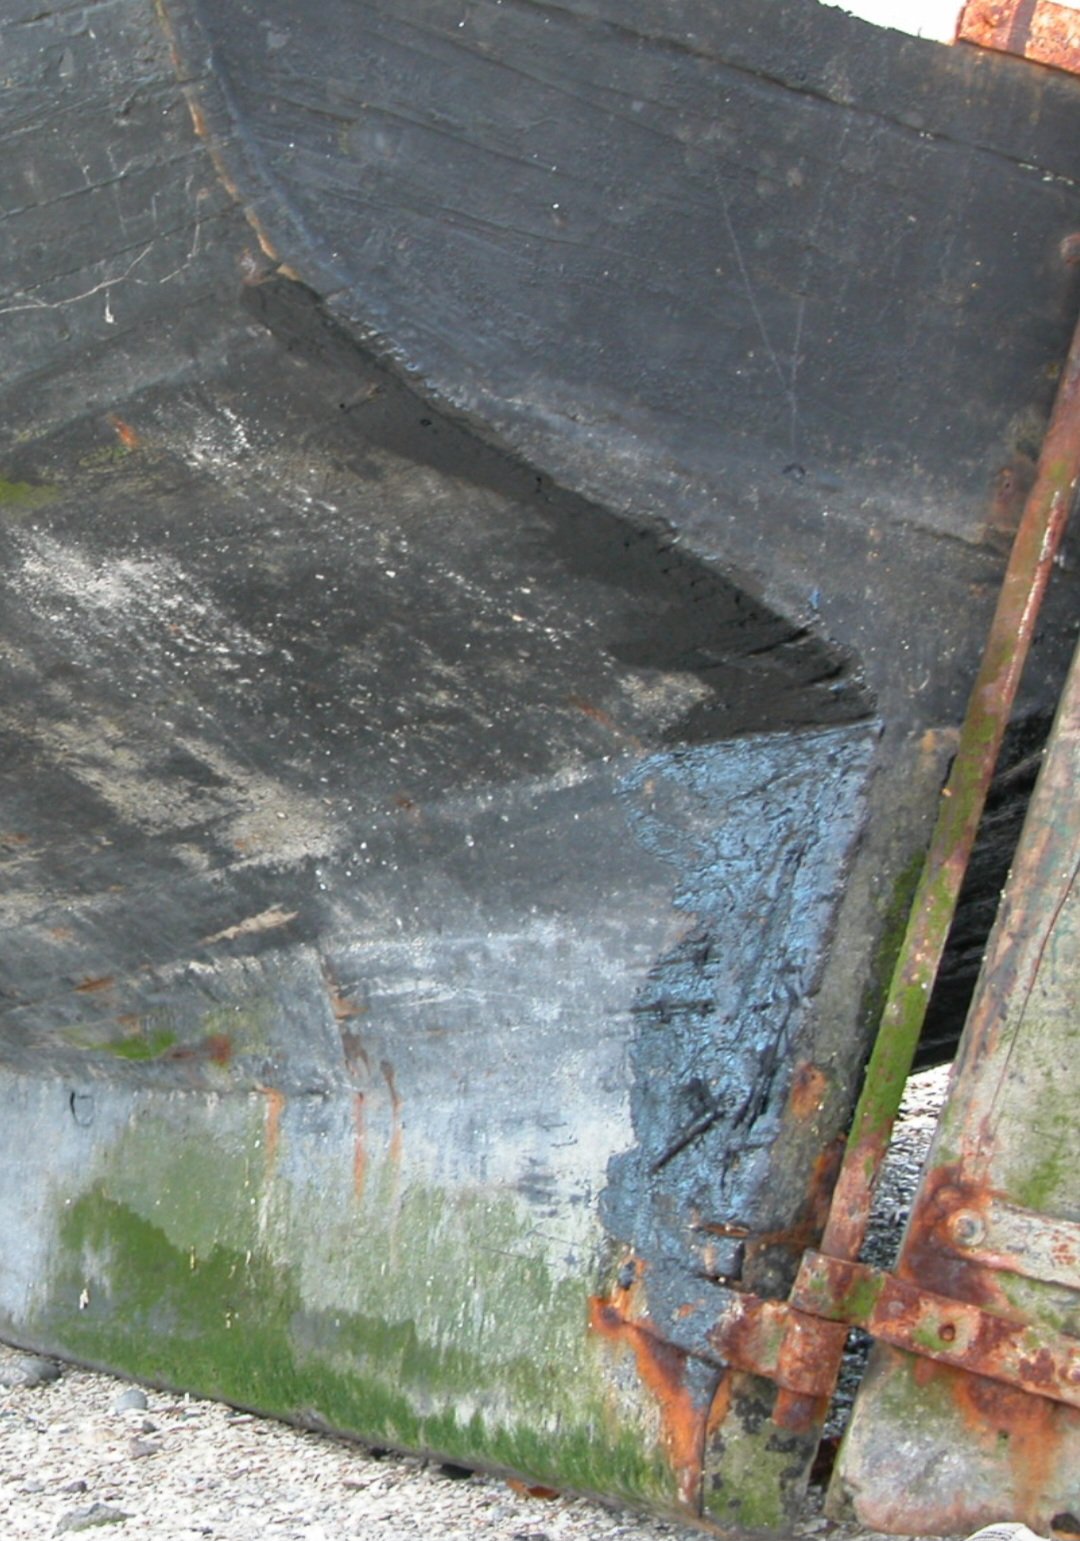
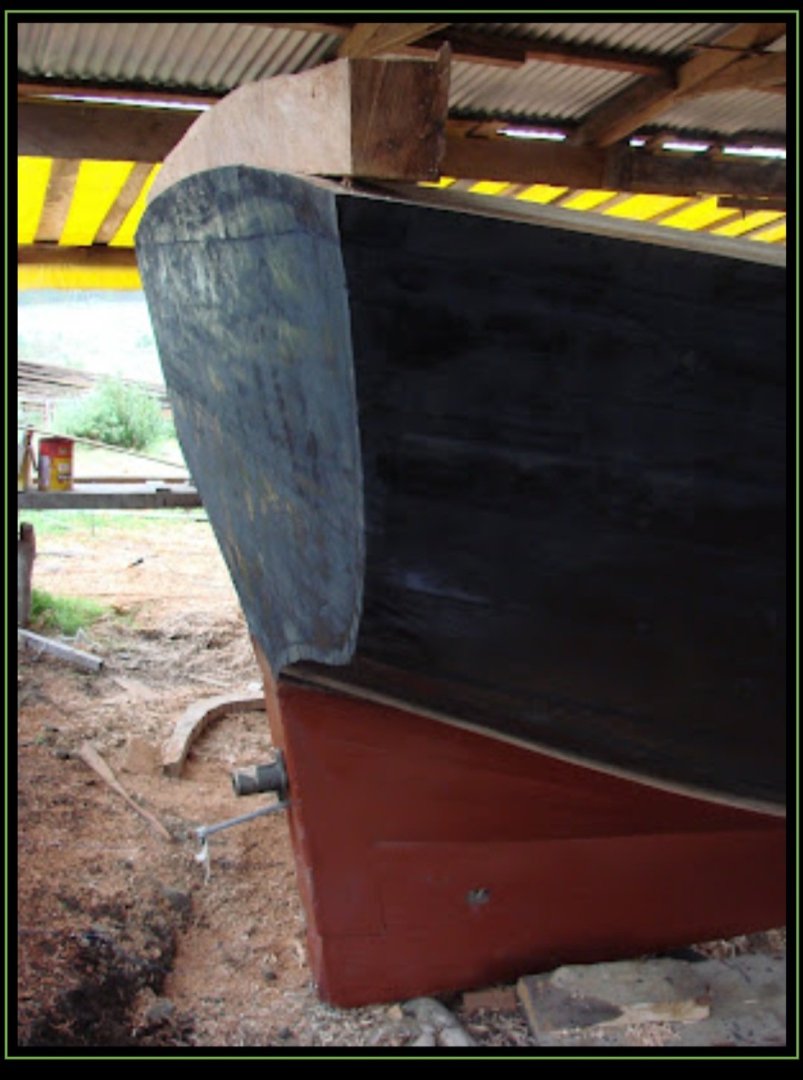
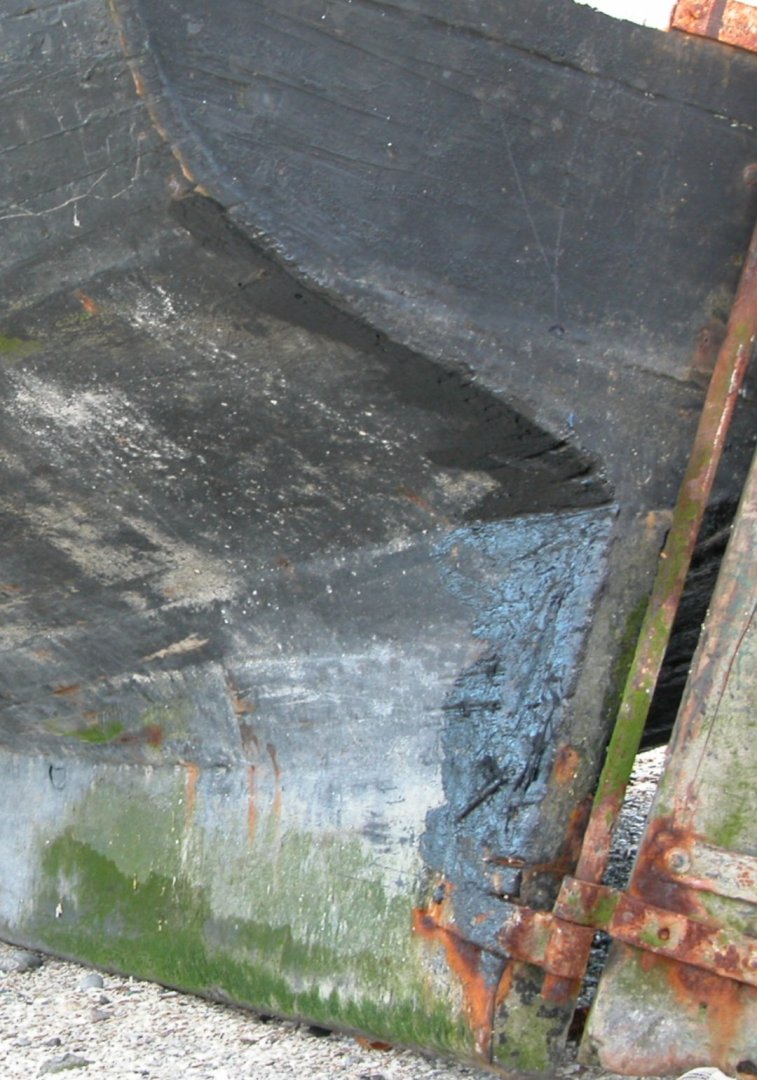
I've been doing some fairing, something that takes a good bit of patient work and doesn't really produce interesting photos in the middle of the process (e.g., "here bulkhead 3 has been sanded by about 1/128 of an inch, I will check fairness with a batten a dozen times and continue sanding"). So far it's coming along well and is a good bit faster than the multiple months I spent fairing the Half-Hull, although it does look like bulkhead 6 and the lower half of bulkhead 2 will need to be slightly shimmed. While working on that, I turned my attention to something I should have figured out a while ago. As I mentioned above, the plan provides for a combined backbone/keel/stem piece, which I split into separate parts. The plans didn't show a visible sternpost, instead showing the planks simply running to the trailing edge of the hull (with the sternpost presumably inside covered on the sides by the planking. This seemed weird to me, so I looked at photos of the Quenita (the vessel the plans are based on). It was hard to tell what was going on at the stern, as the area was covered in a thick layer of tar or caulk or something. Source: https://lanchaschilotas.com/dscn7156/ In any case, I thought it looked like the planks might indeed run to the edge of the stern. I figured it might be an oddity of the type, so I decided against making a visible stempost and figured I would come back to the question later. As I'm getting closer to planking, I took a deeper look at other examples. Although there aren't many close-ups of this area, I found a few that do indeed show a visible sternpost. The Voladora, a yacht lancha that was built beginning in 2008, does show a sternpost from the sides. It's rabbeted at an angle, such that it's relatively wide where it joins the keel, but tapers (on the exterior) to where it meets the transom. Source: https://lavoladorachiloe.blogspot.com/2008_06_27_archive.html?m=0 The model lancha held by the Museo Regional de Ancud, which I linked to in an earlier post, shows something similar. Checking elsewhere on this site, I noticed that this is basically how the Syren Medway Longboat handles its sternpost, as well. So, before I add the transom (which I've unglued the plank from in the meantime), I'll need to add a sternpost to the aft end of the backbone. I don't think it should be too tricky to add.
- 312 replies
-
- 5
-
-
- Chile
- Latin America
- (and 6 more)
-
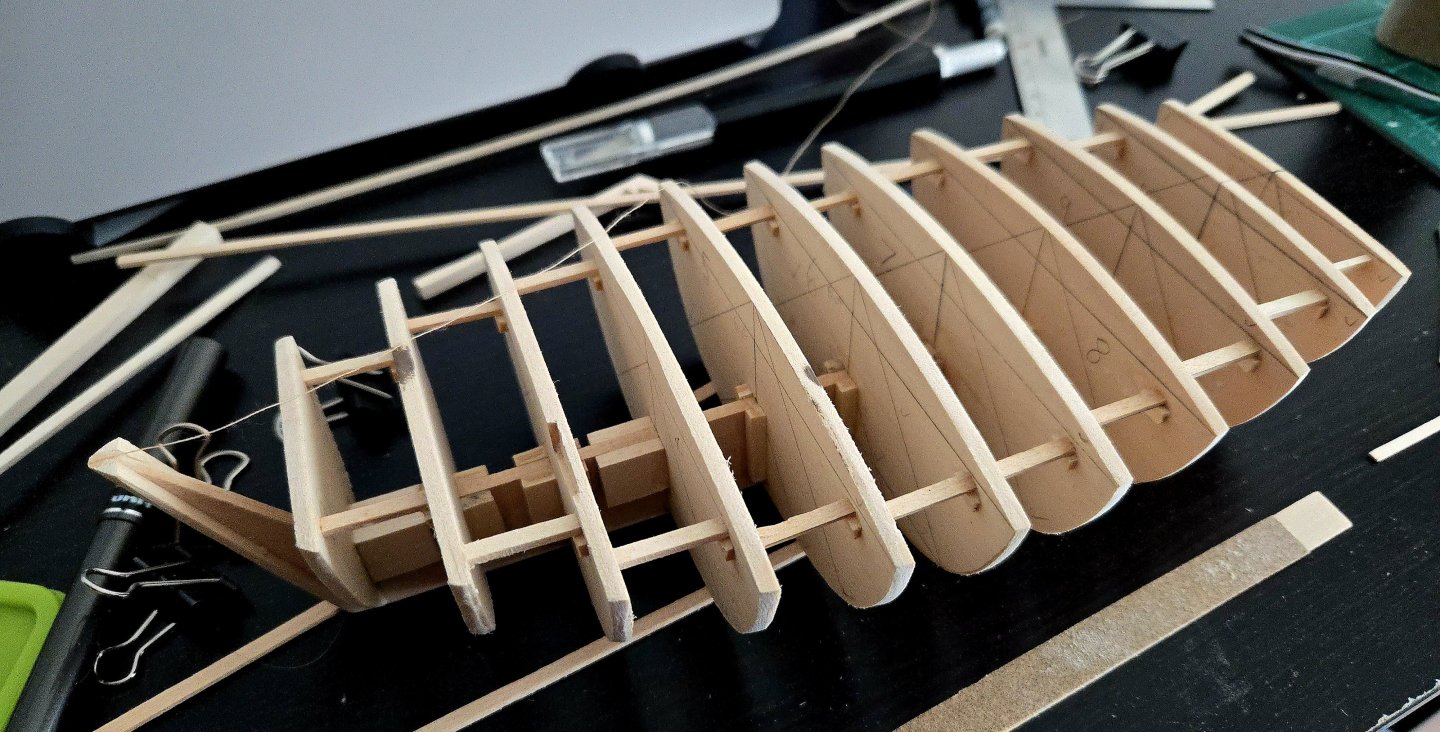
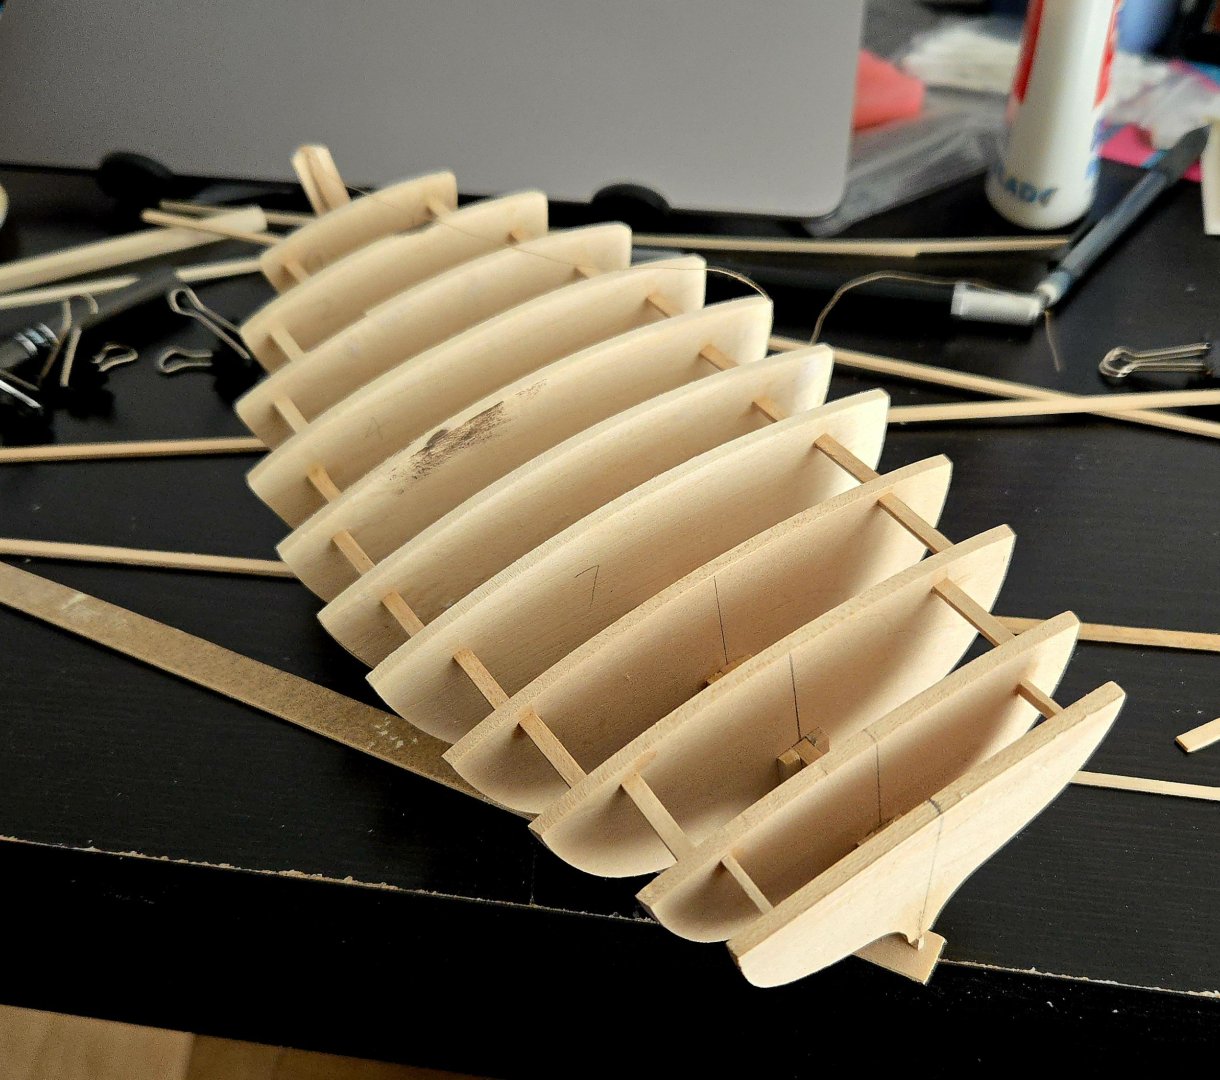
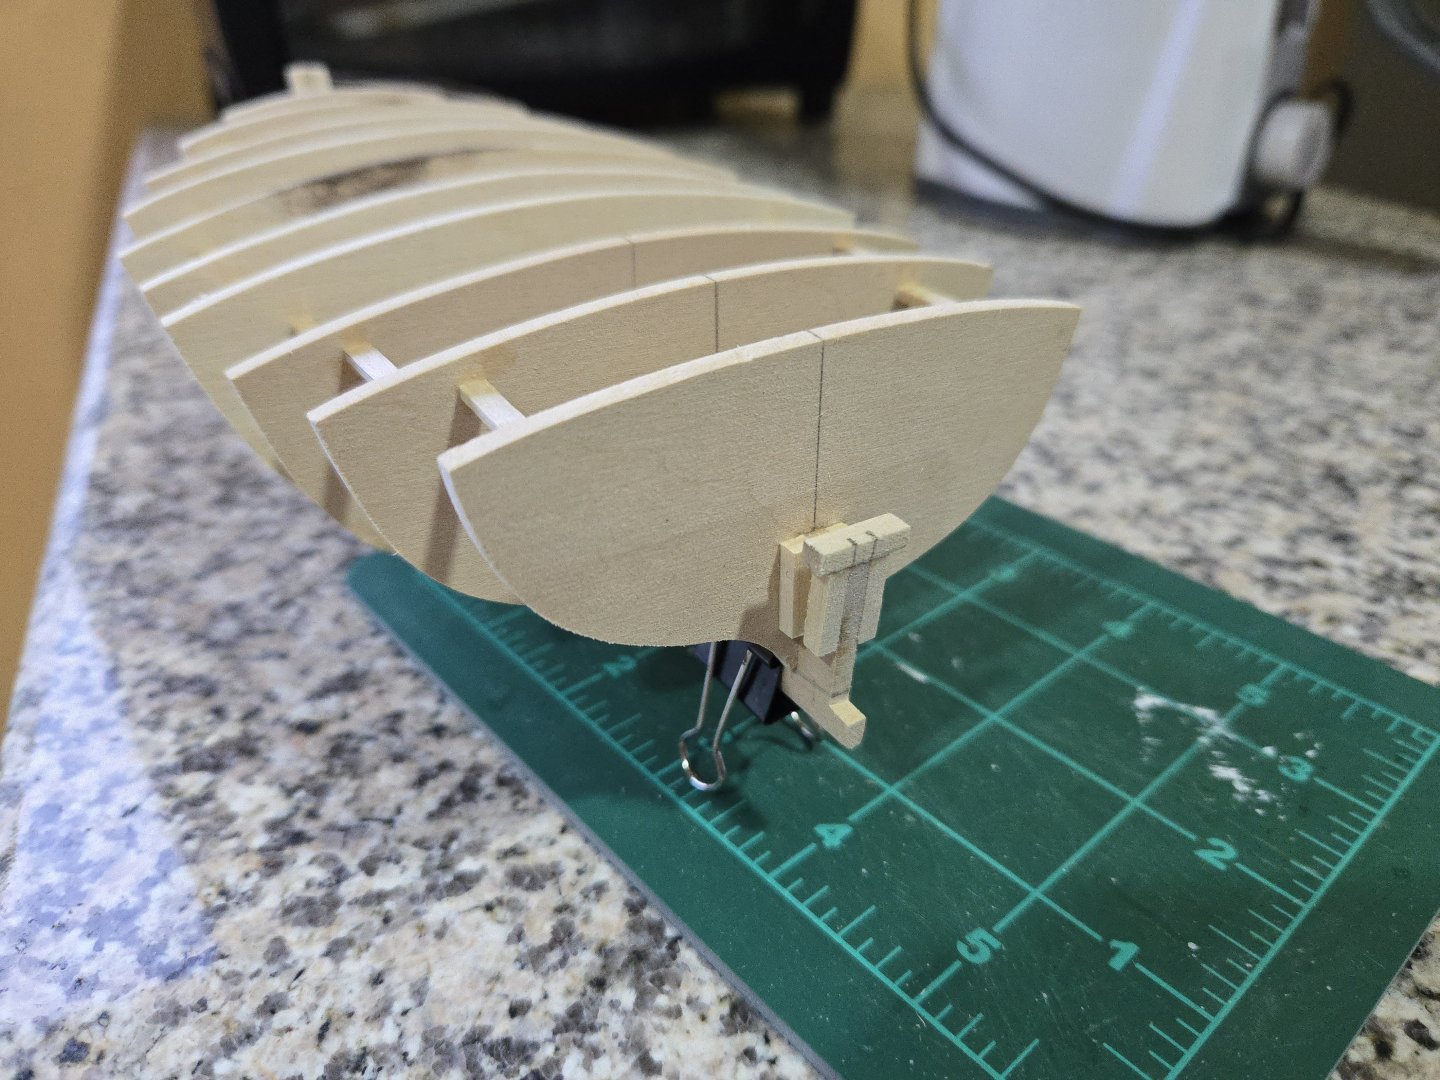
Thanks! I think I will plank it after adding it, so I'll need to wait a bit until I have access to my exacto knife again so I can pry the plank off after soaking the joint in alcohol. I finished the framework except for the transom, adding support pieces to better support it at the stern. I can't use the binder clips or the square to check evenness on the transom, so I'm planning on fairing the rest of the hull first and using battens to line it up, and adding more support beams once I have it squared.

- 312 replies
-
- 8
-
-
- Chile
- Latin America
- (and 6 more)