HOLIDAY DONATION DRIVE - SUPPORT MSW - DO YOUR PART TO KEEP THIS GREAT FORUM GOING! (Only 72 donations so far out of 49,000 members - Can we at least get 100? C'mon guys!)
×


Scottish Guy
-
Posts
382 -
Joined
-
Last visited
Content Type
Profiles
Forums
Gallery
Events
Everything posted by Scottish Guy
-
That is exactly my issue right now. By the same mould used I would say the earlier the better, but what about parts included. I know that the 1959 kit came with glue and paints but as it looks without any metal parts and only the ratlines, no other ropes. The 1969 kit should have gotten the metal parts but not the lines and got rid of the glue and paints. I don´t know what to do, at the end of the day, I would love the 1959 kit, I would have changed some aprts anyway with more detailed parts, like the deck and chains. But the price of that model is way too high for all the missing items and condition of the box. Micha
-
 Thank you for that Steven, I like that one, positioned correctly on the ship it looks maybe really good. There is a way to do it, leaning against the mast for example. Really cool, thank you. I get your point here lol and yes, drinking that way would be a bit... "wet" but hey ho as a sailor it always is wet hahaha Micha
 -
I just found out that the kit that is offered to me is NOT complete. The cement (which will be long outdated) and the paints are missing. Also the wooden stand is missing. I asked the seller for a discount, never got an answer back... therefore it won´t be the 1959 kit. I also realised that the 1969 and even better the 1974 model has added parts like metal chains and proper ropework. Micha
-
What do you mean by that? If they added new parts it means it has more than the 2017 therefore I would always prefer the old one. Also the moulds are still in use. Meaning the 2017 model is still made in the original moulds which should be worn out somehow. I´m torn between to buy or get a 2017 model but I heard that some folks are pretty unhappy with the 2017 model kit. Especially quality wise and about the parts itself, not clean and lots of not well conected parts. Micha
-
I agree with you David, the EZE tissue looks interestingly intriguing, I ordered a bag to have a look at it. For later maybe... and I love dogs but I feel sorry for you that the dog got hold of it and... destroyed it? To be honest, I like the ship wreck, looks interesting. If you paint it porperly you could put it into a nice small diorama, somehow stranded on a beach? I like that idea... Micha
- 114 replies
-
- 2
-

-

-
- Cutty Sark
- plastic
- (and 4 more)
-
Very well done Bob, looks amazing. I have no doubt that doing the coils will be an easy job for you Micha
-
Hello and welcome aboard here at MSW. I would go with Chris for the first layer planking. For the second layer I would use maybe rubber bands around the hull or cord strings. If you don´t have clamps that fit around the hull. Micha
-
Hello and welcome aboard here at MSW. Hope you will have fun on your journey and we don´t bite ^^ Micha
-
Hi David, that is something I would have considered from the beginning for the Cutty Sark, I think the plastic sails look ridiculous, even if you would paint them properly with weathering and aging, they still look odd. Don´t be reluctant, listen to your wifey (they often are right even if we don´t like it ^^)... Micha
- 114 replies
-
- 1
-
-
- Cutty Sark
- plastic
- (and 4 more)
-
Thank you Paul, I might consider a new board with blocks to secure the molds and turn the ship upside down. Sounds more logical than everything else. If the molds will be removed afterwards I´m not certain if I should glue the ribs in already or atatch them just after the planking is done? But yes, I will throw the "jig" away and build an upside down construction where I use blocks to secure the molds (after making sure they all end up in the same height so the ship will be flush on the board. Maybe I even cut out some new moulds from plywood sheets, should be more stable than extensions. Again, thank you for the advise, I also will have a look at your build. Micha
- 146 replies
-
- 2
-
-
- Roar Ege
- Billing Boats
- (and 2 more)
-
Thank you for that idea Eric, sounds somehow reasonable and I agree, much easier to archive. The scene sounds even really cool when I´m honest... will give it a go, but first I have to finish the ship ^^ Micha
-
Very well done so far... impressive work and set up. Looking forward to see the rest of your journey. Micha
-
Hi @bdgiantman2, I doubt that Calvin ever will read this since he hasn´t been online for 10 yrs. I started to check if folks of older threads are still online or I don´t even start liking anything nor reply to their posts. Micha
-
Like I said, I´m not an expert in ratlines or rigging yet but that`s how I would have done it anyway. Sounds logical to me at least. I´m confident you will make it properly and it will work out fine. I´m still fighting my Roar Ege from Billing Boats lol... Micha
- 125 replies
-
- 3
-
-
- Trial
- Vanguard Models
- (and 1 more)
-
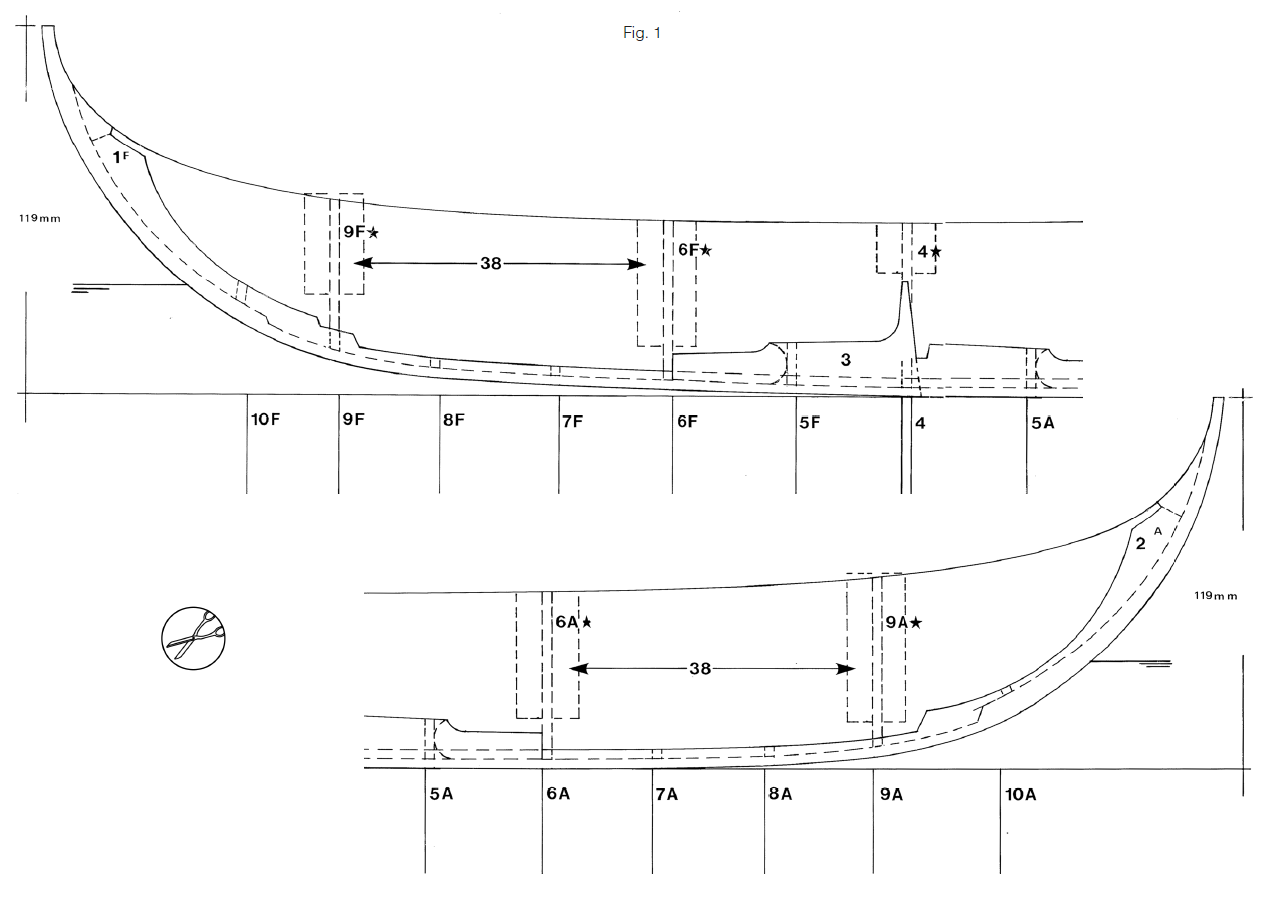
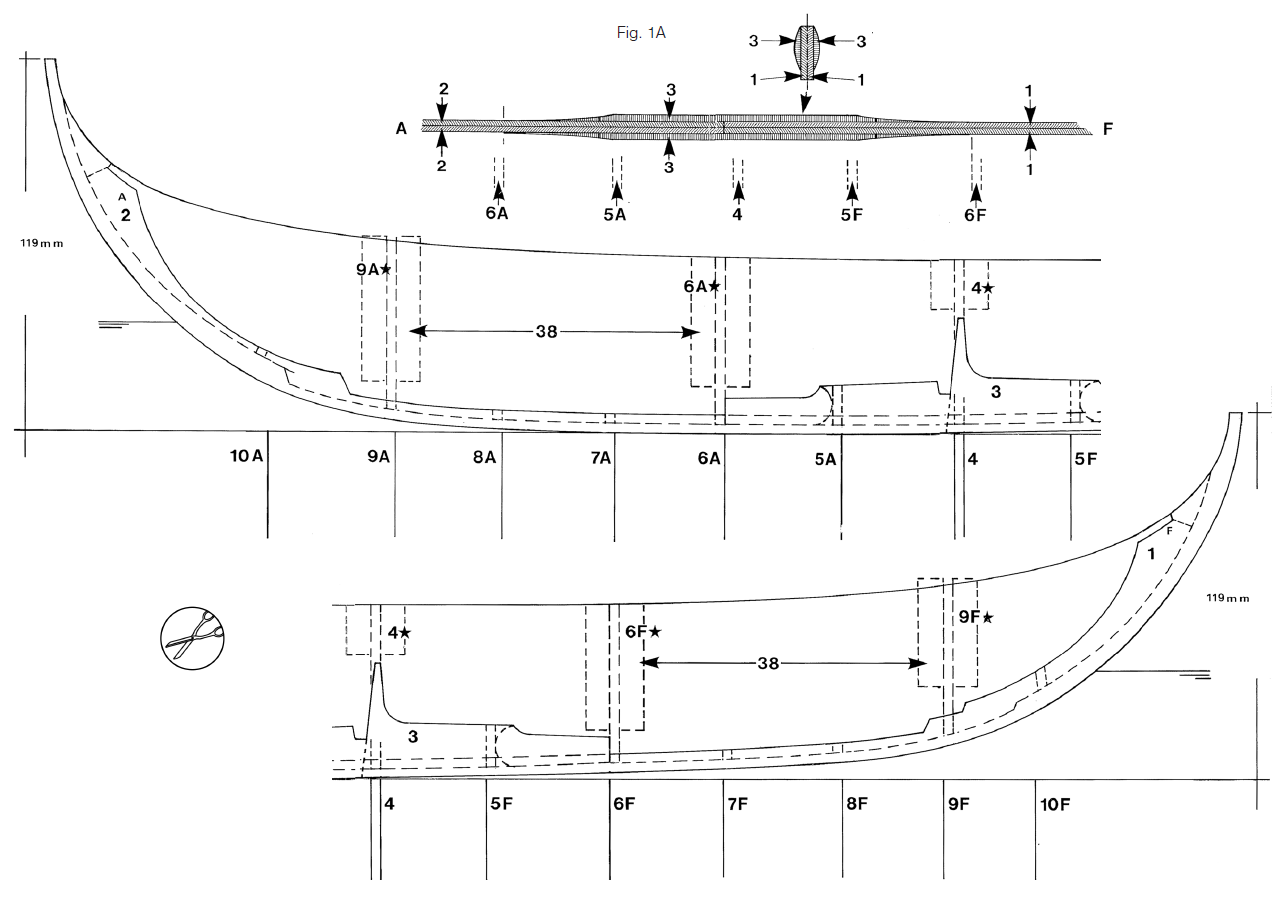
Here is the manual Simon and the two pages. This is Fig. 1 (Page 9) and this is Fig. 1A (page 10 - as we can see, mirrored to Fig. 1) And this is the explanation HOW to do it... unfortunately not connected to the figures but later. So therefore you just go ahead, glue it all together (like the figures show and booom... to late lol To be honest, in my humble opinion the text is not even clear about it and somehow contradictionary abput how to do it. I really don´t understand how they want to do it in two halves but then write that you should glue the "keel" (which I got explained is called spine) together (which I did). But maybe it is my understanding or language barrier... I have no clue, it still works for me, so I don´t worry at all, was just a bit more complicated (even if I´m not sure about that). Micha
- 146 replies
-
- 2
-
-
- Roar Ege
- Billing Boats
- (and 2 more)
-
Hi Simon, when I read and follow the plan indeed. Unfortunately the plan makes step 2 before step 1, that´s why I mistaken glued the entire spine already together before I read that I have to cut out the two drawings (was wondering why there is a mirrored drawing of the assembly on two pages) and glue them onto a board to build each side... after glueing the spine together this plan wouldn´t work anymore lol so I decided to go the way I do now. Also helps me to get the parts cut out of cherry wood sheets to create a more accurate (orignal build) version of the Skuldelev 3 from scratch. This will take longer but I will post both builds on here, I don´t create a second LOG for the scratch build since theis one is build out of the BB build somehow. Micha
- 146 replies
-
- 1
-
-
- Roar Ege
- Billing Boats
- (and 2 more)
-
I would think so but I´m not an expert about ratlines. But just by logic I would say it should be easier and safer to fit the shrouds and ratlines. But I would make sure that the mast is properly secured and fixed, if the mast collapses the entire work is ruined and you start again. Micha
- 125 replies
-
- 2
-
-
- Trial
- Vanguard Models
- (and 1 more)
-
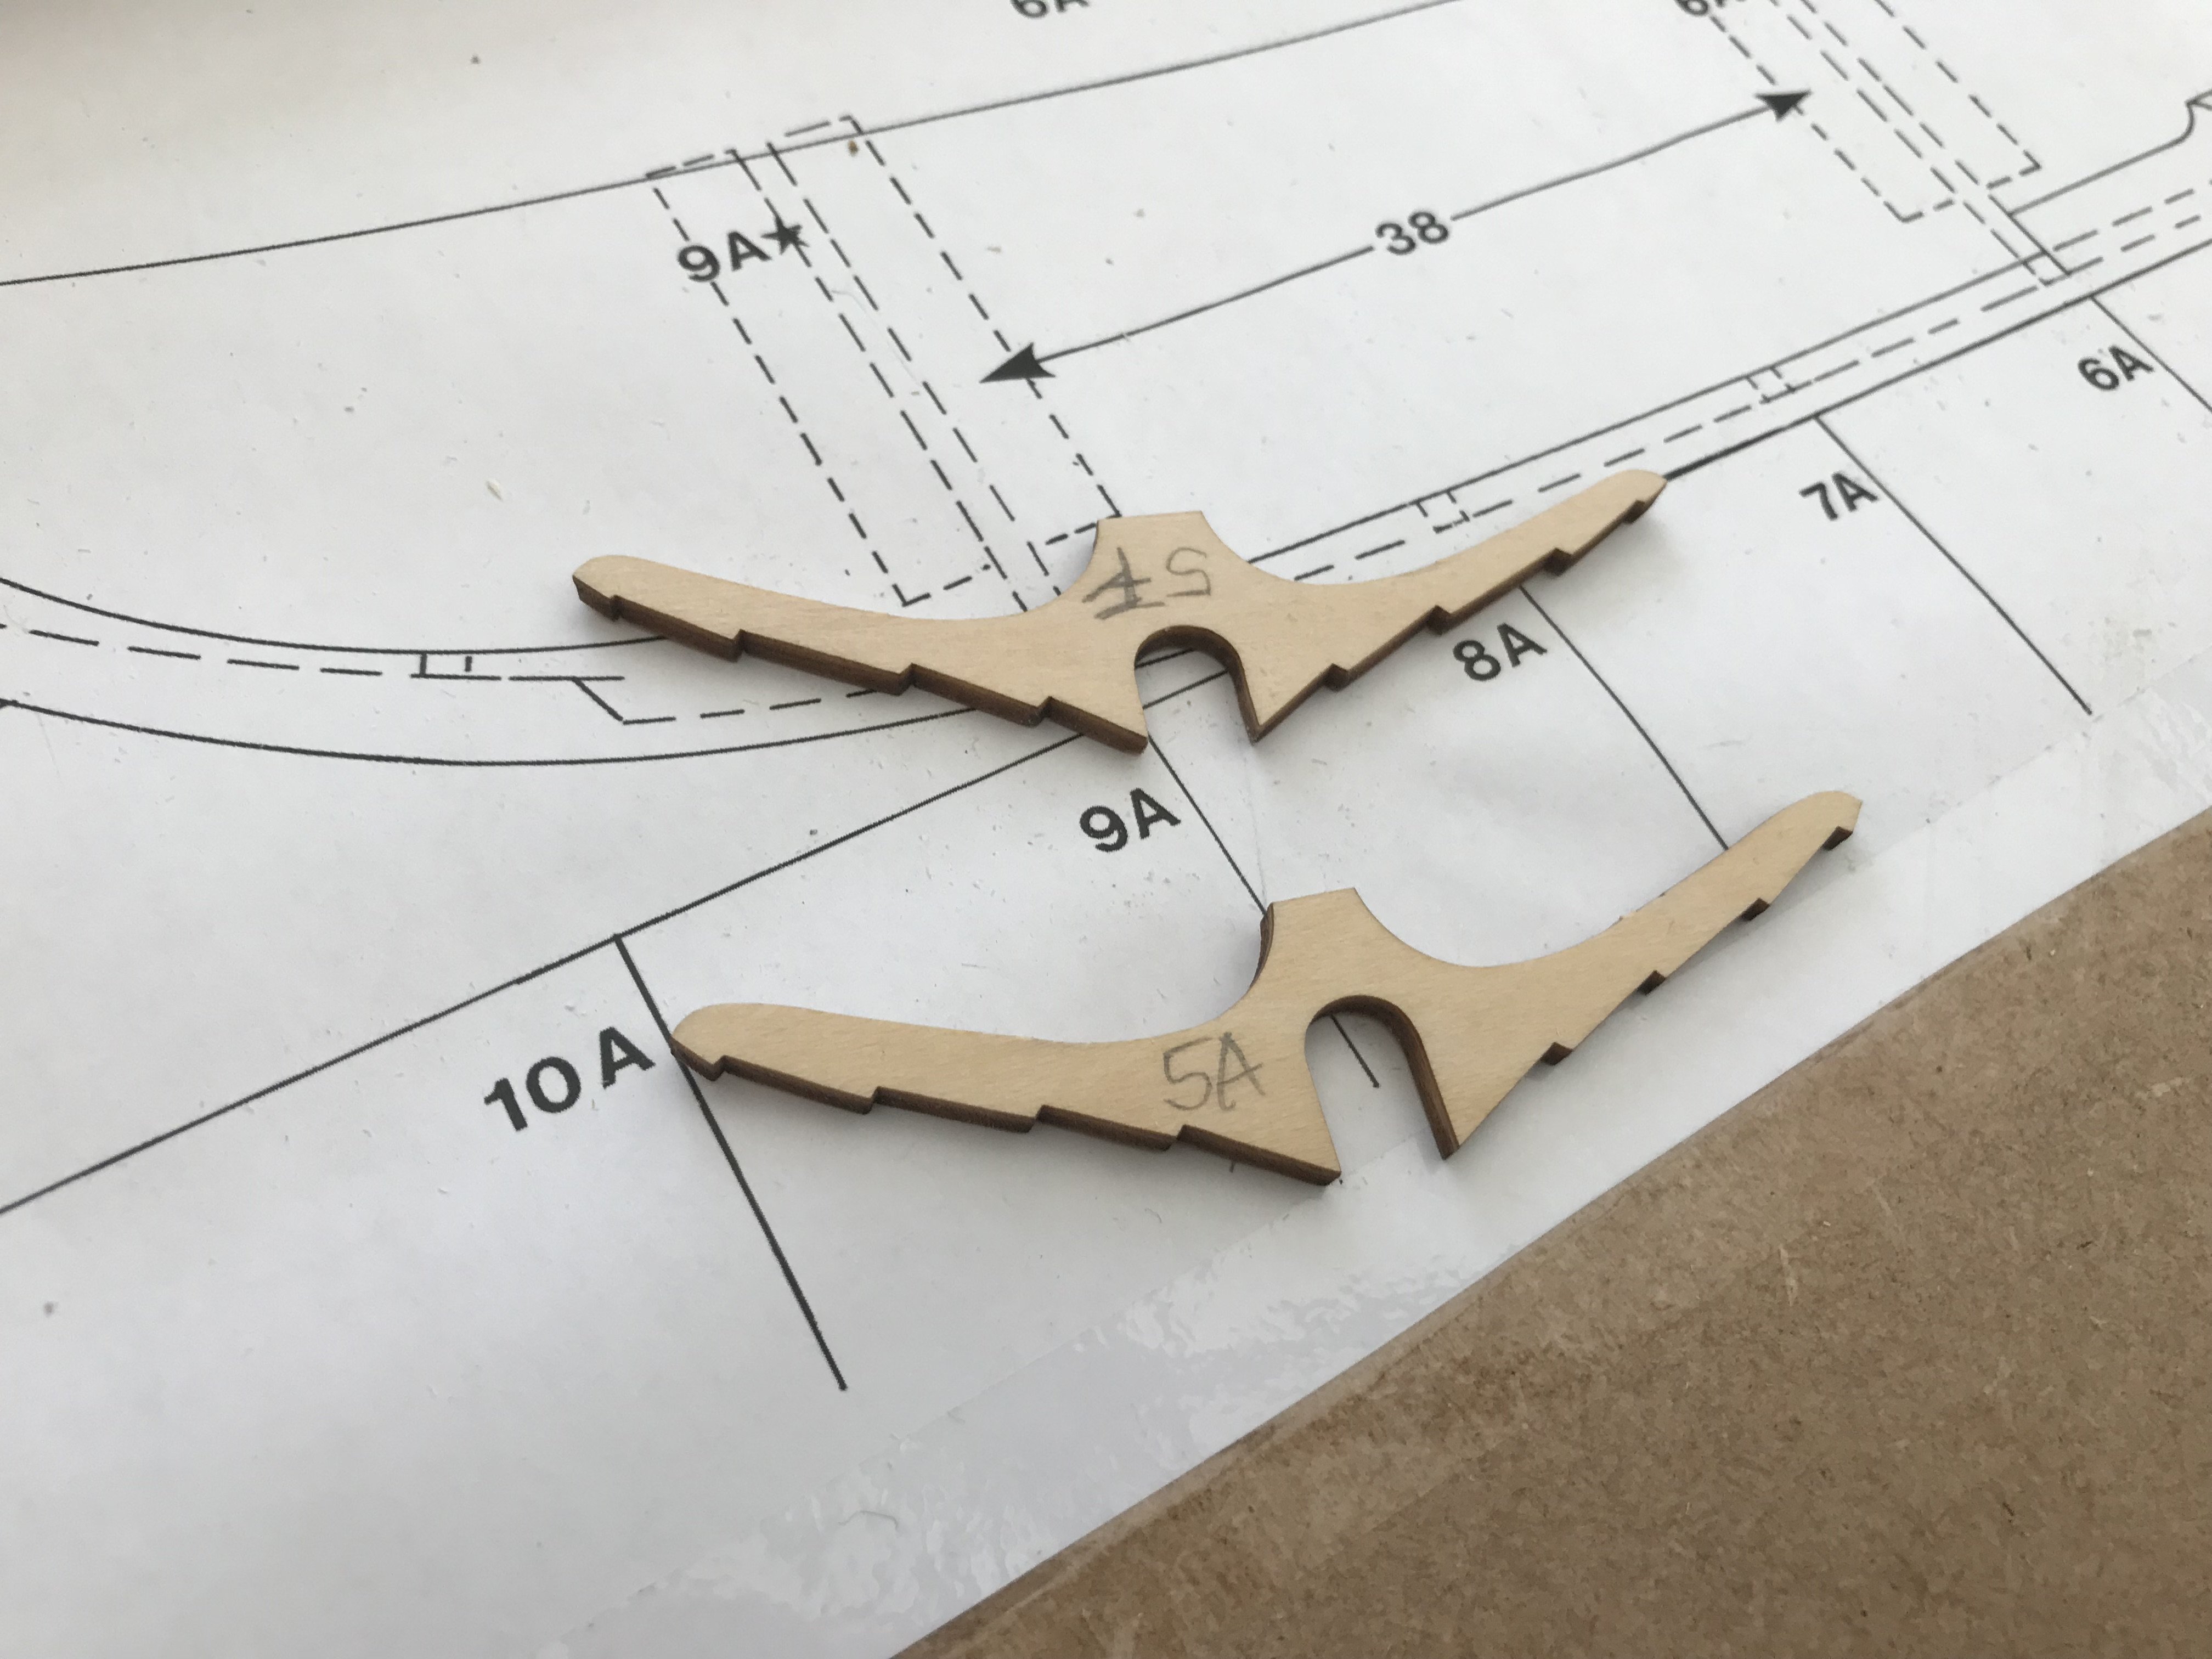
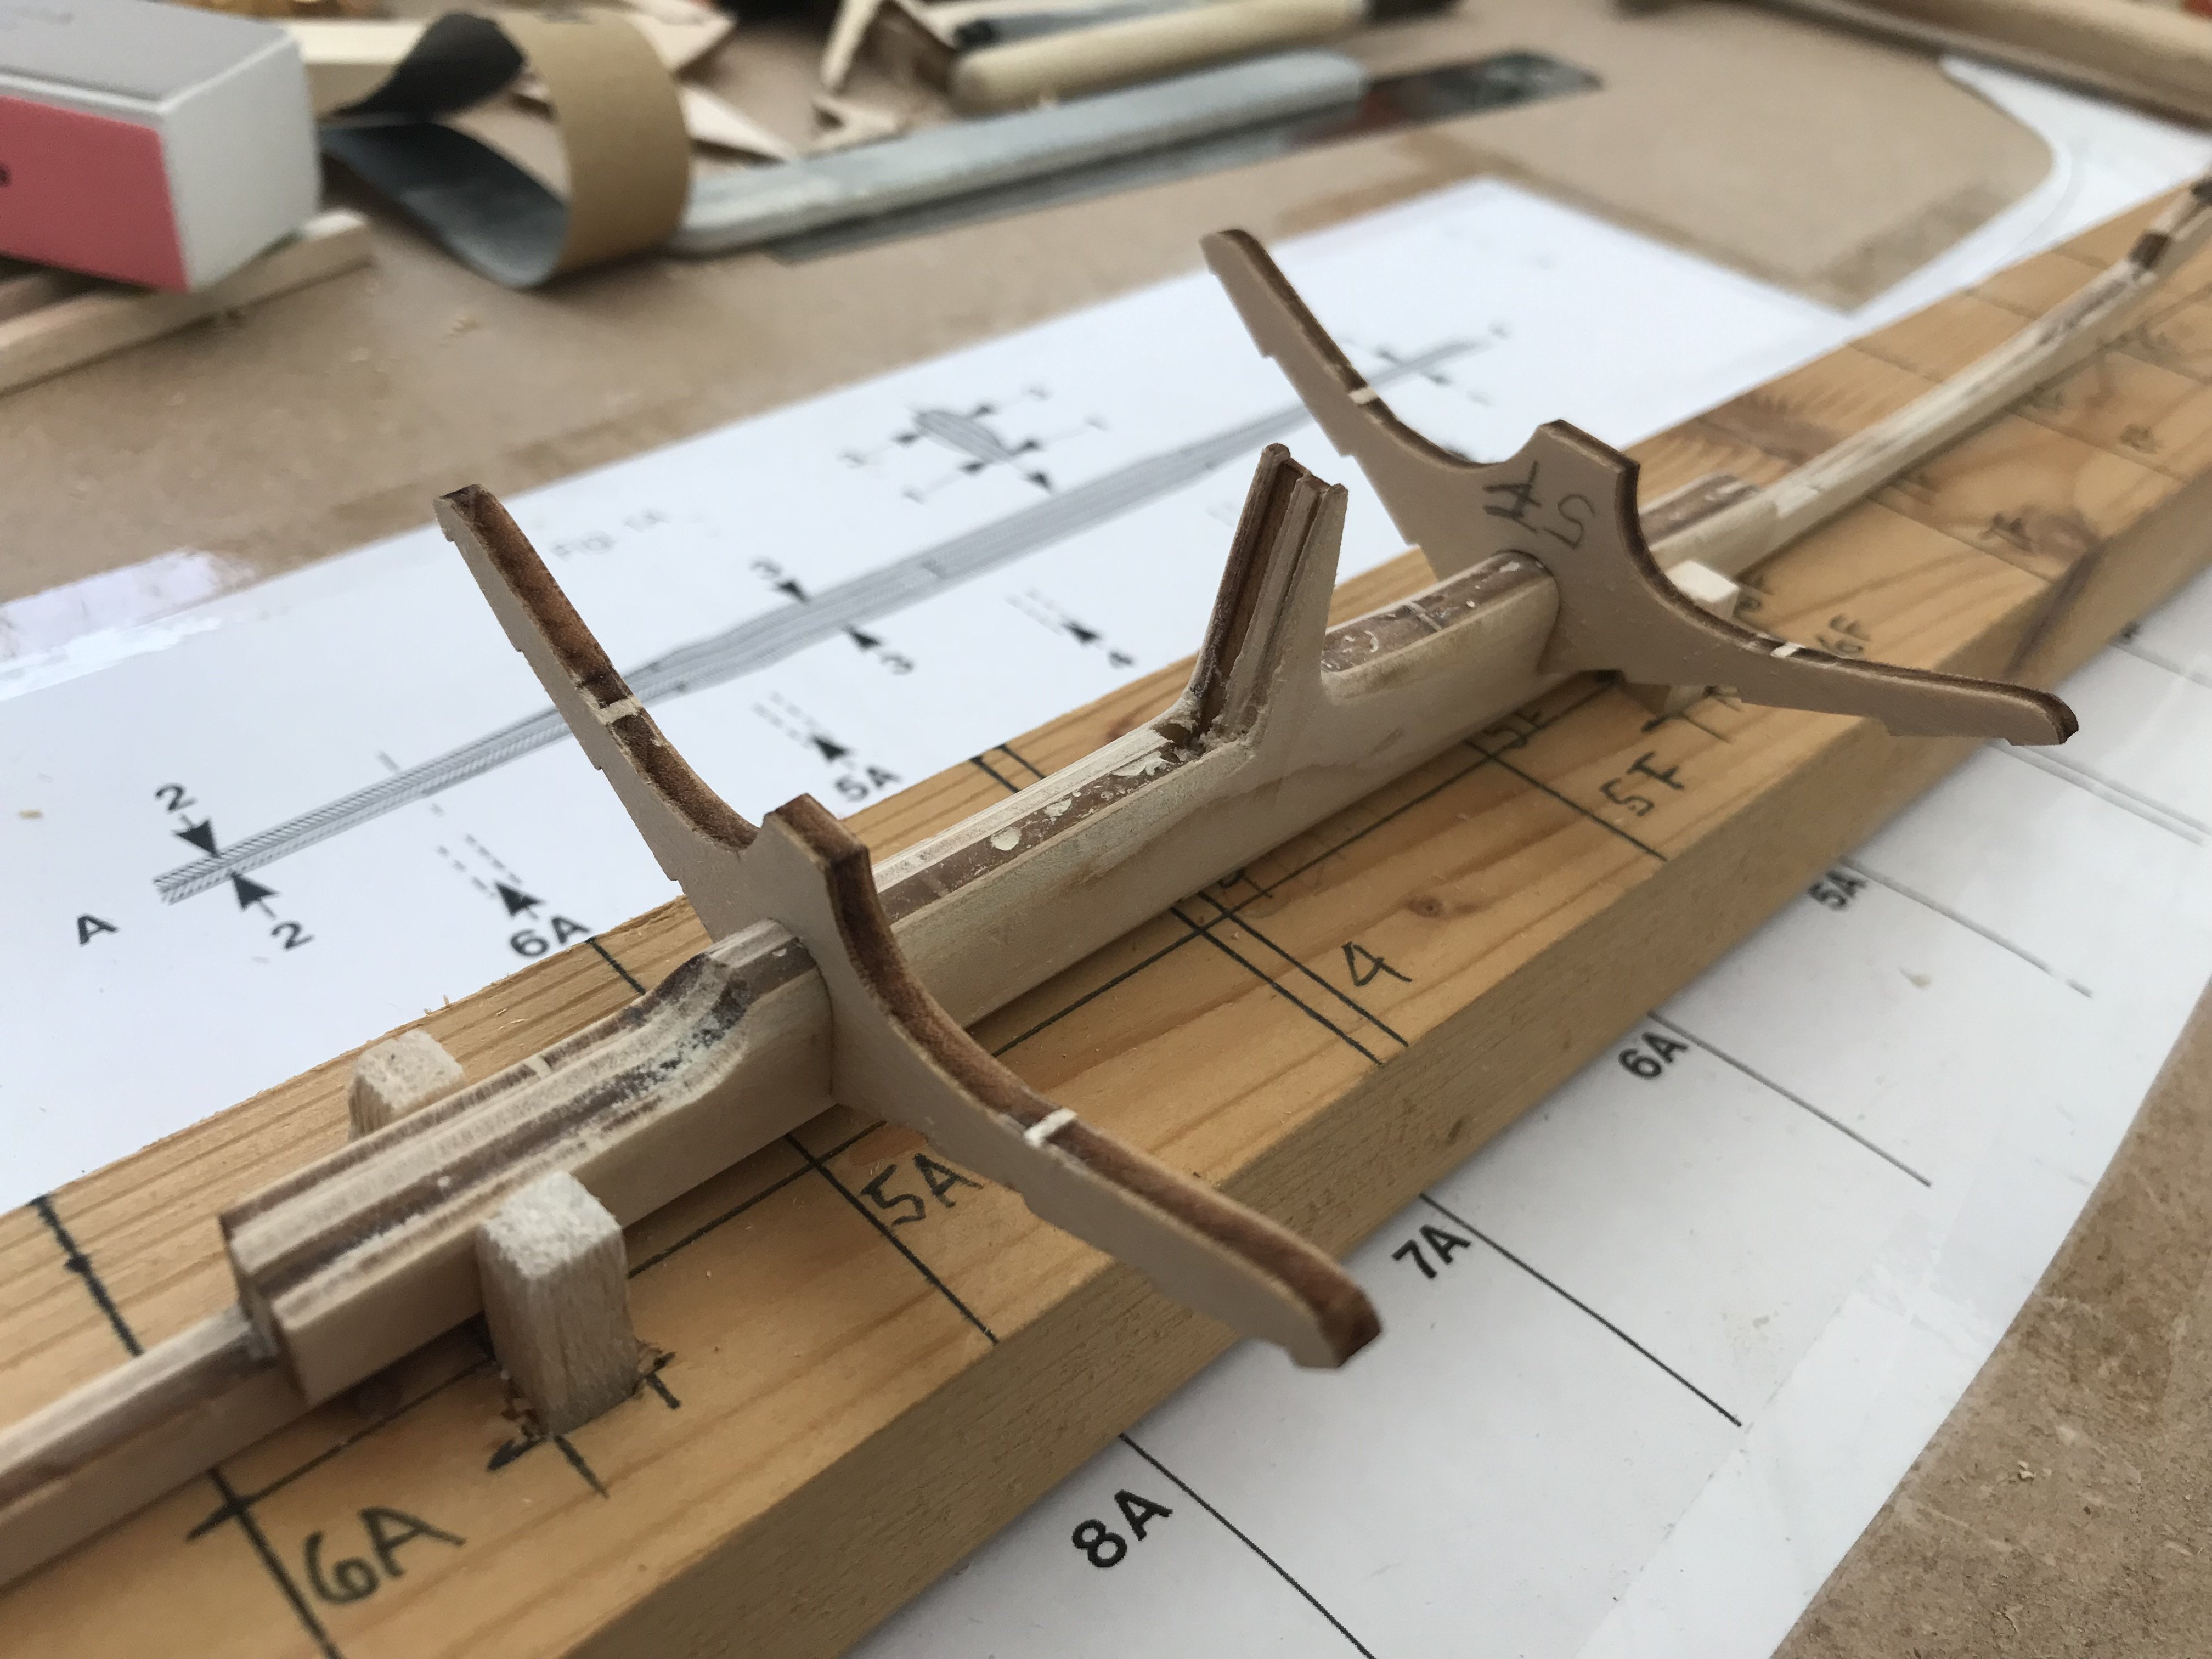
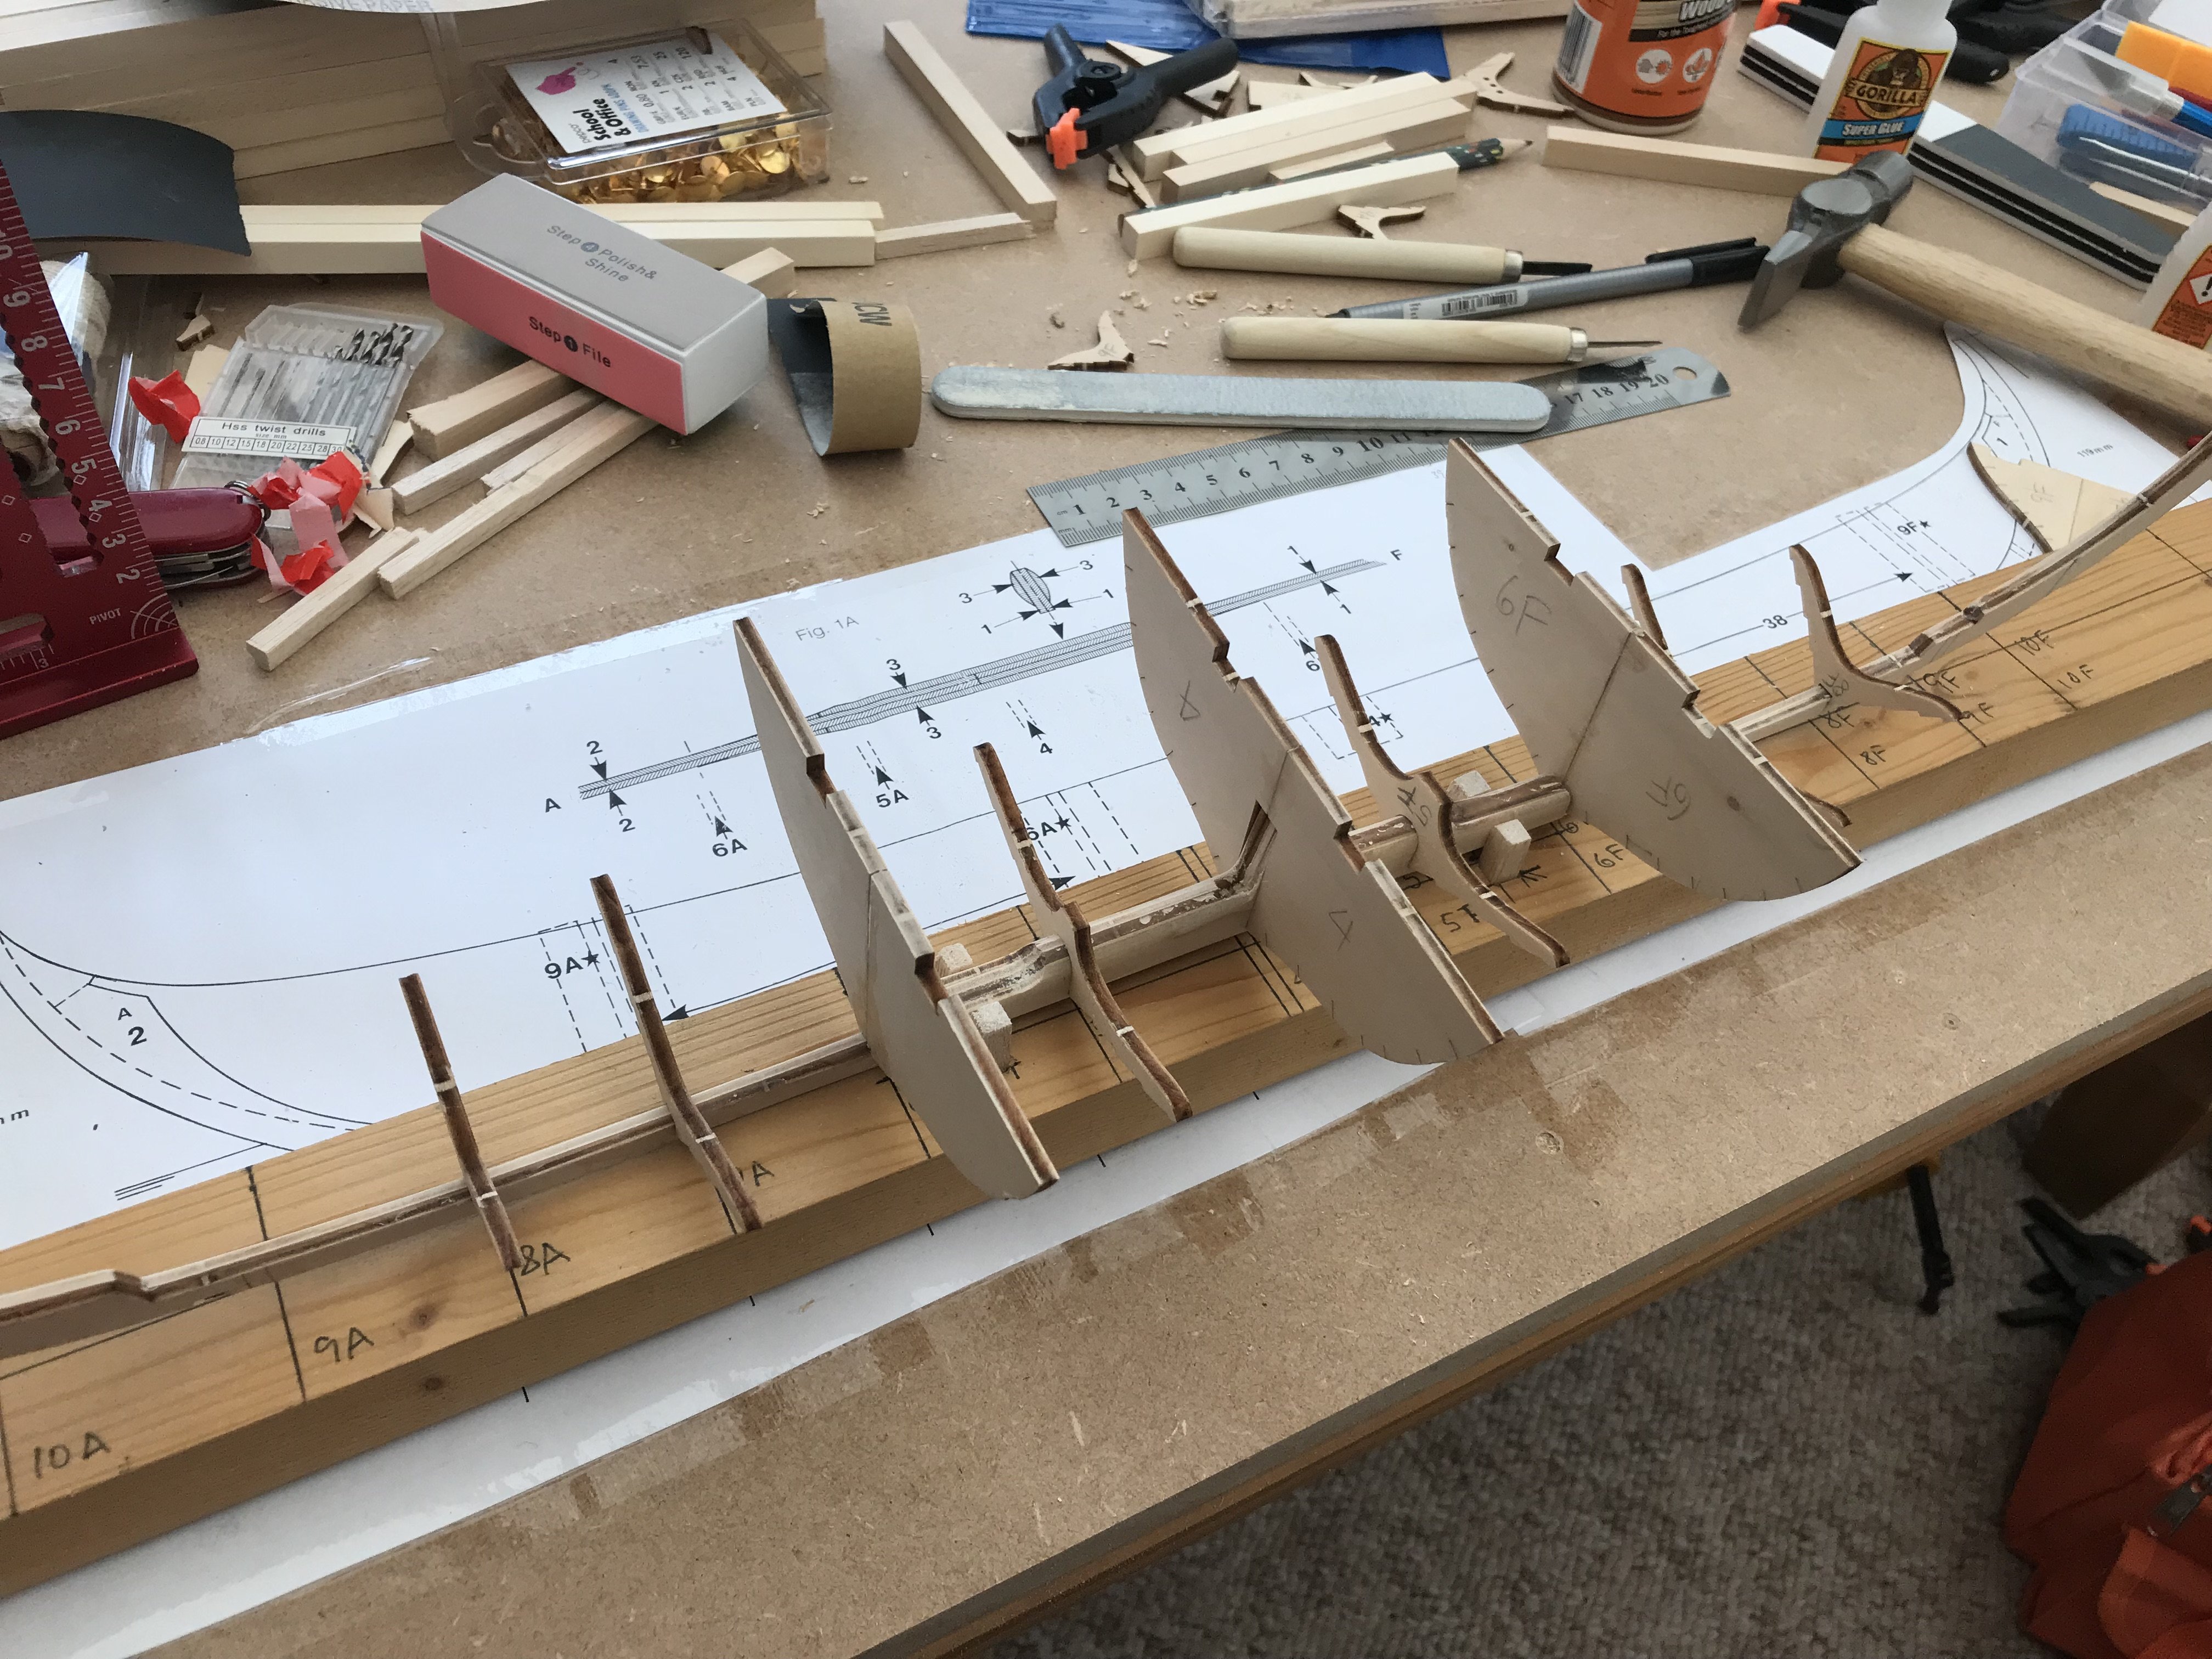
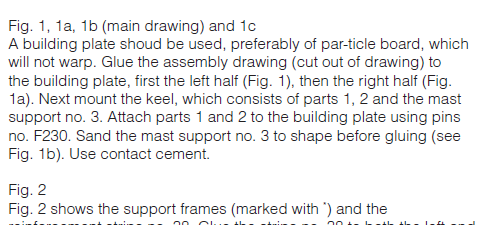
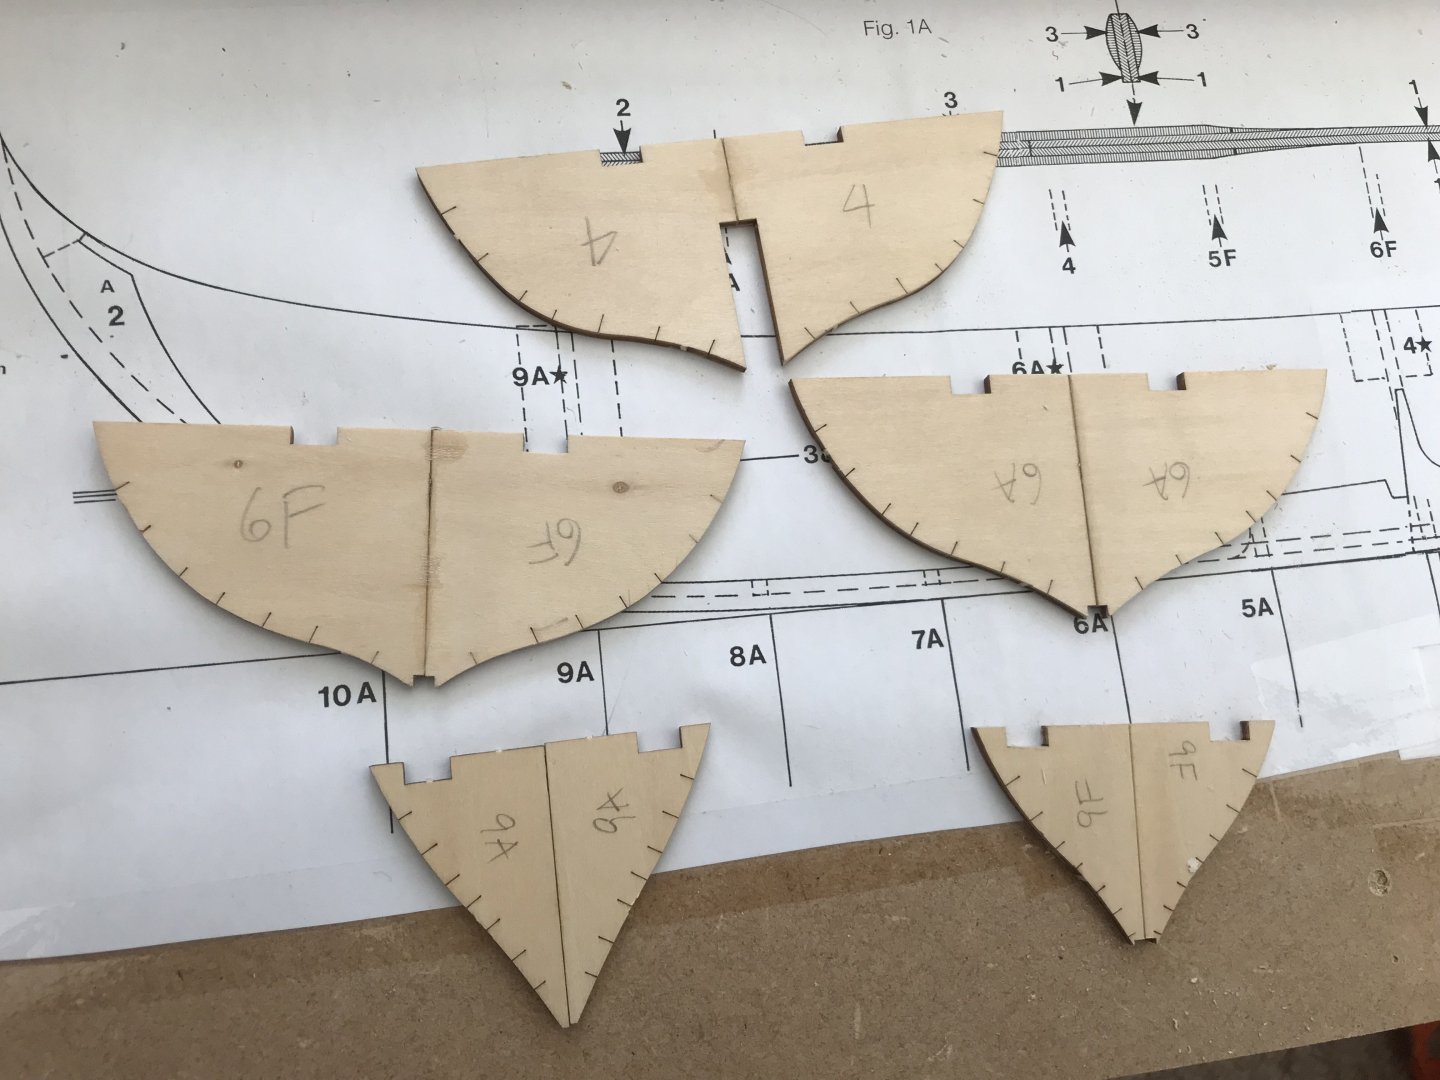
* Chapter Three * The BB Roar Ege Build goes on - not by Plan Since I glued the parts of the spine already together (parts 1F, 2A and 3 - each twice) I couldn’t follow the plan anymore since the plan goes by building two halves. Therefore I needed a jig somehow to keep the spine upright to attach the molds. The next step was now to glue the molds together, meaning left and right side (mirrored parts 4, 6A / 6F and 9A / 9F). Then I sanded the spine in an oval shape around the middle part to fit snuggly in the parts 5A and 5F which both are ribs which will be placed on the spine between molds 4, 6A and 6F. After sanding the spine they snuggly fit onto it Now I had only to sand the center part of the spine (where all spine parts are glued between the two supporting parts 3 to fit on the center mold part 4. I also (not glued yet) added the ribs 5A / 5F, 7A / 7F and 8A / 8F as well as the molds 6A / 6F to see how the spine with the ribs and molds would look like. For the molds 9A and 9F I have to build a support to keep them in angle to glue them because the notch in the bottom is so thin and fragile that they won’t stay straight by themselves. When the support is ready I will put another post up. That’s it for the moment, update will follow, preparing supper now. Micha


- 146 replies
-
- 4
-
-
- Roar Ege
- Billing Boats
- (and 2 more)
-
What shall I say David, that´s unfortunate, I would have insulated the boat and would have stayed on it even if I have to say... WA can become pretty cold in winter. But I love living on a boat and I wish I could afford it nowadays but my job doesn´t allow living on a boat but who knows, retirement maybe will be the time to go back onto a sail boat. Quiet a nice boat, I prefer sail boats over motor boats but both have their advantages and disadvantages. A nice size to live on it. Never have been there but what I can see (Google Maps and Google Earth) a nice place to live. Close enough to Seattle but far enough tho have this charme of a small town. I love small towns and villages (that´s why I live in a small fishing village). Micha
- 114 replies
-
- 2
-
-
- Cutty Sark
- plastic
- (and 4 more)
-
Hello from Kiowa, Colorado
Scottish Guy replied to Doug from Kiowa's topic in New member Introductions
Welcome aboard and a happy journey here Doug. -
That is what I was thinking of, refitting it with wooden masts stuff, most likely it`s the hull, even the decking I would replace with a wooden one though. Batteling myself here lol, should I or should I not... Micha
- 114 replies
-
- 1
-
-
- Cutty Sark
- plastic
- (and 4 more)
-
That´s what I think personally... the result counts and as long as everyone recognises an iceberg... it´s fine Micha
- 109 replies
-
- 4
-
-
- Ghost Ship
- Jenny
- (and 2 more)
-
Hi Eric and thank you. True and valid point even if an half unloaded ship without crew doesn´t make sense (to me) but moored to a wharf sounds more legit, the crew could be in a near tavern for a drink or some rest. Thank you for that ideas, my idea was just to display the ship in a rough sea close to a shore line... but ideas are not always possible to do... Micha
-
I´m sorry to be the one telling you but a scale model set into the gulf stream might survive for maybe a week, if so long and then it will just capsize. I crossed the Atlantic twice and know the conditions in this regions. The waves on a sunny calm day might already to much for a 100 cm long scale boat, especially since no one will be there to take actions to avoid being swallowed by the swell. The copper or metal sheeting won´t secure the ship for that, they just might keep it floating a few days longer but that`s it. As long as the ship is not completely water tight, doesn´t have the proper buoyancy, ot will sink within days. Meaning you would have to build a scale model that doesn´t allow any water inside at all and has enough buoyancy to stay afloat in any condition. But then you won´t need a metal sheeting but some proper coating or maybe using glassfiber to protect the hull and installations on deck. This would be quiet a job to find the proper buoyancy for this ship. Sounds like an interesting project but still doesn´t justify an english wheel, in this case I wouldn´t even use metal sheets but glassfaser or a really good coating like real sail yachts would use. I really appreciate you dedication for such a project would be nice to have more people that much dedicated and caring for the wishes of others. Bowing to you for that. Micha