
HOLIDAY DONATION DRIVE - SUPPORT MSW - DO YOUR PART TO KEEP THIS GREAT FORUM GOING! (Only 13 donations so far - C'mon guys!)
×


jim_smits
-
Posts
653 -
Joined
-
Last visited
Content Type
Profiles
Forums
Gallery
Events
Everything posted by jim_smits
-
 Hi Eamonn, It's looking good at the back there.The stern of the boat is quite nice as well......
- 1,039 replies
-
- 1
-

-
- ballahoo
- caldercraft
- (and 2 more)
-
Hi I simply glued the staves on at the appropriate height. I think they were lashed on, so it might be possible to simulate this with some guttermann thread but I didn't bother.
- 1,144 replies
-
- 1
-
-
- snake
- caldercraft
- (and 1 more)
-
All you need to do is simply give them a call if there are any issues. It will then be dealt with very quickly in my experience.
-
Stunning work so far Jason. Well done mate!
-
Excellent looking work there Kester!
-
Cheers Carl, I think i'll try to do the ends with a chisel as there is more material to remove and they will be closer to the fixed points anyway and then fniish and polish with sand paper. Playing about with techniques at the moment before committing to actual pieces.
-
Chisel arrived Friday. Gave it a sharpening using successive grade of sandpaper over a ceramic tile. Probably can get it sharper with more effort Think there will be a bit of a learning curve and I think trying to fabricate a tool rest will help. Did some test runs on 8mm dowel and it's tricky to say the least. Perhaps flexing of dowel under pressure doesn't help? Anyway, a little way off attempting my actual yards yet......
- 412 replies
-
- 1
-
-
- snake
- caldercraft
- (and 1 more)
-
Got a chisel on order from eBay, should arrive by the weekend hopefully.
- 412 replies
-
- 1
-
-
- snake
- caldercraft
- (and 1 more)
-
They look excellent Ray. I'm right at this stage on my Snake build so they will be a great inspiration for me.
- 536 replies
-
- 1
-
-
- diana
- caldercraft
- (and 1 more)
-
Ok. Made a good start on the large over the weekend. Went to B&Q and bought some timber and got the handsaw out and made some sawdust....! Base is done, together with the sliders for the end plate section. Initial brace for front drill is also done. just need to build up the support for the drill itself now and drill the hole in the end plate. Spare chuck has arrived and just waiting on a couple of radial bearings
-
Truly excellent work Gil! Need a tissue to wipe up the drool......
- 755 replies
-
- 2
-
-
- finished
- caldercraft
- (and 1 more)
-
Carl, Couple of quick queries. 1) Presumably the lathe centre has inbuilt bearings and can be mounted directly into a block of wood? 2) For mounting a drill chuck, did you have to 'acquire' a separate bearing? (i guess a radial bearing is best in this case) Cheers
-
Whenever possible I have done a double loop. In this case I did a double and single for each side.
- 1,144 replies
-
- 2
-
-
- snake
- caldercraft
- (and 1 more)
-
Hi I've found the kit itself to be pretty good although the main weakness are the plans and instructions as this seems to be an earlier model. That being said it's a good kit for what you pay and can be enhanced easily with some aftermarket upgrades like carronades, blocks and rigging thread. Ultimately your choice but I've been happy with Snake.
-
Thanks Carl. I'm going to order a lathe centre from eBay and get some ply from B&Q and whip something together. I'll let you all know how I get on.
-
Cheers Kevin! Low tech and dirty is always a good option. Also been investigating getting a scrap drill and extracting the chuck and bearing and mounting as the opposite end to the driving drill.
-
And back to the Snake build.....! Looking to get started on the spars but I have a question regarding using a hand drill as a lathe. I understand that obvious the drill itself must be braced in a jug of some type but I am unsure as to how brace the other end of a dowel to be turned. Any ideas?
-
Looking good Jason! Was the bow section causing issues?
-
This ^^^^^^^
-
I suspect I started with 0.25mm but found the knot at the end would pass through the deadeye still....
-
I think I used 0.5mm thread for the deadeye lanyards.
-
This is the advantage of being distracted by a smaller build.....!
-
Side project is an electronics project I am putting together. Came off the back of investigating using a micro controller to create flickering LEDs as lanterns on ship builds, something I will incorporate into my Diana build when I finish Snake. I saw using the micro controller to control LEDs in other ways, mainly for creating LED cubes to create a decorative 'show'.
- 226 replies
-
- 2
-
-
- ballahoo
- caldercraft
- (and 1 more)
-
Thank you all for the compliments and the likes. Eamonn - hope you can see now why I kept this under wraps, there was massive potential for it to go badly wrong....! And that was just the waterline, yet alone drilling into the expensive case....... Stergios - I will be back onto the Snake in a week or two as I have another unrelated project on the go that I really need to complete. I may post details on the off topic section once I am done.
- 226 replies
-
- 2
-
-
- ballahoo
- caldercraft
- (and 1 more)
-
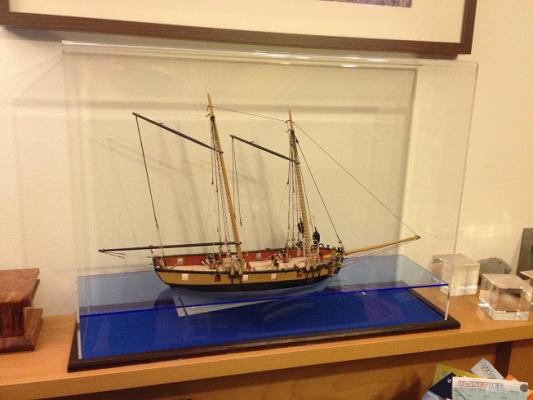
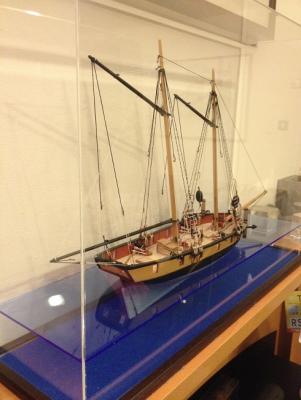
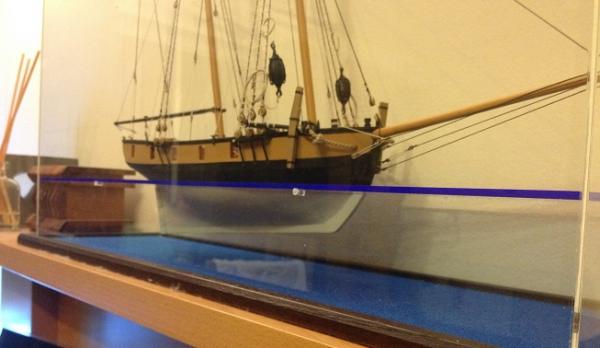
And onto the second of my completed build posts! The last part towards completion was the case. I've hinted that I was going to try something a little different and I'm immensely happy to say that I managed to complete the case without any mishaps. And here is the final result: I ordered a wooden base and acrylic case from a supplier and also a sheet of blue acrylic. The sheet of blue acrylic was to simulate water level and I measured up the approx. dimensions of the ship at the water level and then deducted a few mm to be safe. I then cut out the approximate shape of the ship from the acrylic sheet. Then spent a long while iterating towards a good fit, using a dremel and then files, so that the ship rested in the acrylic sheet at the water line. Once this was complete (and I polished out the scratches I accidently made), it was onto the main case. I need to drill four small holes to fit 10mm lengths of 3mm diameter acrylic rod through each hole to act as a rest for the waterline sheet. This was the most tense section as I could easily write off £80 worth of acrylic case. Stacked a load of old paperbacks and a piece of wood to brace the acrylic against. Then VERY carefully drilled a 1mm pilot hole by hand. Using the pilot hole I then used the dremel at its lowest setting to drill 2mm and then 3mm. Everything worked out well and I'm very pleased with the final result. Thank you to everyone who has followed the log and provided encouragement and support. Now I really must get back to my Snake build.....!!

- 226 replies
-
- 18
-
-
- ballahoo
- caldercraft
- (and 1 more)


