Bill Hudson
-
Posts
151 -
Joined
-
Last visited
Content Type
Profiles
Forums
Gallery
Events
Everything posted by Bill Hudson
-
Liver of Sulfur Help
Bill Hudson replied to Laggard's topic in Metal Work, Soldering and Metal Fittings
Maybe my posting on LOS was misleading. I did not understand you were attempting to blacken the brass. That will never happen with LOS it will only darken it. There are several products on the market that will blacken brass. I use Hobby Black which I found at the local hobby shop. Also Old Number 7 cold brown (gunsmithing) and the cheapest is Novacan black patina developed for stained glass work. I find it at local craft houses. Most of these are nitric acid and selenium compounds. Be sure to wear rubber gloves and eye protection and good ventilation. CAUTION: All of these kinds of darkening products are very poisonous. Use ventilation when using. Also a warning, keep the cap on the bottle when not in use as the acid in them will fume and turn all your bench tools; drill press etc. a nice brown patina. (don't ask how I know). I have made my own using copper sulfate. https://chestofbooks.com/reference/Henley-s-20th-Century-Formulas-Recipes-Processes-Vol1/Black-Color-on-Brass.html -
Liver of Sulfur Help
Bill Hudson replied to Laggard's topic in Metal Work, Soldering and Metal Fittings
Be sure to degrease your brass. Handle it with tweezers. Heat water to nearly hot and kept there, dissolve LoS in water. Heat the brass to quite warm and then dip it into the solution. It takes quite while for the brass to start turning. -
Rotary tool recommendations, preferences
Bill Hudson replied to Steve116's topic in Modeling tools and Workshop Equipment
I have had it for many years. The only marking on it says MICROMOT 50e. It is very small. I would say it i comparable to a hand piece for Foredom but a little bulkier. I got it through Woodcraft. About files: yes they have their place and are good for finishing off parts. An equivalent for rotary tool burrs would be diamond burrs. They come in fine and course. They work great on wood. If they become clogged with wood fiber just dip them in Dawn and scrub with a toothbrush. I enjoy the knowledge being shared here. -
Rotary tool recommendations, preferences
Bill Hudson replied to Steve116's topic in Modeling tools and Workshop Equipment
I have been at this model making business for over 40 years. It seems too be a constant search for the ideal rotary tool. Started with Fordem but got tired of the dance with the stiff cable and foot pedal. Then came Dremel. The earlier ones were quite small and not too powerful. Finally the larger body with lots of power came out. When they added variable speed that became my tool of choice. Had one set up as a router table, one as a saw for ripping strips and one as a drill press. I also had several for hand work. The bulky size kind of made hand work a problem when I needed fine work. The main problem I had with dermal was keeping bearings in them. The front bearing does not take kindly too much side force. I decided I needed a cordless and ordered the Dremel 8050 cordless which is smaller size tool good for finer work but I found out it is no longer available, even through Dremel. My fall back was to order the Dremel 8220 cordless. Turns out it is large and heavy and not too useful for fine work. The battery life is poor and extra batteries are quite expensive. I finally settled on the Proxxon rotary tool which has been the best so far. I am now sticking with my Proxxon. -
Gilmer wood in Portland Oregon is a very good place to buy specialty woods. Years ago I purchased a whole 8' slab of pear. I am now down to just a chunk about a foot long. Good people deal with. It is quite an experience to go there. They usually have a good selection of guitar back wood. these can be cut down into strips as needed.
-
Doors
Bill Hudson replied to Don Case's topic in Building, Framing, Planking and plating a ships hull and deck
Don't forget "walls, floors and stairs." -
Unless you are wealthy enough to afford a mill and lathe you work with the tools you have at hand. When I first started building horse drawn vehicles I did not have a lathe to turn the wheel hubs. My neighbor gave me his little Montgomery-Ward bench model drill press. I used that to turn the hubs. I ran a long 3/8" bolt up through the plate and held it solid with a lock nut. I used that as a tool rest to turn the hubs. For milling cutters I used regular drill bits. I ground the ends flat.
-
Sherline Mill Essential Accessories?
Bill Hudson replied to Some Idea's topic in Modeling tools and Workshop Equipment
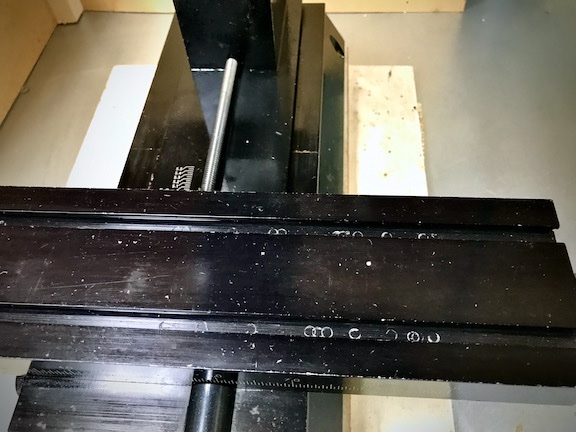
My mill after 30+ years of use. The T slots in the cross slide show most wear to the anodizing. That is from the hold down clamps screws a bit too long. Also some aluminum is showing through along the leading edge of the cross slide. That is all the wear there is on this mill. I found out using a white lithium grease is best. It puts a fine film on the wearing surfaces. Regular grease collects swarf and dust. A few drops of 3-1 oil on the lead screws are all that is needed..jpeg.c6651ca31ce07dde6087a5da116549dc.jpeg)
-
Sherline Mill Essential Accessories?
Bill Hudson replied to Some Idea's topic in Modeling tools and Workshop Equipment
So far that has not been a real problem for me. The anodized coating on the aluminum parts of the mill and lathe is very hard. I do have some little nicks and scratches over the years but those are mostly from my screw ups. The ways for the lathe bed is steel so the swarf does not bother it at all. The cross slide is aluminum and doesn't show much wear from clamping the tool post and other accessories on it. The ways on the mill are of aluminum but don't seem to be bothered by swarf to any extent. I use an inch wide paint brush and an old tooth brush to keep swarf at bay while machining. Another similar mill and lathe would be the Taig. With Taig you can build up your own lathe or mill from their parts. The lathe chucks are quite clunky for my taste but with a ring spacer on the spindle you can use Sherline chucks. The Taig lathe does not have a lead screw, all cutting is done using a hand wheel. When I had my larger shop in operation I also had a Taig lathe. There are some advantages to the Taig if you like to do graver turning using a T rest. Taig also has leaver feed for the tail stock which is much better than the hand screw feed on the Sherline. -
Sherline Mill Essential Accessories?
Bill Hudson replied to Some Idea's topic in Modeling tools and Workshop Equipment
The Sherline mill and lathe are designed to machine any type of machinable metal including mild steel. The threads on the mill spindle are the same as the lathe, in fact the headstocks are the same and are interchangeable. The threads on the mill are for use for an adaptor for holding 3/8" shank mill cutters. The two drawbar collets for mills are about as accurate as any mill in this price range. As I said before, I have been using both Sherline products for one 30 years. I have done some very intricate machining and have not had any problems with accuracy. The main thing is to keep your machines clean and adjusted. Both machines can be taken apart and cleaned. I would not recommend messing with the headstocks. I like to clean the lead screws and remove any swarf that might have accumulated. When putting it back together is the time to adjust the gibs on the cross slide. Bill -
Sherline Mill Essential Accessories?
Bill Hudson replied to Some Idea's topic in Modeling tools and Workshop Equipment
Mark, I have had my Sherline mill for over 30 years. Same for the Sherline lathe. Most all accessories for one are also fit the other. Suggested accessories for the mill: Sensitive drill attachment (very useful). Tilting angle plate, Rotary table + chuck adaptor (I use my rotary table a lot) and of course the vice. Sherline has adapter for WW collets (very expensive for a set). Sherline also has a draw bar collet set for 1/4", 3/16" and 1/8" mills, a draw bar chuck for drilling. Lastly a good assortment of step blocks and clamps. I have the high speed adapter for the lathe and mill but find it mostly not an advantage. If used for an extended time the headstock bearings heat up. Bill -
Over her time the MC has probably had several changes. These pictures come up in my research of her showing stanchions. The first picture shows traces of lifelines just around the cabin and on the fantail. The last picture shows what appears to be gun ports or windows. So the information is very confusing. At this point the bulwarks on my model are covered and I will leave its that way but I do like the look of open stanchions. Perhaps on another ship model, maybe a revenue cutter. B


-
Thank you all for your help. Bill
-
The ship is the Marie Celeste. scale 1:90. In this picture it appears that the bulwark planks have been removed. I found a video U tube showing installing stanchions in the same manner. Unfortunately I am not finding the video again. (Maybe I was just dreaming )

-
Andy suggestions how to make stanchions and life lines?
-
I have been researching the Mary Celeste. I find several pictures of her having a forward cabin and after cabin. I am debating with myself; do I include a forward cabin on this model? Several pictures also show a lower bulwark with lifelines on top. Many the pictures show the ship in different configurations so I am confused as to what is correct. I am also wondering what information the kit producers were working from. Because of the kit's lack of detail I feel at liberty too add details I feel belong on the ship. Feed back on this very welcomed. Bill
-
If you are going to pint it for sure I would suggest using super glue and baking baking soda. Spread a film of glue over the area to be filled and sprinkle with soda repeating until you have a good buildup. It is very easy to sand and build up until you are satisfied. Do this before you paint. Experiment with it on some scrap wood. I think you will be surprised and how easy it is to do. Bill
-
The plan sheet is not clear about where the fife rails are located. Just a general area of where they should go. I also don't know how many pins are to be in each rail. Any ideas would be helpful. Bill
-
Thought this might be of interest: https://en.wikipedia.org/wiki/USS_Oregon_(BB-3)
-
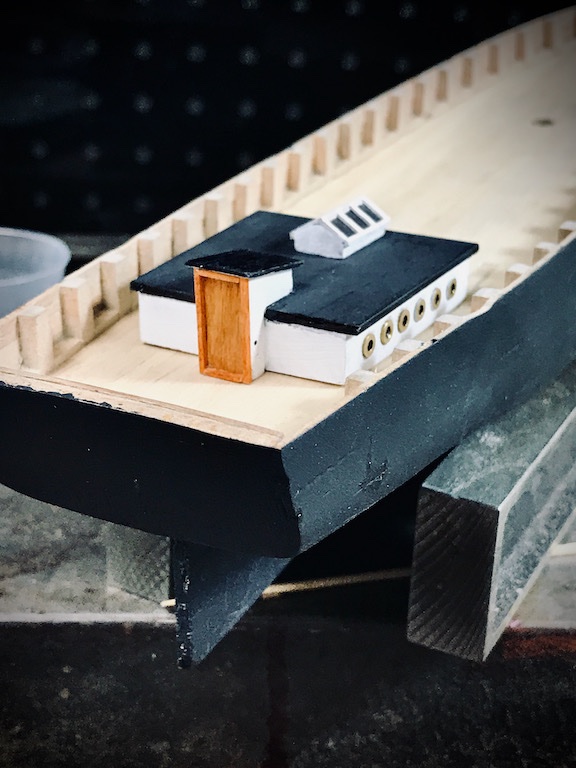
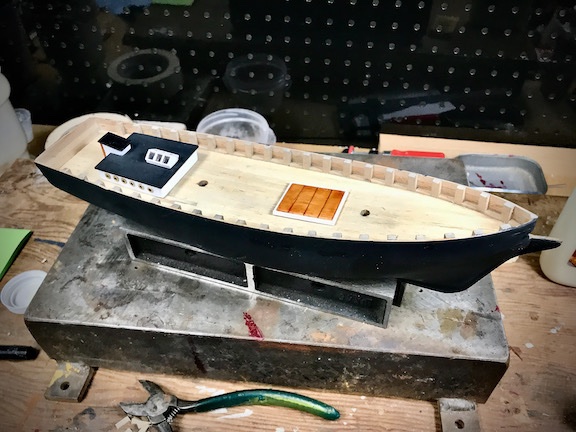
Time goes slow. Have the main cabin about done. The camera sees more than I can see so need to go back and touch up. Used 0-90 brass washers for portholes. Also added the cargo hatches. Nothing is glued down yet. the cabin is held in place with positioning pegs through the deck.
.jpeg.14e7206b1e680f6b1d9705de0a260b01.jpeg)
-
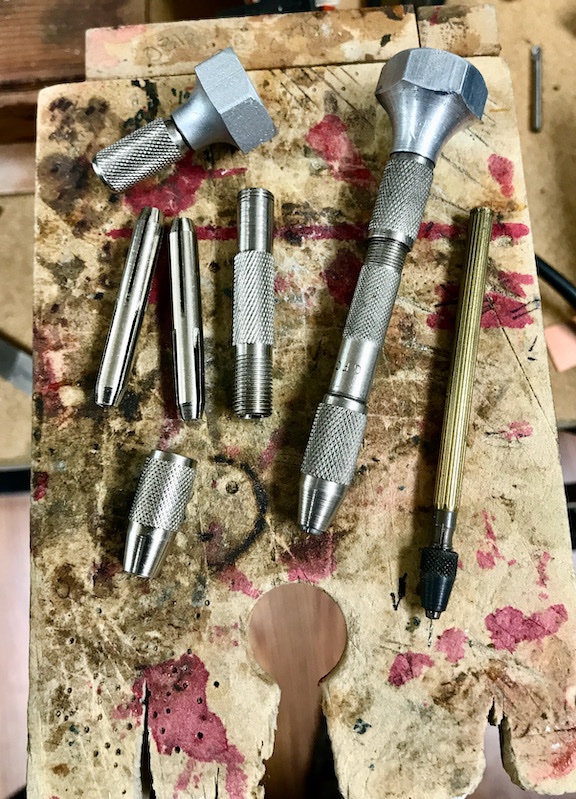
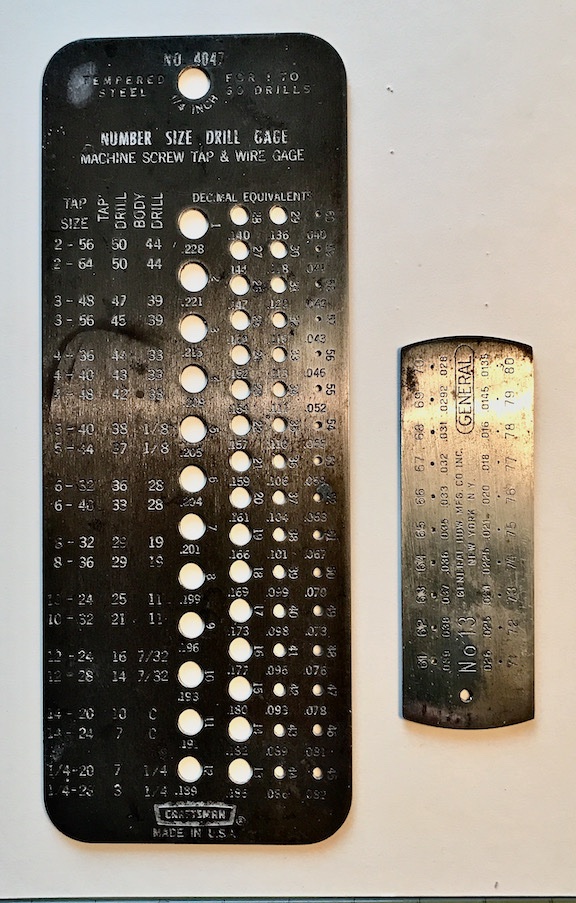
Micro drill bit sizes
Bill Hudson replied to Peanut6's topic in Modeling tools and Workshop Equipment
this is part of my assortment of pin vices. The round head one is my favorite but is limited to #60 and smaller. It will not go down to #80. The bright metal ones have multiple chucks but again will not go down the very small drills. The little brass one will hold #80 - #61.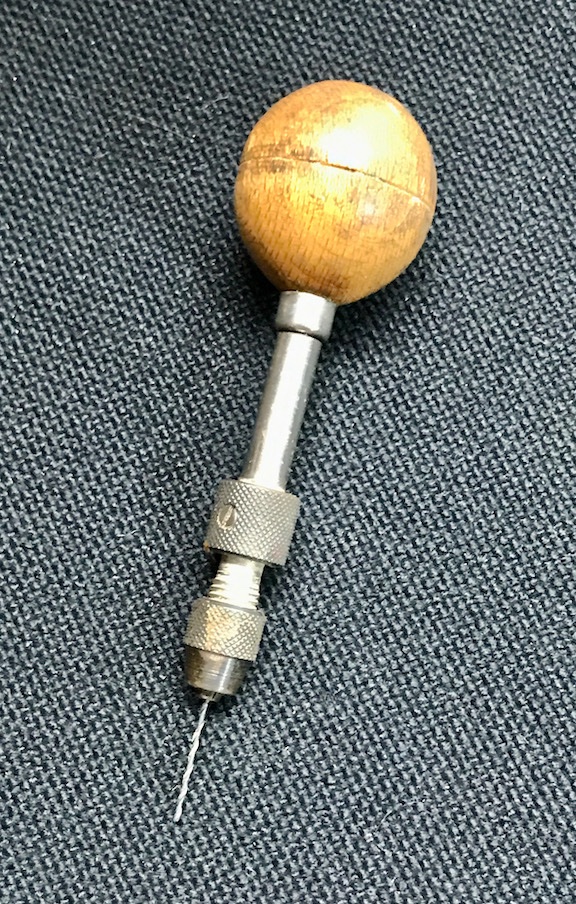
-
I have had good luck using regular drill gauges. On the front sides the hole edges are rounded but from the back side they are sharp edged. I find bamboo cocktail sticks a good source for drawing. Just split them down to approximate size and start drawing at large holes (they will eventually round out) progressing to smaller sizes. Bill
-
Working on the cabin. Have not figured what to use for portholes. Bill
.jpeg.ad45d27f29bde08330b76f04717a2205.jpeg)
.jpeg.a94316c12c16d4ec4c8029ef6c0cf70b.jpeg)
-
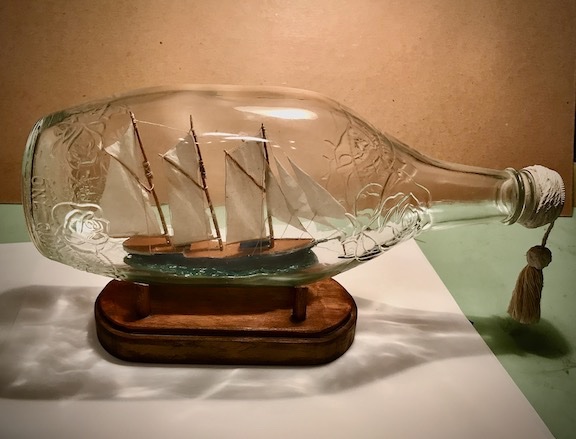
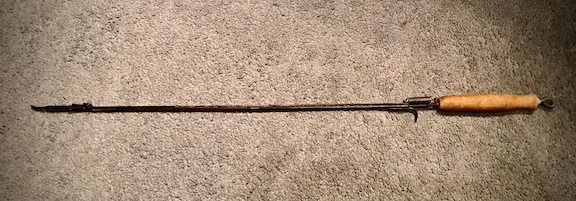
I built this in 1954 soon after getting discharged from the Navy. This was my first attempt at ship modeling. the ship was rigged before installing into the bottle then once set in the clay the masts and sails were raised by using the rigging. I built a special tool for reaching inside the bottle from scrap. It is a little bit ugly but did the job. Bill
.jpeg.2c136261bc5c47a0cf8da37ff97ec0d9.jpeg)
-
He is happy to see me finishing it. Today is his 61st birthday but it will not be done in time. Maybe his 62nd. I will be 90 by then if I make it that far.