Wintergreen
-
Posts
1,002 -
Joined
-
Last visited
Content Type
Profiles
Forums
Gallery
Events
Everything posted by Wintergreen
-
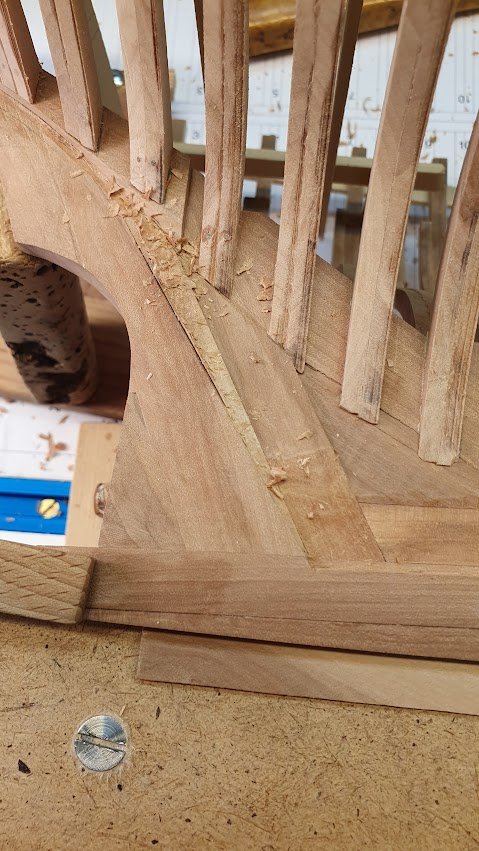
Thank you Keith 🙂 One struggle is that the apple wood shifts its grain pattern. And that is even though I choose as straight pieces as possible for the keel assembly. So while the chisel cuts nicely it all of a sudden stops and I have to cut from the opposite direction. Which sometime is not even possible... However, having really sharp chisels helps (it always helps to have really sharp chisel, no duh) but I mean Really Sharp chisels.. And then care is needed so no unplanned blood samples are given 😛 Hopefully I have a mood better suited for building tomorrow. Today was a waste, more or less.
-
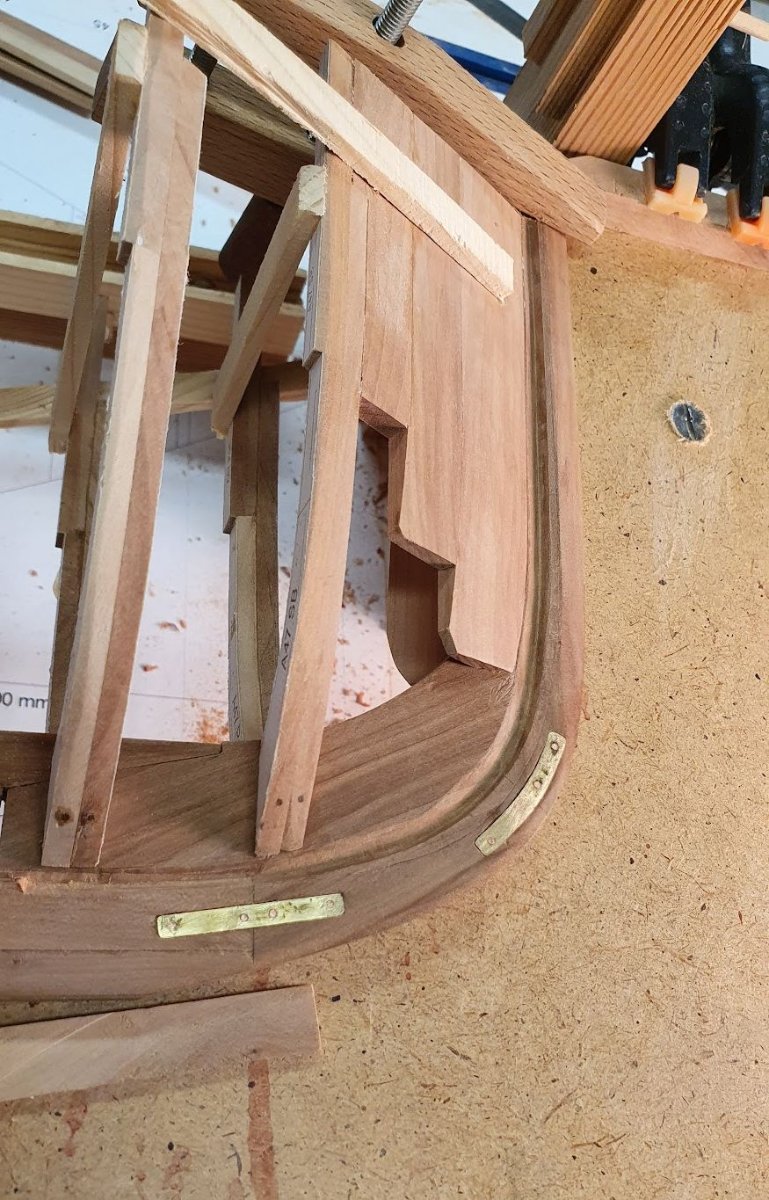
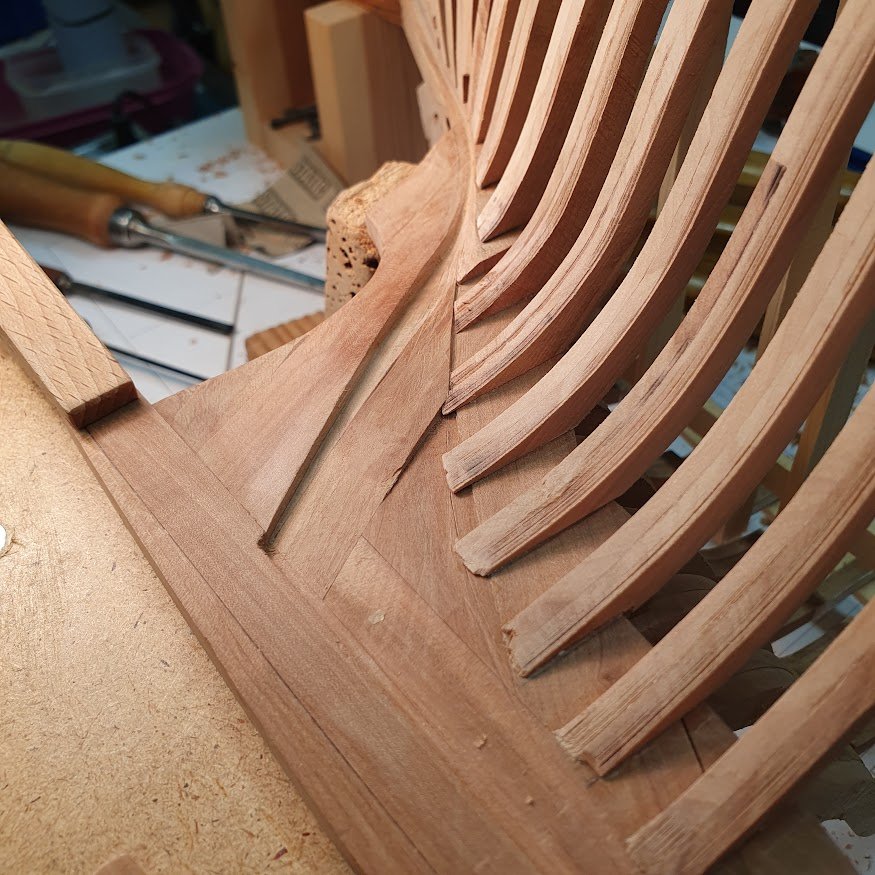
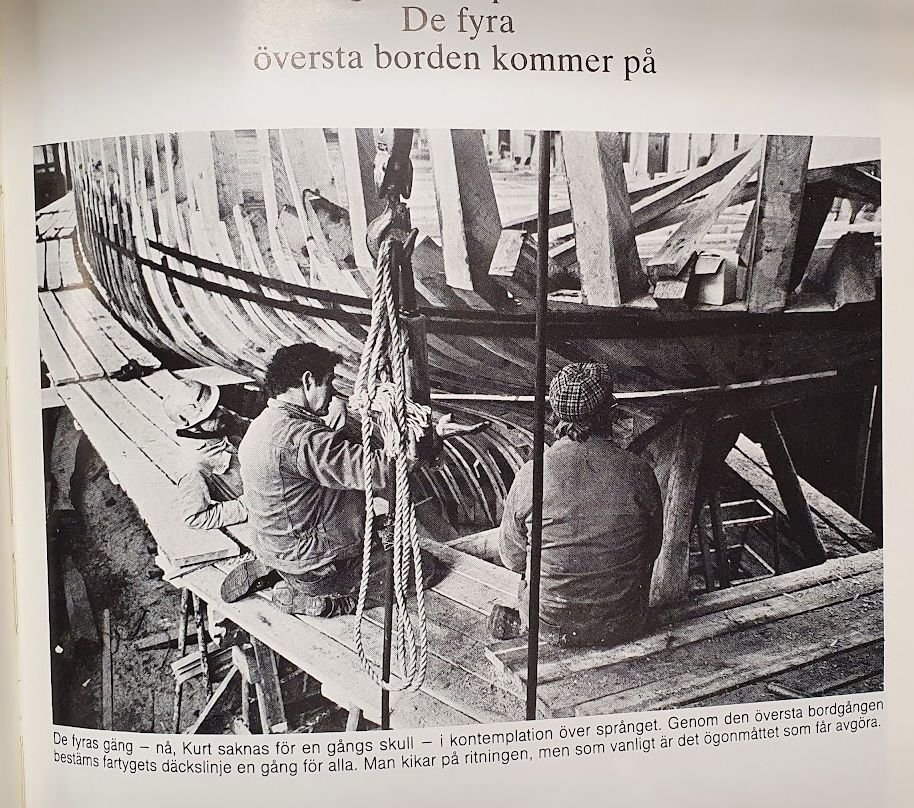
That rabbet thing is quite something. After closer inspection at the stem more work is needed. Meanwhile work has been carried out along the keel and moving aft. After several hours this is what it looks like (below). The hard part is the transition from deadwood and up against the transom timber. The book is great support and I'm examining every image to find hints and evidence on how things were done. If you think everything is so tidy and in order... think again 😉 Pax et bonum.
-
It is interesting how we tend to discover things from our photos that we don't pick at the building board. You're doing a fine job B.E! Good decision to go for the slimmer strake. Keep it up!
- 106 replies
-
- 2
-

-

-
- Admirals Barge
- Vanguard Models
- (and 1 more)
-
Coming along nicely B.E. Ivory is definitely a good choice for "white". Using a too bright colour and it just sticks out if you know what I mean. Keep it up!
- 106 replies
-
- 2
-
-
- Admirals Barge
- Vanguard Models
- (and 1 more)
-
But it looks good, even if it took half a lifetime 😉 I can really appreciate the trials and tribulations with planking small hulls... the one I did (Kågen in my signature) was at a larger scale and didn't have that many strakes and they were also wider. And then you happen to browse past one of Gregs delicate builds and you feel totally inferior and insignificant. I think your boat will look really good after some cleaning up and finishing B.E. I can't see anything but nice lines in the photos. And these close up photos tend to highlight what can't be seen at an ordinary watching distance. Keep it up!
- 106 replies
-
- 2
-
-
-
- Admirals Barge
- Vanguard Models
- (and 1 more)
-
I just realized I got the signatures wrong, apologies for that. Mixed up the commenter with the builder. My bad. Well done B.E.!
- 106 replies
-
- 2
-
-
- Admirals Barge
- Vanguard Models
- (and 1 more)
-
So a large scale build it is, right? Okay, I'm glad we have got that decided then. Now then, what will it be? Nah, just kidding! I'm just on my third somewhat sized build and can truly appreciate the placing problem. Some of the Admirals book shelfs need to go, but that is a discussion for another day. James, 171 by 29 mm is not a very large object but you are doing a terrific job on the barge! (not suitable for children under 36 months - what a peculiar statement 🤭) Keep it up!
- 106 replies
-
- 4
-
-

-
- Admirals Barge
- Vanguard Models
- (and 1 more)
-
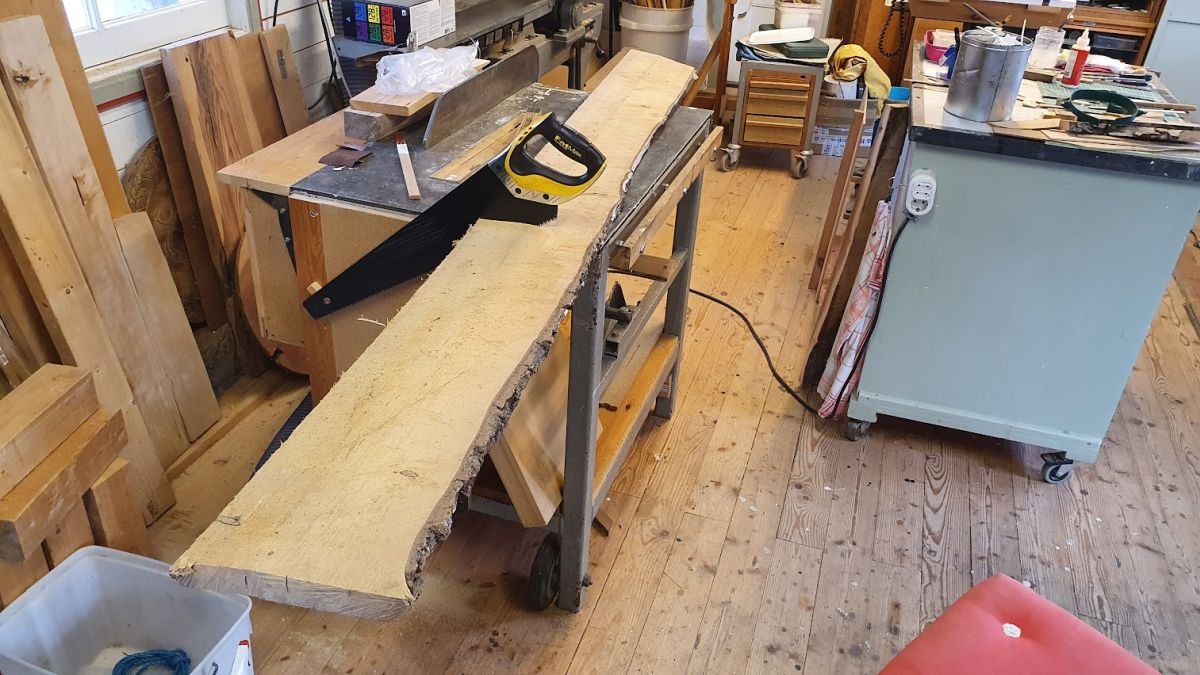
Well thank you Andy! Yep, much working by hand since I have but full size woodworking machinery. No mini lathe, no mini drill/mill, no mini table saw, not even a scroll saw. Instead, home made disc sander, home made thickness sander, sharp chisels, nice files, manual scroll saw and a can-do attitude. 😉 But I have a question for you, now that Orca is finished - what are you up to?
-
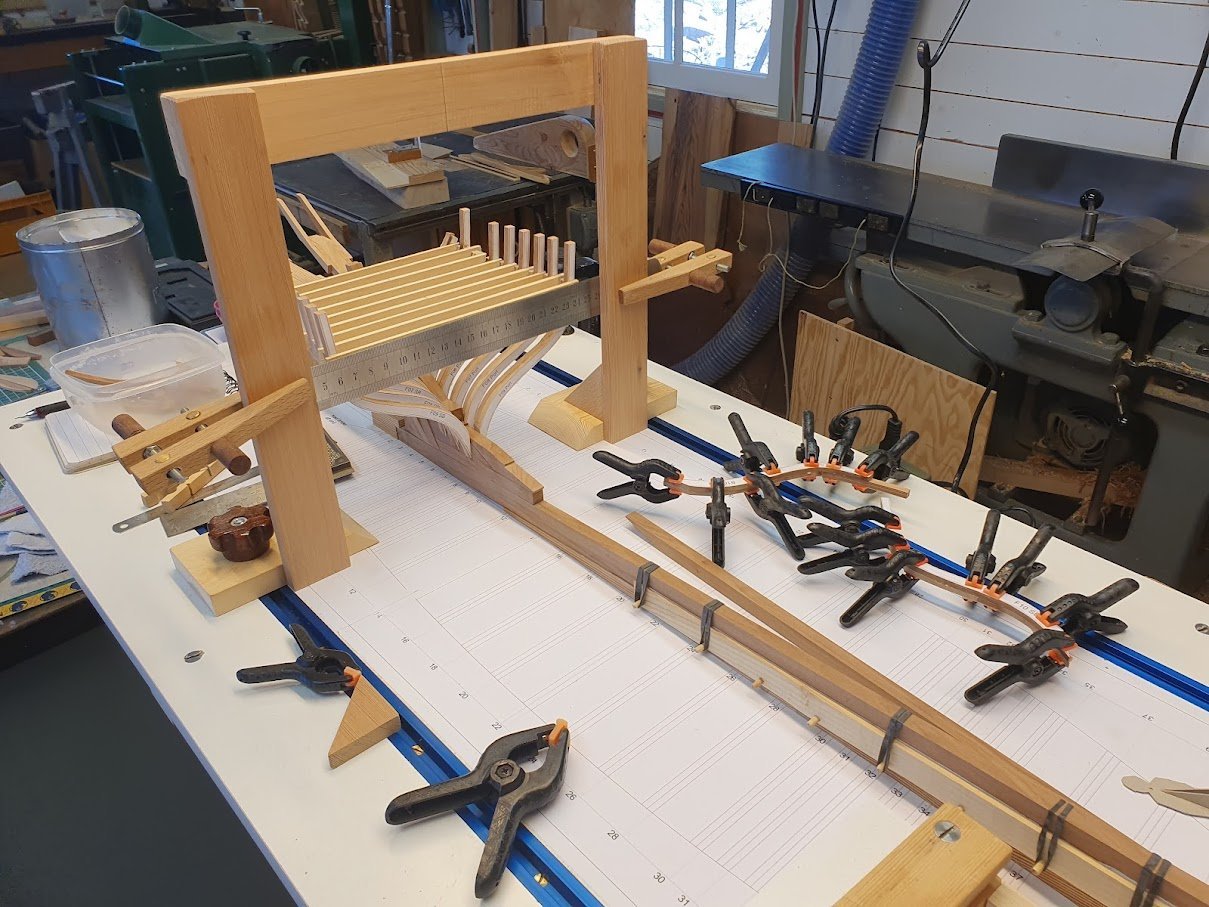
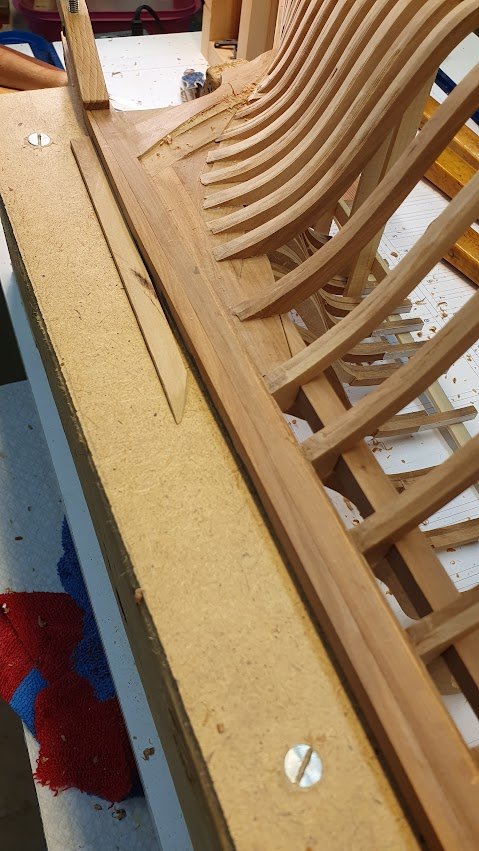
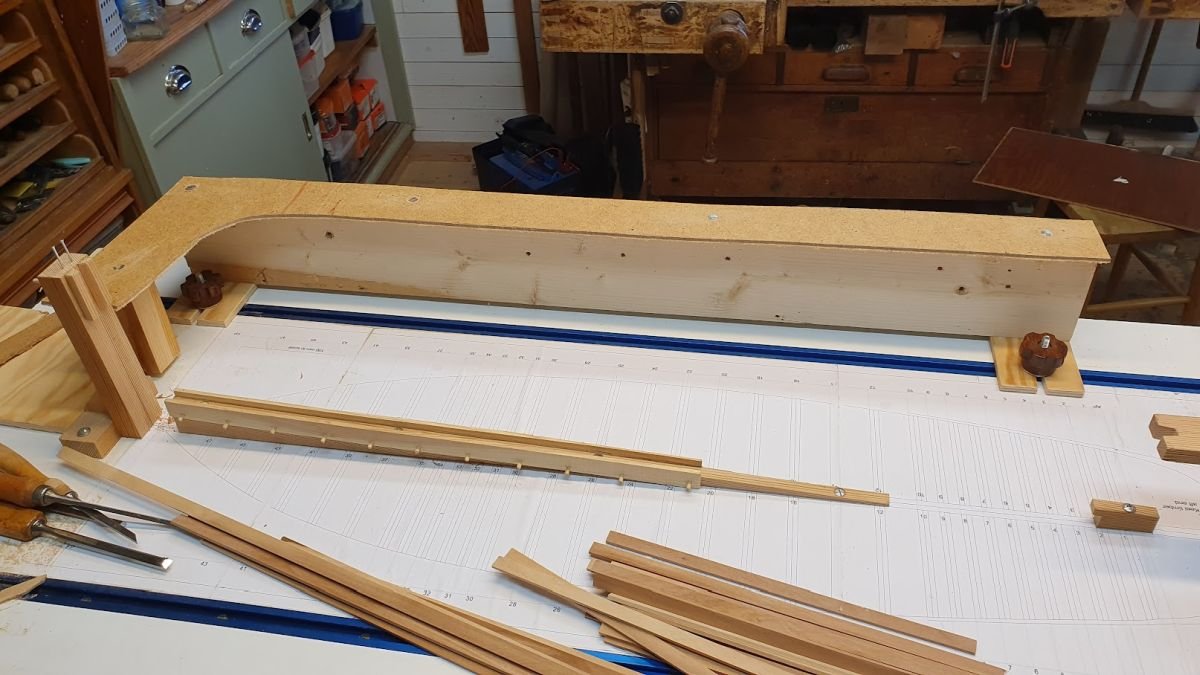
Haha, thank you @KeithAug for the laughter of the day! No, I didn't get too excited, just you know, like normal excited 😛 Anyway, thanks for the likes so far. Planking, yes. But after a second thought I checked in with the book. After framing the shipwrights put on the four topmost strakes. After that the deck structure went in and after that planking. So... that's how I am going to do it. I think. First the bollard timbers though. For them to line up properly I partly cut the rabbet in the stem, then glued stiff paper as guides and then it was just down to sanding, testingfitting, more sanding, more testfitting and so on. Next picture is a good deal of hours later. Rabbet is cut in the stem, frames are faired, now all I need is planks... To be able to get a satisfactory result you need to be able to secure the object. Be it a piece of a frame or the entire hull structure. And also be able to see, i.e. lighting! Initially I cut the rabbet with the hull upright on the slipway. Not ideal since it was awkward and I obscured the light with my hands. After a good nights sleep I came up with a better idea. Not only can I secure the hull to the holder, the support itself is secured to the slipway. See next picture below. And it is easy to flip over the pattern to match work on port side since it is screwed on top of the 2by4. Then, about planks... in the picture above lies a bunch of planks, 3x9", and scale length 250mm. All in all 8 planks per strake and 23 strakes, plus the garboard which will be wider. That is 184 planks + the garboards. Oh my. Better start ripping... 😄 I will cut the rest to about 300mm length, even though that is beyond the scale. Reason is to have some millimeters to spare when laying out the pattern. The keen eyed viewer will recognize the plank below as birch and that will be used for all but the garboard and rubbing strakes (the 4 topmost). These exceptions will be of apple. Pax et bonum, fellows!

-
Quite true. I've done some sailing on a the boat in my avatar and the peak and throat hallyard are always on deck when the main sail is hoisted. Same goes for the mizzen sail hallyard. However I have to disagree about the "mess on the deck" 😉 Even if the surplus is just laying on deck it is stoved in a figure eight with the loose end at the bottom, under the pile. The rationale for this is that then it will not tangle if the sail has to come down in a hurry. When the sail is down and belayed, then the surplus is coiled and hanged on the belaying pin because it is much less meters of rope at that point.
-
Hi Valeriy, Even if your work is truly amazing and well above the skill level of many of us here it is still very useful to us. It is useful since your work shows what actually can be done at a small scale. Thanks to your build we have been taught how metalwork actually can be accomplished on a model ship. Truly amazing!
-
Well, if you opt for another sail yacht, how about Lulworth? At present I can not help in the steam object trade.
-
Well, to refresh our memories you can start by just list what you've built so far 😉 Then I am certain there will be suggestions from the audience here 🙂 About your GN, and schooners in general, such beautiful boats!
-
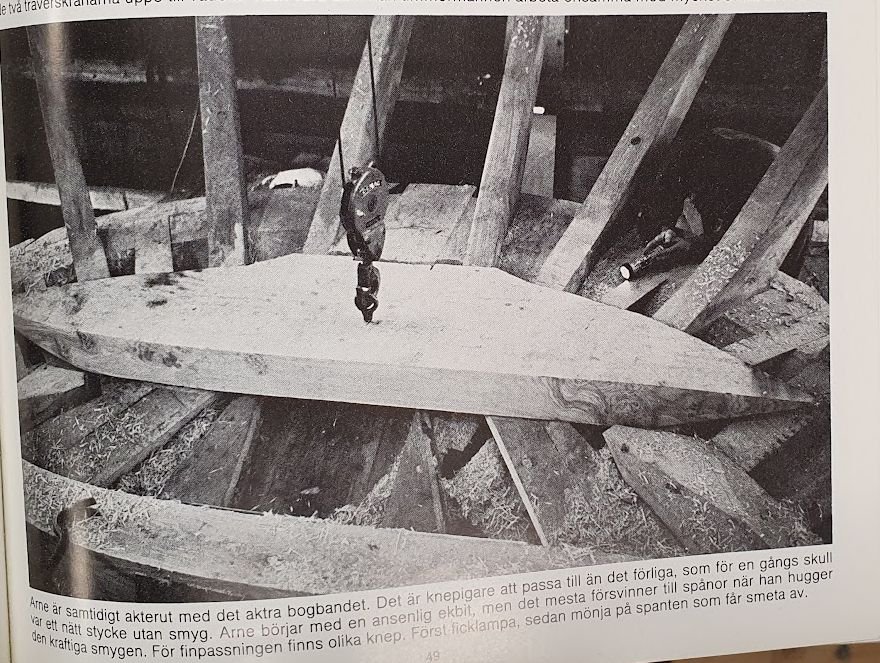
Thanks for likes and comments! Always appreaciated 🙂 So, filler work continued in stern area. Since I hadn't drafted this part mostly due to lazyness all pieces were cut oversized. First a copule of pictures for scale... I especially like the second picture and the little fella with the torch. What also can be seen in the second picture is how even and nice all the filler pieces are. Mine, not so much as we'll see shortly. In the next picture starboard side is more or less roughly to shape. Port, as can be seen, is not started. When both sides where filled and after some initial sanding with 60 and 100 grit paper I drew a bunch of waterlines to see the shape more clearly. Looks okay from this angle... Not so much from this angle (see below) 😮 As the lines reveal the lady needs to loose some pounds from her rear end. (Do Not, I repeat, do Not say that to the Admiral!) The lines should in a perfect world describe a nice arch and lines from both sides should meet att no more than 90 degrees to the centreline. Problematic areas are highlighted. After even more sanding things are starting to look okay. A bit wavy close to the centreline, but I put that in the bag for hard to reach areas when drawing the waterline. Right side up and things are looking even better (yup, I'm biased). Now over to the rabbet and planking can soon be started. Yay! Pax et bonum, friends!
-
Thanks guys for all the well-wishes ❤ A couple more progress photos today. The shapes are a bit crude, but nothing some sanding can't fix. "Oh, glorius sanding"
-
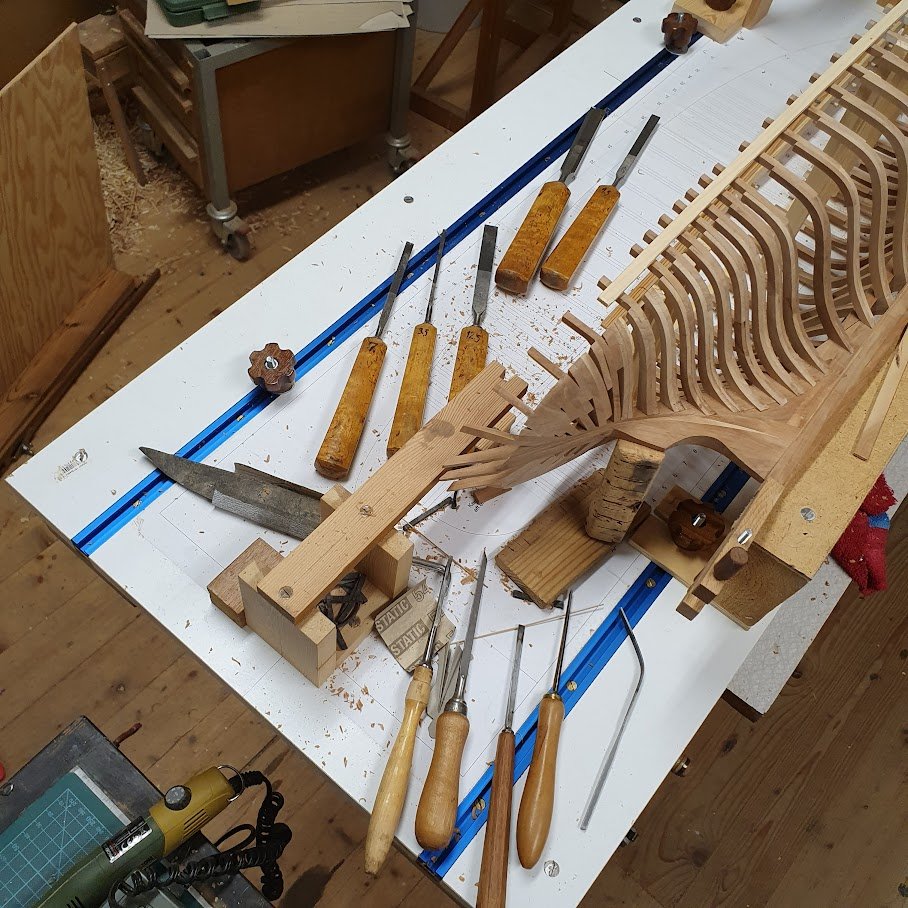
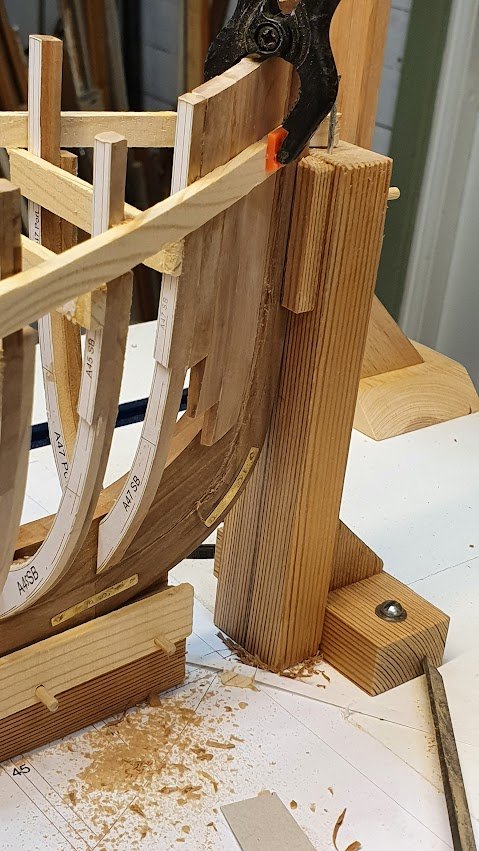
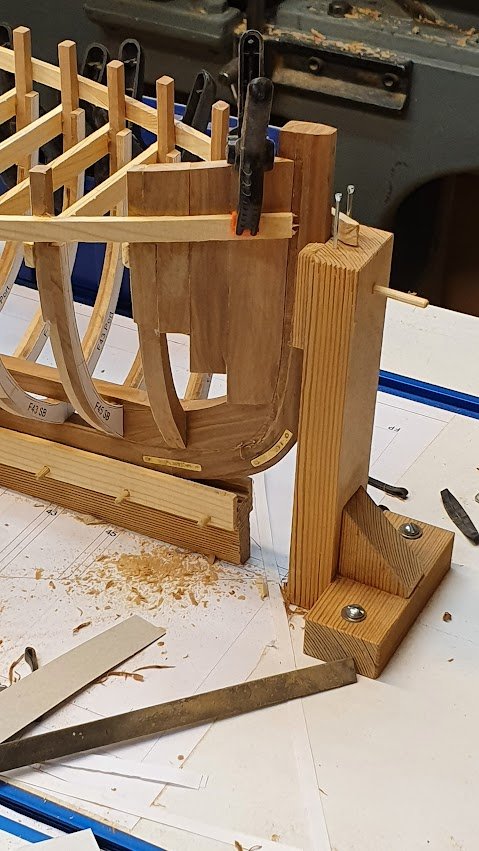
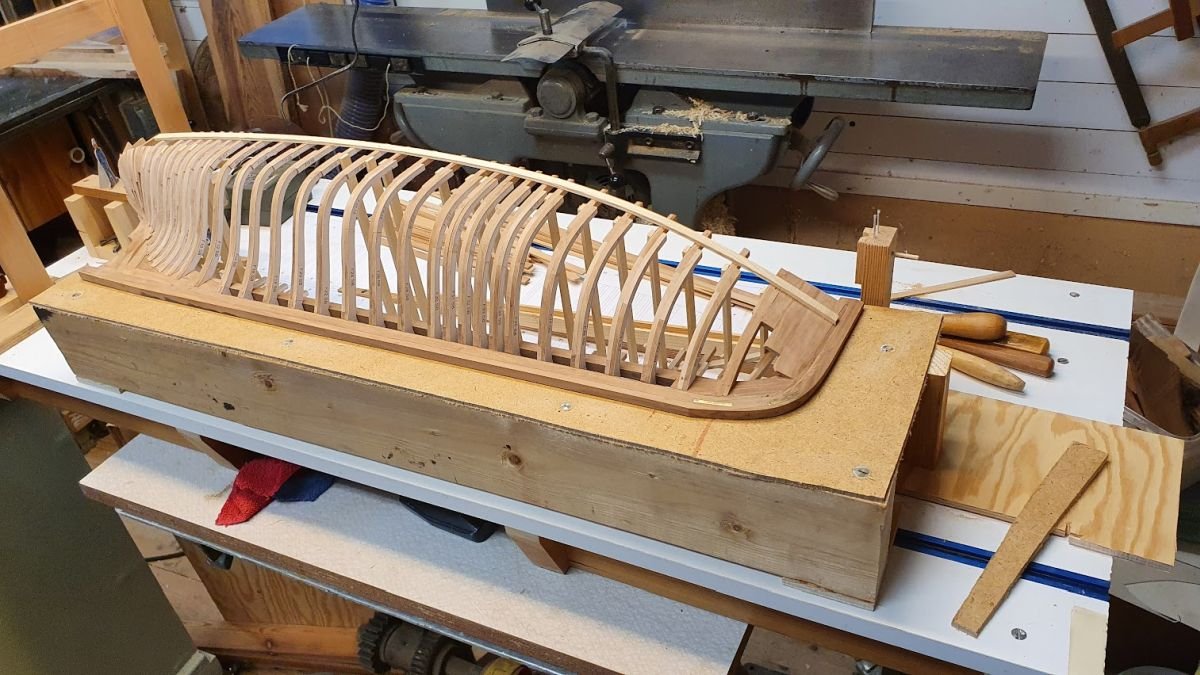
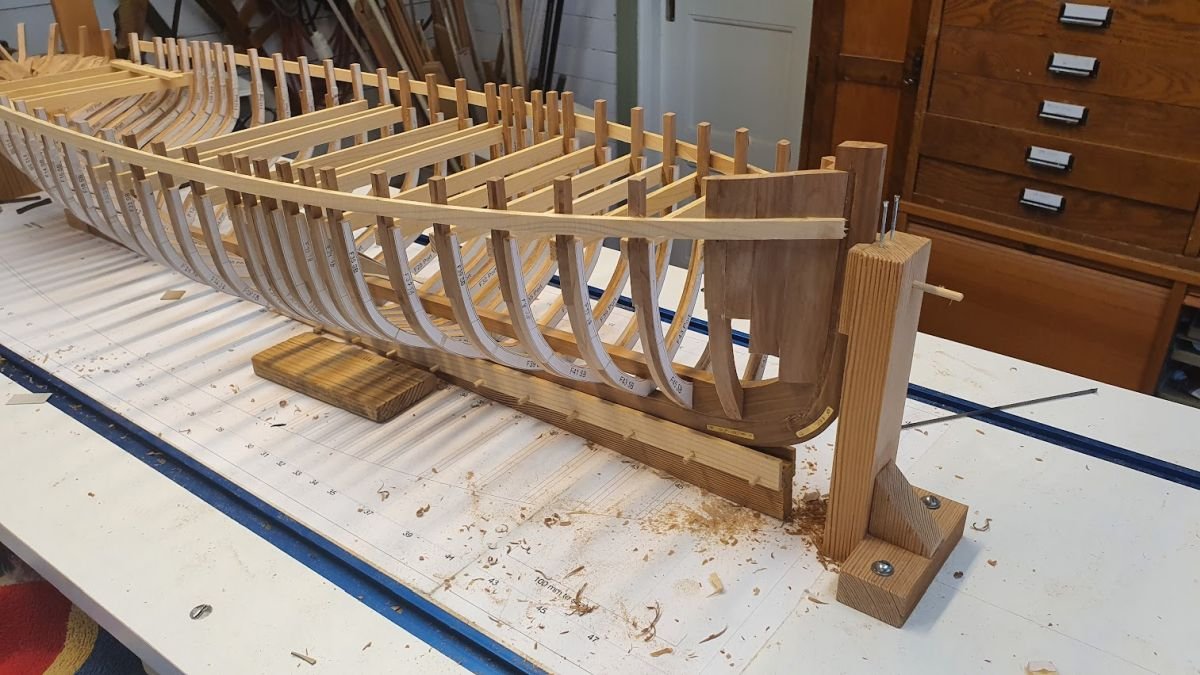
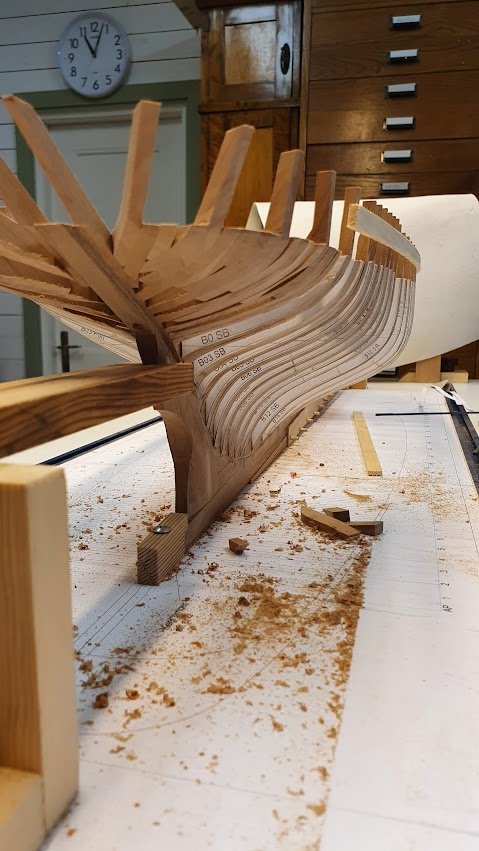
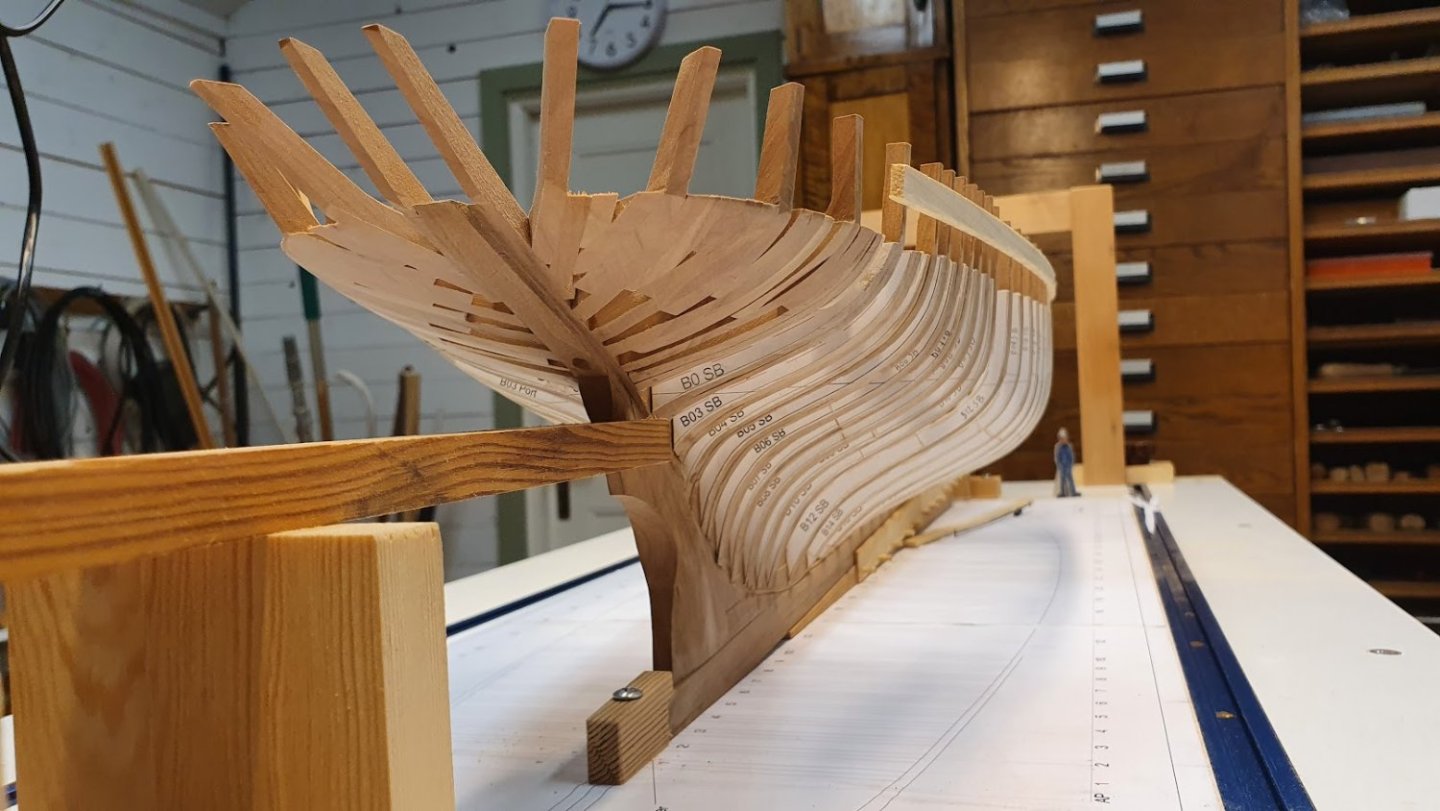
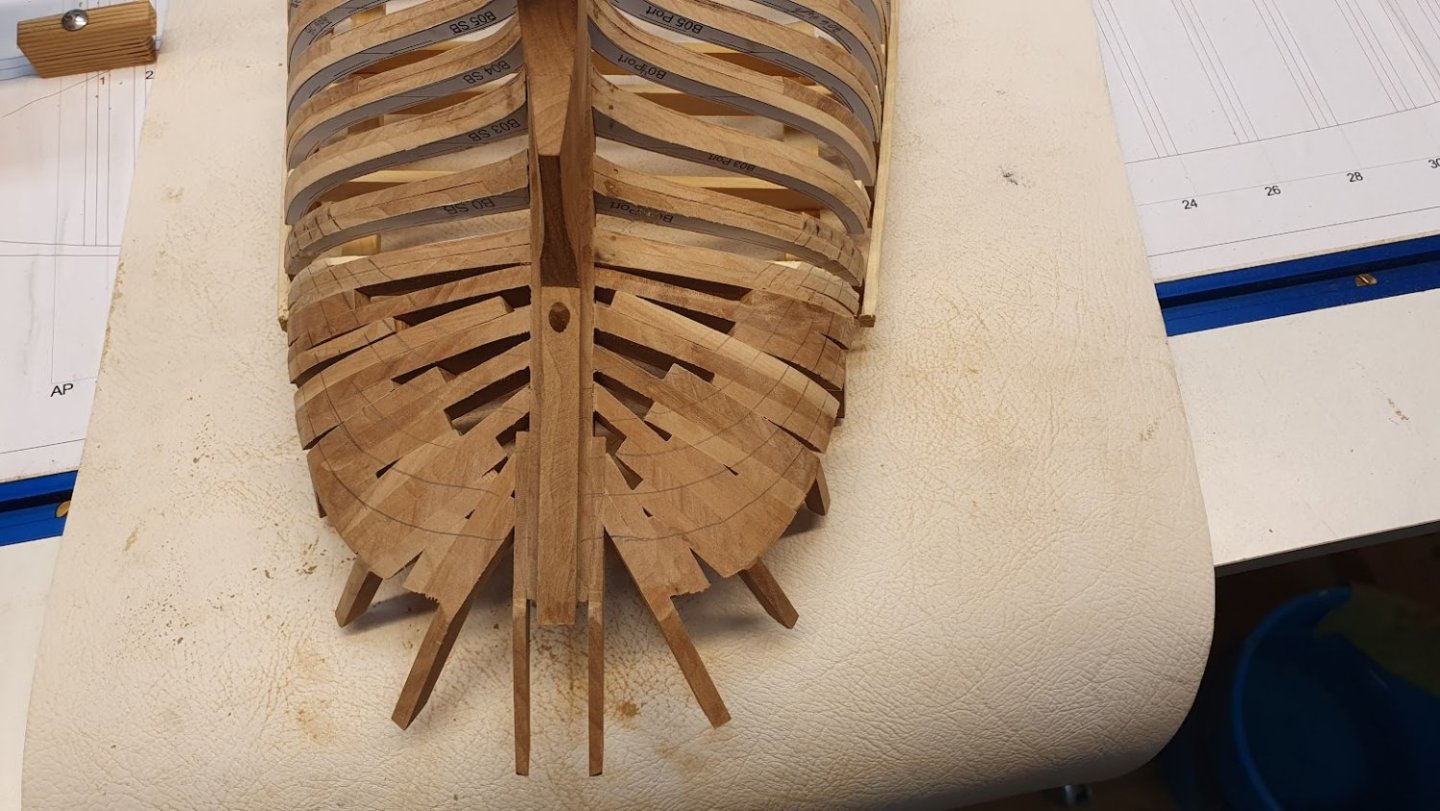
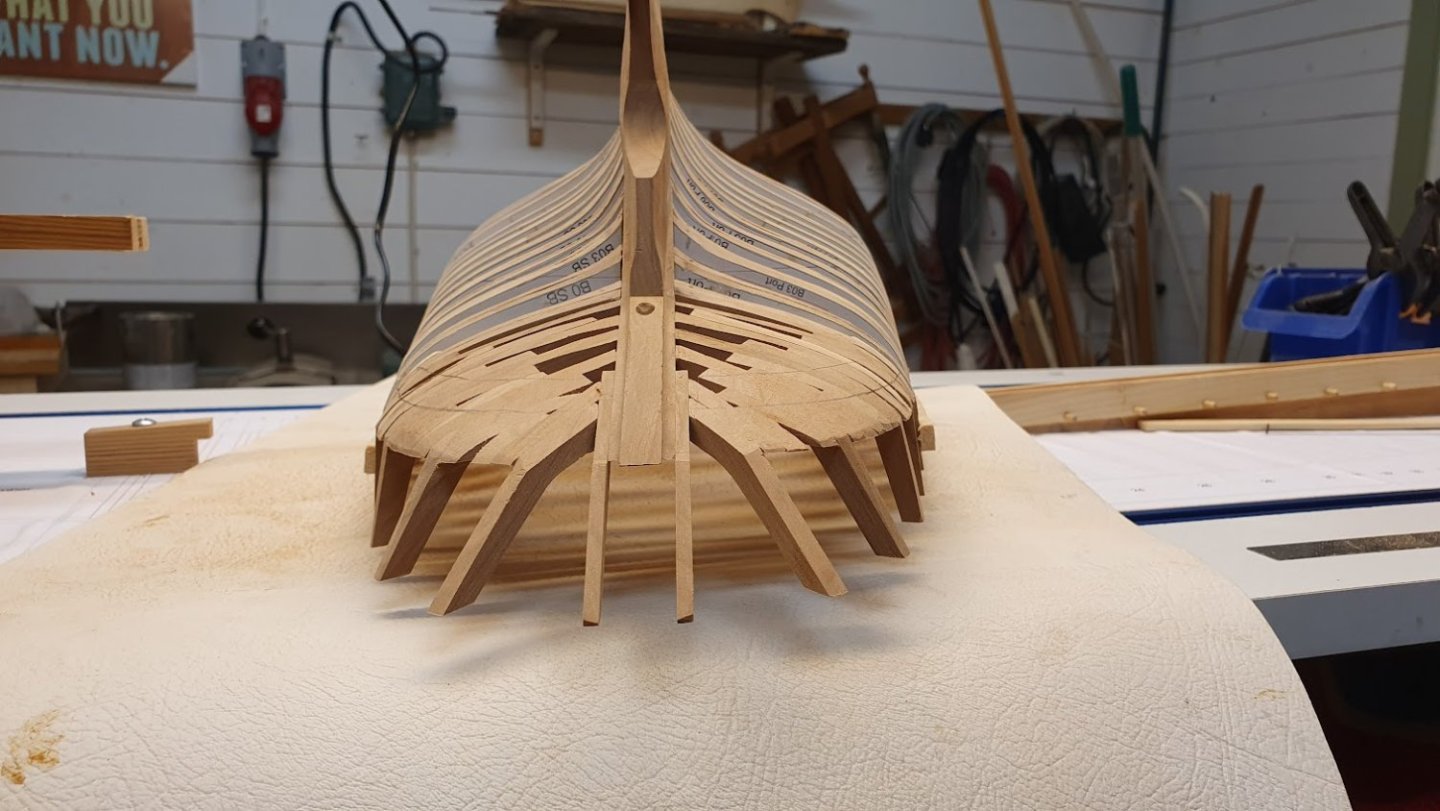
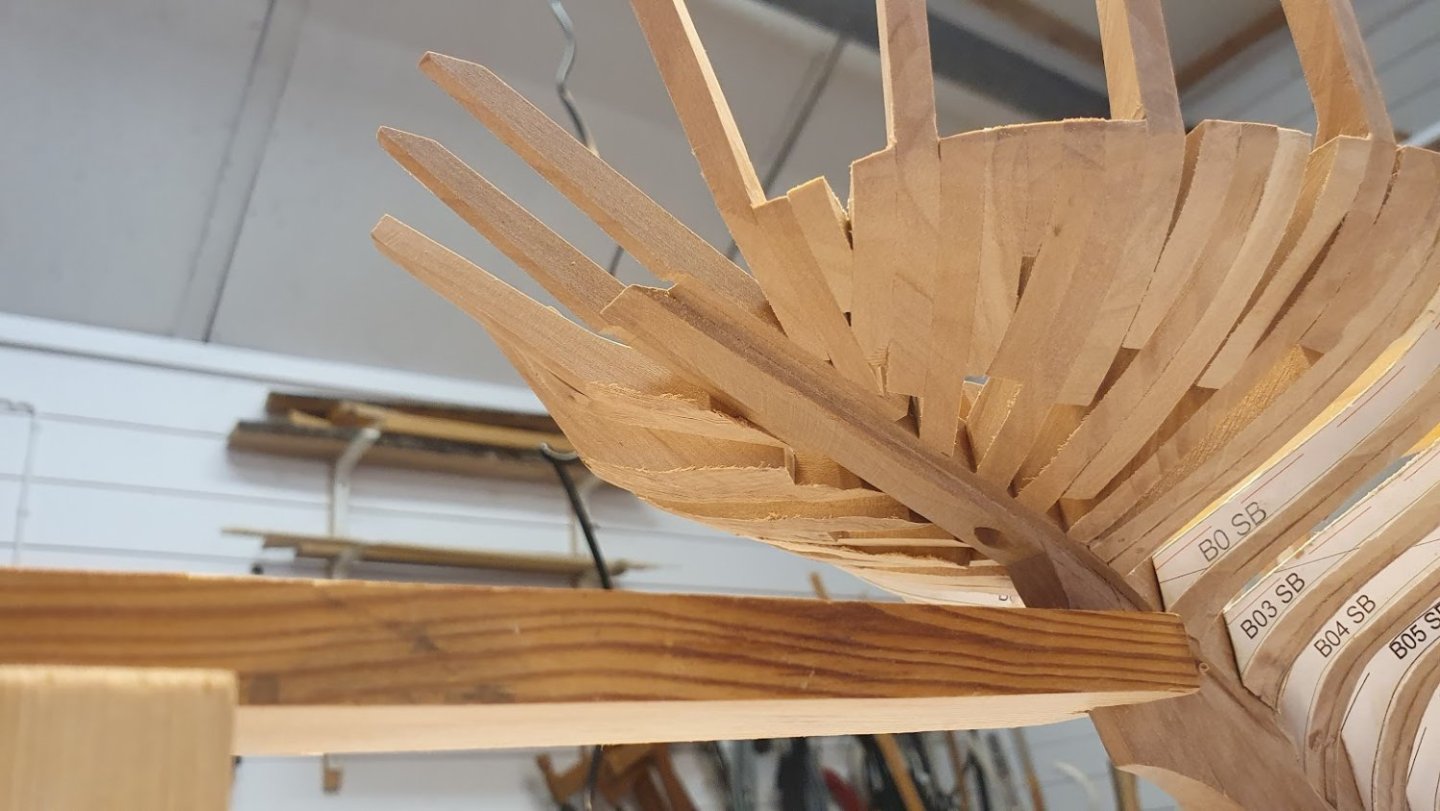
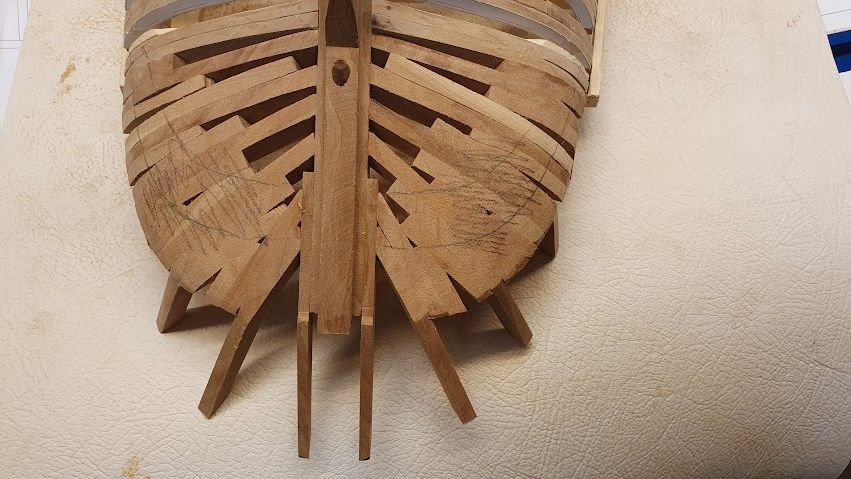
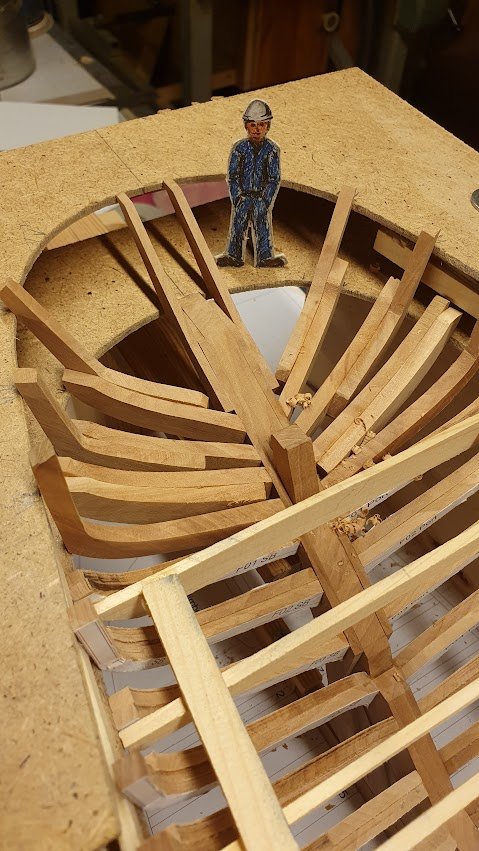
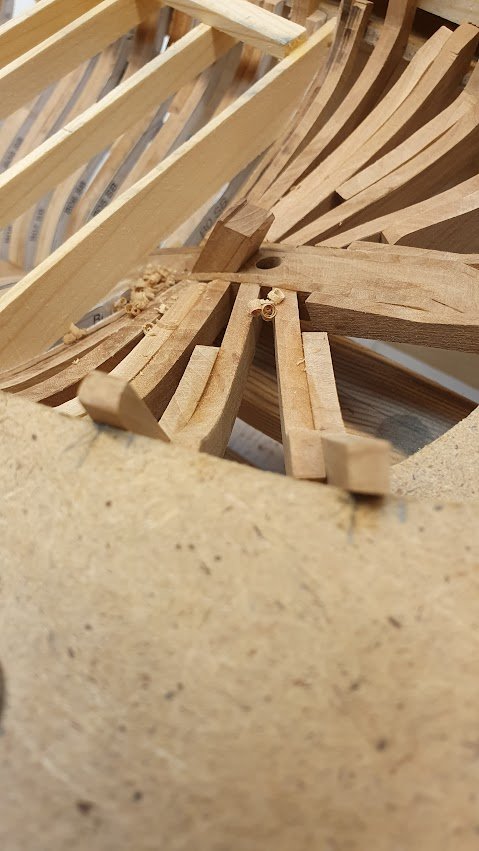
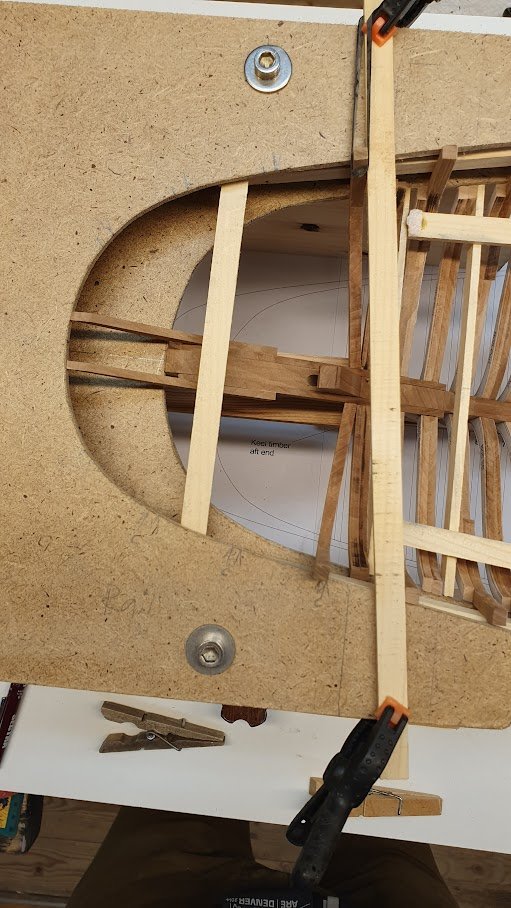
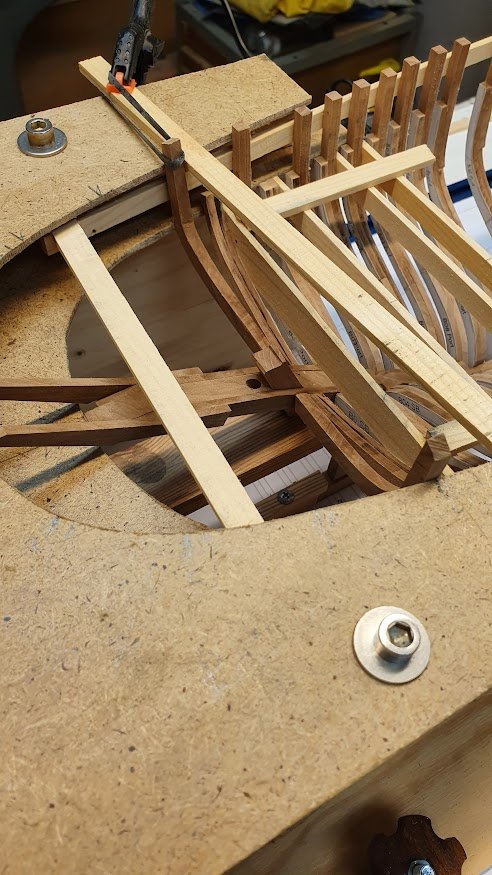
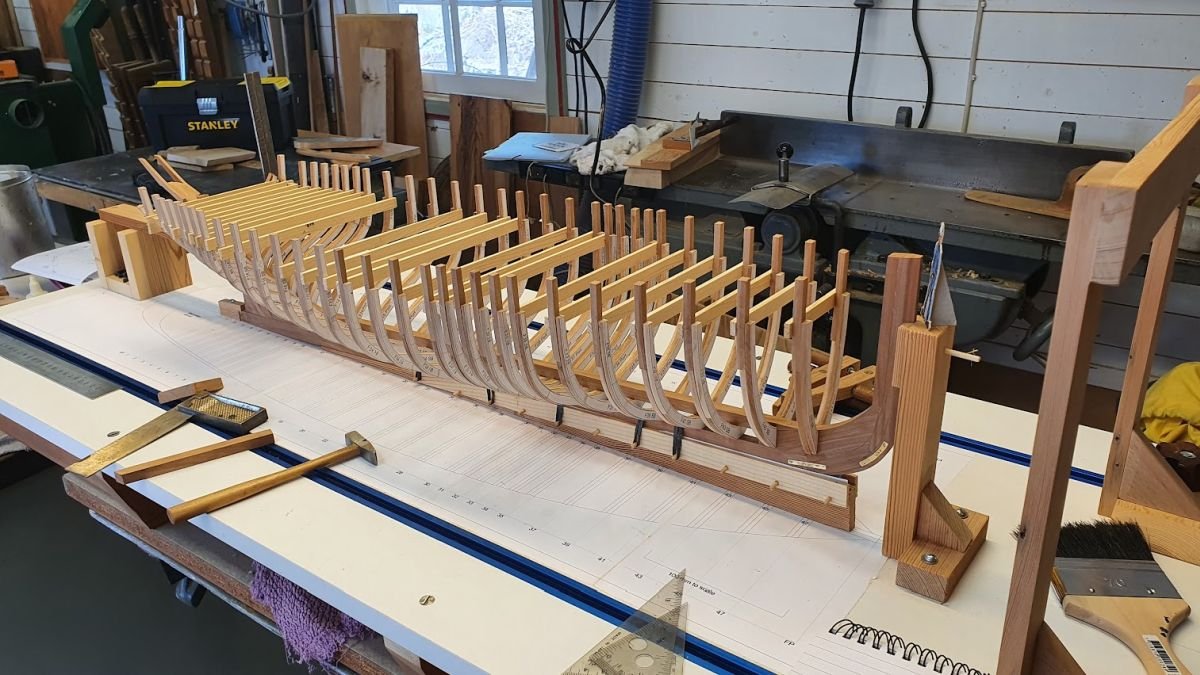
I don't know if you've been dying for an update? Anyway, at last, here is one. 🙂 Since last update I have been fairing the outside of the frames. I used my blue Bosch orbital sander. All in all it looks good. Areas left are closest to the keel where more work is needed. For the next step I have been debating if I should start carving the rabbet or if I should try to make the cant frames at the stern. After some messing around with the rabbet just to see if it was plausible to work on I decided to focus on the aft section. The challenge to solve was for some kind of jig for ease of fitting all these flimsy and small frame pieces. On the real ship the stern is completely filled with timber and I intend to do likewise. As can be seen in the images the structure is movable and the upper part is detachable. To get the shape right I switched from one type of CAD to another... that is from Computer Aided Design to Cardboard Aided Design 😄 The upper face of the lower part is the deck line and the upper face of the top part is the top of stanchions line. From the book it is clear that the rail stanchions only go halfway down to the keel bar the foremost one. That is a blessing since it will be much easier to fit those compared to the first pair seen in the pictures. Another subject under debate is my health. It was supposed to be a DT for pre-operative planning but instead it became me vs cancer Round 2. At the moment I've been to one MRi last Monday and was right away scheduled for another one three weeks from now. The worry is metastatis in the liver. What can I say... Life is what it is and there is no guarantee for a long and healthy life for any of us. Try to make the most of it or as Gandalf says to Frodo: "All we have to decide is what to do with the time that is given us."
-
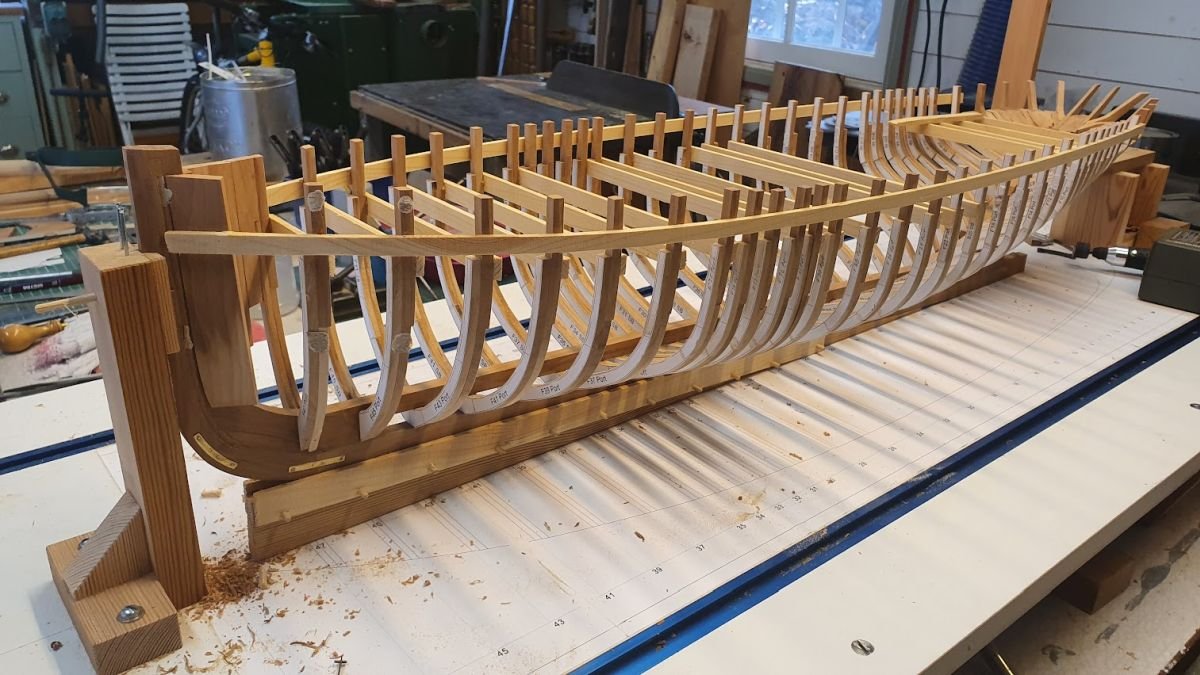
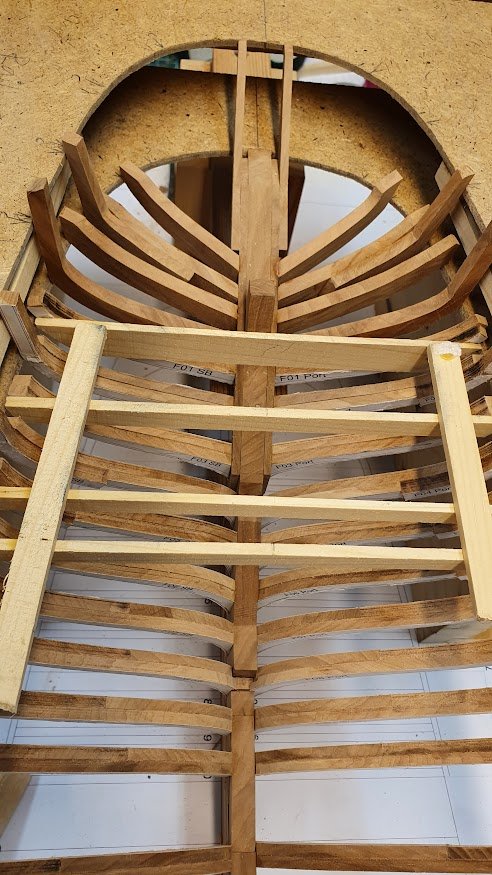
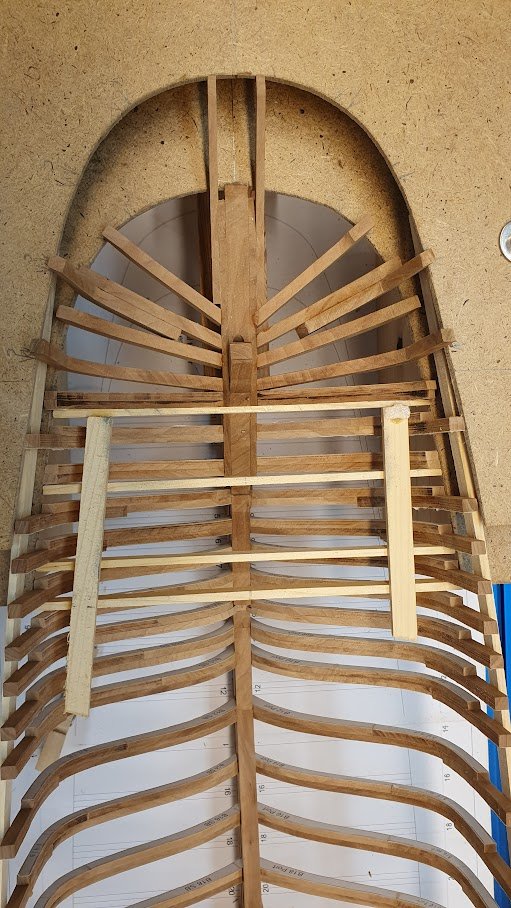
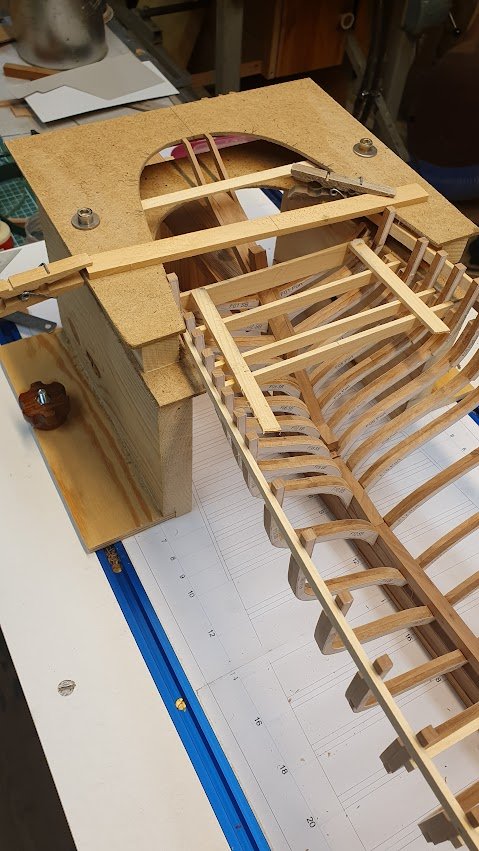
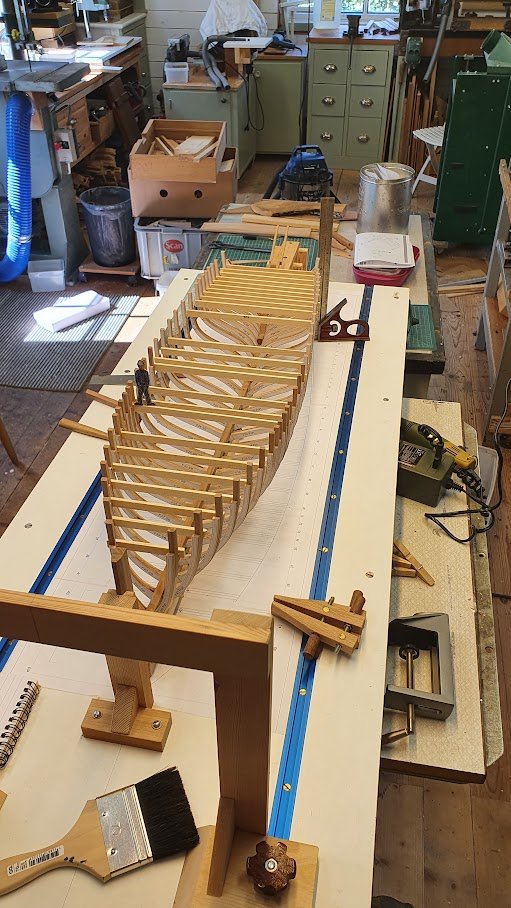
Voliá! Here I am again. No boating this summer to blame, instead a lot of other fun activities. I guess the picture material calls for some sort of celebration, right? Yep, that is framing done. Well, almost... there are filler pieces that goes up to the stem and then there are the stern timbers also. Now I must make plan for sanding the hull and how to support it. My plan for now at least is to temporary glue strakes to the timber tops. That will give me an even curvature of the frames. As far as my drafting goes I had made a couple of mistakes so I had to redo 4-5 pieces. Not much at all and I'm satisfied of the result.
-
Nice progress Vaddoc! If you decide to paint the hull I'd say it will look very authentic with those small cracks and gaps. The paint will of course fill the gaps somewhat and then it will just look like any wooden boat after a winters storage 😉 Keep it up!
-
Hi Keith! Just catching upafter some absence on my part. Excellent progress and you truly deserve every superlative comment. Alas, what the others have said! Keep it up 🙂
-
It has been a while since I last checked in. Glad to find some good progress Bolin! Keep it up!
- 118 replies
-
- 2
-
-
- billing boats
- meta 484
- (and 1 more)
-
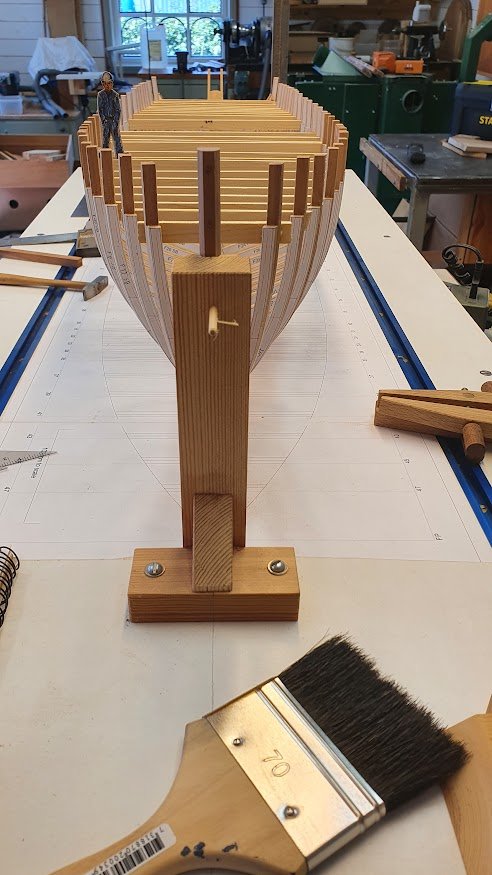
Me again. Thanks for likes and comments! Always appreciated. As can be seen in the photos below progress is being made. My goal is one frame per day. As of now, #30 is glued in place (yes, after the picture was taken) which means I'm not exactly up to target. After frame zero, actually no 22, I'm on the home stretch regarding framing. The hull shape is starting to show now. Apart from that, not much else to report at the moment. Feeling quite well and been out MTB-ing a couple of times in the last week. Feels good!
-
Nice progress Bolin. I think that with this kind of builds, where there is no unambiguous documentation a bit of artistic license is always allowed. 🙂 You can always add Meta as source of inspiration to the Baltic schooner. Keep it up!
- 118 replies
-
- 2
-
-
- billing boats
- meta 484
- (and 1 more)
-
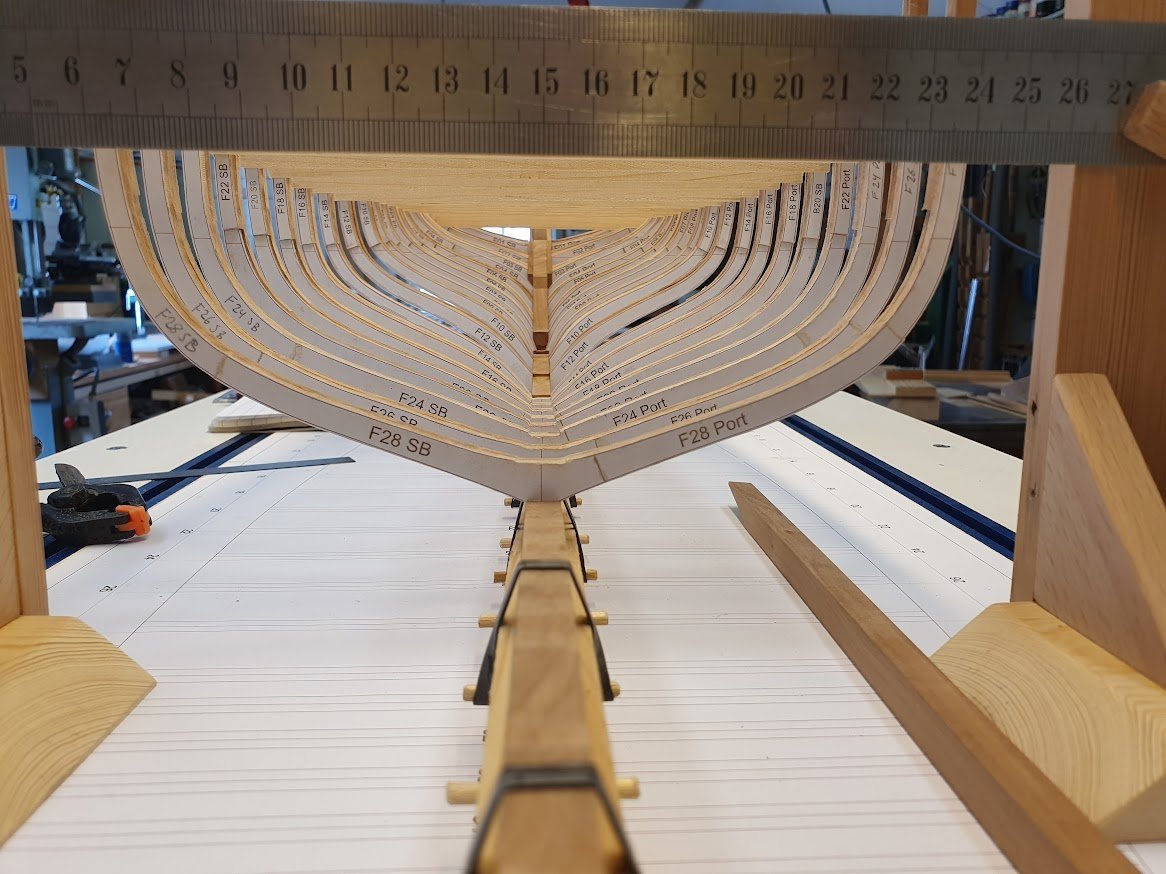
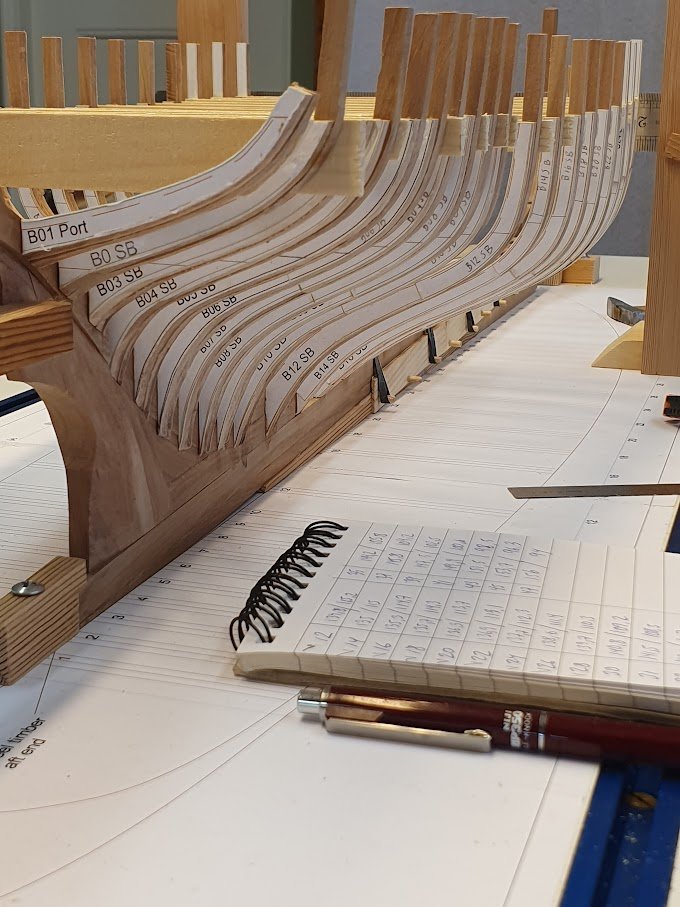
I thought that it's time to treat the audience with a small update. The "quick recovery" is unfortunately not what my body was in for. However, on the upside I've skipped the painkillers and I'm back to work tomorrow at 50%. Downside, I still need IV Mon through Fri, but I think that is about to change soon. My bowel is slowly going back to normal speed. Right now I'm only 10-15% above target. It has been 70-90% previously. And I still get (very) tired after any kind of exercise. Anyway, that about my health. Now about the build. Frames are coming along at a slow and steady pace. No 9 is in place. No 10 is what you see resting on the board. Before it got too crowded I took care of the keelson (laying beside the keel structure). With No 10 in place I'm 1/3 done with building the frames. Parts for No 12 to 32 are already sawn and waiting for their turn. If you wonder, the ruler is set at deck level. I chose that as reference instead of any other line. Timber tops will need trimming and the waterline is secondary to the build I thought. It can't be seen in this photo, but the timbertops are waywing a bit in and out. That will be remedied when the horizontal help beam is removed and sanding commence. Also, the templates are mounted to the frames with double adhesive tape. No too tricky to remove after sanding has taken place. Finally, a Big thank you for likes, comments and well wishes!