
HOLIDAY DONATION DRIVE - SUPPORT MSW - DO YOUR PART TO KEEP THIS GREAT FORUM GOING! (Only 69 donations so far out of 49,000 members - Can we at least get 100? C'mon guys!)
×


popeye the sailor
-
Posts
16,007 -
Joined
-
Last visited
Content Type
Profiles
Forums
Gallery
Events
Everything posted by popeye the sailor
-
 the paint was removed from the bridge deck using thinner......can't say if I'd stand behind the use of it. I think it may have ruined some of the deck detail. I'll know more when I repaint it. I guess I should count myself lucky that this isn't one of the upper decks.....some it might not be readily seen. Still curious about the bulwarks and how they relate to the deck levels, I tried to put them in place on the hull. only one side stayed put though. As mentioned, the A deck and the boat decks got the treatment using brake fluid. then I took a look at how the other processes are coming along I used the tray with the plaque, to draw the fluid from when the decks were painted......I have more if the need arises. I painted on some more after a short time, and ran our errands. when we came back, they got their first scrubbing with a nylon brush. I was able to pick up most of the paint I wanted...really stinks that HobbyTown isn't close anymore. I had a problem with the names of the paints, wearing off the labels. this happens due to the handling they go through, made it hard to read what they are.....let alone getting some more. I put scotch tape over the names and numbers to prevent this from happening. the decks underwent another scrubbing. they were them brought outside and given a bath of strong soapy water. the results varied.... some of the other smaller deck parts were entered into the process. I figured I'd get a little more assembly done on the boat deck. I forgot about the rest of the deck parts........I had painted just about all of them more assembly of the boat deck......and checking out the new colors last thing I did was assemble the main parts of the funnels once I can get past the stripping process, I can get my main table free, and can do other things. what a drag!
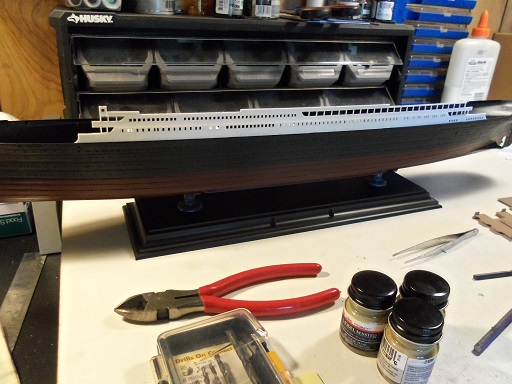


- 573 replies
-
- 15
-

-
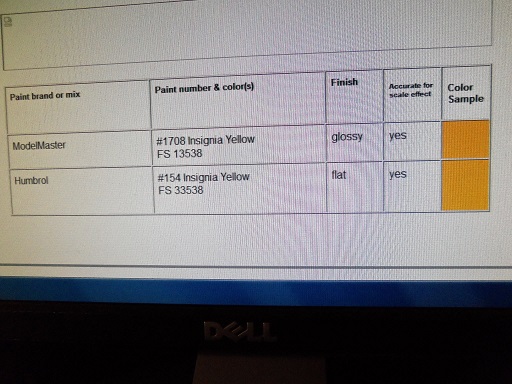
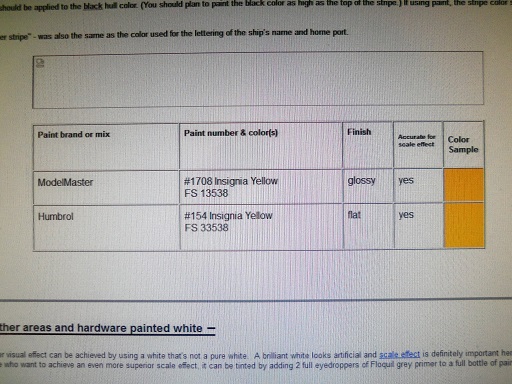
oh.......that's right! how could I forget yea........I guess that would be icing on the cake http://titanic-model.com/articles/planking/Deck%20Planking.htm here is an article on deck paint and plank.......I think it's interesting the differences in the base colors of the decks. I'm getting up enough nerve to pull the trigger with the new color.
-
very nice progress Jerry......love what you did with the sail
-
your using acrylics......your results may differ from mine.......I use enamels. looking through the paint chart, I see that a lot of mixing is being done to achieve some of the colors. the decks are planked with yellow pine........the fore deck, the pop deck and the well deck are planked with pitch pine.
-
hi John.......good to remember the old methods......you never know when ya need 'em hey casey....I found out this afternoon, that a friend in Canada has the same kit, as you do. yours must be a tad larger than mine......the Academy hull is 26 1/2 inches long. they say the same about it on the TRMA site as well.......not for the faint at heart what color are you using? I don't know Bob....I have a few variants of tan......all of them seem too dark.......the proof is what I'm stripping at the moment
-
Thanks KP........welcome to my nightmare so ......your another of the lucky ones. so far, I seem to have gotten off on the wrong foot with the deck paint, so I'm removing it, and go to something a bit lighter. what color did you use to paint your deck? you must be close toward finishing you La Reale.....I hope you do........then you can show me the subtle differences...Hee....Hee Academy has several versions of the Titanic........I just found out from another friend, that he also has the Revell kit. glad to have you following along......I hope you find it interesting. well folks......got home from running some errands.......made the discovery that HobbyTown had moved to the next town over. that will put a damper on the quick jaunt to get paint and stuff. I went into Hobby Lobby instead and bought some paints for the Titanic. I messed up though.......I bought two of insignia Yellow. should have some kind of update soon.
-
hello Greg! I though towards those lines.......quite positive if you ask me I was going to lean toward mahogany, or something lighter. at least I can feel good about making this kind of choice thanks for the insight!
-
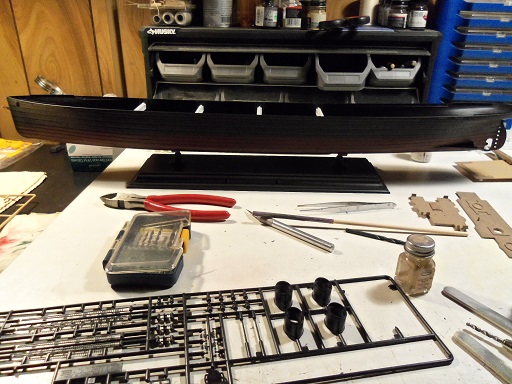
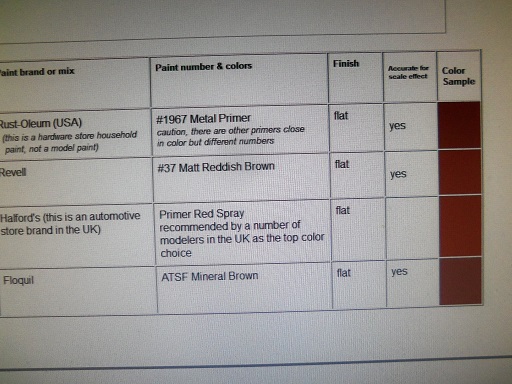
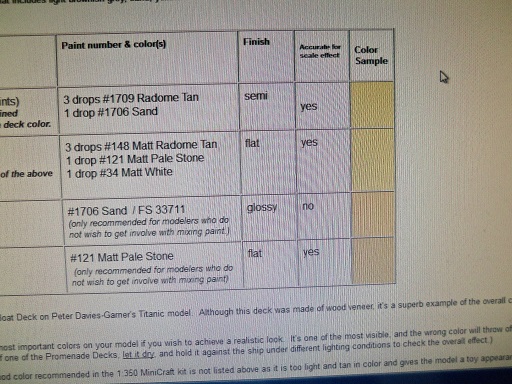
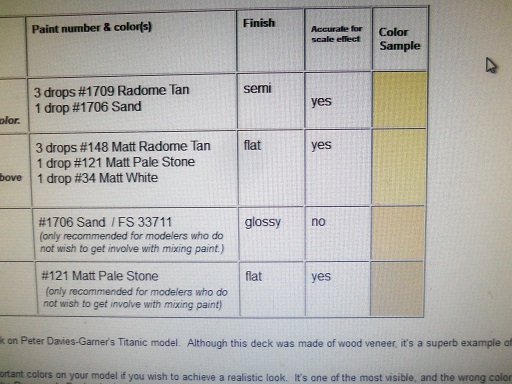
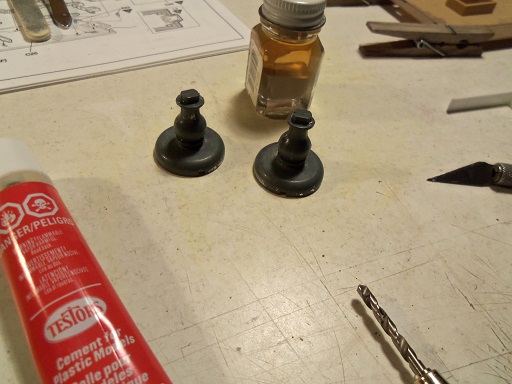
well.......the first hurdle has arrived! I'll get into it in a moment. first, I'd like to show you how the stand is coming along. the holes were drilled for the hull the brackets that will support the ship has been drilled and fitted to the hull and then disaster struck. the kit scheme lists the use of deck tan on the decks. what I have is the remainder of a bottle of flat sand......seemed close enough...and looked pretty good. touching up the decks, I noticed that it seemed to be drying out, a good indication that I had thinned it at the time I used it {I think I used it for the Spitfire}. having another bottle of flat tan, that had separated, I poured a little of the suspension from that bottle to it. what resulted was this. yea.......not good. so....pondering on this, I continued with the stand assembly. the pedestals were sanded and cleaned up to the point where the separation lines are gone. the bottoms were drilled out......all I need to do now is drill out the tops of the pedestals.......I'll do that when the supports are cemented on. ......and then the hull was set in place. going online, I started to look for a Titanic color chart.........since I got the feeling that the instruction scheme might not be quite right {even though it was my goof to begin with}. they do suggest mixing paint for some of the colors, but in this day and age, I'm sure that the spectrum offered by model companies now, has expanded quite a bit. I did find a site that seems quite good.......they offer a lot of insight, and list paints that others has used with great satisfaction. Titanic Paint and Color Reference I got a good line for the bottom paint color. though these look close, I still may elect to redo the entire bottom. a controversial color that this ship had, was the depiction of a color called white star buff. it was used for the funnels. a color they suggest is British Gulf Light Stone.......and I happen to have a brand new bottle of it. the stripe along the hull of the ship is a yellow chromate, which I'm sure it can be found in a flat {it's a military color} it is suggested to look at the colors from different angles.......computer screens can play tricks with the hue. the big head turner is the deck color. they do list a sand color, but it's gloss. I'm sure that it can be found in a flat........but the flat sand that I used is much darker, and I need to strip it off the decks somehow. this color sand would be much better to use......I'm sure Model Master has it in a flat {as a gloss it would not be suitable}. I was looking through my paints, and I came across a couple of paints that may work as well. the deck on the Titanic was a yellow pine, so it has to be a lighter color. the fore deck, poop deck and well deck was planked in pitch pine, considered a tougher wood at the time, would be a shade darker. teak was used sparingly, as it was an expensive wood at the time. it was used for moldings and margin trims...but I may not go into that much detail the two choices are: 1) Armor Sand - Model Master it has the light sand color, but has a slight greenish tint to it 2) US Army/Marines sand - Model Master has the light sand color, and a bit more on the yellow/tan side if you get right down to it though.....the British Gulf Light Stone could also be used.....it too possesses the light sand color with a shade more yellow to it. I'm in the process of stripping the decks now. I used thinner for the bridge deck.....not much to do. but the other decks, I have painted them with brake fluid........I'll see how that works.
- 573 replies
-
- 13
-
-
yes, I have seen that site George.........as a matter of fact, I posted it for Casey. thanks for your help thanks Dragzz I've used the brake fluid method for quite some time. as mentioned, it depends on the age of the chrome process. thank for your suggestion.......appreciate the help
-
looks good.........to bad you don't want to diversify neato on the strips.
-
just tell her to leave the tail at home
-
hi there John the instruction color chart lists a deck tan for the decking...I was actually searching around today to see what color would be used inside the structures. the site listed above, gives a different color, as well as formulas to mix a proper color. they list a gloss color...which I wouldn't use in a million years......but the color is called 'sand'. that is what I used, and it's a flat. sad to say, but the bottle is almost empty. I used it for something, because I had added thinner to it, and it gave me the impression that it was drying out. so, I added the suspension from another flat tan color {it had separated}. now I have semi gloss patches on the boat deck. the site states that yellow pine was used for the main parts of the decking. teak was used along the edges of the structures and the bulwarks. I'm not going to go into that much detail with it, but it's looking like I'm going to be repainting the decks. the fore deck, the poop deck and the well deck was done in pitch pine, which is a bit stronger, and probably a shade or two darker. Teak was used much later for deck planking. I have a small list of paints........one more paint got added to the list. is there a color you might suggest? thanks for the good word
-
actually, your just in time.........I'm just getting going I was doing a little research.......found the site listed above. glad to have you looking in Patrick.
-
http://titanic-model.com/paint/ hello casey what scale is the Revell version? you'll notice on this site, they deal quite a bit with the Minicraft 1:144 kit. I've done a few Minicraft kits....really wasn't that fond of them. go into the TRMA forum {you'll see the link}. the color that is this stripe {as well as the funnels} is called White Star Buff.....the site can go into more detail about it. they have color conversion charts, and if your into mixing paints, they supply formulas as well. thanks for looking in...........do you have a build log going at the moment?
-
thanks Nenad.........it was nice to get a little done last night today was small gains.........had to mow the front lawn and keep Gibbs happy. I did manage to paint a couple more parts and assemble a small section of the boat deck structure. count on an update tomorrow
-
thanks Augie......yea, taking a stroll down memory lane. I actually shocked the admiral.......she wasn't bugging me to do it, I just brought it out and started playing with it. brake fluid will free up rusted parts......Marvels Mystery oil works well too. thanks George......I always looking out for the contaminates......it's the temperature......always tend to think I can squeeze something past mother nature. I'm sure a lot of folks know the tips I may give.......I want to add them for the folks who are just starting out. thanks Crackers......I don't think this build will shadow the A.G. but I will try to make it fun spent a good part of the noon hour today, checking out sites that give information on the color scheme.......I have a small list put together. it won't be exact, but it will be darn close. thanks for the good word! thanks Jack......I hope everything comes back to me quickly thanks for the good word if anyone wants to take their own trip down memory lane.....check out this site. some of you may already know it. Old Plastic Model Kits: model airplane kits, Revell, Monogram, Aurora
-
thanks Nils.......I guess it's a good thing I did. I was looking at the last page or two.......where the images should be are simply the photo numbers. I clicked on one of them, and it just sat there spinning it's wheels......never got to see the picture. I sure hope that didn't happen to you. this was a simple case of over embellishment.....I went too far and ruined the subject. rather than trash it, I made up the second hull.......and there you have it......a dual build. this is the only build I've that's other than Billing's. it was still fun thanks for the good word!
- 552 replies
-
- 1
-
-
- maine lobster boat
- Midwest Products
- (and 1 more)
-
is that a Lancaster?.........are we cheating? what type of strip work is on the canvas? looks neat!
-
hard to really nail down the differences........the most obvious difference is that most parts are already formed and shaped. they can be altered, if you plan on embellishments or bashing. most of the detail is already there.......paint enhances and defines, and then assembly can occur. a plastic can be assembled quicker, but only if your doing an out of the box build, or your not concerned with any inaccuracies. if you like to play.......you can spend just as much time on a plastic kit, as you can a wooden one. there are aftermarket enhancements that can be bought that will bring out additional detail. to sum it up.........twenty to thirty years ago......I'd say that plastic is the quicker medium.............today, I'd say that the playing field is pretty level. it all boils down to what you want to do to your model. the younger crowd would have a field day, as opposed to what we had when we were their age. I still remember the kits that didn't have a rivet on it.......seeing a kit like that would have me strolling down memory lane
-
the parts have....yes. I have been at work....didn't get to do anything with the build till last night. if this was an older kit, the process would have taken only hours......perhaps overnight. I don't know of anyone who has painted over chrome, and was happy enough to tell about it. over time the paint would crack and peel. on this particular kit, the chroming process is still fresh. the bonding agent hasn't had time to break down to any degree. felt good to play a little with the kit. once I can get a conga line going on the paint work, it will pick up some speed. right now, it's just preliminary work thanks for looking in Carl !
-
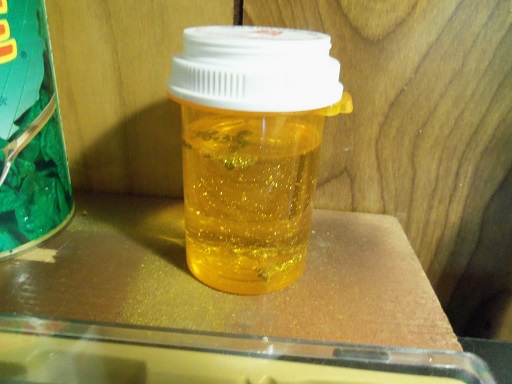
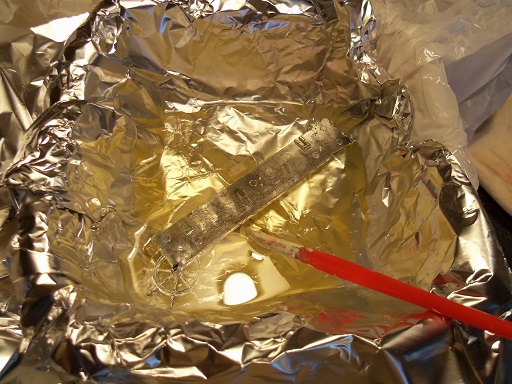
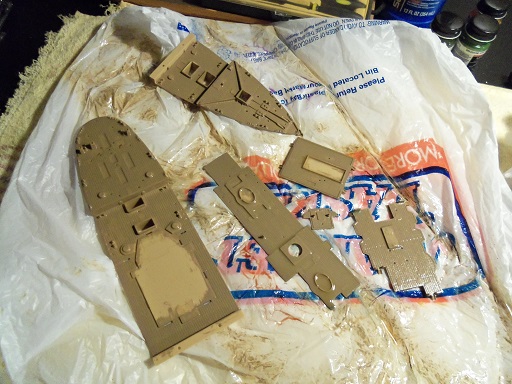
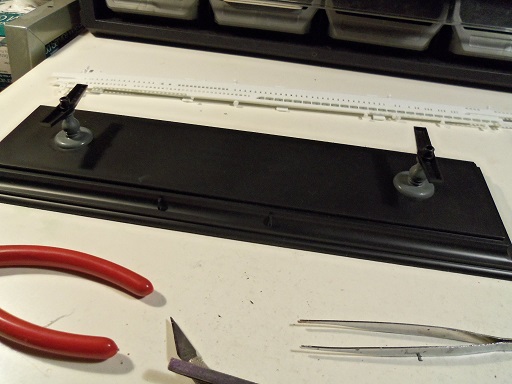
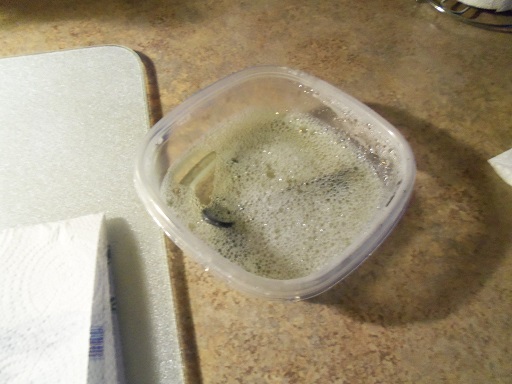
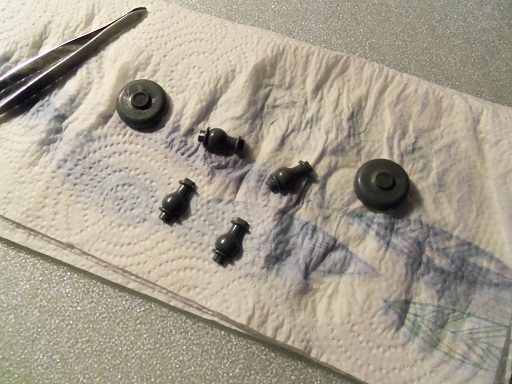
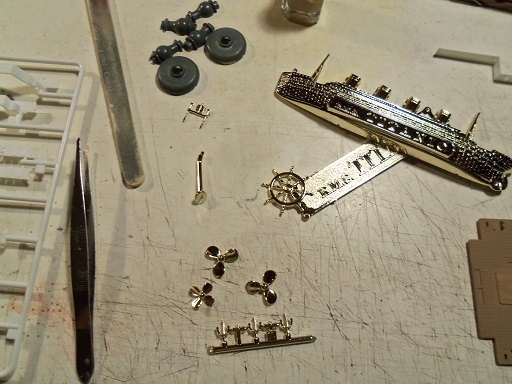
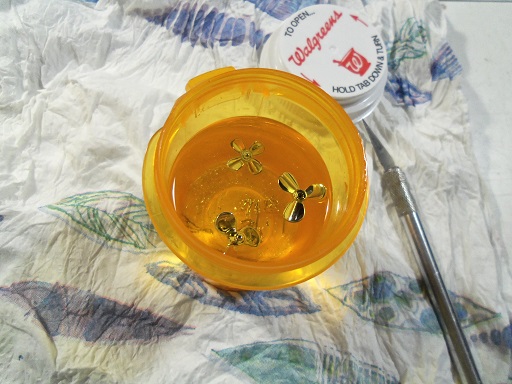
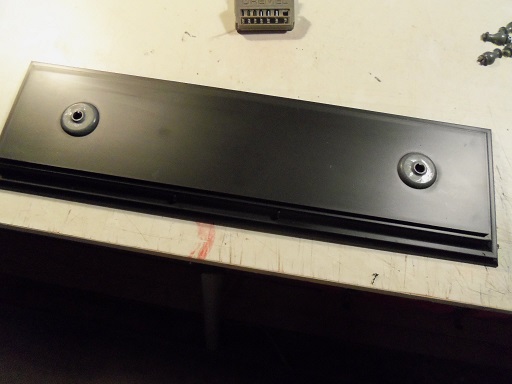
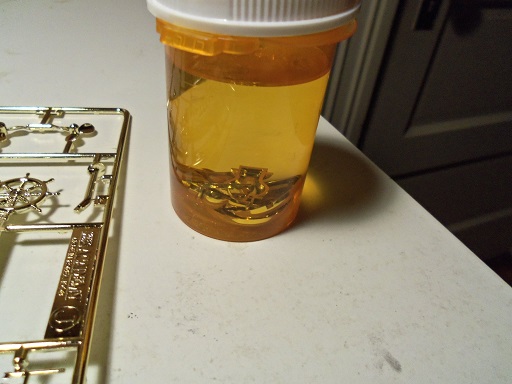
the stand parts have been in the brake fluid now, for four days. I woke up this morning at the crack of dawn. after turning on the coffee maker, I set to work. one of the worse feeling I dislike, is the feel of brake fluid .........antifreeze is second on my list. I have rubber gloves.......and got one of the plastic grocery bags. it's the best way to shield your surroundings from brake fluid , while your cleaning the parts. I use a wire brush....I even have a stiff nylon brush, if the chrome is old enough. it depends on the age of the kit........I've done this to older car kits and the chrome comes off much more quickly and easily, than if it was a newer kit. chrome is not a forever process......it will peel off over time. as it ages, it begins to lose it's bond on the plastic........I've had cars on my shelf......some as long as ten years {if they survive that long before I get sick of them}, where the chrome had started to bubble up and crack. it also depends on the process use by the manufacturer. as mentioned, ships usually do not have chrome parts. I'll do the rest later. after the parts were scrubbed with the brush, they were put in a soapy solution...I make it kinda strong, to cut the brake fluid quickly, and to be sure they are cleaned thoroughly. Academy uses a good process......they were kinda tough to clean. I keep everything in the confines of the plastic bag brush strokes are away from me....any spattering will fly toward the bottom of the bag {and not at me}. the brushes are cleaned after the parts are done. cleaned and rinsed, they were set on a thick bed of paper towel to dry them off. I will go over them later with some fine sand paper....not that they are rough, but there is still a little bit of chrome still on them. it should come off easy at this point......and even if you paint over it, I don't believe it will matter. the other parts were removed from the chrome sprue. that boat thing......I probably won't even use, but the next items to go in the container, are the anchors, the props, and believe it or not......the ship's wheel {that small part near the stand parts}. the name plaque will need a larger tray to lay in. it might need to stay in there longer, but that's OK, I don't need it right away. the other parts were trimmed of sprue, sanded smooth and tossed in. again, never put this container directly on the table........not good if this stuff contaminates the work area. I have it on a damp paper towel.....it won't soak through, it repels water I'm still not completely convinced that I can do lighting , but I will proceed like I can. I need to drill the holes in the stand, since I will be using the stand that came with the kit. this will be my first pedestal stand. I do want to drill the holes as close to center as I can.......I will use the base of the pedestals to do this. once the holes were scored, the pieces were removed and the holes were drilled the rest of the way the pedestal parts were assembled, since they will be the same color. these parts will have the joint lines sanded smooth and then I can drill the holes in them as well........bottom up through the top.......


- 573 replies
-
- 15
-
-
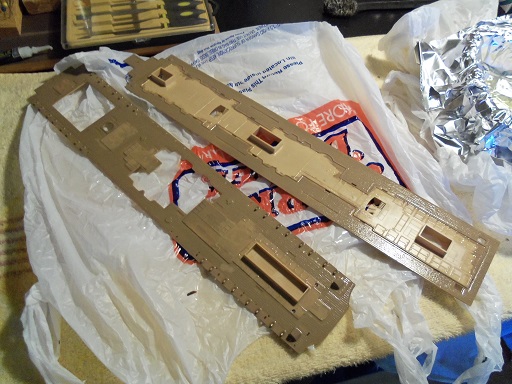
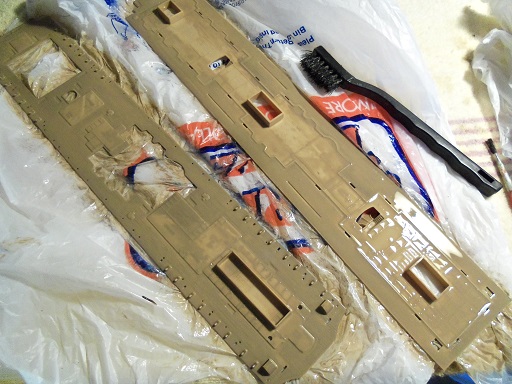
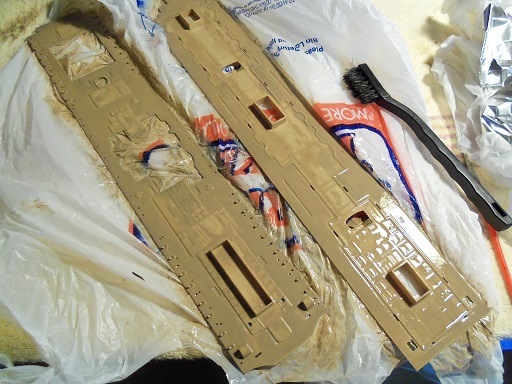
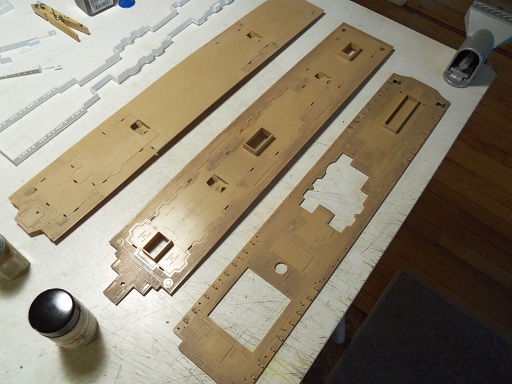
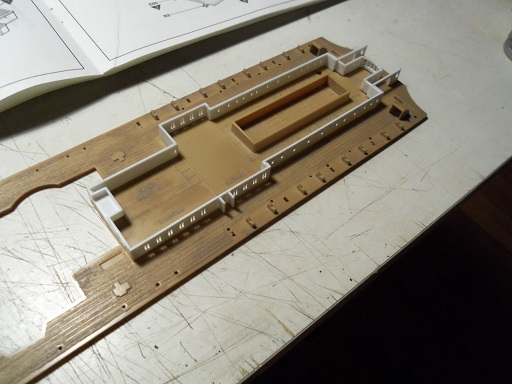
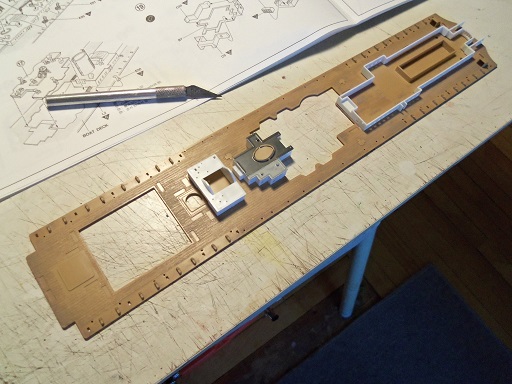
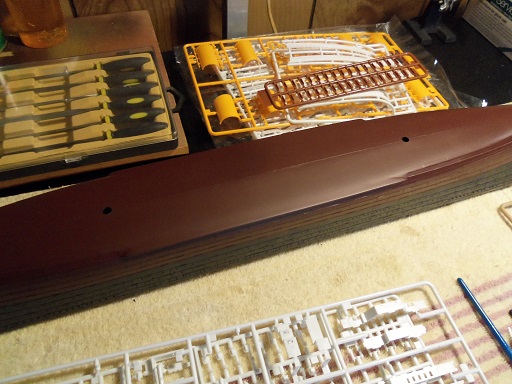
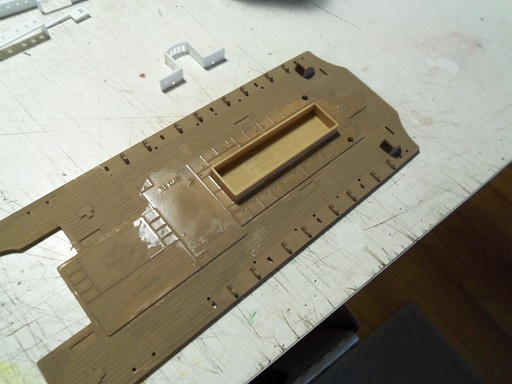
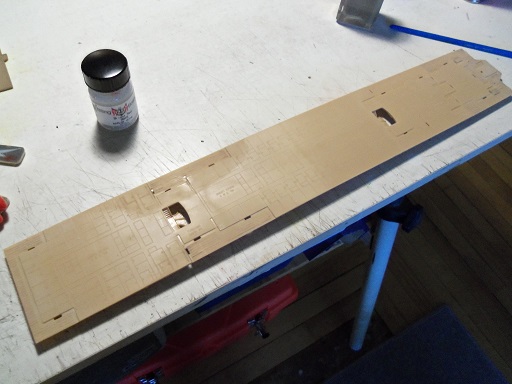
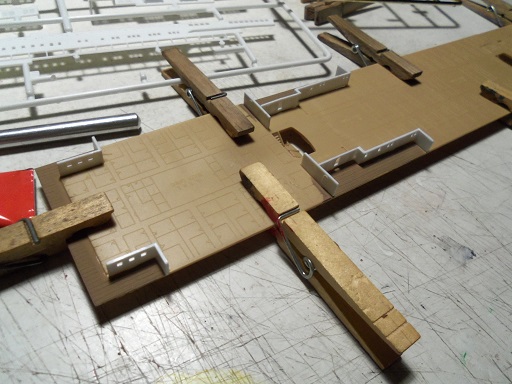
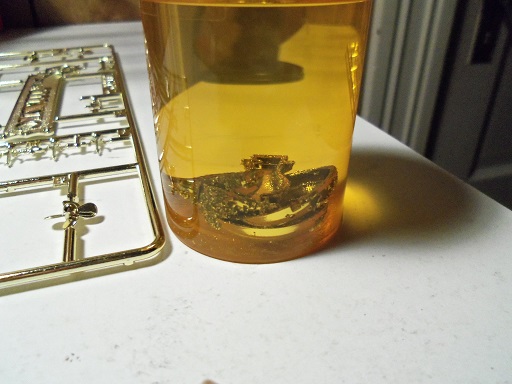
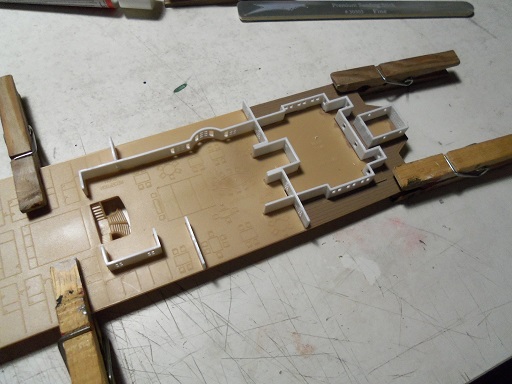
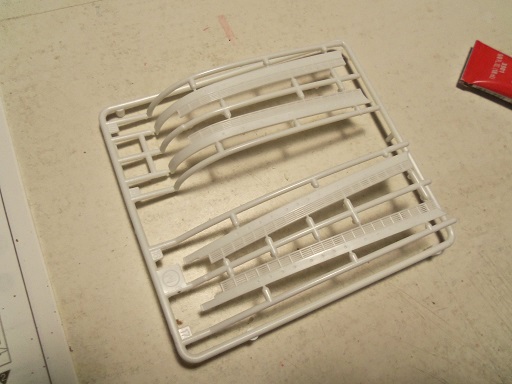
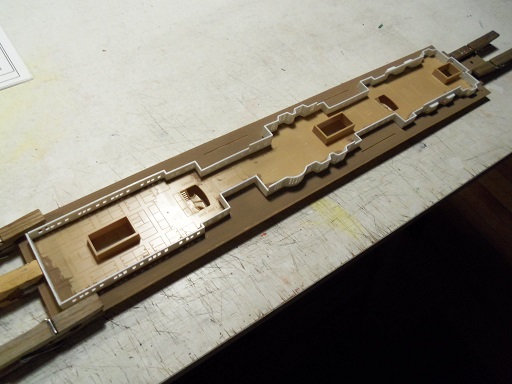
well.....now that I've caught myself up somewhat.........Andrea's in the gallery, along with the Lobsie Twins {which was way overdue}........closing logs are done on Word Press {haven't done the Titanic yet.....don't want to wait too long and have them pile up on me}....I can now settle down a little {still have the lawns to mow though} so far, the only paint I've used is deck tan.......I did all the decks with it {I'm still jealous Evan } at the moment, I'm going to assemble the structures between the decks, and paint them flat white, after cleaning up all the joints. once assembled I'll try to keep them separate......but with them at this point, it won't be too hard to see where they go. I took the stand parts and have them sitting an a container full of brake fluid. this is the old school method of removing chrome. now we wait......... in the meantime, I'll share this with you. I'm a bit of a hound as well......I'm forever curious as to when a kit is produced. I noticed that on the instruction manual, it has a copyright date of 2012. but, that doesn't tell me when the molds were made......so I looked through the parts. in the case of the Revell Cutty Sark 1:96, the date stamp can be found on one of the deck sections.......on the top, of all places {if I remember right}. with this kit, I found it on the flip side of the sprue sheet tabs......1998. the sprues are stamped from Korea.....the hull is stamped from the Philippines....... another bit of trivia. so........these parts were put in the brake fluid. they've been in there for over three days. now they look like this. it's looking like it's time to take them out.......it doesn't hurt the plastic at all. during this time also, I've been working on the deck structures. I will assemble them and paint them after with an airbrush. this is the bridge deck. the parts fit in a very narrow impression in the deck. there are tabs that need to be fitted....a few of them are very tight.....I've had to open them up a bit more to accept them. these are the parts that Evan was referring to....the fore and aft railings. I'm not impressed with them.......the railings are molded solid with no slotting at all to depict them. I want to do something to make this bit of detail come out. the next thing I did was to cement the screw tunnels to the hull. the paint was sanded off and they were installed. After the rest of the hull seam is cleaned up, the bottom paint will be redone new spelling for the word thread? this is the A deck. this structure goes almost the entire length of the deck. the clothes pins you see on there are merely for support. these decks are so flimsy. I only painted the deck areas on these deck parts.........I'm curious to see what color the floors were inside the structures. you can't see much, but the inside is still visible to a degree.


- 573 replies
-
- 15
-
-
such a great build KP.......the artwork is simply eye popping! very well done!
-
thanks Sjors.........I'm sure there are some with the munchies right about now glad to have you following along you are right Nenad.........I have been chained to this computer long enough! all my logs are written {except for the Titanic...I still have to start it}, all the gallery pictures are posted.........it's time I got around to some playtime I have a couple of pictures, but I will compile a few more before I update again.