


popeye the sailor
-
Posts
16,007 -
Joined
-
Last visited
Content Type
Profiles
Forums
Gallery
Events
Everything posted by popeye the sailor
-
 very ....very nice KP! the bottom hem is a little odd, but there's not much you can do with plastic sails you could try to loosen up on the offending line to lessen the effect. you've done a great job on this model, none the less
 -
she's looking super Jesse.......planking should be fun and go smoothly with the way you have it set up
- 1,306 replies
-
- 3
-

-
- syren
- model shipways
- (and 1 more)
-
she had them.....so your not spinning your wheels she look even bigger for it
- 92 replies
-
- 1
-
-
- Cutty Sark
- Billing Boats
- (and 2 more)
-
sweet looking binnacle Augie.......really compliments the helm! have fun on your vacation
- 2,191 replies
-
- 3
-
-
- confederacy
- Model Shipways
- (and 1 more)
-
have you given any thoughts of copying a hull from what you've come up with already? I'm kinda hedging with the fellow who mentioned earlier, that you may not get her back.
-
you've really gone quite a ways since I last looked in! love that tri level lower decking.....very nice color. sheer deck framing looks great too......I'm really enjoying the direction your going on this one
-
I love the size Nils! simply awesome......slip set up is awesome too!
- 2,625 replies
-
- 3
-
-
- kaiser wilhelm der grosse
- passenger steamer
- (and 1 more)
-
yes, I would {adding to what Dr. Dafi mentioned}. you could also use diluted white glue........paint it on before you cut it, then shape with fingers very carefully. your going for the look......not the feel
- 119 replies
-
- 1
-
-
- la reale de france
- heller
- (and 1 more)
-
you could also use testor's in the green tube. the testor's brown tube is the same stuff.......it's used when a gas engine is involved. I know what you meant I've never used P.E. either.....it will be interesting when I do. keep going......it will get easier.......bet on it!
-
I'm with Augie on this.......we all have our pace. glad you decided to paint them........they look much better. your doing such a splendid job with this one, you don't want to rush it and muck it up
- 1,616 replies
-
- 6
-
-
- caldercraft
- agamemnon
- (and 1 more)
-
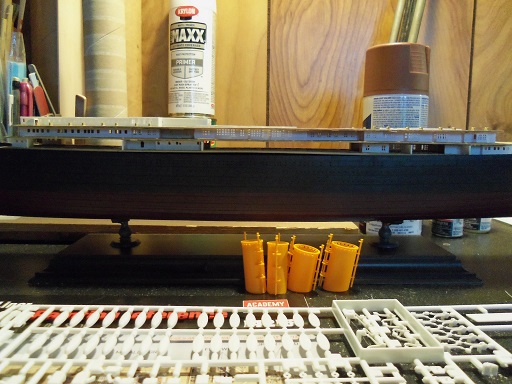
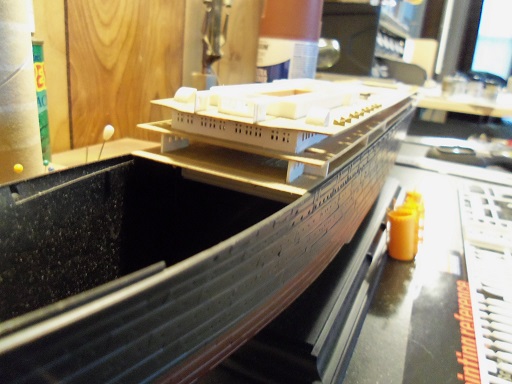
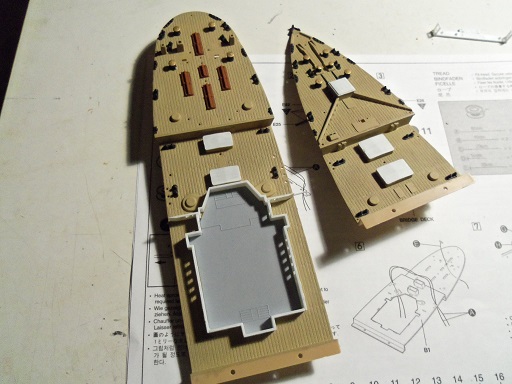
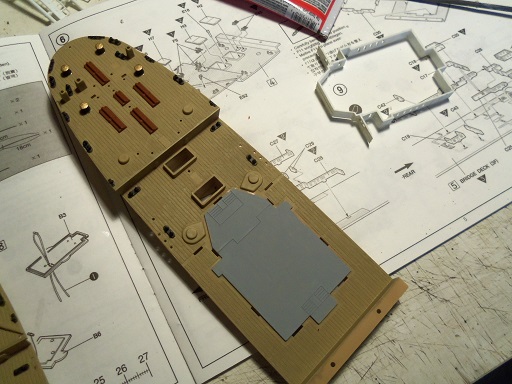
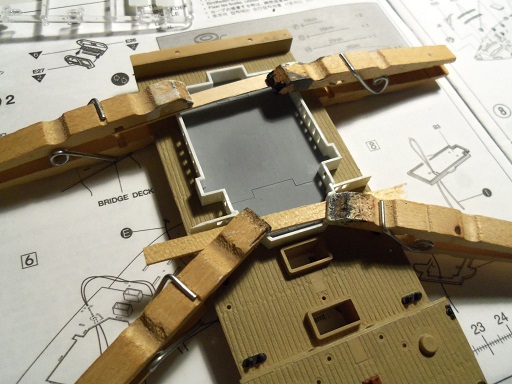
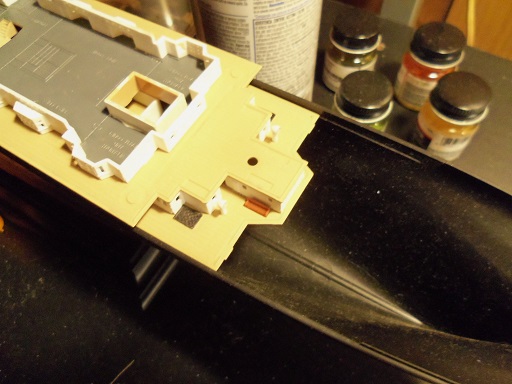
as I mentioned. the spacing between the decks, is not very tall. I was curious how they would stack. the bridge deck is not as wide as the A deck ans boat deck. the bulwark sides allow them to slightly bulge out past the hull perimeter. in the background, you can see the can of primer, which I think matches the bottom paint. I haven't tried it yet. the admiral and I much have looked like a couple of nuts........I was trying to find the number that the TRMA suggested for it. to make matters worse, I forgot to bring my reading glasses.......so, here we are......in an aisle, trying to find a four digit number on a spray can......we'll soon see if I'm right about the color. these first two pictures were taken with both lights on......I had to turn the overhead crane light off for the others. ....a look at the bow end ......... ....and a look at the stern end ......... the boat deck does interlock with the A deck in two places. there are decks associated with these two areas as well. there are no openings between these two decks.......although there are two holes inside the confines of the forward structure that I'm curious about.......not sure how they come into play. the stairwells in the bridge deck and the A deck will not be seen.......I may not even bother to paint them {I'll look into it further}. the same thought goes for the insert that was cemented in the molded inner structure of the forward structure. the outer walls were painted, but from what I can see so far, this will not be seen either. of course, there is still some touch ups that need to happen, and more parts need to be added, before the decks can be joined with the port and starboard bulwark parts.

- 573 replies
-
- 16
-
-
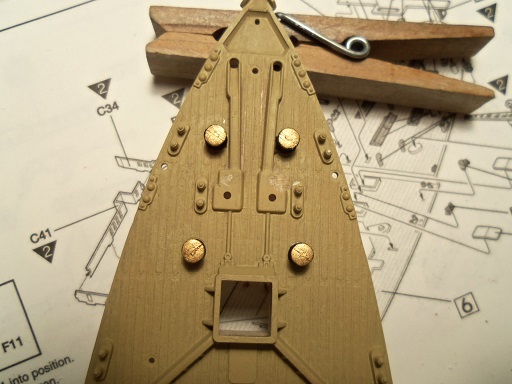
I got a bit of insomnia last night.......the admiral and I are trying to cut down....to eventually quit smoking. so I messed around some more at the table. the crane bases were touched a bit more and set aside to dry I added the rest of the hold covers to the bow and stern the boat deck has no tab slots, nor the structures have tabs......I'm not liking this. I was getting used to no glue marks to touch up. the forward structure was cemented in place. there are 11 stair cases that need to be assembled. they will be cleaned up and painted later, once they dry. the starboard side chain was cemented in place......the port side will be done once this has had time to dry. I am still curious how these decks will assemble....especially without making a mess. I'll try and show you how they stack up.
- 573 replies
-
- 13
-
-
thanks John.....she's coming along better....found it a little hard to get back into the plastic mode. so true Nenad.......our interests evolve and ever change as we grow older. sadly we must flow with the change. it has been said that the modeler rebuts these changes, by trying to dwell in the past.....but it's not true. we merely want to preserve and protect all that was once beautiful, in a time that technology wants to confuse and destroy. ........to keep simple, what life wants to make complicated, even though under the guise of streamlining. we have a better saying here in the states: "if it ain't broke.......DON'T fix it"
-
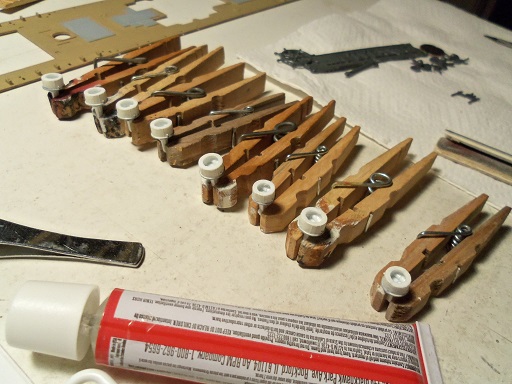
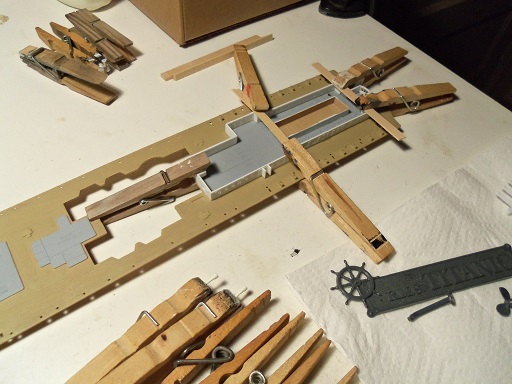
thanks for the good word gents I'm assembl'in all these little things........the hull will be coming into play in a bit. yea, I dunno George.........they must flip a coin in the R&D dept, as to what stays and what goes. got a good idea for 'em........why don't they ask a modeler! Thanks Frank.......I hope your right. the admiral's complaining about me working with plastic....I'm laughing cuz.....she got it for me she wouldn't have sunk, if they only glanced the iceberg. it was a huge tear...four or five compartments long! thanks Gary.......I use the clothes pins for pretty much the same reason. I find that this way, they have more reach. thanks Sam......I'll be honest.....I did all this after 9:00AM........ I had to have my coffee and cruller
-
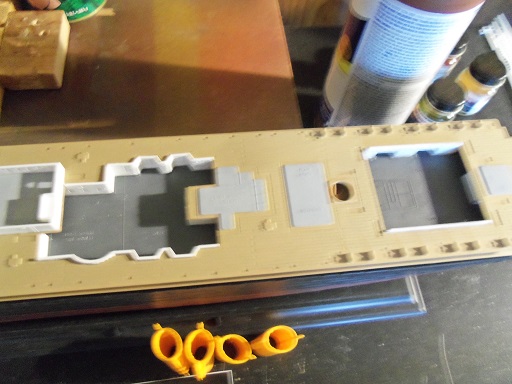
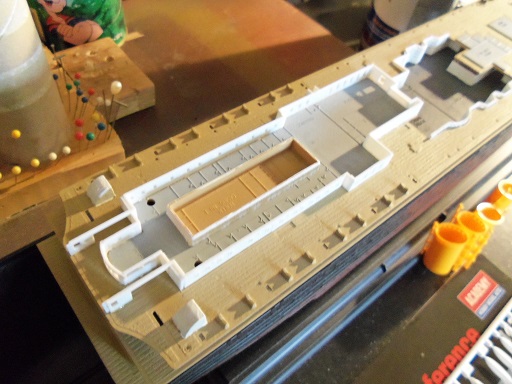
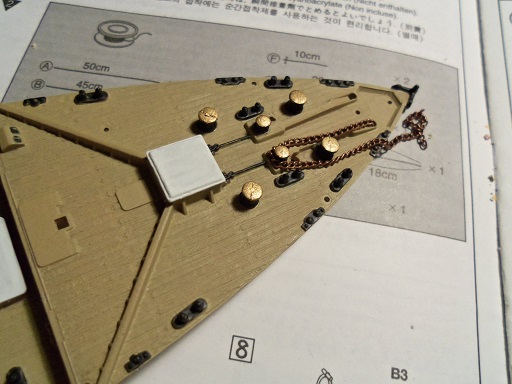
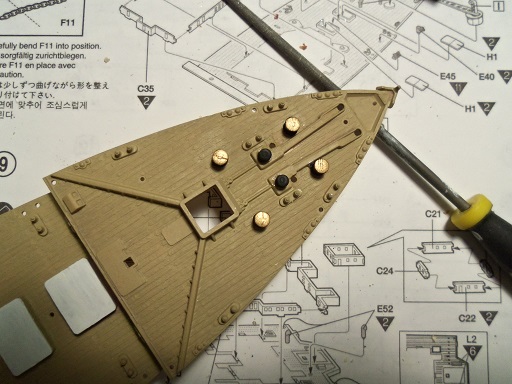
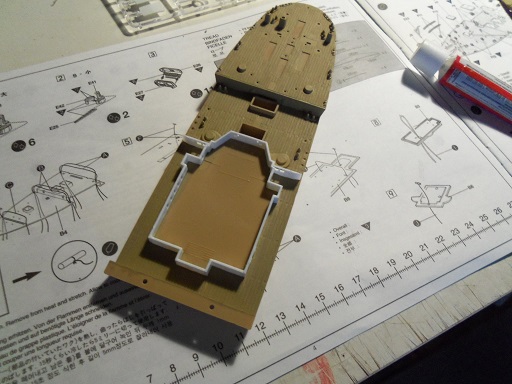
Both sides are notched out now. the capstans are in place and the holes are drilled. I may have to enlarge them a bit more to accept the chain. some work has been done to the stern / poop deck. the double benches are in place, four more capstans, and the bollards along with some of the other detail has been painted. the same treatment has been done to the fore deck as well. I have a few other thing that I'm working on.....there are eight cranes that are to be located on these two sections. they also lack a bit of detail, that I think should be there. I'll show you those next {second enhancement}. the structure for the stern [ poop deck has been painted. it was cemented in place on the deck, the same way I did the long structure for the A deck, by cementing the tabs from underneath. the night is still young....I may do a bit more before I call it a night......I'll post it if I do

- 573 replies
-
- 13
-
-
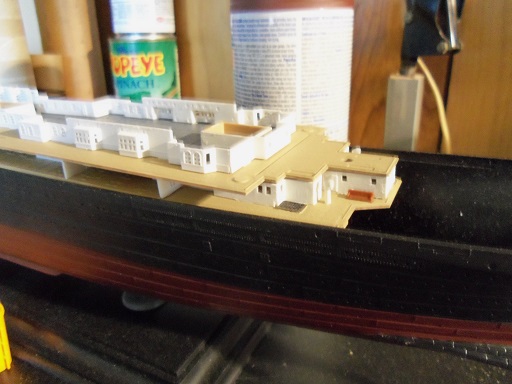
I had today off.......I was going to add electrical outlets out in the garage, but it was a really cold damp rainy day! such a good day to sit inside and play I was looking over what I had done, and I though you might like to see how these decks associate to one another. that is the bridge deck and A deck........and also a good idea how light can impact a color. really not that much space between decks either......looks like about 10/32nds. I'm only using one of my crane lights for those pictures....both, and you really go blind!. I started to play with the stern and poop deck, making the structure for it. Ben really helped me out with the anchor chain.....I knew there had to be a chain gate. the detail for this is lacking in this model......hard to imagine, with all the detail that is there. in order to enhance this aspect, I'm going to modify the capstan platform....it doesn't allow for it. there are two small tabs there, which I cut off. a small square of the platform was removed from the starboard side platform. not sure if it's doable, but I may try to make the chain gate from these two little pieces of sprue. even if I don't, it might not matter too much......some of the gate detail is missing at the front hawse holes of the guide. I will get the port side notched out and then drill a couple holes. I can touch it up then.
- 573 replies
-
- 10
-
-
yes Wayne.......I know Gene's work very well. last I knew he was ill....don't know how he's doing. as a mater of fact, I'm a member of the site...haven't visited in quite a while though. he is a very accomplished modeler thanks for the good word my friend!
-
great job Jerry.......she sure is a sweet looking build! Hey!!!! now I know which end is the bow!!!!!
-
musing the site........and what does my wandering eyes see? ....but an absolutely delicious idea! the execution has you pulling your hair a bit, but your on the right track. I wish I knew some of what your mess'in with......I'm still at the point of using parts panels to replicate my hulls ah well, I just wanted to let you know that I think you've got a great idea.......and now that I've commented.......this will add your build to my watch list. I won't miss out on all the action! cool looking engine......I like the imagination I still harbor thoughts of an M&M racing boat {I've thought about making an engine as well}. your way ahead of me I'll have to read through all this again......perhaps I'll understand more looking forward in seeing what ideas you have in store P.S. your daughter's a cutie!
-
hello Brian thanks for the kind word....... 1:400 isn't too bad of a scale to work with. it still comes out to a fair size model. I do plan to light her, but the deck levels are around 10/32 or so high......gonna be a feat with the lighting I want to use. I have the basic kit from Academy.......they do have one that supplies the wood decking and P.E. I do have a build where I substituted the plastic decking with wood, but it's a larger kit. welcome to the build, feel free to follow along
-
A really cool dioramic display.....she's looking real sweet! nice work Wayne!
-
looking back, the funnels are made of an orange plastic. I'm sure that a light coat of a light sand color, will bring out the hue. we'll see what I come up with gents thanks for the article George......I have not seen that one the work week is done, so I hope to have an update soon.