


popeye the sailor
-
Posts
16,007 -
Joined
-
Last visited
Content Type
Profiles
Forums
Gallery
Events
Everything posted by popeye the sailor
-
 I hear you on that..........but I've had a few helpful folks in my travels.....so it's a win/win.
 -
good to see your back at the table Rod. I haven't had to do trimmings like that......but tugs weren't known for having high bulwarks. all in good necromantic fun........Hee.....Hee.....Heee
-
here in the states, I only need look in the craft stores
- 1,279 replies
-
- 3
-

-
- agamemnon
- caldercraft
- (and 1 more)
-
I had to look back in the build........didn't have to go far....there's another mast look forward in seeing that one going up!
-
super KP! very nice work on the sail!
-
guess Pud should be happy your not in a third floor apt! are you sure you don't have a gremlin? great repair Danny! {I'll put my like on the after pictures}
-
what I have is a plastic kit Nils.........1:400 would be more of a feat. I really like the contours of the stern keel......gonna look so cool when you get round to fleshing her out. very interesting set up to be sure......and you sure started it off with a bang! those props look really neat!
- 2,625 replies
-
- 2
-
-
- kaiser wilhelm der grosse
- passenger steamer
- (and 1 more)
-
what a pleasant surprise to come in this morning and find this wonderful build log started looking at your past builds of these fine vessels, man.....I've got to sit in! gonna be a beauty! nice bit of info about the props.......she does kinda mirror the Titanic in a way, doesn't she
- 2,625 replies
-
- 4
-
-
- kaiser wilhelm der grosse
- passenger steamer
- (and 1 more)
-
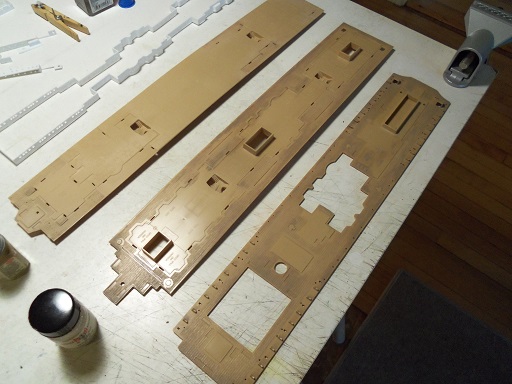
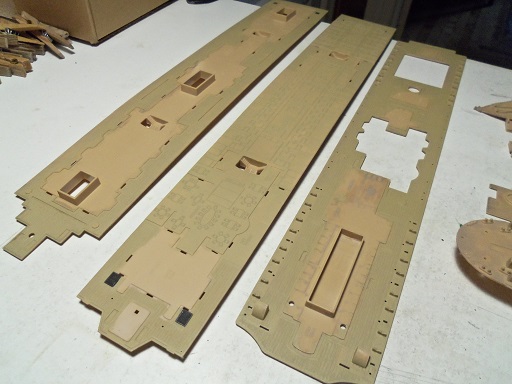
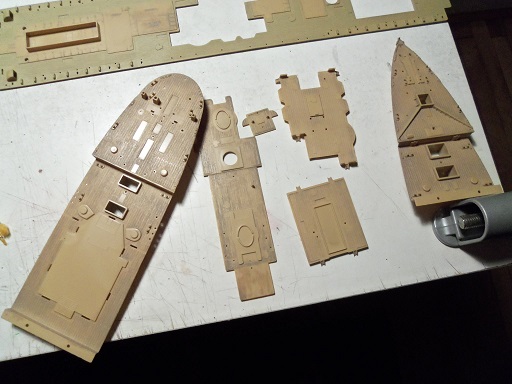
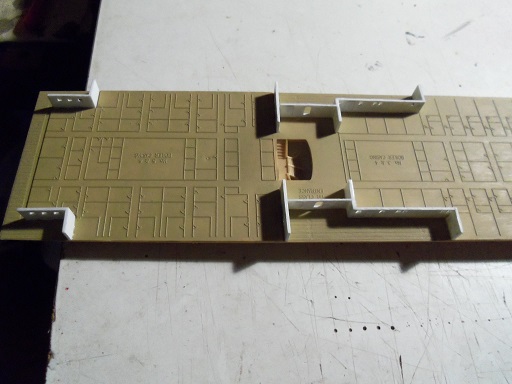
I though I had shown the stripped decks to you.....varying degrees of paint removal. it might not be all bad......may tend to shadow here and there, when they are repainted. I did show you these though the paint that I decided on is called U.S. Army/Marines sand......it's lighter and has a bit of a yellow tint to it. these are the parts you haven't seen. these came out with varied success as well, but I think it will cover nicely I began to paint and assemble the bridge deck.....hope to have more for tomorrow.
- 573 replies
-
- 14
-
-
after a repast like that.........I don't think I'd be able to move you feed your men very well....is there a sign up sheet?
-
you've made some wicked nice progress there Larry.........I think your painting looks great. very nice detail there!
-
rigging looks pretty good to me.........keep going, this is going to look really sweet!
-
great update Augie.....the ship's wheel and fittings look really nice with the contrast of the deck
- 2,191 replies
-
- 4
-
-
- confederacy
- Model Shipways
- (and 1 more)
-
your making some good progress thus far....sorry to hear about your paint woes. I haven't used acrylics much.....wish I could offer an idea for you. I'll enjoy following along
-
I not sure that anti-foul comes in that color.......what am I saying....of course it does! sweet looking paint work Patrick.....love the contrast of the solid and off color nice!
-
thanks Nigel. the Academy kit has a lot of nice detail molded into it. the site that I linked has a lot of good info, really neat that they include the formulas for mixing paint. their kit of choice seems to be the minicraft kit........I've build a couple of these kits though, and I wasn't too impressed with them. I'm glad that you and the folks here are enjoying the build so far........I feel as though I'm just spinning my wheels for the moment. I'm going to go with the deck color I've arrived at.......it looks much better, in contrast to the heavier sand color I started with. thanks for the good word and looking in my friend
-
I used brake fluid Sam........I've used it ever since I was a newbie {with plastic}. the thinner was bad enough.......and the only reason why I tried it, was that the paint was still fresh. thanks to you folks who looked in......I haven't done much....and now it's the work week. I did do some testing {sort of} with the new choice in paint....looks much better. should have an update soon.
-
another paint you could try Casey, is Jo Santos. do you use alcohol as an accelerator, since it's a water base paint? cripes, I know guys, that have used windshield washer because of the alcohol content don't worry about me......just because I work for Wally, you can bash 'em all you want thank you for the good word and looking in Nenad.......if you have a question......ask away! I'll try and answer as best I can. anything for you my friend I wish you and your the best tomorrow {which with the way time works, may already be here} fingers crossed my friend!
-
your kidding right? ...and on both counts, to boot?!?! after seeing the process you went through to build her........I find it hard to think that rigging would be your Achilles heel. nor would I say that I'm the least bit bored. you've done a fantastic job on her.......I like to see the rest
- 119 replies
-
- 1
-
-
- la reale de france
- heller
- (and 1 more)
-
note to self........
-
I told ya........to think...those little rings got you going....hmmmmm! took a whole boat to move me nice work my friend!