


glbarlow
-
Posts
4,127 -
Joined
-
Last visited
Content Type
Profiles
Forums
Gallery
Events
Everything posted by glbarlow
-
 That’s some serious sanding, my elbow hurts just looking at it. Looking great!
 -
Thanks. It’s true building Cheerful taught me lessons I carried over to Winchelsea, modelling is definitely a progressive skill set.
- 840 replies
-
- 4
-

-
- winchelsea
- Syren Ship Model Company
- (and 1 more)
-
Very clever work on the tiller. It and your other deck furniture are looking great. Well done!
-
Wow, thank you all for the kind comments. They are very much appreciated and a joy to read.
- 840 replies
-
- 4
-
-
- winchelsea
- Syren Ship Model Company
- (and 1 more)
-
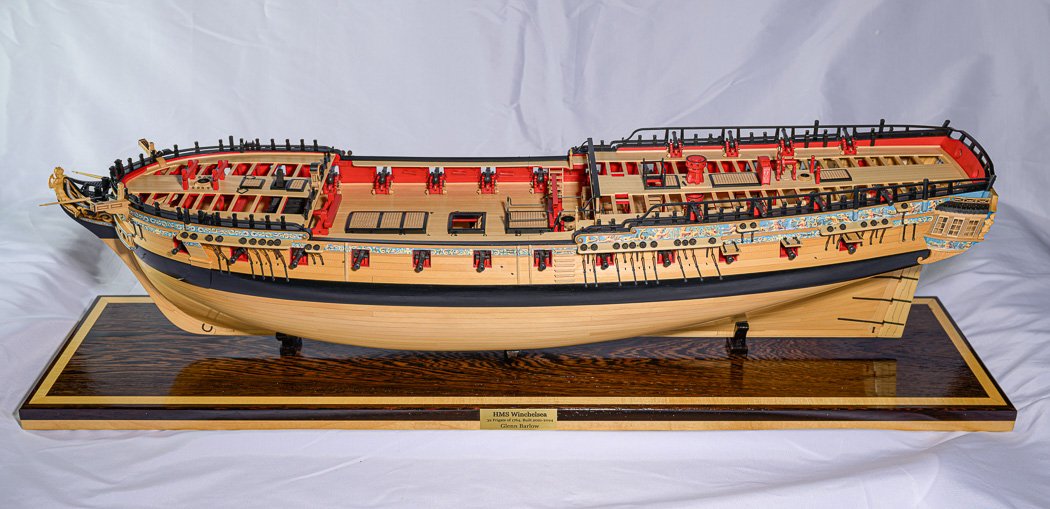
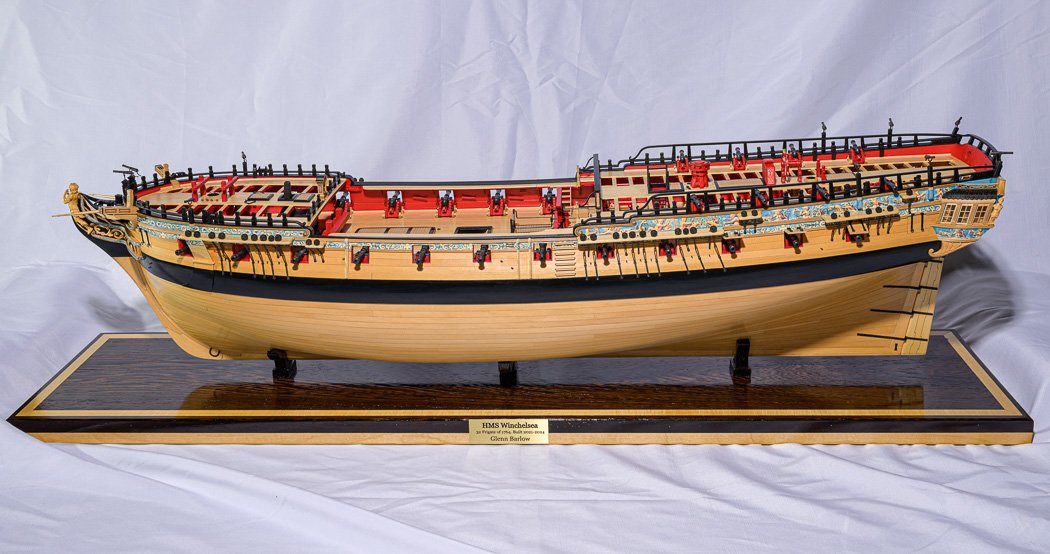
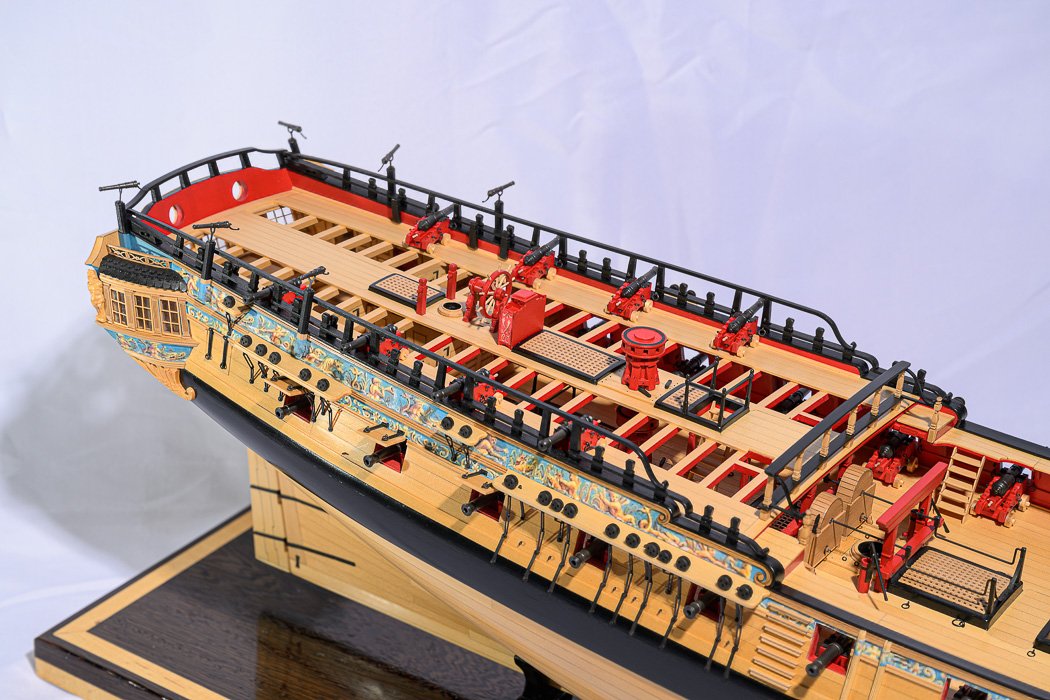
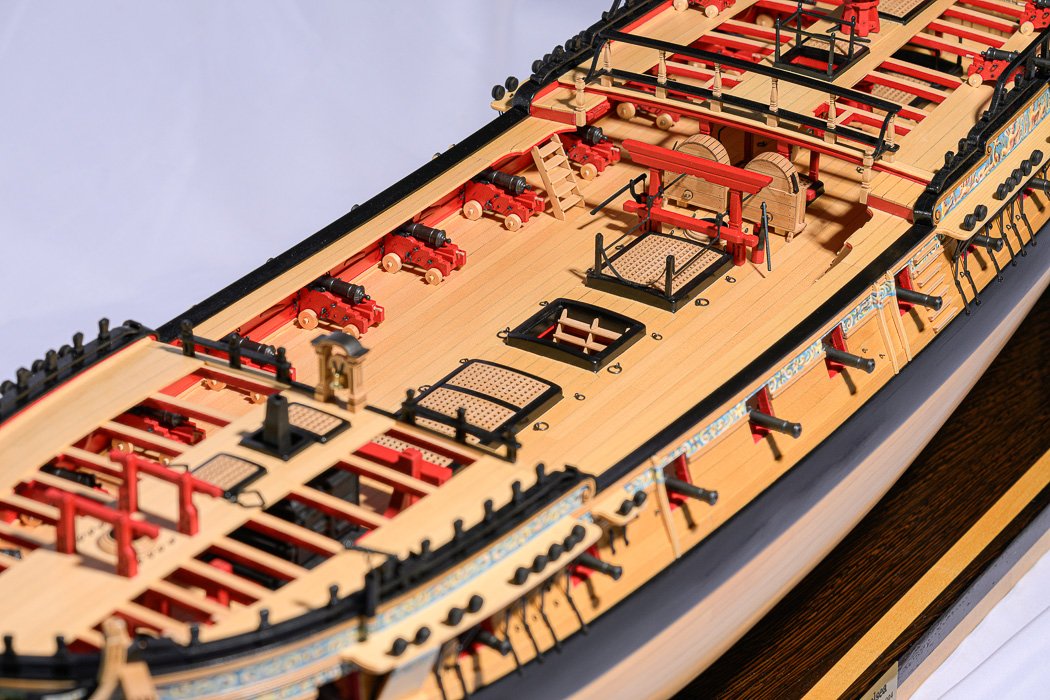
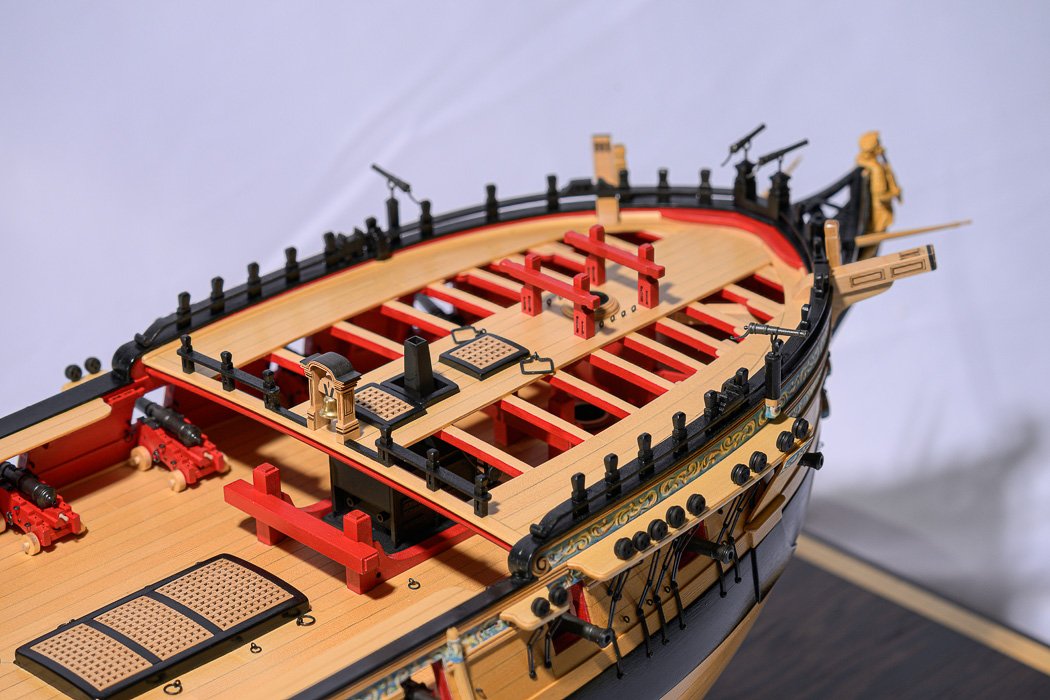
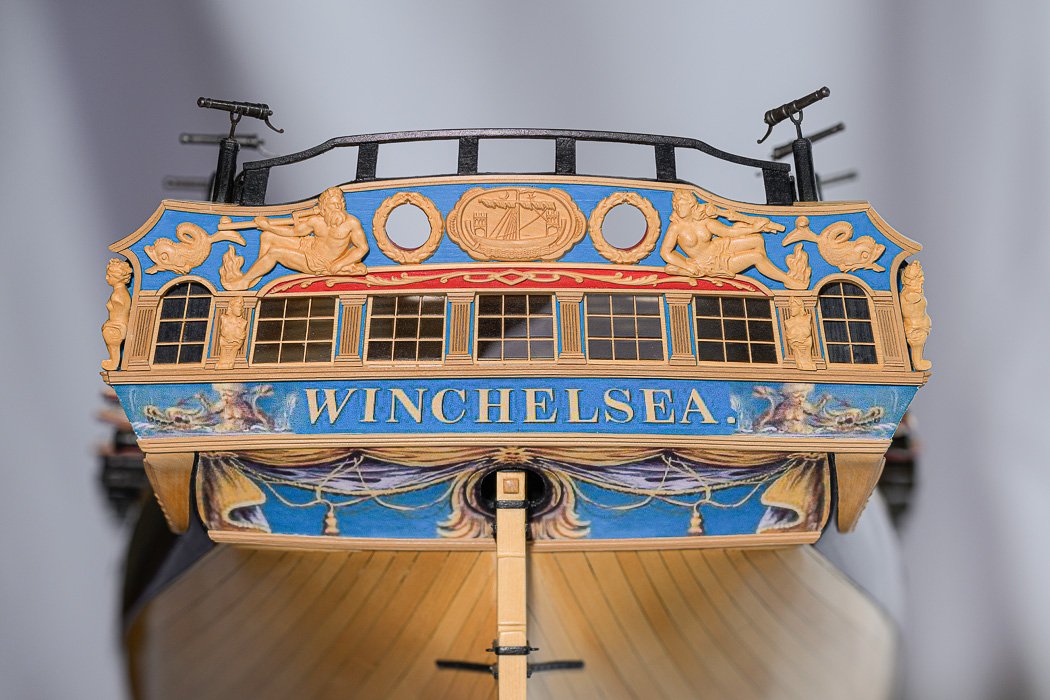
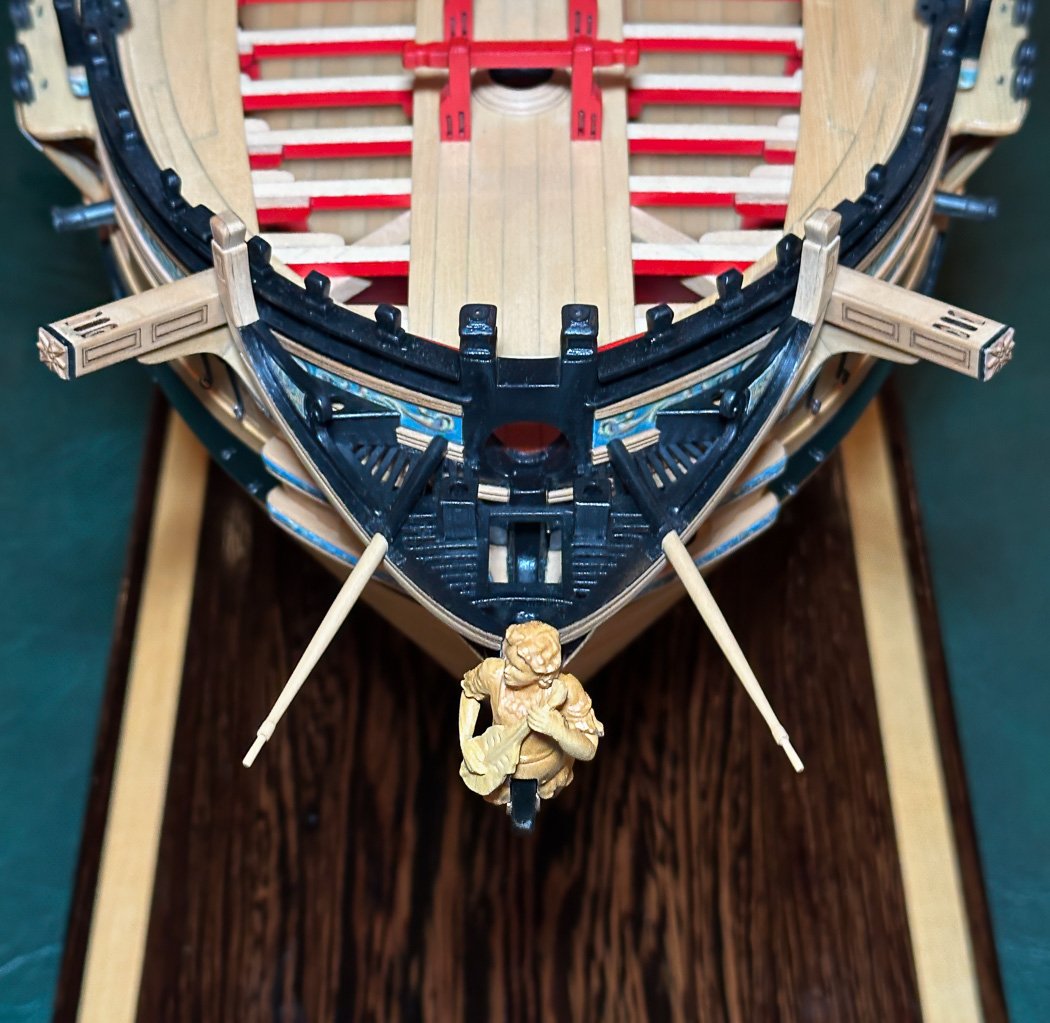
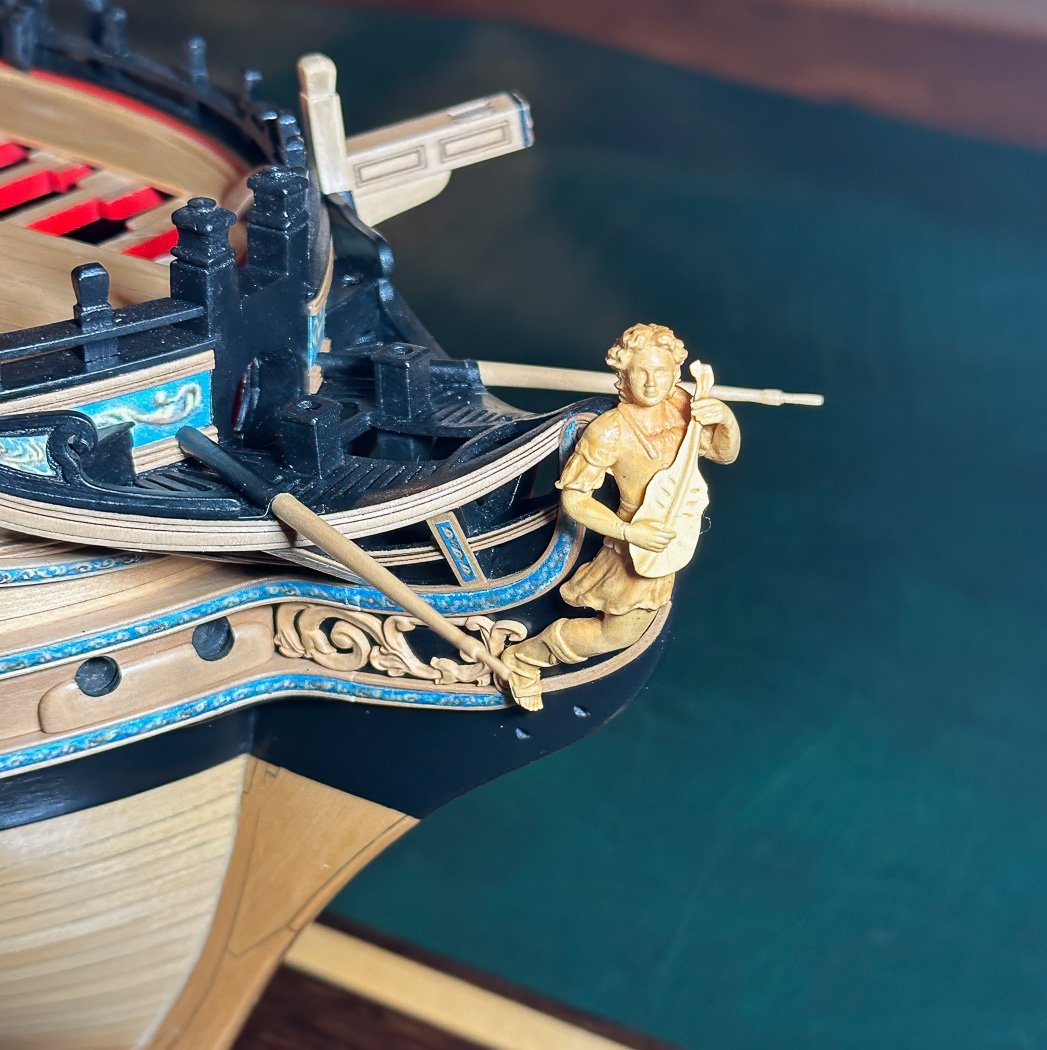
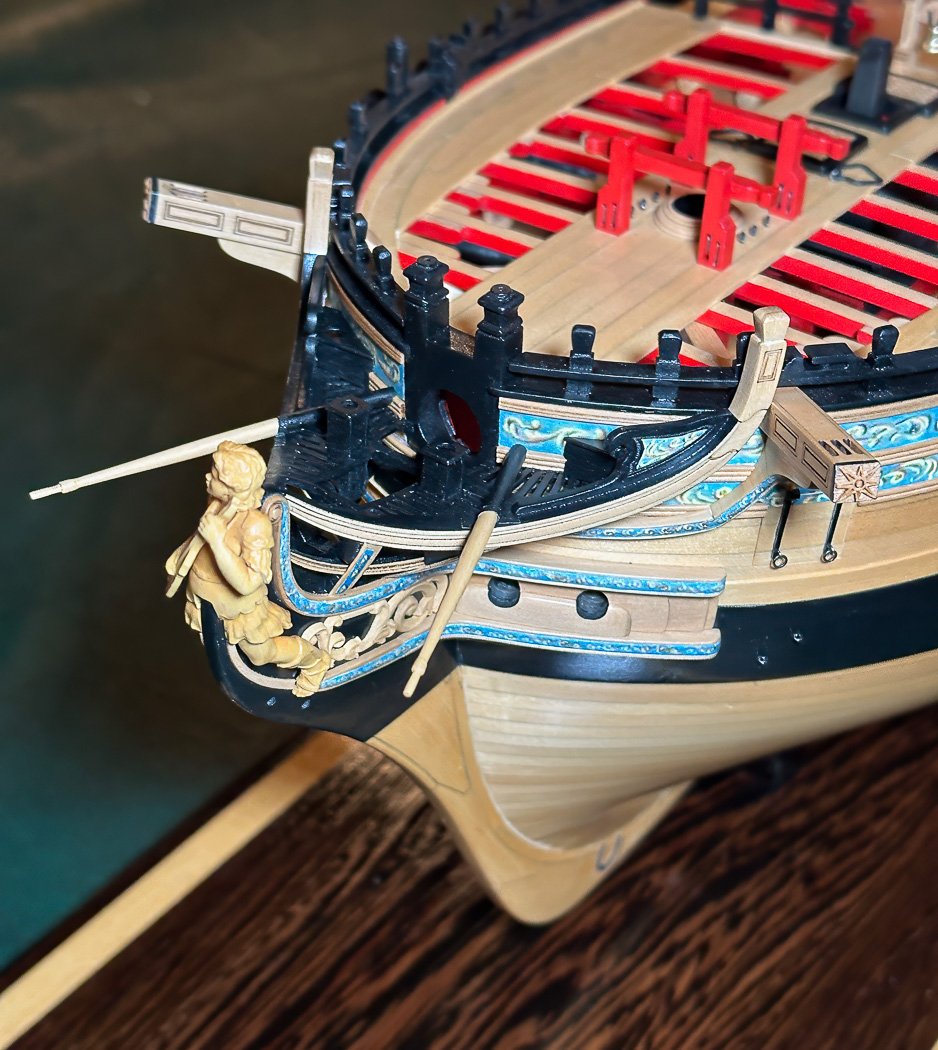
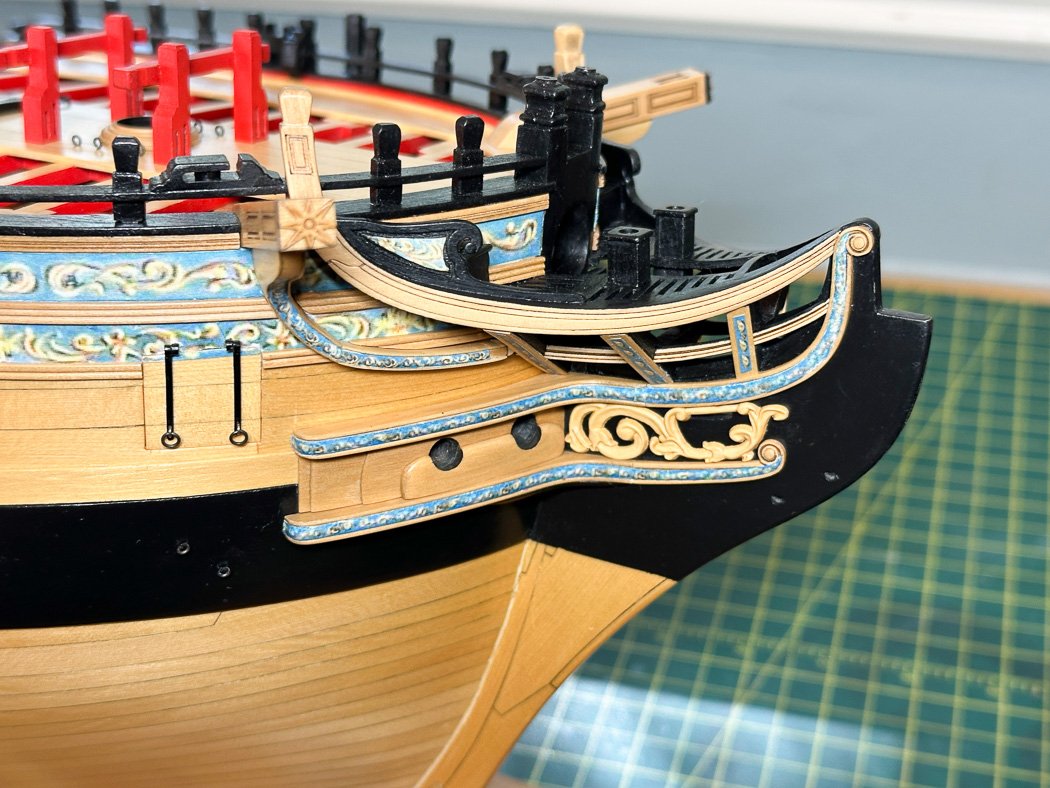
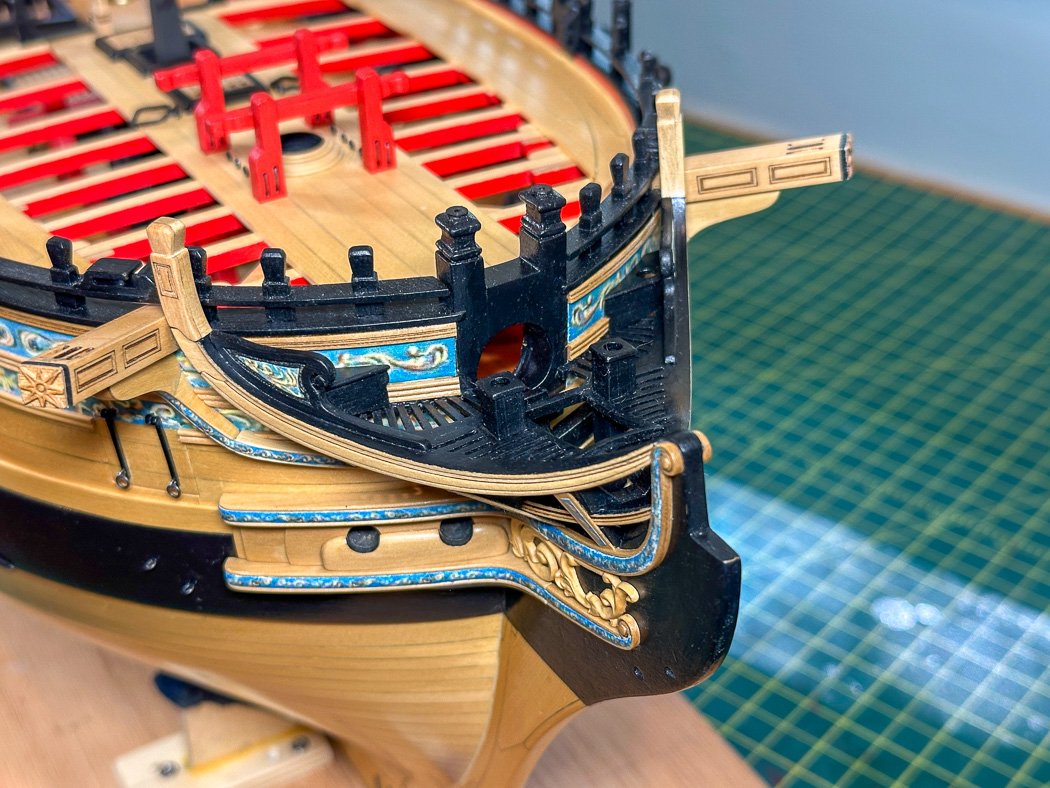
Finished With this my 66th post and three years since I began I have finished my HMS Winchelsea. I’ve included a few final photos, in each I am reminded of the time and effort I put into that section of the model. It was important for me to get it right, I was never reluctant, or better said even if I was reluctant, I’d take it apart, tear it off and do it again, often multiple times. I like to think my hull has three sides worth of planking. Like those before me I commend, thank, and appreciate Chuck for his outstanding design and quality parts from beginning to end. I appreciate his patience in answering my questions and his unfailingly providing replacement parts when I exhausted the included spares. Thanks Chuck for giving me the experience of building this amazing model. While many smaller parts were provided in boxwood, the majority of the model is Alaskan Yellow Cedar. It is beautiful wood, my Cheerful completed 4 years ago continues to age into a pleasant golden tone. The AYC is just right for its color and woodworking properties, it and the boxwood blend well together. In the end I decided not to include the lantern, sorry. I built it and it’s fine, my “candle” even turned out great. However, the stern with all its intricate figures, friezes, and combination of small parts is likely my favorite part of the model. I just couldn’t bring myself to deflect any part of that view, let along drill into the boxwood crest. So historical accuracy is set aside this one time, I built a little stand for it to sit on a shelf and there it will stay. So here are the photos without further commentary: My thanks and appreciation to those that have followed my log these past three years, I hope it was helpful or at least entertaining. I’m not sure what’s next, I’ll take some time to think about it. If on the other hand you’re wondering what your next project will be, Winchelsea is a great challenge to take on. It sure was for me.

- 840 replies
-
- 30
-
-

-
- winchelsea
- Syren Ship Model Company
- (and 1 more)
-
Definitely, but that’s going to be a bit of a wait.
- 840 replies
-
- 1
-
-
- winchelsea
- Syren Ship Model Company
- (and 1 more)
-
There are multiple heights of that same style brass pedestals available. I used two different ones on my model. I did scratch build a few of the deck furniture as the kit supplied ones are horribly out of scale, as described in my log. Nice work for a first model, you’re doing great.
- 39 replies
-
- 2
-
-

-
- Amati
- Victory Models
- (and 1 more)
-
Yep. Not sure what I’ll do with myself…
- 840 replies
-
- 2
-
-
- winchelsea
- Syren Ship Model Company
- (and 1 more)
-
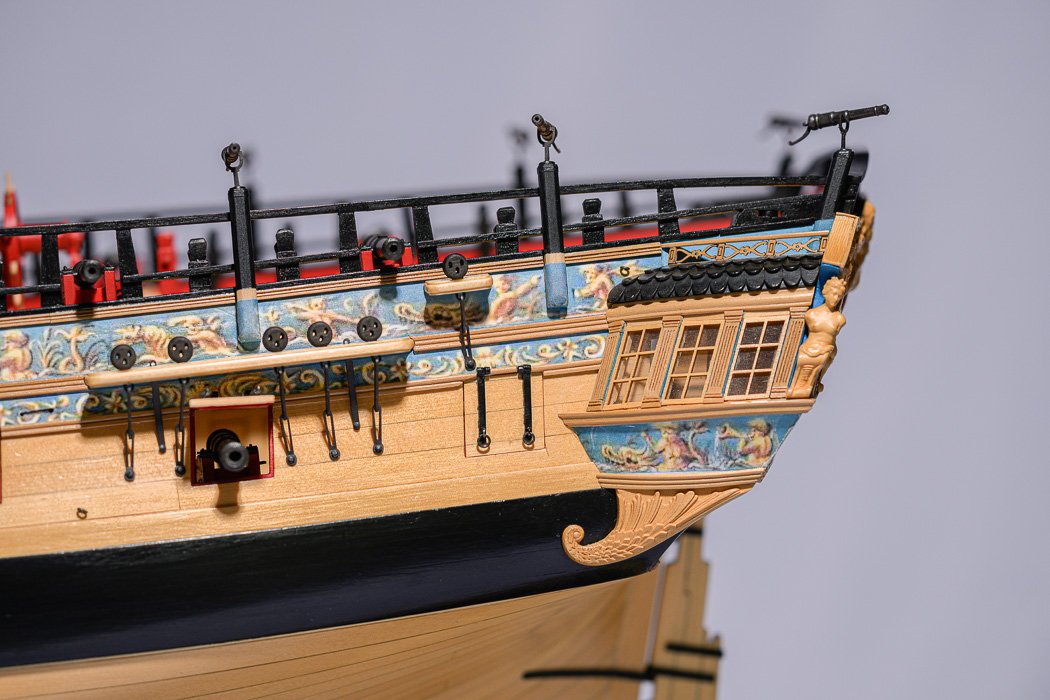
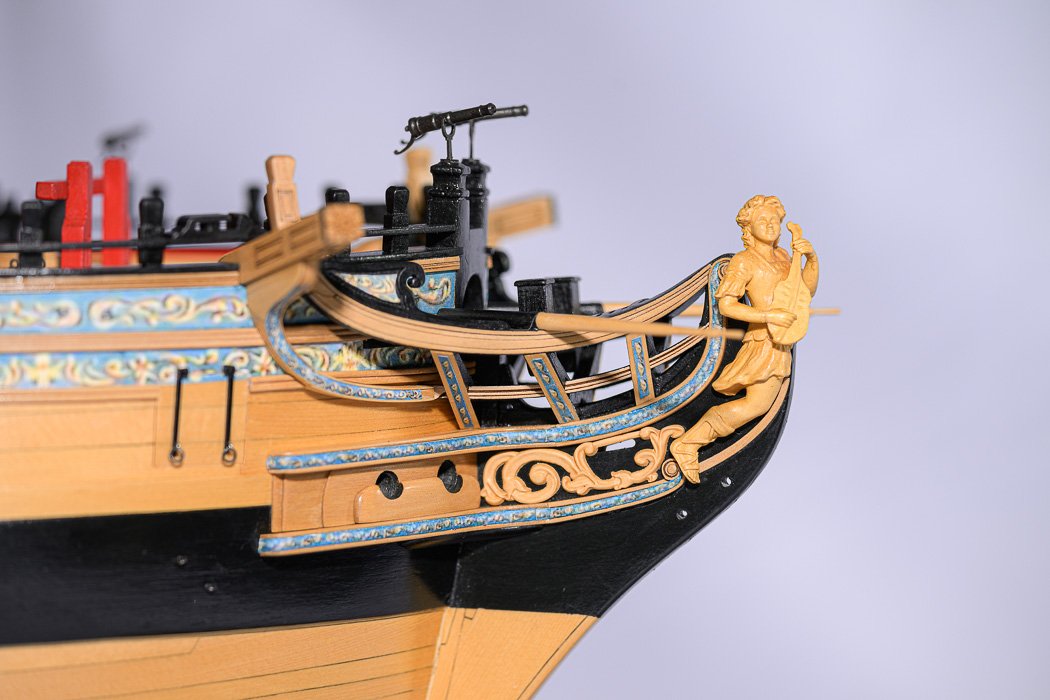
Bumpkins, Completed Headworks I’m nearly at a the finish line. The bumpkins, were they drunk when they named these…, are completed and installed. Like a few others I couldn’t bring myself at this stage and in this tight area to drill thru and/or remove moulding, so I faked it as best I could. The brackets are added using black masking tape. The figurehead, the young man, patiently waiting, playing his mandolin, in my cabinet for three years, is now permanently installed along with the extensions of the hair brackets that have waited with him The model is now sitting on my pool table, temporarily on its soon to be home. I’m working on the lantern, not sure if I will include it or not, we’ll see. I’ll also dust, touchup, paint and buff where needed before the final photos. Thanks for stopping by.
- 840 replies
-
- 24
-
-
-
- winchelsea
- Syren Ship Model Company
- (and 1 more)
-
She’s been patiently waiting…😁
-
Let’s just say it has less red than mine. I built my Fair American by “painting with wood,” not a drop of paint on it, all variations of different woods. It was a fun project so I get it.
- 399 replies
-
- 2
-
-
- winchelsea
- Syren Ship Model Company
- (and 1 more)
-
The all natural wood approach is bold and interesting. Well done!
- 399 replies
-
- 2
-
-
- winchelsea
- Syren Ship Model Company
- (and 1 more)
-
Glad the fly tying thread is also working for you.
-
Gotta love building more cannon. Great work on chapter 9.
- 399 replies
-
- 2
-
-
- winchelsea
- Syren Ship Model Company
- (and 1 more)
-
Thanks Ben, much appreciated from a fellow builder.
- 840 replies
-
- 1
-
-
- winchelsea
- Syren Ship Model Company
- (and 1 more)
-
Thanks Chuck. Doing my best to do justice to a great design.
- 840 replies
-
- 1
-
-
- winchelsea
- Syren Ship Model Company
- (and 1 more)
-
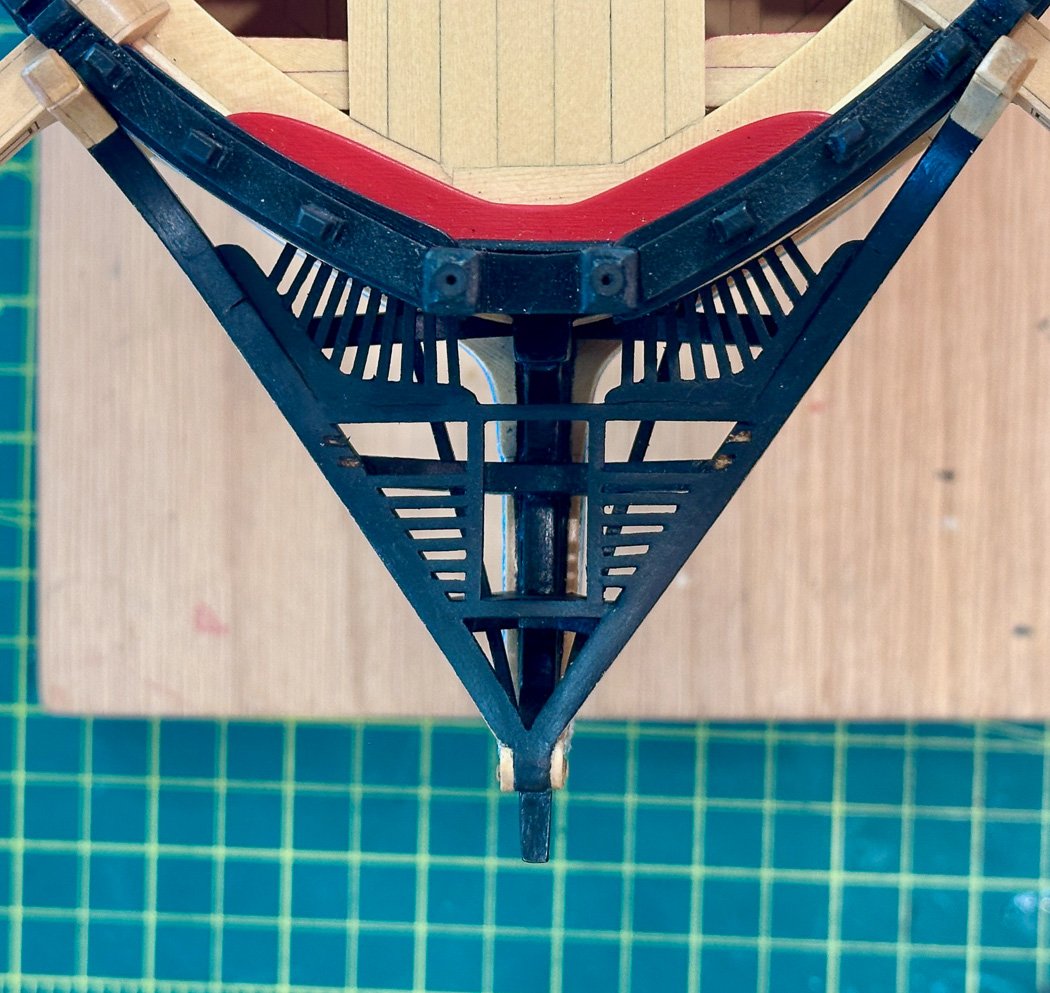
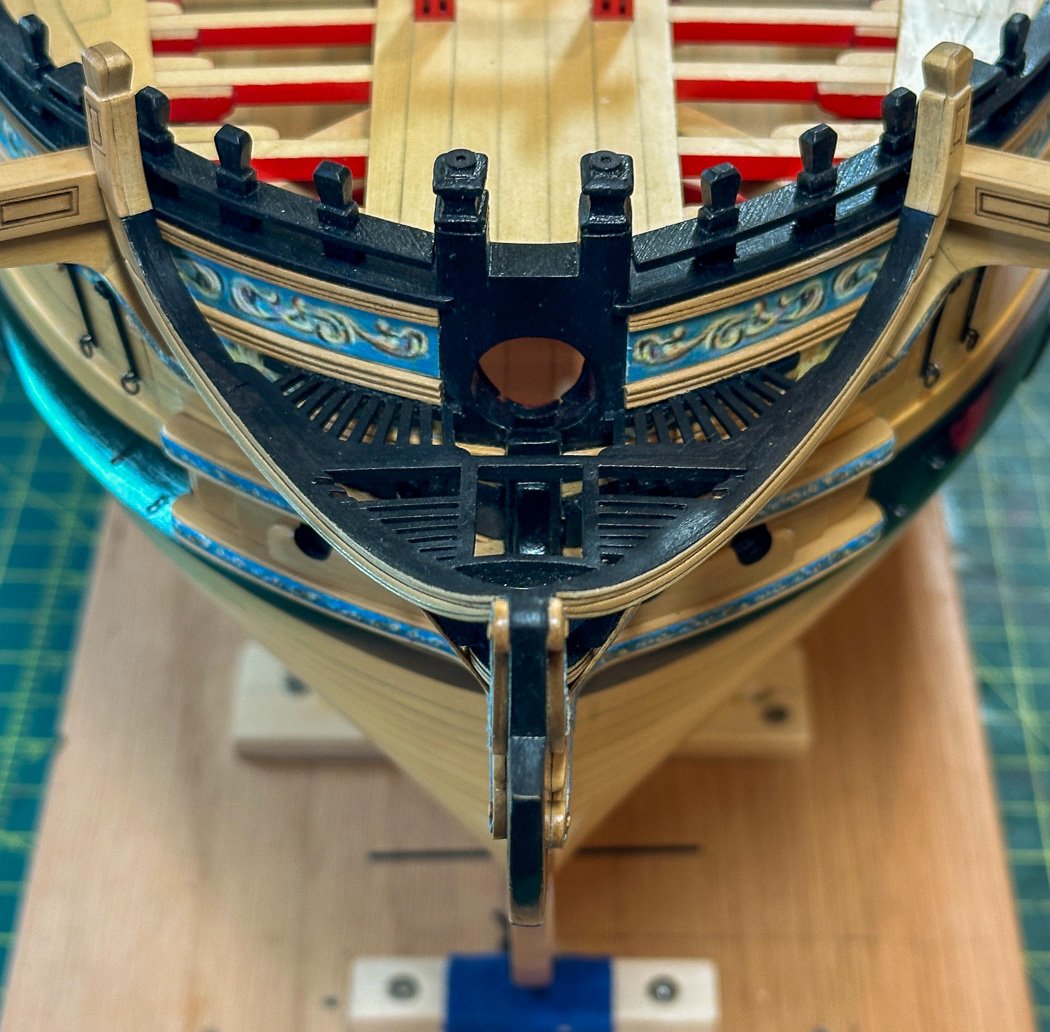
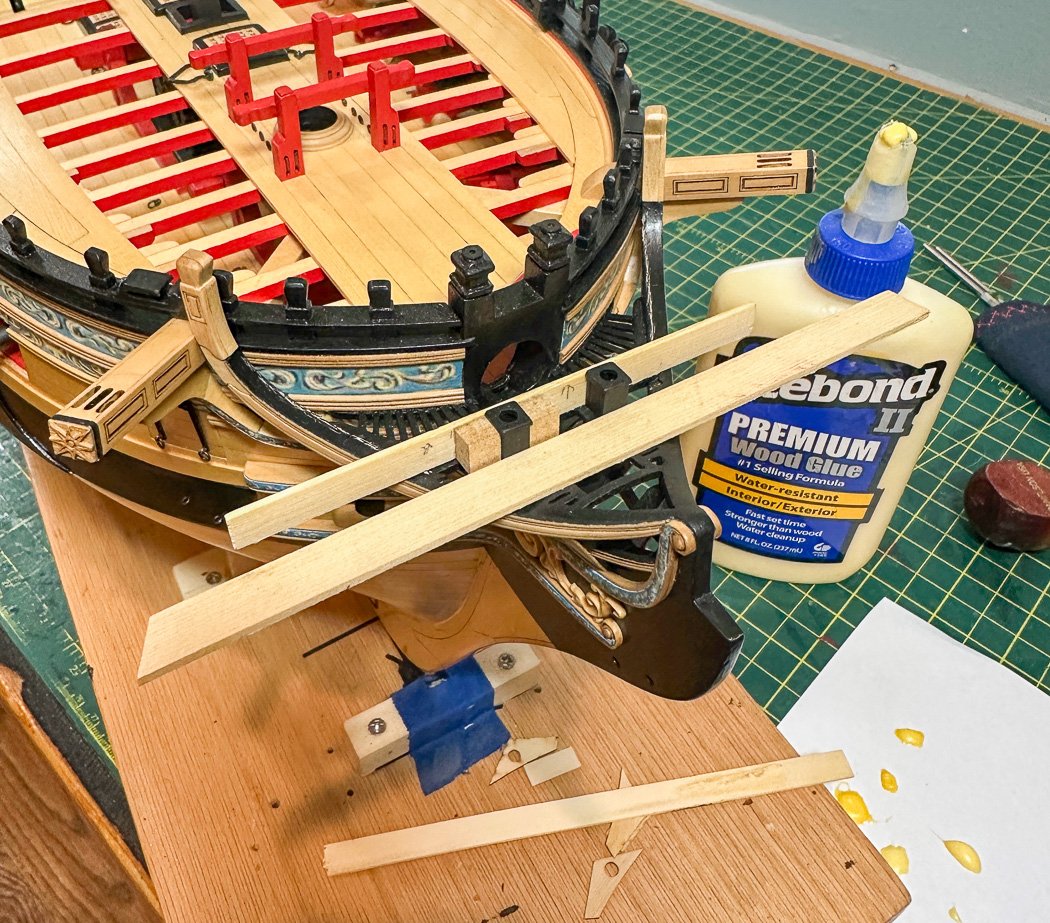
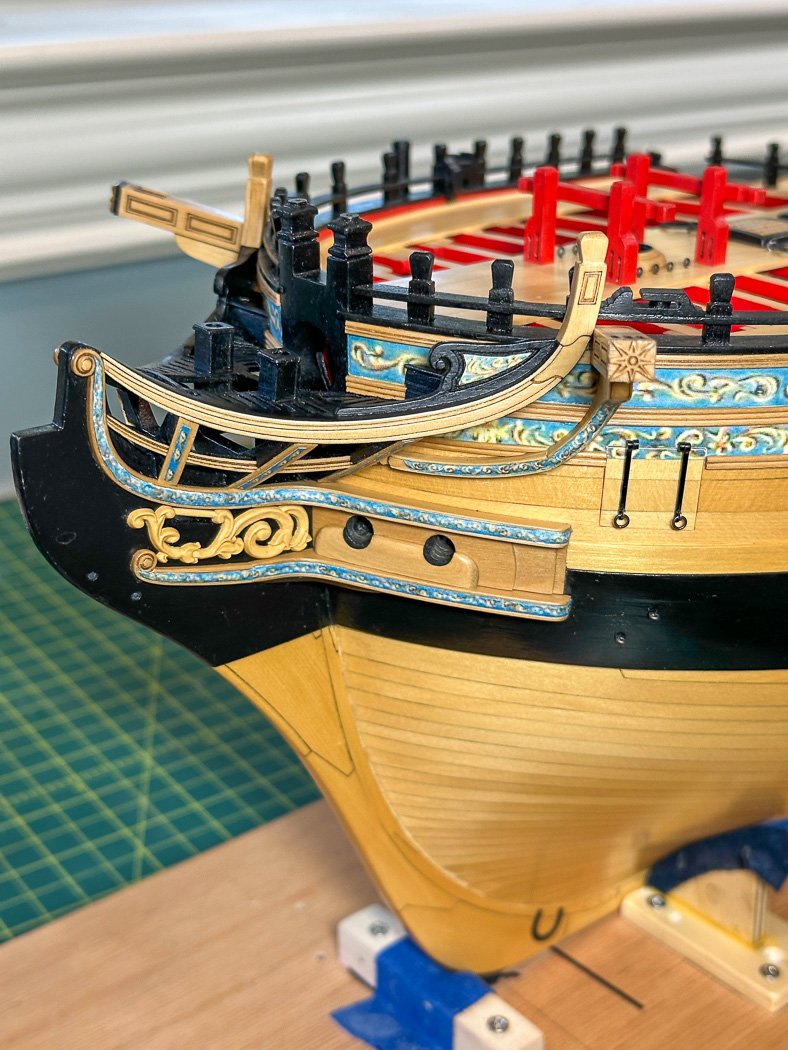
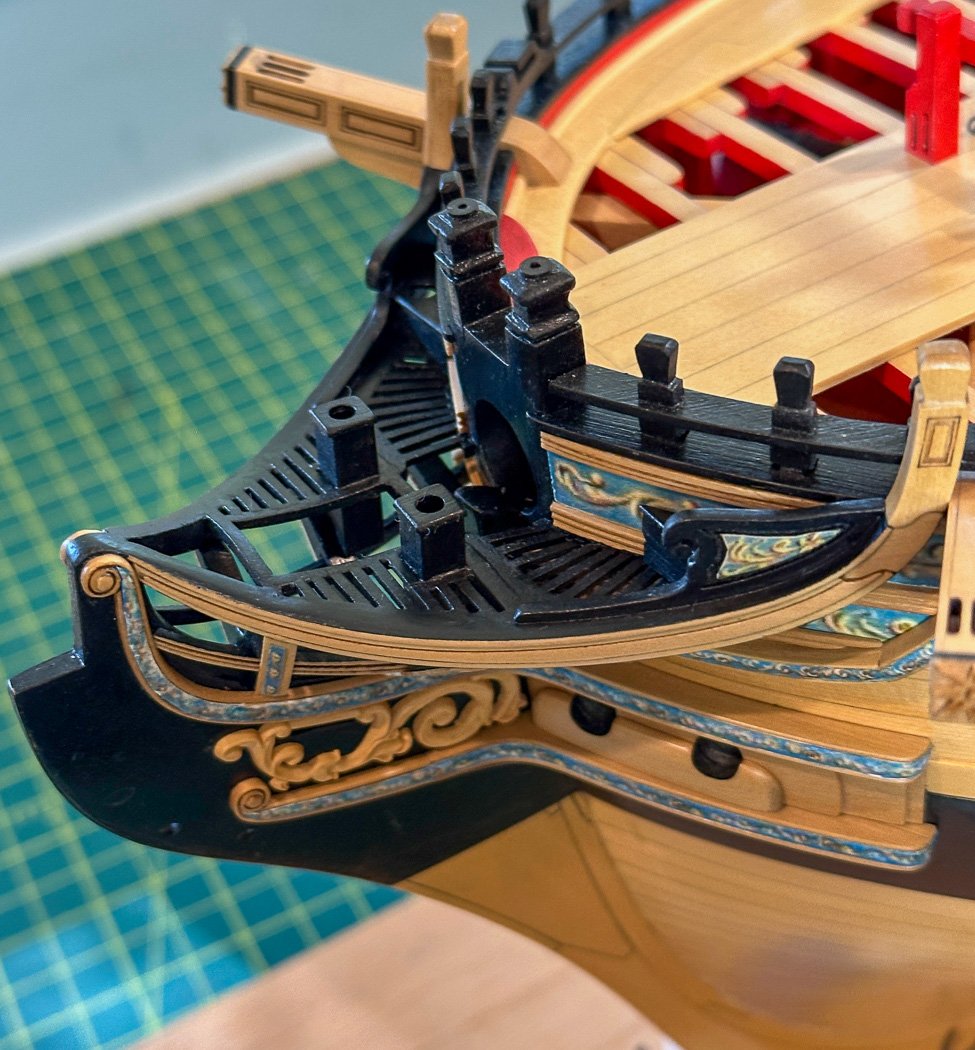
Cathead Supports - Head Gratings & Poop Chutes It’s been a minute. I have spent four months on Chapter 12, though the shop has been closed or not visited about half of that with travel and family time. It’s almost like I forgot the rest of model with my total focus on the small real estate forward of the bollard timbers for so long. Look, there are cannons back there. Cathead Supports: Tweaking. A word we modelers use a lot. Not to be mistaken for Tweakers, which is a whole different thing. For me Chapter 12 has been a whole lot about tweaking. Tweaking taken to a whole other level. Nothing much to add other than sand and shape, test fit, followed by more sand and shape, test fit, and repeat. I removed two levels of moulding at the bow to get a better fit. I so enjoy the trauma of removing it without destroying the hull finish or ripping up the friezes. Not to mention the fun of getting them back on inside what has become a tight space. Head Gratings: When I first saw photos of head gratings by those who went before me I wondered how it all fit together or more precisely how I’d fit it all together. More, a lot more, of the required tweaking is how. The gratings consist of 46 separate little pieces of wood, each and every one custom fitted one by one by one. It’s also when you learn just how important was the measuring, sizing, squaring up, leveling, and fitting done in Chapters 1-5. There was a little variance I was able to account for by adjusting and sanding a few of the pieces, the goal is symmetry and visual match of the two sides, a little of here and there isn’t noticed. the important visual element being those first gratings either side of the bowsprit be equal-distant apart. It takes a great deal of time to make it all work, cutting each of those little pieces for a tight fit. It took a long while, but it’s worth it in the end. Poop Chutes: Speaking of taking time. While the forward two to just took a little squaring up to assemble I had to take care to center, align the height from the grating, and square them up to each other. I made a simple jig to manage this, it worked out quite well. The lid sits above the jig side pieces to create a total height of 5/16. It, along with the front piece, squares it on all four sides and with its partner. I still have to think how challenging it would have been to use these on the high seas, I think I’d wait on the back, more sheltered two myself. Good time to point out I elected to use Titebond II for all the head gratings and poop chutes. I needed the setup time it provides to adjust positioning and holding power, not too short like CA, not too long like white PVA. Plus it’s stronger than the wood once it’s dry. Although only two pieces the rearward two seats take a lot of time and patience to fit with the various angles. Like the forward two they need to appear identically aligned with the gratings and false rail, a few adjustments creates that look. The reward, as with the rest of the model, is the historical accuracy and detail that Chuck has built into this design. Now to remove some of the dust. Can’t say I want to fit head timbers again anytime soon, though I sure do like the way it all ties together. Also I’m not taking much time with my iphoneograhy. The glare is bad lighting, the model in reality does not have the shine seen in the photos, the white balance is all over the place. Thanks for stopping by with your likes and comments - I’m ever closer to the completion, only the bumpkins and lantern to go.


- 840 replies
-
- 24
-
-
-
- winchelsea
- Syren Ship Model Company
- (and 1 more)
-
Well done, you’ve done a wonderful job with her!
-
I’d say go with the plans, however from a model perspective six of typical hand pumps around what appears to be the mast would result in a very crowded look and likely make rigging more challenging than it needs to be so my input is chain pumps. They are a nice look on a deck. …..later after the refit, seeing his men jammed together trying to pump out water Aubrey replaced the hand pumps…
-
I enjoyed making the mast coat a little more special. Nice work on yours.
-
My friezes look great as they are printed then sprayed as described in Chuck’s instructions. I’m not sure how paint on paper would hold up over time, but then I’ve never tried it. I was skeptical of the paper friezes at the start, but now two-three years since I applied them I’m more than happy with the result. However it’s your model and you should do as you wish, conducting experiments is always a good plan.
-
Any hardware store. And correction. Denatured alcohol (also used as camp stove fuel) not isopropyl alcohol
-
Isopropyl alcohol is useful in loosening white/ yellow glue (not CA) glue, a modelers best friend, a better than sawing. Isolate the area with paper towels, apply it with a dropper and give it seconds not minutes to work. It may take more than once for yellow glue, white PVA separates quickly. Never be reluctant to remove, back up, restart, replace. These are wood models, not assemble in place plastic ones. Wood is very forgiving if treated carefully. I’ve backed up on hull planking that I often feel like I’ve planked three sides of a hull. Often laser cut parts are cut a little big on purpose to allow for variations in each build, no two models are the same. You can sand it smaller, can’t make in bigger. As pointed out getting the ‘infrastructure’ or bones of the model correct is crucial to your enjoyment at later stages. Vanguard models are excellent, both for quality of parts and depth of instruction. You’re off to a good start. Have fun. Although without Chris’ skill and while I have that mouse sander I rarely use it for fear of losing the symmetry of the hull. I just sand away by hand.
- 129 replies
-
- 4
-
-
-
- vanguard models
- Sherbourne
- (and 1 more)
-
I agree with Rusty, there is always another model that needs building. Two dozen has a nice ring.
- 131 replies
-
- 2
-
-
- Medway Longboat
- Syren Ship Model Company
- (and 1 more)