DelF
-
Posts
1,409 -
Joined
-
Last visited
Content Type
Profiles
Forums
Gallery
Events
Everything posted by DelF
-
 Technically I suppose what I called spirketting was really the waterway, or a combination of spirketting and waterway as this drawing shows.:
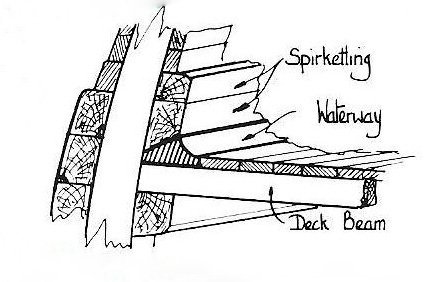
- 345 replies
-
- 1
-

-
- Duchess Of Kingston
- Vanguard Models
- (and 1 more)
-
Thanks David. Ships did indeed have spirketting - I’ll see if I can find an illustration to post later. My flush cutter is by Xuron. I find their tools well made and durable.
-
Your model is coming along very well. Most likely black in common with naval practice at the time. I painted mine black which makes a nice contrast with the unpainted masts. I chose not to paint my tops, but that was only because I didn't want to cover the boxwood. Sometimes, aesthetics is more important to me than historical accuracy! I'm not sure what your question is about the shape of the yards in the AOTS book (unless you meant shaded?). They are octagonal in the central portion and round elsewhere. I took all my mast and spar measurements from the book (including the mizzen topgallant which isn't in the kit) and was happy with the result.
-
William doesn't look impressed at the idea of using him as a scapegoat (or maybe he's groaning in anticipation of Glenn's post!). Fortunately my shipyard assistant, Hector, is too small and lazy to eat important stuff, unless it falls off the workbench and straight into his mouth: Happy New Year to you from me and Hector

- 857 replies
-
- 7
-
-
- Sphinx
- Vanguard Models
- (and 1 more)
-
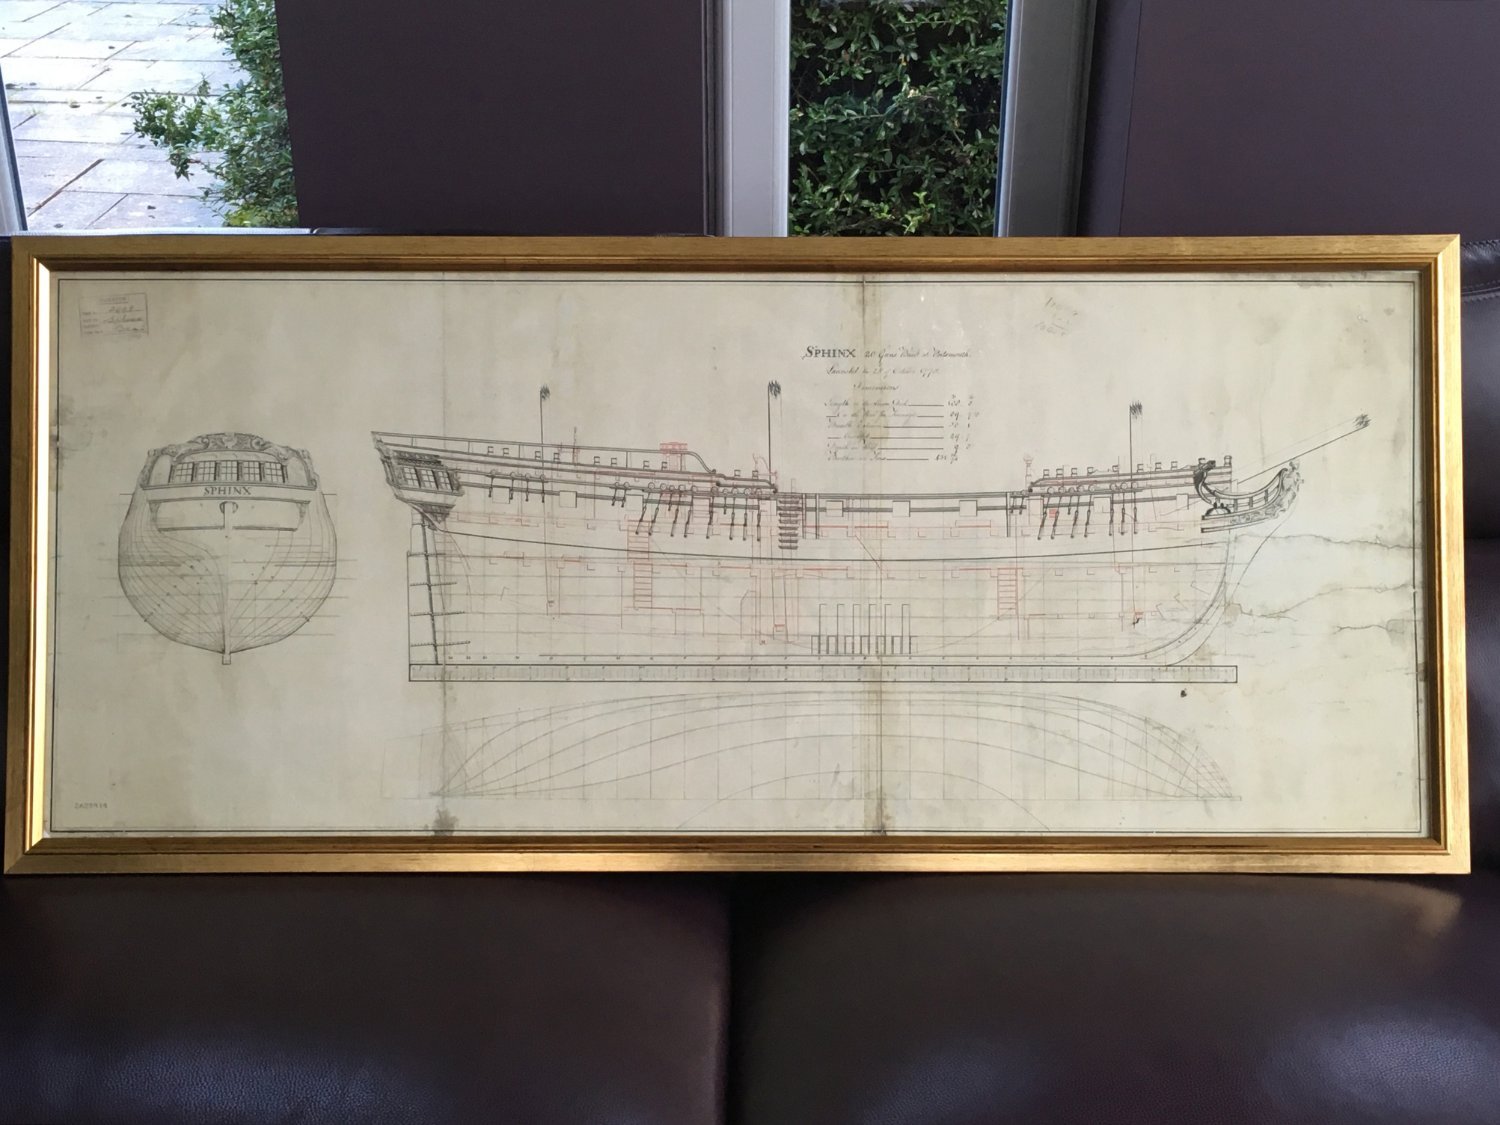
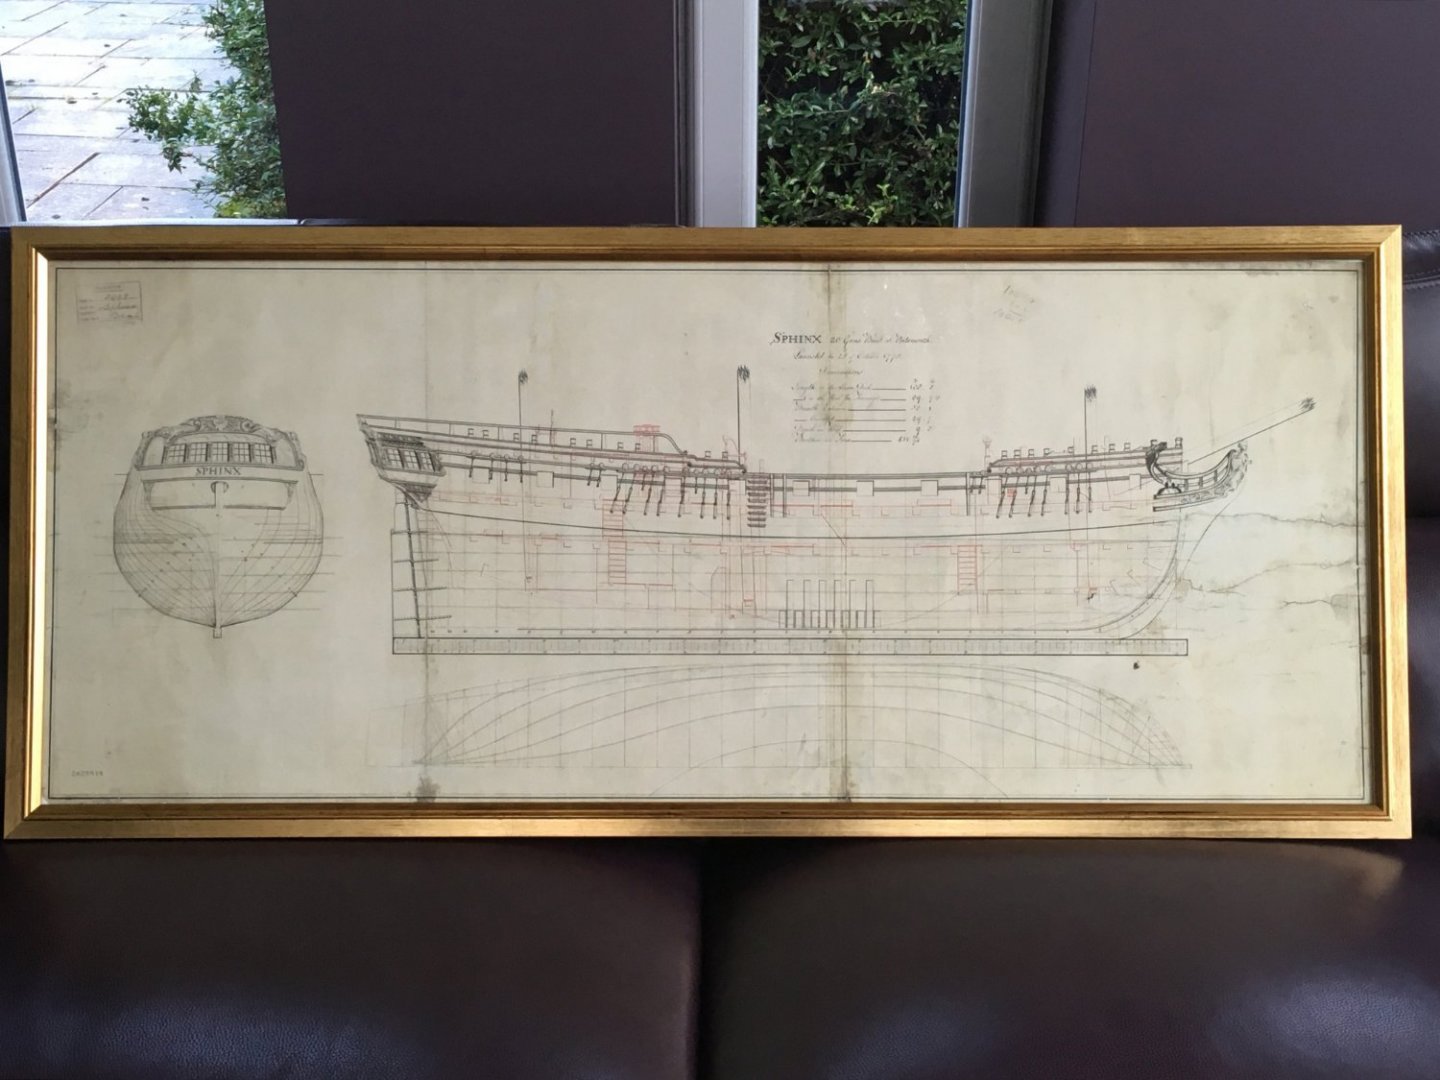
I just got this NMM plan of HMS Sphinx back from the framers and couldn't resist sharing it, even though not directly related to this build. However it's also by Vanguard Models so there is a link. Happy New Year everyone! Derek
- 345 replies
-
- 11
-
-
- Duchess Of Kingston
- Vanguard Models
- (and 1 more)
-
Looking great David. Like you, I'm still getting the odd photo refusing to upload resulting in the 200 error code. I noticed there were two Windows 10 upgrades on 17 December which is when I first experienced the problem. Coincidence?
-
Thanks (I think!). Hopefully not too much detail, but to be honest a lot of it is for selfish reasons. I take so long to build ships that I would forget half of these techniques between models if I didn't write them down. If it helps other people then that's great too. The photos are the best I can do on an ancient iPhone 6SE.
- 345 replies
-
- 2
-
-
- Duchess Of Kingston
- Vanguard Models
- (and 1 more)
-
Glenn, I had promised to stop pointing out your autocorrect typos, but now that you've mentioned it yourself I'll take that as the green light to continue. My favorite is still "sanding a rabbit on the bottom" from your Lady Nelson log (I hear the animal cruelty people dropped the case for lack of evidence), although I see the offending typo has now been edited. Spoilsport. Derek
-
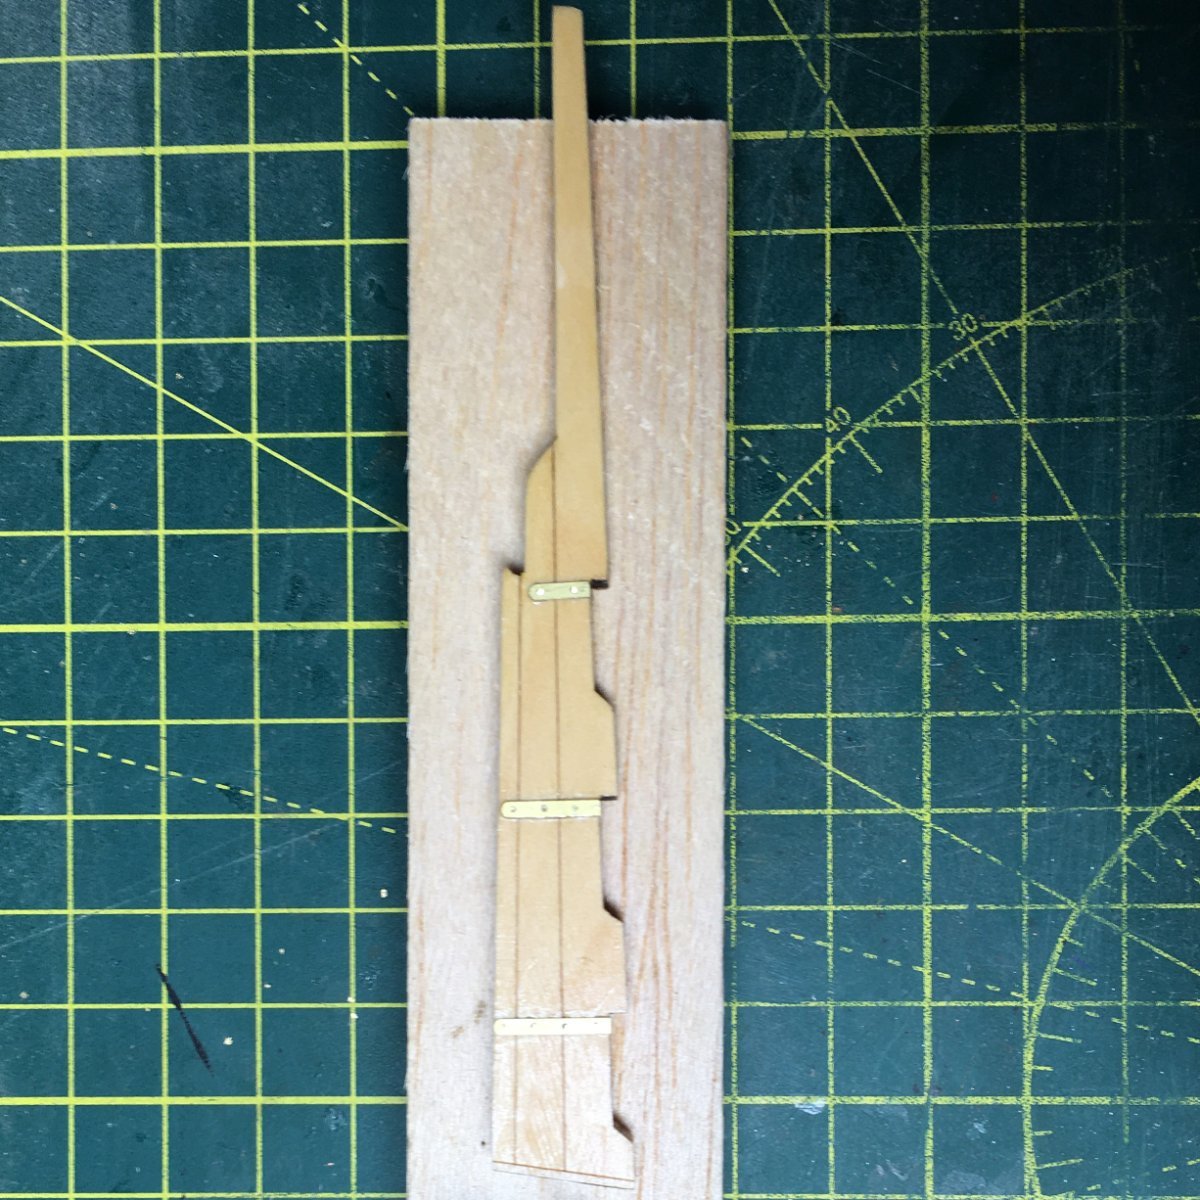
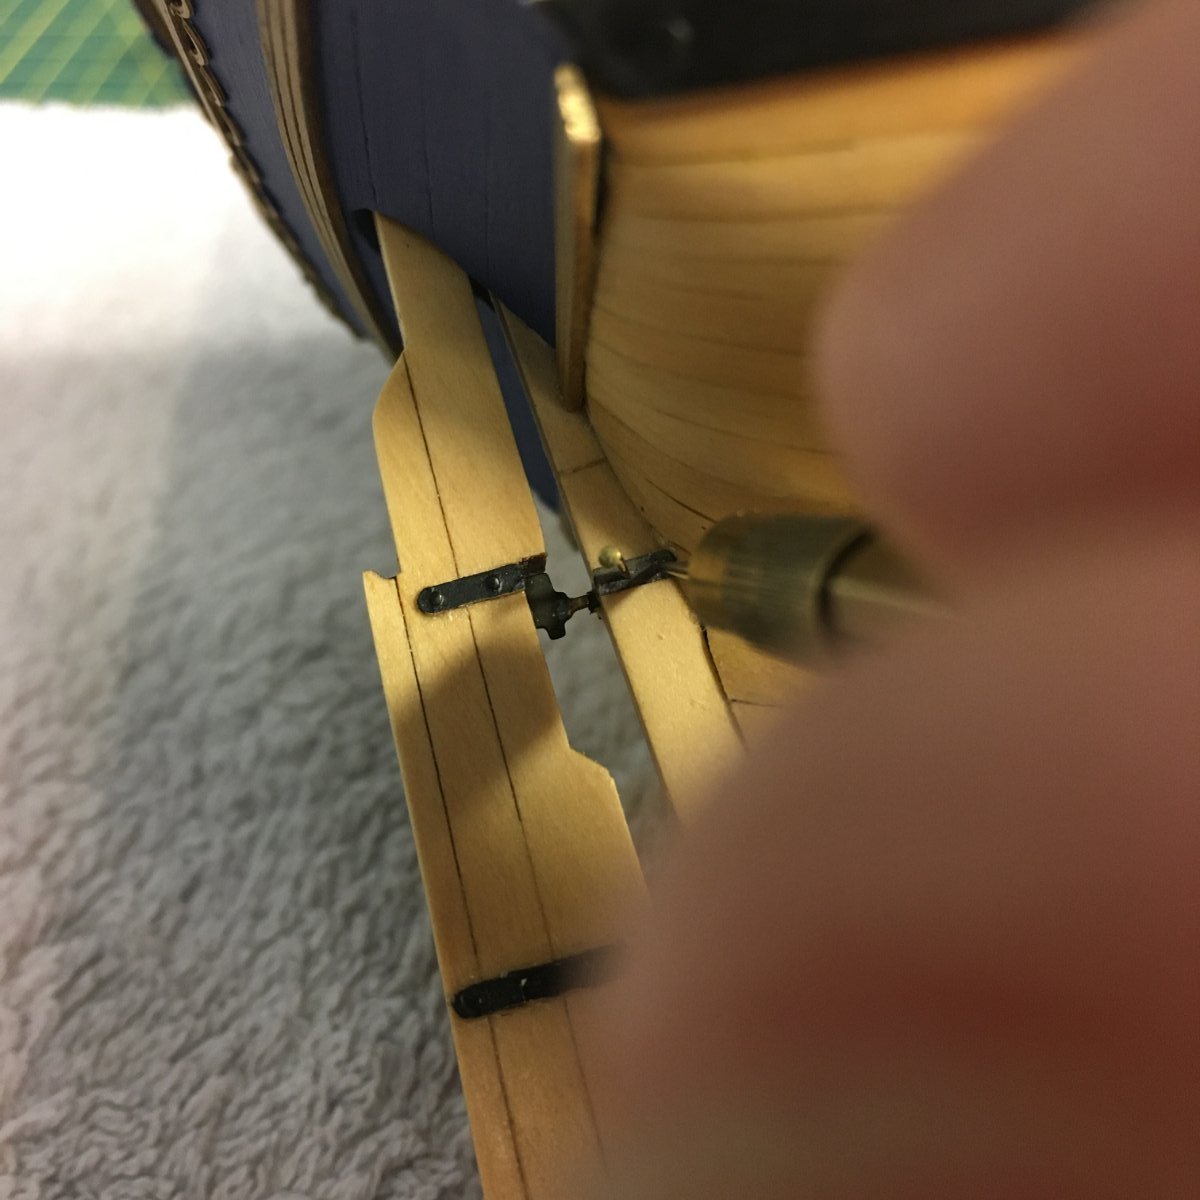
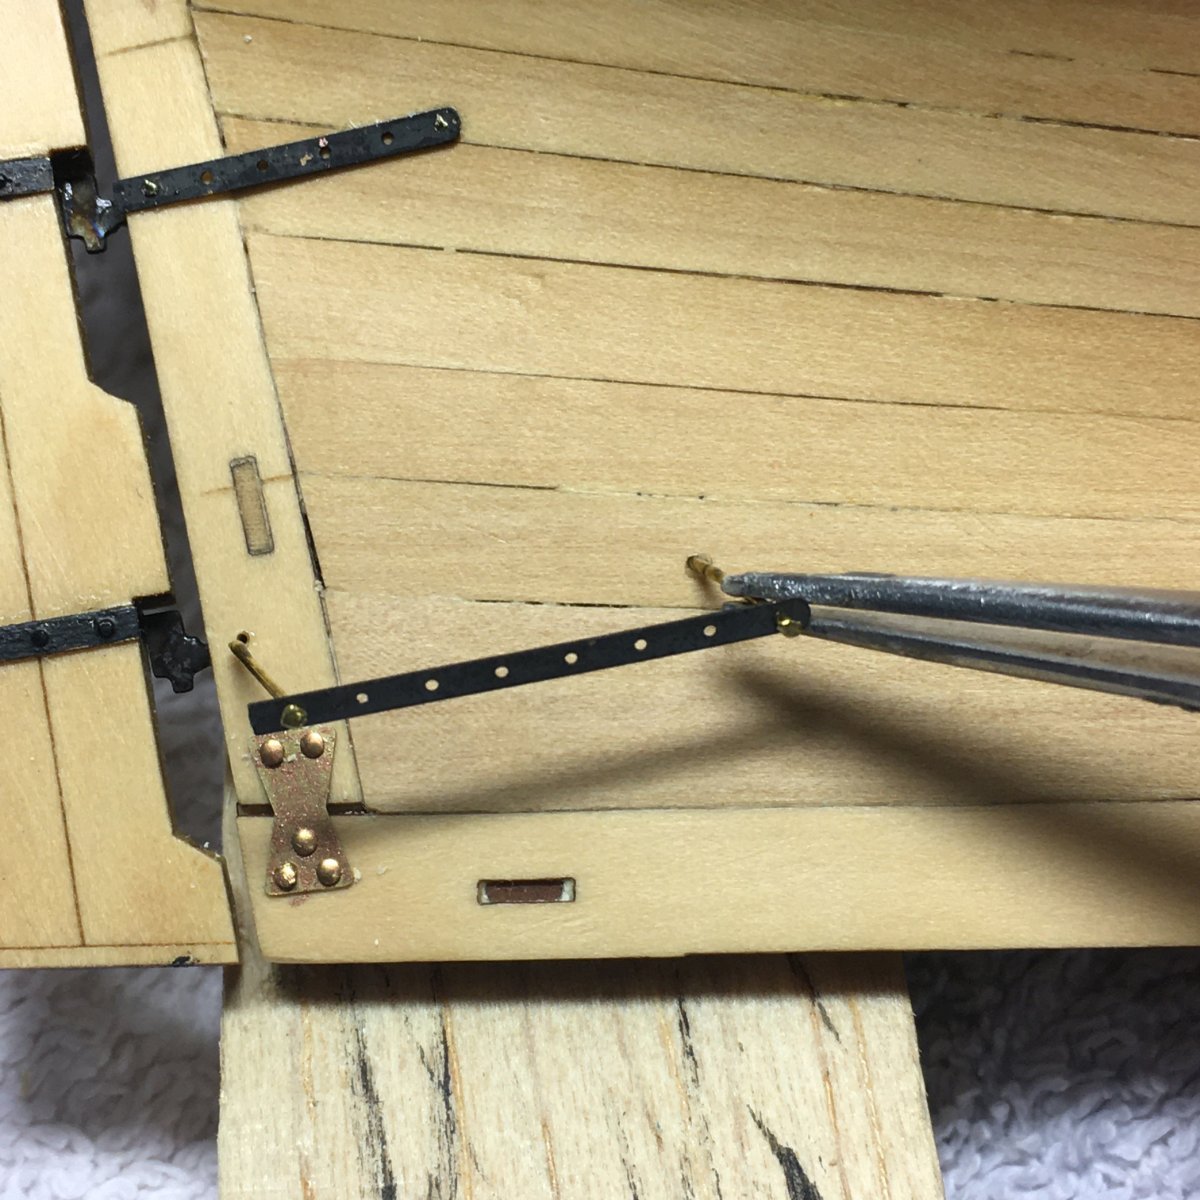
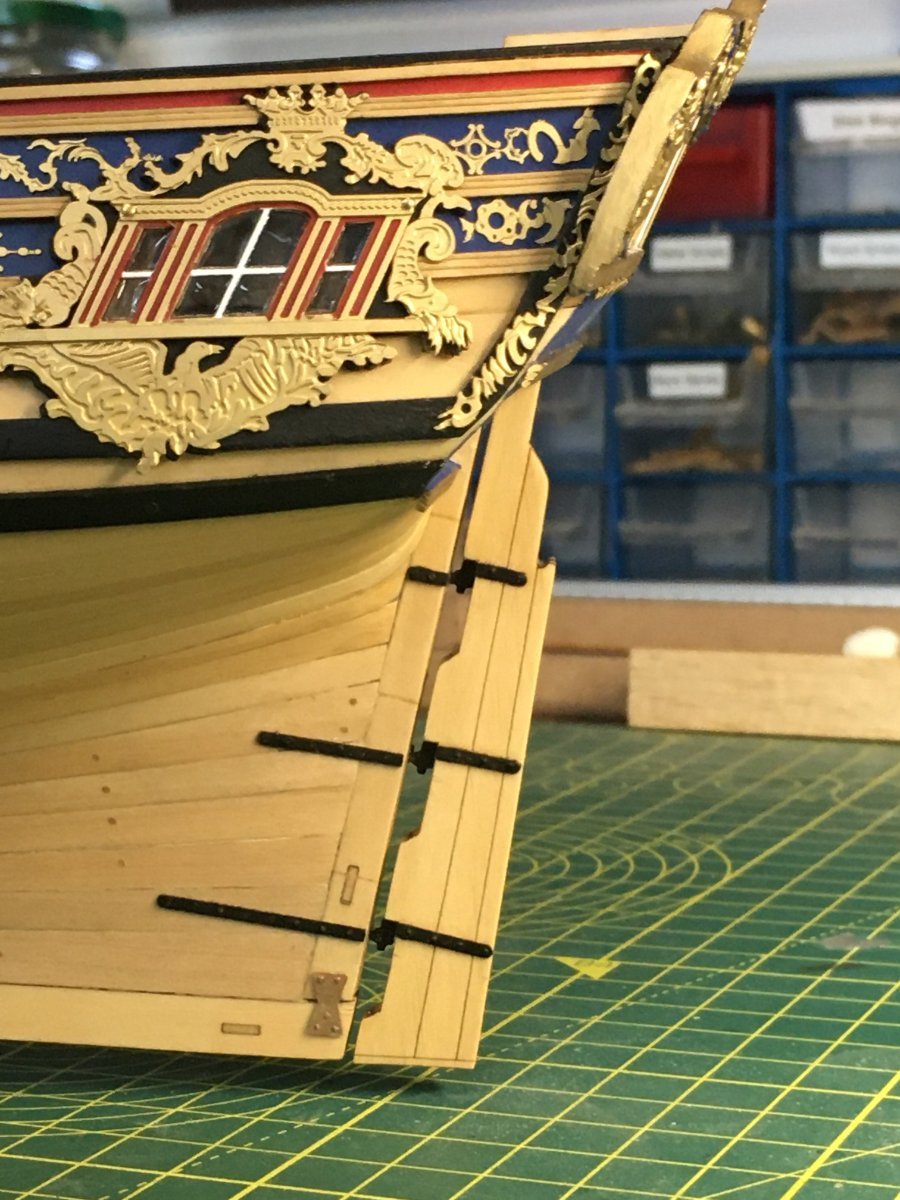
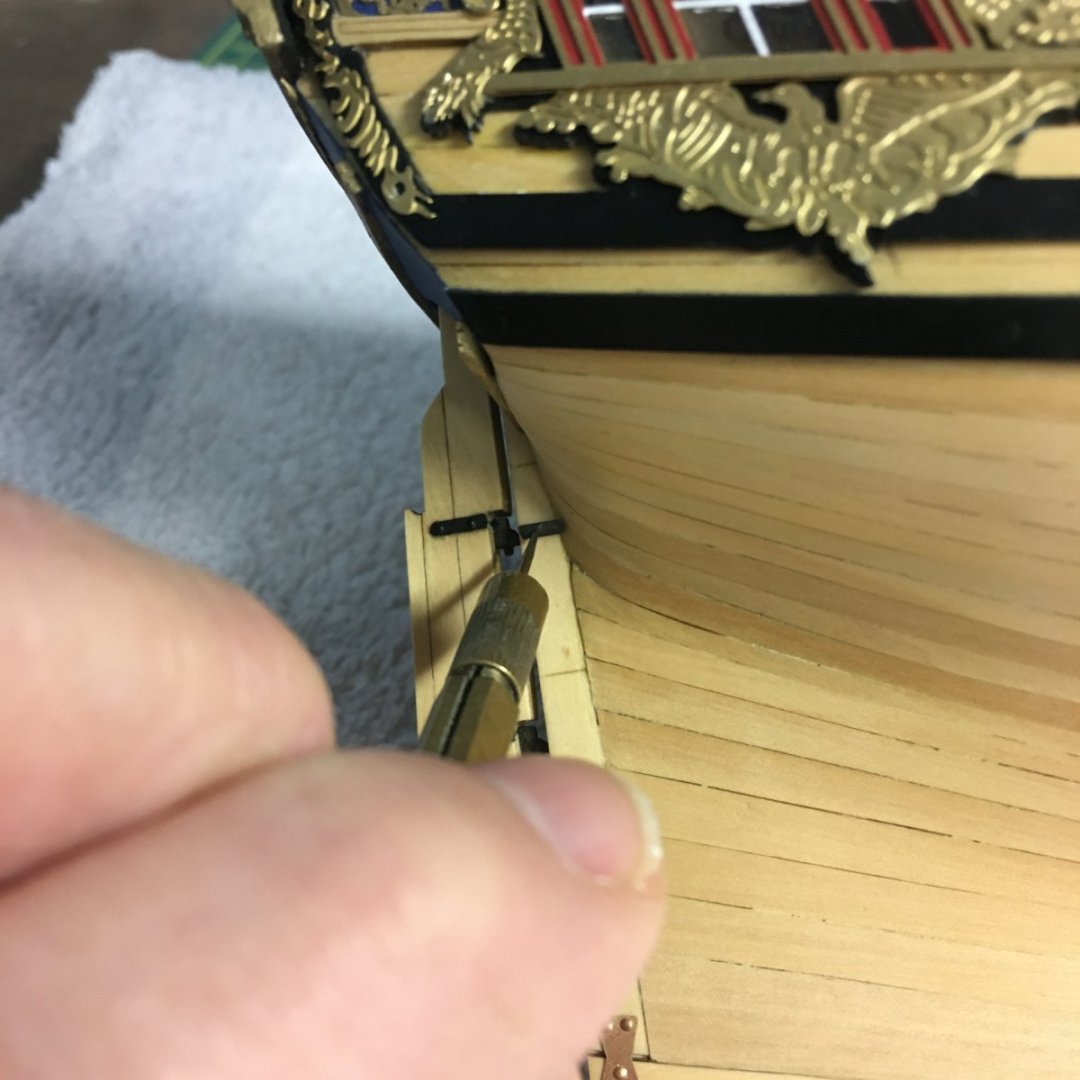
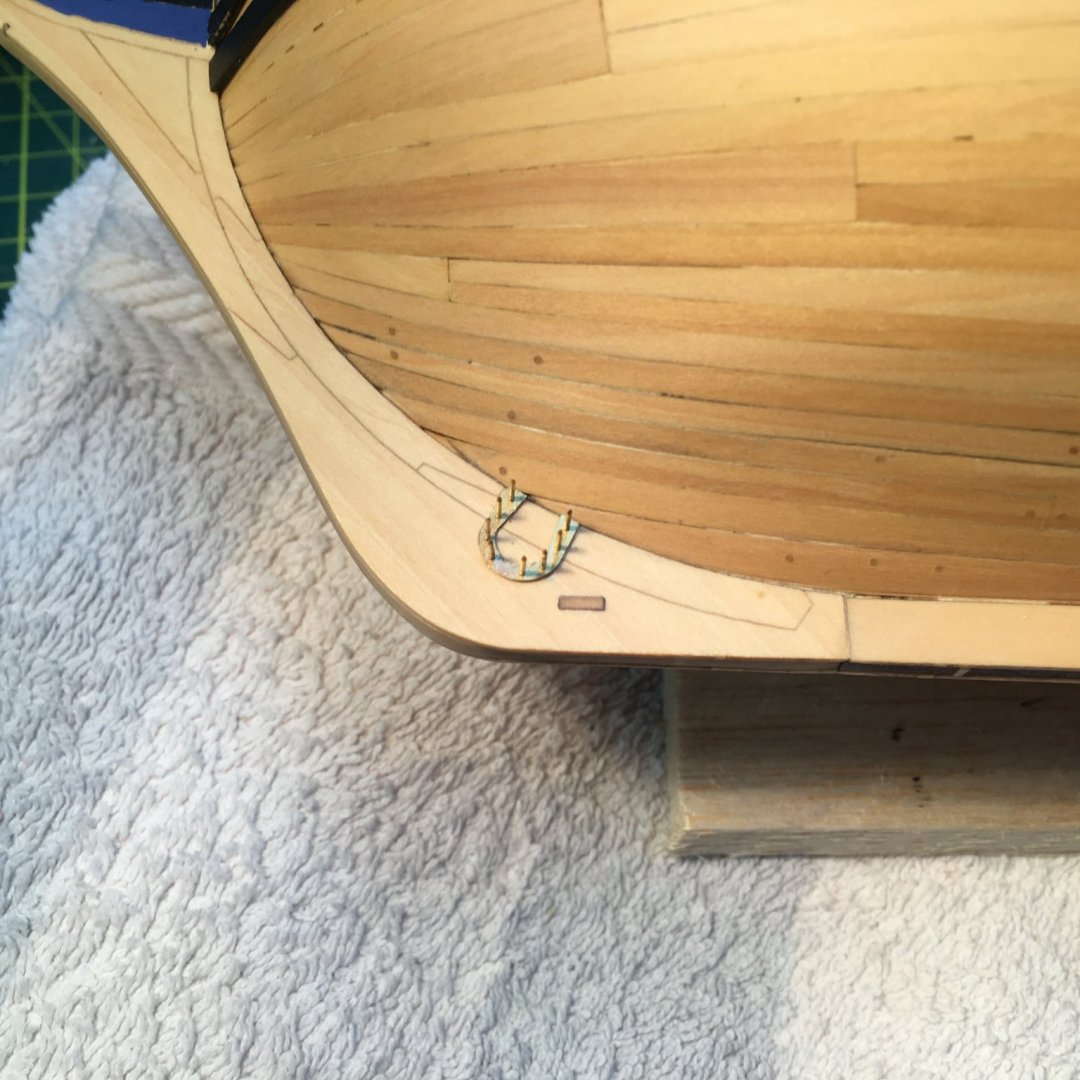
Rudder Constructing the rudder from the wooden core, boxwood veneers and photoetch parts was straightforward. My only change to the instruction manual was to snip the heads off the pins, otherwise I think they look over-scale for the bolts securing the straps: Once painted and the pintles fitted, the rudder fitted neatly into the three holes pre-drilled in the stern post: Fitting the straps to the hull was slightly trickier. Given the shape of the hull and the fact that it had several coats of wipe-on-poly, I felt trying to glue the straps would be a non-starter so I used the following method with pins. First, with the strap laid on the hull with no glue I used a pointed tool to mark the position of the hole nearest the stern, drilled a hole then dry fitted a pin. With that pin in place and the strap at the correct angle, I marked the second hole: I did all this dry, no glue. I found if I put CA on a pin and tried to push it through a strap, most of the glue would wipe off on the hole. The best method was to insert the two outermost pins first then apply glue to the ends before inserting them in the drilled holes: Once the pins were in place I snipped them short against the strap with flush cutters, leaving just enough showing to simulate bolt heads. Btw, this shot reminds me I should have beheaded the pins in the fishplate to avoid overscale bolts. Oh well, the port side looks OK. With the outermost pins in place on every strap I drilled through the intervening holes, just deep enough to take a short length of pin held in place with a tiny dab of PVA - any excess PVA being easier to wipe off than CA. Here's the starboard side finished, bar a little touching up: Here's the port side (if only to illustrate the point about the bolt heads on the fishplate!). Derek


- 345 replies
-
- 16
-
-
- Duchess Of Kingston
- Vanguard Models
- (and 1 more)
-
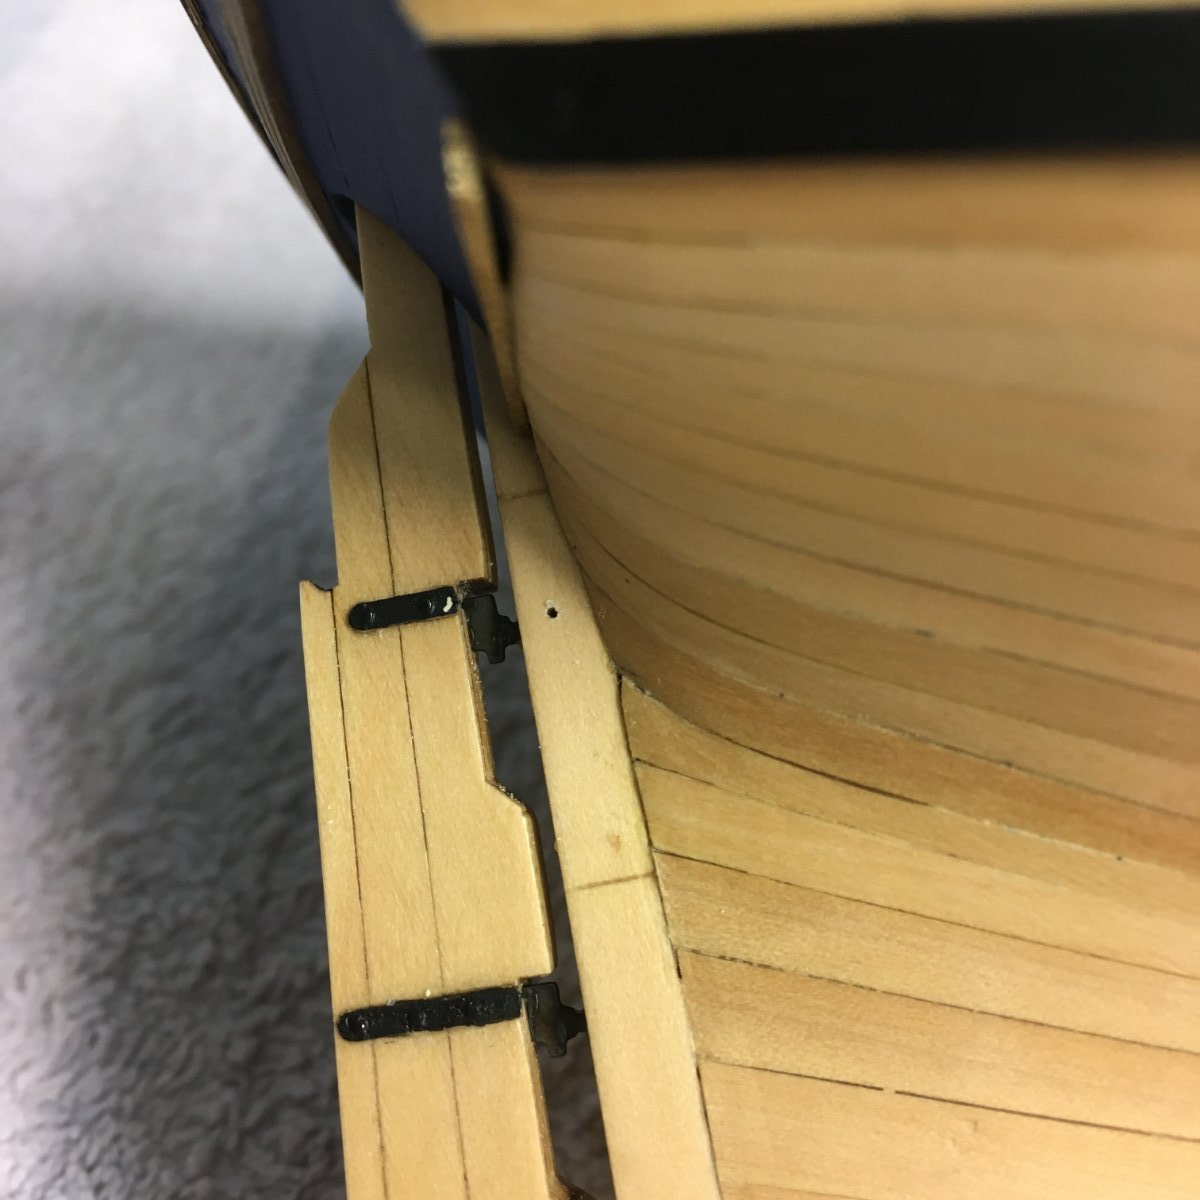
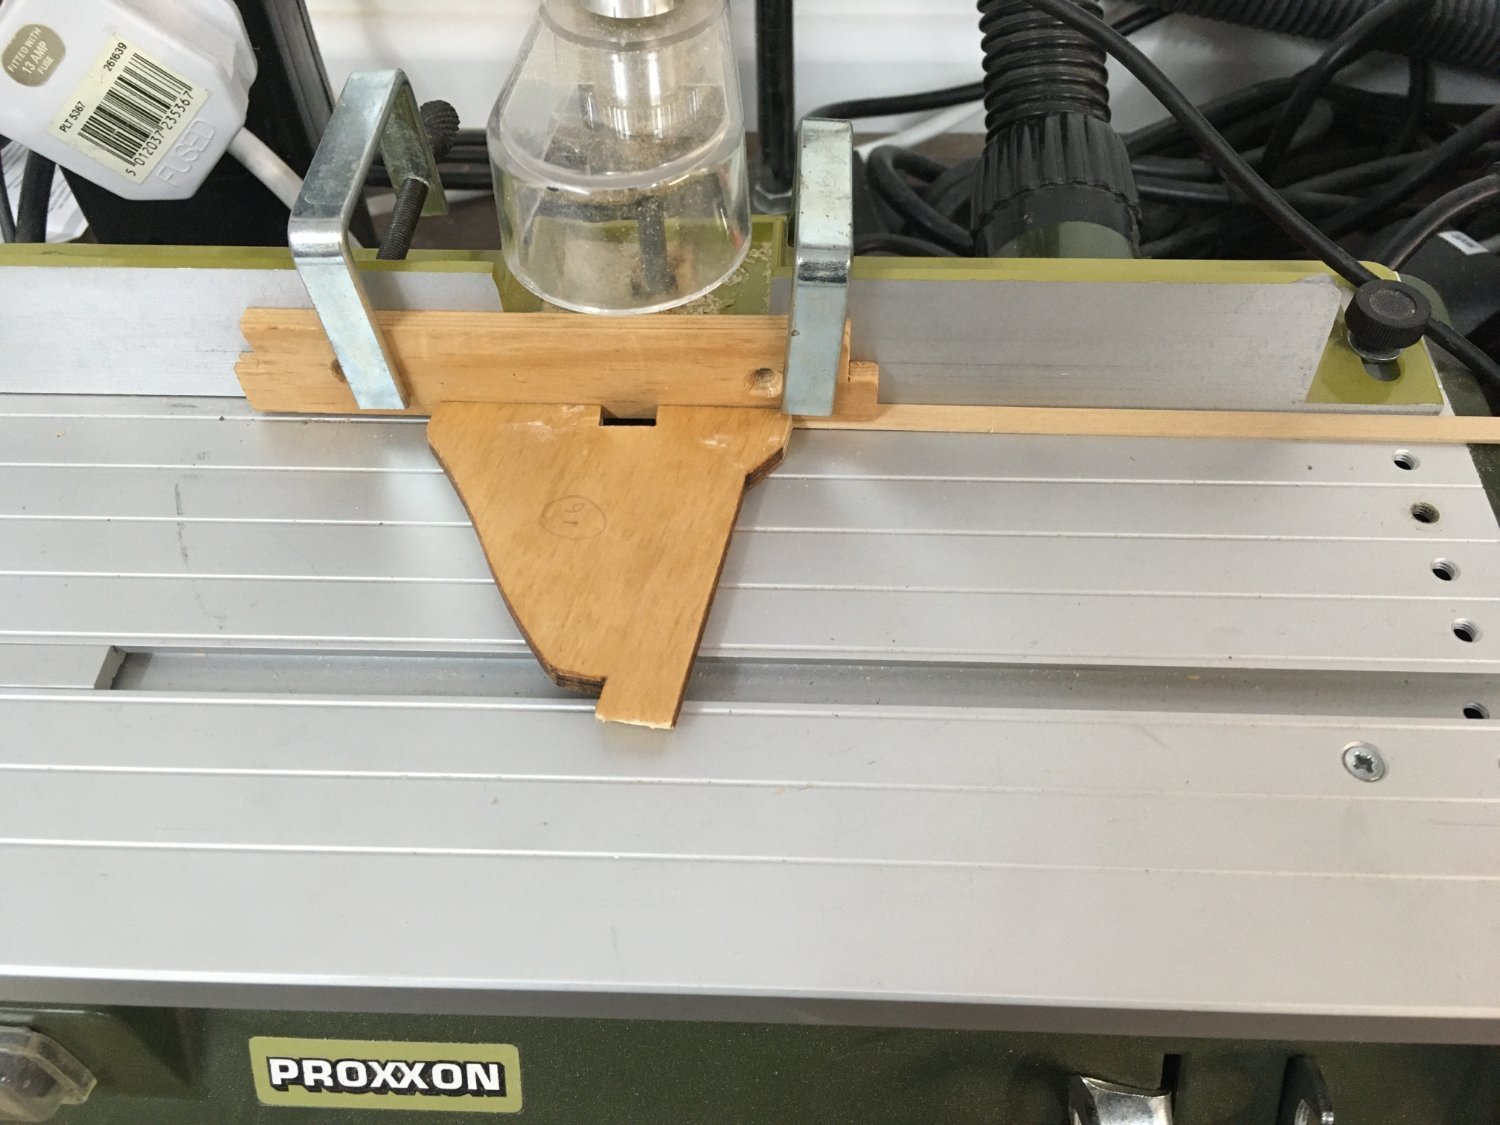
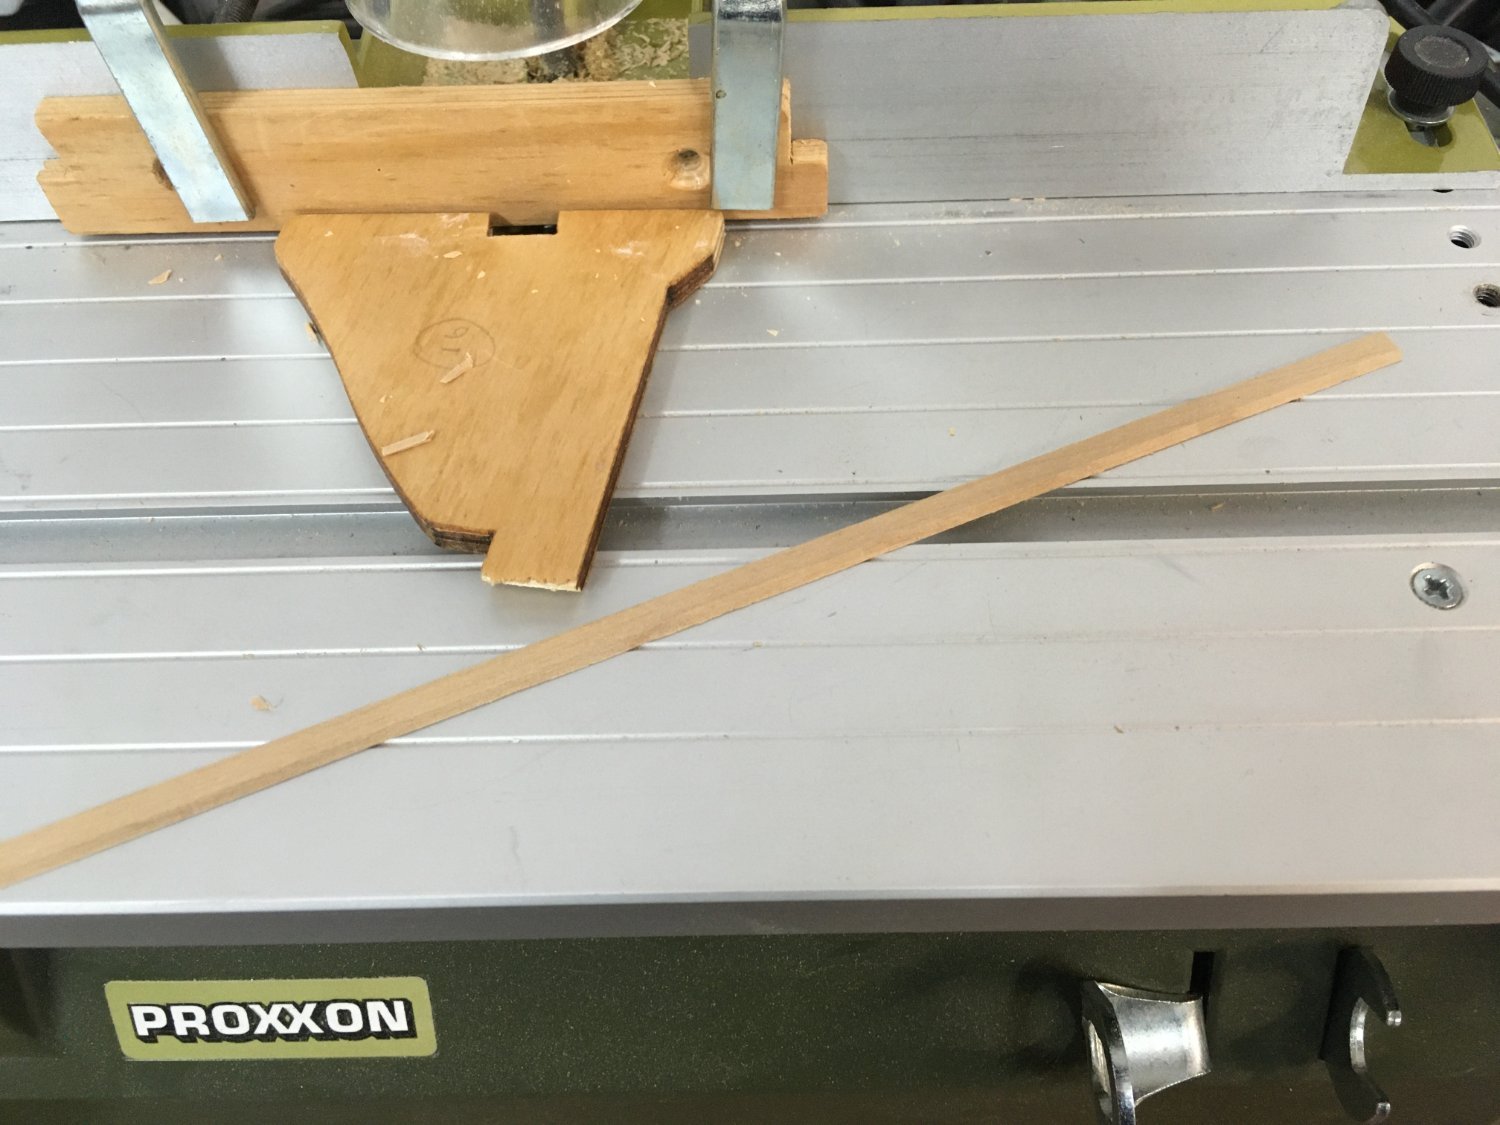
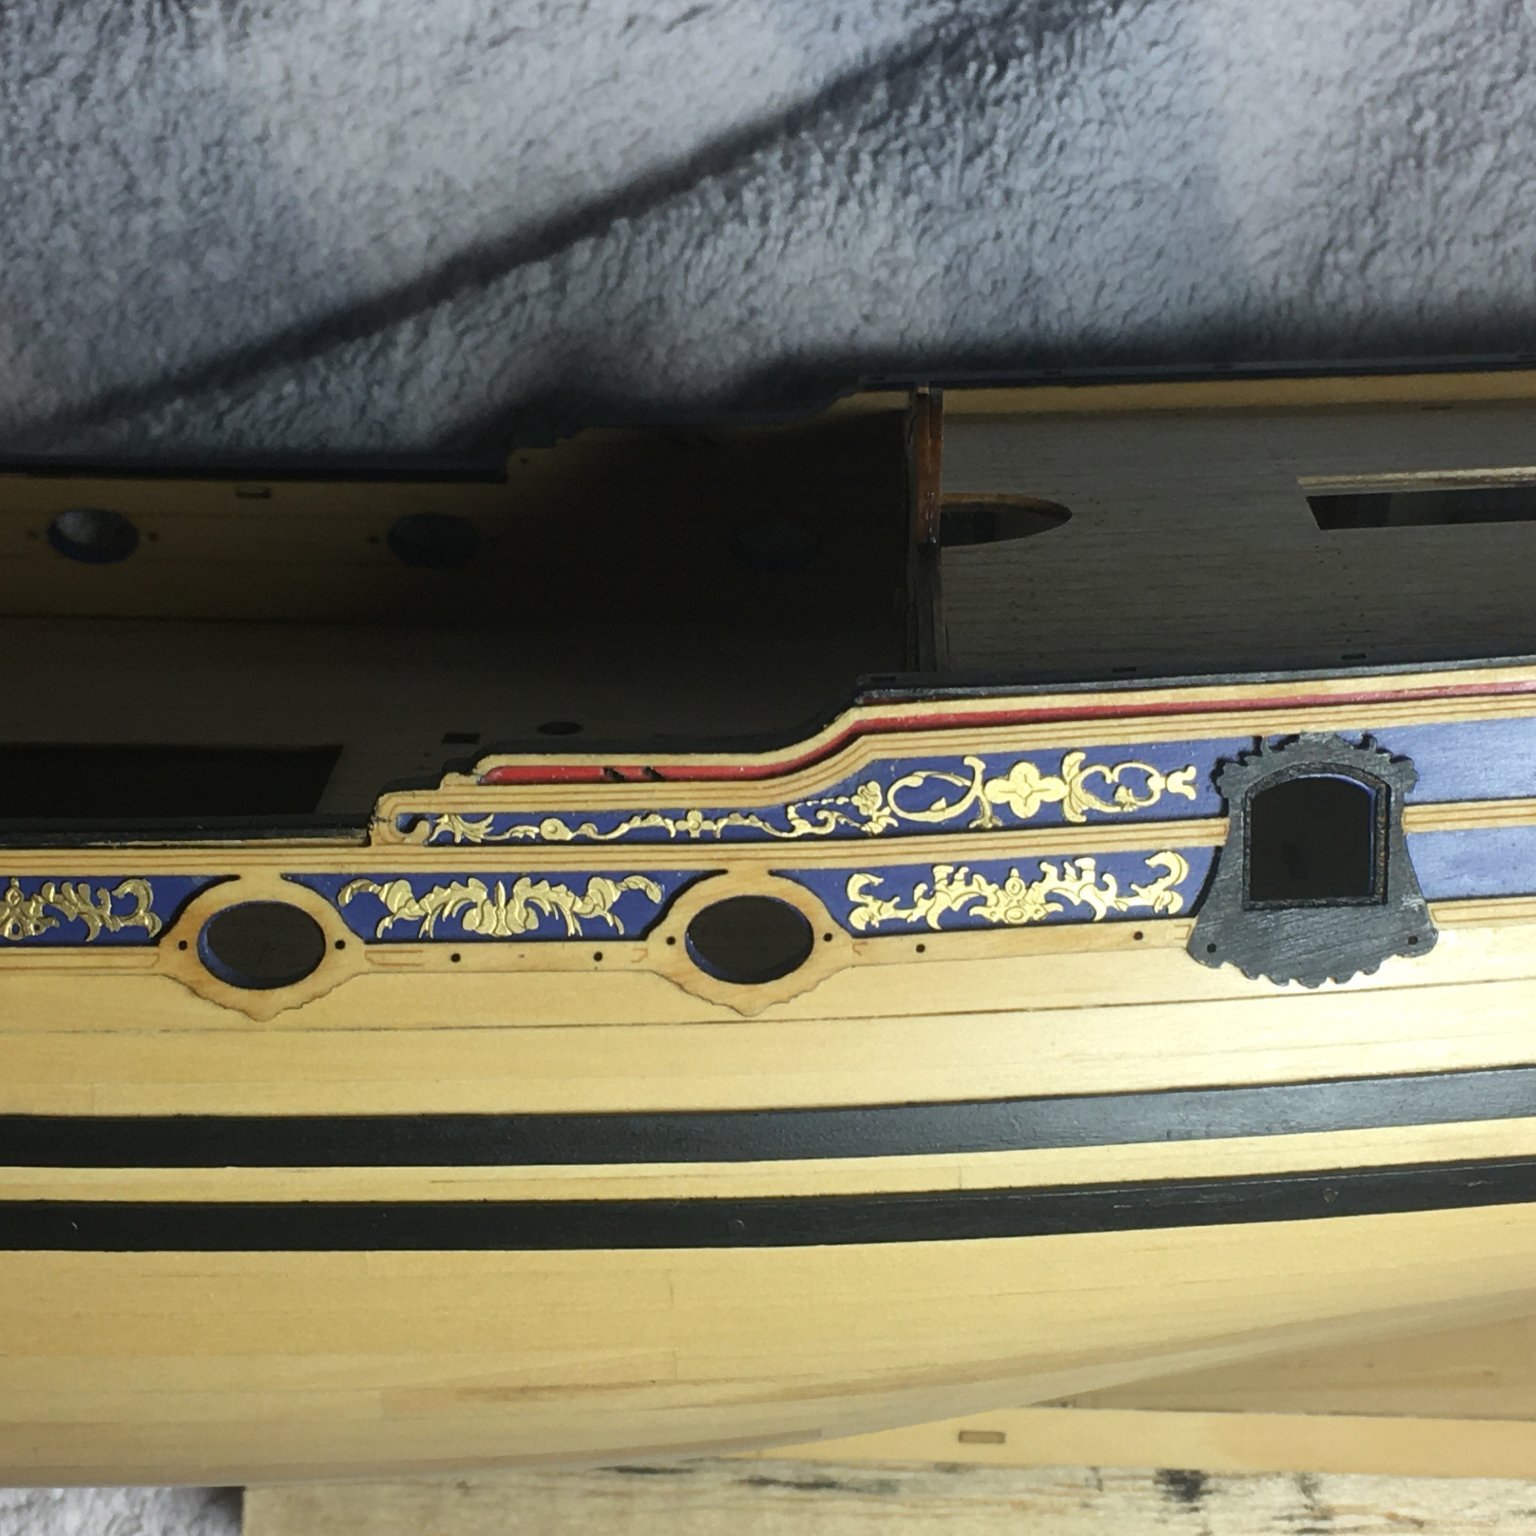
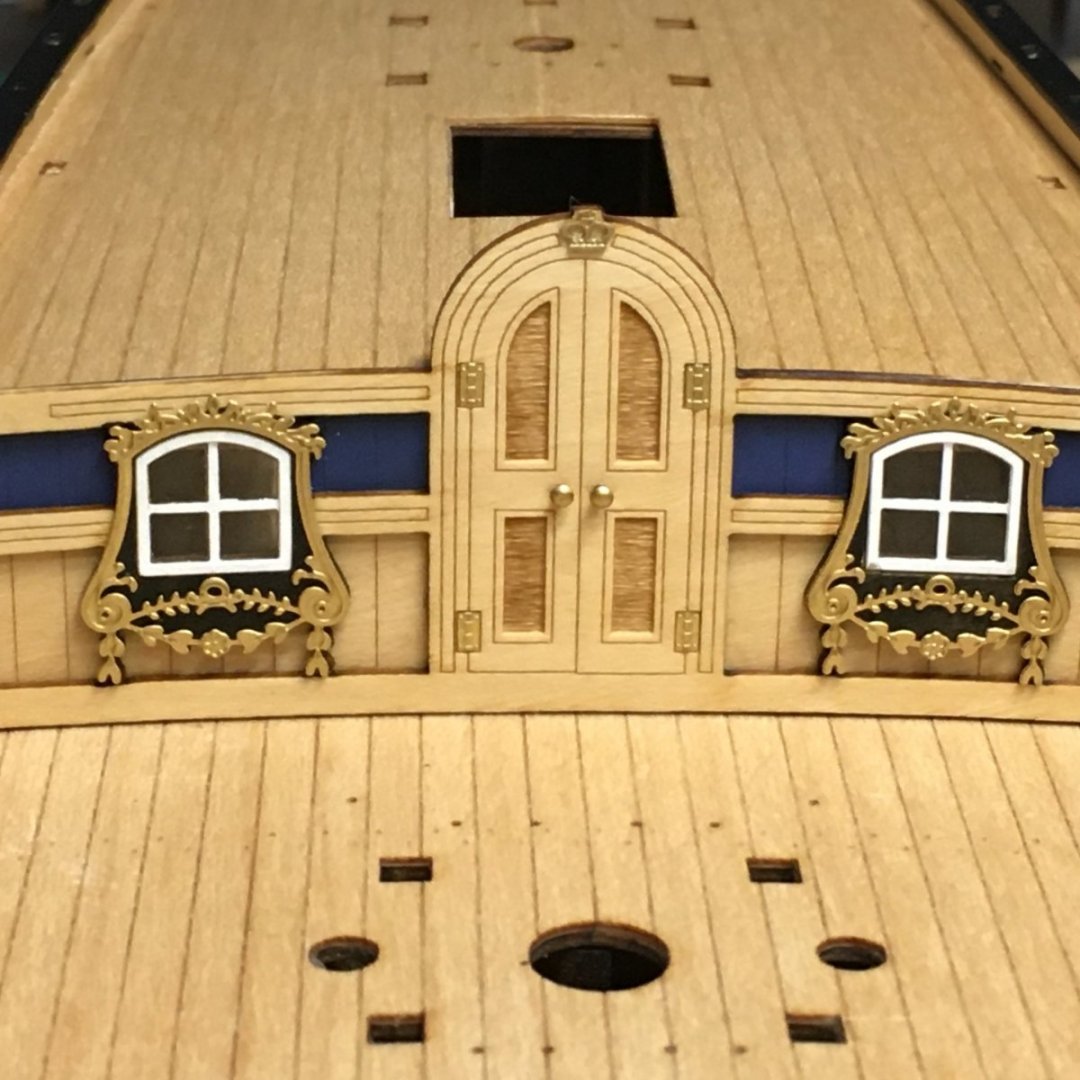
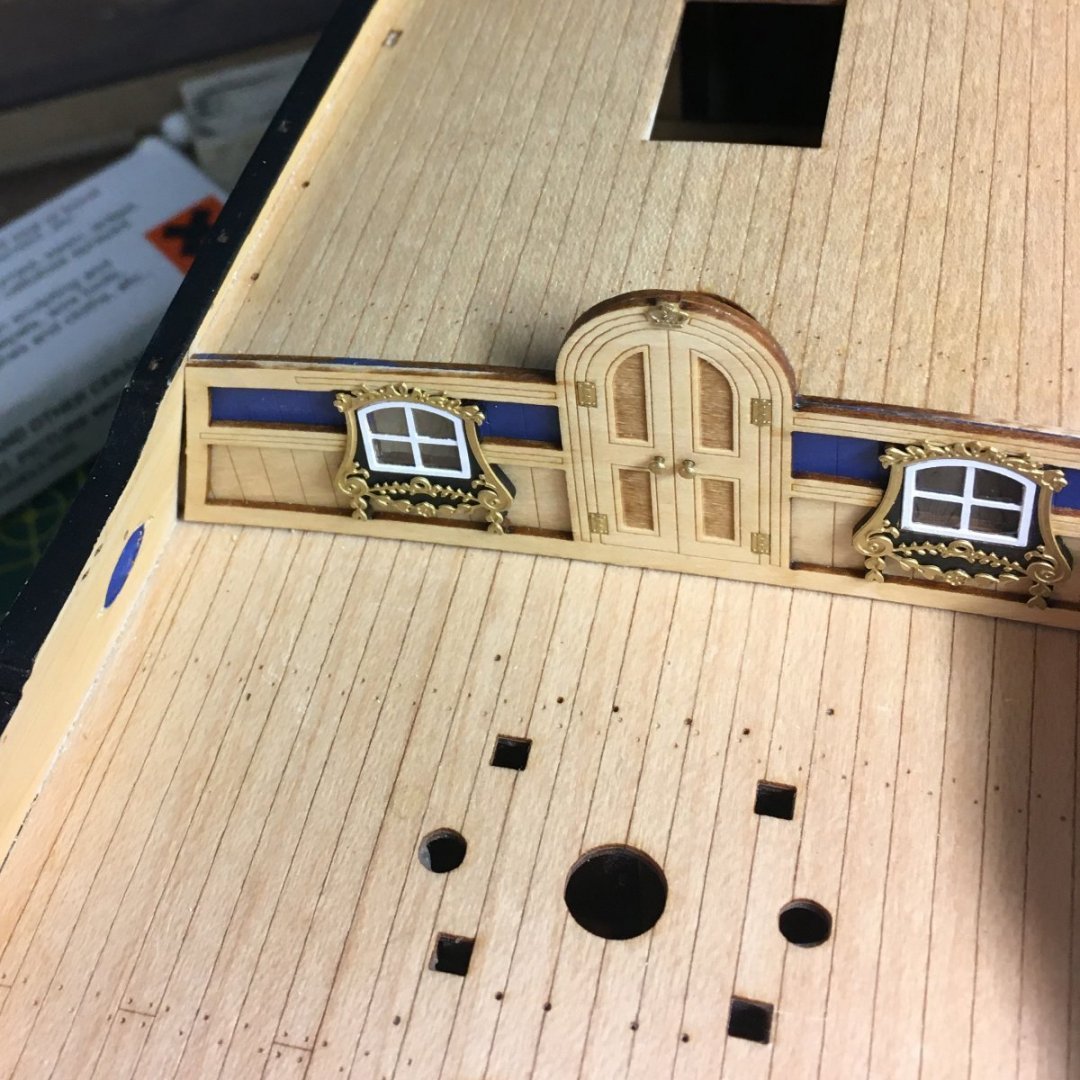
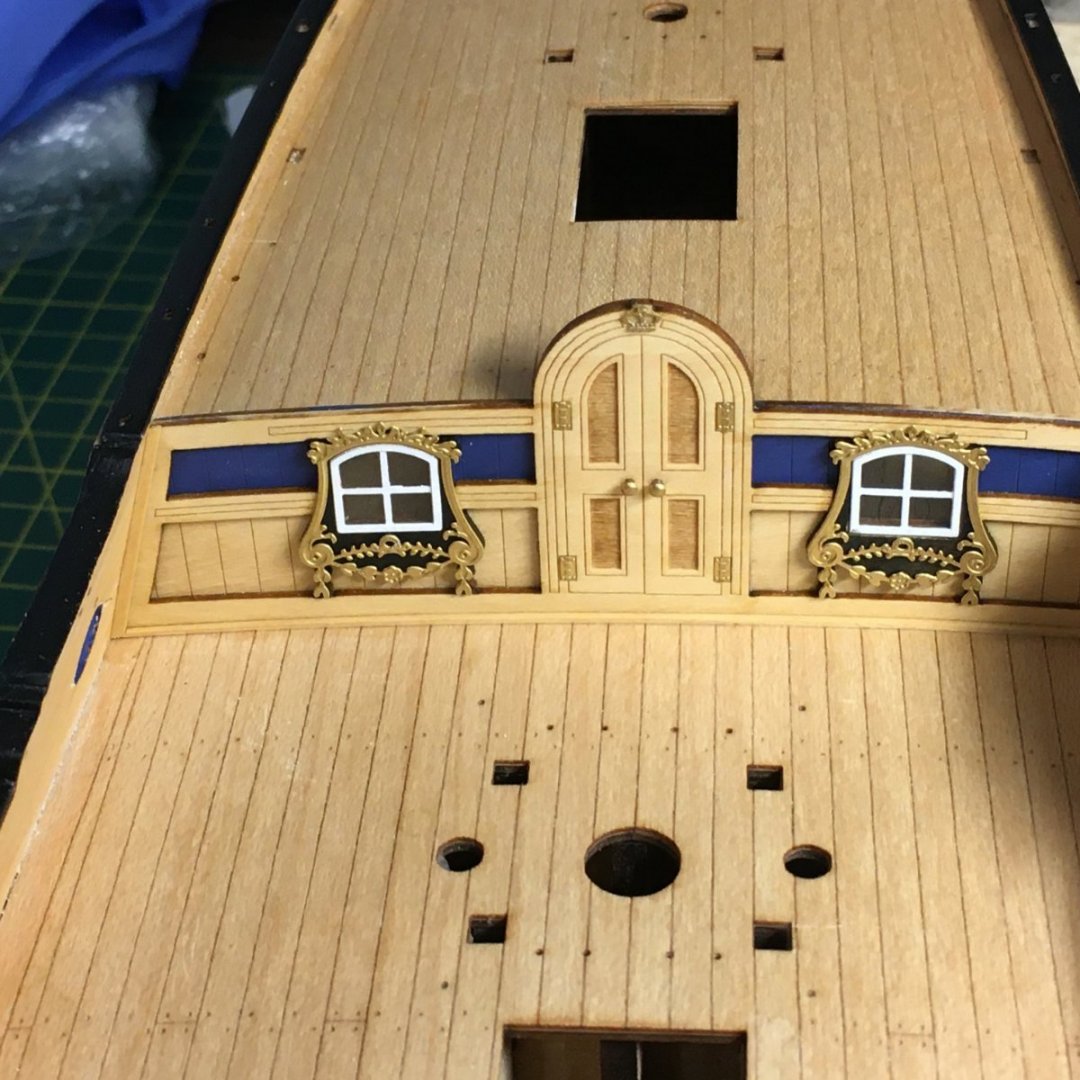
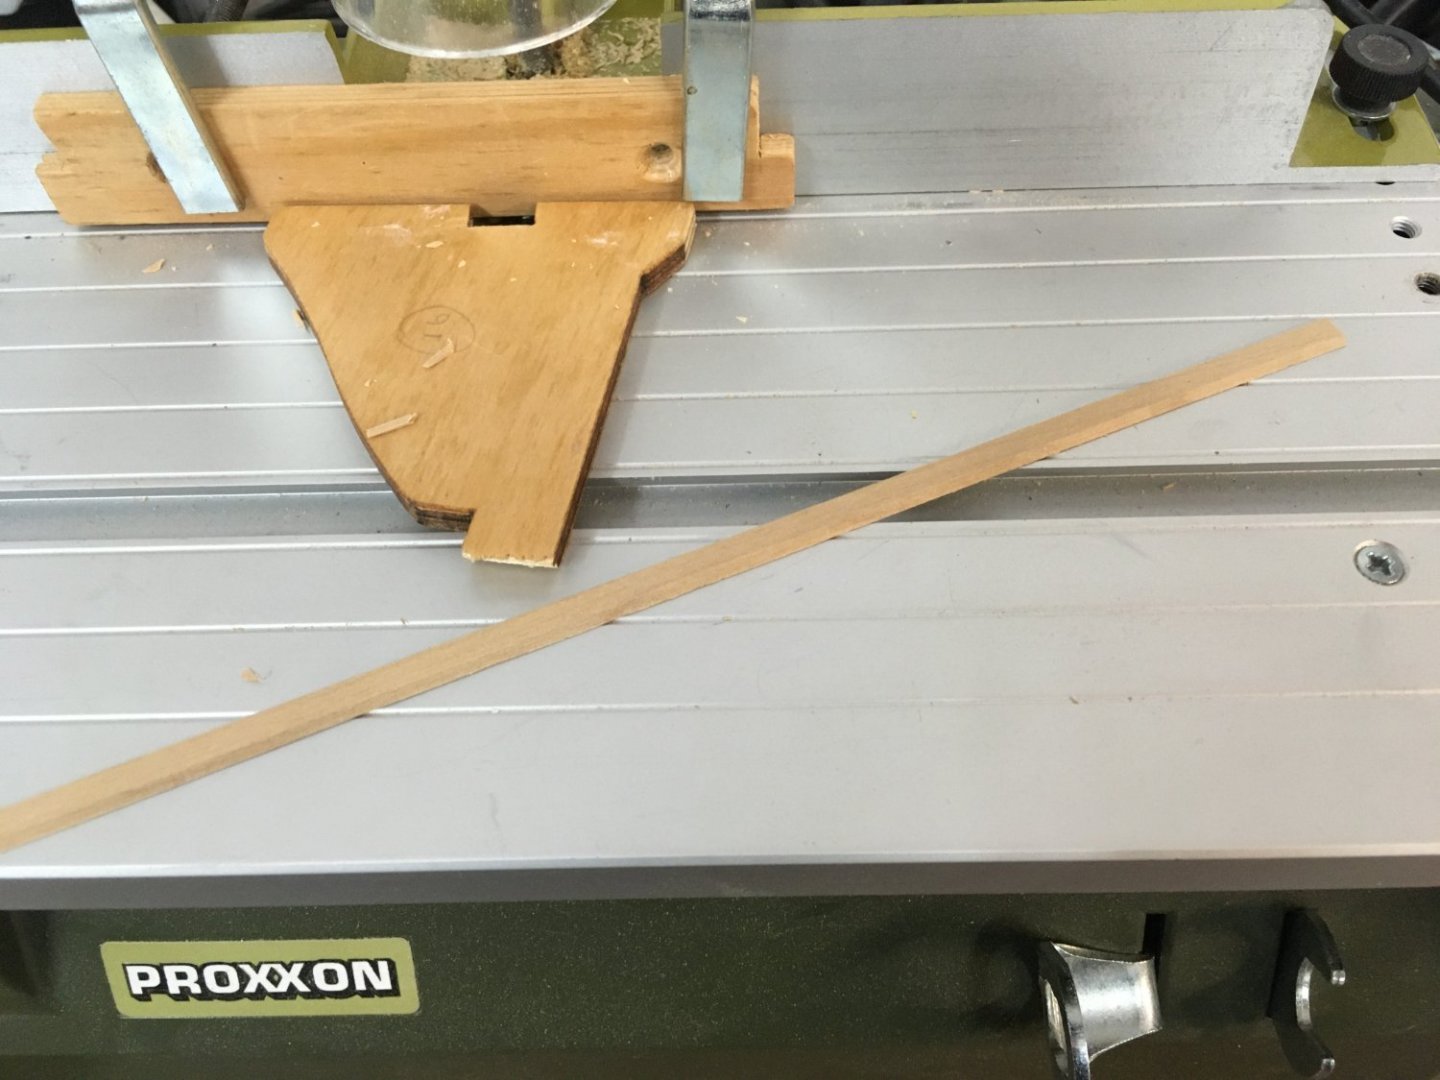
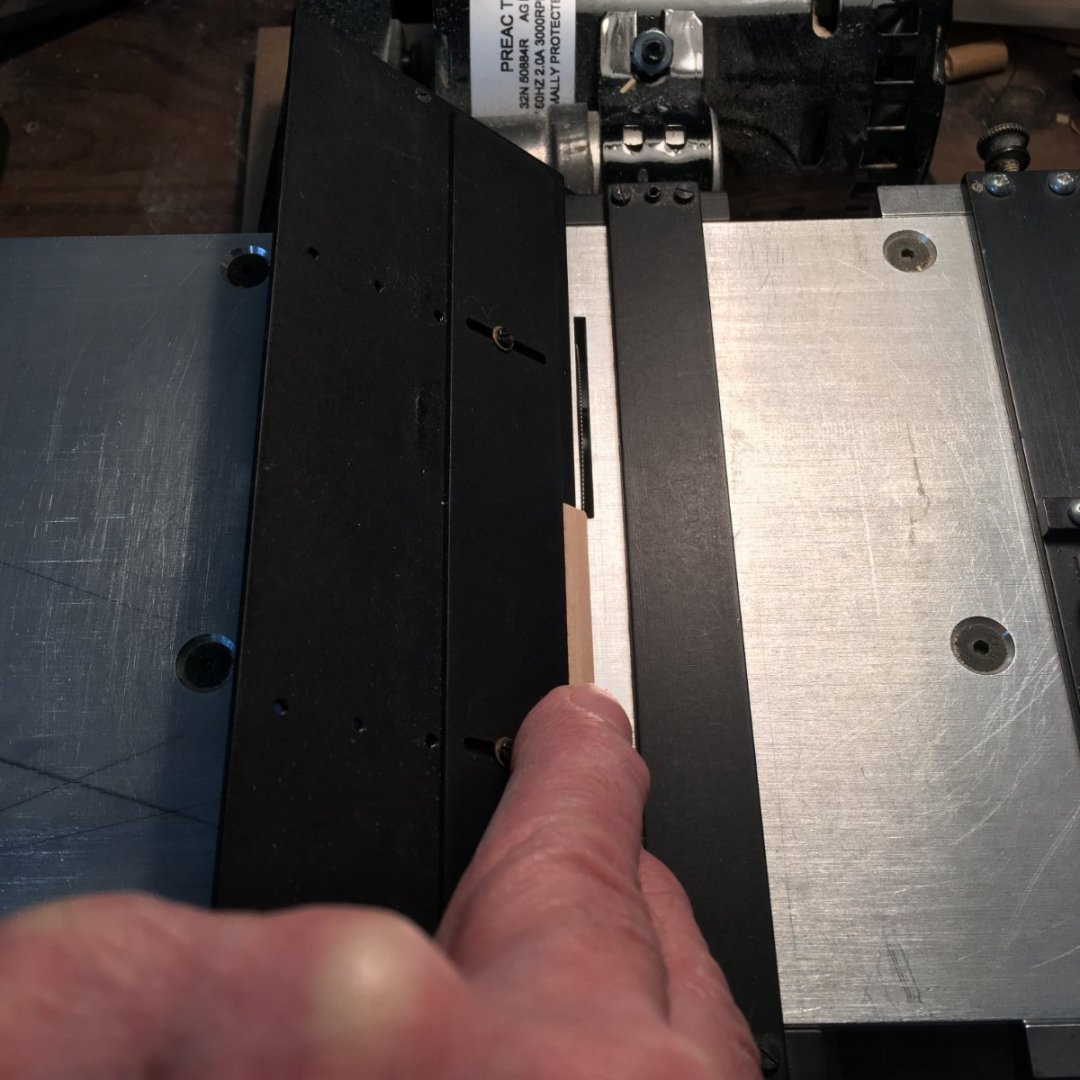
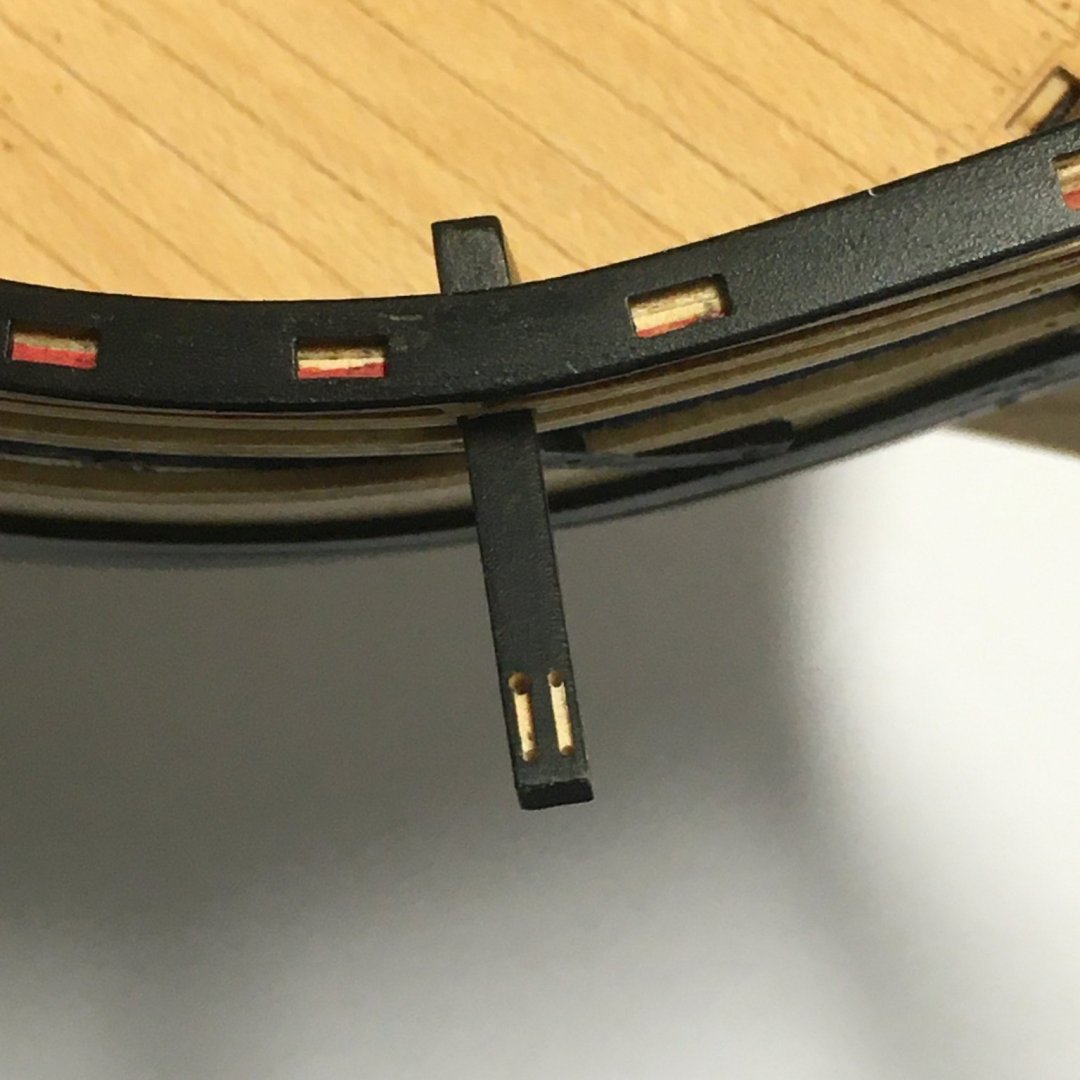
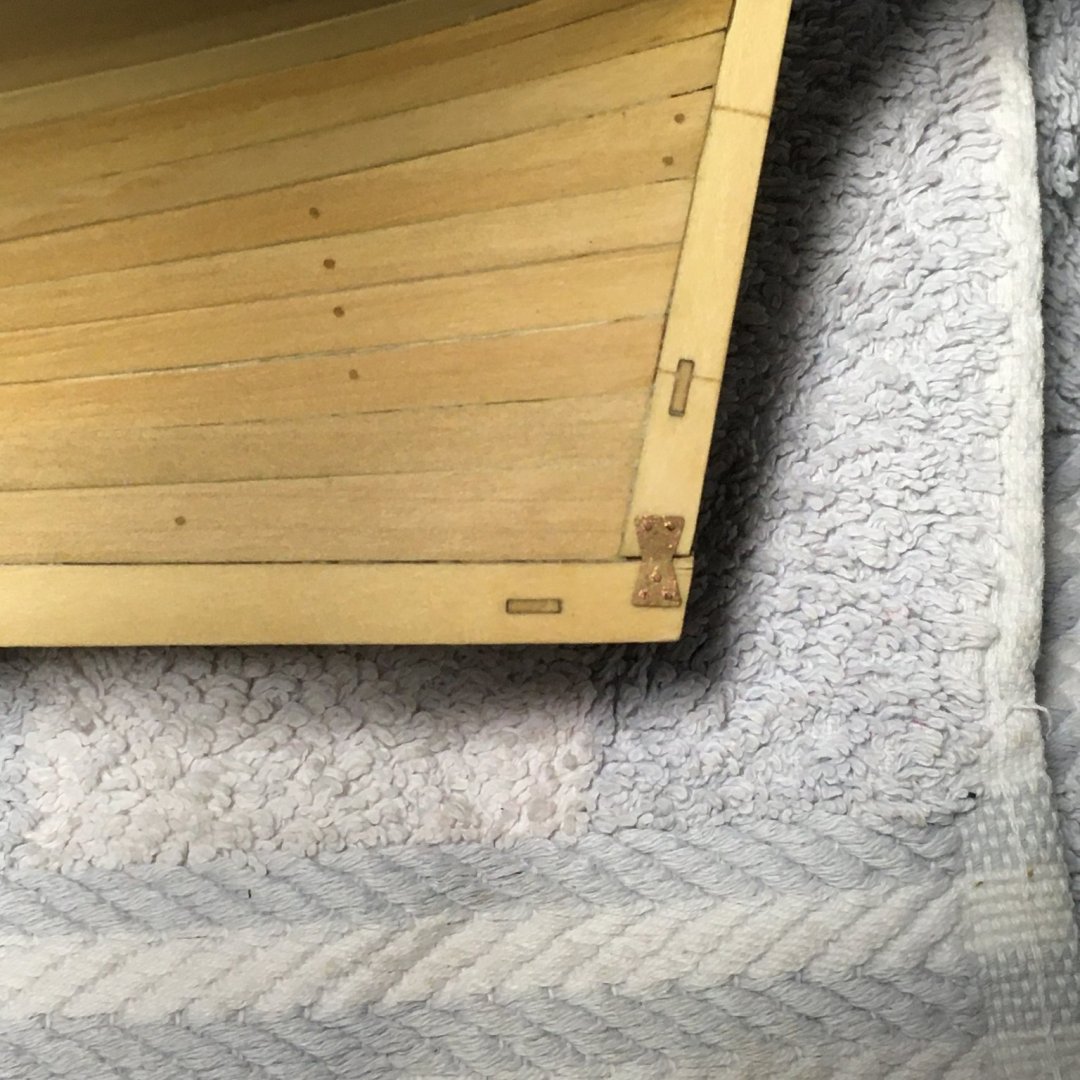
Mid Deck Bulkhead & Spirketting Now that the last relative has departed and the remains of the turkey are in the freezer, it's time to get back to the shipyard. The mid deck bulkhead was straightforward to assemble, with a couple of minor modifications. I glazed the windows with Fantasy Film as before (care is needed the starboard and port frames are very slightly different). Also, I wasn't keen on the door handles suggested in the model. They looked slightly over scale to me so I substituted round-headed pins to simulate plain knobs: The bulkhead looked a bit gappy, especially where it meets the bulwarks: I cut some narrow strips of boxwood to cover the gaps - 1 X 0.7mm on the sides and 0.7 X 0.7mm along the deck: A similar very slight but noticeable gap was visible between the main deck and the bulwarks, which I took as an excuse to make some spirketting. I started by bevelling one edge of a spare 0.75 X 5mm boxwood strip. I tried a couple of methods, the first using the Proxxon table router with a 45 degree cutter. As the boxwood was thin and bendy I had to use a couple of pieces of scrap wood to keep the strip tight against the cutter blade: The second method used a tilting table on the trusty Preac saw: Both methods worked well, with the saw being slightly easier to set up. Then, it was back to the saw with the tilting table removed to cut the bevelled edge off, thereby producing a triangular strip to represent the spirketting: The trick here was to avoid making the spirketting too big. I initially tried making it from a 1mm strip but the result looked over-scale. The 0.75mm strip covers the gap neatly and looks better, at least to my eye. On to the rudder next. Derek


- 345 replies
-
- 11
-
-
- Duchess Of Kingston
- Vanguard Models
- (and 1 more)
-
Thanks David, kind of you to say so. I'm enjoying watching our models progress in tandem. I just think empty widow frames look wrong - nearly as bad as poorly applied glazing! I've struggled for a while to get it right, but the film I'm using at the moment gives good results if used carefully. My next job is making a replacement for the blasted plume on that figurehead. Best wishes Derek
- 345 replies
-
- 2
-
-
- Duchess Of Kingston
- Vanguard Models
- (and 1 more)
-
Many thanks for the kind words B.E. Having spent the last several years gaining inspiration and ideas from your build logs from Pegasus on, I think it's only fair that I should pass some ideas/cost your way! The chisels are indeed great, but to use them to best effect you really need the honing guide from Richard Kell, a toolmaker from Northumberland. Here's a link to a recent discussion on the subject, with a link to Richard's website. Have a very happy* Christmas and a peaceful New Year. Derek * I think I was the one that confused Glenn on the happy/merry point; I always get it wrong!
- 345 replies
-
- 4
-
-
- Duchess Of Kingston
- Vanguard Models
- (and 1 more)
-
Thanks Dave, and the same to you and yours. I look forward to seeing your Endeavour coming on in the new year. Derek
- 345 replies
-
- 1
-
-
- Duchess Of Kingston
- Vanguard Models
- (and 1 more)
-
Vanguard make great kits but they still require care and skill to produce such fine results. Have a happy Christmas. Derek
-
Error code 200
DelF replied to Blue Ensign's topic in Using the MSW forum - **NO MODELING CONTENT IN THIS SUB-FORUM**
Unfortunately that doesn’t seem to explain the current problem, at least in my case. I’ve taken a series of photos with the same device, saved them on the same PC and all organised in Photoshop. Some photos in the batch upload fine; others show the 200 error. This has never happened before. Others seem to be experiencing the same issue. -
Error code 200
DelF replied to Blue Ensign's topic in Using the MSW forum - **NO MODELING CONTENT IN THIS SUB-FORUM**
Happened to me for the first time on Saturday. I’d posted another batch of photos after the 8th before Saturday without problem. -
Thanks Yves and Rusty, much appreciated. Thanks Glenn. I bet you'll raise the bar again with your Winchelsea, especially when you get to that lovely Alaskan yellow cedar. Me too, although we'll have to keep the tool recommendations to a minimum in future in case our spouses start to wonder what's happened to our retirement funds!
- 345 replies
-
- 5
-
-
- Duchess Of Kingston
- Vanguard Models
- (and 1 more)
-
As B.E. says, a wealth of interest and great photos. My Sphinx is still in her box but itching to get out when I read your log! Best wishes Derek
- 542 replies
-
- 3
-
-
- Sphinx
- Vanguard Models
- (and 3 more)
-
Error code 200
DelF replied to Blue Ensign's topic in Using the MSW forum - **NO MODELING CONTENT IN THIS SUB-FORUM**
The error is still there. I had one photo rejected just now, out of seven. As before, saving it under a different name and reloading it solved the problem. -
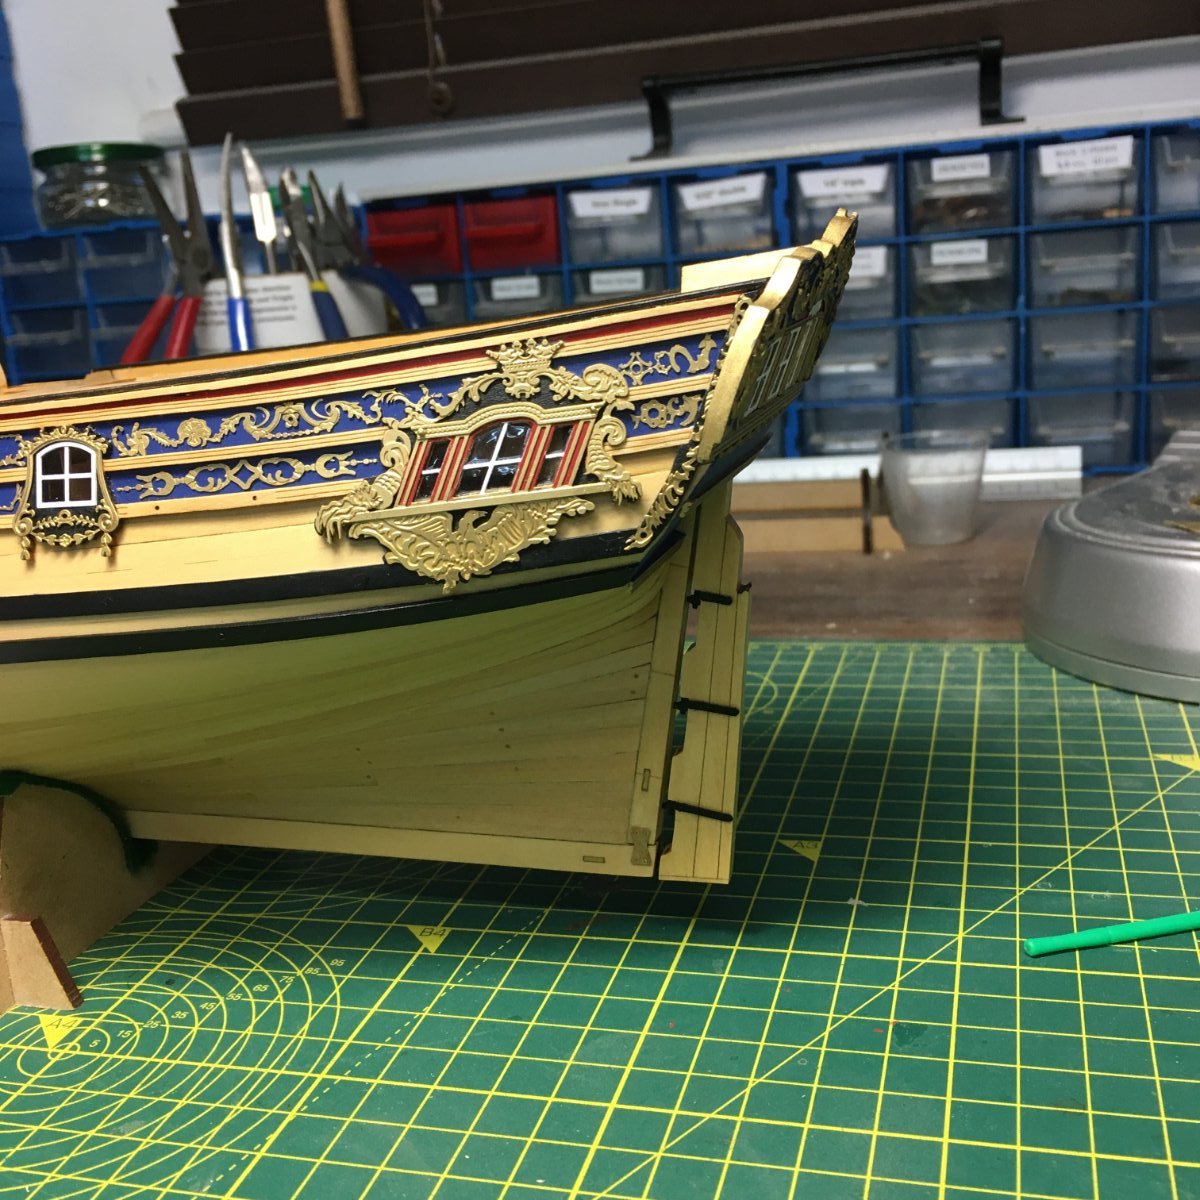
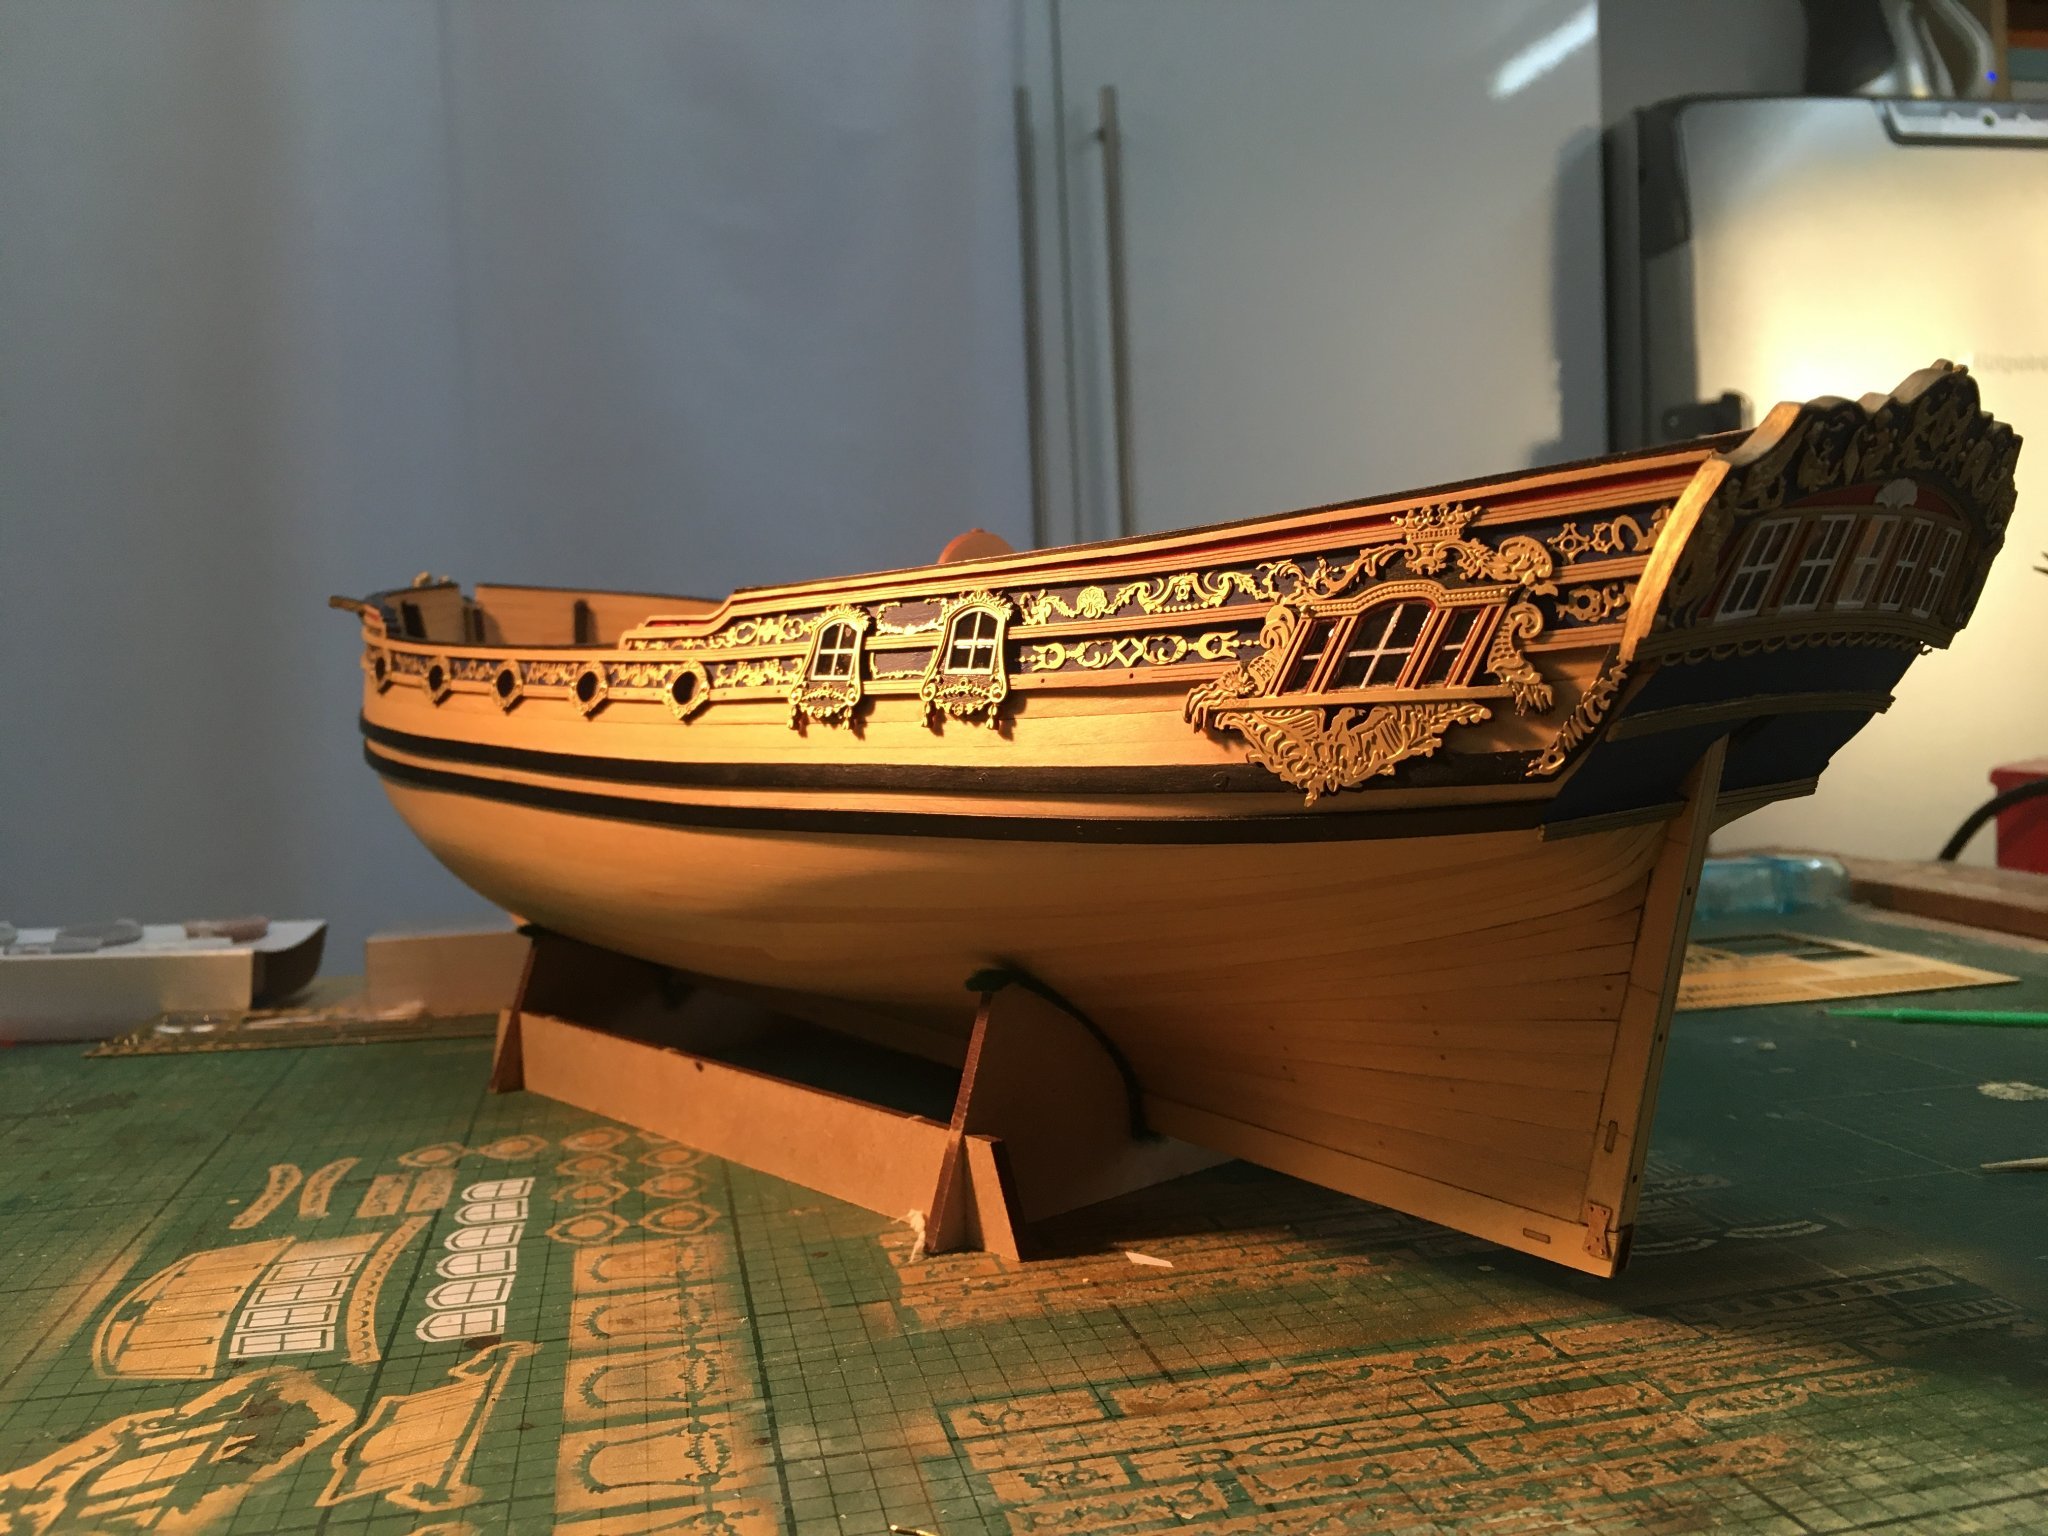
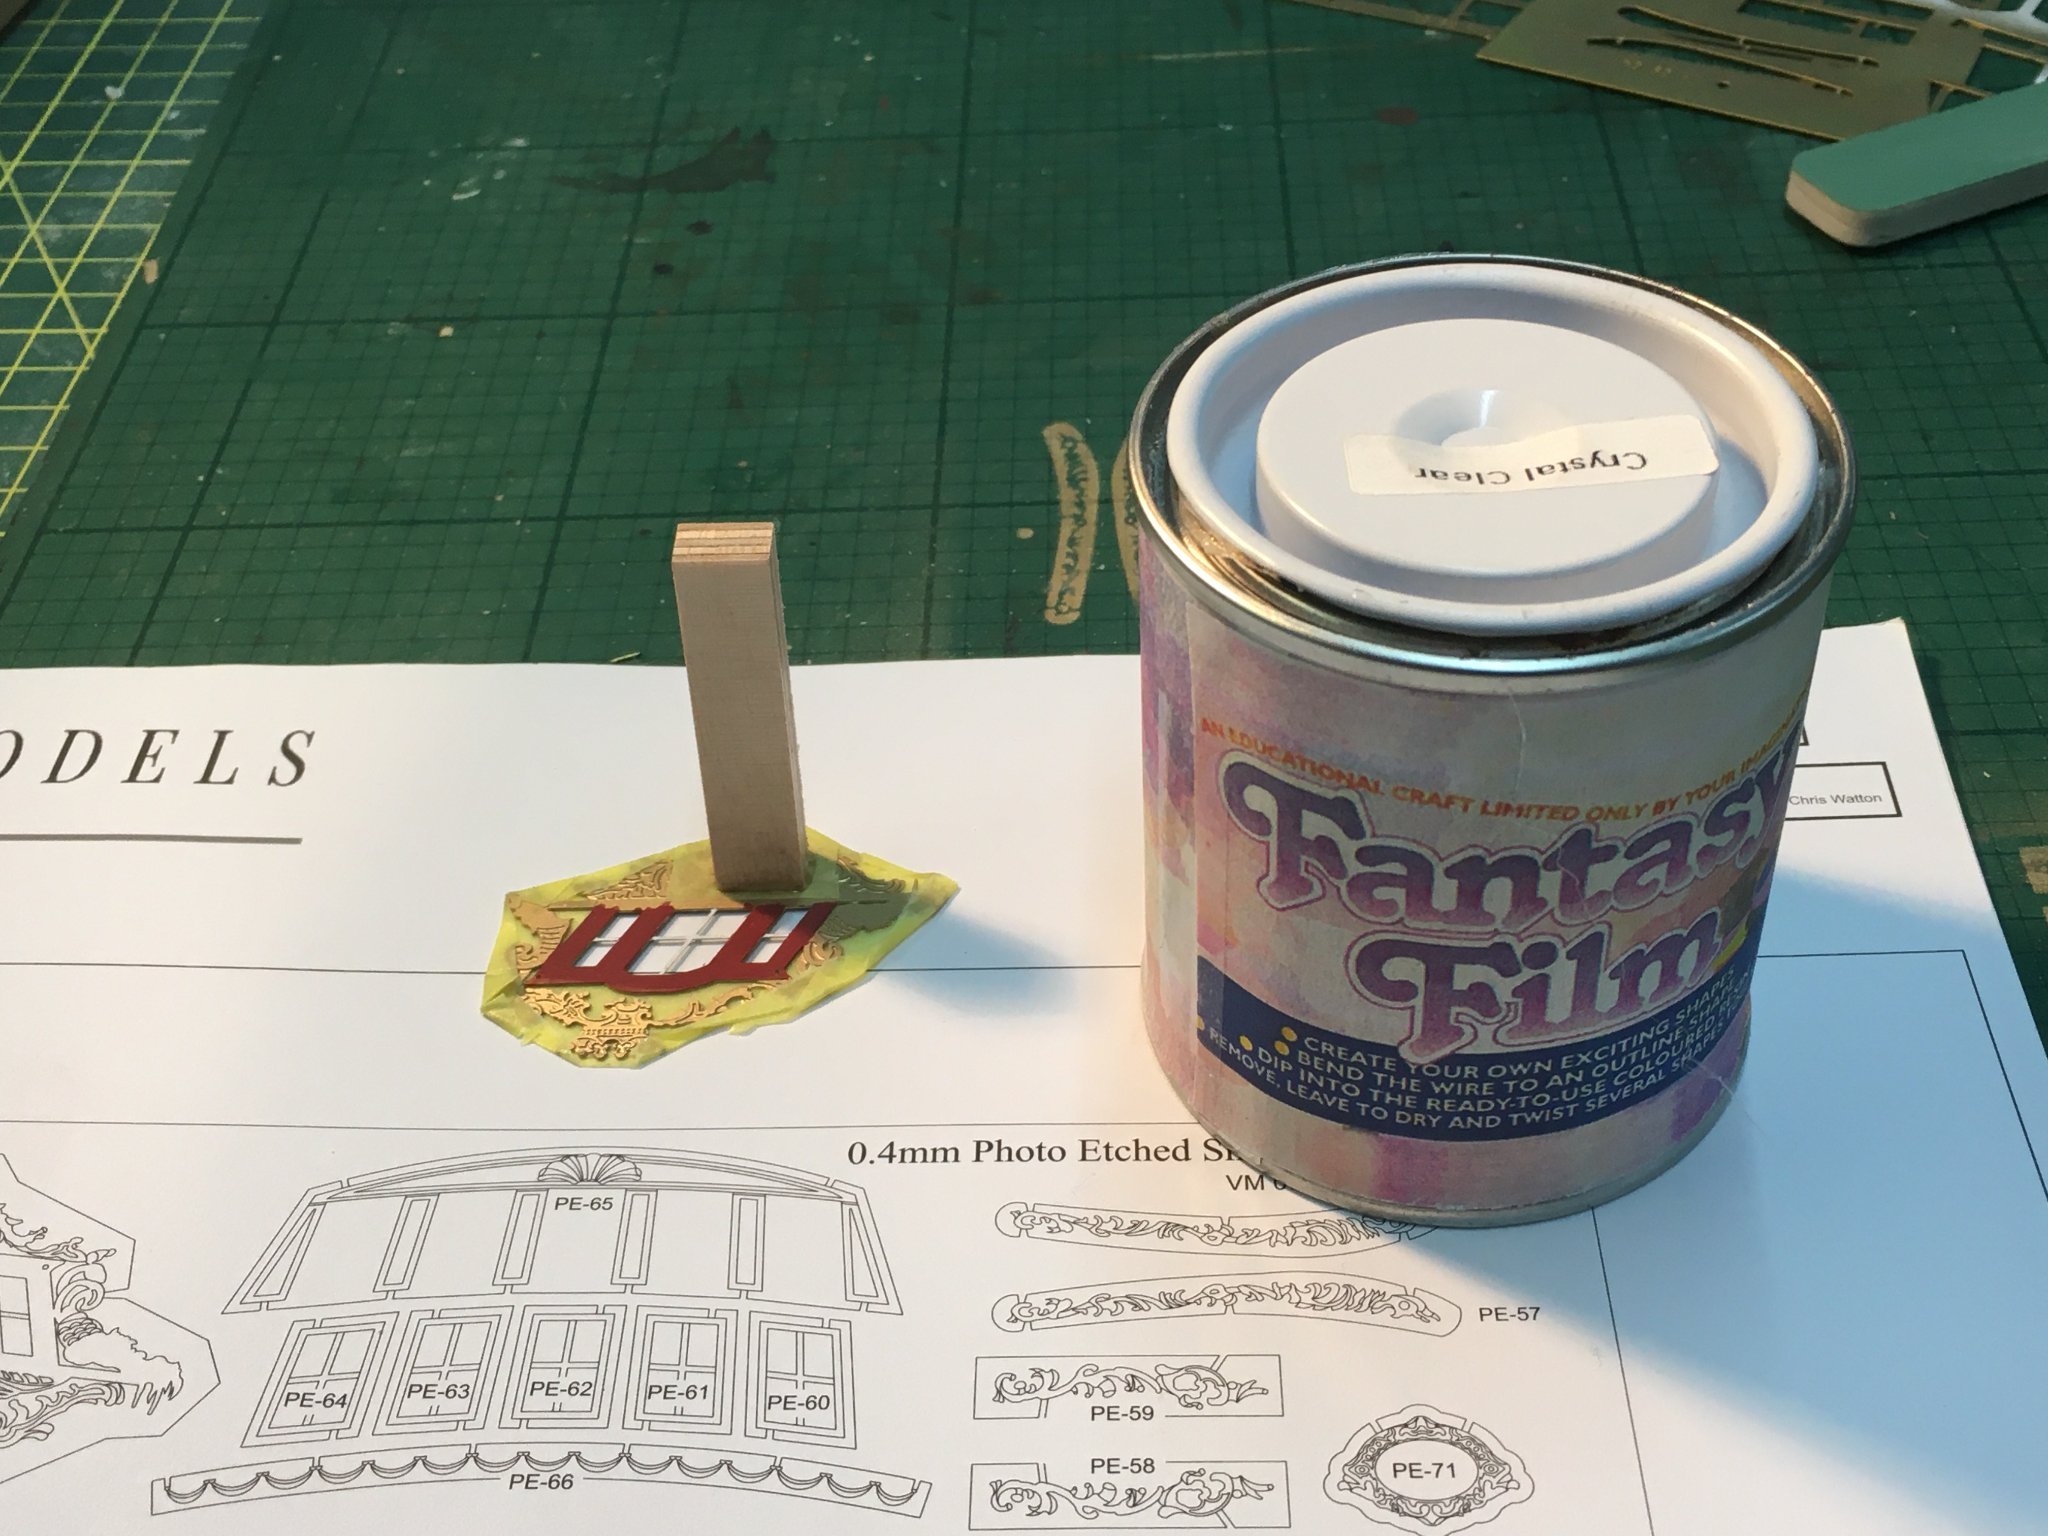
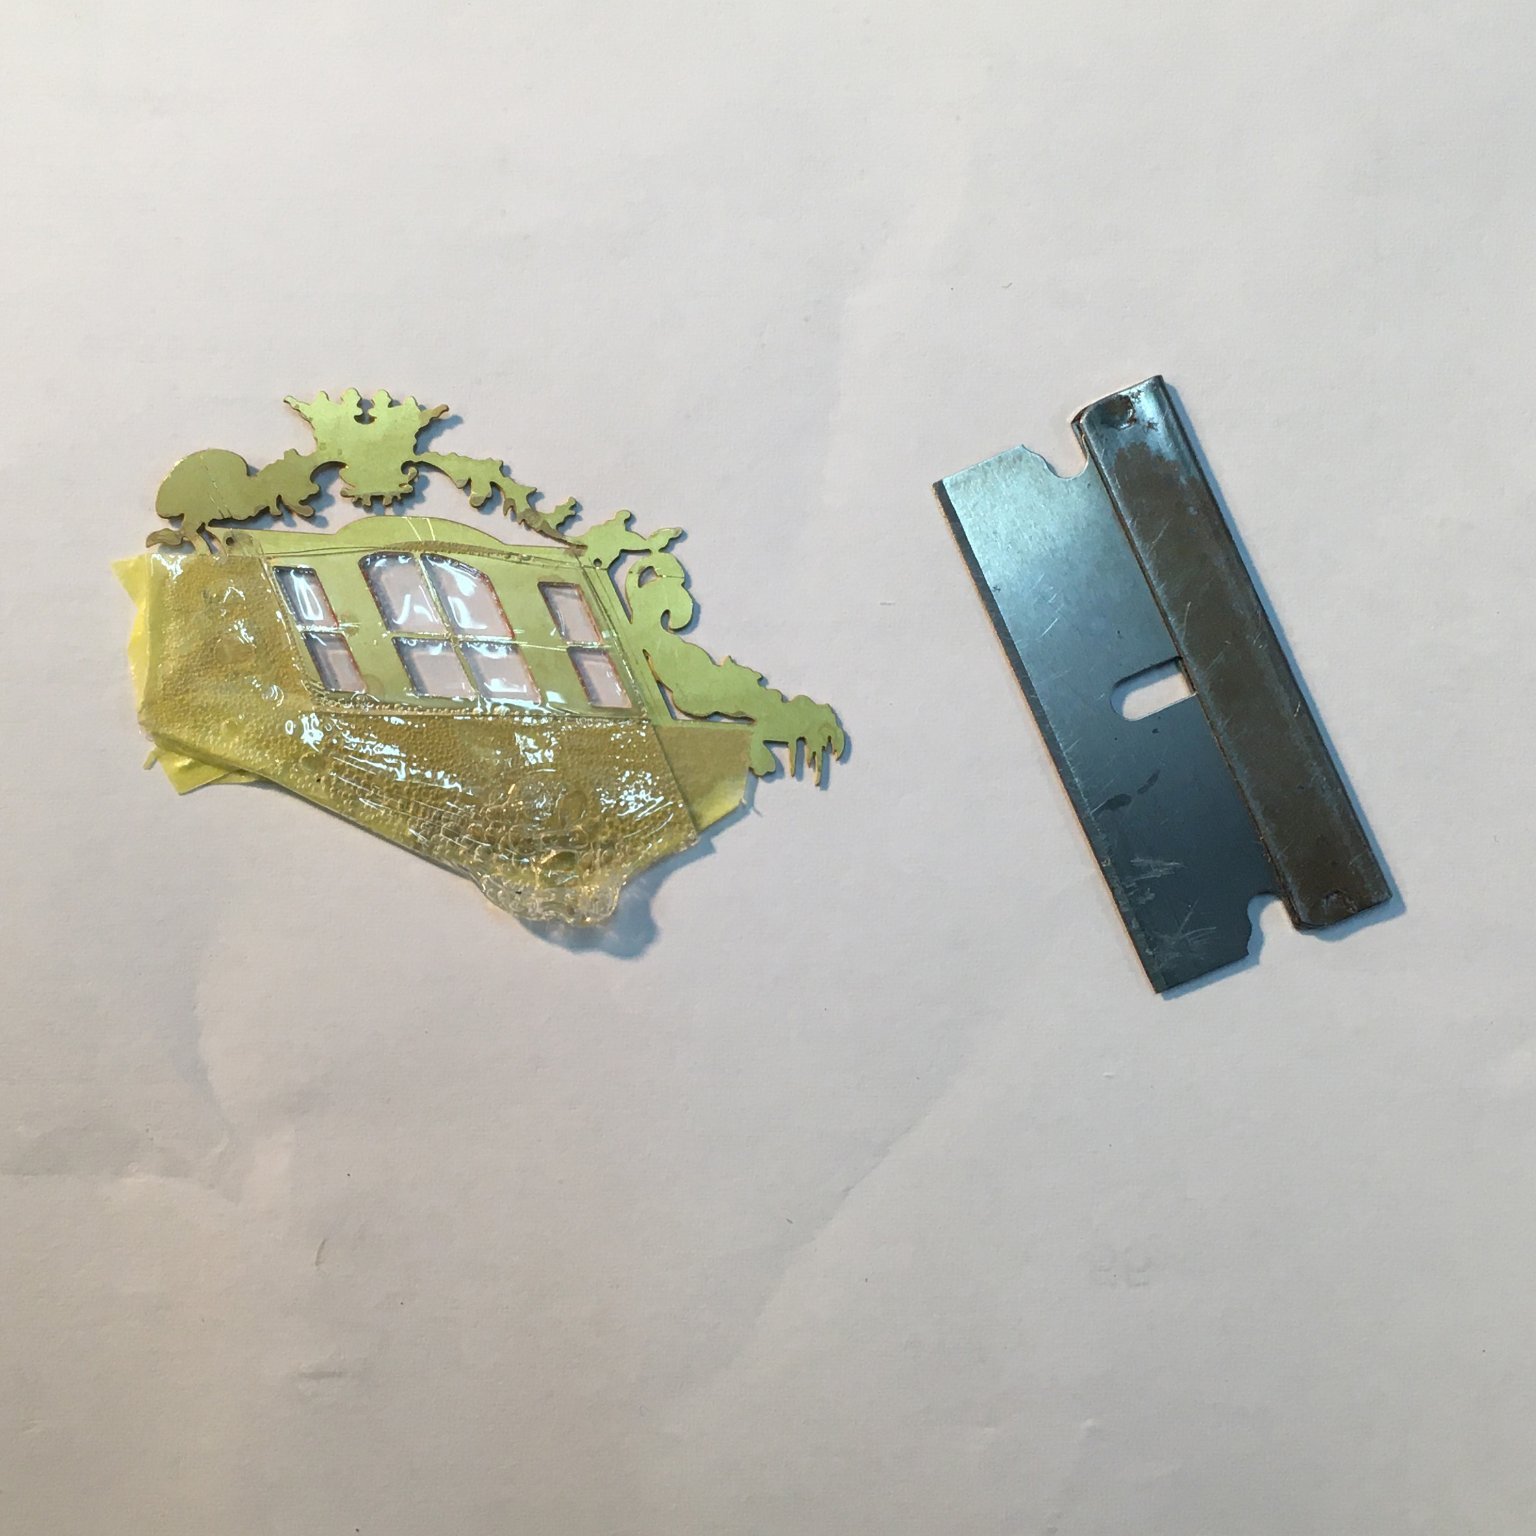
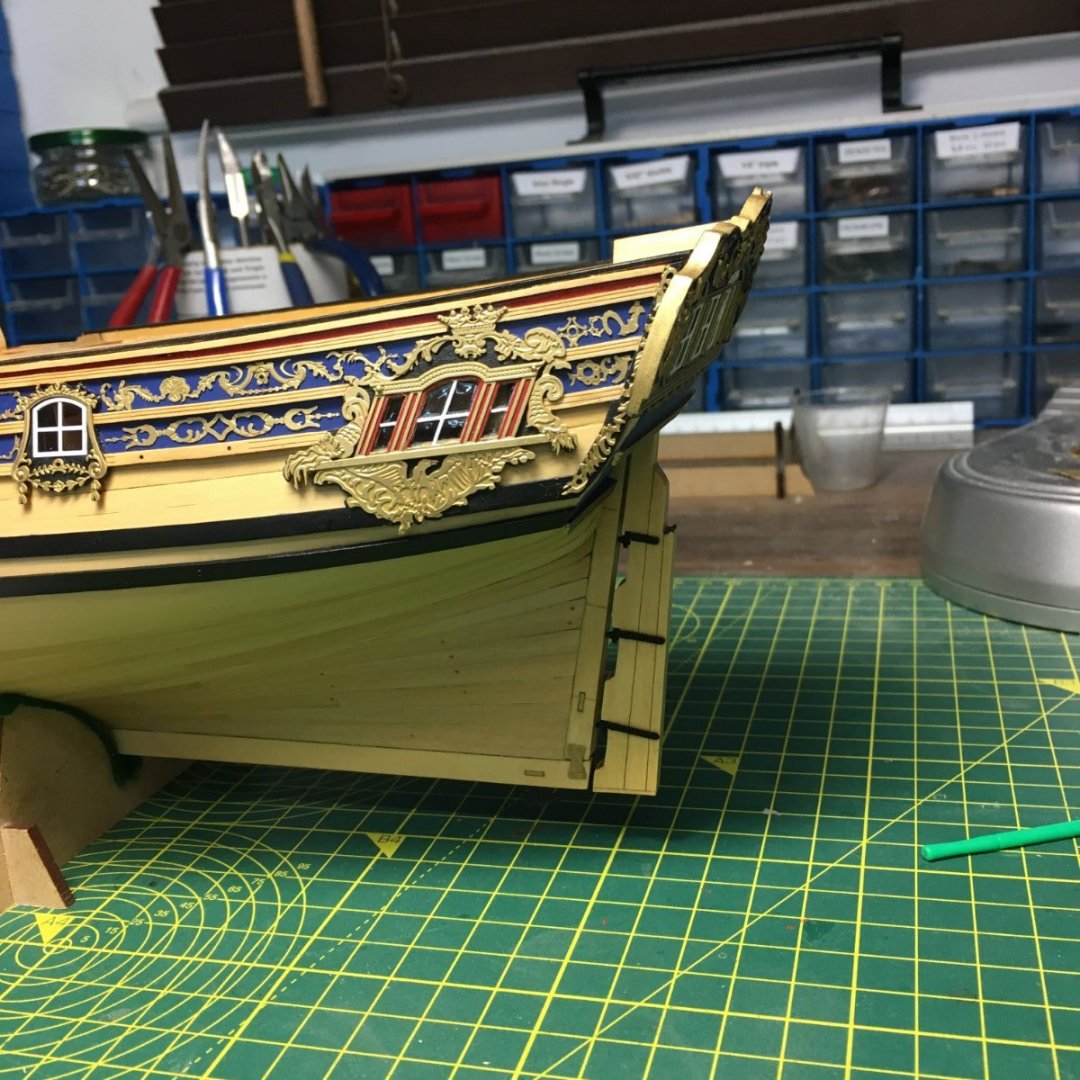
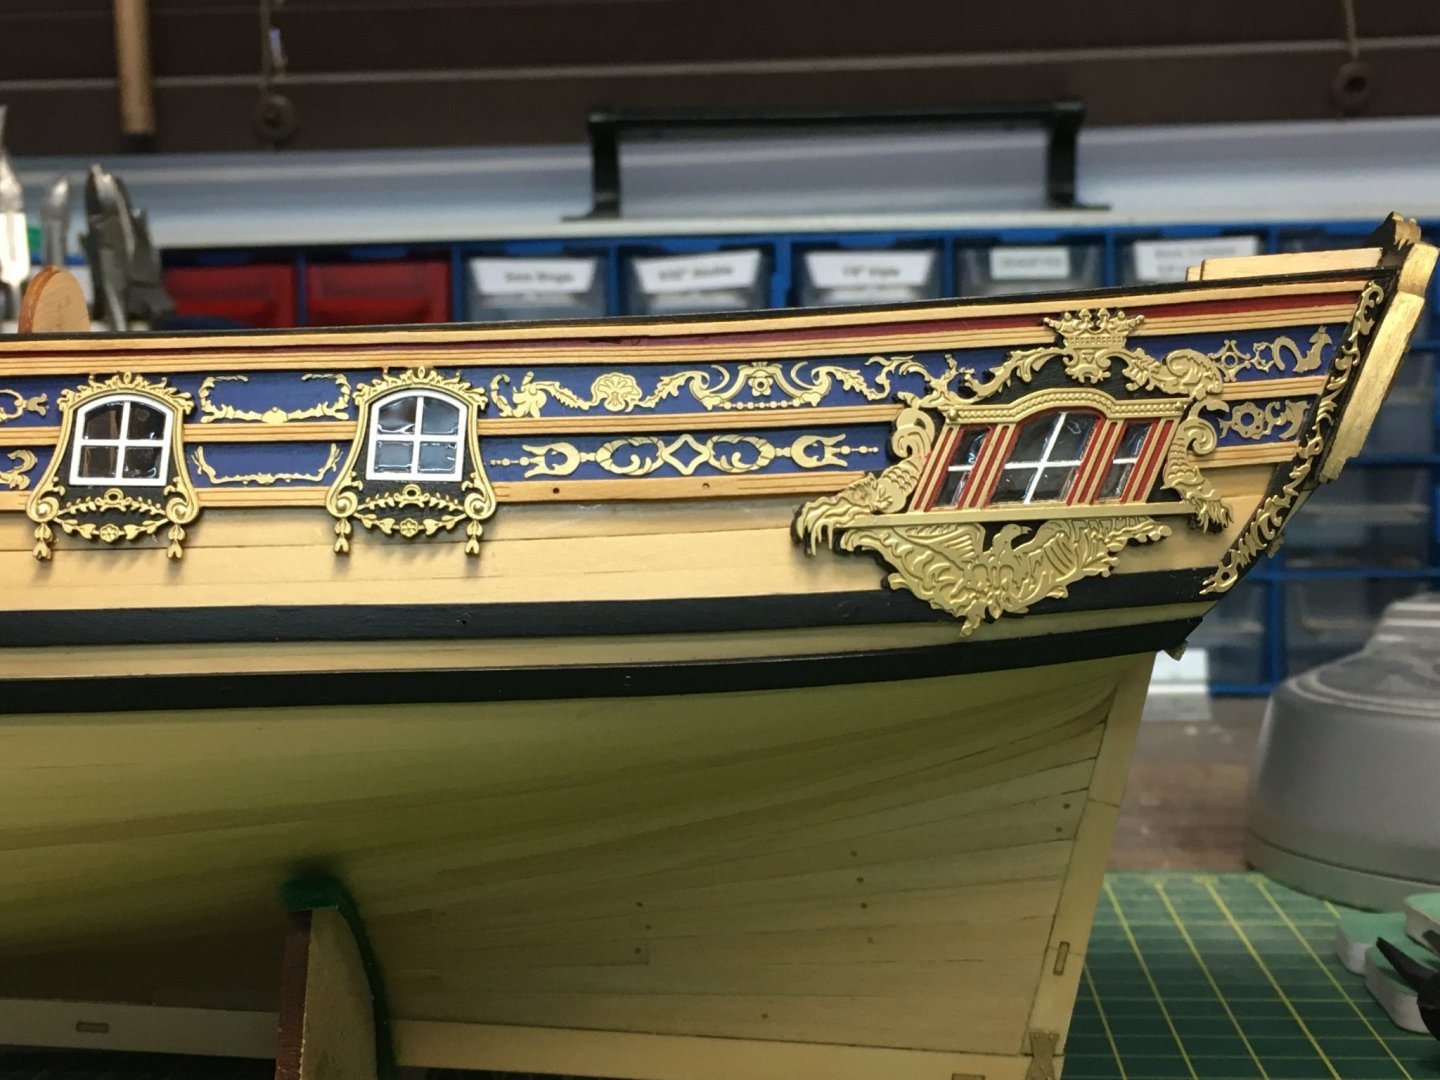
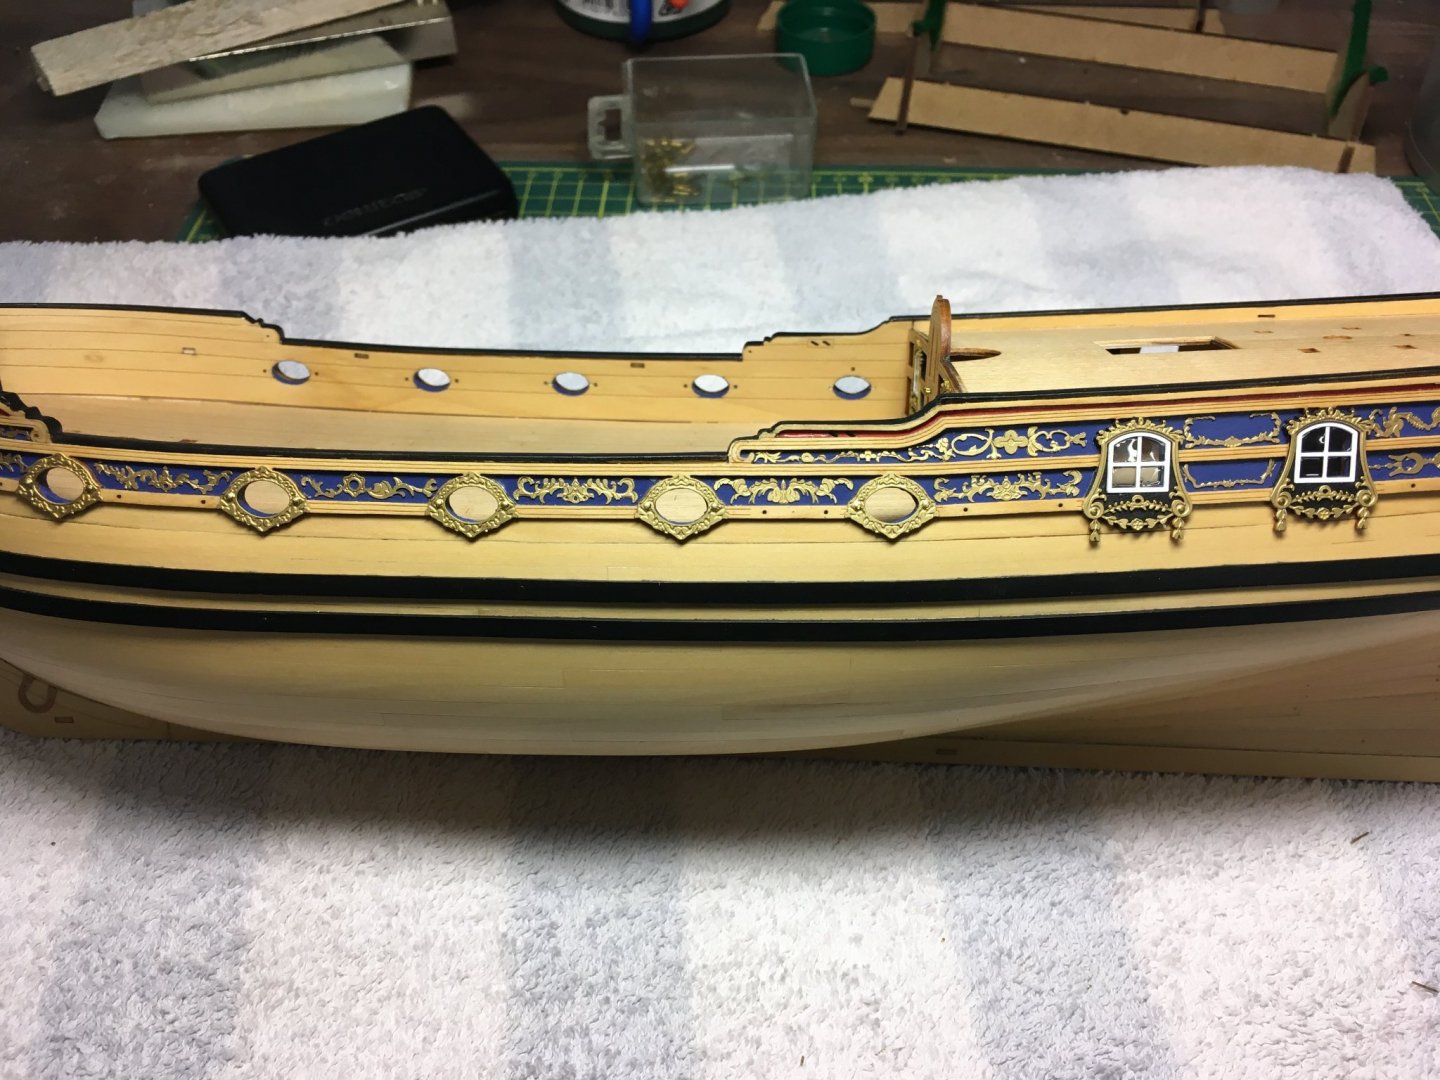
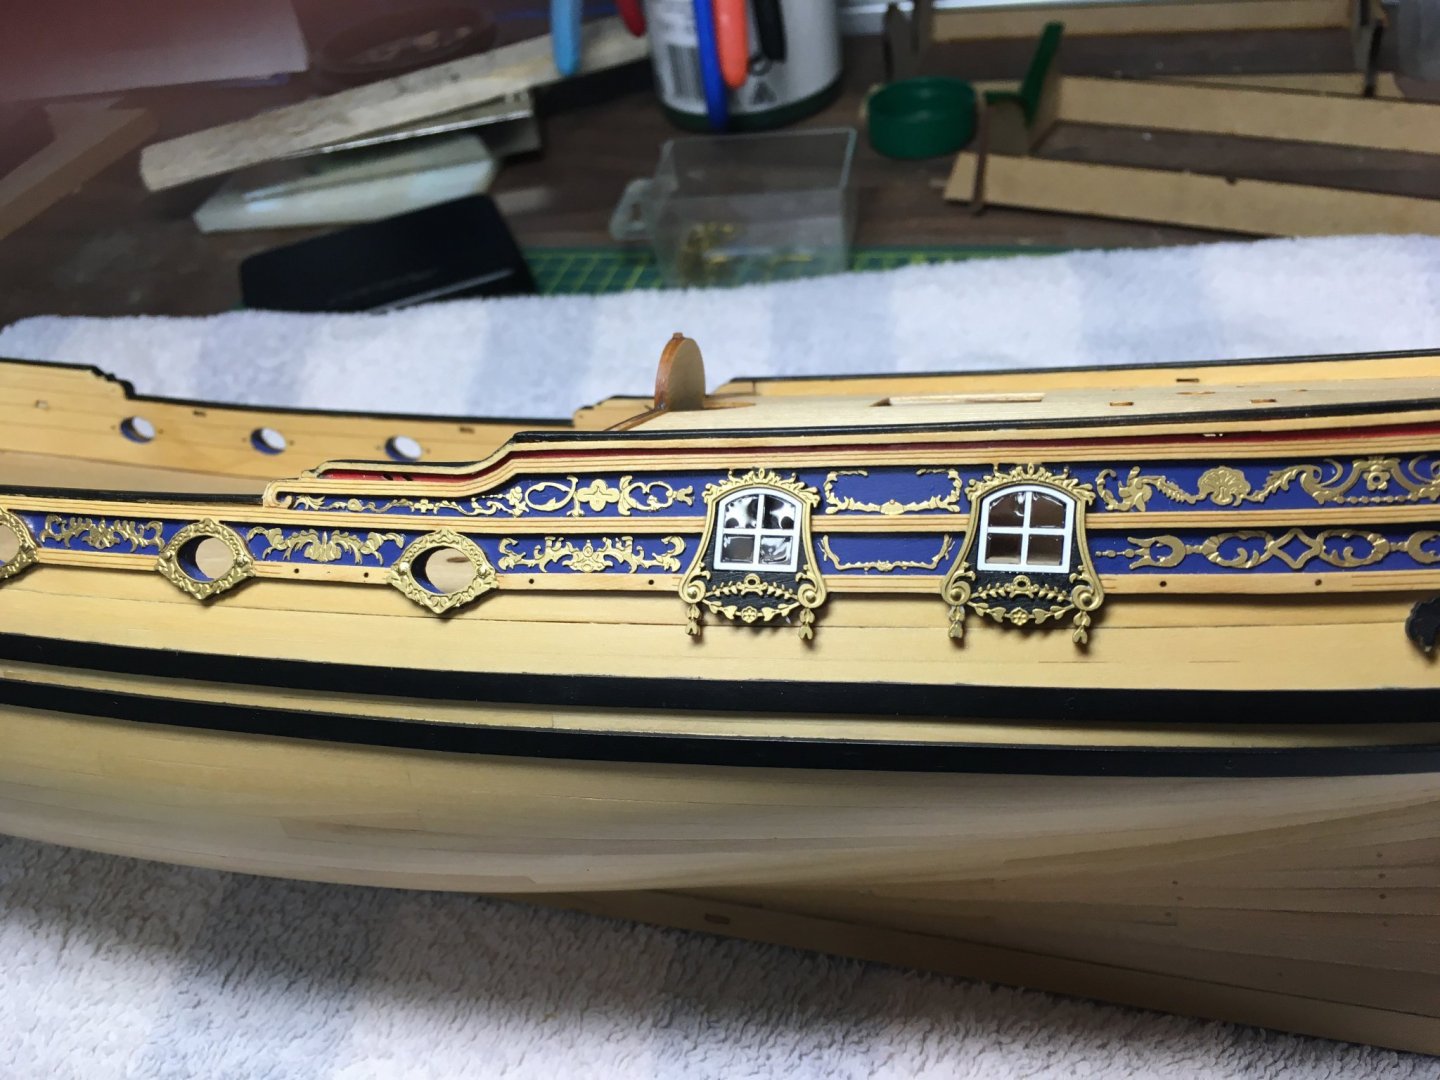
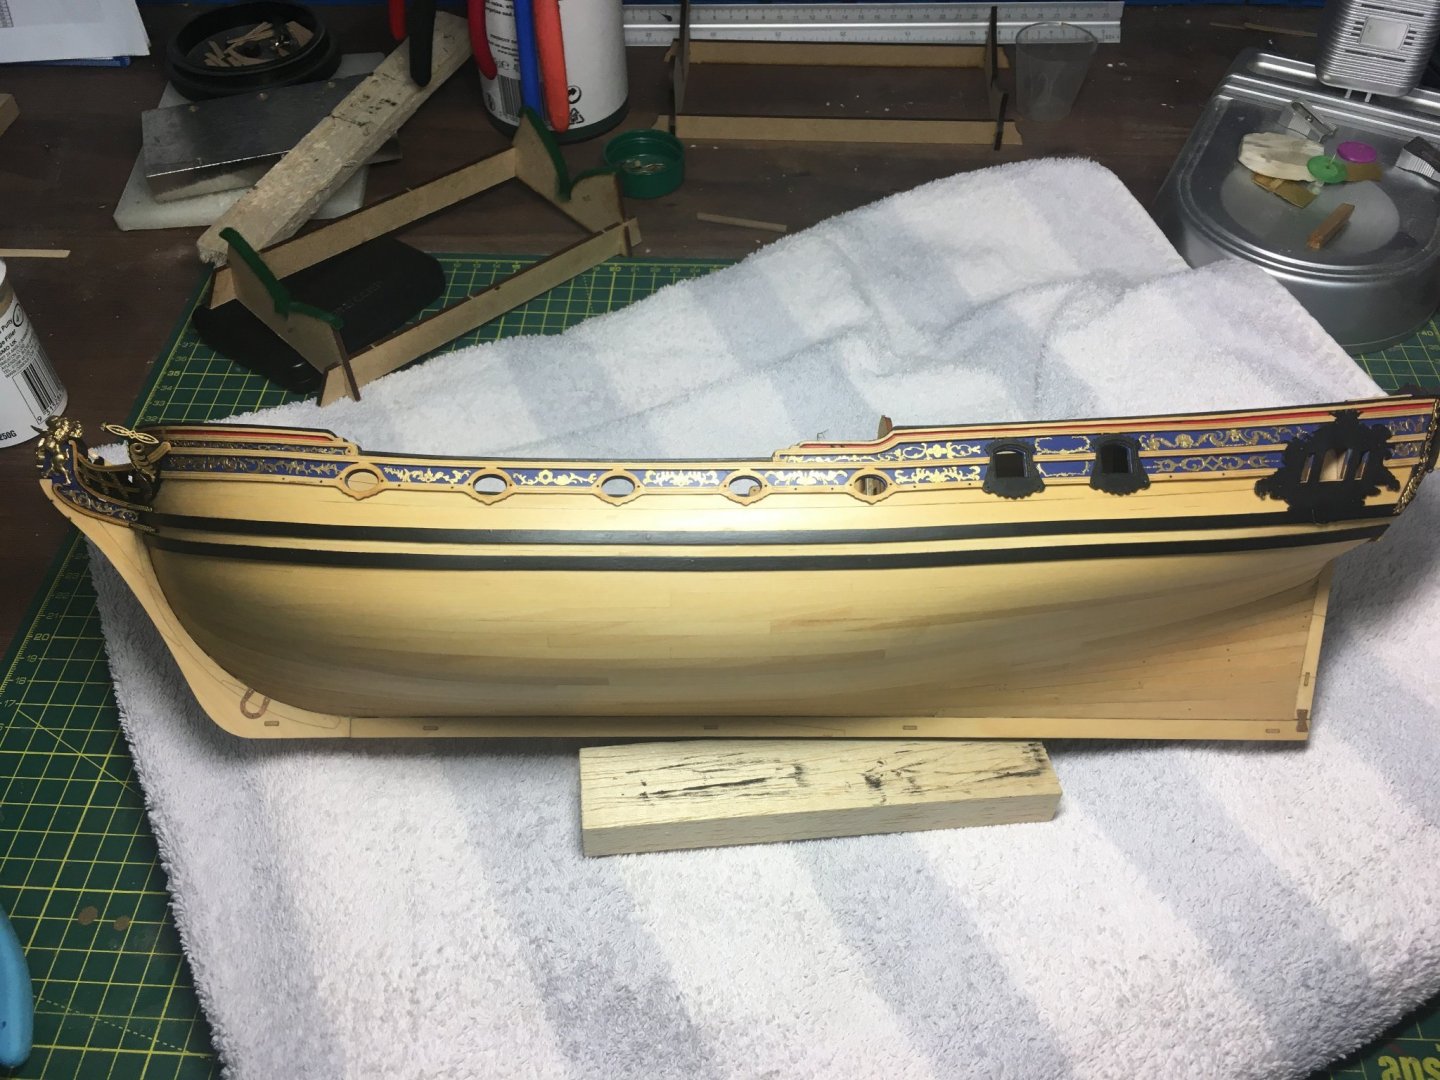
Completing the decoration Finishing the starboard side decoration and then fitting the oval surrounds to the gunports was all straightforward. I fitted the four small side windows next, having glazed them using the same technique as on the stern. As with the decoration, the port and starboard sides are very slightly different - the windows will fit in the frames on either side but will not look right if not on their correct side. Again, careful study of the plans and manual is essential. Here's the port side gunports and small windows fitted: When it came to gluing back the tiny dangly bits that had broken off the wooden window surround, I found it easier to glue them to the back of the PE surround before I fitted the latter in place. Next, it was on to the large windows at the aft end. These are ornate objects pierced with several holes that I did not want to glaze, so the first job was to cover all but the window openings with masking tape. Also, the windows were too large to allow me to use tweezers to dip them into the glazing solution as I had with the smaller versions. Instead, I stuck a piece of scrap wood to the front of the PE, giving me a handle that enabled me to dip the window flat against the surface of the Fantasy Film: As before, the trick was to allow only the back surface to touch the film, then to withdraw it as quickly as possible and hold it in the vertical position while the excess film ran off the bottom edge. The first window worked fine. The second took two goes before I was happy. The first attempt left bubbles in the film - I don't think I lifted it quickly enough - and I had to wait for it to dry before I could cut it off and dip again. Once the film was dry I used a razor blade to cut round the back of the window frame so I could peel off the excess film and masking tape: The next job was to bend the PE slightly to match the curve of the hull. I was reluctant to bend the glazed portion so I wrapped it in paper to protect it and held it in the rubber jaws of my vice while gently bending the bottom, non-glazed part: Here's the port side fitted: And a more atmospheric view (ie I got the lighting wrong!): No prizes for guessing what I used the old cutting mat for! That's almost all the decoration fitted. I'm holding off fitting the scuppers while I'm still handling the hull a lot. Next job will be the rudder. Probably my last post for a while, so I'll wish everyone a happy Christmas and peaceful New Year. Derek


- 345 replies
-
- 18
-
-

-
- Duchess Of Kingston
- Vanguard Models
- (and 1 more)
-
Thanks, but I think yours looks equally good. Take extra care when you fit the upper and lower rails on those V-frames. I found I had to tweak the slots a fair bit to get them to sit correctly. Derek
-
I had the same problem - must be an issue with the server. However I loaded the photos into Photoshop and saved them under different names, with no other changes, and they then uploaded. No idea why, but it worked.
-
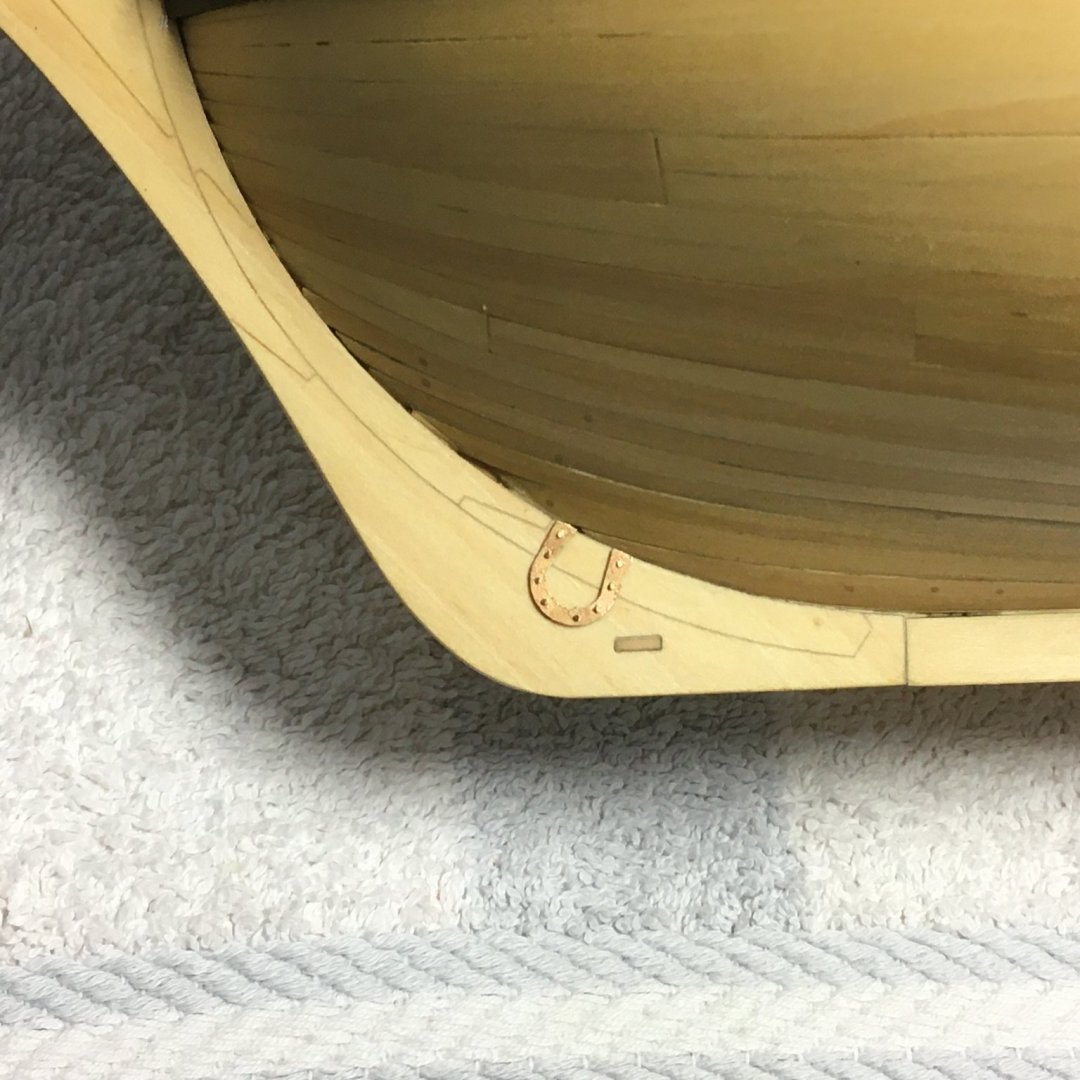
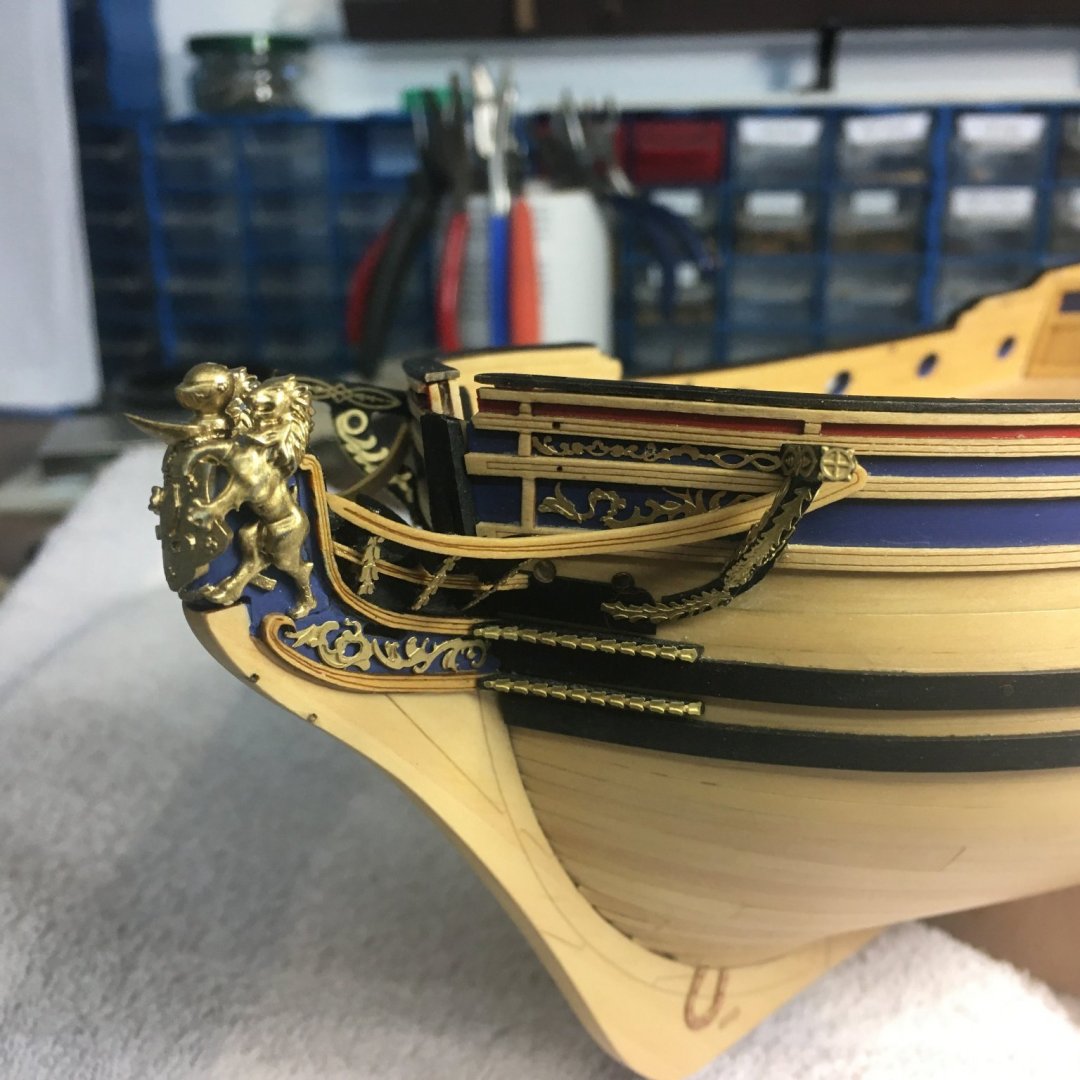
Completing the bow area & portside decoration Thanks for all the likes and kind comments, they're much appreciated. Before fitting the various head rails I painted and fitted the catheads. Unlike Speedy, when I neglected to drill sheave holes in the catheads until they were on the hull, I got to work with the trusty Proxxon micro mill before fitting them. The catheads are just shy of 3mm wide, so a 0.5mm mill was just right to cut the necessary holes and grooves: The cathead support brackets require careful bevelling on each contact face. I found this problematic and ended up disguising a small gap each side with acrylic filler and paint. As a quick aside, I also fitted the horseshoe and fish plates at this stage. Not a big deal in itself, but worth mentioning as a further example of the kit's accuracy - all the 0.5mm holes in the plates themselves, the two boxwood veneers and the keel itself were lined up perfectly so that all 13 pins went through without a problem: On to the various bow rails and decorations. These were fiddly given their small size, but went together as per the manual without a hitch. The manual is supplemented with detailed 1:1 plans showing the placement of all the photoetch decoration. Given the shear volume of decoration (I counted 30 separate items in the bow area and catheads alone) I found it essential to have the plans to hand to correctly identify and position each piece. Most pieces are asymmetric, meaning the port and starboard sides are different which further highlights the importance of care at this stage. I should add that I grew impatient waiting for the matte medium I mentioned in my previous post to dry, and ended up resorting to CA for most of the photoetch. Here's the bow area mostly finished: It was around this time that I read @desalgu's Duchess log where he mentioned accidently breaking the plume off the knight's helmet on the figurehead. I felt a sinking sensation as I rushed back to the workshop to check mine. Sure enough, the plume was missing and I hadn't realised 😒. I hunted far and low but it had fallen into the black hole. Oh well, I'll knock up a replacement from Milliput or similar. Anyway here's the current state of play, with most of the portside decoration finished and just waiting on the gunport and window surrounds: It's worth a closeup of some of the decoration. Bearing in mind this is from a 0.2mm sheet, I'm amazed how the process manages to produce three dimensional detail: Extraordinary. I think I'll do the starboard side next then all the gunports. I'll leave the windows 'til last as I don't want to risk damaging the glazing. I also need to glue back on the tiny details I managed to break off the window frames earlier in the build. I'm normally very careful when I'm modelling, but this kit has so many fine and delicate parts I'm finding it a real challenge. I must learn to be less ham fisted! Derek


- 345 replies
-
- 17
-
-
-
- Duchess Of Kingston
- Vanguard Models
- (and 1 more)
-
I don't know the answer either, but when I eventually get round to my Sphinx I'll leave the stop off. Historical accuracy be dammed - it just looks wrong 😒!
- 857 replies
-
- 3
-
-
- Sphinx
- Vanguard Models
- (and 1 more)