HOLIDAY DONATION DRIVE - SUPPORT MSW - DO YOUR PART TO KEEP THIS GREAT FORUM GOING! (Only 20 donations so far - C'mon guys!)
×


DelF
-
Posts
1,409 -
Joined
-
Last visited
Content Type
Profiles
Forums
Gallery
Events
Everything posted by DelF
-
 Touché Glenn. Actually, I just "dropped" that in to check if you'd got your nautical dictionary yet. Honest. To complicate matters, I've checked some of my references and I think what I called a drop(ped) plank is more properly called a diminishing stealer, ie because you go from two strakes to one as you move towards the bows. The drop plank is where an extra plank is inserted in the stern area to increase the number of strakes by one. Not to be confused with an expanding stealer which achieves the same effect. Differently. 🤪
- 345 replies
-
- 1
-

-
- Duchess Of Kingston
- Vanguard Models
- (and 1 more)
-
I used 6mm rather than 4mm right at the stern, although they narrowed to 4mm midships.
-
Not at all - it's all part of sharing tips and ideas. Dropped planks and stealers are OK if you really need them, but you should aim to minimise their use. I took my garboard strake too far up the stem so I ended up having to use three dropped planks whereas I probably should have needed one at most. I managed to avoid stealers at the stern because I used wider planks in the first few strakes above the garboard. Derek
-
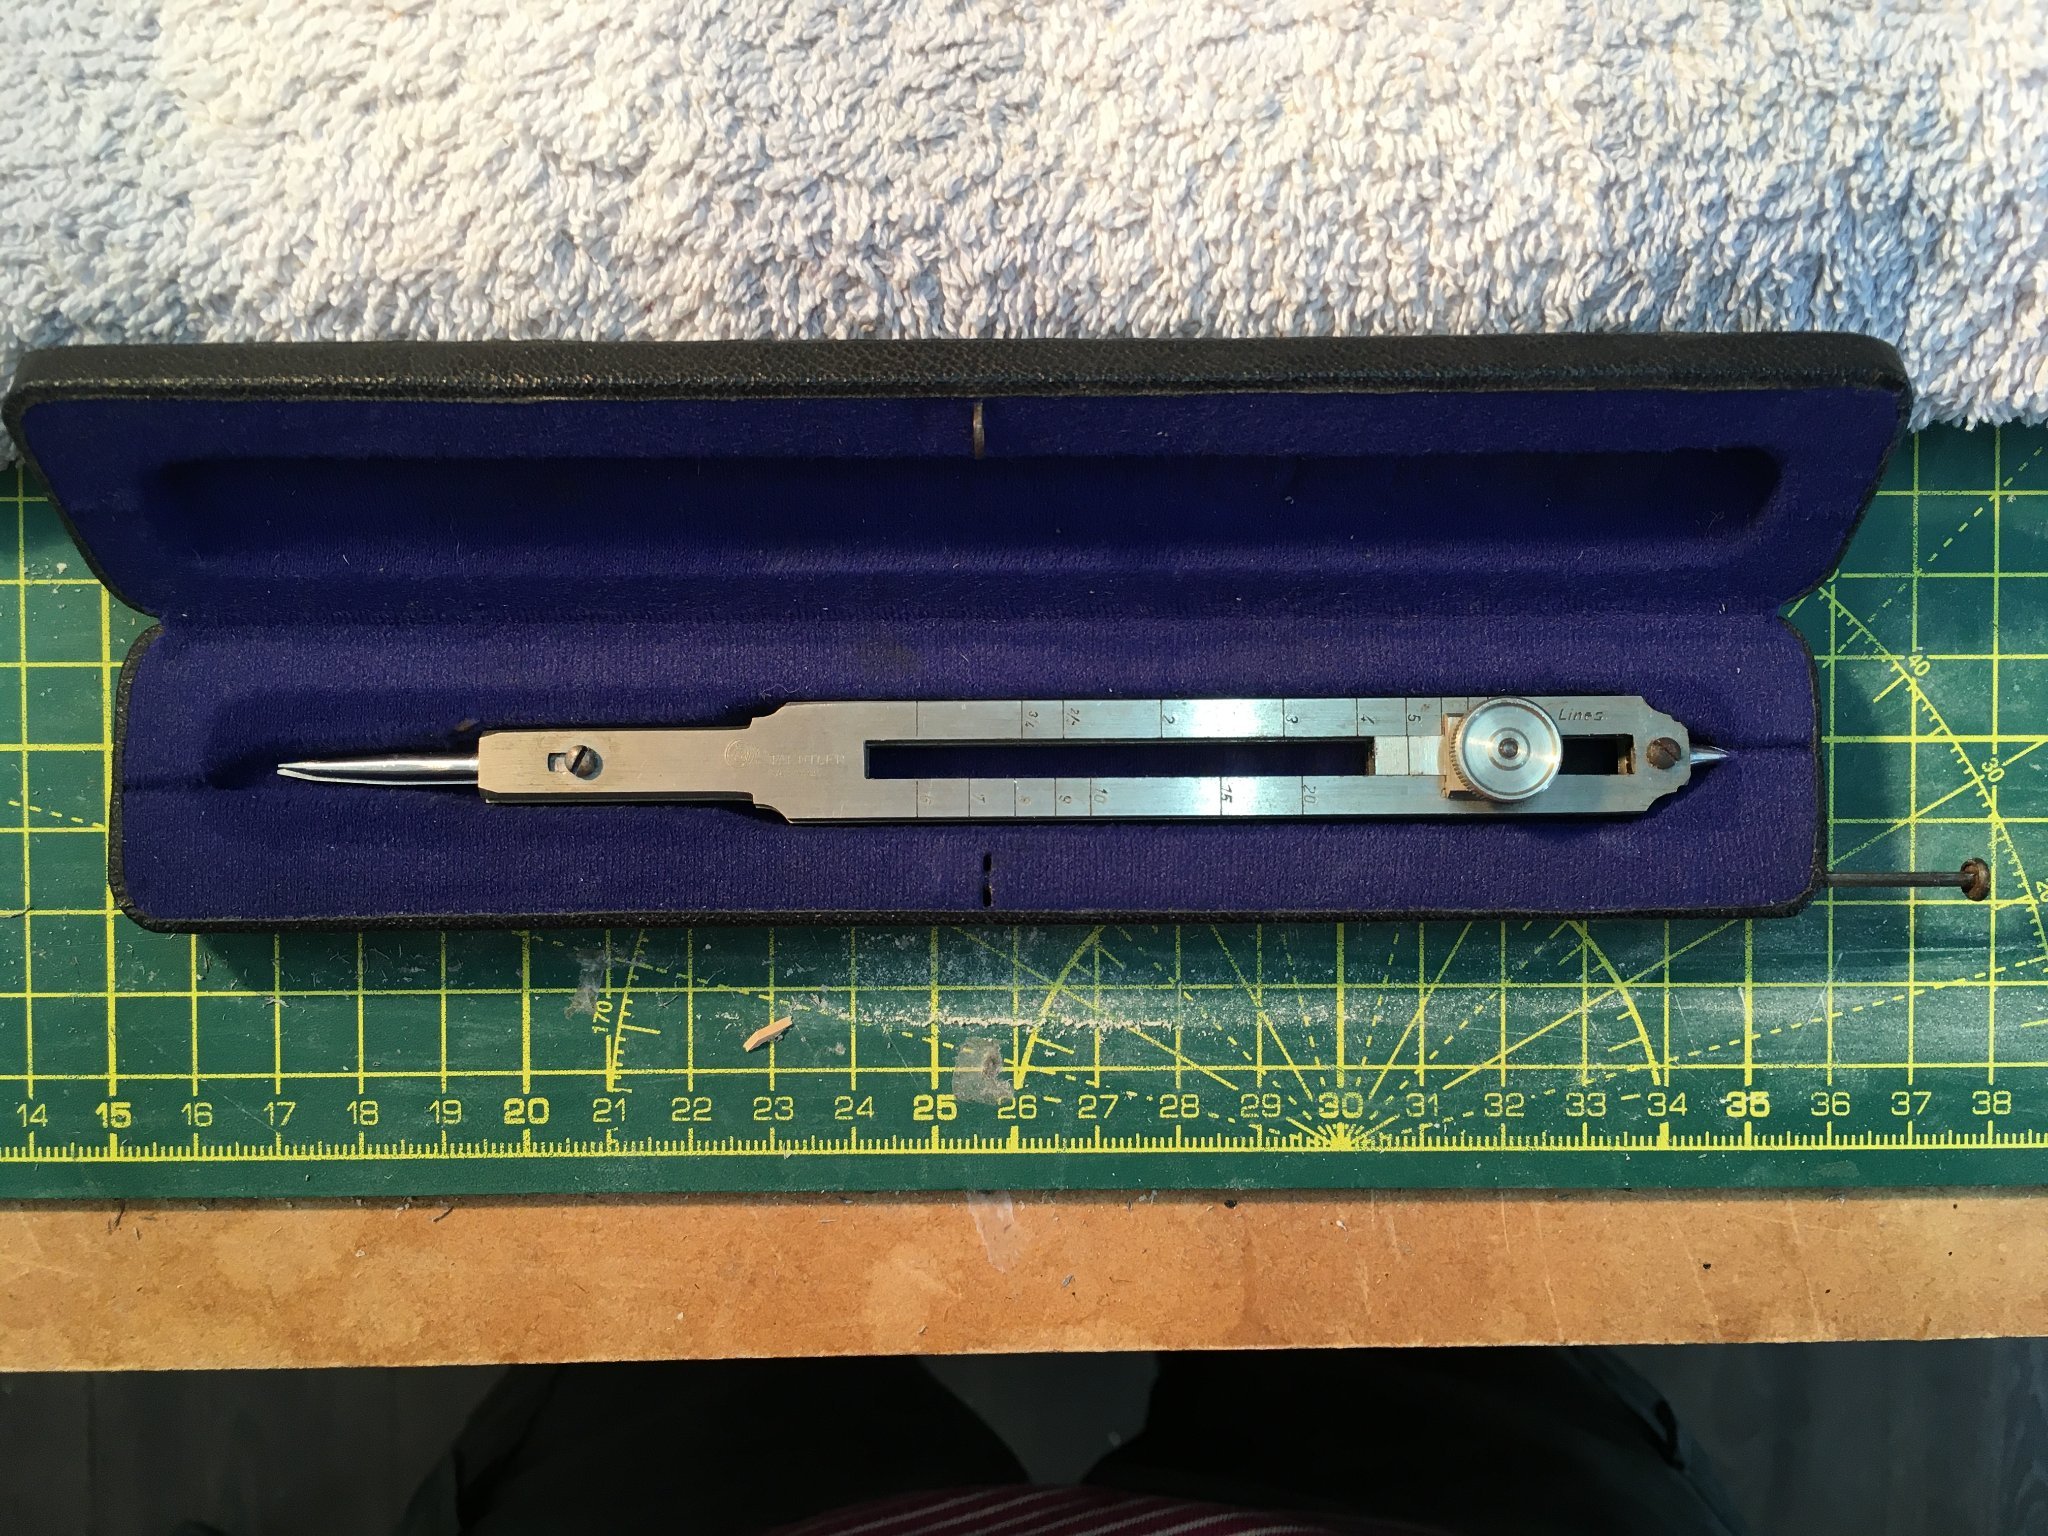
Thanks Dave. I'm still learning, as you can see from the mistakes like the unnecessary drop planks. However the dividers do make the job a lot easier. Keep your eye on ebay. This one is open for bids now and is similar to mine. There are several others on the site today, but as I said before, I would go for a good vintage one rather than a modern repro. Good luck Derek
-
Hi Doug. I'll follow with interest, especially given Flirt's close resemblance to Speedy which I really enjoyed building. Derek PS I like the door, btw
- 102 replies
-
- 2
-
-
- Flirt
- Vanguard Models
- (and 1 more)
-
That last shot shows off the contrast between the boxwood and the paintwork beautifully. By the way, I'm not sure you need mechanical painting aids - your brush work is at least as good as my spraying. Nearly. They're hawse-holes. The hawser is the cable that passes through them, and the hawse is the part of the ship's bows through which the hawse-holes pass (haven't you got that maritime dictionary yet? ) While we're on vocabulary... ...do you mean fiddling? That's a pretty ordinary word. A more interesting word you might have seen used by many of us on this side of the pond is fettling, originally meaning to scour rough castings after they come from the furnace, but now more generally meaning to put something in order. Used a lot by engineers and mechanics (and model ship builders), particularly in Northern parts.
-
Photographing your models
DelF replied to Patrick Matthews's topic in Photographing your work. How to do this.
This would interest a lot of people, but as Glenn says, you should consider posting on the "Photographing your work" sub-forum. Stunning model, btw. -
That deck was definitely worth the effort - well done!
-
Thank you Gregory, Kevin and Chris, much appreciated. Thanks Yves. I'm still in two minds to be honest. I love bare wood, but at the same time I want to decorate the upper parts of the hull and I'm concerned that it won't look balanced unless I also paint her white below the waterline. Thanks Glenn. I can see that that's exactly what I did wrong, and I think I made it worse by readjusting the battens after I'd fitted the garboard strake. Trouble is, I'm going to have to repeat the same mistakes on the starboard side because I think it would be worse for the two sides to be asymmetrical. Oh well, I'm learning and hopefully I'll get it right for Sphinx!
- 345 replies
-
- 1
-
-
- Duchess Of Kingston
- Vanguard Models
- (and 1 more)
-
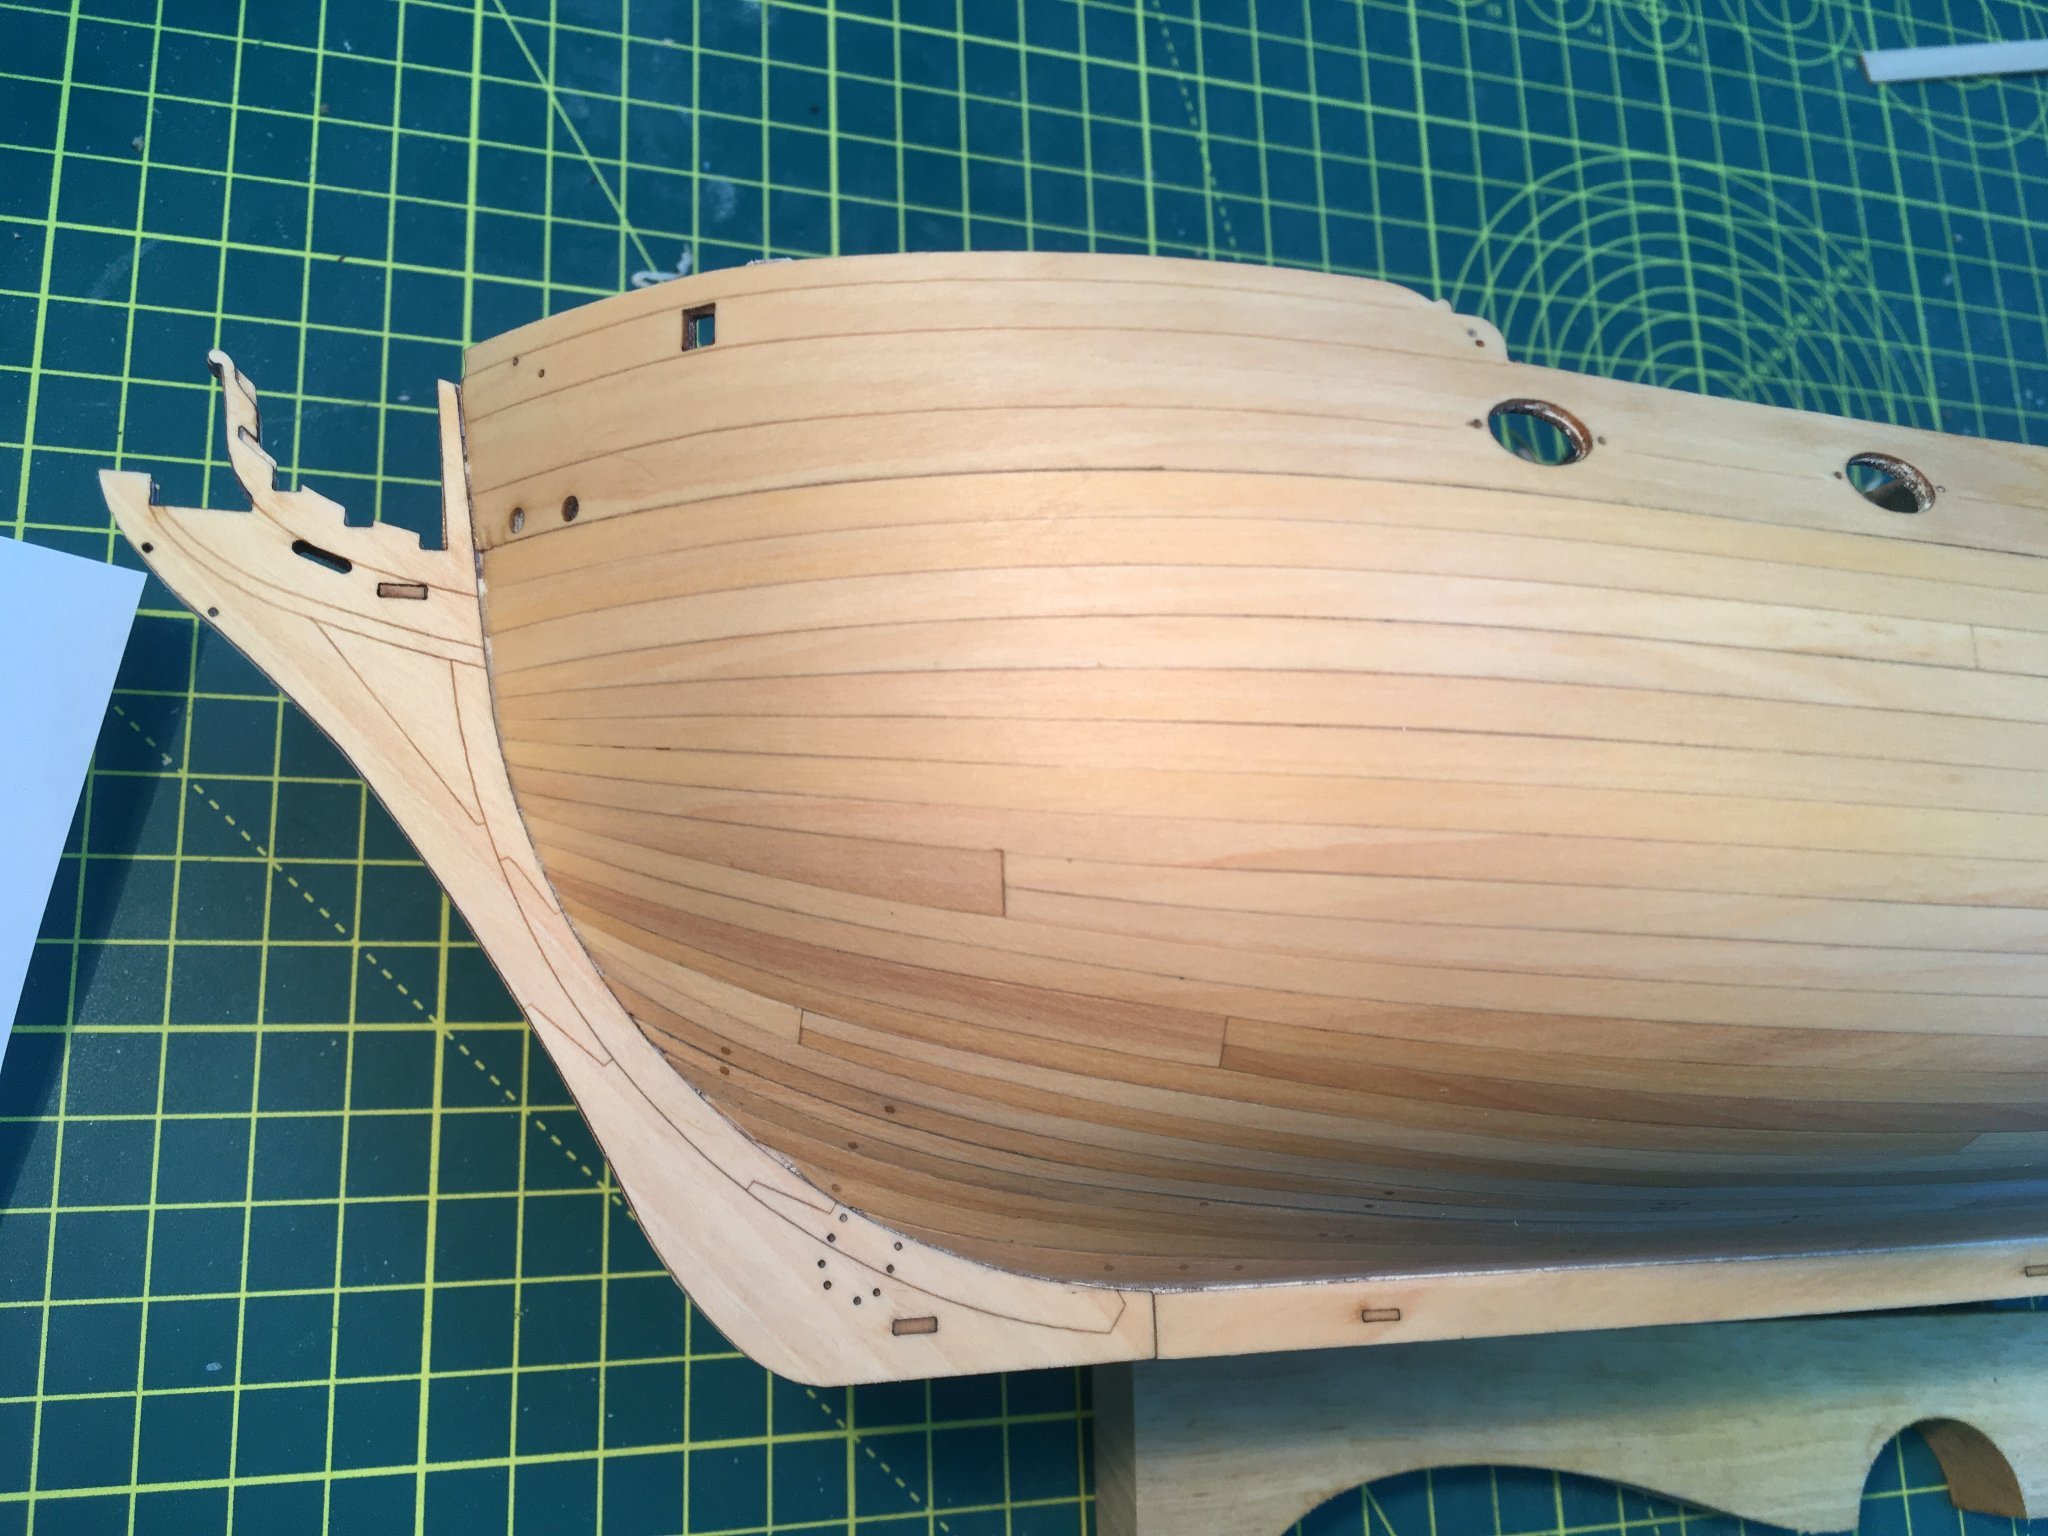
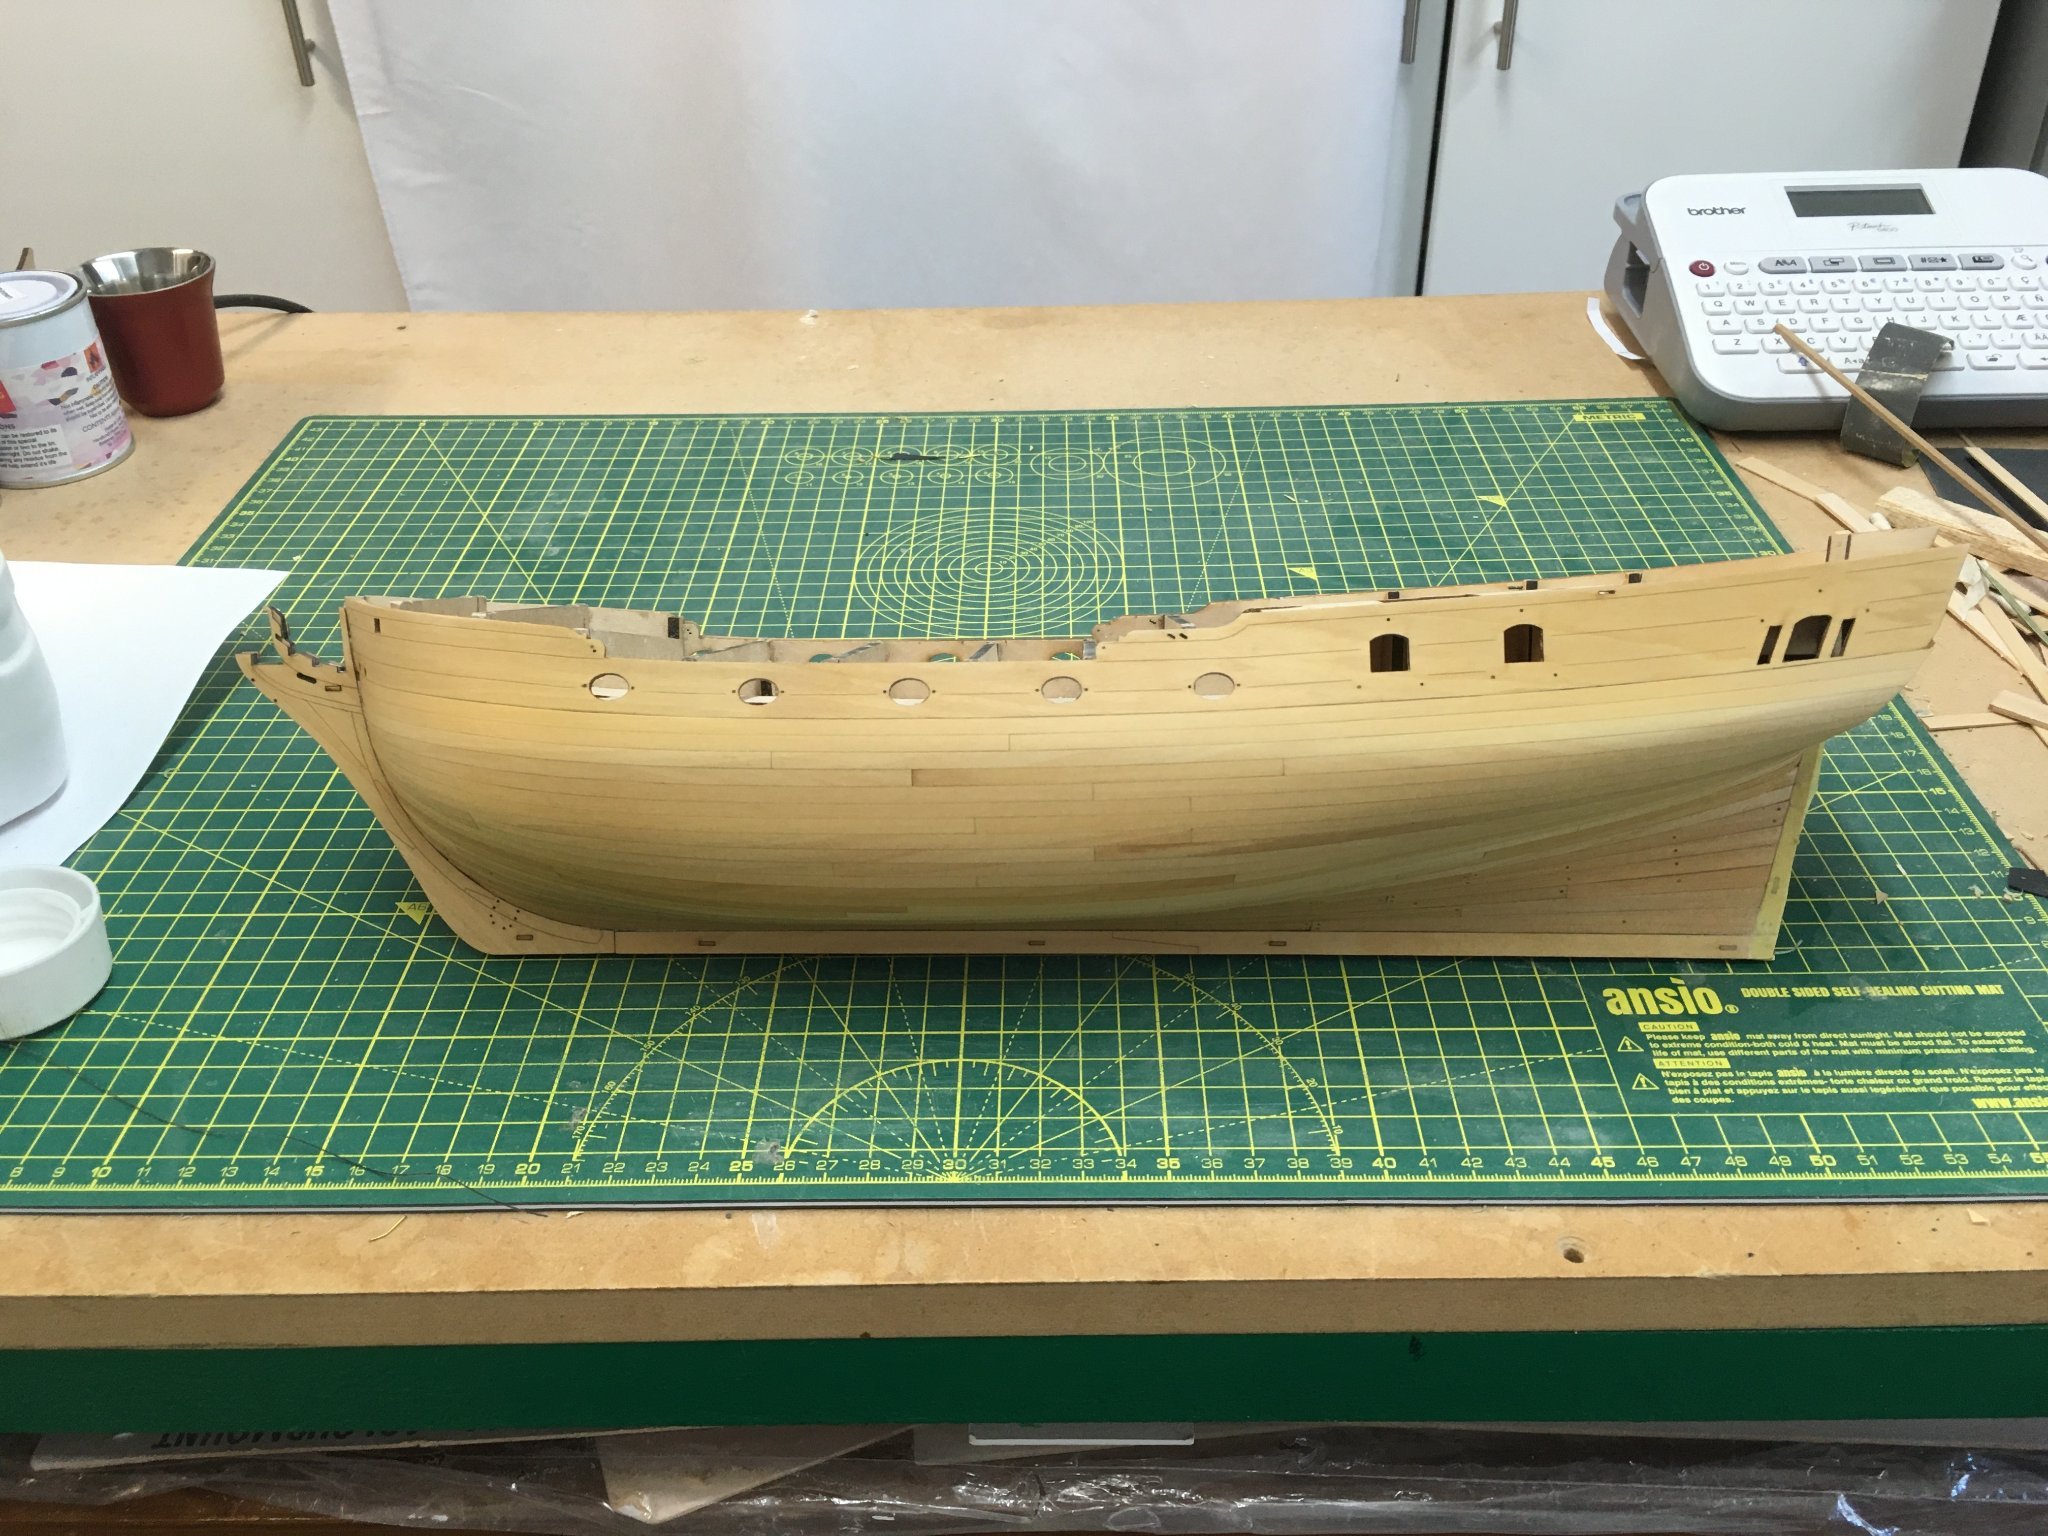
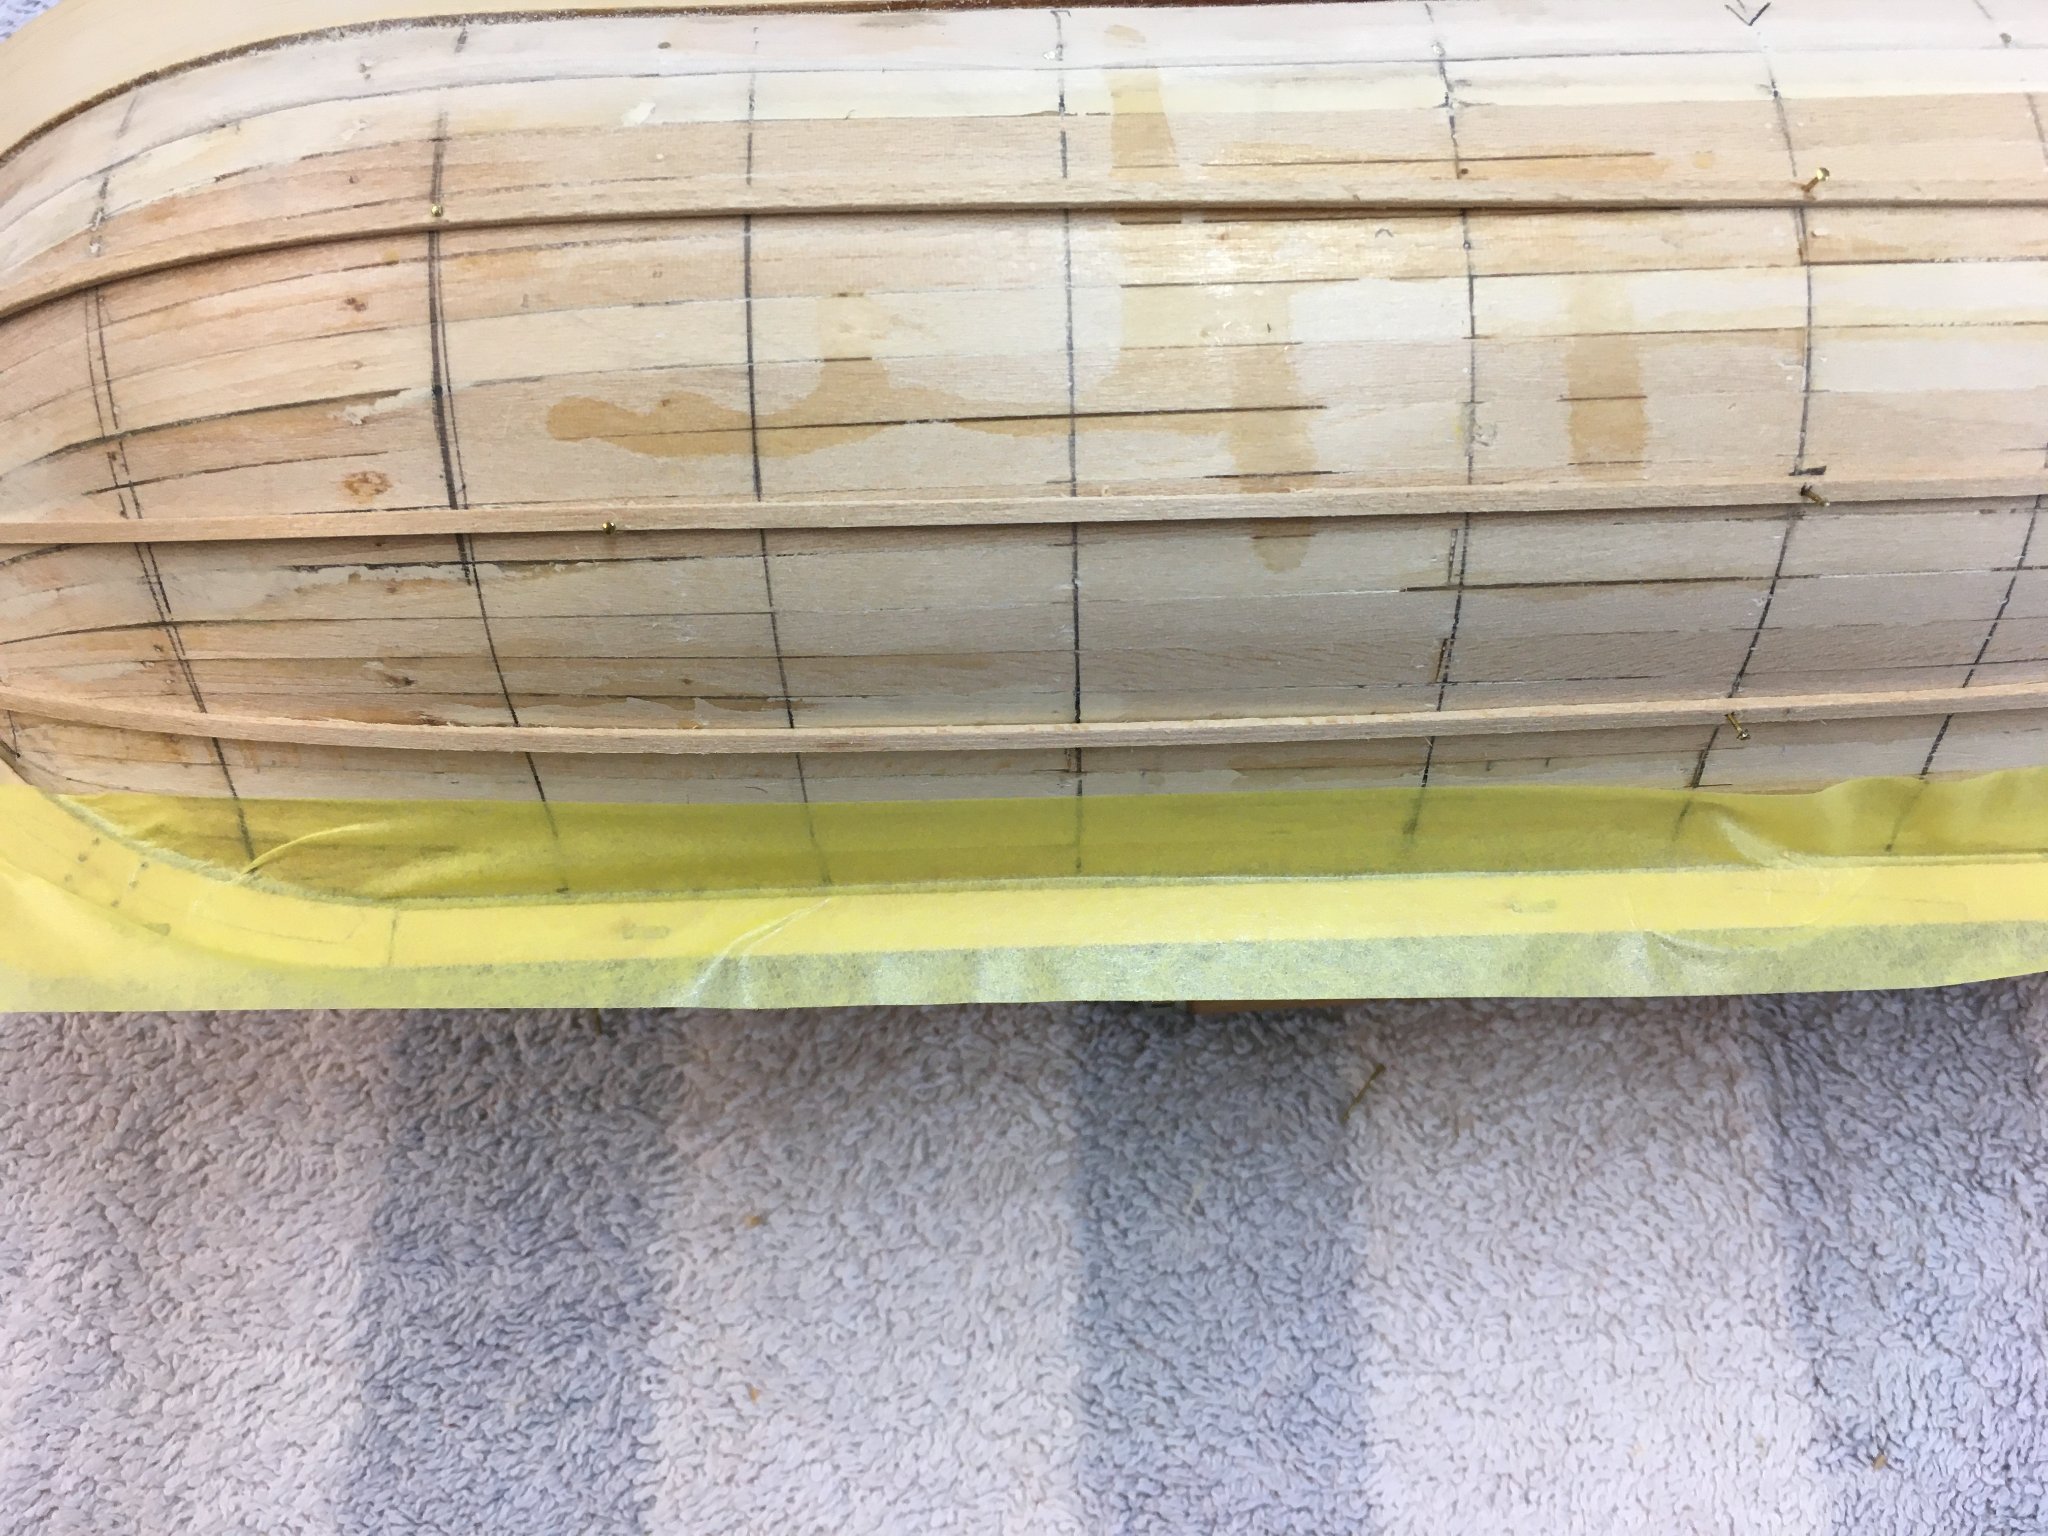
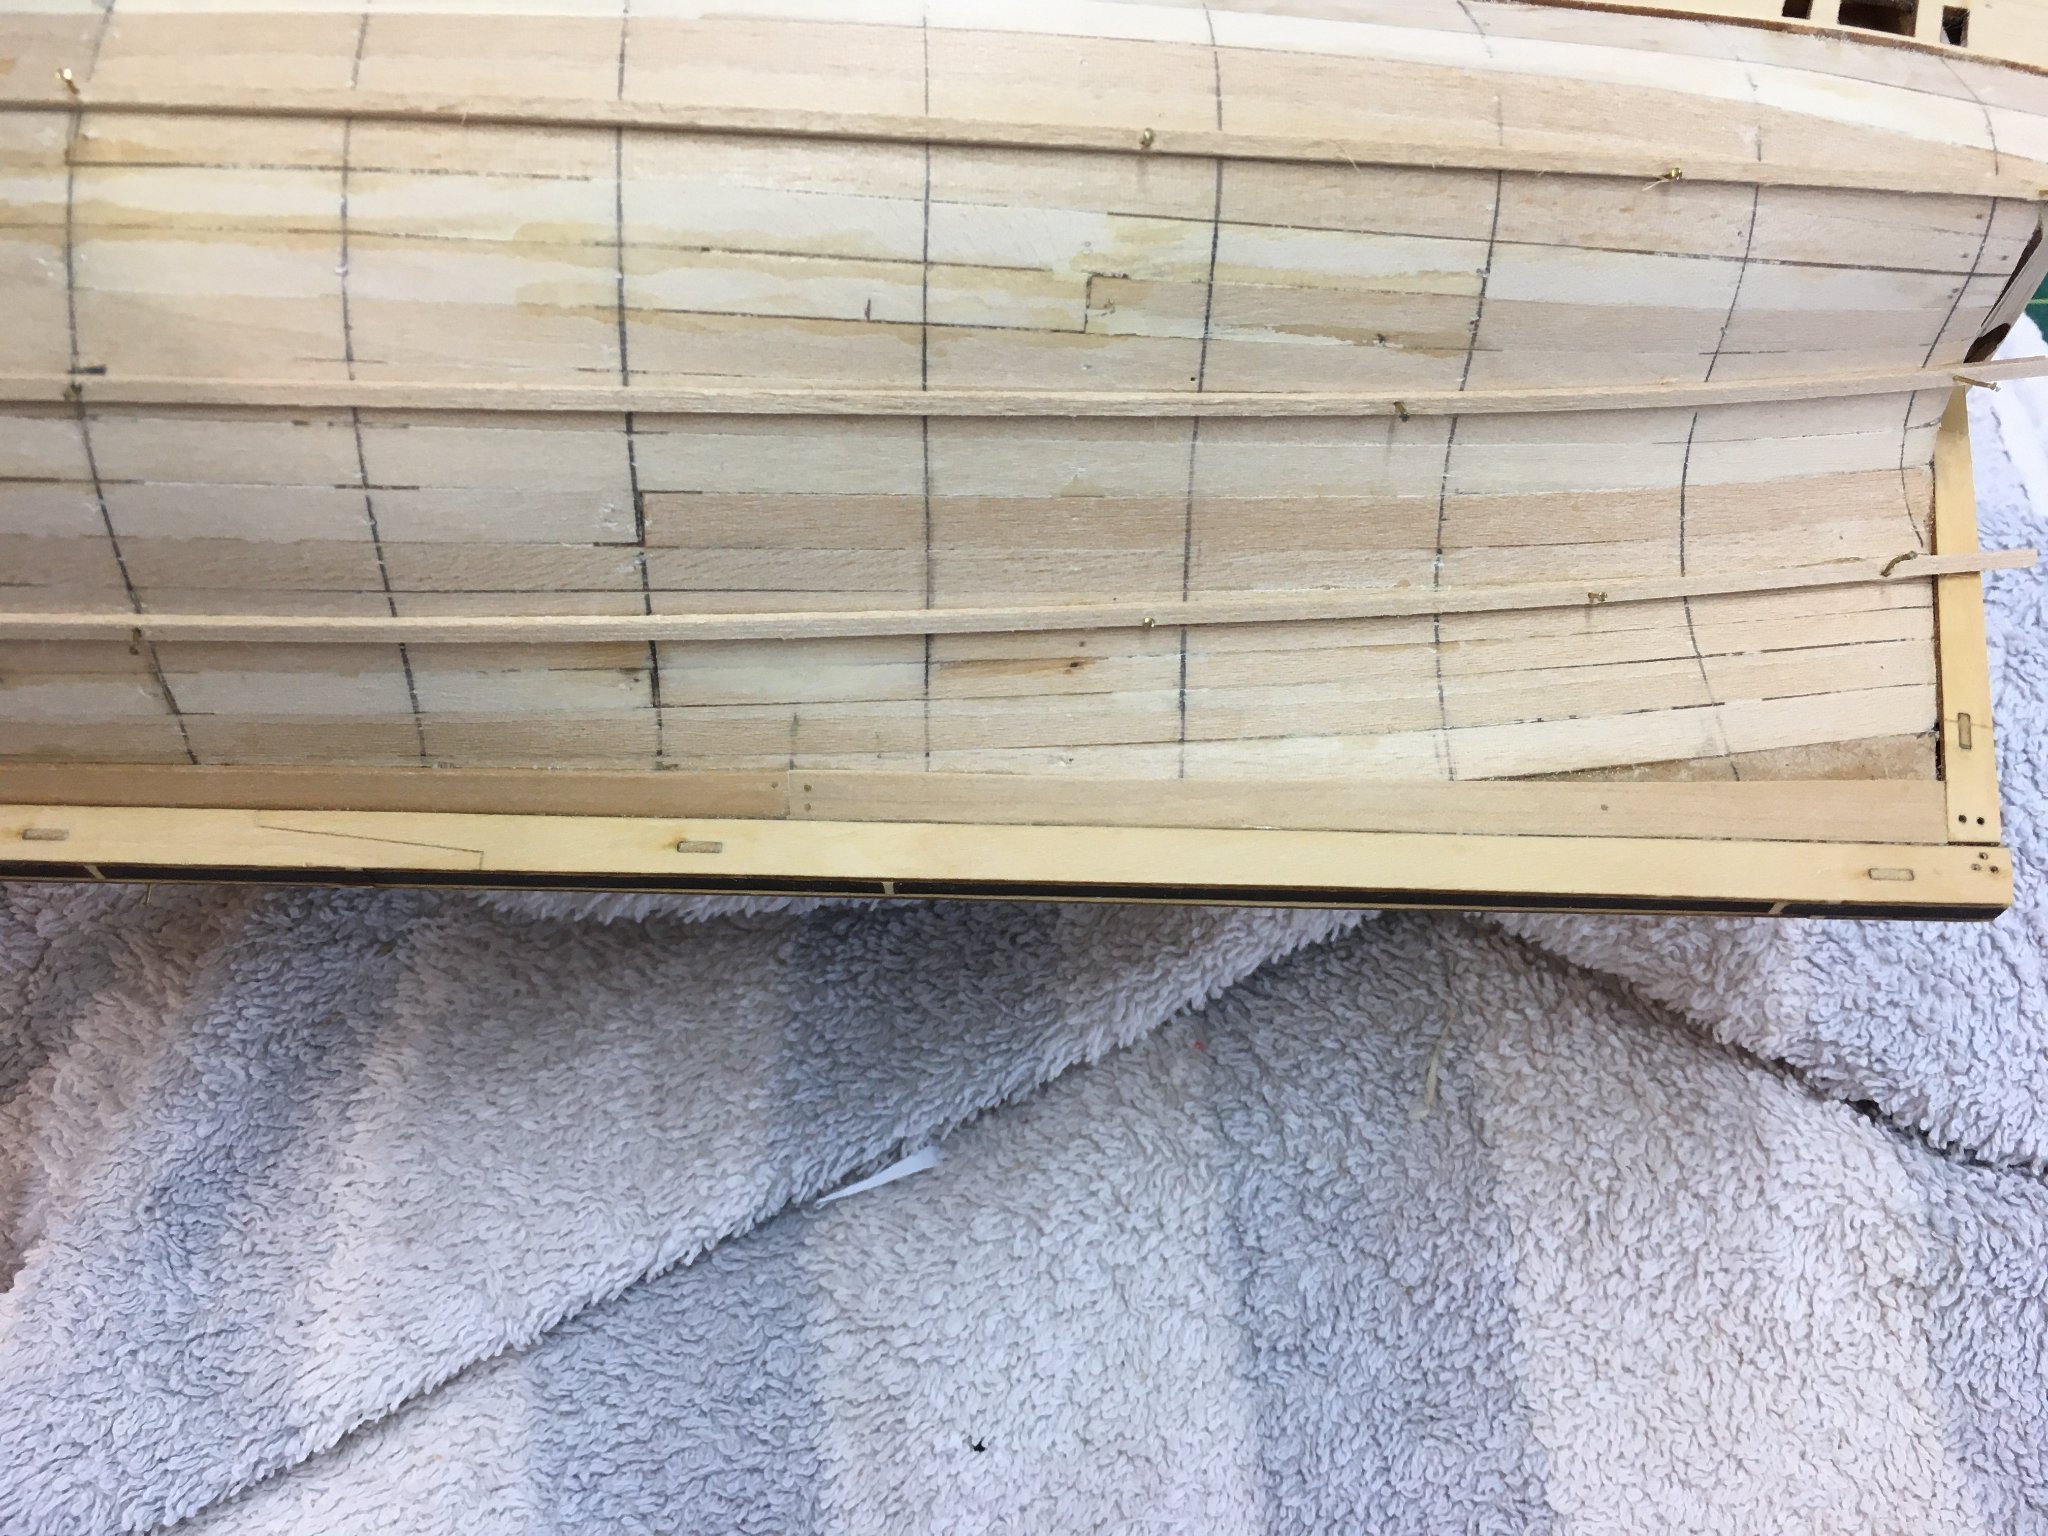
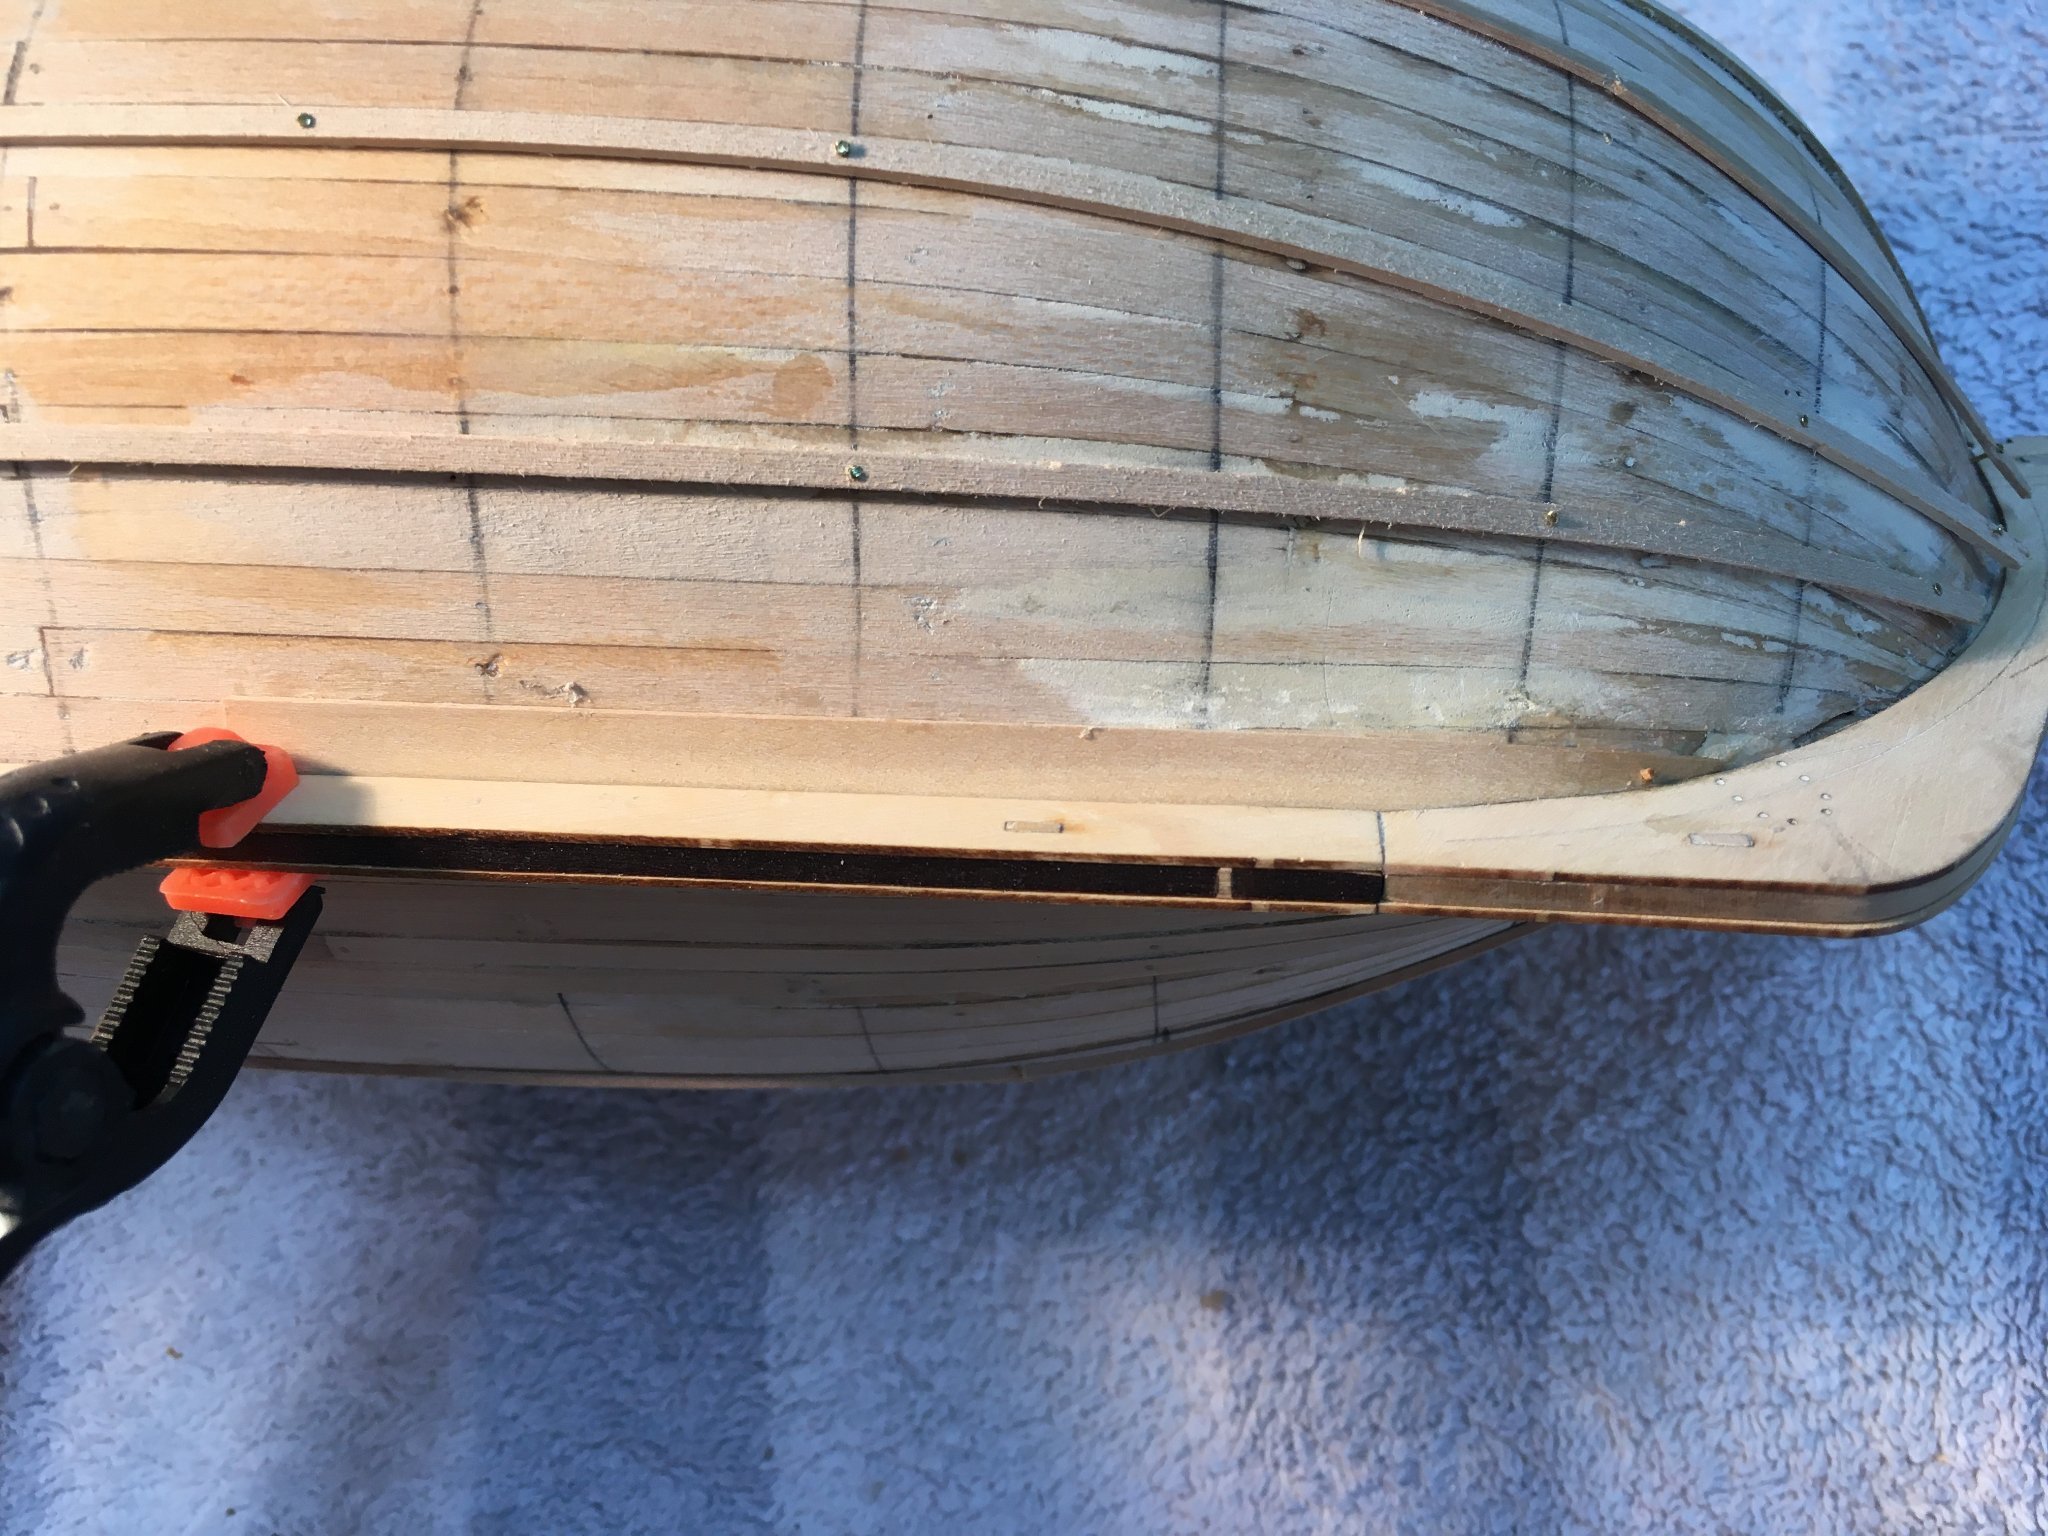
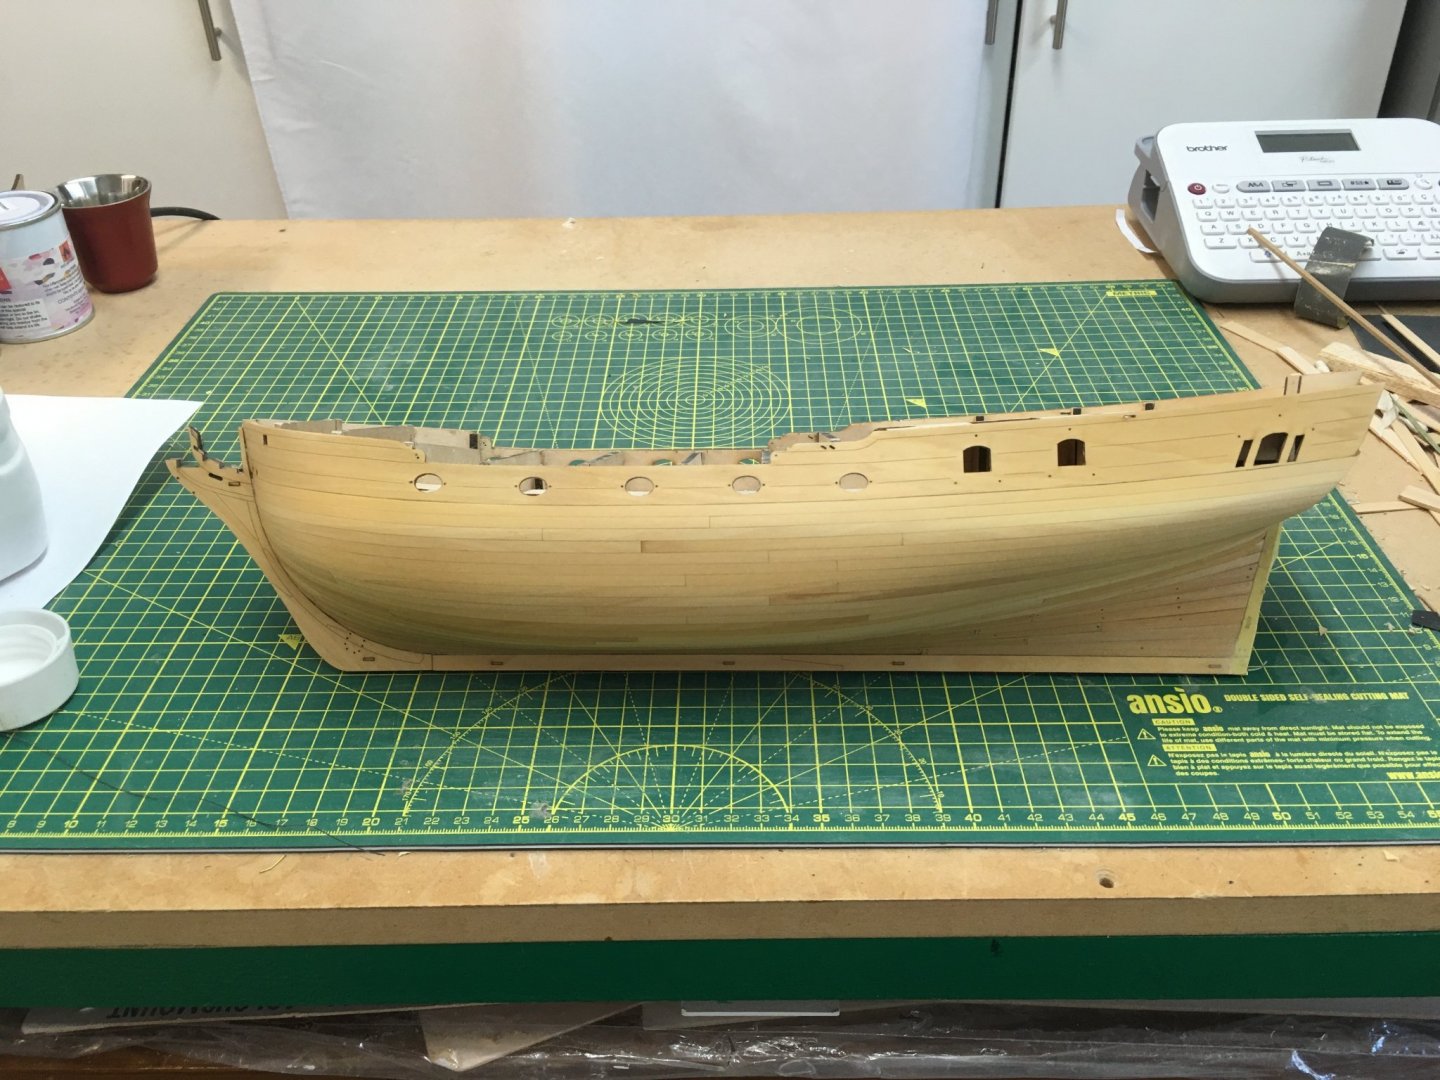
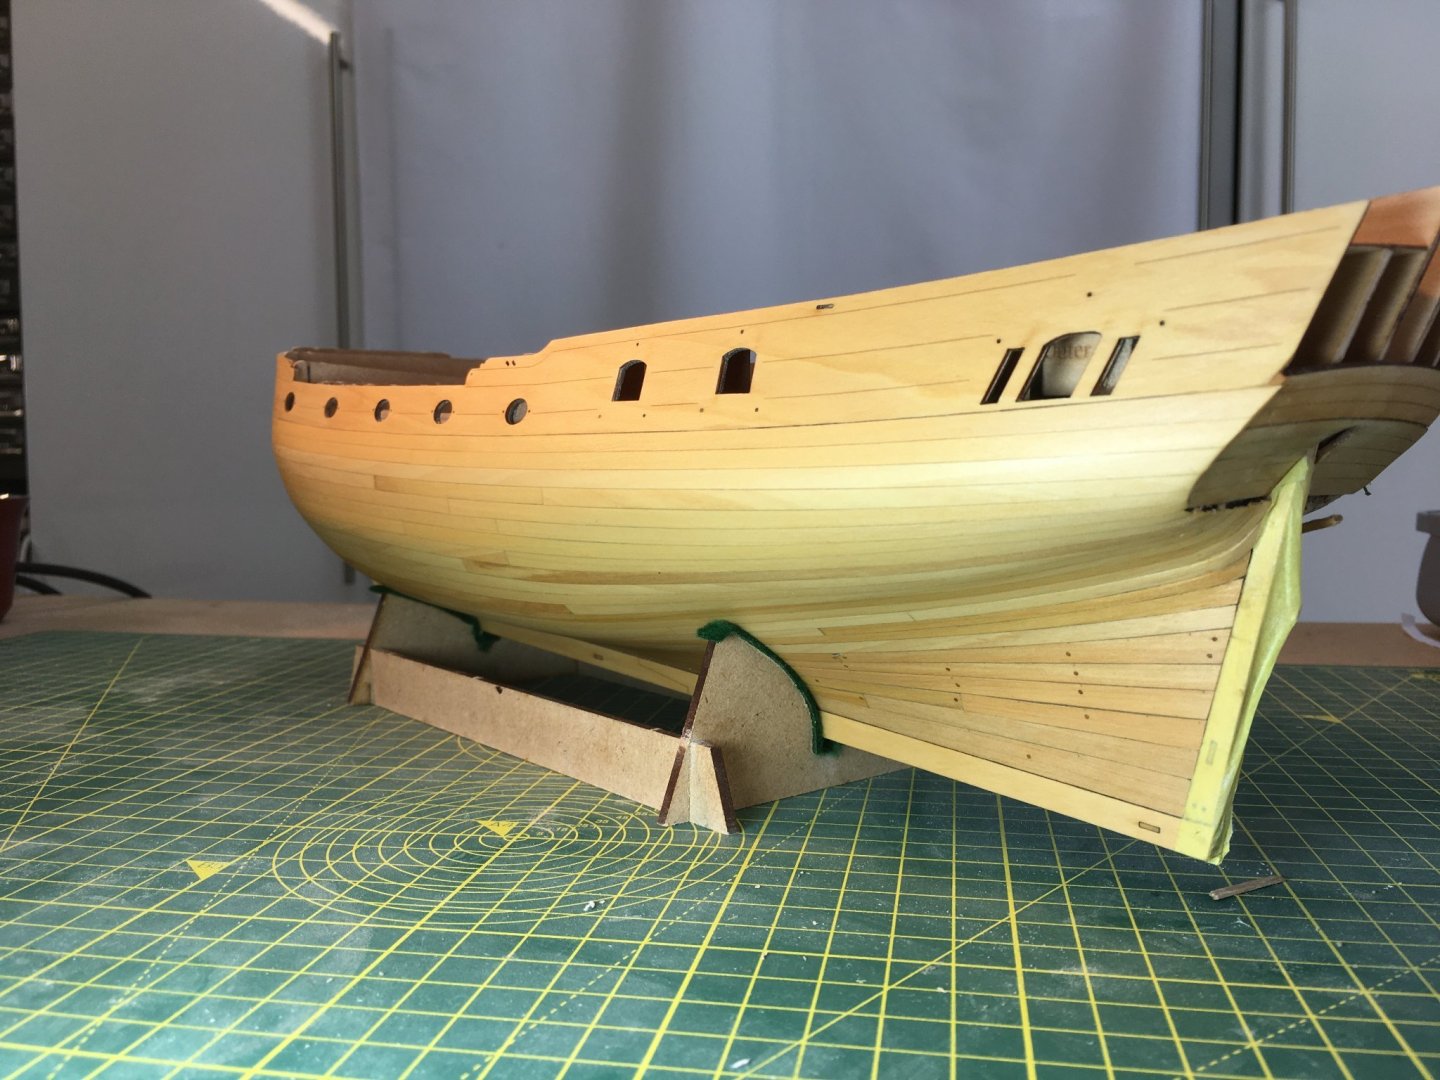
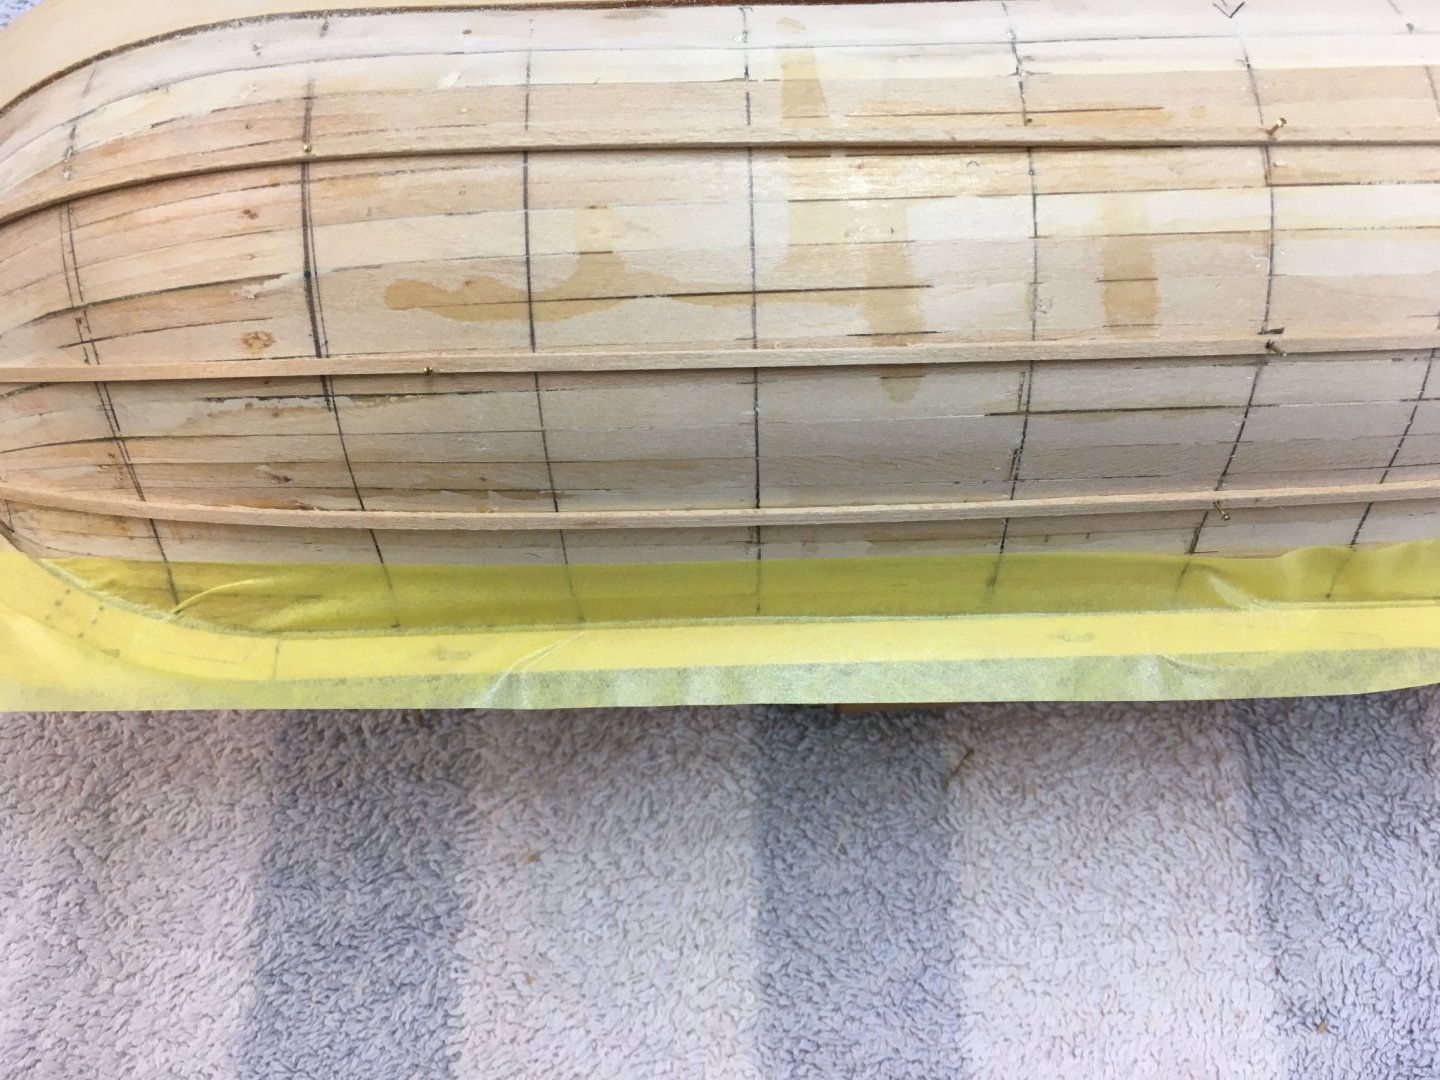
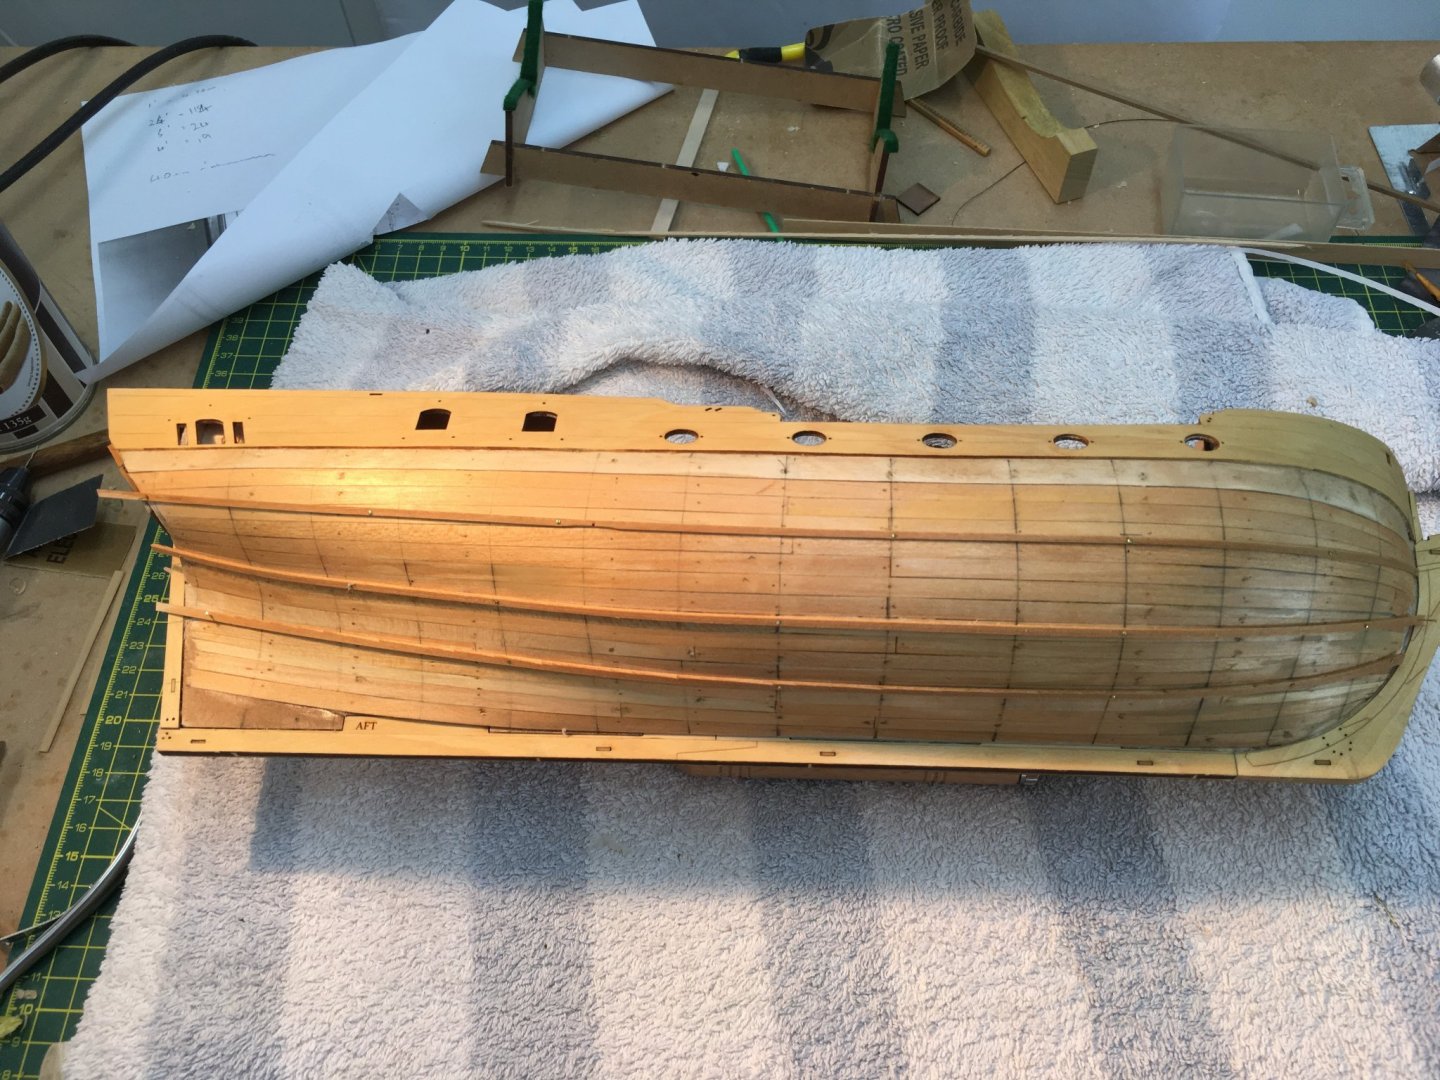
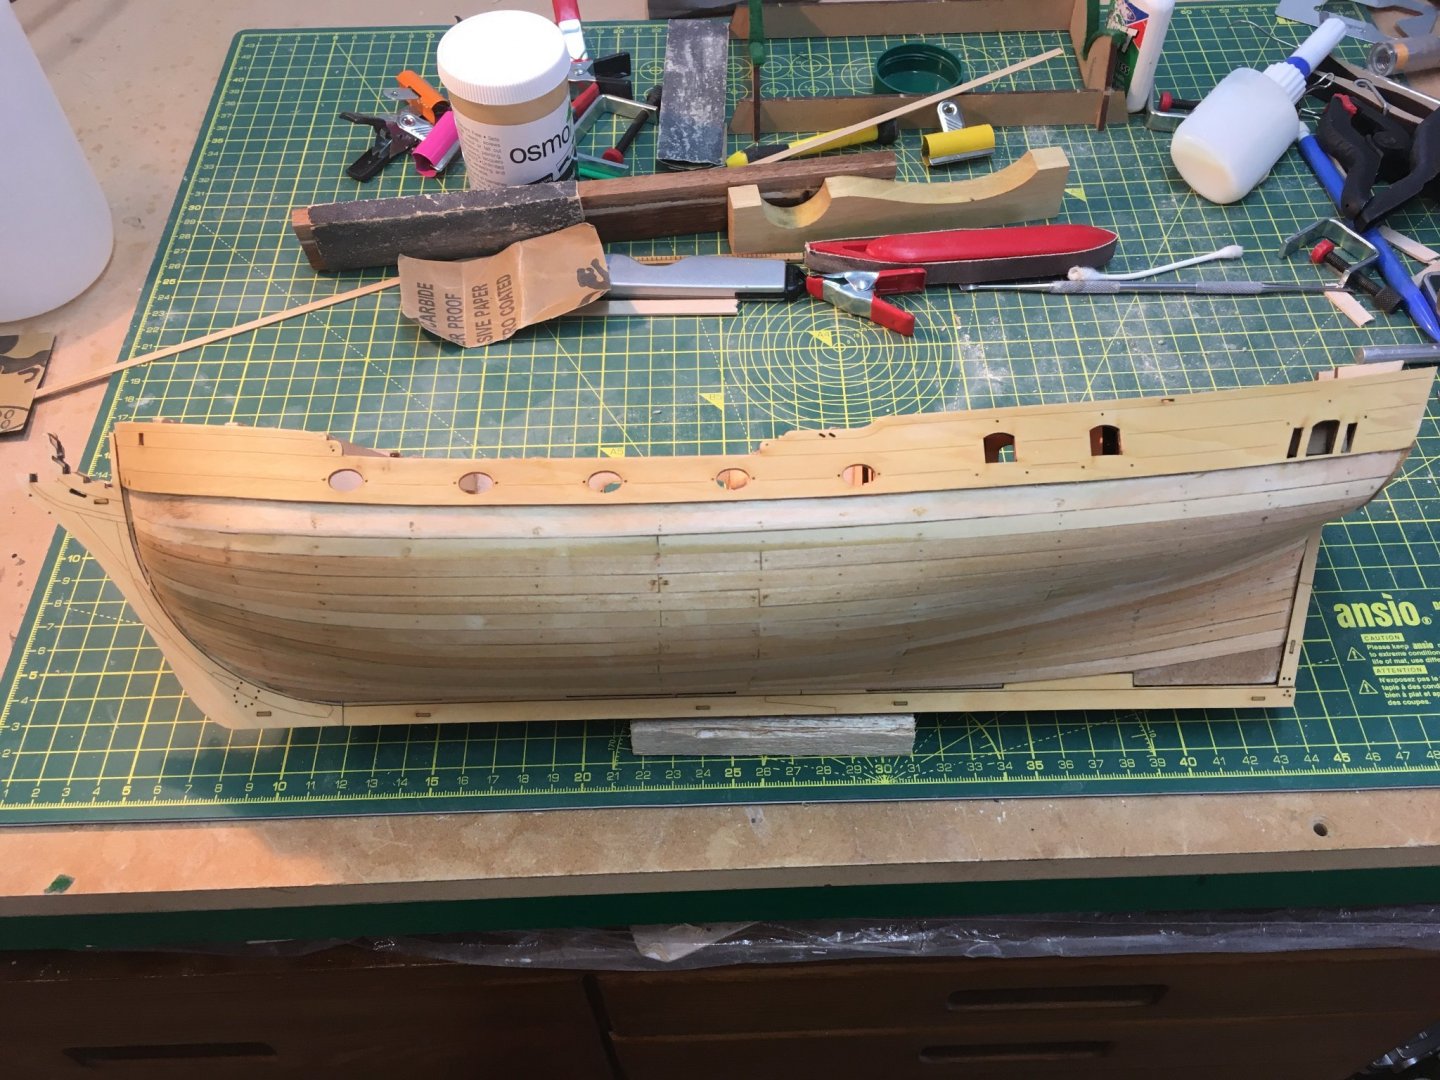
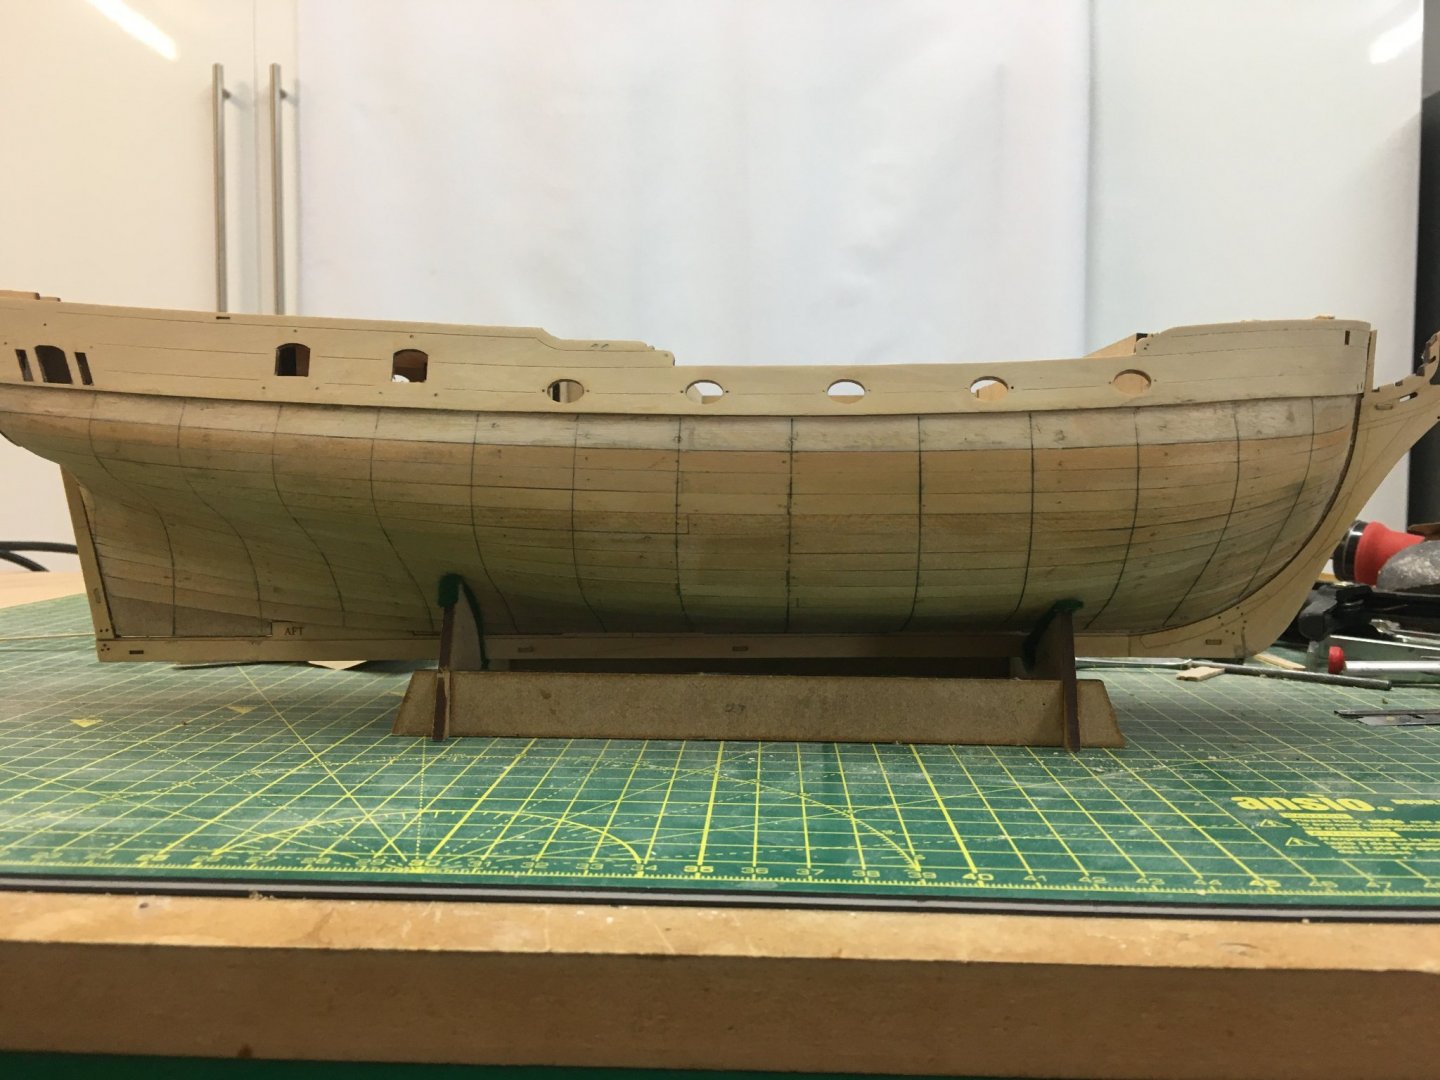
Port side planking Thanks as always for the kind comments and likes, they are much appreciated. I've finished the first side of the hull, with mixed results. I wanted to tackle this planking job as well as I could and I've described how I lined off the hull and used battens and proportional dividers. On balance I'm pleased with the accuracy I achieved, with most planks fitting well. However I made a couple of avoidable errors which will be obvious in the photos. The first was to bring the garboard strake too far up the stem, thereby leaving too little space for the necessary strakes resulting in no fewer than three drop planks in the bows. The second mistake was in failing to sort out the supplied planking material more than I did. I don't mind some variation in shades but I usually do a better job in keeping the darker planks for the less visible areas. I was so engrossed in the marking out process and using the dividers for the first time that I didn't pay sufficient attention. Anyway, I'd more or less decided to paint the hull as soon as I had to start using trennels during my early abortive attempt to use PVA on the second planking, so these mistakes shouldn't matter. Another real positive is that after the first few strakes I was able to use the odourless CA from BSI that @glbarlow recommended. At first I was careful to limit my exposure, but now I can happily use it for extended periods without the adverse reactions I get from normal CA. Here's the current state of play, with just a little more sanding required before WOP or shellac (I haven't decided yet). Derek

- 345 replies
-
- 20
-
-

-
- Duchess Of Kingston
- Vanguard Models
- (and 1 more)
-
I'm sending Duchess to you for planking and painting...
-
I agree with Spyglass and Bob - your boxwood planking is beautiful, especially with the WOP. I followed the instructions on Speedy and struggled, although it came right in the end. Your method looks more logical and gave you a very neat result. I hope you hurry up and move on to HMS Sphinx so I can copy some more good ideas 😁 Derek
-
Looking good Dave
-
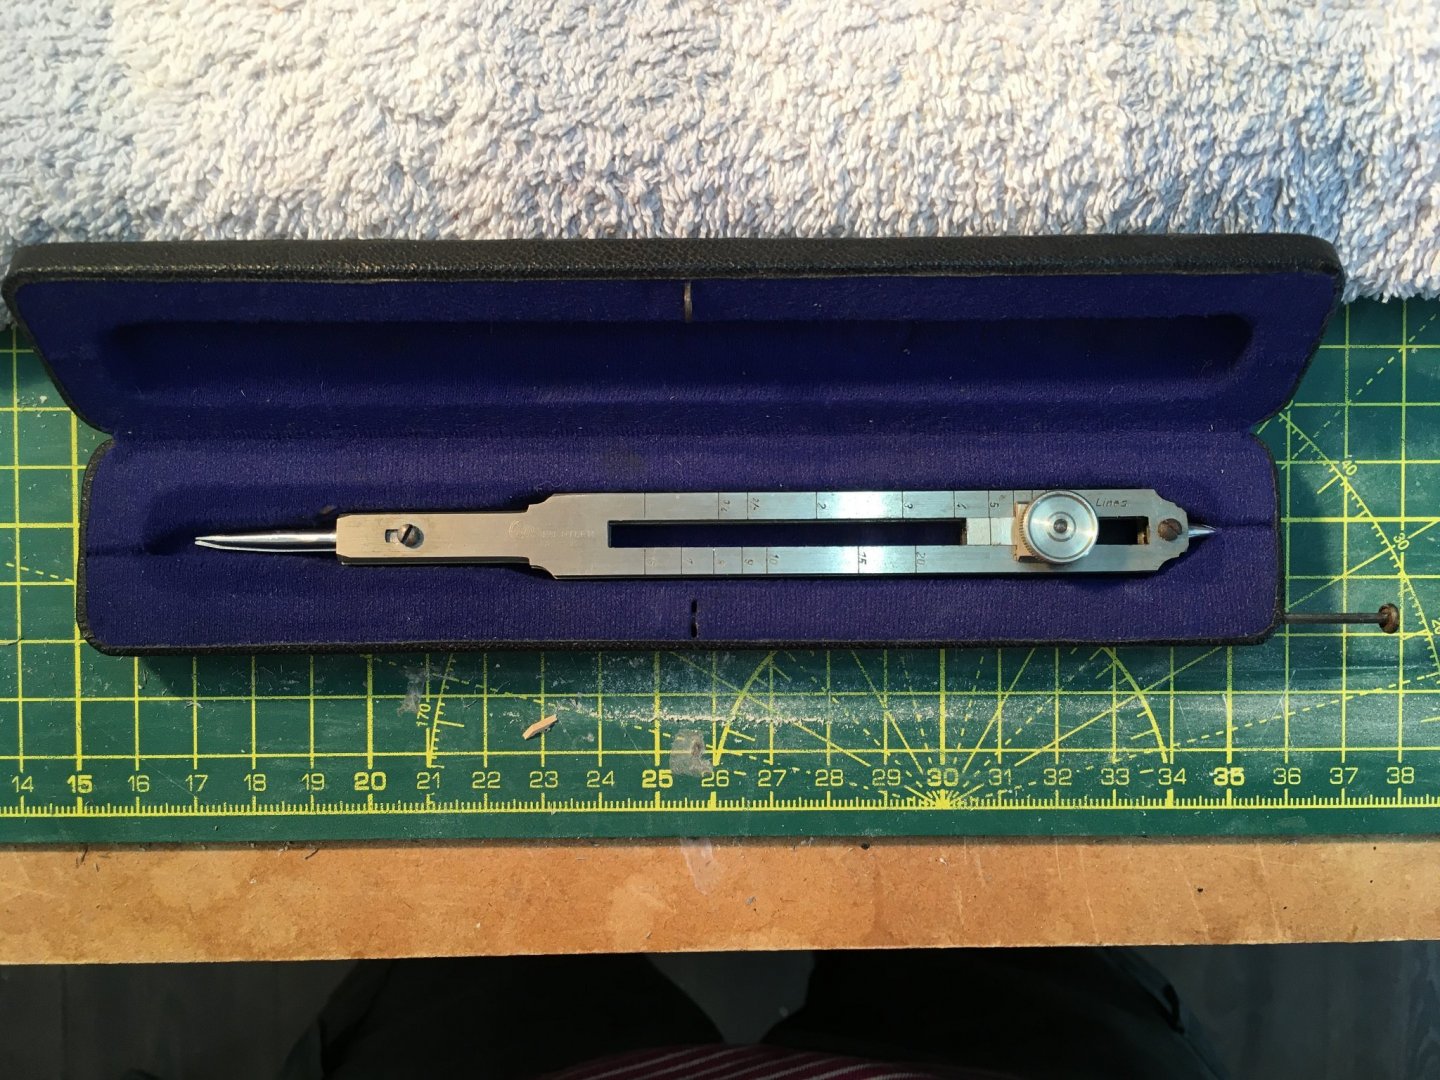
Thanks guys, I'm pleased you found the explanation interesting. I actually bought the proportional dividers about eight years ago but never got round to using them. Although I'd read of their use in planking I always suspected there must be some 'dark arts' involved in getting good results. I was wrong. I'm so glad I've eventually got round to trying them out on the Duchess, as in practice they seem much easier and quicker to use than tick strips and planking fans. And more accurate, I suspect. Of course that depends on the quality of the dividers. I'm not sure I'd trust the cheapo modern ones on Amazon, but neither would I want to spend £150 to £200 on top grade new ones. Fortunately there are plenty of well-engineered sets on the second hand market, such as the £30 Staedtler dividers I got on ebay. That's what I've found, provided you use good quality timber of the right size to bend into smooth curves but not so fragile it kinks. Of course it still takes quite a while to get the right curves, but the battens do seem to make it easier. I put fine pins part way through the battens to hold them against the hull while I checked the resulting planking bands, which made it comparatively easy to reposition them until I was satisfied. Once I got one side of the hull done I just transferred the measurements (ie where each batten crossed each vertical line on the hull) to replicate the planking bands on the other side. I'm managing about one strake every two days in between work around the property, but I'm delighted to say that the BSI odourless CA Glenn recommended is still doing it's job without the adverse reactions I get from regular CA.
- 345 replies
-
- 5
-
-
- Duchess Of Kingston
- Vanguard Models
- (and 1 more)
-
Good save (I hope!) 🤞
-
More great work Glenn. I like what you’ve achieved with the laser etched deck and I’m tempted to follow your lead when I get to the same stage with the Duchess rather than planking my own as I did with Speedy. I’m interested in the soft sanders you’re using - would you recommend them for use on second planking? Glad you’re getting on with the Fineline applicators. Derek
-
That's exactly right. The only time bulkheads really matter is if you're only doing a single layer of planks. When you've got the whole area of the hull to go at you can put the lines where you like.
- 345 replies
-
- 2
-
-
- Duchess Of Kingston
- Vanguard Models
- (and 1 more)
-
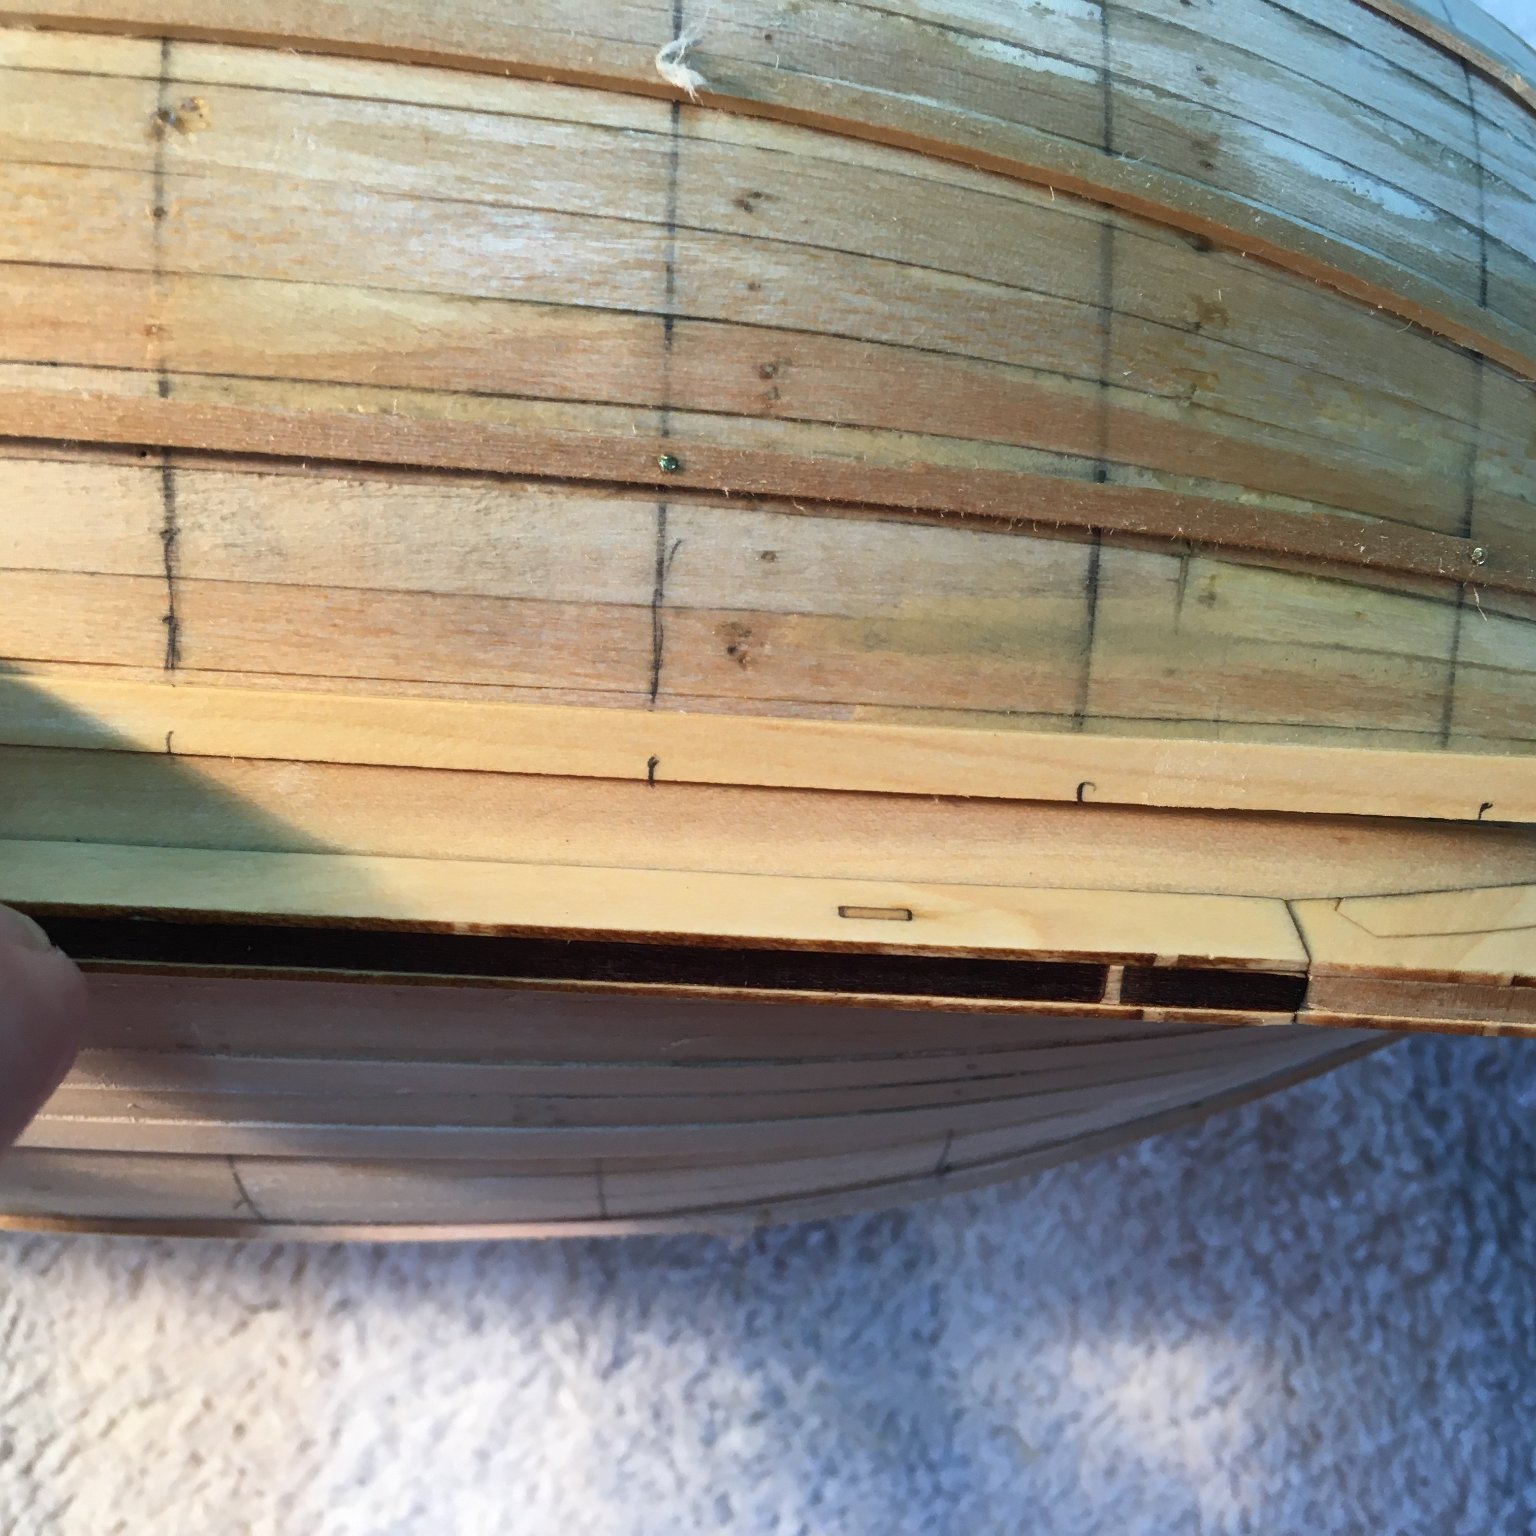
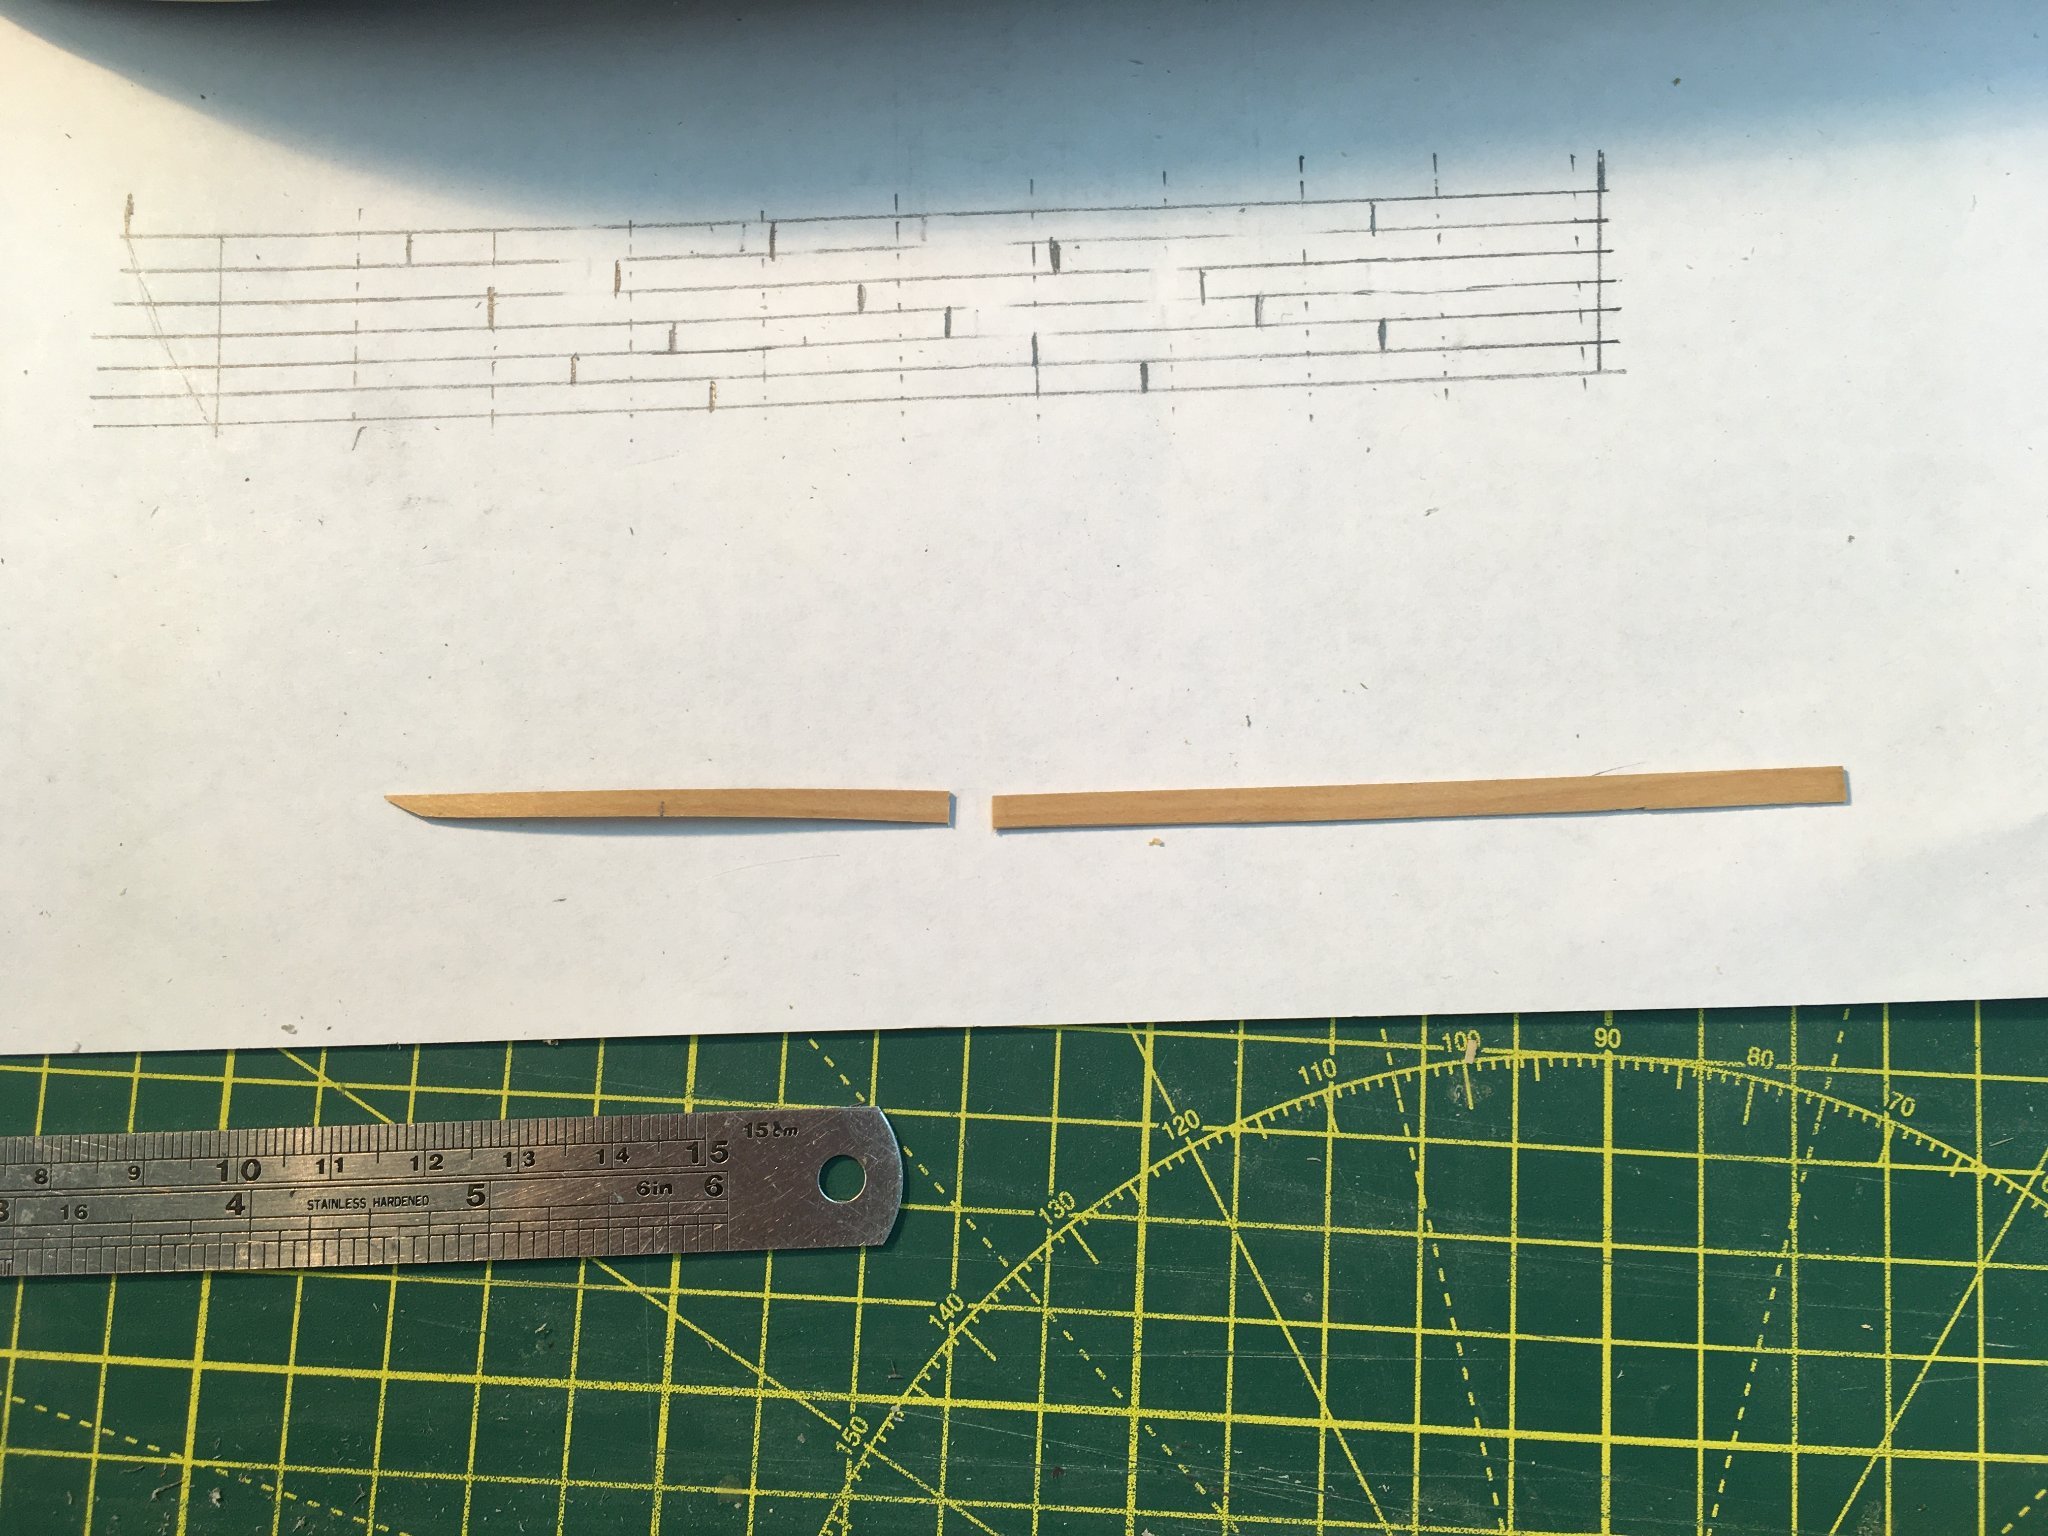
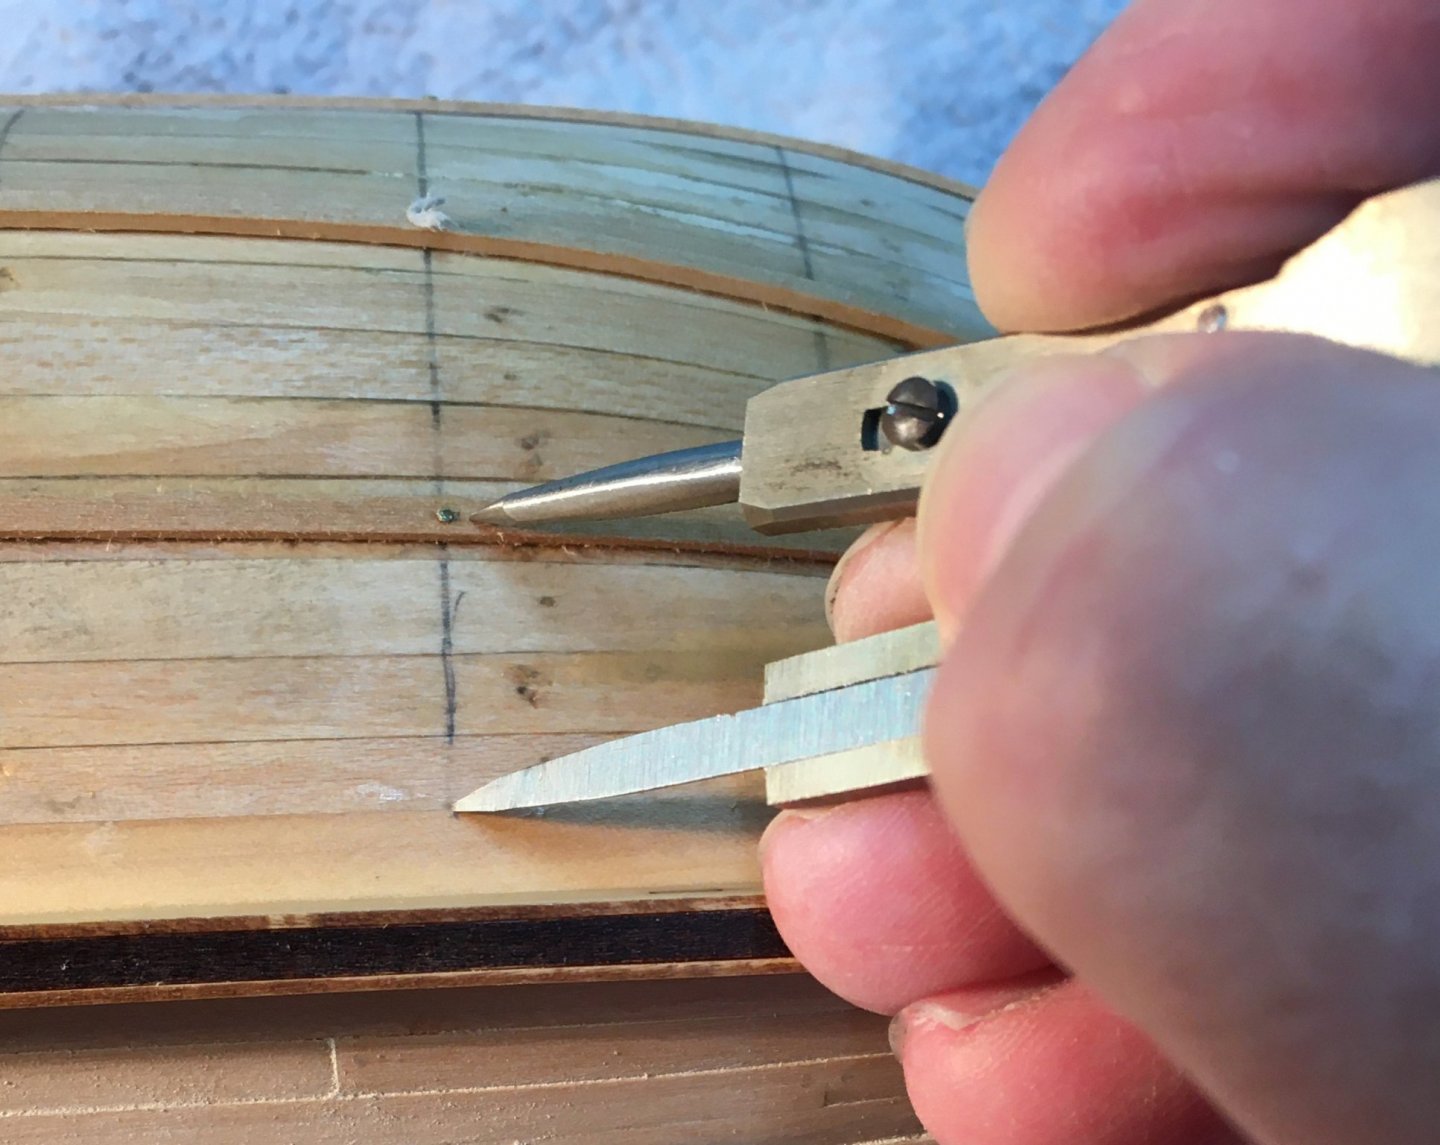
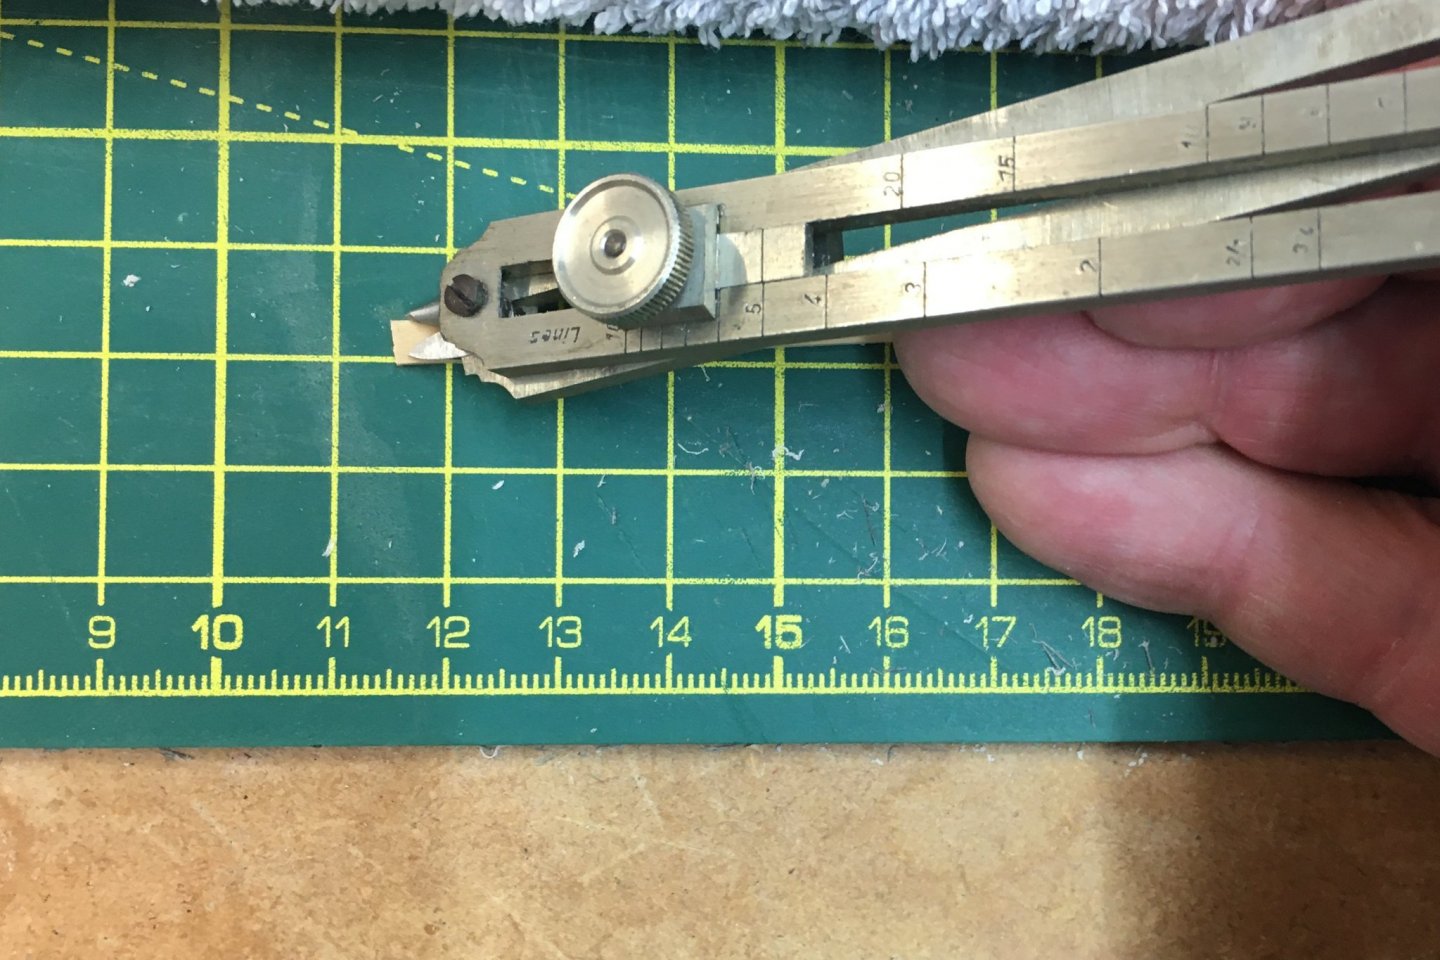
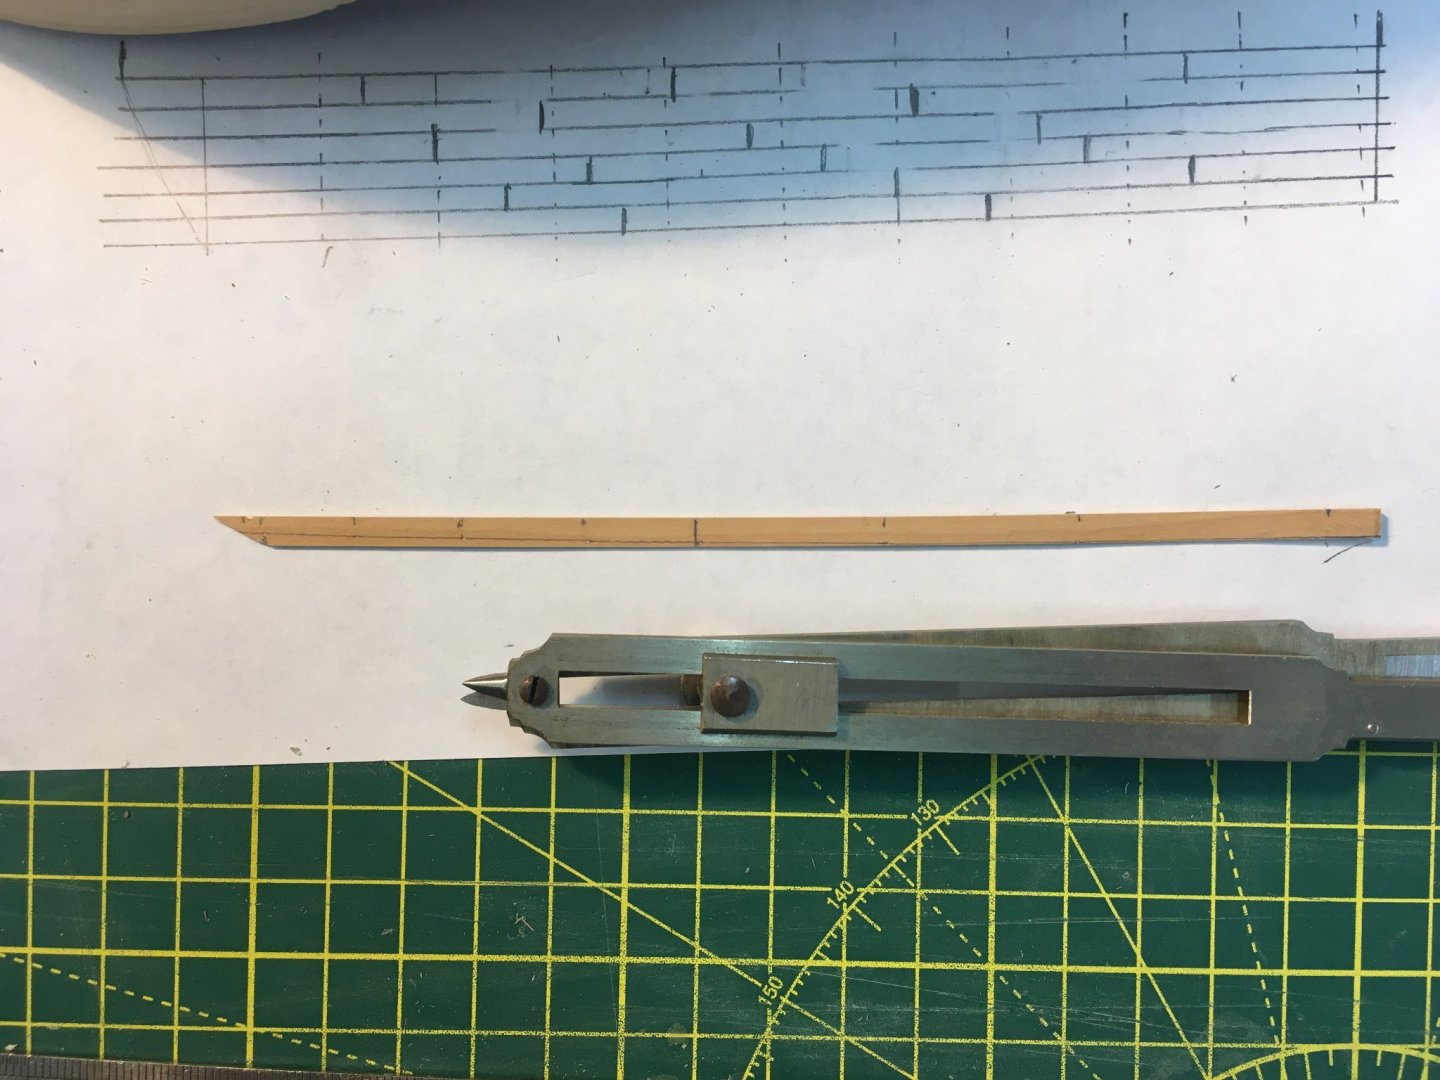
Second Planking #2 Many people use tick strips and planking fans to determine the shapes of planks, a method well described in the modelling techniques section of the forum and in many logs. I wanted to try using proportional dividers to simplify the process. I bought a set of model #20594 made by Staedtler of Germany a few years ago, second hand from ebay. In this shot the dividers are set at 5, meaning that when a distance is measured with the large points, the small points at the other end will be exactly one fifth of that distance apart. The first step for each plank is to hold it in position on the hull and make a mark against each vertical line: As I explained in an earlier reply to Thukydides, these lines are fairly arbitrary. I just wanted them close enough to give me sufficient points to determine the shape of the planks accurately. In practice, I found myself inserting additional measuring points as I went along, for example where curves were particularly severe. Then, I set the dividers to the number of planks I wanted to fill the space (in this case five) then used the large points to measure the distance from the preceding plank to the centre of the next batten. Where the hull was reasonably flat I measured directly, otherwise I bent a thin strip of paper round the hull and took the measurement from that. Either way, the next step was to transfer the measurement from the other end of the dividers to the corresponding position on the plank. I just used the point to make a tiny dint in the wood: Once the distances had been measured and transferred along the length of the plank (a very quick task with the dividers) I joined the dots and then cut the plank to shape using miniature planes and spokeshaves. Files and sandpaper would do equally well - I just like miniature tools! Then, it's back to normal practice - bevelling, edge bending and ordinary bending until the plank fits snuggly. In this case, I've chosen to shape the bottom edge of the plank, although I know people often shape the top edge. I'm not sure it matters (I hope!). Once a whole strake had been completed, there was obviously one fewer needed to fill the remaining gap in the planking band so I reset the ratio on the dividers to four ready for the next planks. This continues until there is just room for one strake. Once the measurements have been made for all the planks in that strake the batten must be removed before the planks are fitted (as measurements are taken to the centre of the batten. Then, it's on to the next band, resetting the dividers as appropriate. Btw, I should have mentioned that I tried to set the battens 24mm apart (centre to centre) at midships so that each band would accommodate 6 of the 4mm planks supplied in the kit. I had to adjust this slightly to allow for the extra wide garboard strake. I've just completed the first band on the port side and the starboard garboard strake. Progress is slow and steady; slow because I'm doing a lot of work around the house, and steady because I'm mindful of Chuck Passaro's belief that many builders rush through planking to the detriment of the finished model. He reckons to spend several months on the task, so taking his lead I'm in no hurry to finish. I'll probably get on with some deck furniture for a bit of variety, but I suspect my updates will remain relatively infrequent. Derek

- 345 replies
-
- 17
-
-
-

-
- Duchess Of Kingston
- Vanguard Models
- (and 1 more)
-
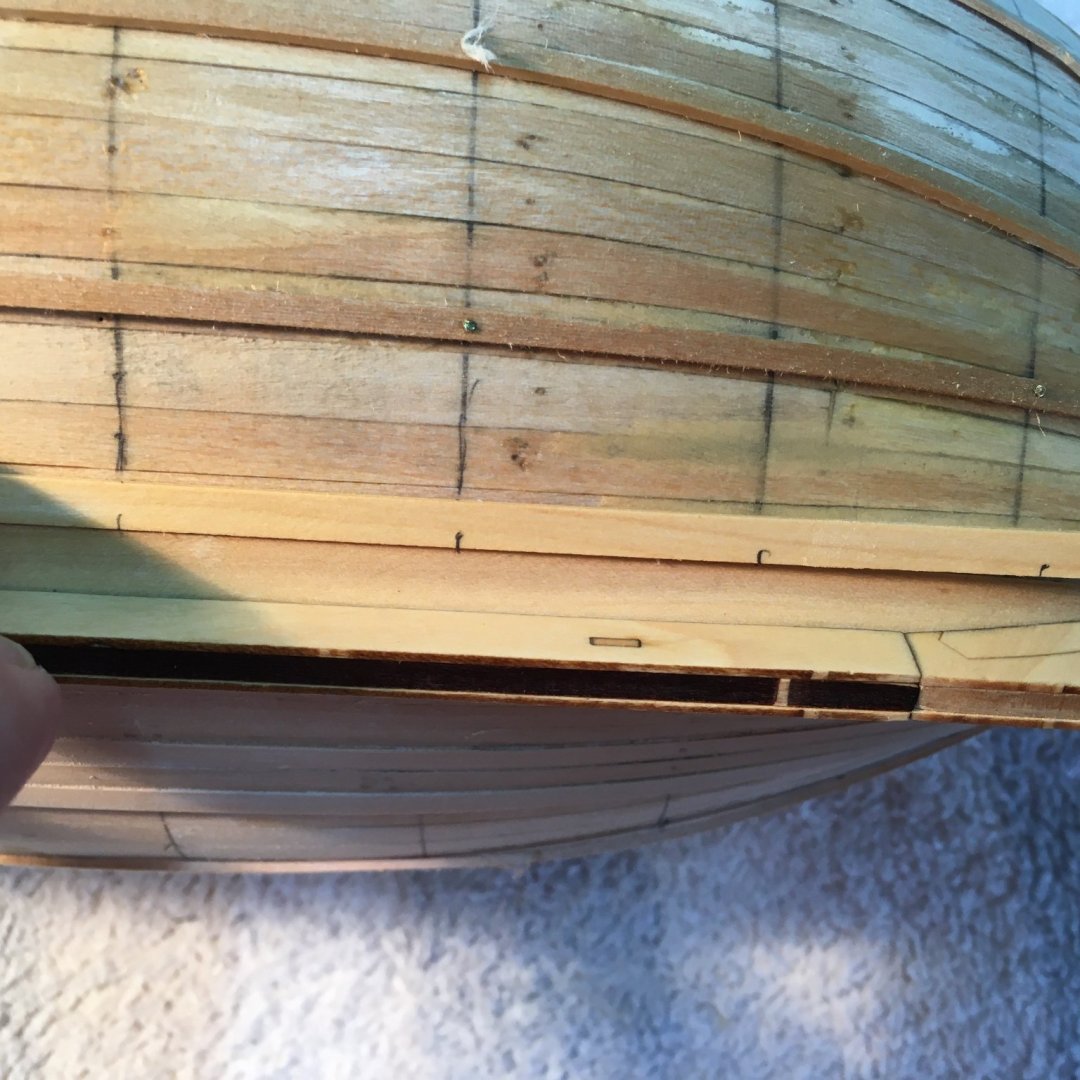
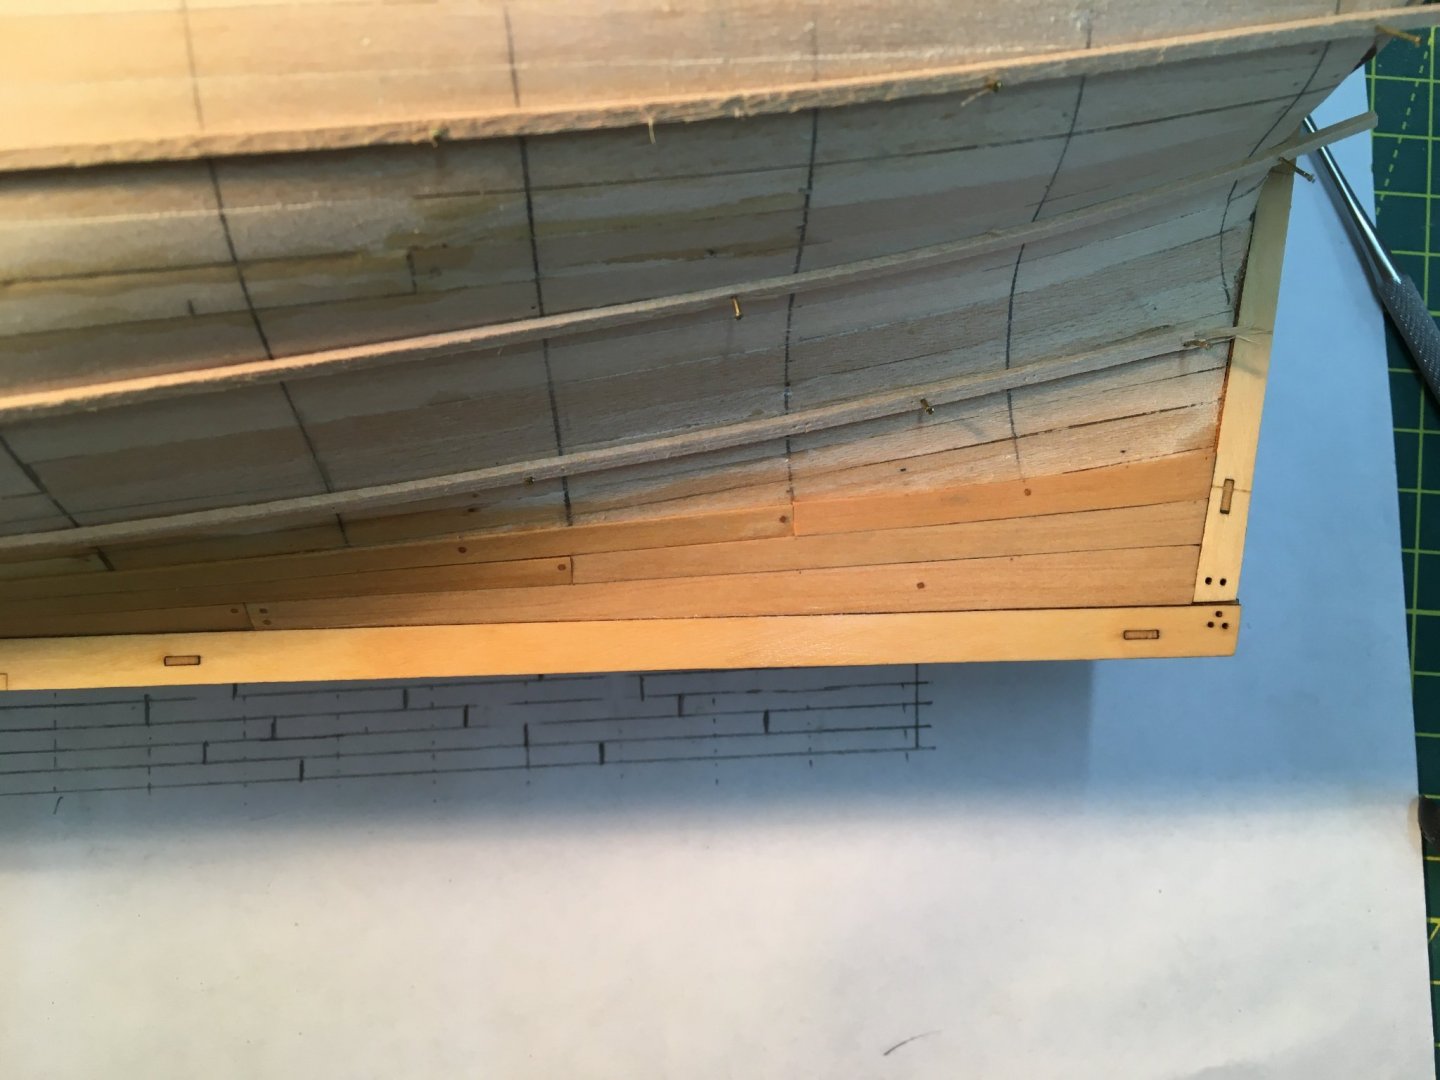
Second Planking In between lots of decorating jobs around the house, I've made a start on the second planking. I was keen to try to do this as well as possible so I had my first go at using battens to divide the hull into manageable areas. I tried using thread and then thin tape - methods that others use successfully - but they didn't work for me so I went old school with thin strips of wood. I used some of the good quality limewood left over from first planking, cut to size: I had several goes to try to get this right, and may change the battens again when I take stock after the first band. Technically, I think I should have aimed to use this method to plank the area from the wale down to the keel, but as the wale goes on after the second planking in this kit I felt that trying to do the job 'properly' would be too much effort for too little advantage in terms of historical accuracy. I decided to start with the garboard strake, using a strip of masking tape pressed into the rabbet to get the shape: I wanted to use scale plank lengths, so I drew a planking plan that aimed to follow the various rules designed to strengthen the hull, such as keeping the joins on adjacent strakes at least five feet apart. Not easy, and I'm sure I got it wrong in places! Here's the plan for the first planking band, together with the first two portside planks in the garboard strake. Unfortunately, despite bending the bow plank as well as I could, I wasn't able to get it to stick properly with the Super 'Phatic glue I'd hope to use as a way of avoiding CA which gives me an adverse reaction. Thinking on the hoof I used some 0.7mm boxwood trennels left over from another job. These held the plank down very firmly while the glue set. I'm hoping the trennels will be virtually invisible when trimmed and sanded as I certainly don't want to replicate every fixing that would have been on the full size ship. At the moment I'm just using them where absolutely necessary. Stop press: the odourless CA from BSI (Bob Smith Industries) that @glbarlow recommended works well and so far without adverse reactions on my part. I've only done the first band on one side with trennels so far, and I'm hoping CA will do the rest. I decided to use wider planks in the stern area in order to minimise the use of stealers, so for the garboard I cut a 6mm plank from my own stock for the bow and midships part of the strake, and an 8mm piece for the stern section. To get the shape of the stern garboard plank I just drew a gentle curve on it so that it gradually narrowed from 8mm to 6mm. Here it is in place: The middle and stern garboard planks both required a significant twist to get them to lie flat on the hull. In each case I wet the plank, clamped one end in a vice and twisted the other with a clamp whilst using a hot air blower to set the twist: After the garboard strake I reverted to the kit supplied 4mm boxwood for the bow and midships planks, using my own 6mm planks for the stern area: To keep the log to a reasonable length I'll stop here and leave the rest of the description to the next entry. Derek


- 345 replies
-
- 9
-
-
- Duchess Of Kingston
- Vanguard Models
- (and 1 more)
-
The lines are fairly arbitrary - I just wanted enough points along each plank to be able to determine its shape. The lines I drew mainly follow the bulkheads, as far as I could tell from the nail holes in the first planking. I suppose I could have spaced them out more evenly but it's really not that important. In fact, when I'm actually planking the hull I sometimes make an extra measurement between two lines if the shape of the hull is changing a lot in that area and I want extra points to determine the shape of the plank as accurately as possible. Hopefully this will make more sense when I describe the method in more detail.
- 345 replies
-
- 3
-
-
- Duchess Of Kingston
- Vanguard Models
- (and 1 more)
-
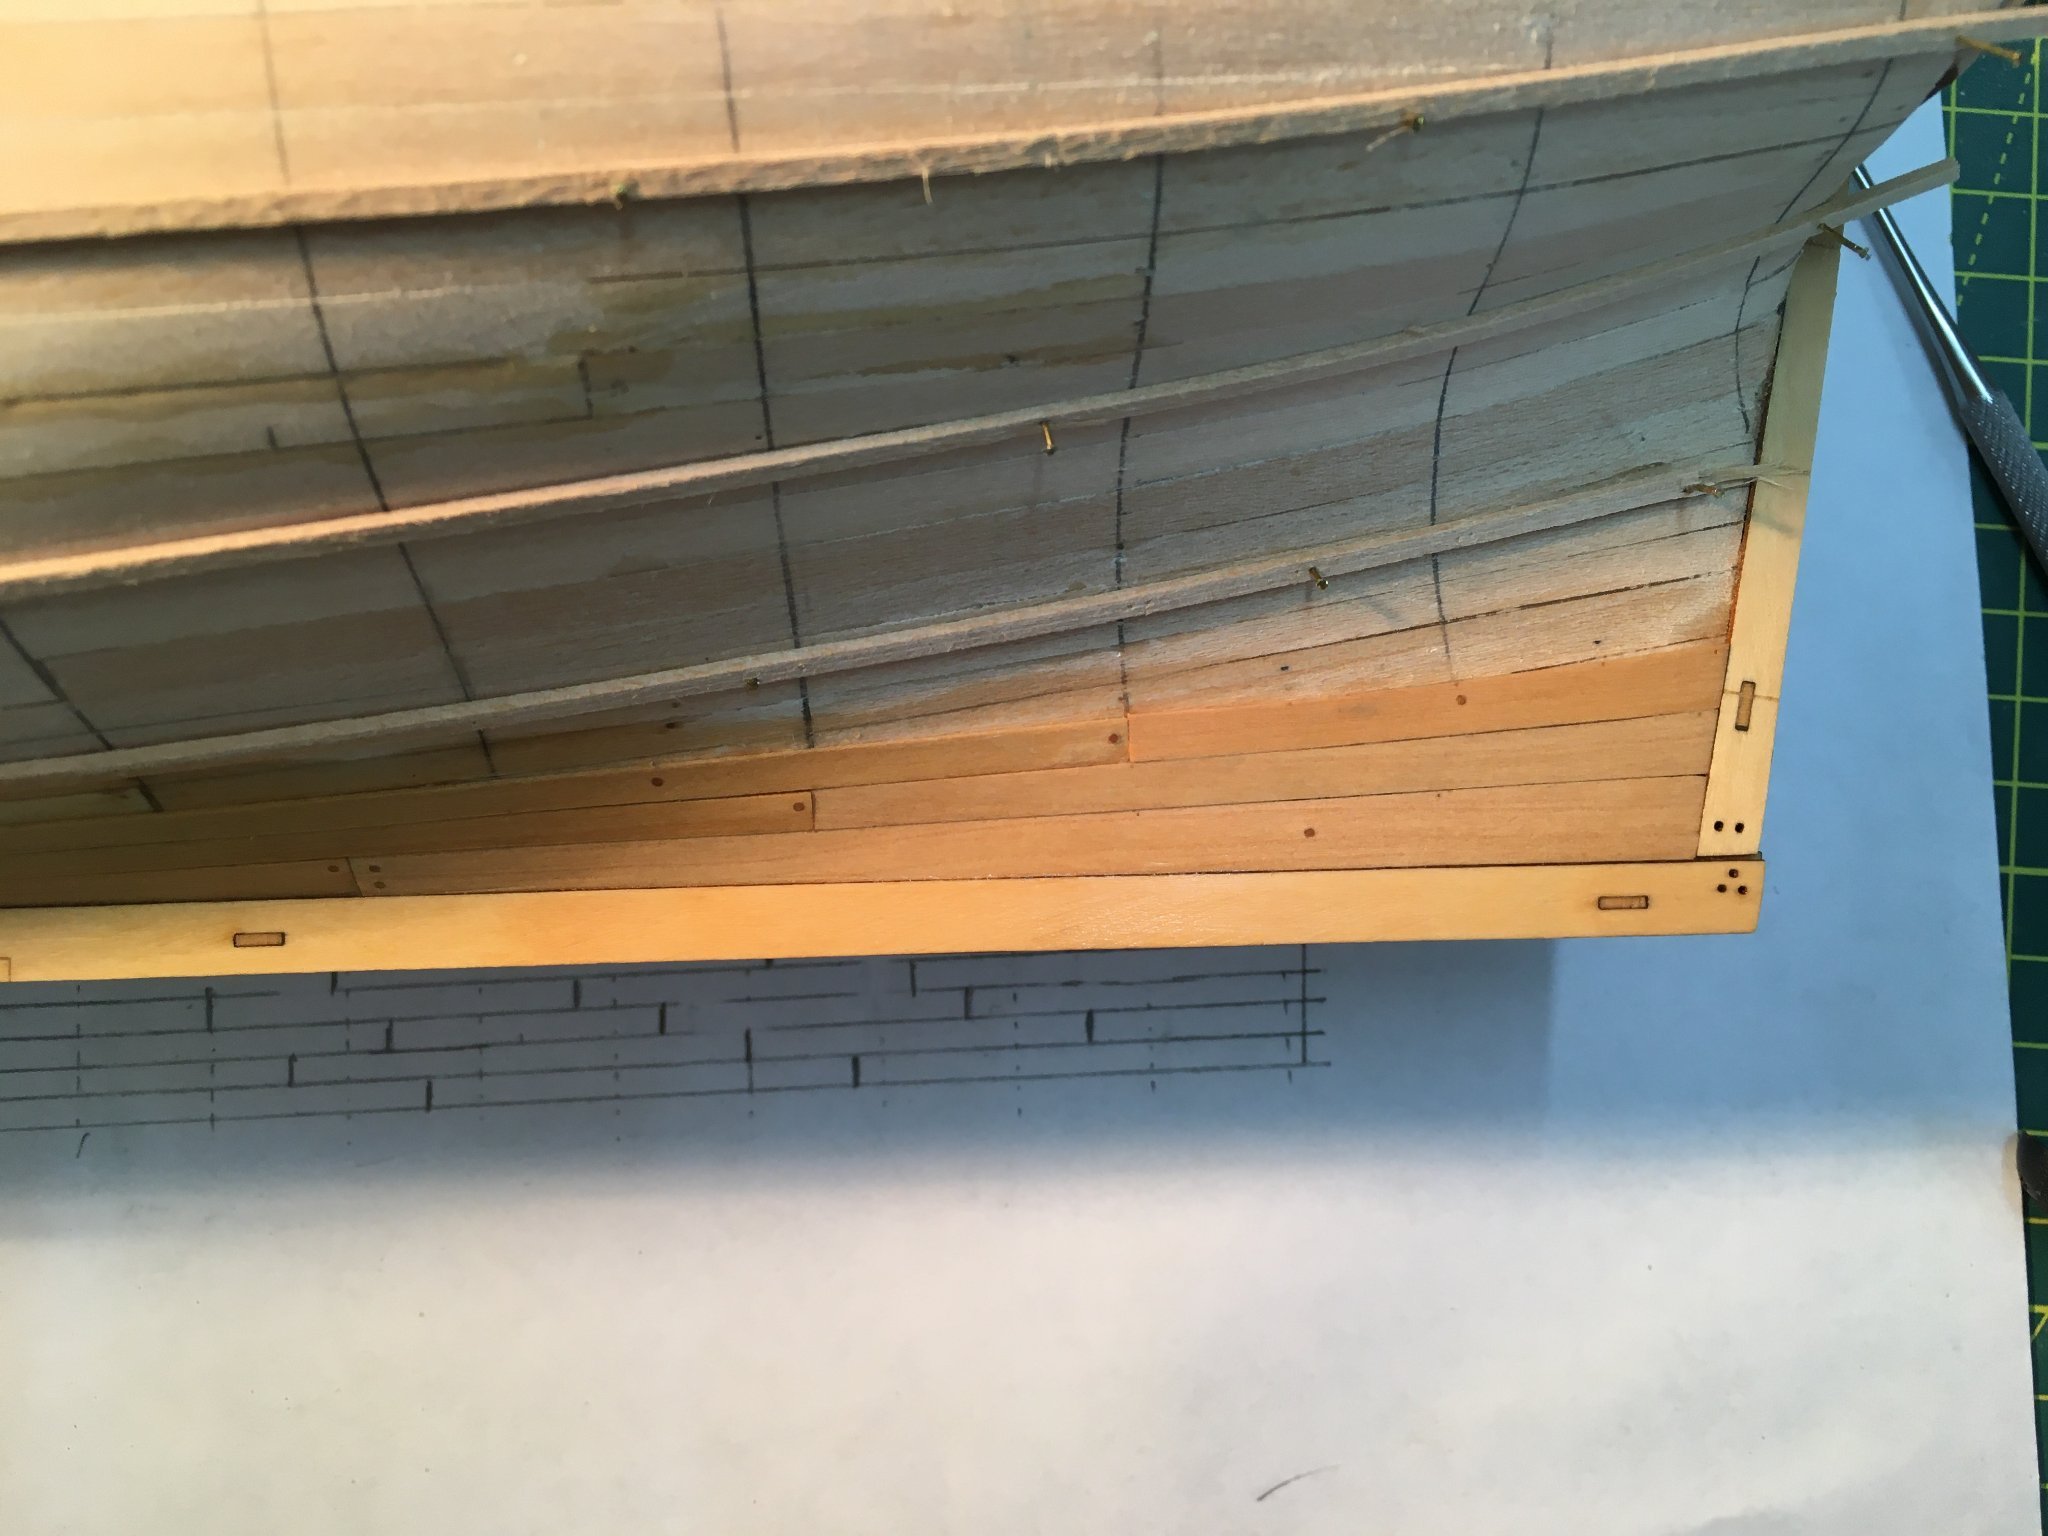
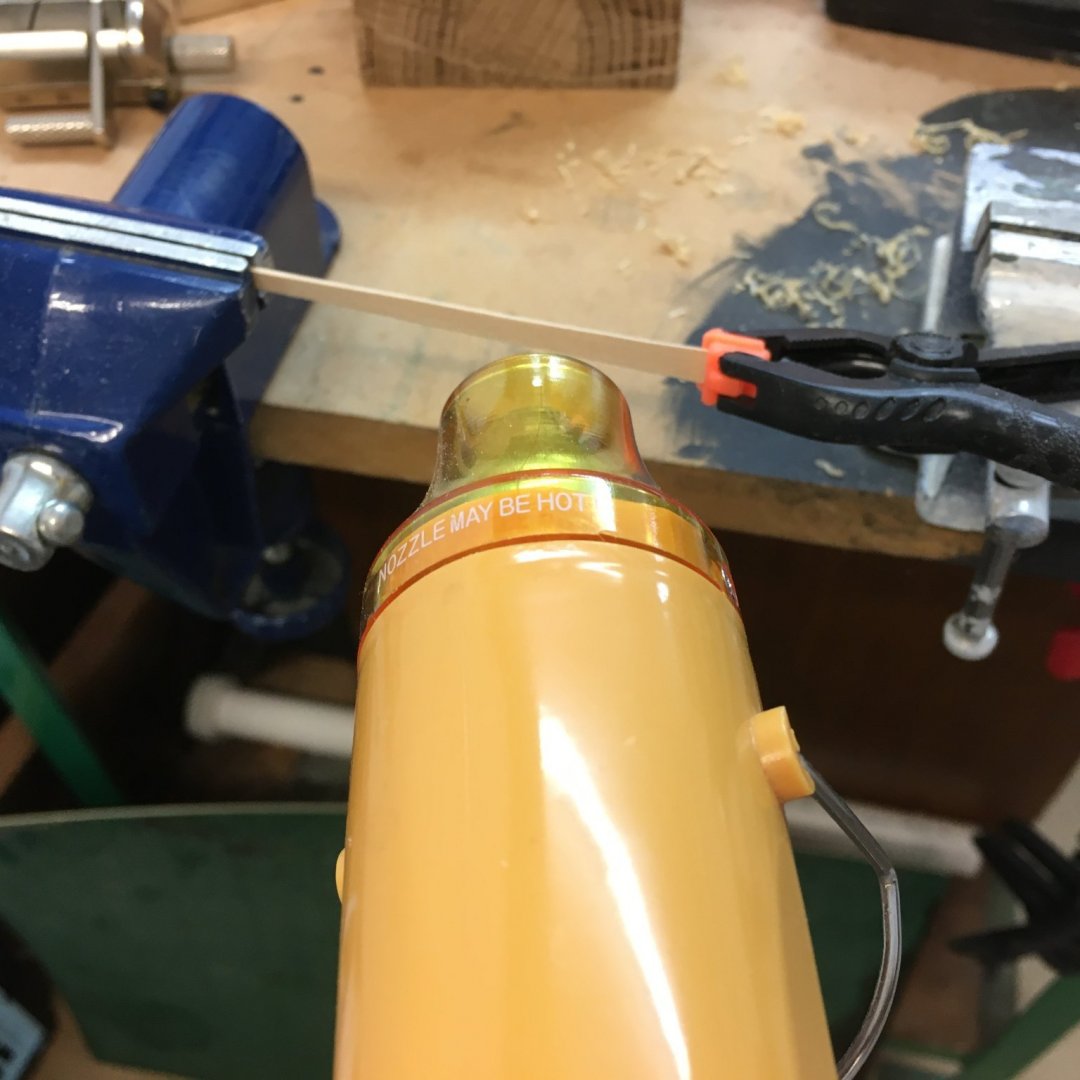
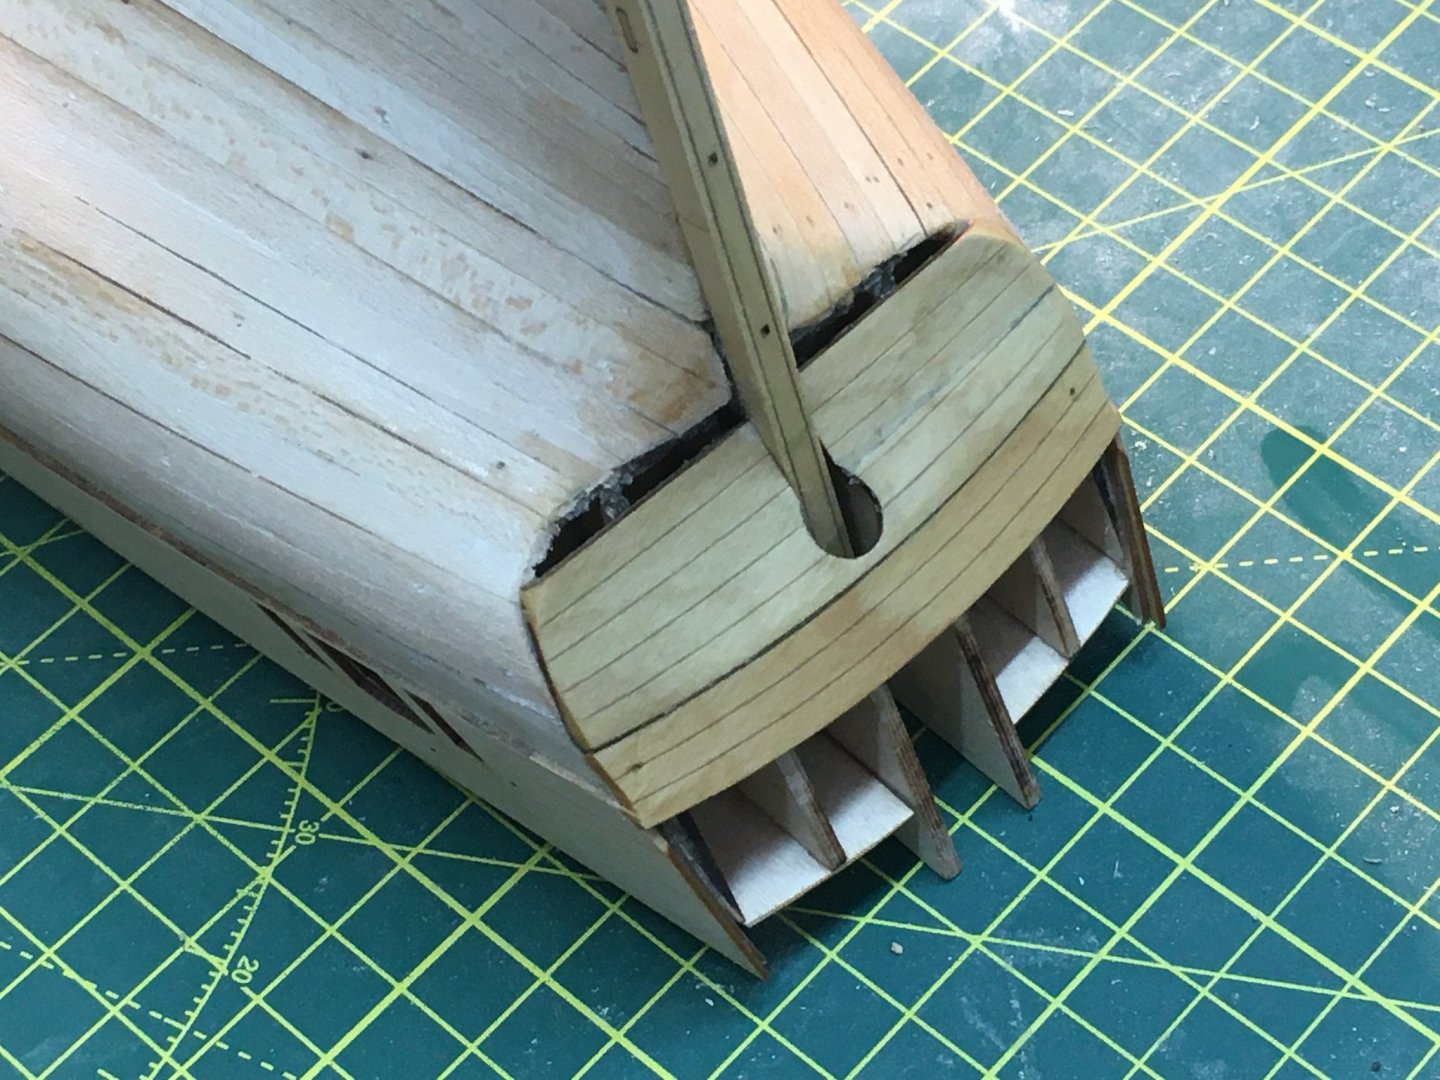
Stern Counter & Various Outer Facings I've fallen way behind with this log, mainly through lack of time in the workshop. Here's a quick catchup. I managed to break the stern counter by trying to bend it round a small bottle: I soaked the counter in hot water for a long time, but in hindsight the diameter of the bottle was too small. I considered making a replacement, but decided that as the counter will be painted I'd fit it and hope for the best. Looking at this shot, I may have terminated the first planking too short so more filling may be required. All the outer facings for the gun port patterns, stem and keel, provided on thin boxwood sheets, went on fairly easily and without mishap: All these components have holes and/or location inserts that engage with holes in the underlying structures and which makes lining everything up a doddle. In the final shot I've started marking out the hull for second planking: Derek

- 345 replies
-
- 10
-
-
- Duchess Of Kingston
- Vanguard Models
- (and 1 more)
-
Superb work and a very helpful description Glenn. As Gregory says, it’s your decision on painting, but it seems a shame to cover that beautiful wood. By the way, I wondered what camphor had to do with shaping planks until I realised you must still have autocorrect switched on 😂
-
I ordered some of the odourless CA from Bob Smith Industries as recommended by @glbarlow and it arrived today. I tried the medium version (described as 'gap filling') and so far I haven't experienced the adverse effects such as streaming nose and sneezing (which persist for days after use) I've developed with other brands of regular CA. I'll try using this brand for a more prolonged period to see if I remain symptom free, but just now I feel cautiously optimistic.
-
Can you come over and do my second planking please Glenn? I'll rig your cannon in return 😁