HOLIDAY DONATION DRIVE - SUPPORT MSW - DO YOUR PART TO KEEP THIS GREAT FORUM GOING! (Only 20 donations so far - C'mon guys!)
×


DelF
-
Posts
1,409 -
Joined
-
Last visited
Content Type
Profiles
Forums
Gallery
Events
Everything posted by DelF
-

Veritas Miniature Worktop from Lee Valley Tools
DelF replied to Jack12477's topic in Modeling tools and Workshop Equipment
I agree with Glenn's comments above. Mine's about 20" X 10", but that's only because I've got 6 grits. I could probably get away with just using three most of the time, and if you wanted to save space you could stick less-used grits on the other side of the glass. -
Veritas Miniature Worktop from Lee Valley Tools
DelF replied to Jack12477's topic in Modeling tools and Workshop Equipment
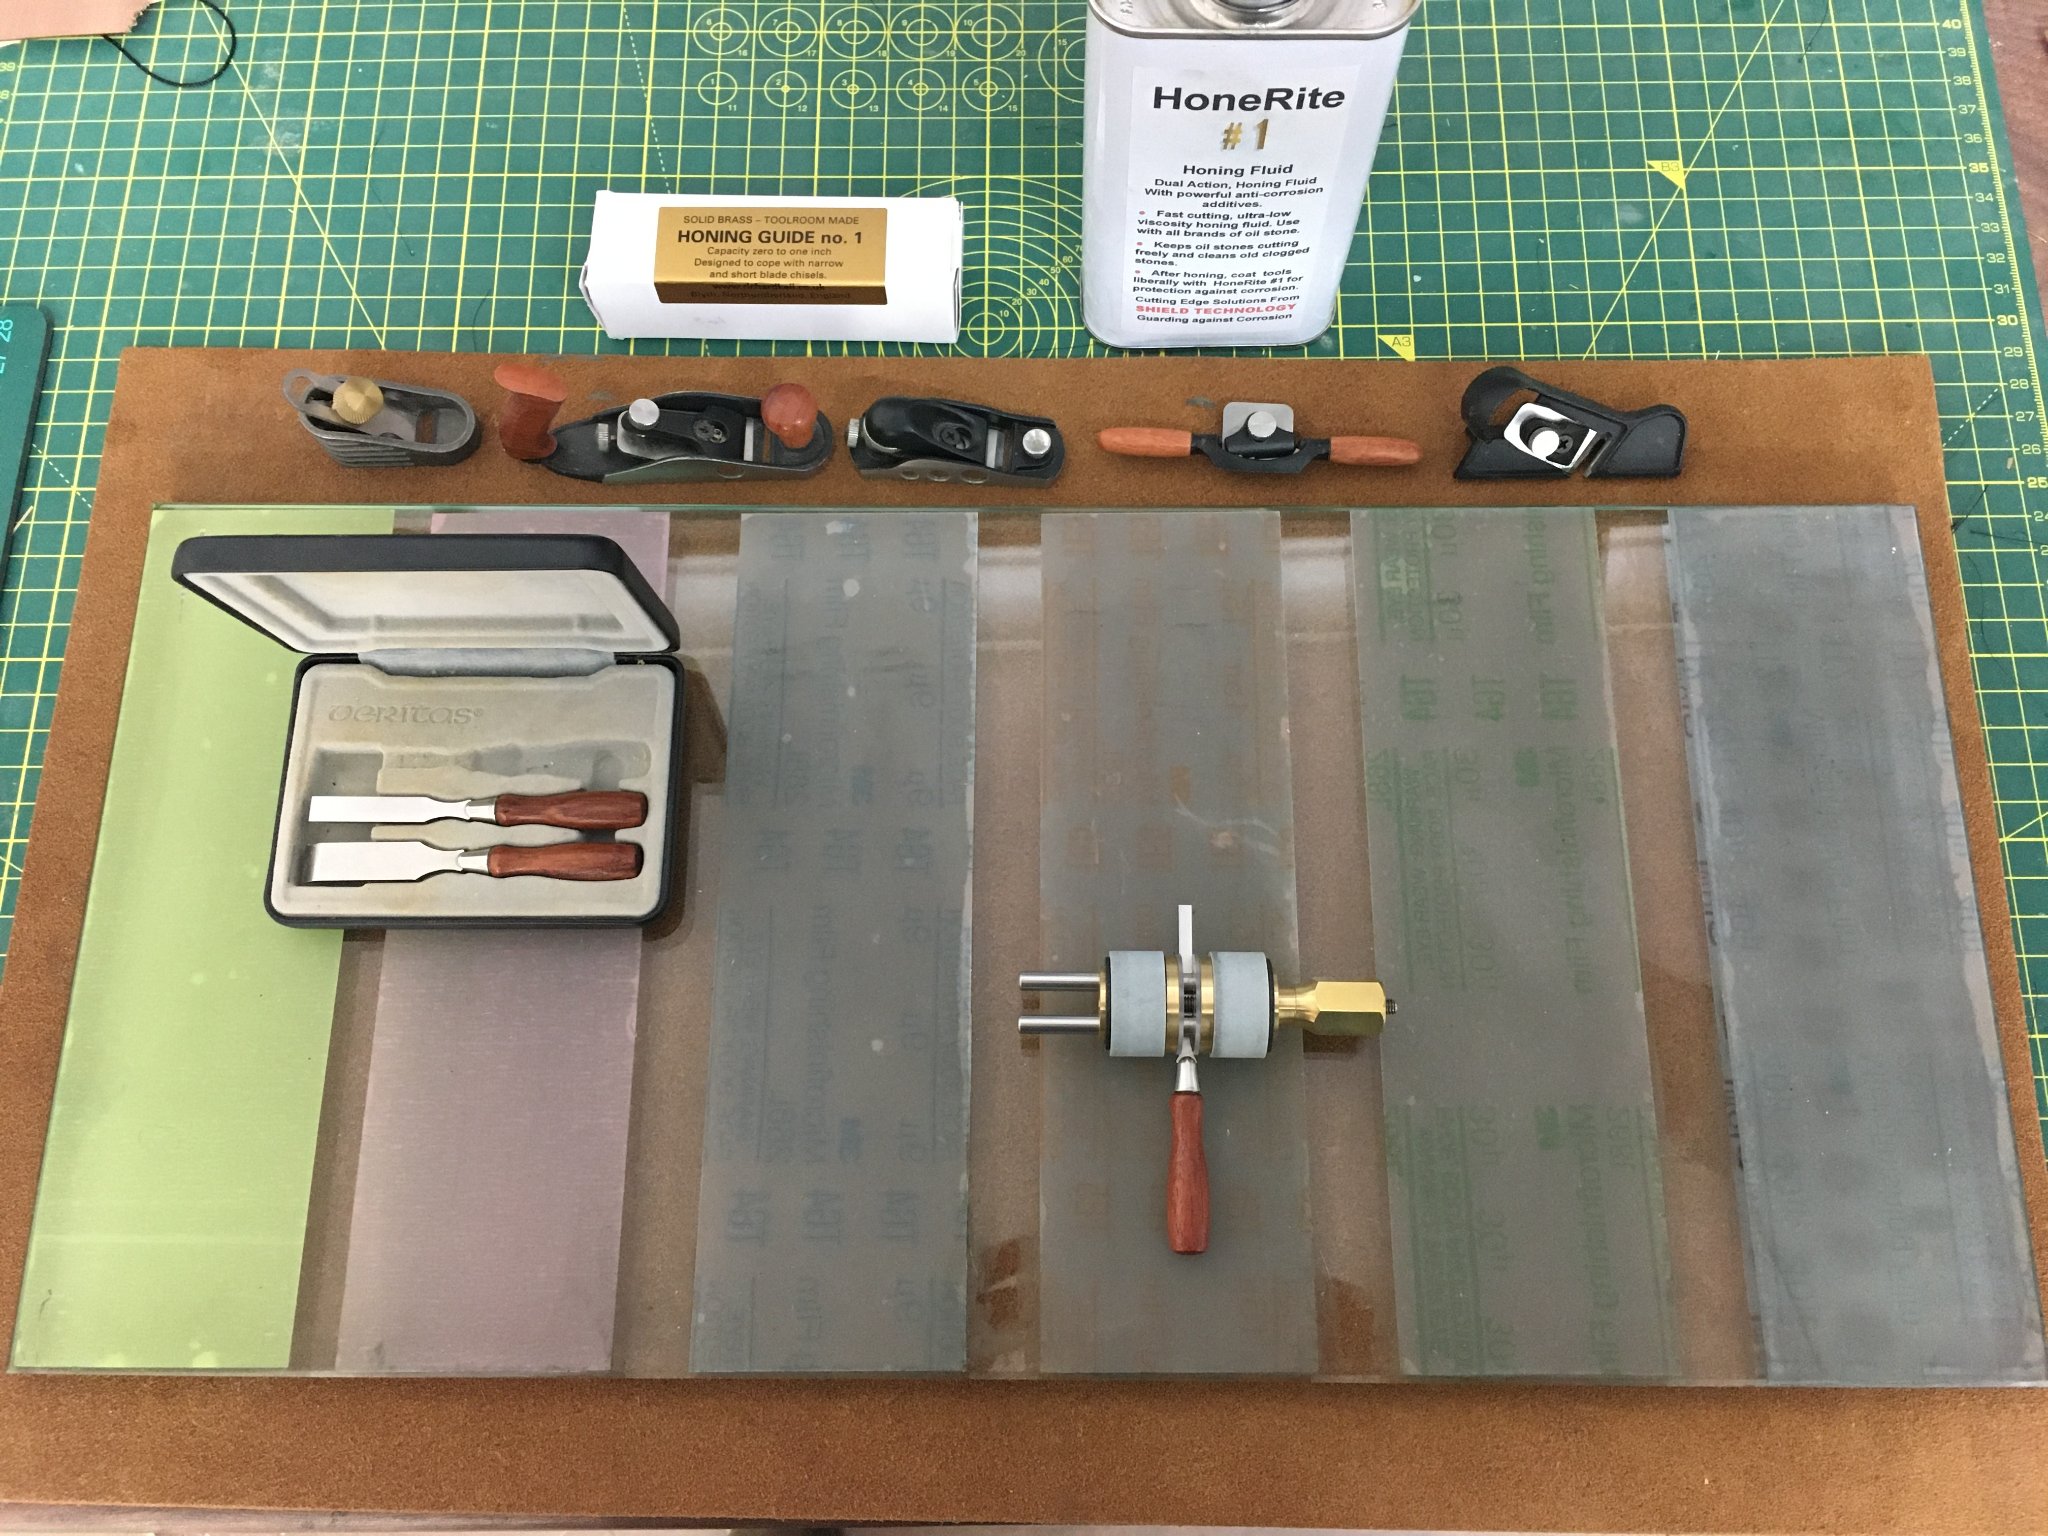
Bob Here's a copy of part of a post I did on this in Glenn Barlow's Cheerful log. The best advice I can give is to watch Paul Sellers' videos which I've linked in the following text: I've abandoned traditional sharpening stones in favour of sandpaper. Stones inevitably wear and need to be reground or replaced. So does sandpaper, but it is considerably cheaper and, when glued to 1/4" plate glass it stays dead flat. Plus, it is easier (and cheaper) to have a wide range of grits to suit your needs. Another point - and I apologise if this is teaching granny to suck eggs - but when you say you haven't sharpened your chisels yet it occurred to me that you might not realise that chisel and plane blades bought straight from the manufacturer are not best suited for immediate use. They need a degree of preparation, sometimes called initialisation - even Veritas tools! This takes a bit of work on the sharpening station but once done it becomes quick and easy to hone your blades back to perfect sharpness. Paul Sellers does the best videos I know on woodworking - here's his explanation of initialising new chisels. Interestingly, Paul is using three sharpening stones in this three year old video - he now uses sandpaper. [NB - here's a link to another post in which I've included a link to Paul's video on using sandpaper] If you decide to set up a sharpening station like this you'll find you will be much more inclined to keep all your blades in tiptop condition. Glenn subsequently made his own sharpening station and followed the initialisation process, and reports that he now has super-sharp chisels. Hope this helps Derek -
Veritas Miniature Worktop from Lee Valley Tools
DelF replied to Jack12477's topic in Modeling tools and Workshop Equipment
Hi Mike This is purely my personal experience, but because the Veritas guide has a single roller I found it difficult to keep the blade level as I moved it up and down the sharpening surface, particularly with a very narrow tool like the 1/8" chisel I showed in my earlier picture. I found it hard to stop it wobbling from side to side. Other Veritas users have told me they've had the same difficulty, especially with very narrow tools. The Kell guide avoids this by having two wheels which hold the chisel rock steady. The two wheels also clamp the tool between them, ensuring it is held absolutely square. As I said before, Veritas make great tools and it may be lack of skill on my part that makes it hard for me to get good results with their honing guide - after all, some people hone freehand with great results, but I'm not one of them! I just find the Kell guide takes the skill element out of it. I should also add that it is a beautifully engineered tool, a real gem to own and use. Richard (a one-man-band with whom I have no commercial or other relationship) is a toolmaker by trade and it shows in his products. Hope this helps Derek PS a couple of people sent personal messages asking what sharpening stones I use. I gave up stones some time ago in favour of wet-and-dry paper stuck to a sheet of plate glass. That way I can use (and easily replace) a wide range of grits to suit whatever sharpening or honing I need to do. -
Veritas Miniature Worktop from Lee Valley Tools
DelF replied to Jack12477's topic in Modeling tools and Workshop Equipment
The Kell guide comes with a table showing how far a blade's cutting edge should project beyond the steel support rods to achieve various honing angles. For example, 0.5" for 30 degrees. I find this measurement easy to make if I hold a 6 inch steel rule against the chisel in the guide. -
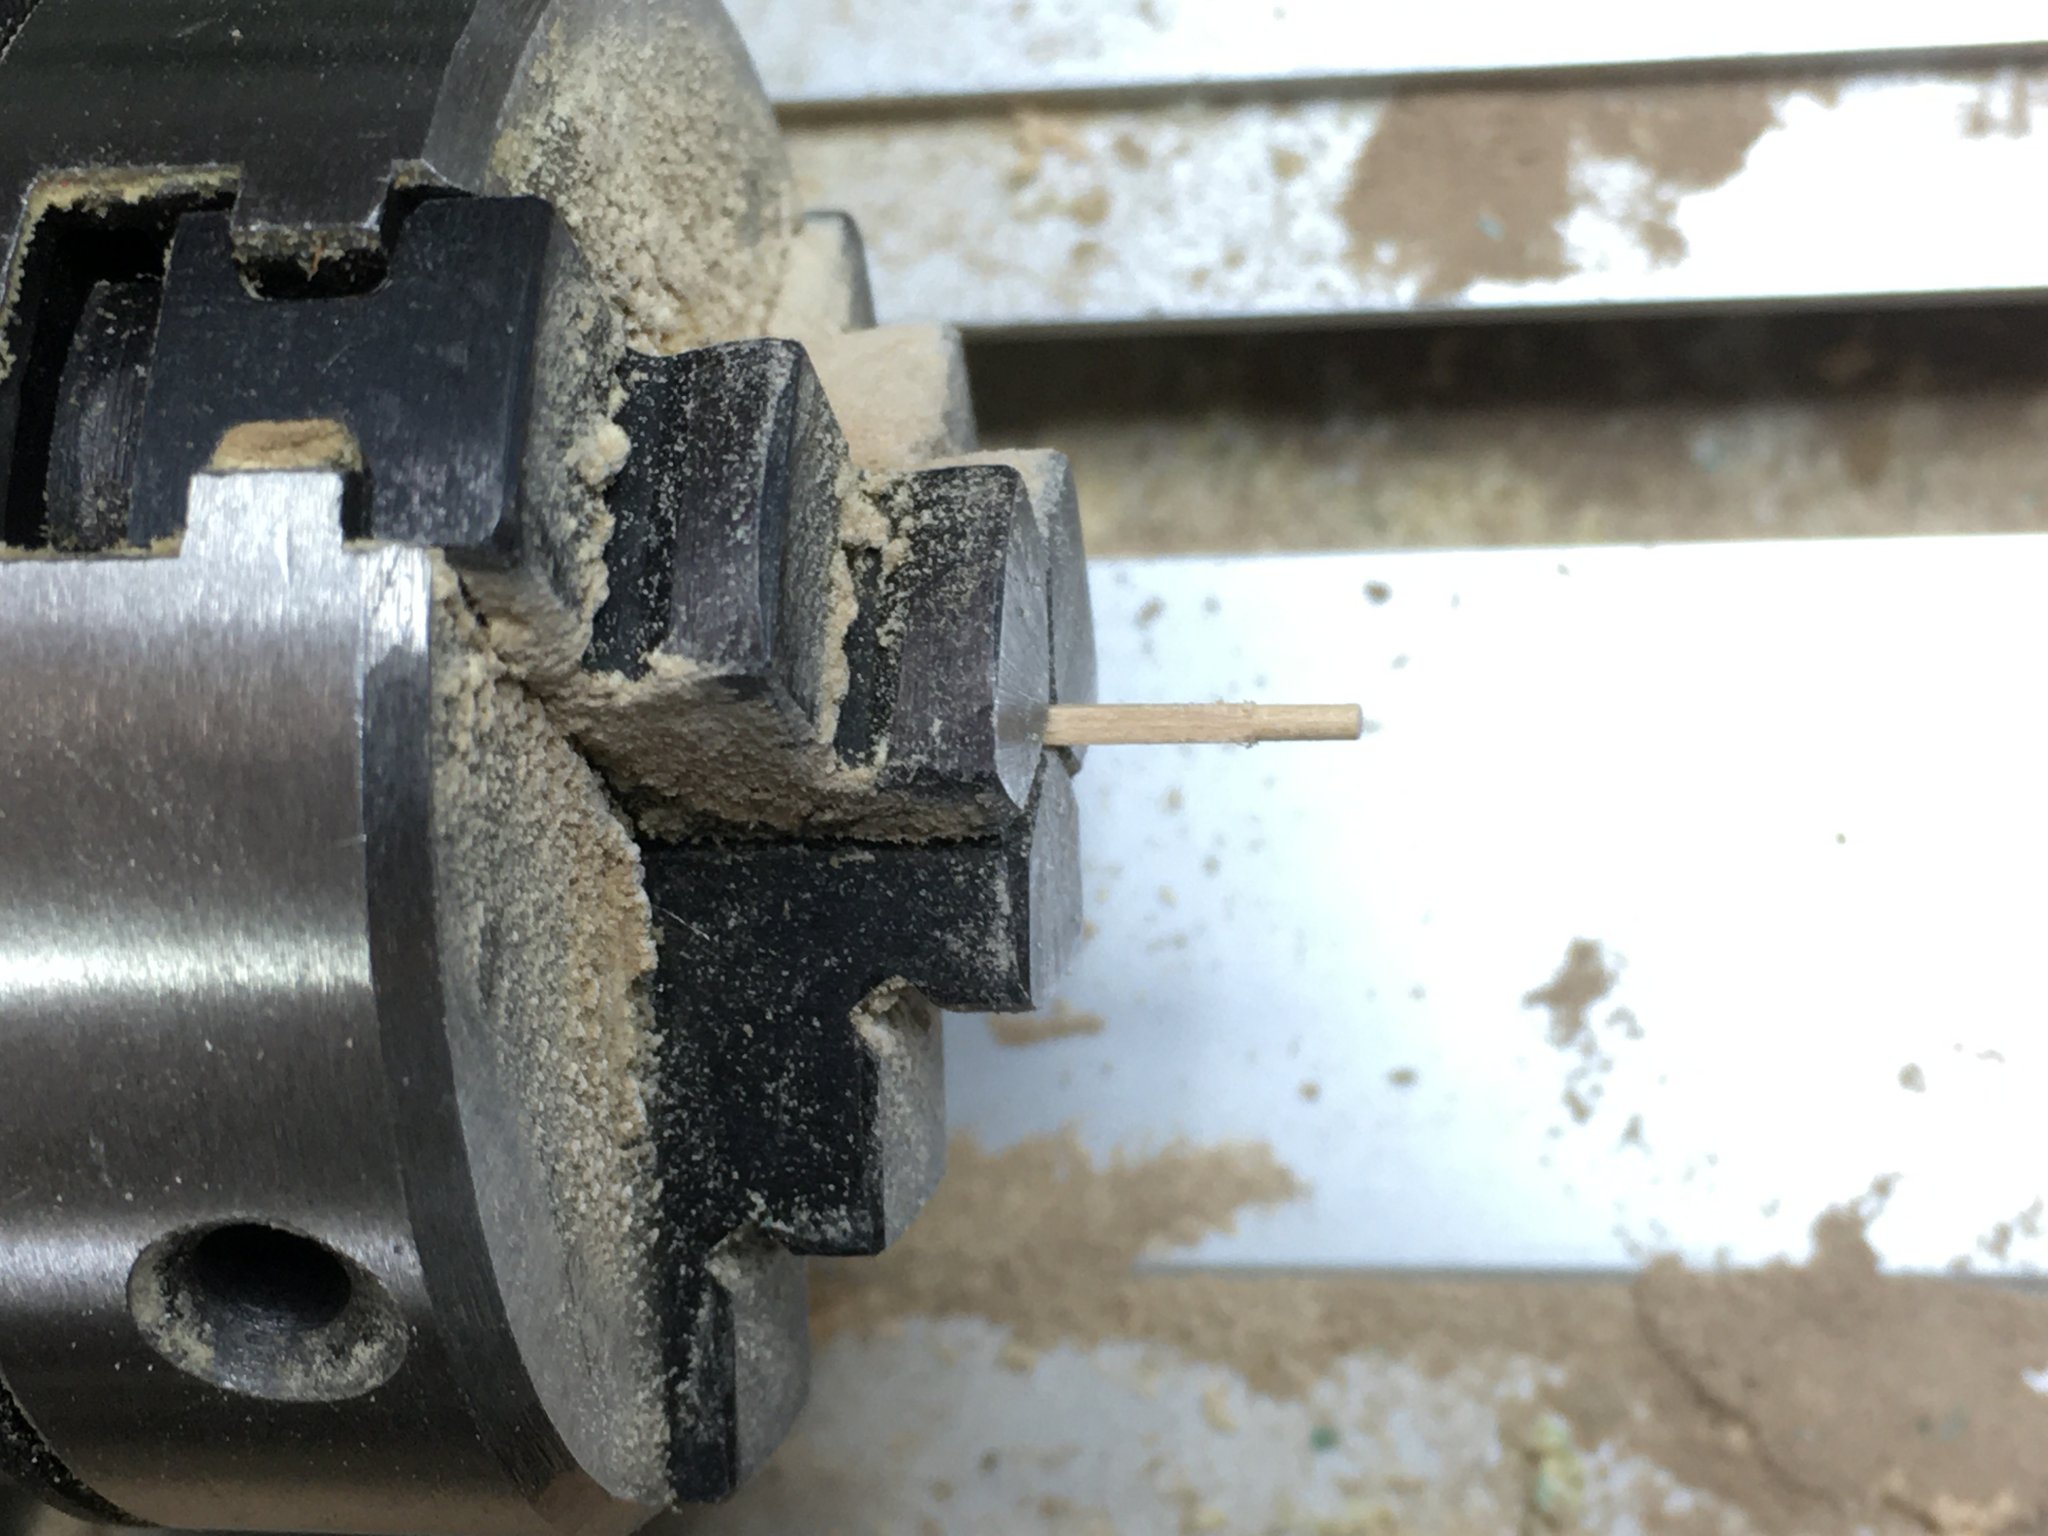
Hi Dave. It's in a lathe, but a drill would do equally well. It's square stock and as it's only 1mm centering isn't really an issue. You just need to spin it fast then press it into the 1mm hole in a drill gauge to round it off. Dead easy. It's a very similar method to Gregory's.
-
Veritas Miniature Worktop from Lee Valley Tools
DelF replied to Jack12477's topic in Modeling tools and Workshop Equipment
I love Veritas tools and have tried their honing guide. Like all Veritas products it is well made, but with very narrow chisels I find it can be difficult to get the blade to sit absolutely square, and with a single roller it can be difficult to avoid the blade rocking as you move it up and down the sharpening surface. The best guide I've found for these blades is the No.1 Honing Guide from Richard Kell. Richard is a one-man-band based in Northumberland, and although his products were at one time available through US retailers I believe that is no longer the case. However I know several people on the forum have ordered direct from Richard and now swear by the guide. See Glenn Barlow's current Flirt build for example. Here it is on my sharpening station (I couldn't resist including my collection of Veritas tools !): The key feature is that the blade is clamped between two rollers and so is held dead square. I've got the 1/8" chisel in it, but it will take up to 1". Because there are two rollers it doesn't rock, and because you mount a blade under the two steel guide rods rather than over them, it can handle very short blades which otherwise wouldn't project far enough from the guide to get the correct honing angle. If you look on Richard's own site you will find more details.
-
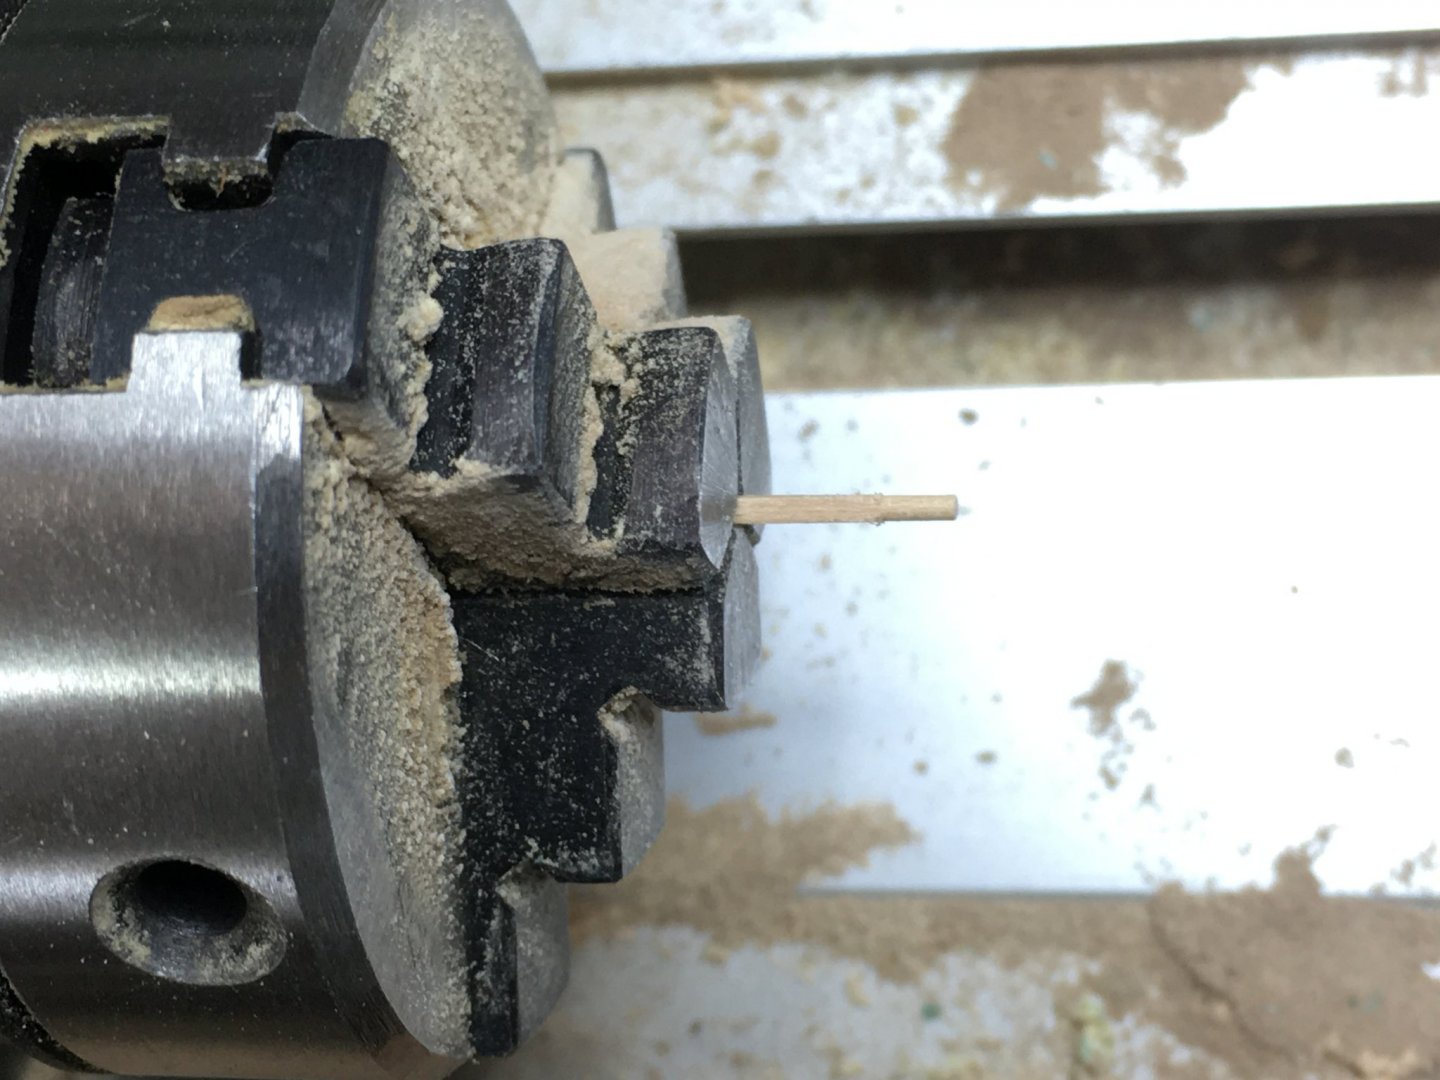
Hi Dave. Excellent work on the carriage sides. One variation you might want to try some time is to start with a single rectangular block of wood, mill the shape of the carriage side into it in one go, then salami slice off the individual sides with a thin saw blade. I found the best way to get the curved shape on the lower edges of the carriages was to use a file. At least you only have to do it once with the salami method. On the axles, you may want to try a method I used to make fids on my last build: The final detail in the tops are the fids. These are supposed to be square or rectangular, but at this scale I can only do round holes. So I cheated by making each fid in two parts, each part a piece of 1mm square boxwood with one end rounded. With the boxwood held in the lathe (just as easy in a drill) I pressed the end against the 1mm hole in a metal drill gauge to round off the first couple of mils. Should work with axles, and any decent wood should do. Hope this helps. Derek
-
Hi David, happy I was able to help on the cut-out. Can you tell me what tape you use to get such a neat edge? Apologies if you've already said and I've missed it. Derek
-
That paintwork looks really neat and sharp David. What masking tape do you use? Your problem might be that the cut-out in the maple deck doesn't line up with the corresponding hole in the sub-deck. That's certainly the case in my kit, but the manual says this has been corrected in later versions so you may be OK. If not, I suspect it would be easier to pin the wheel support in place rather than trying to cut a hole in the sub-deck. That's what I usually do on kits from other manufacturers where items just sit on the deck. Of course you would have to cut off the part of the support that would otherwise project through the deck, but if you pin and glue it the result should be strong enough. As an aside, one of the things that first impressed me about the accuracy and quality of Chris Watton's designs was the way that items like bitts and pumps were secured on Speedy. The legs of these items were made extra long so that they passed through the upper deck then located in cut-outs in the lower deck. In each case everything aligned perfectly. Keep up the good work! Derek
-
Spilling (very long) planks
DelF replied to vaddoc's topic in Building, Framing, Planking and plating a ships hull and deck
Hi Vaddoc I started using proportional dividers this year and would highly recommend them. Here's a link to my description of using them in my build log. I wouldn't go for the cheap modern ones you might find on Amazon. Fortunately good second hand ones are usually available on ebay. Thanks for the tutorial on spiling by the way - very informative. Derek -
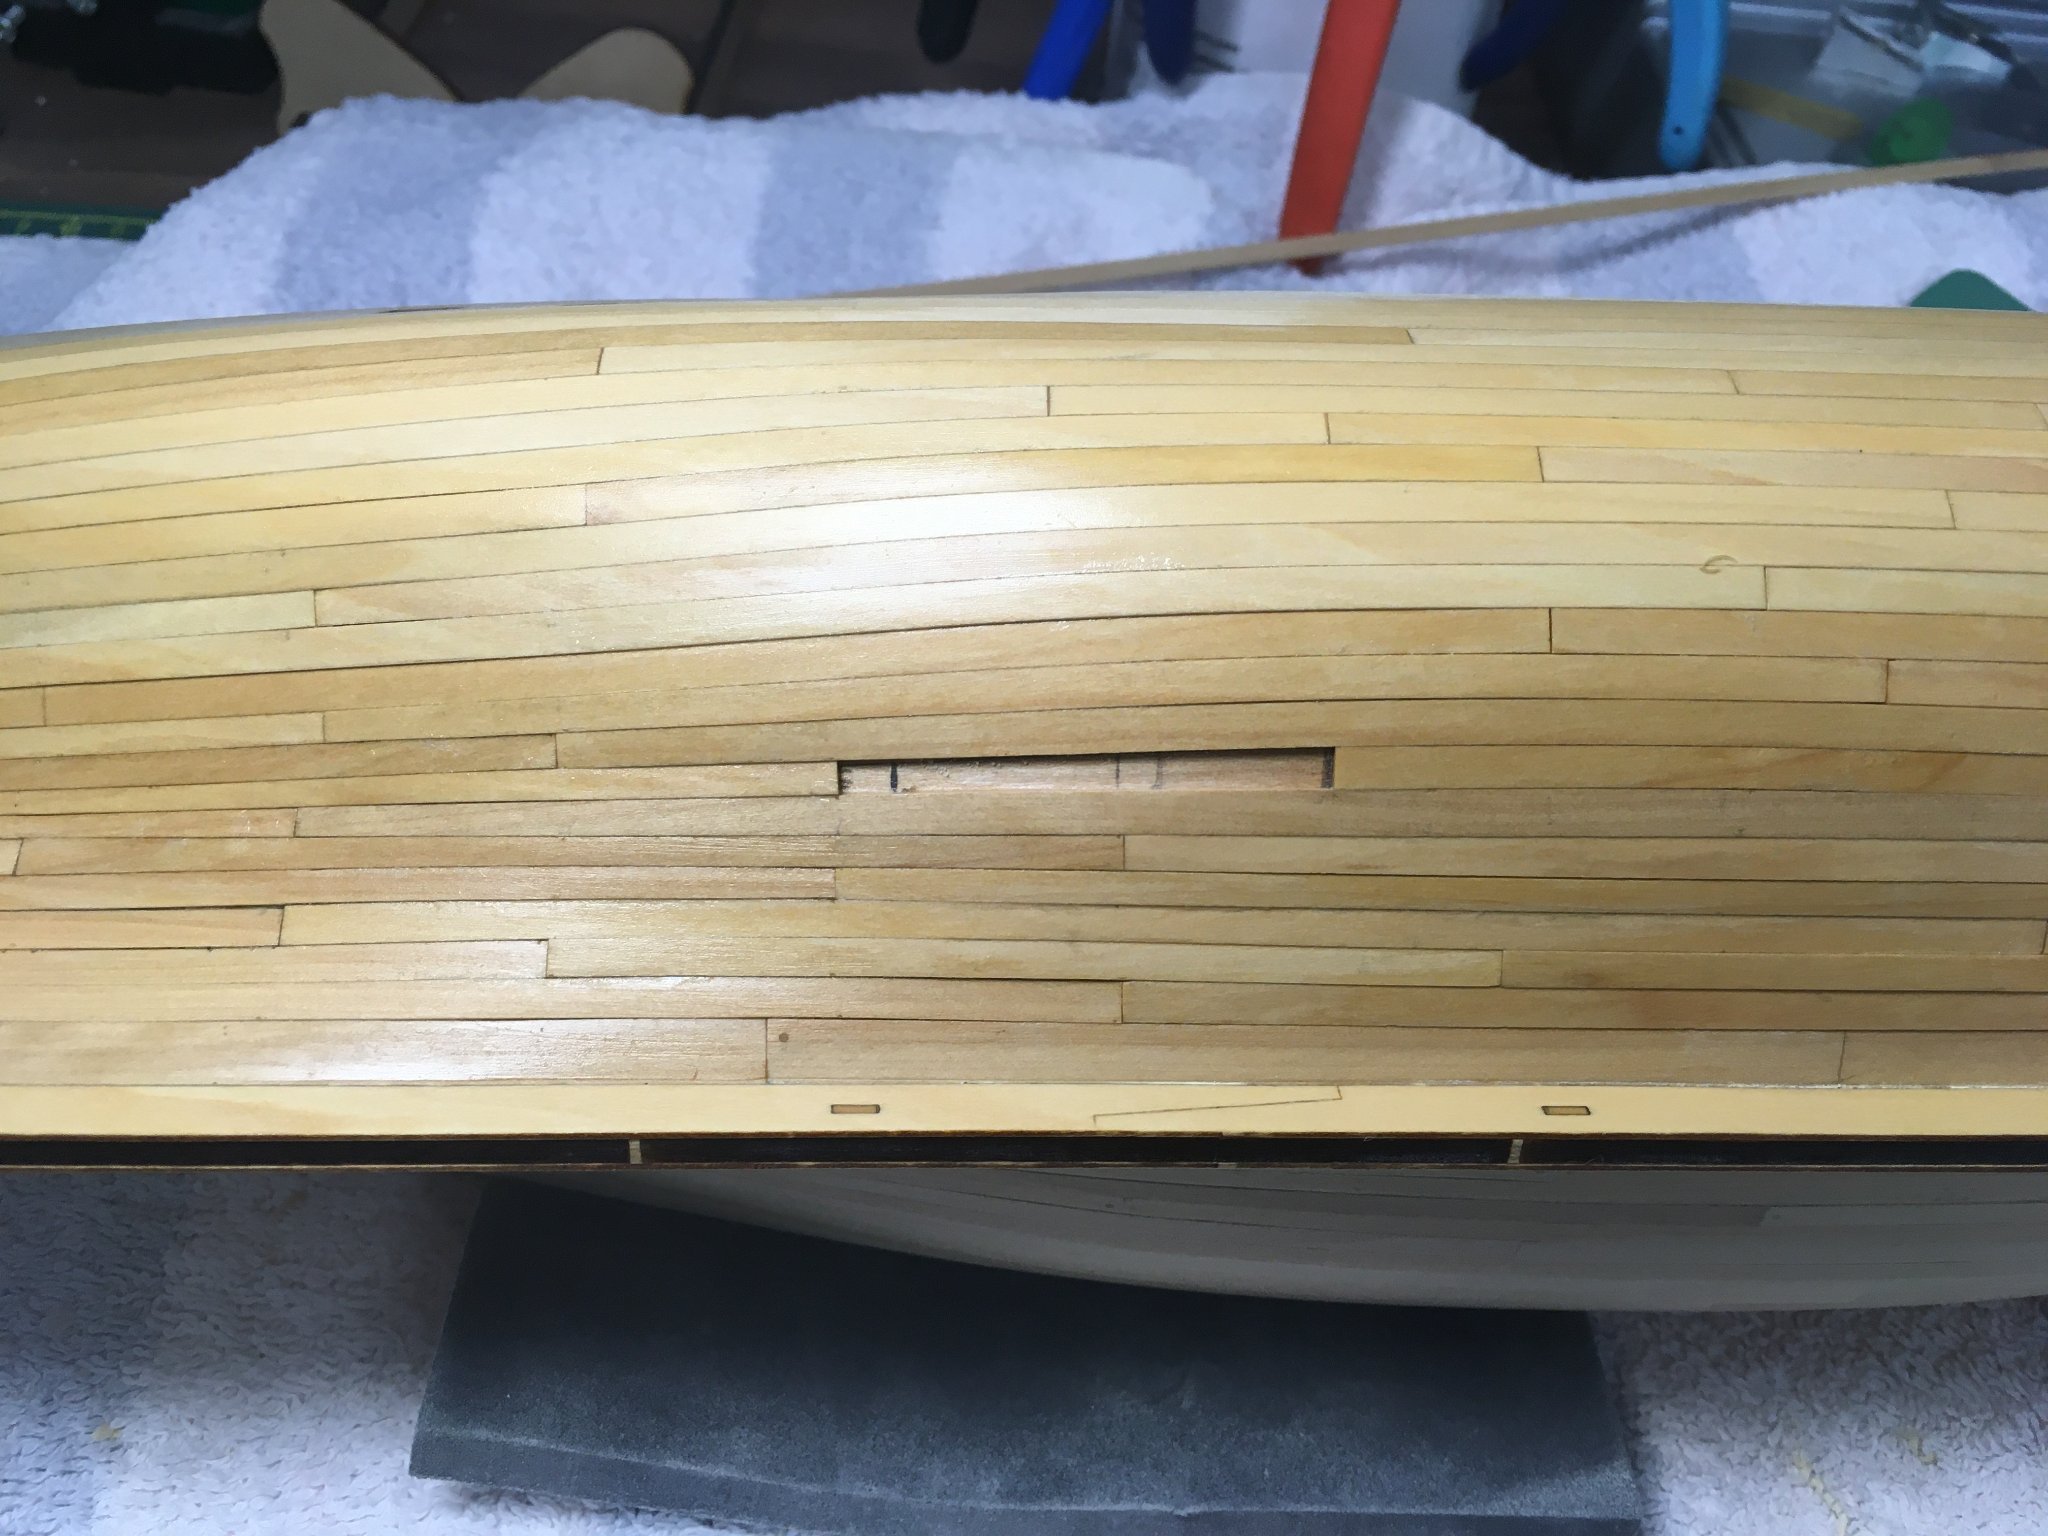
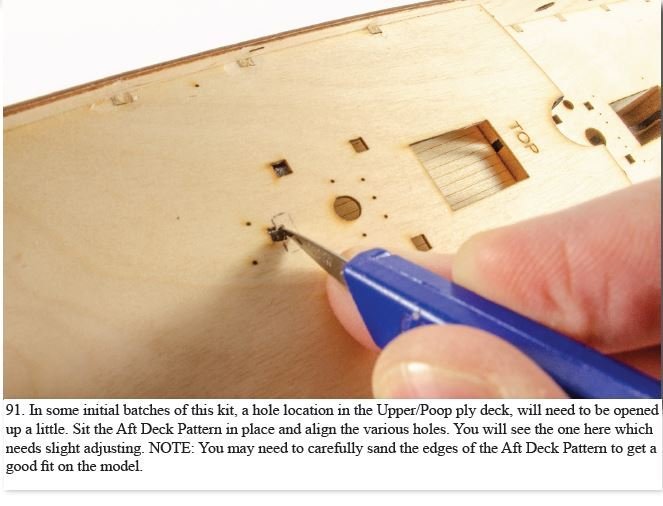
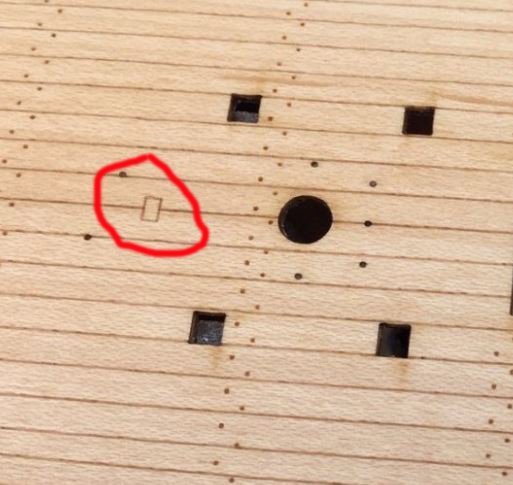
Looking fine David. I'm glad you're ahead of me on this build as I'm still learning from your log. I'm still in two minds about planking the deck myself. On a positive note, I experimented with sanding the laser decks with 320 grit paper to remove all traces of char, and I was pleased to find that this didn't destroy the pattern. One thing I wondered about after reading ahead in the manual, was this little rectangle in your aft deck: Does this relate to the information in the manual about some early versions of the kit where you need to open this hole out? Here's the part I read: Derek
-
For me, the bottom line is that once someone has bought a kit it's entirely up to them what they do with it. Speaking purely personally, when people like Chris Watton and Chuck Passaro put so much effort into designing great products I feel a duty to put my own effort in and build them as well as I can. Glenn - I've always enjoyed reading your logs and picking up tips from them, and I know from our correspondence that you're always seeking to improve. However on the subject of running: I used to be a competitive runner as well Glenn. However I read elsewhere that you're a sprinter, while I ran marathons. Slow and competitive works too! 😉 Derek
-
You and @glbarlow have converted me to the use of weathering powder - your buffed barrel is strikingly realistic - and I've already ordered some. I wasn't aware of the need for a fixative though - is that because you're applying the weathering powder to resin, or would you use it with any surface?
- 857 replies
-
- 4
-

-
- Sphinx
- Vanguard Models
- (and 1 more)
-
Excellent work so far David. Great to see another Speedy on the go, and I’ll follow your build with interest. I was particularly interested to see your approach to colouring the decks. I haven’t yet decided whether or not I’m going to use the kit-supplied decks in my current build (Duchess of Kingston) or make my own, so I may try your method as an alternative. Derek
-
I think you should fully rig all 14 guns, just like you persuaded me to do on the same tiny ones on Speedy🤣😁 Seriously though, yours look great the way they are, especially the ironwork. I really must get hold of some weathering powder.
-
Thanks! Looks like I might have a nice little sideline going on 🤑, if only I could figure out the geography. Is Alberta anywhere near Alaska? Or North Carolina?
- 345 replies
-
- 4
-
-

-
- Duchess Of Kingston
- Vanguard Models
- (and 1 more)
-
Happy to help Yves. I'll be in the US next year and could do it then provided North Carolina isn't too far from Alaska (geography was never my strong subject at school 😁). Seriously though, I've just looked at your log and you've got a big job on your hands planking Bellona at that scale. Good luck, and I hope my log is of some help. Thanks Glenn. I very much agree with the comment you made on David's (desalgu) Duchess log where you said that planking defines the model, with nothing standing out or showing more. Another reason why I'm still in two minds about covering it up. You've already been a big help Rusty, as I've got your Duchess log bookmarked and often refer to it. I hope you can get back to it soon. Thanks Gary. I'll now use nothing else for planking! Any problems or questions, feel free to send me a PM or ask on the log. Derek
- 345 replies
-
- 4
-
-
- Duchess Of Kingston
- Vanguard Models
- (and 1 more)
-
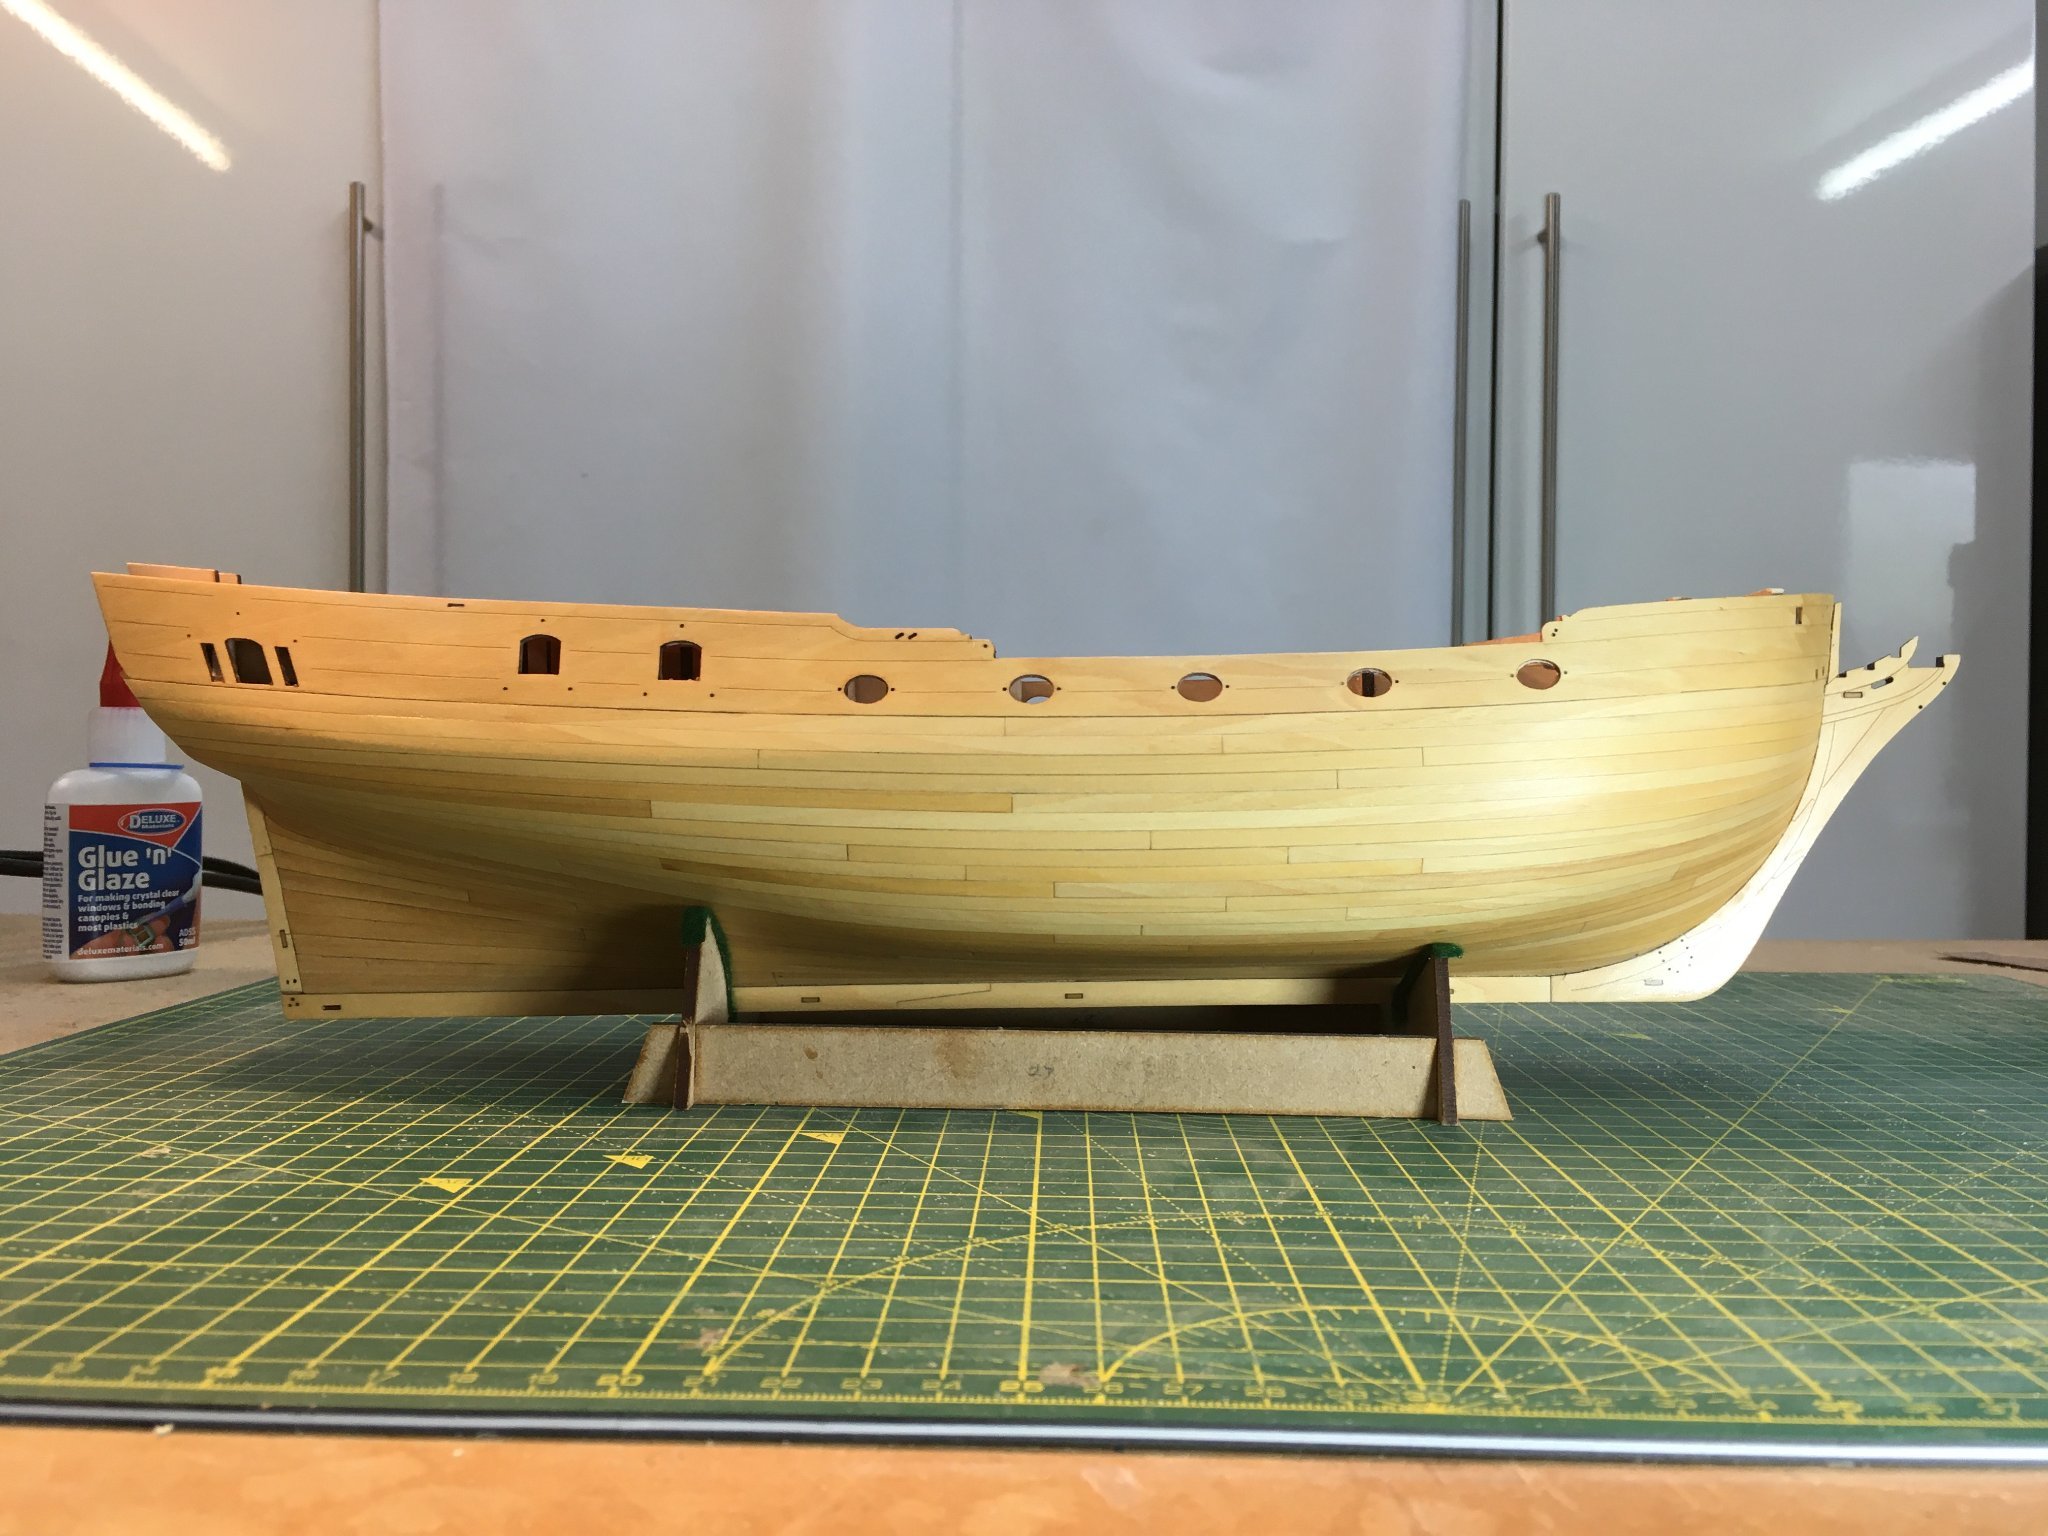
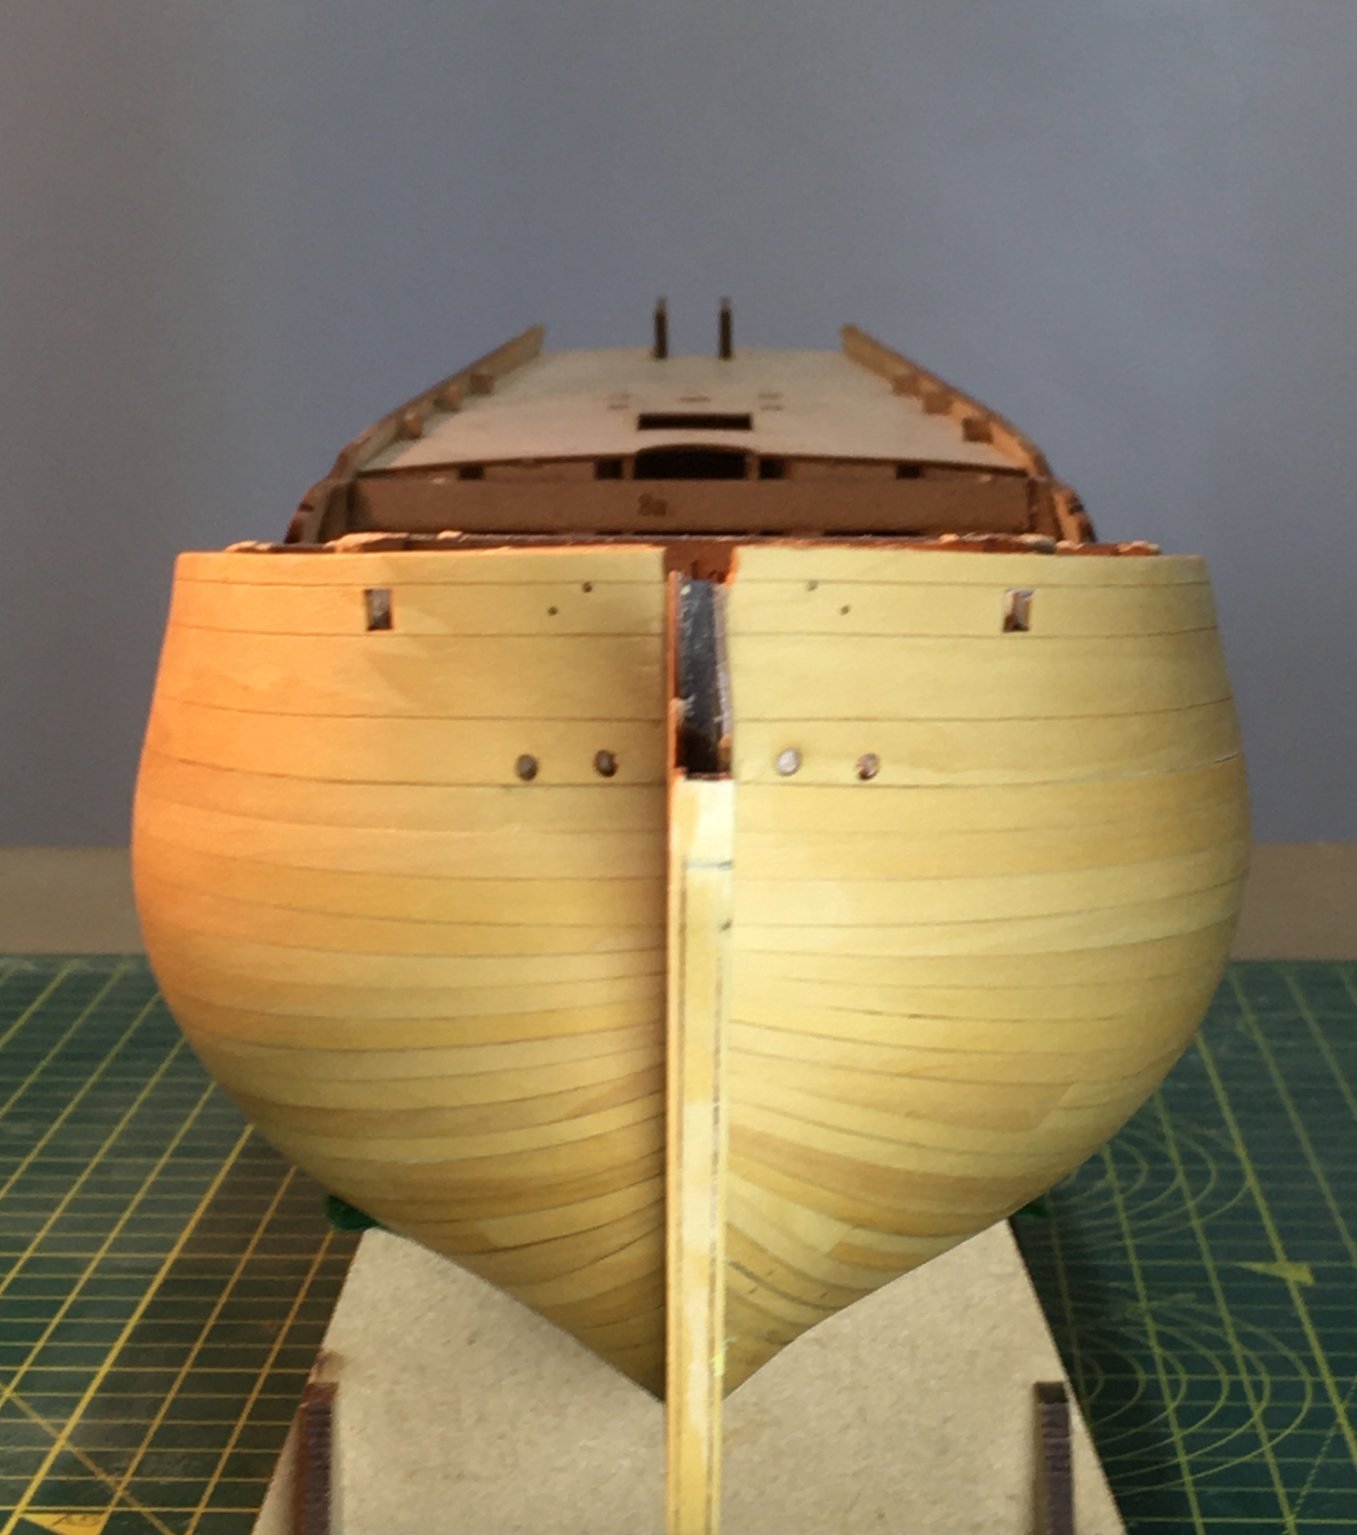
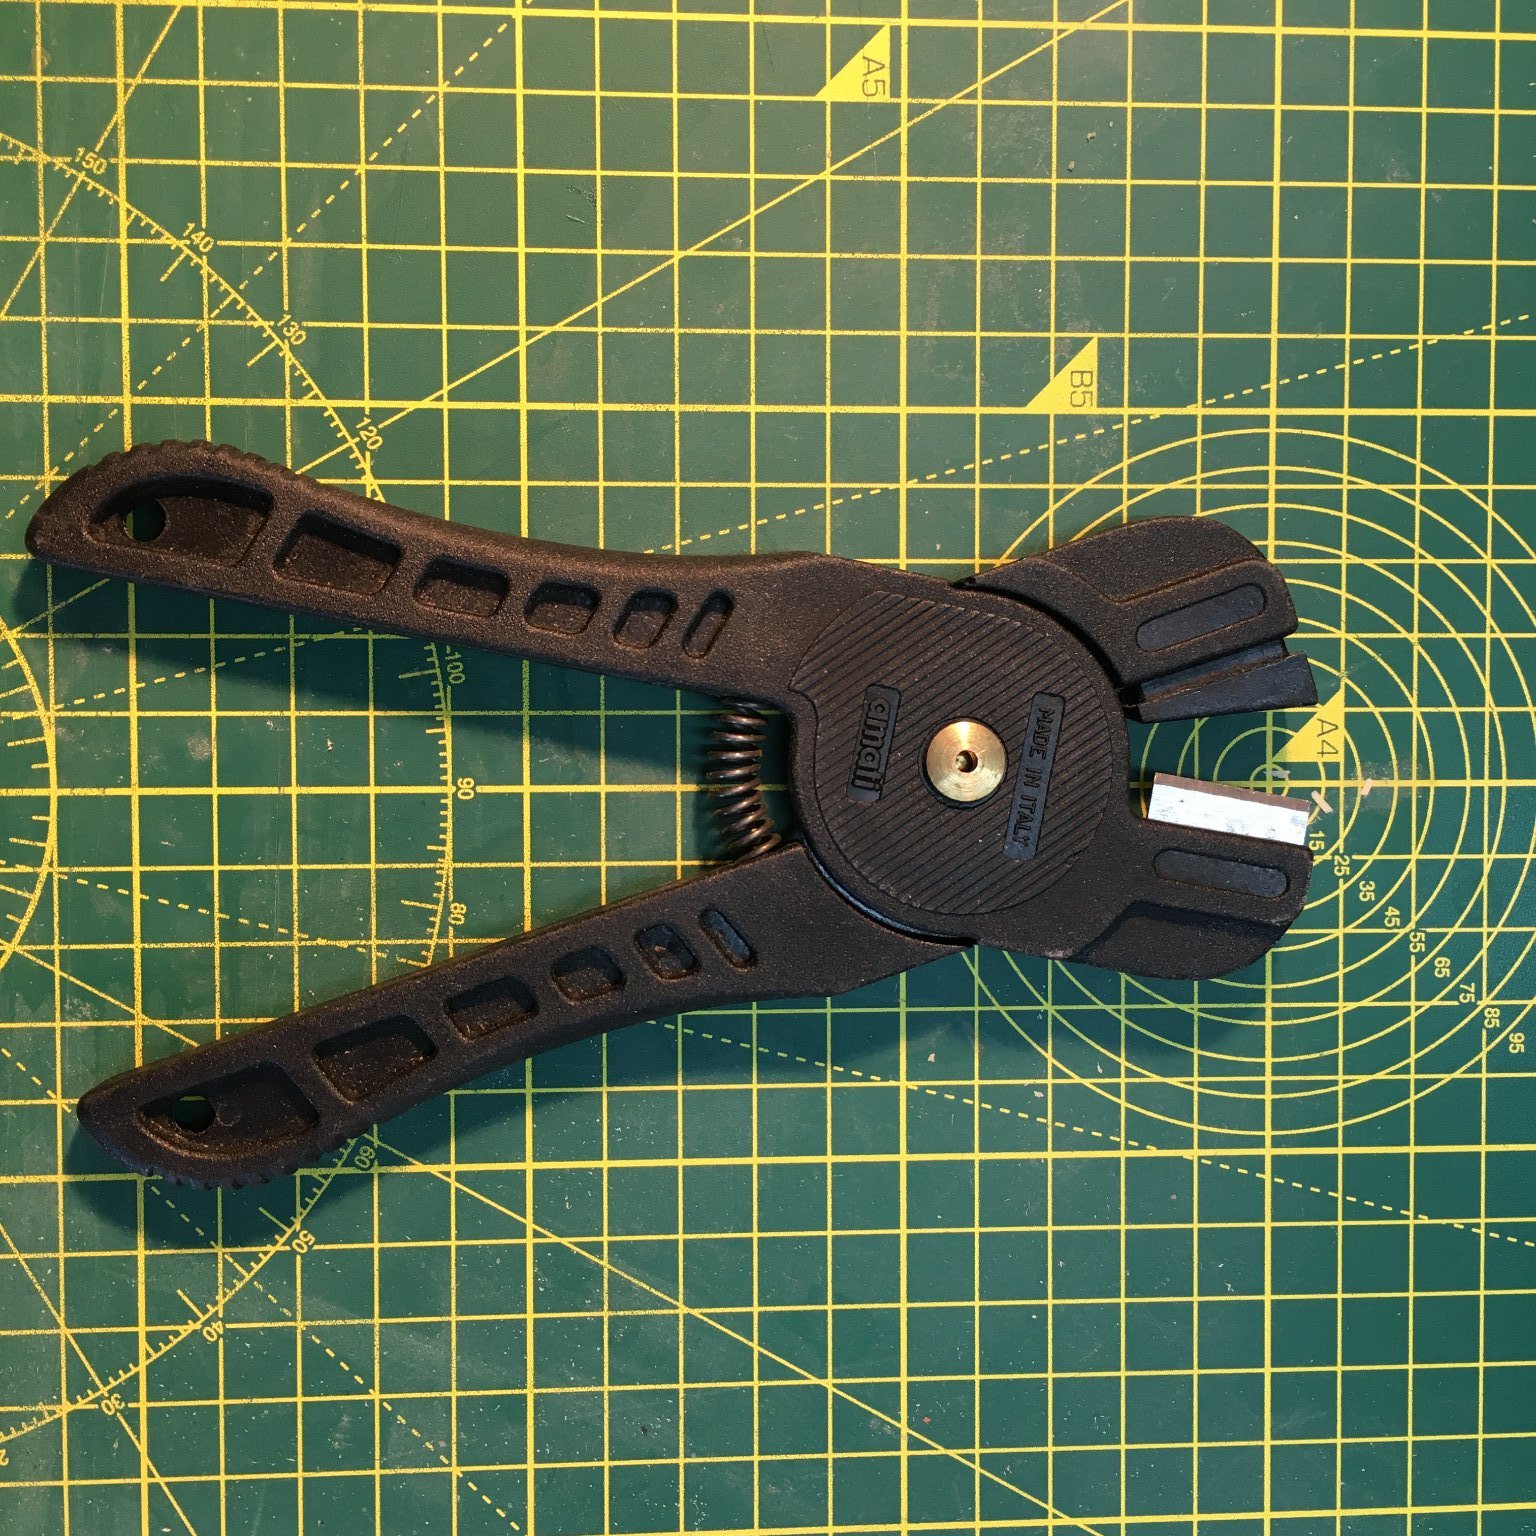
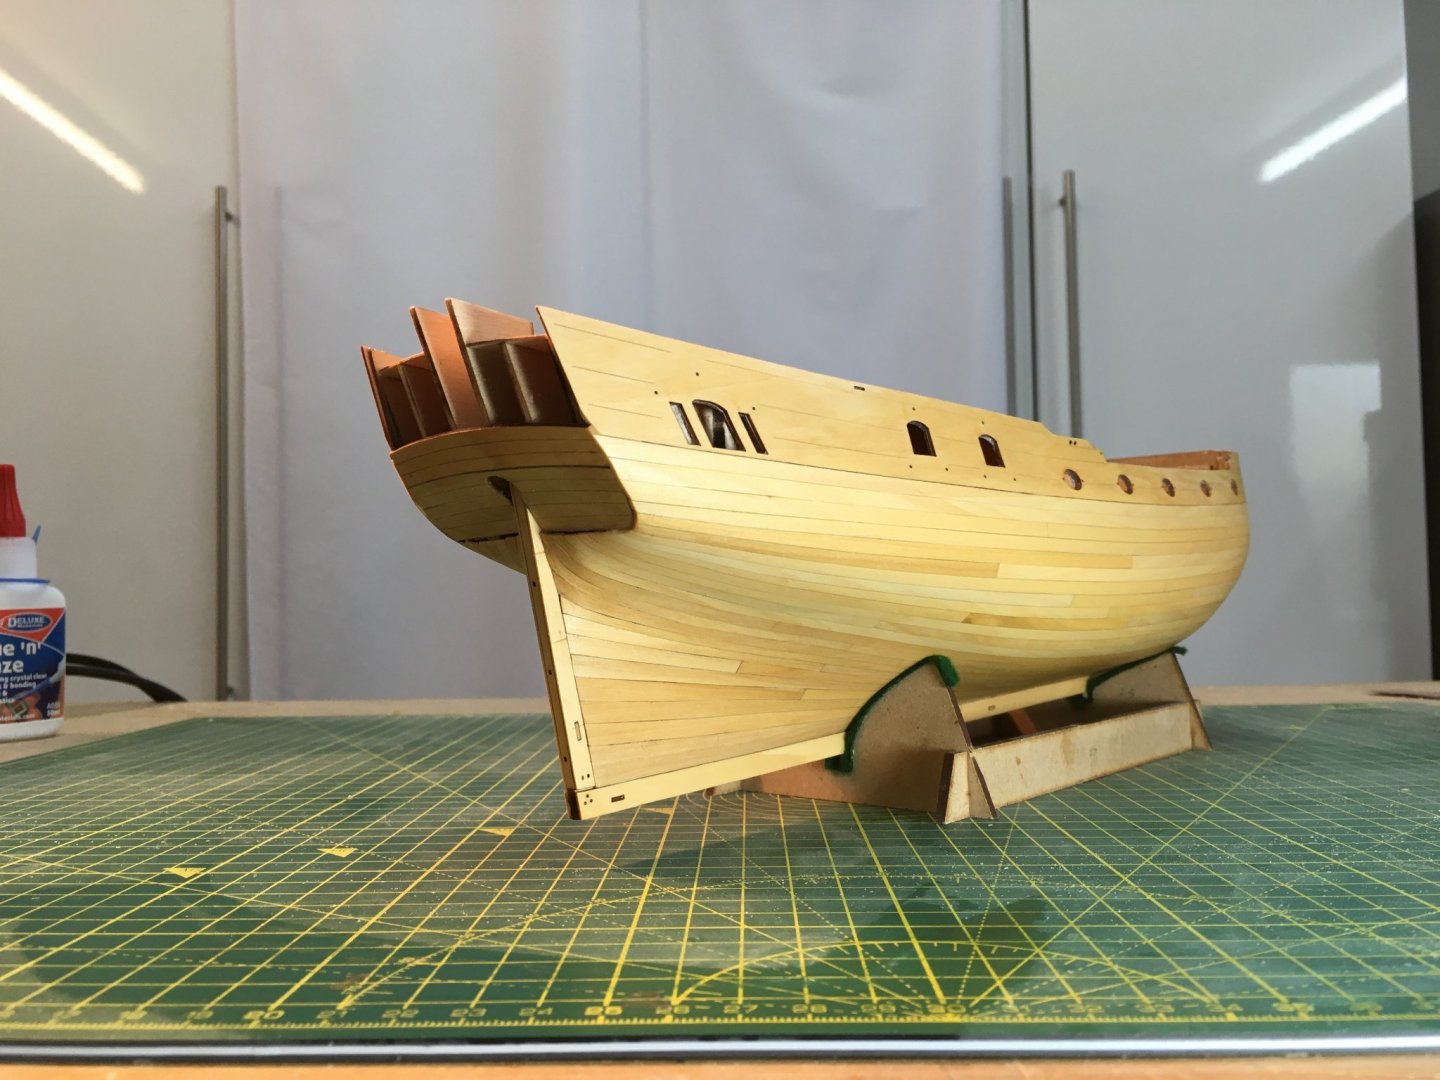
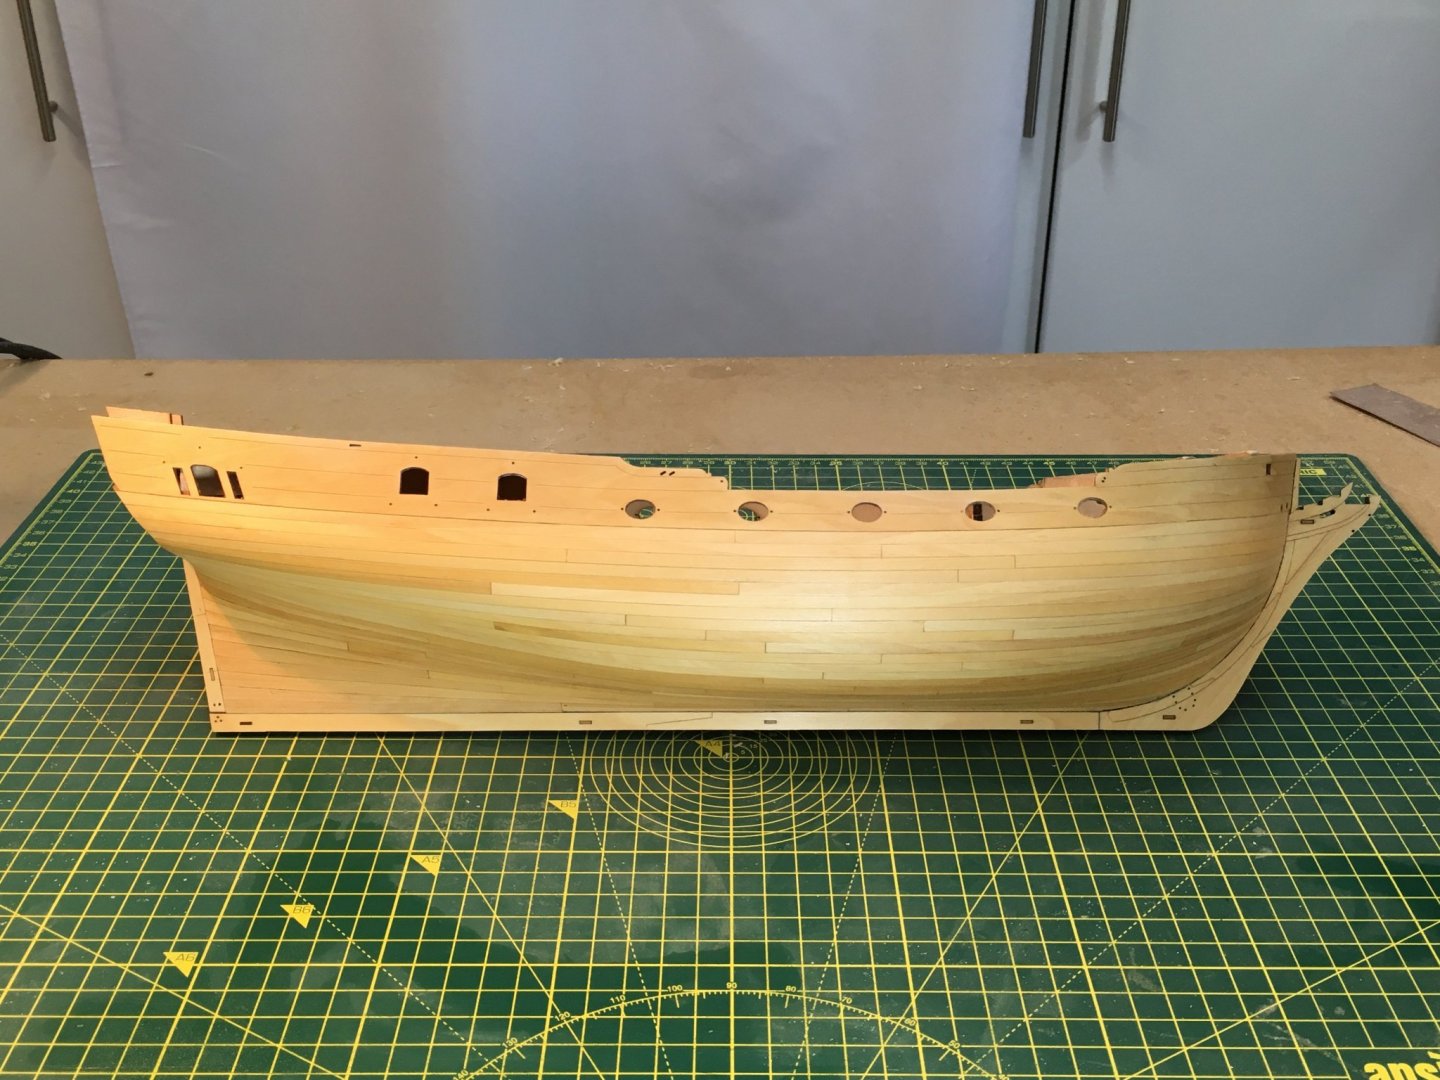
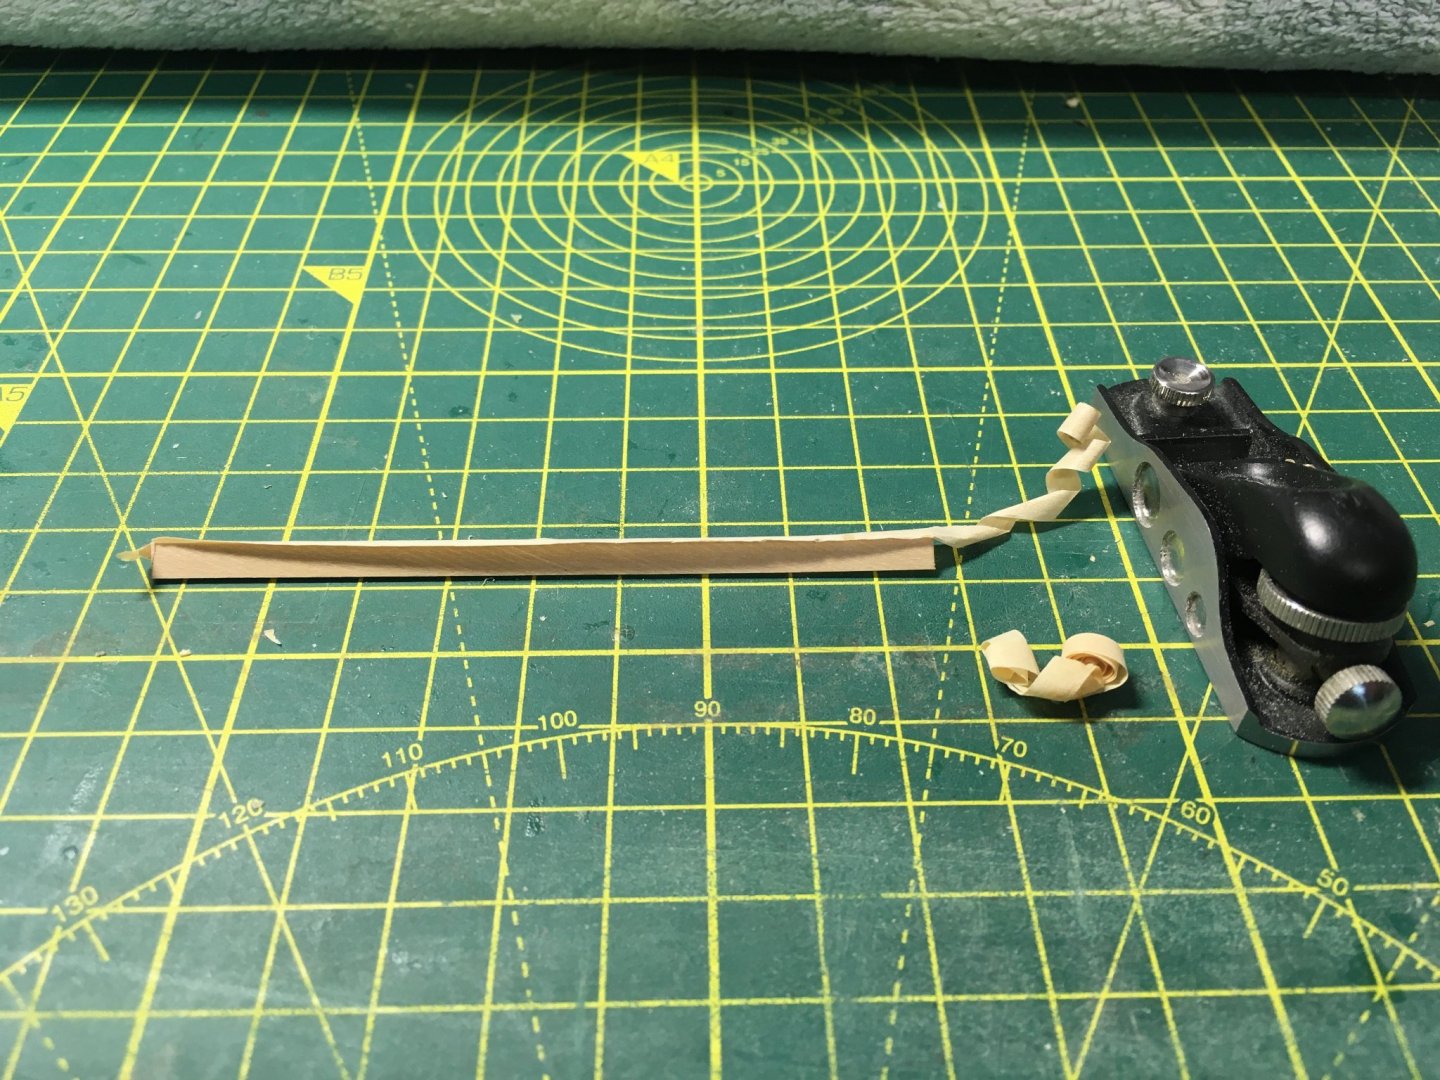
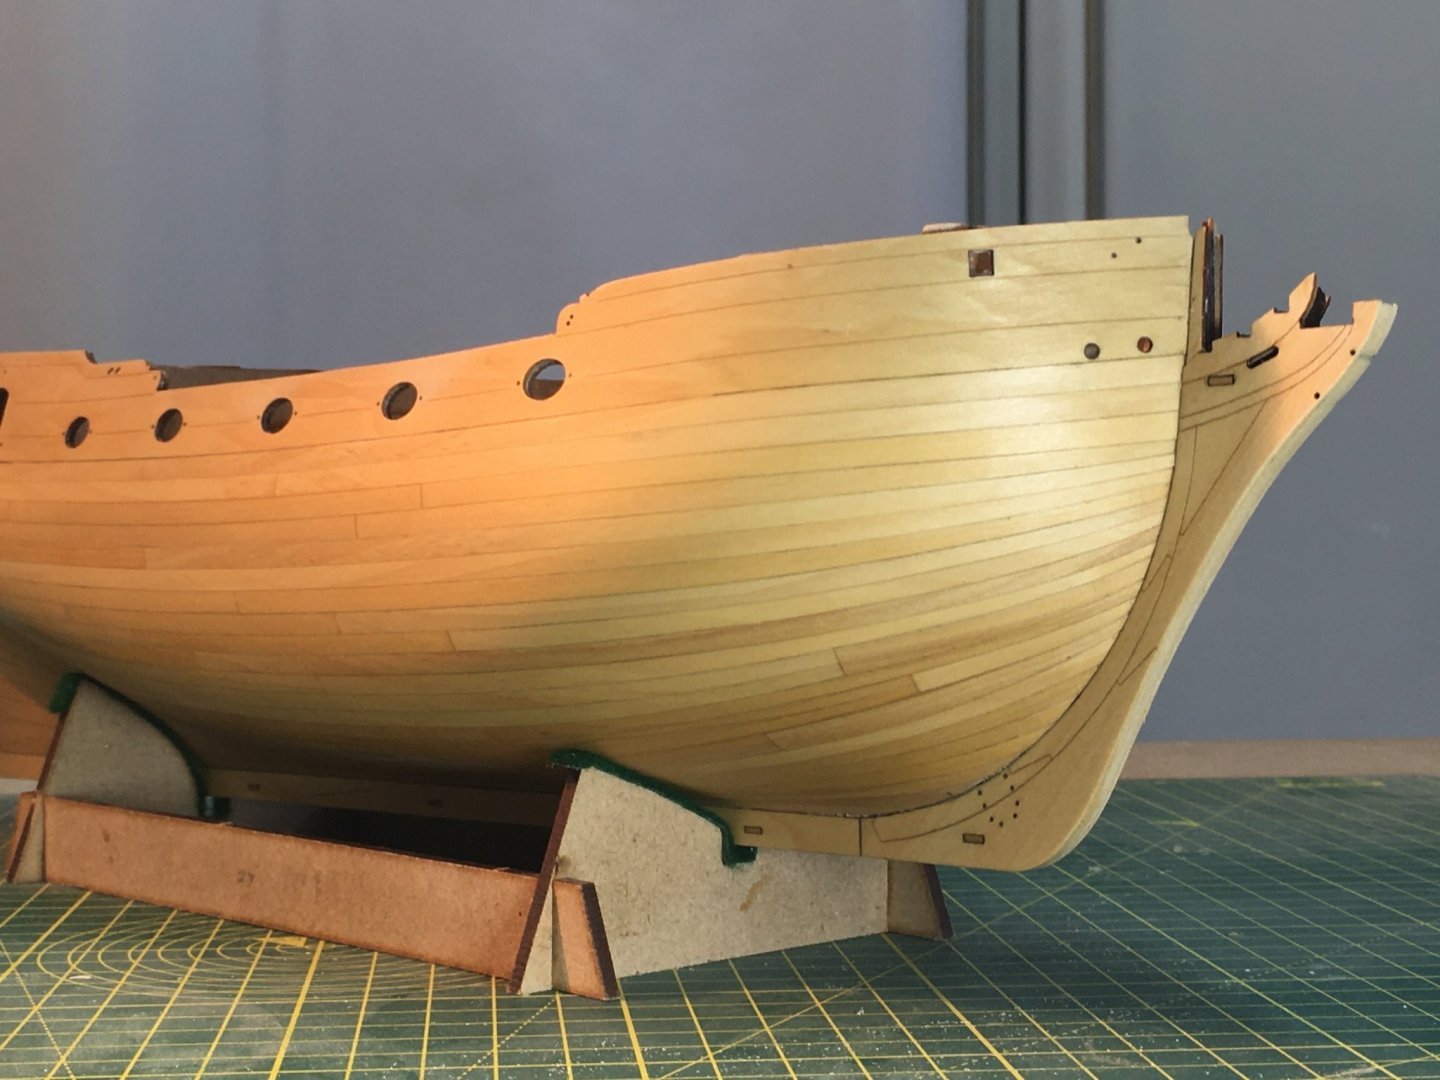
Starboard planking Thanks as always for the supportive comments and likes. Here's the starboard planking finished: I've applied no finish yet, just wiped her over with white spirit to remove the dust. I covered the methods I used when I described planking the port side. However there are a few points of detail I ought to mention. In each strake I fitted the planks at the stem and stern first then finished with one or two planks in the middle. Getting the planks shaped properly at either end of the ship is much trickier so it makes sense to get these right first. I believe the last plank fitted in a strake was known as the "shutter" plank. Here's the gap waiting for the very last shutter plank on the starboard side: The Duchess's hull calls for some very tight curves, and I previously mentioned using my electric plank bender to achieve some of these. On a whim, I thought I'd also try a tool I bought when I first started ship modelling - the Amati plank nipper. I very quickly stopped using it when I found it left obvious marks on the good side of planks, and produced a series of straight line segments rather than a smooth curve in the wood. It's been languishing in the bottom of a drawer ever since. To my surprise I found it worked well with the thicker, better quality 1mm boxwood in this kit. Using the nipper first to start a bend, it was subsequently much easier to impart a tight bend with the electric tool: On one particularly awkward plank I found I'd left a narrow gap against part of the preceding strake, a gap that couldn't be closed by further edge bending. Rather than PVA and sawdust, I tried using a thin shaving produced with a little Veritas block plane. I glued it to the edge of the plank, trimmed it and fitted the plank as normal. A prize to the first person that spots it! I should point out that I staged this photo with a spare piece of plank after the event as I didn't shoot it at the time. In reality I had to use a double thickness of shavings to fill the gap. The last point I wanted to mention was the rabbet. This is one of many clever design elements in this kit, producing a neat finish at the stem by hiding the ends of the planks. However it's important to be aware that the planks are likely to be slightly thinner than the rabbet, which means that if you glue the ends down tight against the first planking, you're liable to see a gap between the planks and the stem. It's better to leave a slight 'spring' in the ends of the planks at the bows and, assuming you're using CA like me, to avoid pressing your fingers against the first few millimetres. This will allow the plank to press up against the top edge of the rabbet, eliminating any potential gap. And I still don't know whether or not I'm going to paint the darn thing! Derek


- 345 replies
-
- 18
-

-
-
- Duchess Of Kingston
- Vanguard Models
- (and 1 more)
-
Looking good! Like you, I often get fed up with repetitious tasks like planking. However I’ve enjoyed Duchess, probably because I took it more slowly - almost treating each plank as a separate project rather than rushing to get the job done. I’m still looking forward to moving on to the next stage though! Derek
-
Brilliant. I'm not sure how I missed this log until now, but your great model has reminded me why I love the beauty of bare wood. I was also impressed with your attention to detail - I don't think I've seen such realistic snaking before for example. I'll follow your current build with interest. Derek
-
Rather than stones, I would suggest wet-and-dry paper stuck to a sheet of plate glass - see this. You don't have to worry about dressing stones to keep them flat, you can have as many different grades as you need, and sheets are easy and cheap to replace. Works fine with the Kell guide. Your planking looks great, btw! Derek
-
+1 for shellac for all the reasons Jaager and Bob Cleek describe. It really does impart a beautiful, deep warm glow to wood.
-
Looking good. Smart move making the false sheaves in your catheads before fitting them - unlike me with Speedy!
-
Type the @ sign immediately followed by their forum name. As you type, a list of members should come up matching the letters until you see the one you want. Click on it and youre done: @mtaylor Hope that’s what you wanted
-
Thanks Bob. I’ll take stock when I’ve finished the starboard planking and make a final decision then.