HOLIDAY DONATION DRIVE - SUPPORT MSW - DO YOUR PART TO KEEP THIS GREAT FORUM GOING! (Only 20 donations so far - C'mon guys!)
×


DelF
-
Posts
1,409 -
Joined
-
Last visited
Content Type
Profiles
Forums
Gallery
Events
Everything posted by DelF
-
 Superb. I’ve never tried flags as I didn’t think I could get them to look realistic, but you’ve nailed it.
- 185 replies
-
- 1
-

-
- queen anne barge
- Syren Ship Model Company
- (and 1 more)
-
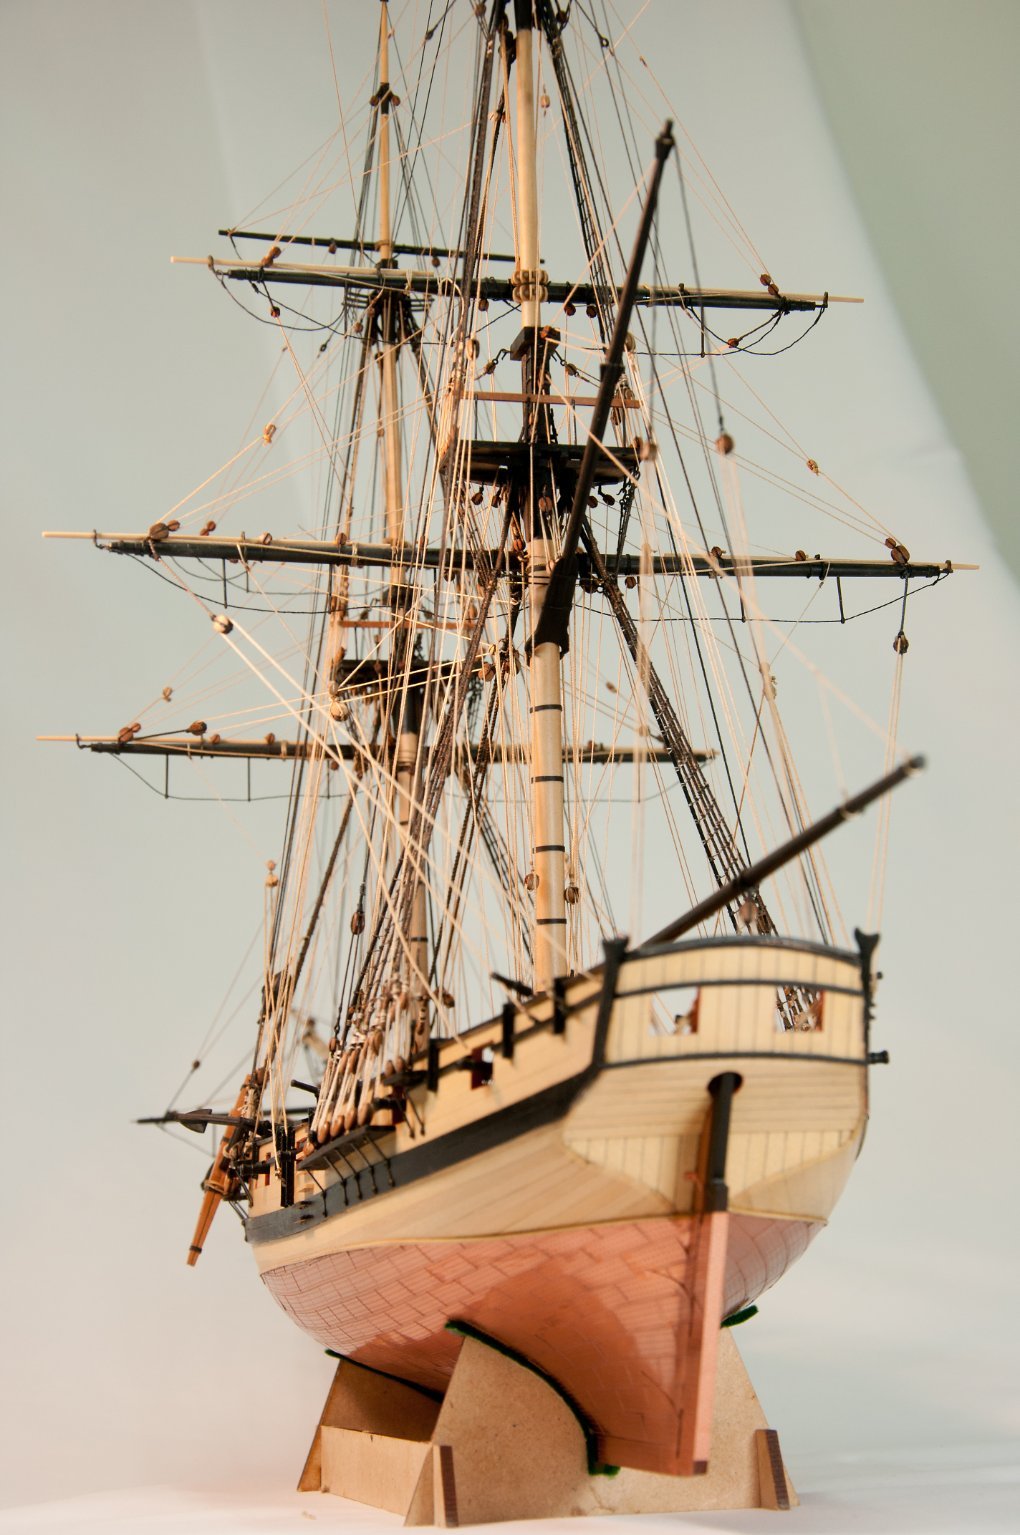
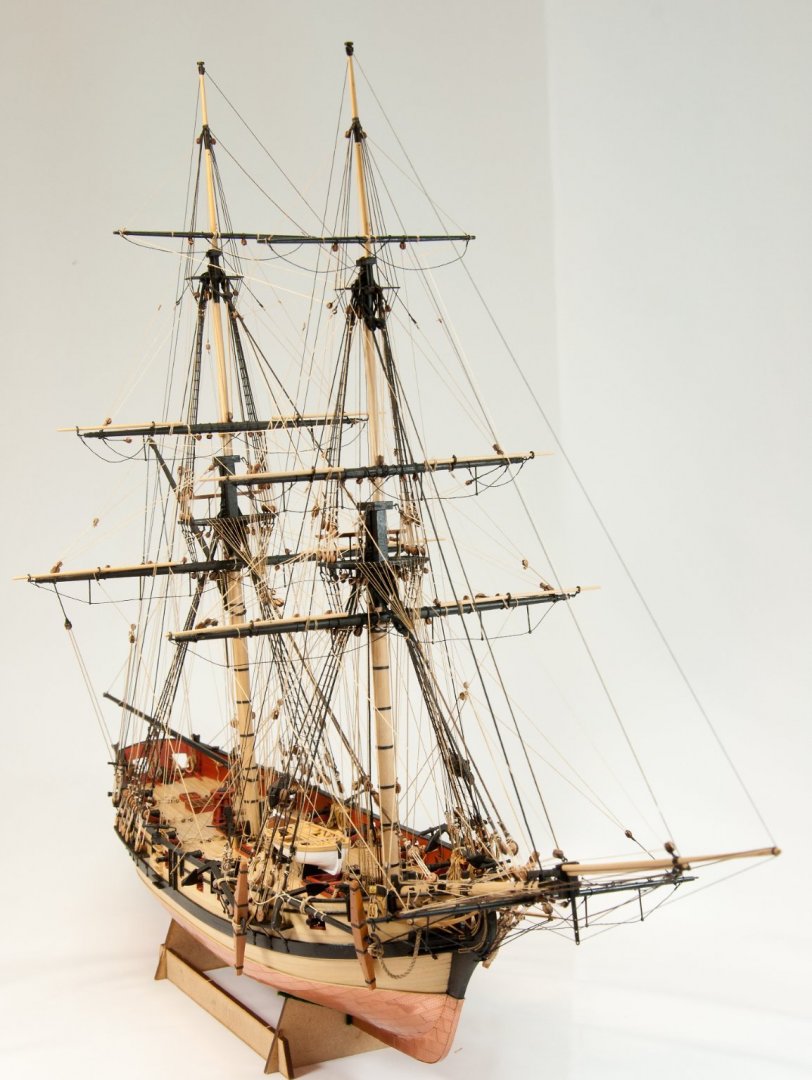
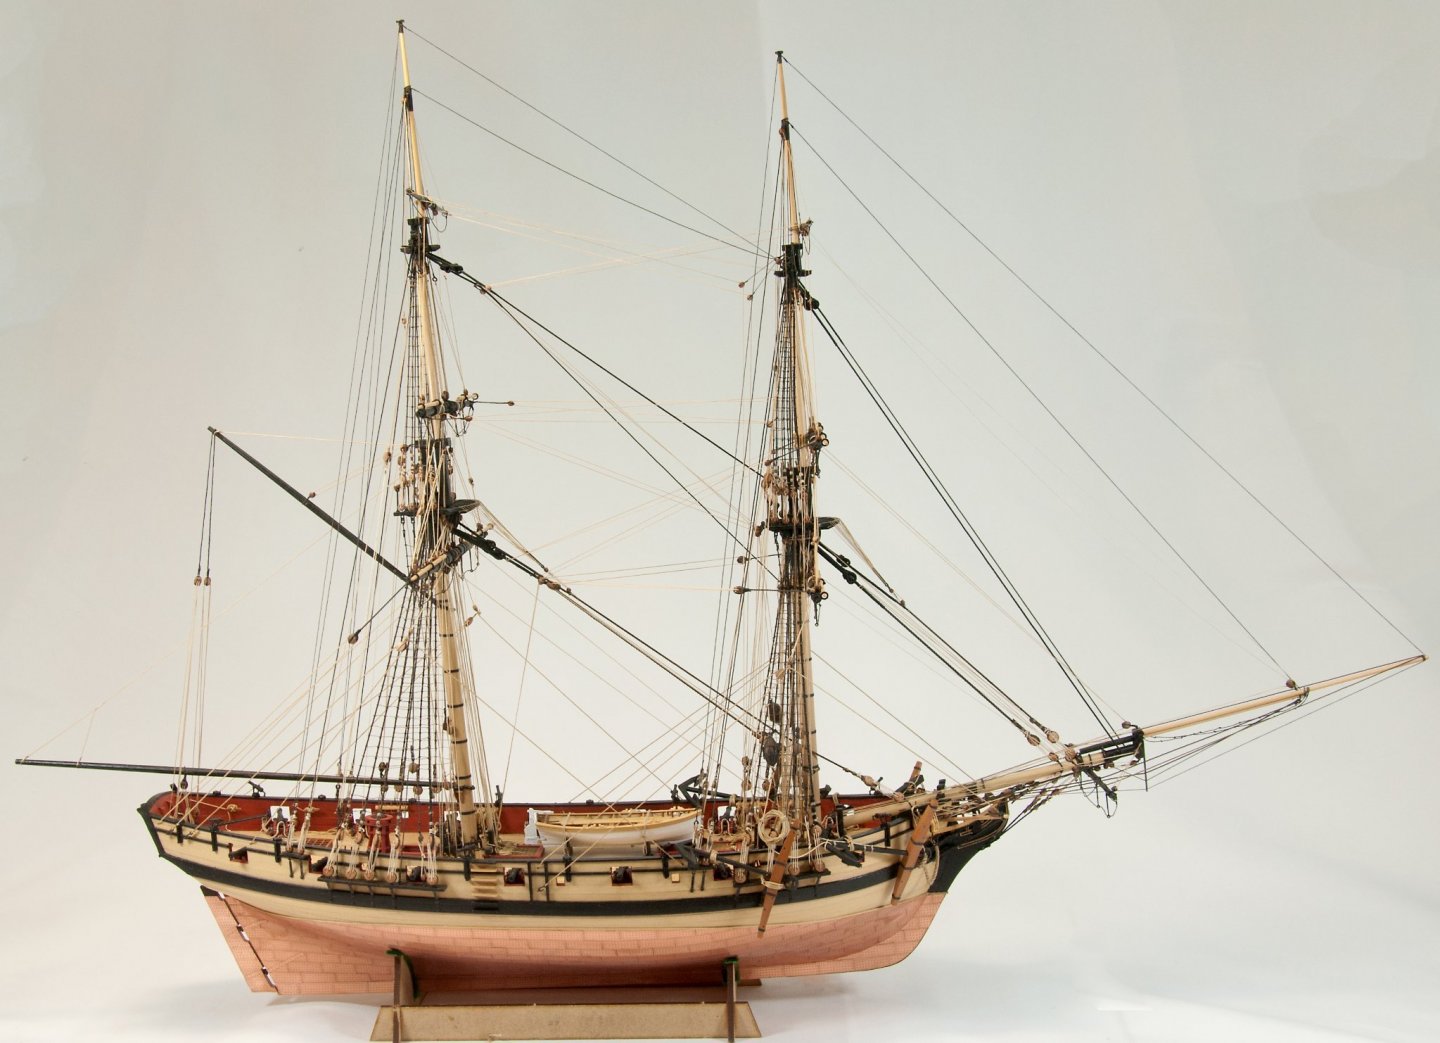
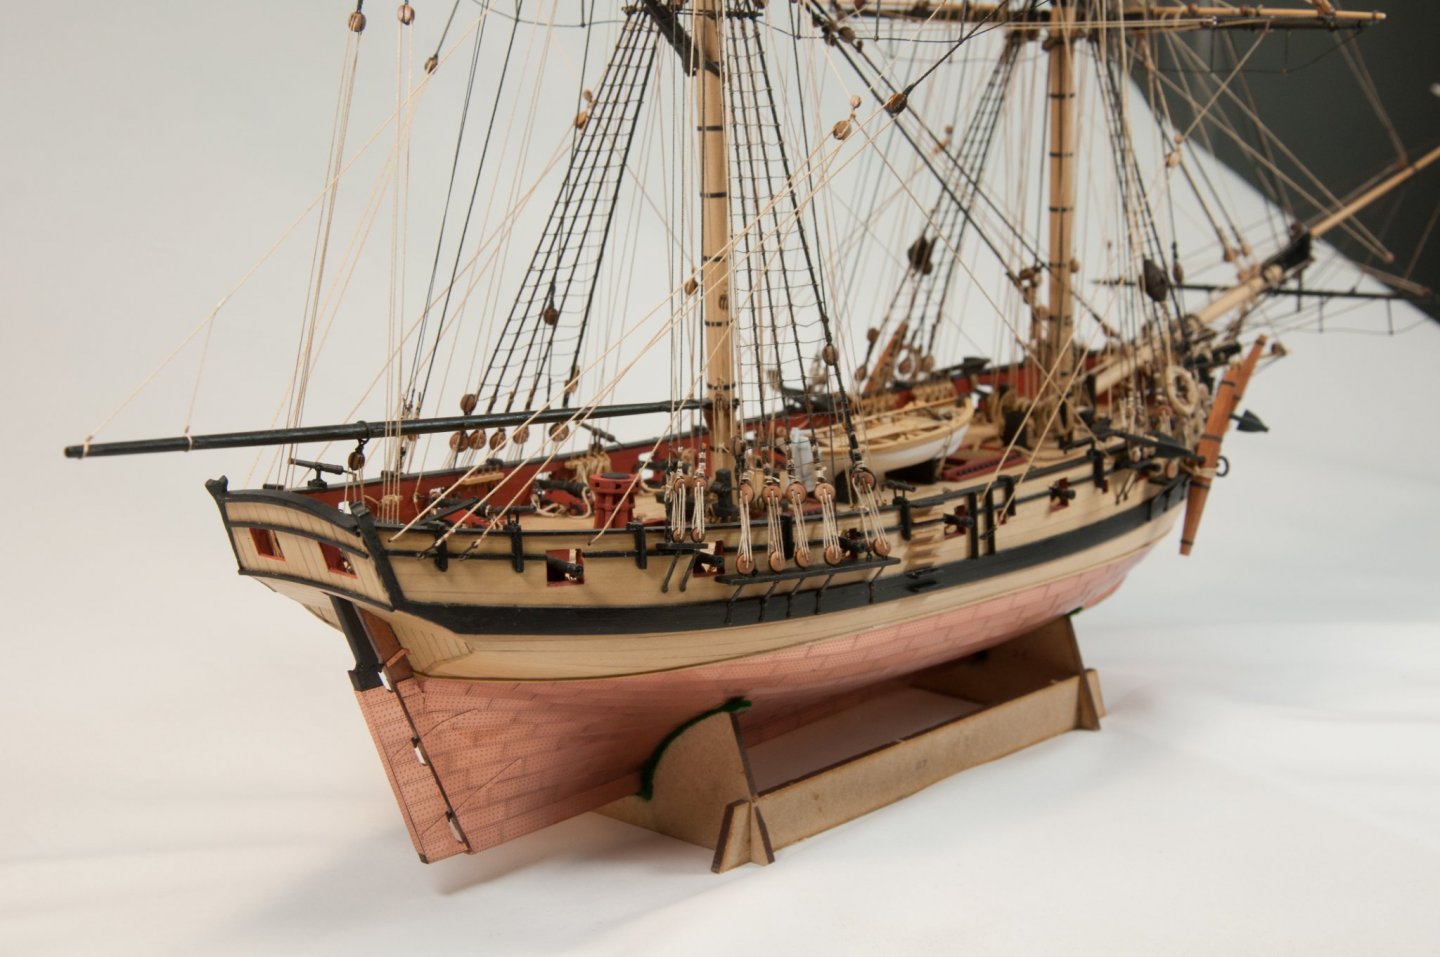
The Finishing Line I started Speedy on 5 January last year and after 19 months of very enjoyable modelling I've finally completed her, except for final decisions about display. When I first opened the box I was impressed with the quality of the materials, the plans and the instructions - all much superior to other kits I've built (only the manual and plans for the English Pinnace by Model Shipways come close, but they were produced by Chuck Passaro). I enjoyed putting my own stamp on the ship, for example by adding a boxwood deck, but everything I did served to complement a very accurate kit - rather than having to make good the shortfalls so often found in commercial offerings. So, a huge 'thank you' to @chris watton and Vanguard Models. The biggest compliment I can pay Chris is that I've already got his Duchess of Kingston on the shelf and I'll be getting HMS Sphynx as soon as she's released. I must also thank the 56 people who have followed the log and offered their support, encouragement and advice, and I've been particularly glad to read that people have found some of my methods helpful. One person in particular has made the journey even more enjoyable - Glenn (@glbarlow) and I have shared quite a few tips about tools and techniques as we've worked on our separate builds (check out Glenn's Cheerful log), and equally importantly we've enjoyed plenty of light-hearted banter along the way. Even our valets and butlers are on first name terms😁. One of Glenn's less successful efforts has been to help me improve my photography. His knowledge and advice are great; my abilities are not. Here's the results: A short break now, then on with the Duchess! Derek 24 July 2021


- 725 replies
-
- 18
-
-

-

-
- vanguard models
- speedy
- (and 1 more)
-
Thanks David, glad you've found it helpful. That's how I learn too! This forum really is the best source of help and information I know.
-
Thanks Tim. I started a log nearly two years ago but ran out of steam when I found I'd copied some of the plans wrong and the three pieces of keel I'd cut wouldn't line up. I had two other builds on the stocks at the time and I shelved Winchelsea. I really would like to get back to her someday. Here's a link to the log, although I'm not sure it'll work if you're not a member of the Winchelsea group? Derek
- 725 replies
-
- 1
-
-
- vanguard models
- speedy
- (and 1 more)
-
Thanks guys. It's been a most enjoyable build. I've got Vanguard's Duchess of Kingston and Model Shipways' Longboat on the shelf, and the Winchelsea group build started (sort of). After a short break I'll definitely move on to the Duchess and will probably do one of the other two in parallel as I sometimes enjoy swapping between models as I did with the English Pinnace and Speedy. And I'm itching to get my hands on Sphynx! But definitely a break first🍺.
- 725 replies
-
- 4
-
-
- vanguard models
- speedy
- (and 1 more)
-
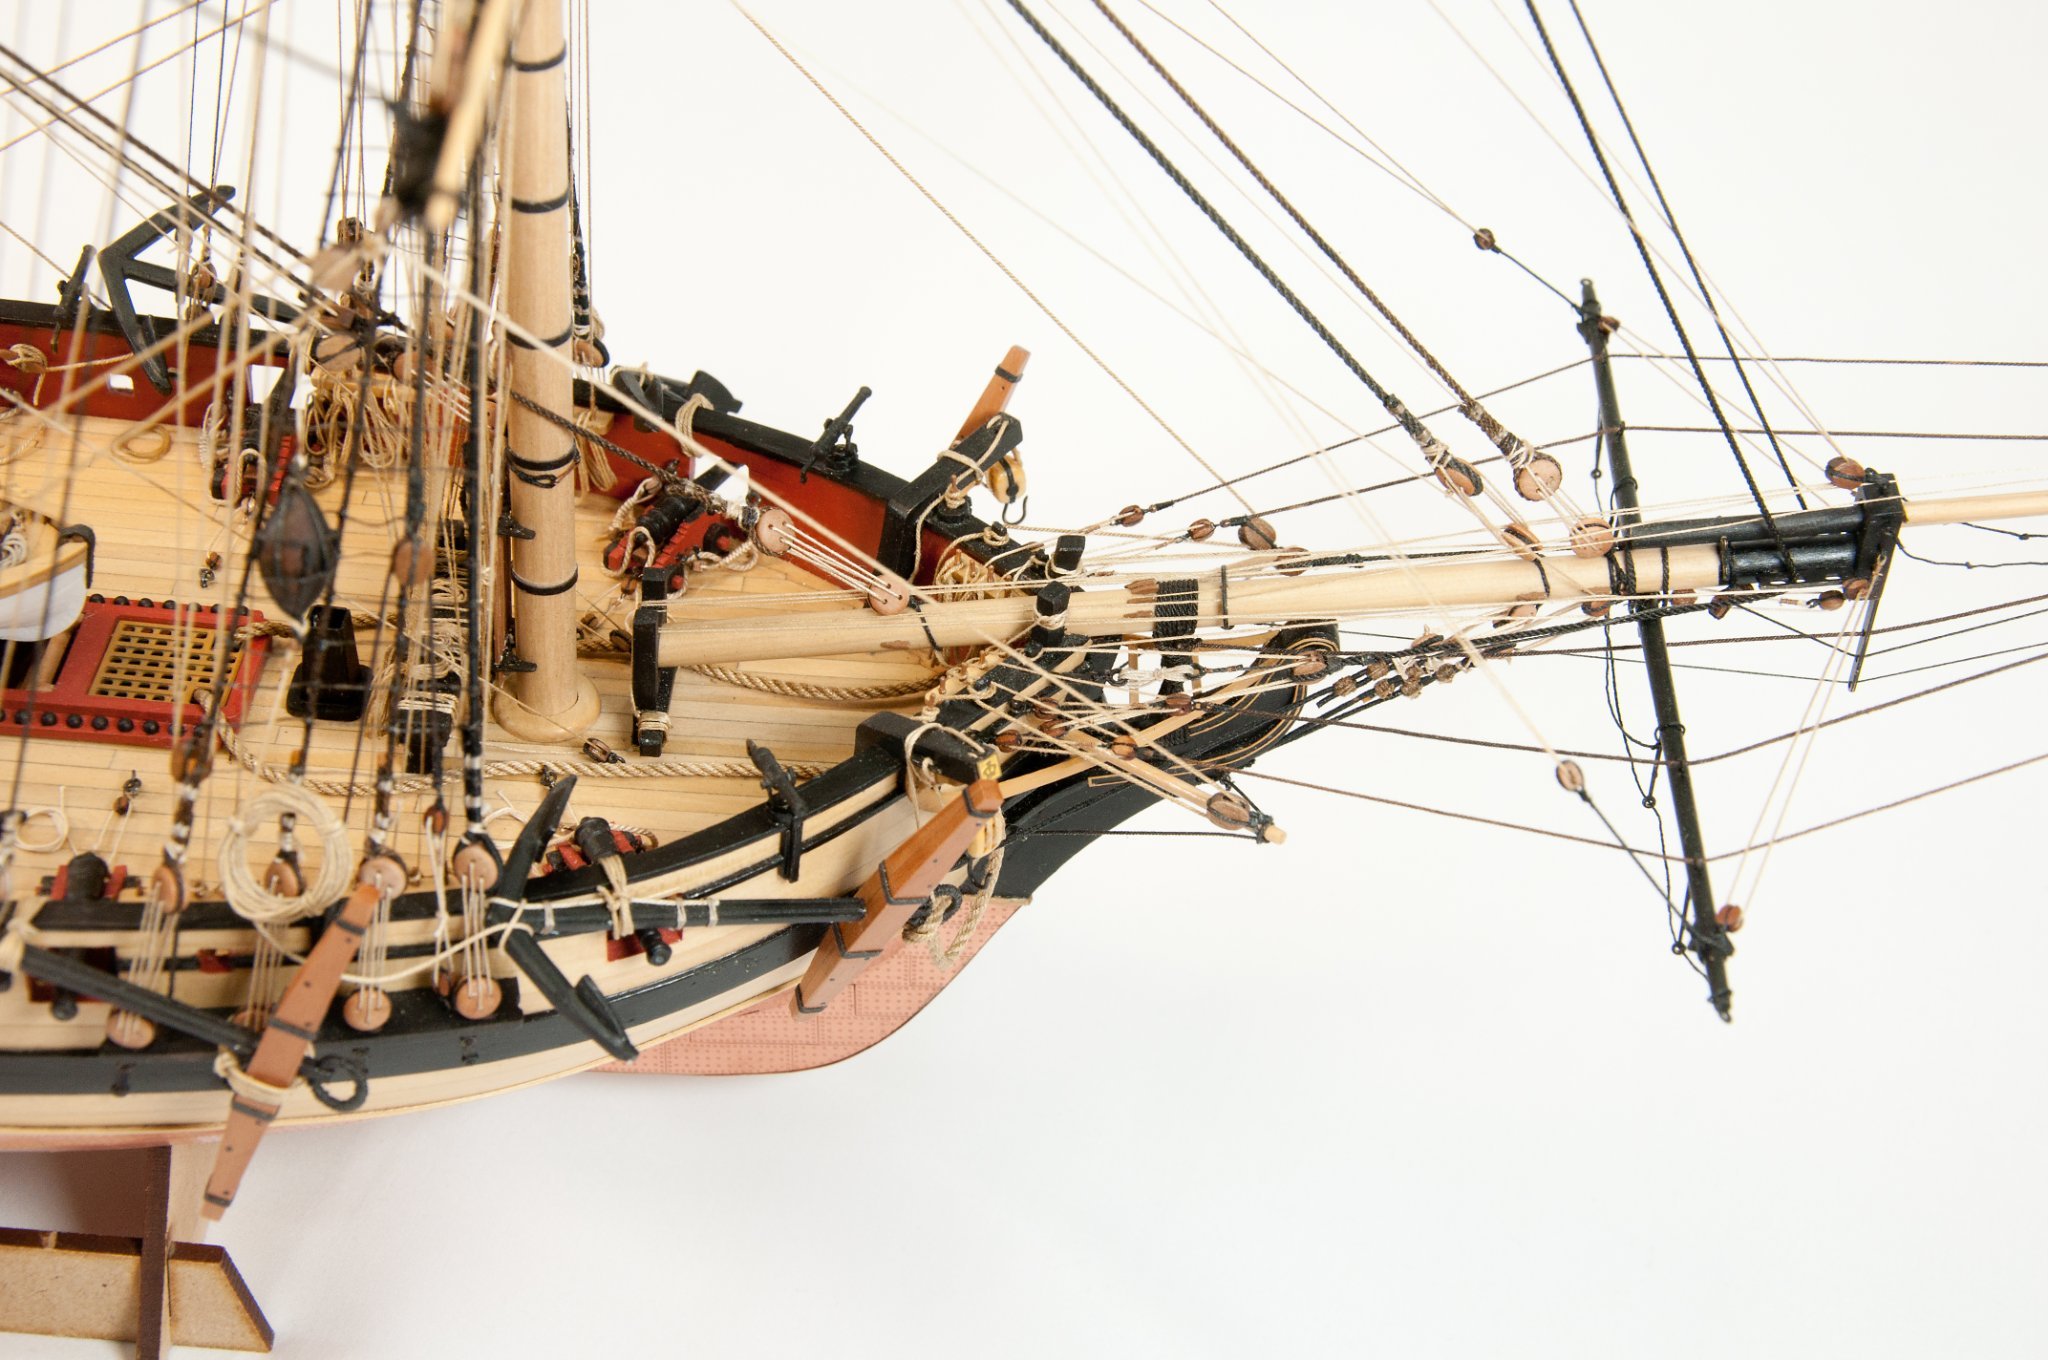
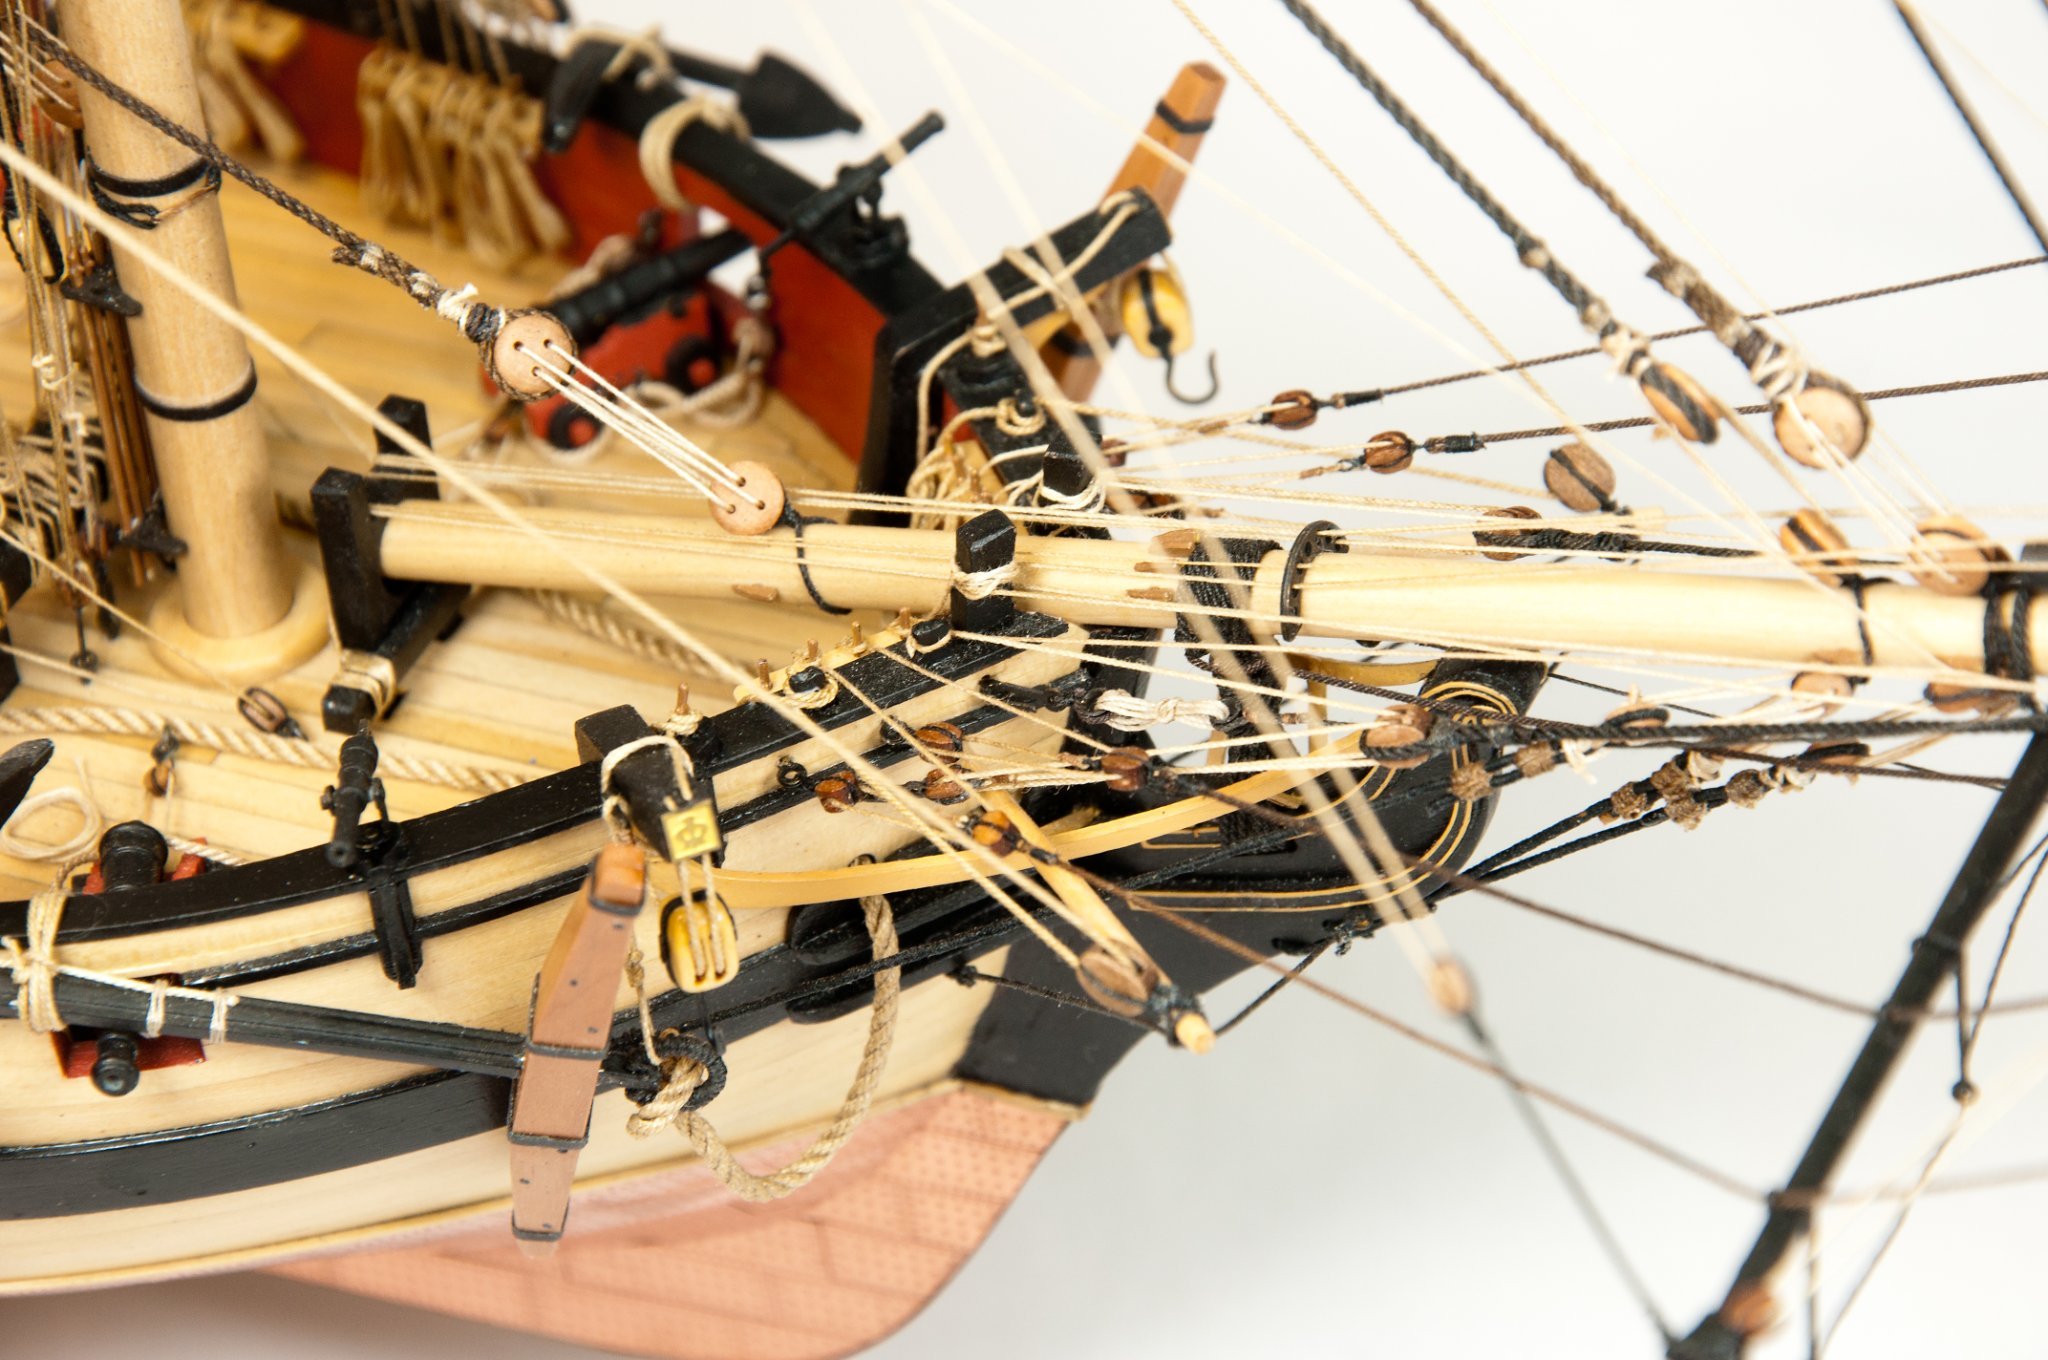
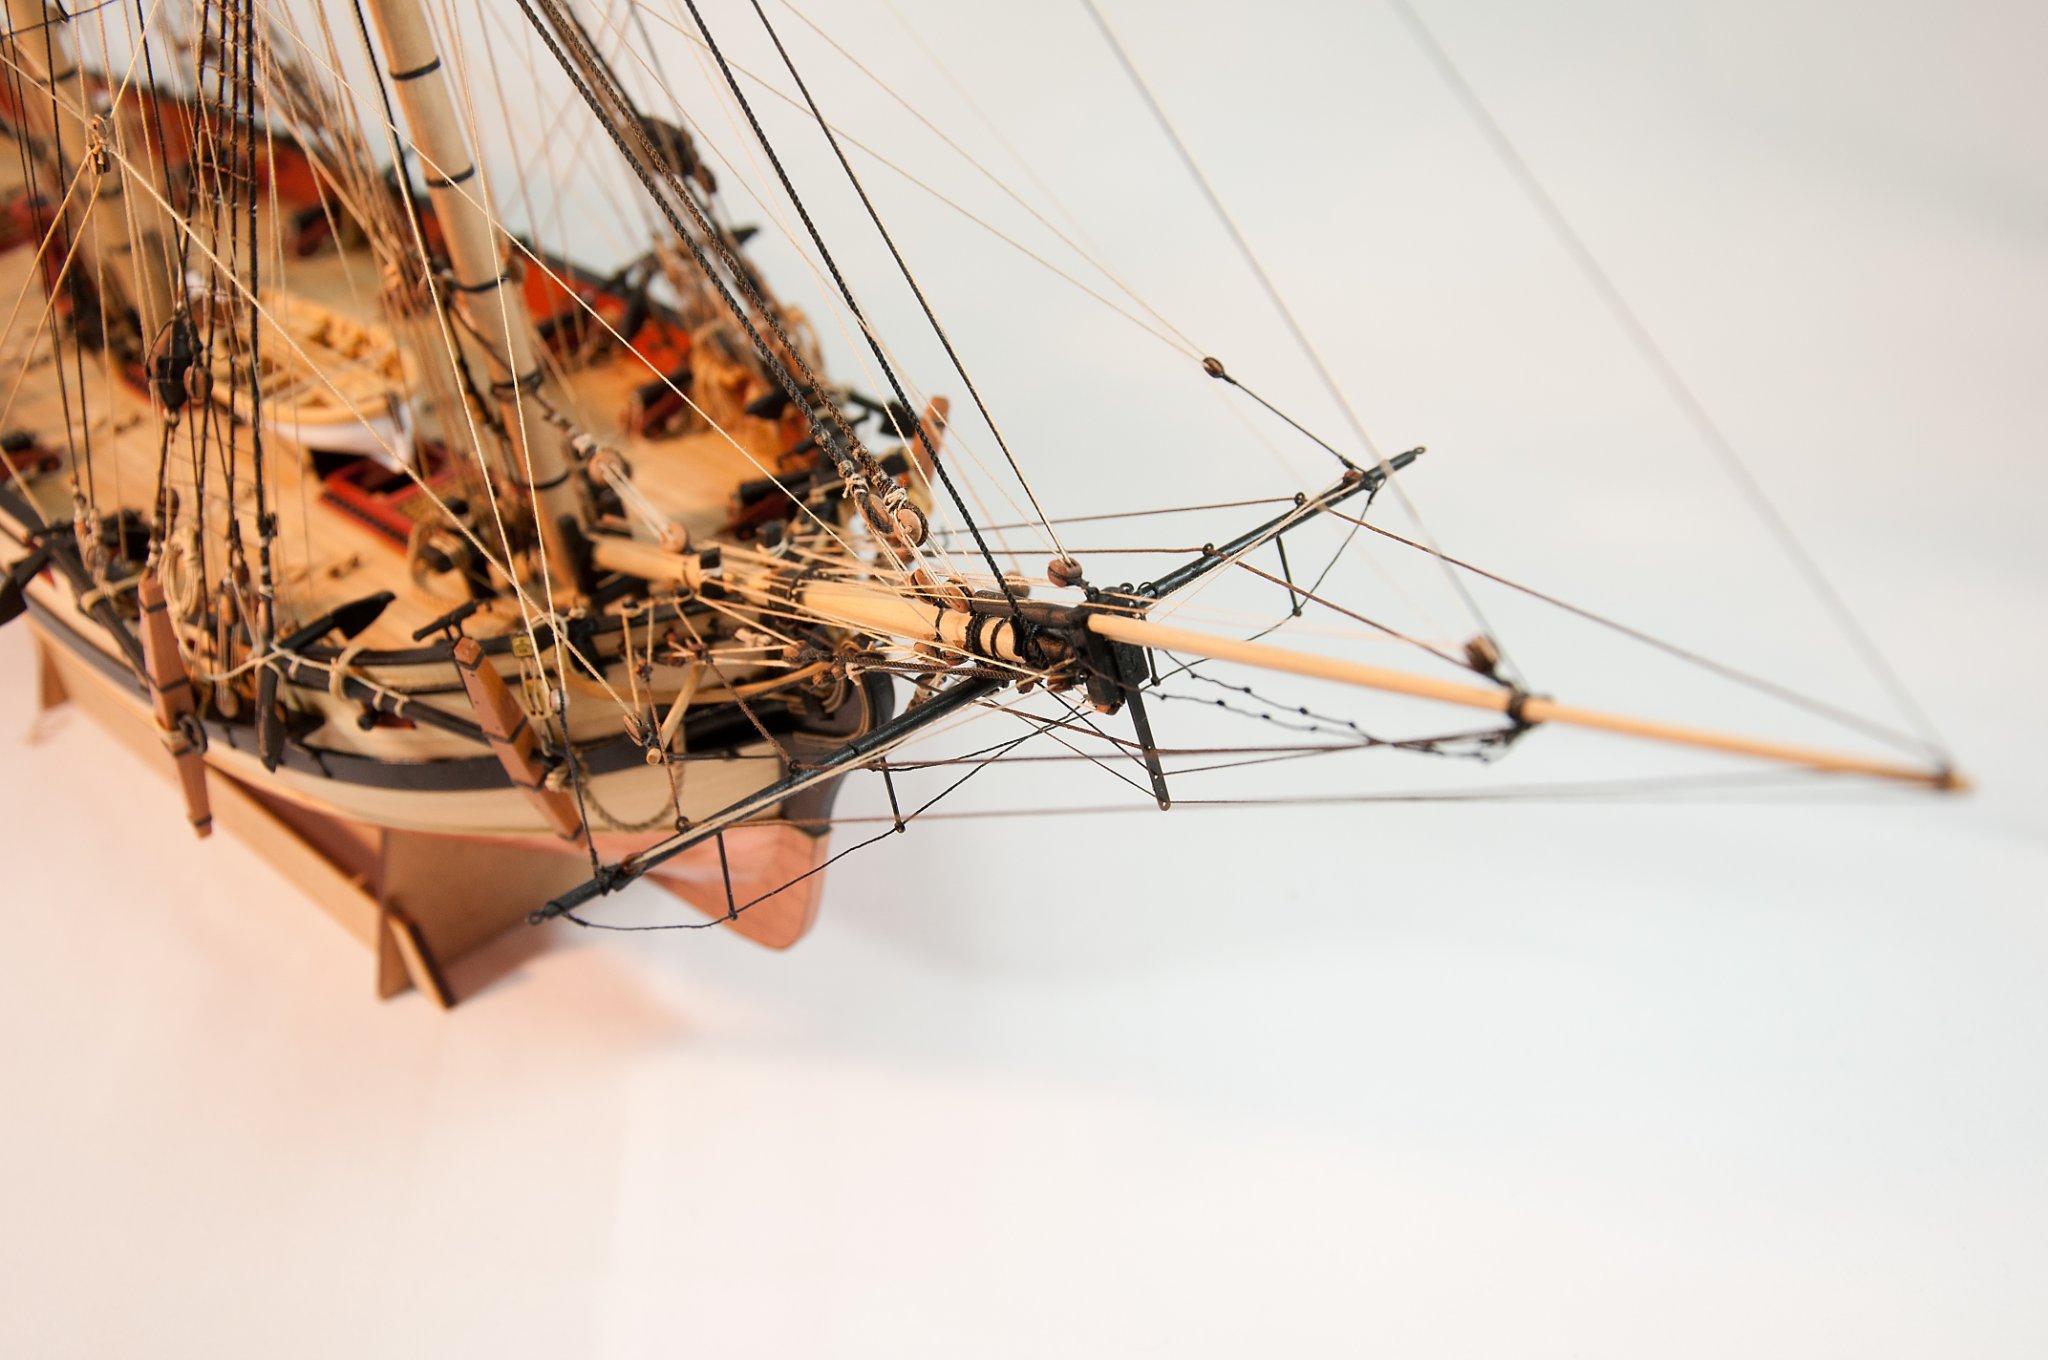
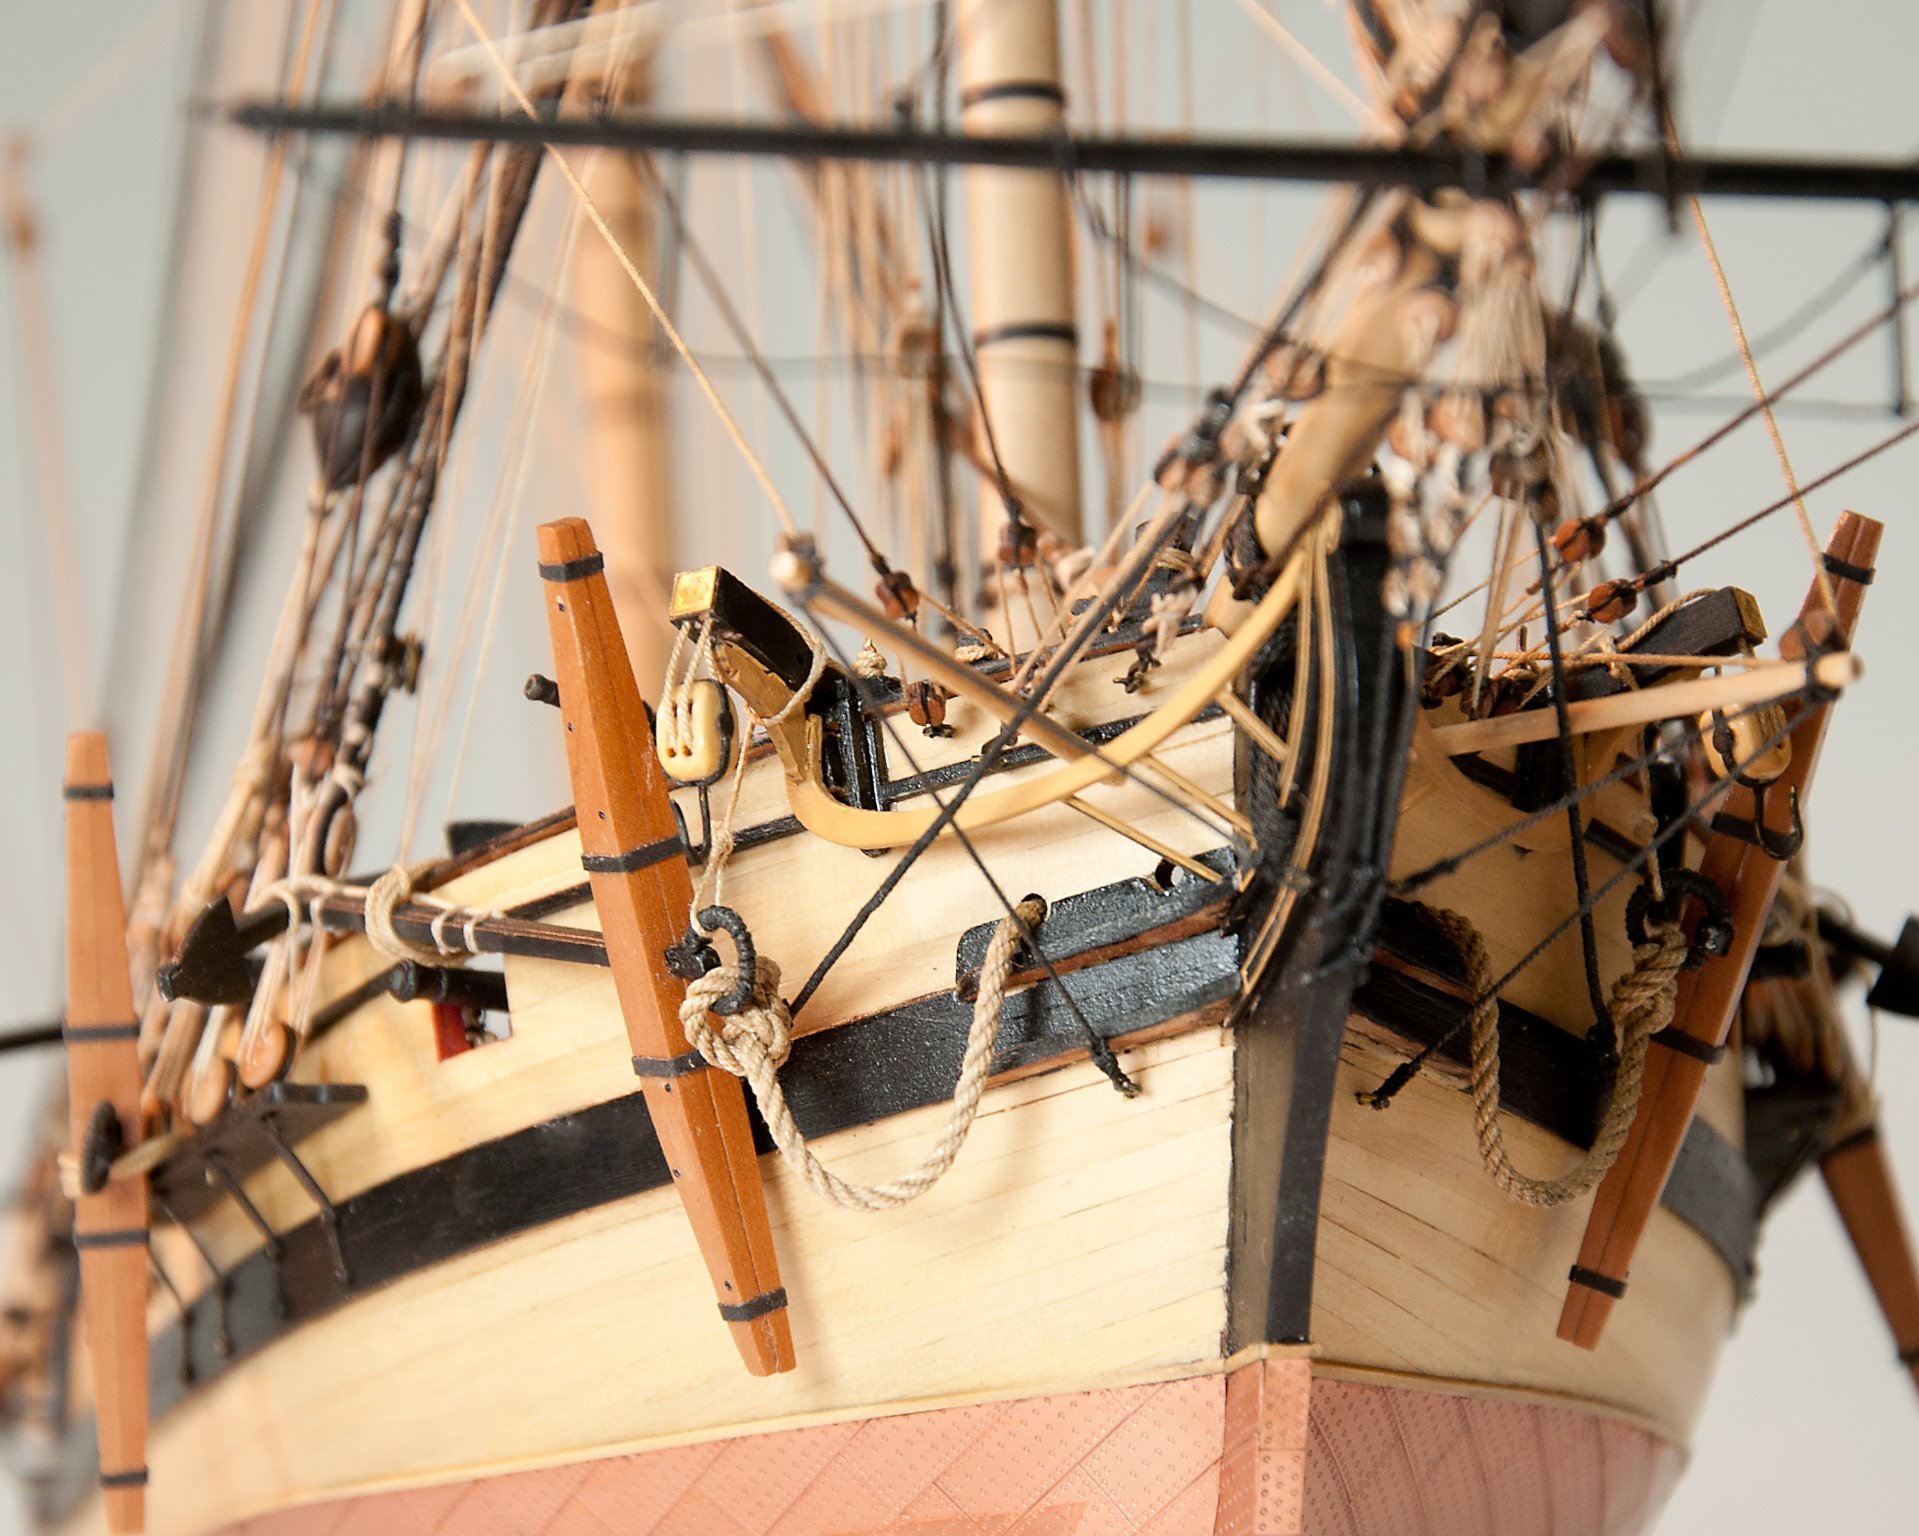
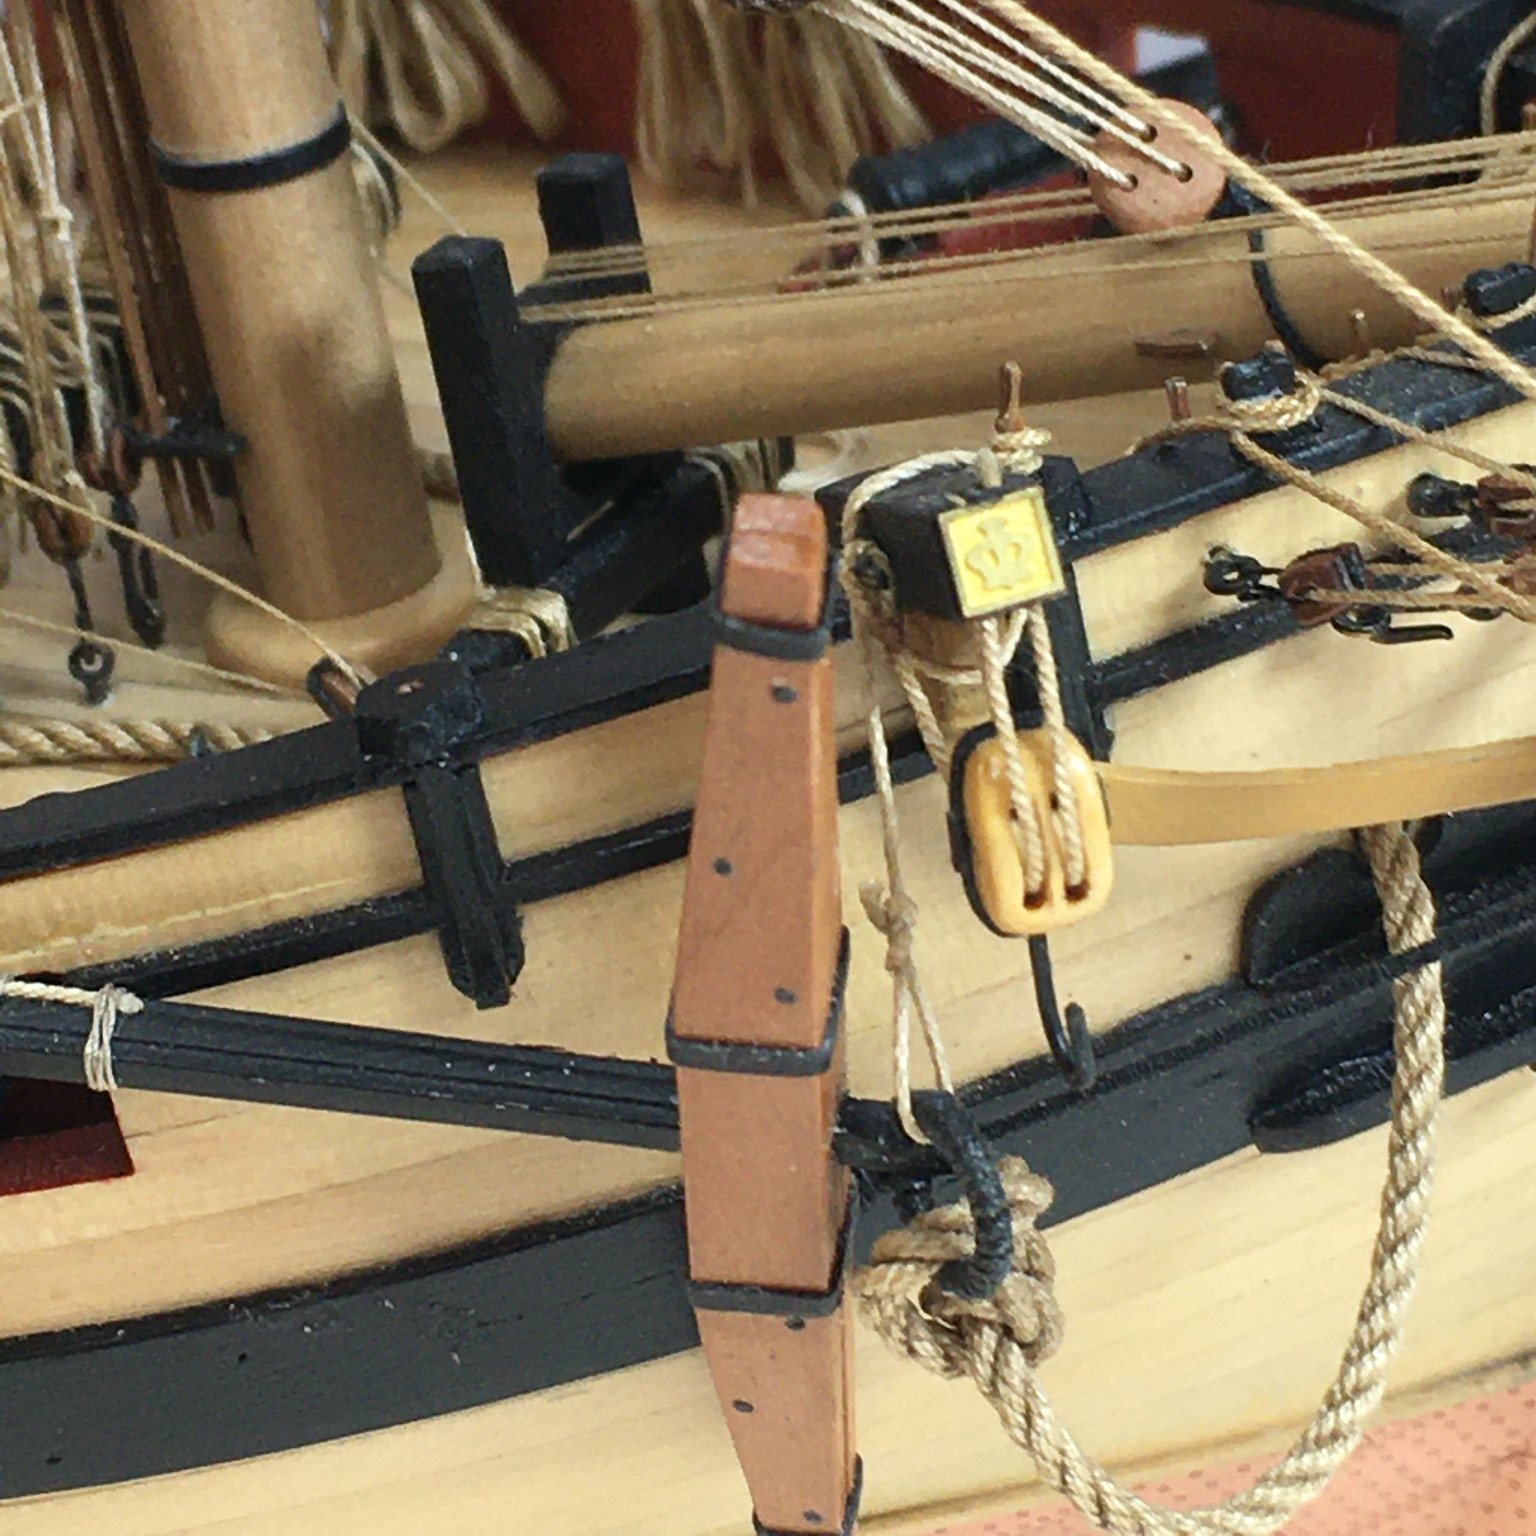
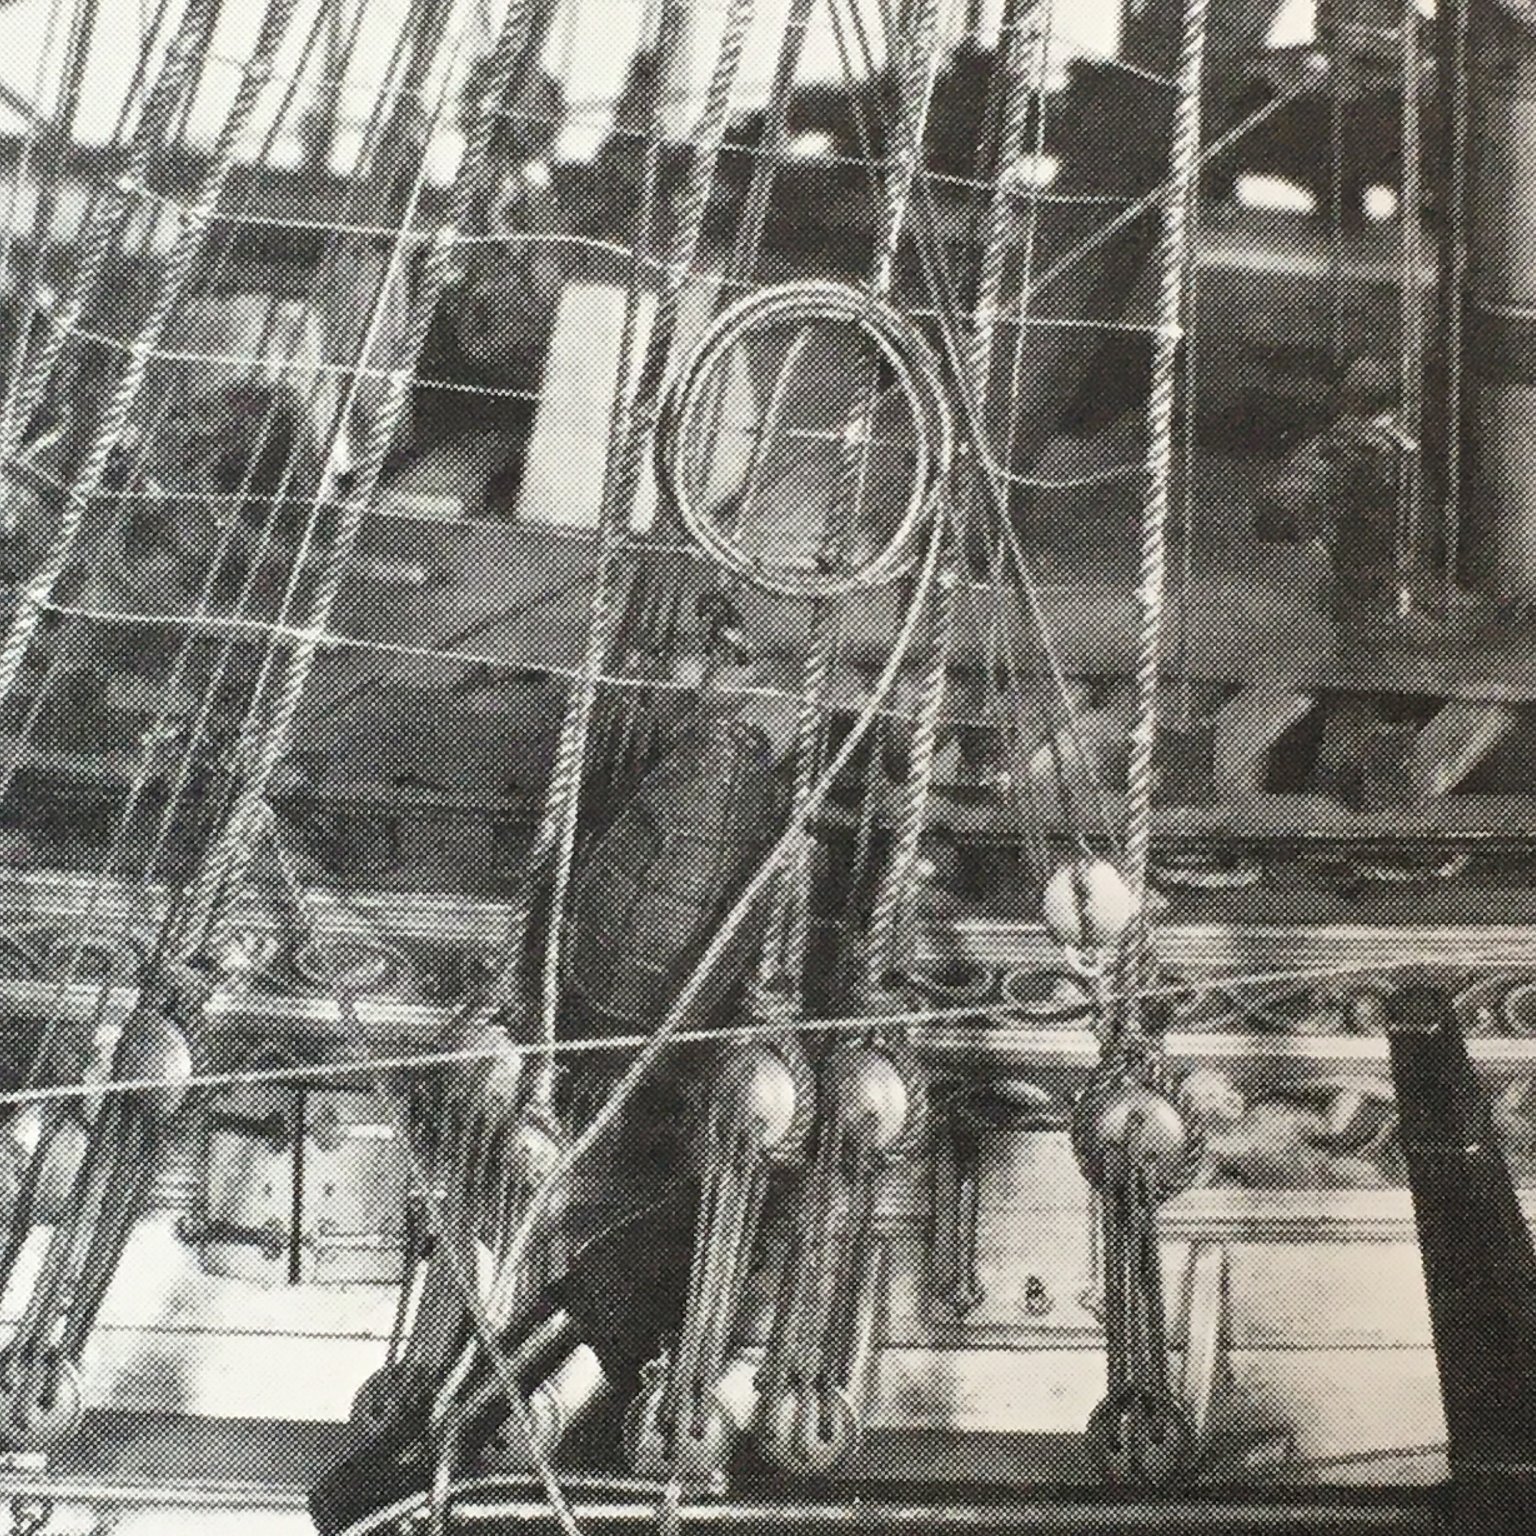
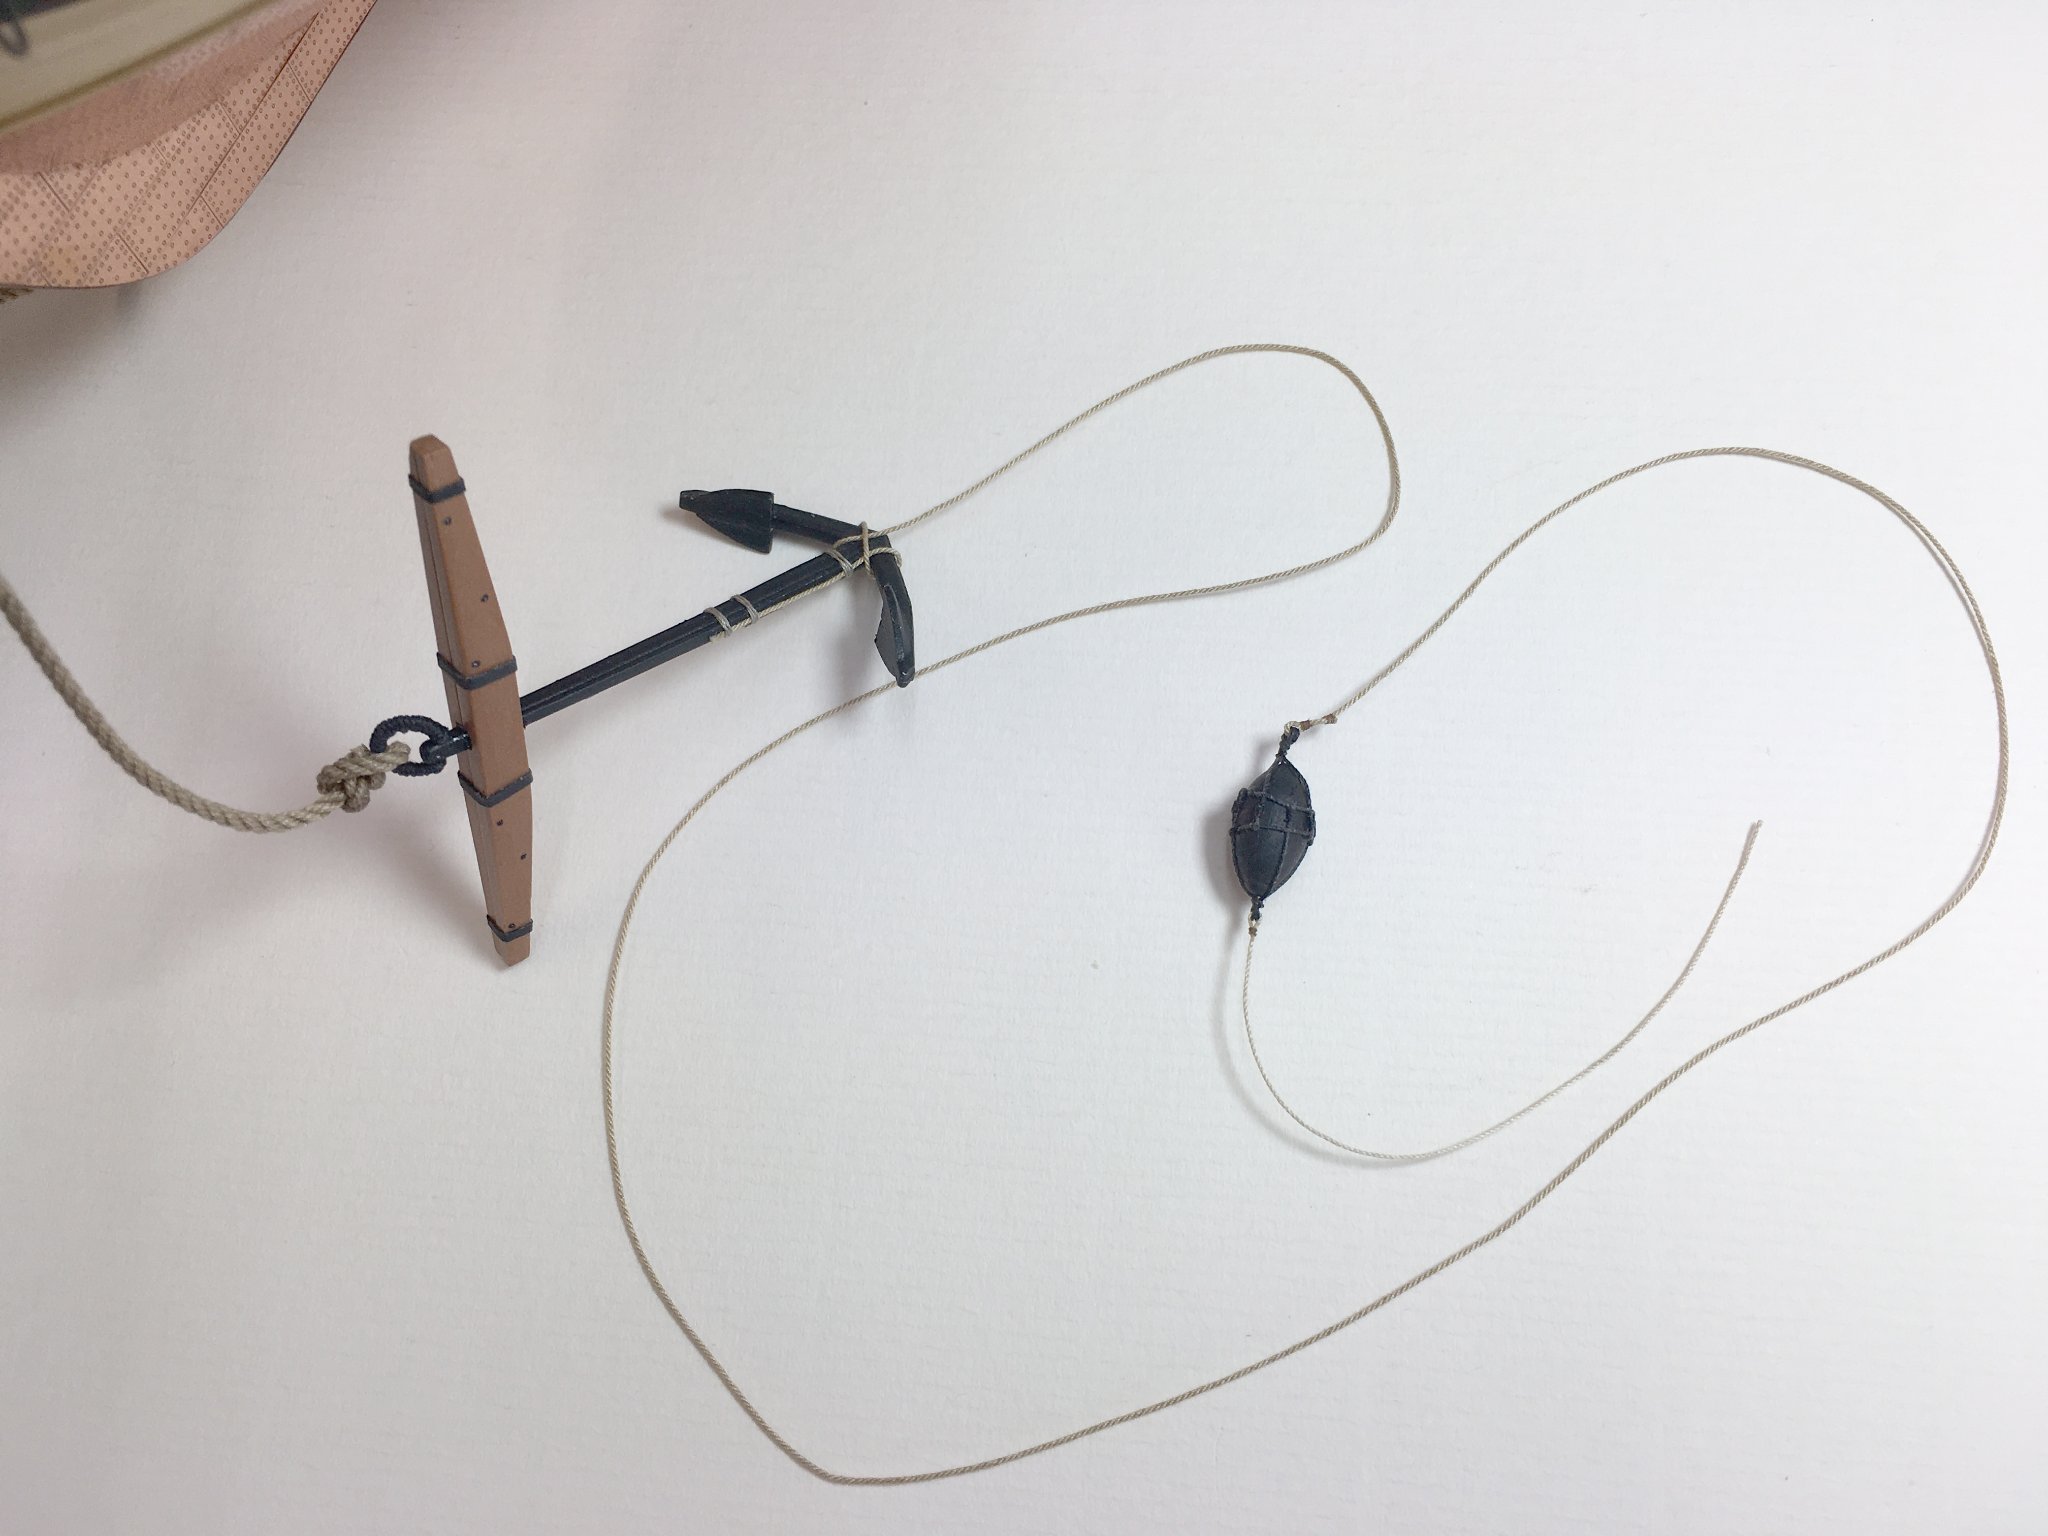
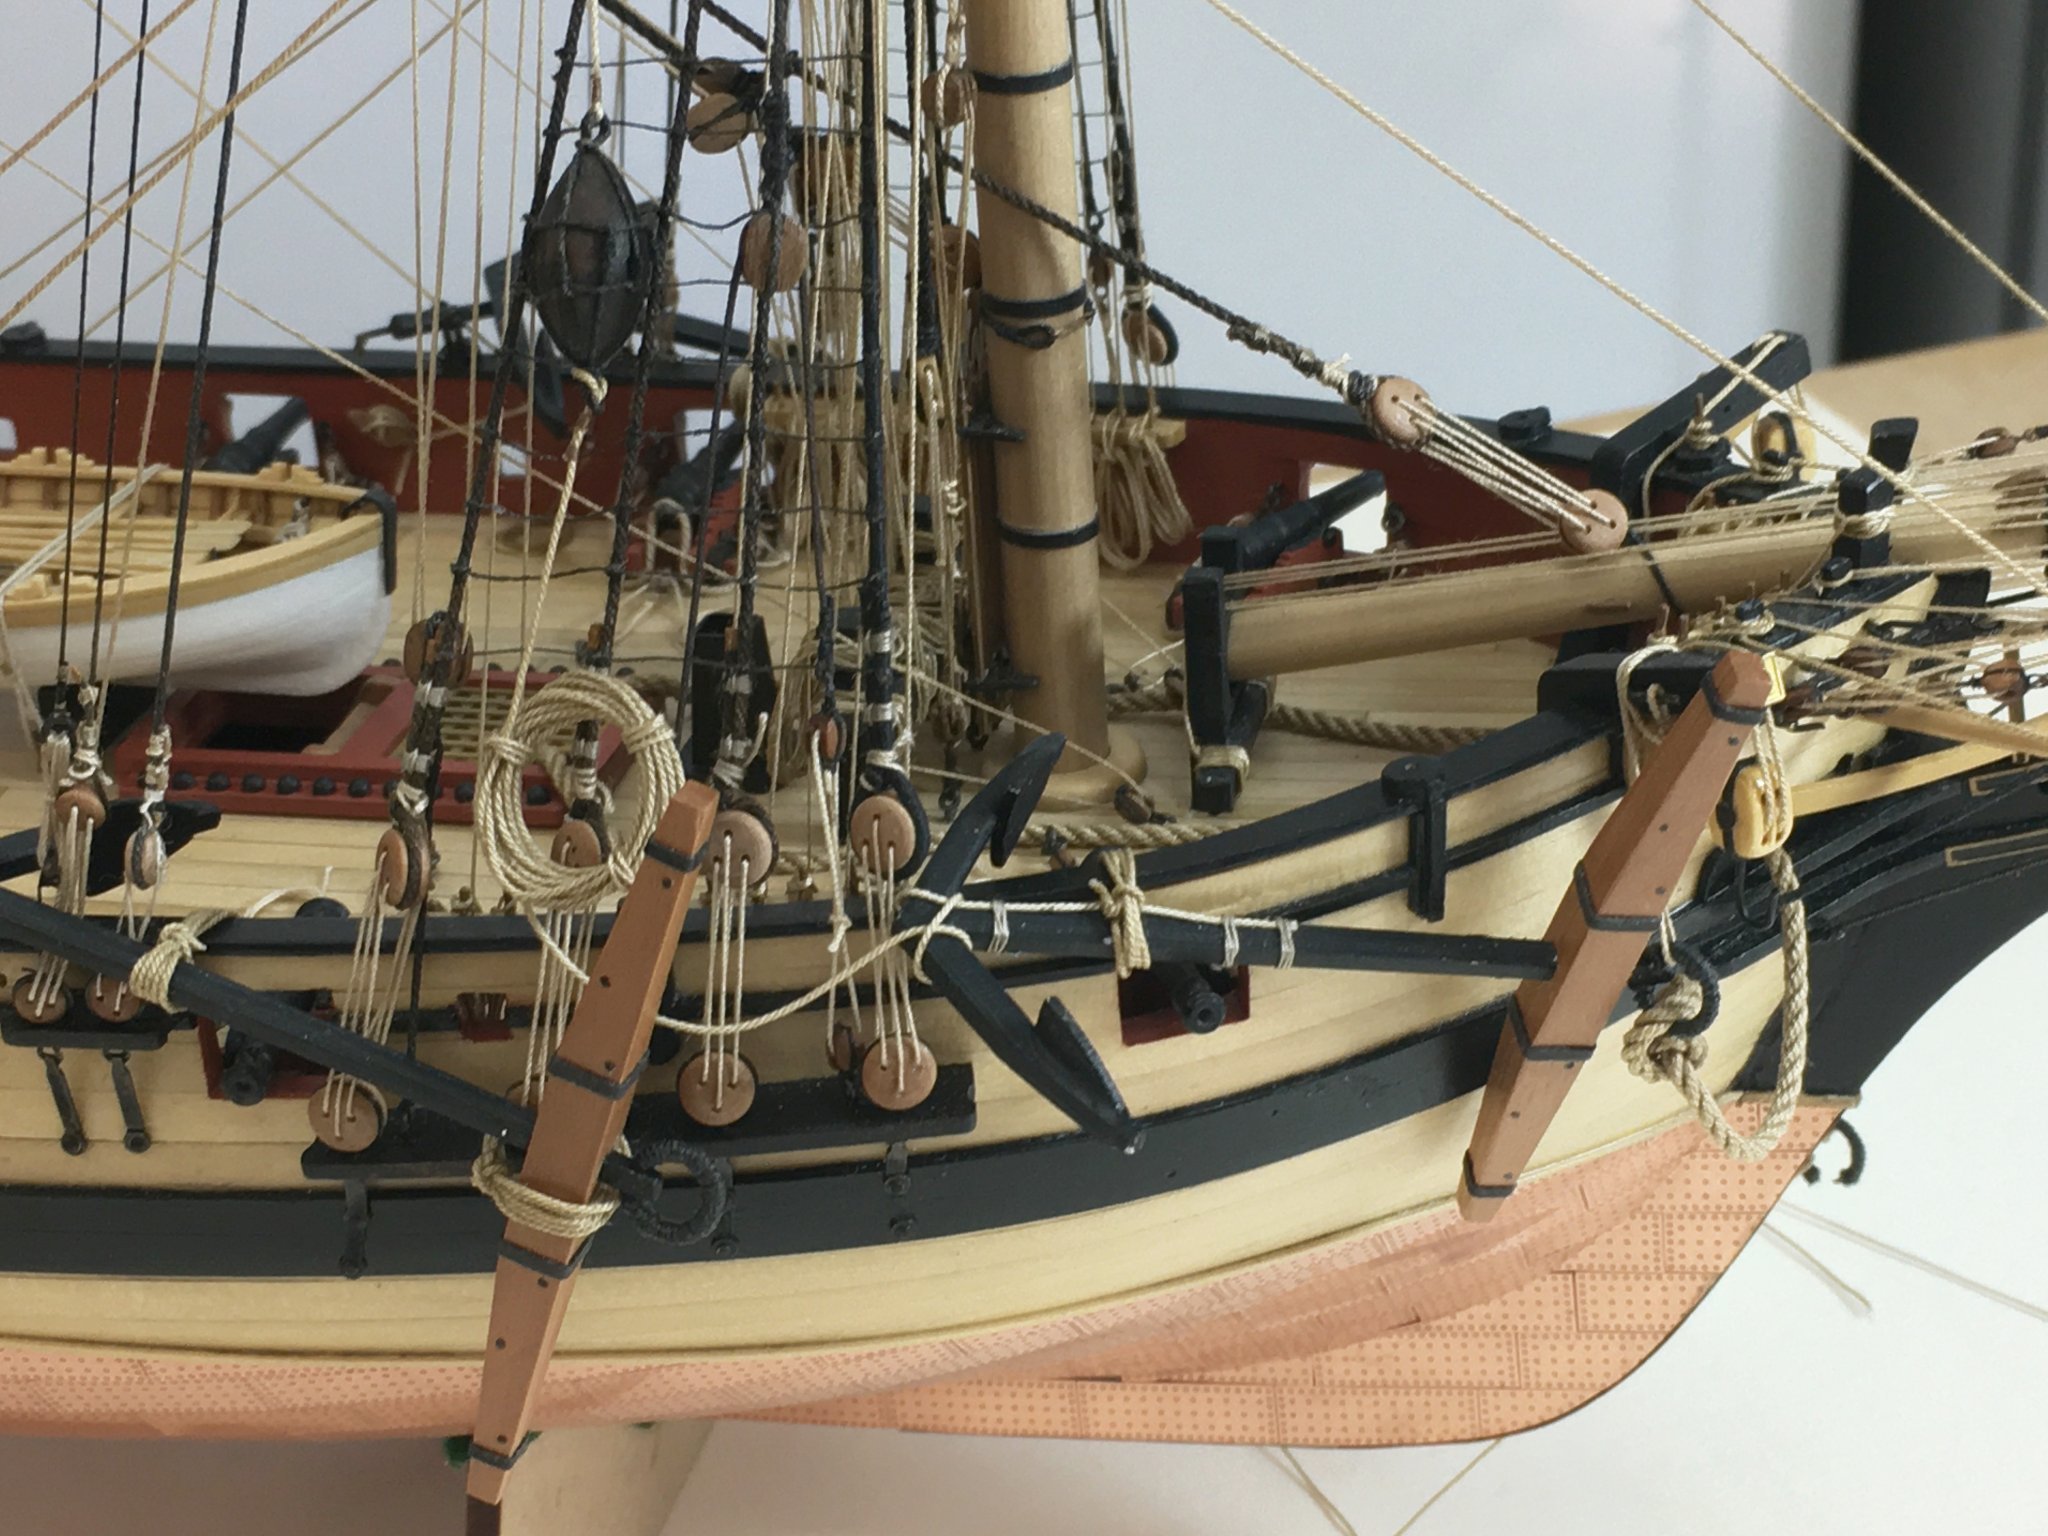
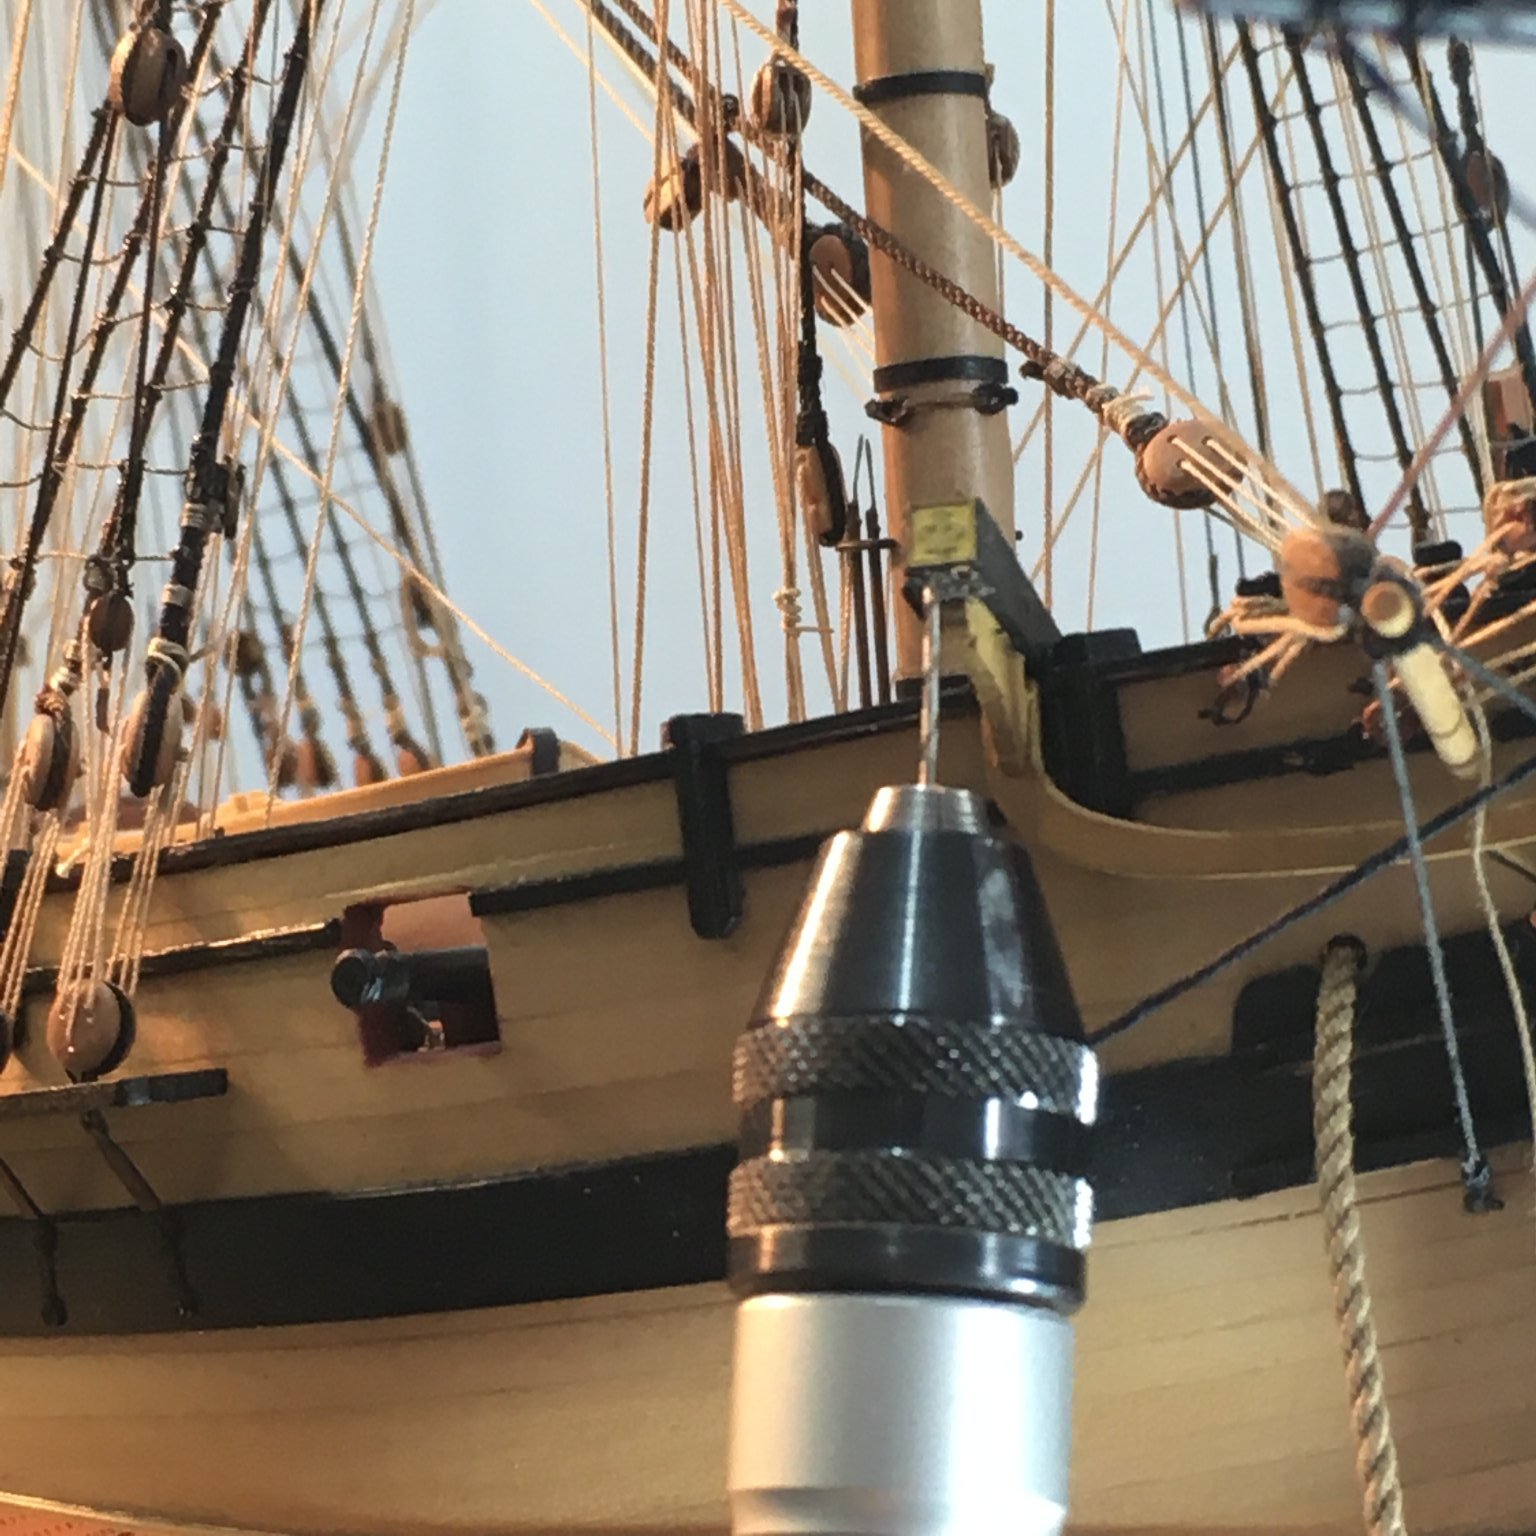
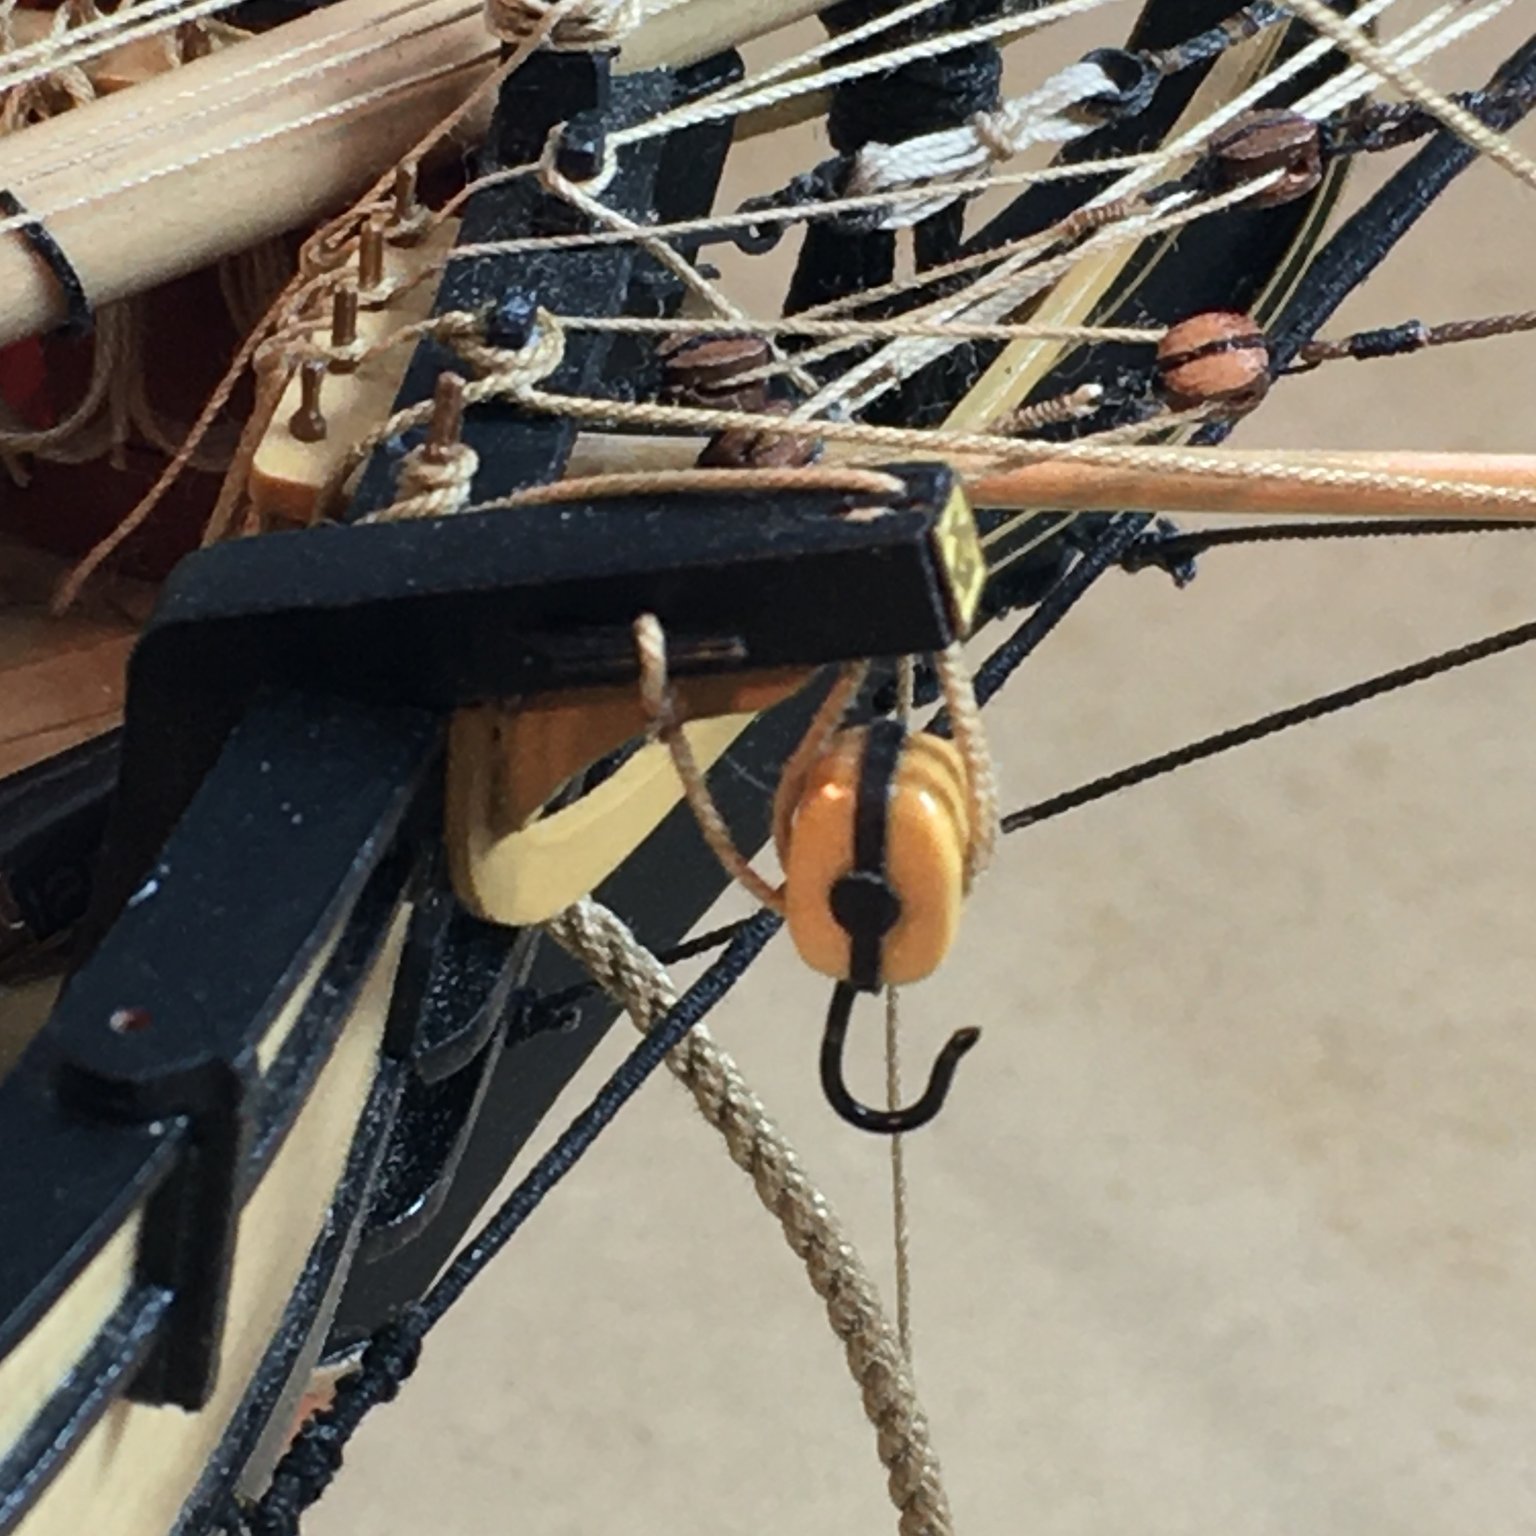
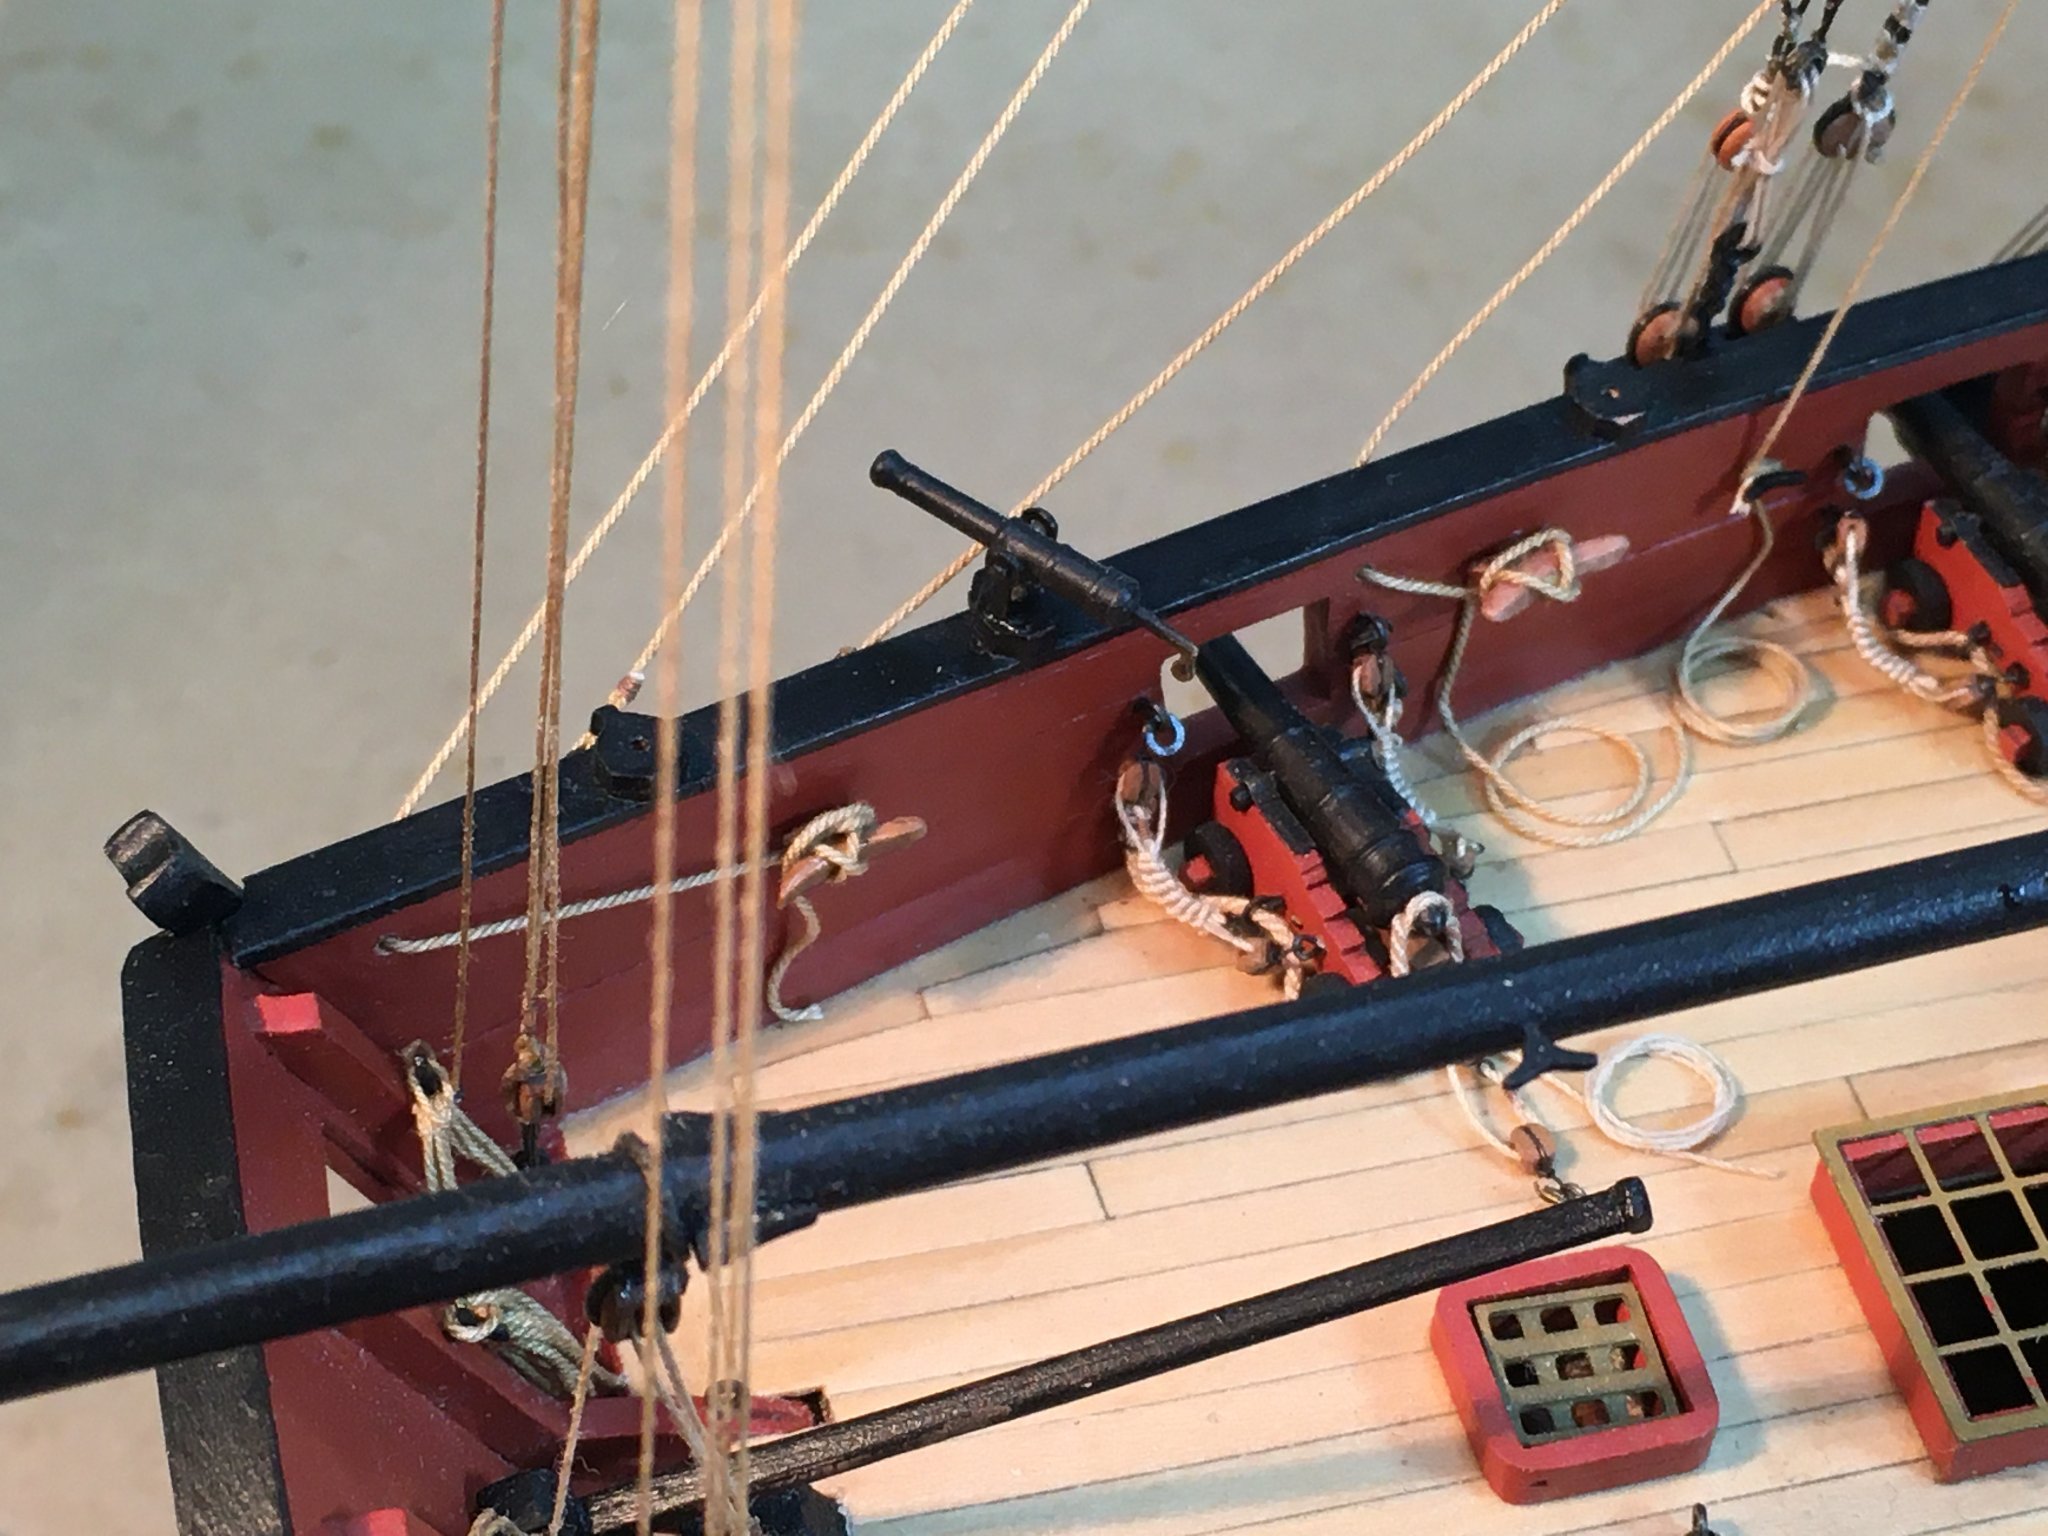
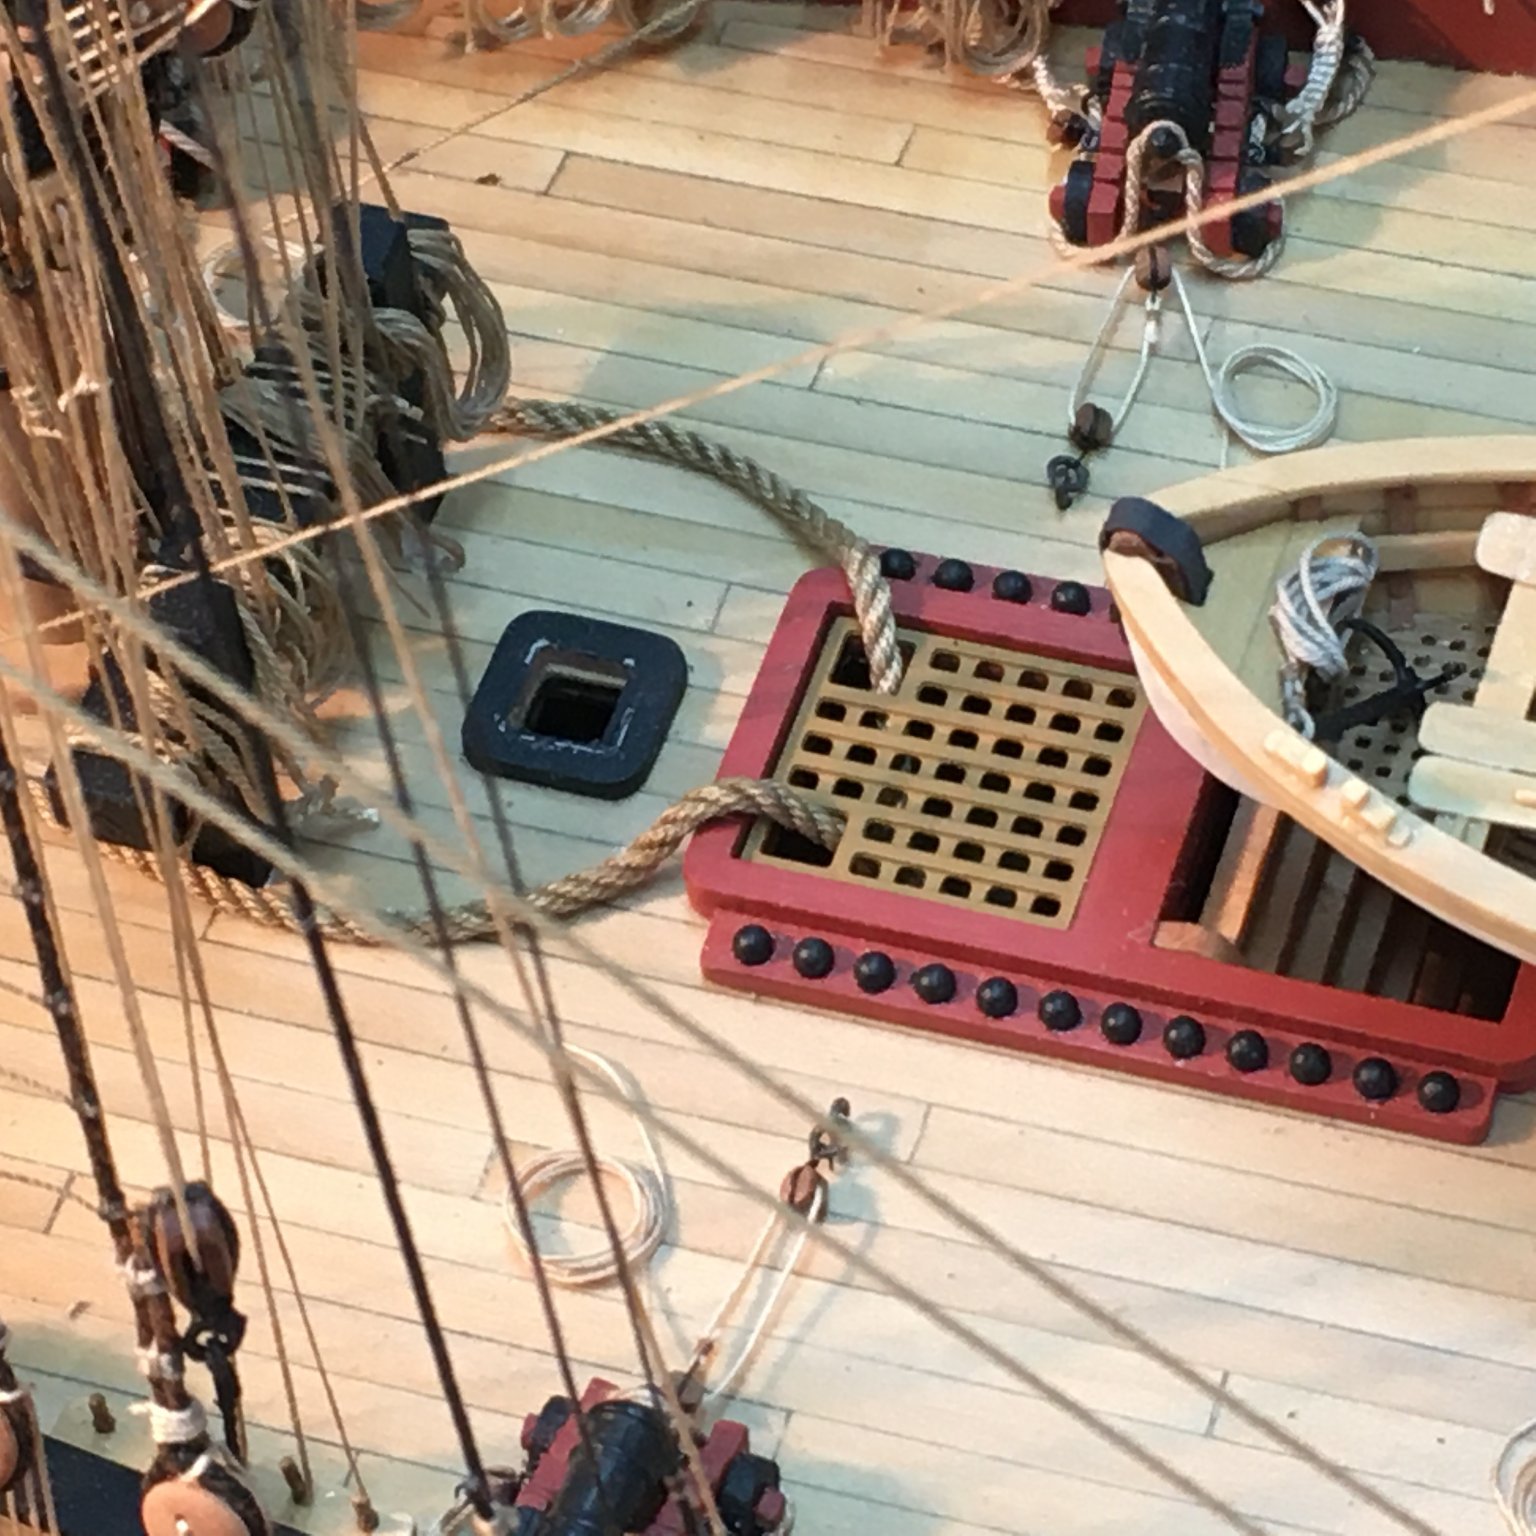
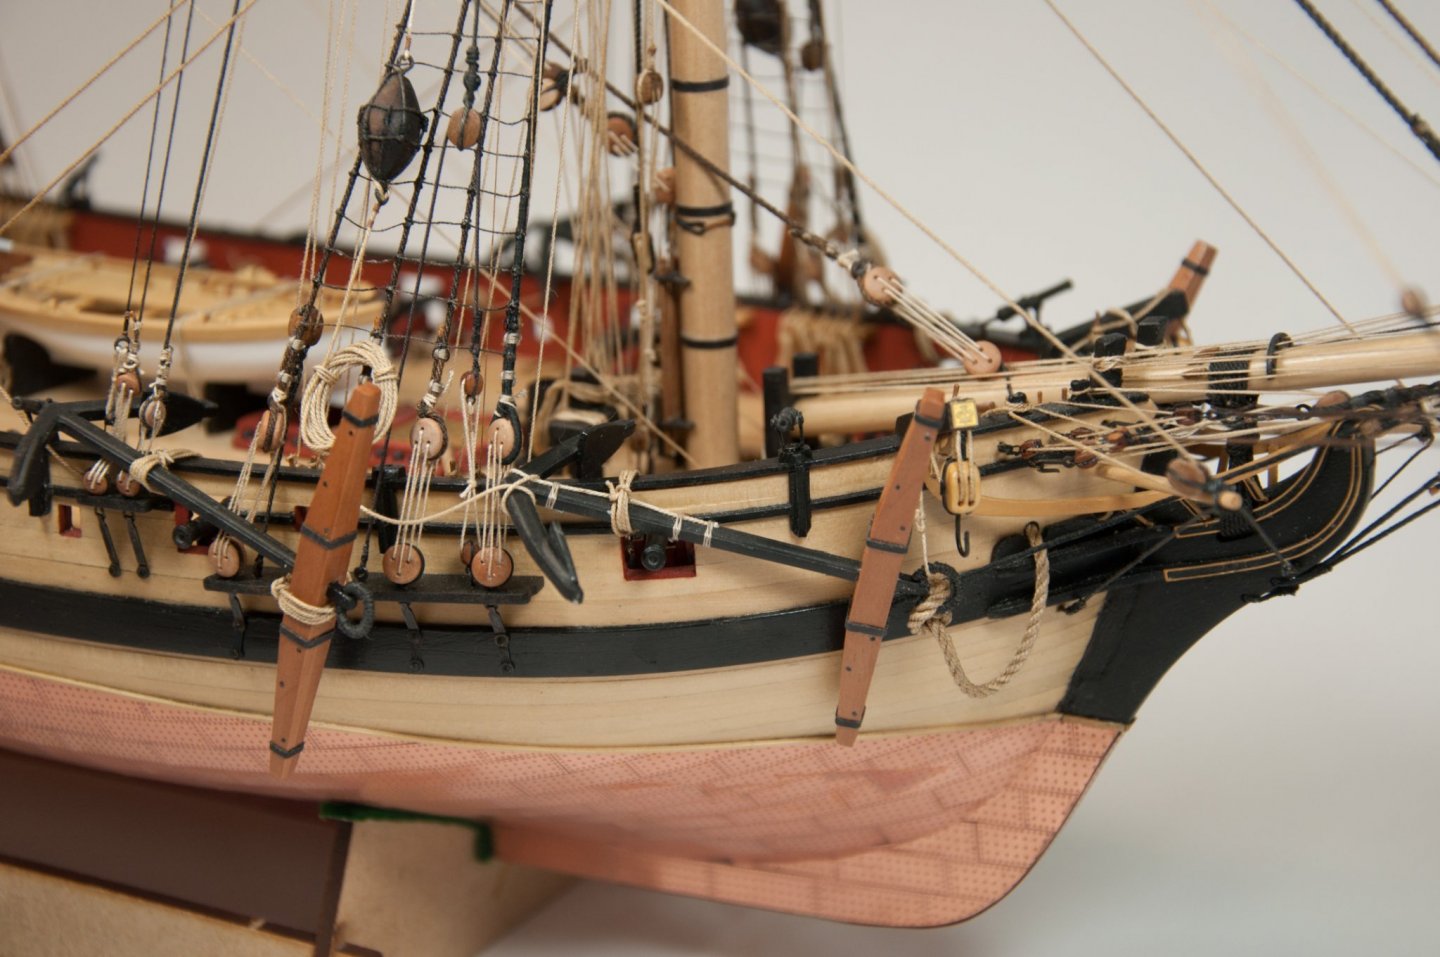
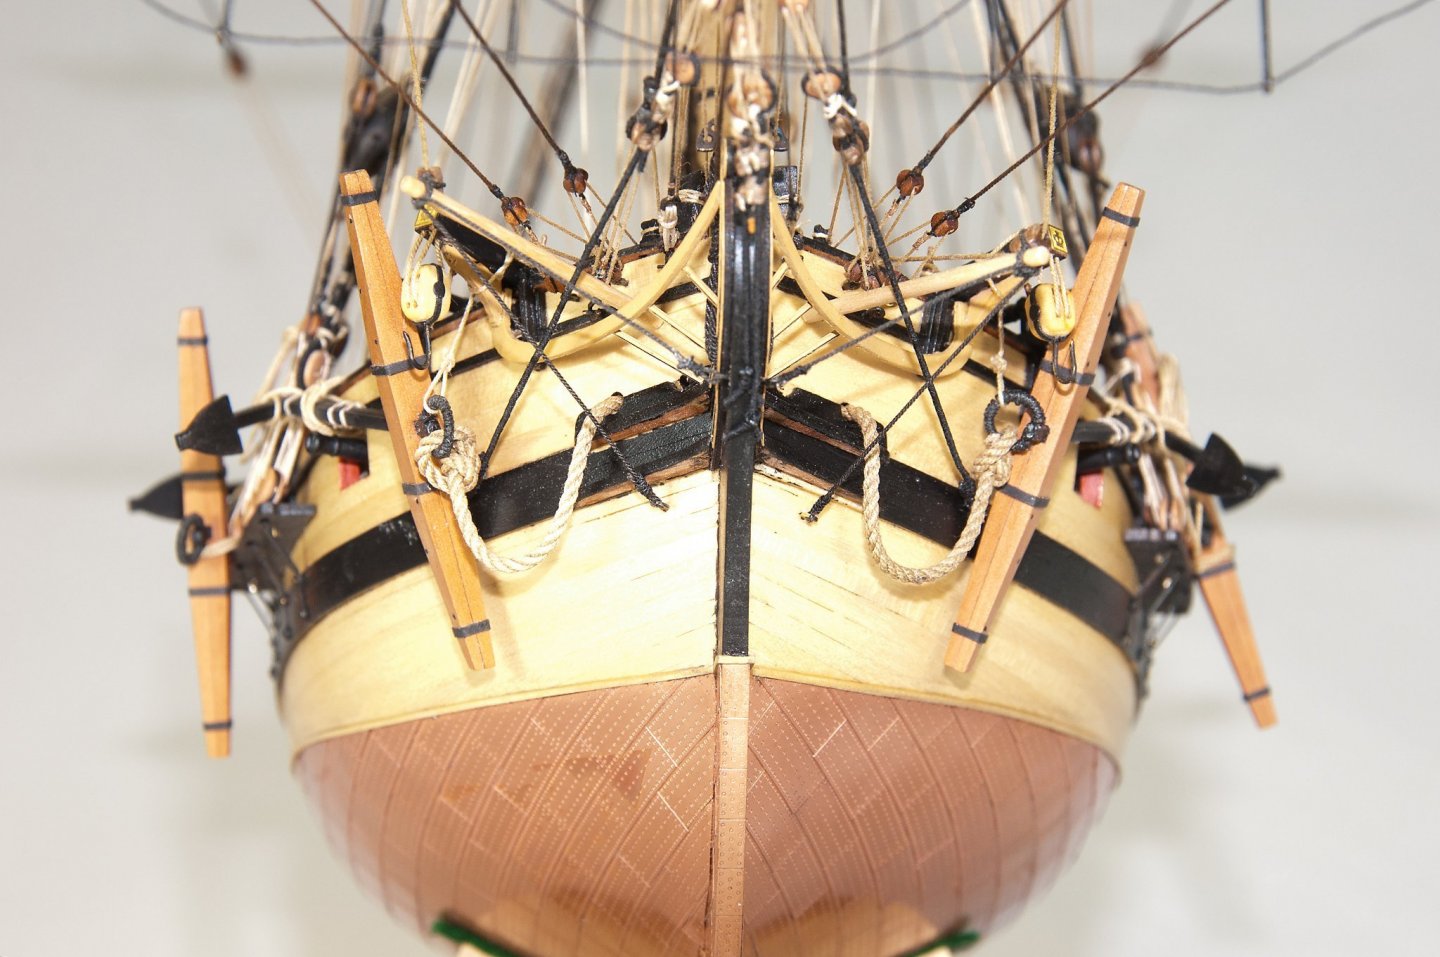
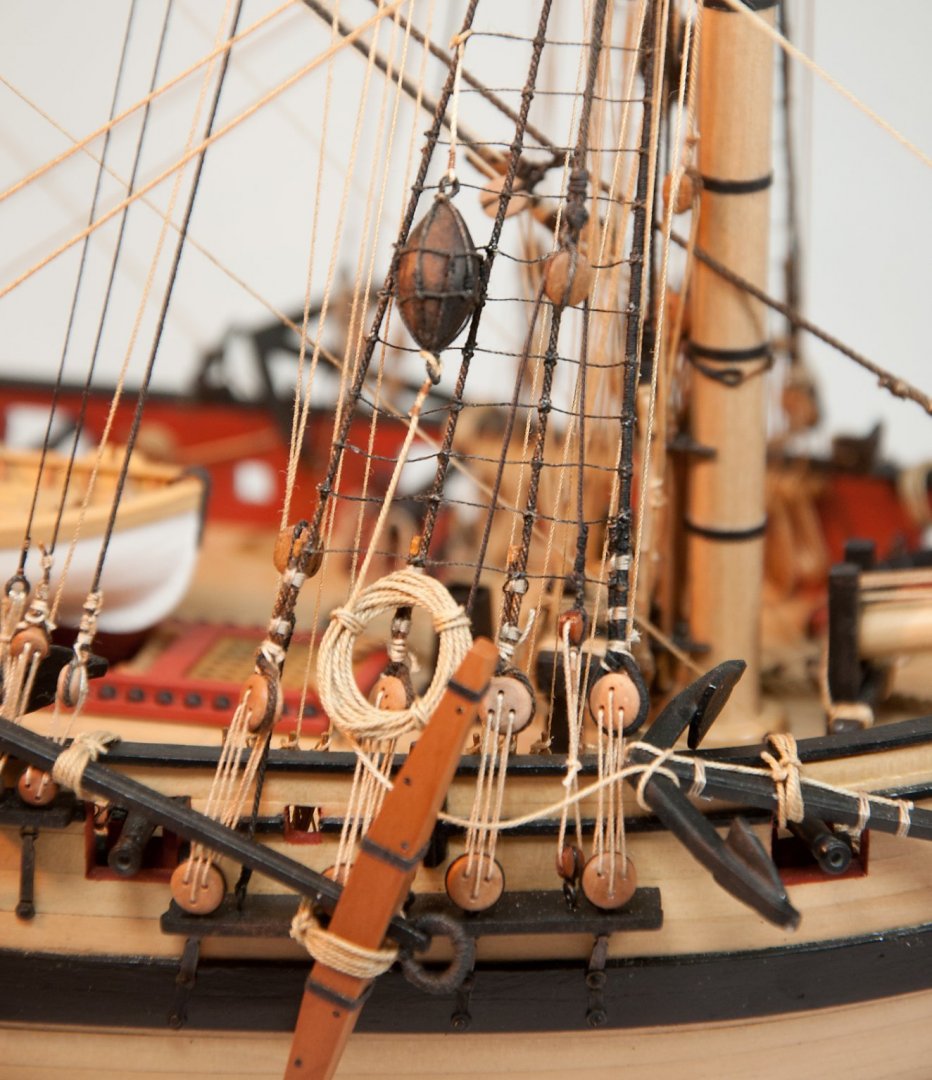
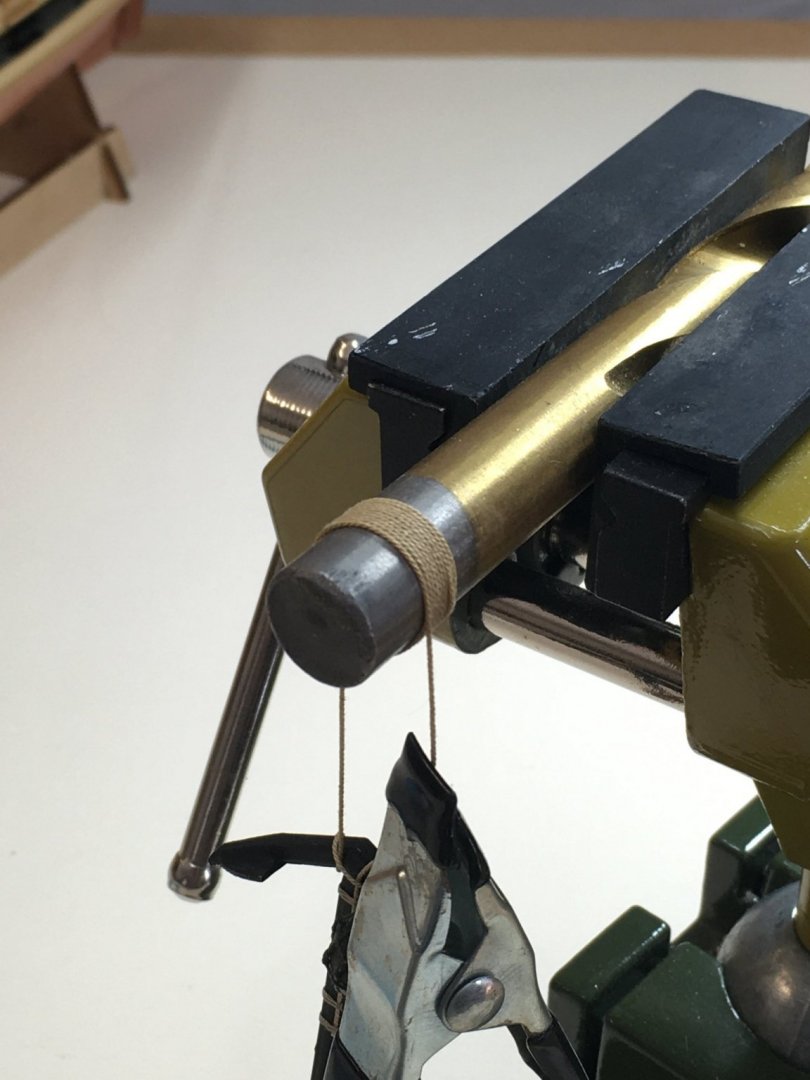
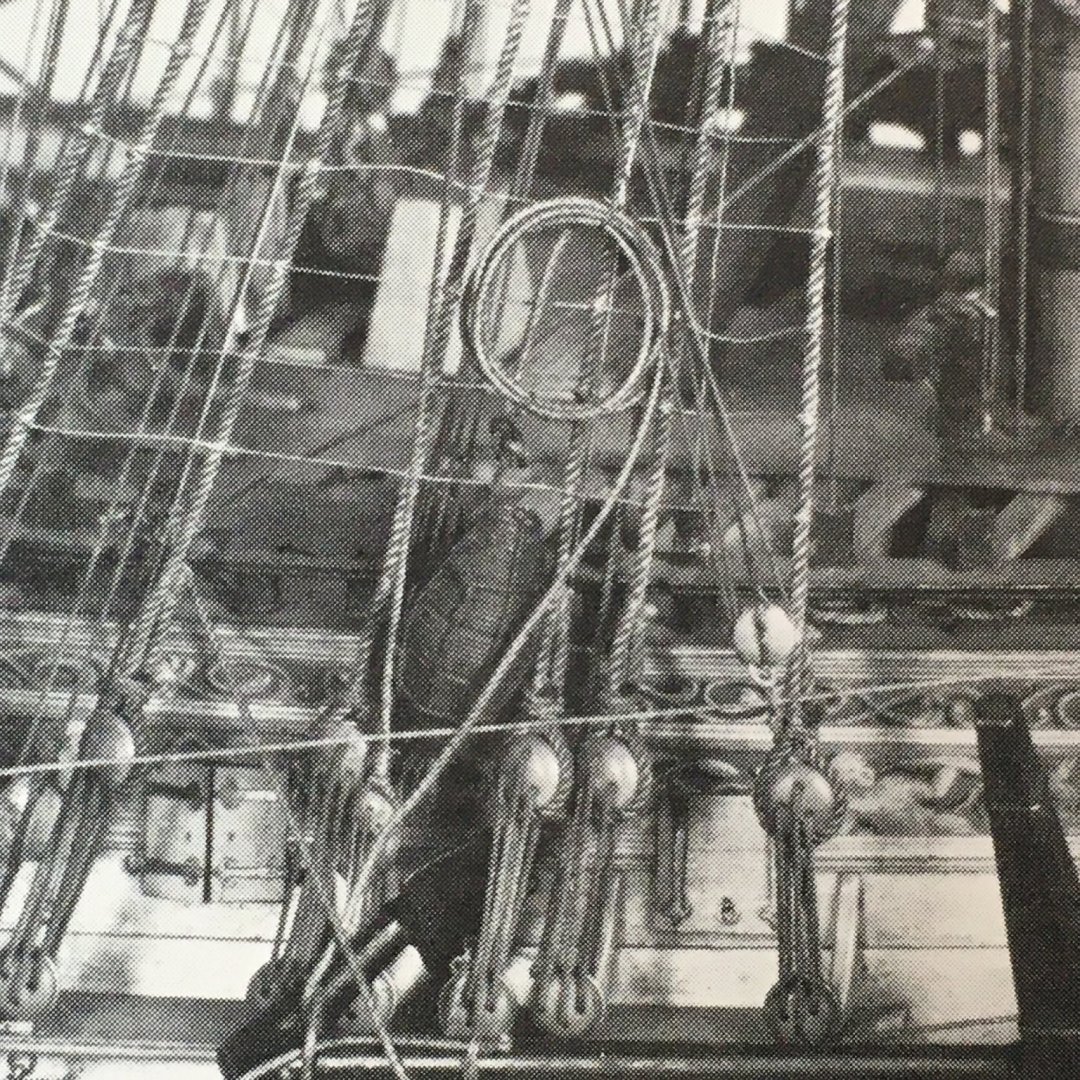
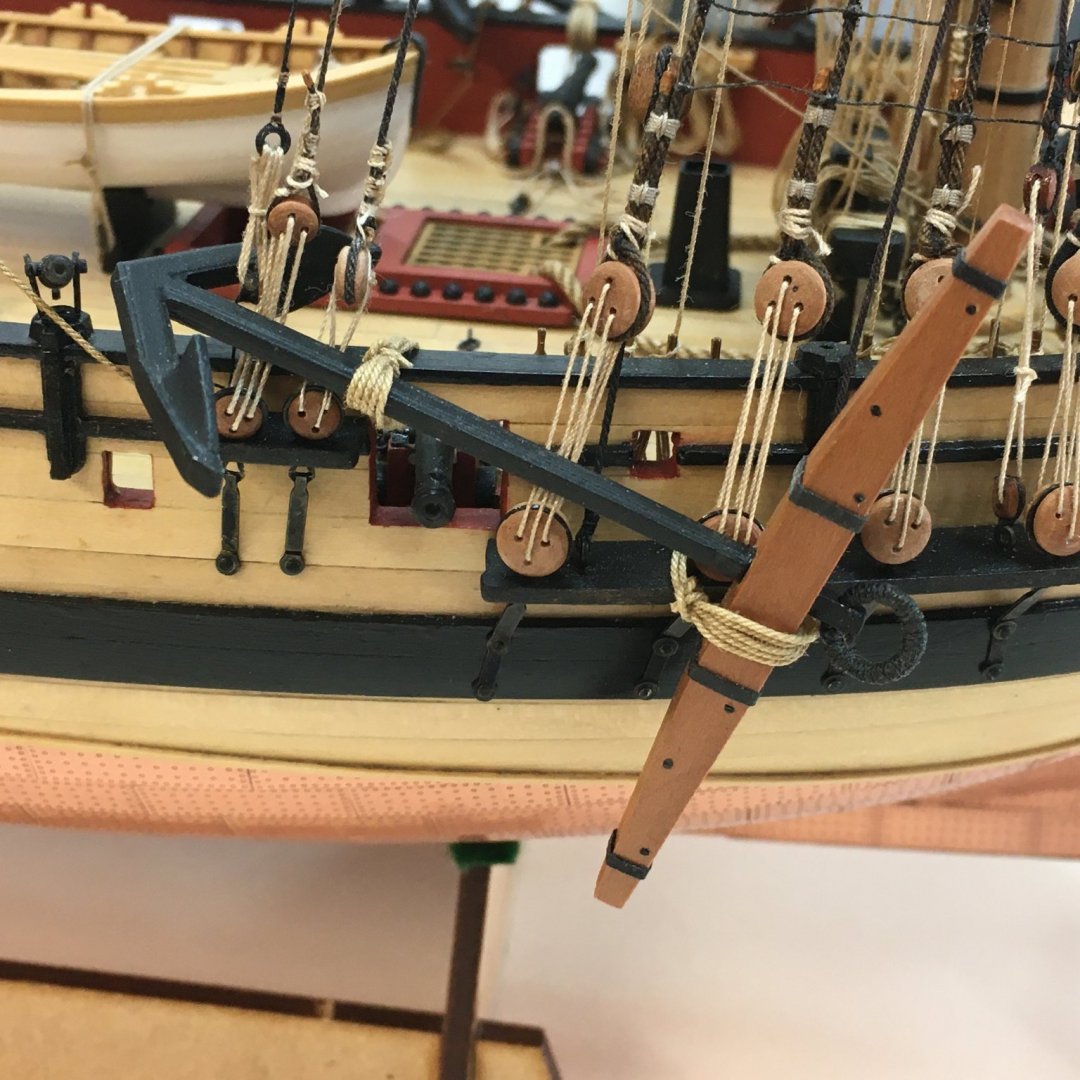
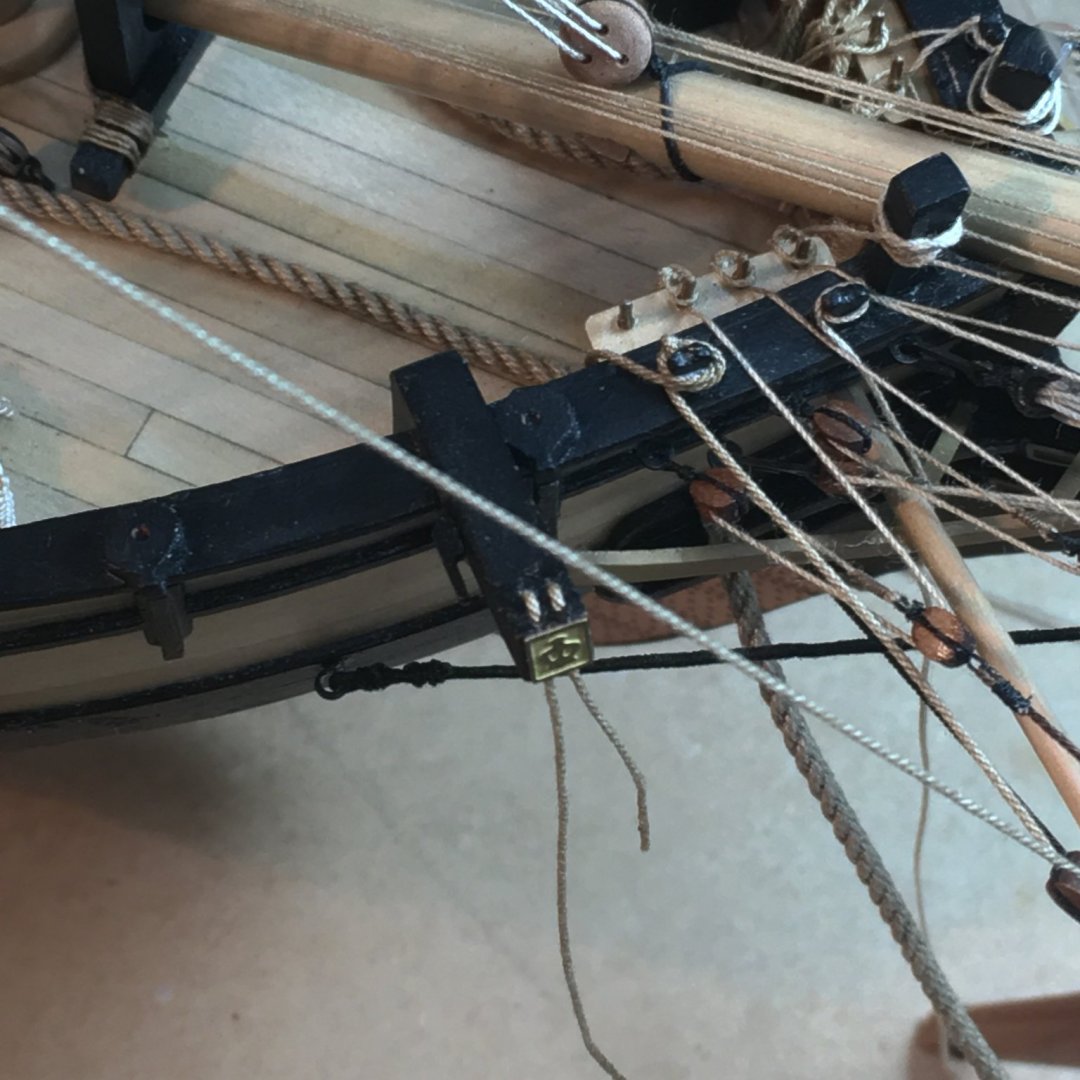
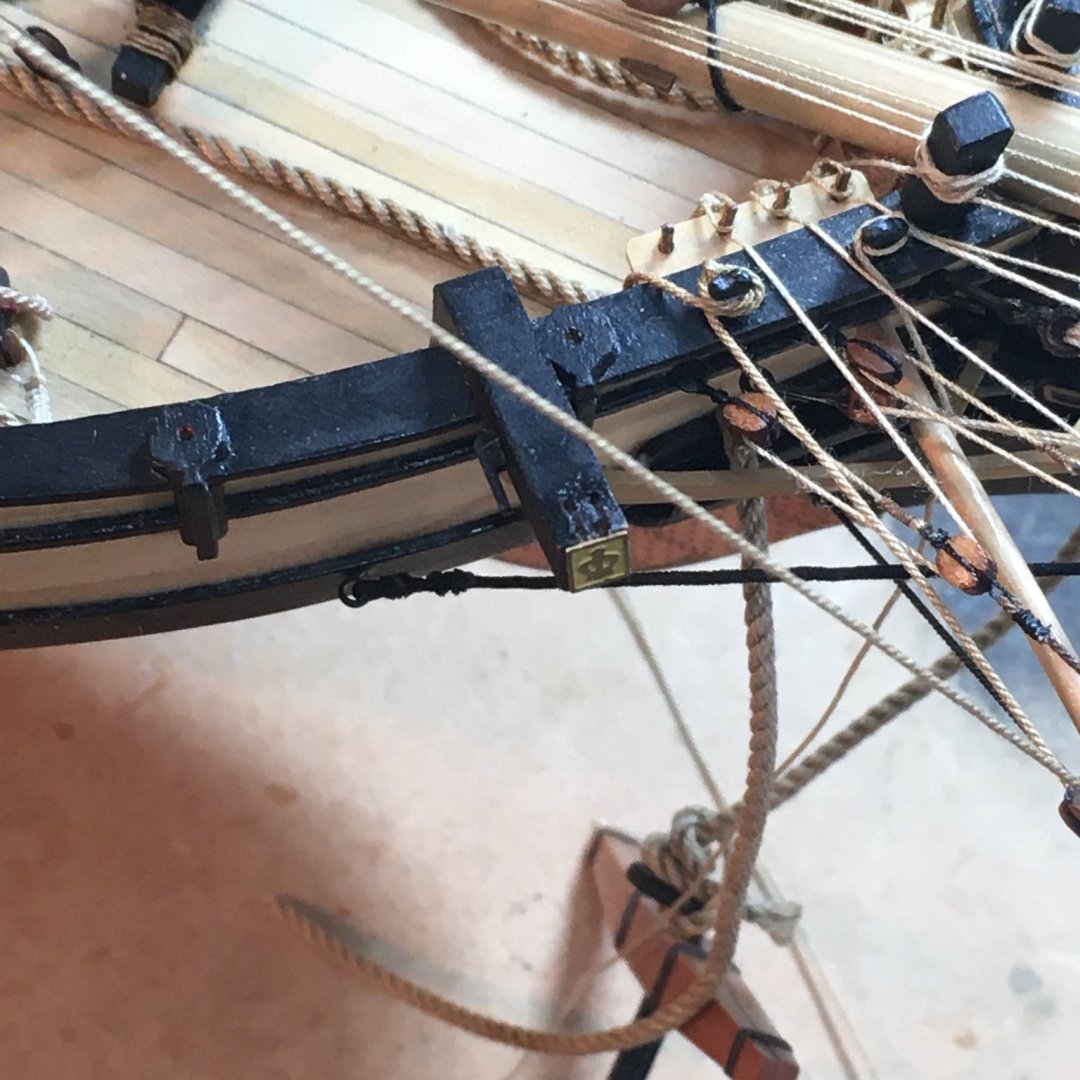
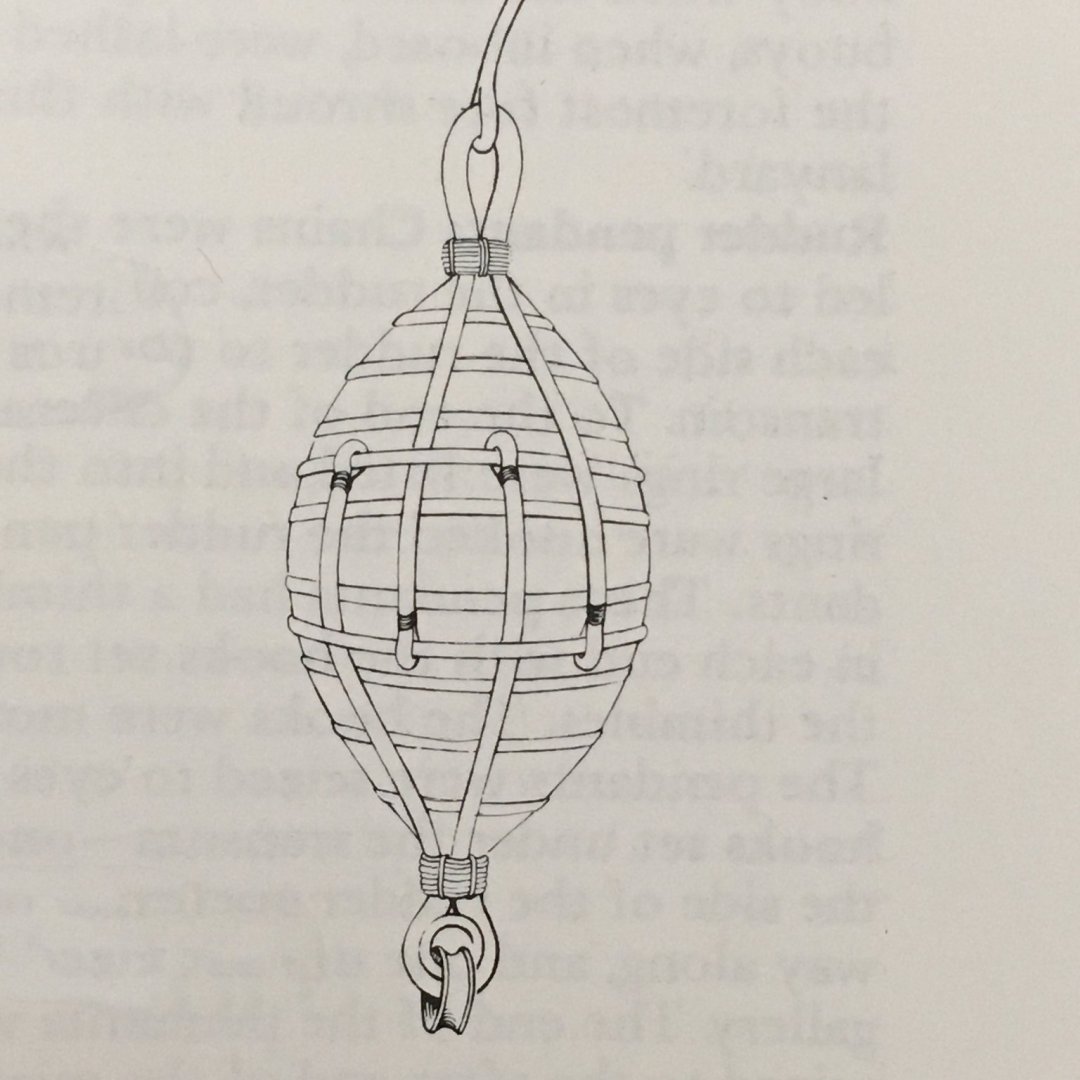
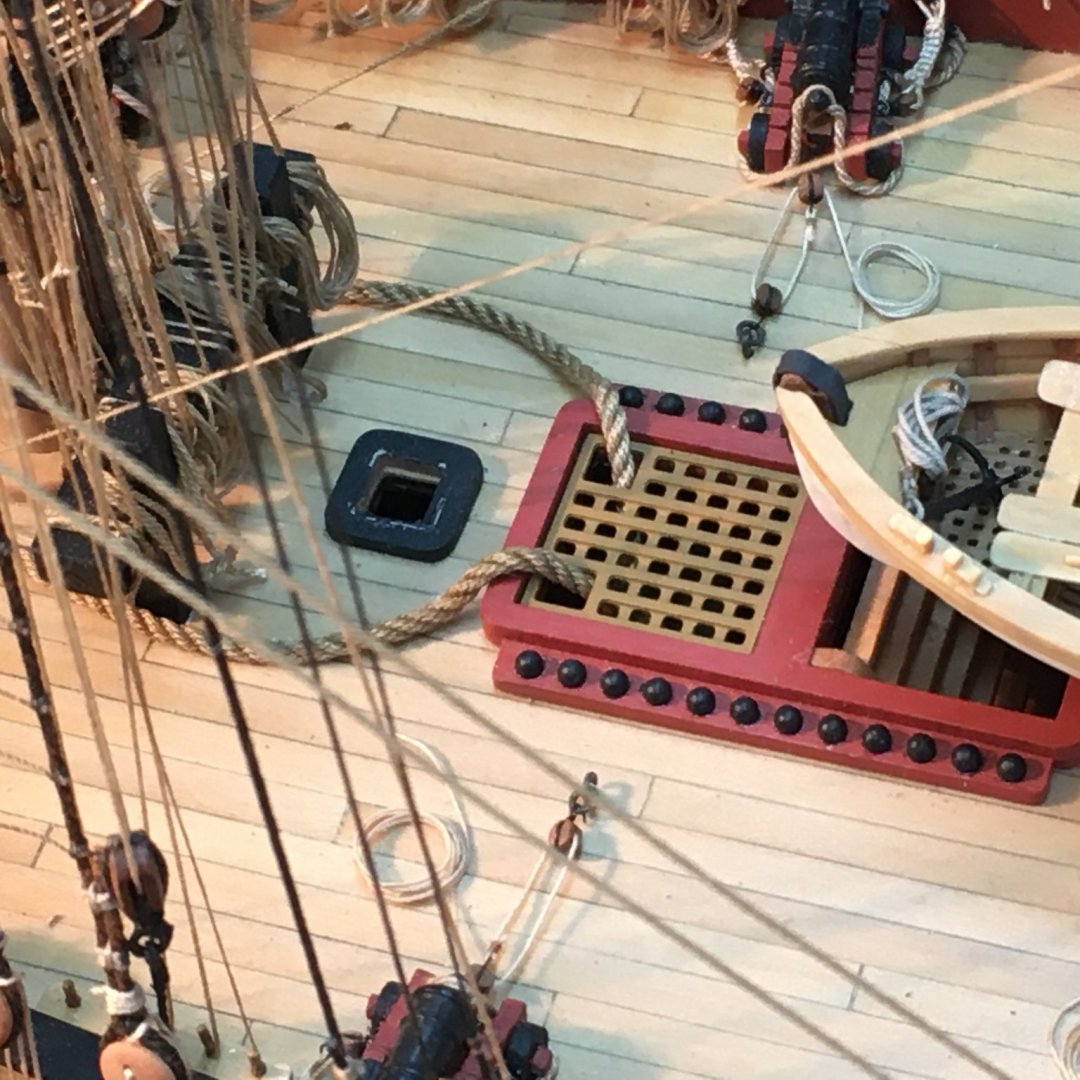
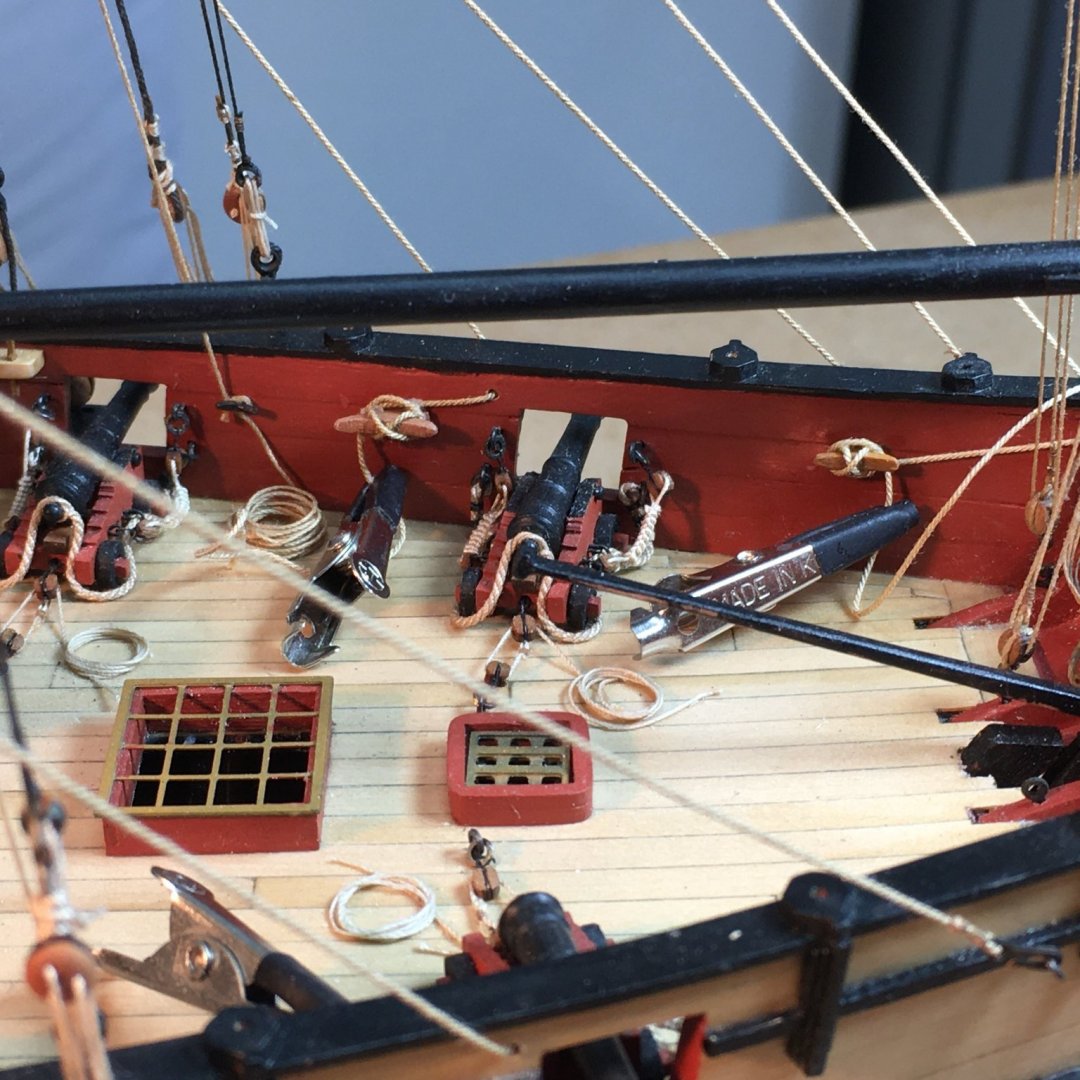
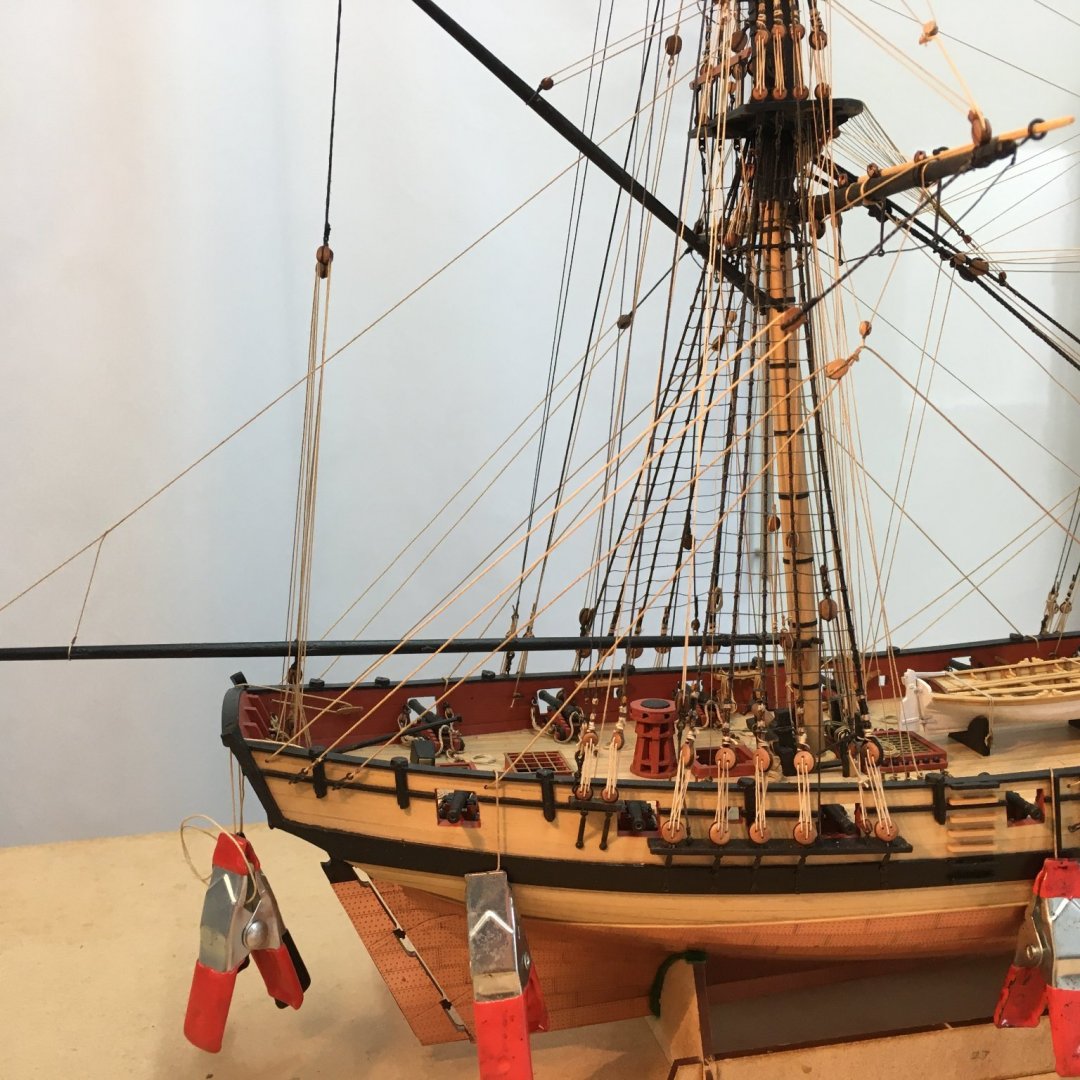
Rigging the Anchors #2 Rigging large equipment like anchors on a small ship must have been a tricky proposition. They must be stowed securely, but without fouling rigging or guns. I found that very difficult on the model and in the end decided secure storage trumped convenient access to the rigging, especially lanyards and deadeyes that would only be adjusted occasionally. So, the lashings for the aftmost anchor (the stream?) on each side went round a deadeye on the fore channels and through a gun port: I used 0.5mm rope for the lashings. I've been reassured to see anchors rigged like this on contemporary models, including the use of gunports. Moving on to the bowers, I used 0.5mm line for the buoy rope and 0.25 for the lanyard used to suspend the buoy from the shrouds. Looking at the anchor in more detail... ...I've improved the simulated bolts (previously just holes pricked with a pointy tool) by using nylon bristles from a hair brush. These were 0.5mm diameter and perfect for the job. I just drilled holes a couple of mil. deep in place of the pinpricks, pushed the bristle in and cut it off flush with the cuticle cutters. The anchor cable is attached to the ring with a double inside bend (I'm sure there's a technical term but I've forgotten it😬!). The buoy rope on Speedy would have been 120', which is 570mm at scale. It attaches to the anchor with a clove hitch round the crown, with the end seized against the shaft as shown. One seizing is near the crown, the other two close together near the end. In full-size practice a knot imaginatively called an anchor buoy knot would have been raised on the rope between these two seizings as extra security against losing the buoy rope - and hence potentially the anchor. I omitted this tiny detail. 120' of rope makes a large coil, which must be stowed with the buoy and near the anchor. I used a 1/2" drill bit to form coils that would have been 32"/812mm at full size, which felt about right: After painting the coil with matt acrylic varnish and leaving it to dry, I removed it from the bit and 'smooshed' it - Glenn's word (@glbarlow)! - into a more realistic shape. I'm still waiting for the Liquitex product that Tom (@TBlack) recommended but I got impatient and the varnish seems to work OK without discolouring the rope. The last job was to tie some small stuff in a couple or three places round the coil to hold it in shape. As for stowing the buoy and rope, I've always thought it impractical the way most models show the buoy half way up the fore shrouds. I found a picture of a model of a 70 gun ship in the NMM that shows a more sensible and more readily accessible arrangement: However, I tried and failed to replicate this arrangement on Speedy. What might have worked on a larger vessel wasn't possible on Speedy. I suspect this might mirror the difficulties sailors would have faced in Cochrane's time, where the sheer amount of tackle that had to be crammed into a limited space - and operated in all conditions - would inevitably have led to less-than-ideal arrangements like buoys half way up shrouds. Anyway, that's my excuse and I'm sticking to it. Here's the result: Here, the bower is lashed through a gunport again. The stock end is secured via a line attached to the ring with a bowline, which is then tied off round the cathead: I'm definitely on the home straight now, with just a few odd jobs to do - last swivels to fit, base to build and final tarting up. My next post will be my last main entry, with final photos and a summary of my overall impressions of the model. Derek


- 725 replies
-
- 13
-
-
- vanguard models
- speedy
- (and 1 more)
-
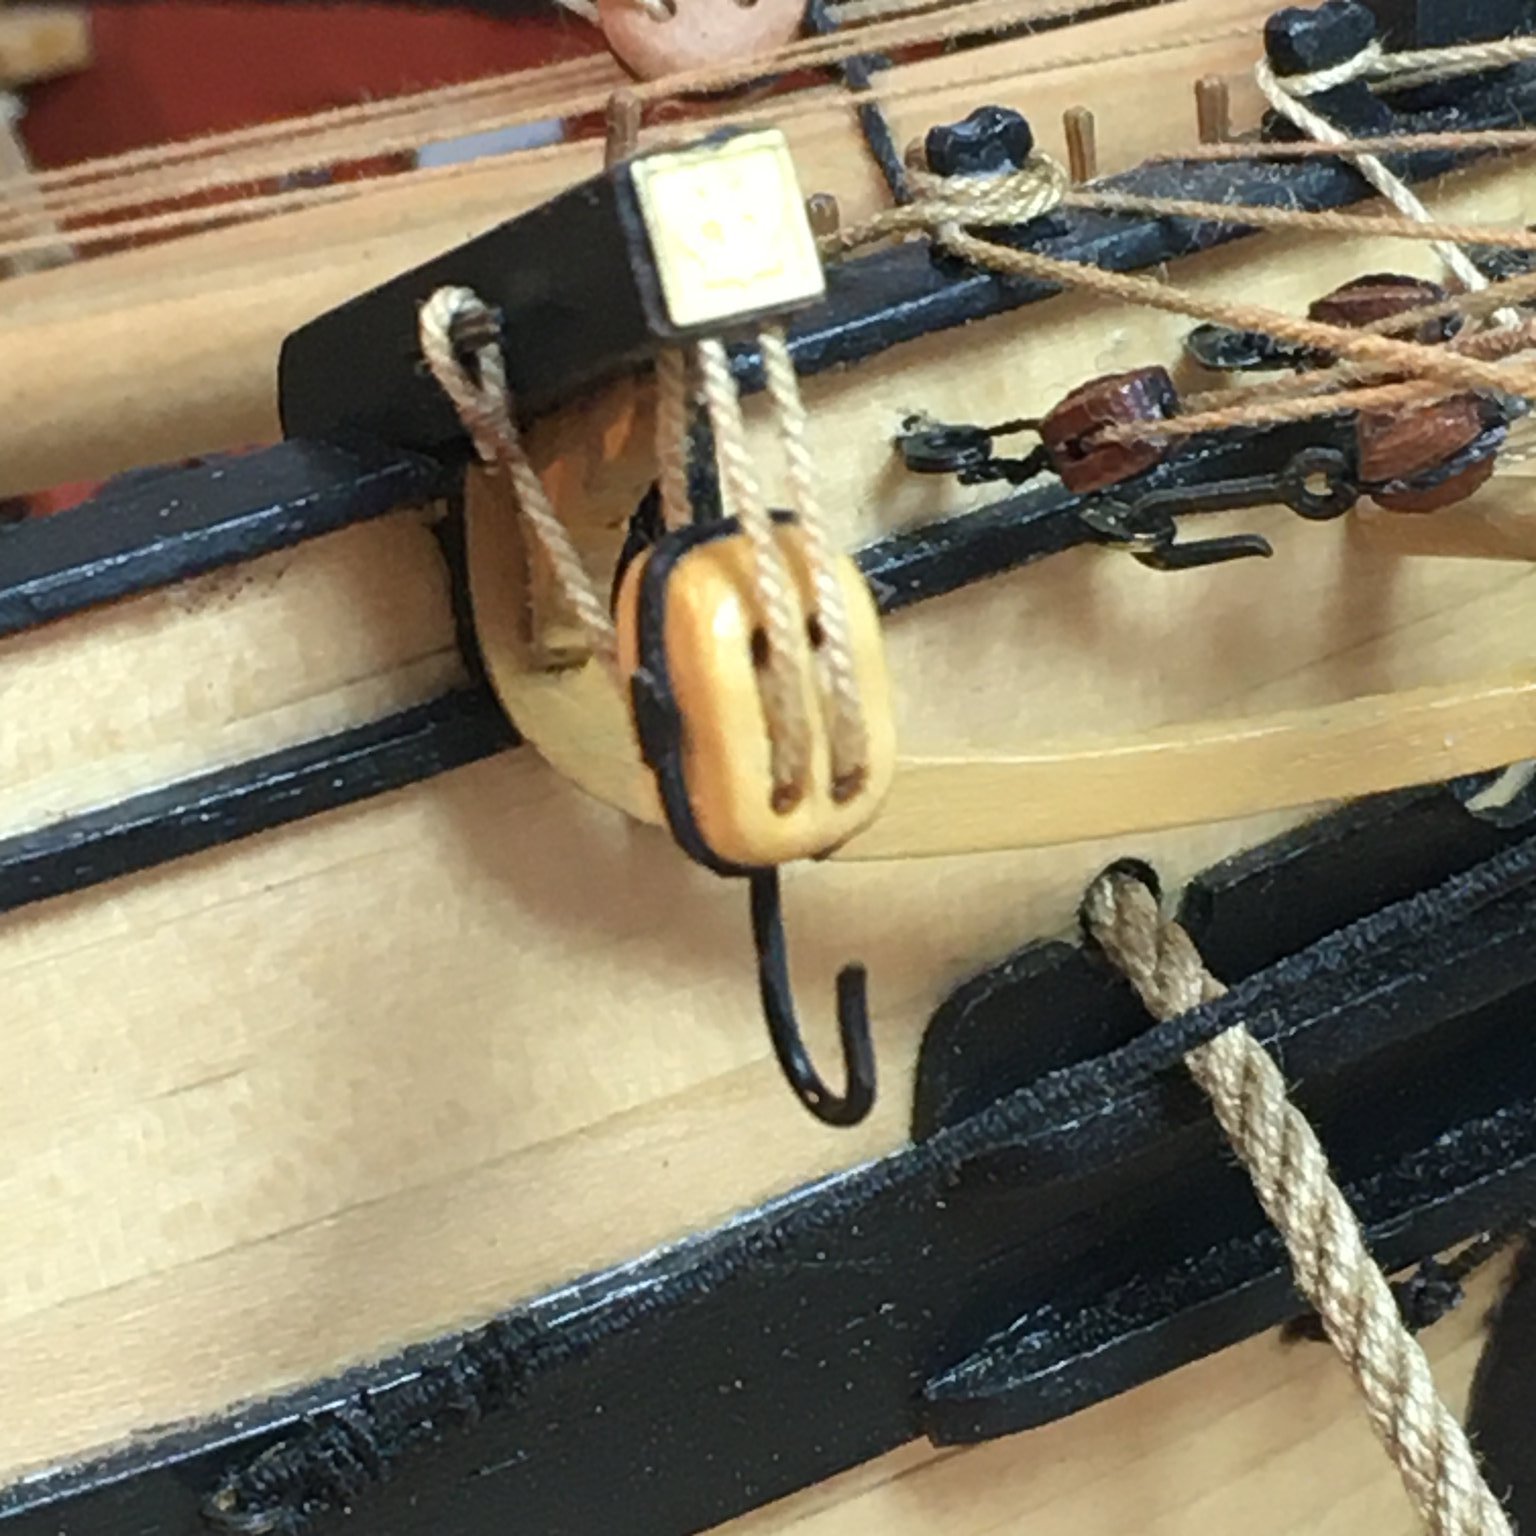
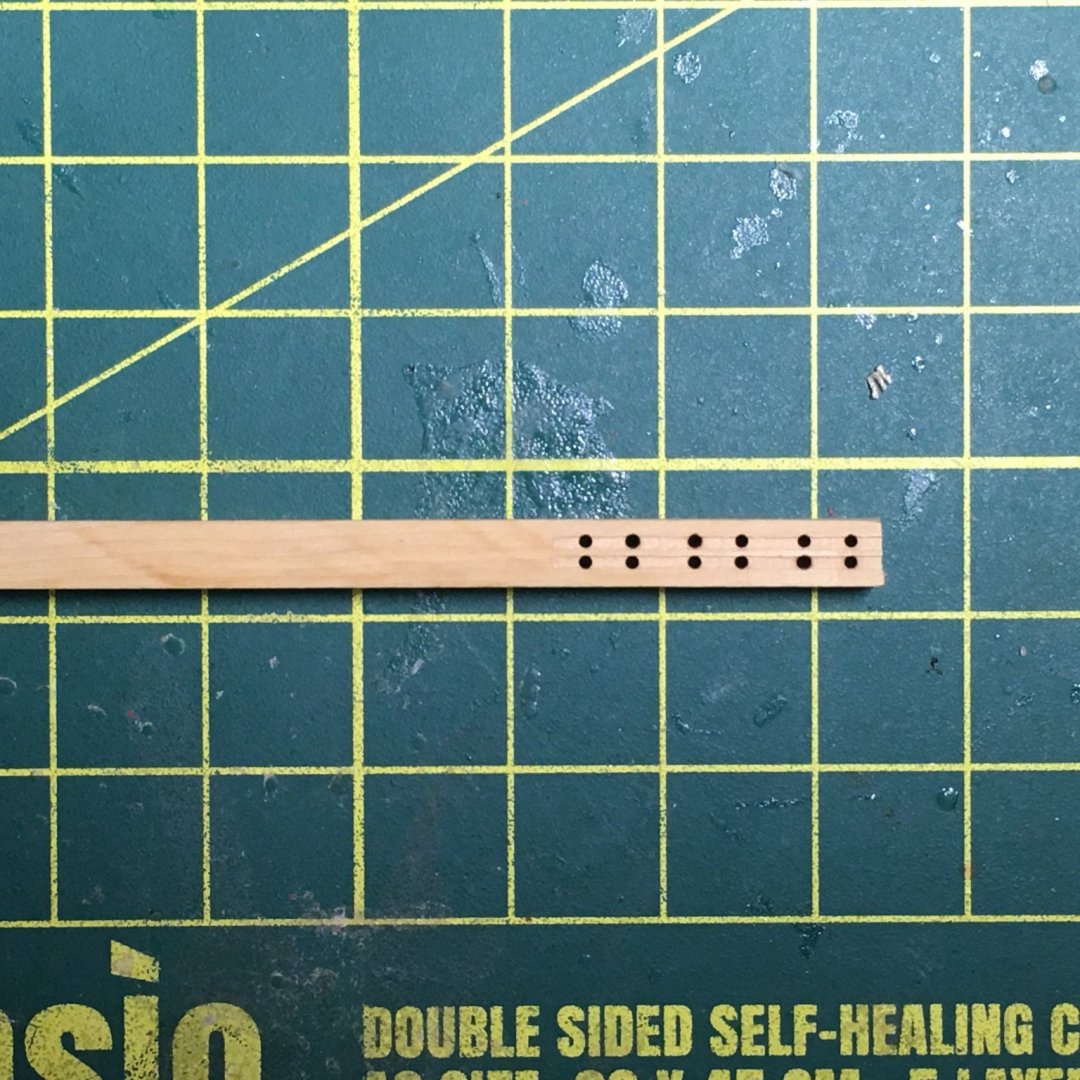
Rigging the Anchors #1 Thank you for all the likes and kind comments. It's great to hear that folk are finding the log helpful. As for the anchors, I have to start by going off on a slight tangent. I'd always planned to rig the cat blocks and falls, but completely forgot to cut the sheave holes in the catheads until after I'd glued them in place. By the time I'd realised, there was too much rigging in the way to drill them from above, and I soon decided that trying to prize the catheads off the hull was a non-starter. I'd removed them once before to plank the deck and I knew I'd re-stuck them very securely. For some time I'd more or less resigned myself to leaving the cathead details out, but that decision has been niggling me and last night I decided to throw caution to the winds and drill the sheave holes from below. I had very little space to work in, the catheads being just 4mm wide, with little more than a 4mm gap between the front of the timber and the support bracket underneath. Within that space I had to drill four holes far enough apart to simulate realistic sheaves. Kneeling on the floor and with Speedy's bow overhanging the workbench and a light positioned on the floor to shine up, I made four marks with a pointy tool, grabbed my flexible drill shaft and crossed my fingers. Starting with 0.5mm pilots I tried to drill as square as I could to get the holes in the right places in the upper surface. That done I widened the holes to 0.75mm - this shot shows the larger bit going through: I used a homemade micro-gouge (described below) to create a groove between each pair of holes, then tested with some rope to see if the result was acceptable: The next task was to make the cat blocks. On Speedy these would have been about large doubles blocks - about 15" - and coaked, i.e. with iron straps in place of rope strops, and with large hooks. 15" is about 6mm at this scale and I felt the 4mm doubles in the kit were too small to utilise, so I decided to make my own. Fortunately I had a prepared boxwood strip of the right size left over from Royal Caroline, complete with holes and grooves: It was a fairly quick task to shape one end of a block whilst still on the strip, then slice it off and shape the other end. I used a new sanding tool from Vanguard Models to do the rough shaping then swiss files for the fine work: I like to shape the groove between the holes to simulate a rounded sheave, as I think the rope then lies more naturally in the block. To do this I use micro-gouges made from hypodermic needles. These obviously start sharp, but I grind the tip on the side of an oilstone so it has a slight chisel shape. Here's the needle and the result: NB: the red stains on the cutting mat are not blood, but you do have to be very careful with these needles! I bought a pack of about 10 million (or so) in assorted sizes from Amazon. To illustrate the benefit of doing the rounding, here's two rigged blocks, one with flat grooves and one with rounded: On reflection, I should have shot this more from the side to emphasize the difference, but you get the idea. The next job was to simulate the iron strap, for which I cut a 0.8mm strip from the black paper supplied in the kit and stuck it round the block with slightly diluted PVA. The strap widens into a circle at the pin position each side of the block. There was no way I could cut this shape out of paper in one go, so I made the circles separately and stuck them over the straight strips. I used a short length of brass tube, about 1.5mm internal diameter, with one end filed sharp. With the paper on a piece of MDF to give a firm surface, a sharp tap with a small hammer produces perfect circles: I made the hooks from 0.6mm brass wire, bent to shape and with the ends filed to a slight point. Using a scalpel I carefully cut a small gap in the straps at the bottom of each block to allow me to drill holes for the hooks without disturbing the paper. A quick coat of shellac and the blocks were finished: For the cat falls I used 0.5mm rope, with an eye seized into one end to hook on the cleat on the aft side of the cathead. The rope then runs down to the aft sheave in the block, up to the aft sheave in the cathead, down to the forward sheave in the block then from the forward sheave in the cathead to belay on the bulwarks. I didn't have any spare timberheads for this purpose so I cheated and fitted belaying pins into the swivel mounts just forward of the catheads. In practice I think the cat blocks would have been hoisted tight up to the catheads to stop them swinging around, but after the time I'd spent I wanted them to be more on display so I've let them hang slightly lower than they ought. I painted the rope with dilute acrylic to encourage it to hang properly: And I thought rigging the anchors would be a quick job! Derek


- 725 replies
-
- 10
-
-
- vanguard models
- speedy
- (and 1 more)
-
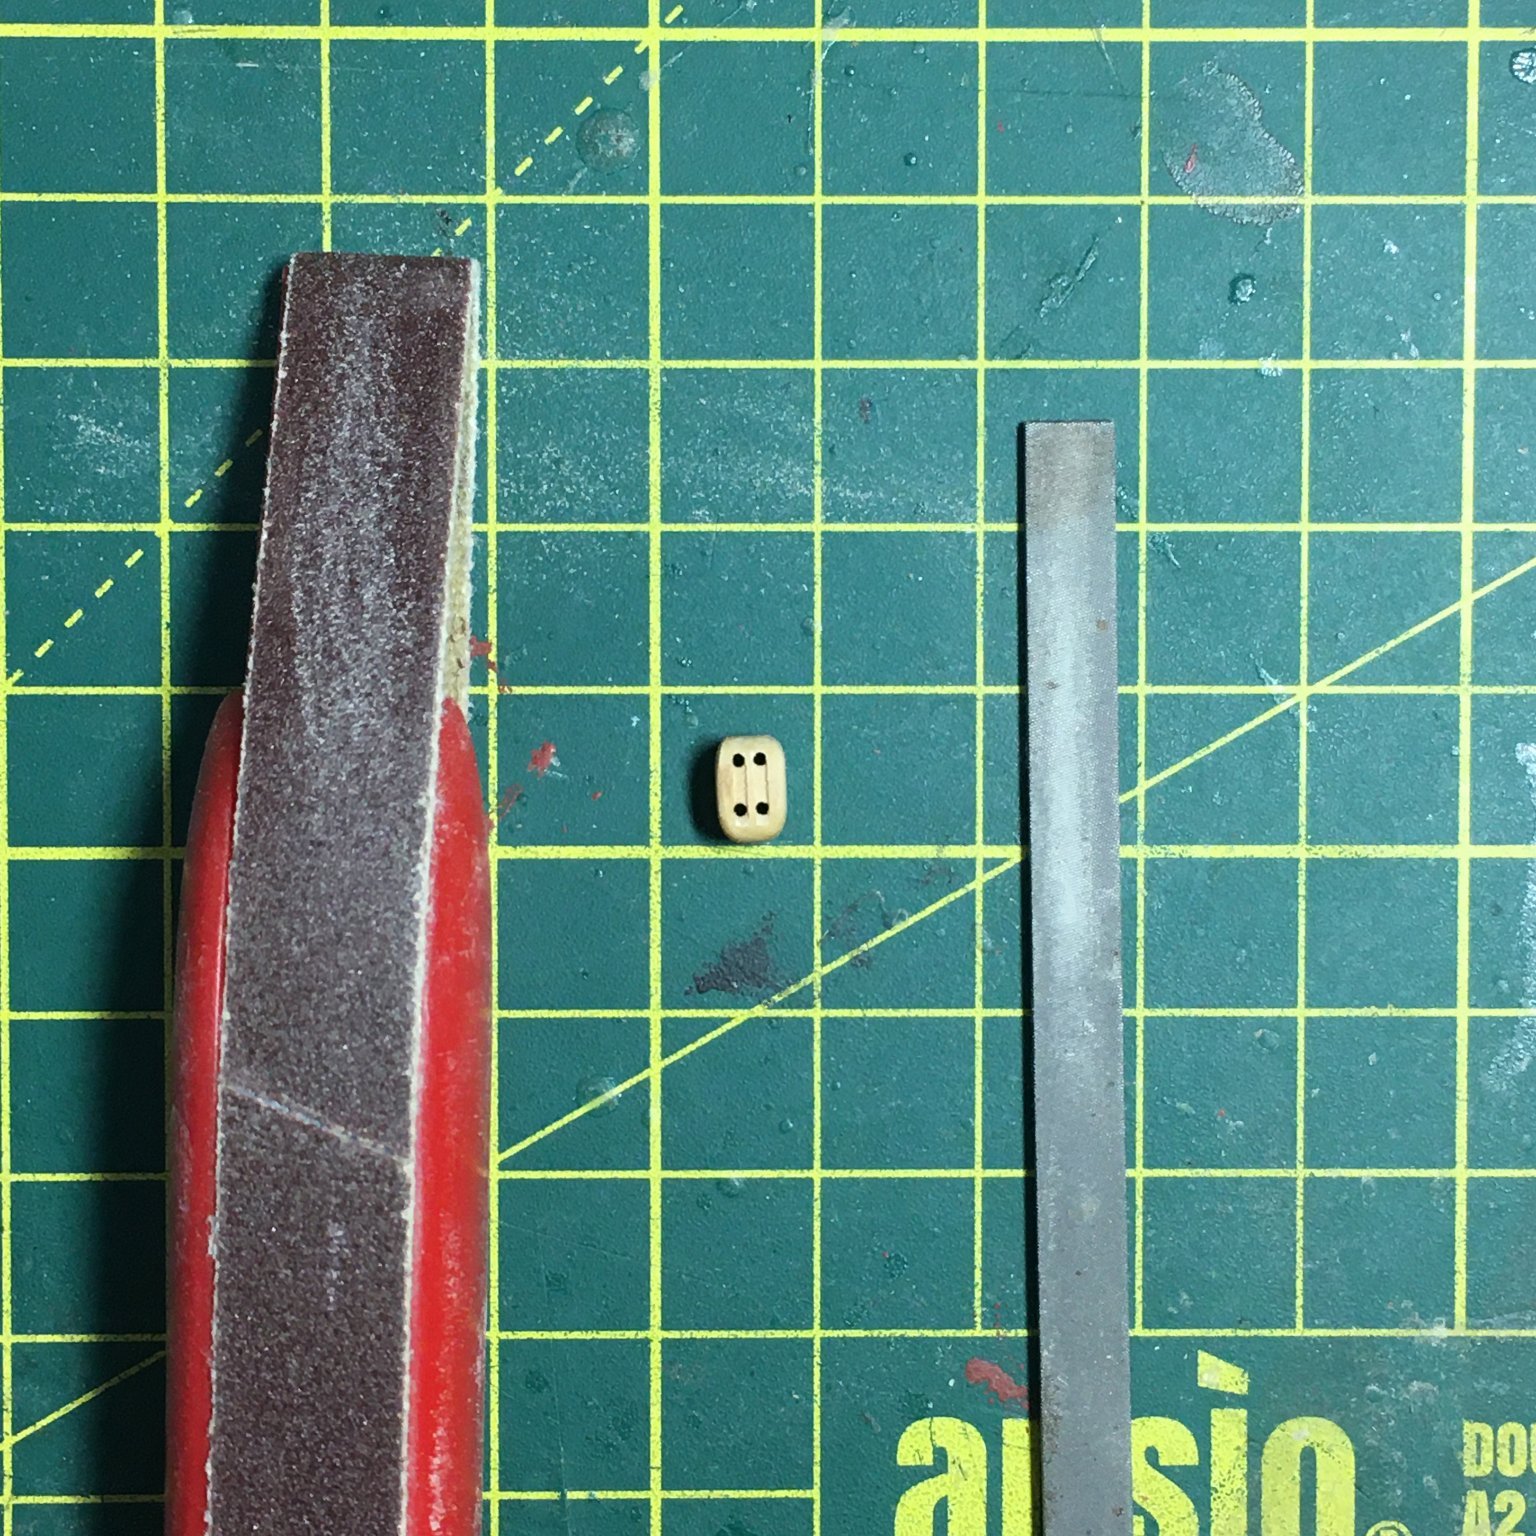
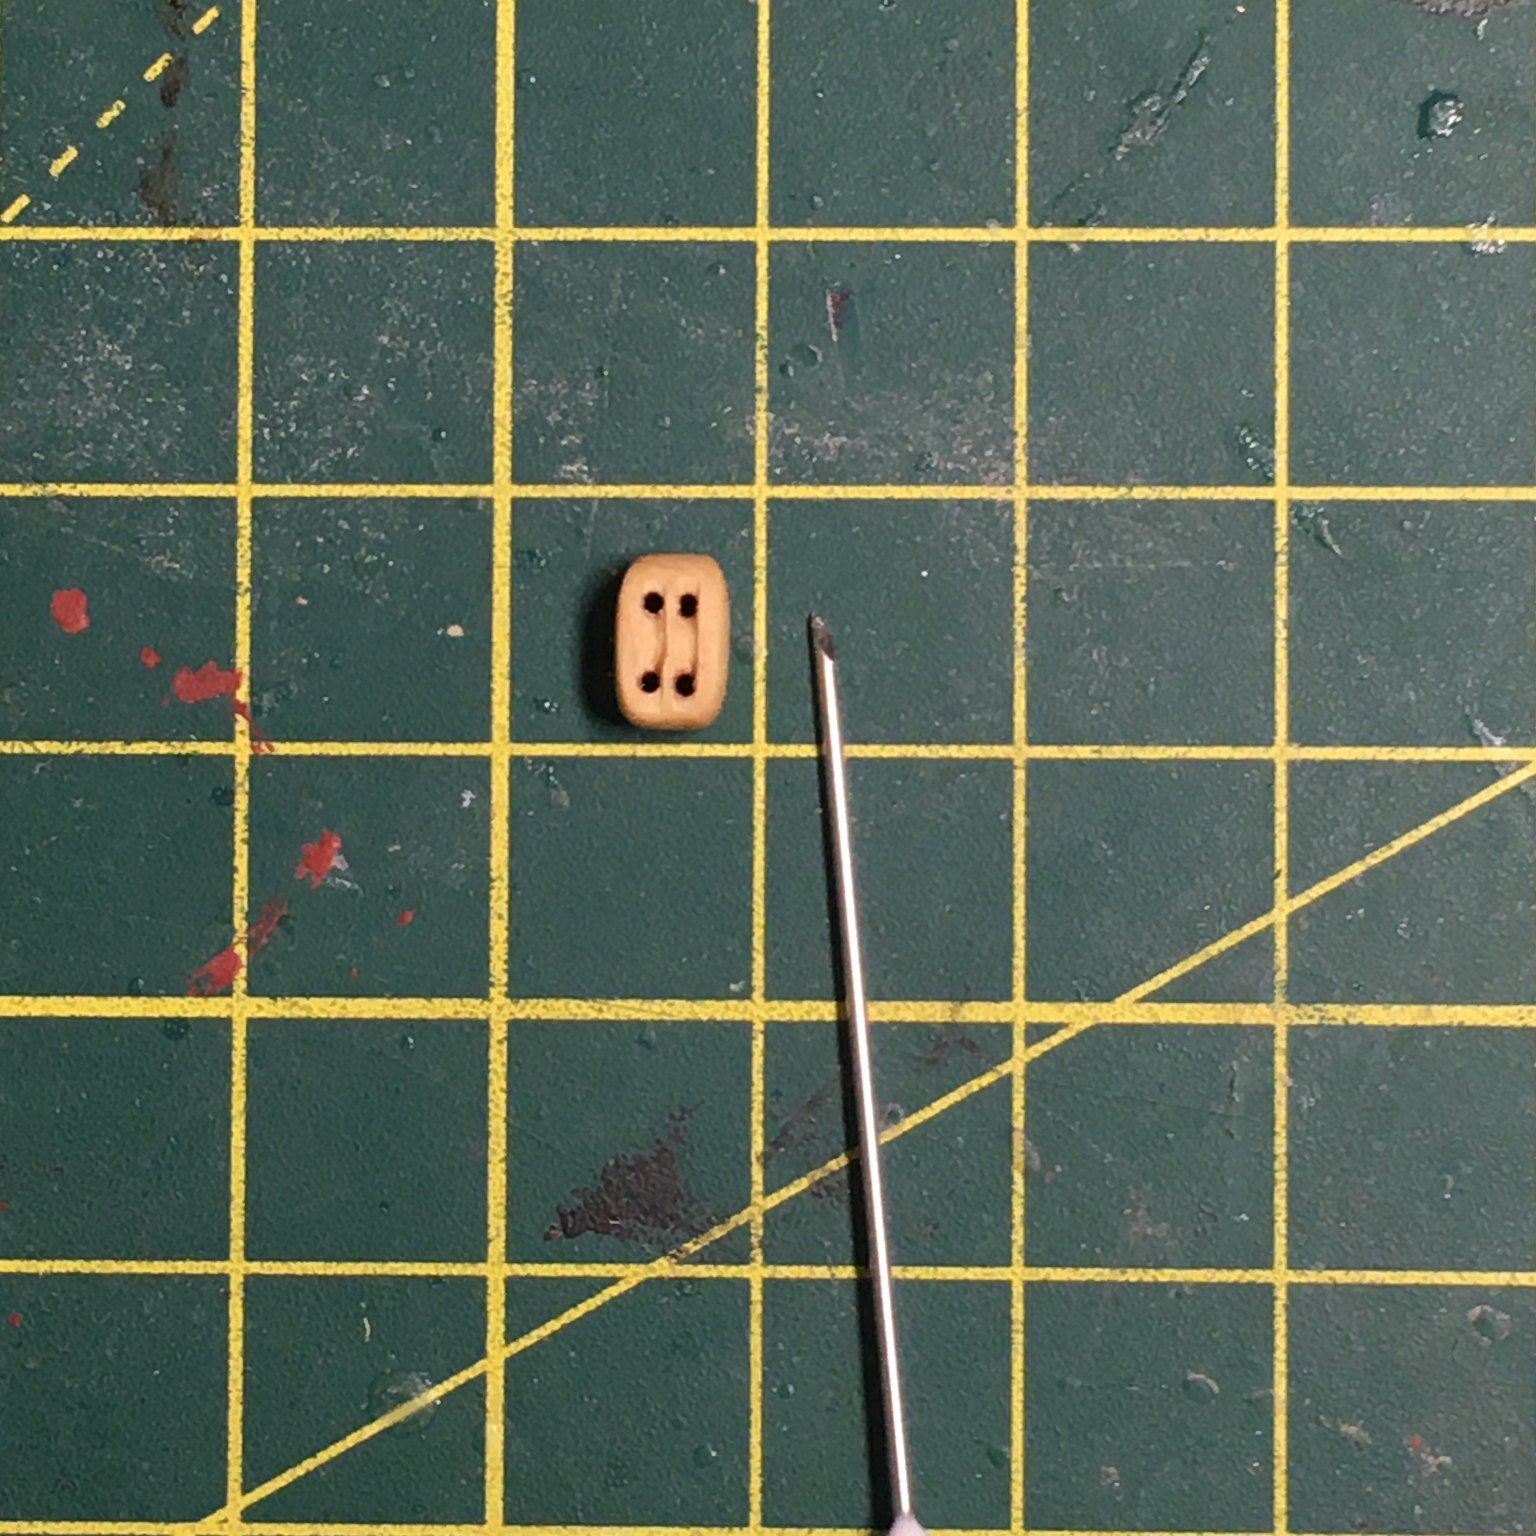
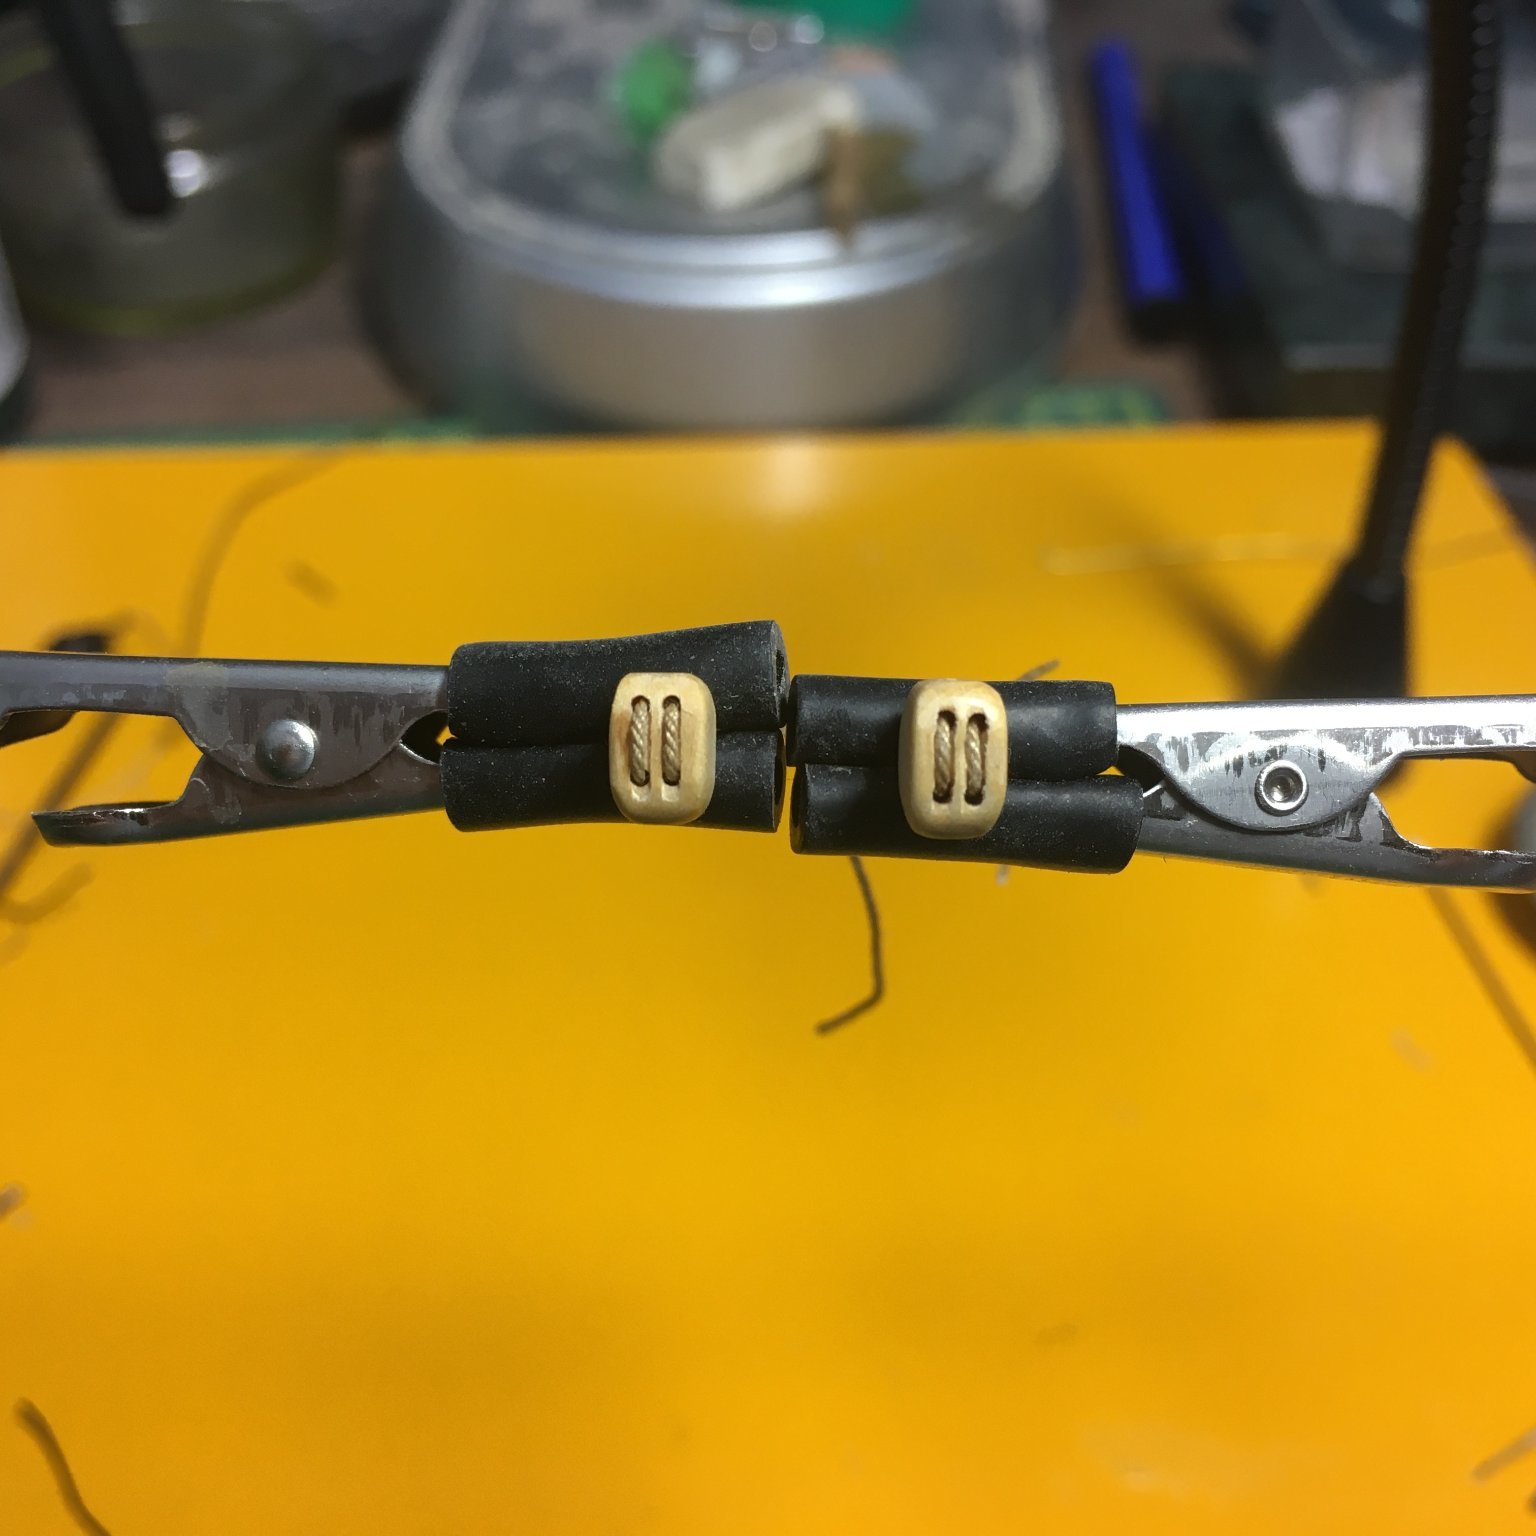
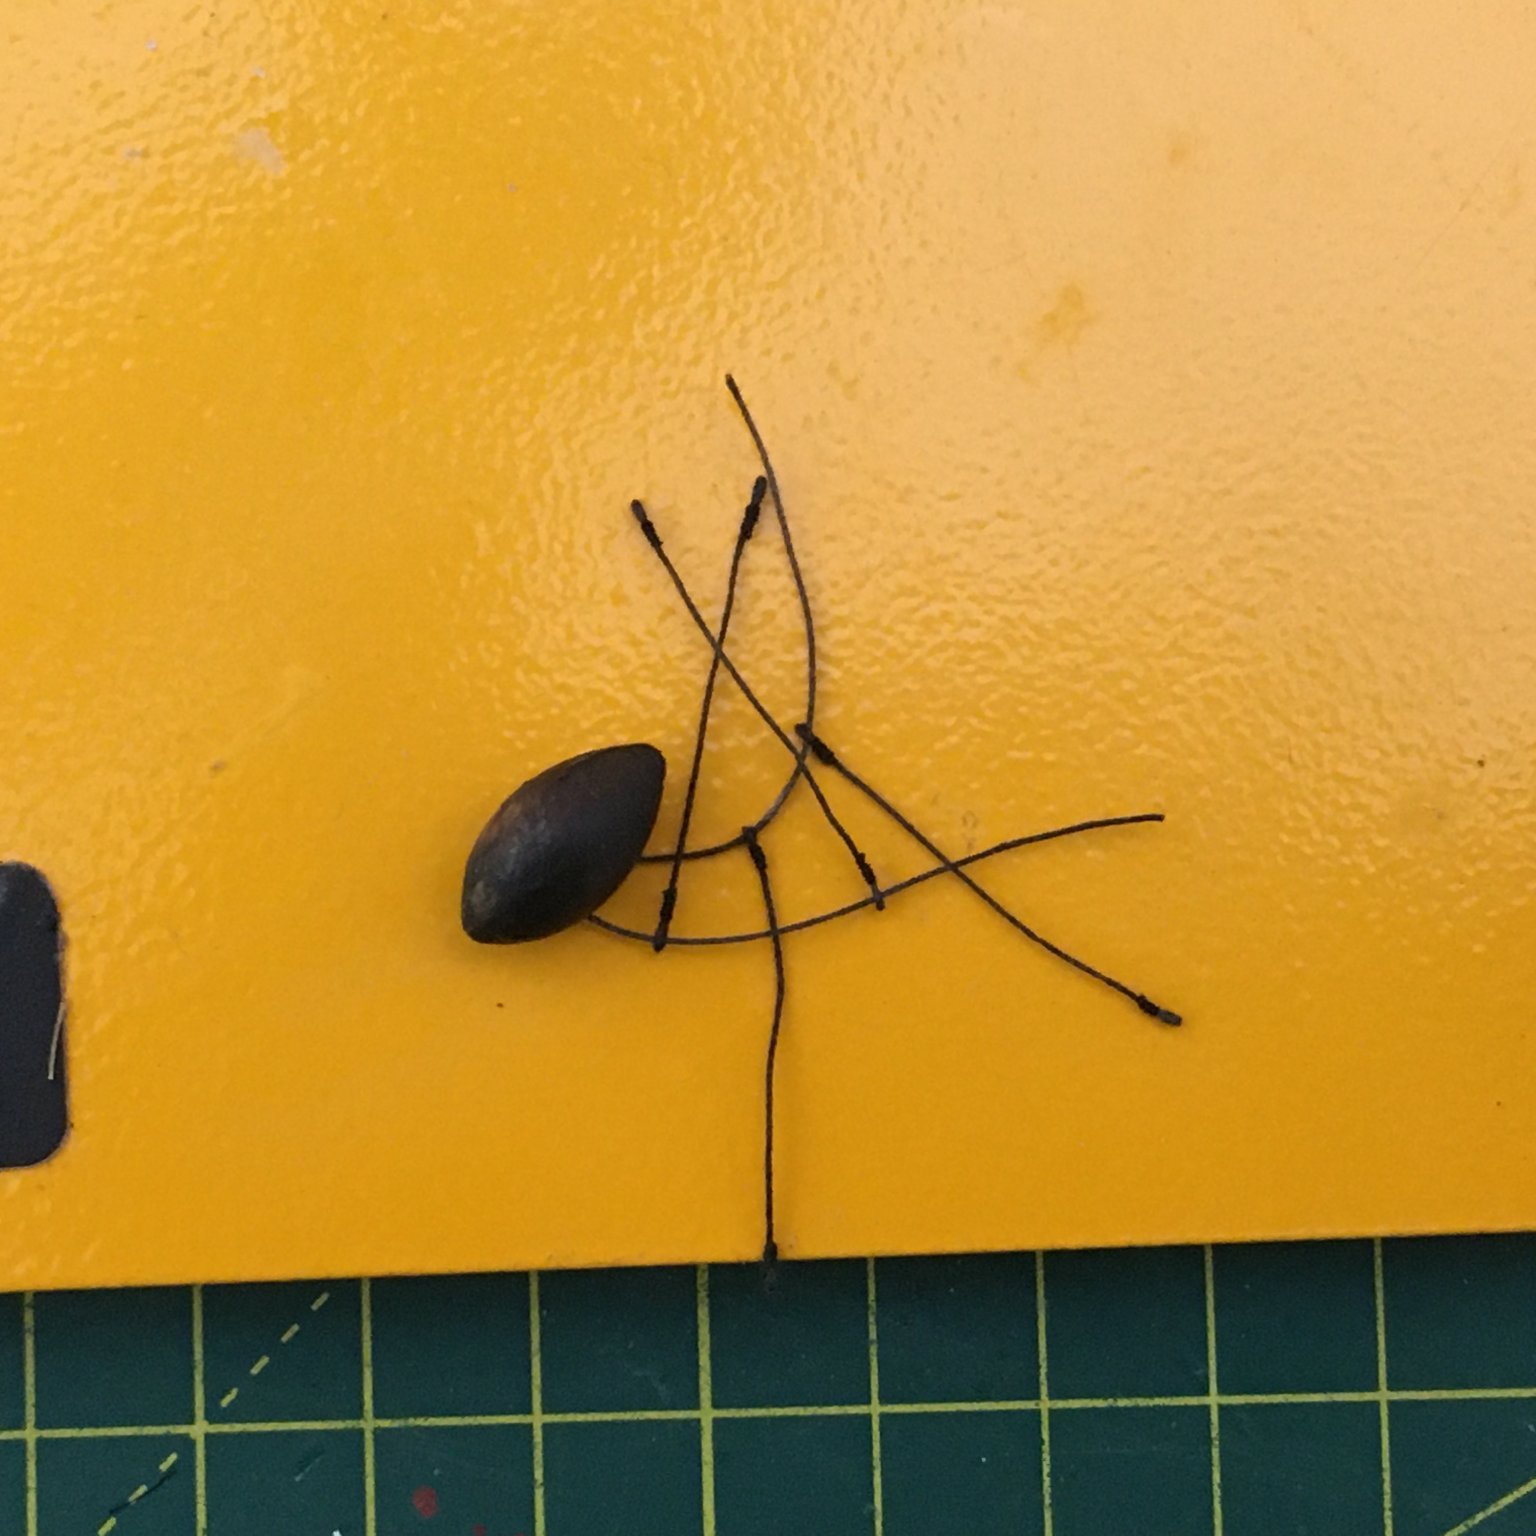
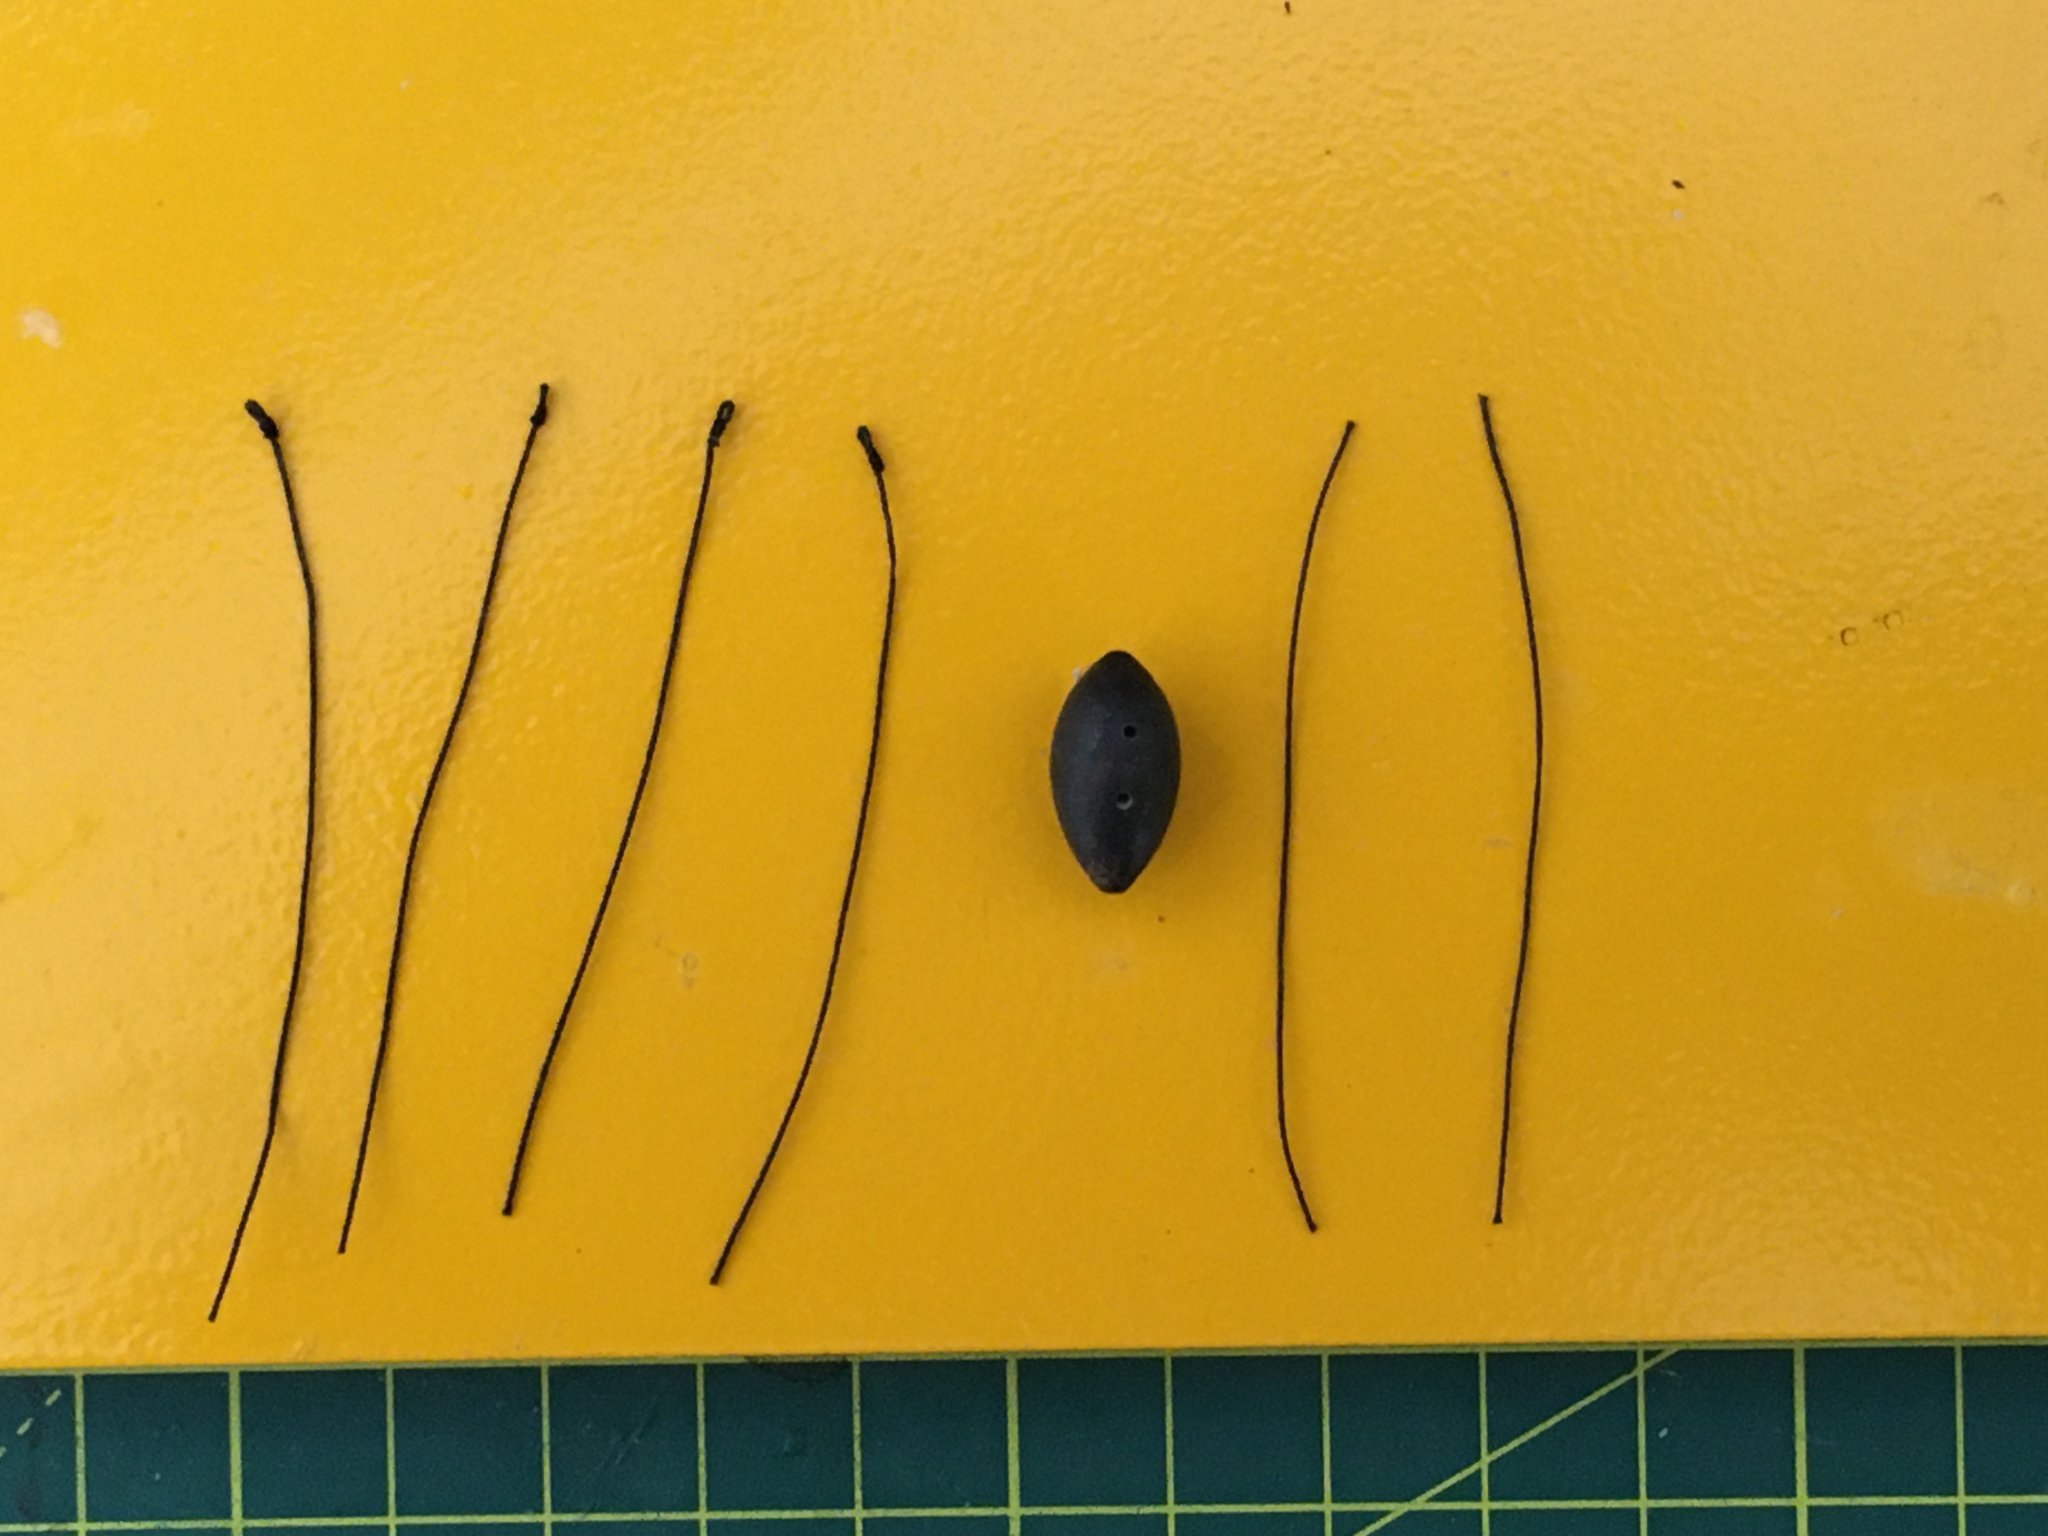
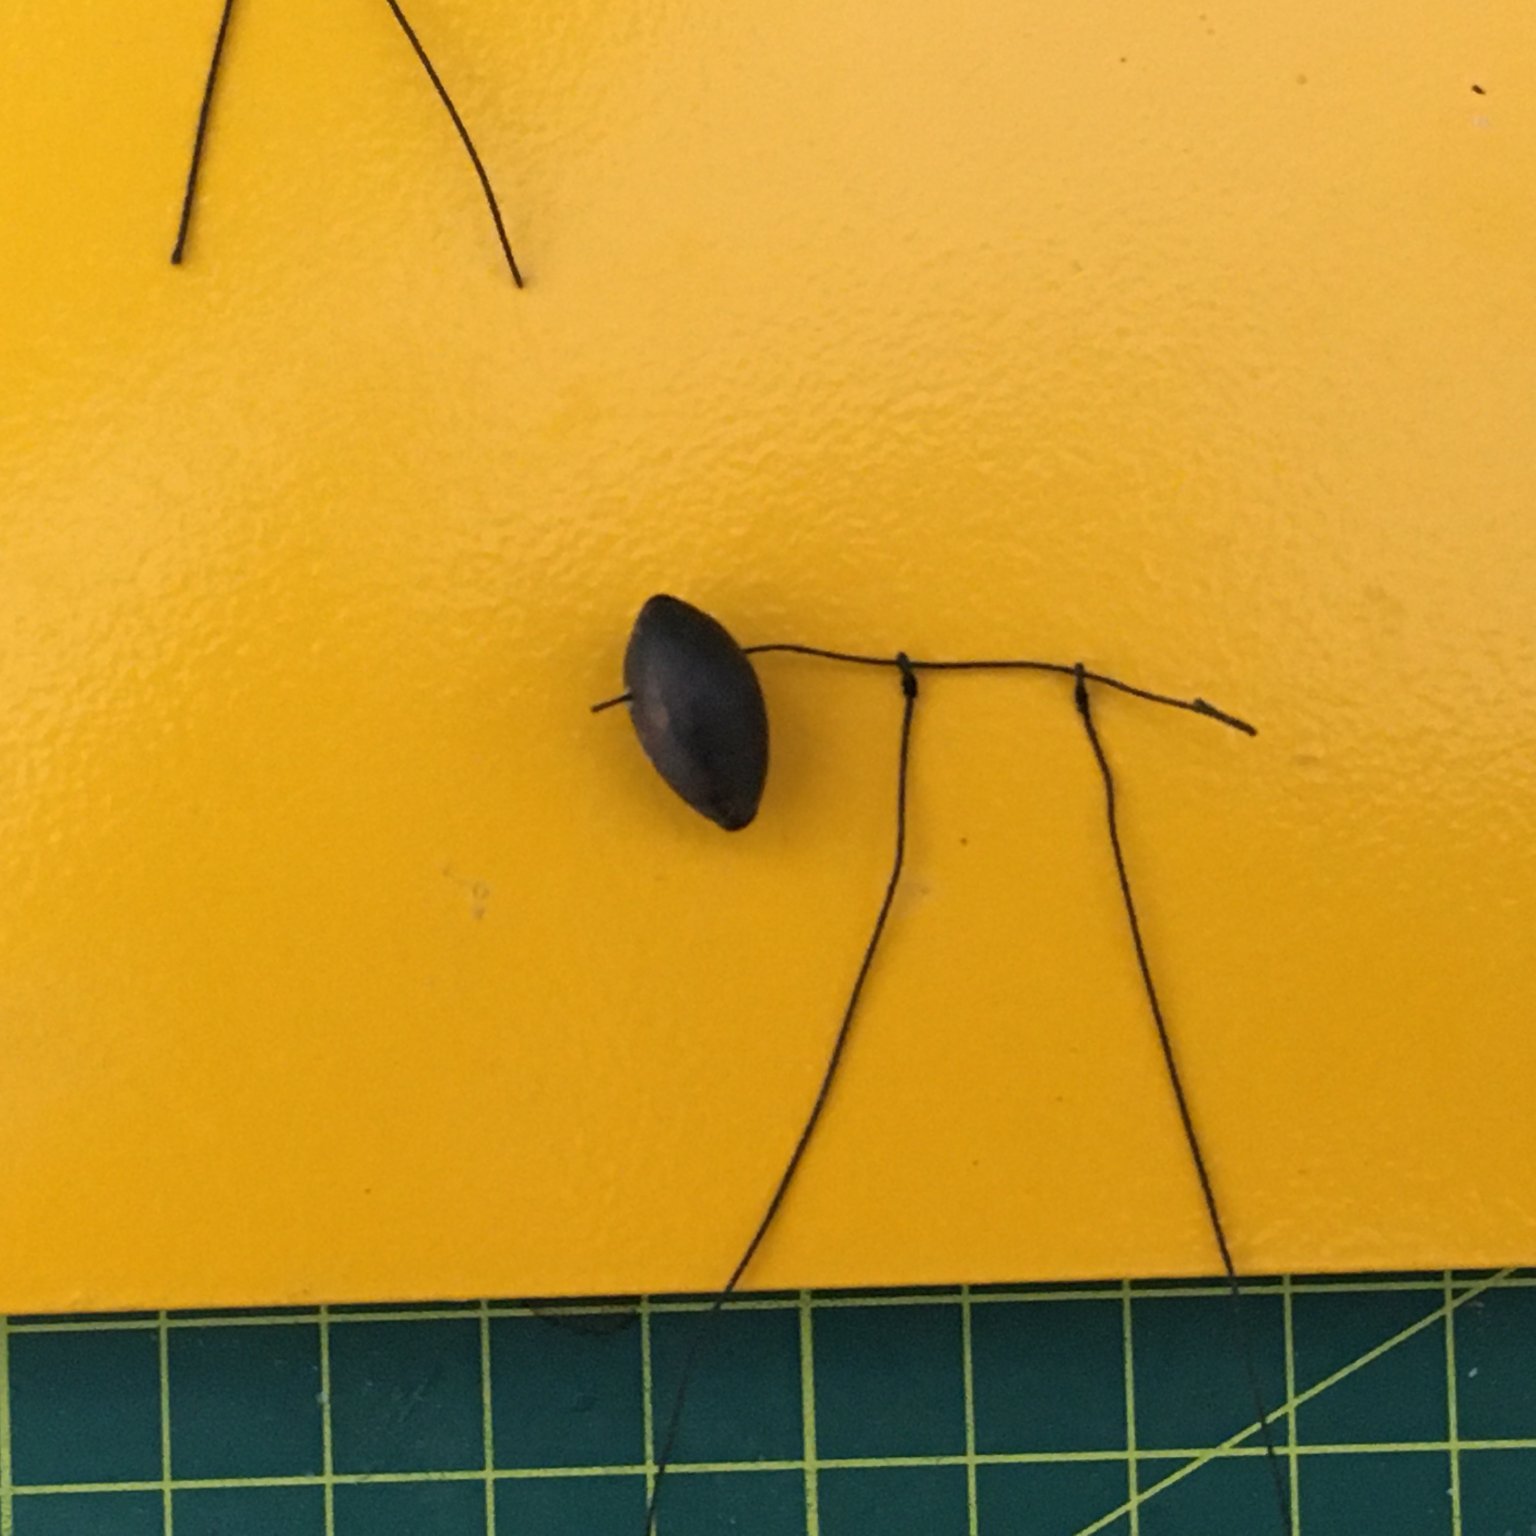
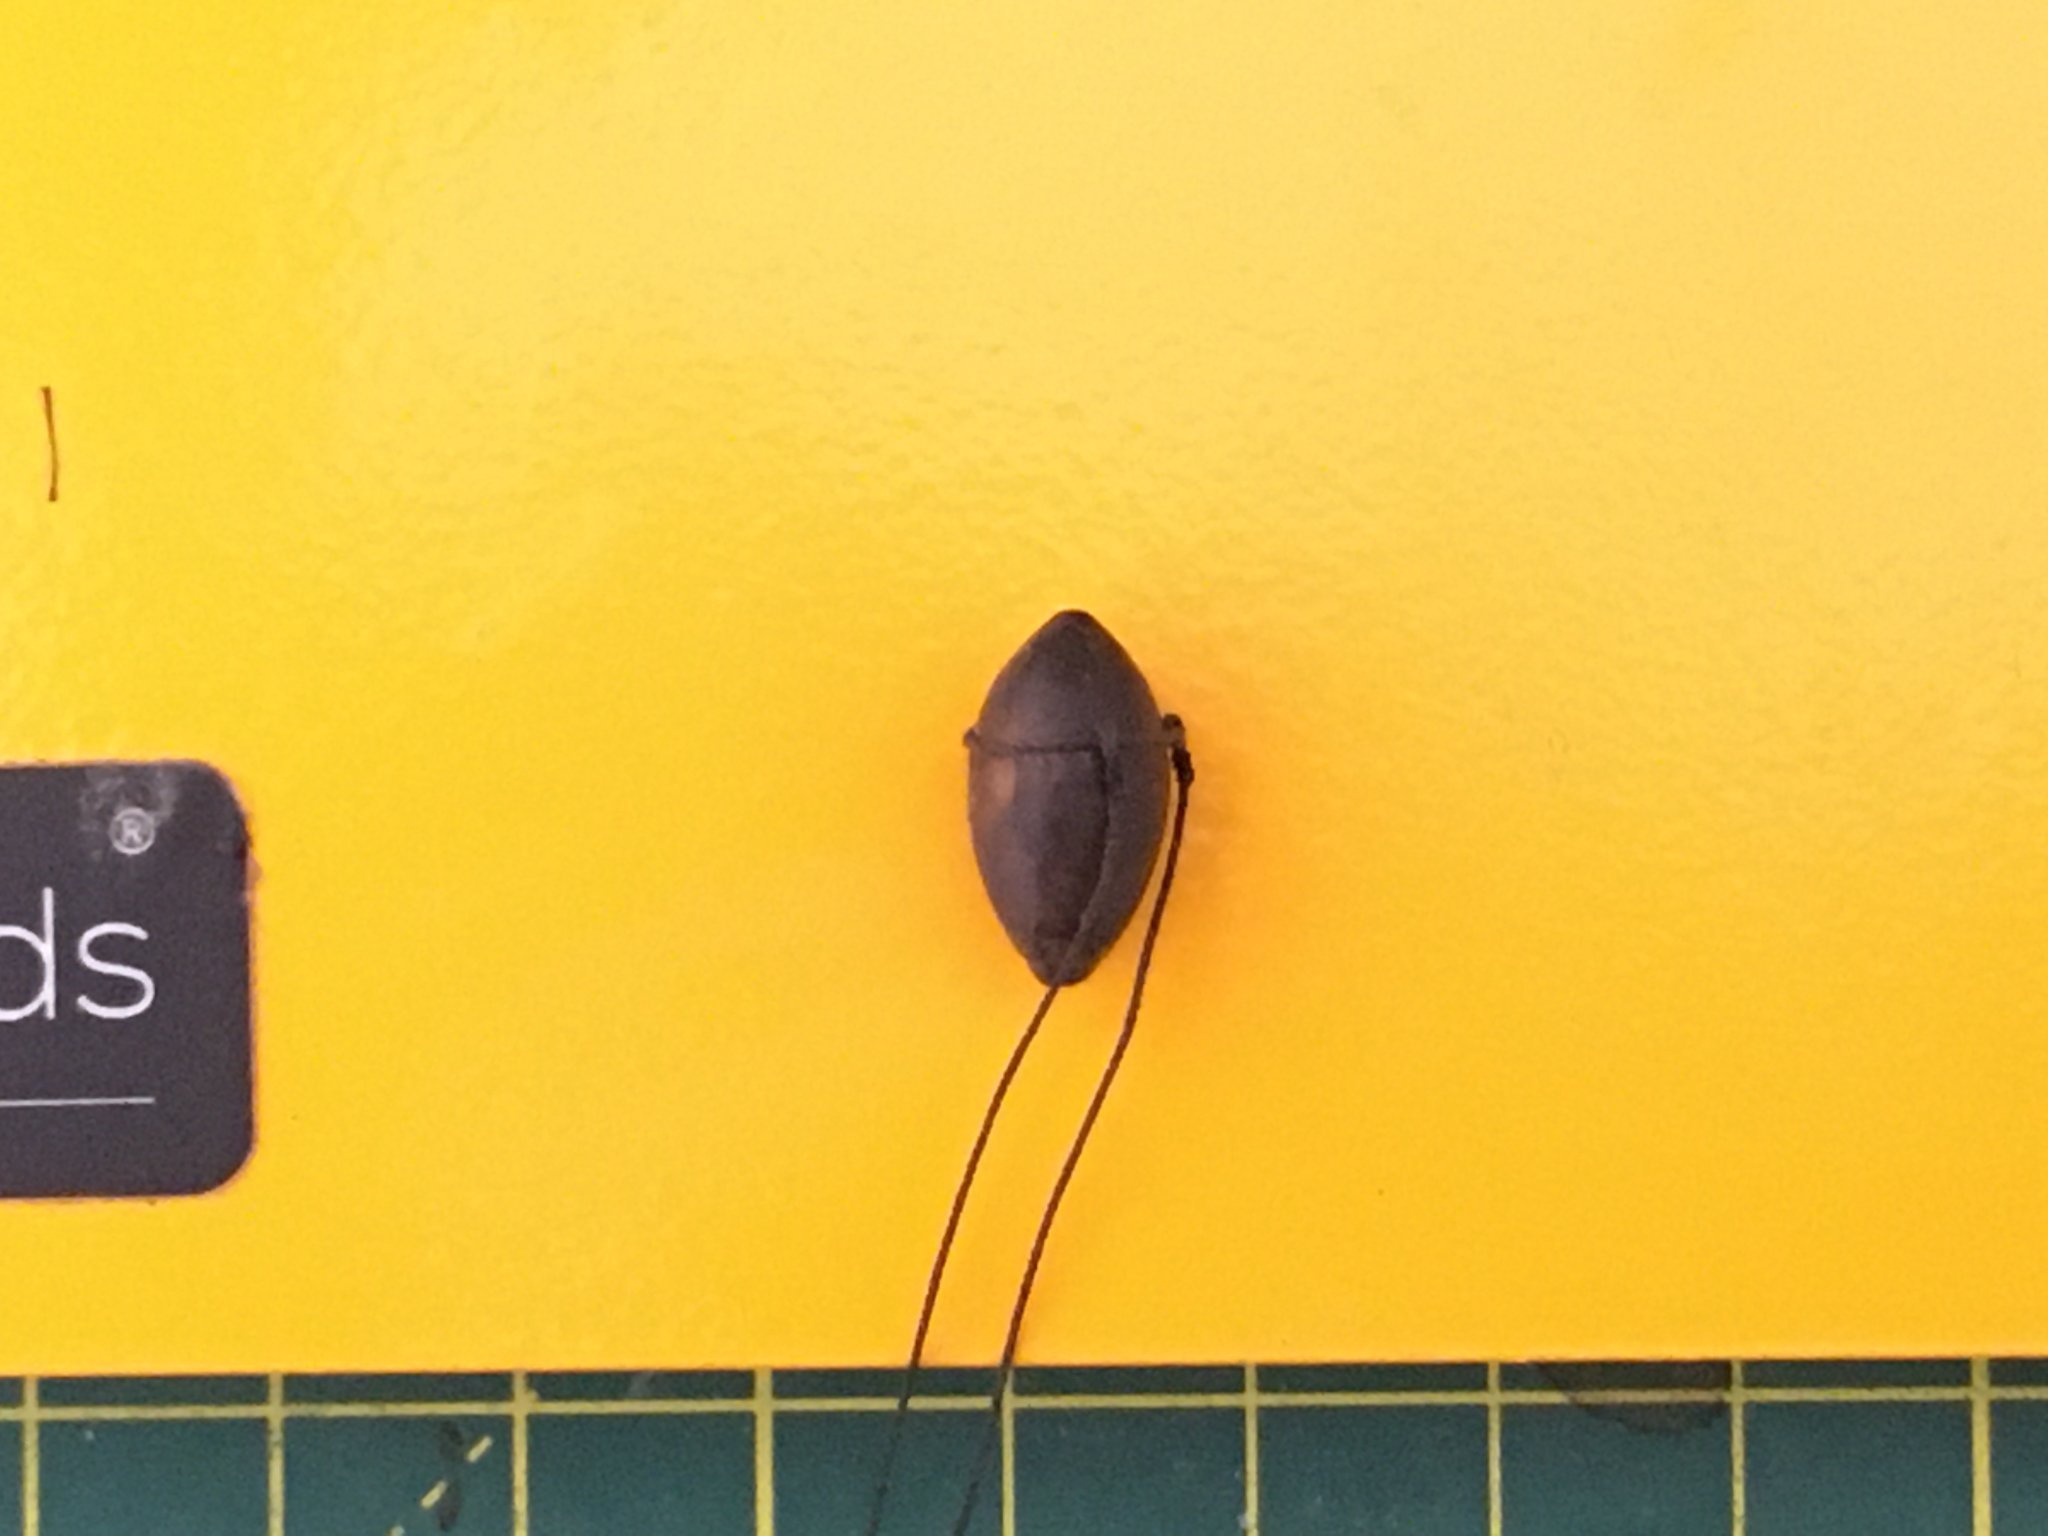
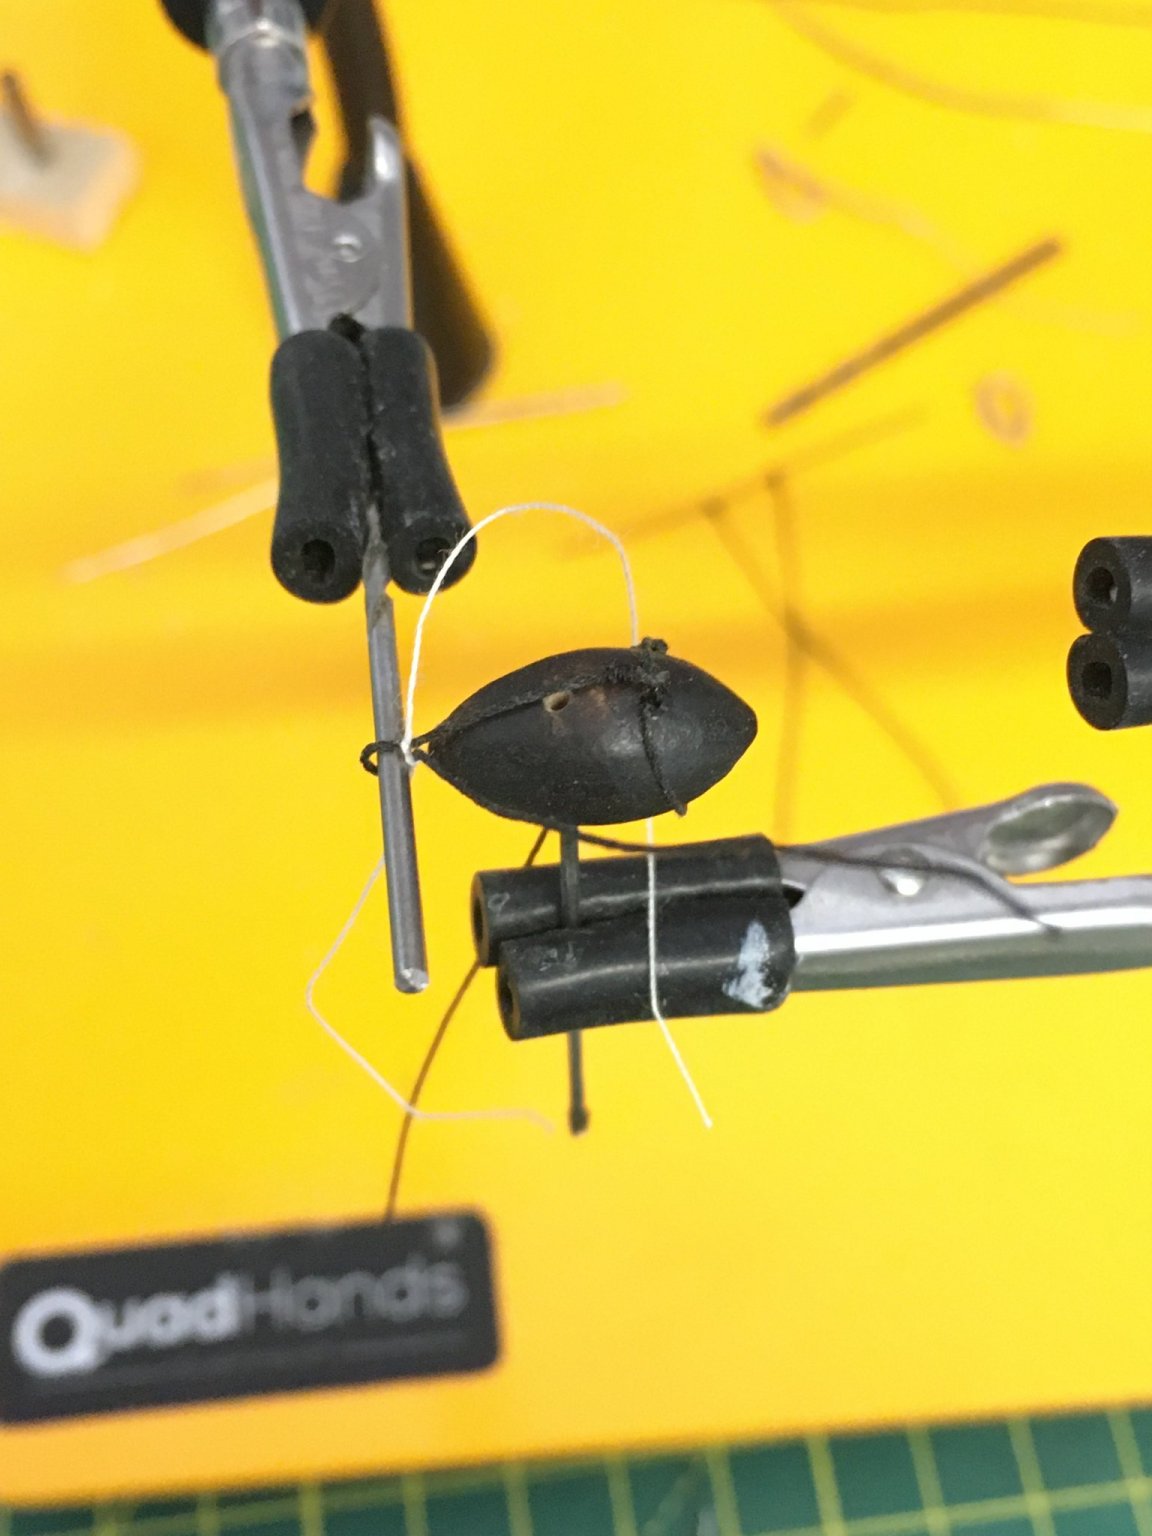
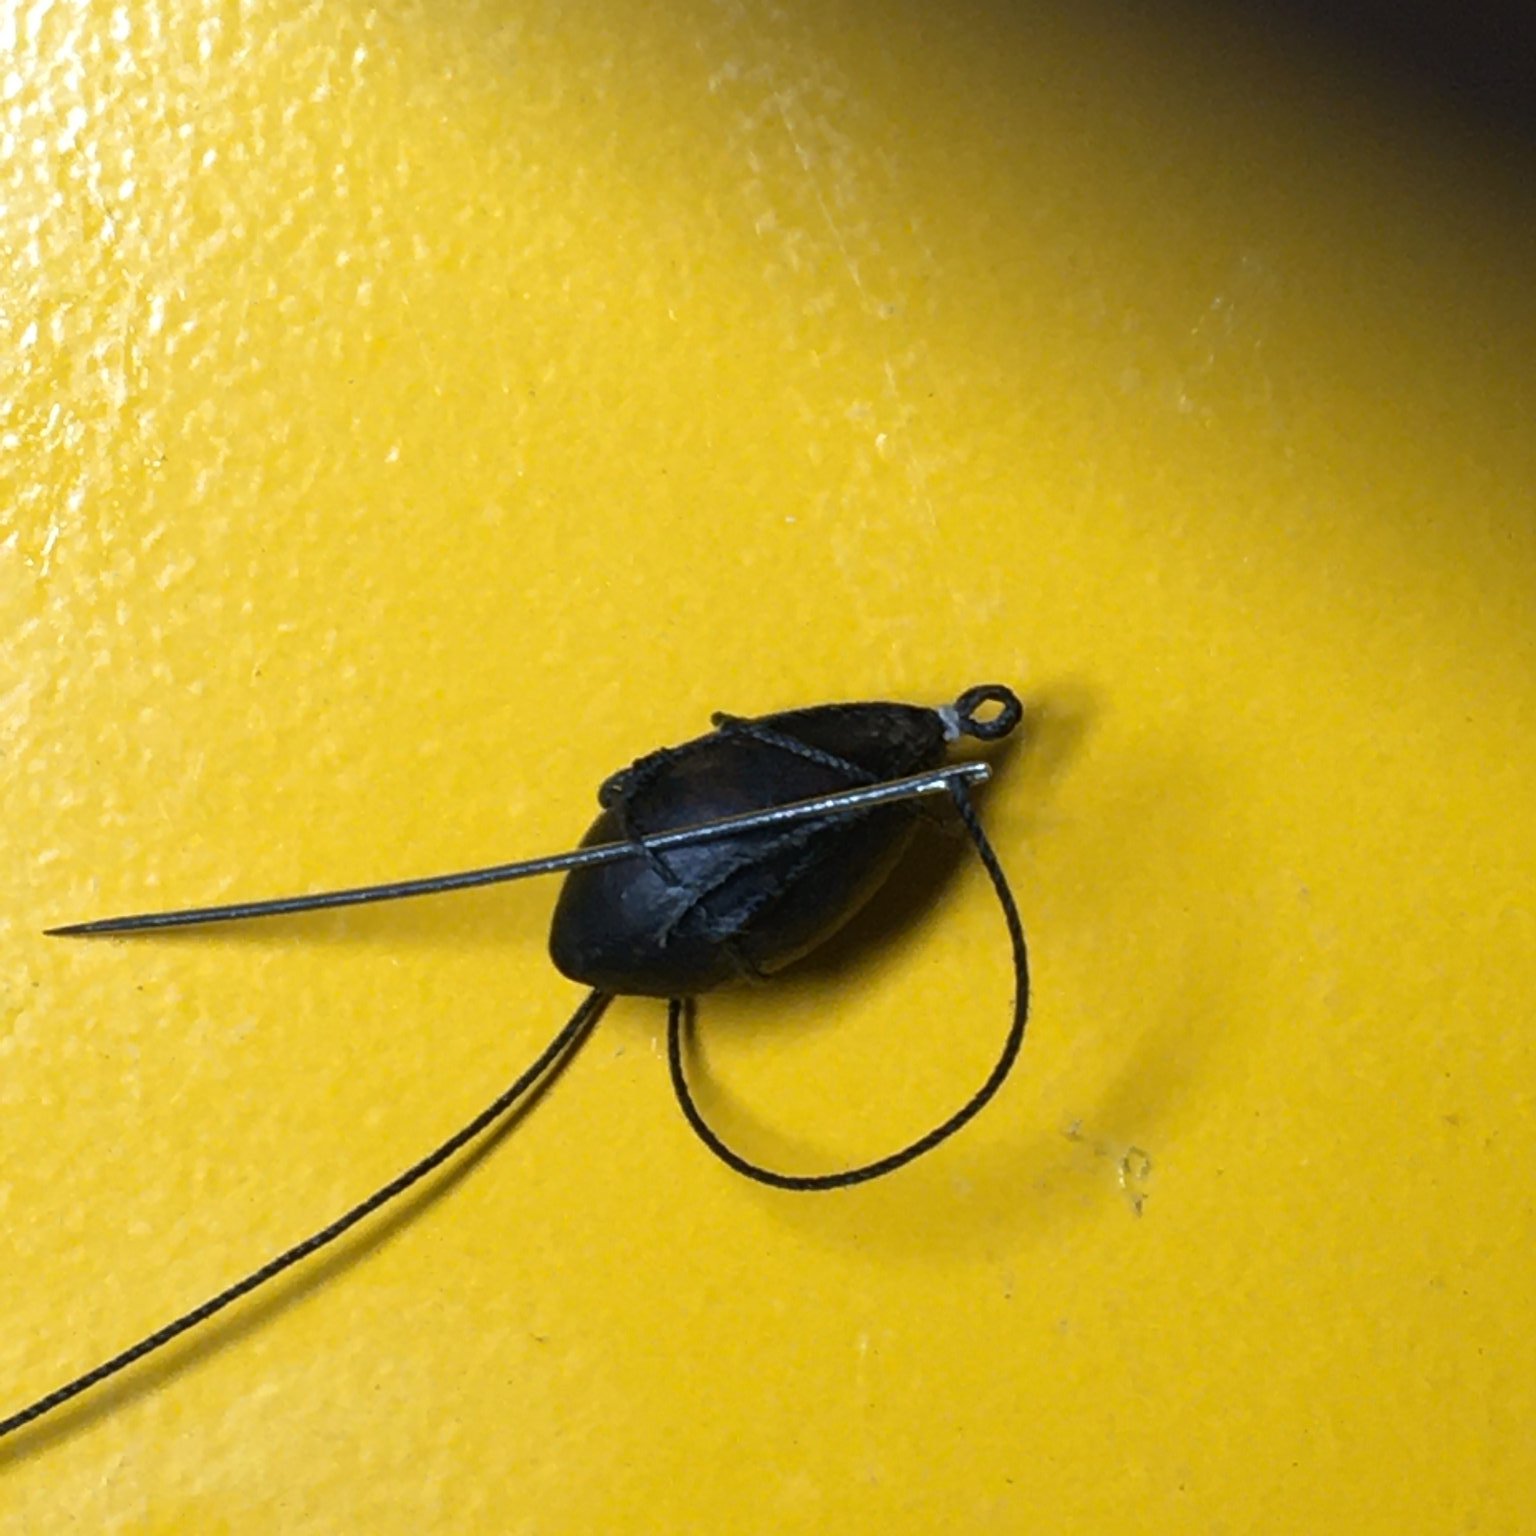
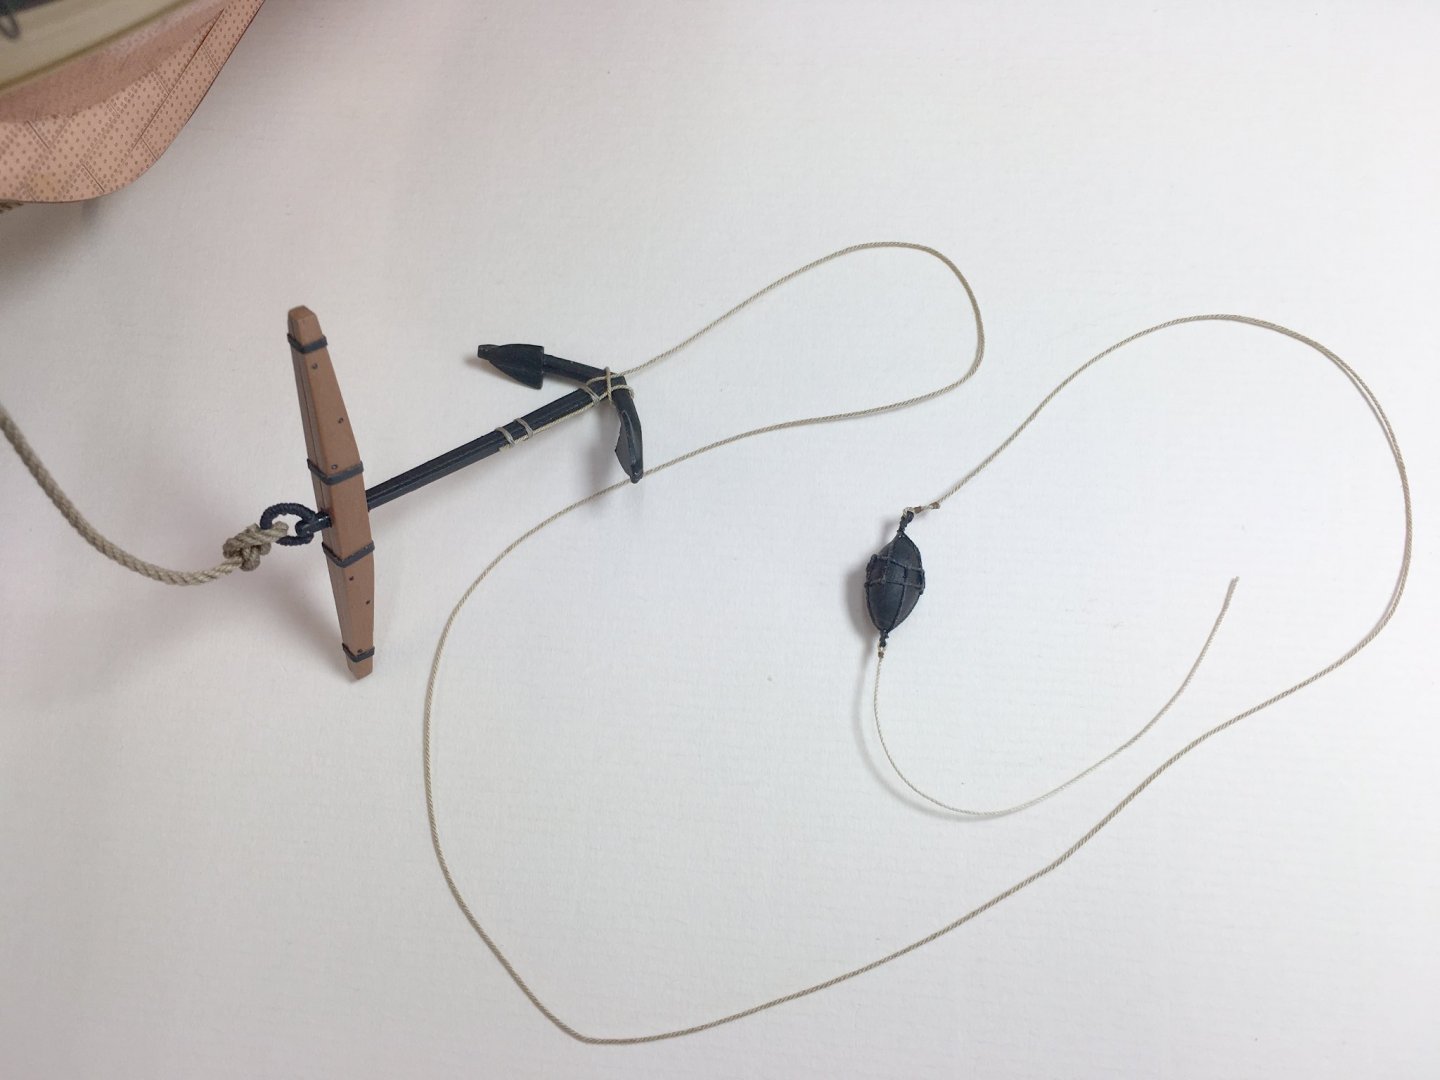
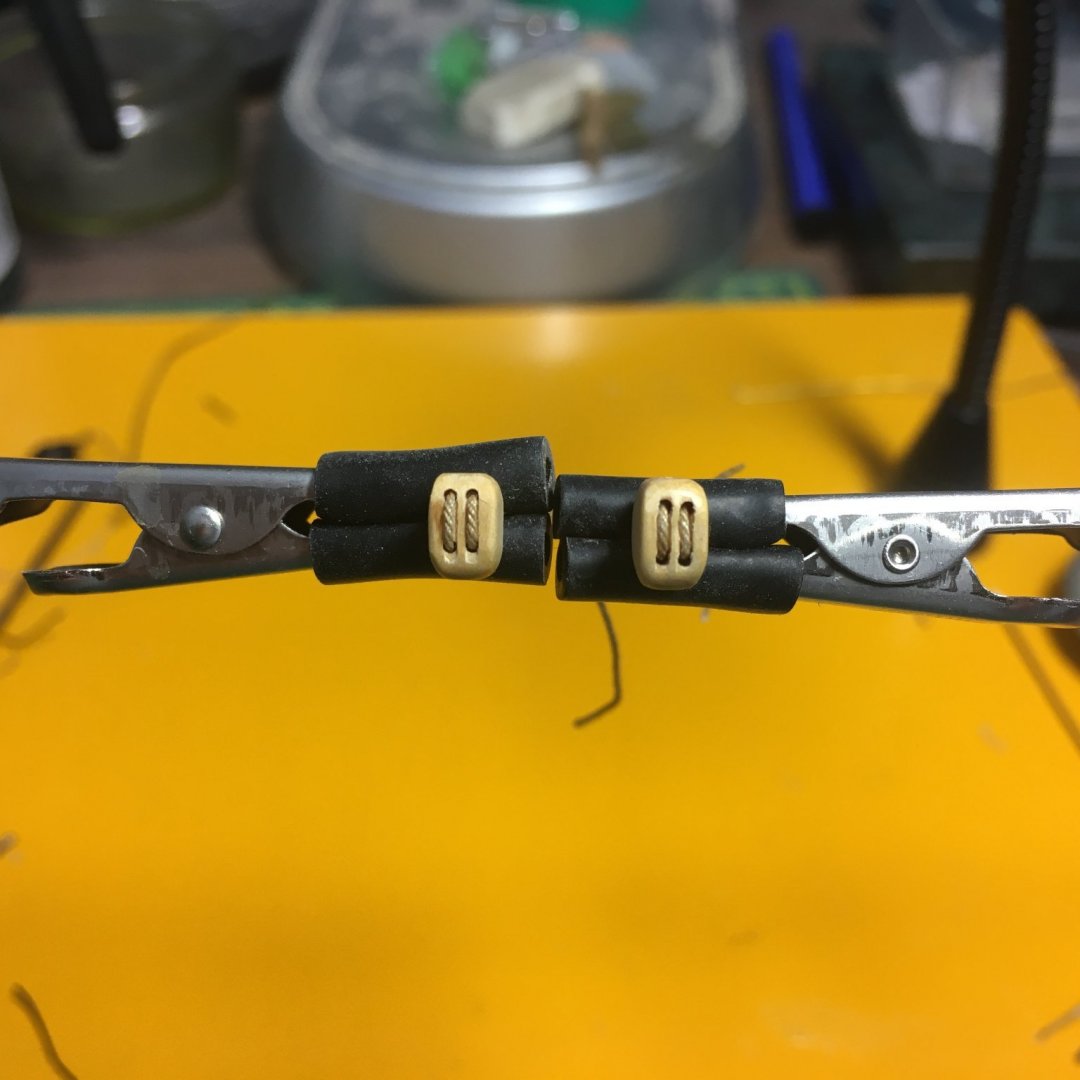
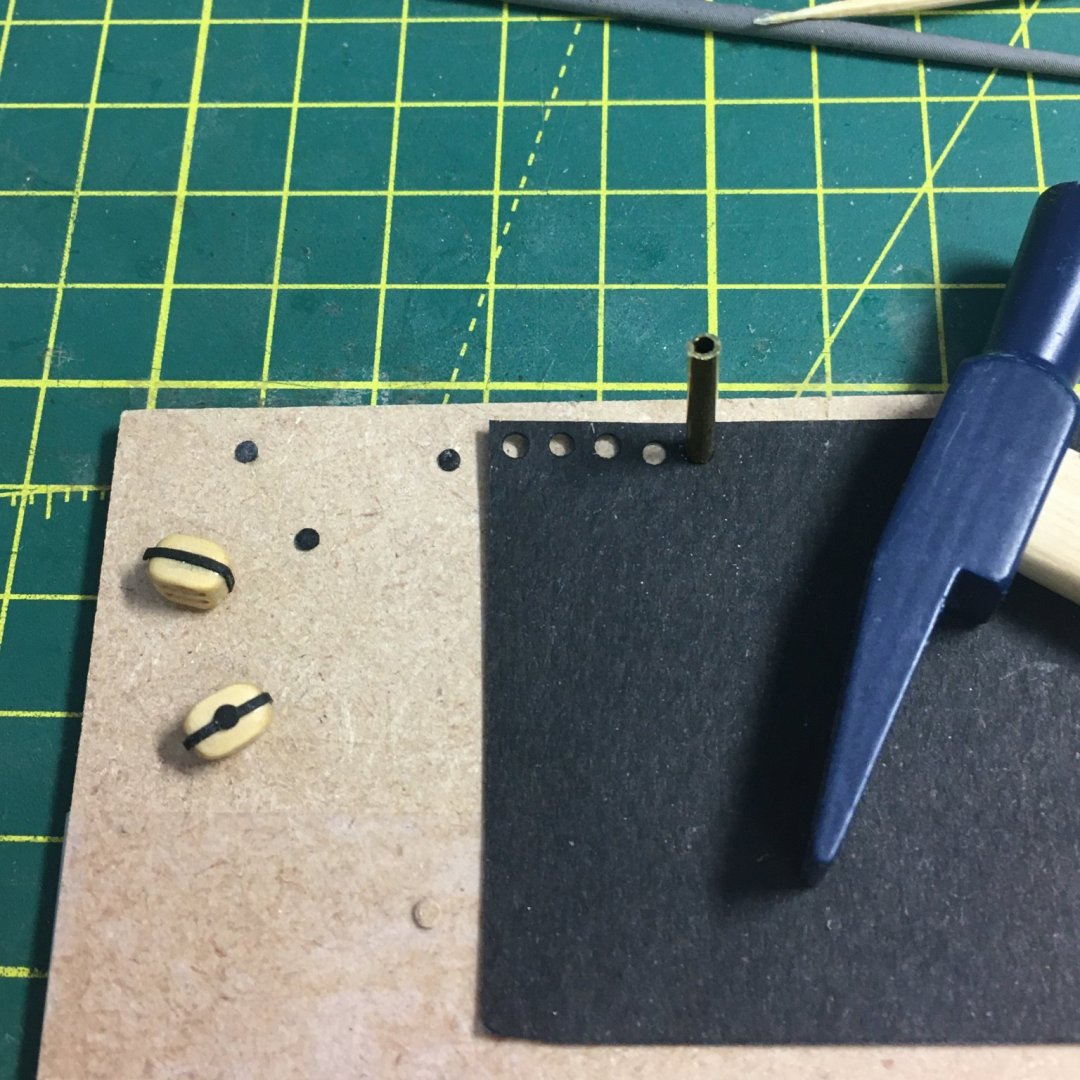
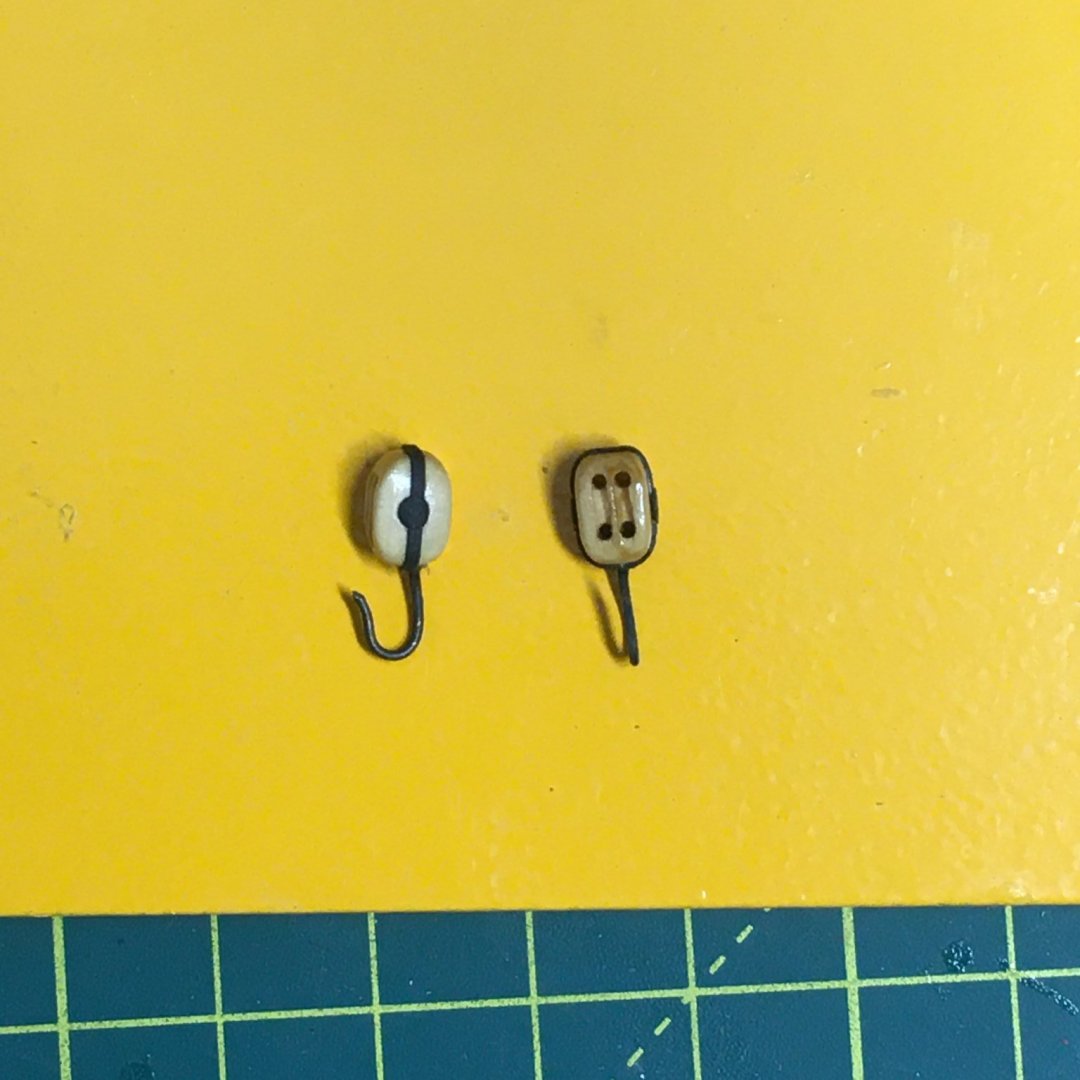
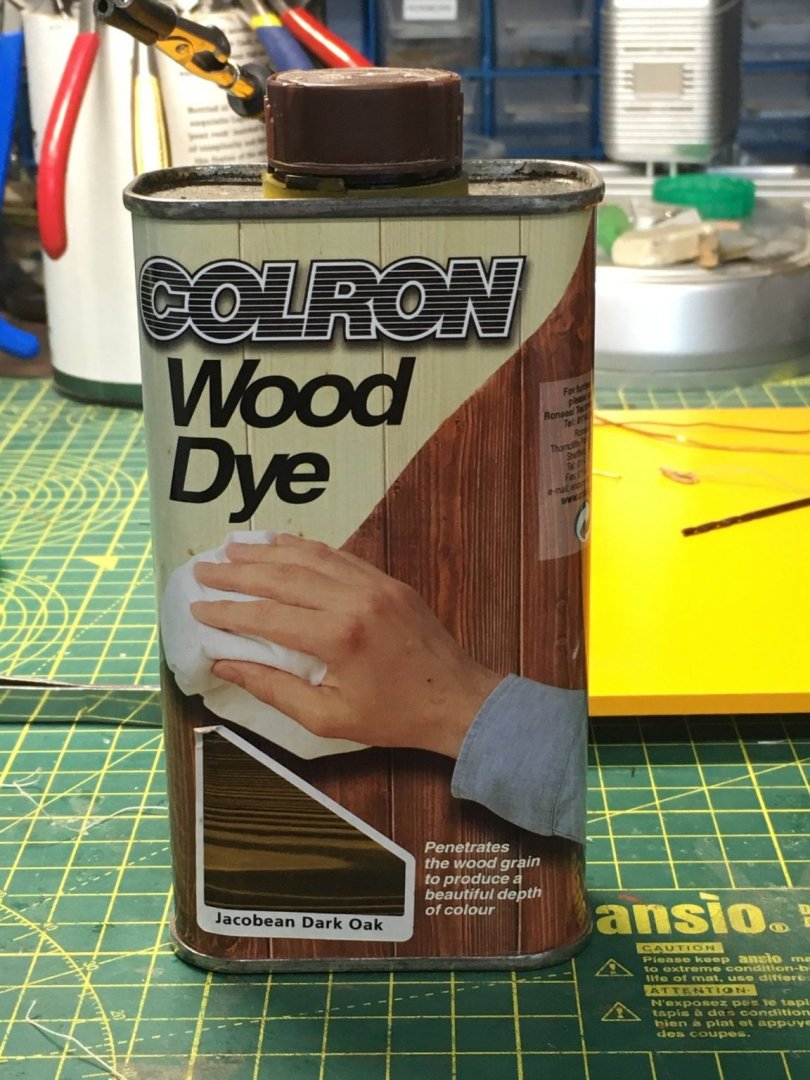
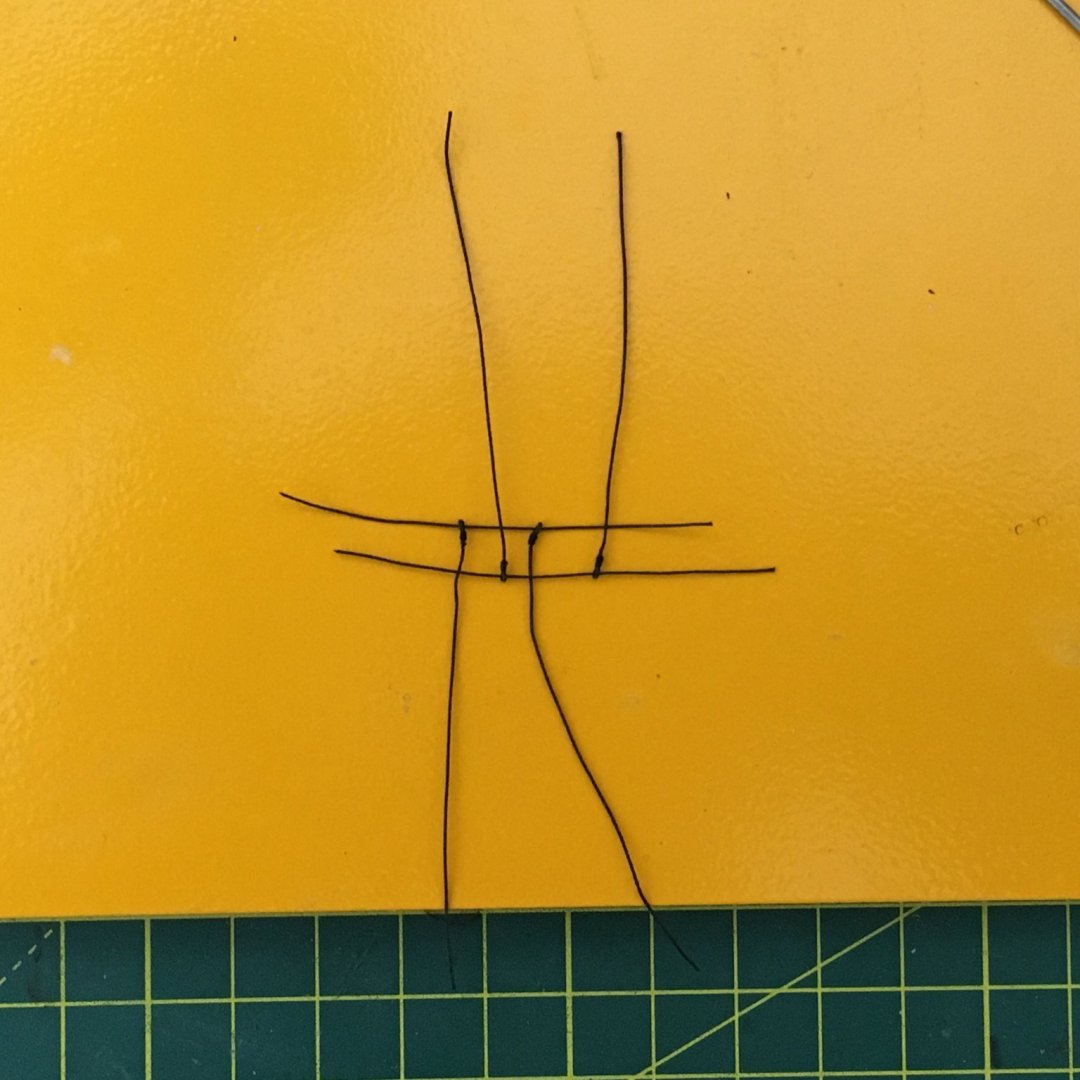
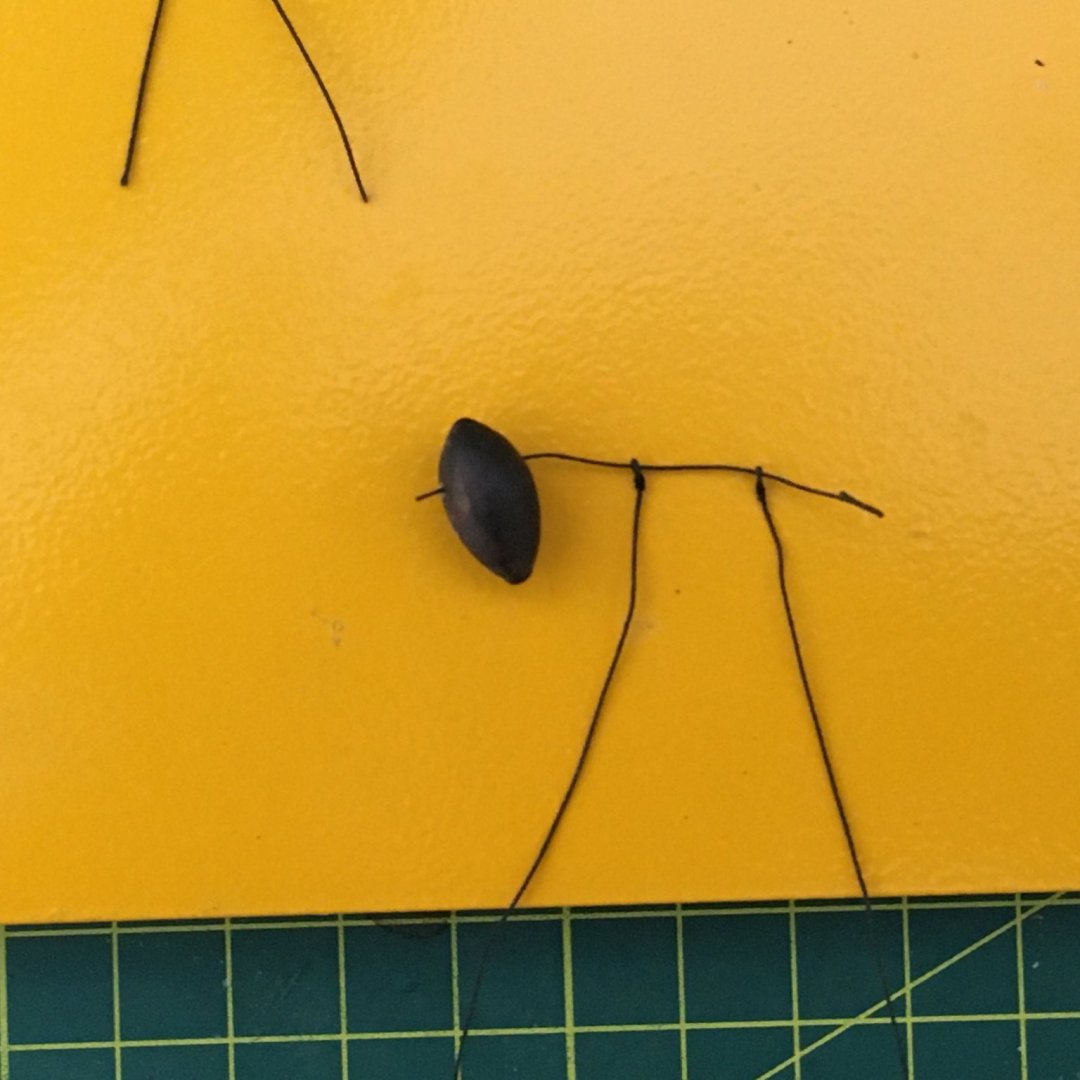
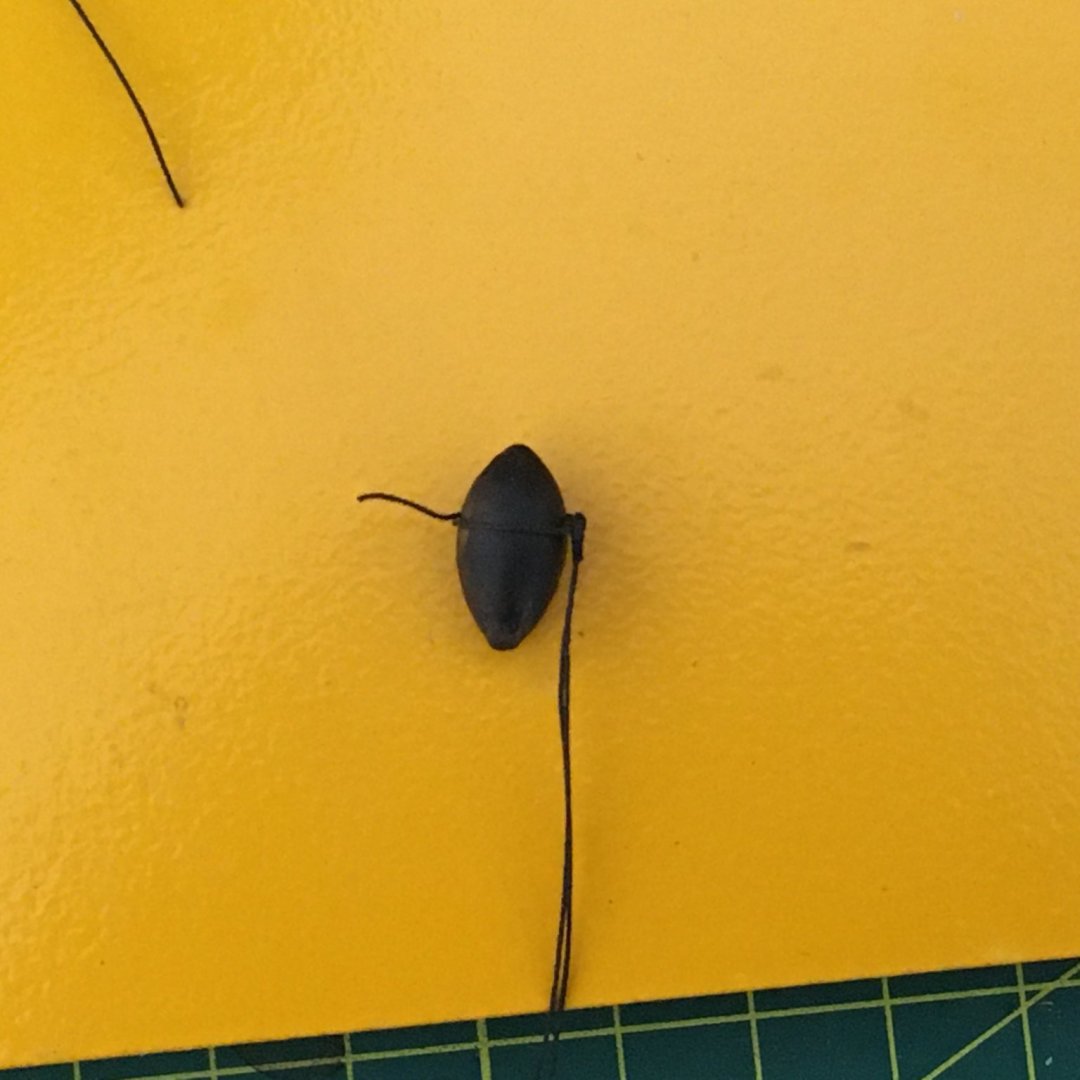
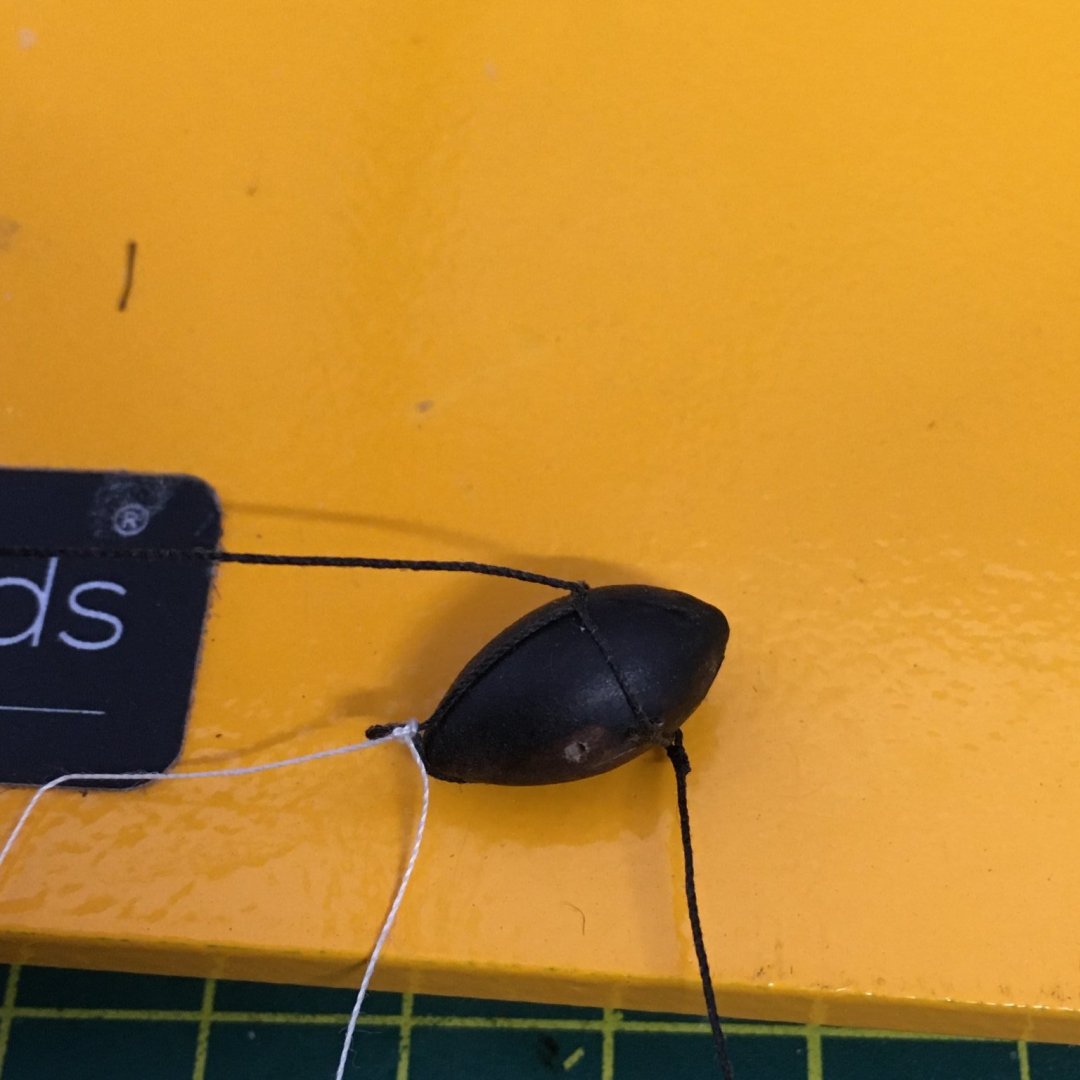
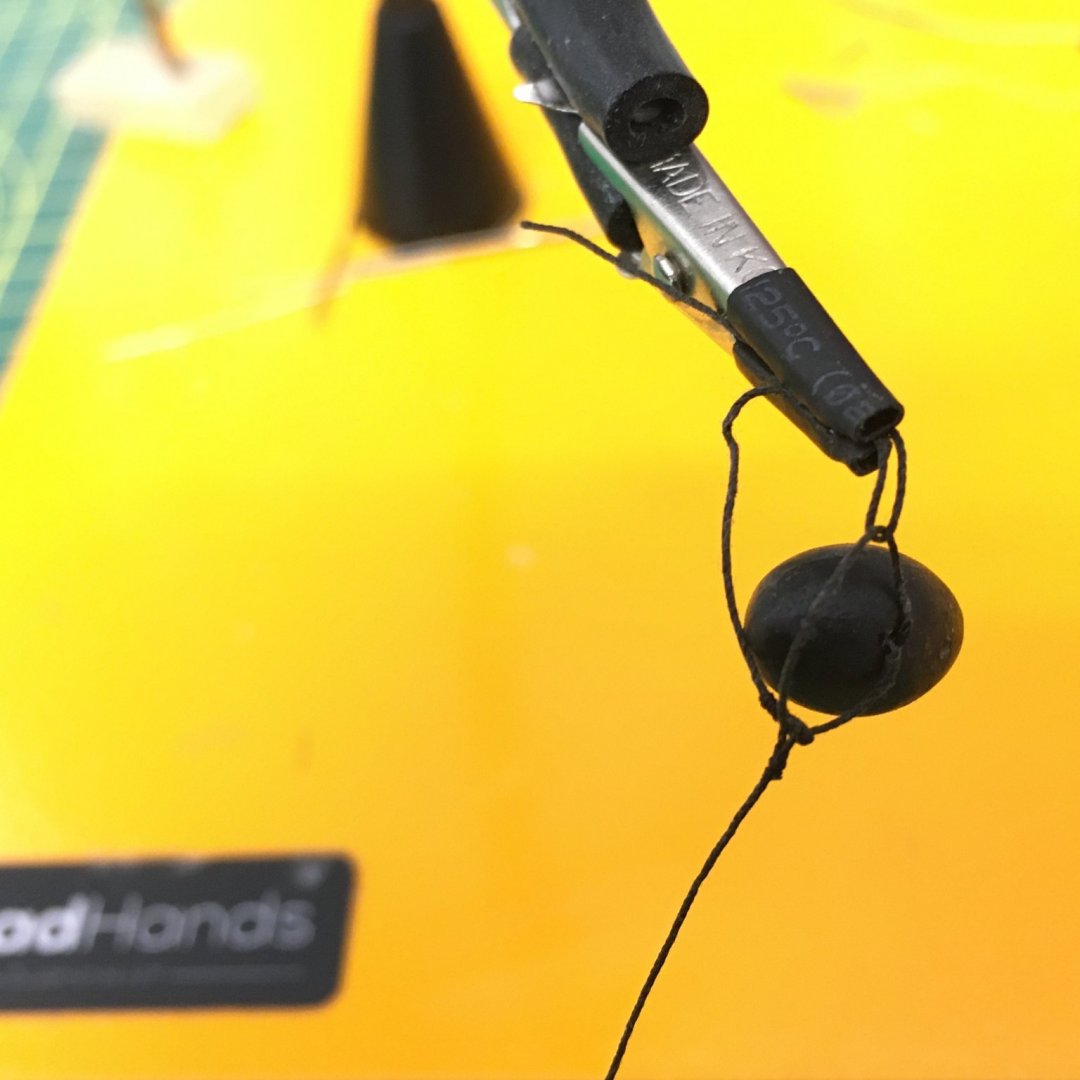
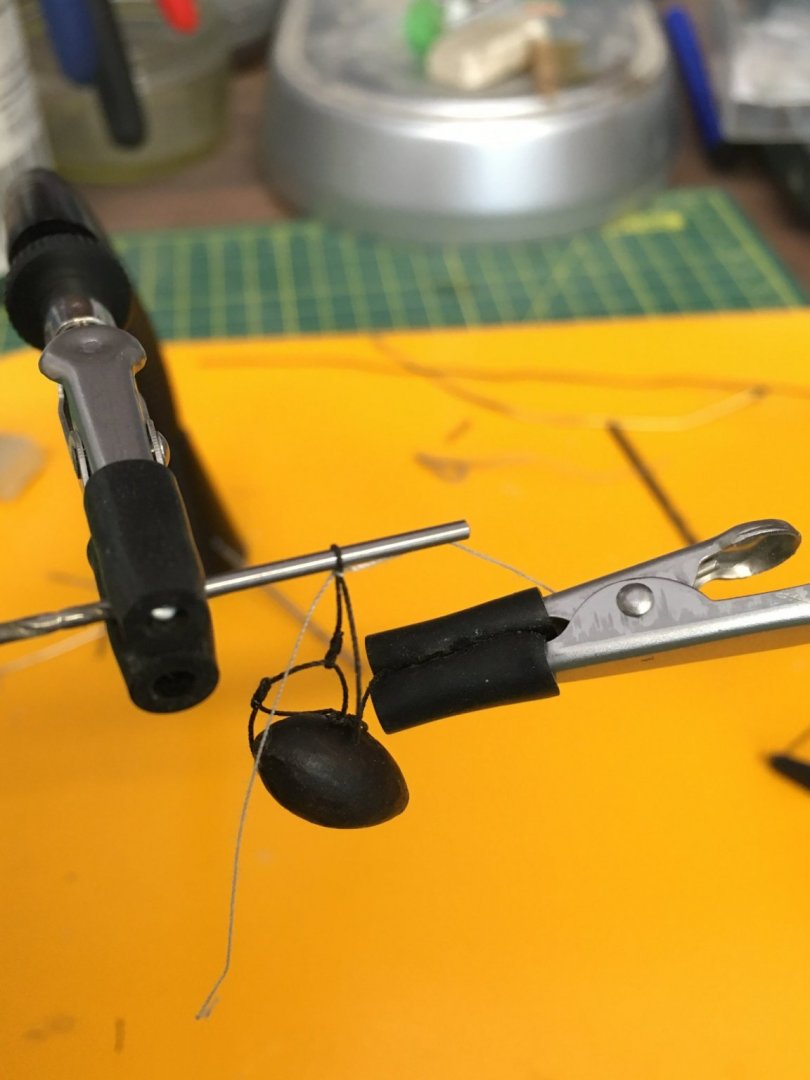
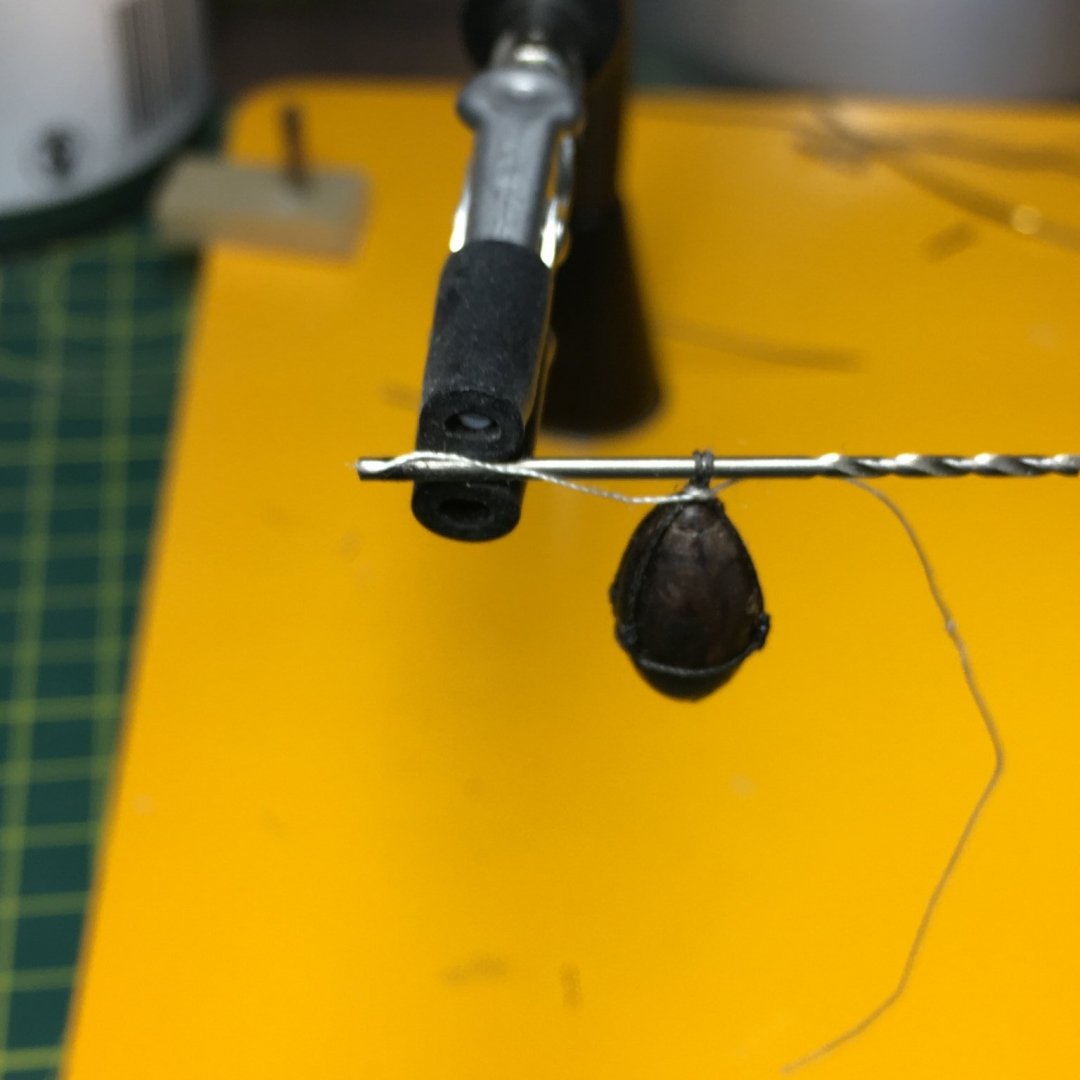
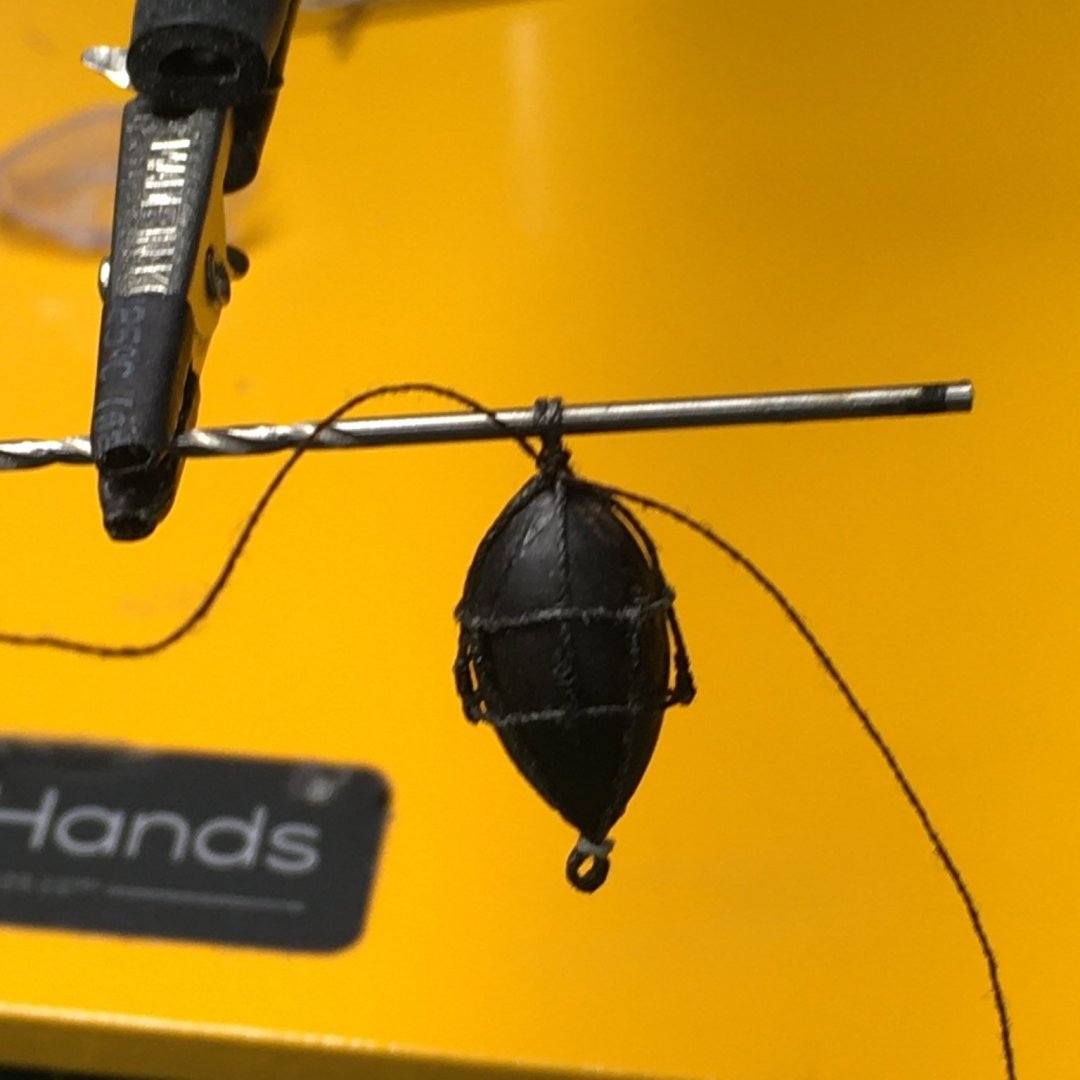
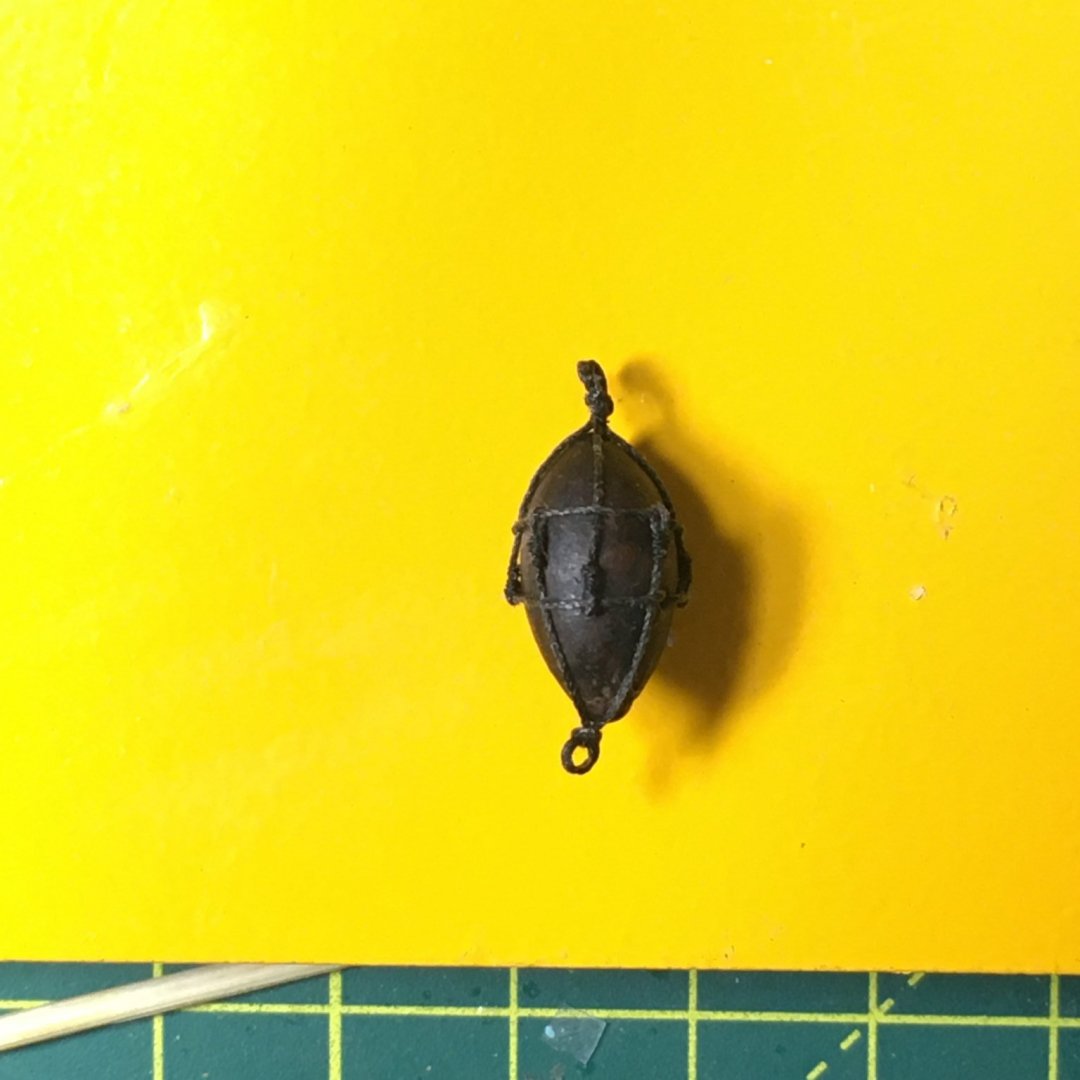
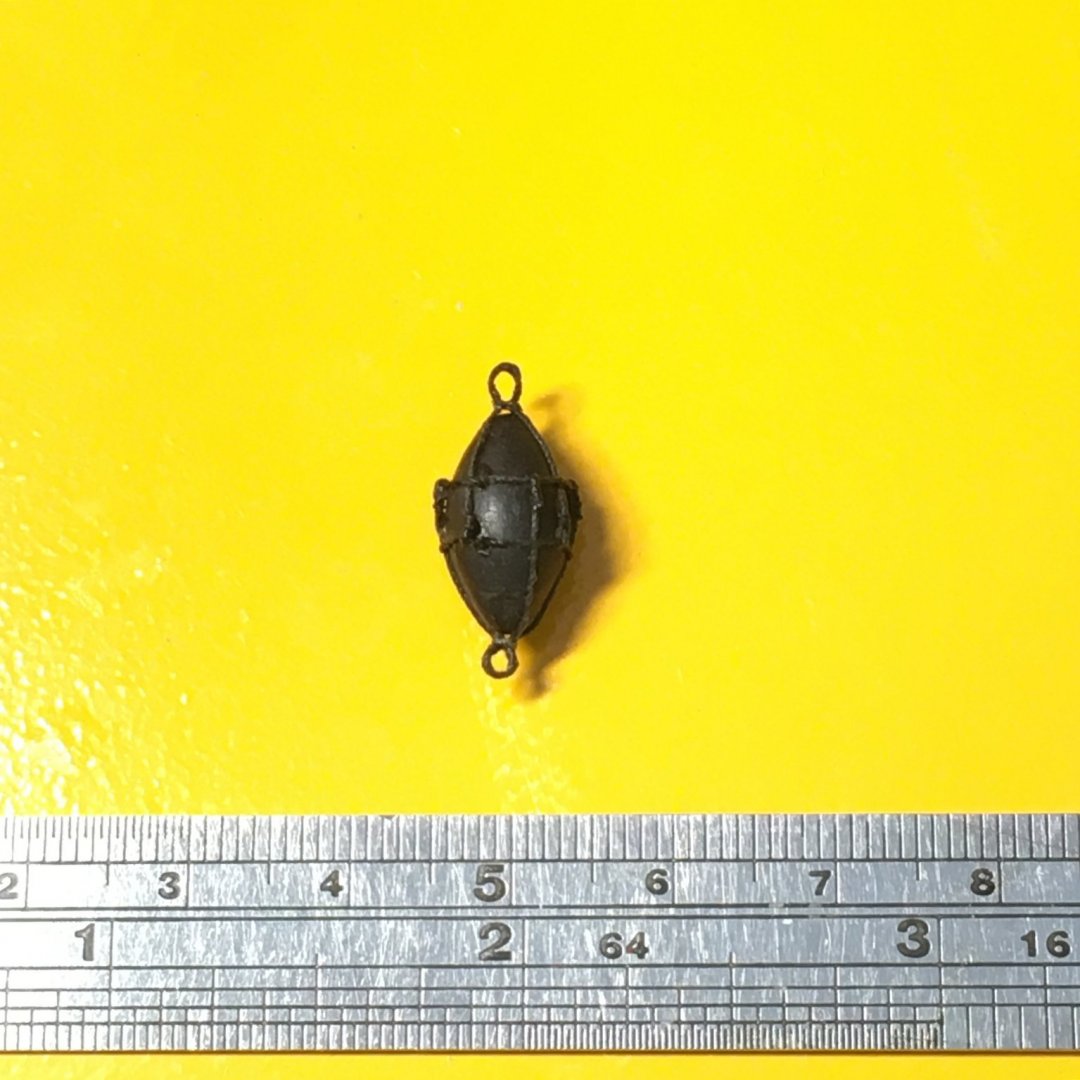
Anchor Buoys #2 As promised, I've tried to document the method I developed for these pesky little items. This is the end result I'm aiming for: Two rope bands circle the buoy either side of the widest point. Two ropes, called slings, with eyes at both ends are attached to each of the rope bands. Each pair of slings is seized together to form an eye at either end of the buoy. I tried the David Antscherl/TFFM method first, which involves starting with an eye in both ends of each sling, with one end of each band glued into a hole in the buoy: The problem I had is that I couldn't get the length of the slings right and I found it impossible to glue the second end of the ropes into the hole to complete the two bands. I looked at this in one of the Cheerful monographs and, whilst it produces reasonable results, I'm not sure it's 100% accurate - as far as I could tell only two ropes meet at each apex not four (apologies to Chuck if I've mis-understood). Nevertheless I had the method in mind as Plan B if I couldn't get the TTFM method to work. The following is the method I ended up with. First, I dyed the buoy by soaking it in wood dye for a few minutes: As a cautionary aside, I made the mistake of using a plastic pot to hold the dye, not realising the dye would melt the plastic. Result, a very messy workbench! Next, I drilled two 0.9mm holes in the buoy. I chose 0.9mm as this was just large enough to accommodate two lengths of the 0.3mm rope I used for the bands. Initially I drilled each hole just a few mil deep, but found it very difficult to get both end of a length of rope into the hole to create a tight band round the buoy. The best method I found was to drill each hole right through the buoy. So, here's the starting position: From the right: two rope bands, the buoy with two holes, and four slings, each with an eye in only one end. The eyes are just big enough to accommodate the rope bands, and are made with 18/0 fly tying thread in the usual way. The ropes are 50 - 60mm long but lengths are not critical at this stage so long as they are not too short to go round the buoy. Next, two slings are threaded on each band: Then the end of one band is threaded right through one of the holes in the buoy: It must project far enough for you to hold it in place with a finger while you wind the rest of the band round the buoy to complete a circle. It's a bit fiddly, but not too difficult to poke the second end of the band into the same hole as the first end: Once I was confident that the band was reasonably tight and well positioned round the buoy I placed a drop of thin CA in to each end of the hole. When dry, I trimmed the end sticking out and the remaining hole was virtually invisible: I should point out that the position of the slings is irrelevant at this point as they can be slid along the band to where they need to be. Also, I found it best to finish one band and its slings before moving on to the second. So, the next step was to take one of the slings over the far end of the buoy - crossing the end at 180 degrees - and taking it back to the band. The trick here is to leave sufficient slack in the sling to enable you to form an eye at the end of the buoy. To do this I temporarily seized a 1mm drill bit into the sling: The exact position of this loop is immaterial at this stage - it is simply there to create sufficient slack in the sling. With the drill bit removed, I led the sling over the end of the buoy and back under the rope band. Making sure it was tight, I marked where it crossed the band by pressing a mark into it with a fingernail: I was then able to remove the temporary seizing on the sling and position it to seize the loose end to the band, thereby creating a second eye round the band. This shot shows the starting position, before I created a seizing in the normal way with 18/0 thread, CA and trimming: The second sling followed the same steps... ...after which I brought the slack in the two slings together at the end of the buoy, first making sure the four eyes were evenly spaced around the band. I used the same drill bit to make sure I got a good eye: I used light thread just for clarity, and dyed it later. The second band was a repeat of the first, with the exception that I had to use a thin needle to get the slings under the first band, which was fairly tight by this stage: Other than that the method was identical, ending with the creation of an eye in the second end: Here's the final result: I'm conscious that some folk would have built at least two models in the time it's taking me to rig the anchors, but it keeps me happy🙂. The final job will be rigging the anchors to the ship. Derek


- 725 replies
-
- 20
-
-
-
- vanguard models
- speedy
- (and 1 more)
-
Just wait a bit and I’ll tell you 🤣😂
-
Hi Tom. Thanks for the book suggestion - I’ll add that to my reading list. I don’t suffer from false modesty, but as far as ship modelling is concerned my skill levels are definitely average, especially compared to the real masters on this site. I make up for a lack of innate skill with good tools, a love of problem solving, patience and a willingness to redo a job if it’s not good enough. Given those factors, anyone could do what I do. I should add that my knowledge and abilities have improved immeasurably since I joined this forum. Derek
- 725 replies
-
- 3
-
-
- vanguard models
- speedy
- (and 1 more)
-
Thanks Tom. That looks good and I’ll certainly get some and try it.
-
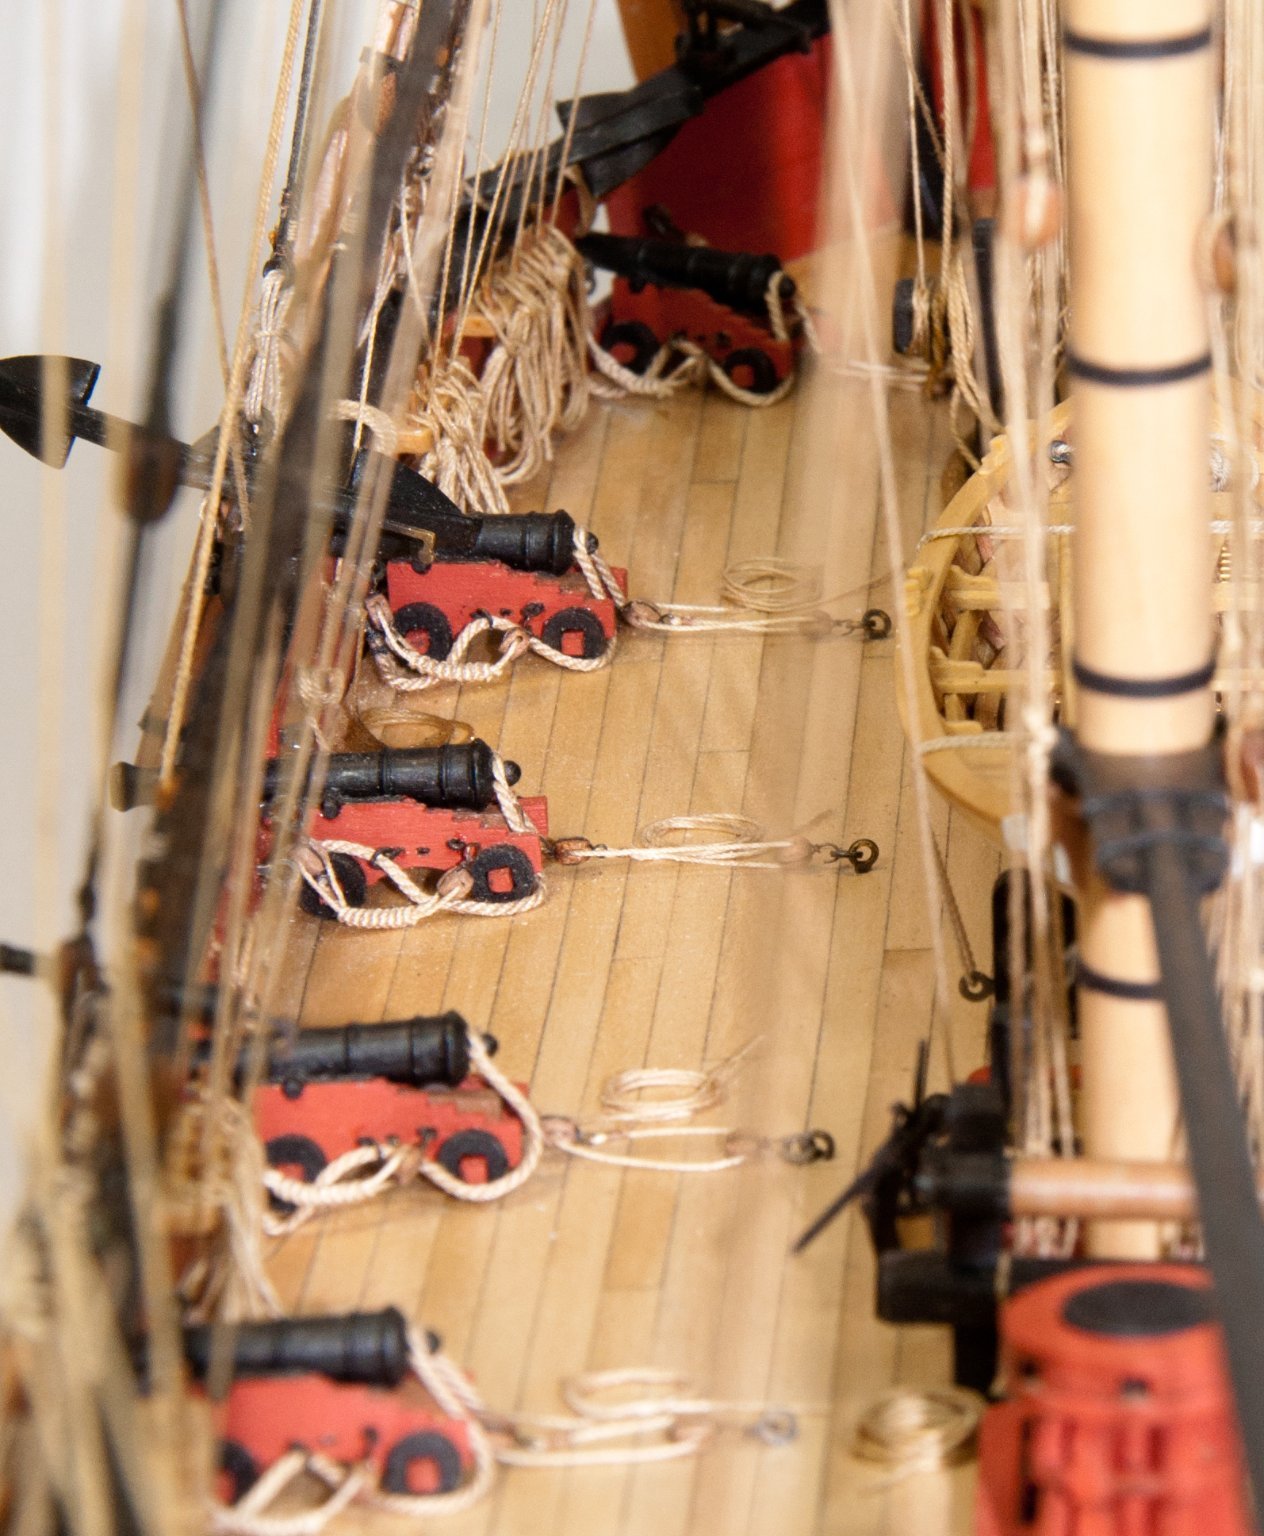
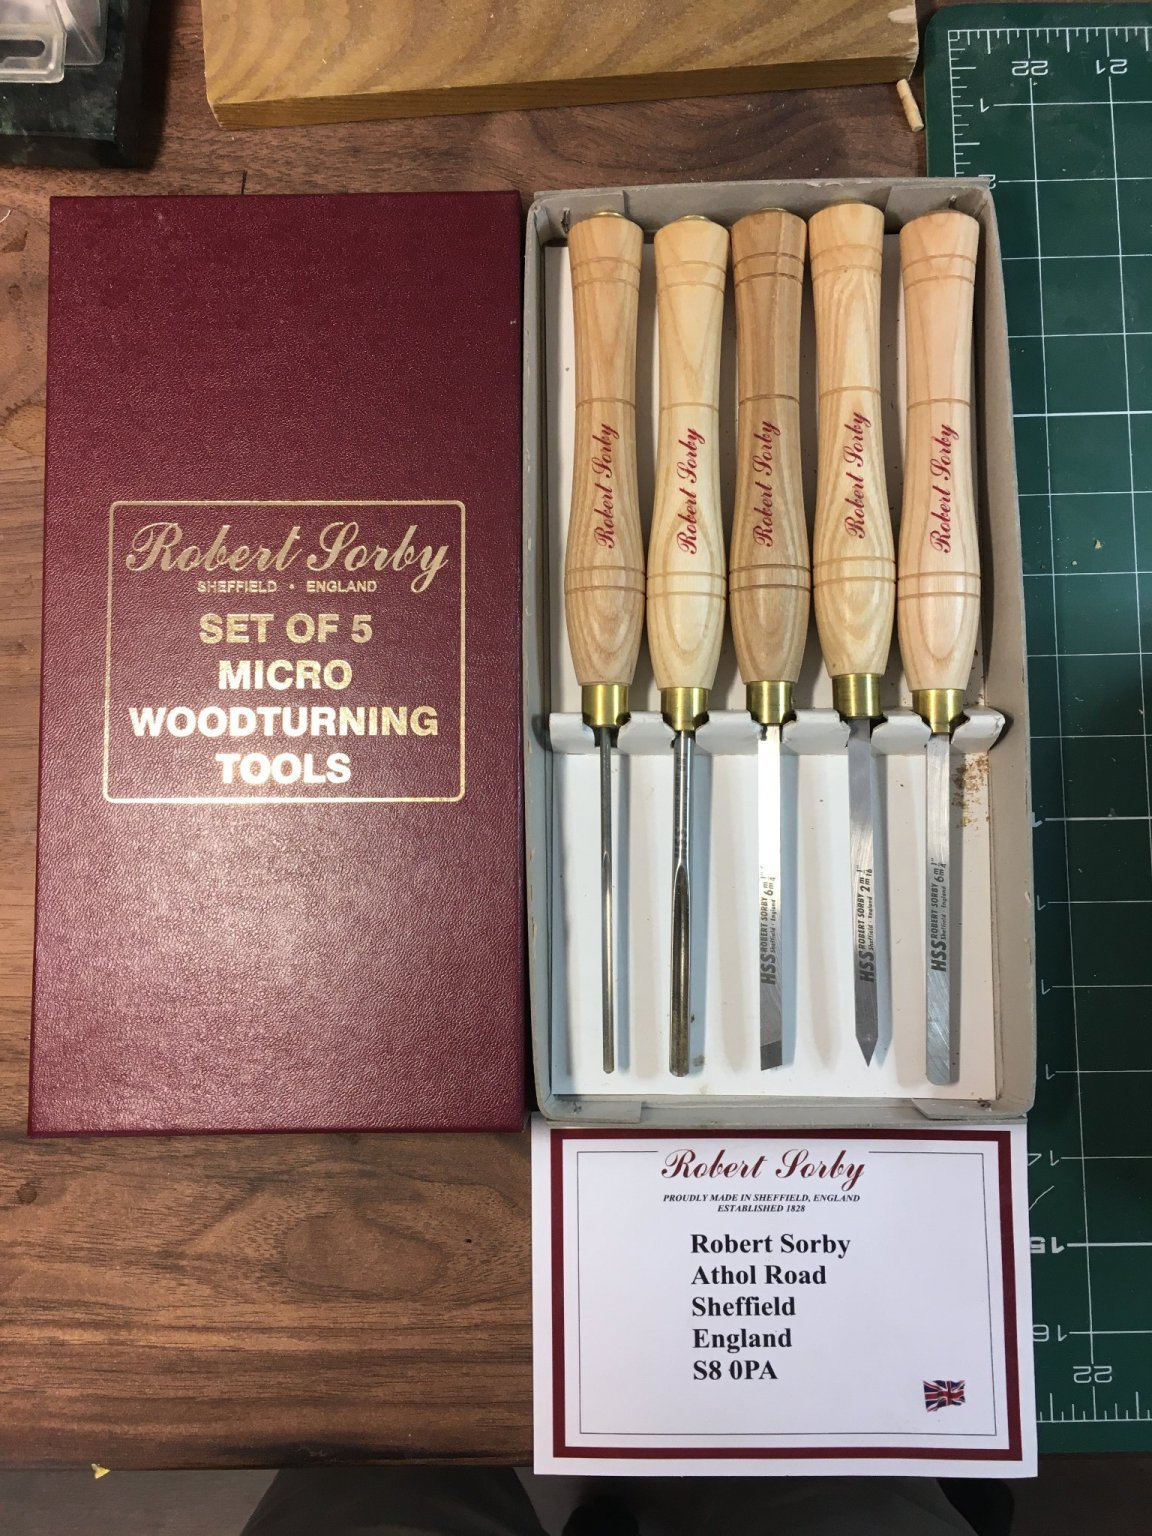
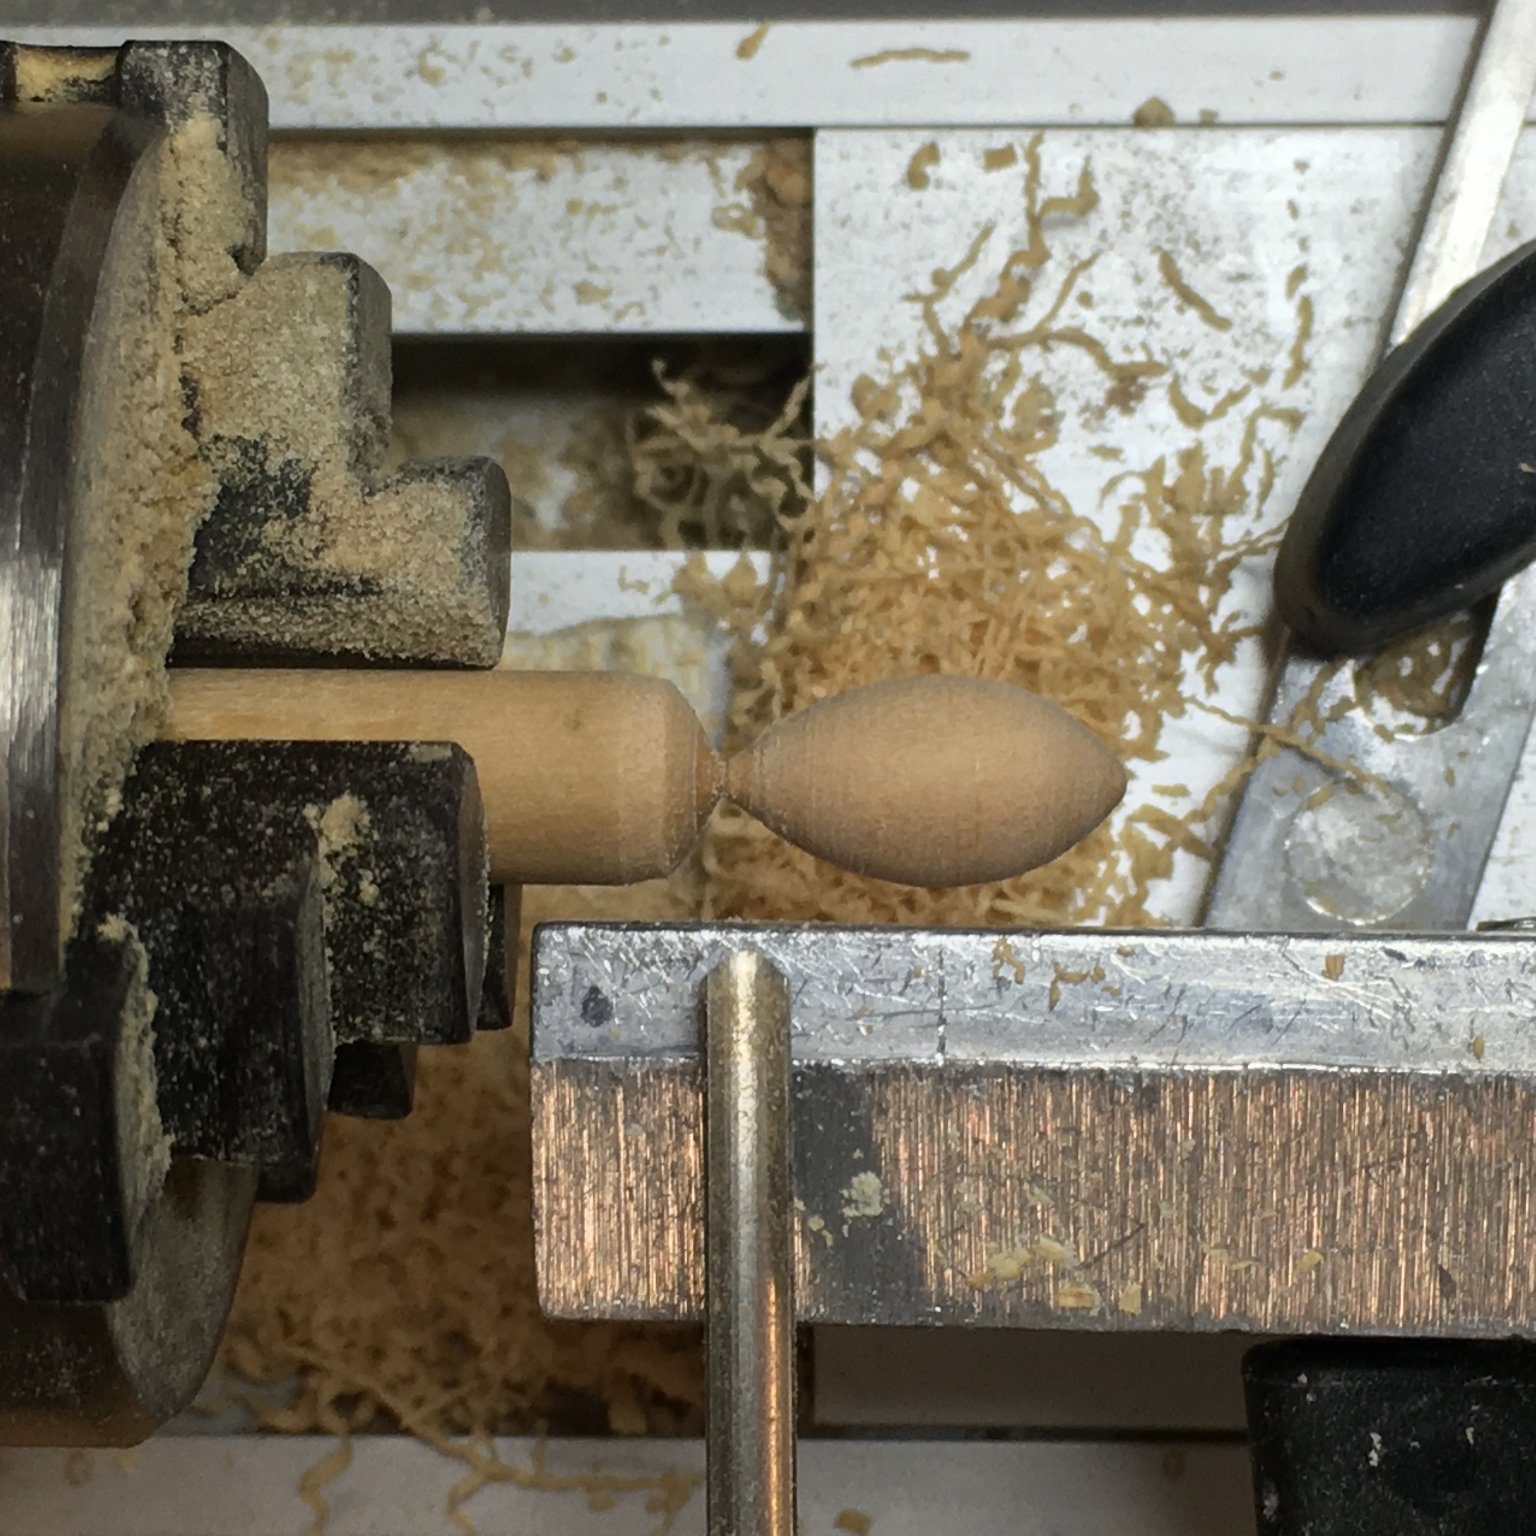
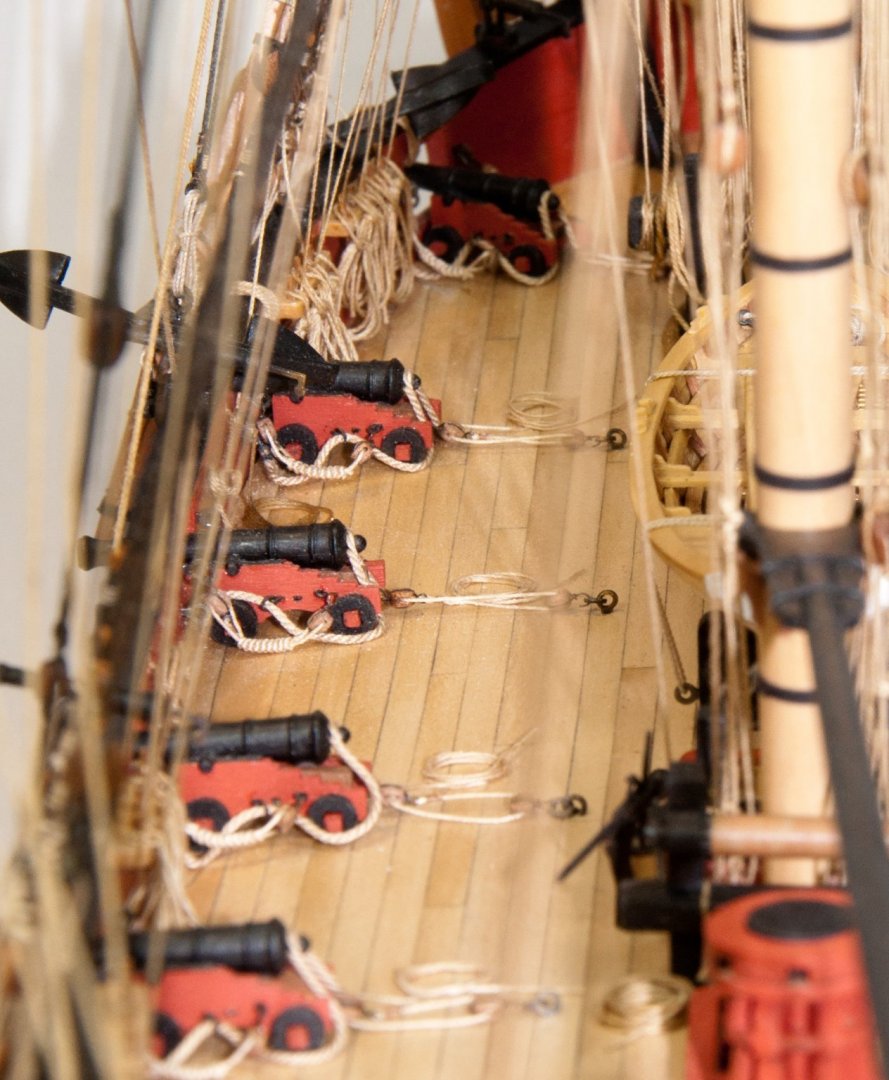
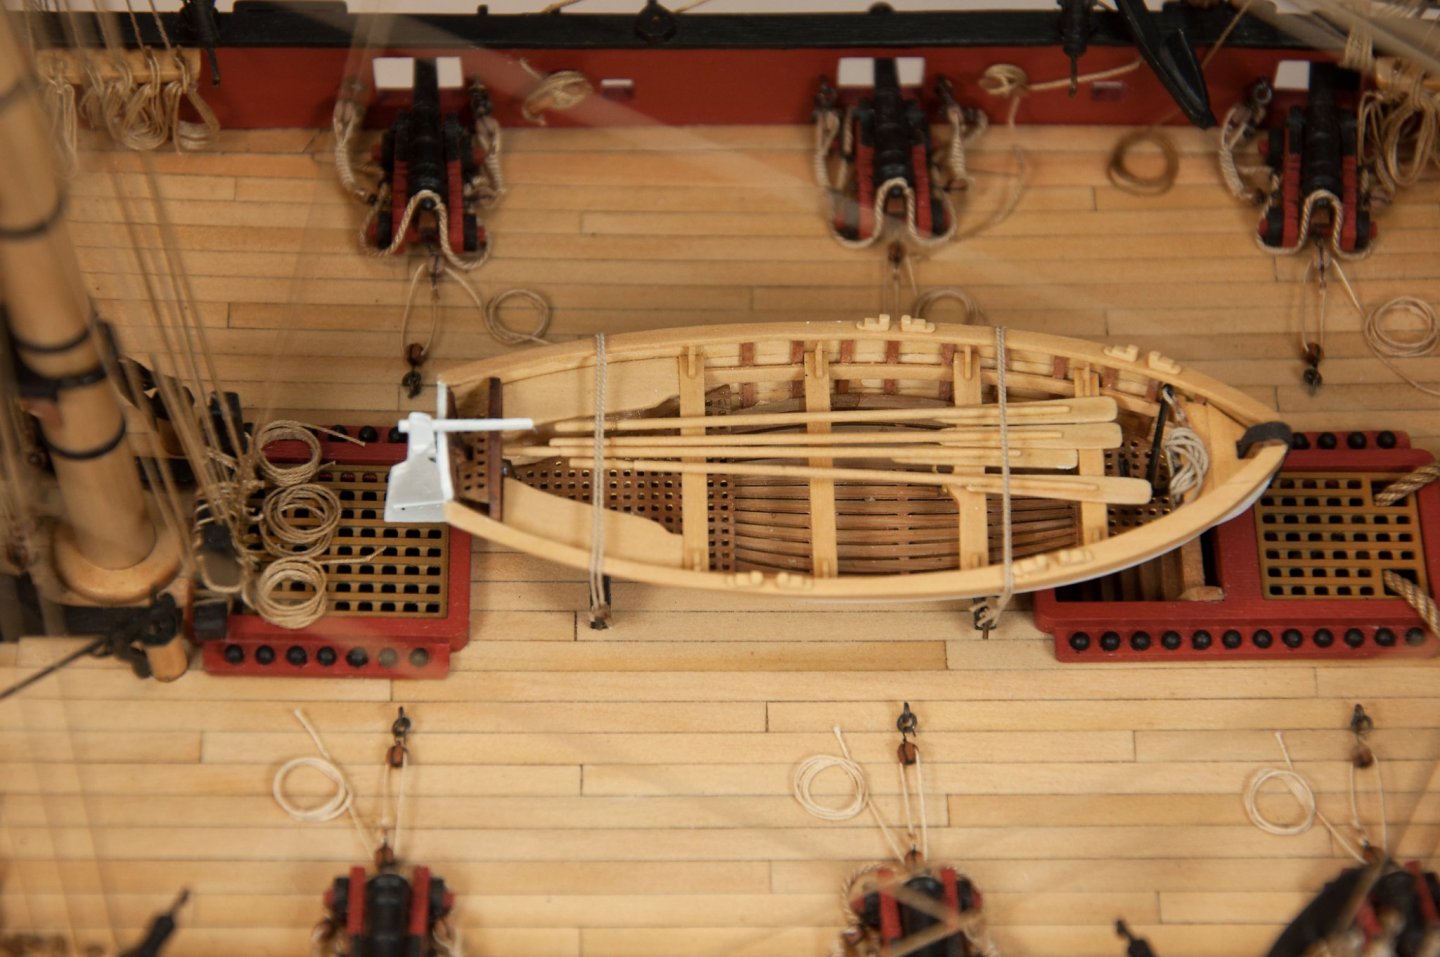
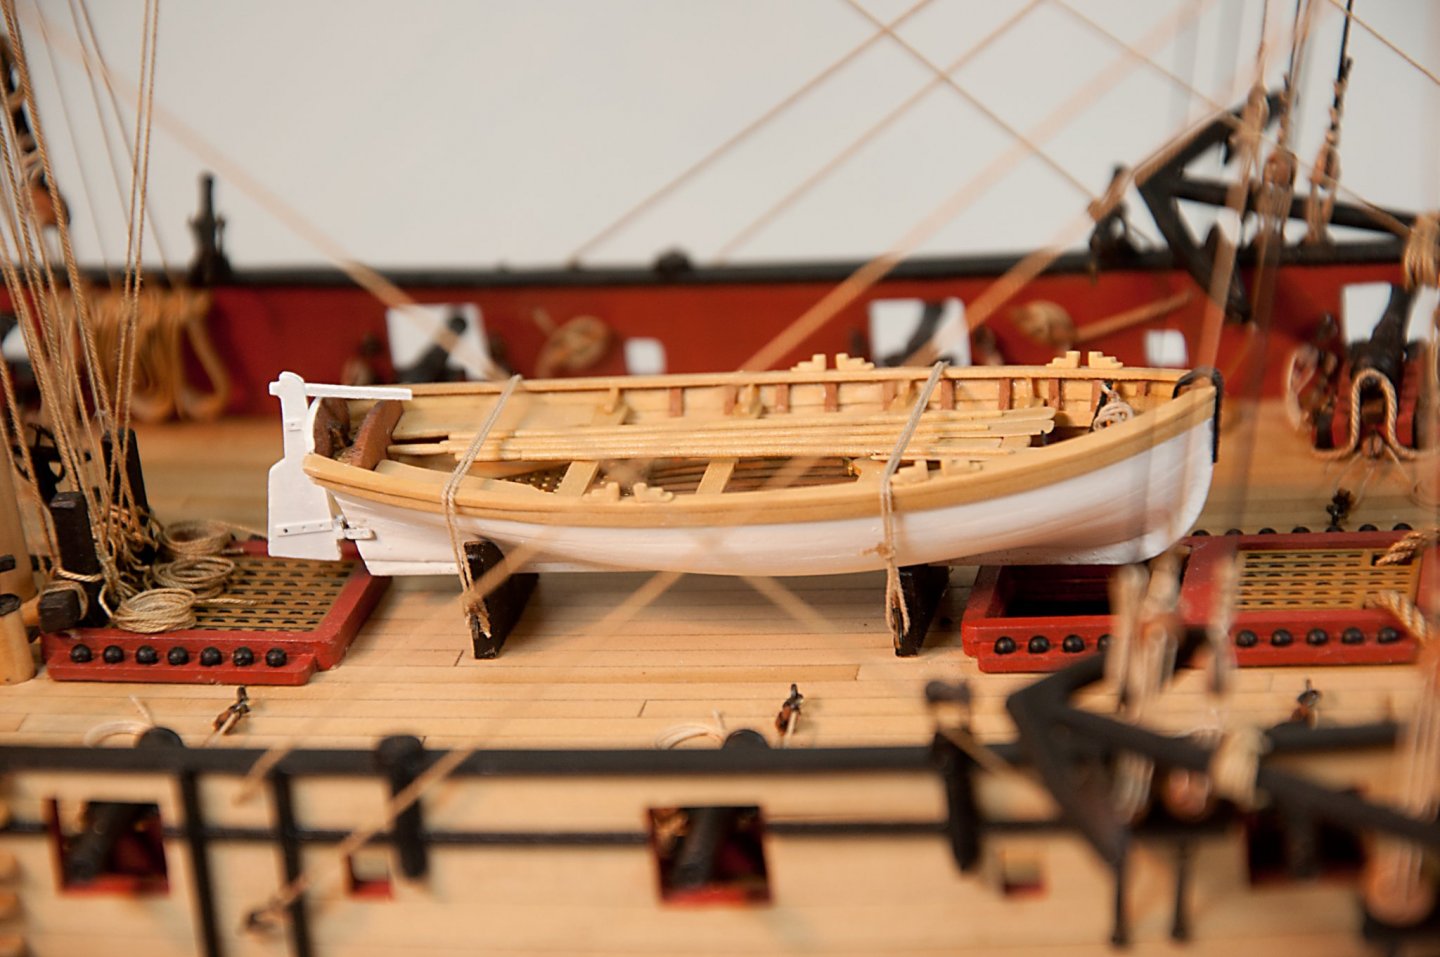
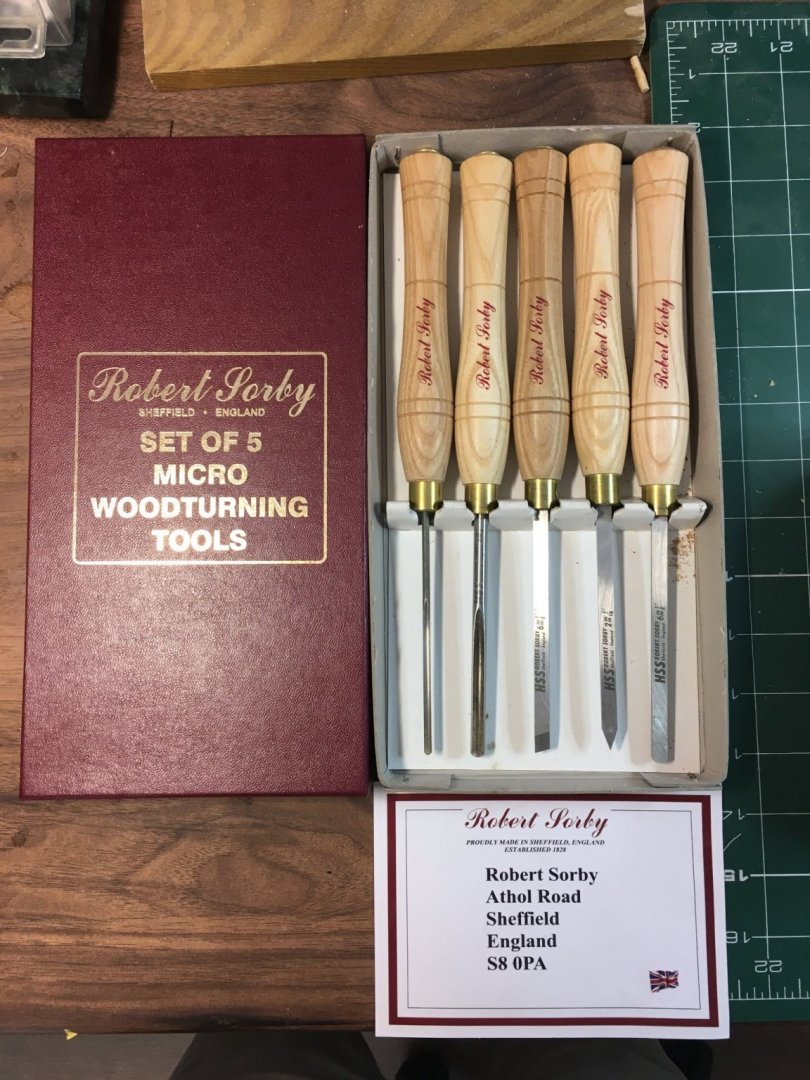
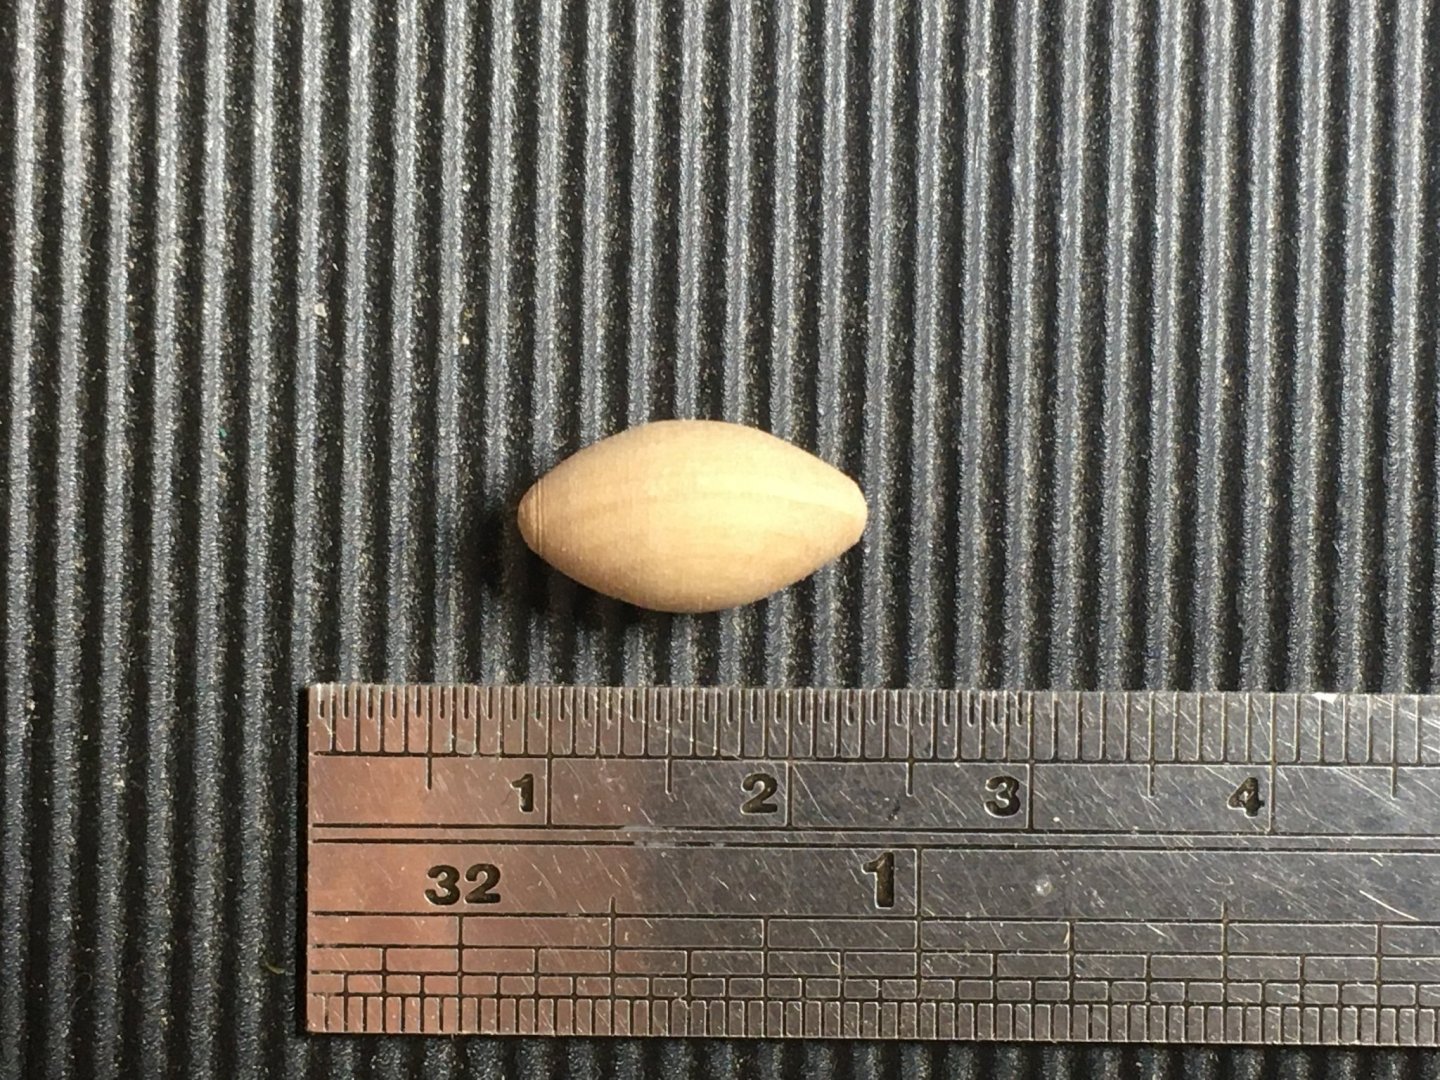
Swivels & Anchors Now that the rigging is reasonably tidy I've started to fit the swivels (seems ages since I assembled and painted them!). Chris has supplied enough to fit all 20 mounting positions, but only because he presumed that some people would be uncomfortable leaving any positions empty. In reality Speedy would have had fewer than 20 swivels, the extra positions being to allow the crew flexibility in combat. I've chosen to fit five each side, although I'm leaving the bow guns until after I've rigged the anchors. Here's one in the stern: On to the anchors. These have also been sitting quietly waiting their turn for some months, although I hadn't finished the puddening and buoys. I always find puddening a chore, but this time I tried jamming the starting end of the thread in the hole in the anchor stock. The anchor ring held the thread in the hole quite tightly meaning I could start the winding process without unsightly knots slipping round as fast as I could wind the thread. I found the best method for me was to pass the thread through the ring using tweezers to keep everything as short and tight as possible: I brushed every few turns with very dilute PVA (3:1 water:PVA) - not so much to stick the thread, but more to reduce its springiness and encourage the turns to remain tight on the ring. The first part of making the anchor buoys - turning the body of the buoys on the lathe - was an unexpected pleasure. Up to now I've mainly used files and sandpaper to shape components on the Proxxon wood lathe. However some time ago I bought a set of micro woodturning tools made in Sheffield, the home of high quality steel tools: I hadn't really used them before now and when I did they were a revelation, removing wood like a dream. I used a spare boxwood mast I'd previously created for another model using the octagon method, and decided it would be ideal for the 7mm X 14mm buoys. Each buoy only seemed to take a few moments to shape: Next came the hard bit - rigging the rope slings that enclose the buoys. I wanted to use the method described by David Antscherl in The Fully Framed Model, which closely follows full size practice. Incidentally, David also explains why anchor buoys are also called nun buoys. Apparently it's nothing to do with religious women, but rather because the shape resembles an old-time child's toy, a top called a nun, or nunne. Anyway, I tried David's method and failed. Suffice to say it took several attempts before I got something I was satisfied with: I didn't take any intermediate photos, but now I've got a method that works for me I'll document it for the second buoy which will follow shortly. Derek


- 725 replies
-
- 13
-
-
- vanguard models
- speedy
- (and 1 more)
-
Hi James. The cables are stuck down, but not so firmly that you couldn’t move them if you really needed to.
- 725 replies
-
- 2
-
-
- vanguard models
- speedy
- (and 1 more)
-
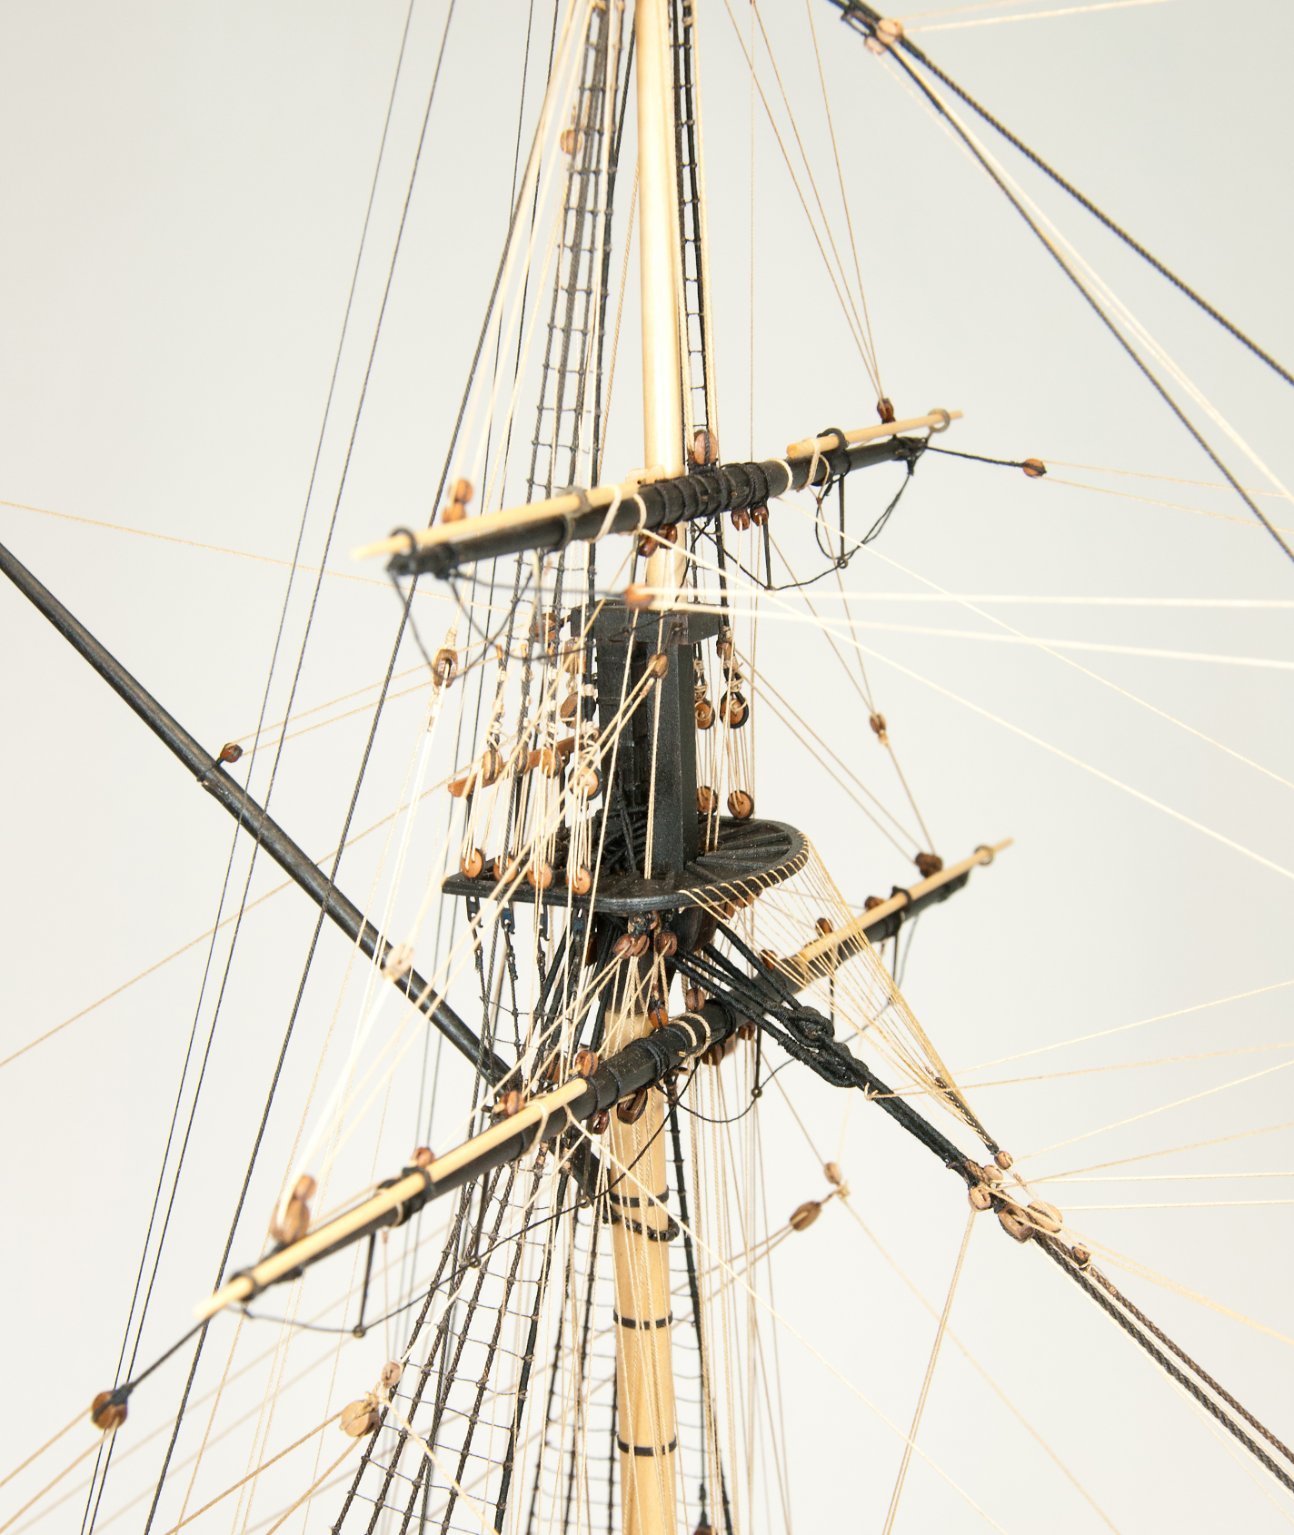
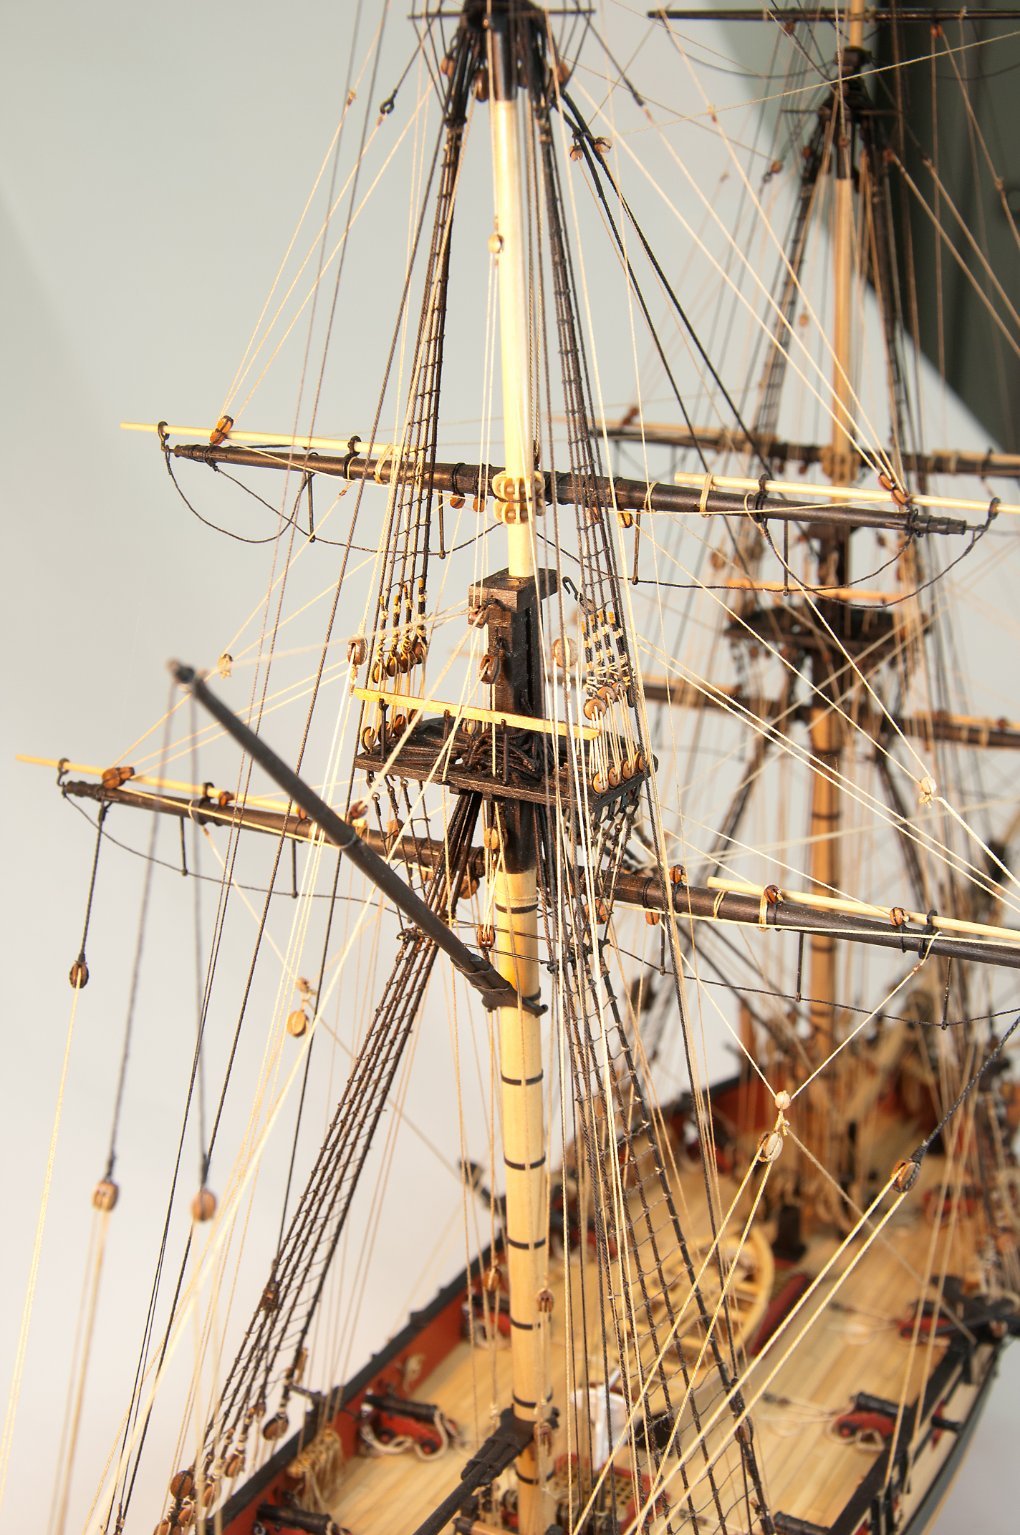
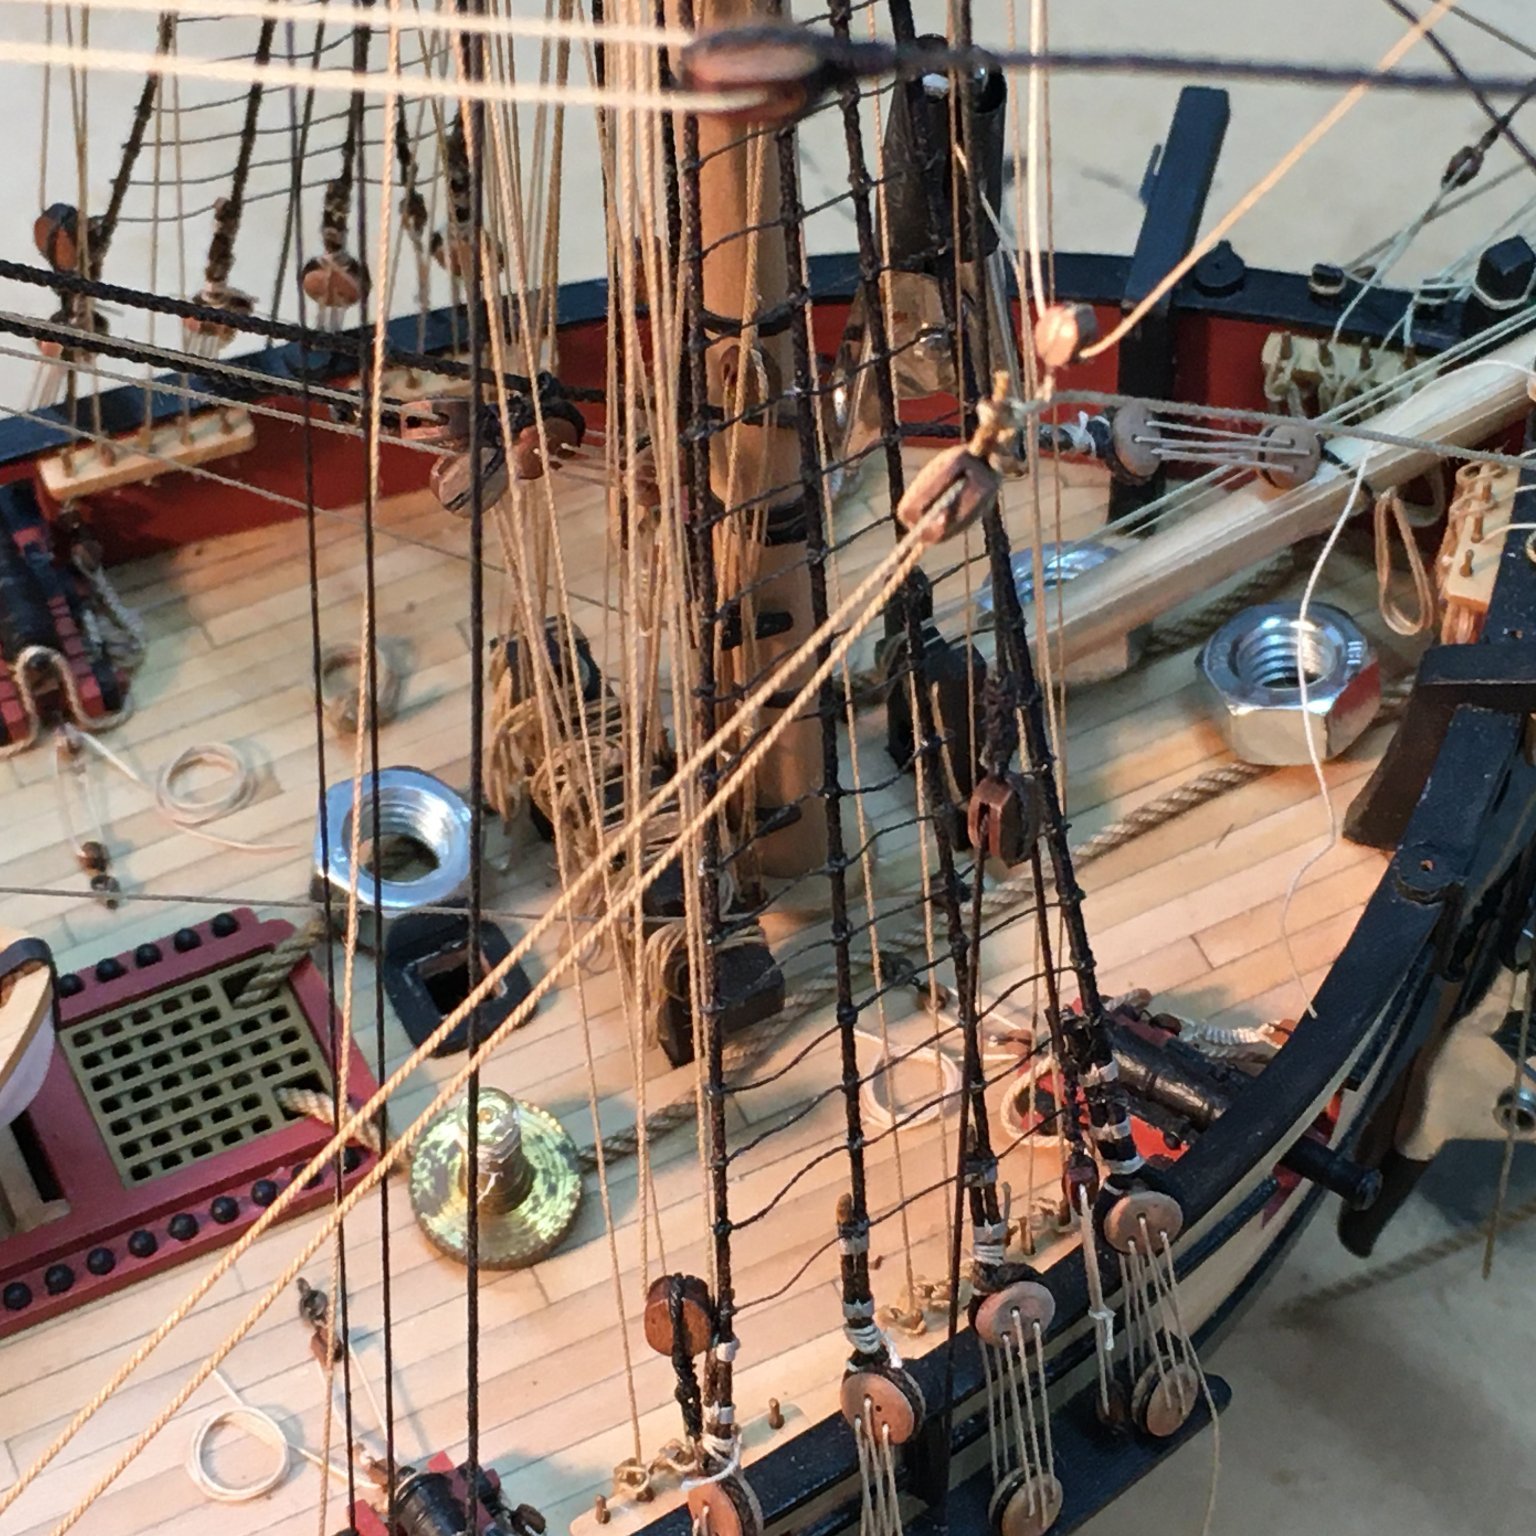
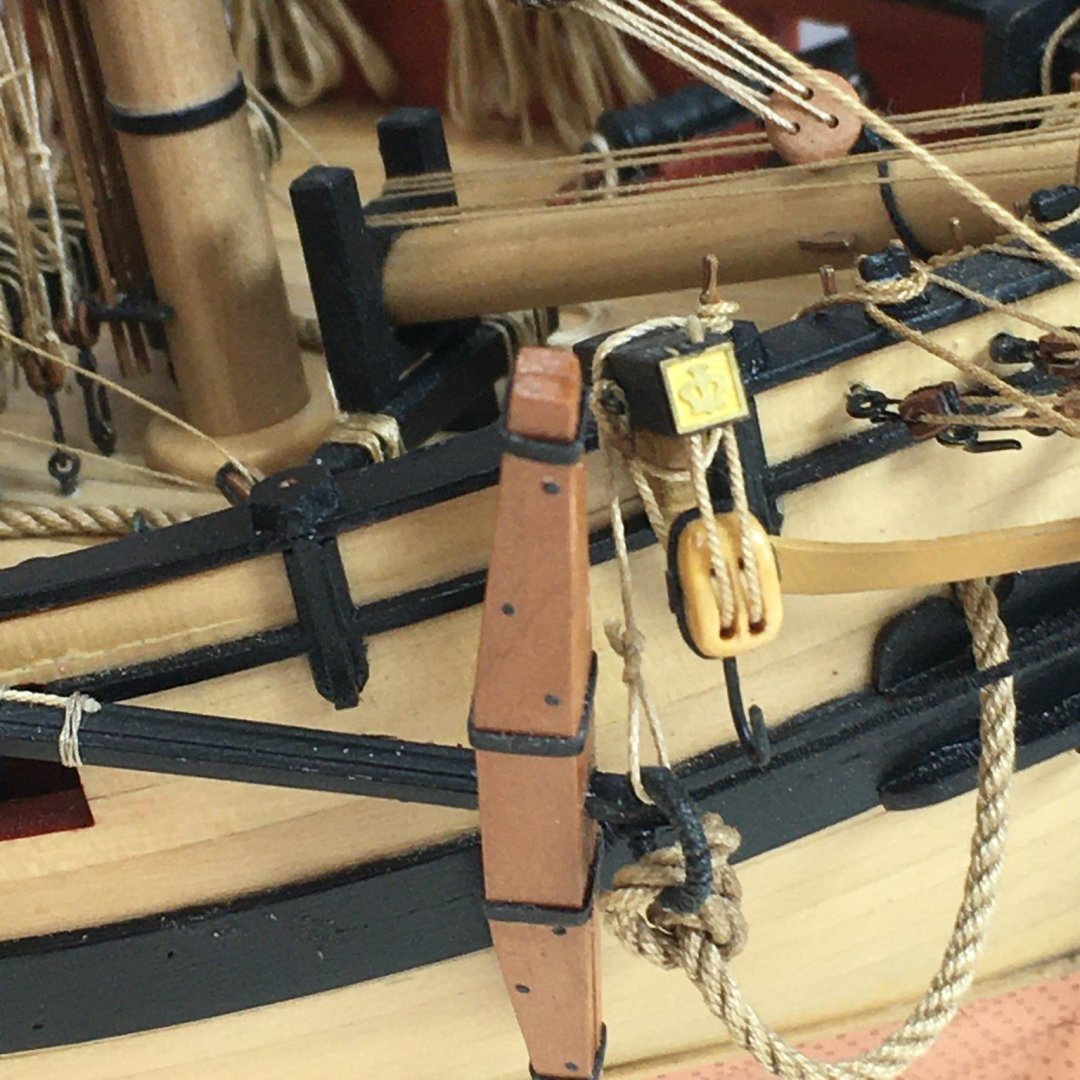
Main braces and more coils The last few days have been somewhat 'bitty' as I played around with rope coils and tried to get the ropework looking as natural as possible. One of the first jobs was trying to get the anchor cables to lie flat on the deck - not easy given how thick and inflexible they are. I found the best method was to brush on very dilute PVA (about 3:1, water : PVA) then weigh the cables down with an assortment of nuts and bolts until dry: This worked quite well. Incidentally, I'd like to pretend I removed the galley flue in order to improve access to the fore bitts (the flue base is visible between the anchor cables). In reality I broke it off by accident; easier access for rigging around the foremast was an unintended bonus. The main braces are straightforward. On each side a length of 0.5mm line has a hook seized into one end, which links to the rearmost outboard eyebolt. The lines reeve through the 5mm pendant blocks previously fitted to the main yard then back through the sheaves just abaft the eyebolts. Here's the starboard setup: Inboard, the lines belay to the nearby cleats. In this picture I've painted on dilute PVA with small clips keeping the lines in place whilst the glue dries: The cleat on the left looks larger for a reason. The rigging calls for eight large cleats but only six are supplied so I thought I'd have a go at making my own. They came out slightly larger than the laser cut originals but didn't look too out of scale. I decided that the main sheets would require beefier cleats than the fore sheets and main braces (based on zero knowledge or information!) so I kept them. Over the next day or so I hope to finish tidying up the rigging then I can get on with last jobs - fitting the anchors and swivels. Derek

- 725 replies
-
- 10
-
-
- vanguard models
- speedy
- (and 1 more)
-
Hi Eamonn. I apologise for being so late to the party, but I'd like to add my congratulations to the well-deserved plaudits you've earned for this splendid model. I particularly like the way you have displayed her. Well done! Derek
- 1,039 replies
-
- 2
-
-
-
- ballahoo
- caldercraft
- (and 2 more)
-
Photographing HMS Terror artifacts
DelF replied to Rik Thistle's topic in Photographing your work. How to do this.
Interesting video Richard - thanks for posting. Btw, I've checked in the dictionary and 'artefact' is the older word (around 1650), being derived from the Latin arte factum - (something) made with skill. 'Artificial' has the same roots, and probably explains why the 'i' snuck in to 'artefact' around 1820. Interestingly the OED considers 'artifact' the more appropriate usage nowadays as the entry for 'artefact' just signposts the newer word. Linguistic convergence across the pond for a change. Nerdy, me? -
They seem very reasonable to me, especially considering the quality (I've just seen them on James's Sphinx). The only ones I know of comparable quality are Syren's and they're $12.75 & $13.75 for the two sizes (roughly £9 and £10, and leaving aside any differences in shipping charges). Pity Speedy doesn't need lanterns! Just one question - you say they're made from very hard resin but the website says they're not resin?
-
You've created a real family heirloom Glenn - you must be justly very proud. Thanks for the mention. Like you, I've enjoyed our conversations and banter over the last year and learned a lot, although looking at your pictures of Cheerful I can see I've still a lot to learn about photography! Best wishes, and enjoy your (hopefully short) break from modelling. Derek
- 778 replies
-
- 2
-
-
- cheerful
- Syren Ship Model Company
- (and 1 more)
-
Good to see you back James - your planking really is superb, and I'm impressed with your joggling. Well done! Derek
-
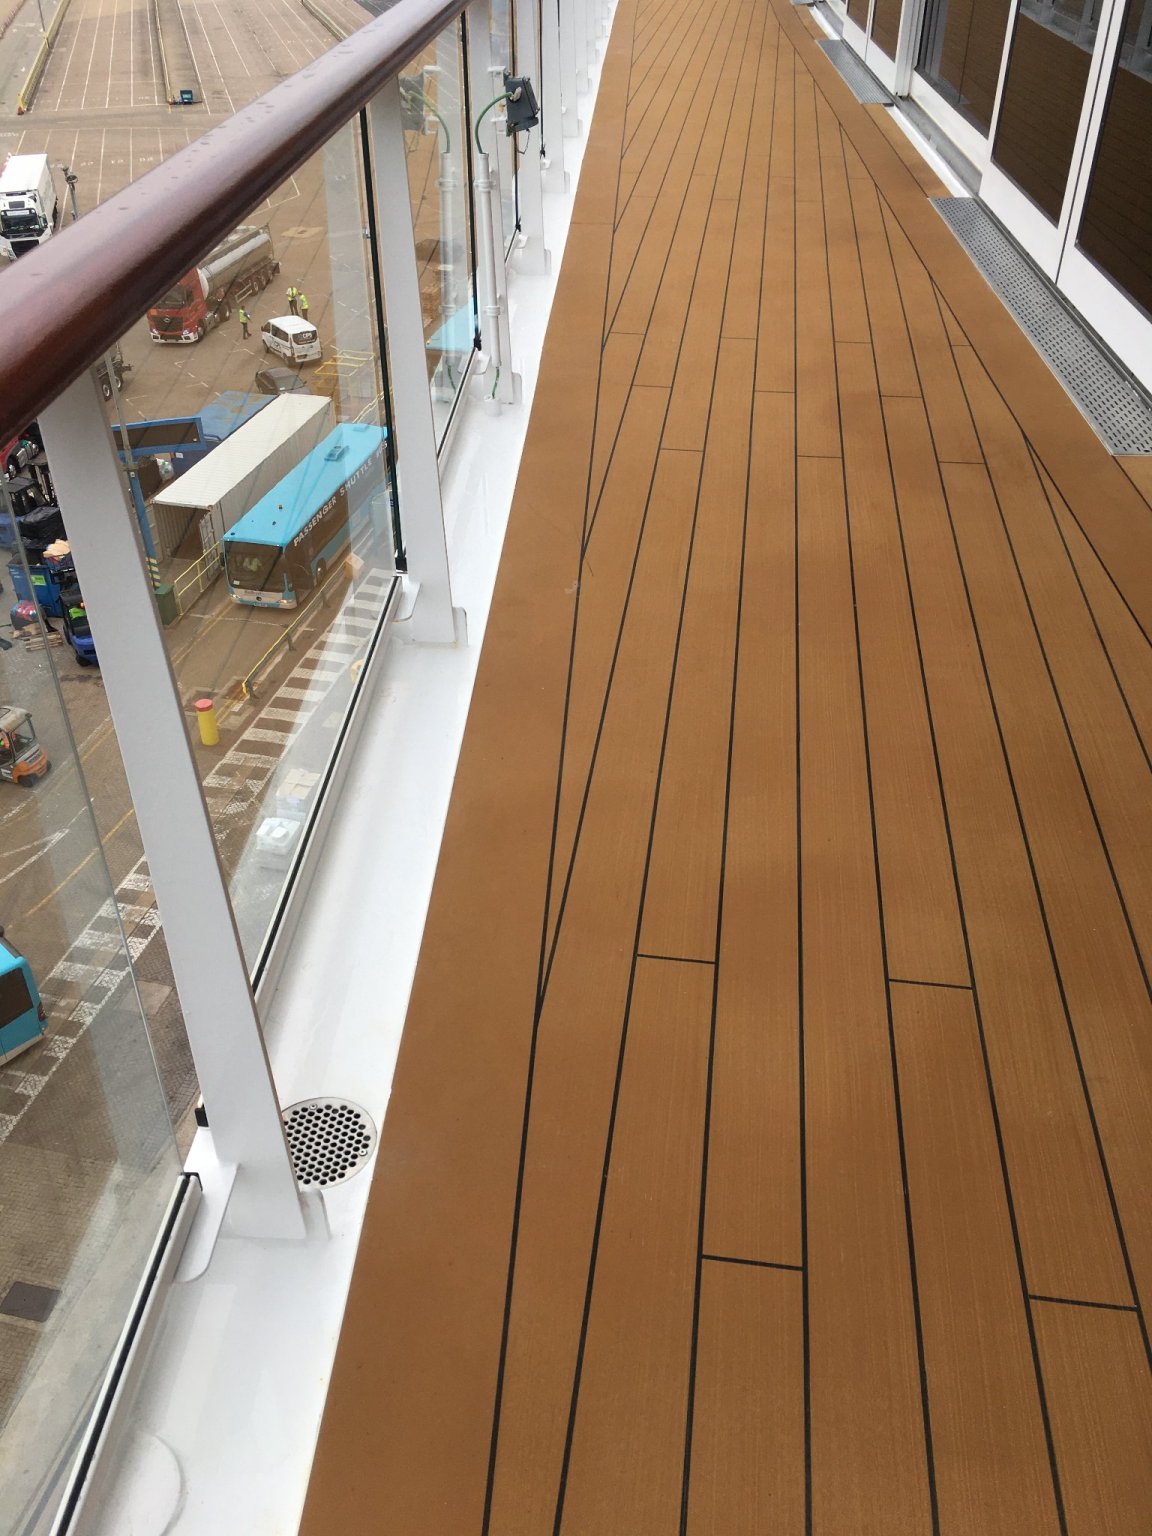
Break Over Just got back from our little mini-cruise, Portsmouth - Liverpool - Isles of Scilly - Falmouth - Portland - Portsmouth, including two full days at sea in between ports. Very relaxing. The dockyard re-opens tomorrow, but in the meantime here's one shot of the Viking Venus. She's a marvellous ship, but I was disappointed to notice that the deck planks weren't properly joggled into the margin plank 🤪 Normal service will be resumed tomorrow.

- 725 replies
-
- 3
-
-
- vanguard models
- speedy
- (and 1 more)
-
Hi Glenn. Just got home from our mini cruise and logged in to find you've finished Cheerful. What a fabulous result! Genuine museum quality. I've really enjoyed following along as you've mastered new tools and techniques, culminating in your superb work on the lathe, and like everyone else I appreciate how you've photographed and described every stage so well in your log. A real masterclass. A well-deserved breather now, or straight on with the next project? Derek
- 778 replies
-
- 2
-
-
- cheerful
- Syren Ship Model Company
- (and 1 more)
-
A short break... We're off to Portsmouth tomorrow to board a real ship😁. We were supposed to be going to Alaska on a trip originally postponed from last year and now kicked forward to next, so as compensation we're going on the Viking Venus for a one-week trip to the Scilly Isles and up the west coast. The Venus is Viking's latest ship, with just half the usual number of 930 passengers, and it's only available to double-dosed adults. To be honest, the itinerary is almost irrelevant - we just want to get away in comfort for a few days. Work on Speedy will resume in the second week in July. Now where's that beer🍺? Derek
- 725 replies
-
- 5
-
-
- vanguard models
- speedy
- (and 1 more)