HOLIDAY DONATION DRIVE - SUPPORT MSW - DO YOUR PART TO KEEP THIS GREAT FORUM GOING! (Only 24 donations so far out of 49,000 members - C'mon guys!)
×


channell
-
Posts
234 -
Joined
-
Last visited
Content Type
Profiles
Forums
Gallery
Events
Everything posted by channell
-
 This is my solution, though I'm gonna have to evict the Admiral from the lower shelves eventually...
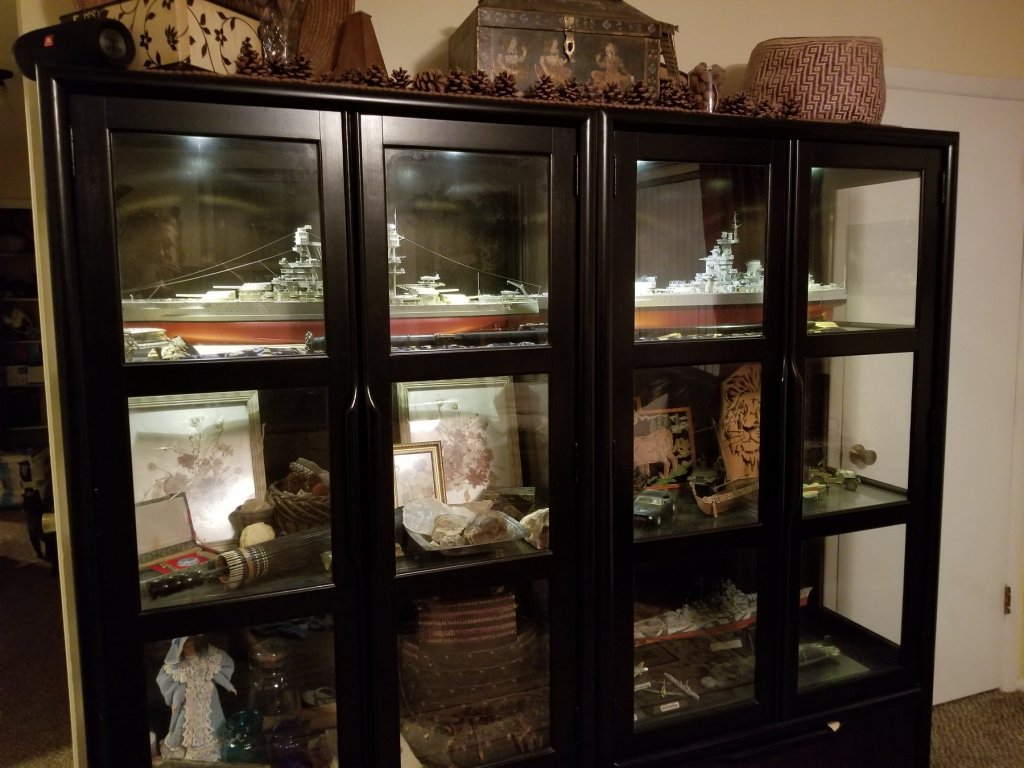
- 265 replies
-
- 11
-

-
Thanks! There is an insane amount of PE on this build, more than I've ever attempted before but it seems to be going well so far. I've honestly been having a good time working on Bissy over these past few months, guess that's what matters most! My Hood build has been on ice for a couple years now and is an equally monster project as the Bismarck but I got bogged down on the build and just wasn't "feeling it" at the time. I figured it was better to wait until the "right time" came to pick it up again... and it will, just like my "Bismarck Madness" came back after a few years. These superdetailed 1/200 warships are not easy projects to see through to the end... hopefully I'm getting old and mature enough now to actually get a few of 'em finished instead of just flitting around between overly ambitious and overwhelming projects...
-
Bismarck had fired on one of the RN cruisers that had spotted and was shadowing her earlier. The concussion of her own big guns knocked out Bismarck's forward radar so Admiral Lutjens moved Prinz Eugen in front. Both ships had roughly similar general profiles and with distance and weather (remember they started firing at each other at 12-15 MILES away) the British wrongly guessed Bismarck was in the lead. Prinz Eugen was undamaged in the battle but Prince of Wales scored a couple of minor hits on Bismarck, forcing Admiral Lutjens to slow down a couple knots and making Bismarck loose fuel, effectively ending Operation Rhine for the Germans and turning a planned convoy raiding expedition into a chase as Bismarck attempted to get to France for repairs.
-
Another weekend, another update! I'm moving along on the aft-half of the superstructure... got the deck installed and everything just about ready for PE: After scraping off the kit details: I skeletonized the AA gun platform extensions with a twist drill and a scalpel; in-progress: ... and how they look after with the PE grates installed: The completed deck: Before and after of vent stacks below turret "Caesar": One of the kit errors is having the aft area skylights as standalone units when they should be attached to the superstructure bulkheads; I modified the skylight trunks, drilled them out and mounted them directly to the bulkheads for a more "true to life" look. I had to add styrene backing so the skylights would sit far enough out to cover the holes in the deck. Got some very nice PE to dress up this area too, after priming the plastic with Tamiya rattlecan primer. And just for giggles and kicks, here's Bissy next to her nemesis, the Mighty 'Ood in the same scale: The myth of Bismarck being the gigantic juggernaut of death that outclassed every other warship in the world is a bit overblown... Hood was a big girl and I'm sure her crew put to sea to chase down Bismarck with all the confidence in the world. The reality of war however is that sometimes you win big and sometimes #$*! happens. It's humbling and a bit disturbing to remember (again) that such impressive and indeed beautiful ships were ultimately built to do such bloody, ugly jobs and that so many men died on them doing just that. One reason I love scale modeling... it brings the past alive for people like me who are so far removed from the original events like no photograph or paragraphs in a book can. I hope in my builds that I can do justice to the memory of those who were there and who gave their lives in service of their countries. War is such a terrible thing but I'm sure the dead of both ships would have been pleased to know the Nazis are long gone and virtually everyone alive today has never known a world where Germany and the UK weren't friends and allies.
- 265 replies
-
- 15
-
-
I'm not saying much but I'm still following along with great interest, Jason. Truly an inspirational job so far; I just love how clean, sharp and exact everything is.
-
Great furniture... are you gonna add a full interior to the captain's cabin as well? Hoping to see Miss Swan dining with the crew as well but that might be too much to ask.
-
There are no whales 16,000 ft down for one so you are firmly in "artistic license" zone already. ...but there's NOTHING wrong with that! Go for broke... may not be a 100% accurate depiction of the wreck but it does look cool! My $.02: Make the diorama as interesting as possible.
-
Thanks for the positive comment! I really like your Bissy build too, she builds up to a really impressive model once you throw aftermarket stuff at it. I love the concept of the deck but I wish the execution was better... it's the worst fitting wood deck I've ever used, has quite a few inaccuracies compared to the Pontos deck and it wasn't cheap either. I hope the high-end aftermarket set guys like Pontos look into printing HQ wood decks instead of laser-cutting them in the future, the idea has merit.
-
I bounce back and forth between PVA (elmer's) and CA (thin, regular, and thick); usually PVA for the very small parts and CA for stuff that needs a little more strength. Afterwards I prime/paint it with an airbrush... on less detailed sections like PE bulkheads I'll prime it with Tamiya rattle-can. I like to cut PE from the fret with those rectangular single edge "safety razors" because PE messes up blades fairly quickly and they are cheap yet still fairly exact in cutting. I cut the PE on a little square of clear plastic sheet that I buy at the big-box home improvement store. Getting parts on is done with tweezers of various shapes or if I get lazy, a tantric monkish telekinesis chant that I learned in the Himalayas a few years back. Seriously though, the secret is just using magnification (I use an optivisor), as little glue as you can get away with, doing good, clean prepwork before you start gluing and practice, practice, practice... plus checking and adjusting parts as necessary after you get everything glued on. It's easy to knock stuff off that's only held by a small amount of PVA but once you get the paint on, it helps "lock" the parts in place so they won't go anywhere unless you butter-finger the finished part. Sorry, no instructional video; it would suck anyway because I'd have to hold my phone in my mouth while I filmed, half of the video would be of my butt in the air as I searched the carpet for the pieces I drop and there would be A LOT of cussing. Anyway, I did some more puttering yesterday... more cleanup, finished up the wing bridges and made an attempt at painting "wood" on the PE deck plates around the bridge: Now I am turning my attention the back half of the main superstructure and getting deep into miniature demolition: Just for kicks, here's more or less what a section of the superstructure looks like OOTB (although I've already began drilling and cutting out vent holes): The Pontos advanced set goes a long way towards improving the details of the kit!
- 265 replies
-
- 13
-
-
Thanks guys! Got the front half of the superstructure all decorated and painted, minus some touch-up, weathering and some other bits like railings and guns that are best done later on: Starting get places now... only have to do the same on the other half of the superstructure and I can finally cross out step #3 in the instruction booklet.
- 265 replies
-
- 14
-
-
Still dressing up Bissy in her shiny gold "jewelry"... Many hours into this part of the project with many, many more hours to go...
- 265 replies
-
- 11
-
-
My 1/100 Bismarck semi-kit is my 'Murica-sized future build, but I'm saving that one for retirement. Still, I've been around the world (including living a year in Amazonian Bolivia) and learned long ago that the world is a bigger place than the USA. I would probably disappoint you with my sad lack of American stereotypical character traits and I don't even know any good wooden shoe jokes to fight back with you so we're probably better off being friends than adversaries. If I ever do a 1/200 wreck diorama, it would be with the wreckage of my first Bismarck and it's just an idea, not a real plan. I think it would be really cool but I don't know if I'll ever actually do it. This one is gonna be as close as I can manage to Bismarck as she appeared at the end of 1940. I'm doing it because EVERYBODY builds Bissy in 1941, either in Baltic stripes or as-sunk and I want to do something different. Besides, I've never seen a model of Bismarck in her earlier guise and that's when she looked the best (in my opinion). The film of Bismarck in Kiel canal is especially inspiring to me, though I'm gonna have 2 of her three radar turrets installed (as was the case in real-life in late fall-early winter 1940). There is no way I'll get every last possible detail exactly right but I'll let you guys be the judge on whether I succeeded or not sometime next year when she's done. One more thing for everyone... Bismarck is a SHE. ALL SHIPS ARE SHE'S! I'll be damned if I let some 'effing Nazis turn hundreds of years of naval tradition on it's head and call Bissy a "he". Sorry, that's one of my Bismarck hot-buttons so I'll get it off my chest now...
-
Nope... box that Mushi-mushi up and get you a real man's warship in the Lord's scale. A 1/200 Yamato class will do nicely, gonna have to up the AAA's part count to 30 or so apiece though.
-
No way, Cog... if I was doing Bissy in 1/350 with Pontos PE I'd be done with the thing already... for example, on the part of the ship where I'm working now you get some pretty nice brass bulkheads with most all the details already etched to just slap on (http://pontosmodel.com/html/35022f1.html)... add the vents and call it a day. Thus far, the 1/200 advanced set has been nuttier than a squirrel turd... even Pontos themselves didn't finish it in real-life and take photos for the instructions (like usual) and only included an illustrated diagram. Still trying to understand why folks still think bigger= easier... that hasn't been my experience at all! Bigger just means large quantities of tiny stuff that goes on top of the bigger stuff. Tamiya rattlecan primer is my favorite too... It's soooo overpriced though.. paying 10-11 bucks for a tiny can rustles my jimmies.
-
Mikasa has the paint adhesion problem too? It's not Trumpeter brand name but it seems pretty obvious that it's a Trumpeter product nevertheless by how it's packaged so I guess that makes sense. My solution has been to hit Trumpy plastic with fine grit sandpaper or steel wool to roughen the surface slightly on all but the very small parts, then prime/paint. It works well for me, considering I'm usually modding parts and going PE happy anyway. I don't wash my plastic either. Hopefully Trumpeter's plastic recipe doesn't also include some of that infamous Chinese product toxicity; I've probably breathed in a little more of their plastic dust than is healthy for me.
-
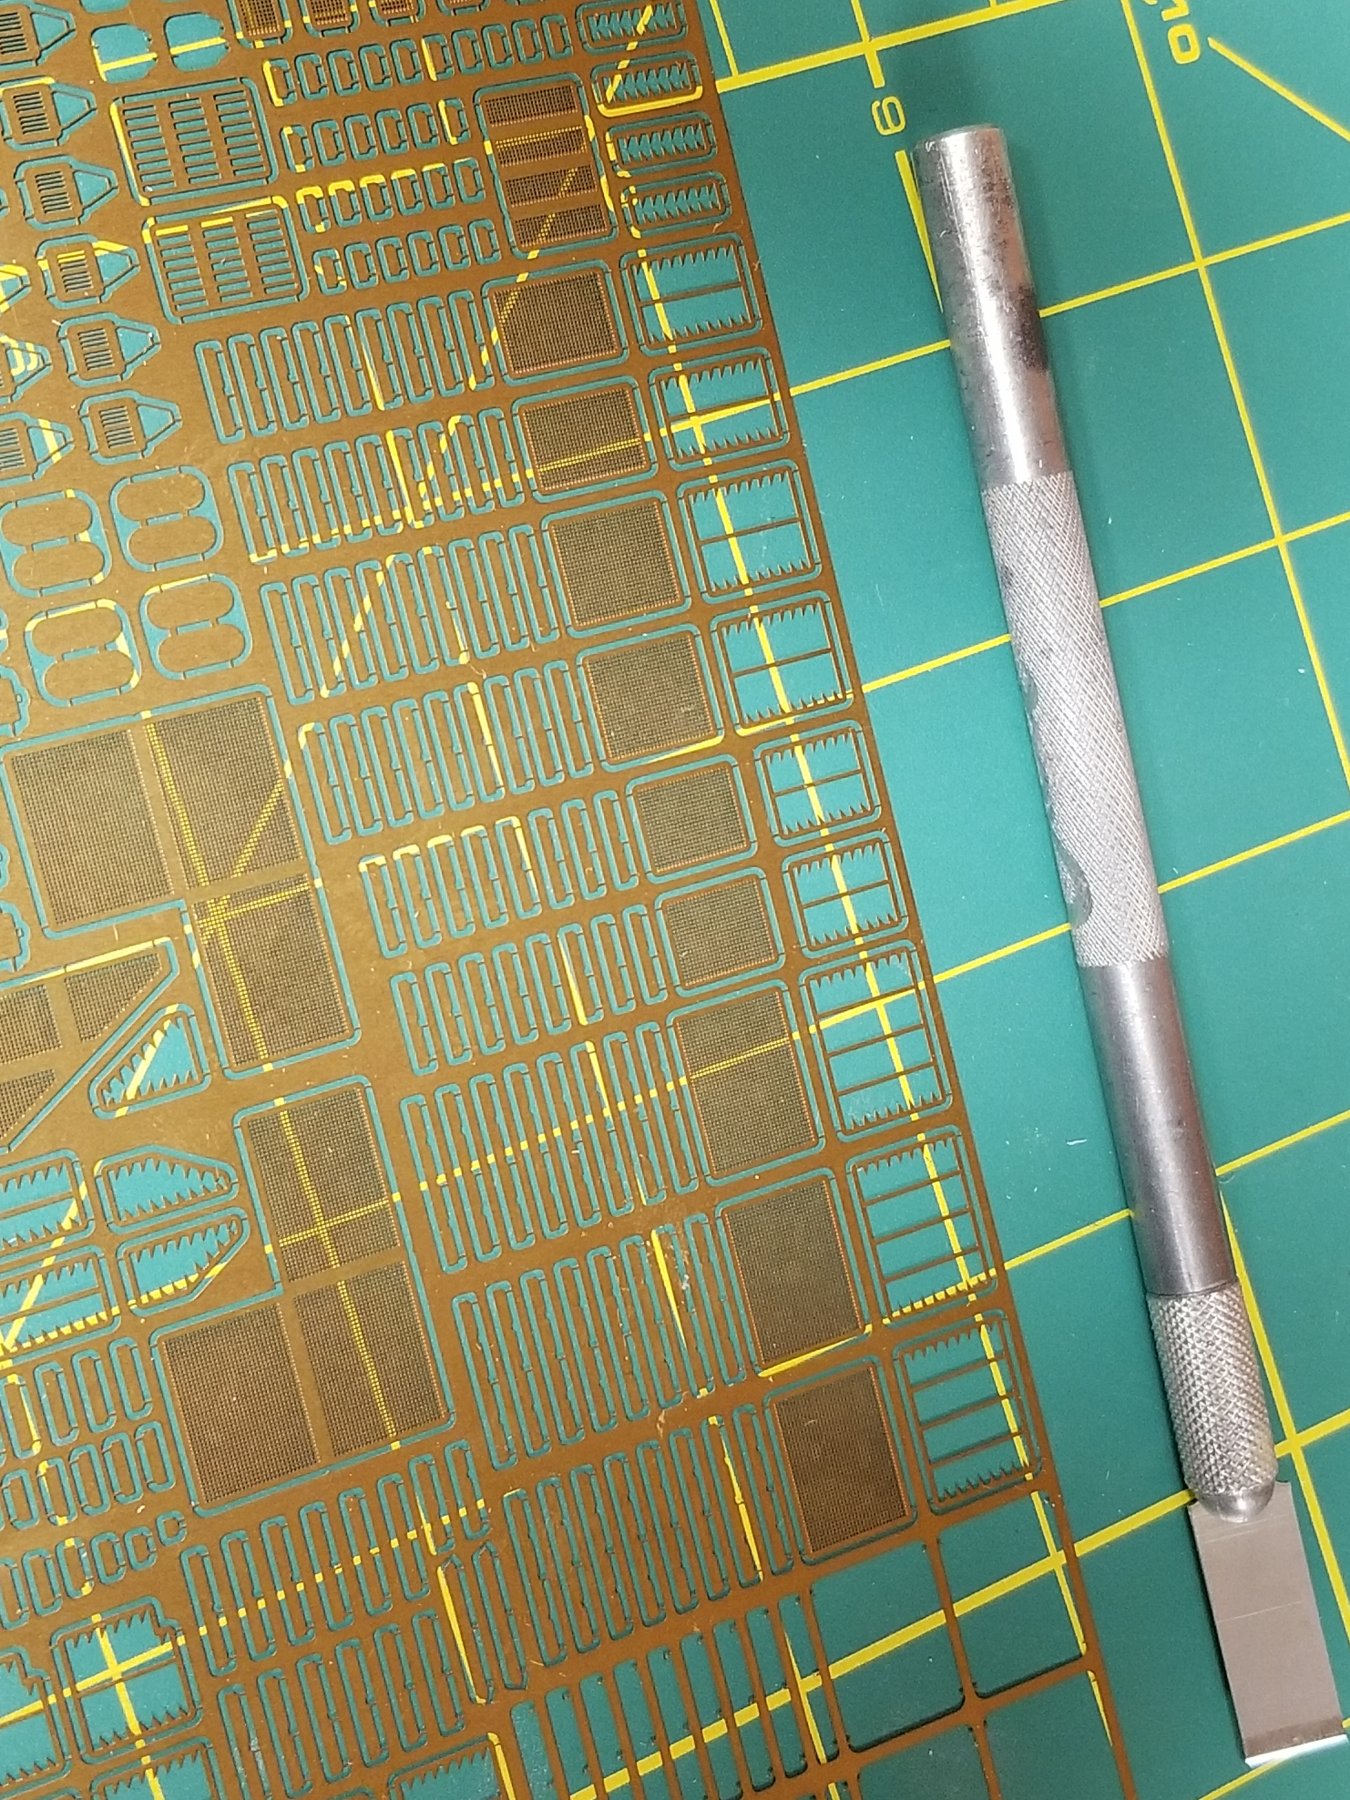
It's finally time to dress this old girl up... making progress on the photo etch: Here's one with a standard Xacto knife for scale: ... again I'm reminded that 1/200 scale is actually pretty dang small in the grand scheme of things!
-
Those poor little bastards are just gonna have have to ask Admiral Lutjens for a hug when the Royal Navy shows them what's what I guess. Gonna be a bit awkward when I eventually park my finished Bissy in my display cabinet right next to my big Nellie (HMS Nelson)... even more so when I finish Hood someday. The deck is easy enough to mask off; I hoped to avoid the worst of it by pre-painting the tough to reach spots too. The superstructure still isn't glued down either, so I should be fine. But yeah, I have a nasty habit of deconstructing kits and then rebuilding them as I see fit and this build is no exception.... there's gonna be very little "Trumpeter" left on my Trumpeter kit when it's all said and done! Anyway I figure I might as well show the ugly as well as the good on my build logs and I am enjoying myself... just not putting together the louver vents. There's always something on a big build that just plain sucks... but still, one has to just grunt though anyway.
-
Yeah, they are. Here's what they look like on the fret. You bend the little triangles out, stick the frame on the grille and glue the louvers on one by one. Easy in concept but a real test of my patience to get them glued straight and not mucked up, and they fall apart if you look at 'em wrong using PVA. With CA glue it's a nightmare to do it cleanly and not clog up the grille with glue runoff. Did I mention this is fun?!

- 265 replies
-
- 11
-
-
...and Hans over at Blohm and Voss said to Admiral Raeder: "Ya, ve heard you like boats, so ve got lots of boats for your boat, das good ya? Keep up the good work... don't give up the... um, ships!
-
Meanwhile, as the crew take a ride around the spinny mainmast winch... Great work OC! That deck really looks the part!
-
All right, got another update for y'all. I'm trying to do Bissy as she looked in the late fall/early winter of 1940, so I've been chasing down things from the kit that were added (and removed) during Bismarck's only refit in January 1941 such as the second level of the vent spray shields on the forward superstructure. Unfortunately, I had not done my homework very well... turns out the two little "phone booths" by the docking bridges that I worked so hard on were added in 1/41 too. Damnit! Oh well, nothing to do but fix it. Oh the carnage! Patching the newly made holes: ...and I'm back in the Teutonic rivet-counter's good graces. 😁 Next I went to work on the deck area behind Turret "Bruno" laying the deck and installing the AA gun "fences" so that I could take out the seams and better integrate them into the superstructure instead of doing the sensible thing and just slapping them on top last: I pre-painted this area to make make masking a little easier for myself, later I can touch up. Finally made a start on the copious amounts of PE that need to go on the superstructure: Those louver vents are little monsters to get together!
- 265 replies
-
- 12
-
-
Cool... what a weirdly fascinating looking ship! Very interested to see this one go together...