HOLIDAY DONATION DRIVE - SUPPORT MSW - DO YOUR PART TO KEEP THIS GREAT FORUM GOING! (Only 36 donations so far out of 49,000 members - C'mon guys!)
×


John Maguire
-
Posts
157 -
Joined
-
Last visited
Content Type
Profiles
Forums
Gallery
Events
Everything posted by John Maguire
-
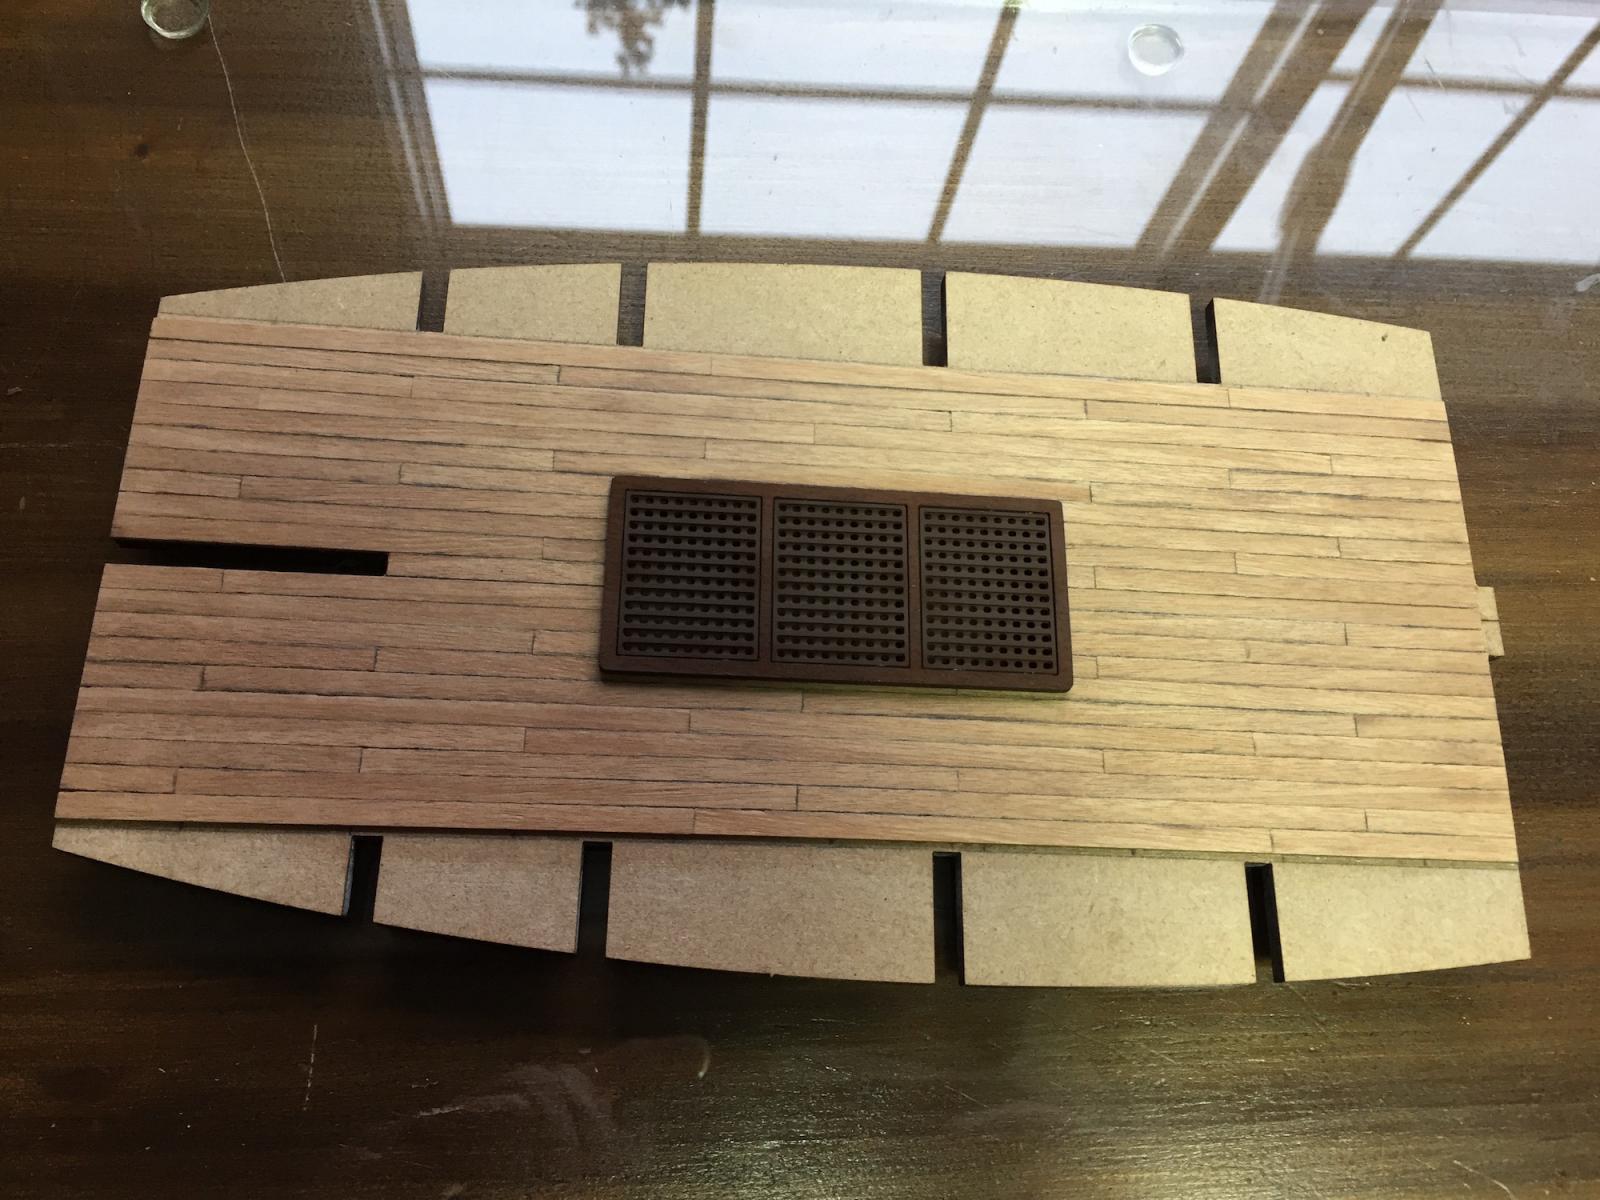
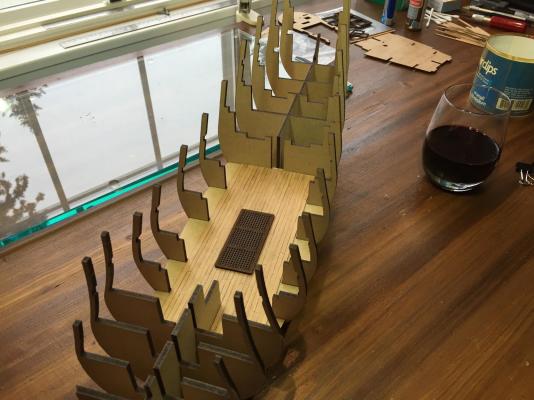
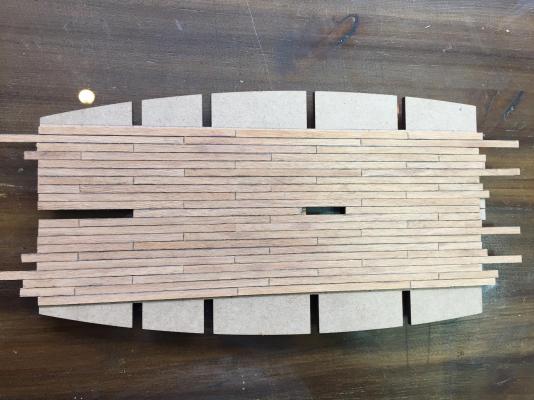
 Denis and Dave, thank you for the edging suggestions. Yesterday I tried both techniques and like them equally, then prepped possibly enough 100 mm planks to do the next two decks. The just completed lower deck is satisfactory to my eye but of course gets not quite the best grades with close photography - you know what the camera discovers! Tests with your techniques look to produce a superior finish and will be used going forward. Big John, thanks for looking in. This project is really fun. I am pleased with the fit and the quality of components. I just may end up working my way well into my wine cellar before there is a mantle worthy product. I put perhaps eight coats of matte varnish on the deck with a steel wool rub down in-between each application. Prior to final installation the deck was given one last steel wool rubdown to give it a weathered appearance. The area below the hatches was painted dark brown but to no avail because it is not visible. I like the unusual detail on the hatch tops not withstanding prior valid comments that in real life those details could present a tripping hazard. Once painted I am challenged to see if the openings aren't square. This was a test dry fit. A permanent home for the lower deck. It now sits firmly on the applicable frames and the false keel. Respectfully, John Maguire Total Time 44 hours
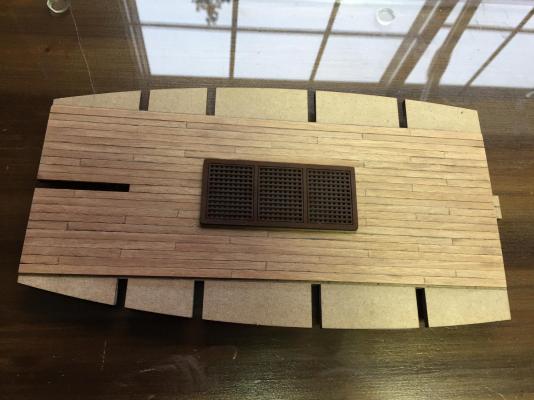

-
Chuck, "Request permission to come aboard, Sir". I am joining very late as I reenter the forum. This log is an overall practicum on how to accomplish many tasks to museum quality. Thank you for your sharing . . . Respectfully, John Maguire
- 1,051 replies
-
- 4
-

-
- cheerful
- Syren Ship Model Company
- (and 1 more)
-
Elijah, Looking really great. You have it under control. Isn't cherry a really nice wood for stain? That temptation could change the dynamic. Respectfully, John
- 701 replies
-
- 1
-
-
- phantom
- model shipways
- (and 1 more)
-
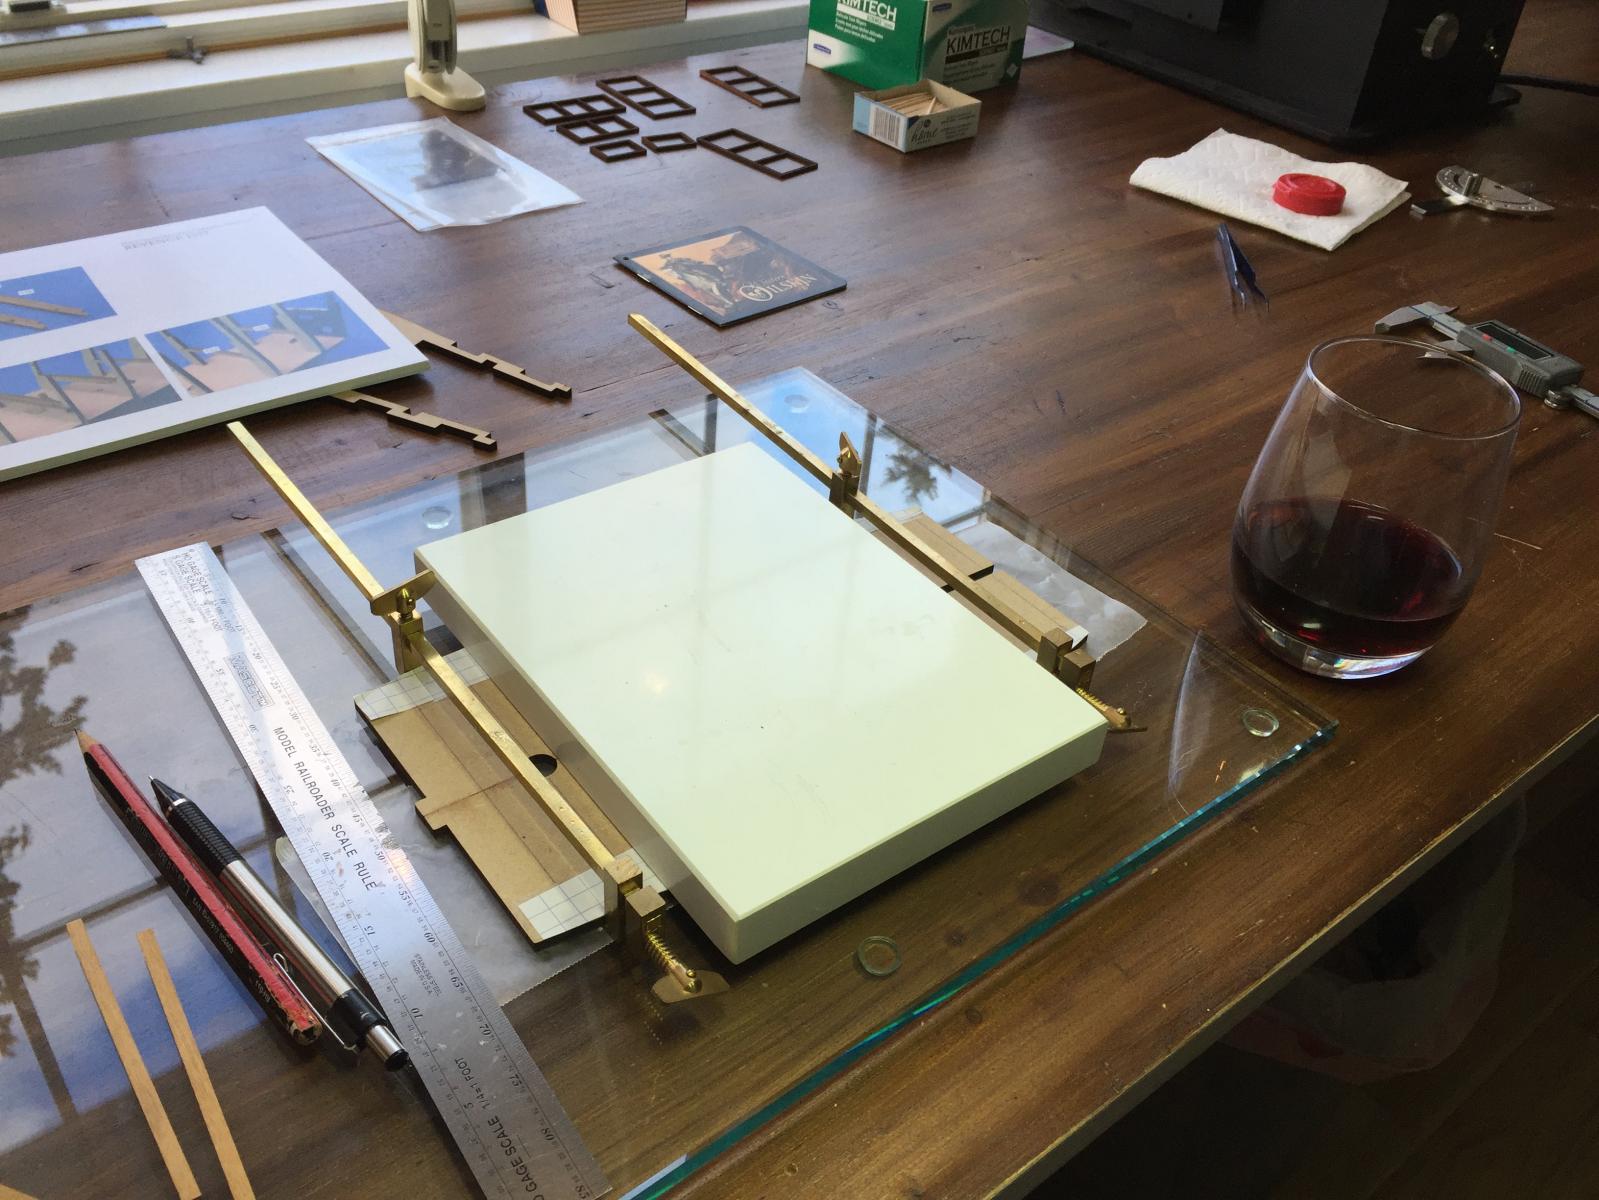
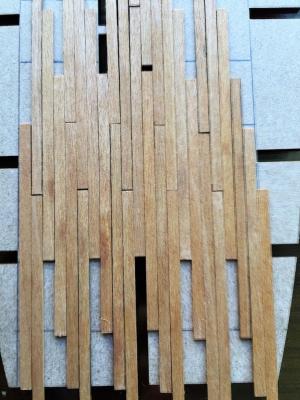
Denis, thanks for that info. At the moment I have finished the lower deck but plan to wait until tomorrow after the glue has some time to cure before I begin to clean it up. I'll see how it works out and implement your suggestion for the next deck. Here it is still in the rough on my plate of 1/2" glass with weights on it overnight. I'll see how it looks when I clean it up. How do I keep the felt tip pen from bleeding too much ink into the wood and seeing it spread. Would it work to tightly clamp several planks together and blacken the combined edges with the felt tip pen? Would you anticipate too much bleed away from the edge? I went back into all my previous posts and added "Total Time" entries. I'll continue the tally going forward. Respectfully, John Total Time 36 hours
-
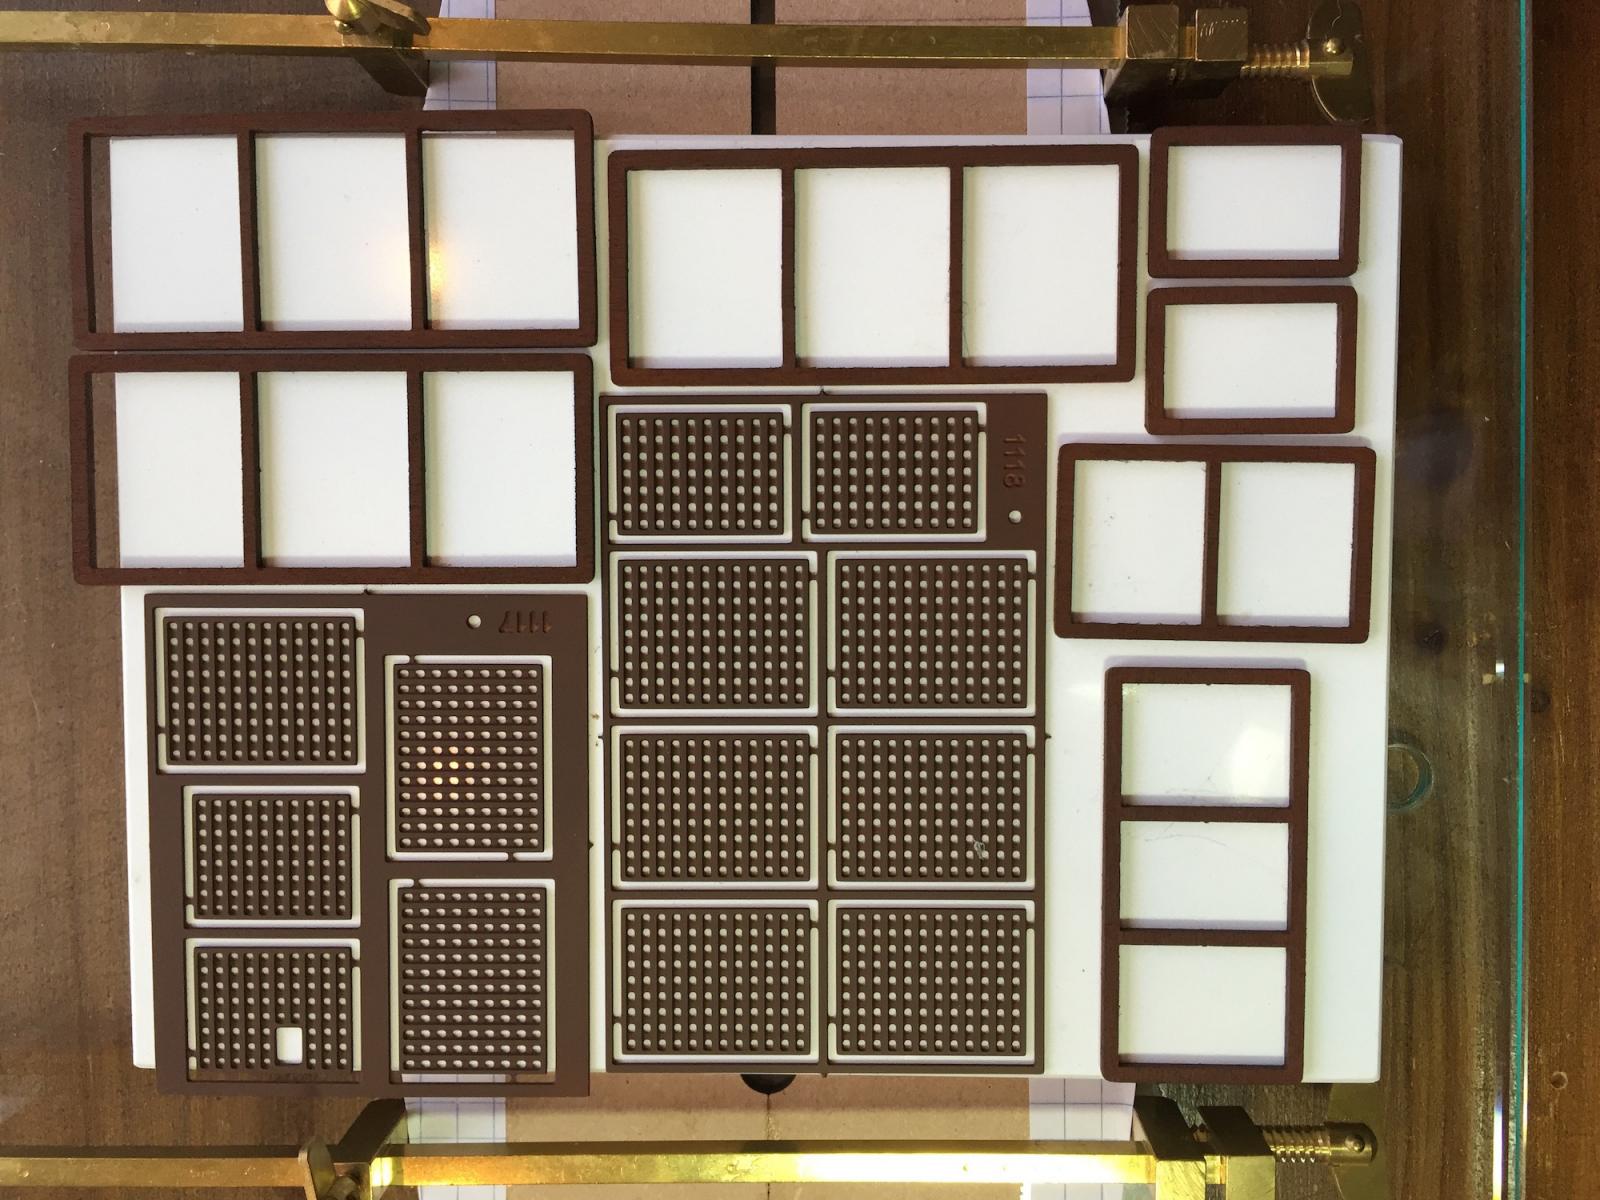
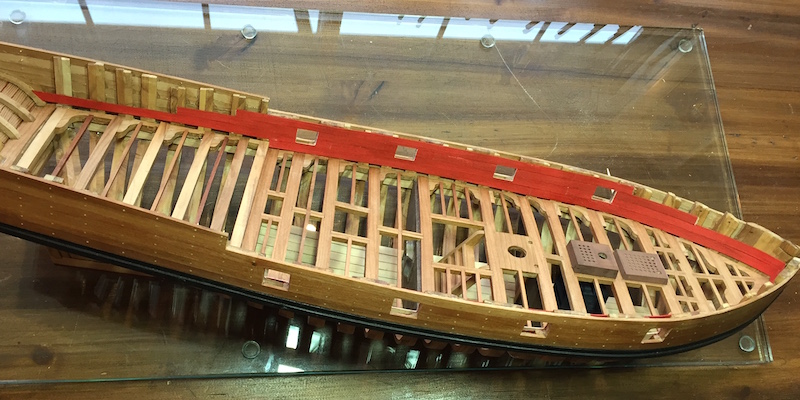
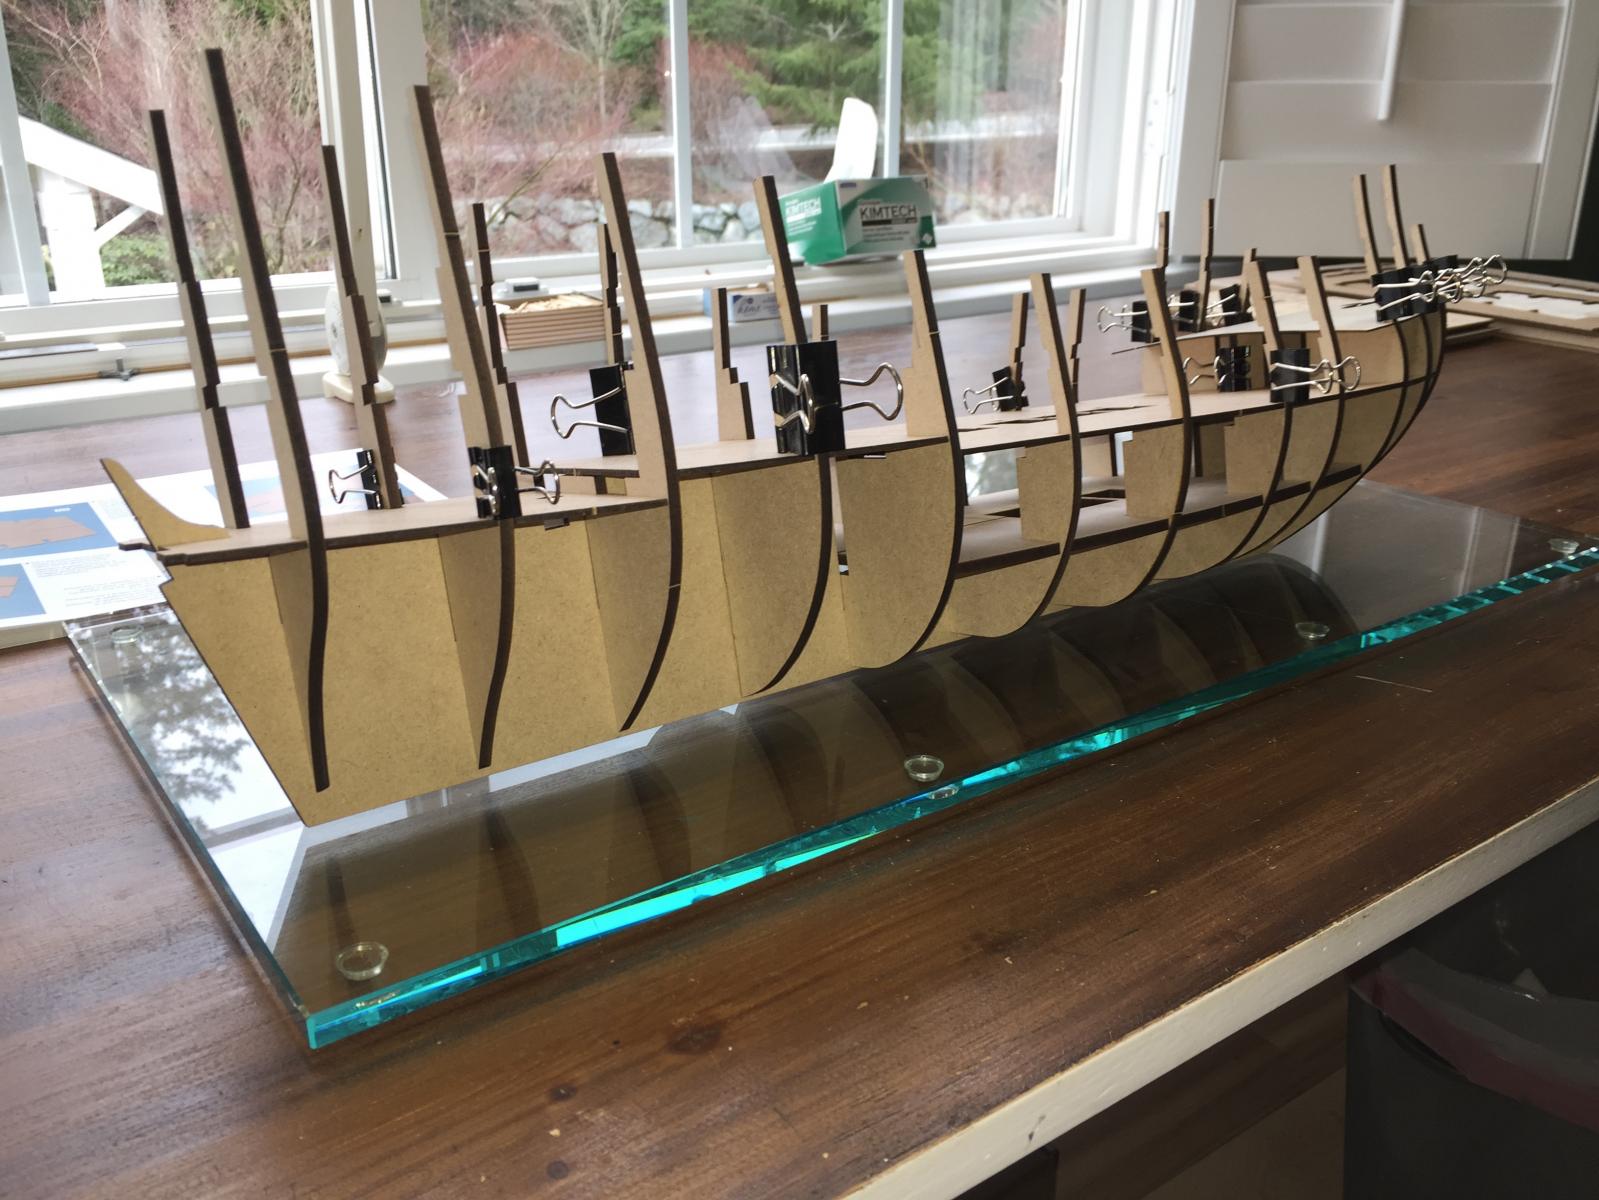
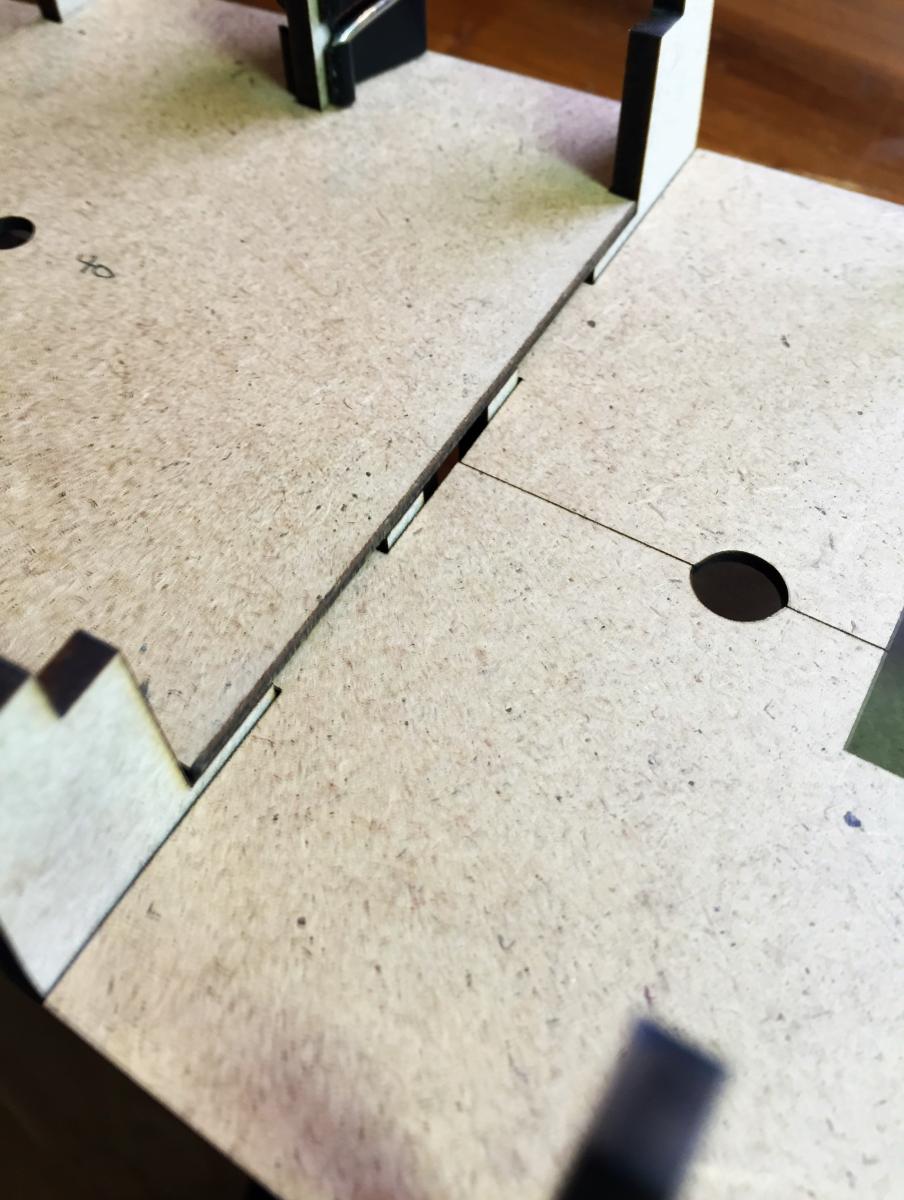
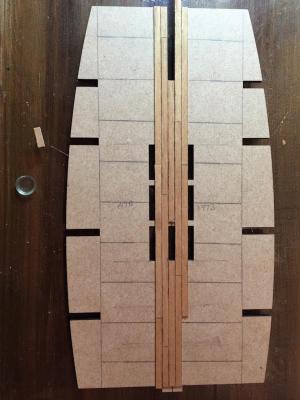
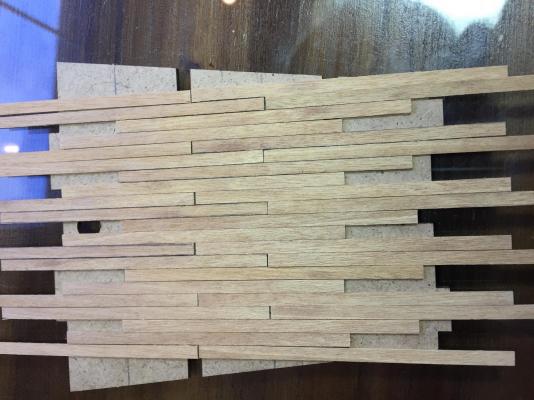
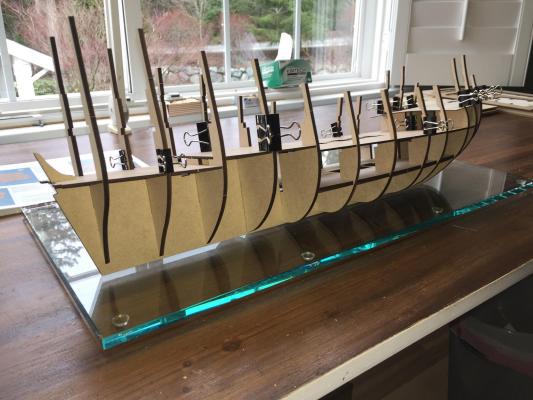
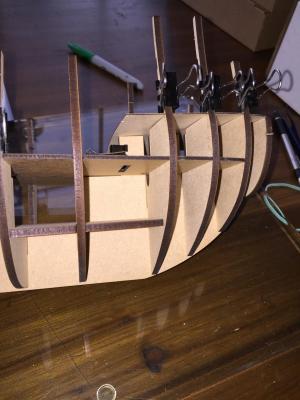
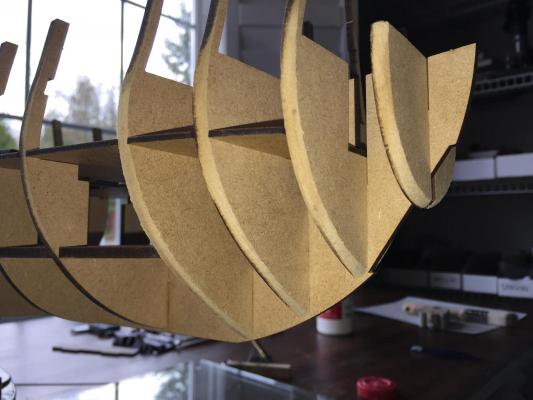
Keith, thank you for looking in and commenting. Your thoughts on MDF mirror all the others ahead of me building this kit. I have no background to qualify making my own statement. I will say, as have the others, that they have had no complaints once they began working with it. The density is greater than normal MDF that I have seen at Home Depot so it handles similar to wood - at least to me. The high extensions on the frames are to temporarily stiffen the large thin ply that supports the colorful decorative patterns. Once those are in place and their supporting upper decks, the delicate pieces are cut off and thrown away so they are not a permanent structural feature. I have only built one other kit and the quality of both wood, parts and particularly the way they fit with such precision in this kit impresses me, albeit I don't have a notable background. Denis, I am using a pencil for the plank edges. When I dry fit them to establish the pattern prior to glue, I photographed it and have been using the picture as a guide, which of course is patterned after your and Martin's work with the one for four layout. During the dry fit, I had a slightly unequal port to starboard width issue. As a result of that, as I work away from the centerline using my photograph for guidance, doing the full length front to back runs I am qualifying the width of the port/stbd planks before fitting, then after installation measuring with my digital caliper the distance from the outboard edge of each row to the frame notches to ensure port/stbd symmetry. The plan is that this will bring the outermost planks port/stbd to the identical relative positions to the frame notches. So far, so good. Wordy, but having done it yourself I'm sure you get the drift. Thank you for your detailed and thoughtful inputs - I need them. Your description for a half round file to chamfer the stern concave frames was perfect. I have previously used sandpaper on a rounded block. The file is so much better. This planking is old hat to all of you but fun for me doing it the first time after reading your hundreds of builds. Nigel, thank you. I do not have an artists eye for color. I think my limit is generality only. I looked at colors on the shelf and picked the darkest opaque brown that I have thinking it reminded me of walnut. Inexperience with the airbrush caused me to initially think I was not covering grain patterns in the wood frames but successive applications of fog thick coats of paint eventually did the trick. The coverage of the brass hatches was very much to my satisfaction, again the result of perhaps a dozen coats of what I am calling fog thick. Particularly satisfying to me was that this was the first time I have been really pleased with the air brush experience. Doc, I love the kit. The laser cutting precision is breath taking. Then, consider the retaining tabs that are so tiny that a razor blade is all I have to use to free even the largest 5MM thick pieces. There is a world of difference between this and what I have recently been working on. I am in love . . . As far as the contents of the glass, Doc, I'm not sure if I was drinking some of my four hundred year old cognac or if it was Charles Shaw merlot . . . The last couple of days have been spent studying the manual and Martin & Denis's work and using that to begin planking the lowermost deck. As you all know having brilliant pathfinders out front who create museum quality models to look at and study is an asset. Working on the lowermost deck I had two rows each side of center when the shipyard workers headed for the pub after work tonight. Thank you to the many kind souls with their "Likes". I am really enjoying this build, Respectfully, John Maguire Total Time 30 hours
-
Gorgeous, Doc. My sincerest congratulations . . . Respectfully, John Maguire
- 755 replies
-
- 3
-
-
- finished
- caldercraft
- (and 1 more)
-
Martin, Thank you very much for your thoughtful reply. I have d/l all your photos as well as Denis's and use them for reference on a daily basis. I would be pleased if you look in on my progress from time to time and if you feel necessary, please head me off from predictable errors or comment as necessary in view of your hindsight. With the excellent logs that you and Denis have done there was nothing more to be added, especially by a rank amateur. My sole purpose in doing a log is that hopefully one of the four of you who are building might catch me in an error before I get too far beyond to reasonably hope to fix it. I appreciate your comment on the stern. I would not have anticipated that issue - Chris makes no mention either. Like you, I am loving this kit and build. I couldn't wait to get started. Respectfully, John
-
Denis, I like your window treatment and look forward to seeing the liquid glass application. Respectfully, John
-
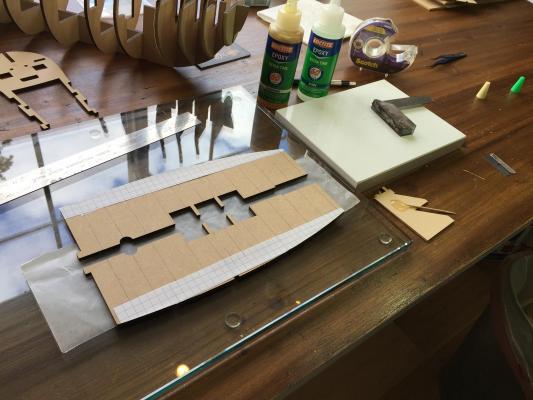
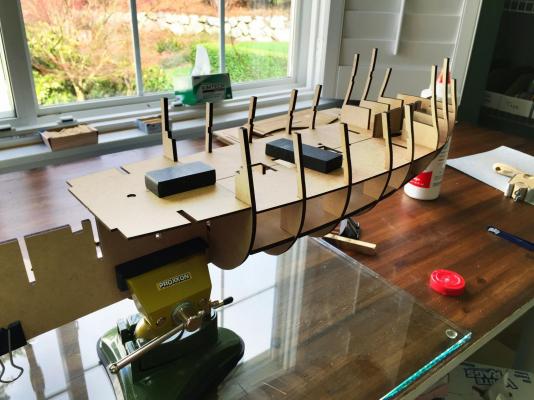
David: welcome aboard! I'm really pleased to see your smiling face again. Elijah, those REVENGE builders ahead of me, whom I am attentively following also mention the excellent fits. Doc, in my case the proxy server didn't pass the MSW notifications. I fixed it by putting my real address in MSW. Many thanks to the kind folks adding "Likes". Several small steps over the past few days, each time consuming. Having not a lot of experience with my air brush it took me two days to obtain a finish on the brass hatches and wood frames that I am satisfied with. Setup/knockdown of the tabletop spray booth, cleanup and giving the Iwata airbrush the cleanup it deserves is a long process. But gosh, the Iwata is an object of mechanical art and the paint application leaves nothing to be desired. The shiny spot on the lower left painted grate is a light reflection. Paint coverage is excellent. Following the lead of Martin and Denis, I laid out three decks for planking. This is a dry fit to lay out one of the planked decks. The lower deck is in two pieces. If it was one piece it would still be possible to mount it. I have laid it out on a thick glass plate and joined the two halves with 60 minute epoxy. Here it is seen clamped and weighted for overnight curing. Once the epoxy cures I'll plank the deck while it is on the glass plate then mount it in the hull. Respectfully, John Total Time 24 hours

-
I love it Doc. You are moving out . . .
-
Doc, I also liked the idea of painting the bulwark insides in a dull red . . .

- 306 replies
-
- 5
-
-
- armed virginia sloop
- Patrick Henry
- (and 2 more)
-
Elijah, Wow, I am impressed with your awesome work and how well things are coming along. May I ask what your education goal is and how your budgeting of time between school and modeling works out? Please keep your posts coming. Respectfully, John
- 701 replies
-
- 2
-
-
- phantom
- model shipways
- (and 1 more)
-
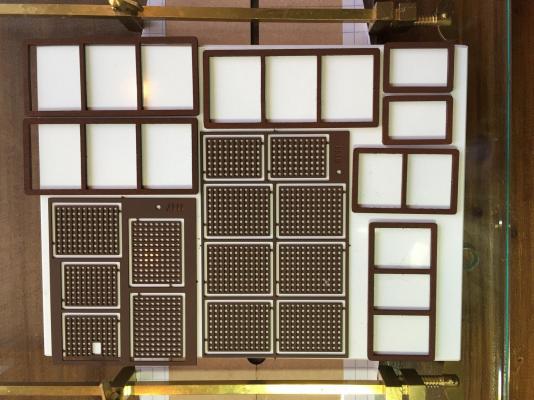
Thank you Mike. Thank you Elijah and thank you for the "Likes" from so many friendly souls . . . . As noted by others, the pieces making up the hull were easily freed from their respective billets. I did a test dry fit and was pleased to see the precision of their fit. Snug, enough room for a thin application of glue but no significant slop. In my dry fit frame 4 and the aft deck each seem to fit correctly without modifications. Others reported necessary tweaking. With that knowledge I spent two days trying to decide if I was missing something I should be seeing but in the end could find no reason to make adjustments. The forward frames were chamfered until a pleasant lay of a test plank was achieved. The test dry fitting positioned the frames so perfectly that I opted to glue the central several frames in place by using the two decks above them to maintain what seems to be a perfect relationship. Unconventional I believe but doing so keeps the frames in perfect alignment with no wiggle room whatsoever. The decks were not glued, only the frames to the keel. The glue is drying and the wine cellar is calling my name . . . . Respectfully, John Total Time 14 hours

-
Martin, I am back in your magnificent build as a student to carefully study your work. How quickly you achieved so much and at such a high level is stunning. As a result of your log and Dennis's, I purchased the kit at Christmas and this week began to inventory and test fit the skeleton. The test dry fit came out very well with subtle differences between your kit and Dennis's. My 197 deck is two pieces as Dennis's but seemingly different than yours. My frame 4 appears to be a perfect height fit, different than yours or Dennis's. My rear lower deck (41) fits perfectly in the dry fit and will not need its forward edge trimmed.I have the same 4 mm planking instead of 5 mm as you and Dennis noted. Your extensive discussion of the work around will be very helpful. I am a novice builder, having only built one admiralty style ship. With that in mind, I have begun a build log in hope of receiving critiques and forward looking advice from the several of you folks who are well out in front of me with REVENGE and could provide experienced guidance such as your early recognition of the need to thin out the aft end of the sternpost. Clearly, that never would have occurred to me this early . . . however it is difficult to see if you actually did thin out the stern as I look at your photos. I see no indication in the instructions that Chris did. Would you please comment now with benefit of hindsight. Your planking came out really well. I have inventoried all the wood and there is only one small piece that I can't find. I am reluctant to begin an inventory of the hundreds if not thousands of tiny pieces - would you suggest that I dig in and do that? Looking forward to your return to REVENGE. I need to have you out in front. Respectfully, John
-
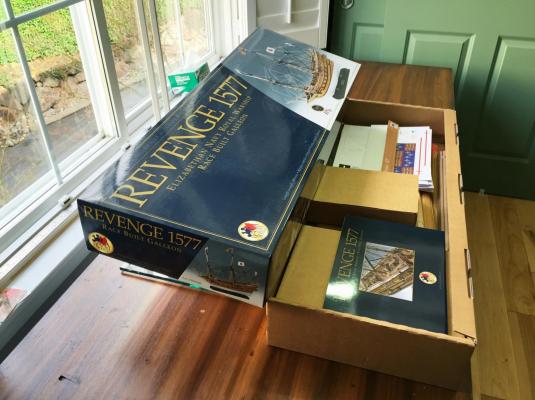
I have been closely following Martin and Dennis's REVENGE build logs - actually, their work was the reason I bought the ship. Awareness also exists that Apollo, Titanic87 and Malcolm are also building. Minimal experience on my part is the reason for this log. With so many advanced builders ahead of me it is my sincere hope that showing my work will invoke critiques and advance warnings for difficulties/traps that lie in my next to come steps. My kit was purchased from the California distributor the week before Christmas. Next there are comments following an inventory of the large components. Comparison to kits already in the field might indicate if changes are being made by Amati.I am not sure if I'll try to inventory the tiny pieces. Here are my notes: Inventory item 38: can’t find the part and can't find it in the step by step instruction. Inventory item 251: should be 1x5x600 but is 1x4x600 Inventory item 39: supplied as two pieces not one - 39A and 39B Inventory item 49: calls for 2 pieces but only one required Inventory item 121: calls for 4 but find 5 Inventory item 149: calls for 14 but have 16 Inventory item 153: calls for 14 but have 16 Inventory item 174: calls for 4 but have 5 Inventory item 188A and 233 are the same Inventory item 197: supplied as 2 pieces not one - 197A and 197B Respectfully, John Total Time 8 hours
- 194 replies
-
- 18
-
-
Dave, Looks like the gangs' all here. It appears you already have a fair amount of time into this new endeavour. I am well stocked with popcorn and my wine cellar is full. Proceed . . . . Respectfully, John
-
Looking really great Dennis. I have been anxiously tracking your progress on a daily basis, adding "thumbs up" rather than cluttering your log with appreciative comments. I am coming to a close on my LSS Patrick Henry and hope to be at work on Revenge within possibly a month. Your progressive steps will be my bible . . . . Respectfully, John
-
Looking great, Doc . . . Respectfully, John
- 306 replies
-
- 2
-
-
- armed virginia sloop
- Patrick Henry
- (and 2 more)
-
Hi Dennis, I have been watching you & Martin and you've motivated me to also purchased the kit. I've yet to inventory. Your progress is excellent and with your kind permission I'd like to continue to observe. Though trivial, please tell me exactly what varnish you like. All my experience has been with oil base on full size vessels - is a different product used for hobby purposes? Respectfully, John Maguire Seattle
-
Happy New Year, Doc. Looking great . . . John
- 306 replies
-
- 3
-
-
- armed virginia sloop
- Patrick Henry
- (and 2 more)
-
I am glad to see you have this figured out for the rest of us. When you finally are completed and thank goodness you won't say so until it is perfect, I will benefit from your tutorial and build mine. It seems so simple but is not . . . but you are making it so. Respectfully, John Maguire Seattle
-
Hi Erik, Hopefully you find this. I am also a closet owner of KF. Early in this thread you show some frames on the Byrnes saw tabletop and mention how valuable it was cleaning up the frames and possibly I saw a hawser there. Your frames are so cleanly cut and other than the ends I can't visualize how you used the saw. If you have time, would you please elaborate for me? Respectfully, John Maguire Seattle
-
Thank you sir; I now understand clearly. I like your reason for building the deck area before planking and plan to do the same as you. I would not have thought of that if you didn't mention it. Regards, John