HOLIDAY DONATION DRIVE - SUPPORT MSW - DO YOUR PART TO KEEP THIS GREAT FORUM GOING! (Only 24 donations so far out of 49,000 members - C'mon guys!)
×


Boccherini
-
Posts
380 -
Joined
-
Last visited
Content Type
Profiles
Forums
Gallery
Events
Everything posted by Boccherini
-
 Bob, nice looking deck framing. It never occured to me to try building the framing on the bench, then putting it in place. Interesting technique. Regards, Grant.
 -
Rusty, the extra detail makes a big difference, congratulations on a good job. Regards, Grant.
-
Hooks
Boccherini replied to popeye2sea's topic in Discussion for a Ship's Deck Furniture, Guns, boats and other Fittings
Henry, I use copper wire, all offcuts picked up on building sites after the electricians have finished. Regards, Grant. -
Ron, as you say, it's a learning experience and the next time will be better. You have a great attitude, so I'm sure the gun deck framing will be far better. Do you intend "burying" the framing by completely planking over it? I just noticed the hanging knees are missing, they should be in by now. Regards, Grant.
-
Paddy, that looks much better. Just to further complicate things (if my experience is anything to go by), you will be able to use three lengths of the right hand rope to make a left hand rope, but don't bother trying to make right hand rope from your right hand rope. Therein lies madness. A tangled mess awaits. Regards, Grant.
-
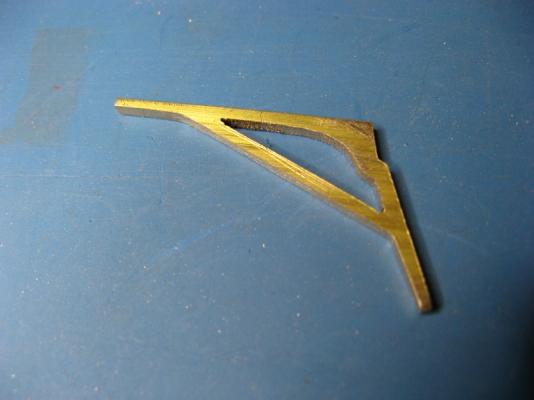
Thanks for the comments, gentlemen. Martin, the files are all by Vallorbe. Russ, I filed the back of each bracket to fit snuggly (as best I could) in its location. I'll dry fit them to drill for the fixings later in the week. They should be pretty good, I'm more concerned with the proportions, don't want them looking to thick for the scale. Grant.
-
Paddy, with regards to your rope making, I have just noticed you have made left hand rope from left hand thread. Try running the ropewalk in the opposite direction to make right hand rope from the left hand thread, this may erradicate the lumpiness. I remember having a similar result first up, reversing the direction brought immediate improvemnent, but our ropewalks are not comparable, so no promises on that. Also, I may have read somewhere that running rigging is right hand rope, and standing rigging (shrouds and stays) are left hand. Regards, Grant.
-
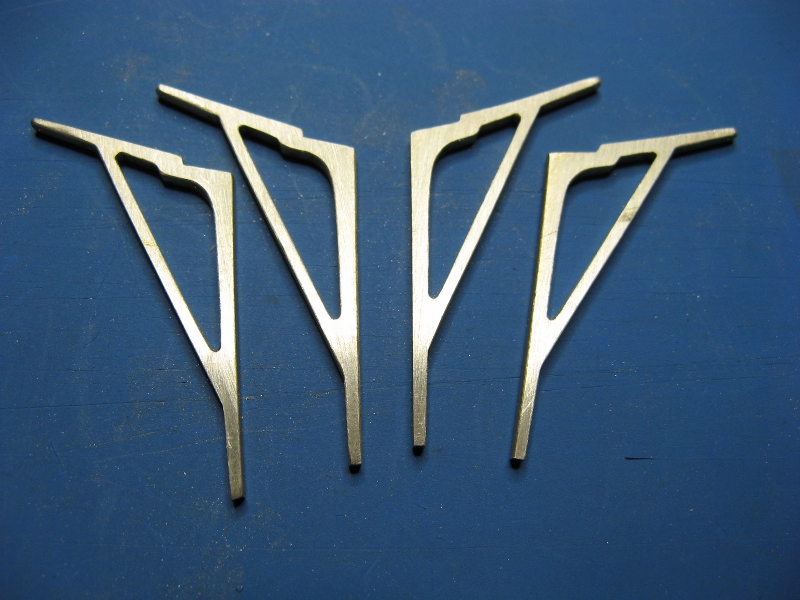
Finally finished the 4 large brackets, looking at the picture, a couple of them still need a bit of touching up. On Friday, I embarked on a spending spree, purchasing several good quality needle and escapement files and replaced my crappy little vice with another (slightly less crappy) little vice that at least has parallel jaws . Well worth the investment. Grant.

-
Paddy, yep, you're committed now. Good first attempt on the rope. You'll get the hang of it pretty quick I expect. You might like to try the DMC Cordonnet thread after you work out how to use the machine. It produces a good looking fuzz free rope. Regards, Grant.
-
Rusty, the bitts have worked out well, looks good with the planking finished. Regards, Grant.
-
Frank, thanks for the additional thoughts. I picked up several Vallorbe files today (needle & escapement), they work very well. Definitely worth the investment. Regards, Grant.
-
Thanks John. Grant.
-
Just caught up with your build, off to a good start. Cutting/cleaning up frame components for the x-section was tedious, congratulations on finishing that lot. Looking forward to seeing this come together. Regards, Grant.
-
Brian, thanks. I have cheap files, they do have their limitations, so I'm thinking some good quality ones will be better. Thanks for the link Frank. It is a good general guide to files. I'm after something more specific. Regards, Grant.
-
Rusty, nice work with the bitts and gallows. Your technique for the top of the bitts is a good one, I'm banging my head against the wall at present whilst repeating "Why didn't I think of that!". The tops of my bitts were made as separate pieces, creating some extra, fiddly work to assemble it all. Keep up the good work. Btw, your use of the word "sweet" to describe the grandkids, are they all girls? Regards, Grant.
-
Bob, that's looking good. Nice to know OC is sometimes useful. I use a syringe to inject dilute glue into the hole, push the treenail in then cut it off with nippers. Any excess glue is wiped off with a damp cotton tip so as not to affect the finish coat. Regards, Grant.
-
Thanks for the comments, guys. Glad you're finding this stuff useful. I'm just finishing the 3rd of the long brackets, one other helpful tip: it would be better to make the template a little narrow all round. What has happened: the scribed pattern on the metal sheet is slightly larger than the template, leaving a little too much to file down. Probably need to purchase some decent needle files, the cheap ones are ok up to a point, but they are not able to get into some of the tight spots. Regards, Grant.
-
I am going to purchase some good quality files (Vallorbe, Grobet), and would like some thoughts regarding the profiles and coarsness grade of needle and escapement files that are best suited to our work, particularly with regards to brass/copper. Thanks, Grant.
-
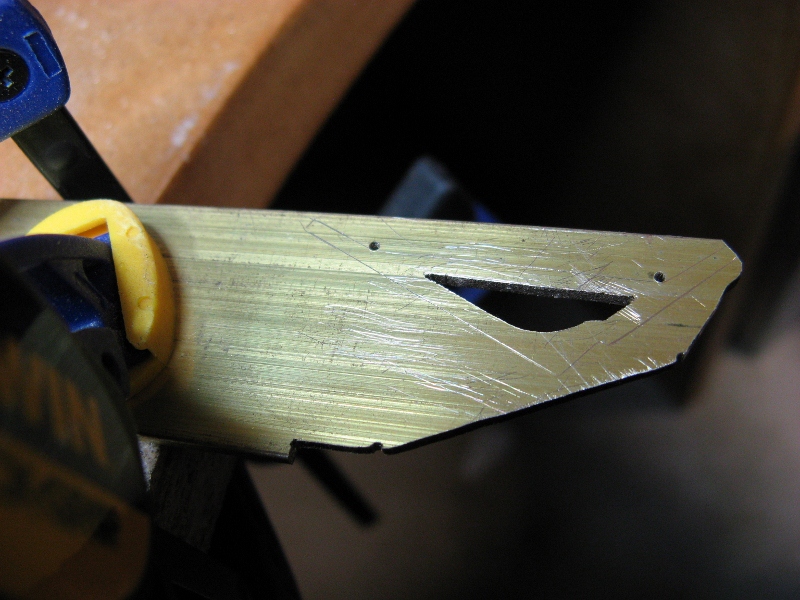
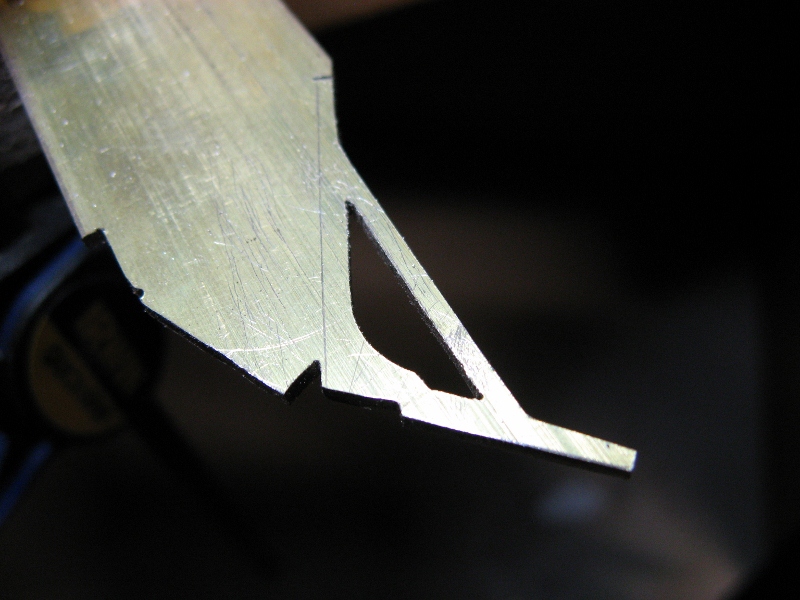
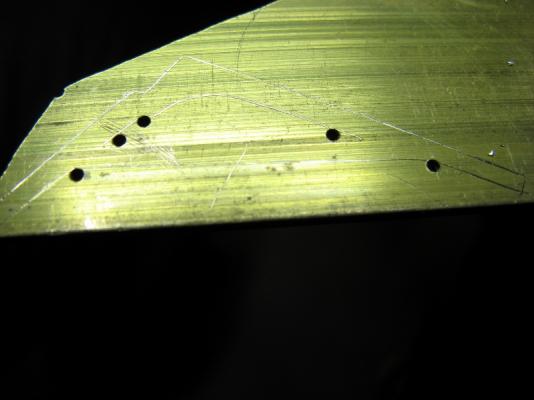
I appreciate the assesments and comments gents. Bob, working with wood scared the heck outta me when I first started because I'd been working with copper and brass since my teens. Don't be defined by what you perceive are your (current) limitations. The Triton x section is a good place to start learning, just enough parts to get a feel for the work. I remember a comment by Harold Underhill that is a great encouragement ..... he believed that anyone is capable of building a good model if they take care with the work and be patient (paraphrased). If anyone should decide to try this method, the following sequence may be helpful. The holes drilled in the outline allowed me to twist the saw blade around corners without breaking it, I learned this quite quickly. By planning the cuts, you can keep the bracket firmly clamped to your bench whilst cutting and filing. After the last cut, the bracket was placed in a small vice and the top filed down to the line. The top arm is still a couple of mm long (better a little too much than too little), this will be trimmed off later. Grant.

-
Nice to see some of the framing exposed, it's a shame to completely hide all the hard work that you've put into the model. Regards, Grant.
-
Hope yesterday went well. How's the hand going? Getting much use yet? All the best, Grant.
-
Finally, some tangible progress. It's been a bit of a journey for you to get this far. Looking forward to seeing more pictures. Regards, Grant.
-
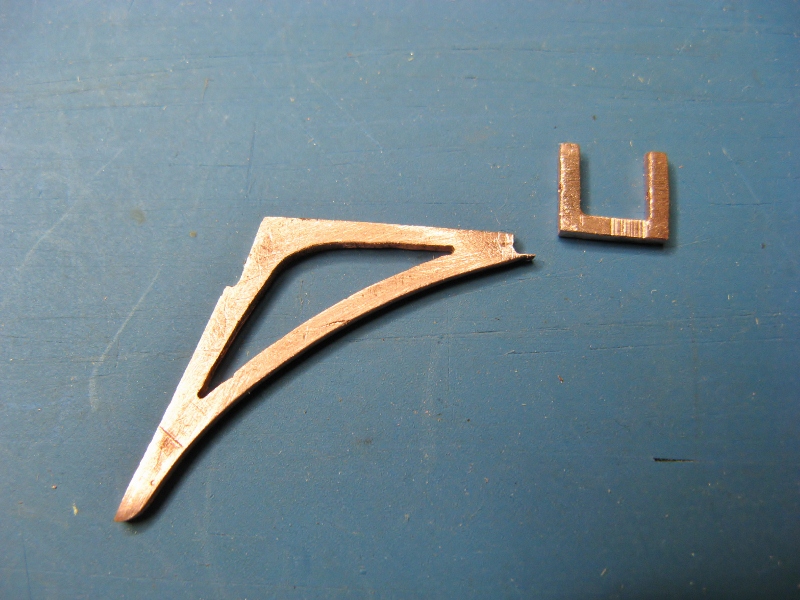
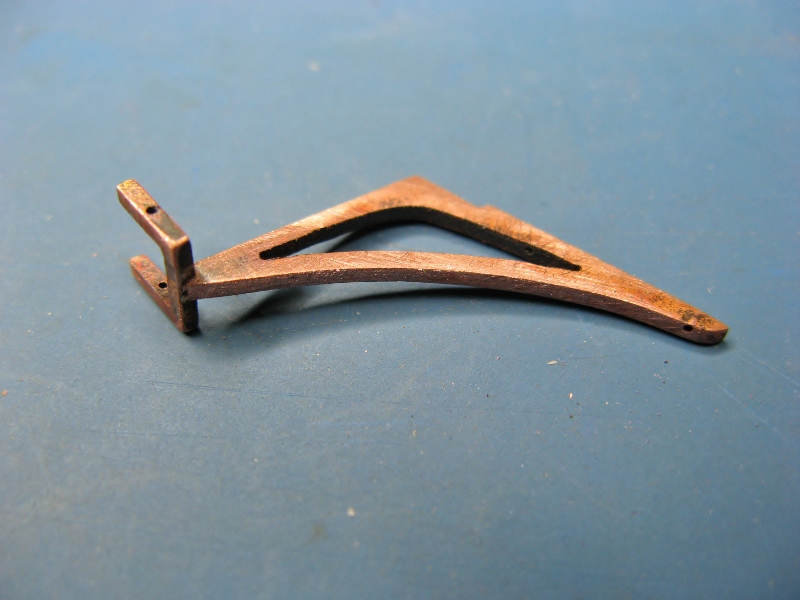
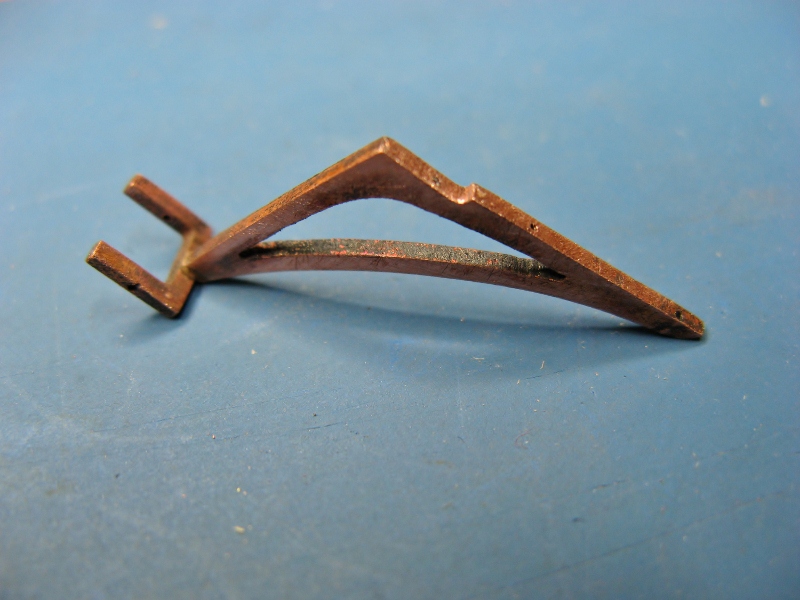
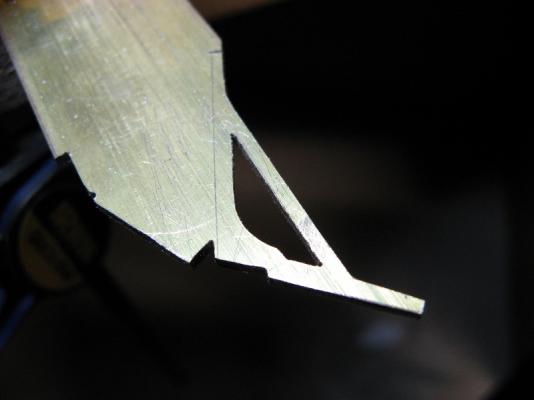
Thanks for the kind words, gentlemen. Russ, I would've used bamboo dowels, but there are none around at present and I'm too lazy to make any. I decided to try a different method to construct the gangway brackets, cutting the pieces from a copper sheet. The prototype seems to have worked out ok, just needs a bit of tweeking. The pattern for the brackets is a modified version of a diagram from TFFM vol 2. A template was made from thin sheet metal which allowed the outline to be scratched into the copper. This was cut from the sheet with a jewellers saw and filed down to the final shape. The two parts were then silver soldered together. The copper sheet came from a piece of 25mm (1") copper tube that was cut, annealed, then opened out and hammered flat between a wood block and a steel plate. To give you an idea of the size, the gap in the bracket for the skid beam is 4mm ( about 0.15" I think). The copper sheet is about 1.2mm thick. Grant.


-
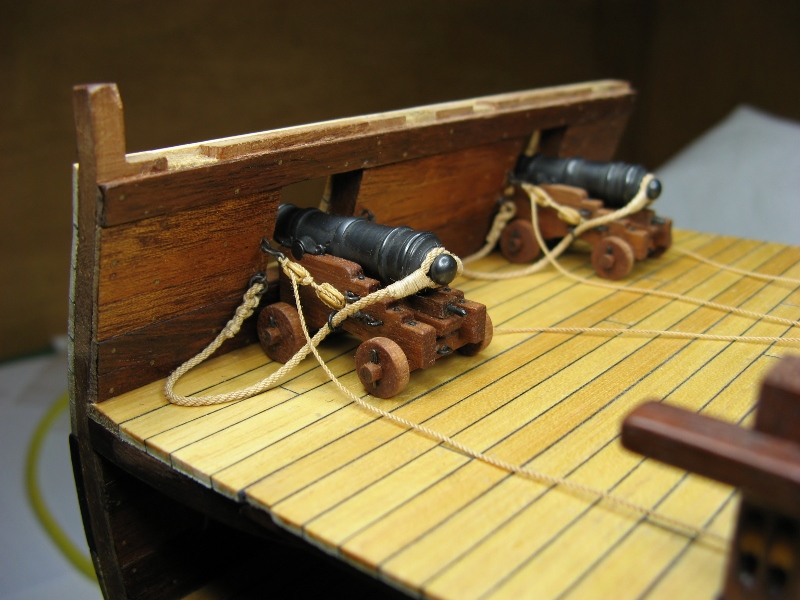
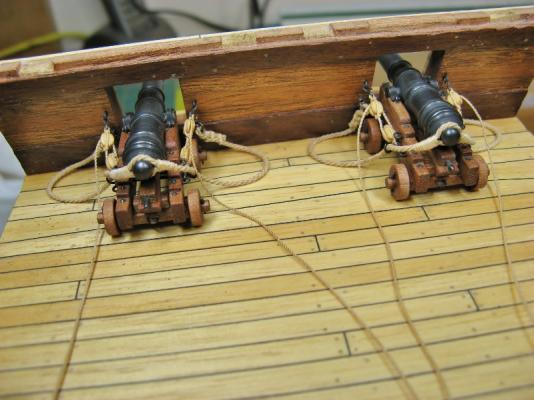
The rigged guns areinstalled temporarily, I needed to make sure everything fits. They will be removed and replaced at the end of the project. To ensure the guns don't get loose, I have 0.5mm copper wire pins in two of the trucks on each gun that fit into holes drilled in the deck. These will be permanently attached with epoxy at the finish. On an unrelated note, my son was examining the ropewalk yesterday (he helped with the electrical side of it), admiring the finished rope, and wanted to know where it was going. It is the first time he's seen the cross section (it's always been under a cloth dust cover), he was suitably impressed. Which is good, as he is the ultimate owner, though he doesn't know it yet. At the current rate of progress, it will be a Christmas present. Regards, Grant.

-
Joss, thanks for reposting this log, I had forgotten what an outstanding piece of workmanship it is. Quality and attention to detail to aspire to. Regards, Grant.