HOLIDAY DONATION DRIVE - SUPPORT MSW - DO YOUR PART TO KEEP THIS GREAT FORUM GOING! (89 donations so far out of 49,000 members - C'mon guys!)
×


Dfell
-
Posts
251 -
Joined
-
Last visited
Content Type
Profiles
Forums
Gallery
Events
Everything posted by Dfell
-
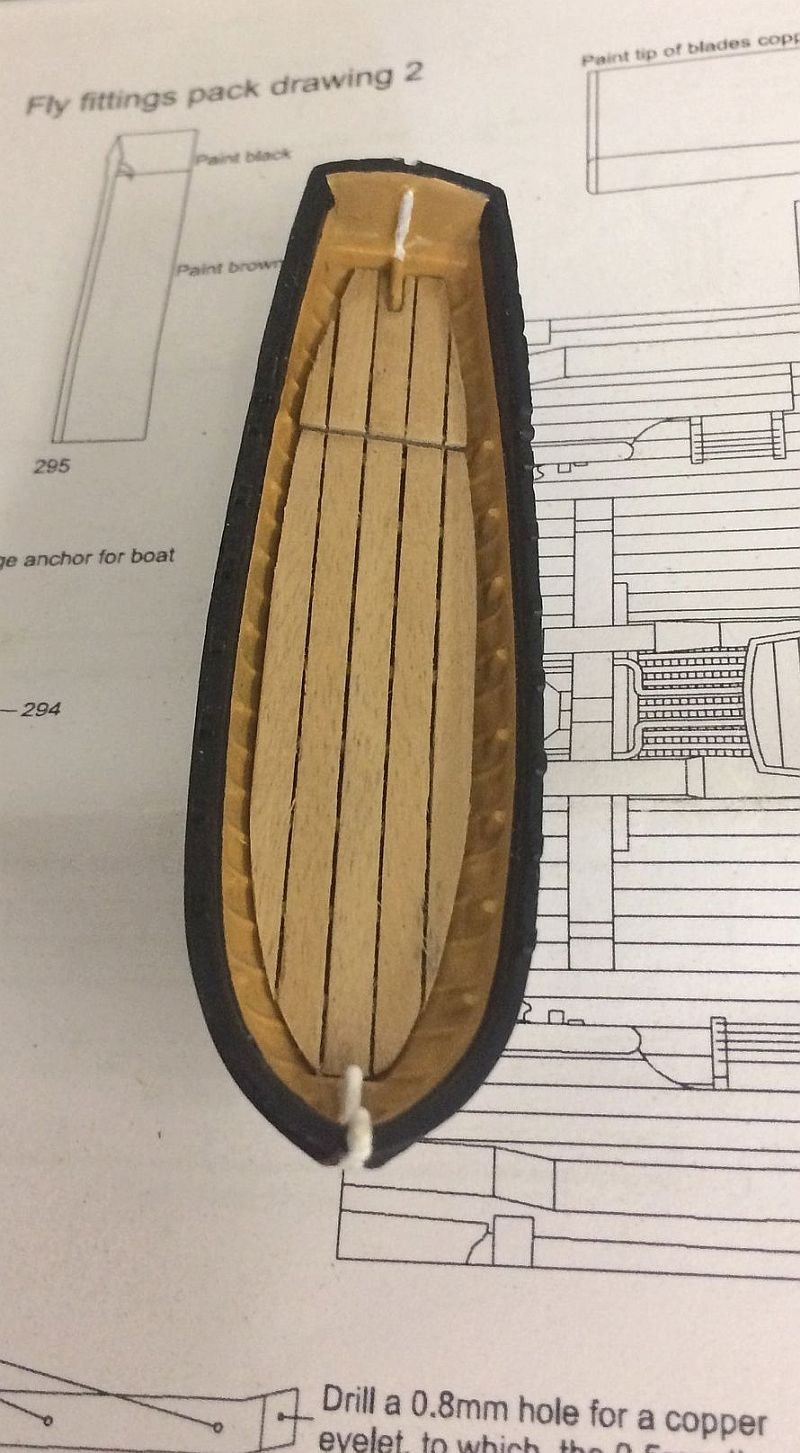
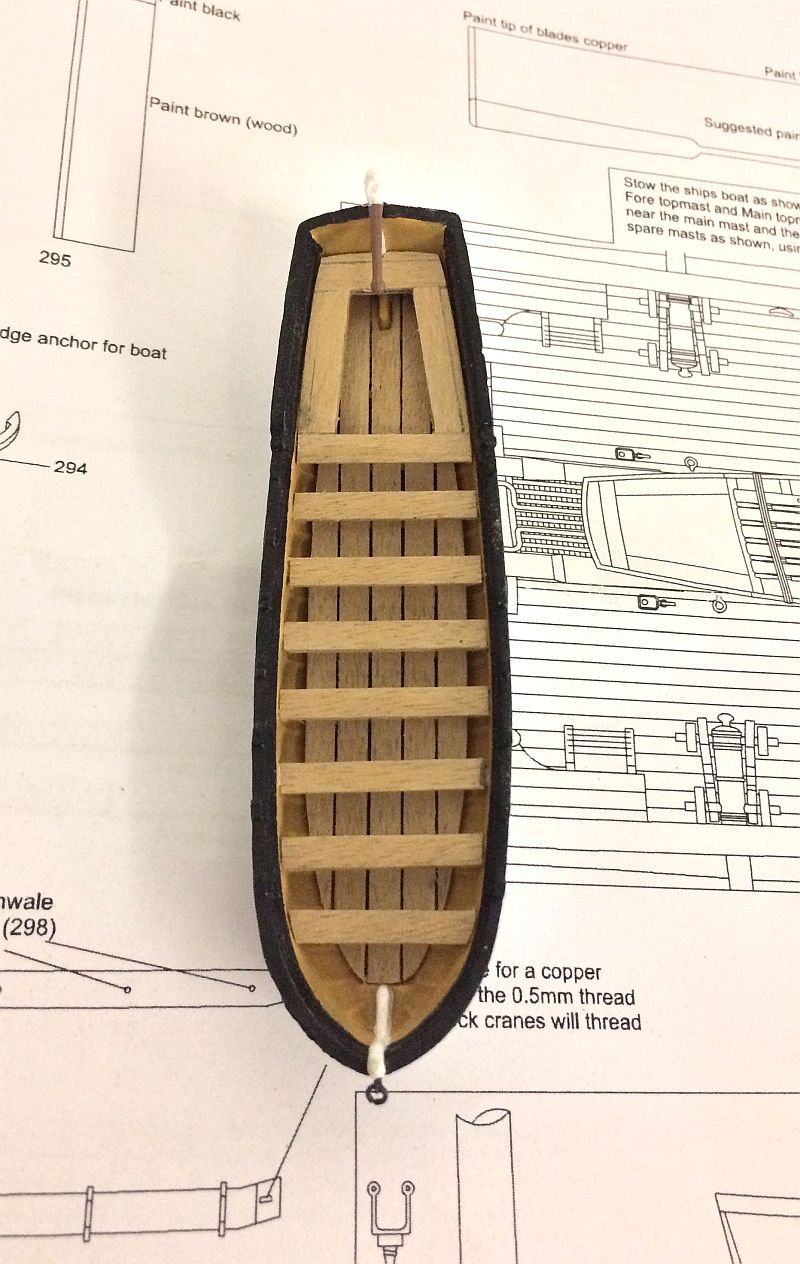
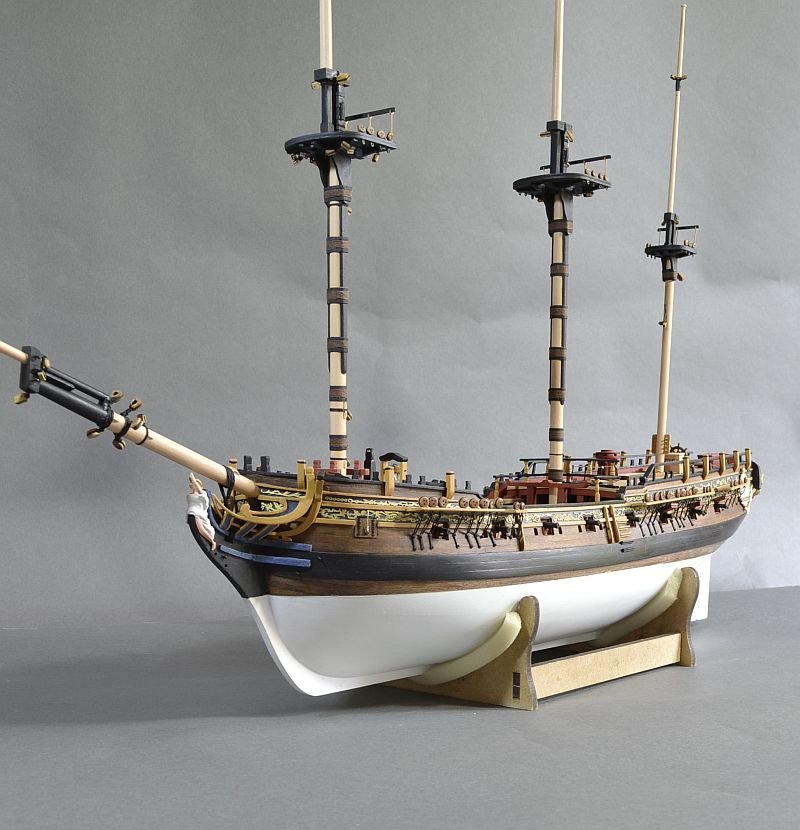
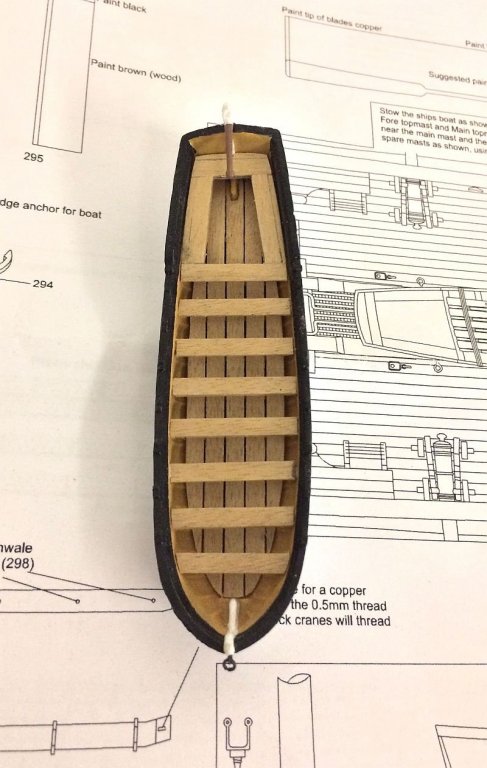
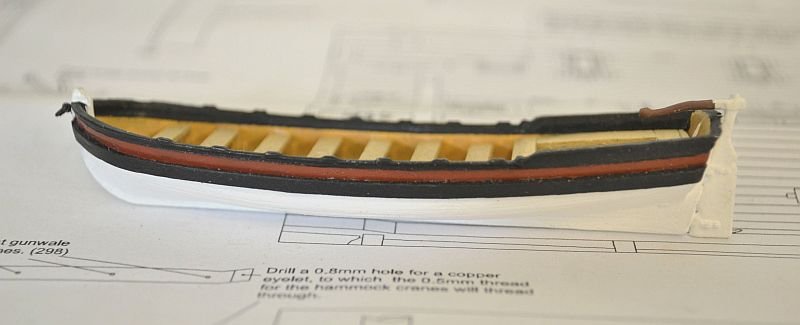
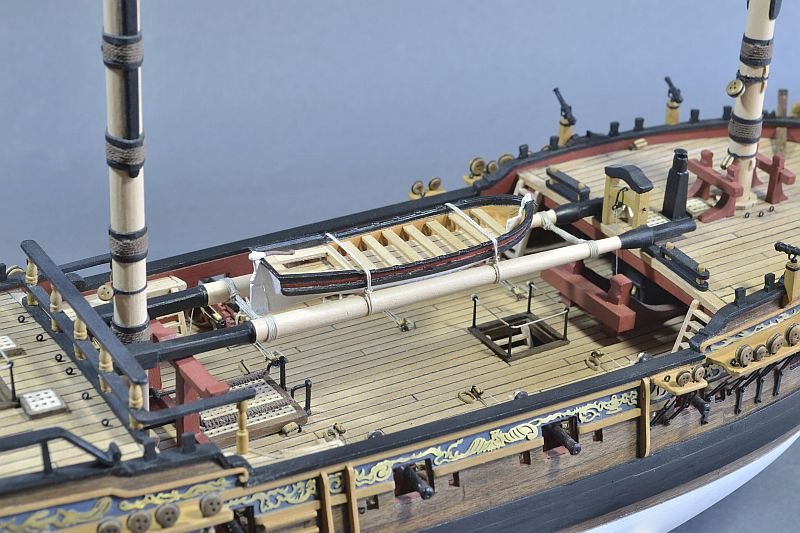
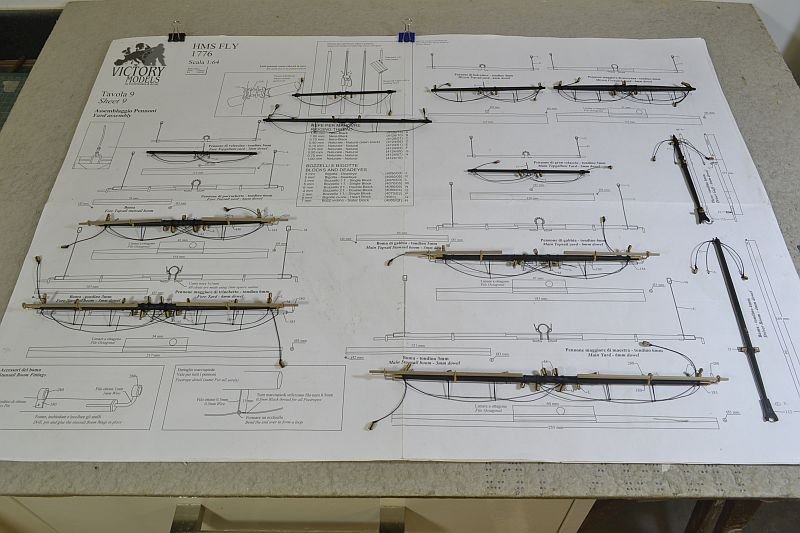
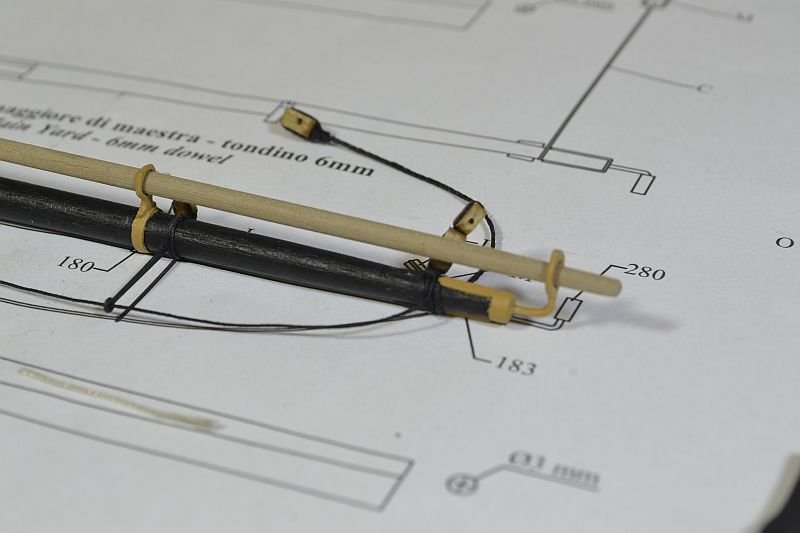
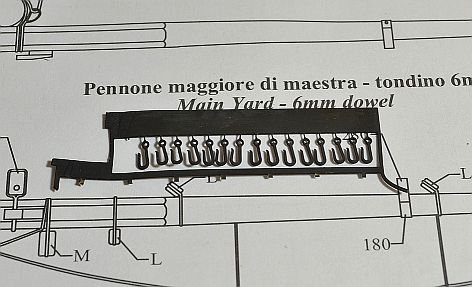
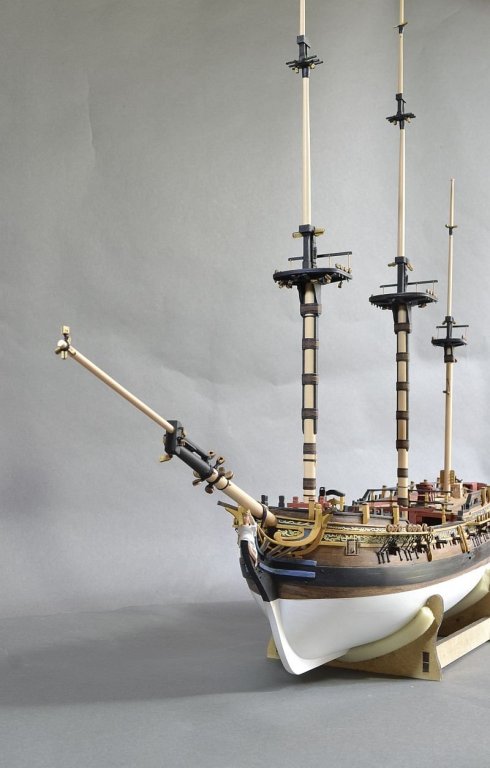
Hello - further steps forward. Thanks Blue Ensign for looking in and thanks for your good ideas Ships boat done (metal hull supplied with upgrade kit). A strip was added along sides for wale and painted black. Yards are also all done as per plans. Slight modification to fixing. Used tape banded around yards (painted yellow) with parts from upgrade kit for the Stunsail Boom It's good to see more Fly builds on here. Regards Doug

- 158 replies
-
- 10
-

-
Andrew You will enjoy this kit, it is a very nice ship - the materials are good. Wish you well. Regards Doug
-
Hello Andrew - Thank you very much for your kind comments and hopefully my build helps you with yours as others have done with mine. Yes, I did spray a matt varnish on the walnut hull after finishing the sanding. Once I had the waterline marked out I masked off the top section of the hull to spray below the waterline in white. First sealed the edge of the tape (being spray up to) with varnish (hand painted, Caldercraft water based matt varnish) and sprayed a grey undercoat (sanding between coats) and then sprayed the acrylic white matt, finishing off with matt varnish. When I mask off I always seal the edge of the tape with whatever colour is underneath the tape to get hopefully a clean edge. Have never found a problem in painting over varnish even though I water down the paint. Hopefully this has answered your question / helped and will now go and check your Supply build as for some reason have not seen it. I always look out for Supply builds as there seems not to many about. Regards Doug
- 92 replies
-
- 1
-
-
- finished
- caldercraft
- (and 1 more)
-
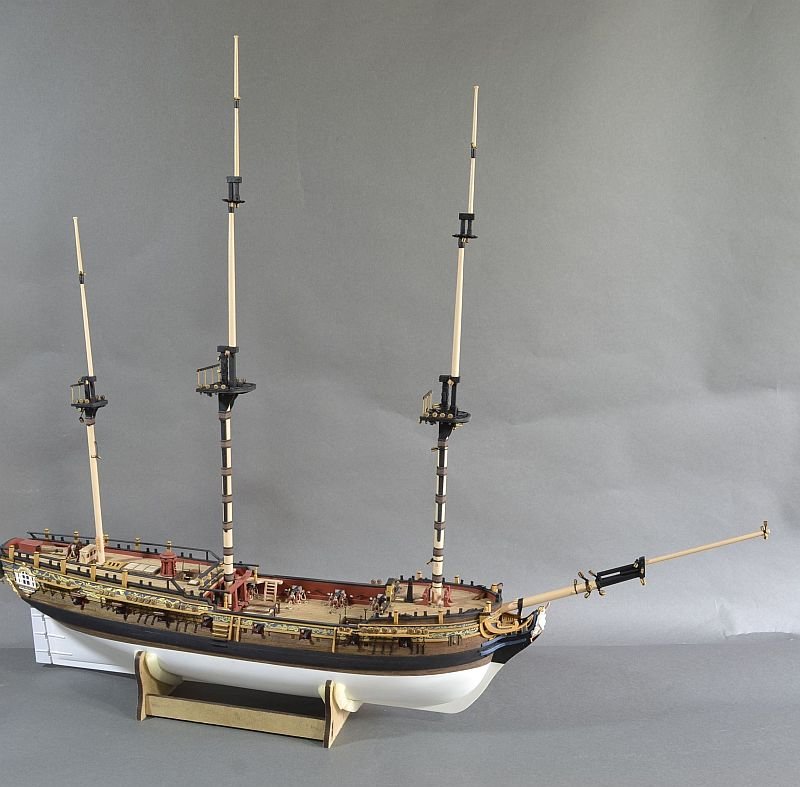
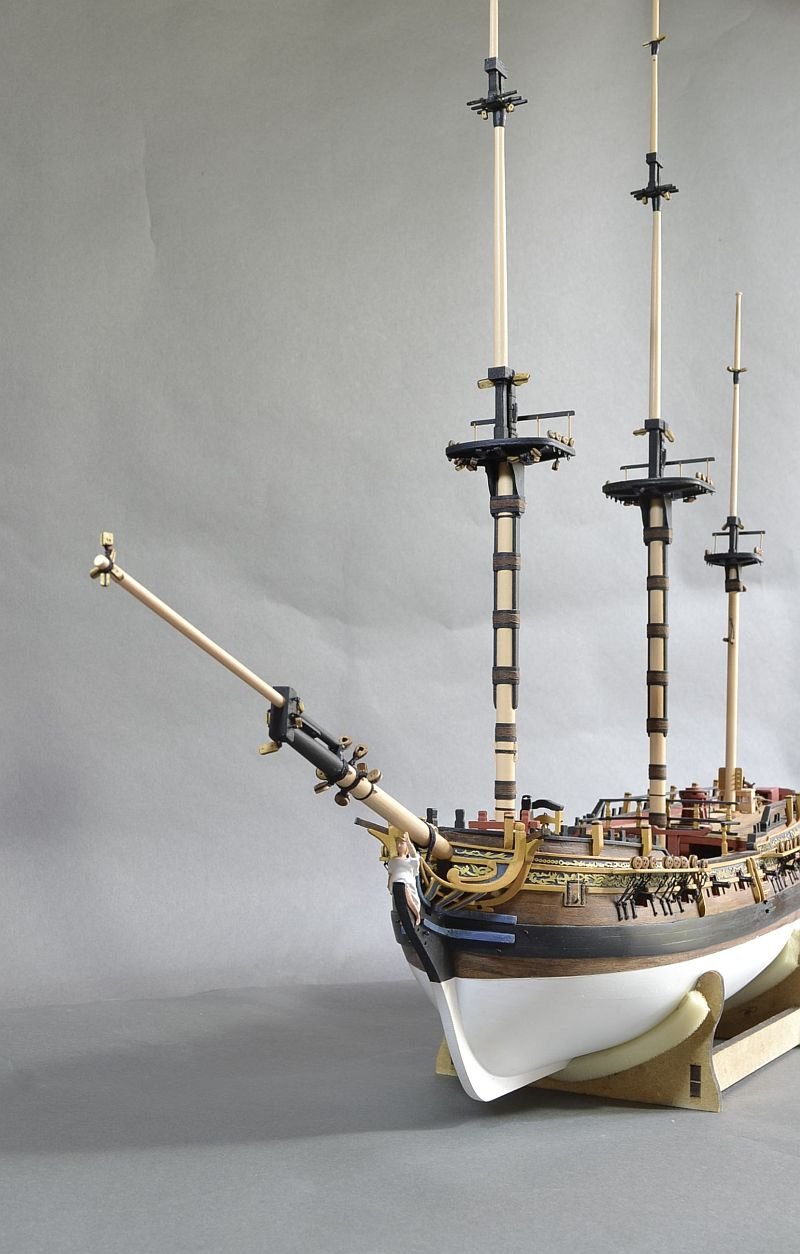
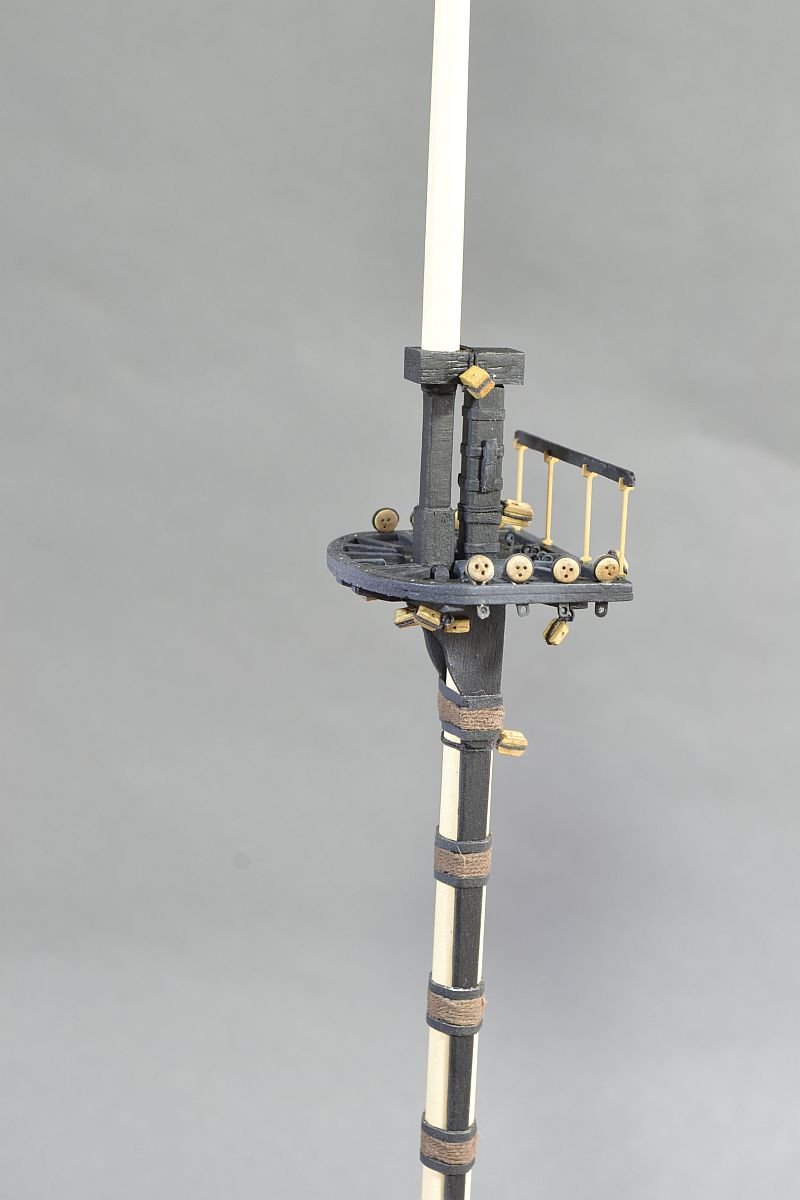
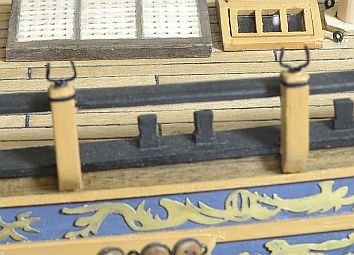
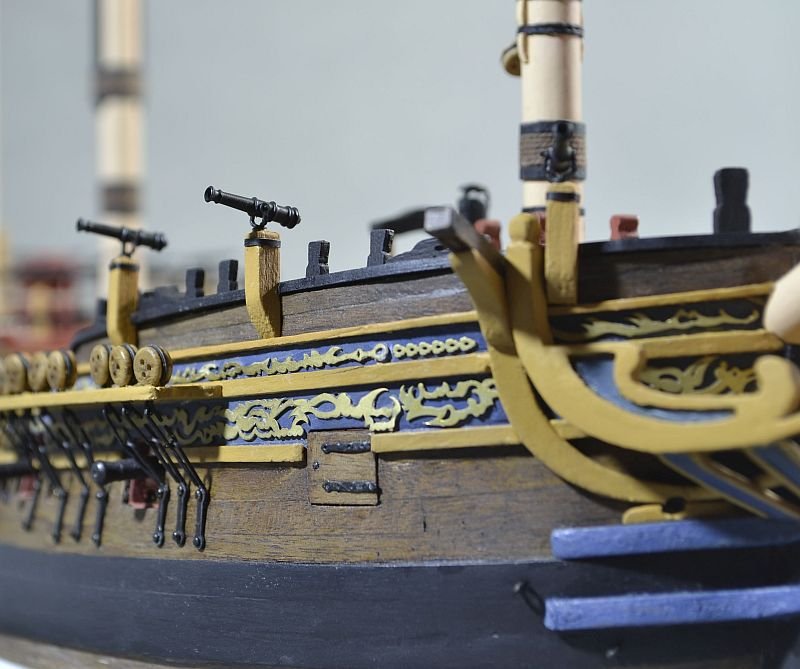
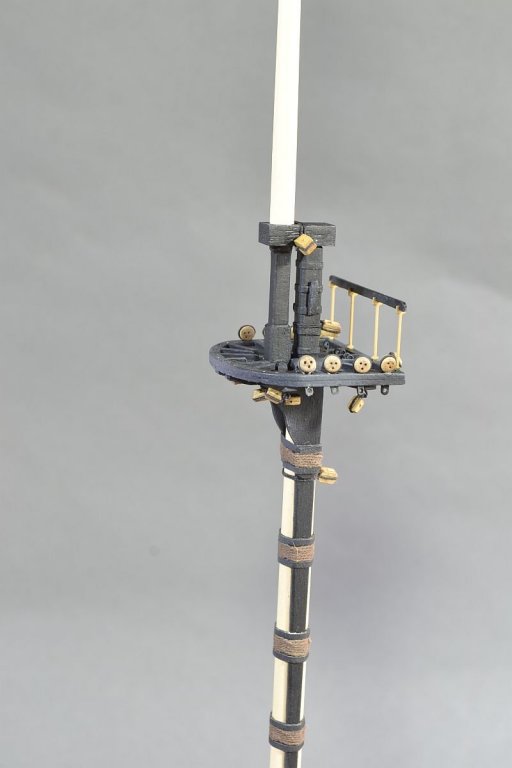
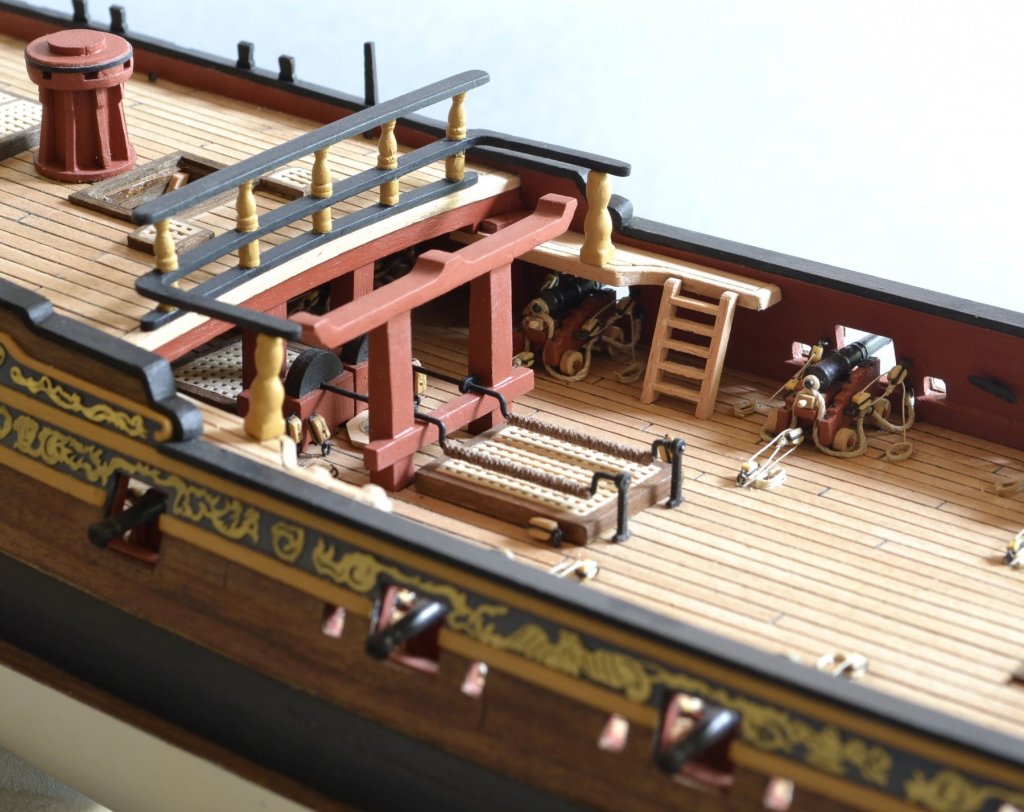
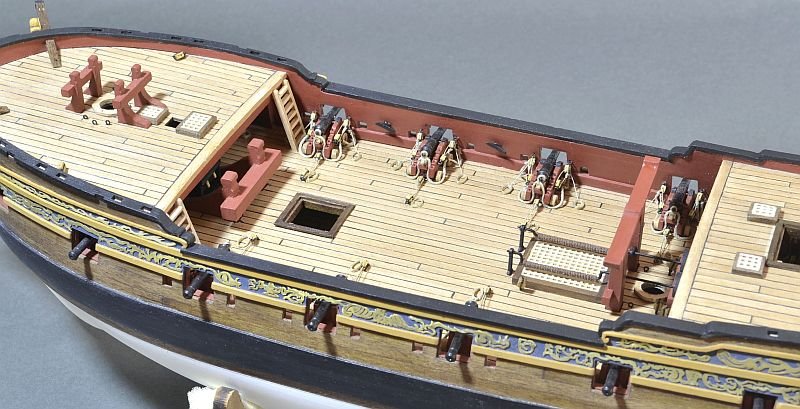
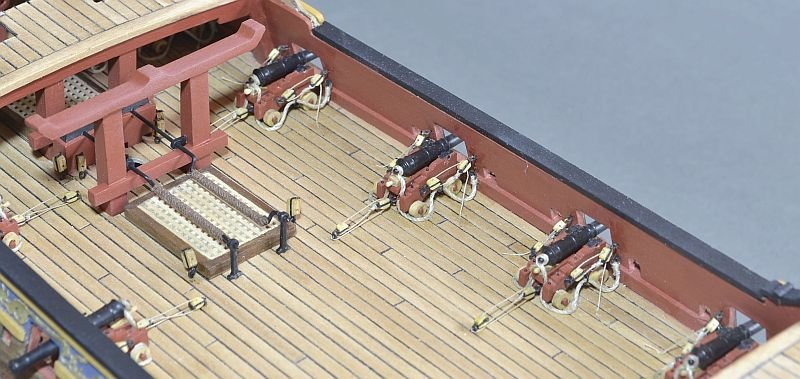
Hello - swivel guns are all in place. The guns are replacement ones from Cornwall Model Boats. I unashamedly copied the idea of the brackets from Blue Ensign which consists of some eye hooks straightened and then bent into shape. Then dropped into a brass tube inserted into the upright stand. (Sorry, out of focus) Not sure the best way to arrange the cannons - either tidy or every each way..... Mind you they will probably end up every each way once starting on the rigging. Dan - Thanks for looking and your comments. Have taken note Thank you for all the 'Likes' - much appreciated. Thank you. Regards Doug
- 158 replies
-
- 10
-
-
Thank you Blue Ensign. Tried to do more with the block work on the bowsprite with seizing etc but found it extremely difficult. As with my first build, Supply, I could not rig the guns fully but this time had ago so maybe on the next build might progress a bit more.... Anyway, again thank you very much for your comments - have learnt from your Pegasus build. (when the internet allows me)
-
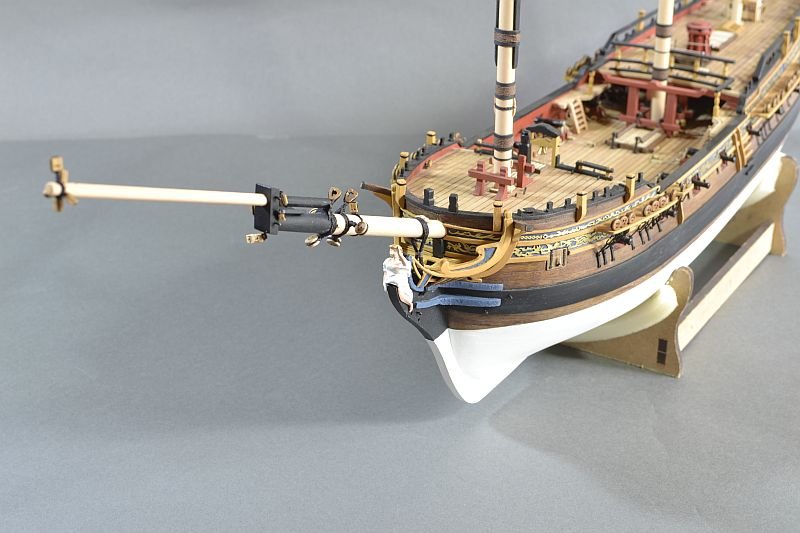
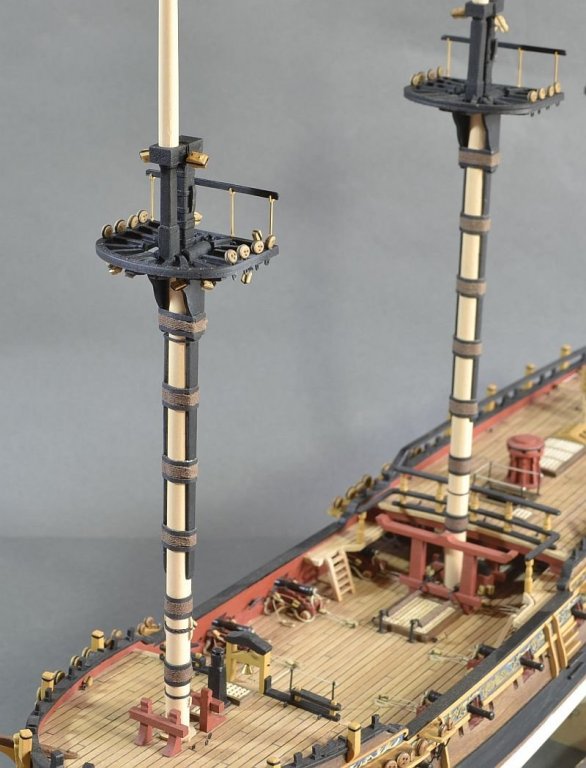
Hello - masts and bowsprit shaped (thinner at one end and thicker the other end), fitted (mostly dry fitted). 'fidded', 'bolstered' and 'blocked' as per 7 & 8 Plan sheets. Masts painted a light cream as walnut dowel was various colour shades. The trestletrees sort of fell apart when cutting them from the laser sheets - 'probablynot' referred to them being badly lasered when he first got his Fly build. Does anyone know what has happened to him - not seen his build for a long time. Hope he is well and the builders have not put him under the concrete floor of his new conservatory...... The woolding I may have used a too thicker thread and the metal bands are black tape. Bowsprite cap rebuilt as kit supplied was wrong shape. Thanks for looking in Regards Doug


-
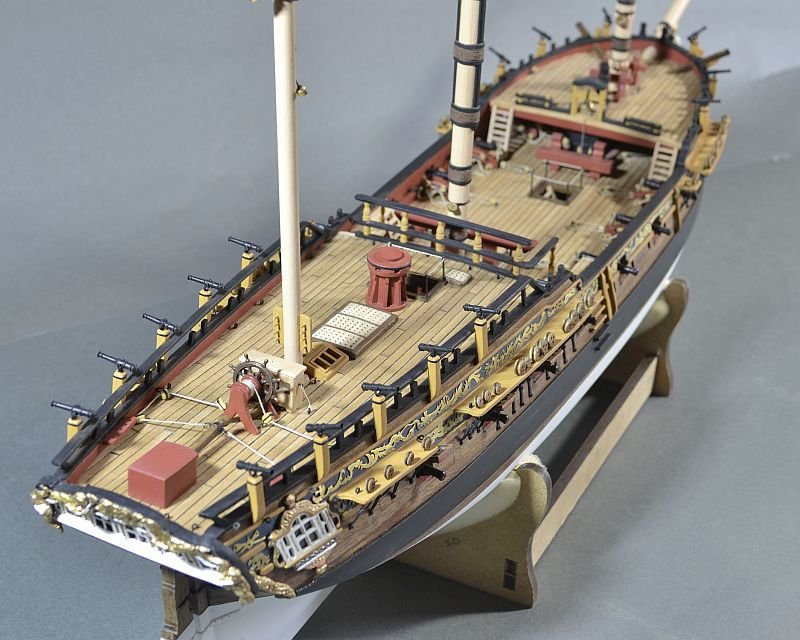
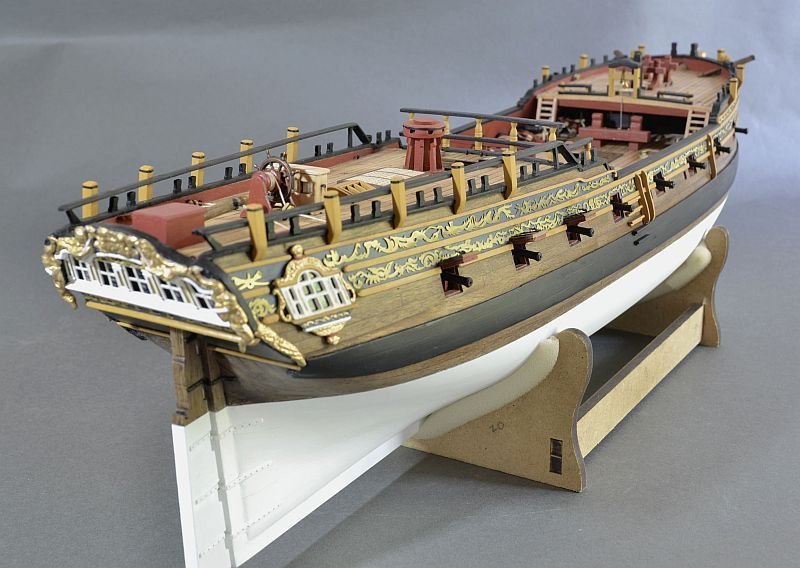
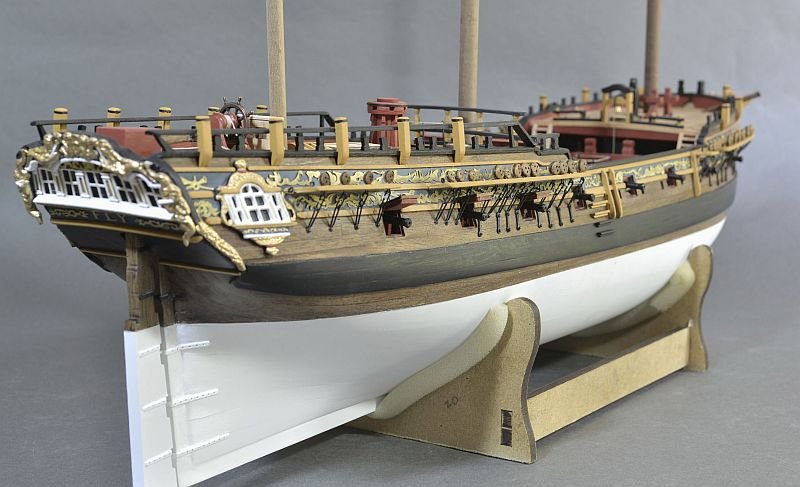
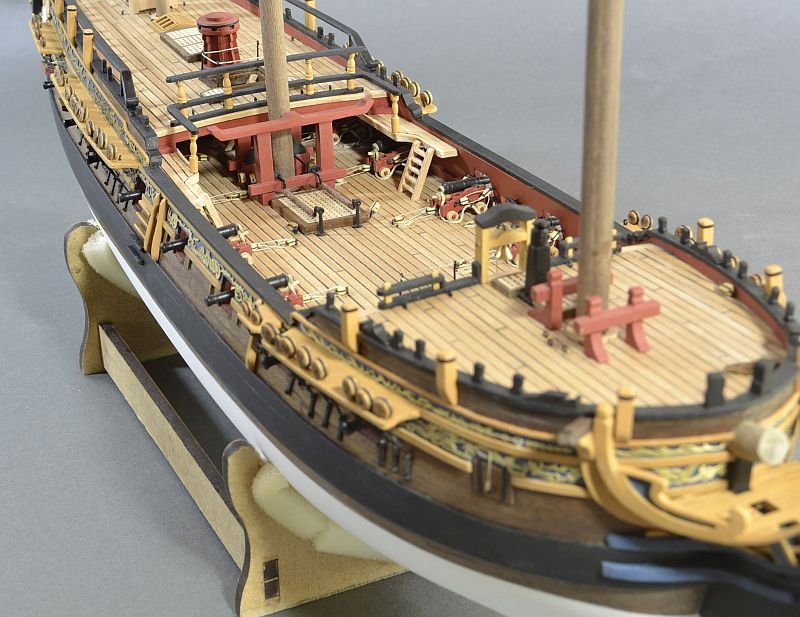
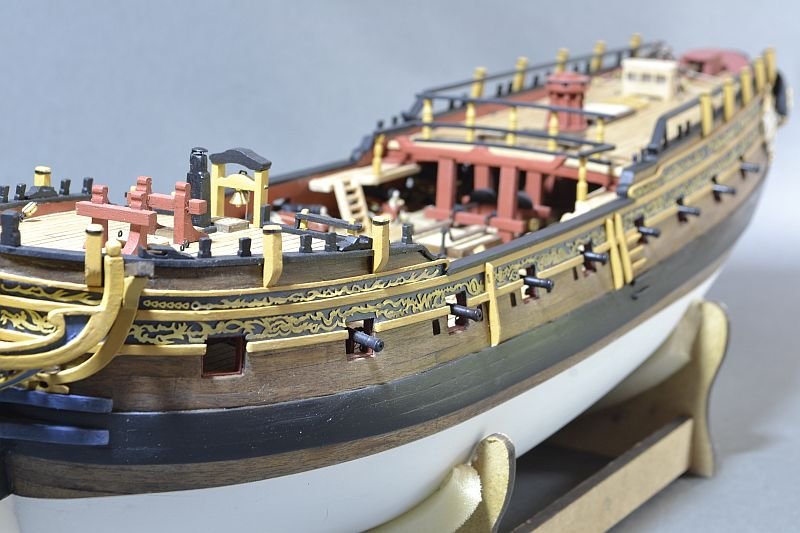
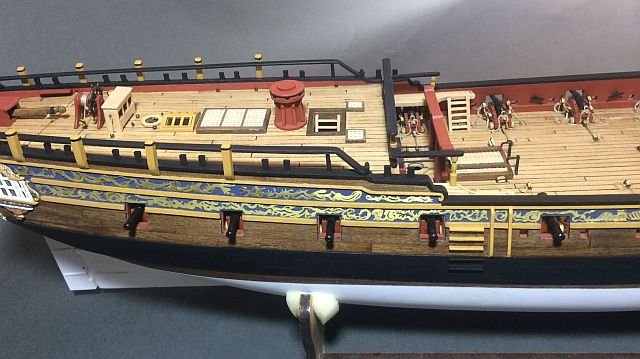
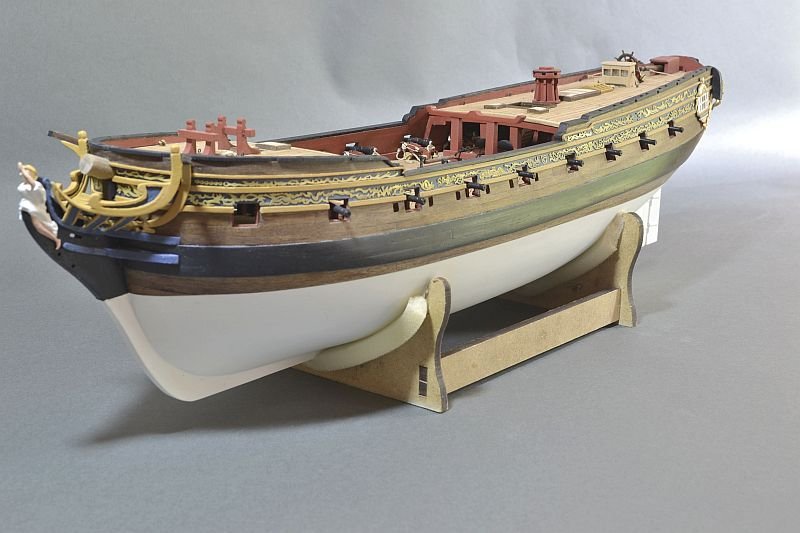
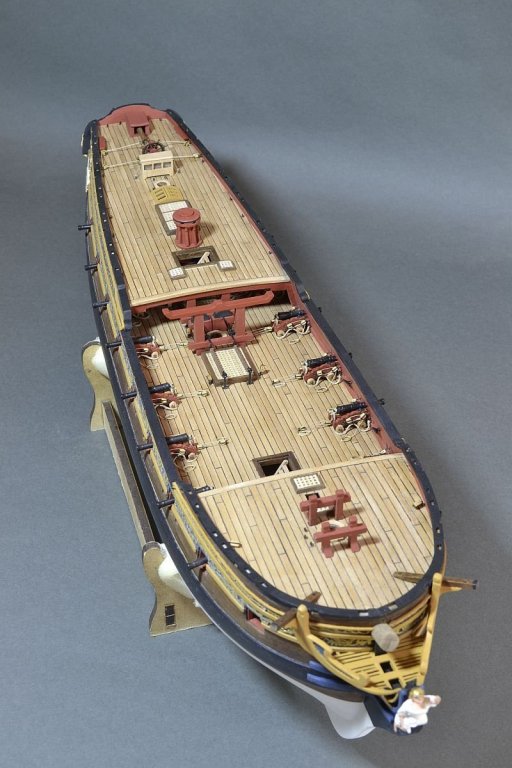
Hello - further steps forward. I feel as if I might be half way through the build - am I? Gun port lids done with the bow ones closed. Channels, deadeyes and chain plates all in place and secured. Thank you S Coleman, Blue Ensign and Martin W for your comments - much appreciated. Martin - the fenders are kit supplied so not down to me. The kit has supplied chain plates which have a nice way of overlapping which surprised me as this type of detail does not appear anywhere else in this kit. Regards Doug

- 158 replies
-
- 13
-
-
Martin - lovely detail. A lot of work and effort put in as you have done with the rest of your build. I liked the work you did for the bell 'tower' earlier. Regards Doug
- 467 replies
-
- 1
-
-
- fly
- victory models
- (and 1 more)
-
Agree with BANYAN - stunning work. So clean and tidy - beautiful to look at. Doug
-
Another step forward. Have completed quarterdeck rail with swivel gun posts. With the foredeck swivel guns posts I have copied the rear post as to how they sit in conjunction with the trim running along the side of the ship - so as to keep everything the same. Sorry for maybe not being historically correct - on the instructions the front posts overlap the trim. Side steps and fenders in place. Also have changed the spindles on the quarterdeck gangways as I did not like the kit supplied ones. Hopefully these look a bit better. Thank you simonthepieman and Spyglass for looking in and your comments and all the likes from others. Regards Doug
- 158 replies
-
- 12
-
-
Sorry - thought I would add this photo as I have just taken it with a mobile phone instead of my usual camera to see if there is any difference....
-
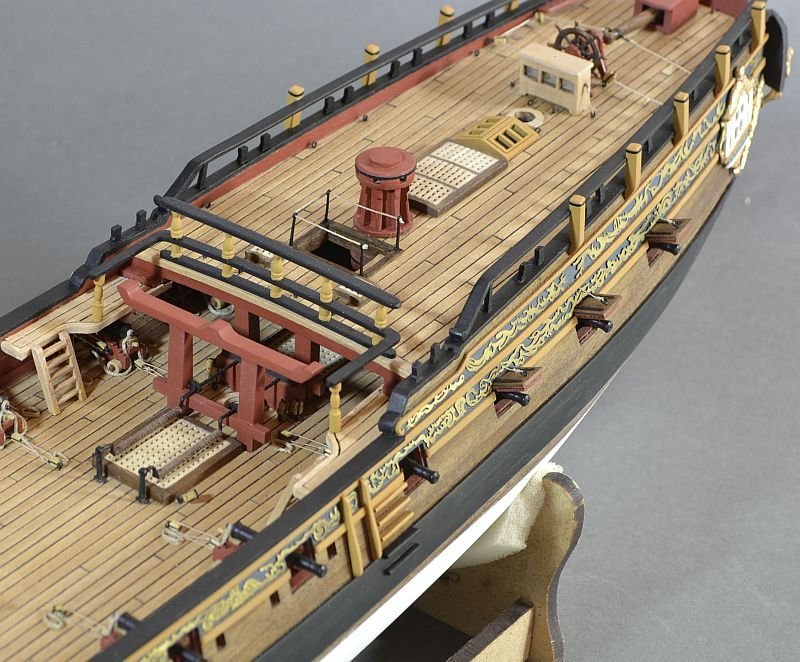
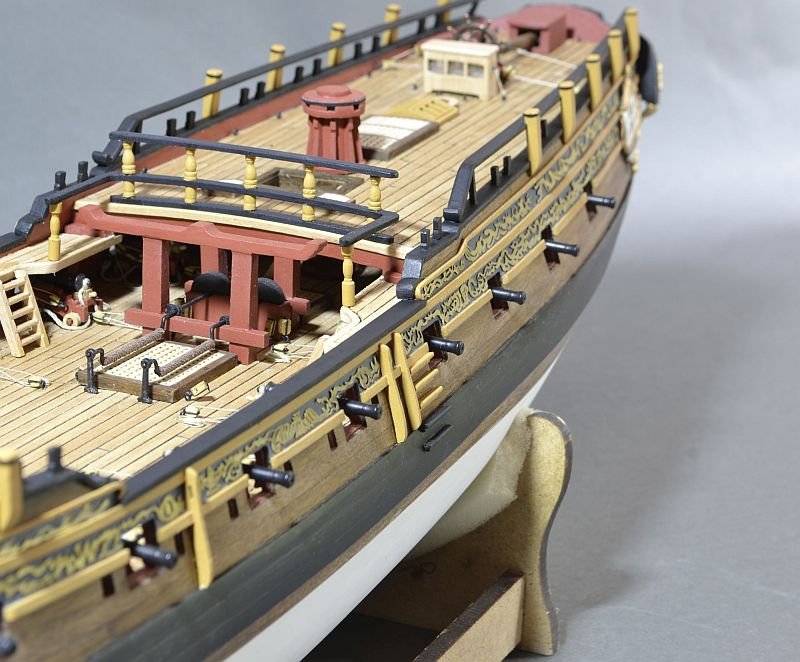
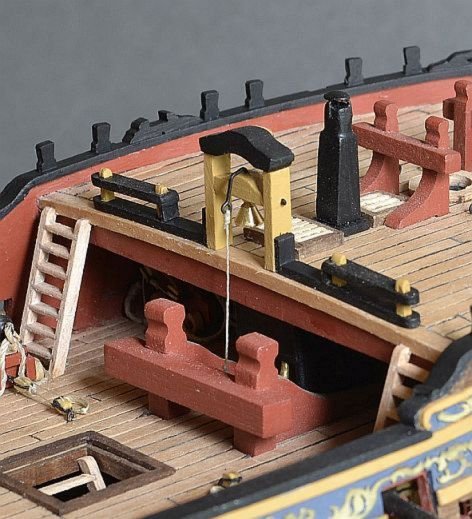
Hello - couple of photos showing the bell tower and the quarterdeck rail and quarter gangways with step. Having built the bell tower as instructed in the kit I realised I had better try harder and do it as shown by the master - Blue Ensign - so had to cut the bell support to place it lower. In doing so realised that it need to be rebuilt plus the canopy. On the quarterdeck rail lower section used round dowel instead of square section as asked for in instructions. Regards Doug
-
Martin - you should find there are 4 stanchions and you put 2 together to make 1 thicker stanchion. 🙂 Regards Doug
-
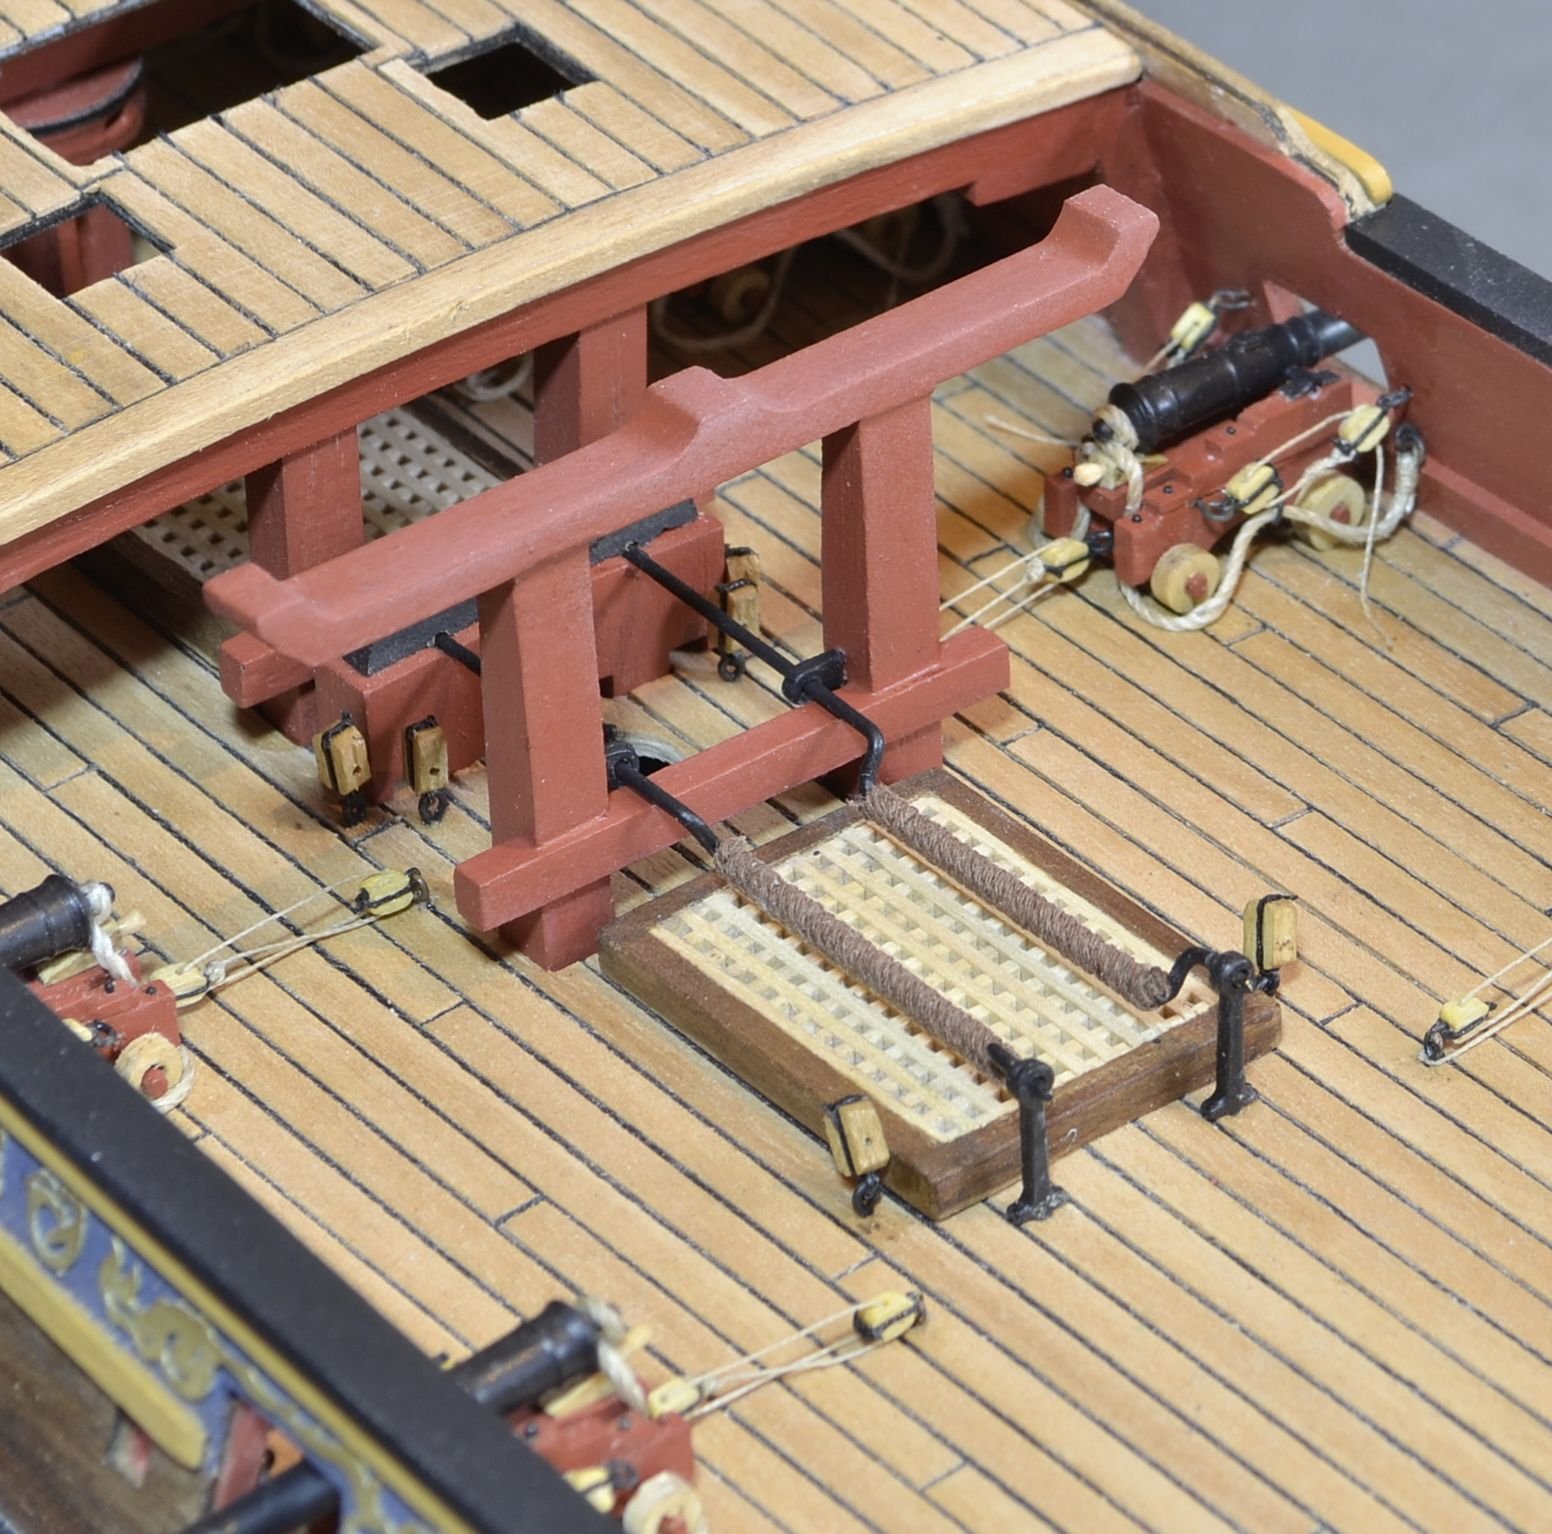
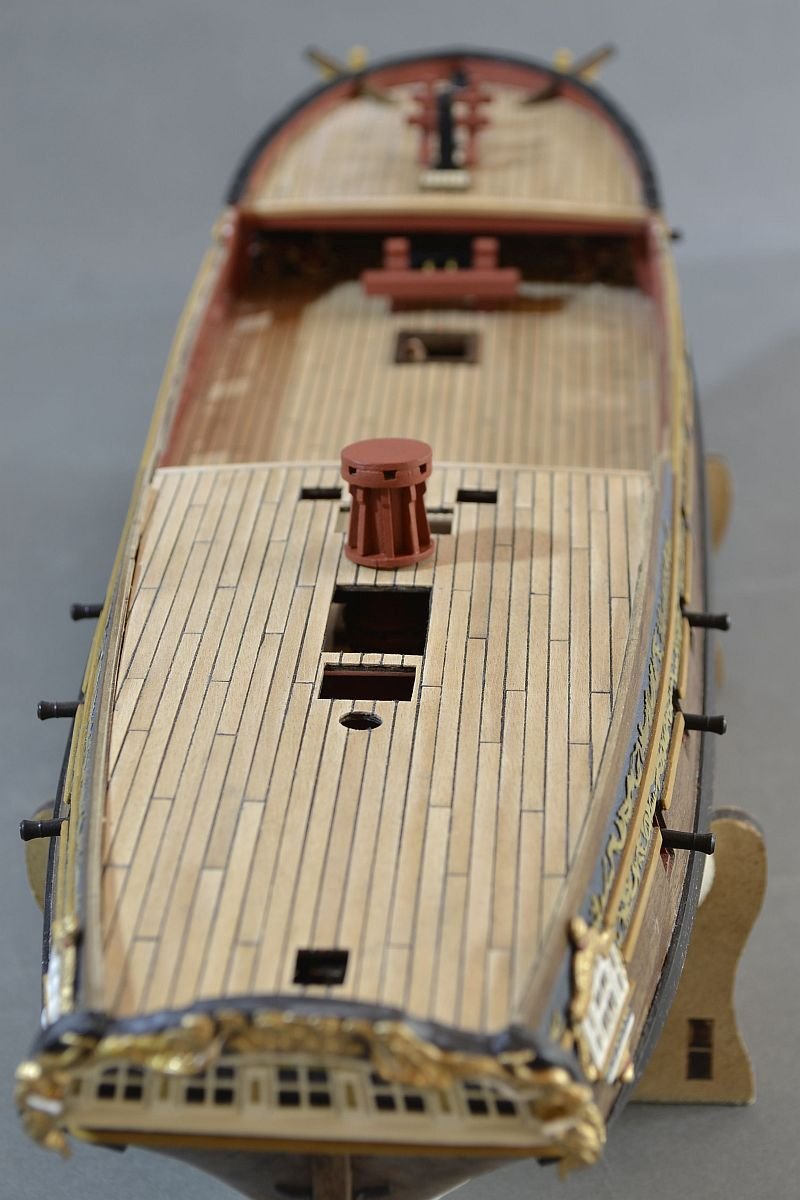
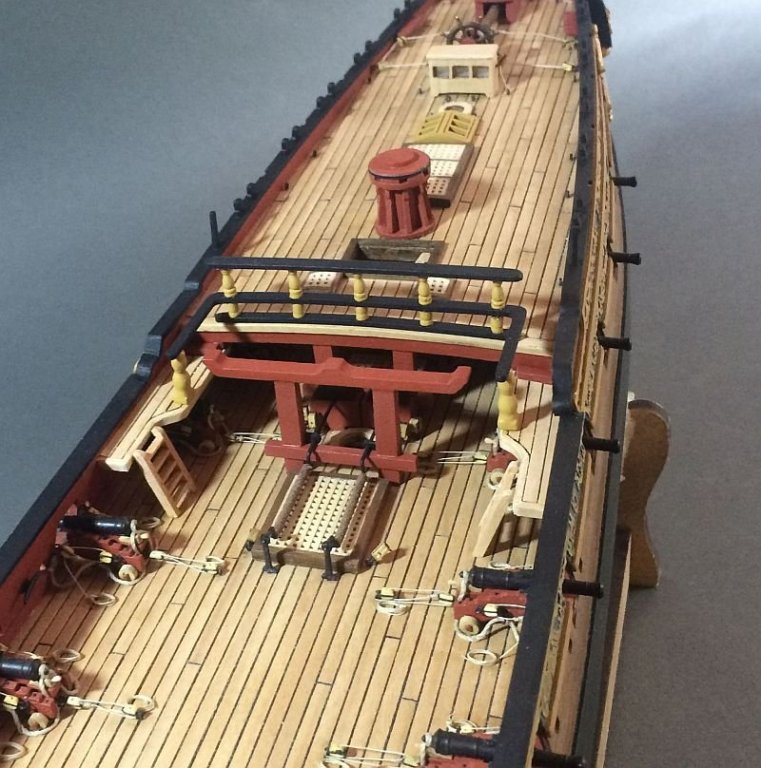
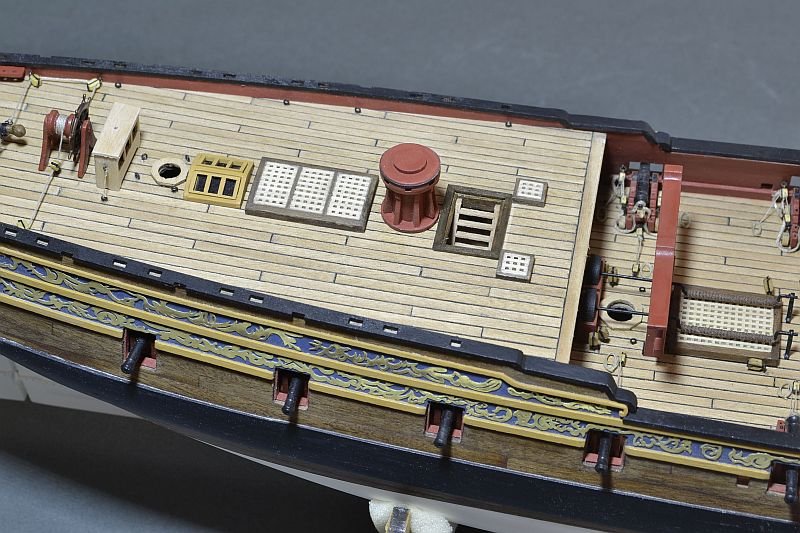
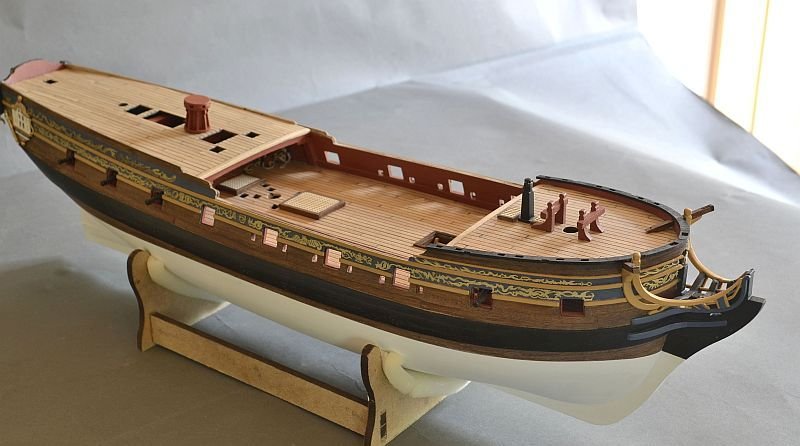
Hi - Some more steps forward. Rope coils finished for cannons and ladders installed. No room around ladders eh? Capping rails all done. Certainly improves the look of the build once those edges are covered. Skylight (glazed), Binnacle (glazed and with a shelf), Ship's wheel in place and rigged. The wheel rigging simplified, not as plans indicate and used 0.5 thread and not 0.25 as on plans. Don't ask me why, fixed the blocks to the side and not onto the deck as on plans. maybe thought they would sit better..... Tiller had balsa wood added and rounded off and painted hopefully to look as timber. Tiller housing shortened, didn't look right as supplied in kit. Ladder fitted and it sits fine as seeing on previous builds the ladder hits the hatch below. Had made lower hatch smaller to avoid this problem. Overall views Thank you for looking in. Thanks to Blue Ensign, Martin W, and aliluke (looking forward to seeing your build back on) for your previous comments and those who pressed the 'like' button. Regards Doug

- 158 replies
-
- 16
-
-
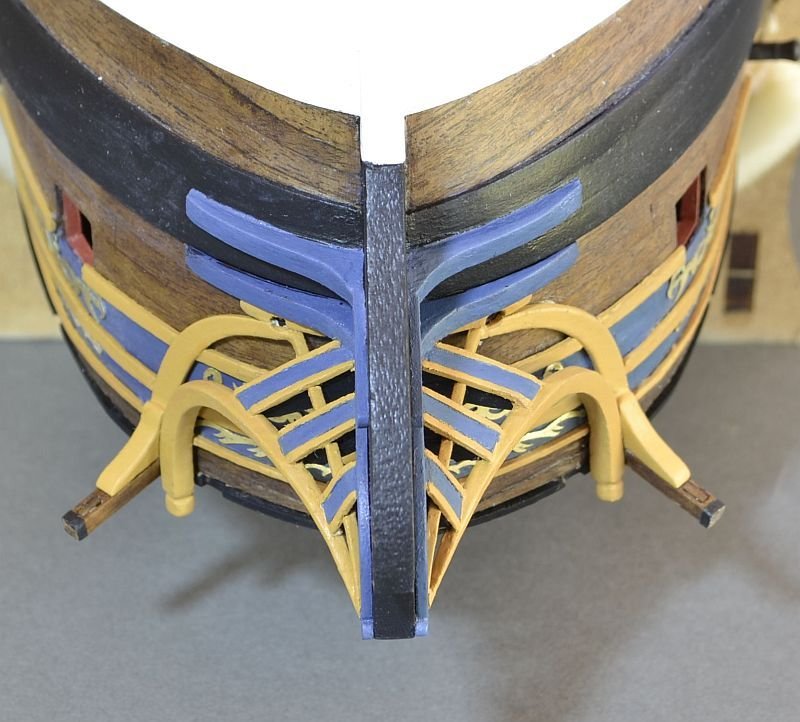
Thank you Tallshiptragic for looking in and your much appreciated comments. I thought this ship had a lot of decorations but seeing your amazing build I realize you cannot have enough ....... I have struggled with the the brass decor on this build and having tried unsuccessfully to put the trim carefully on the cheeks without glue showing have given up. Blue Ensign - again thanks for looking in. The book idea was brilliant - absolutely lovely. Have now rigged the guns - just the coils to do. The pumps and handles are also done. The side screens. A bit clumsy. Got frustrated with the brass trim on the cheeks so took them off. Also for some reason there was a gap on the side where there was no trim yet the plans showed the last section of brass trim went right up to the catheads. As I had some spare from not doing the bow section have placed some bits in. Probably will find later on down the line this will be a mistake. Have now completed other bits of trim on the sides Regards Doug

-
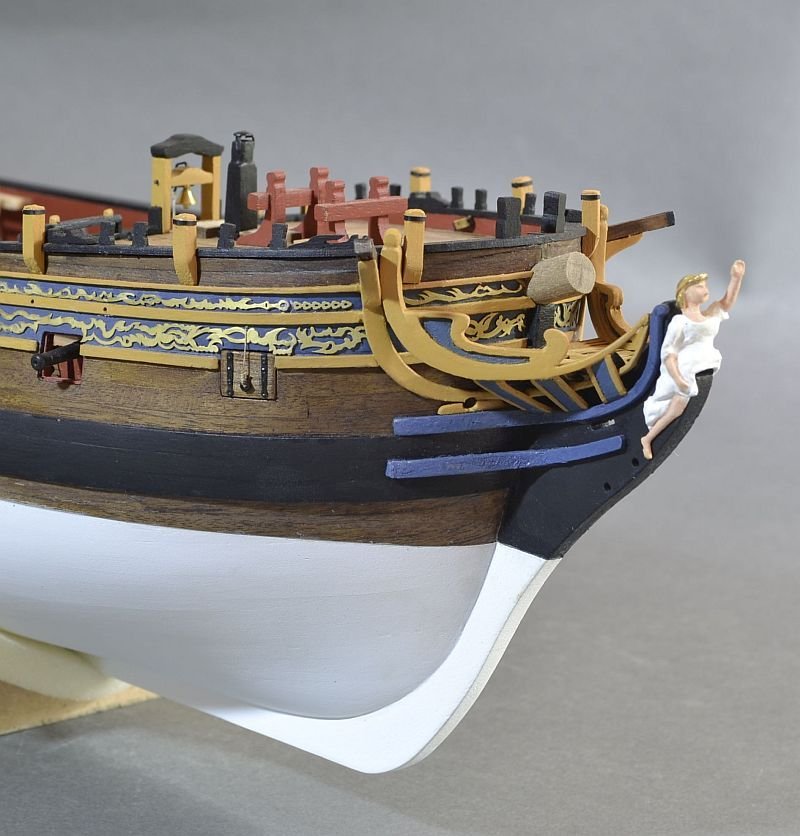
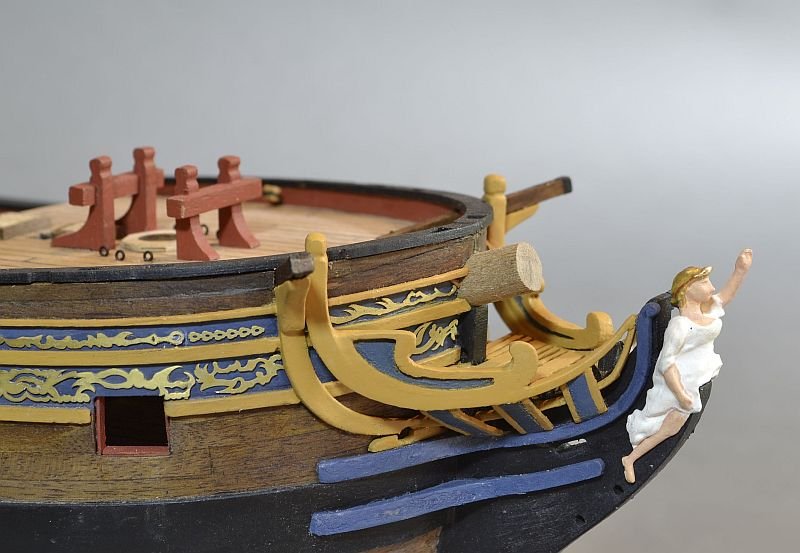
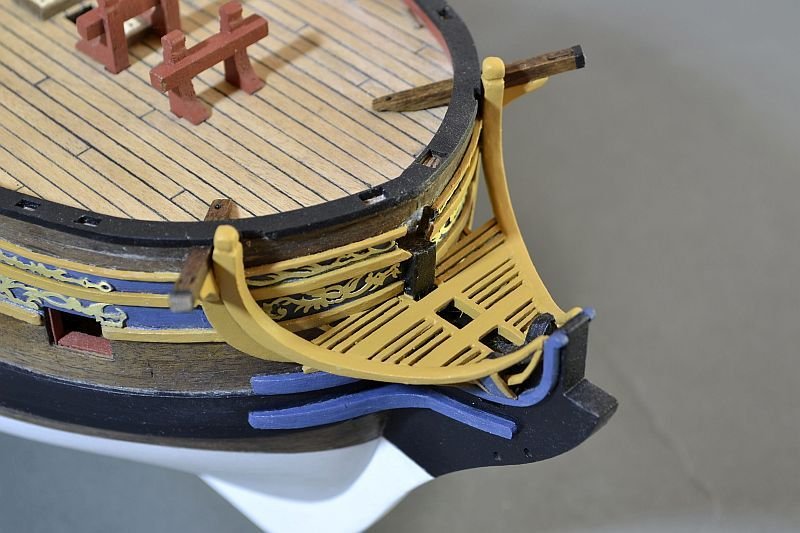
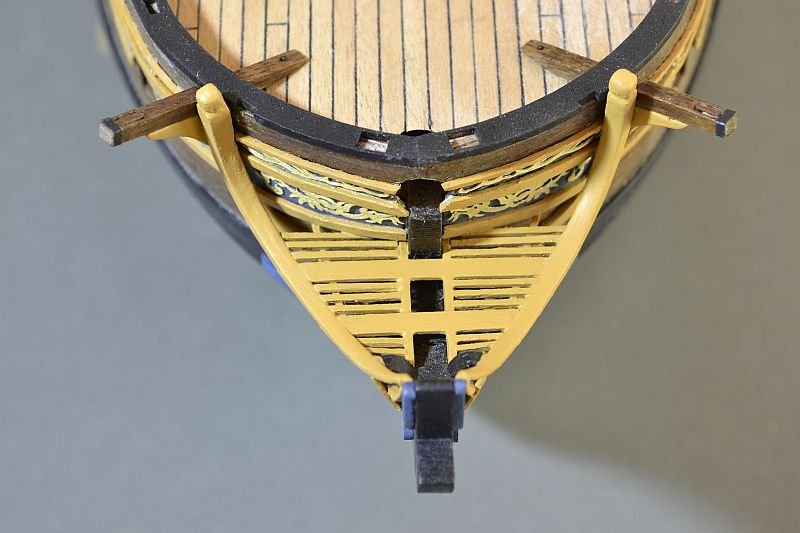
Hi - just a small update. Some more work to the bow section. Not having any reference to what really goes on here have done something based on what others have done. Am doing some side panels Regards Doug
- 158 replies
-
- 10
-
-
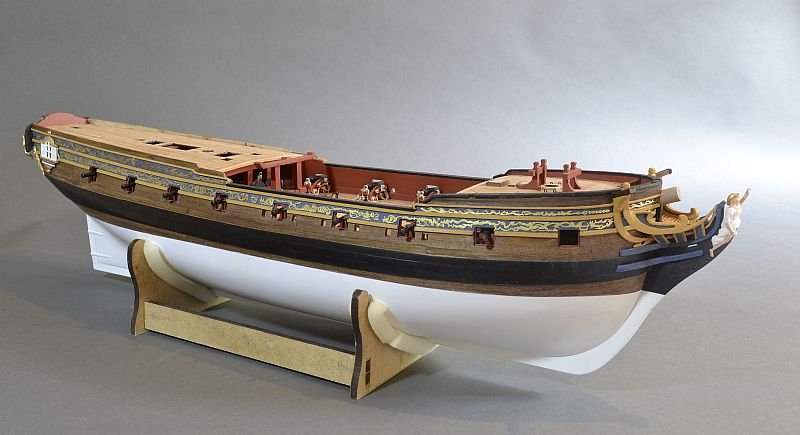
Thank you very much Mirabell61 and Tigersteve for your comments and to those who pressed the 'like' button. Mirabell61 - not seen many white painted hulls either but if I do another build may do copper. Have found on both my builds the white hull had cracks after a few months appearing along the planking. Maybe why most choise either copper or left wood. So before it gets impossible to turn the ship over (mast and rigging started) I repair the hull - gluing / filling / paint etc. On my first build ( HM Brig Supply) the cracks have not reappeared - fingers crossed. Thanks Doug
-
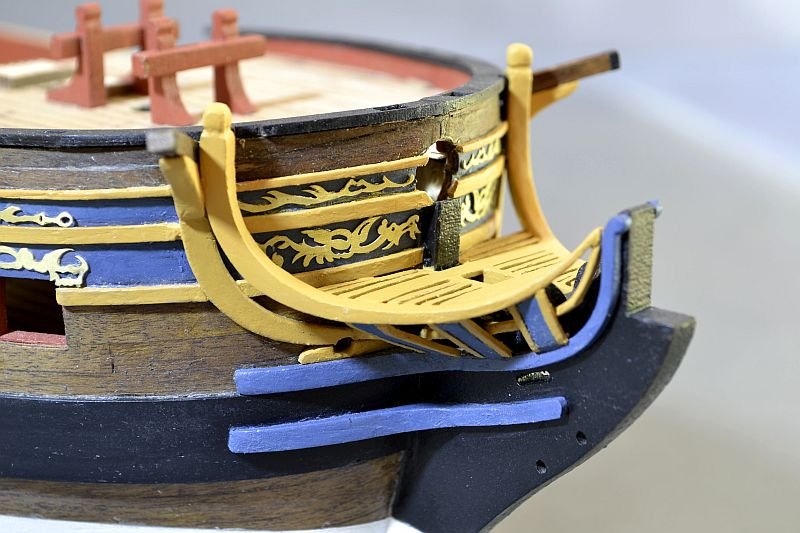
Hello - Been busy doing the Bow part. Quite challenging to say the least!! Upper decks planked - the quarter deck just placed and not glued down. Cheeks painted blue so where ever the decoration appears it has always on a blue background. The instructions ask for black. The 'side pieces' have a strip of 1 x 1 walnut strip added painted yellow. (An addition) Next - will do guns on the lower deck and then back to the quarter deck. Thanks for looking Regards Doug


- 158 replies
-
- 13
-
-
Terry - it's all looking good.
-
It's a amazing build. Your knowledge and skills are above and beyond most of us mortals (referring mainly of myself). Thank you taking the time explaining things and showing us what's what etc. Regards Doug
- 366 replies
-
- 3
-
-
- pegasus
- victory models
- (and 2 more)
-
Unbelievable work !! Lovely pictures - a joy to see. Although may have to stop looking at your build - getting depressed when I look at my desperate attempt....😕
-
Aha - found it and have found out something else. As I have very bad internet here when I have been flicking through your log no pictures so did not see any stove. Today left the page (link supplied) open for half an hour and wow - pictures started to appear. Technology eh? Now I can get back to study rest of your build - and be patience knowing the pictures will be there. Must add that it seems only on your log and the early part I have this problem. Just thought the mishap with the site upgrade had lost your pictures. Thank you Doug
-
Thank you B.E for the help in this matter concerning the stove. It has been a bit embarrassing not to have really checked everything through while building the stove. Have decided to turn the stove around, adjust the beam and this way it gives more room around the stove so it looks like it could be used. Again thank you for taking the time to explain. Unfortunately was unable to find your stove to see what you had done on your build I guess due to sad problems with the sites upgrade.. Regards Doug