.jpg.f26acc9a74319261612561bfa7da1303.jpg)
vaddoc
-
Posts
1,605 -
Joined
-
Last visited
Content Type
Profiles
Forums
Gallery
Events
Everything posted by vaddoc
-
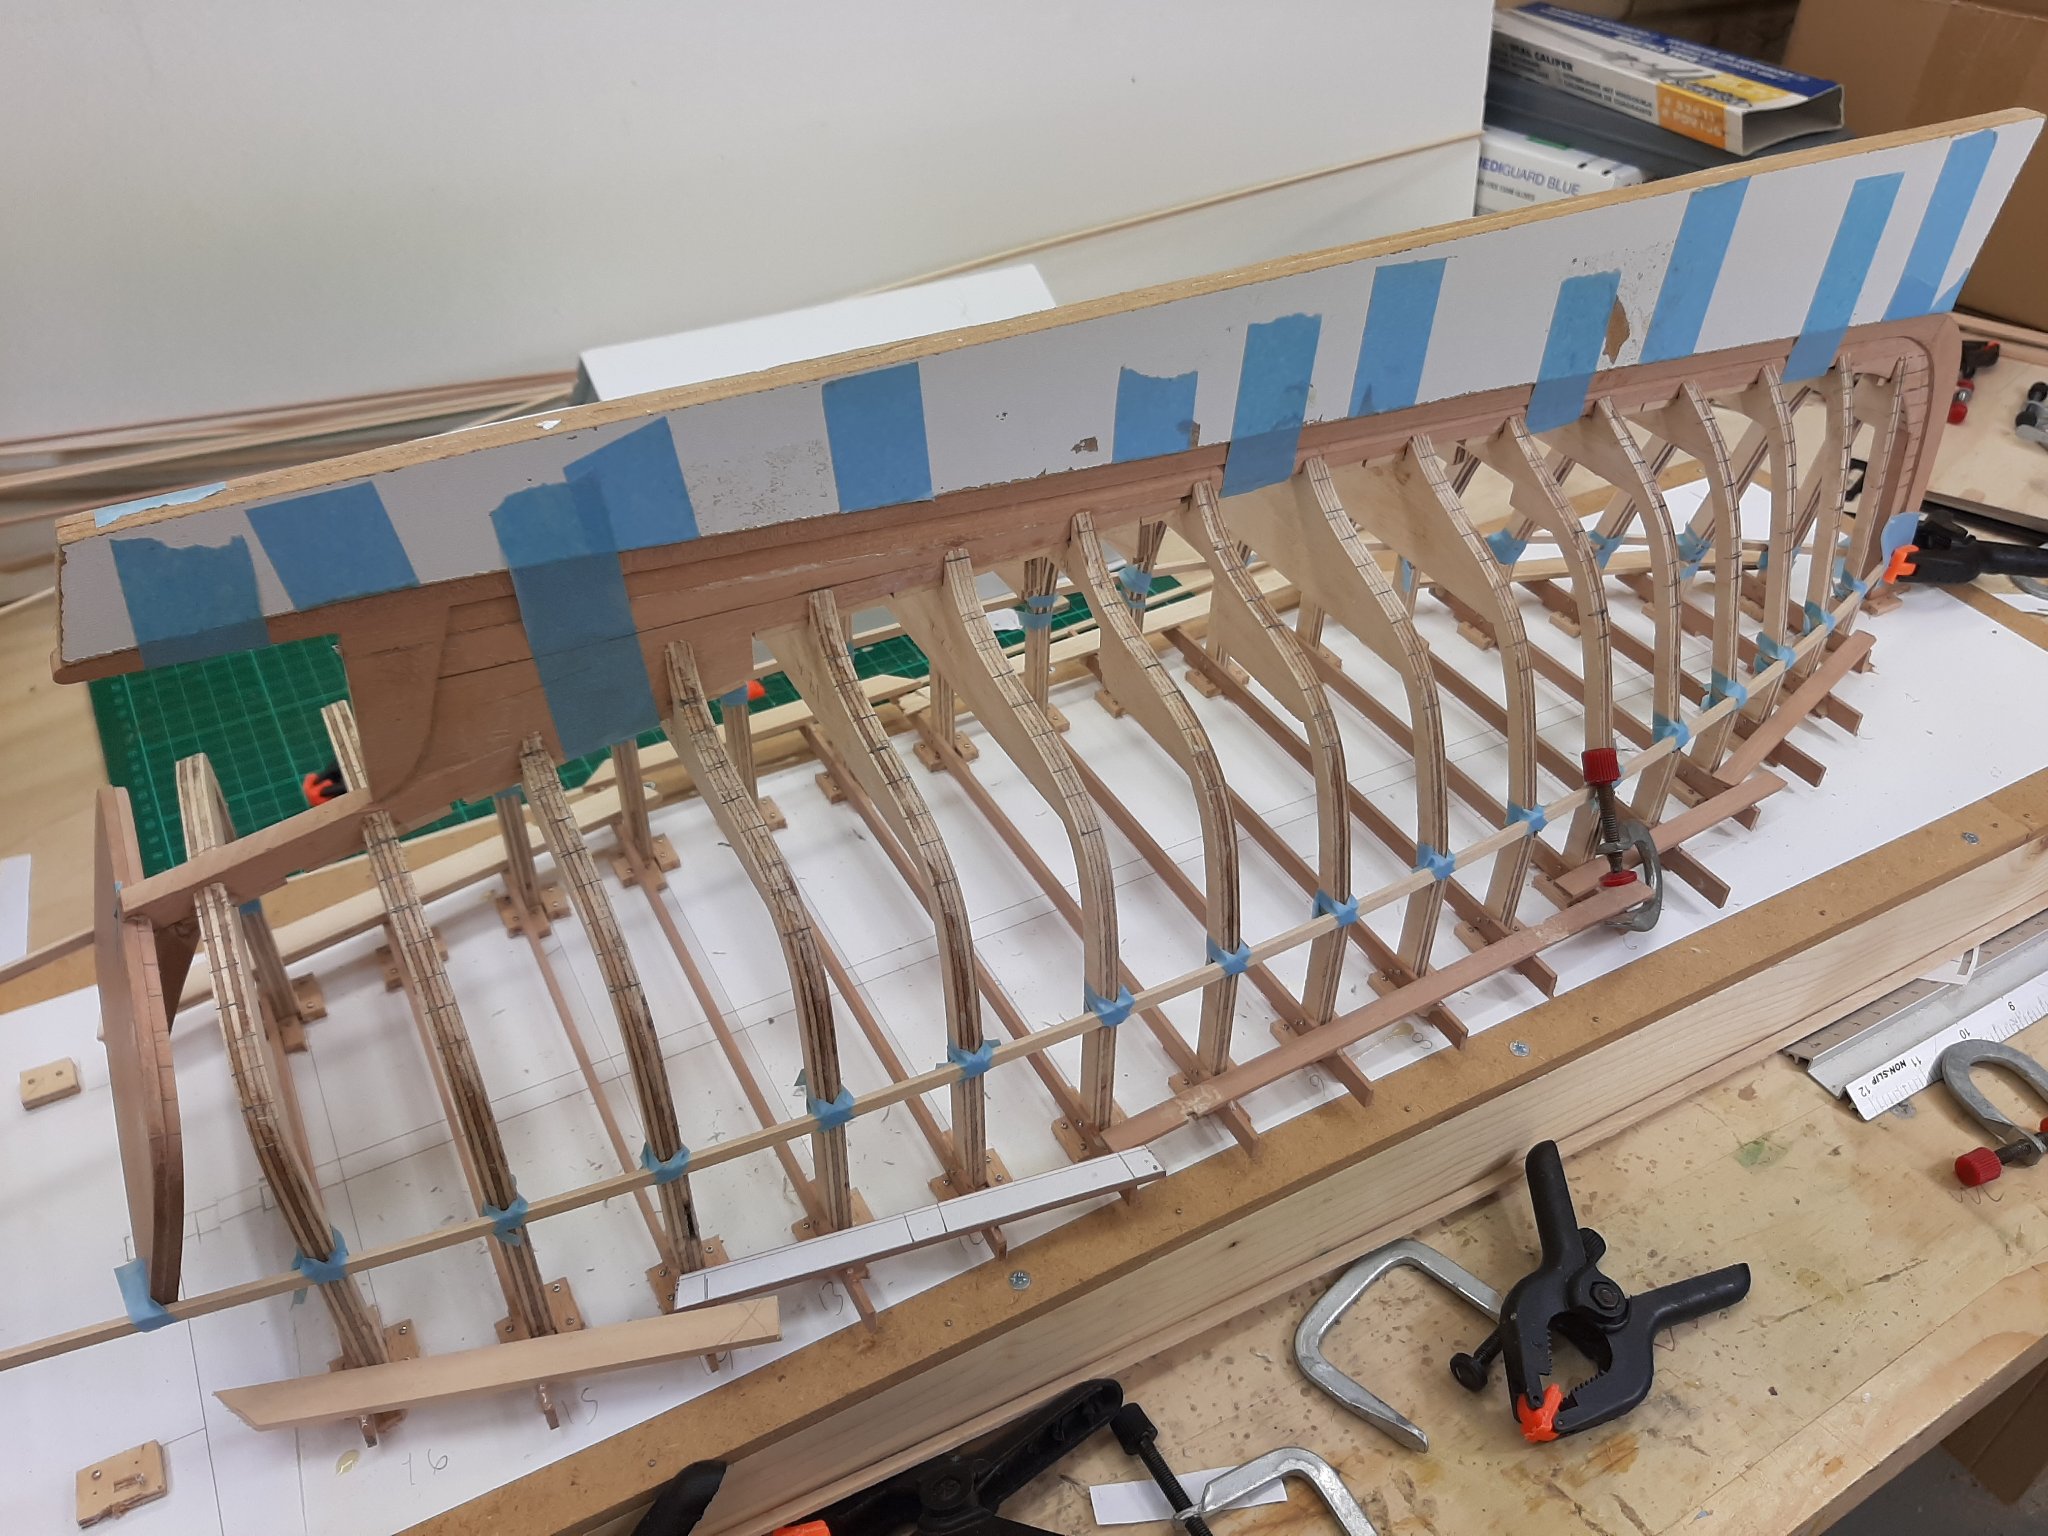
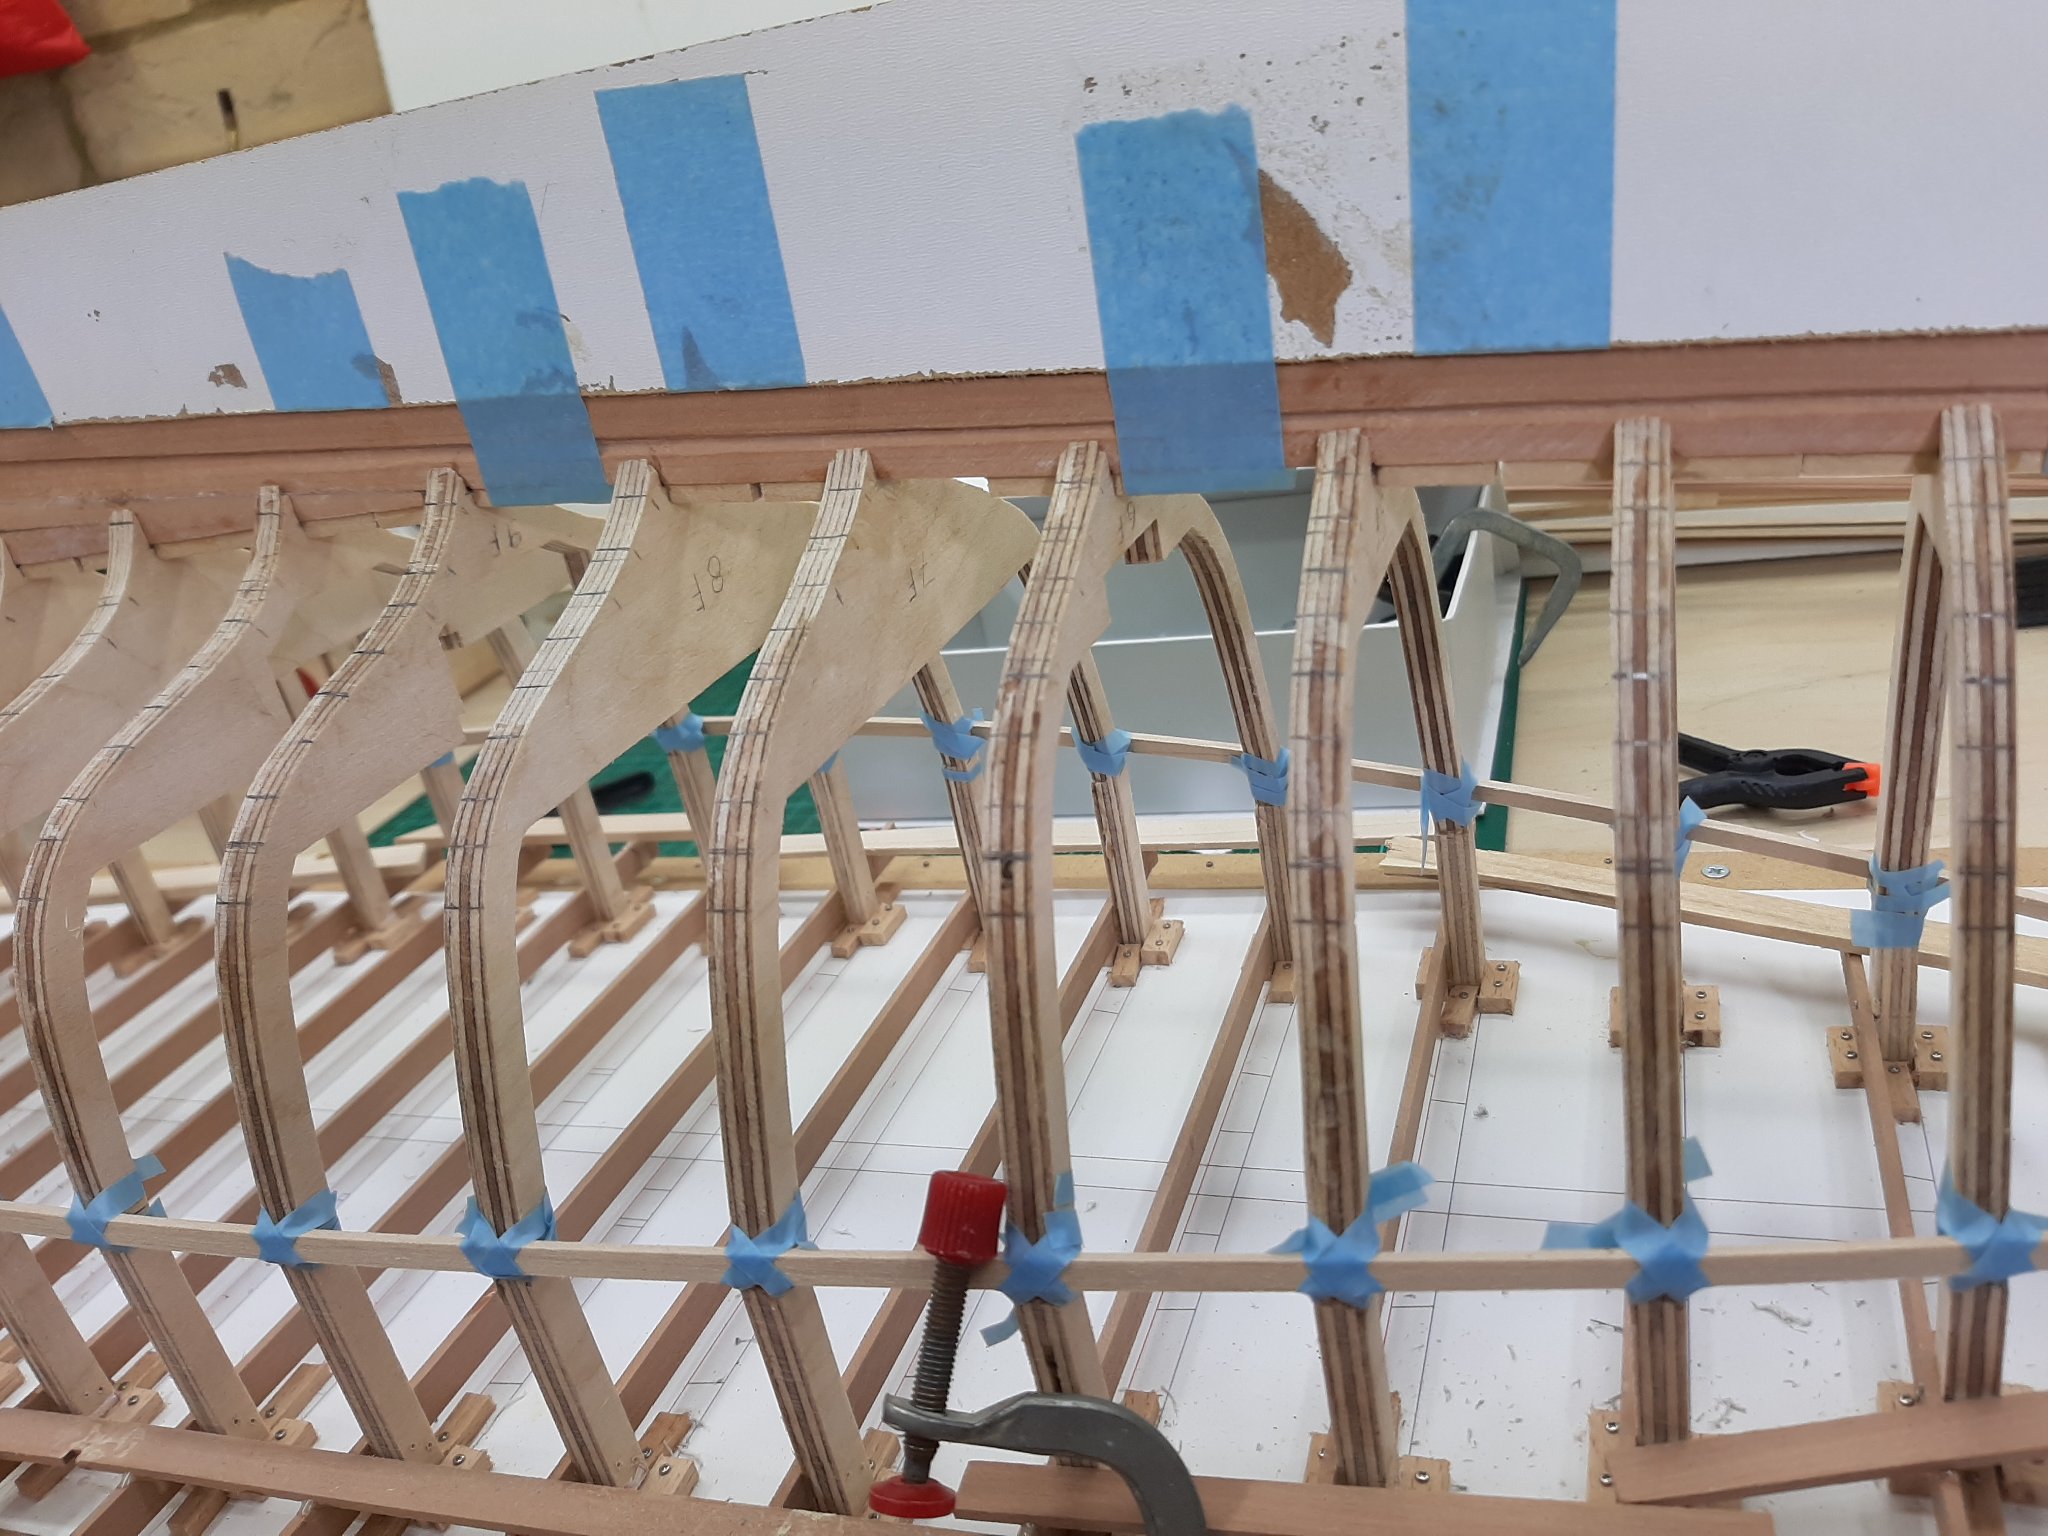
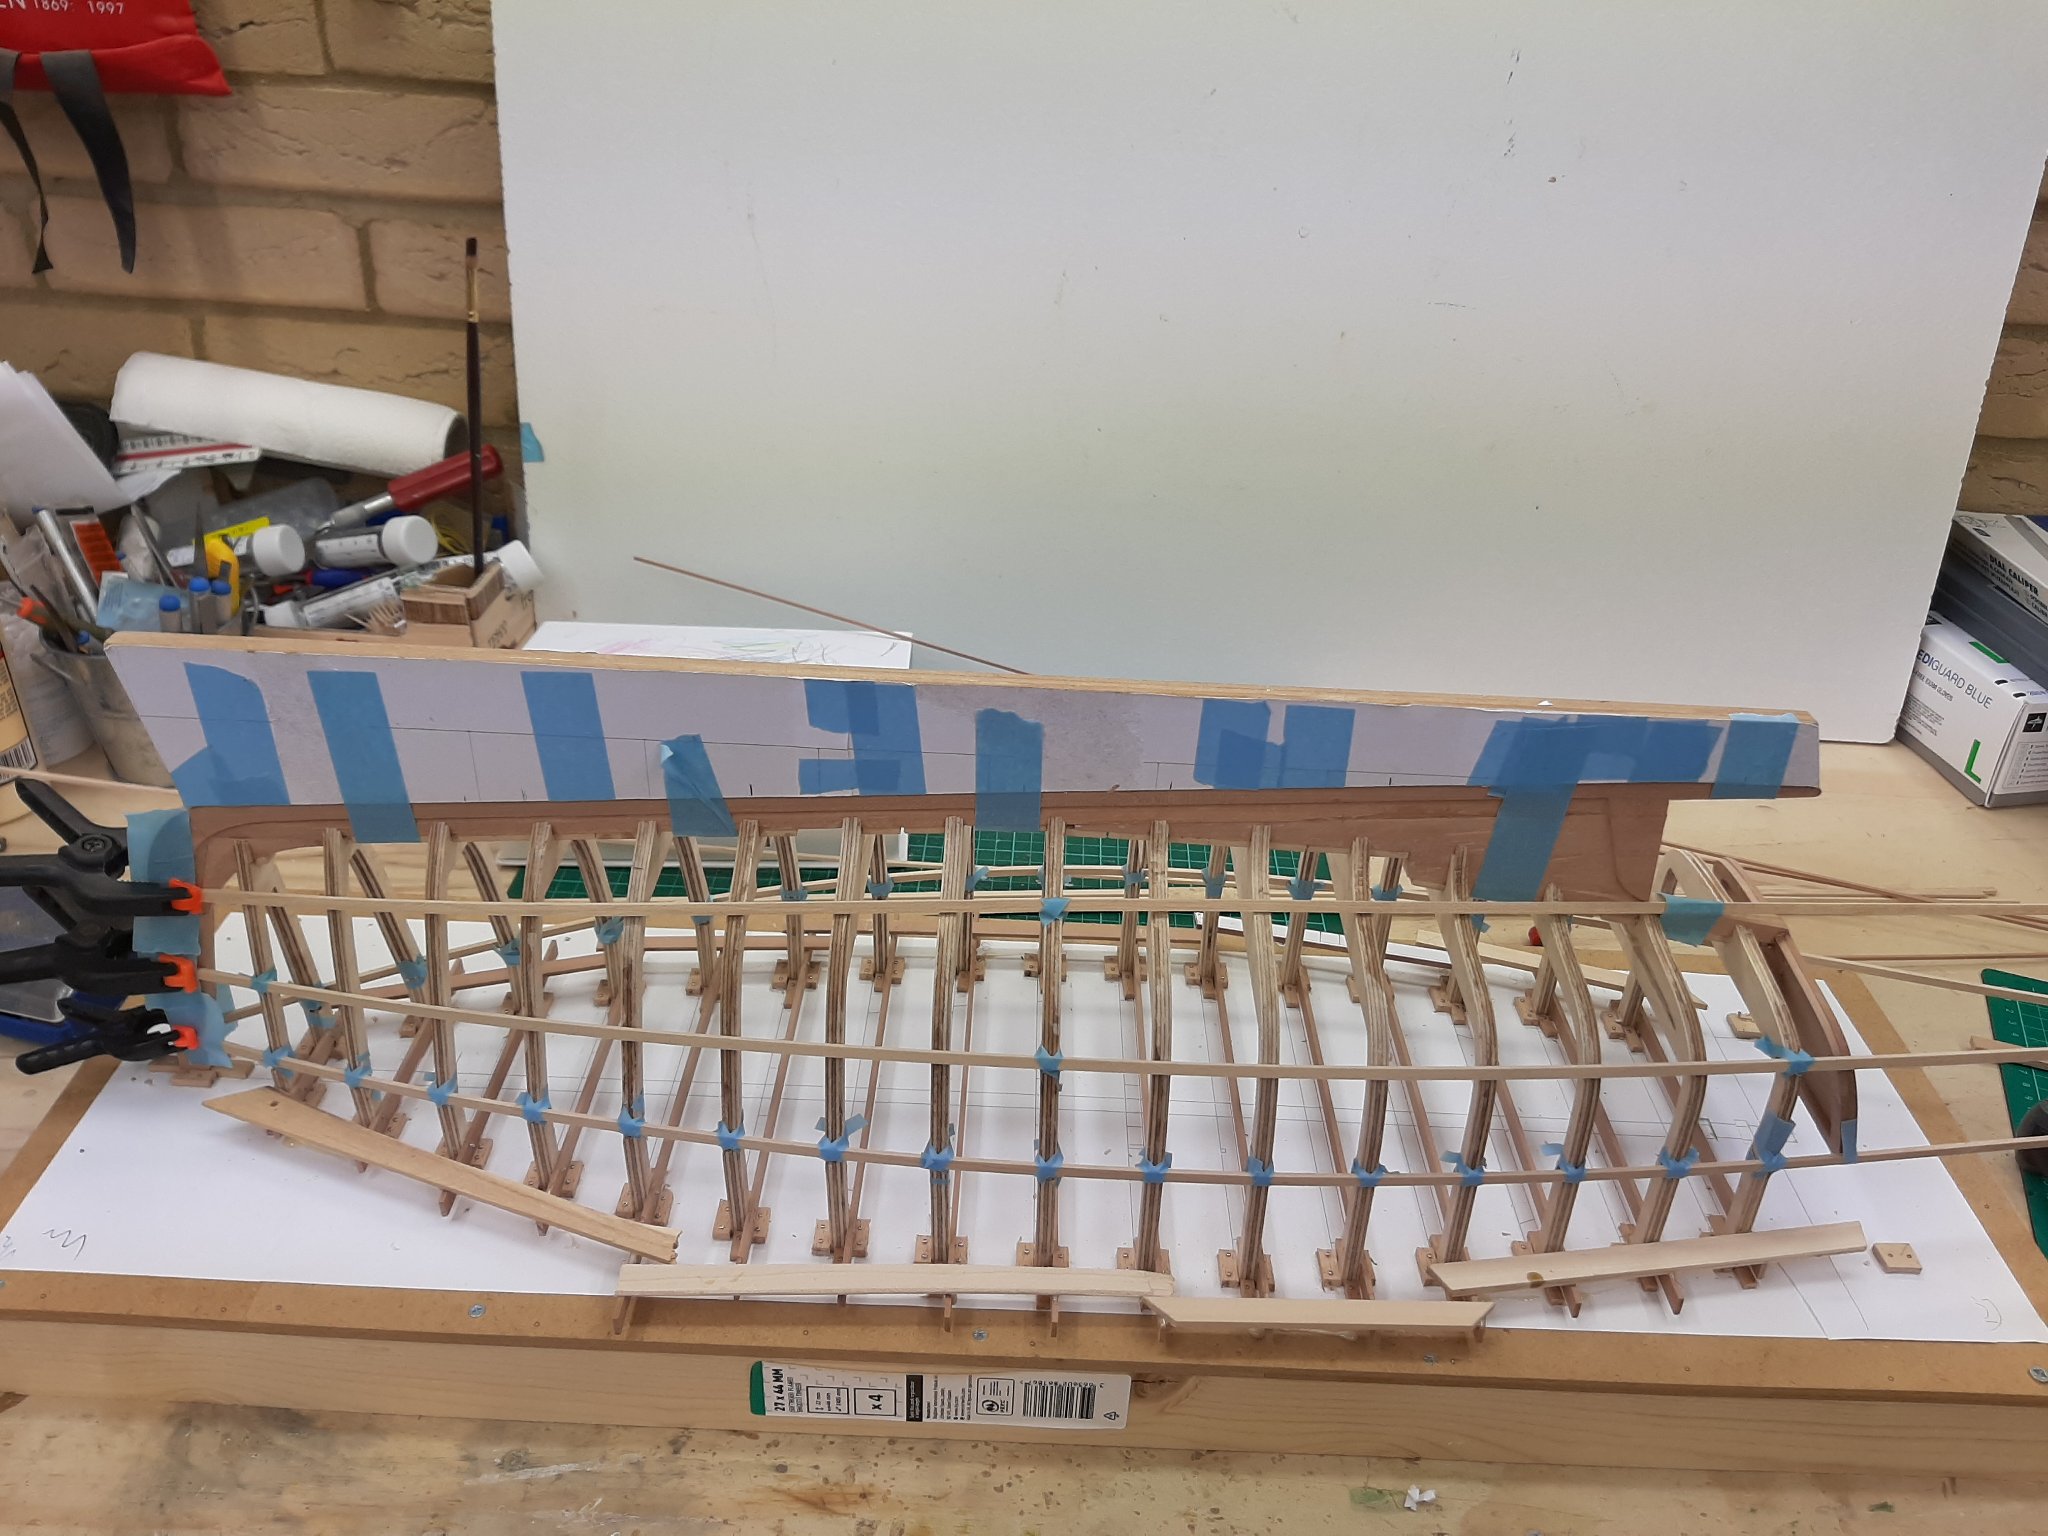
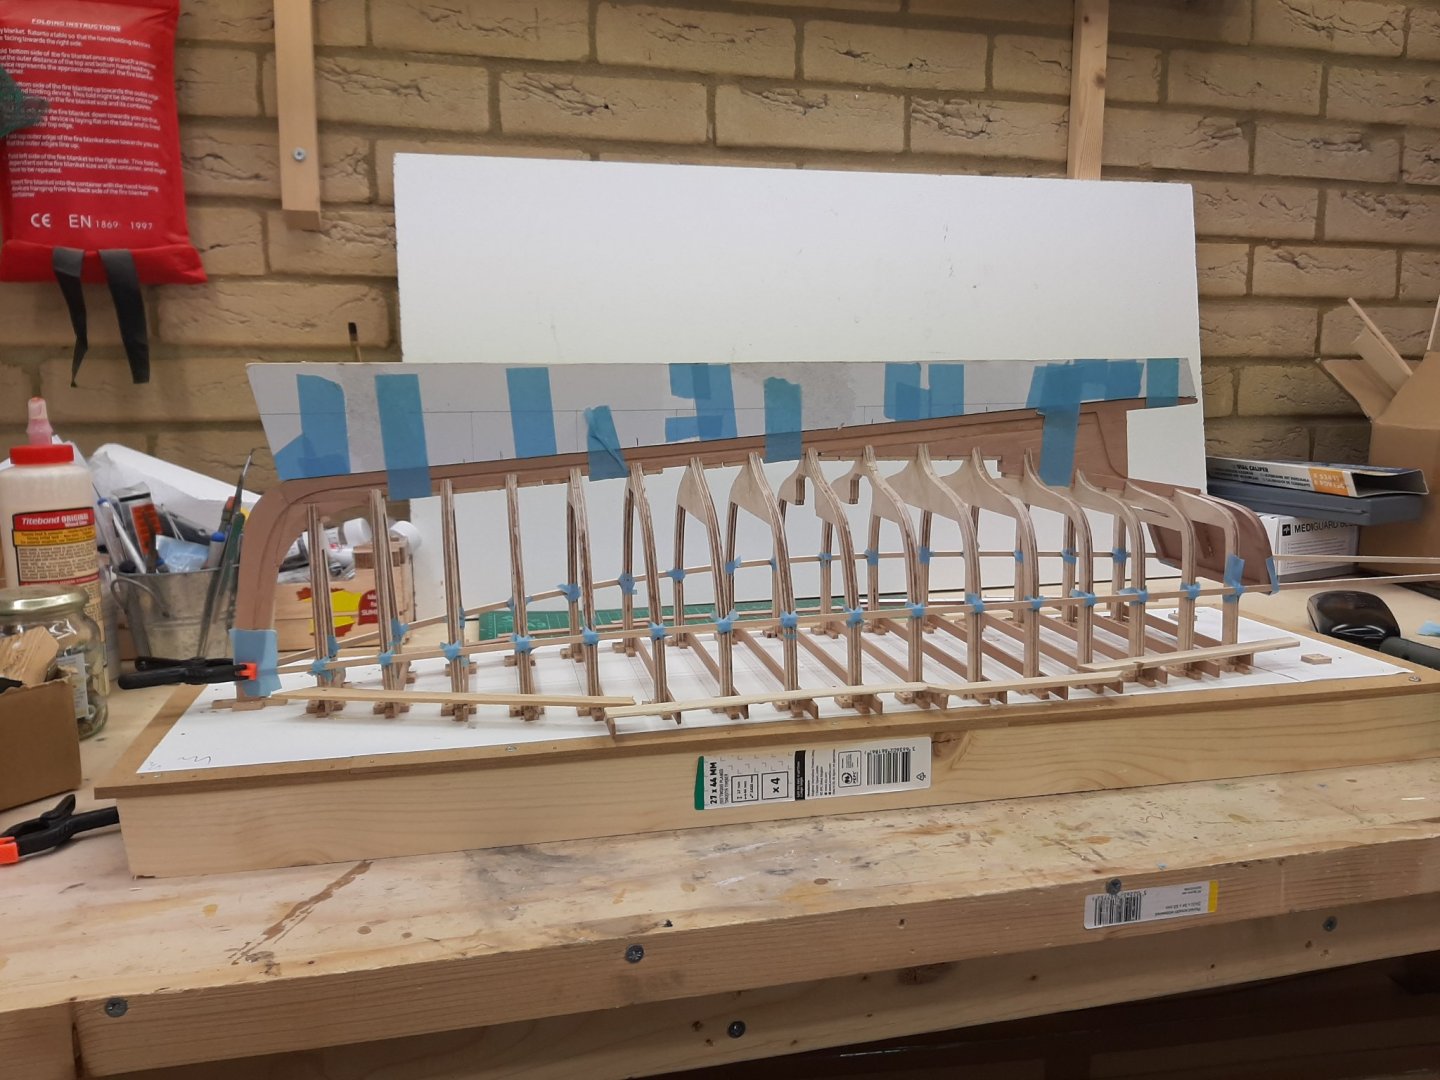
.thumb.jpg.6fd4c1b78768bb3efd745ab810936005.jpg) I did a bit more work so another update is in order. This is were we left things in the last post The sheer has been defined The hull has been divided in three zones The bottom zone has been covered with two planks, one being the garboard plank, and a stealer at the stern. In the middle zone, the first plank has been marked and the plank next to it (the first broad strake) was slightly adjusted to balance things out Two narrow planks will be at the upper edge of the middle zone due to the significant curvature of the hull at that point. The inner edge of these two planks has been defined. So I started by dividing the upper edge of the middle zone into two planks. Their width at the transom will be 8 mm (8 cm in the full size boat), i checked and with a bit of hollowing they can follow the shape of the transom. I also adjusted the first broad strake (the one next to the garboard) a bit better. Next job is to divide the remaining mid zone into strakes. The gap is 30 mm at the stem, 40 mm at the transom and a bit more than that midships. This area is very flat so theoretically we can use very wide planks. However, I think that using for example only two planks, 22 mm each, will not look good. I decided to use 4 planks to cover the area, they should have a width of 7.5 mm at the stem, 10 mm at the transom and a bit more maybe midships. So I measured the distances, divided by 4 and marked the frames. Then I started laying batens to connect the dots and ensure a fair run of the planks, making sure the planks have more or less equal widths. This is one of the batens, I think it looks ok and that the run of the planks is not unreasonable The next photos show the 4 planks defined. So the botom and middle zone are finished. The planks will of course need spilling, I think the planks at the middle of the mid zone will be the most curved but I hope the spilling needed will not be unrealistic. So the next task will be to divide the upper zone into planks. This should be the easiest of the three, as it is very flat but also because the clamps are much easier to apply. One thing to remember is that that the planks at the curved section of the hull will need to be slightly oversized and then beveled, so that they will fit snuggly. However, others may need to be cut exactly to size and then beveled. Doing this bevels without destroying the planks will be a challenge. On a different note, there is a new residential development near my house in St Neots and today we walked through. They ve built several ponds and one seems ideal to launch an RC sail boat! Def something to try one day. Regards Vaddoc
I did a bit more work so another update is in order. This is were we left things in the last post The sheer has been defined The hull has been divided in three zones The bottom zone has been covered with two planks, one being the garboard plank, and a stealer at the stern. In the middle zone, the first plank has been marked and the plank next to it (the first broad strake) was slightly adjusted to balance things out Two narrow planks will be at the upper edge of the middle zone due to the significant curvature of the hull at that point. The inner edge of these two planks has been defined. So I started by dividing the upper edge of the middle zone into two planks. Their width at the transom will be 8 mm (8 cm in the full size boat), i checked and with a bit of hollowing they can follow the shape of the transom. I also adjusted the first broad strake (the one next to the garboard) a bit better. Next job is to divide the remaining mid zone into strakes. The gap is 30 mm at the stem, 40 mm at the transom and a bit more than that midships. This area is very flat so theoretically we can use very wide planks. However, I think that using for example only two planks, 22 mm each, will not look good. I decided to use 4 planks to cover the area, they should have a width of 7.5 mm at the stem, 10 mm at the transom and a bit more maybe midships. So I measured the distances, divided by 4 and marked the frames. Then I started laying batens to connect the dots and ensure a fair run of the planks, making sure the planks have more or less equal widths. This is one of the batens, I think it looks ok and that the run of the planks is not unreasonable The next photos show the 4 planks defined. So the botom and middle zone are finished. The planks will of course need spilling, I think the planks at the middle of the mid zone will be the most curved but I hope the spilling needed will not be unrealistic. So the next task will be to divide the upper zone into planks. This should be the easiest of the three, as it is very flat but also because the clamps are much easier to apply. One thing to remember is that that the planks at the curved section of the hull will need to be slightly oversized and then beveled, so that they will fit snuggly. However, others may need to be cut exactly to size and then beveled. Doing this bevels without destroying the planks will be a challenge. On a different note, there is a new residential development near my house in St Neots and today we walked through. They ve built several ponds and one seems ideal to launch an RC sail boat! Def something to try one day. Regards Vaddoc


-
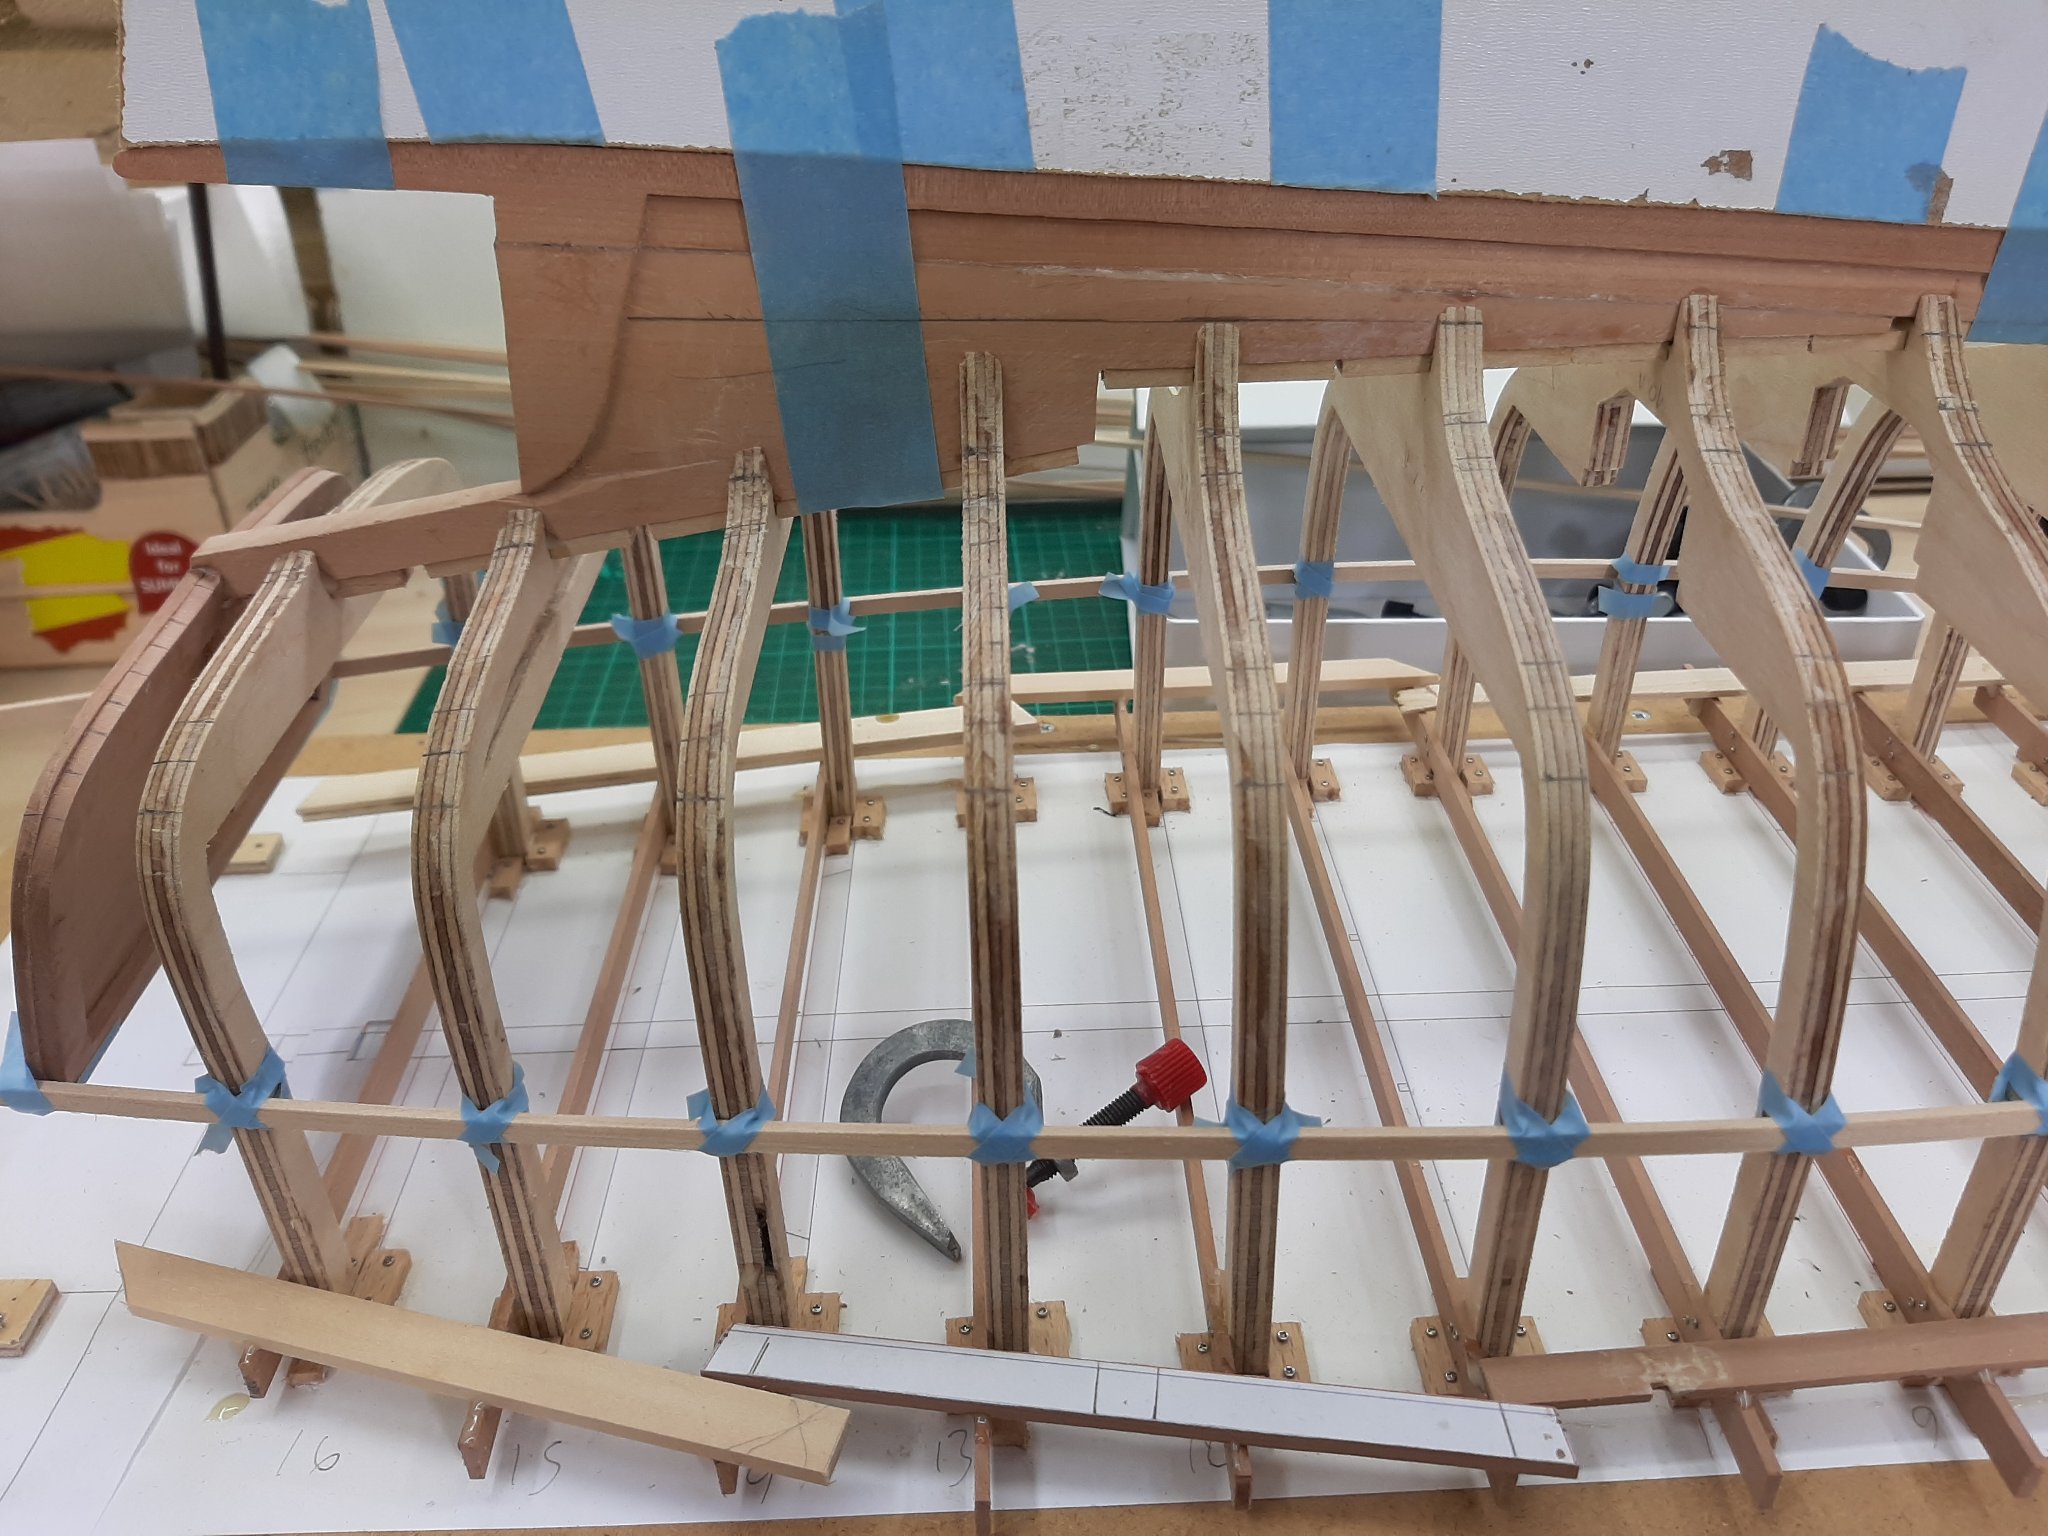
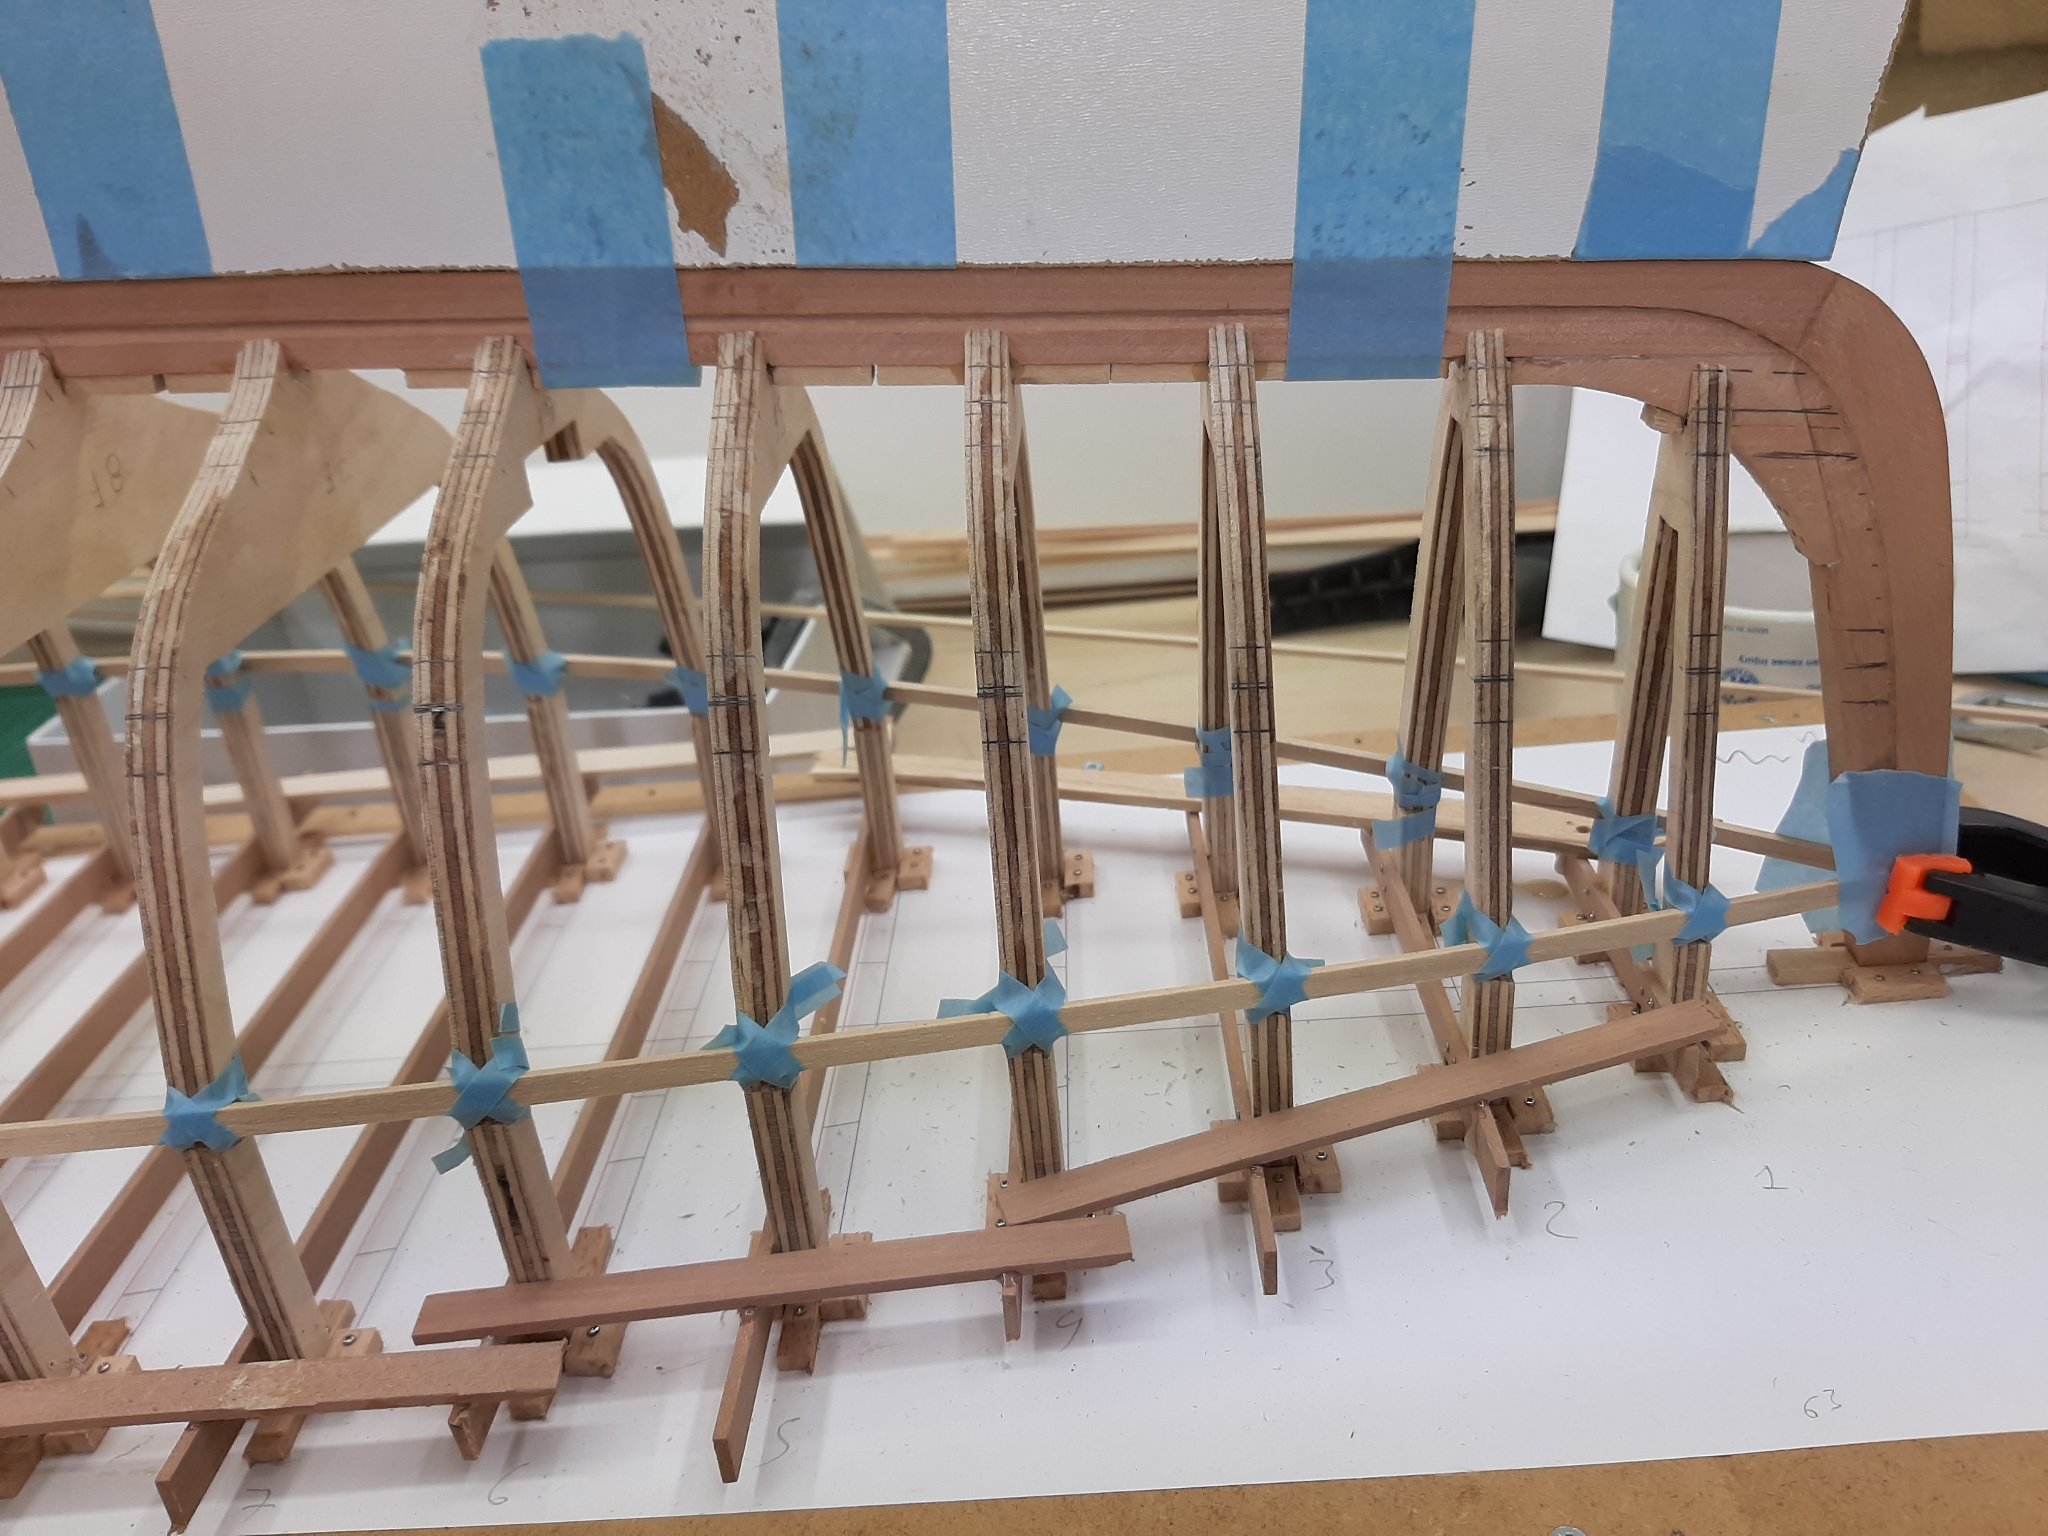
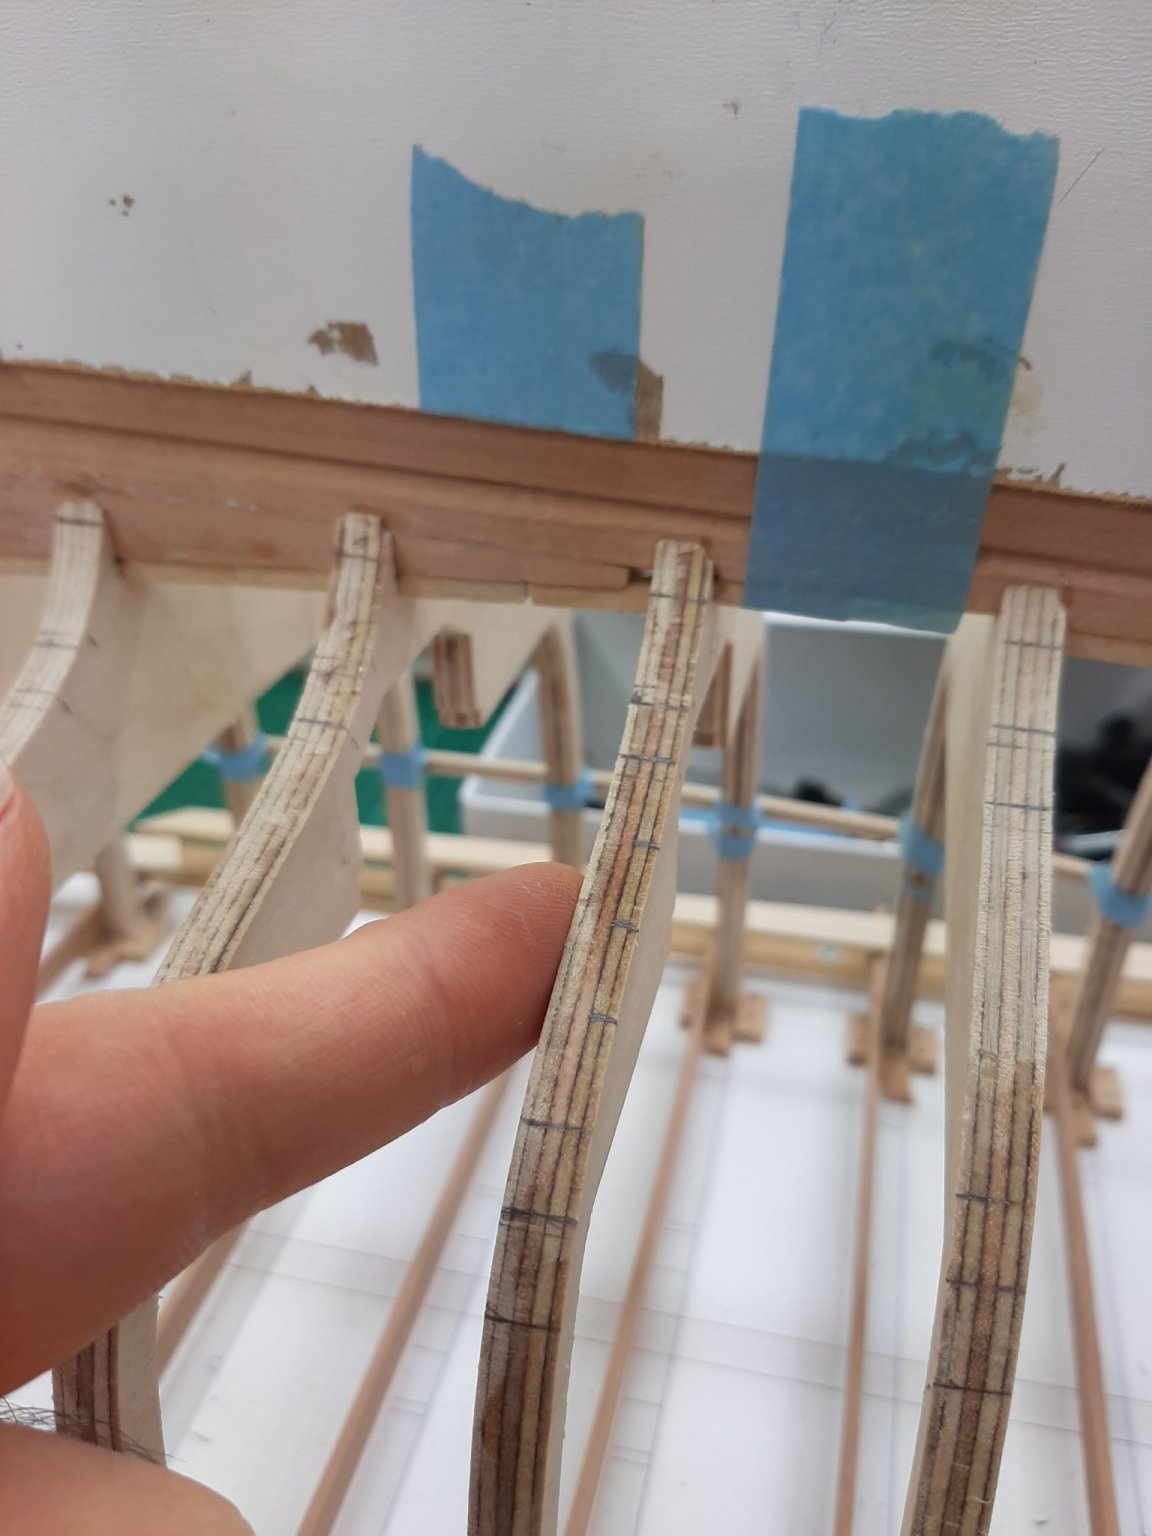
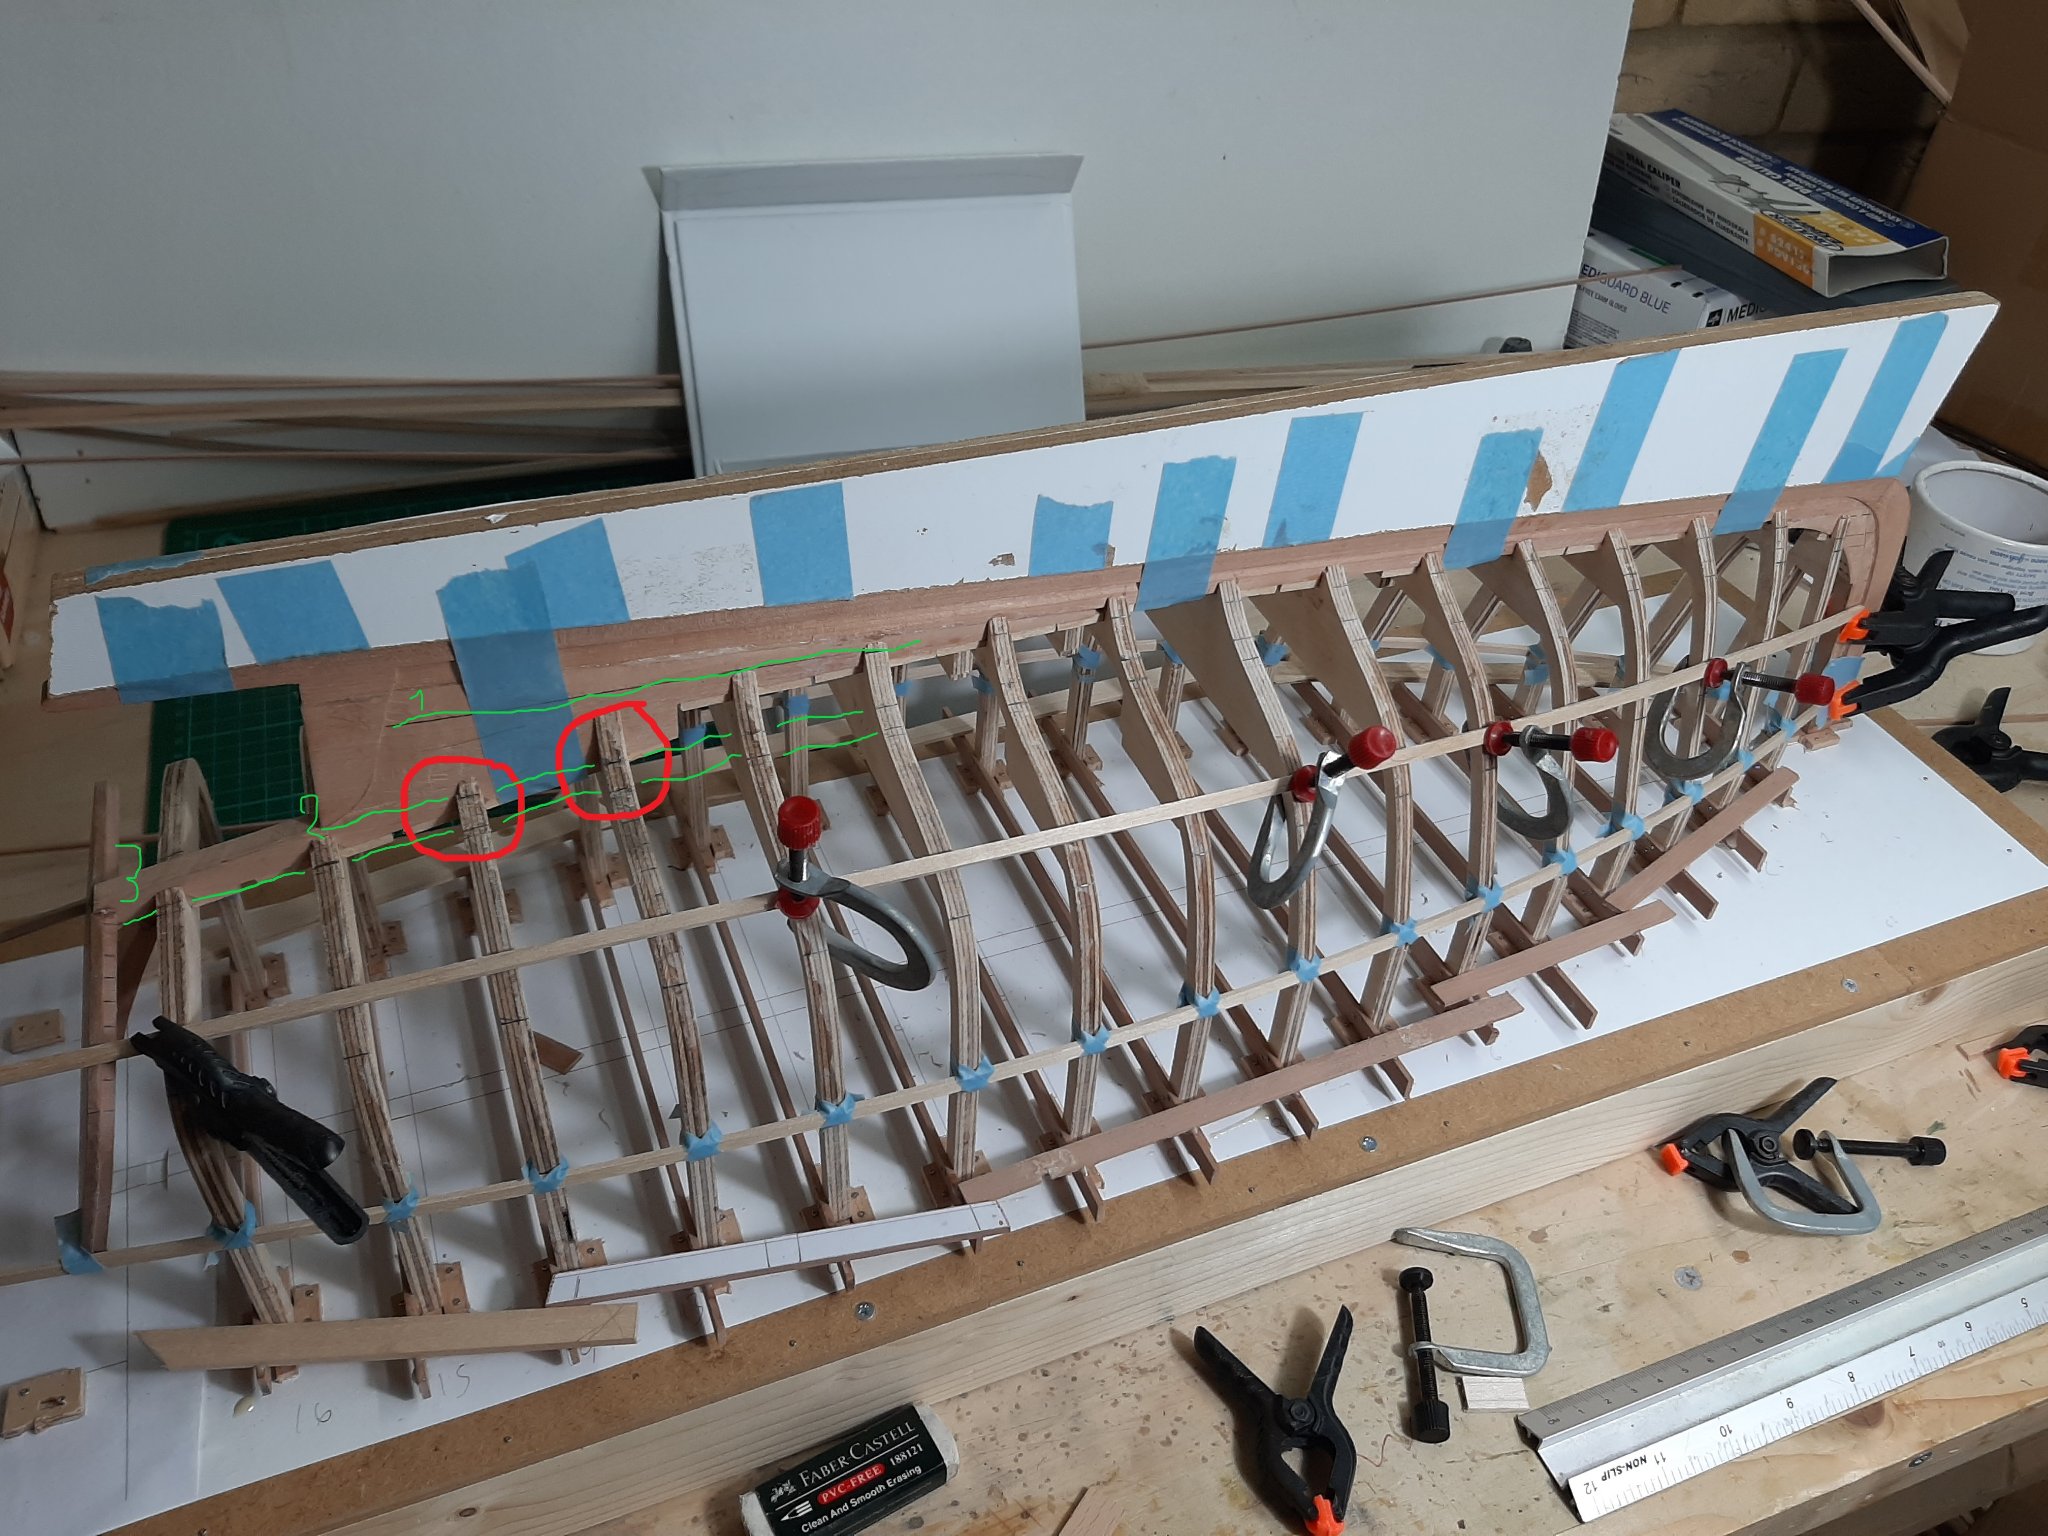
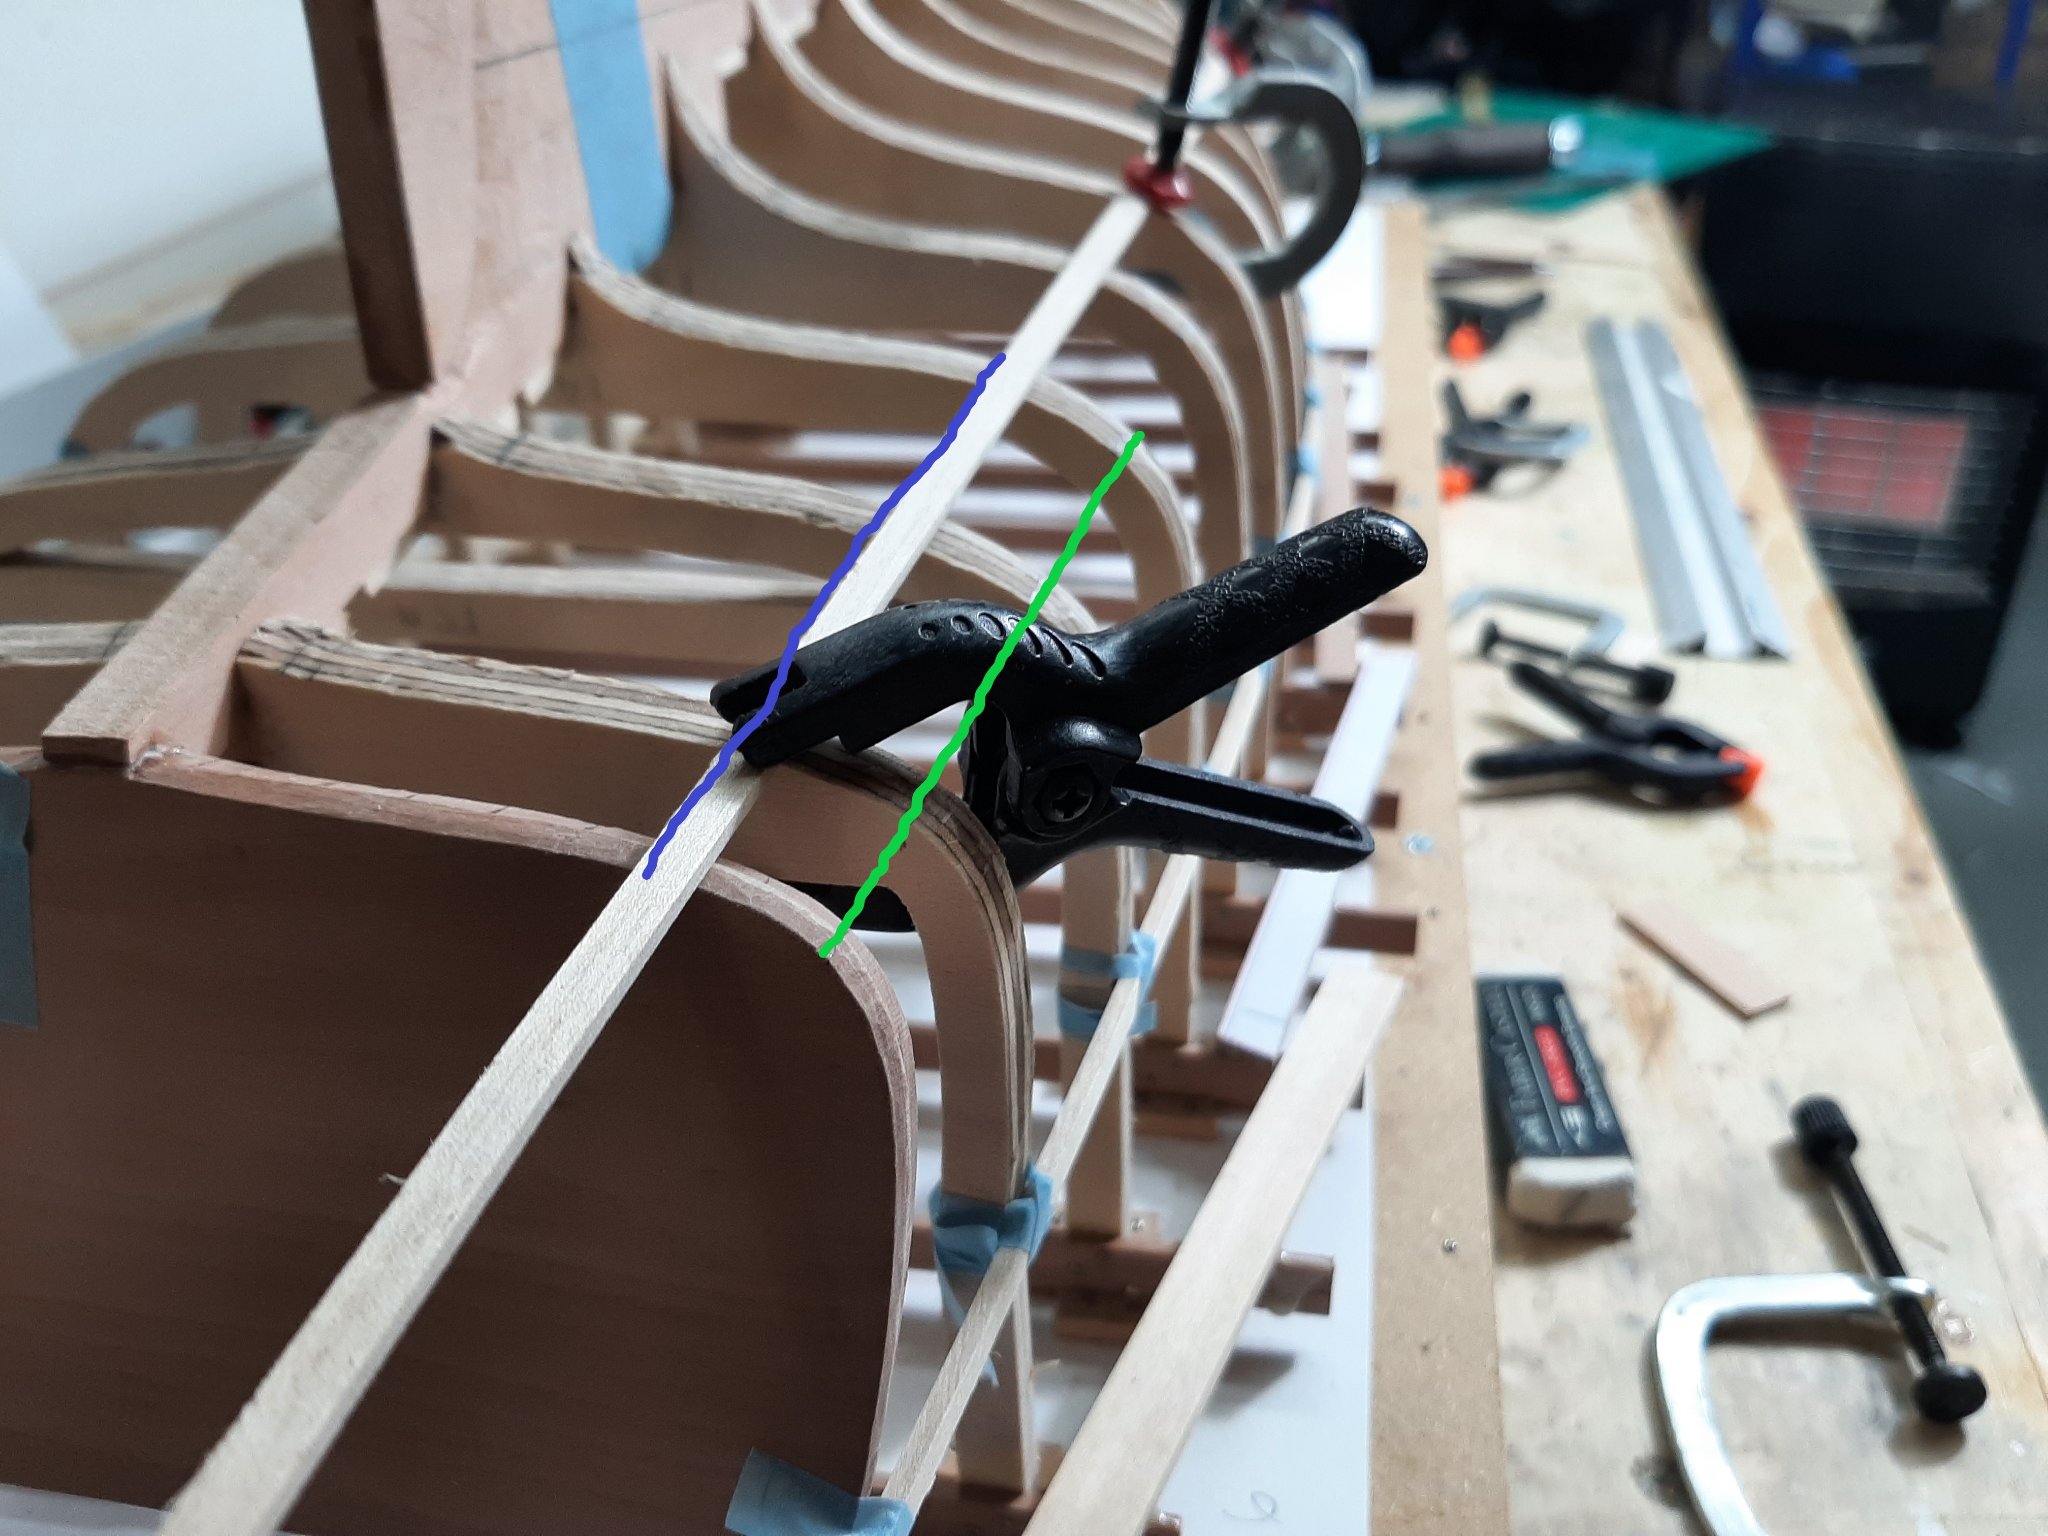
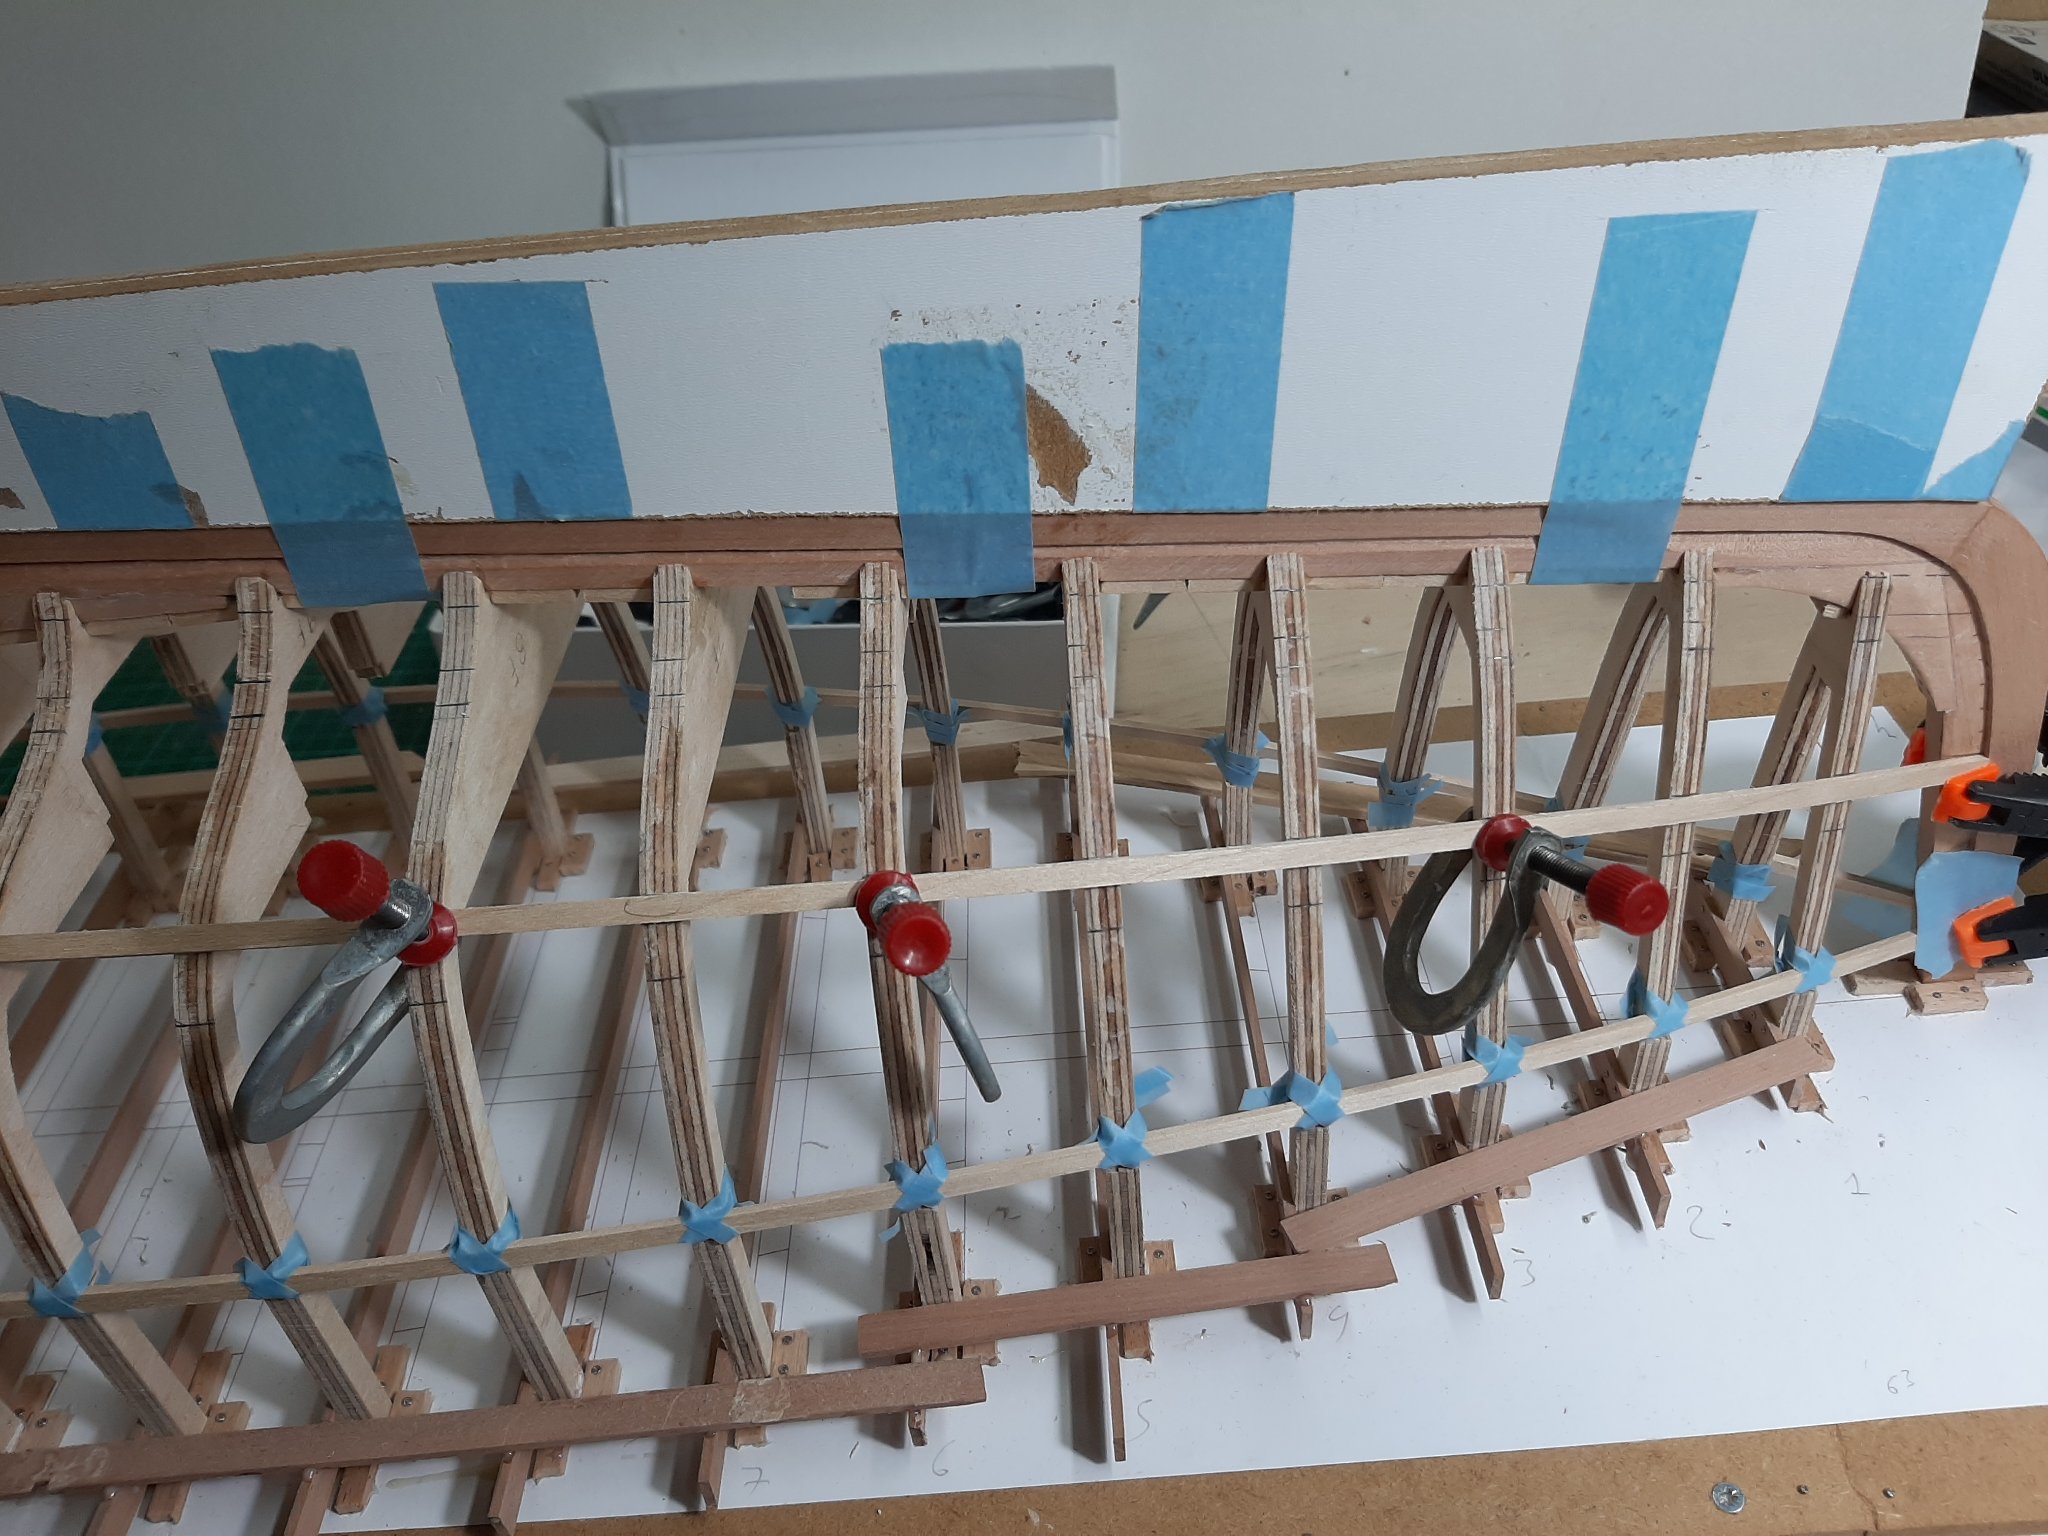
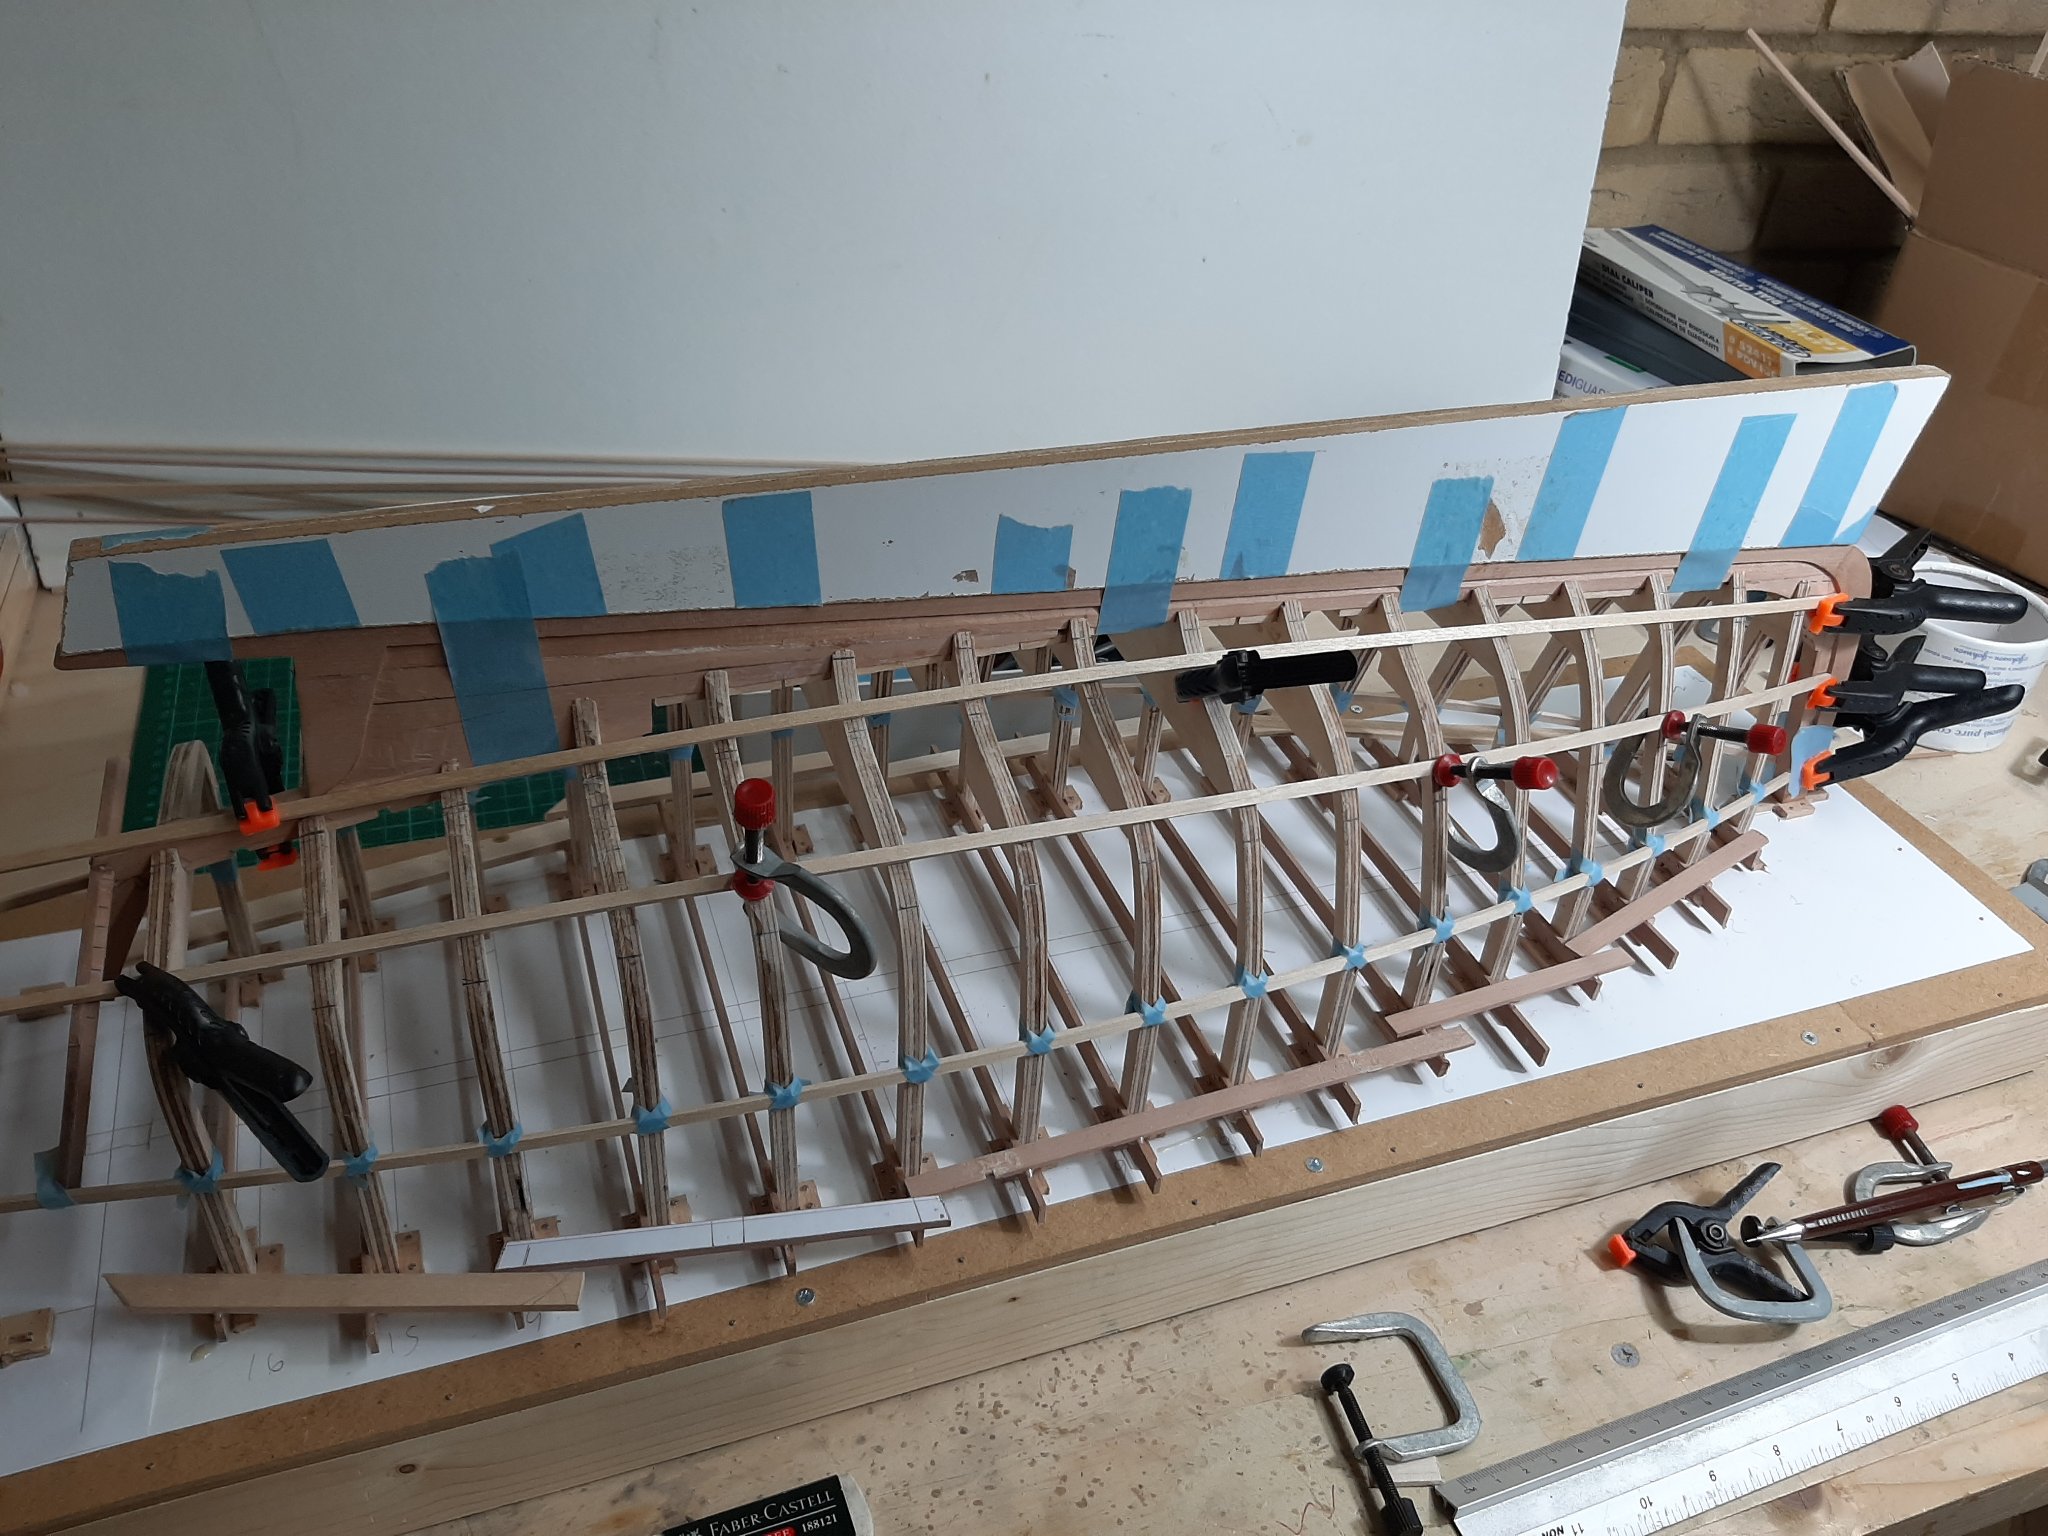
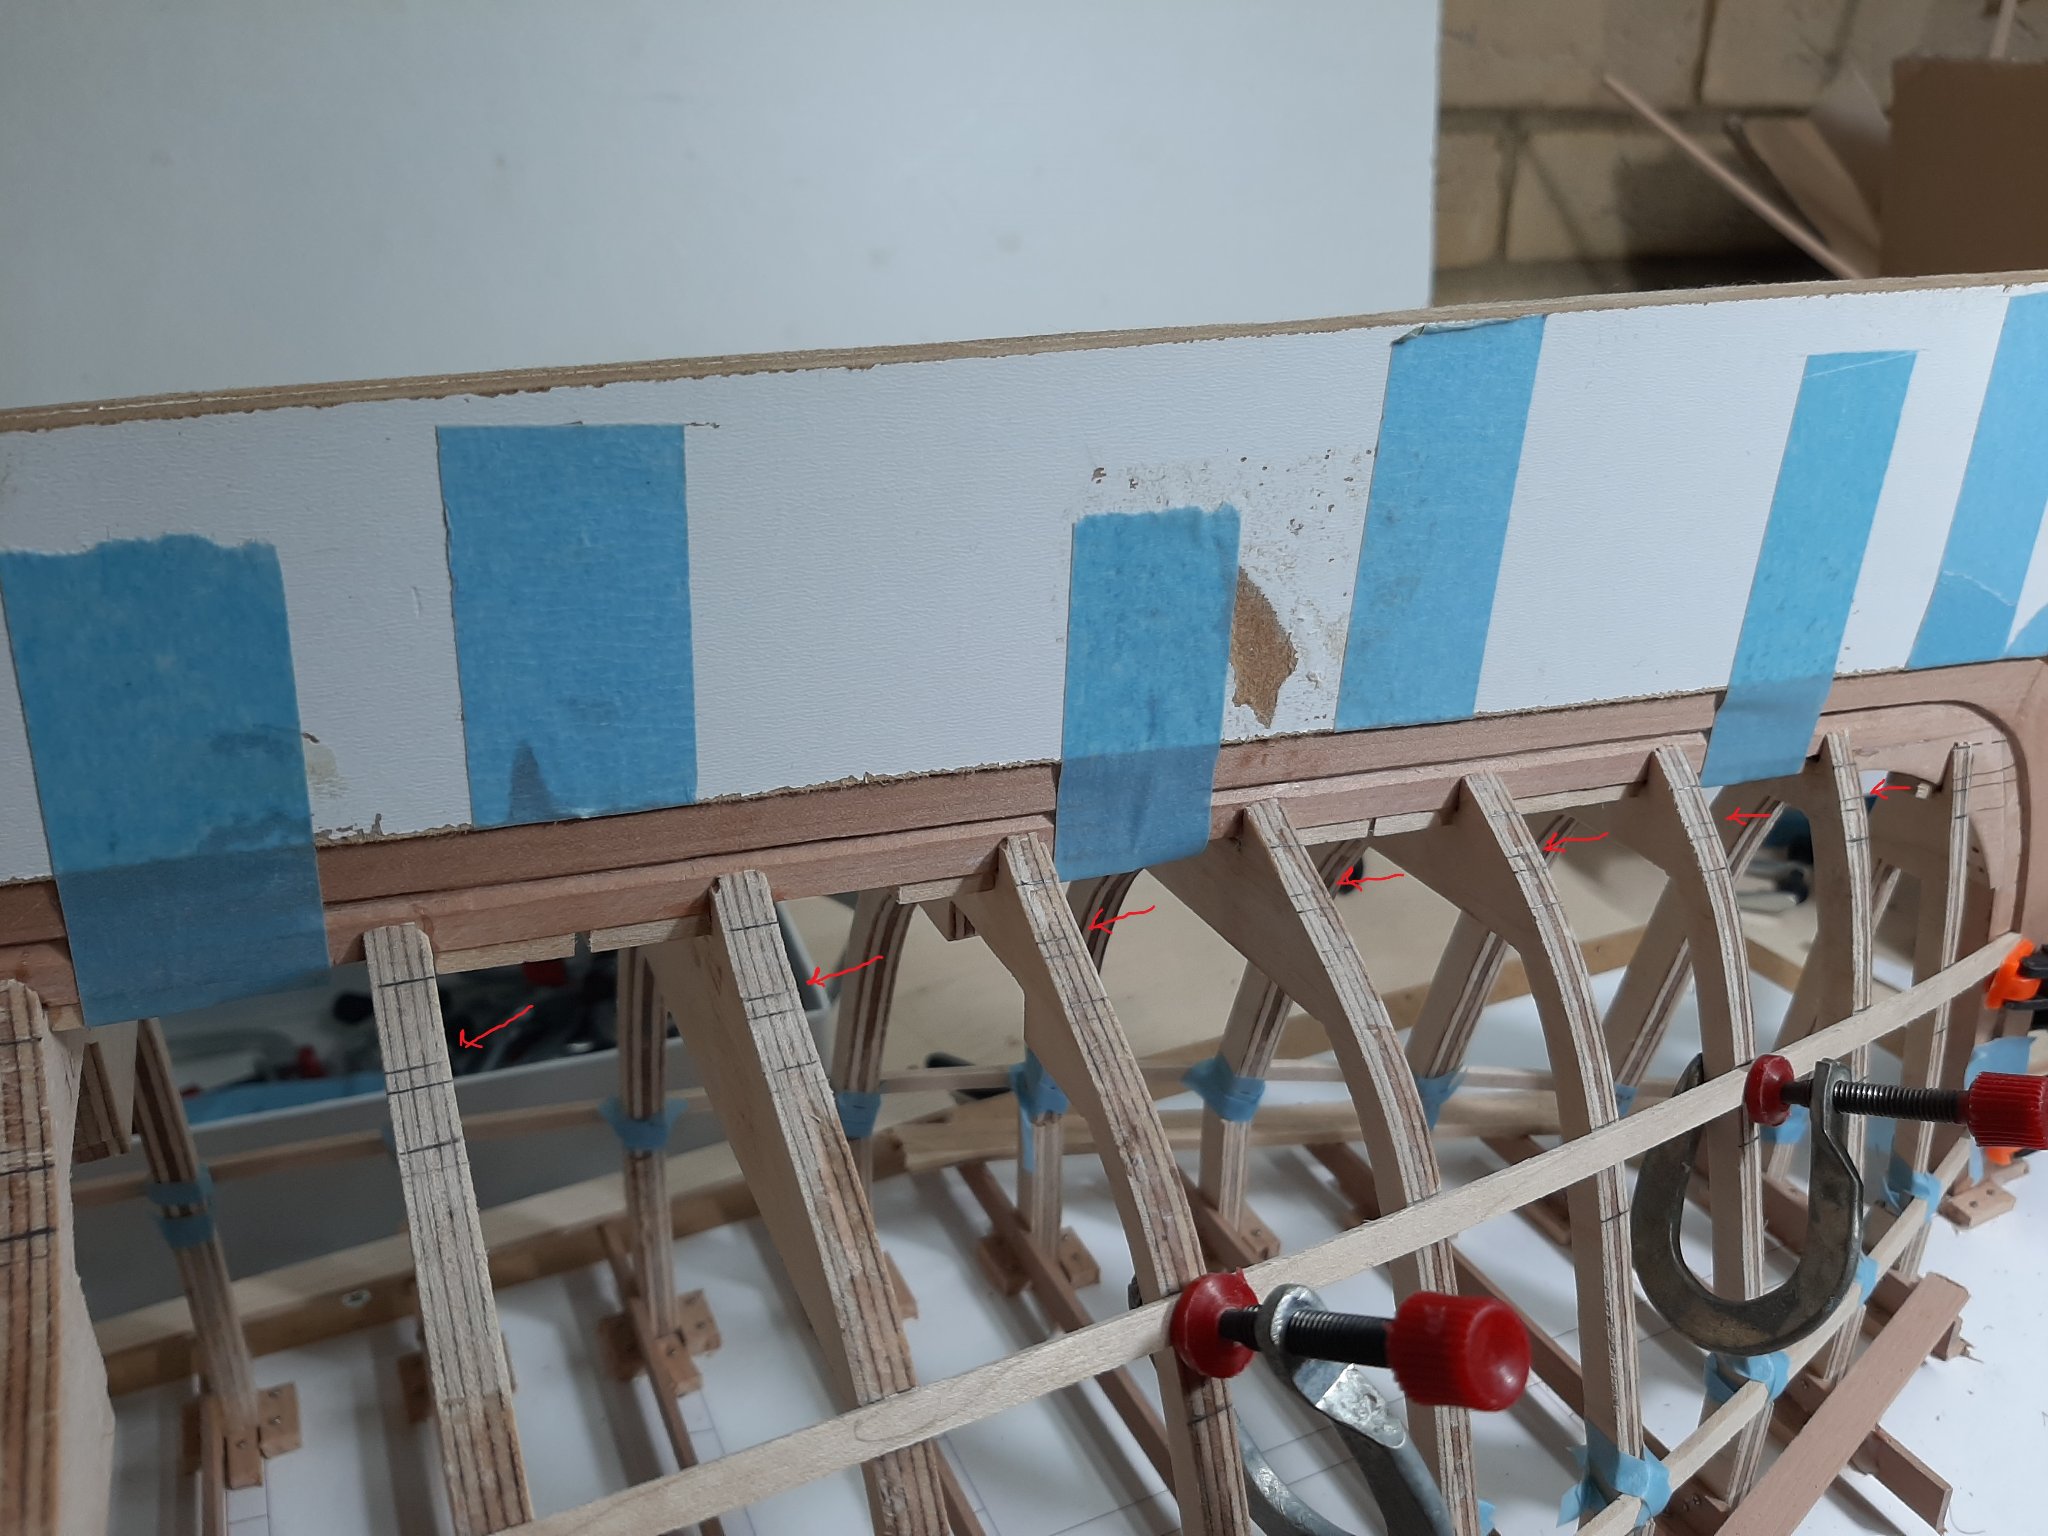
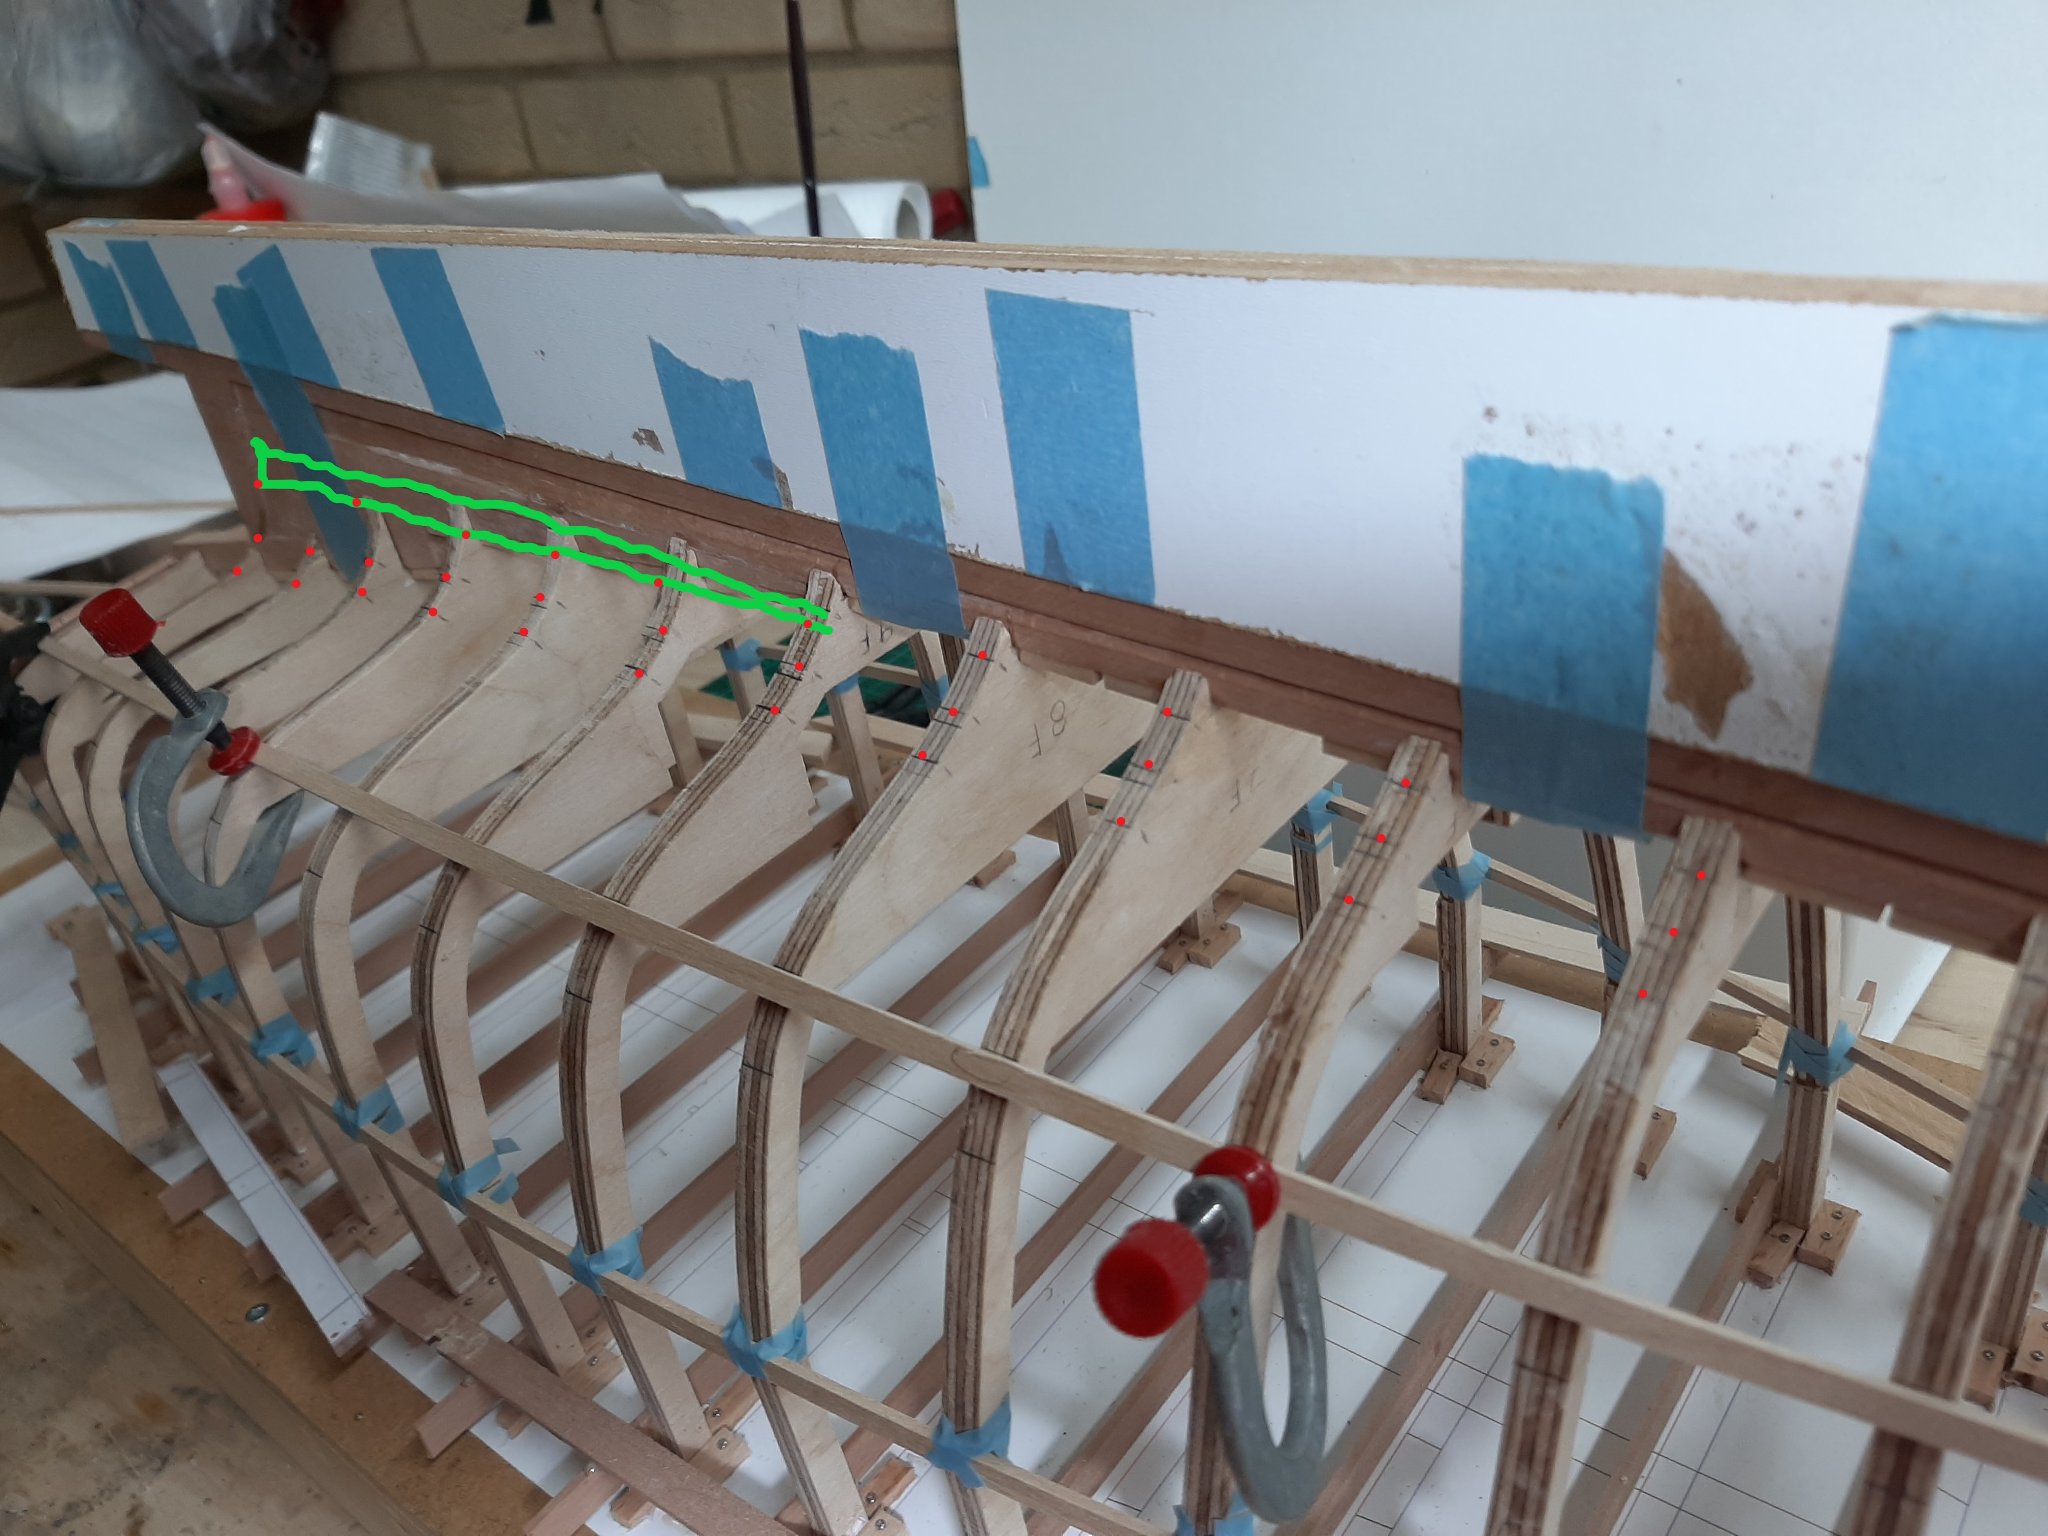
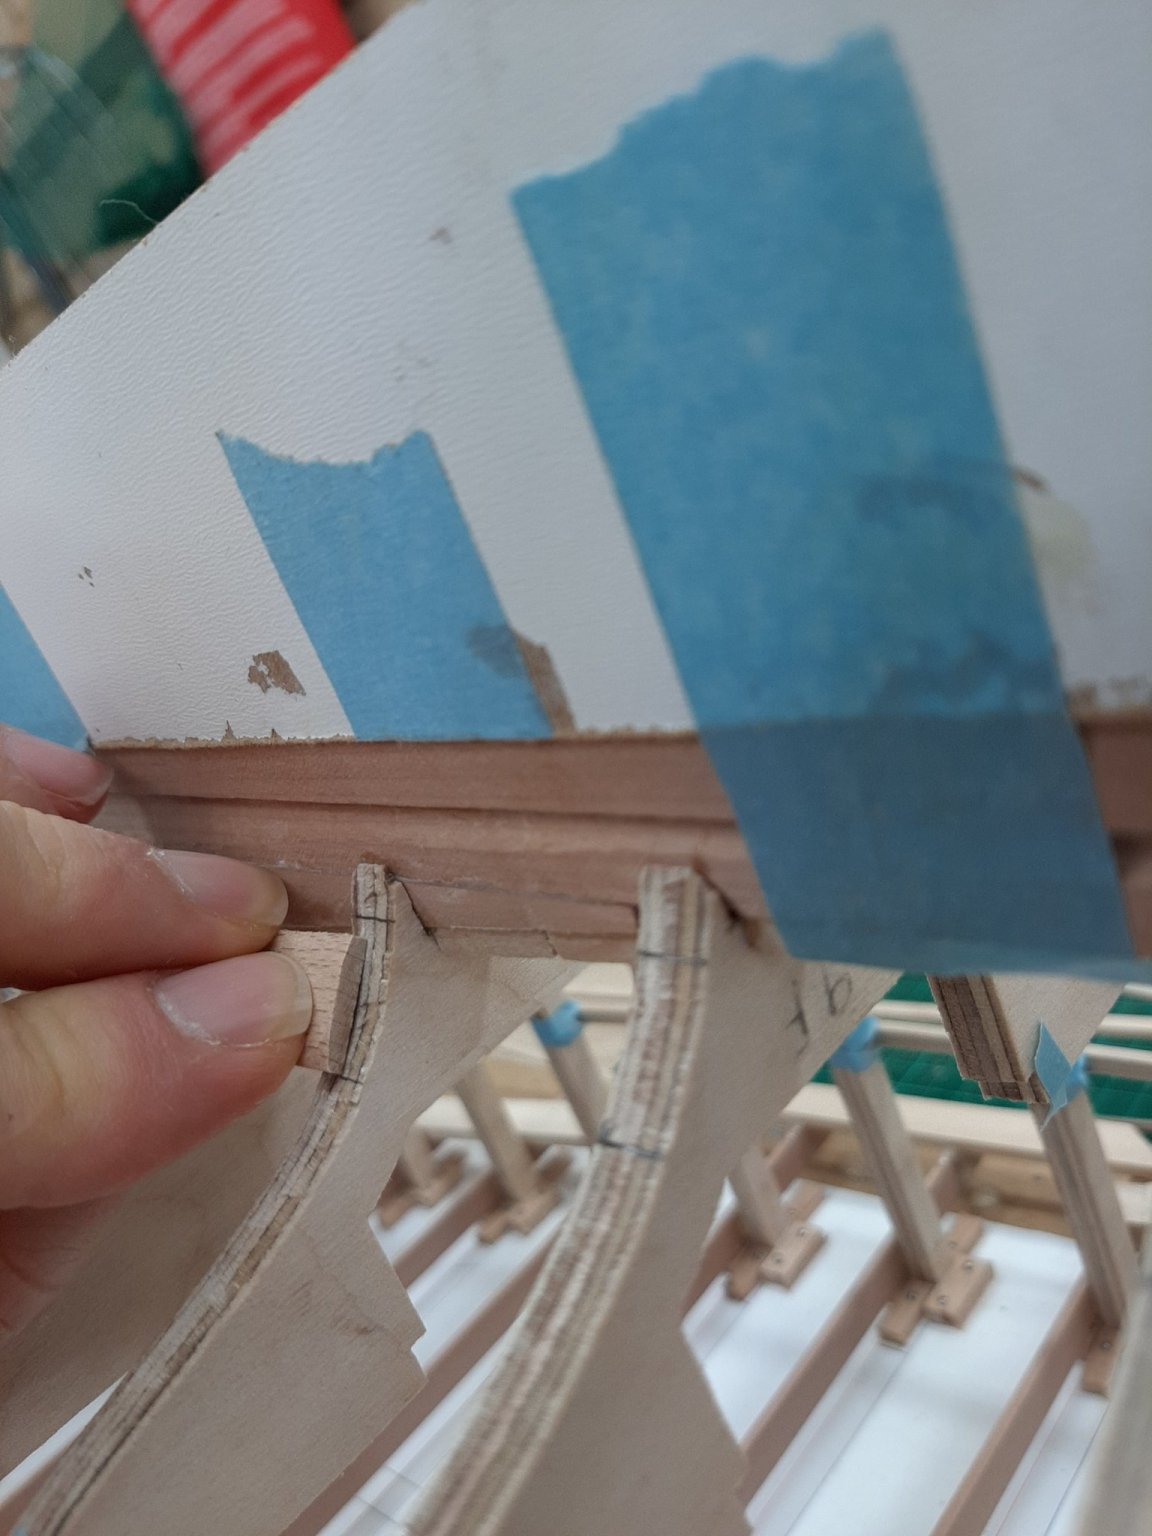
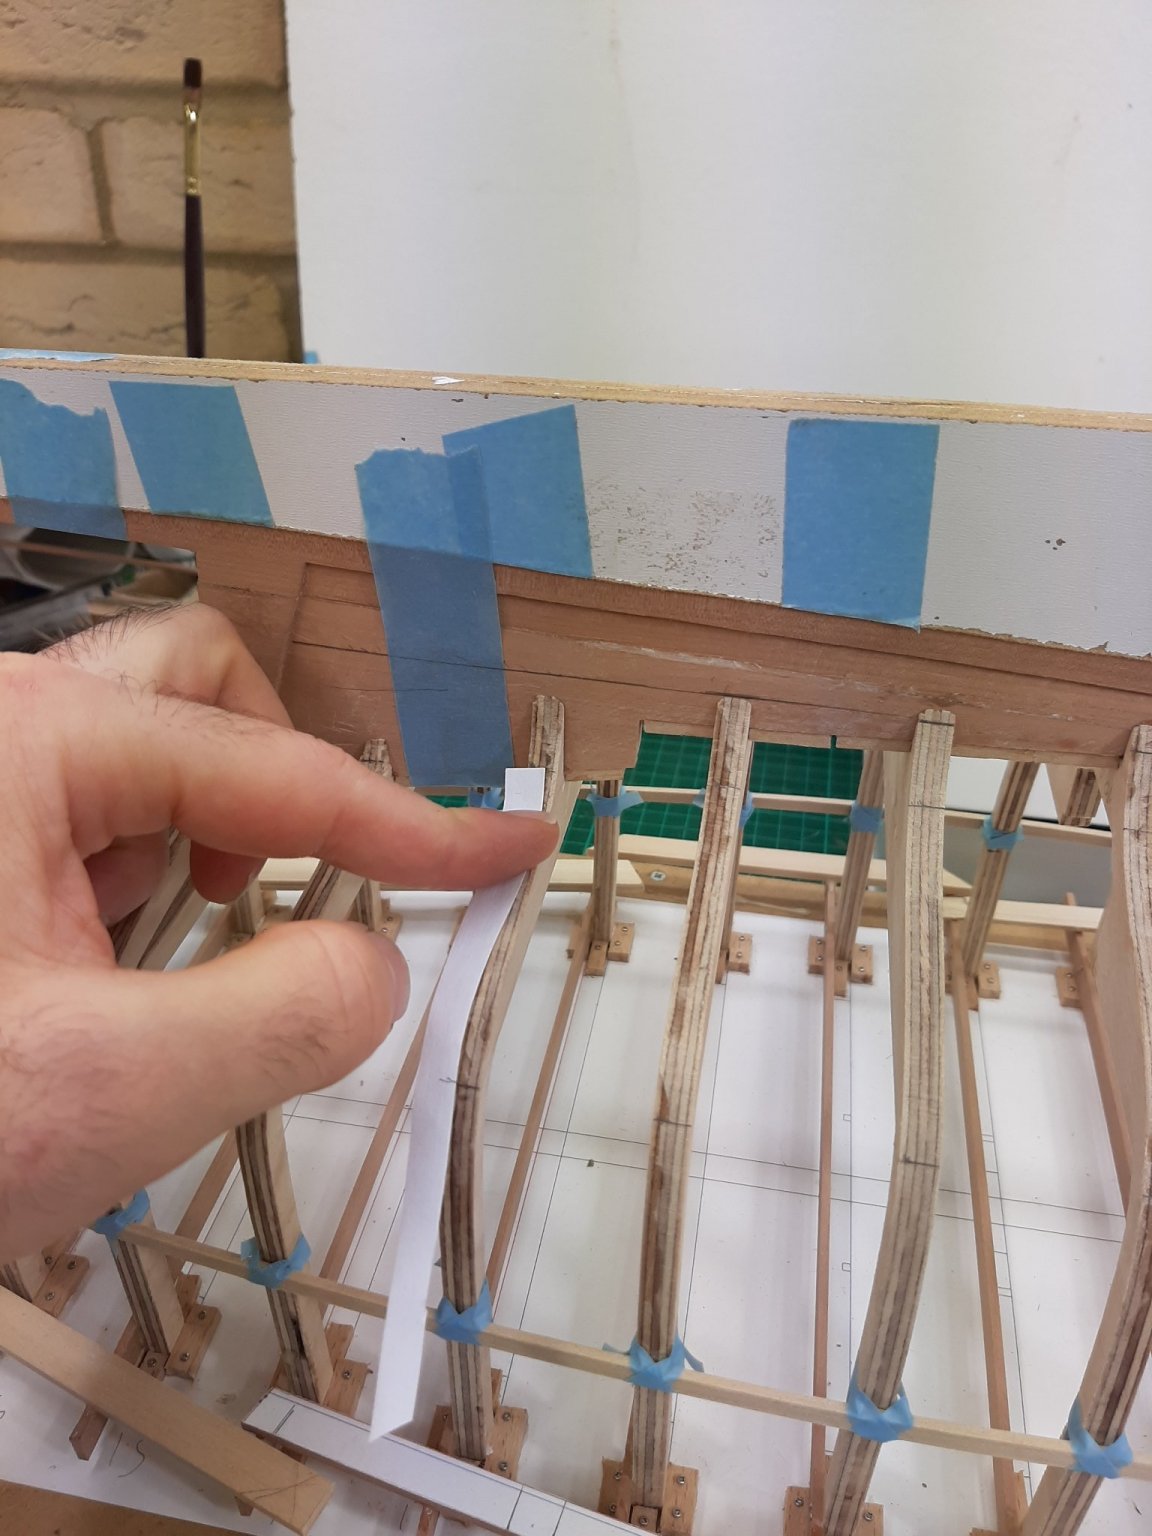
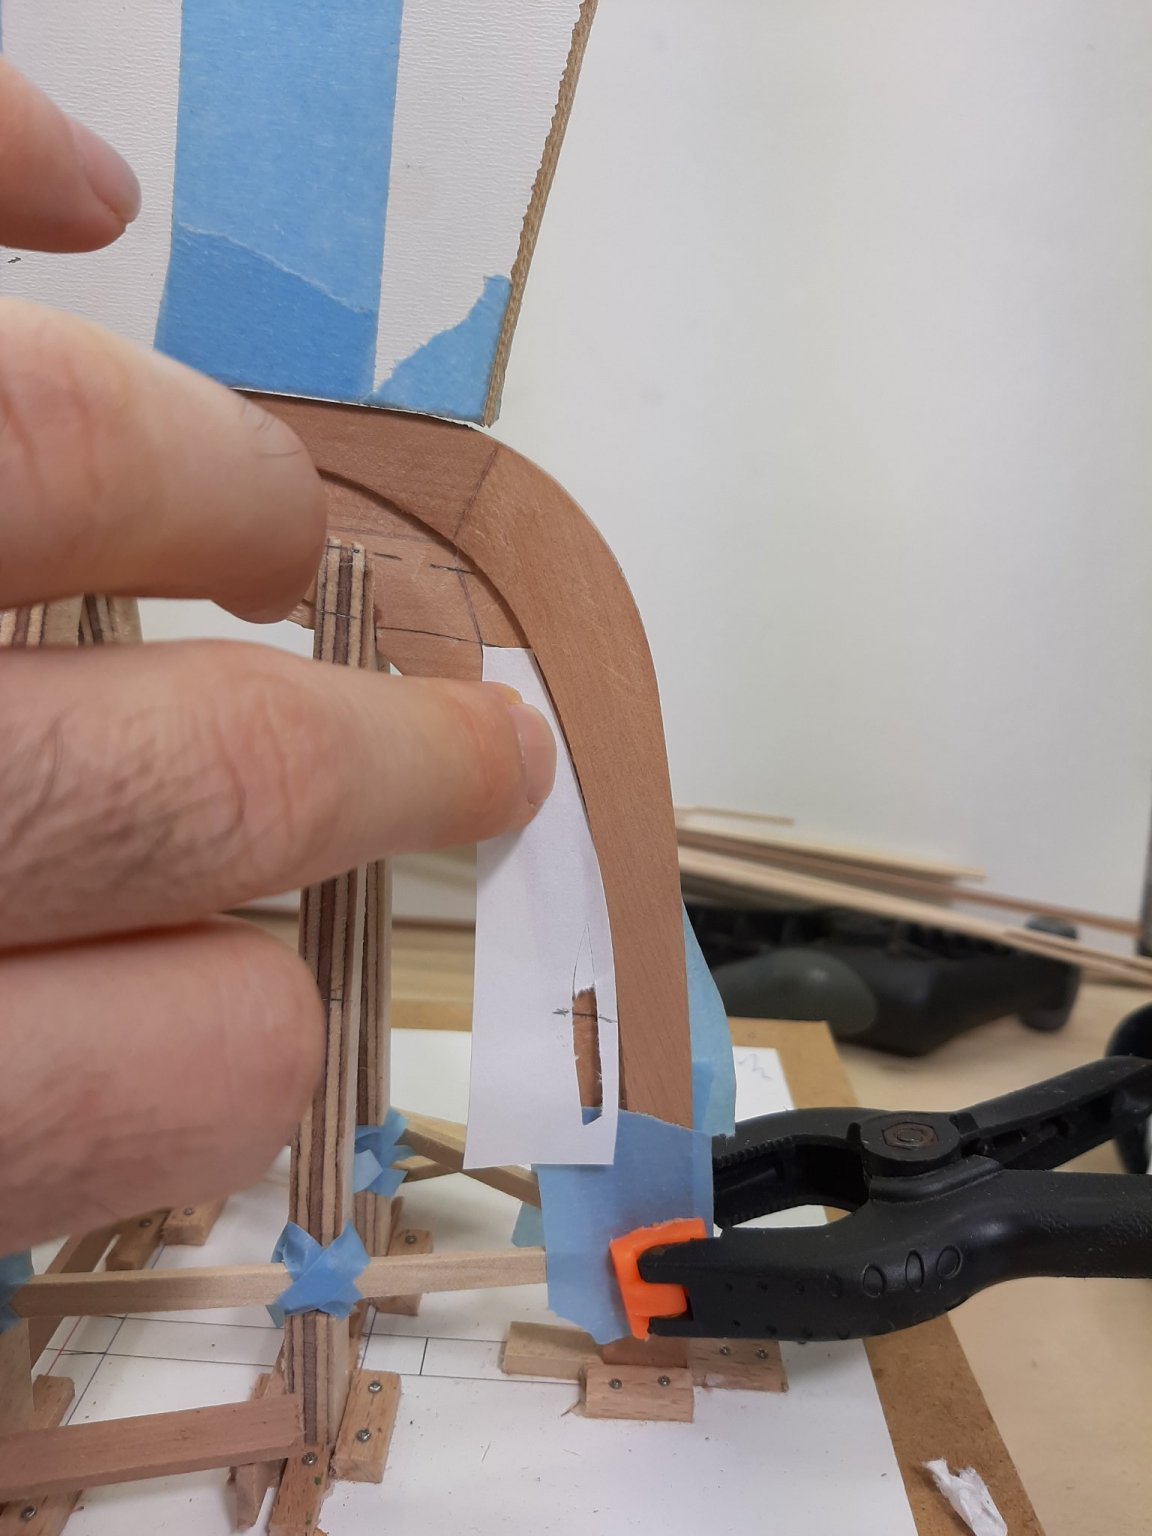
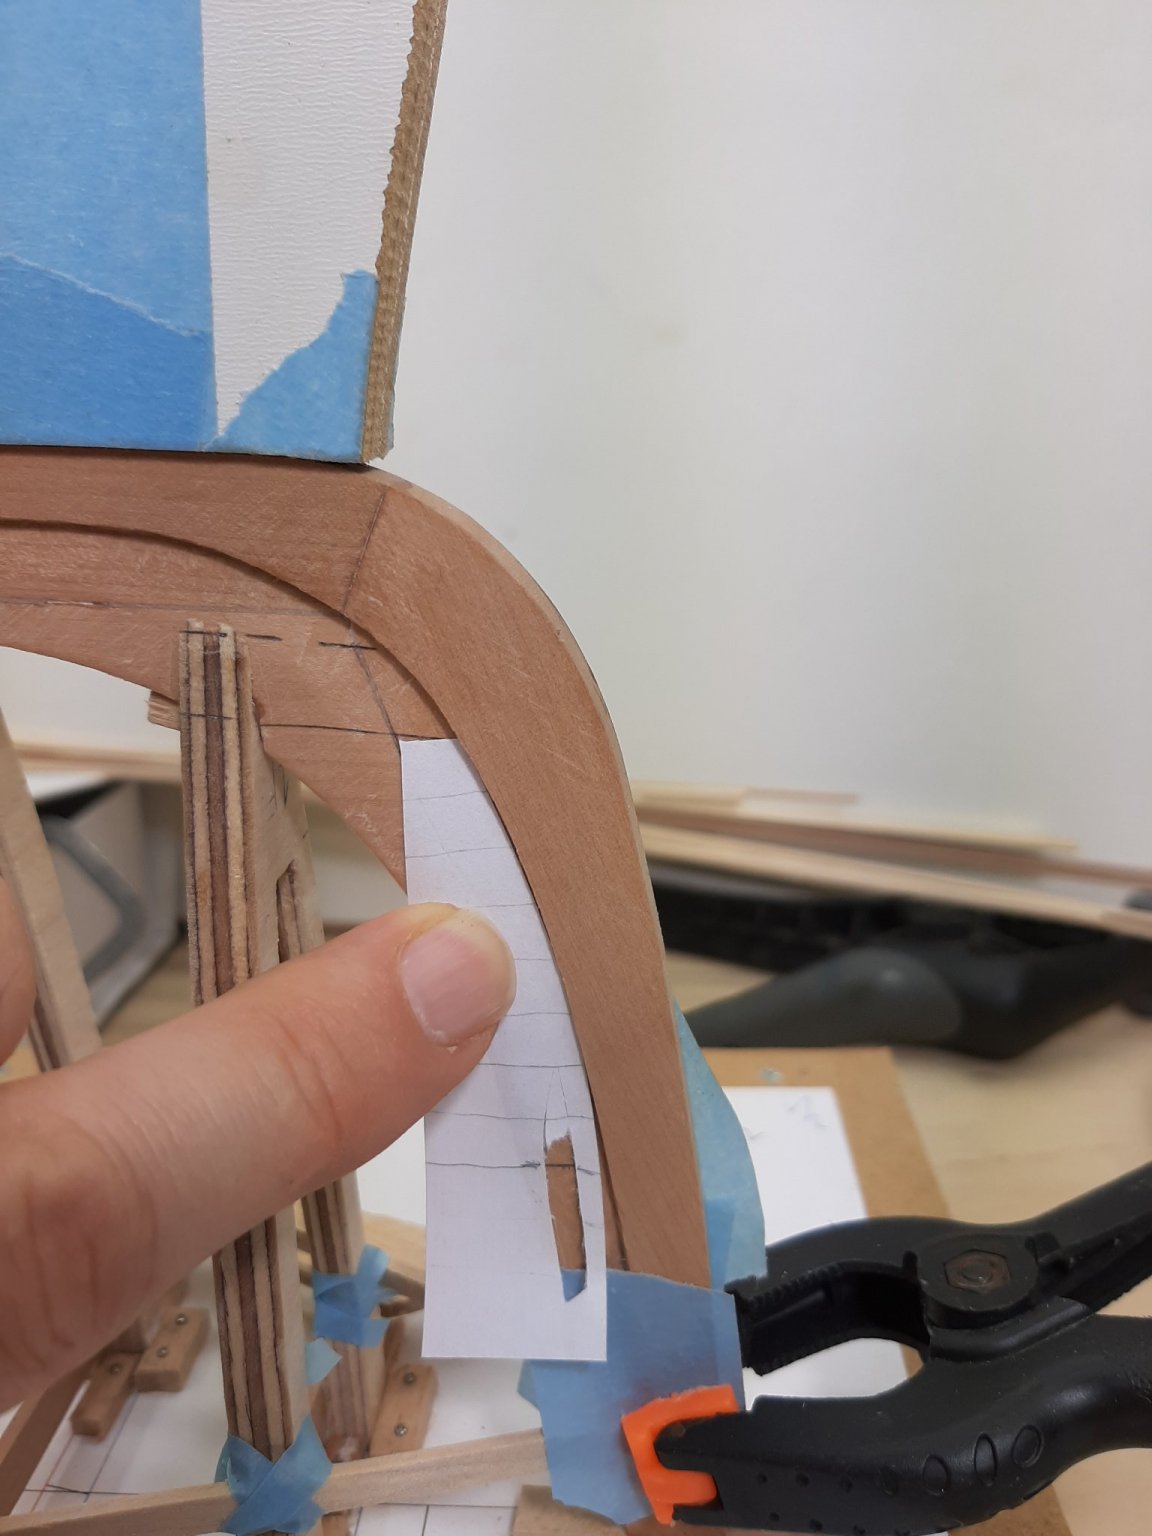
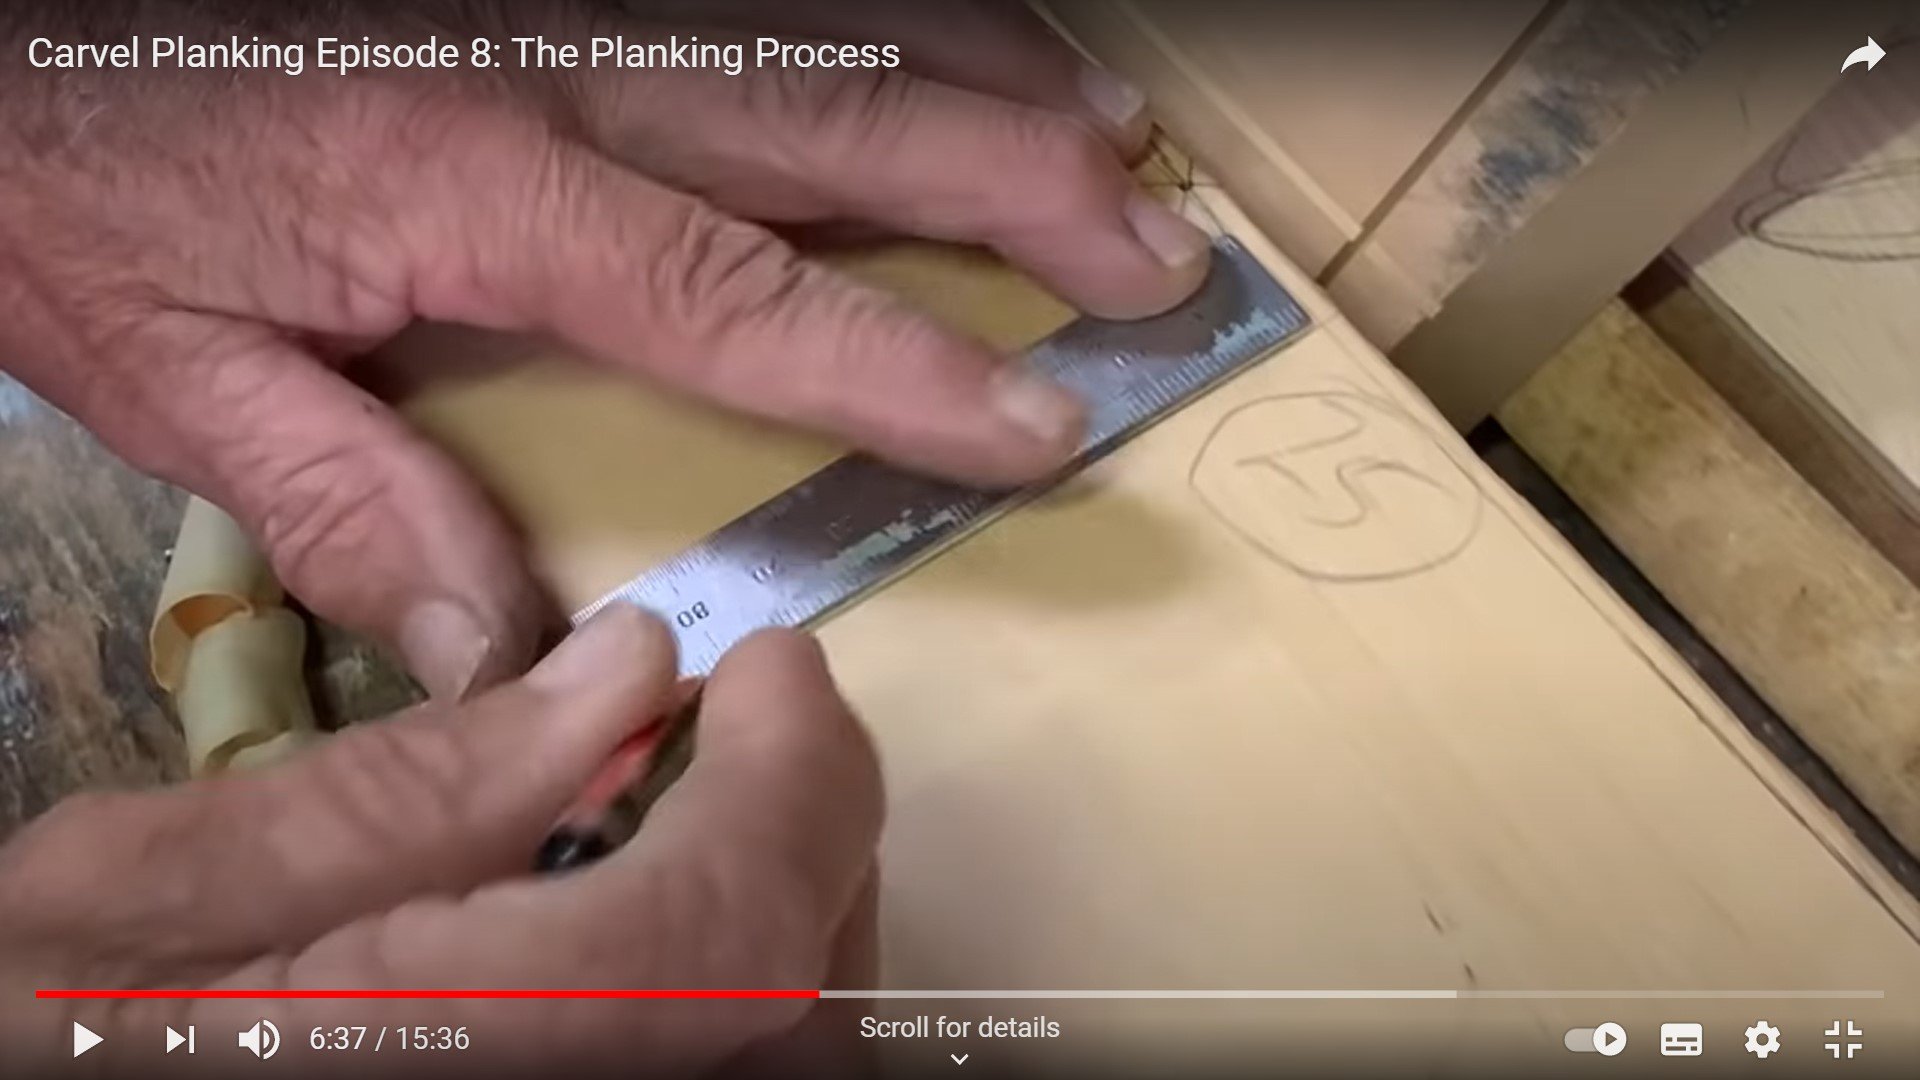
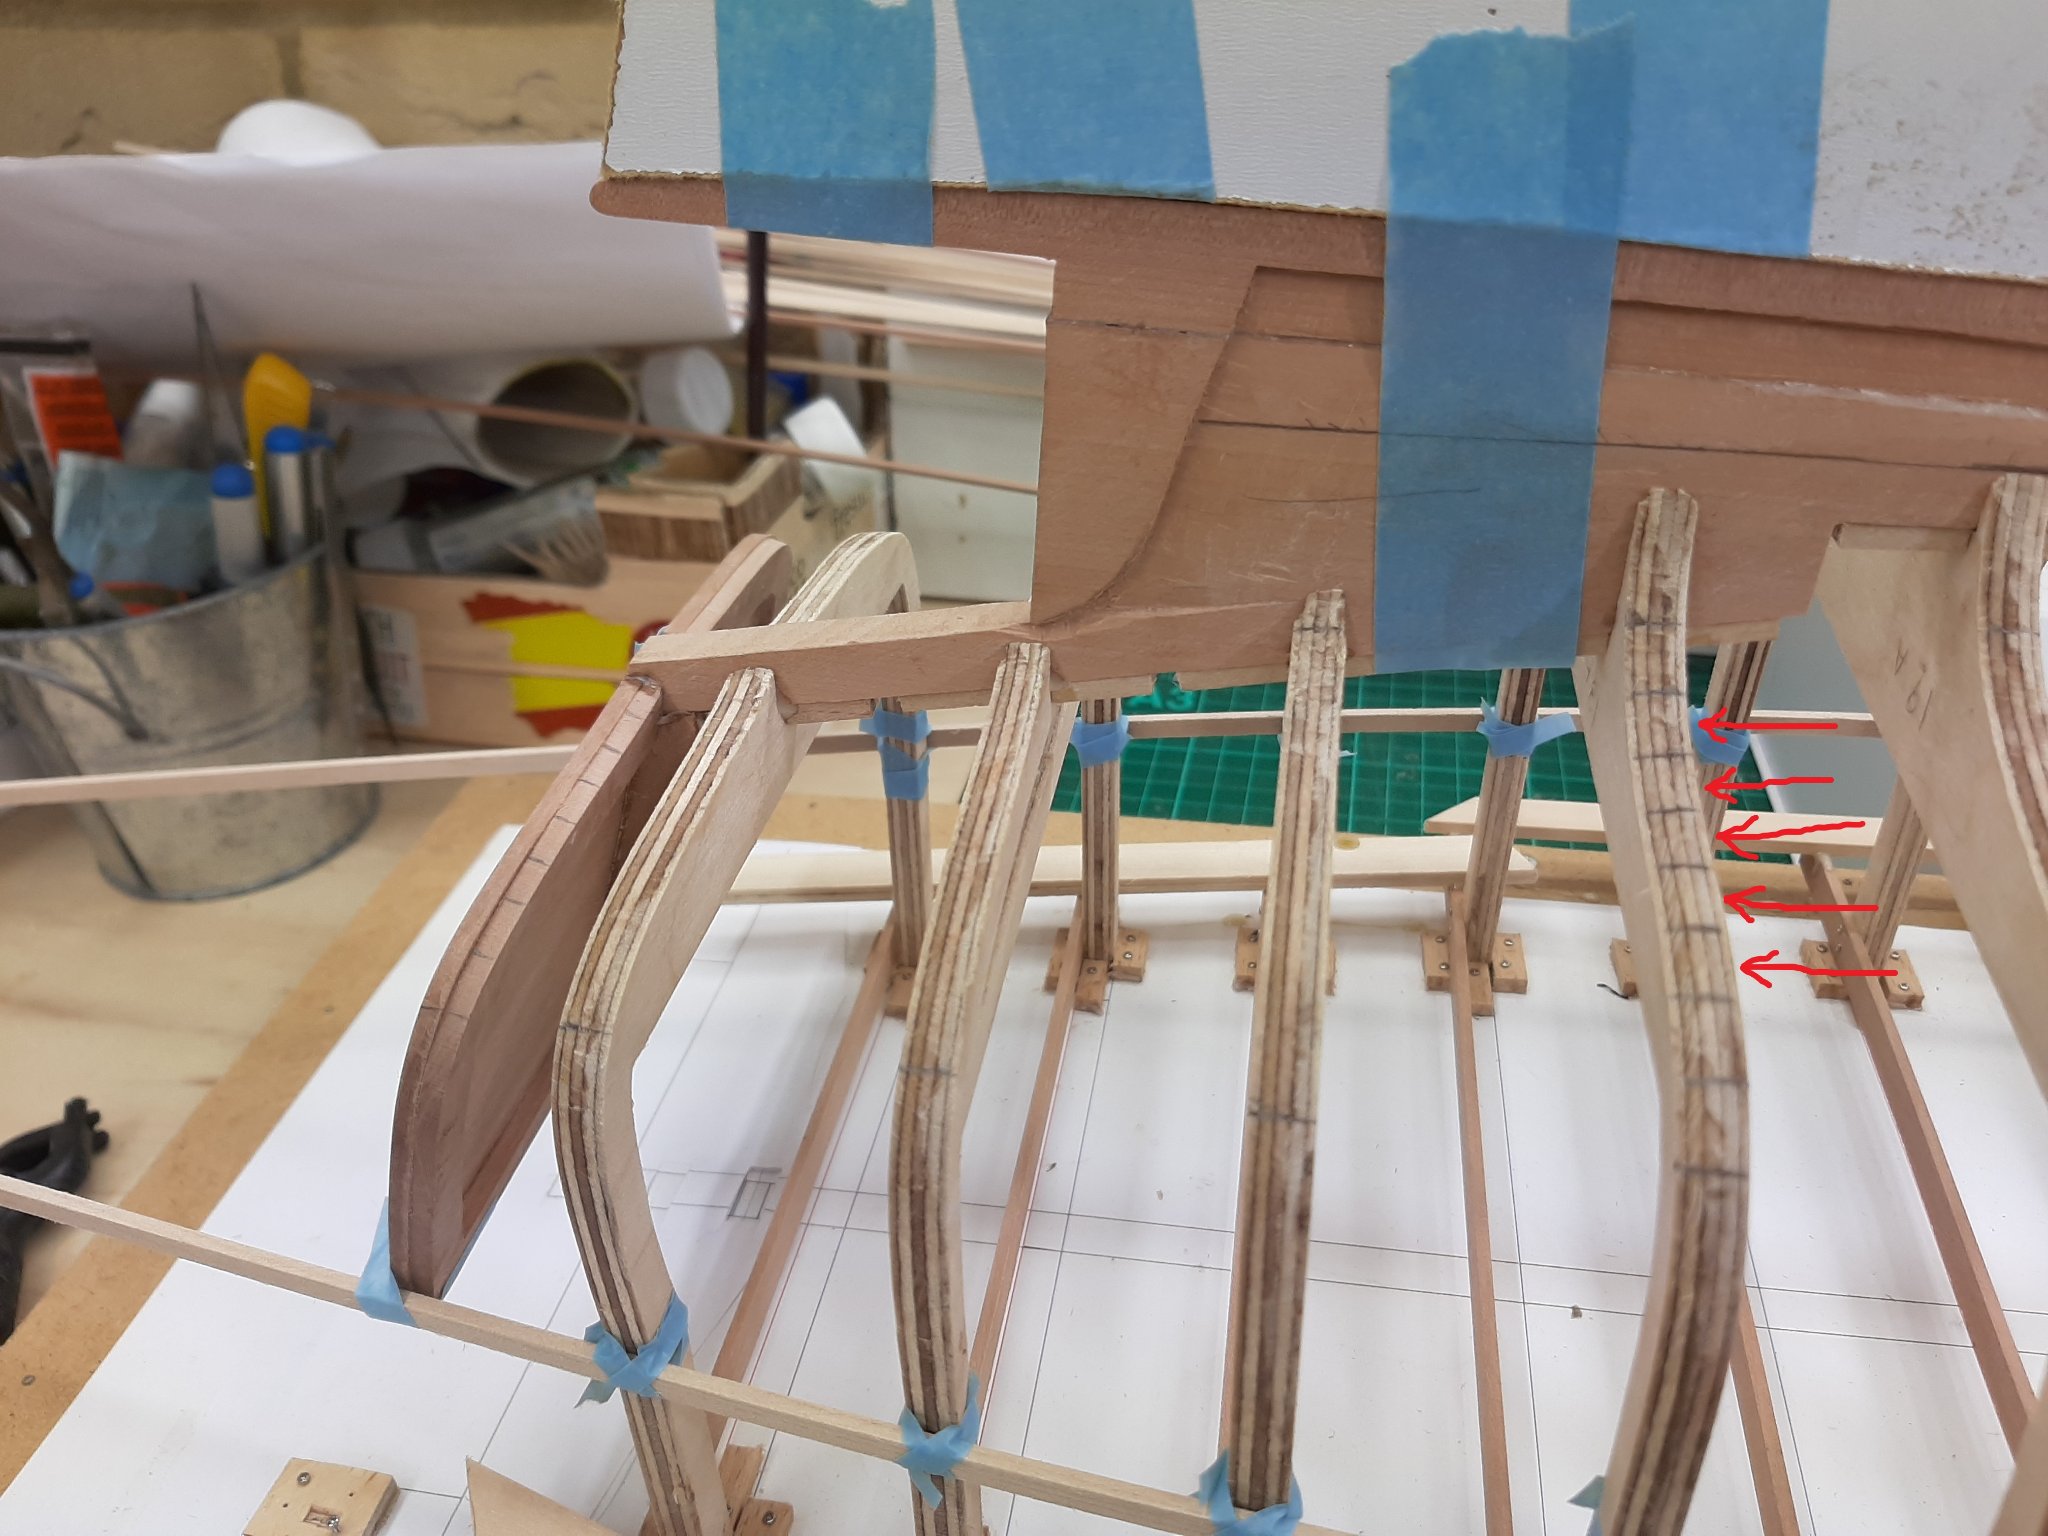
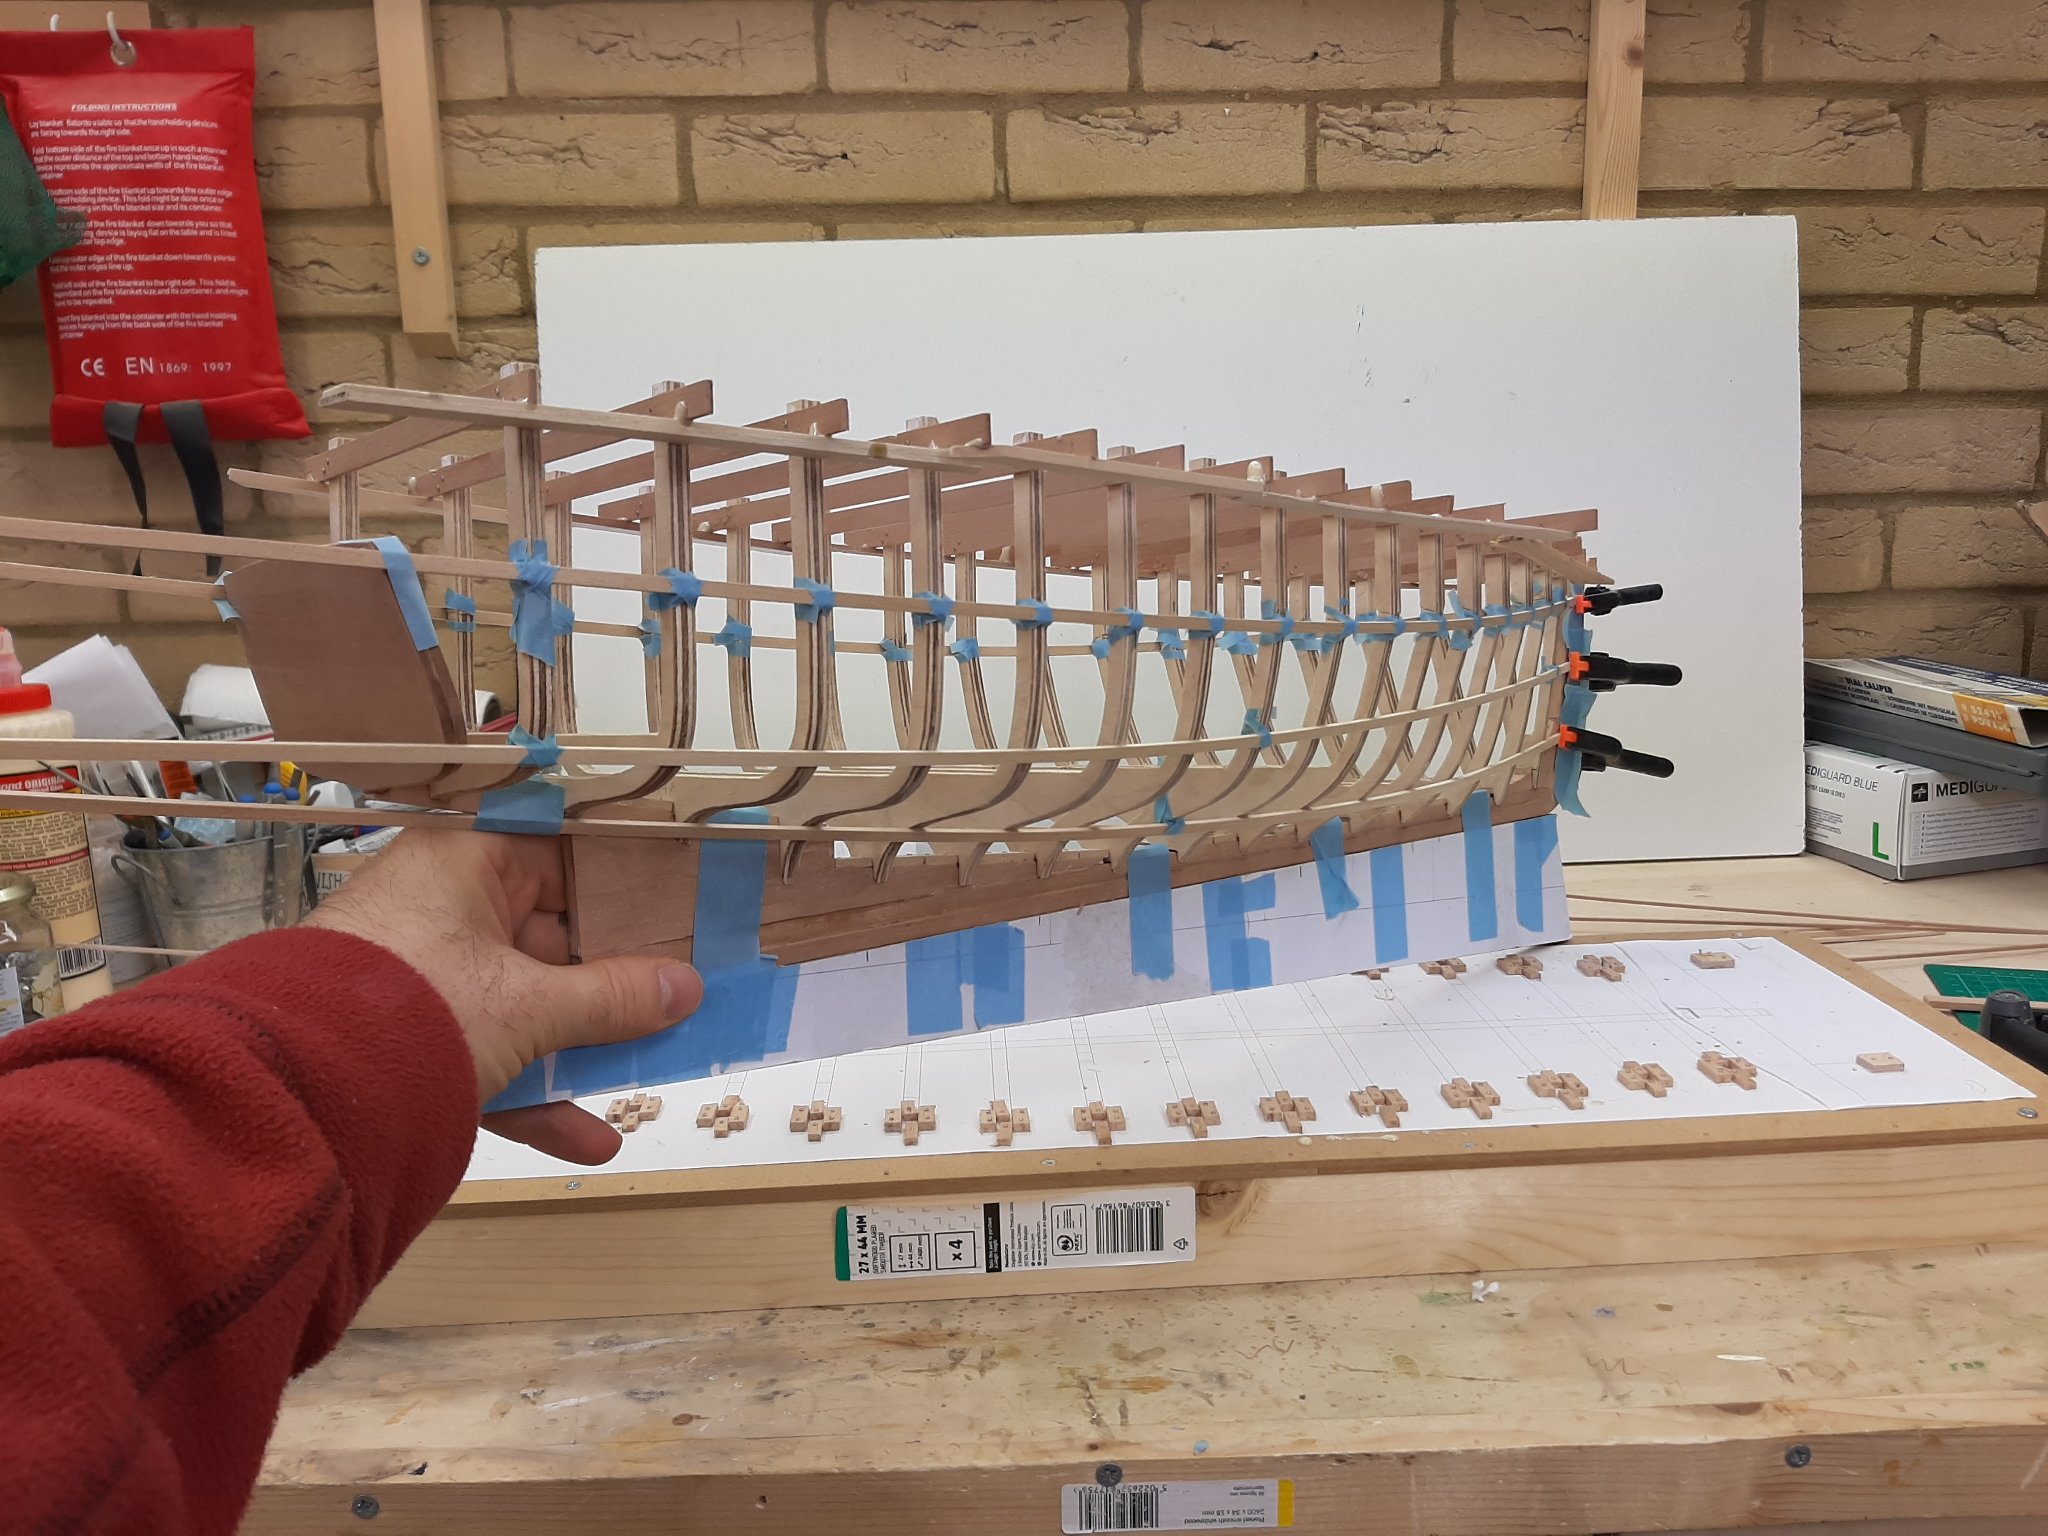
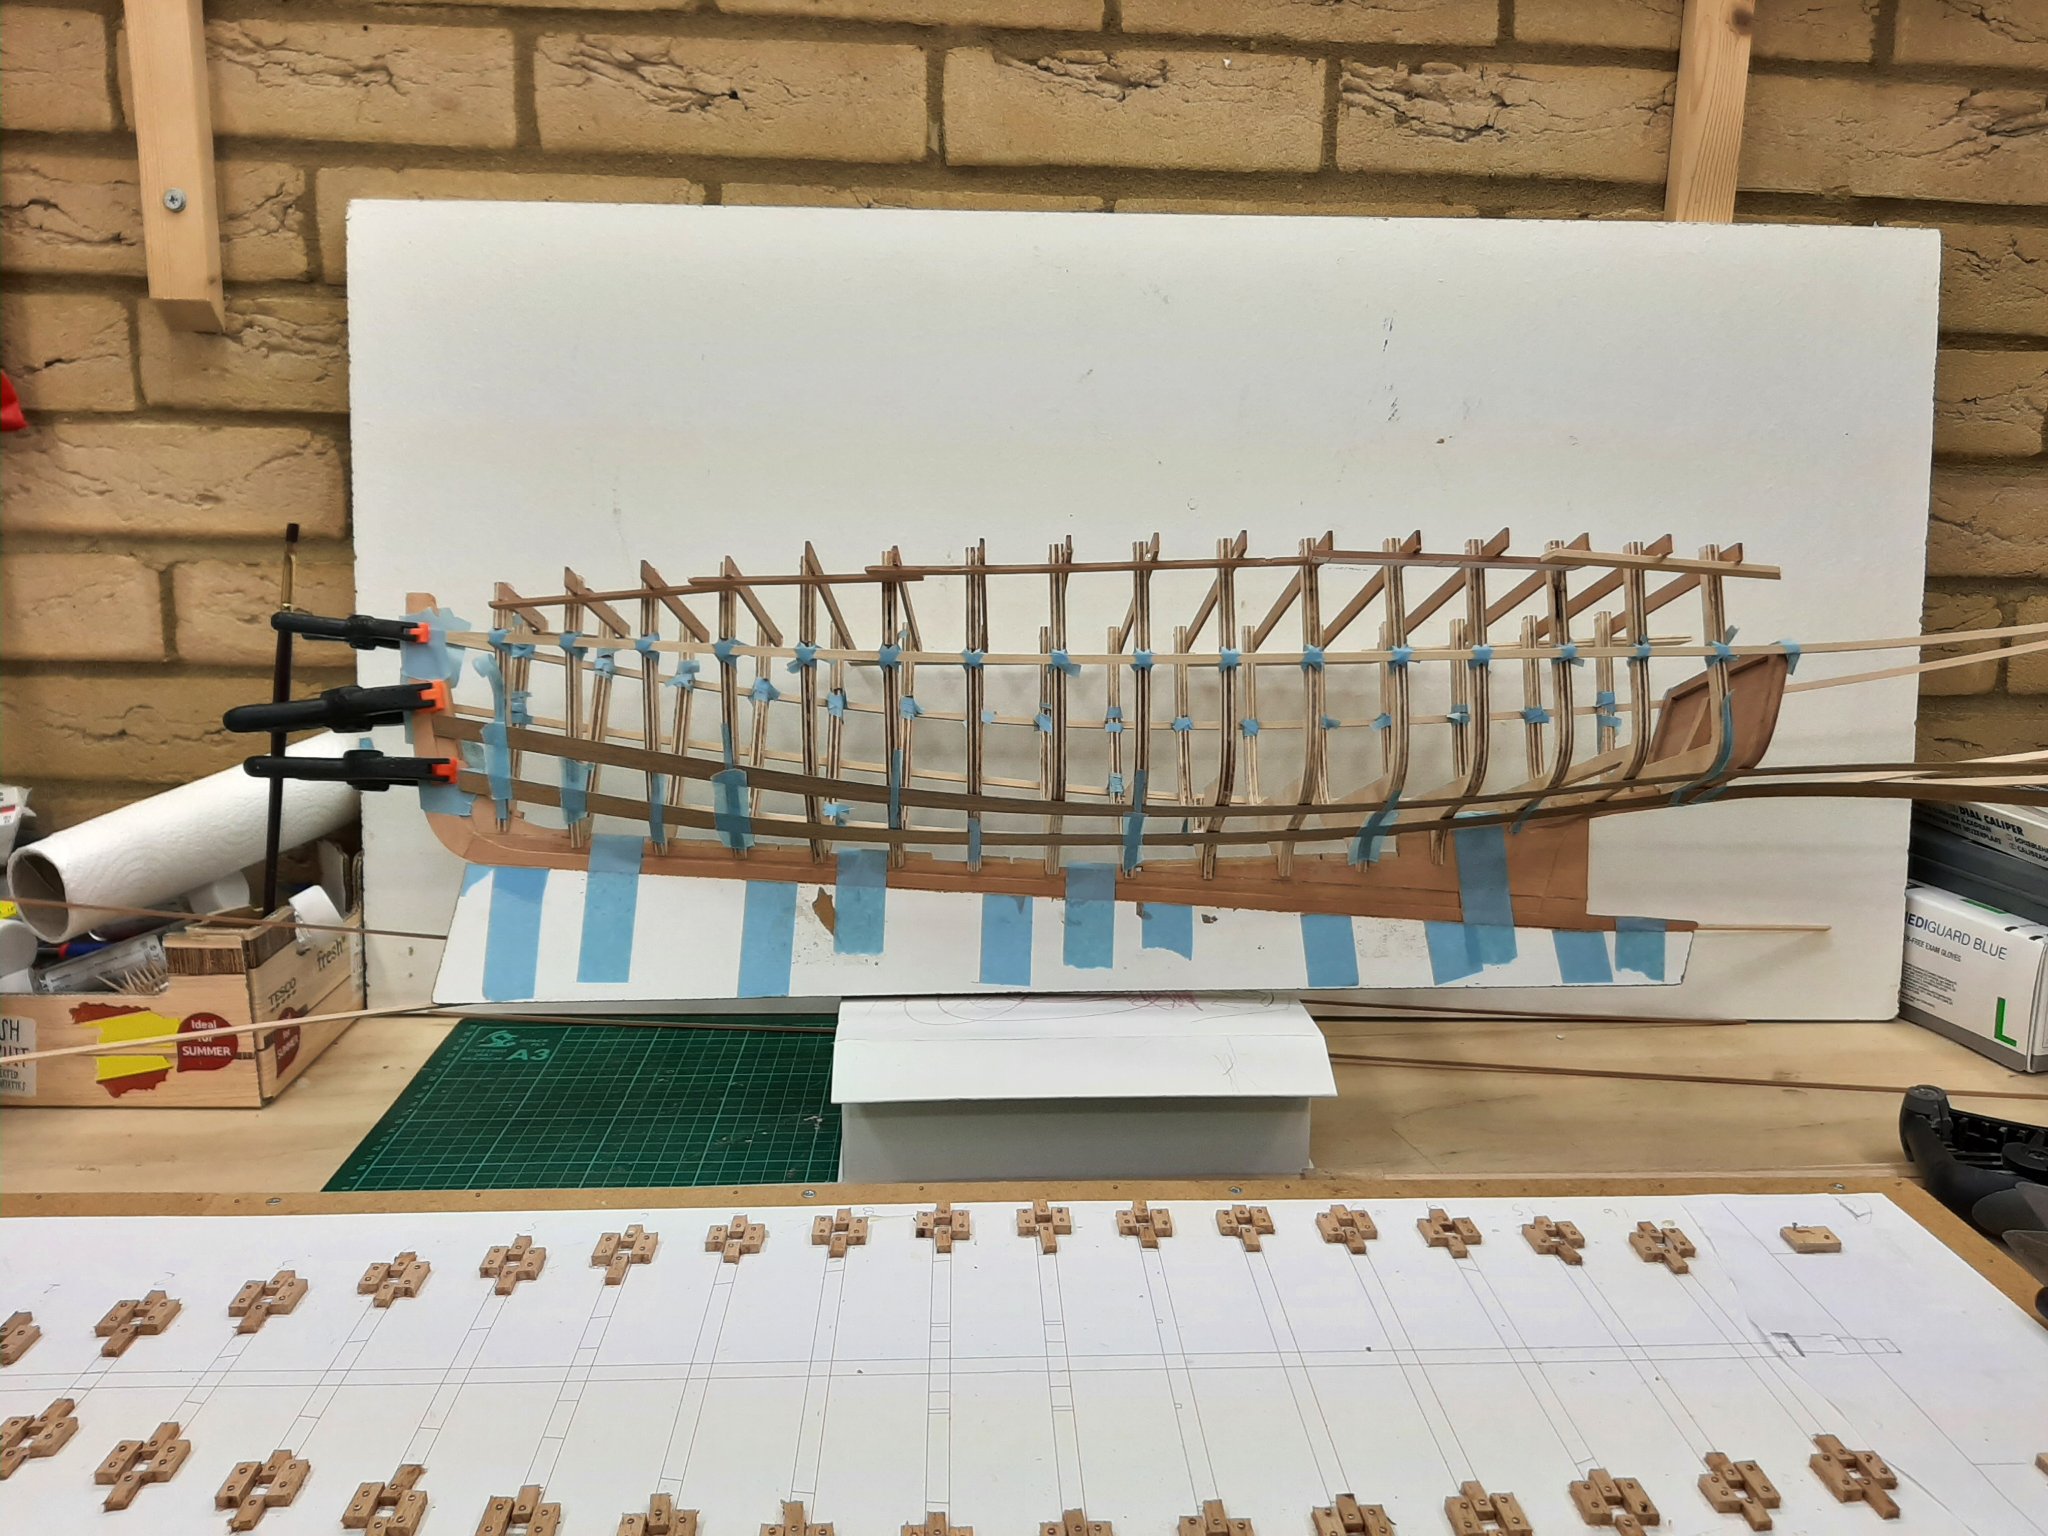
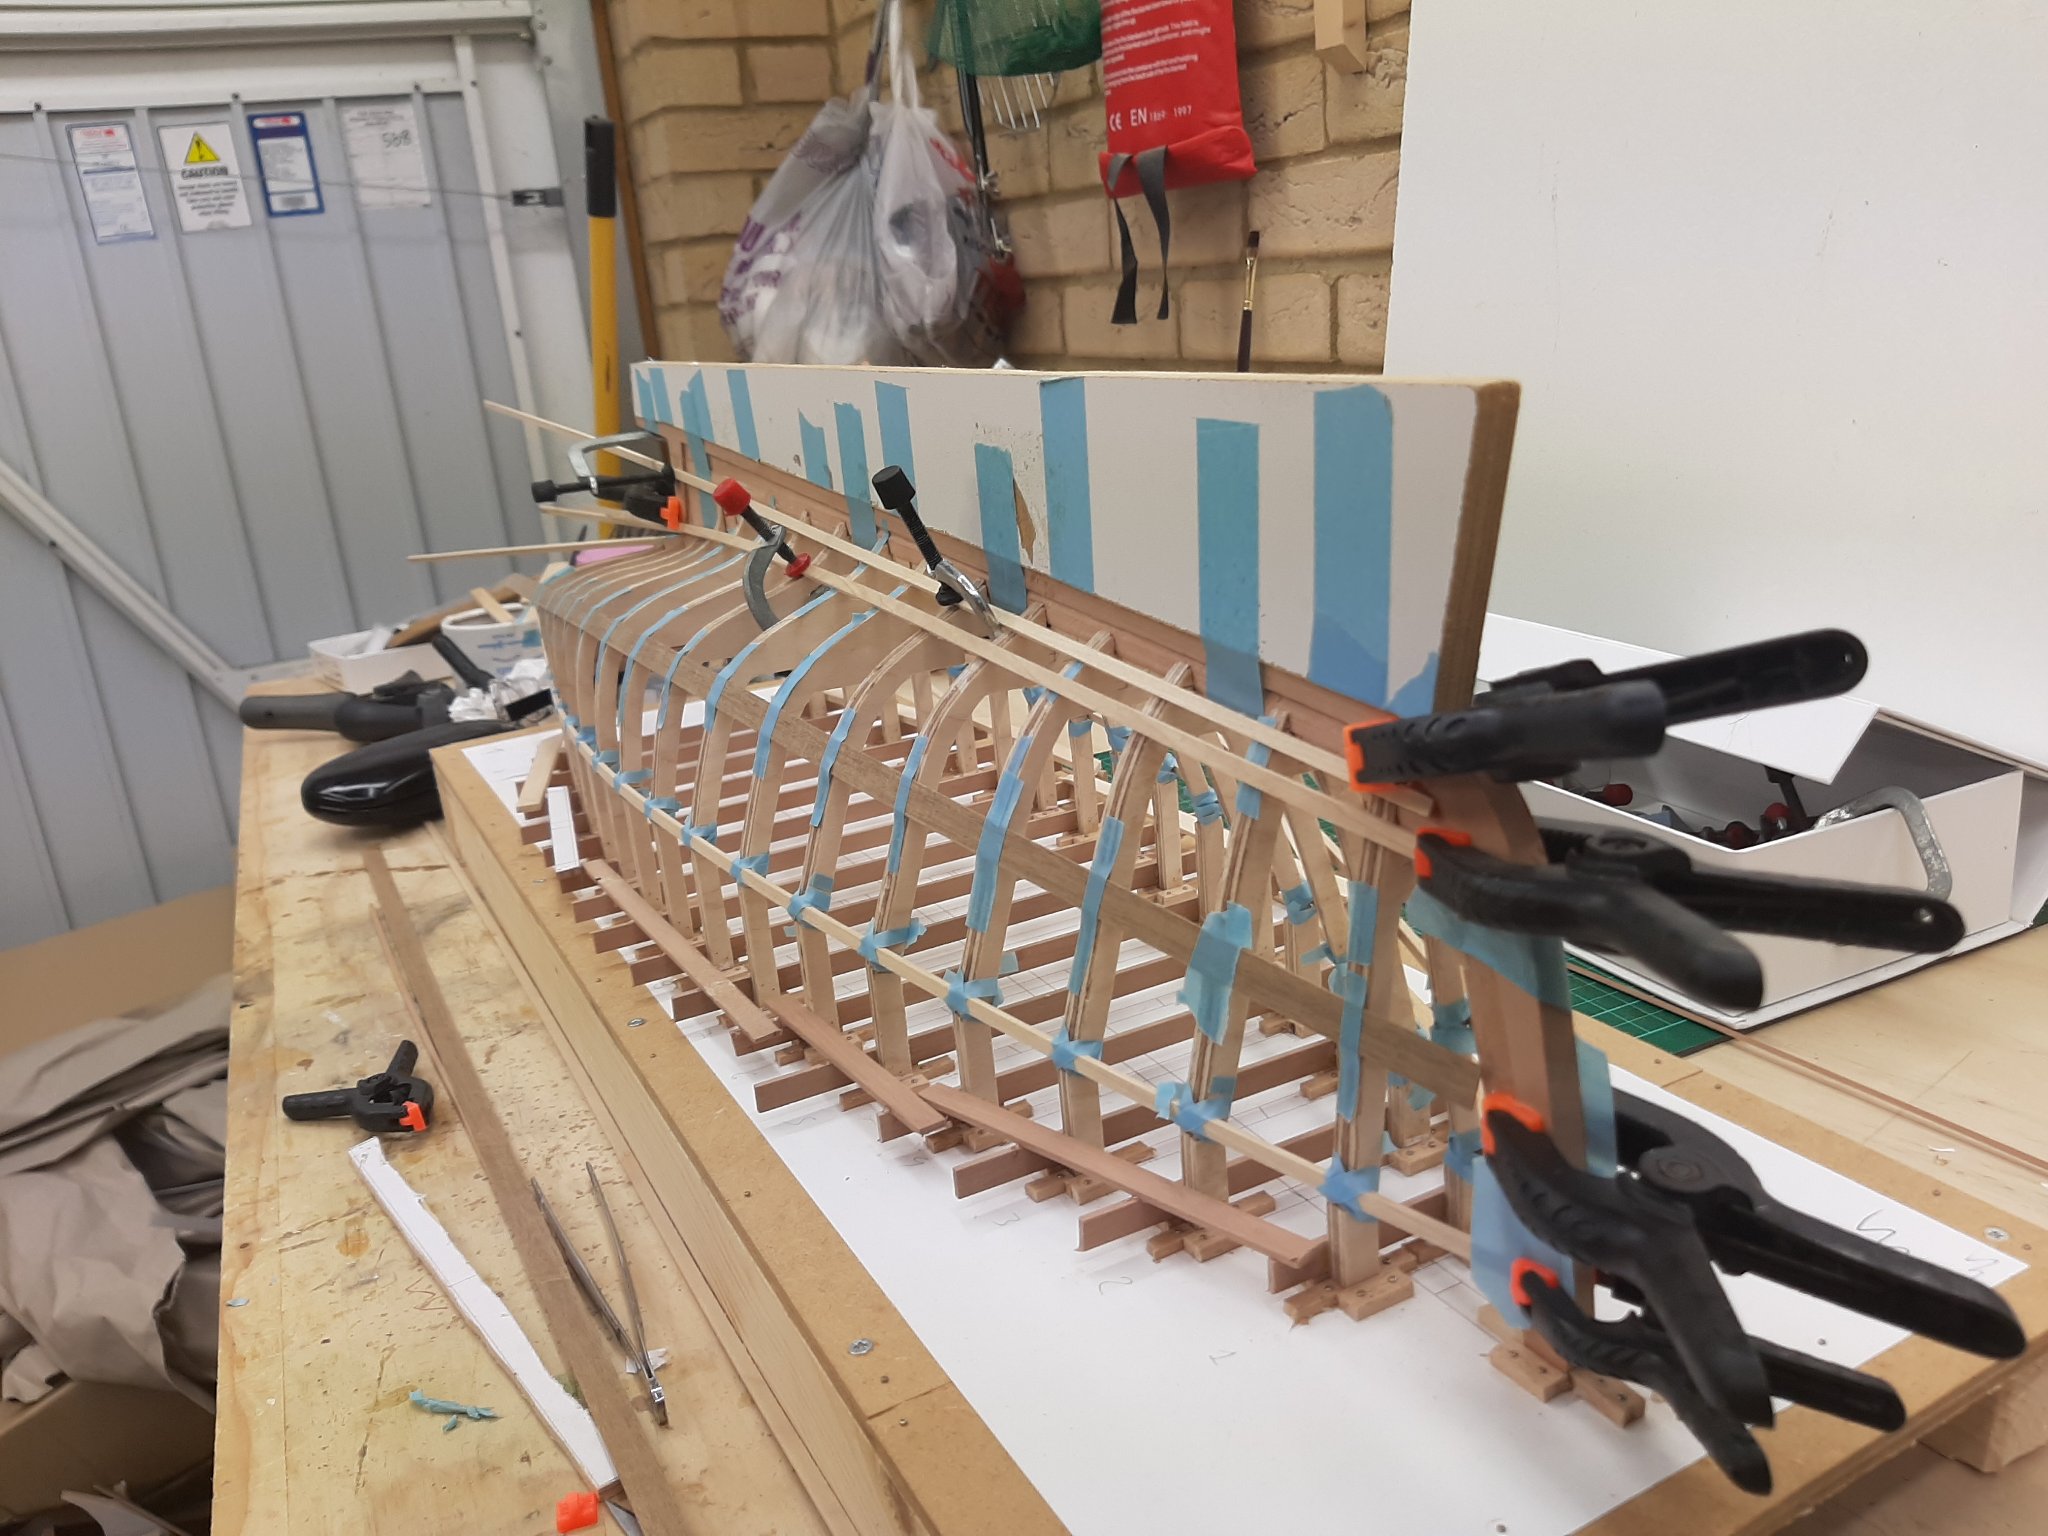
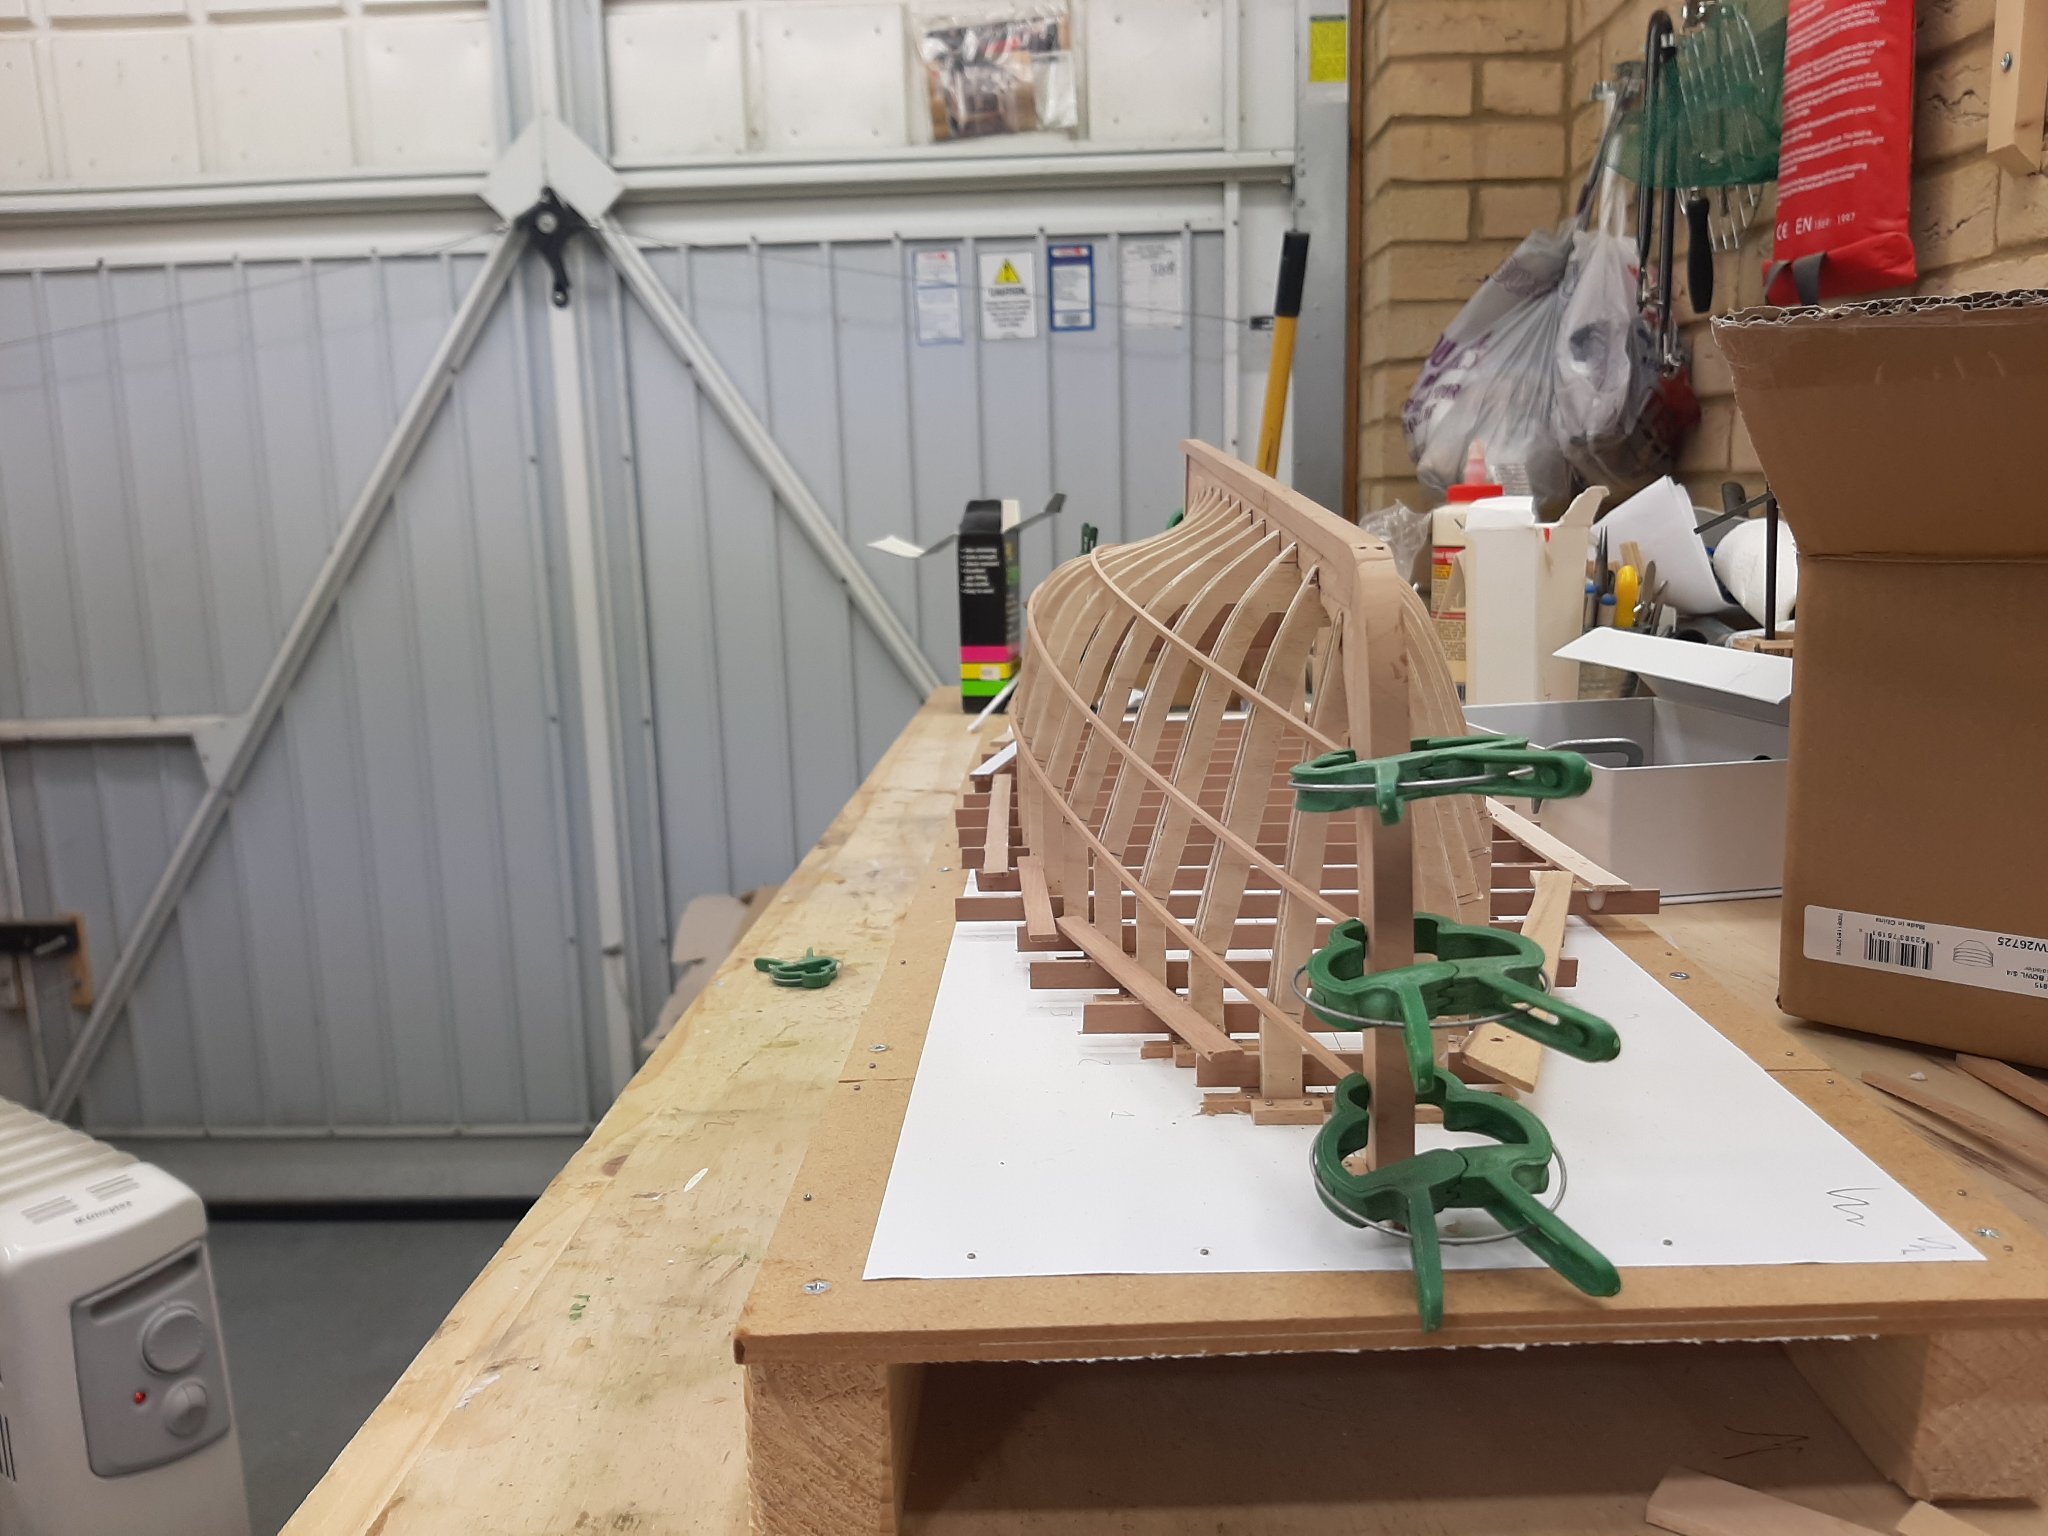
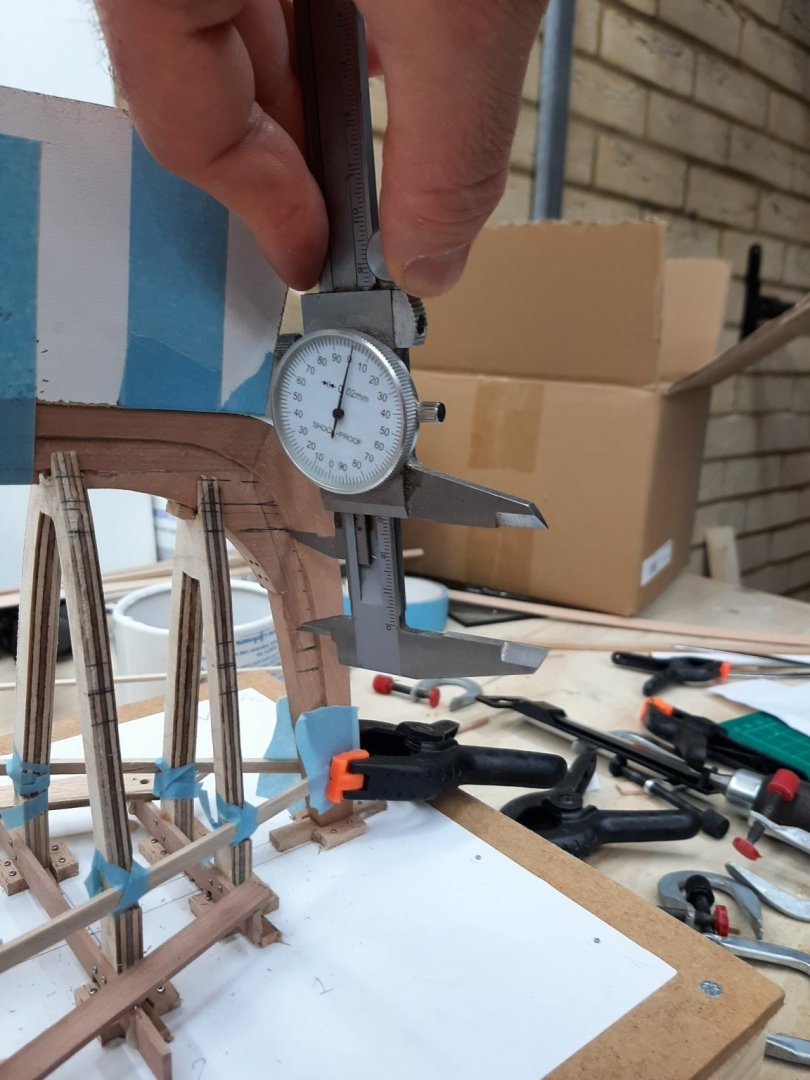
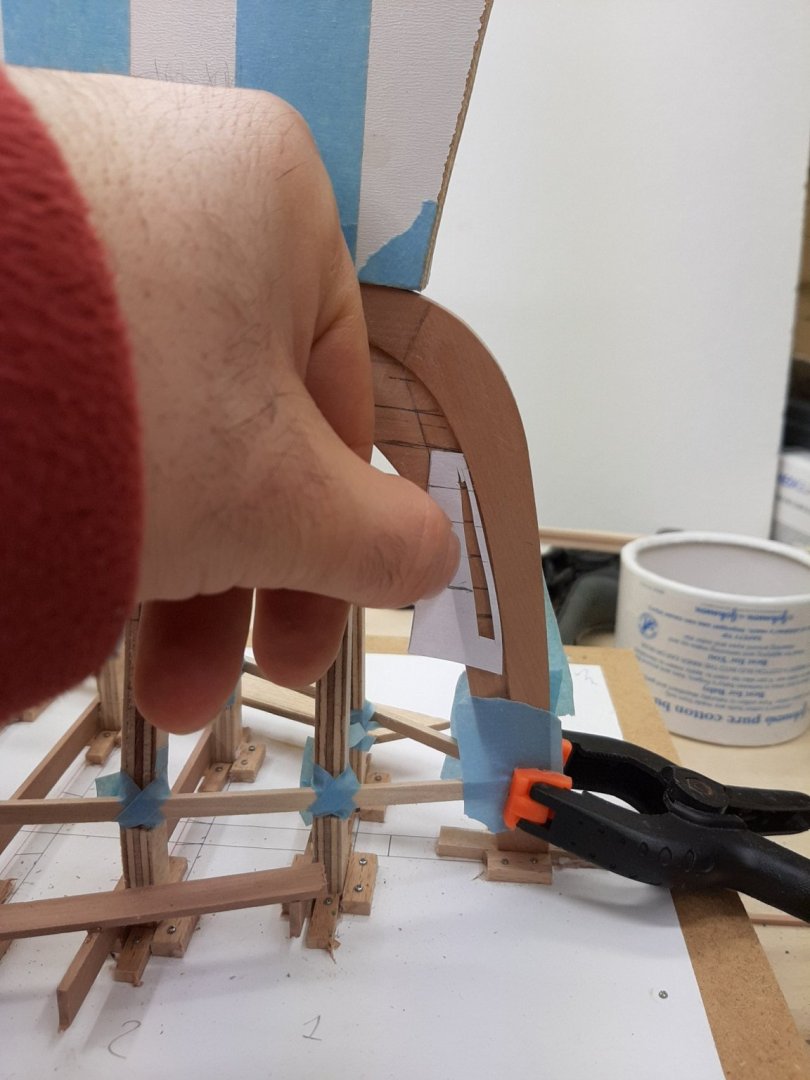
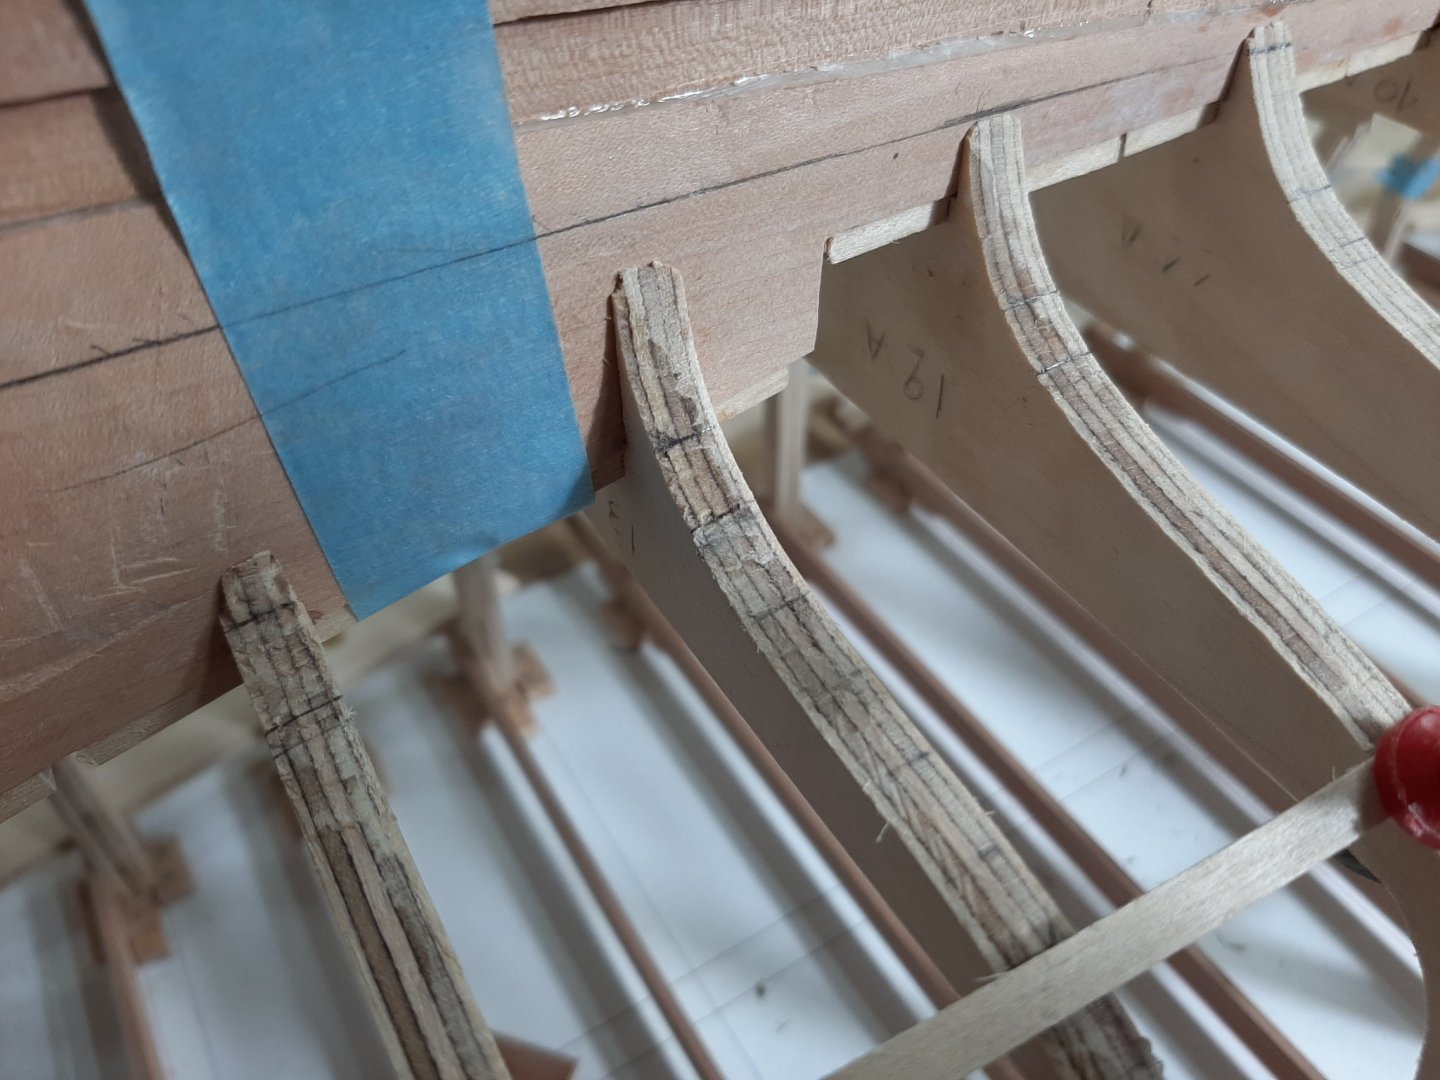
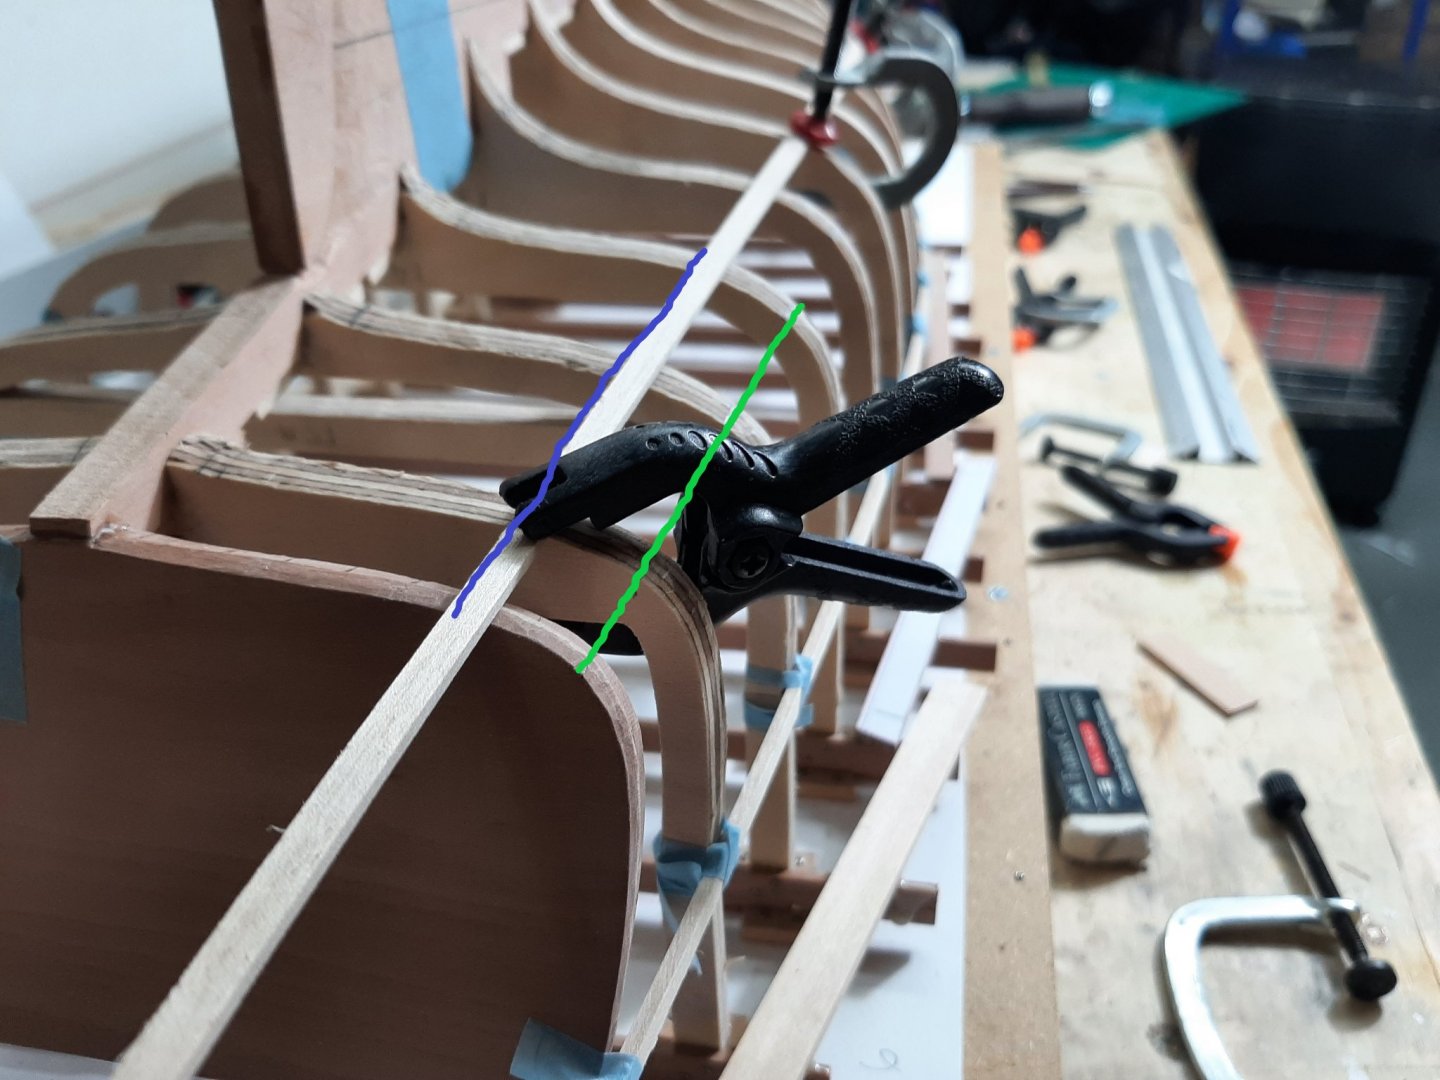
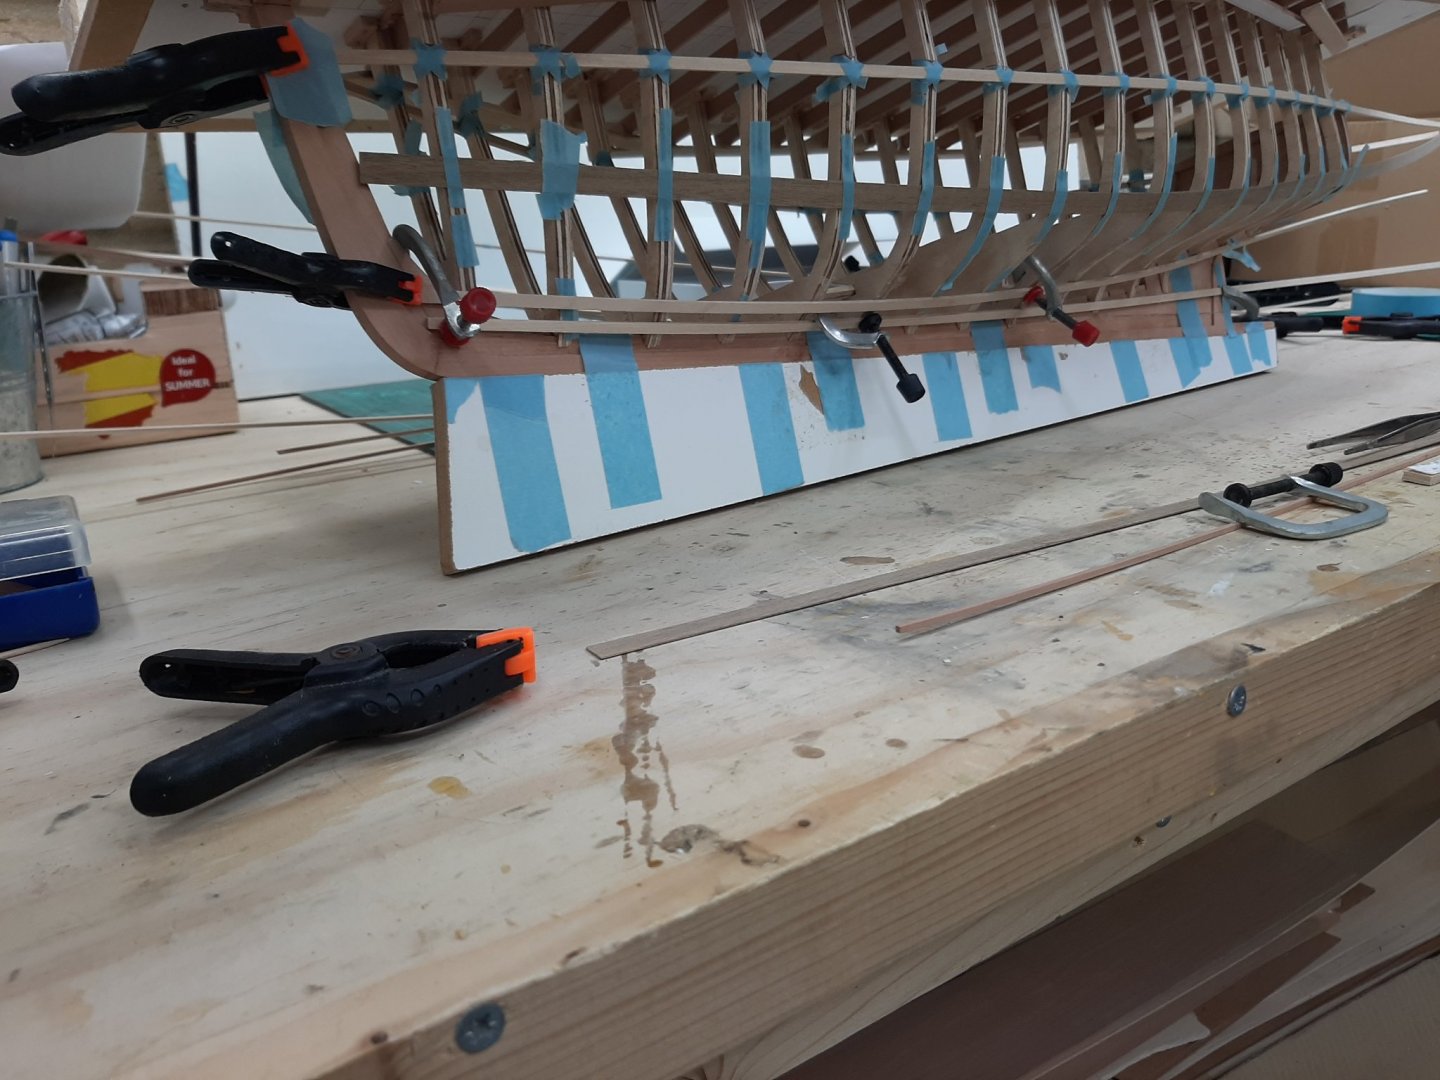
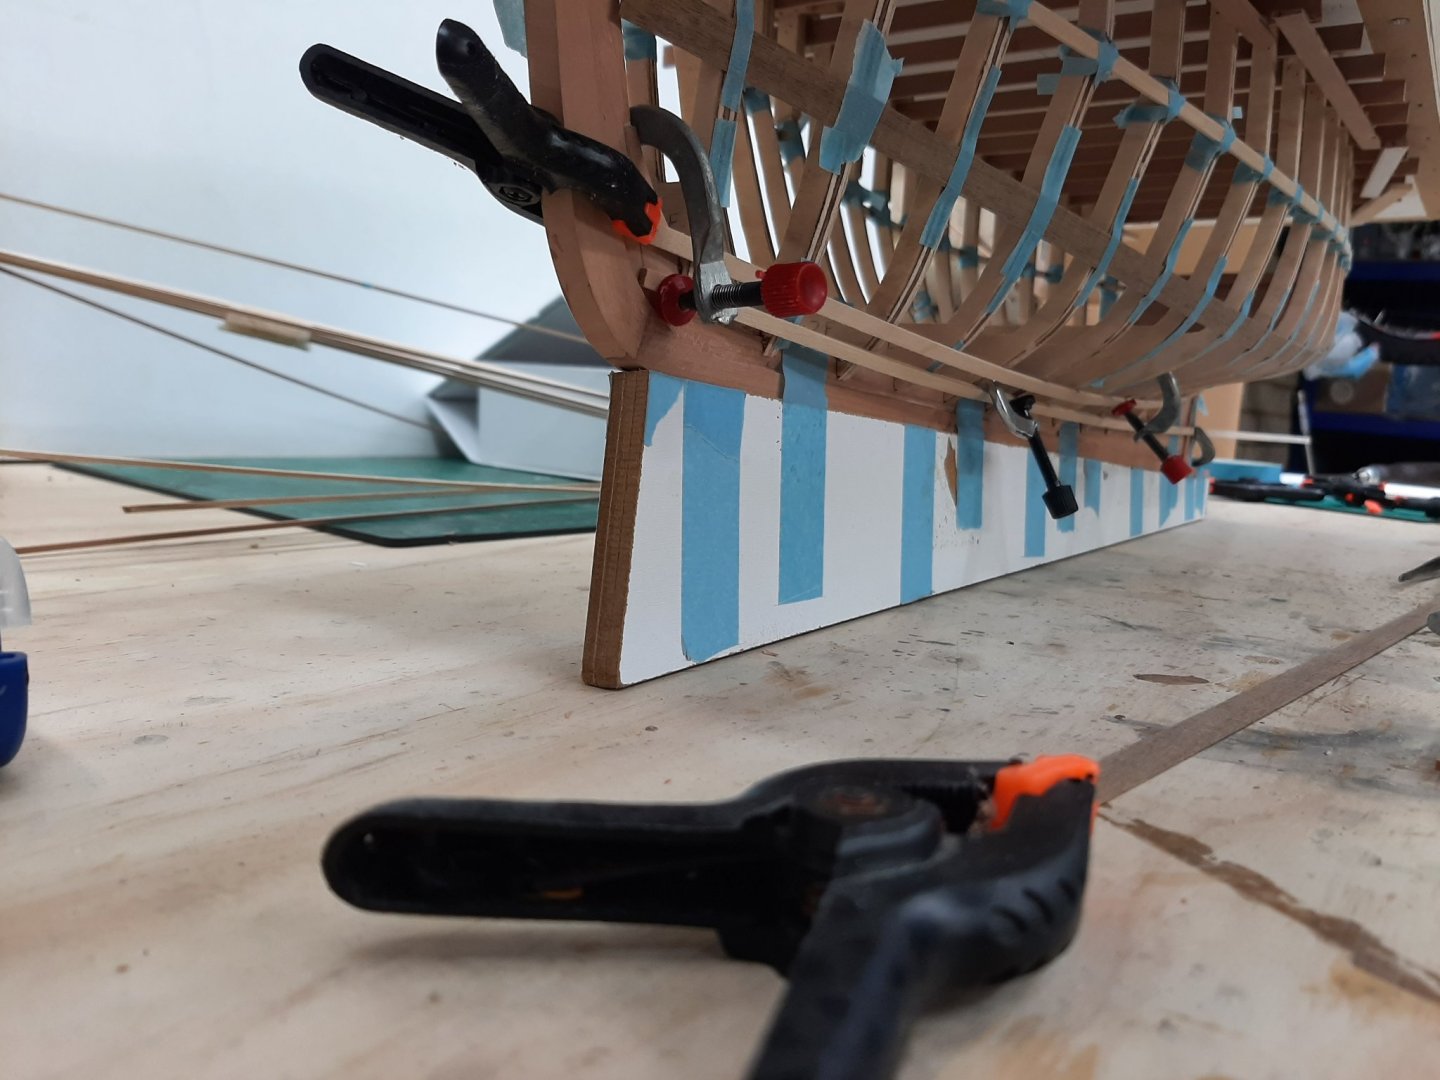
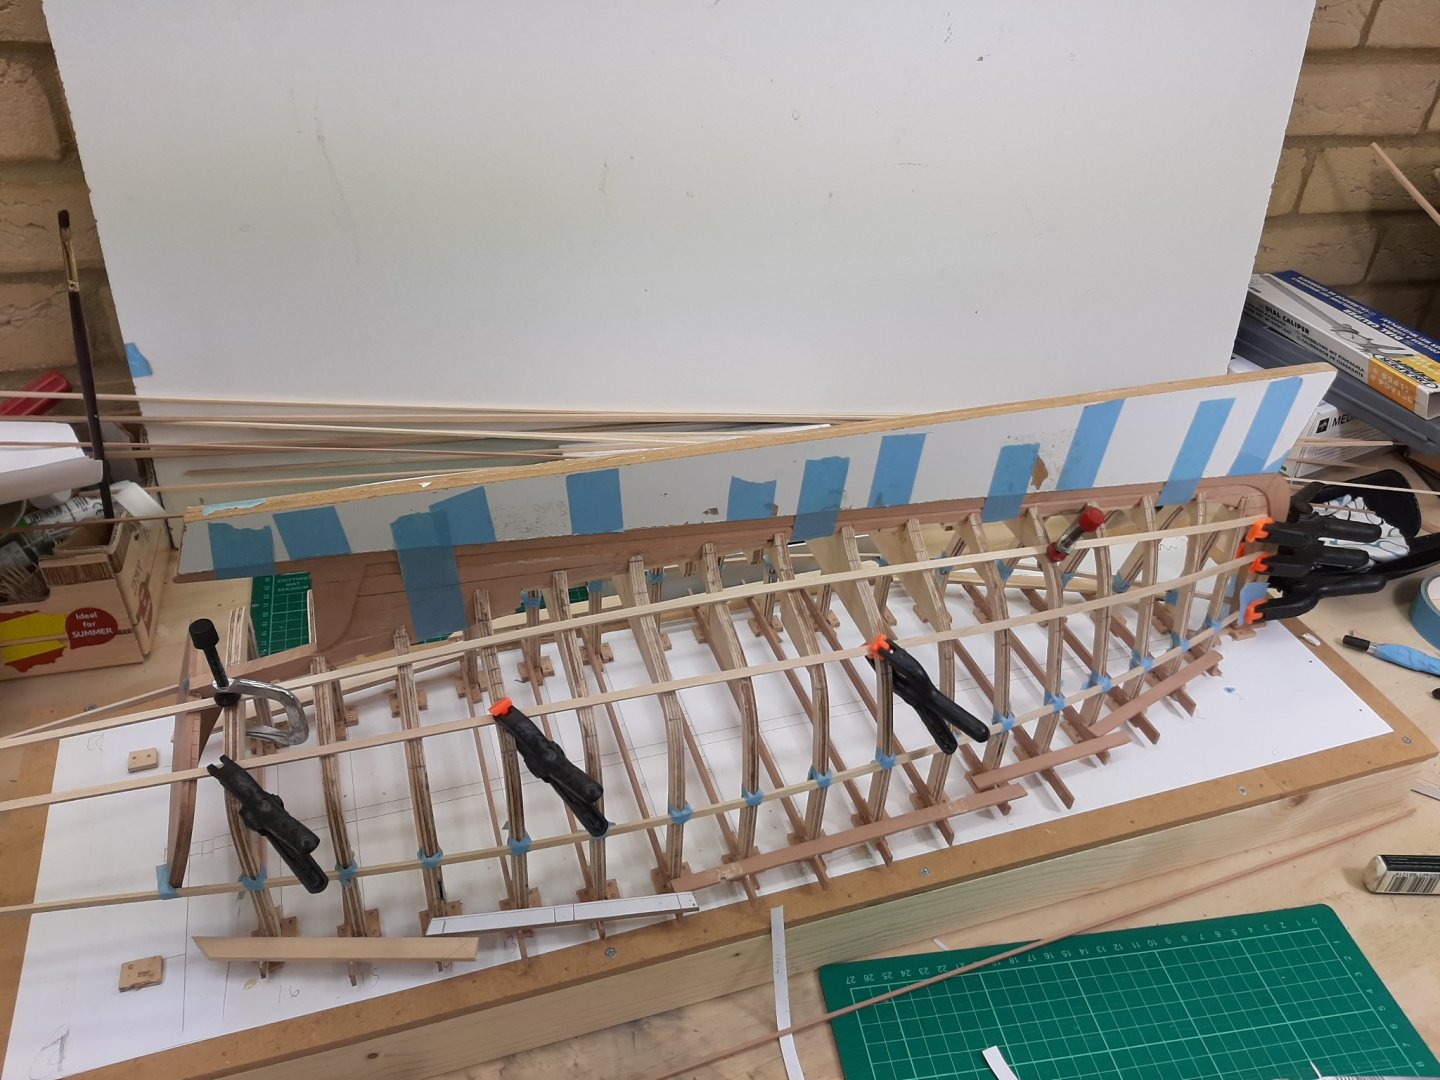
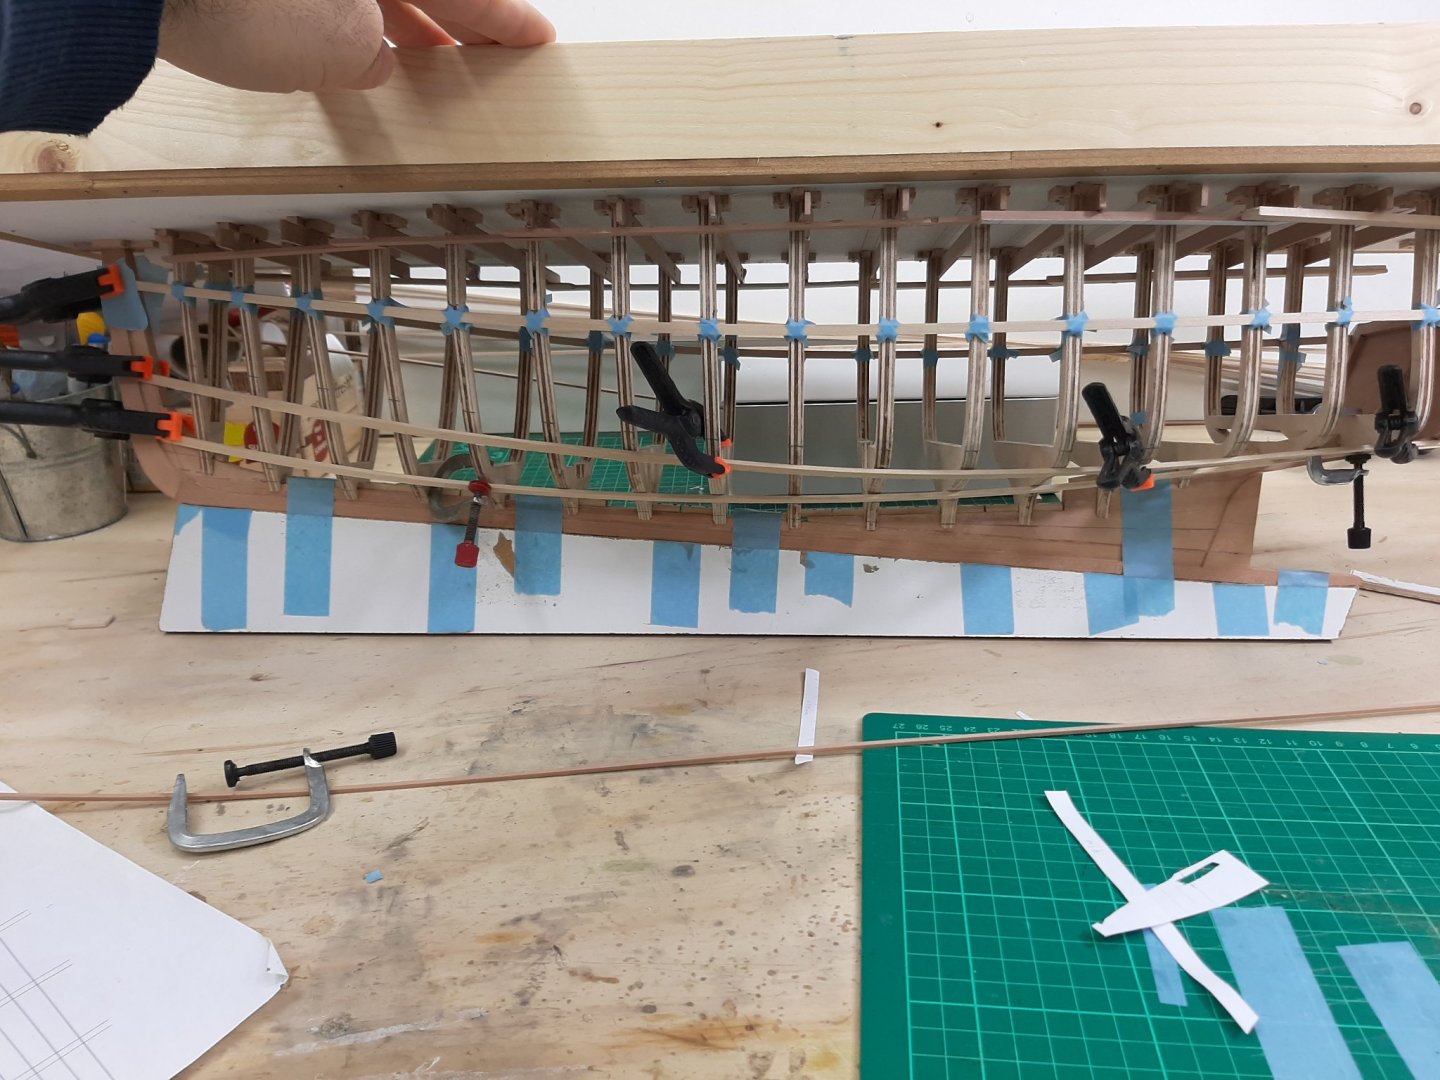
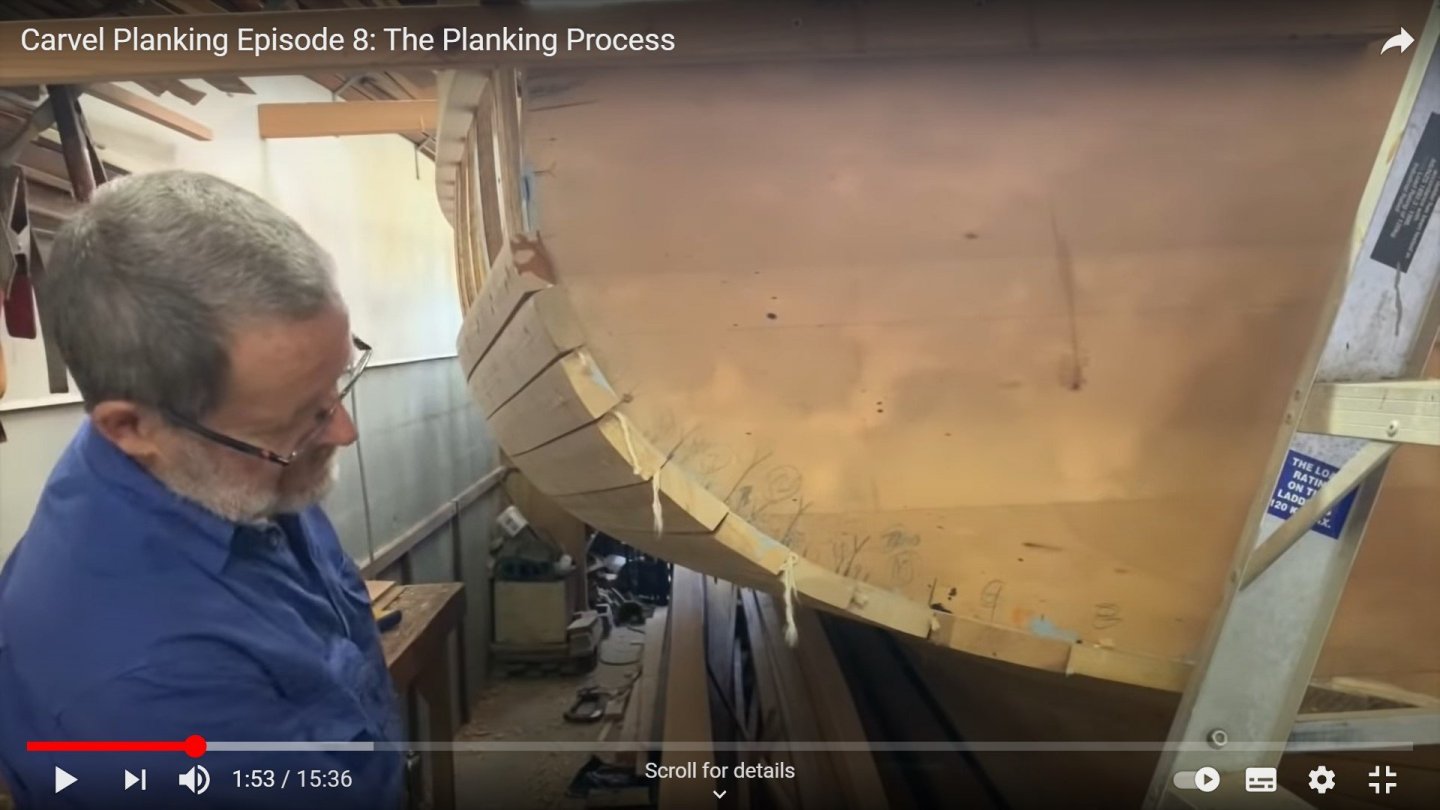
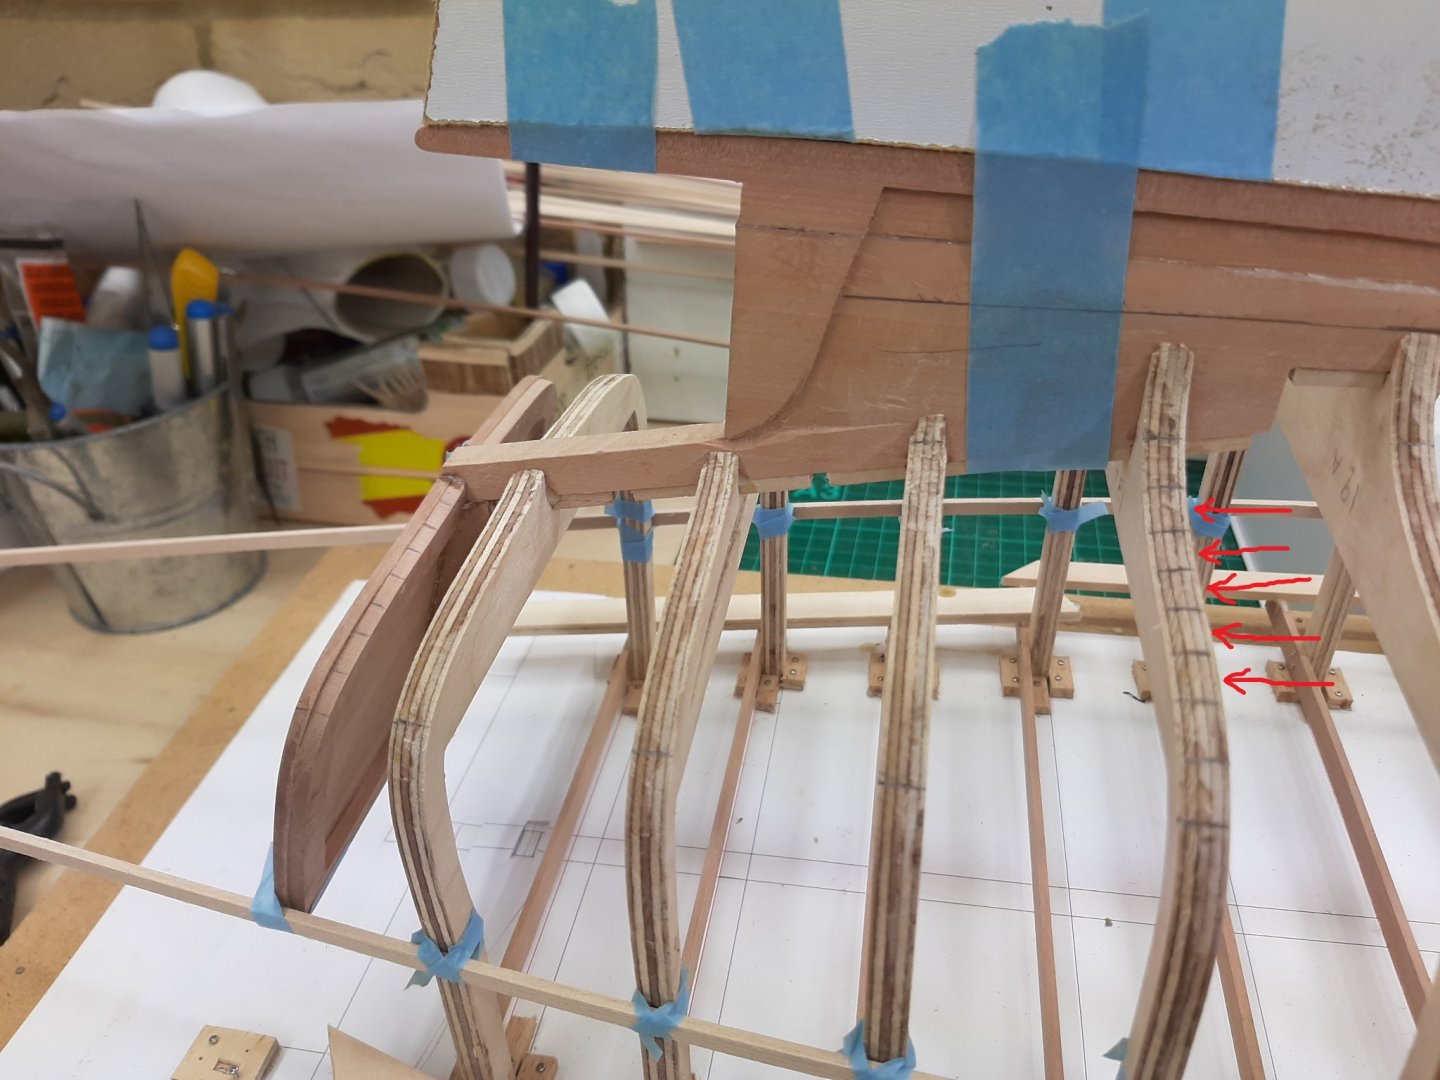
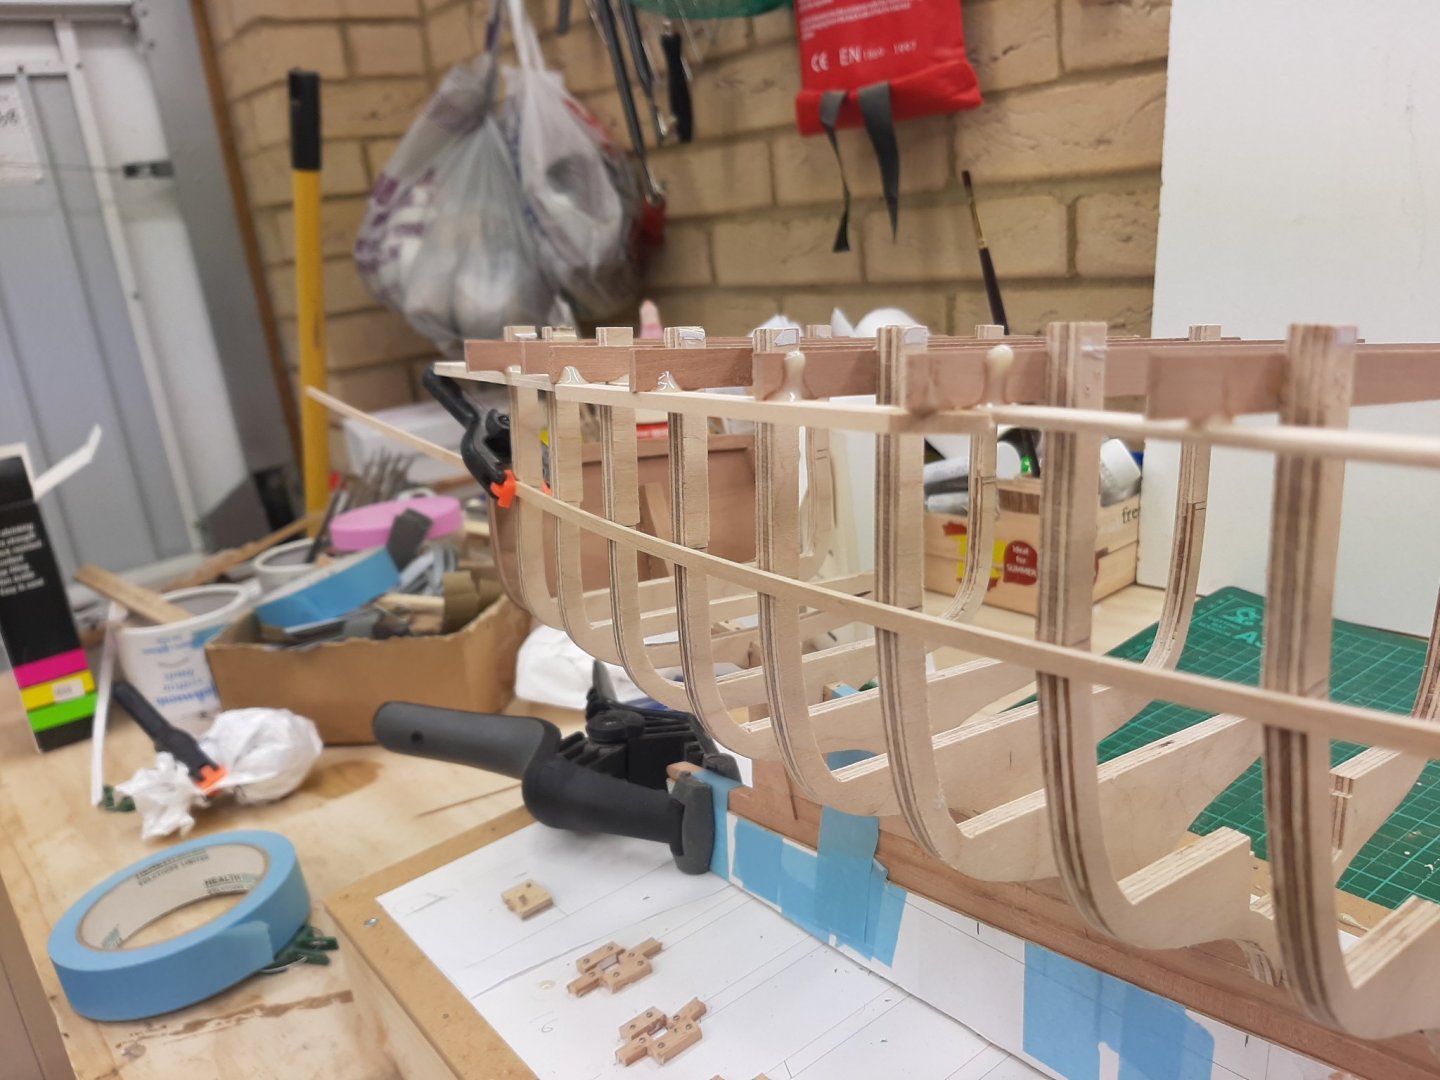
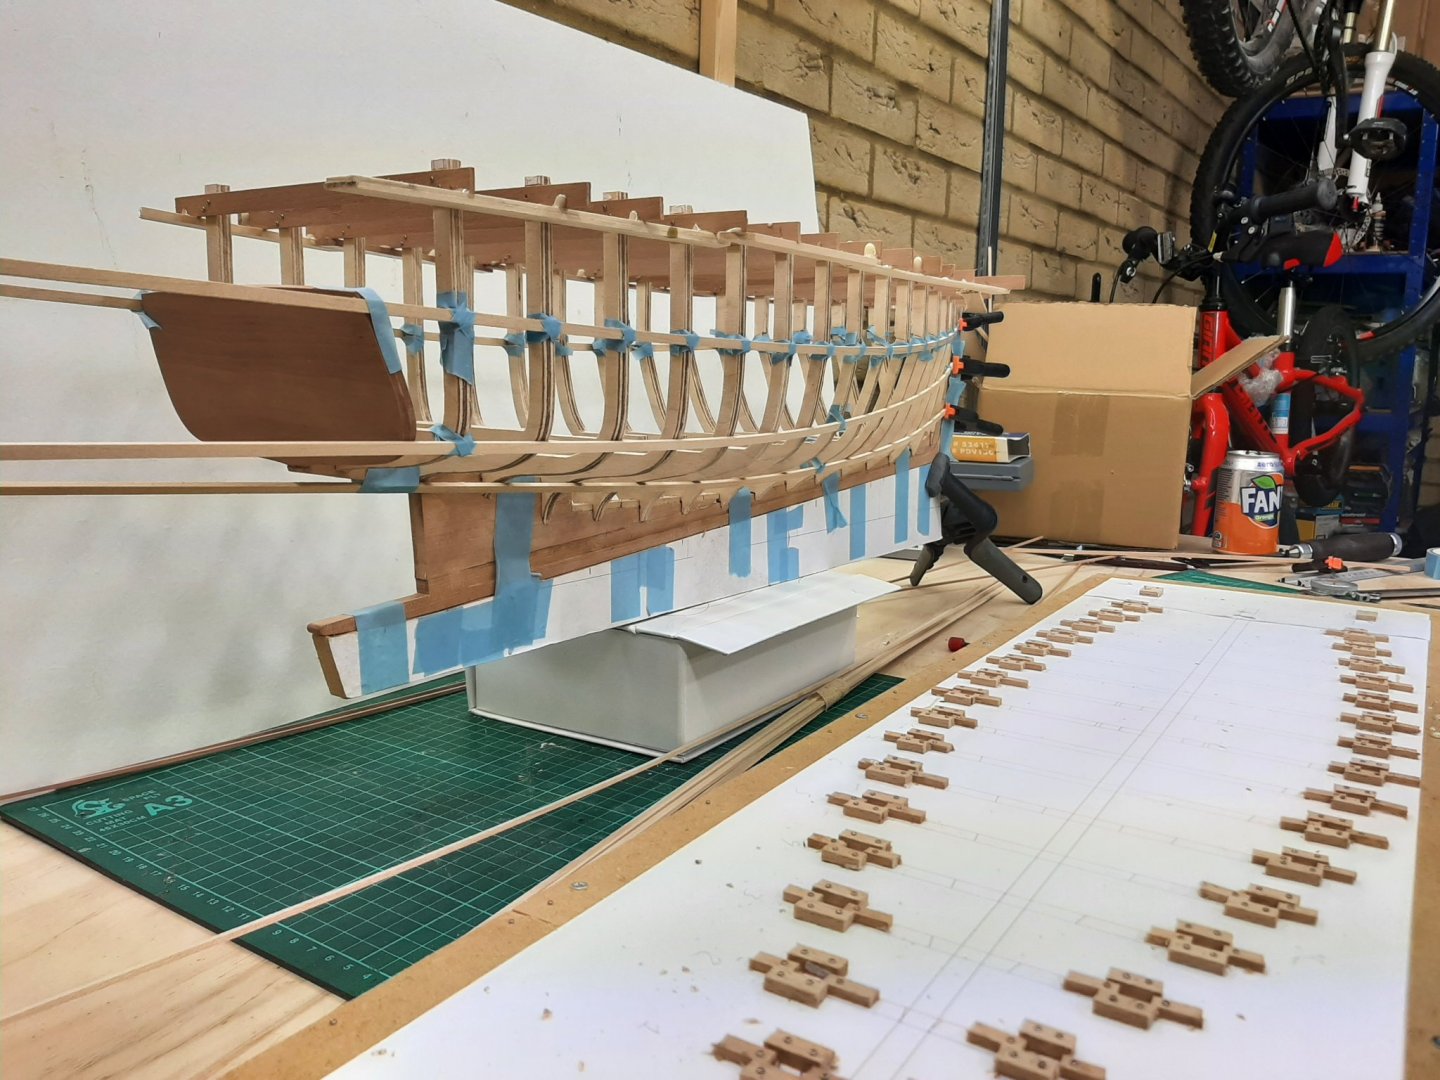
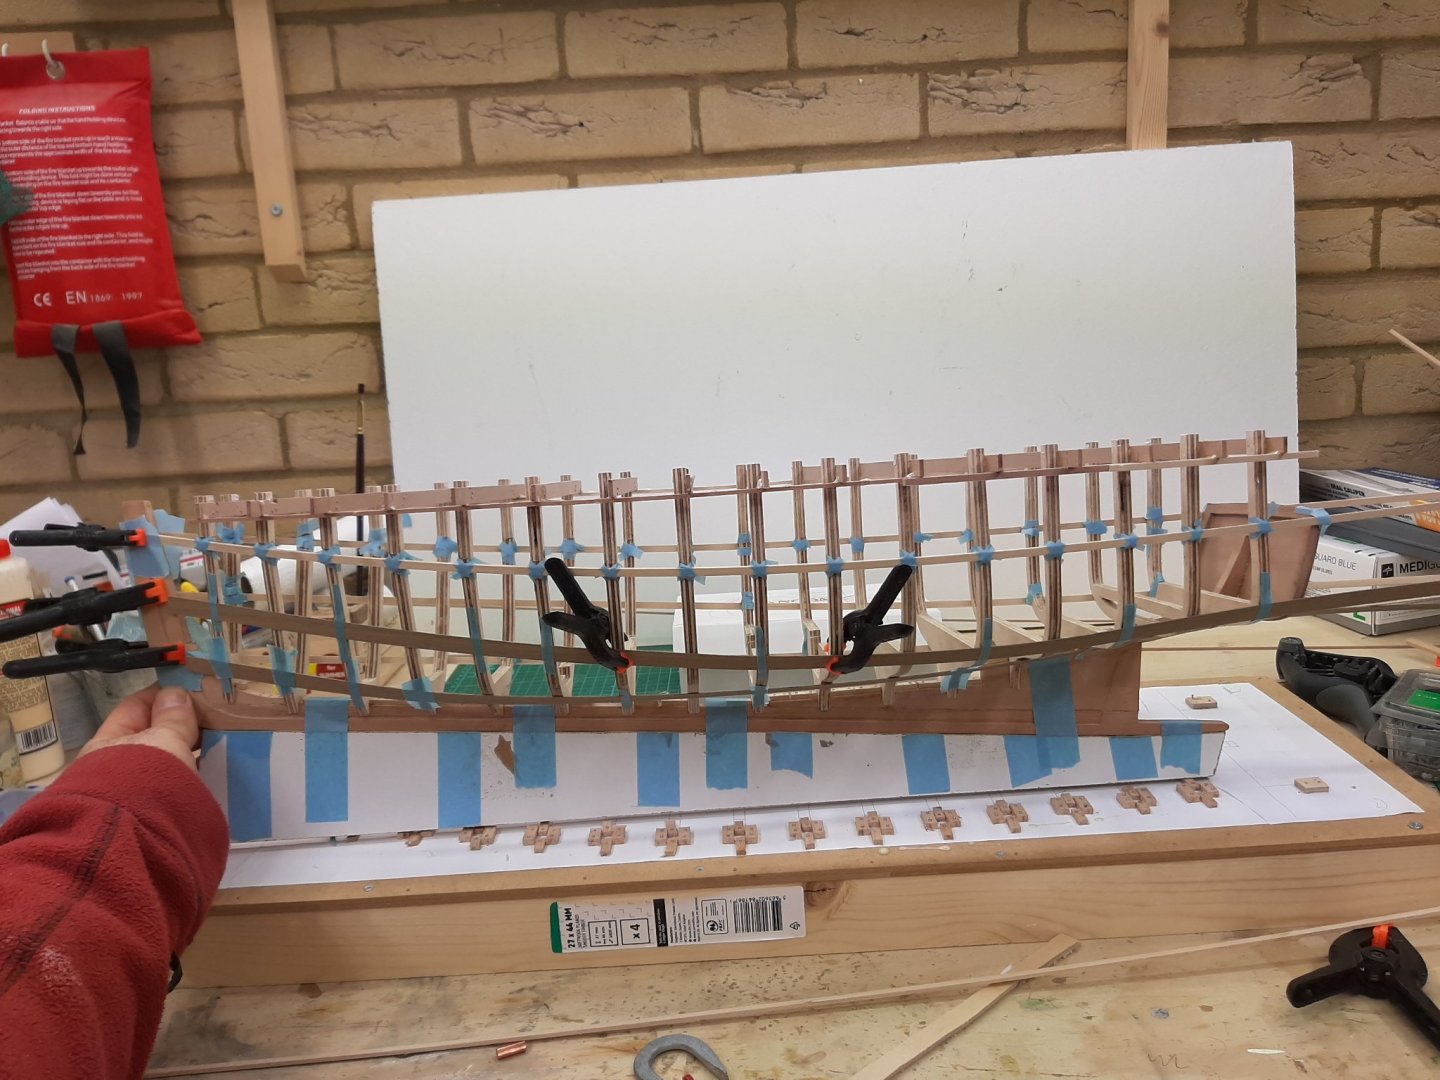
Thanks Keith, this does not guarantee a good result but it is certainly fun! Bob, I did a bit of testing and you are right, after contouring the plank it really dips bellow the level of the rest of the planks. Well, lets worry about this later. A problem suddenly appeared. This is the beauty of very large scale modelling, it is not at all forgiving and often recreates the true boat building experience. Last time, we defined the first plank of the middle zone. However, I realised it would not work: It is too wide to sit properly on the frames, at least the two really curved aft ones. I tested with pieces of wood and the initial 10 mm width is far too much. It took many tries and a lot of headscratching with the baten to find a fair run that reduces the width of the planks from 10 to 8 mm at those areas . In the next photos the problem areas are circled and the new markings on the frames can also be seen On the other side of this zone, things will get very tight as the transom and half the frames have a very acute angle. The planks there will need to be no more than 8 mm. The green line is the edge of the zone, I think the distance to the blue line can be covered with two planks. However, now a new problem appeared. This third plank is far too narrow foreward and there is a visible mismatch with the second plank. It makes sense to reposition the second plank so it gives a couple of milimeters to the third plank. This was not easy, however finally I got a fair curve that looks reasonable The next photo shows the new position of the second plank, it now looks better. Maybe I need to split the difference at the stem and return 1 mm back to the second plank. The red arrows show the new position Aft the changes are less dramatic but overall things seem to be more balanced. The green shows the position of the stealer plank I hope that my planks are not too narrow but really this hull has so many twists and turns that wider planks simply cannot be used. The next photo show first the bow of the boat in the video-indeed some of the planks are very narrow. The other two photos show another boat being planked with relatively narrow planks, especially at the bow, but this one is a simpler shape. I do hope this will work! Best wishes Vaddoc


-
Now Bob, this is bit of worry! I have only 2 mm wood sheets and no thickness sander so I think the future holds a lot of sanding and scraping. Too bad that this particular beech wood I got seems really hard...
-
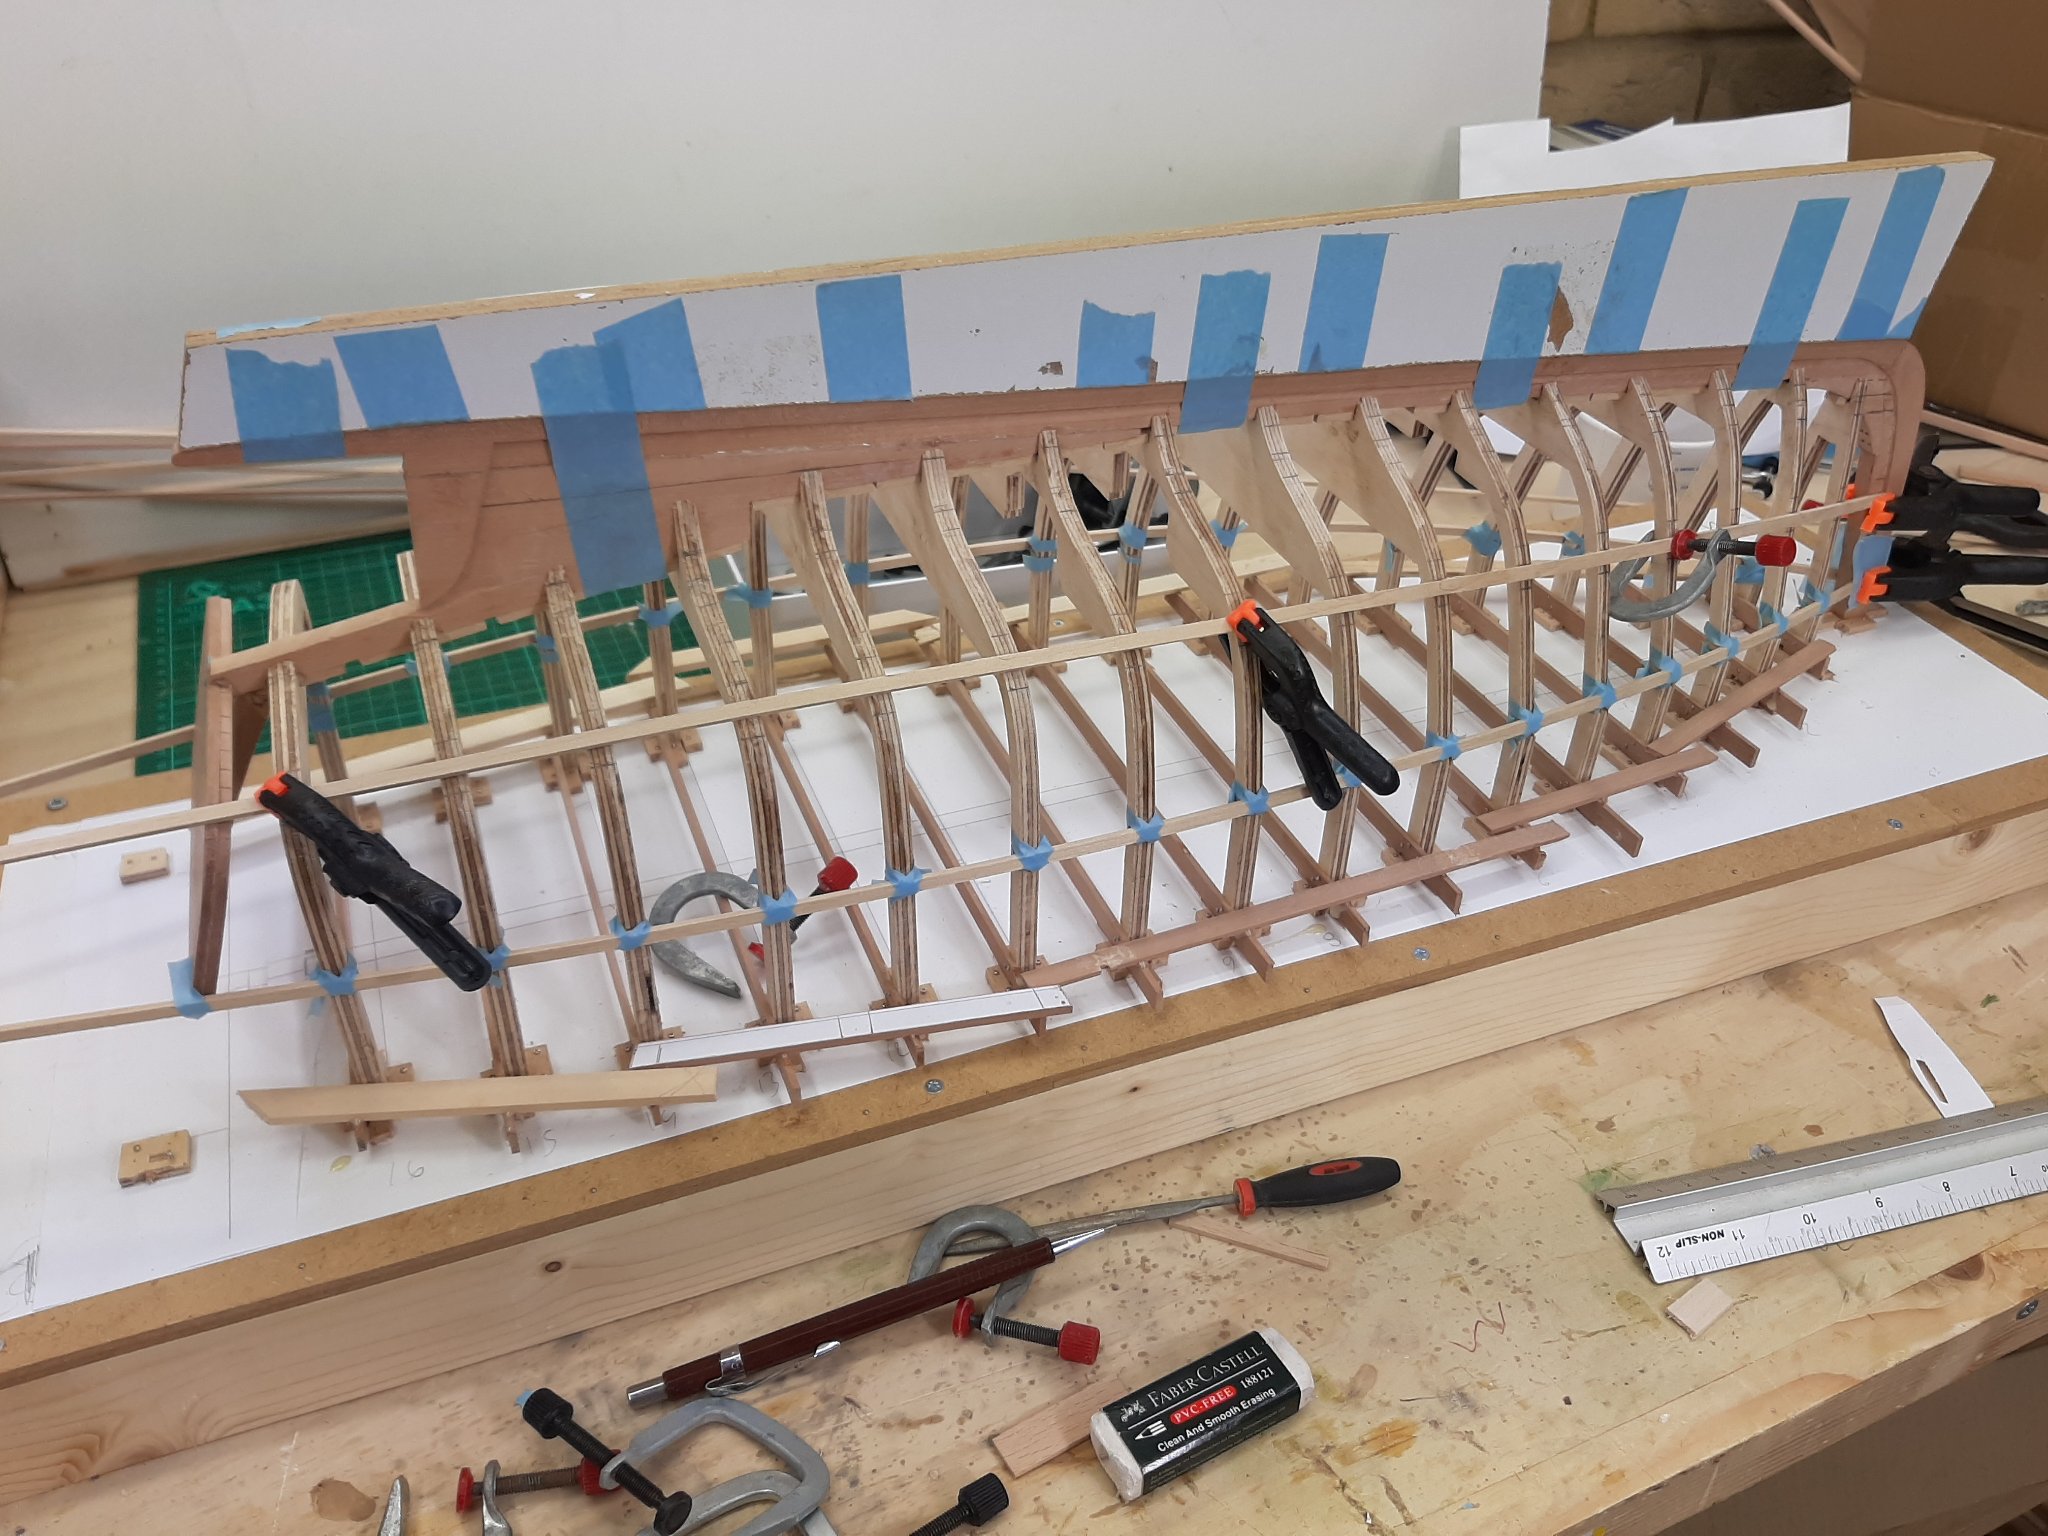
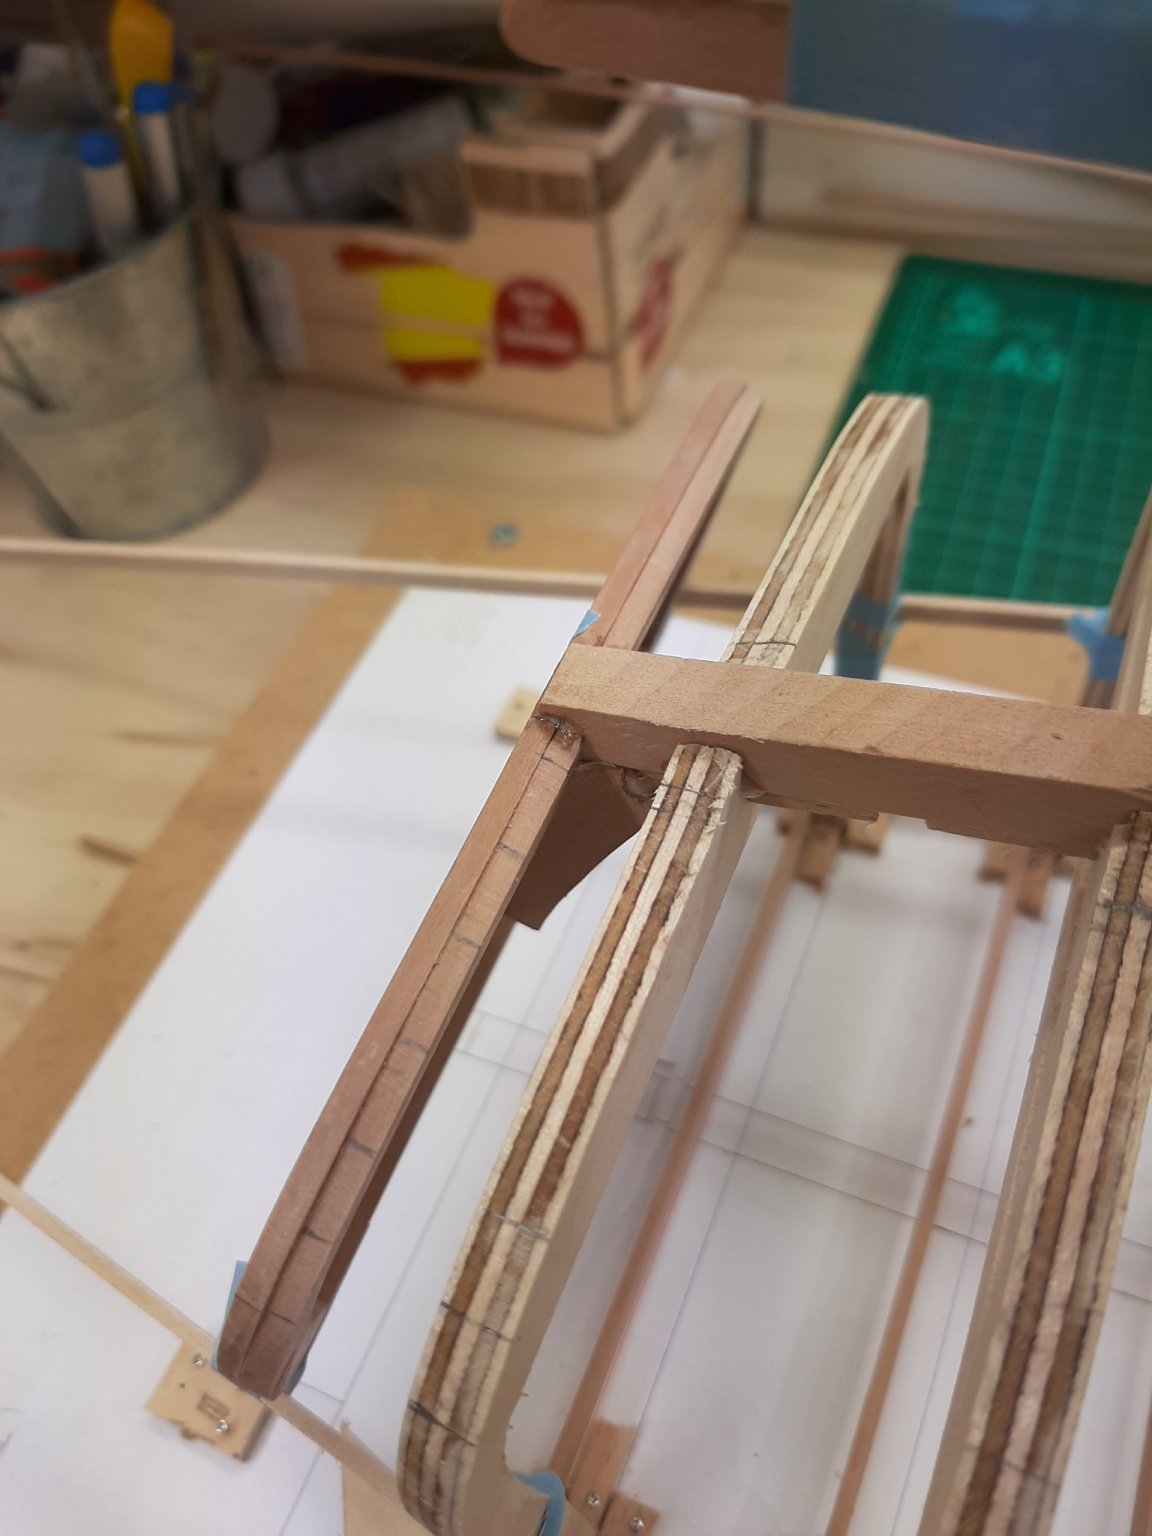
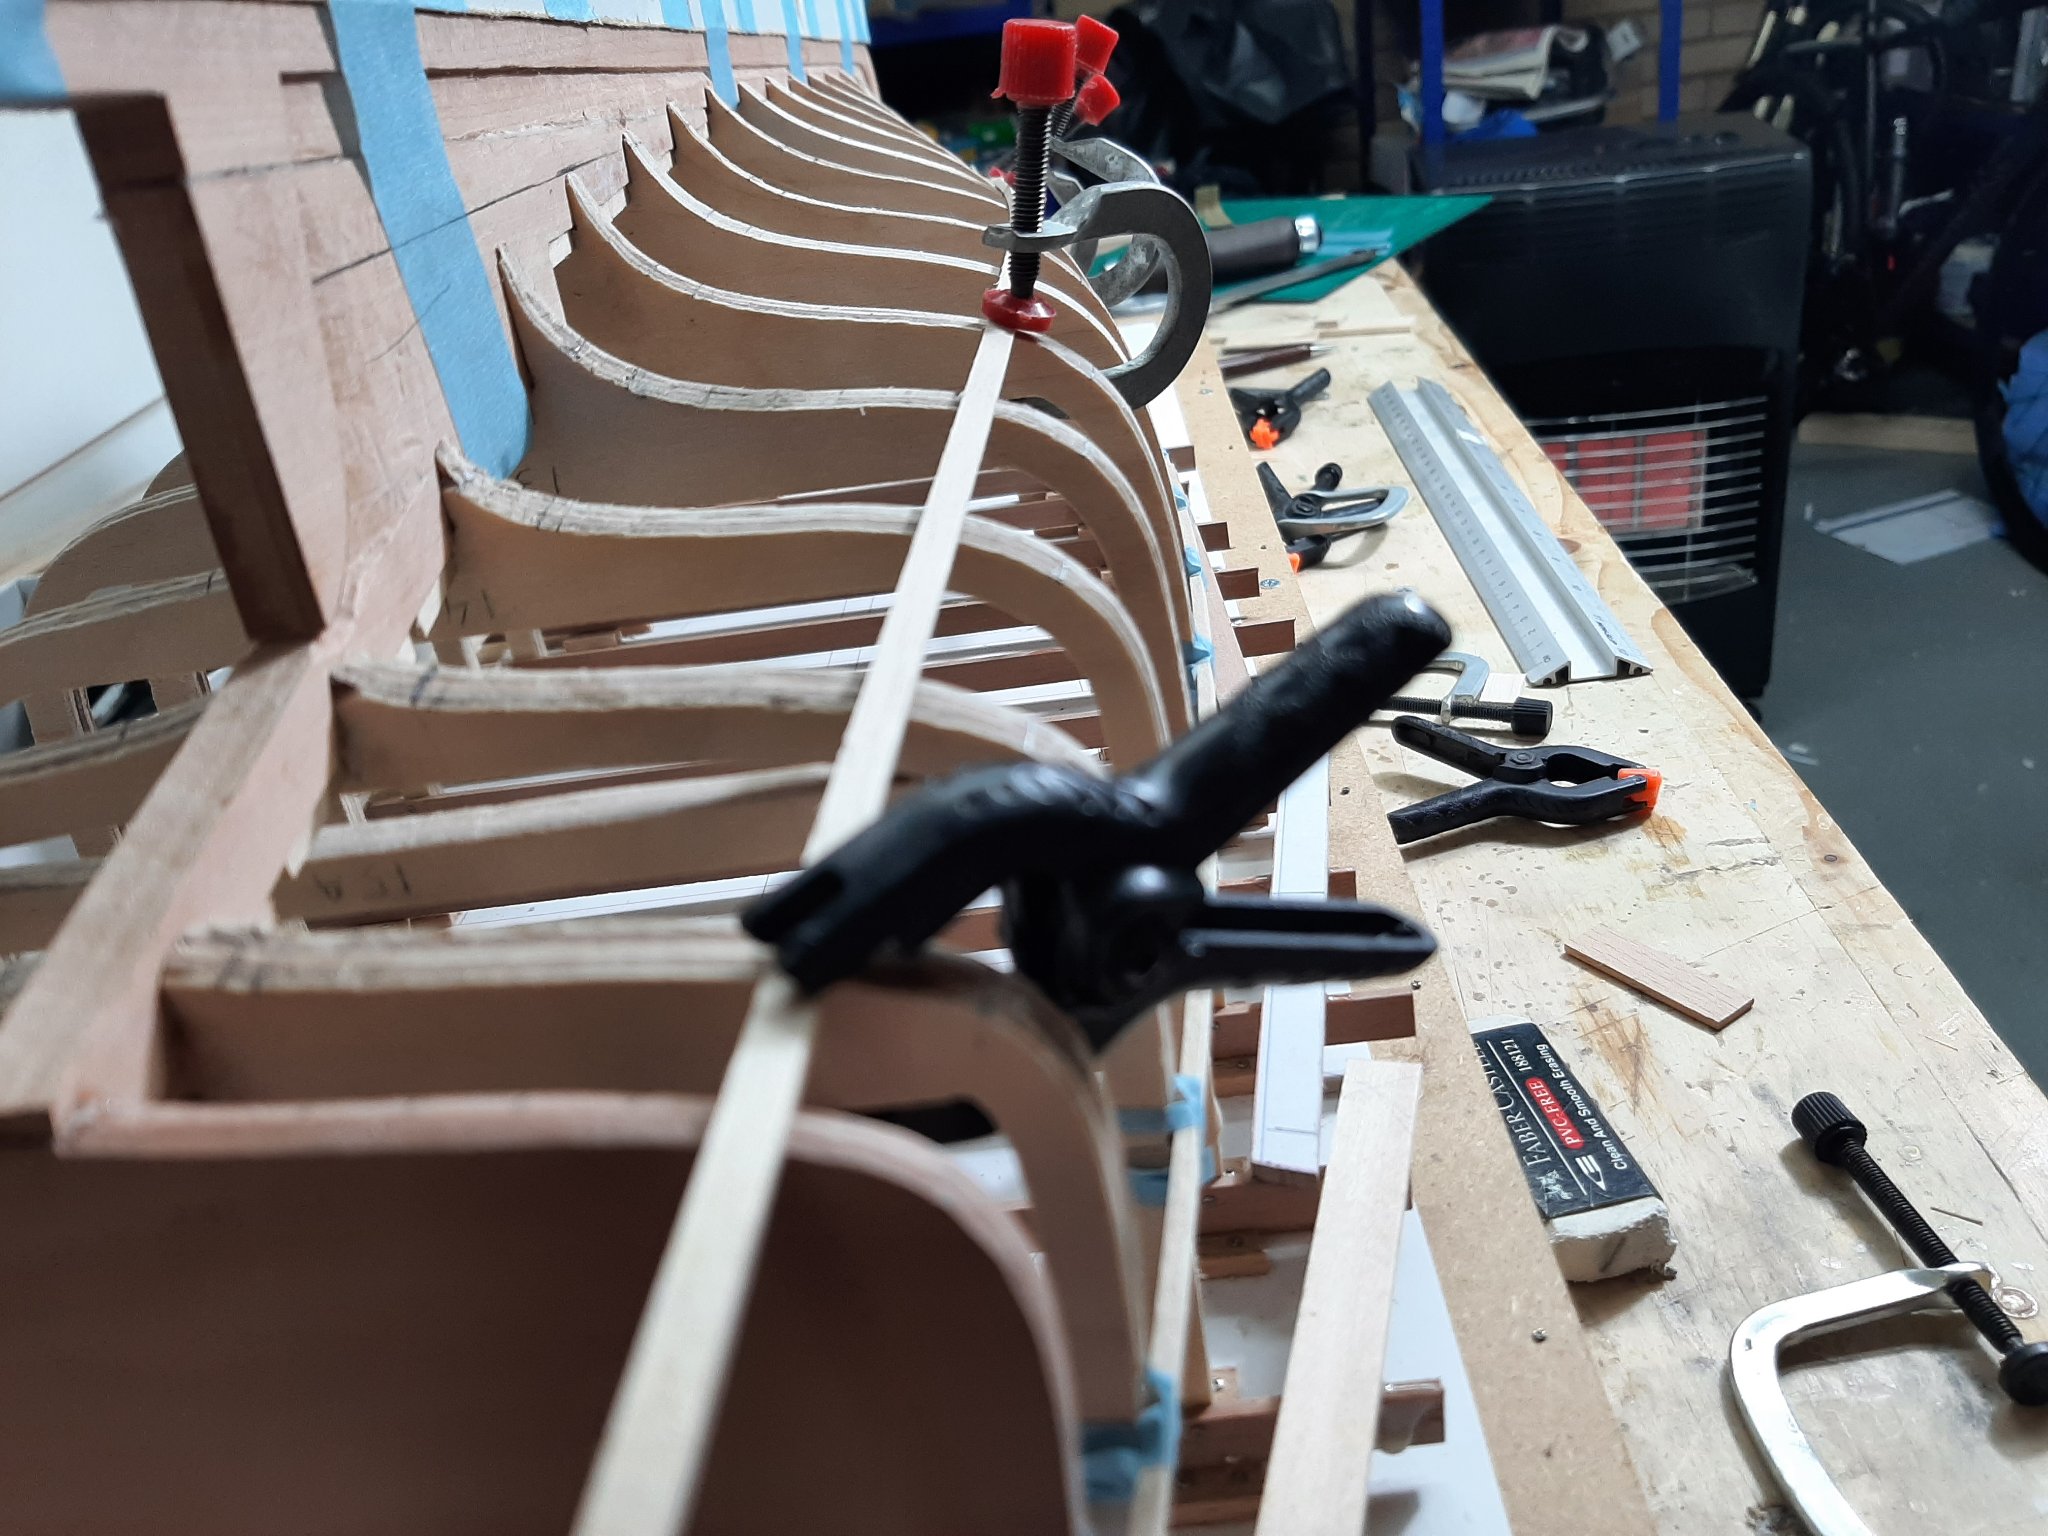
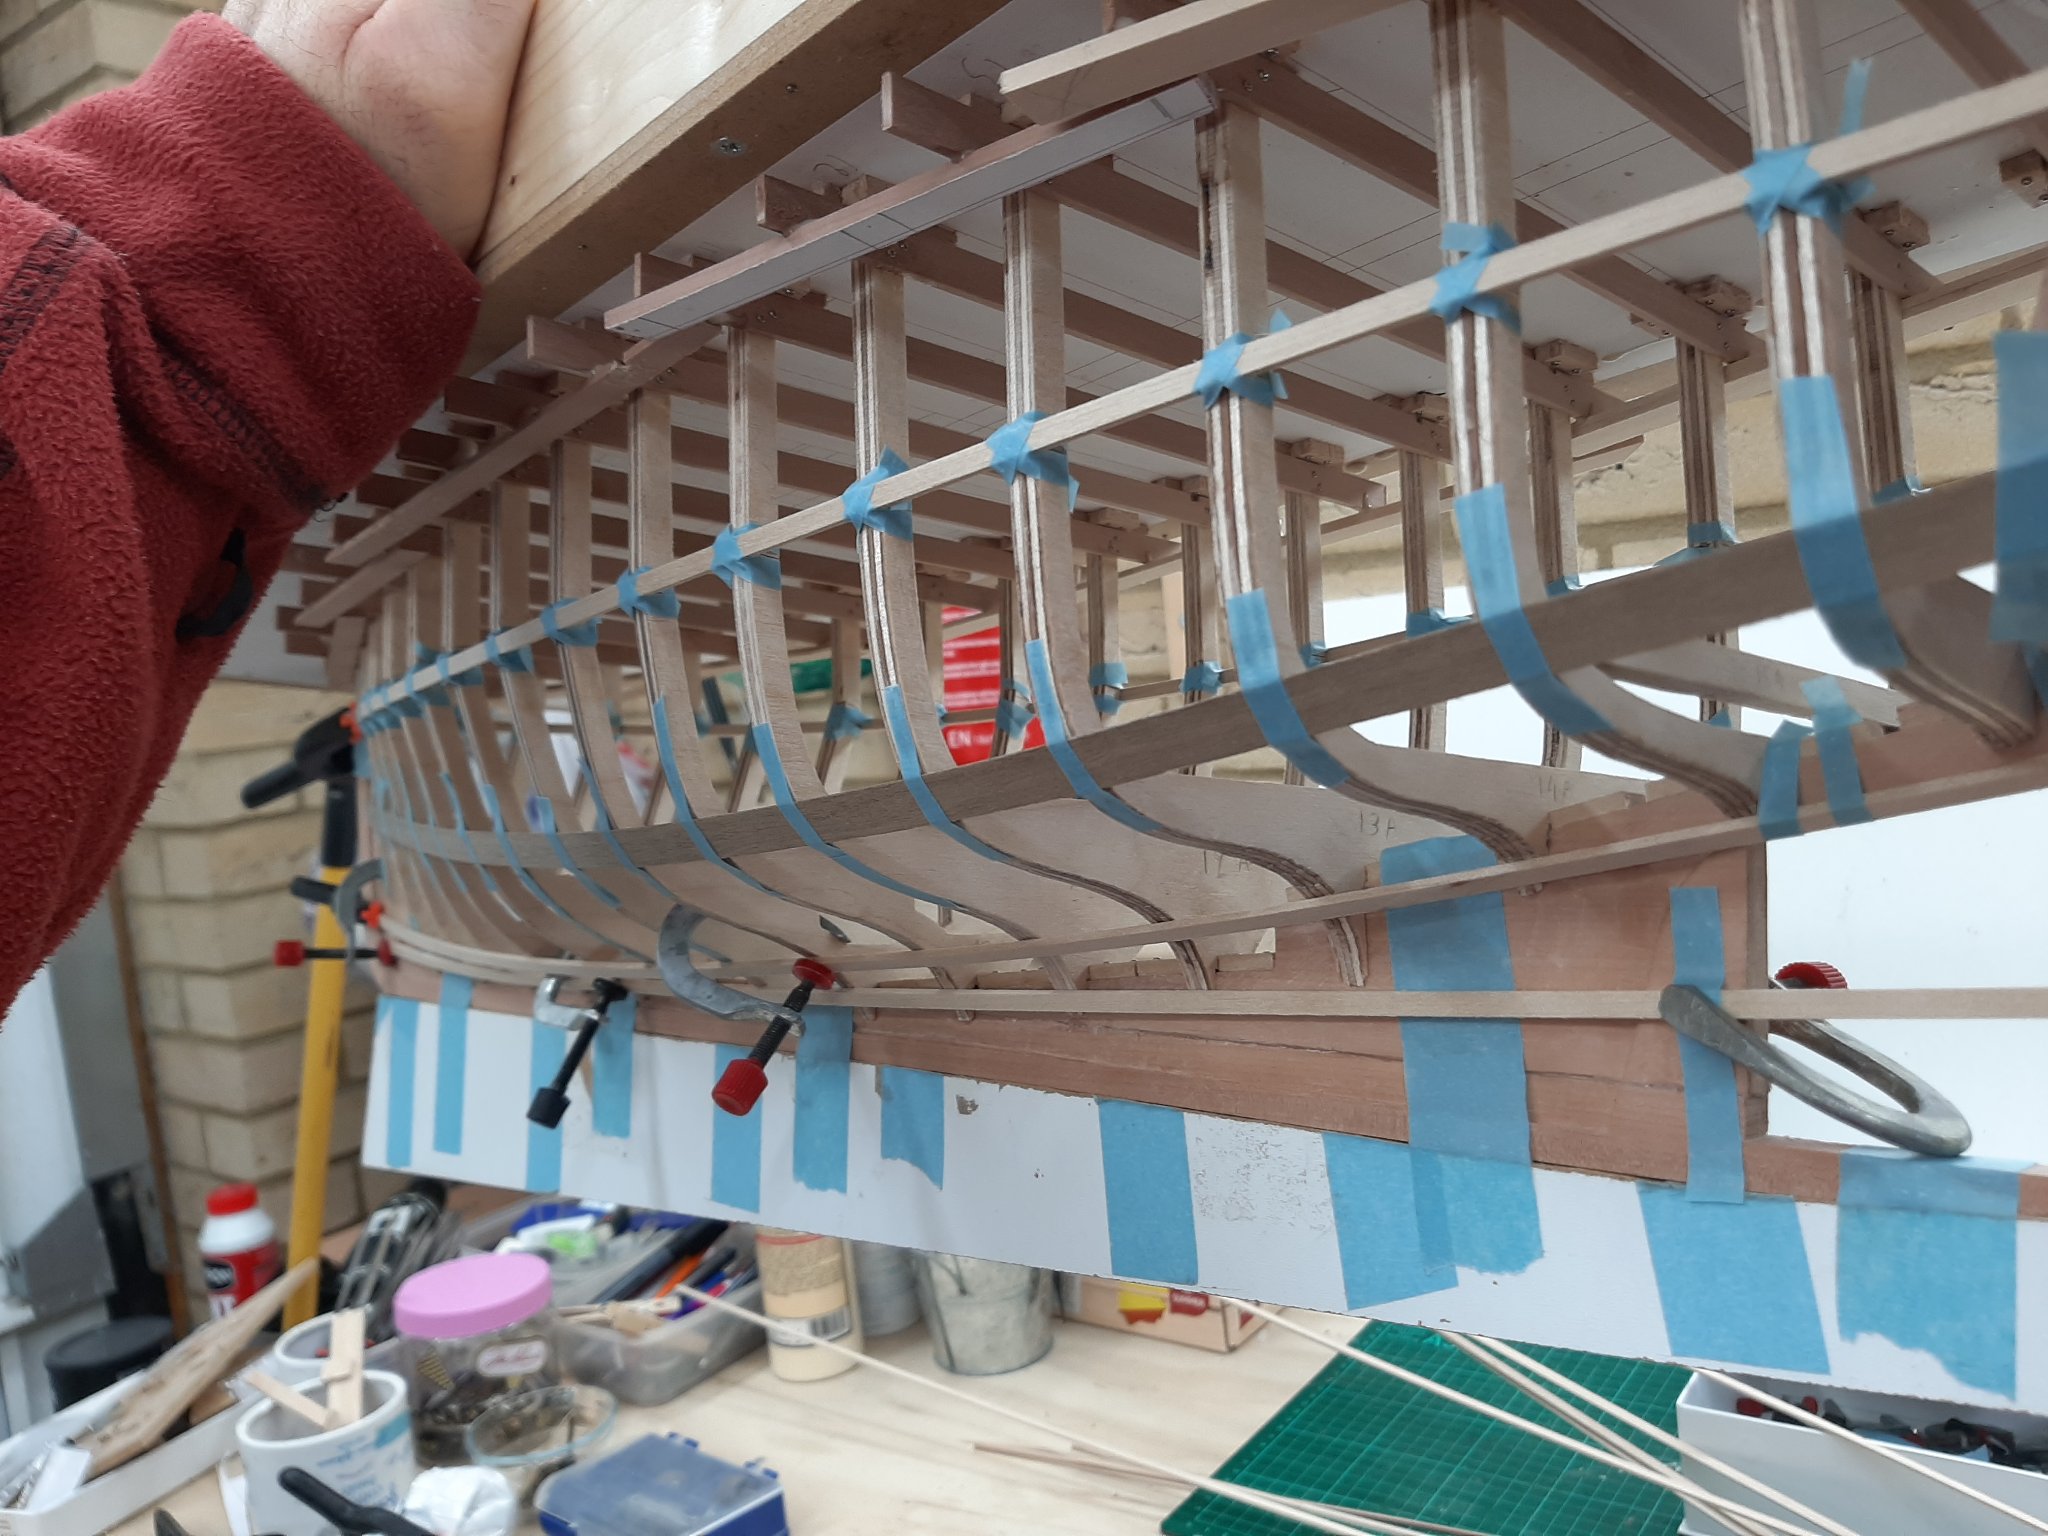
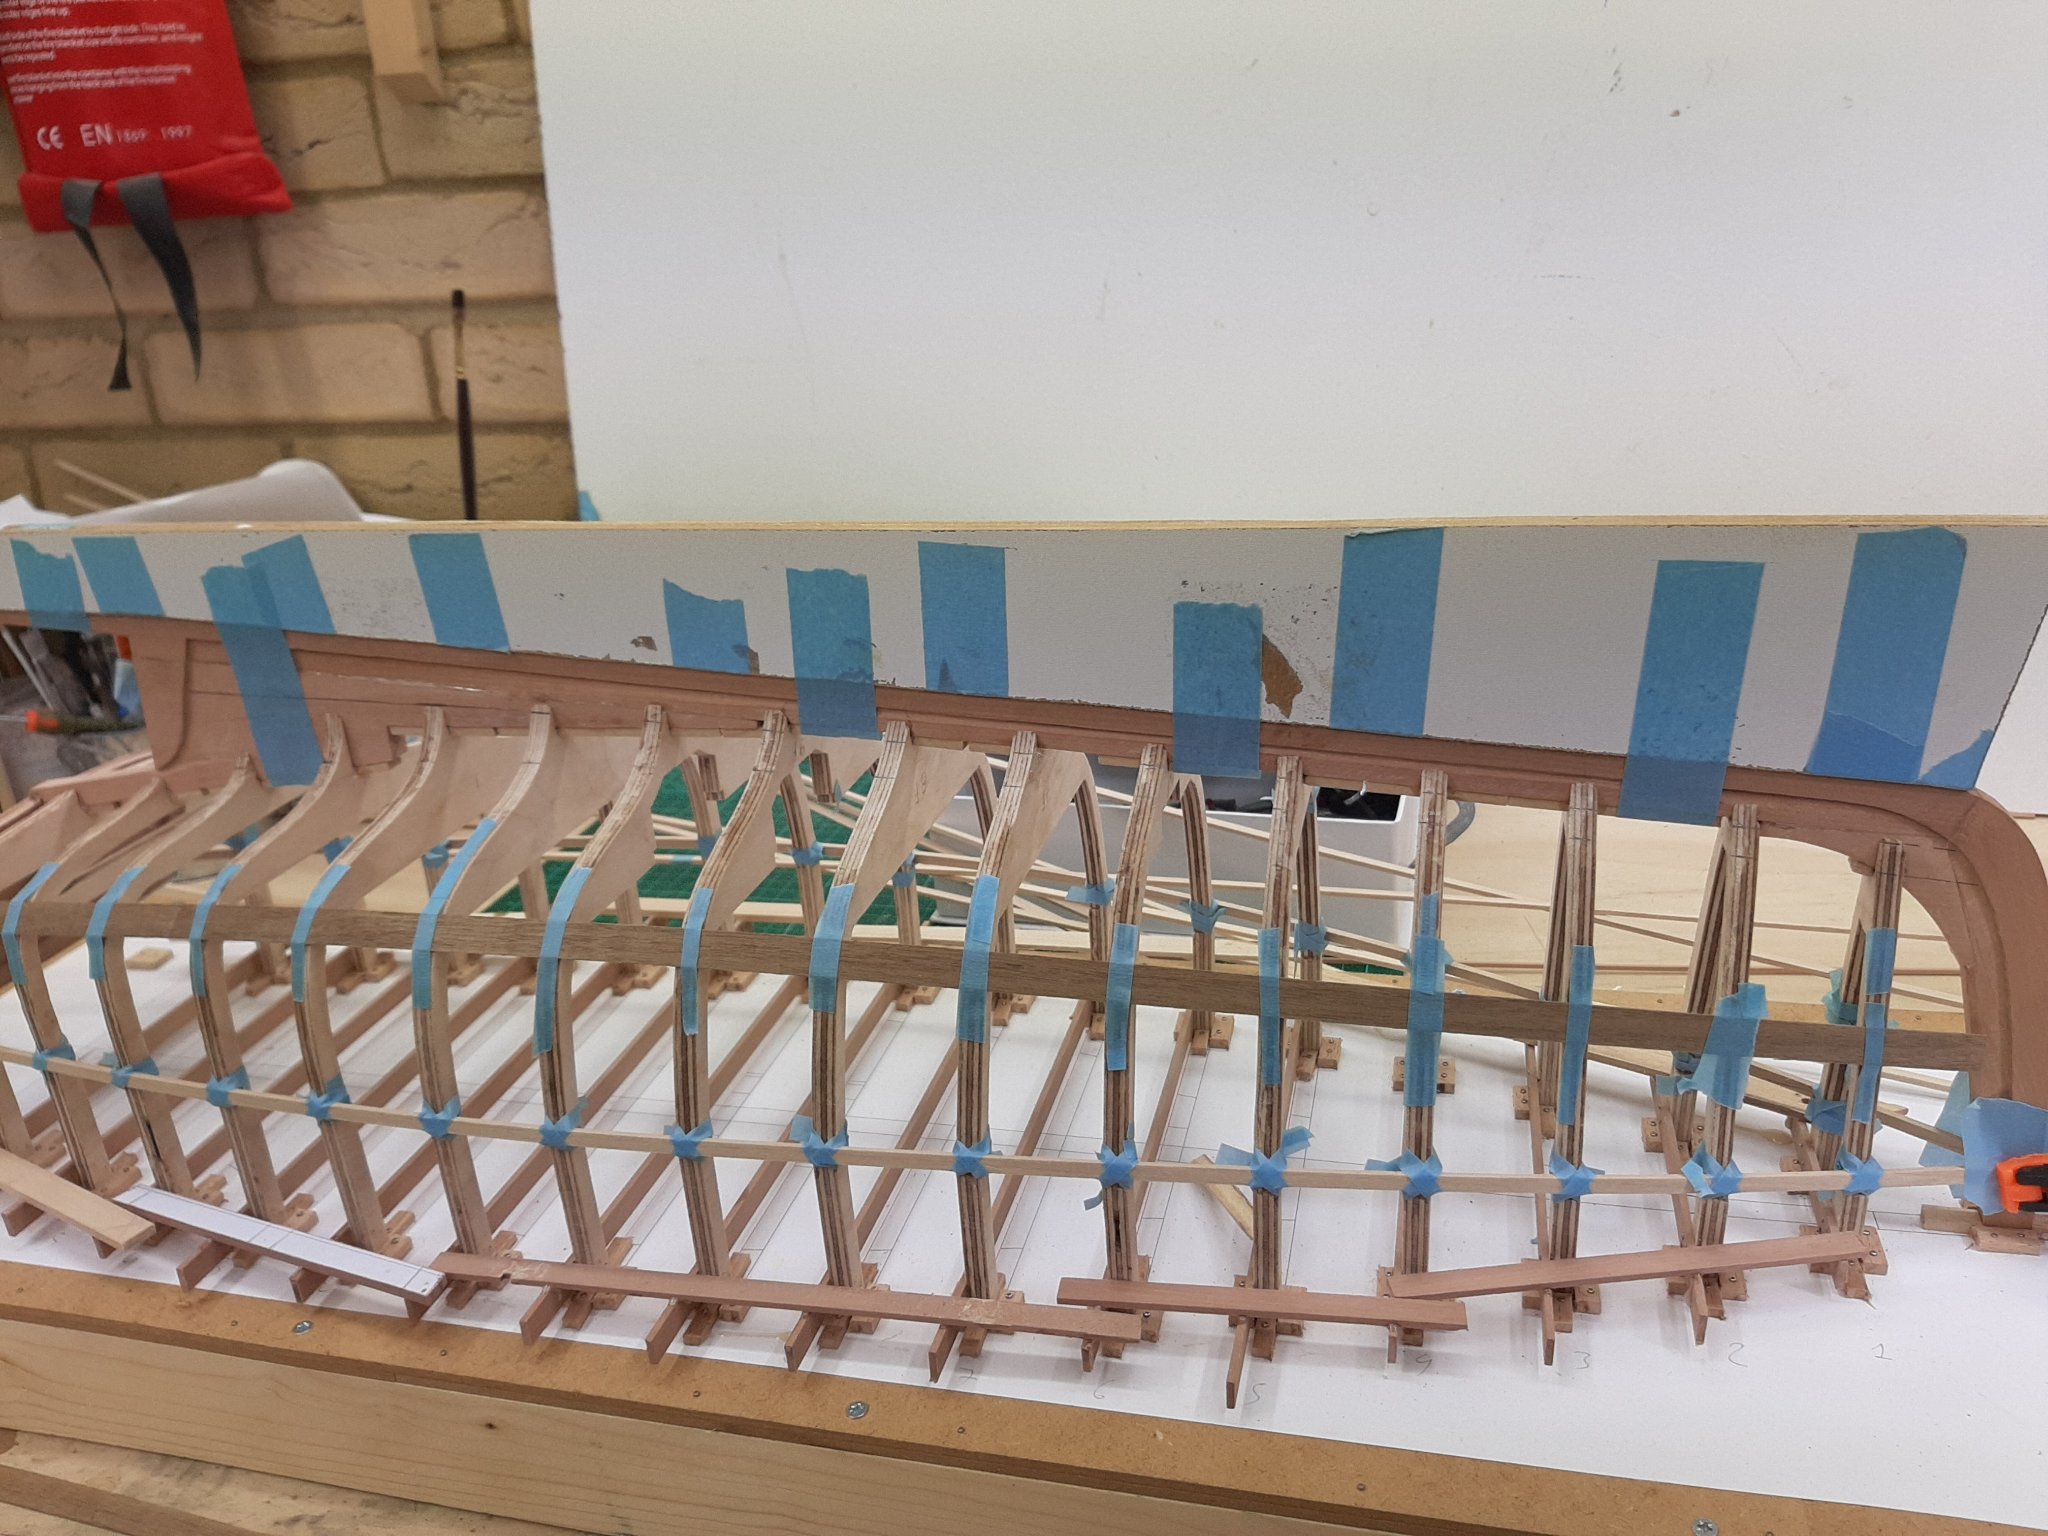
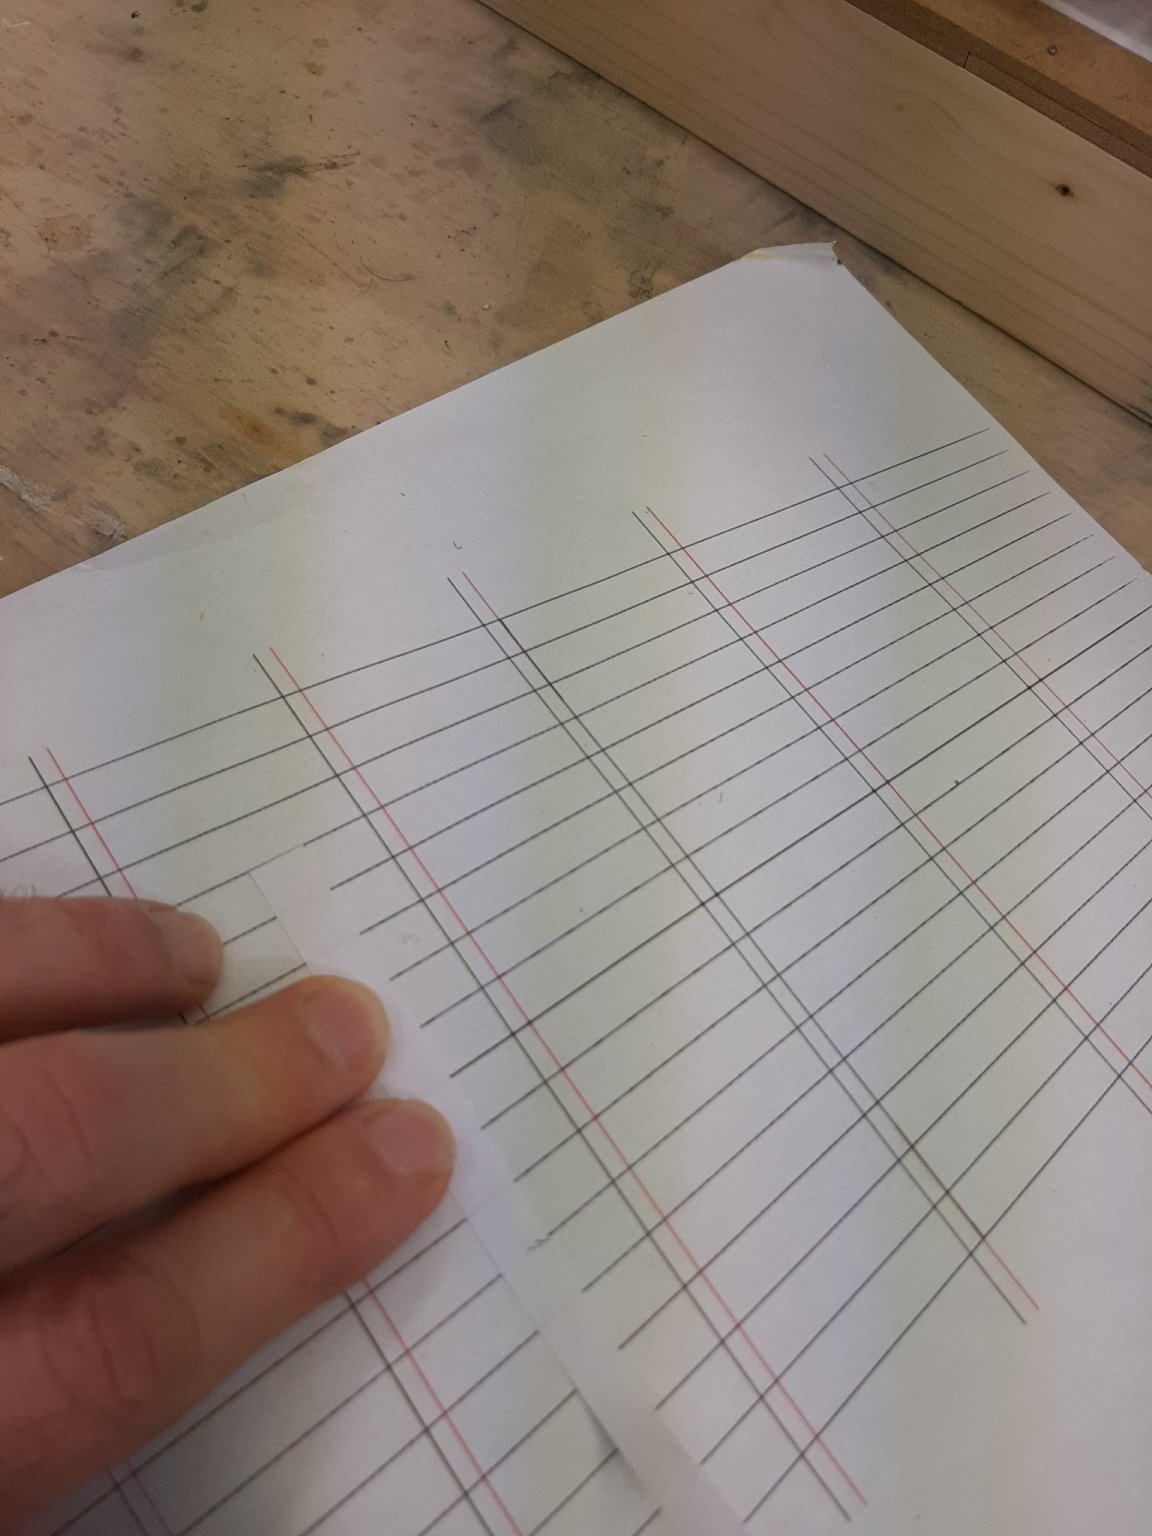
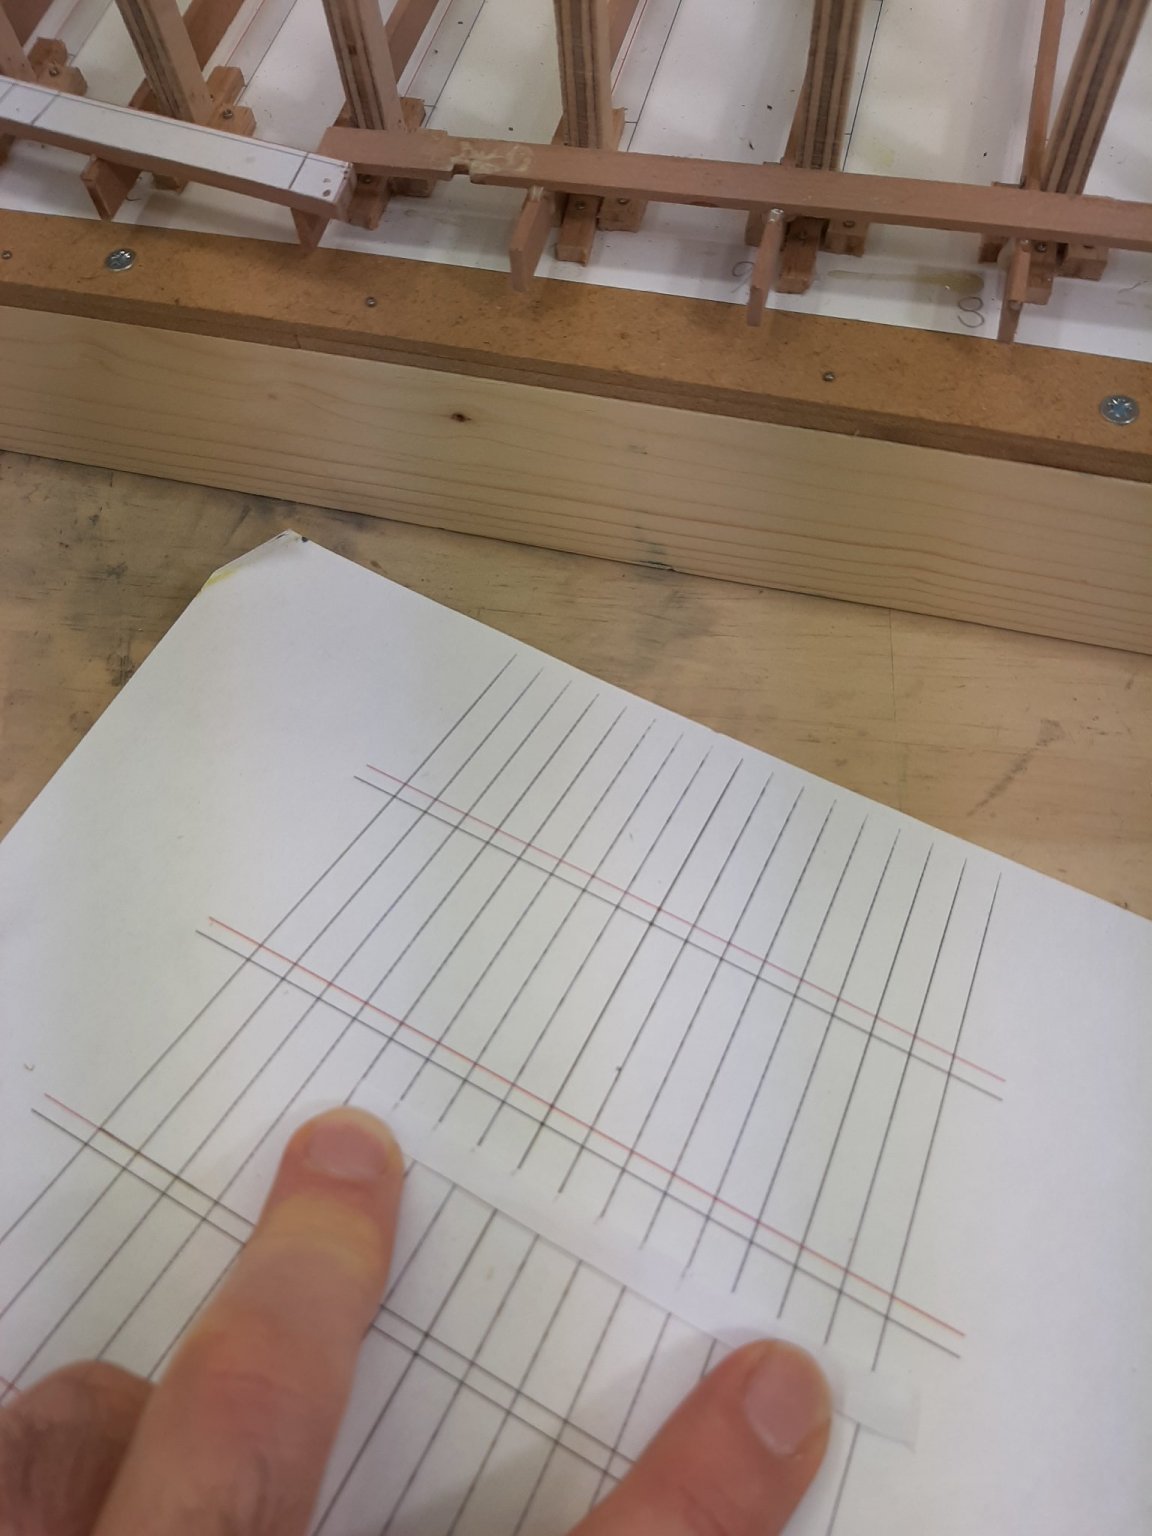
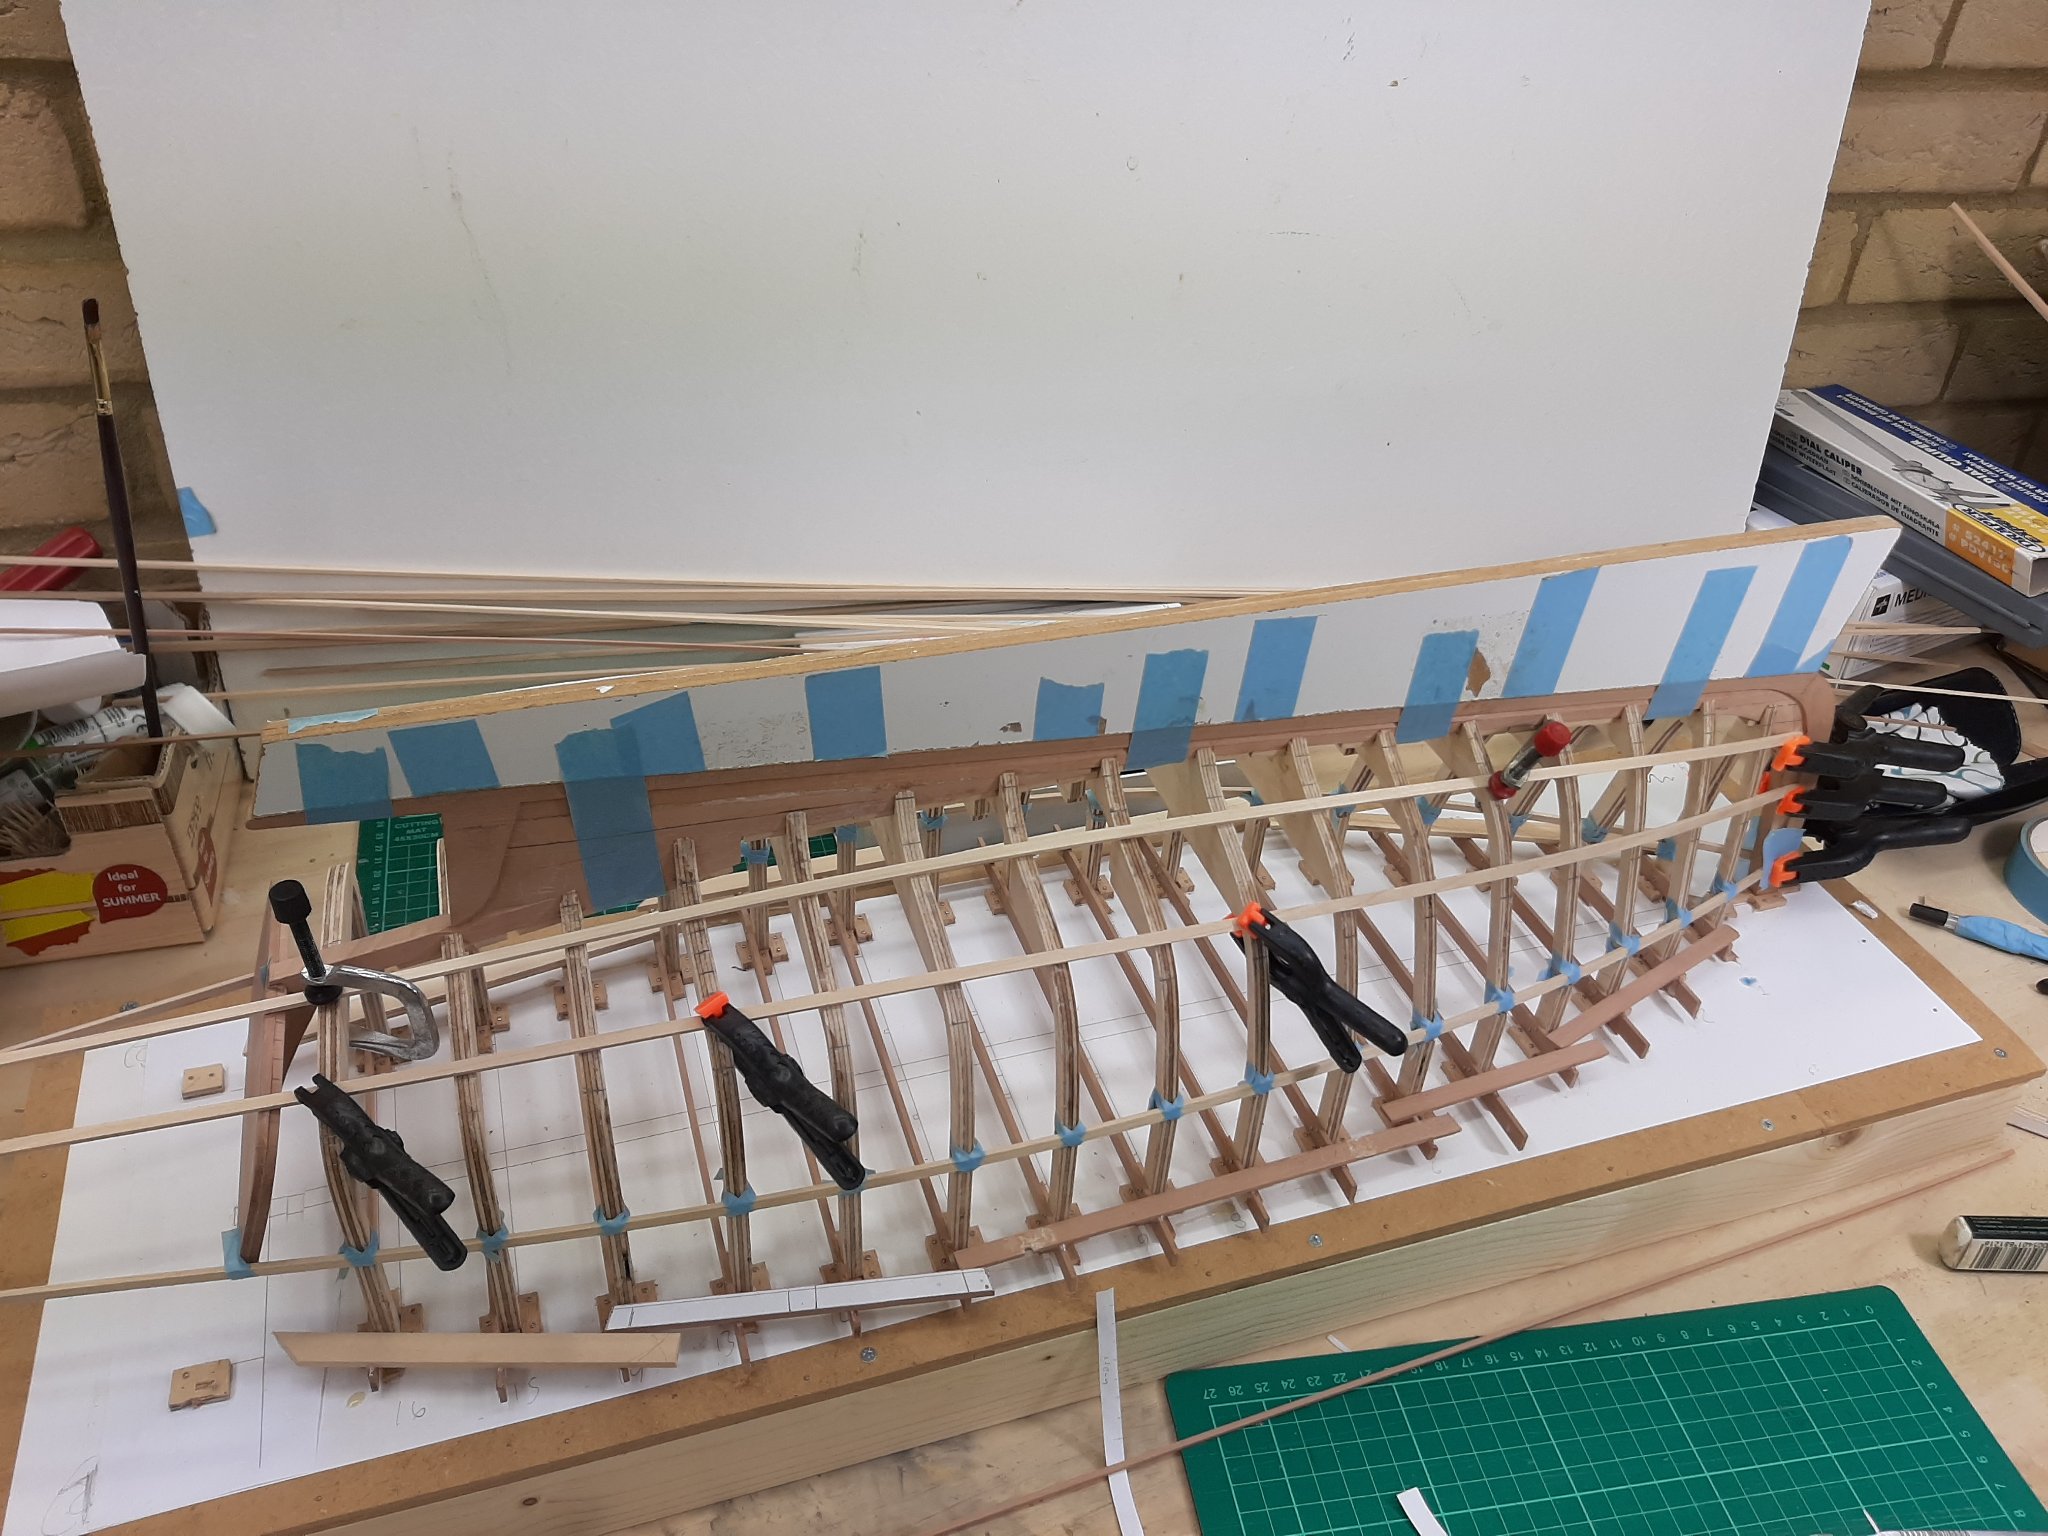
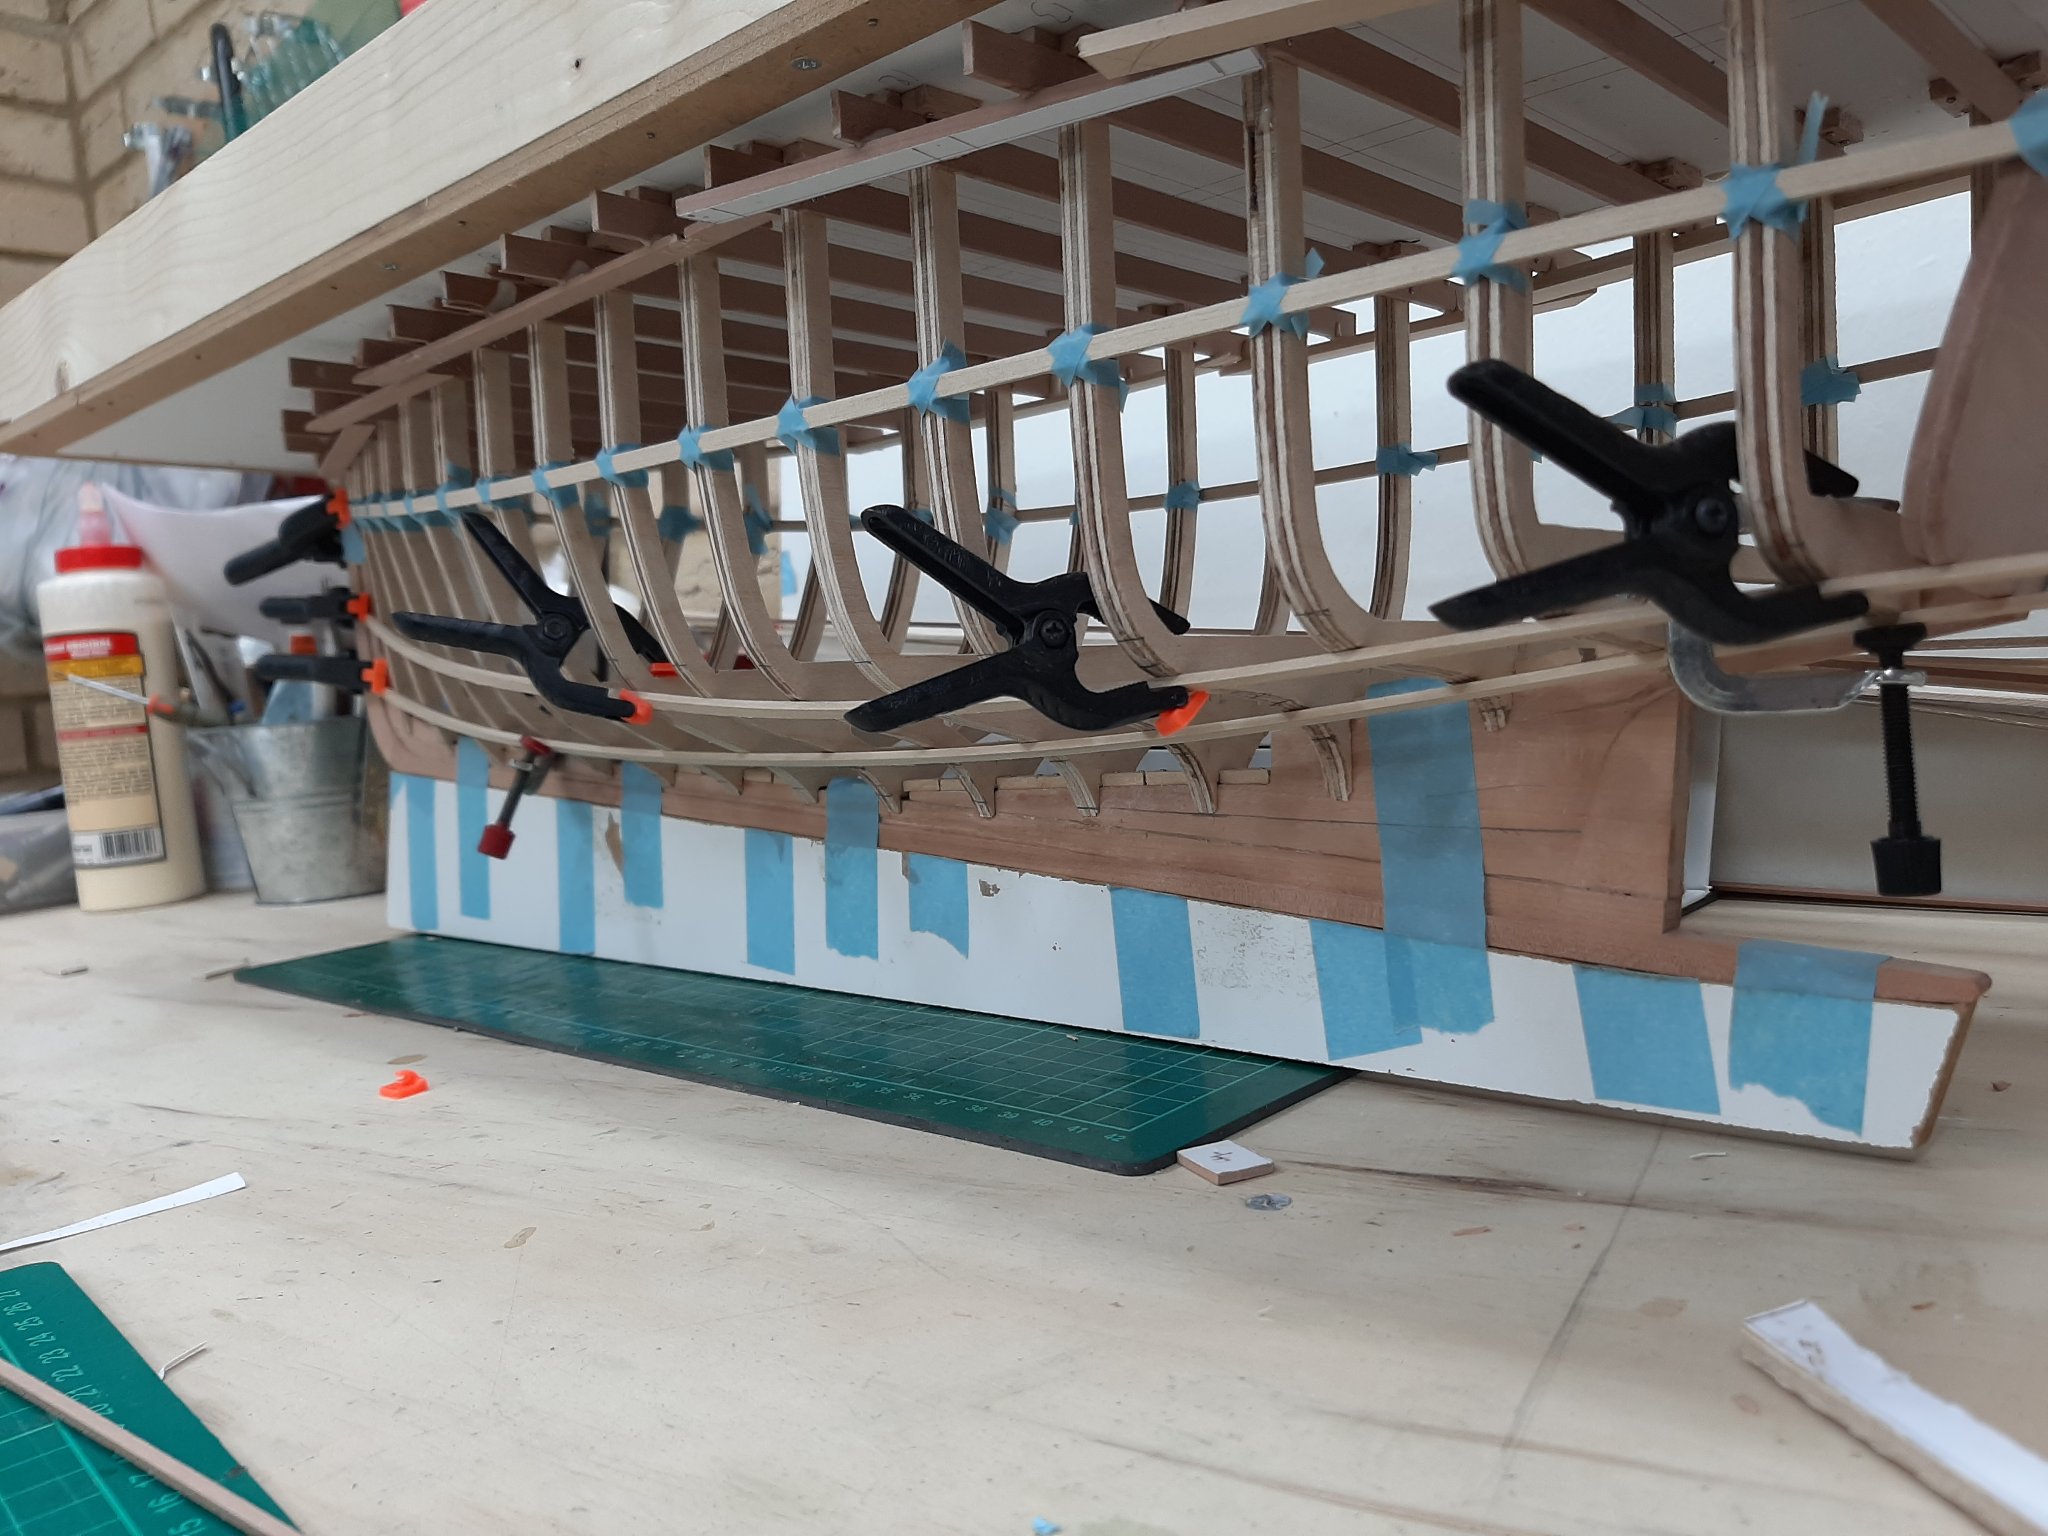
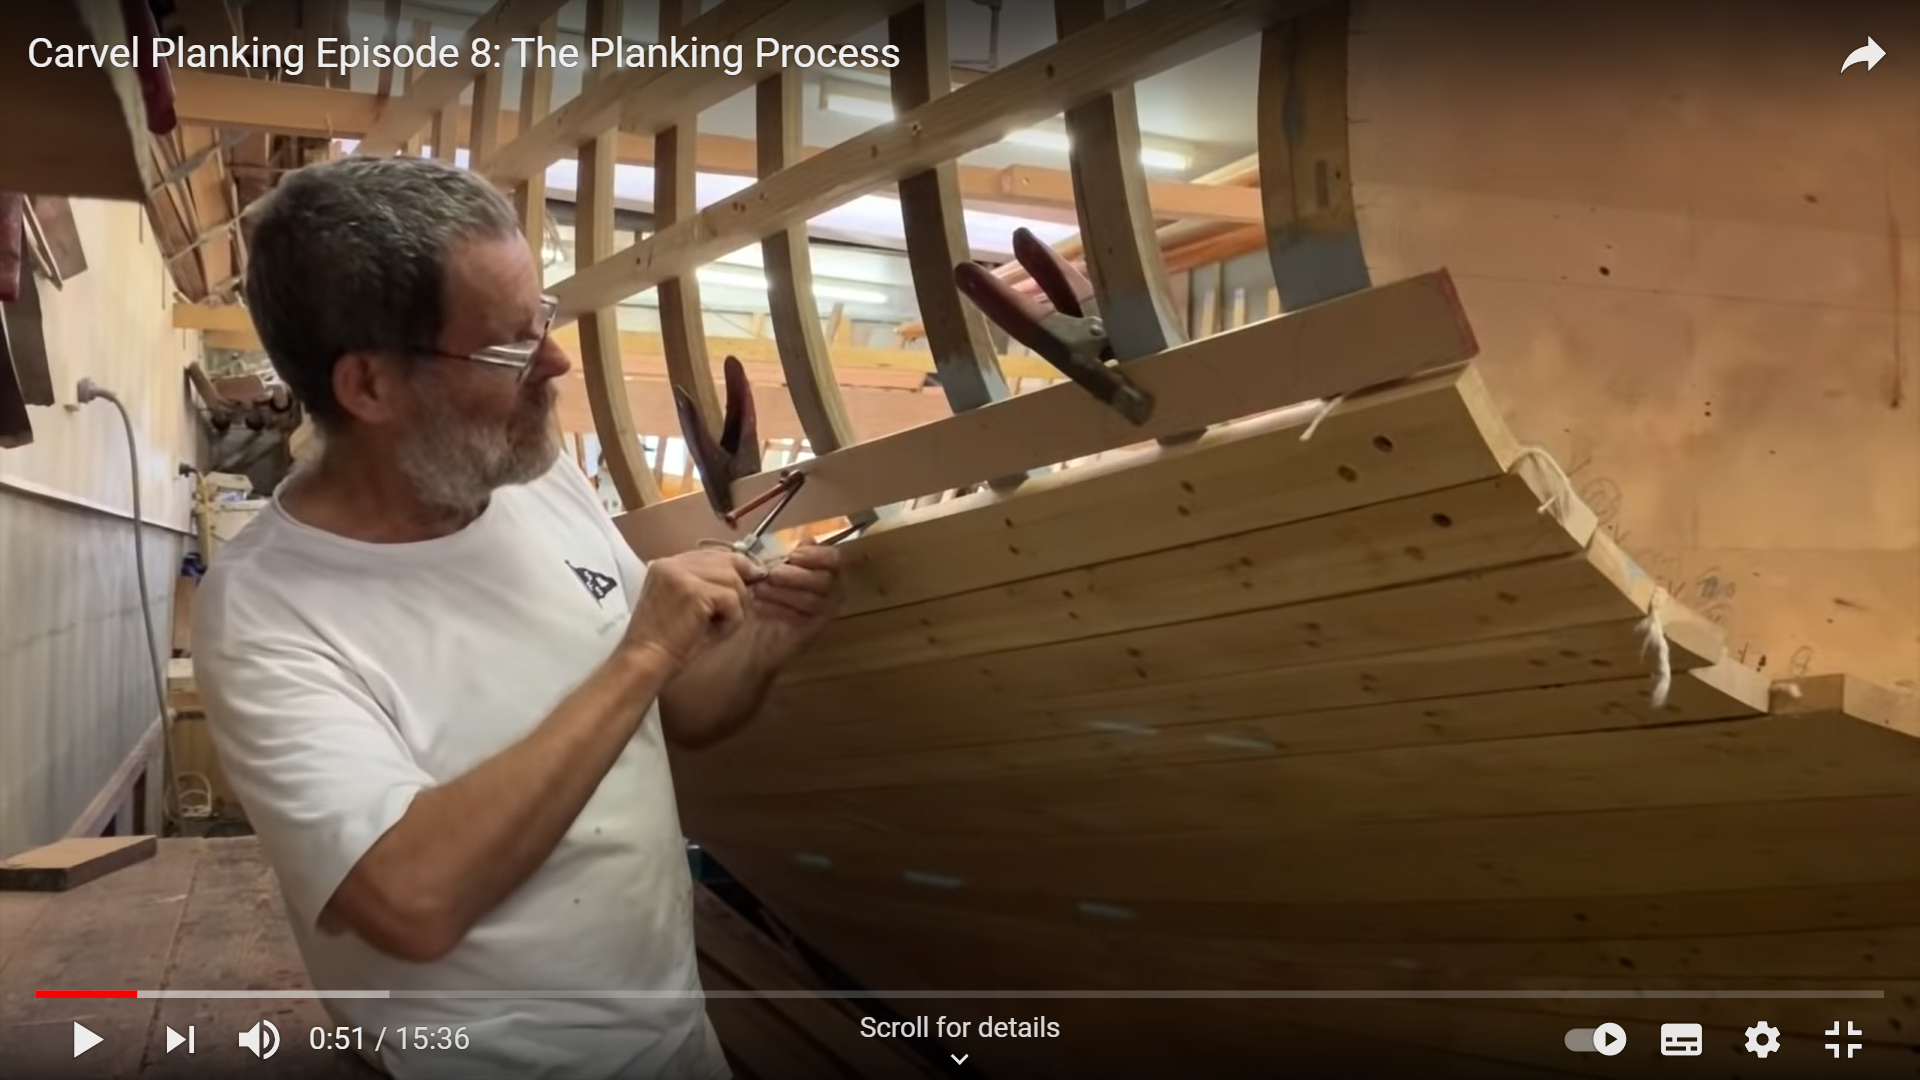
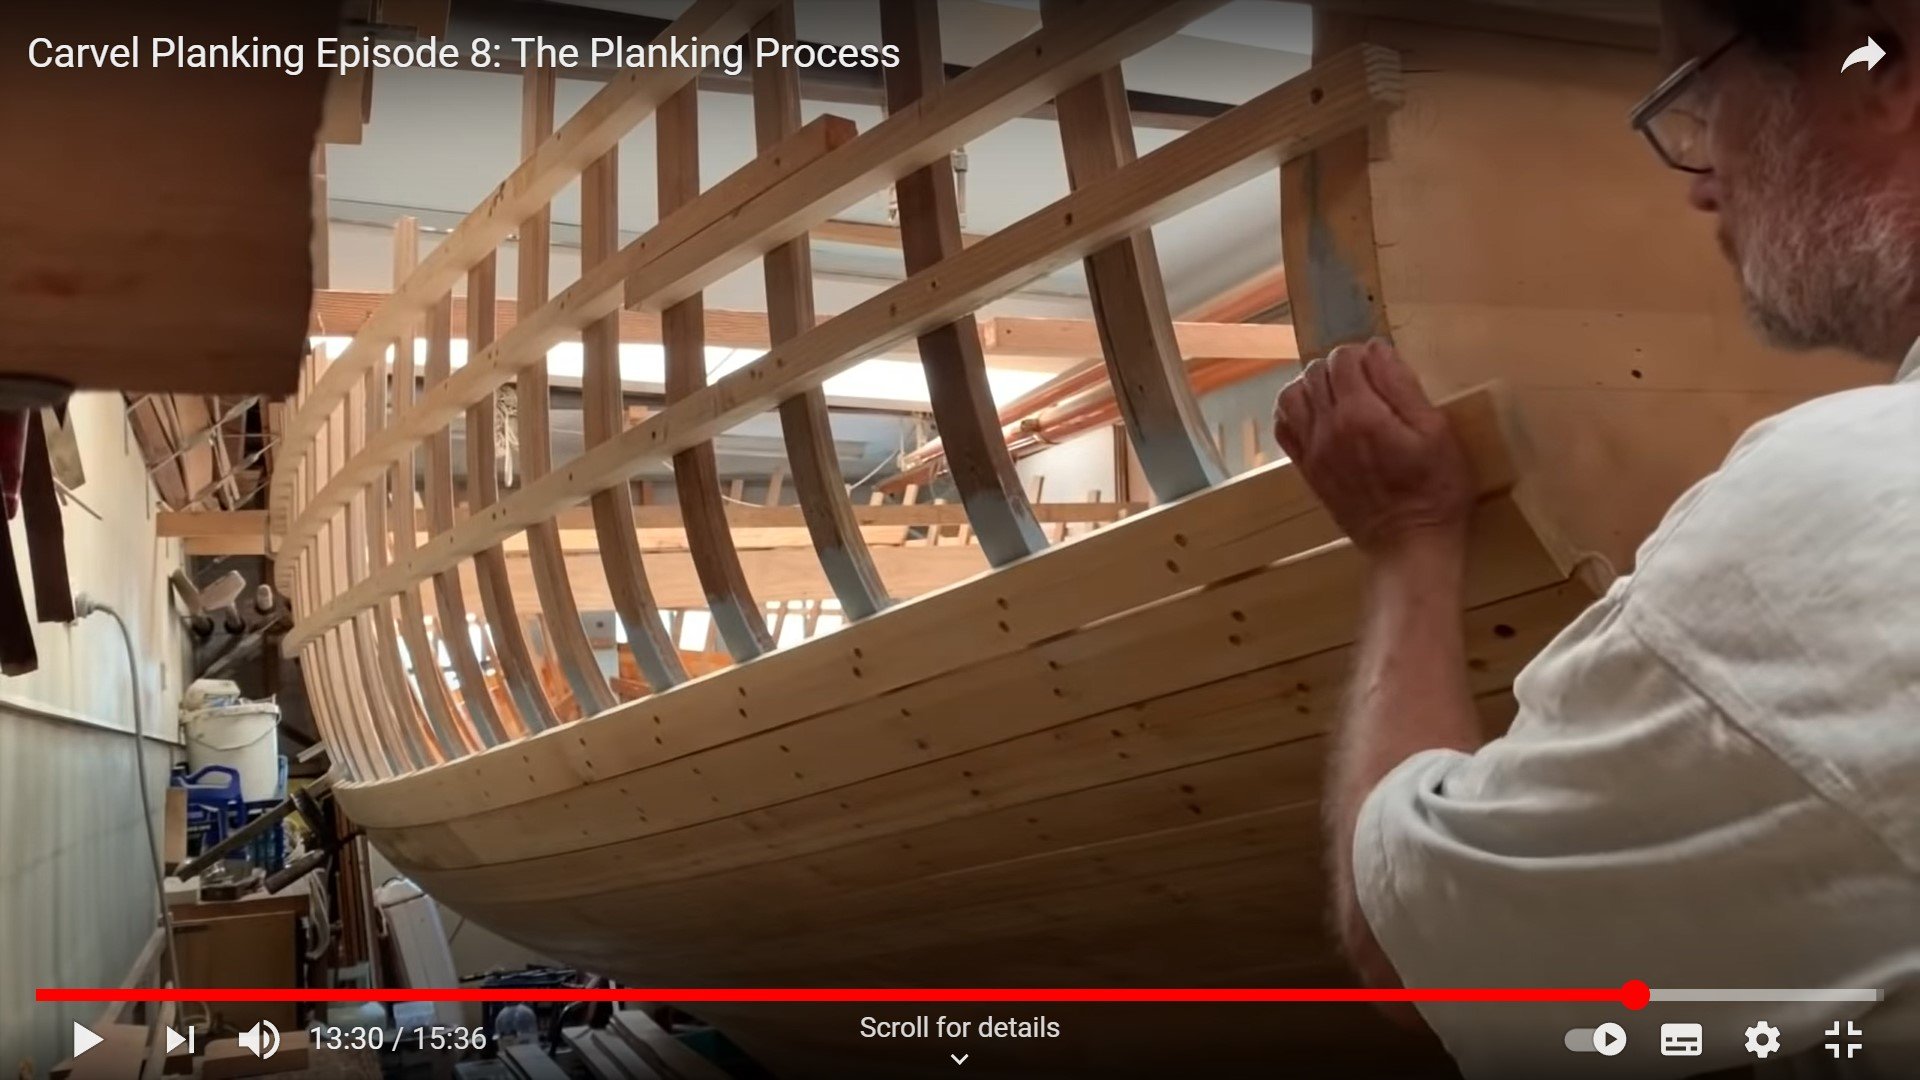
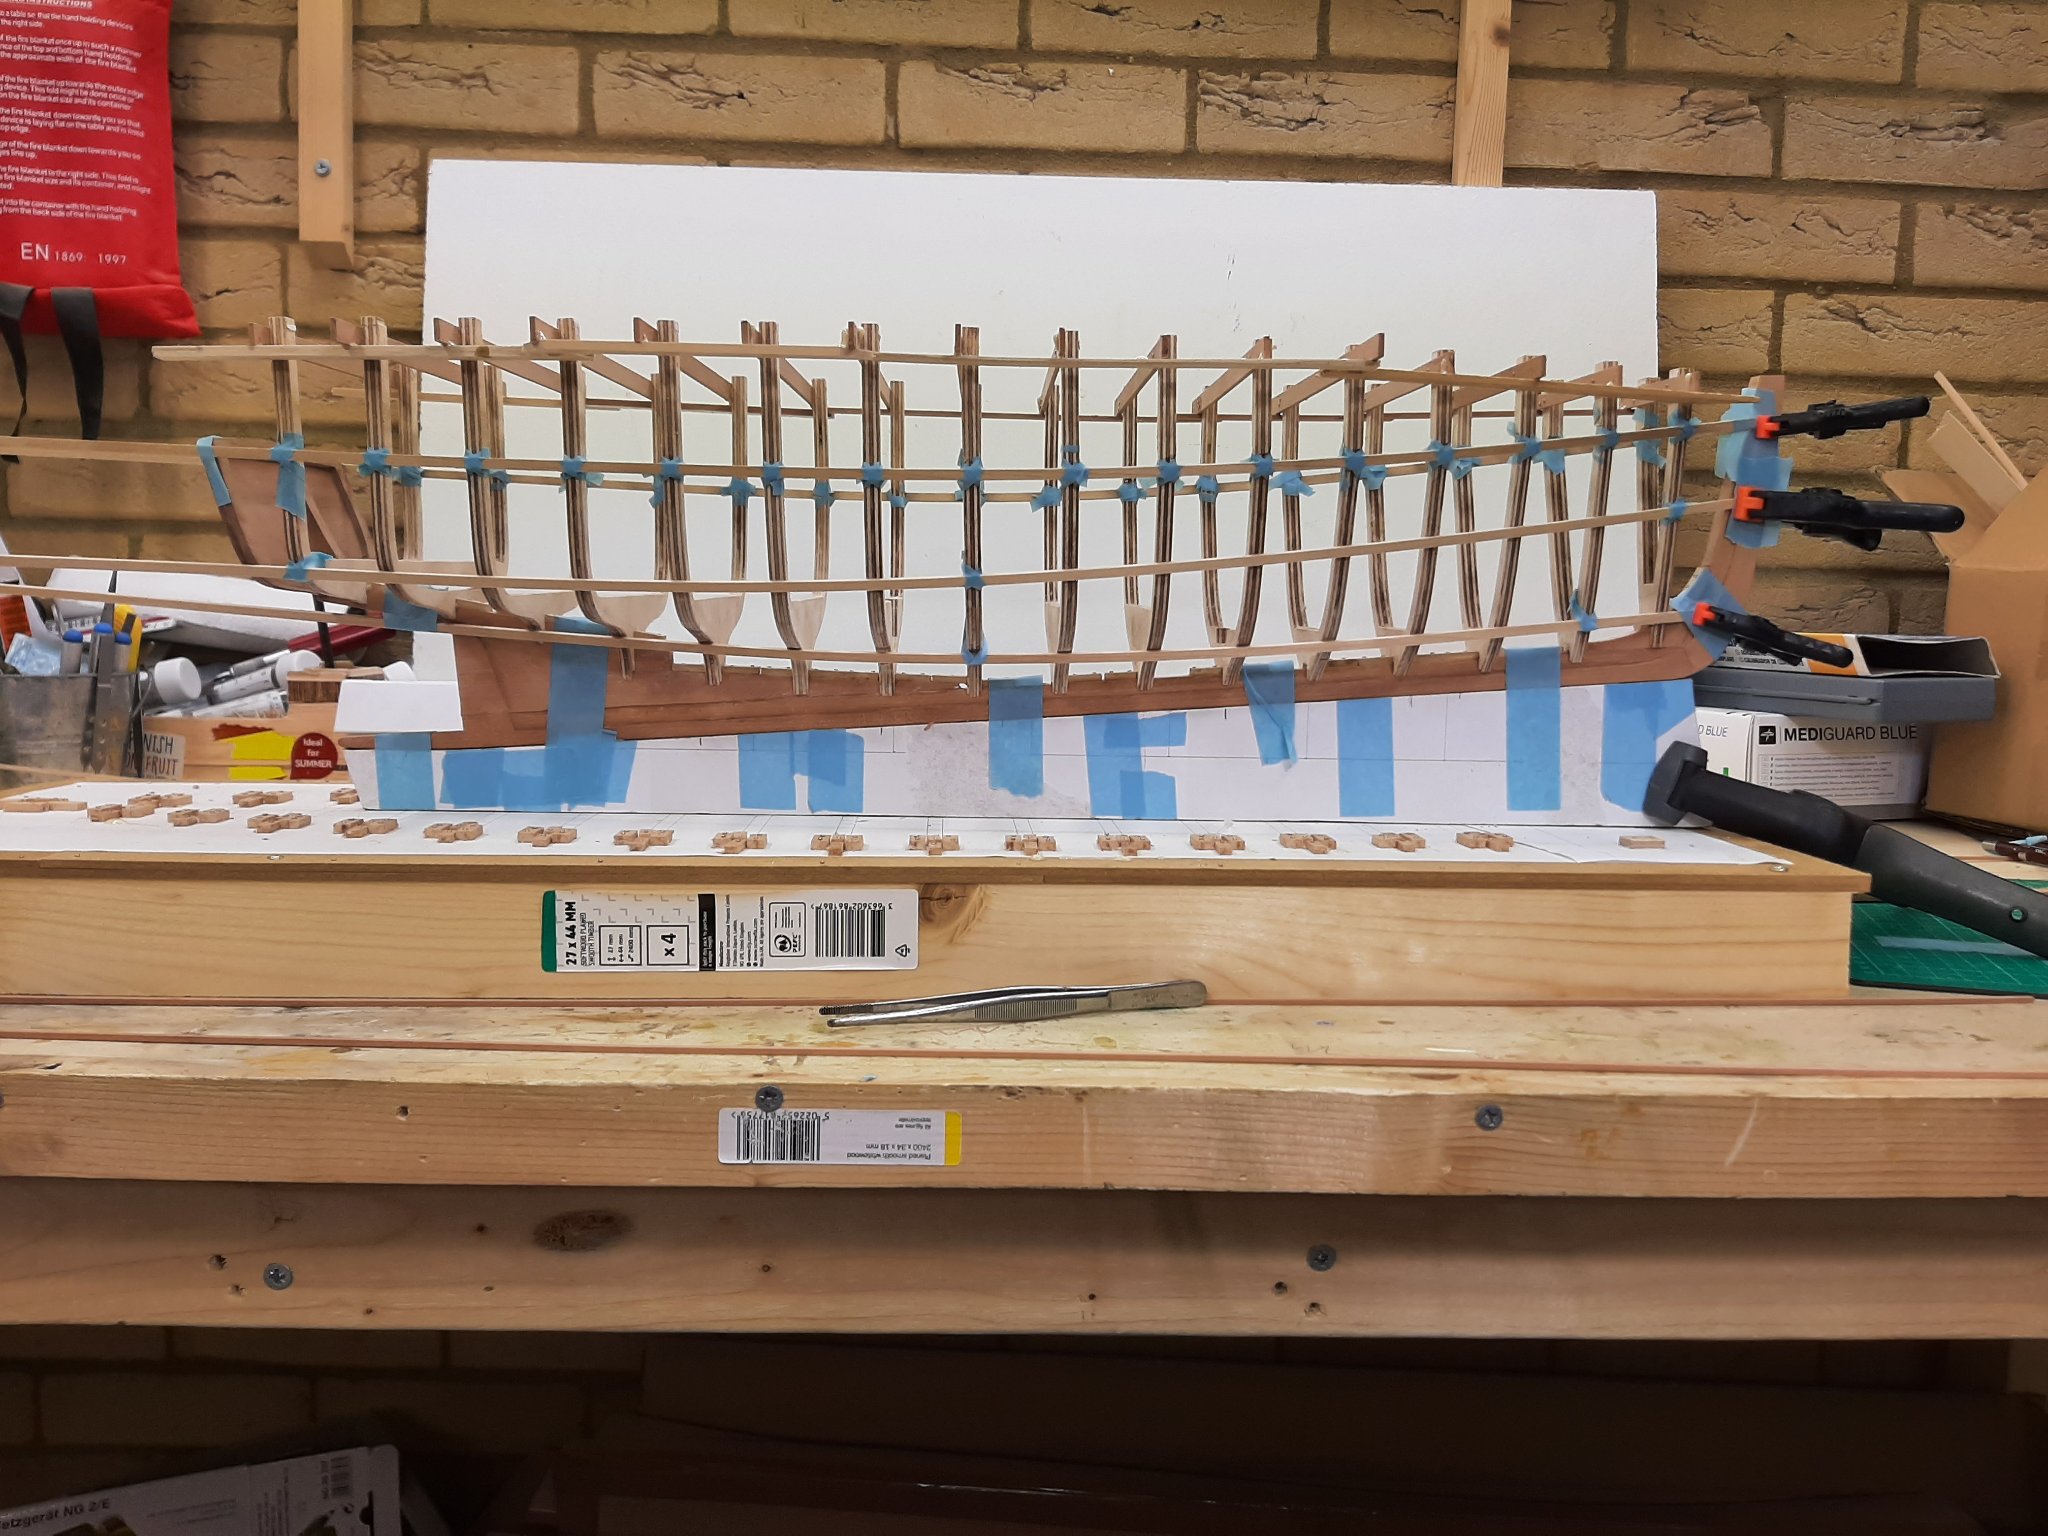
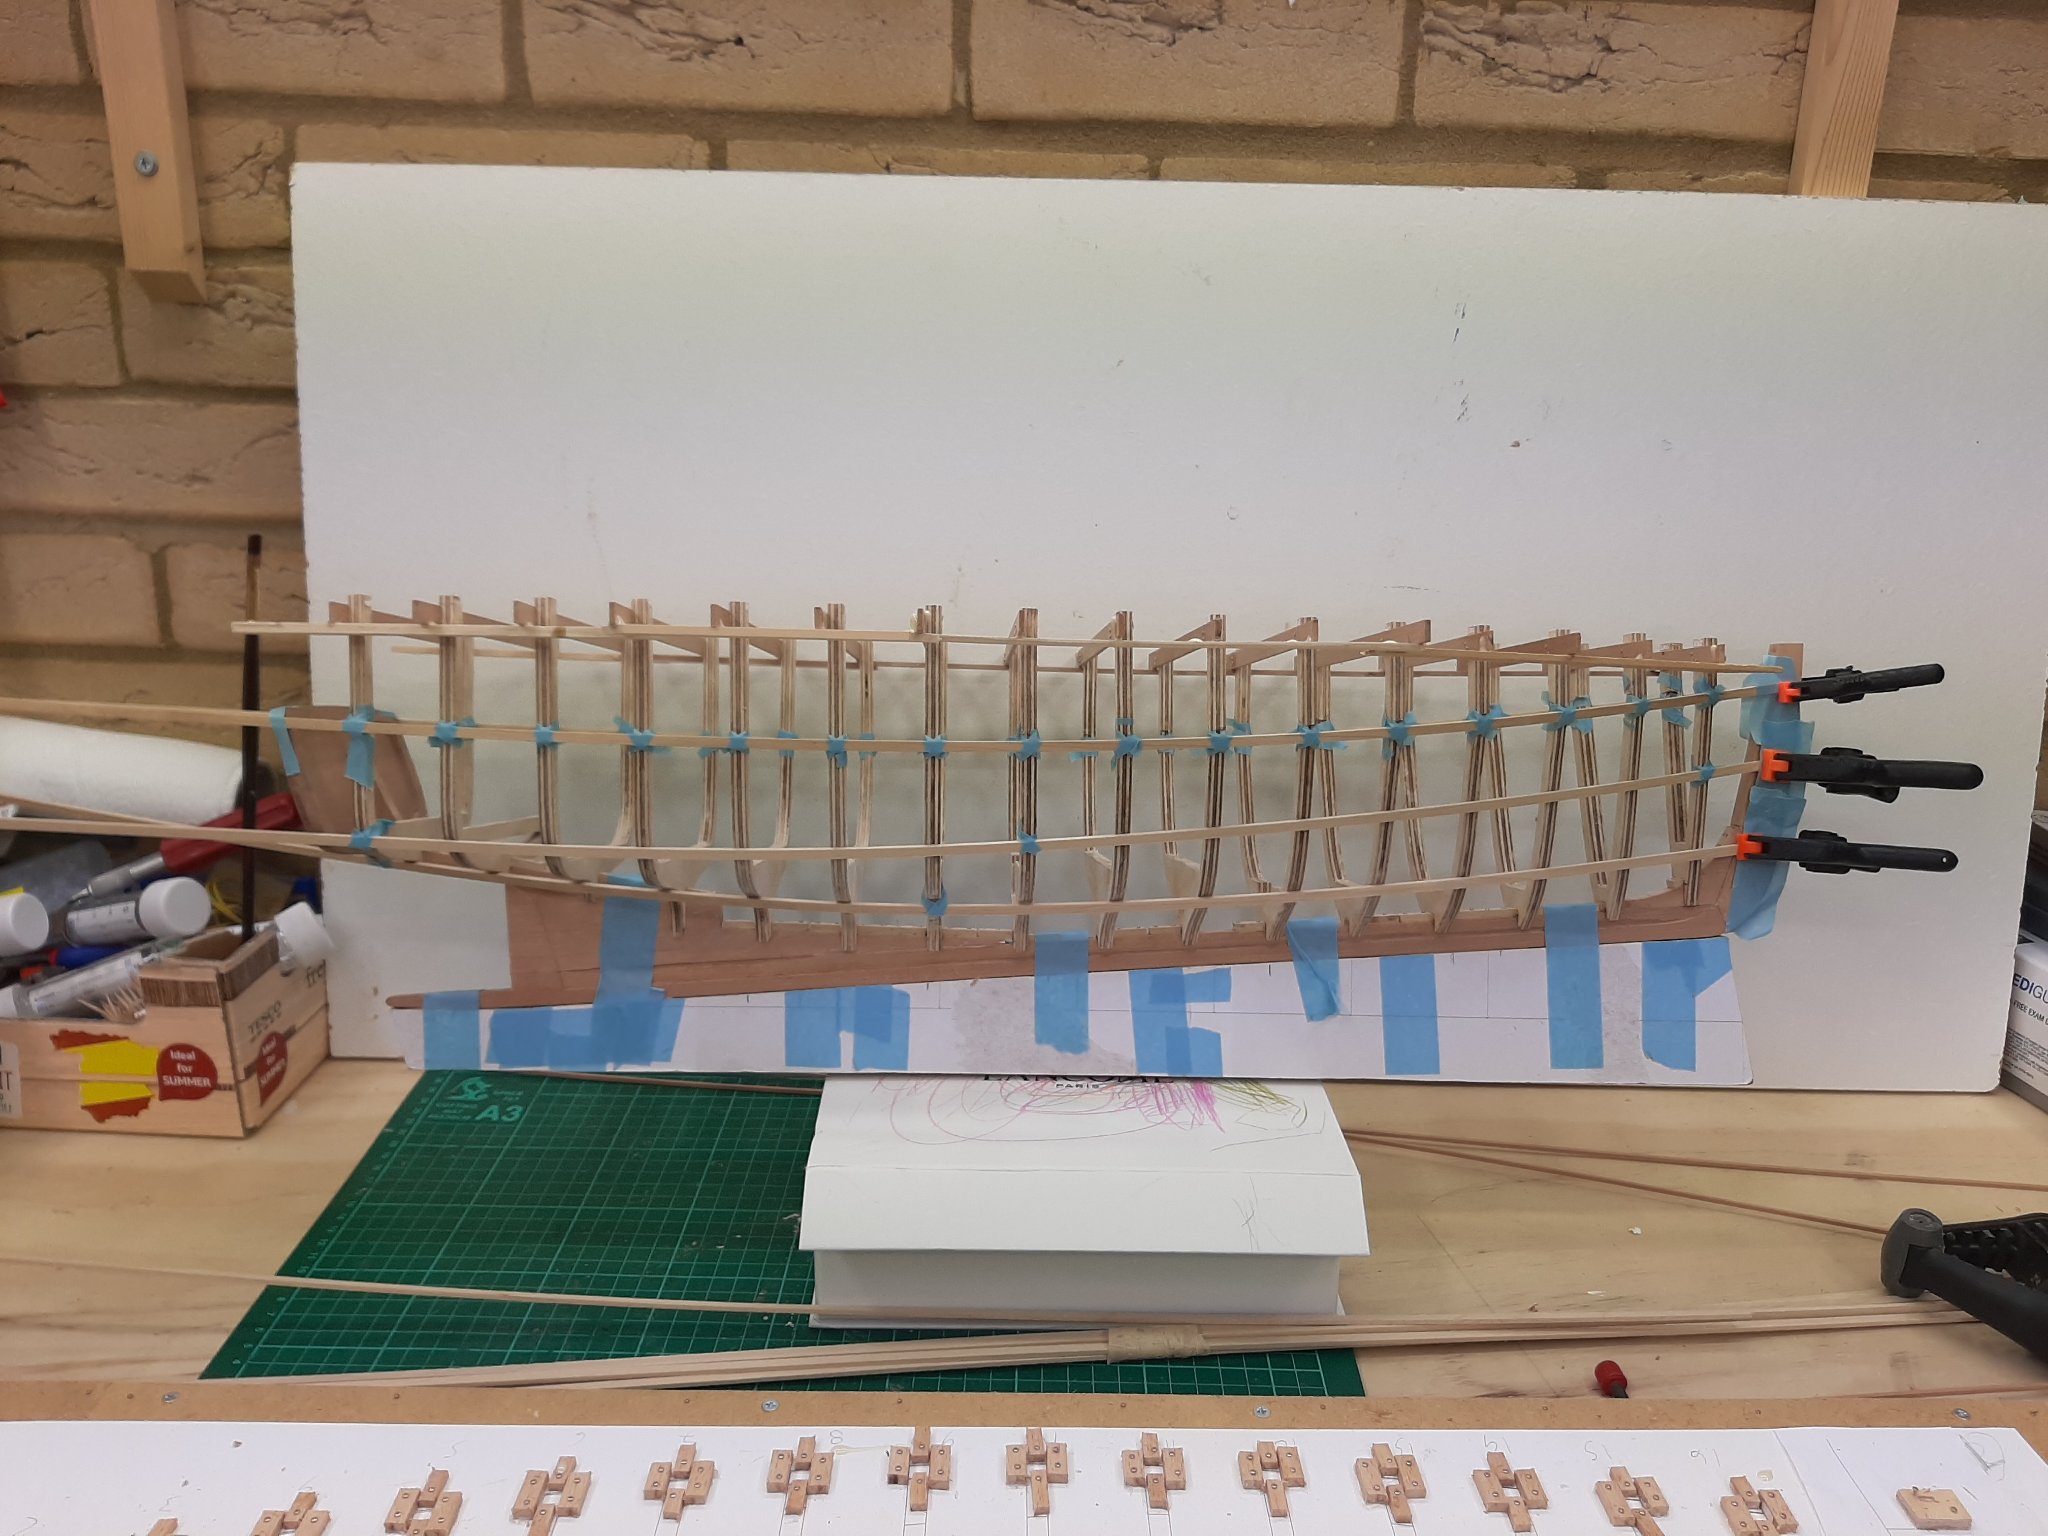
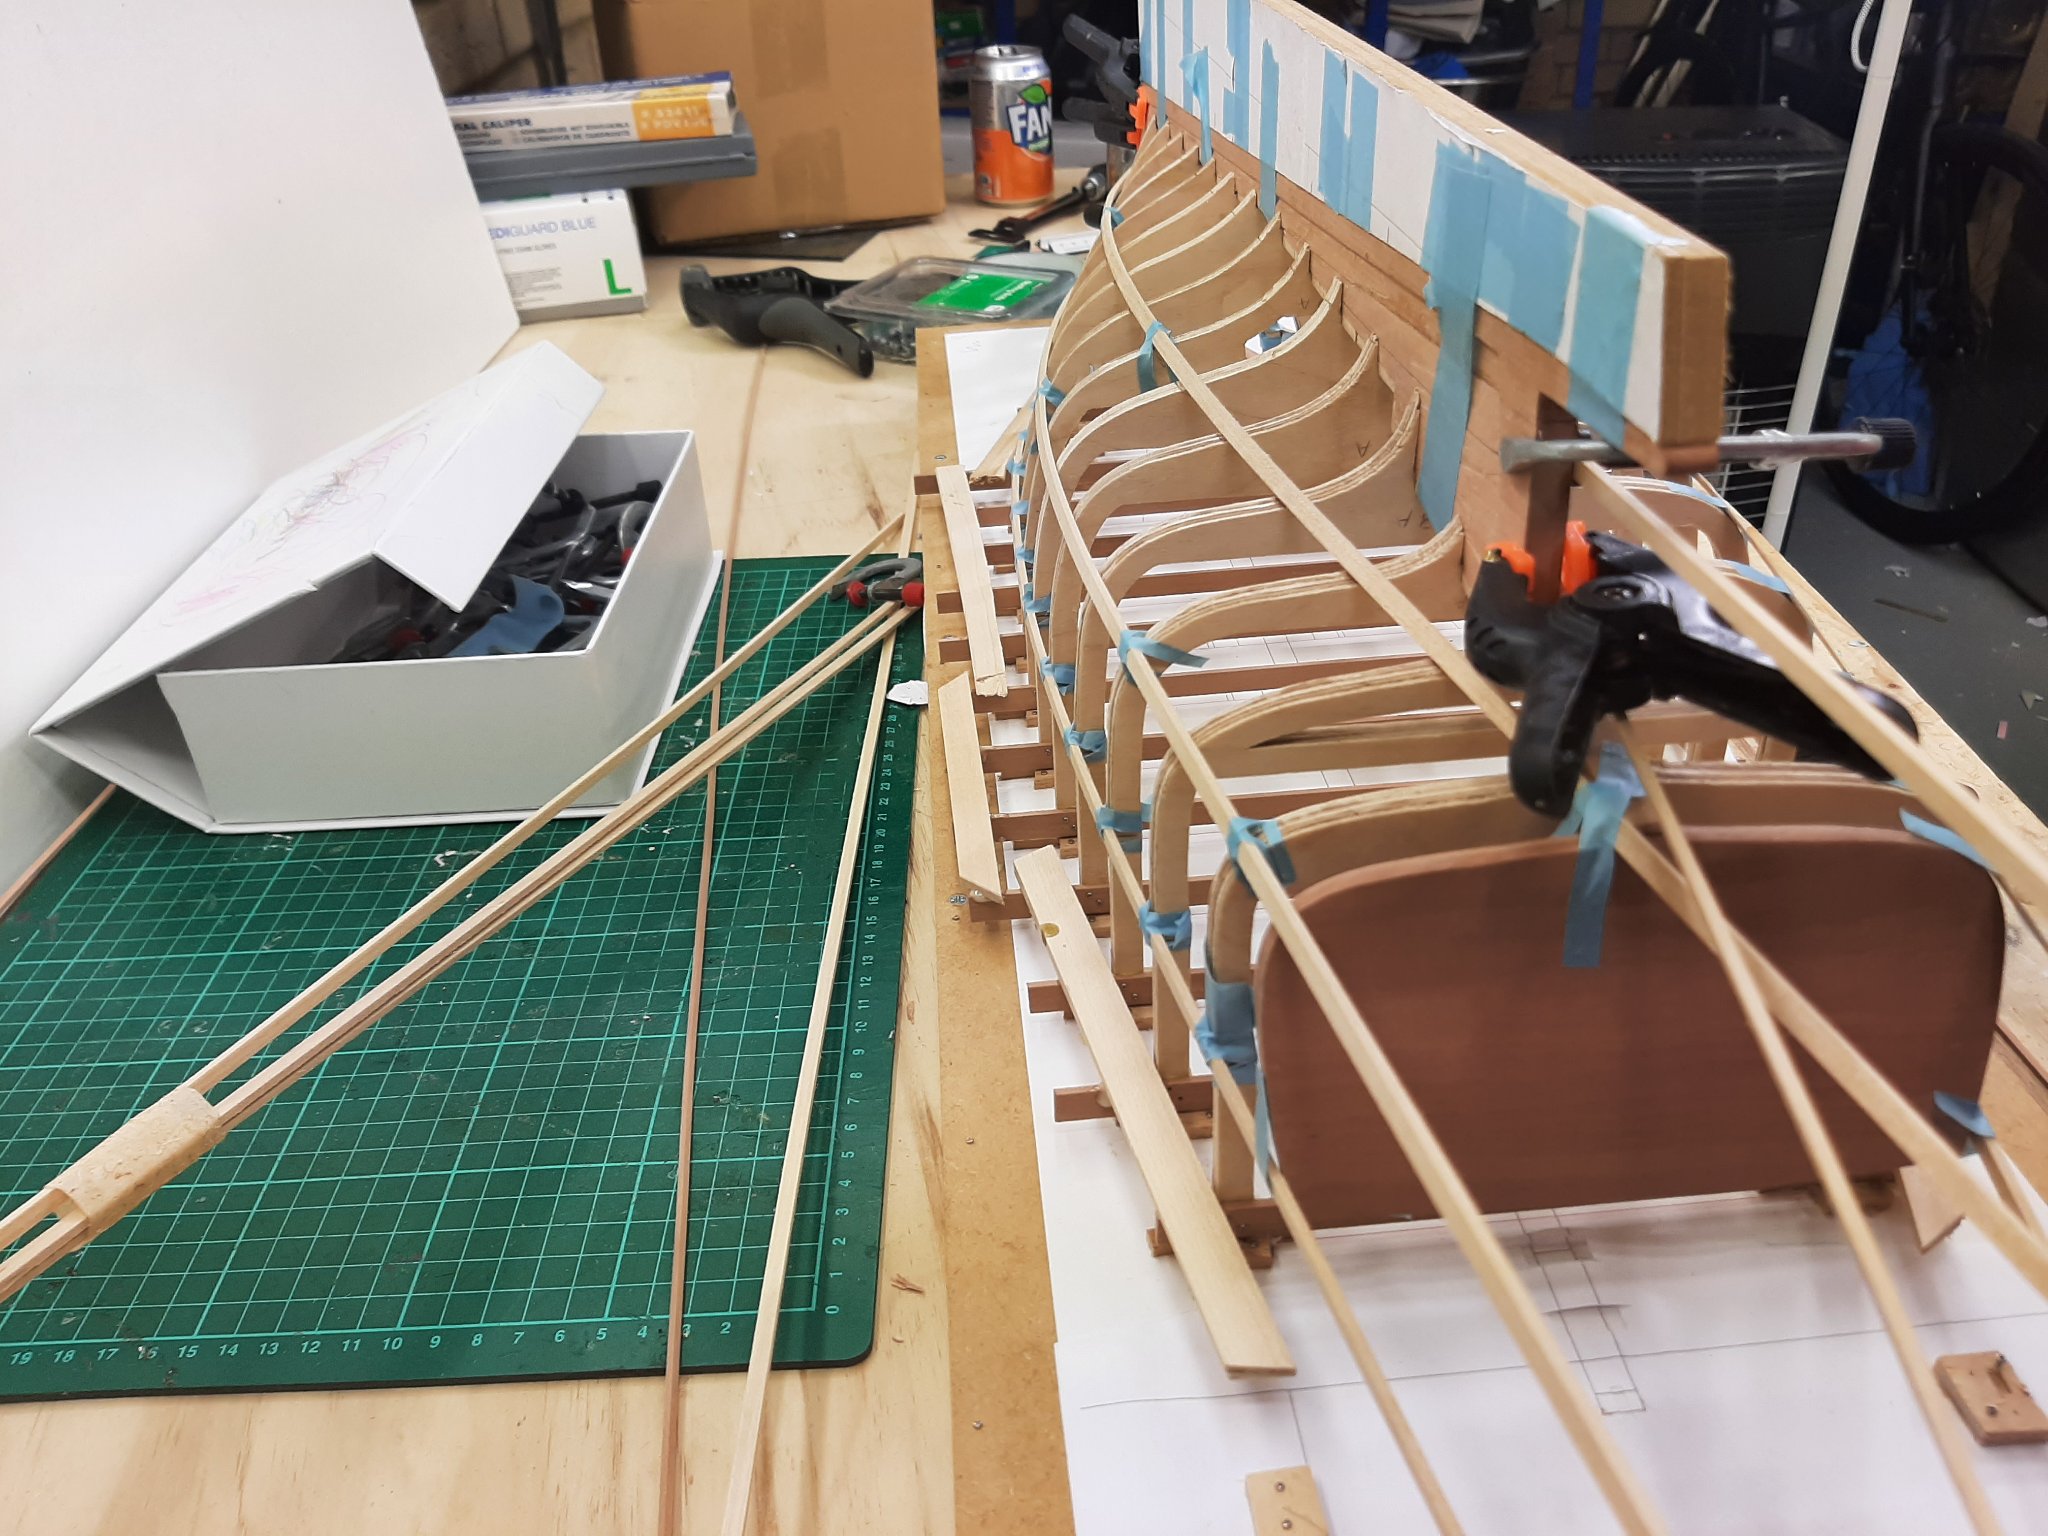
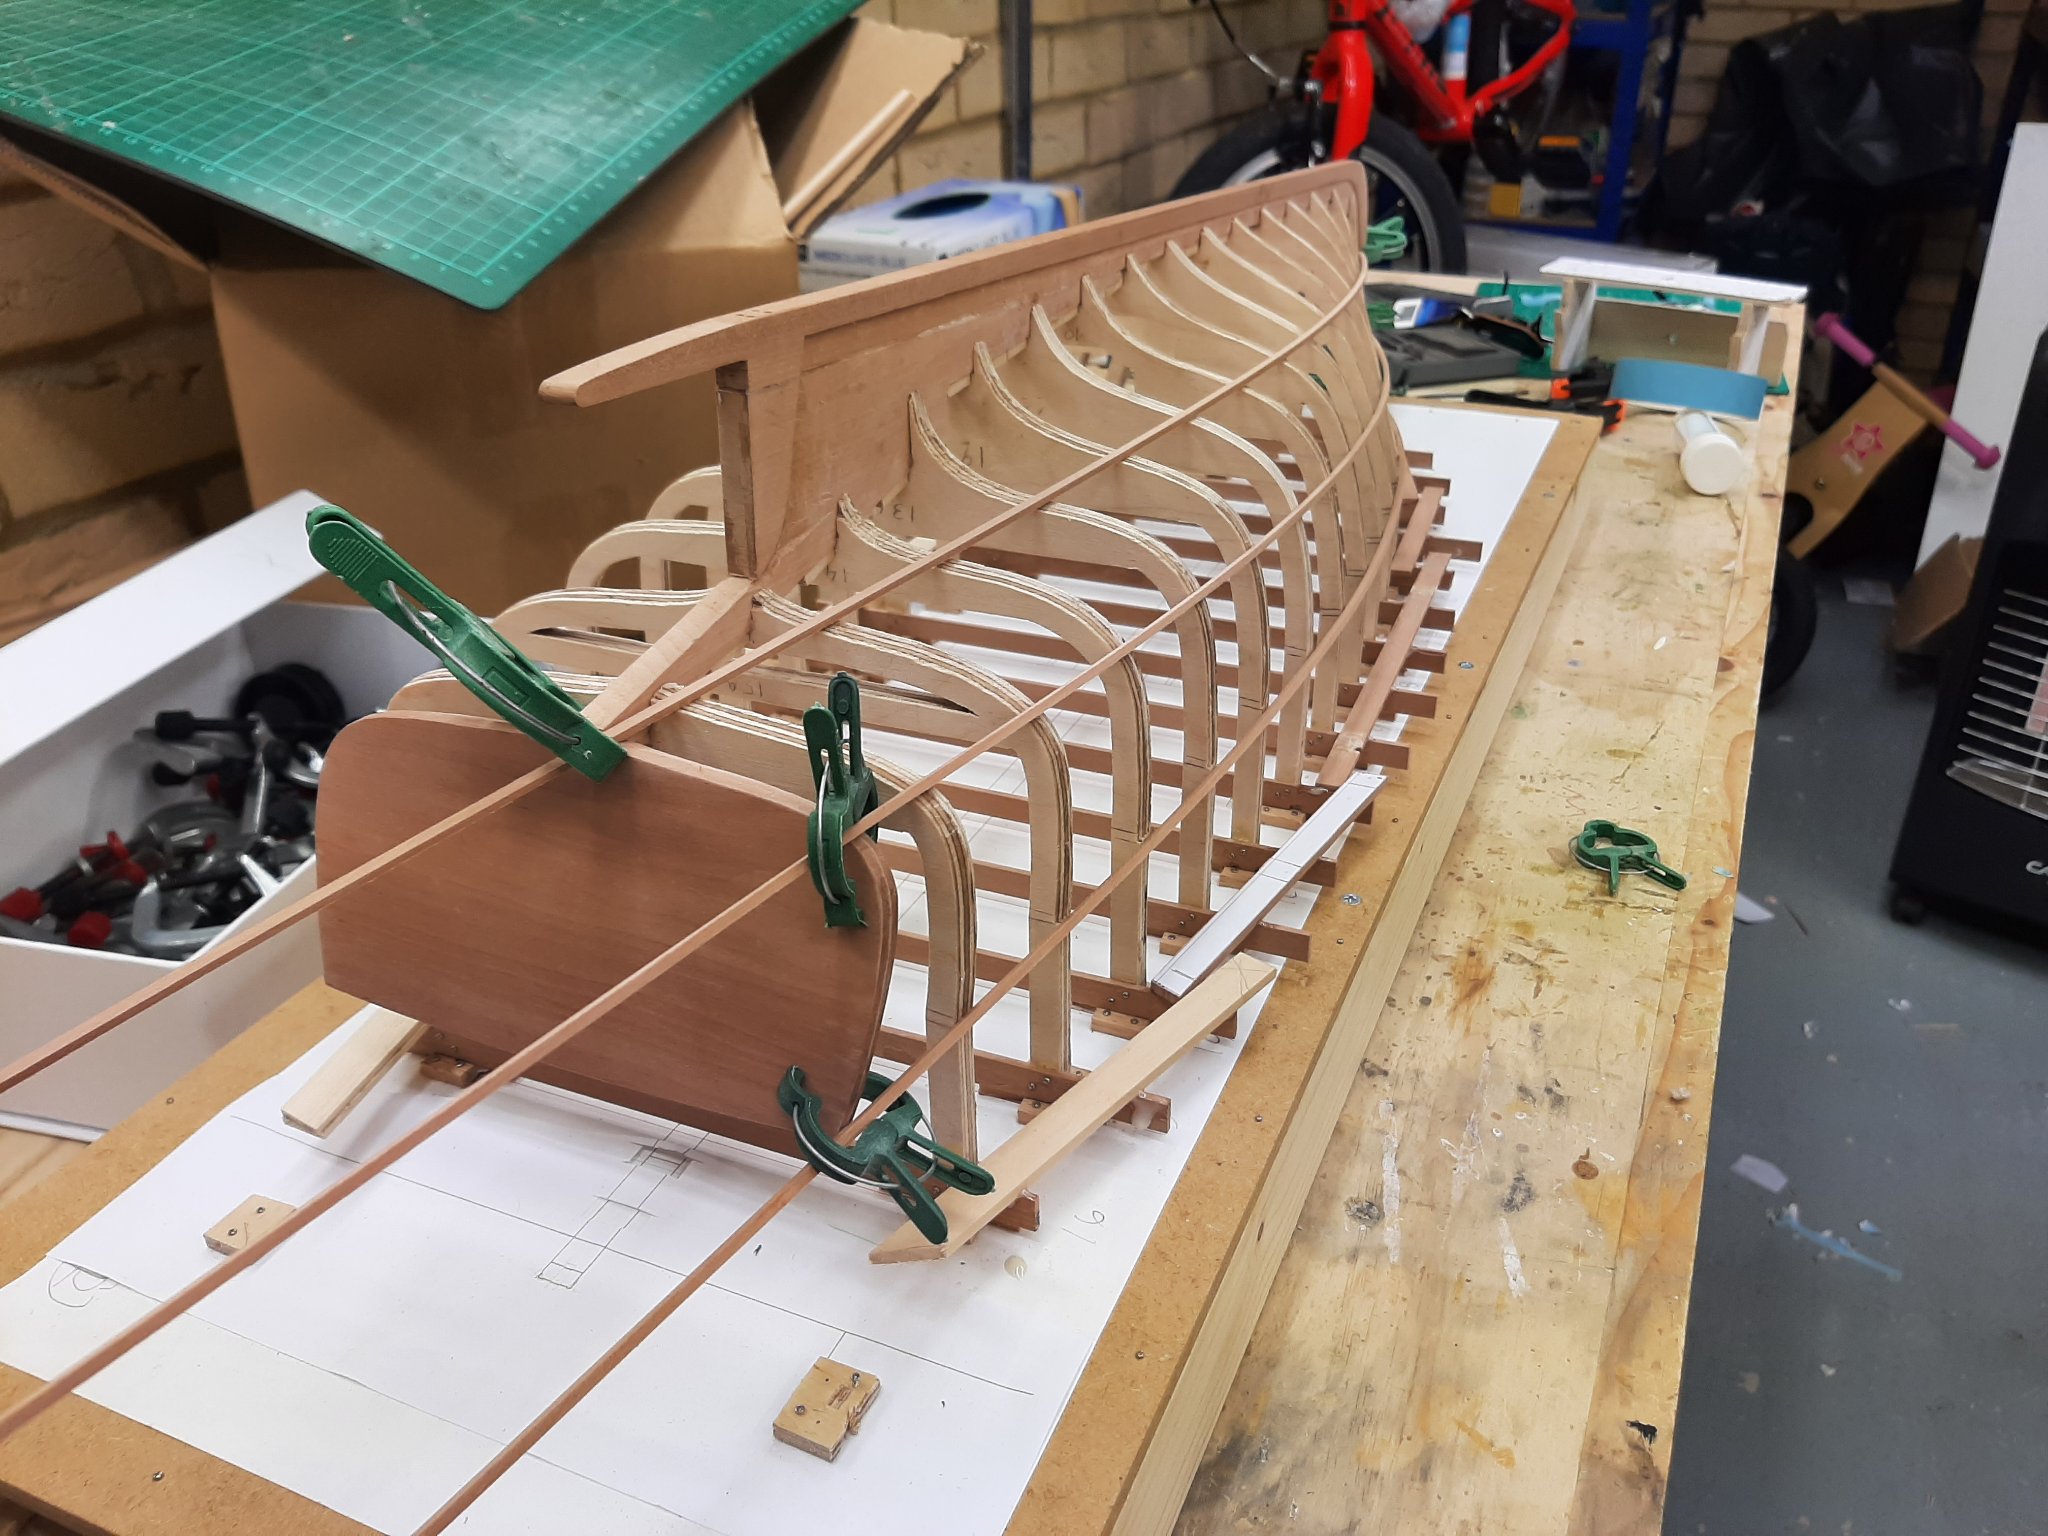
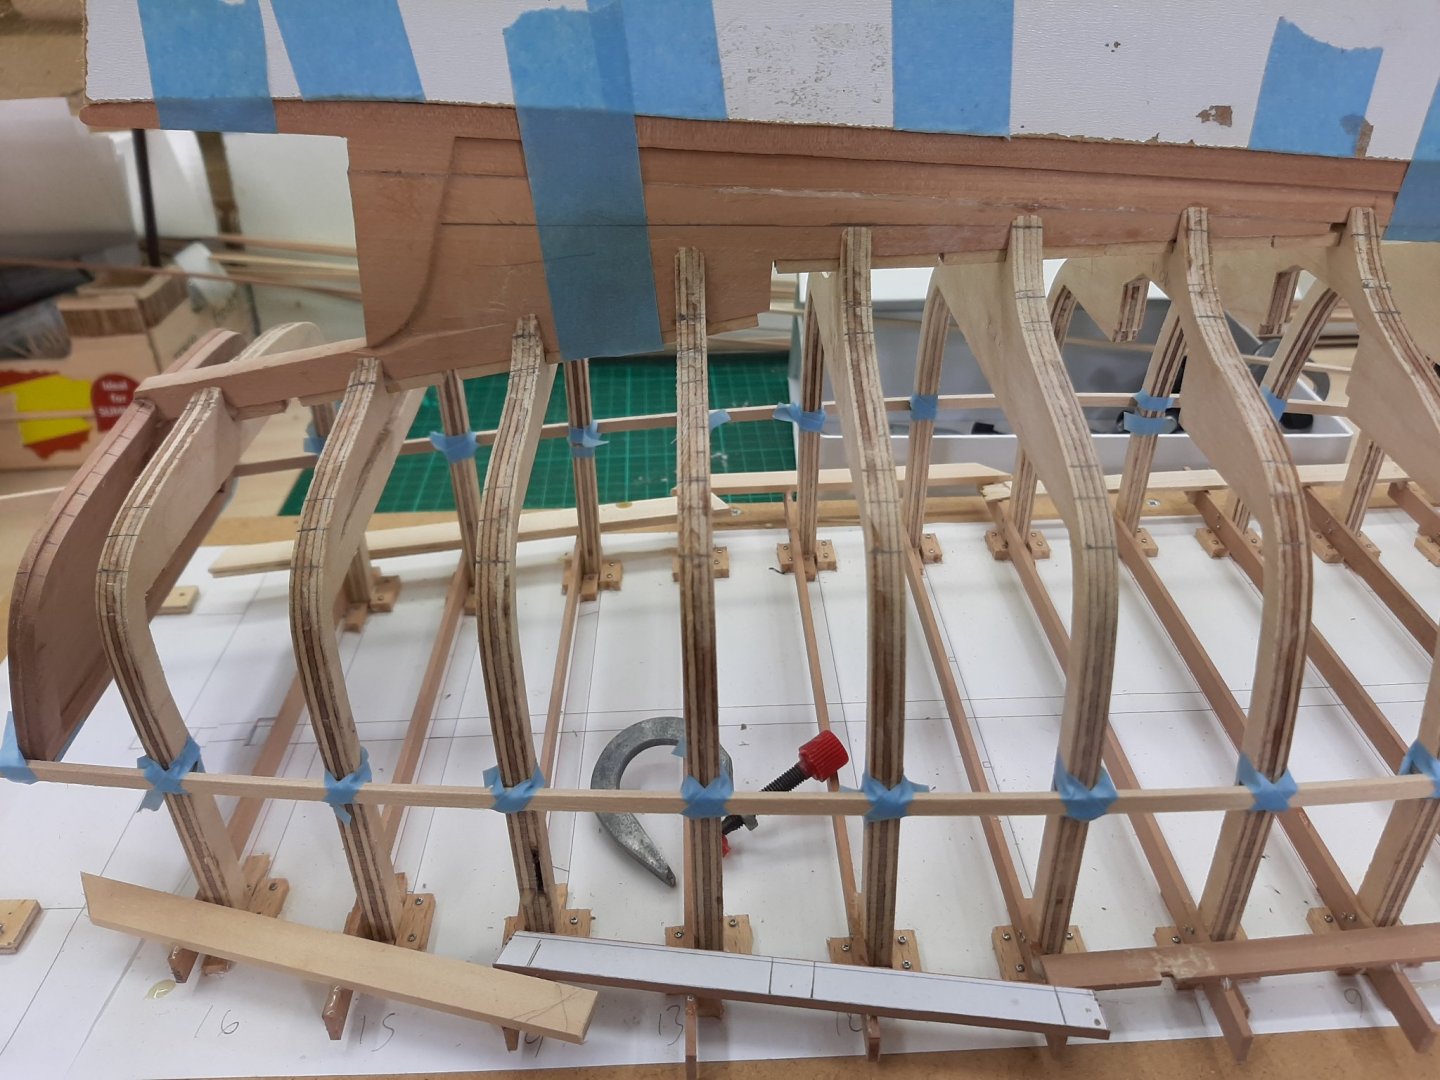
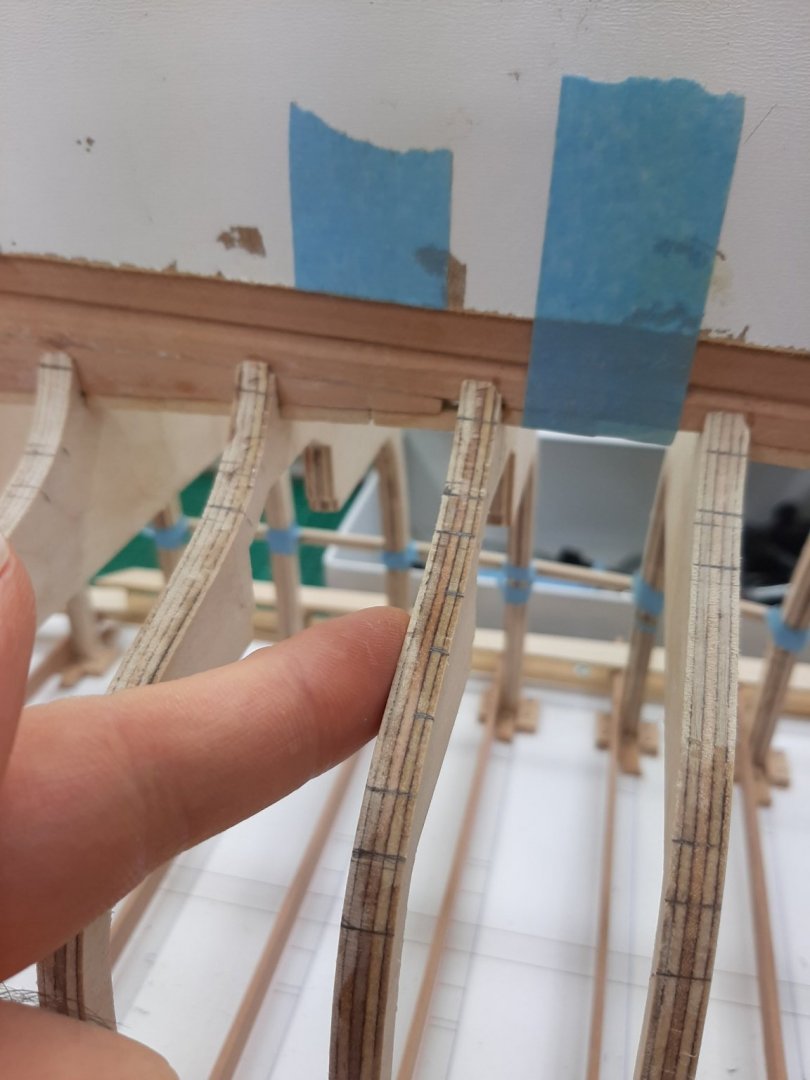
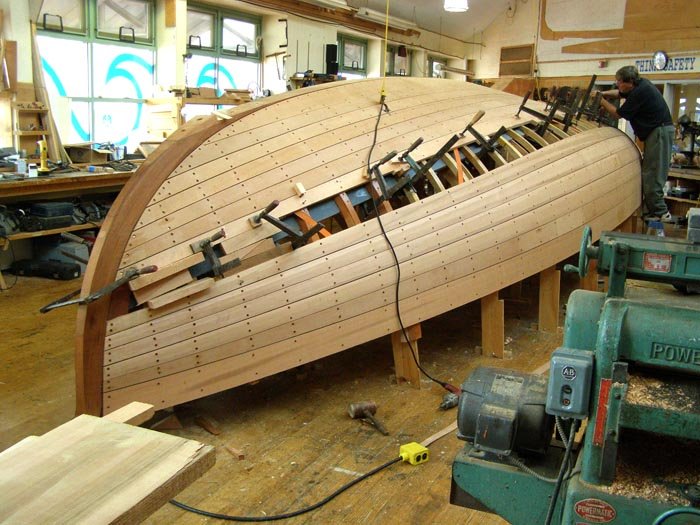
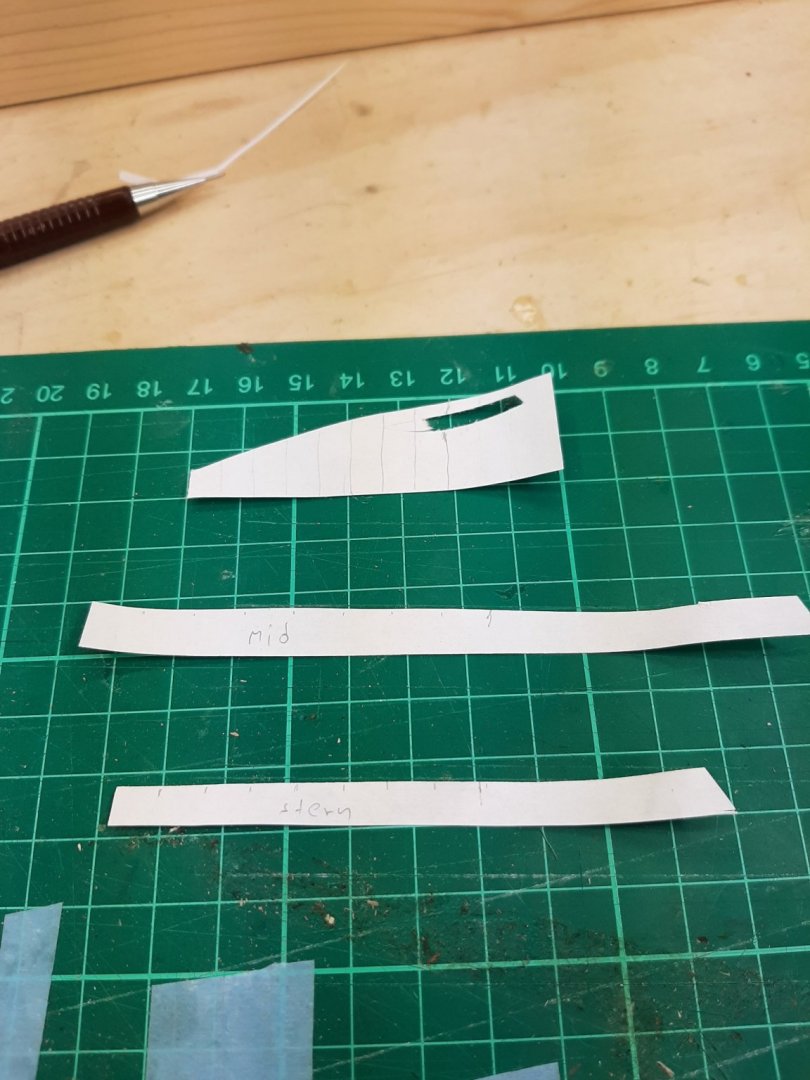
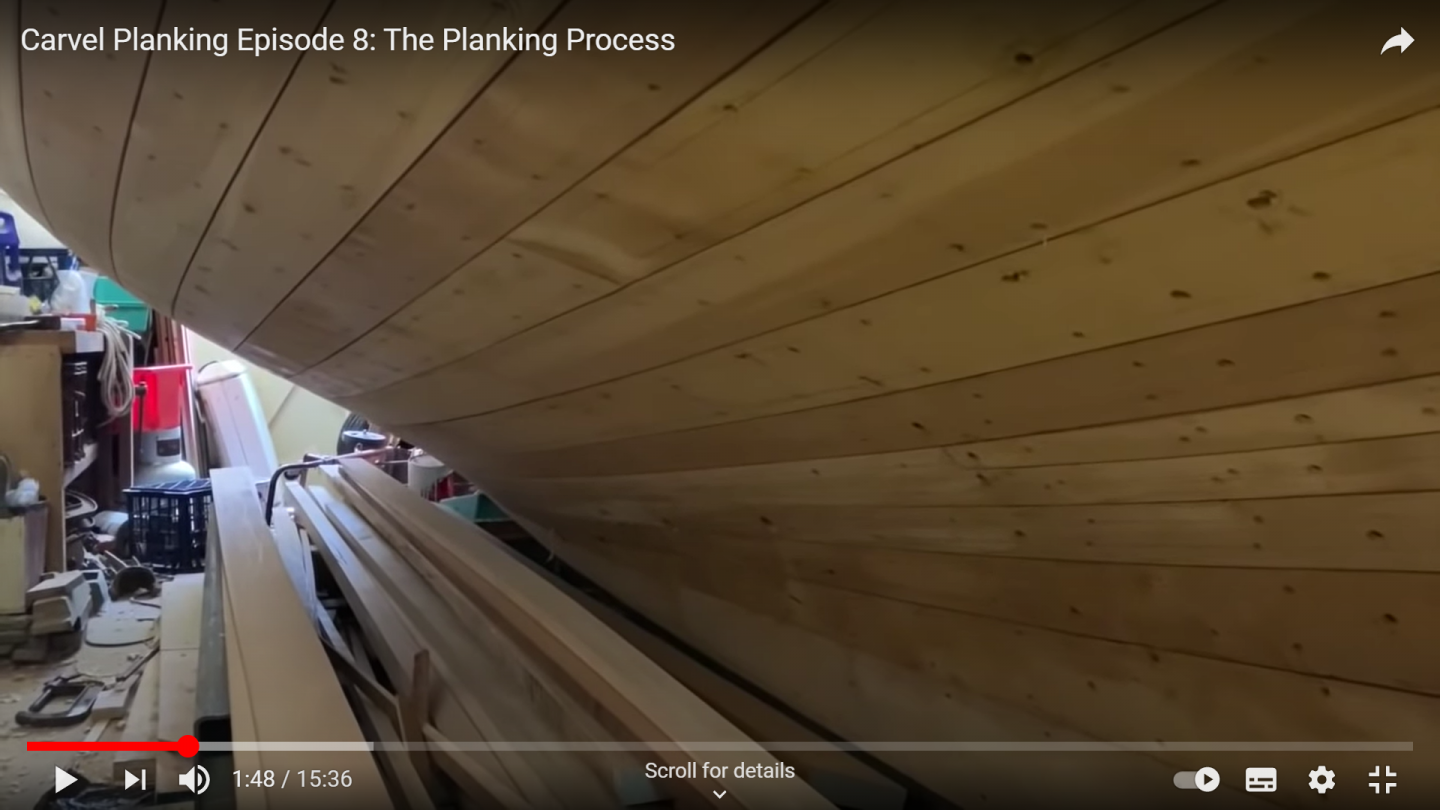
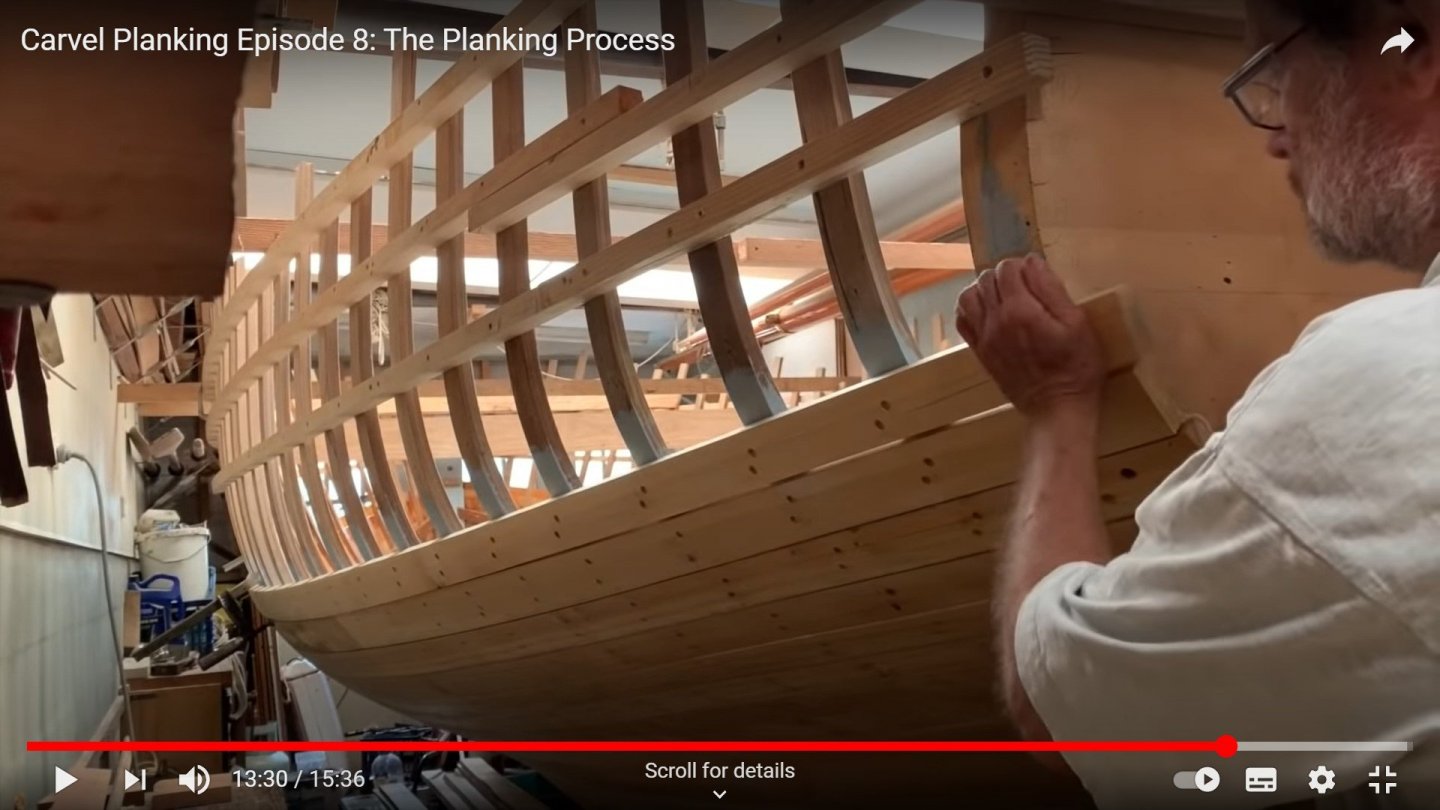
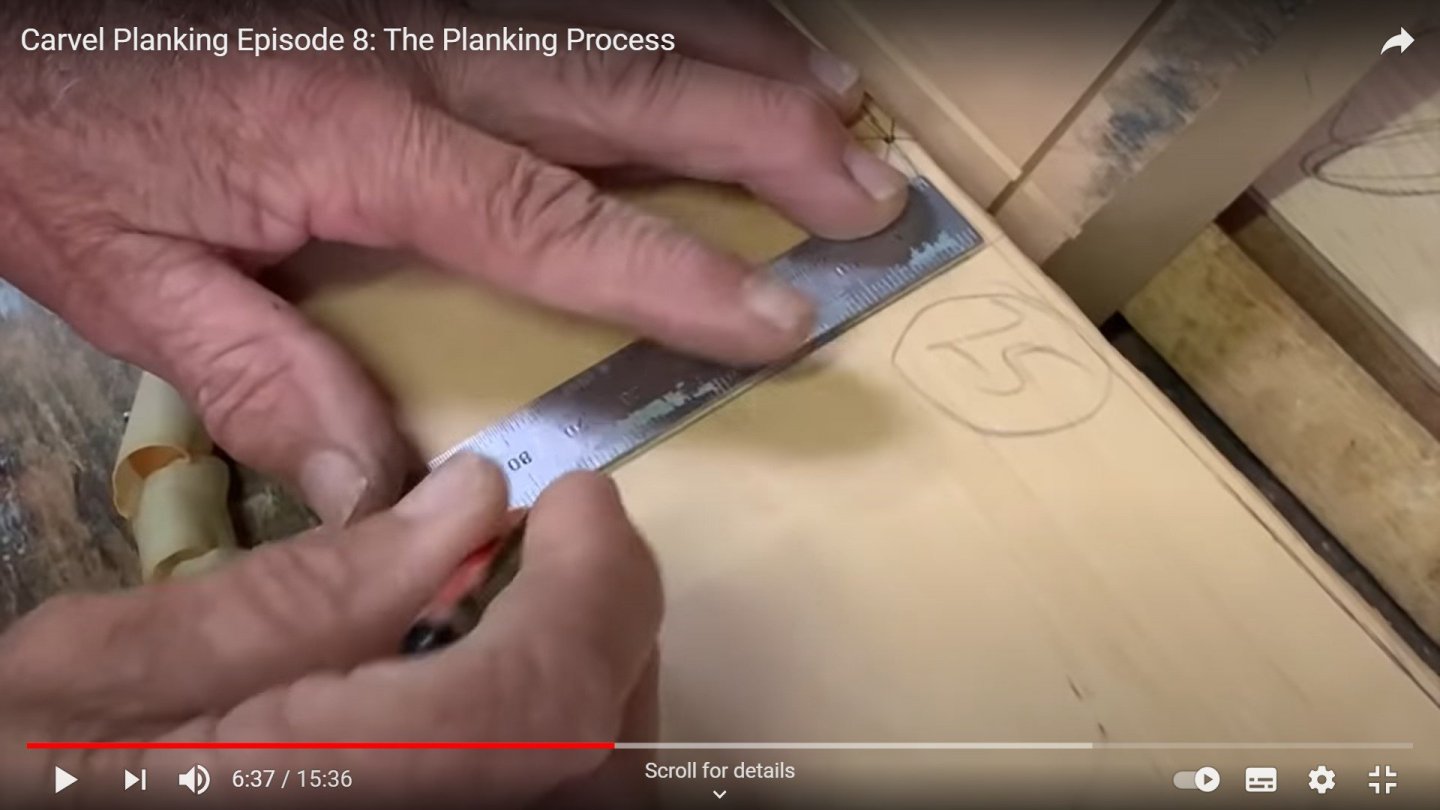
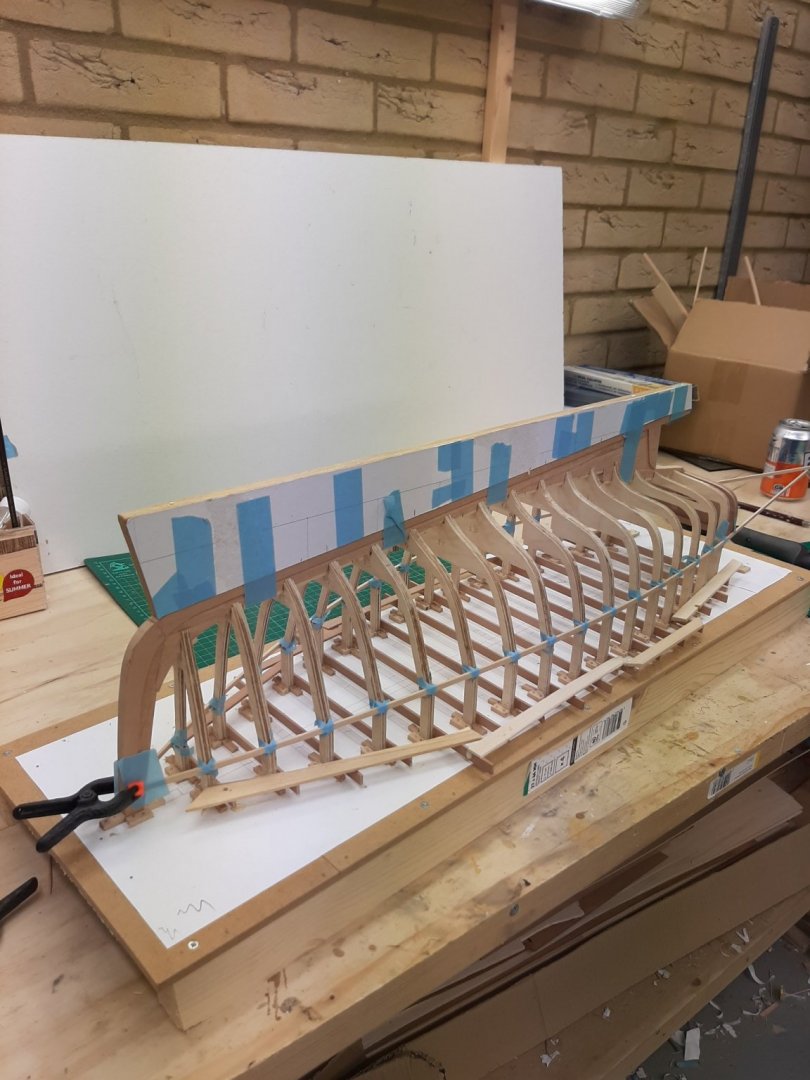
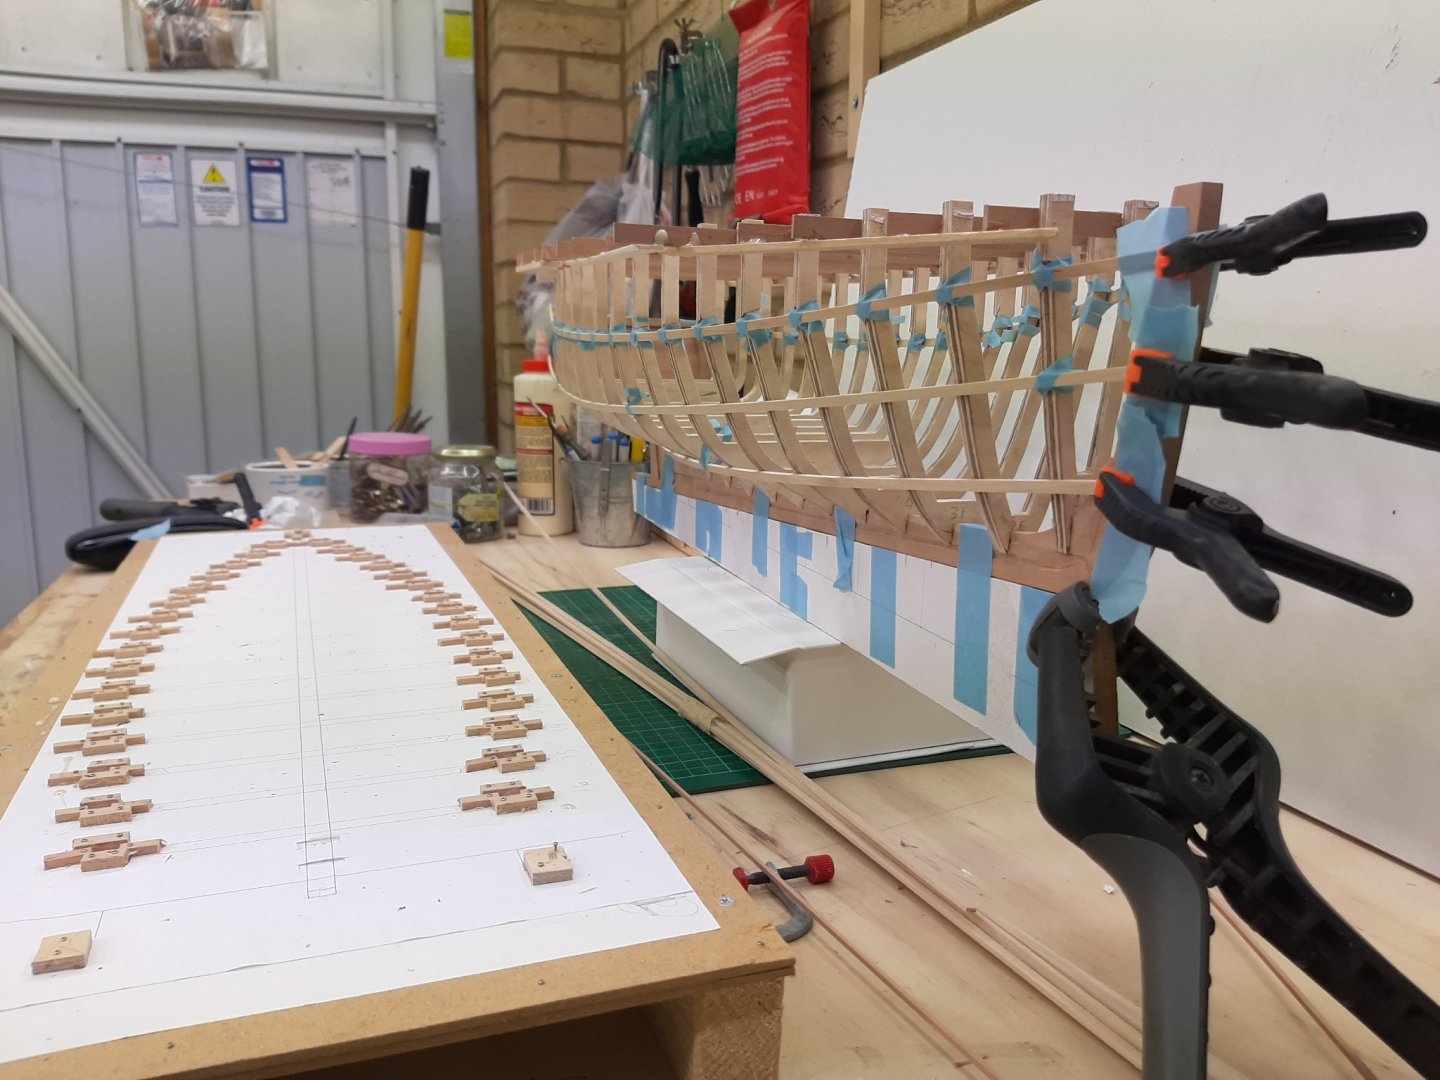
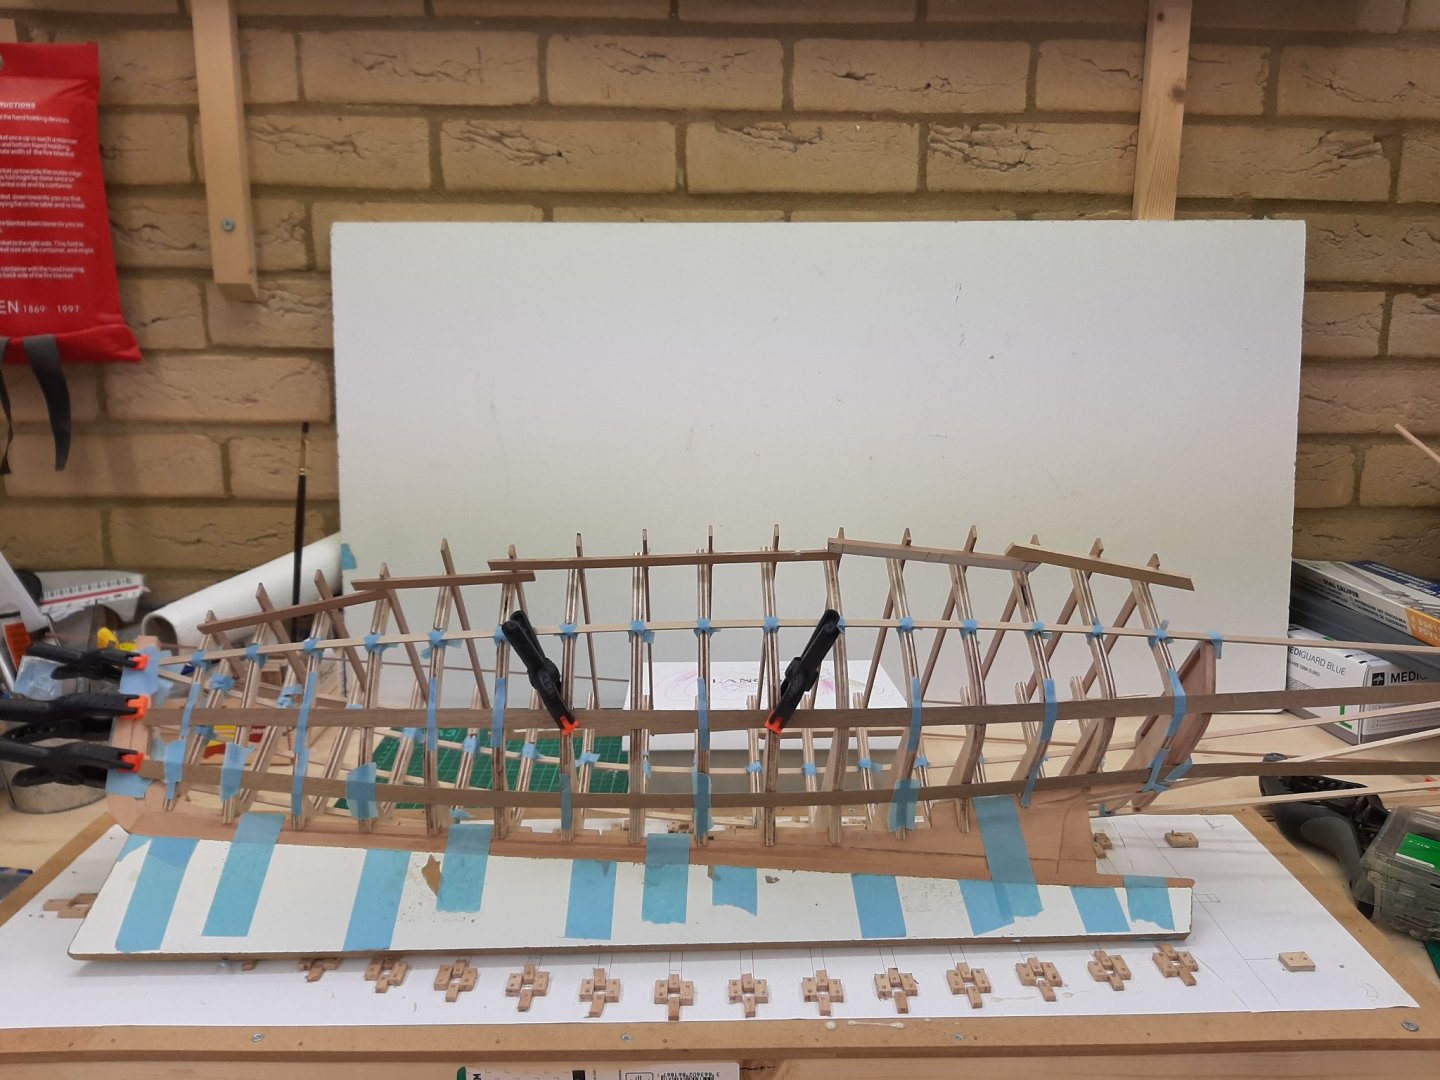
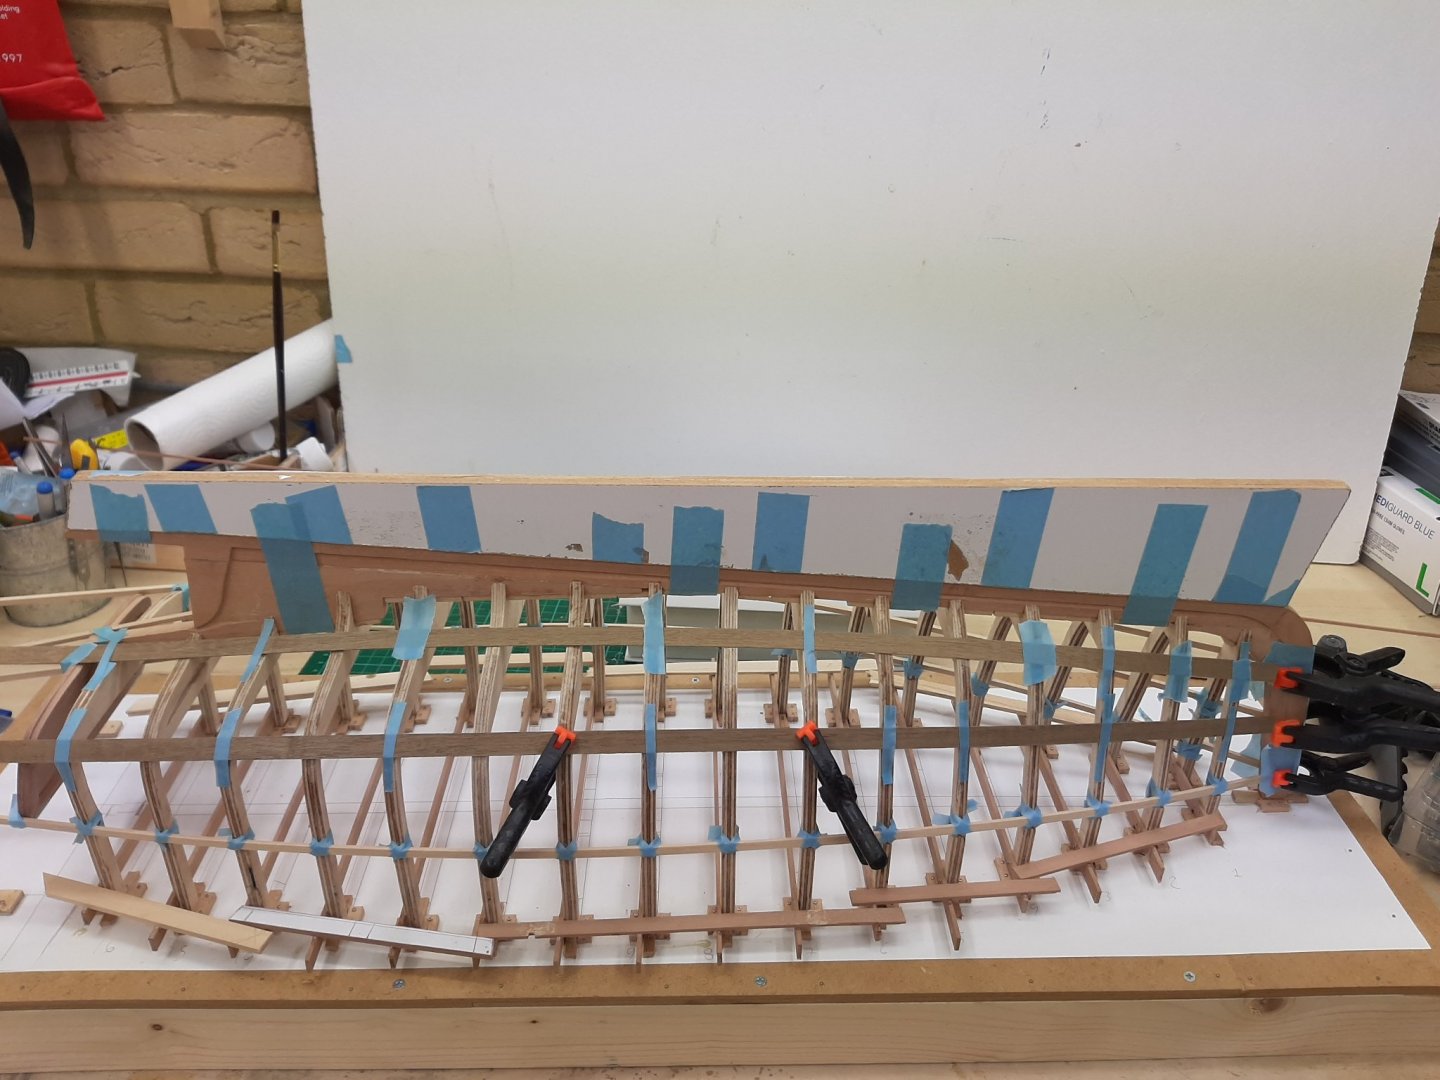
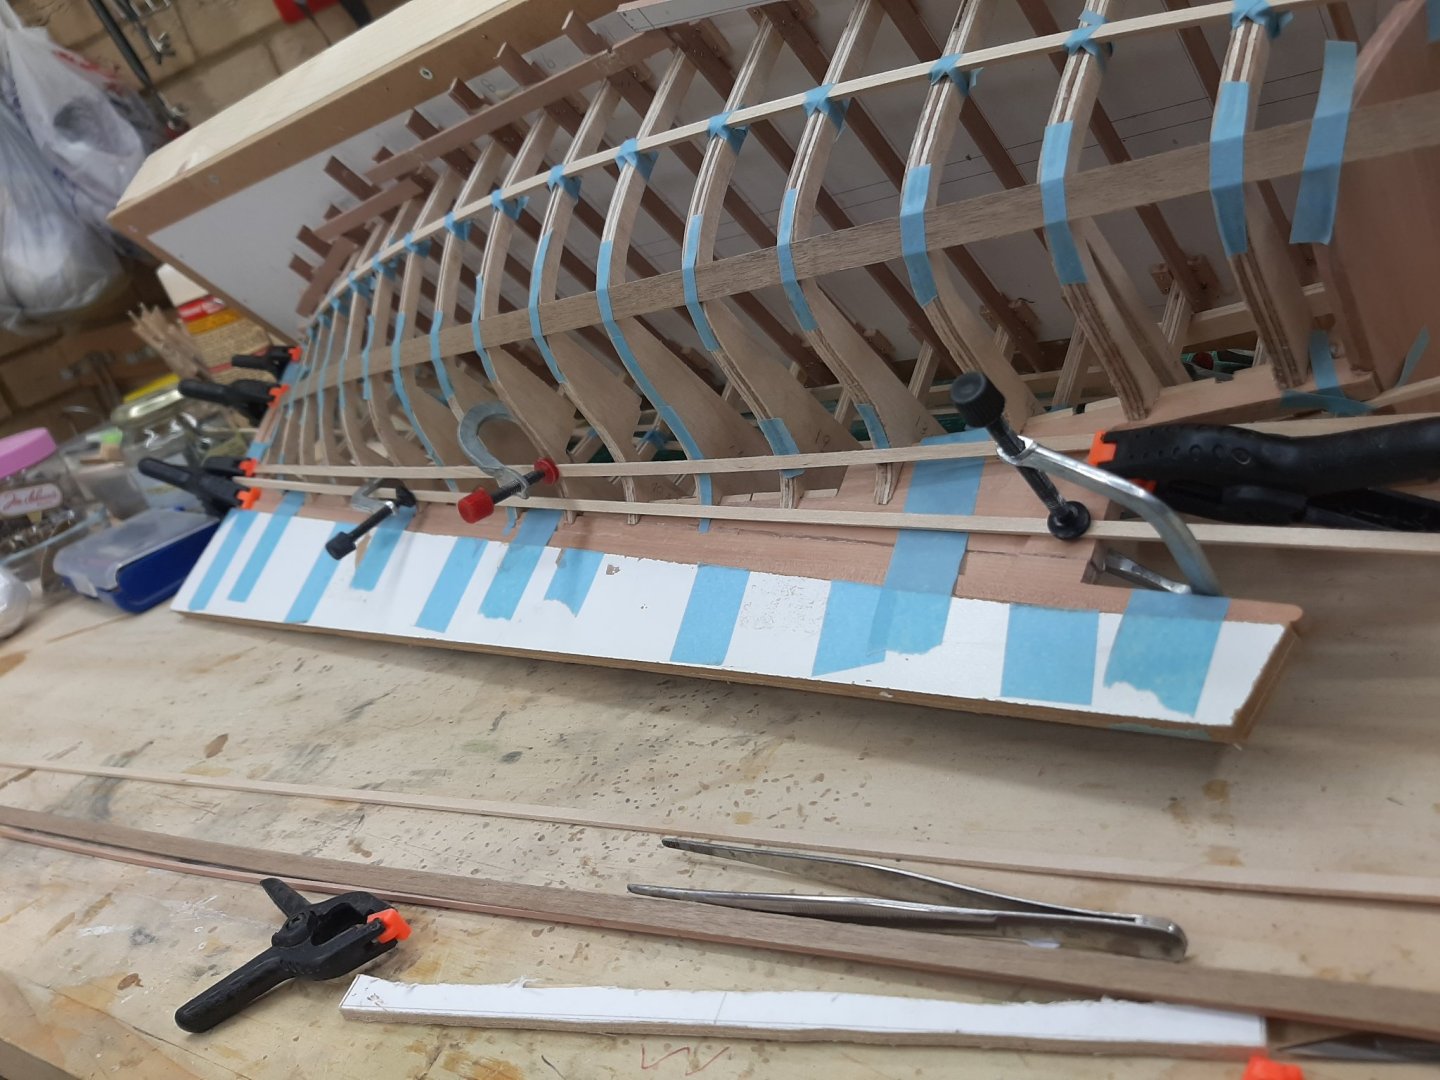
I did not do a huge amount of work but I did a bit of thinking and took some photos, so we can continue our reckoning. At this point I d like to say that I am not an experienced boat builder but just sharing my thought process as I go along. I would like to do the same with the yawl, which however will be much more difficult to plank (clinker in 1:10) So in the last post, we managed to define the sheer and the three planking zones and we also defined the garboard and the first (not so) broad strake. Now, we need to work out the rest of the planks. We have their general direction of the planks but we now need to define their width and decide how many planks we will aim for. The width of the planks will depend on how curved the hull is at a specific point but also on how much spilling the plank will need. I have 100 mm x 1000 mm sheets to cut my planks from but the actual boat builder would have much more narrow stock to work with. The planks need to lie and be in complete contact with the frames. Even hollowing the plank, a certain plank width can only accommodate a certain hull curvature. After that, the width needs to be reduced. Considering the above, my feeling is that the garboard and first broad strake cannot be any wider because a wider plank will not be in complete contact with the frames. The next photos show that even at the current width of the first strake, without contouring the surface, the plank will not lie in contact with the frame. Wefalck suggested that planks should be 15 to 20 cm wide. Perhaps this is the case for large ships but for such small boats, I think the planks would be much more narrow but again it depends on the shape of the hull. I would think 13 cm would be a good number but actually, it can be much less. But lets continue and we ll pick this up later on. So, now it is time to divide the middle zone into planks. The planks that are at the edges of the zone will need to accommodate quite tight curves so need to be pretty narrow. Based on that, I eyeballed that it makes sense to divide the zone into 8 planks-this was a completely random choice. I first removed the wide walnut strip and replaced it with a baten. Then I measured the widest frame, which on this boat is very near the stern, and divided the distance to 8 equal lengths. Did the same with the transom and also the same with the stem This are the widths, pretty narrow So I went ahead and marked these widths to the transom, frame and stem and then threw a couple of batens to see how the planks at the edges of the zone would run. Now, we cannot use wide planks where the hull is very curved so these planks cannot be made any wider. However, the rest of the planks, in between these planks on the edges of the zone, run on a reasonably flat part of the keel so potentially they could be made wider. Lets go back to the very nice you tube video. That boat builder, is actually doing the same. His planks are very narrow where the hull is curved and wide where it runs flat Note the difference in plank width at the transom Somewhere on the video, he actually lays a ruler across the plank-it is 8 cm wide! Even planks as narrow as this can be easily and safely screwed in place Back to our model, I think that the 5 middle planks shown in the next photo could be replaced by 4 or even 3 wider planks I feel a bit uneasy with the sheer, the batens are not secured well. I need to think a solution. Regards vaddoc


-
I think we should just make our models bigger, a few 1:10 cutty sharks and victories would certainly revive this craft/art😁 I once read that art has no purpose but itself so model boat building should be at the heart of this slowly forgotten art... Vaddoc
-
Thank you all for your comments and likes! Wefalck: Stealers: Indeed the stealers in these small boats are also small and narrow but they are used without second thought so probably it is alright. Planks: The 10x0.5 mm (I think it is actually wider) walnut strip is not a plank, it is just a strip to check the run of the hull. The planks will be 2 mm thick beech. Width of planks: You are quite right, this is the next step, to figure out what is the widest plank one can get away with. Now, this is a combination of the type of hull and the amount of spilling needed-the more spilling, the wider the plank stock needs to be. Next it depends on the stock that is available for the construction and wide pieces are not always available. Heavily spilled 16 cm planks may need 50 cm wide stock. I ll be using 100 mm sheets but in real life 1 meter wide planks are not readily available...I would think the wider pieces will be reserved for the garboard and the most heavily spilled planks. Also, the tighter the curve of the hull, the more narrow the plank needs to be. I am still working on the planking but the garboard and the first broad strake in this boat cannot be very wide. Tools: Miniature wood working tools are on the wish list but unfortunately will stay there for the foreseeable future...
-
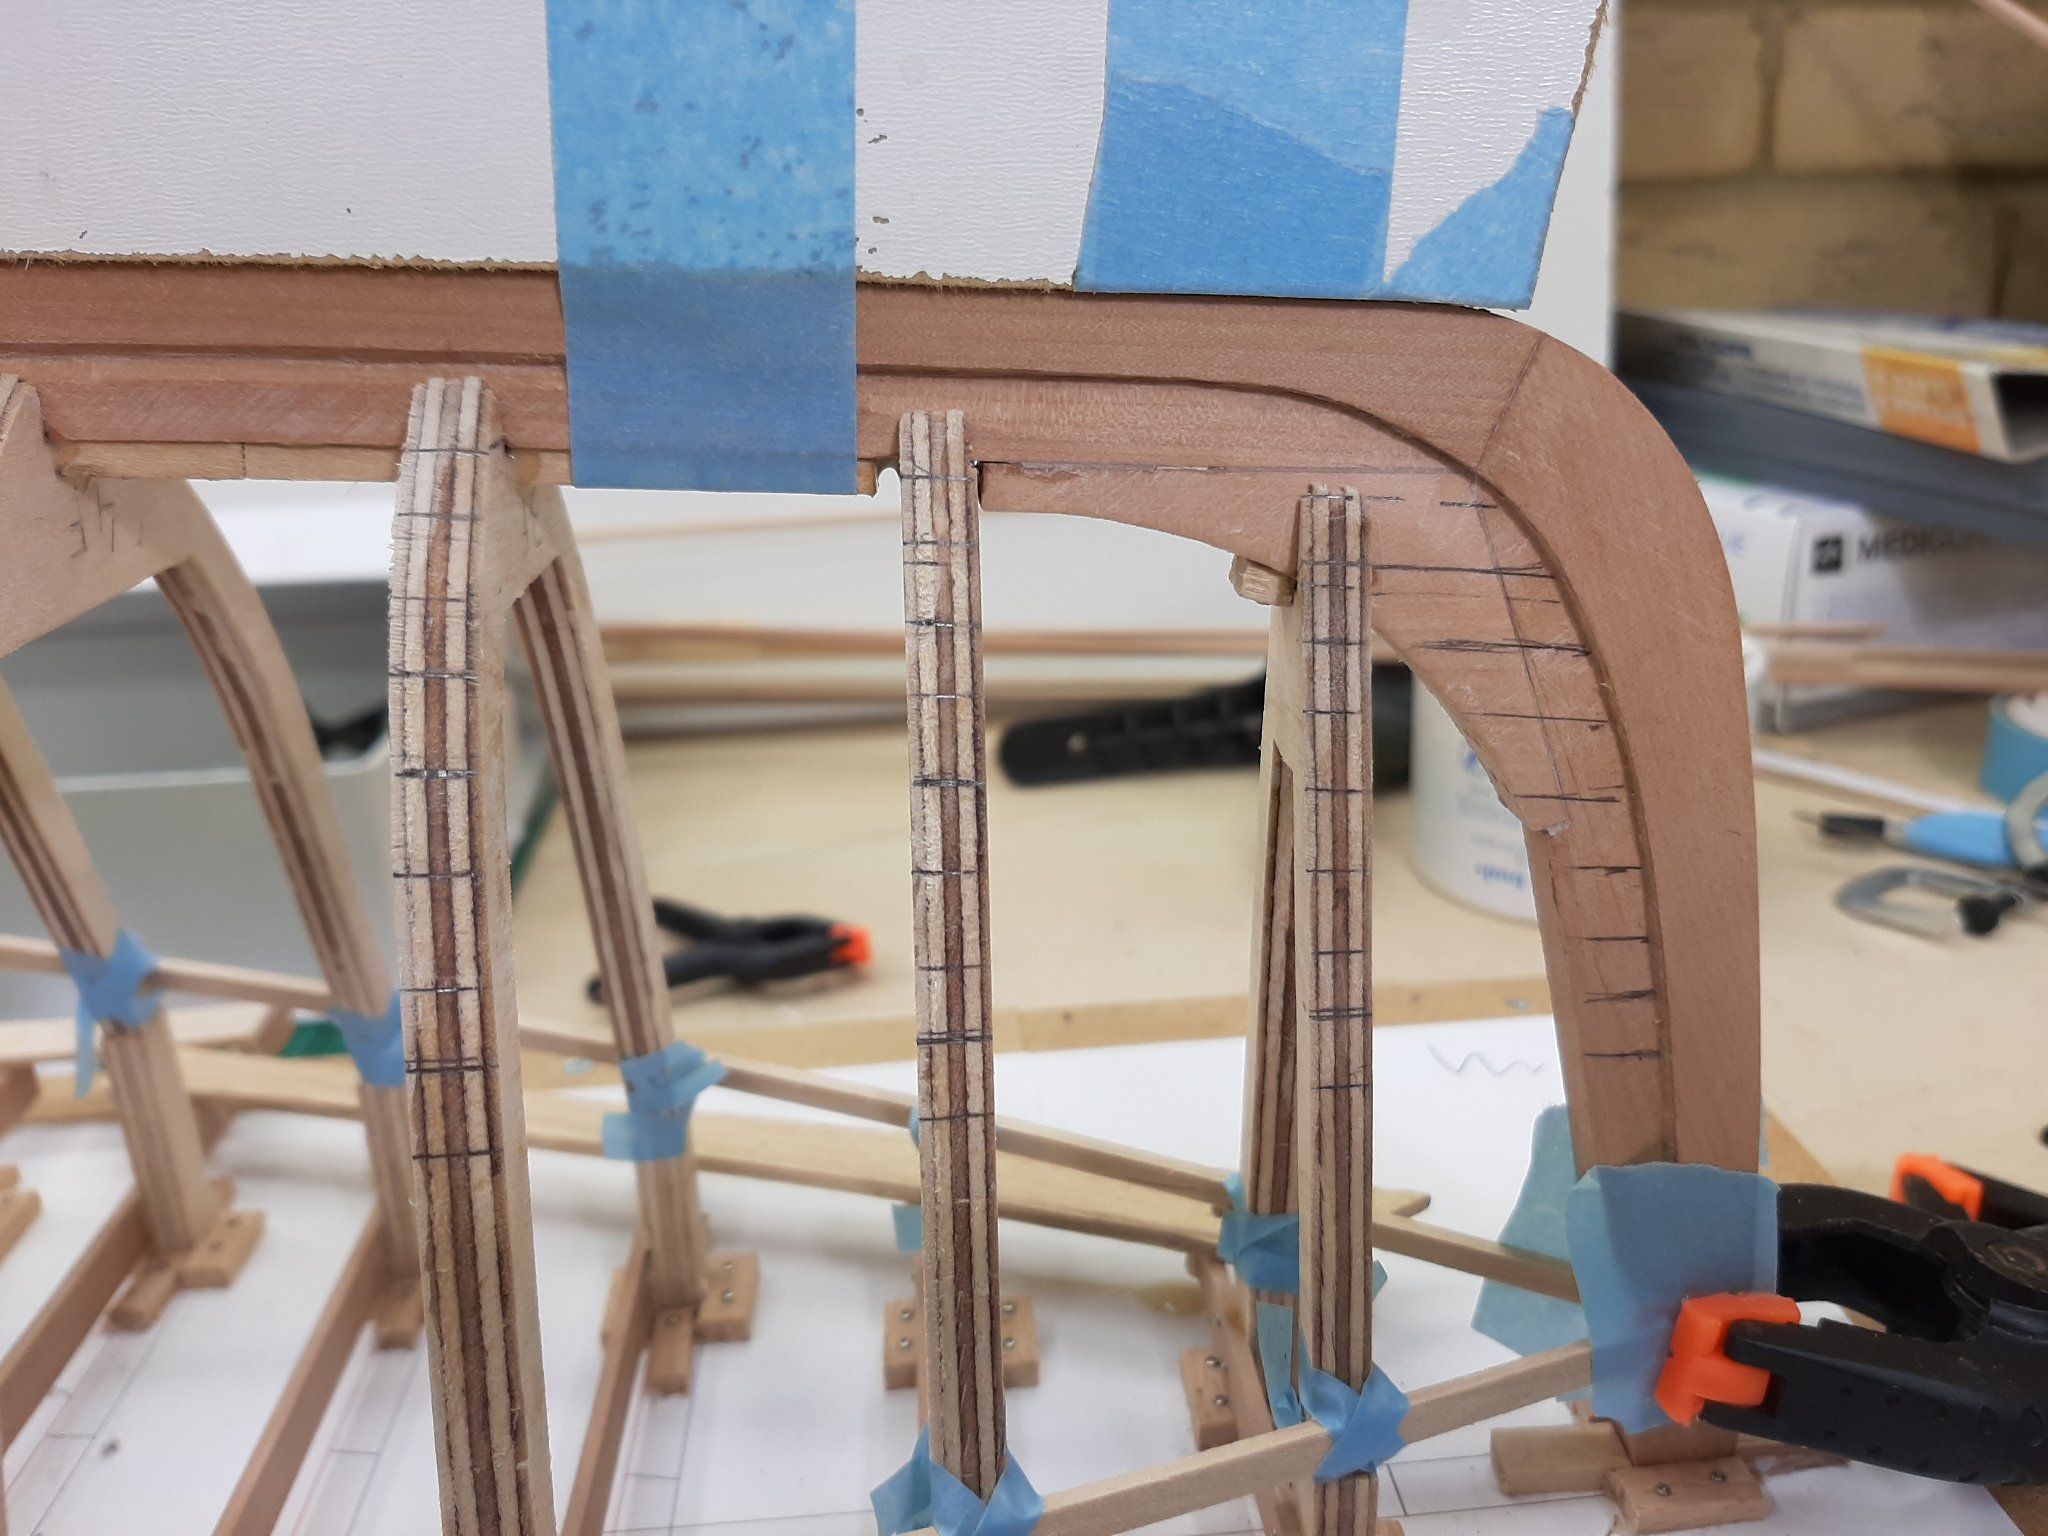
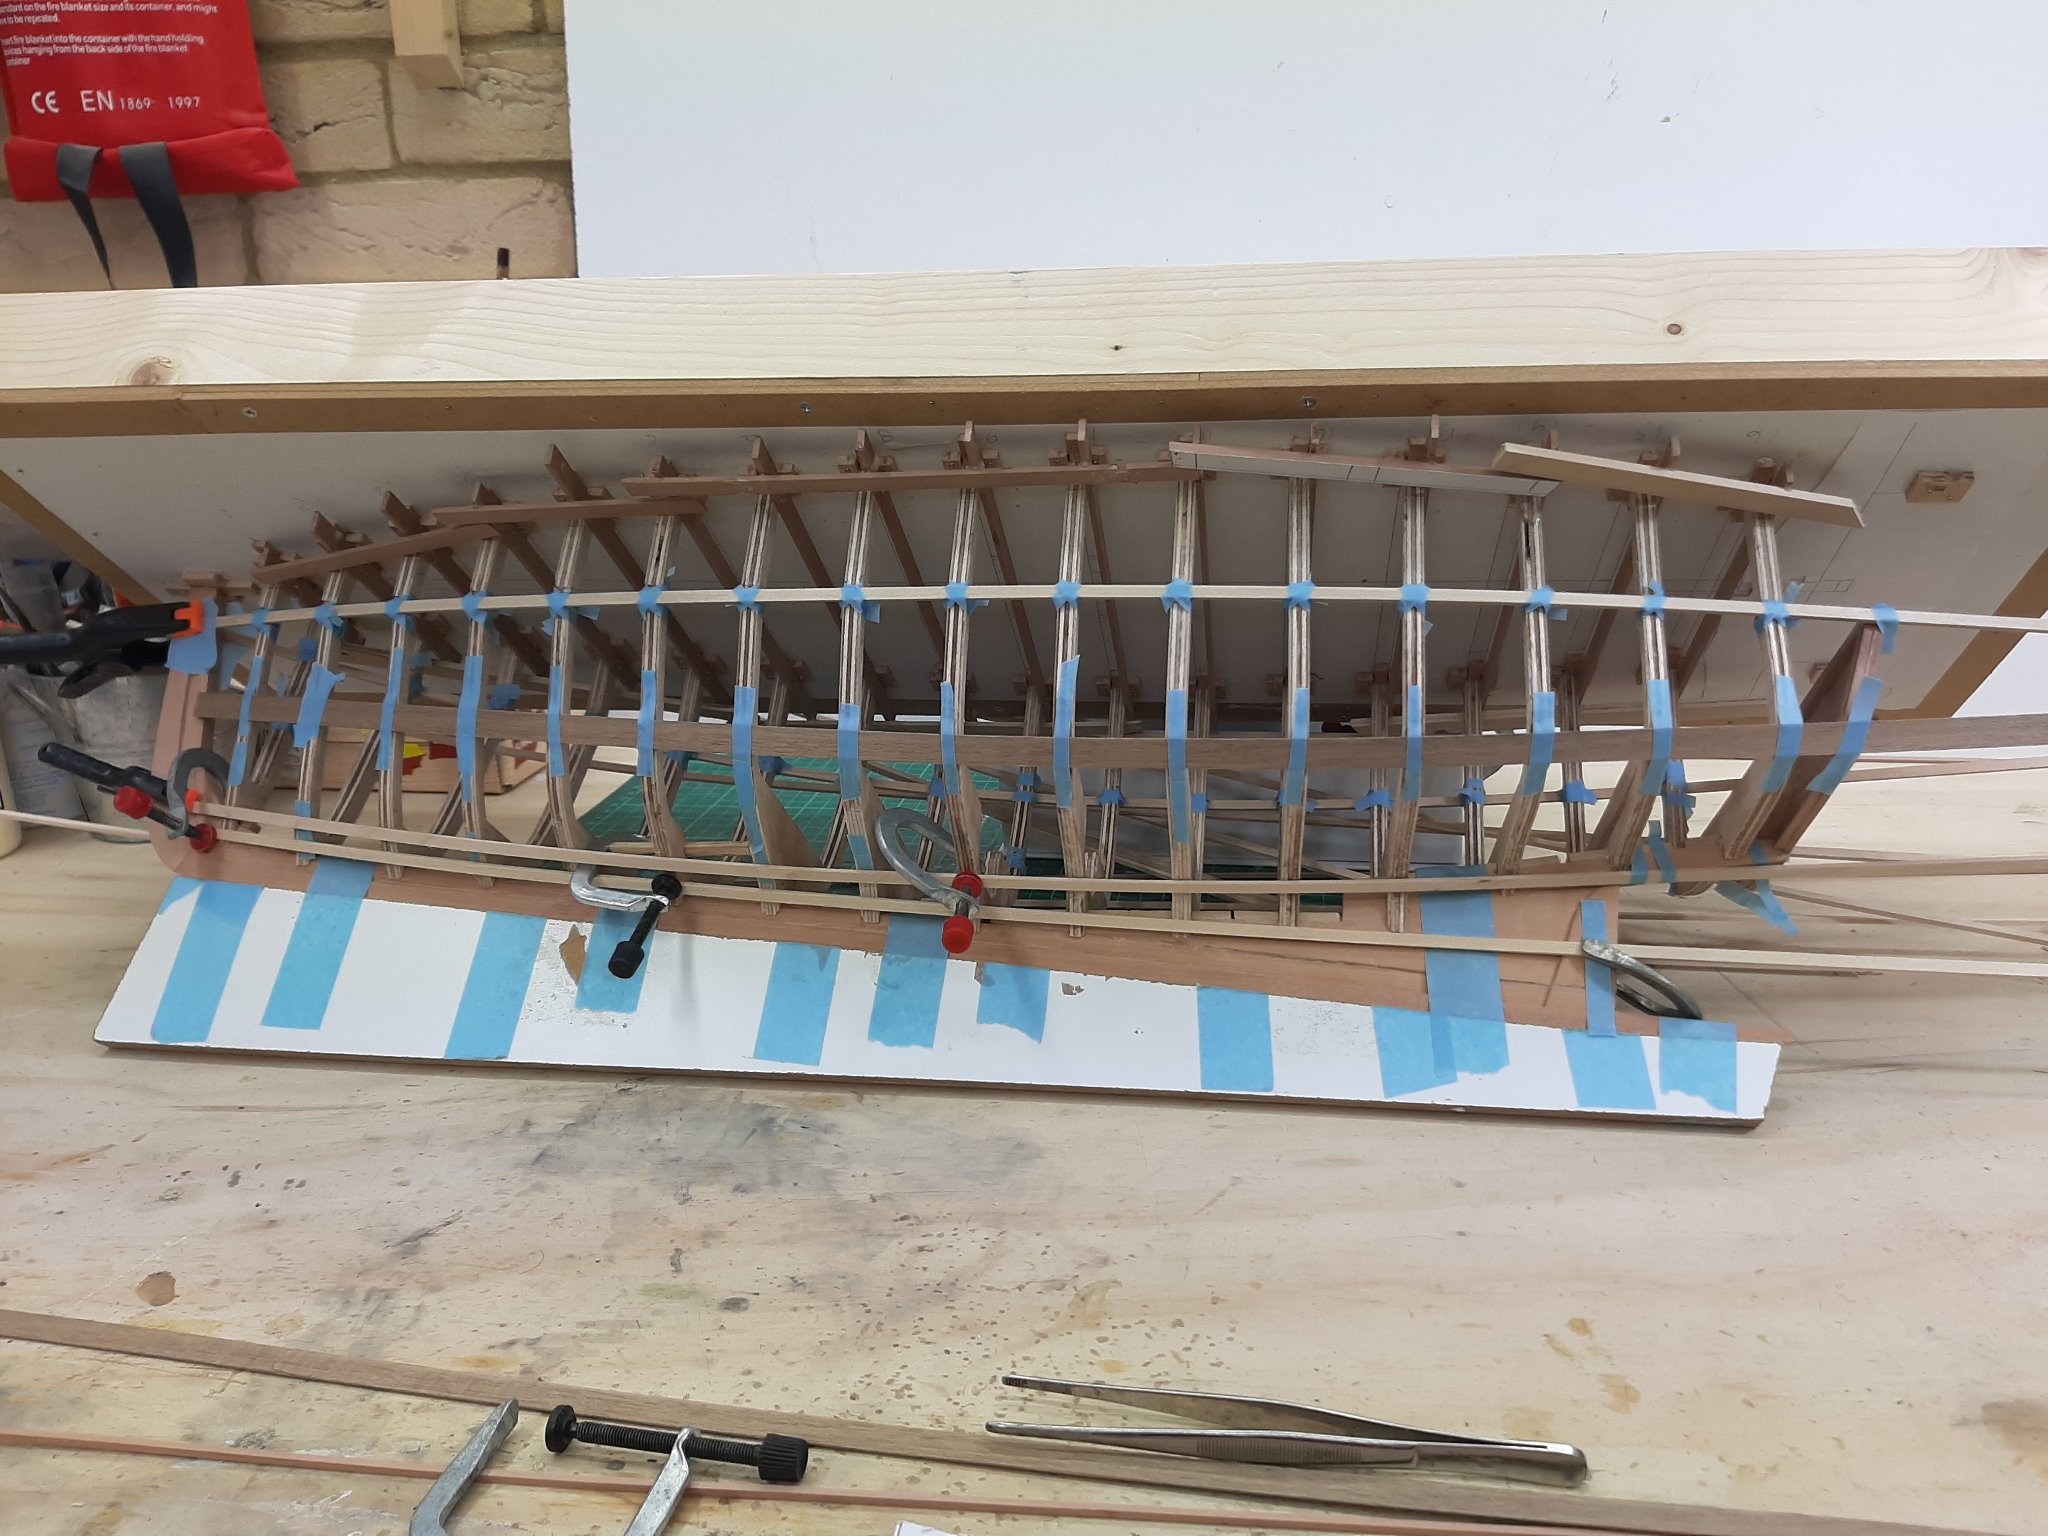
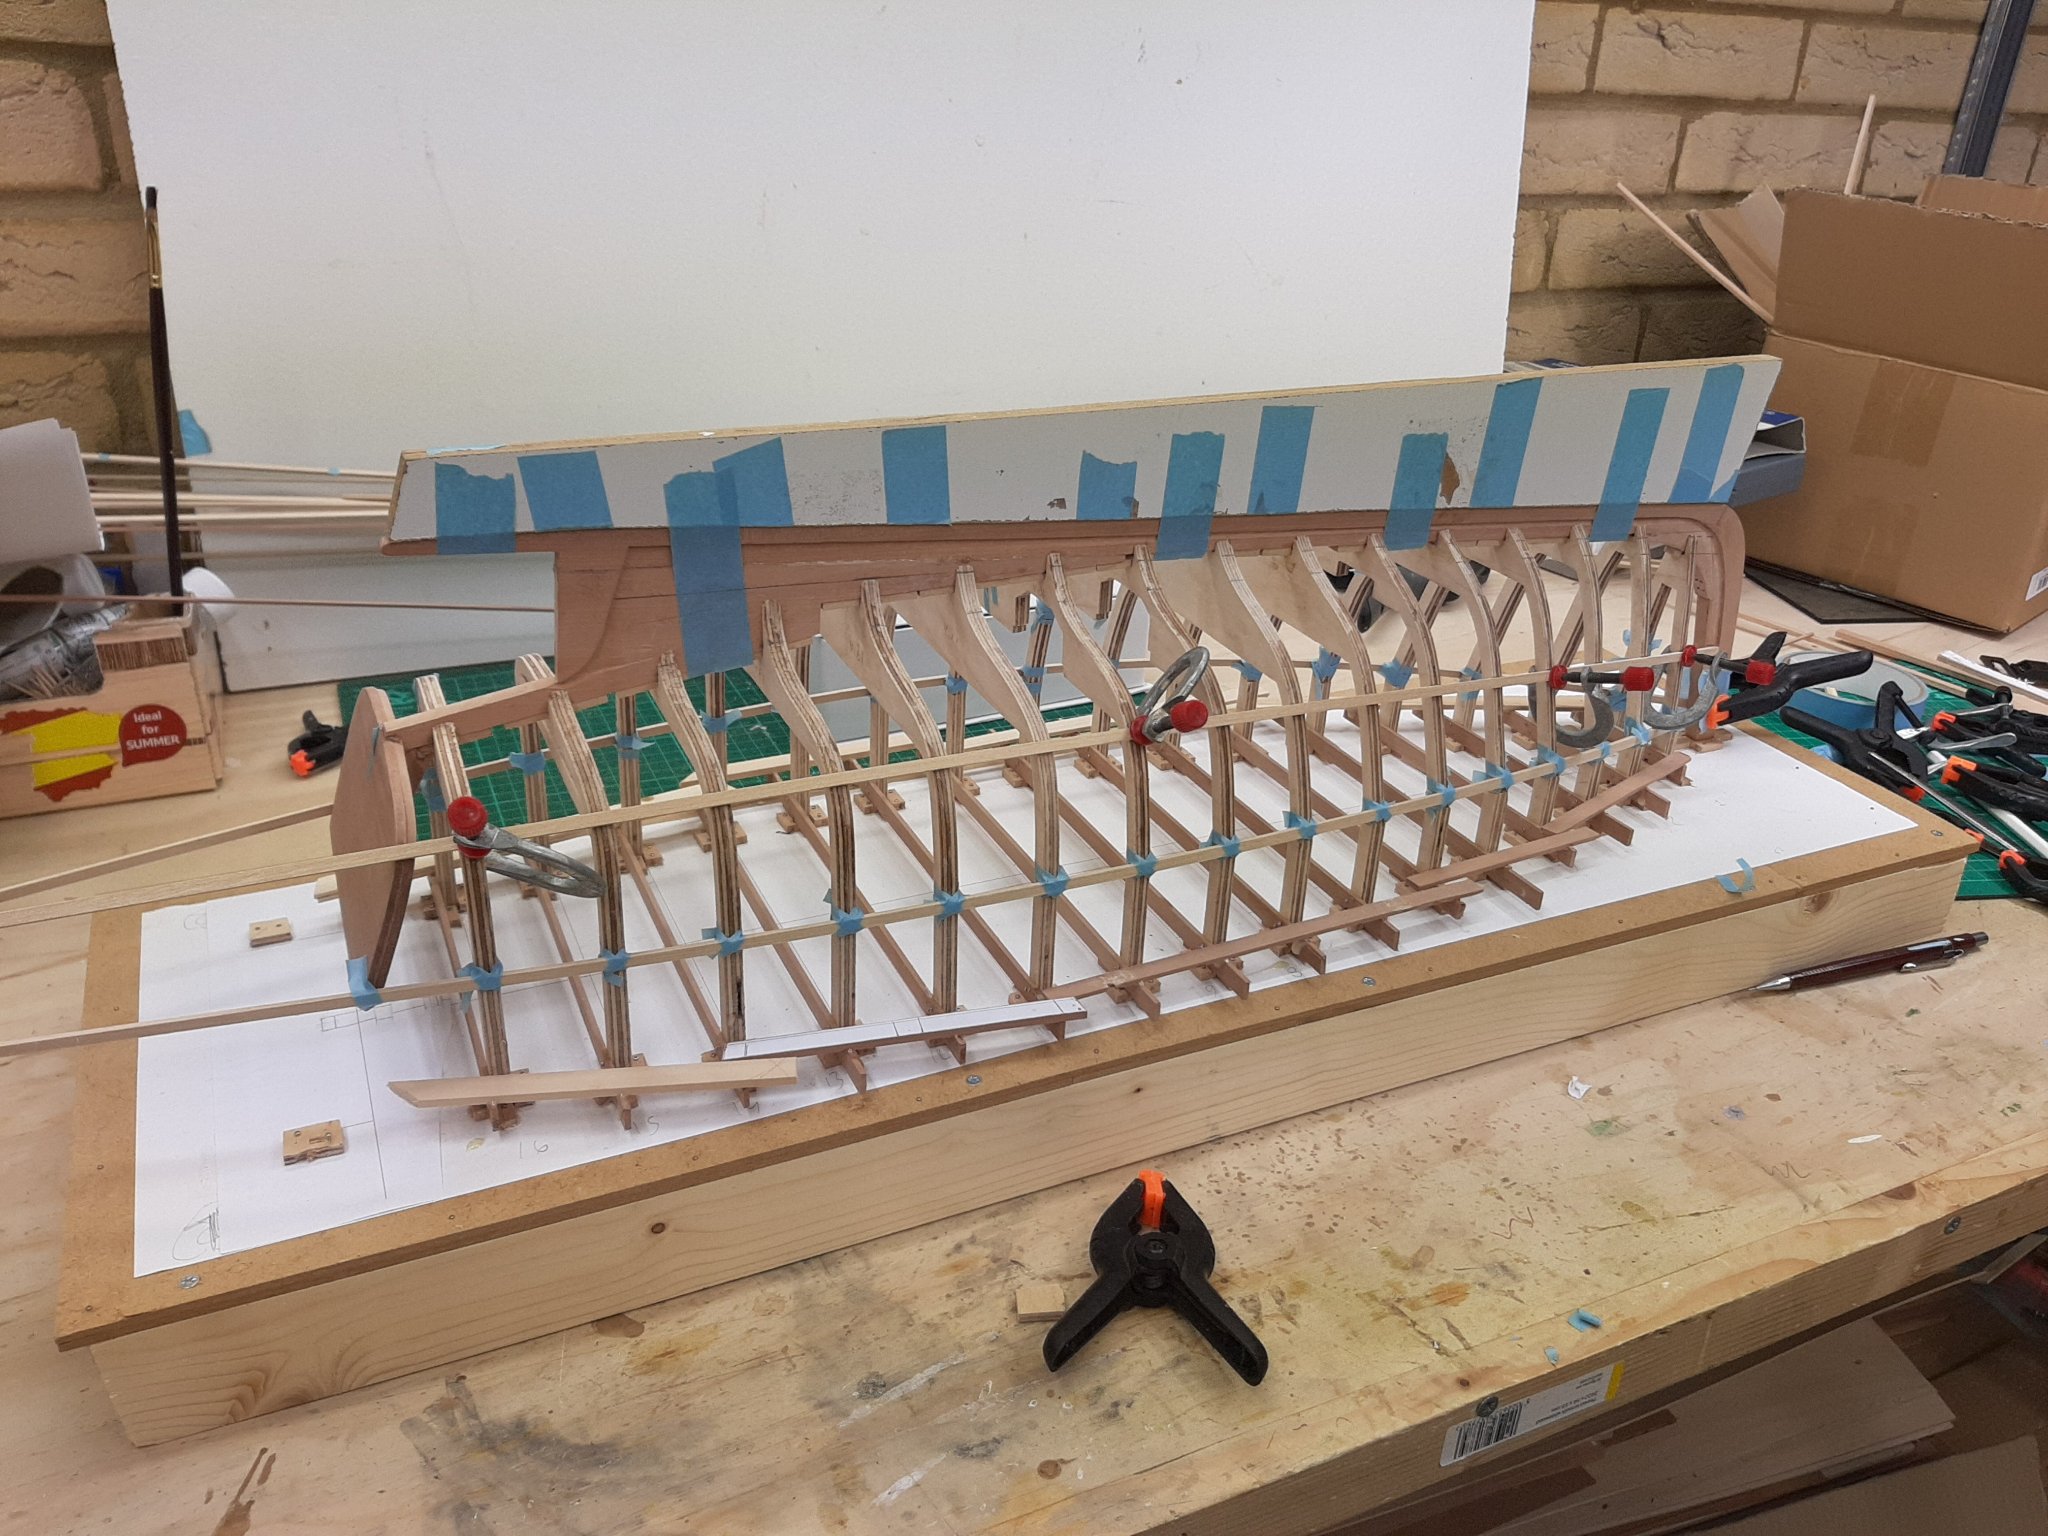
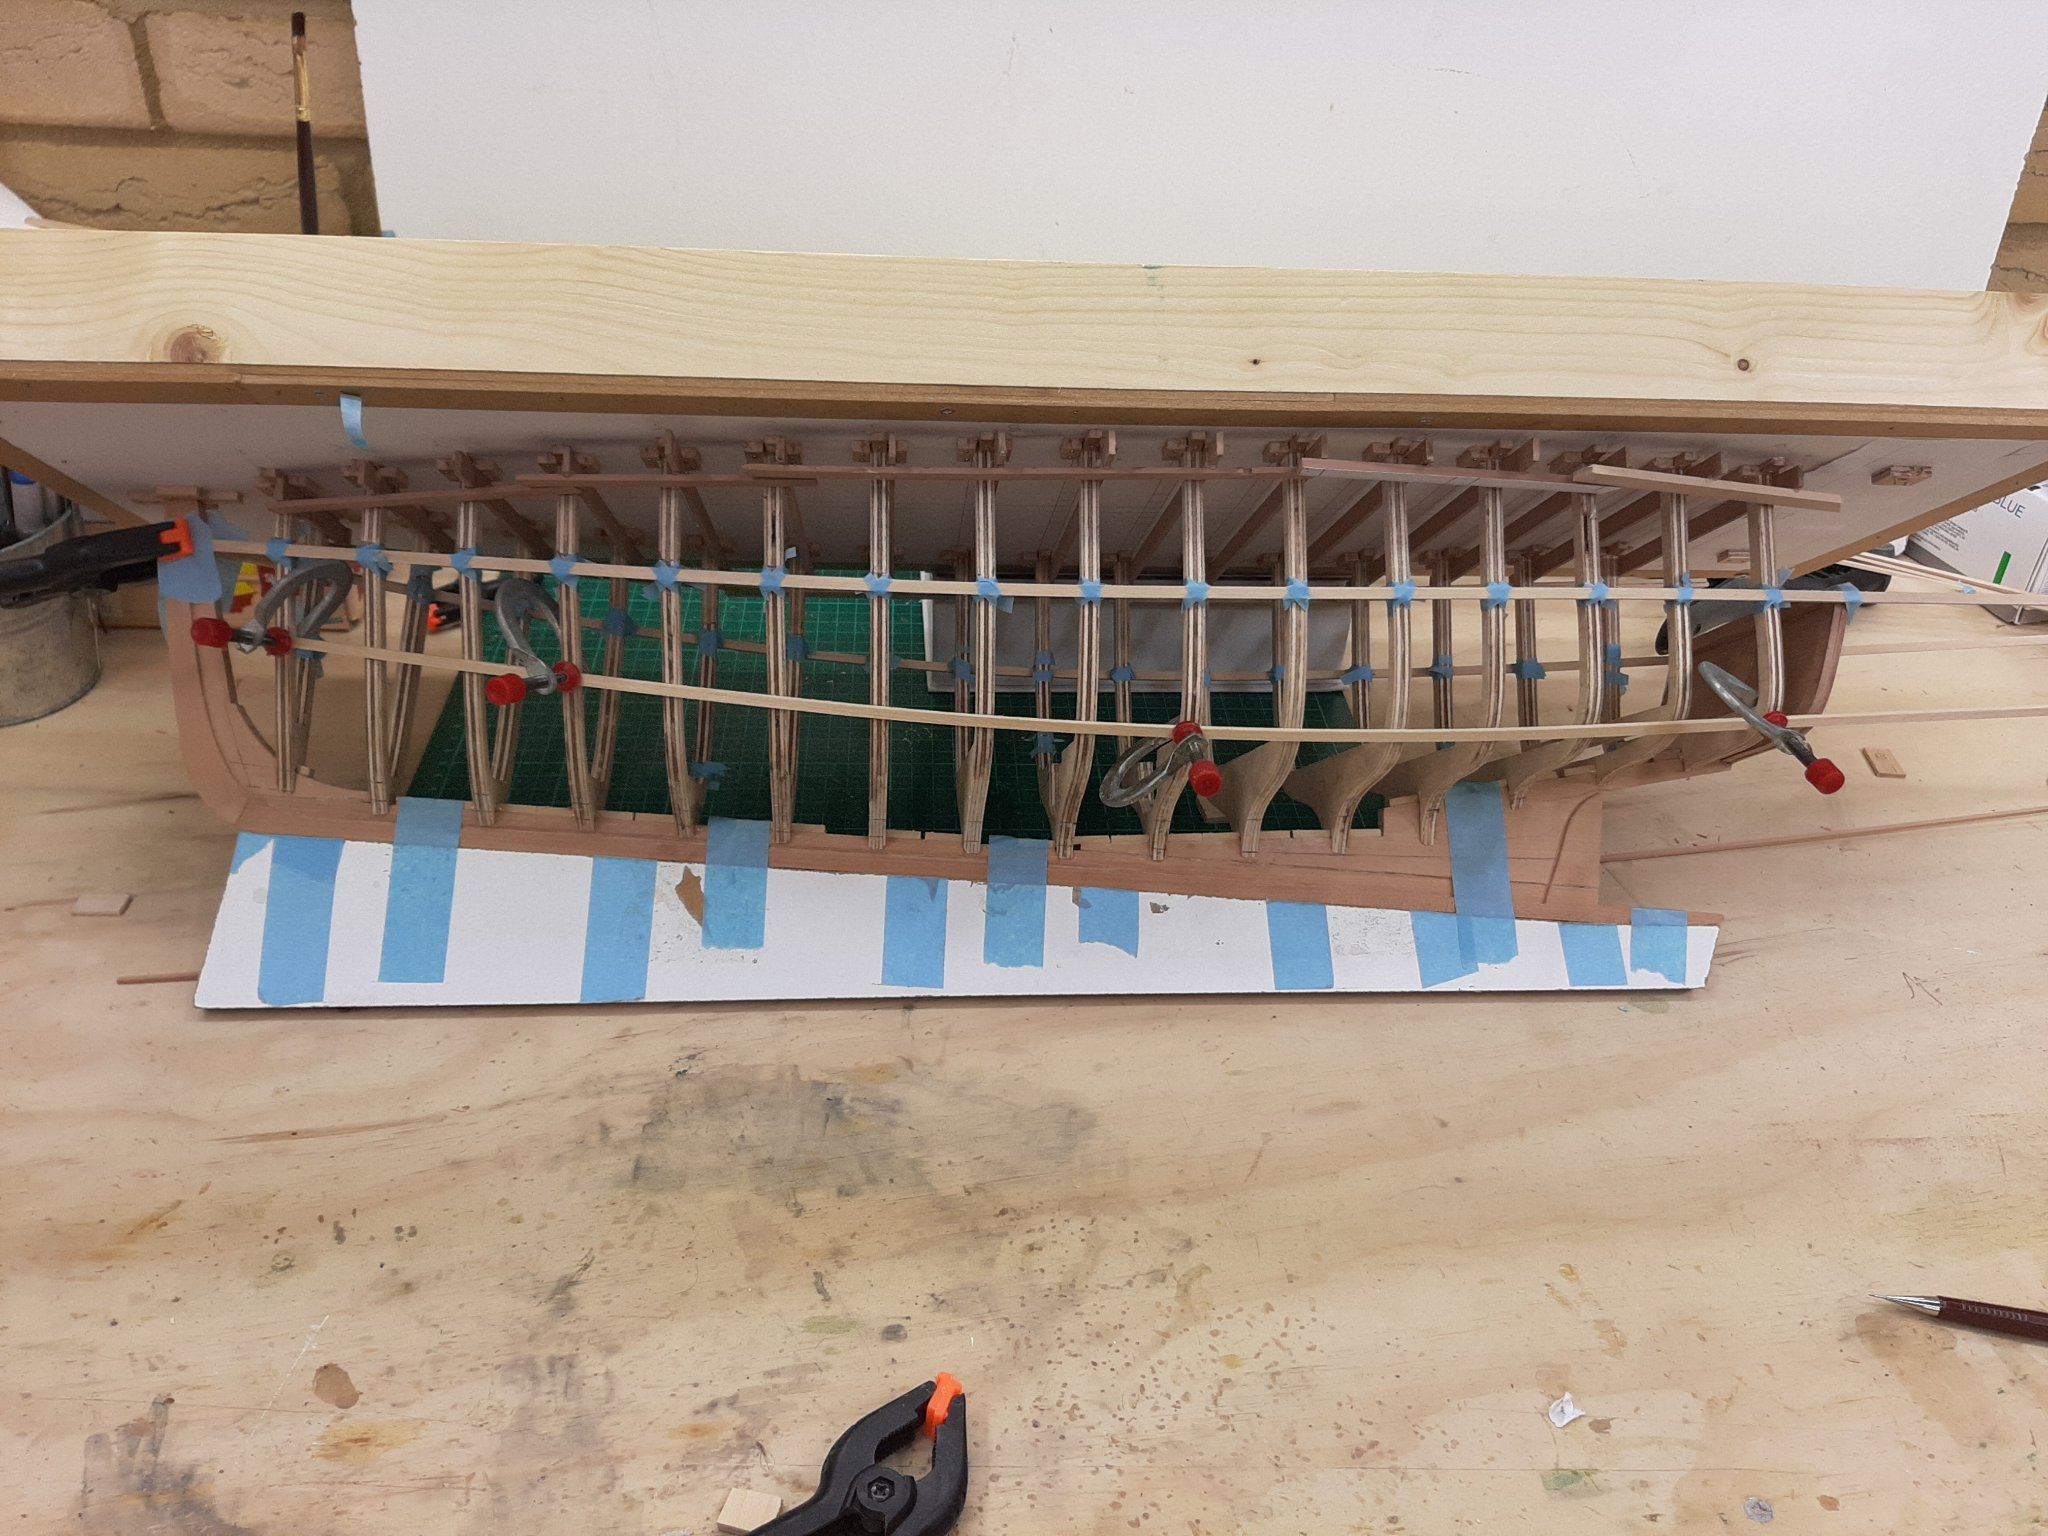
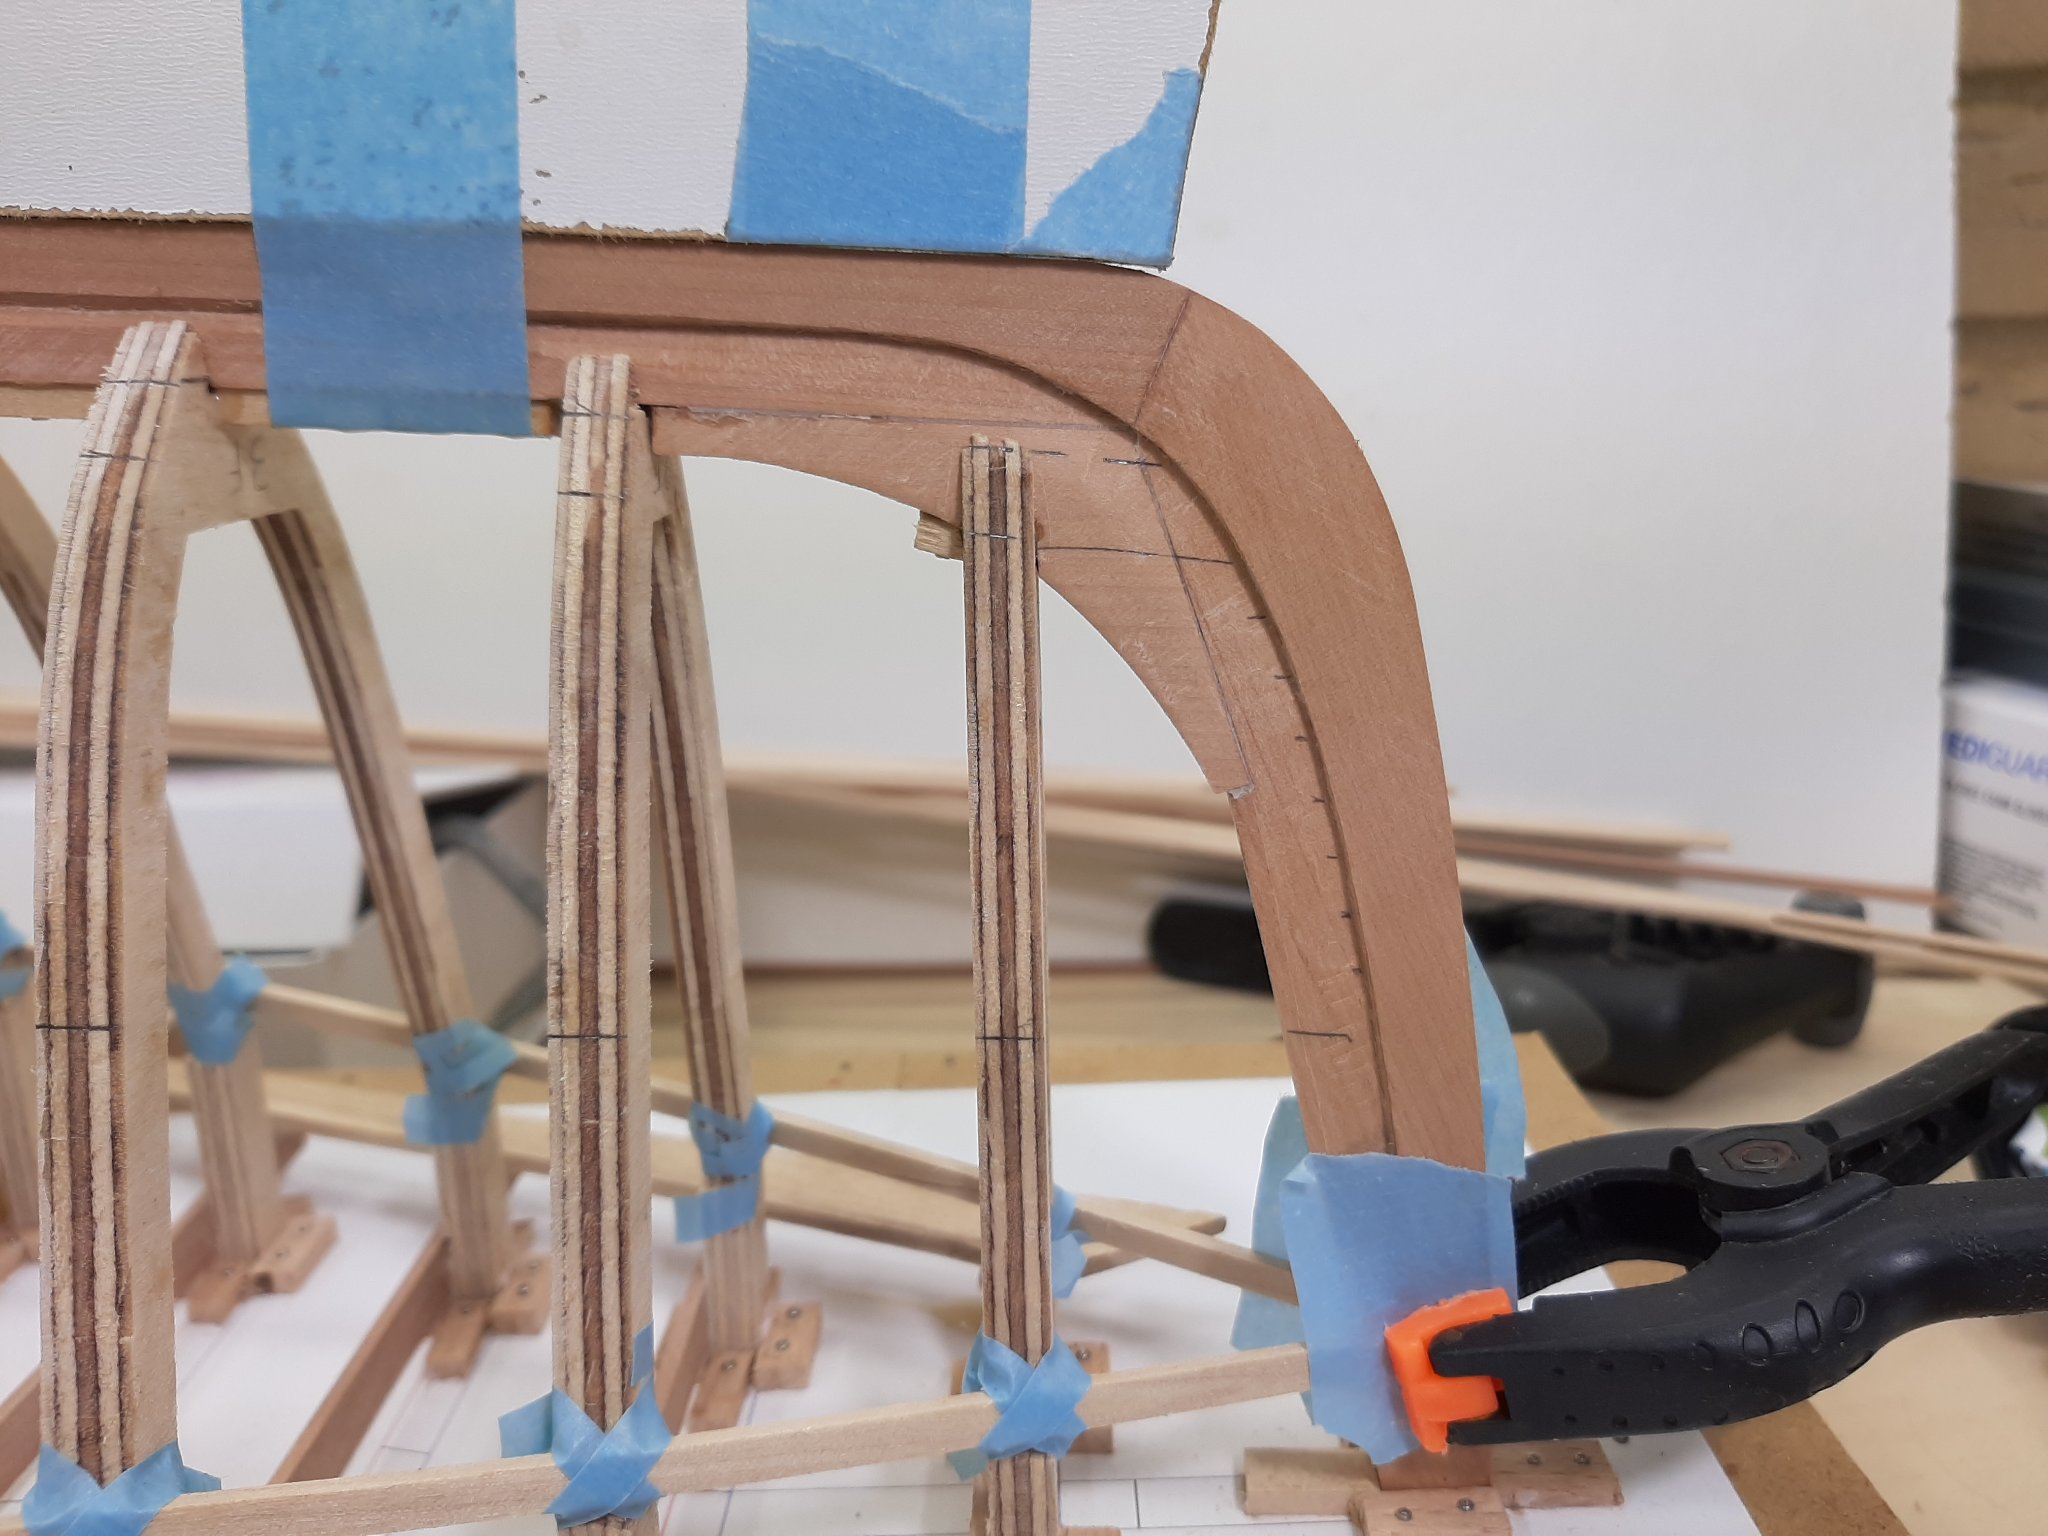
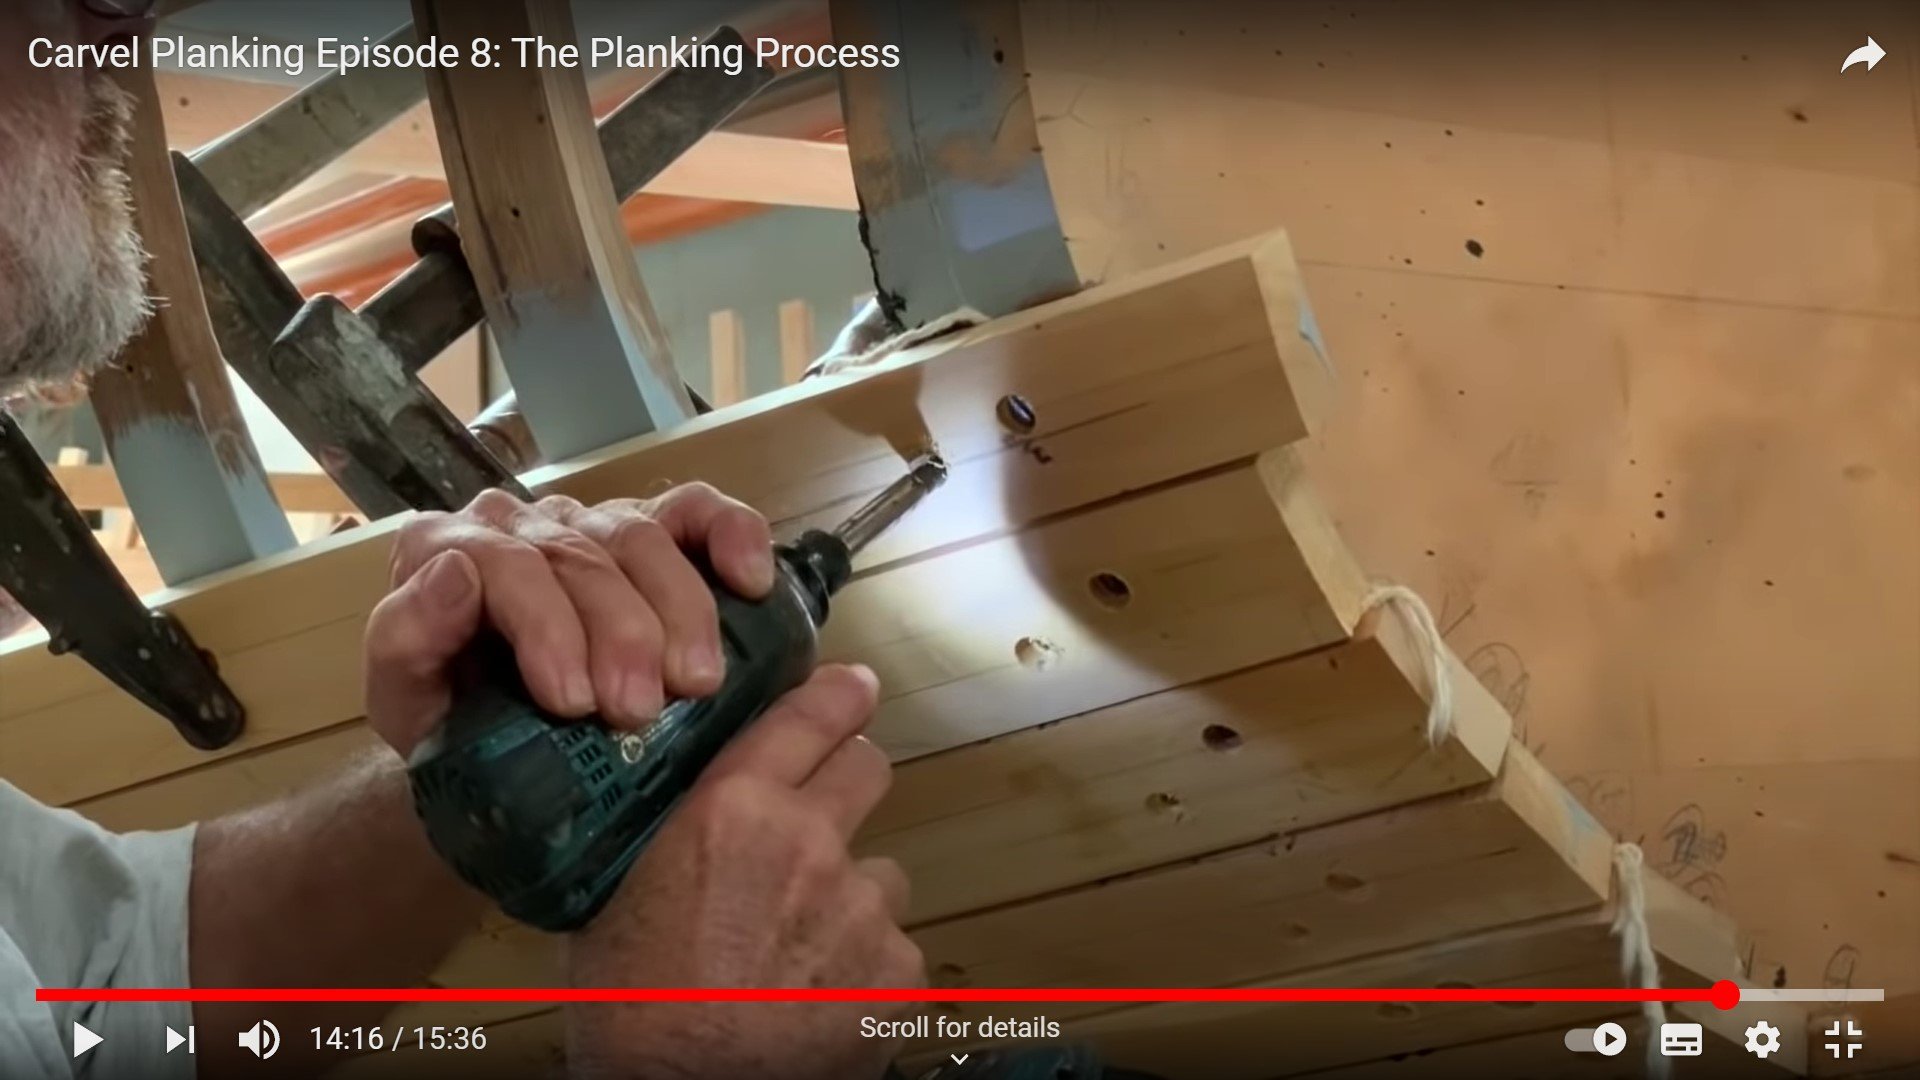
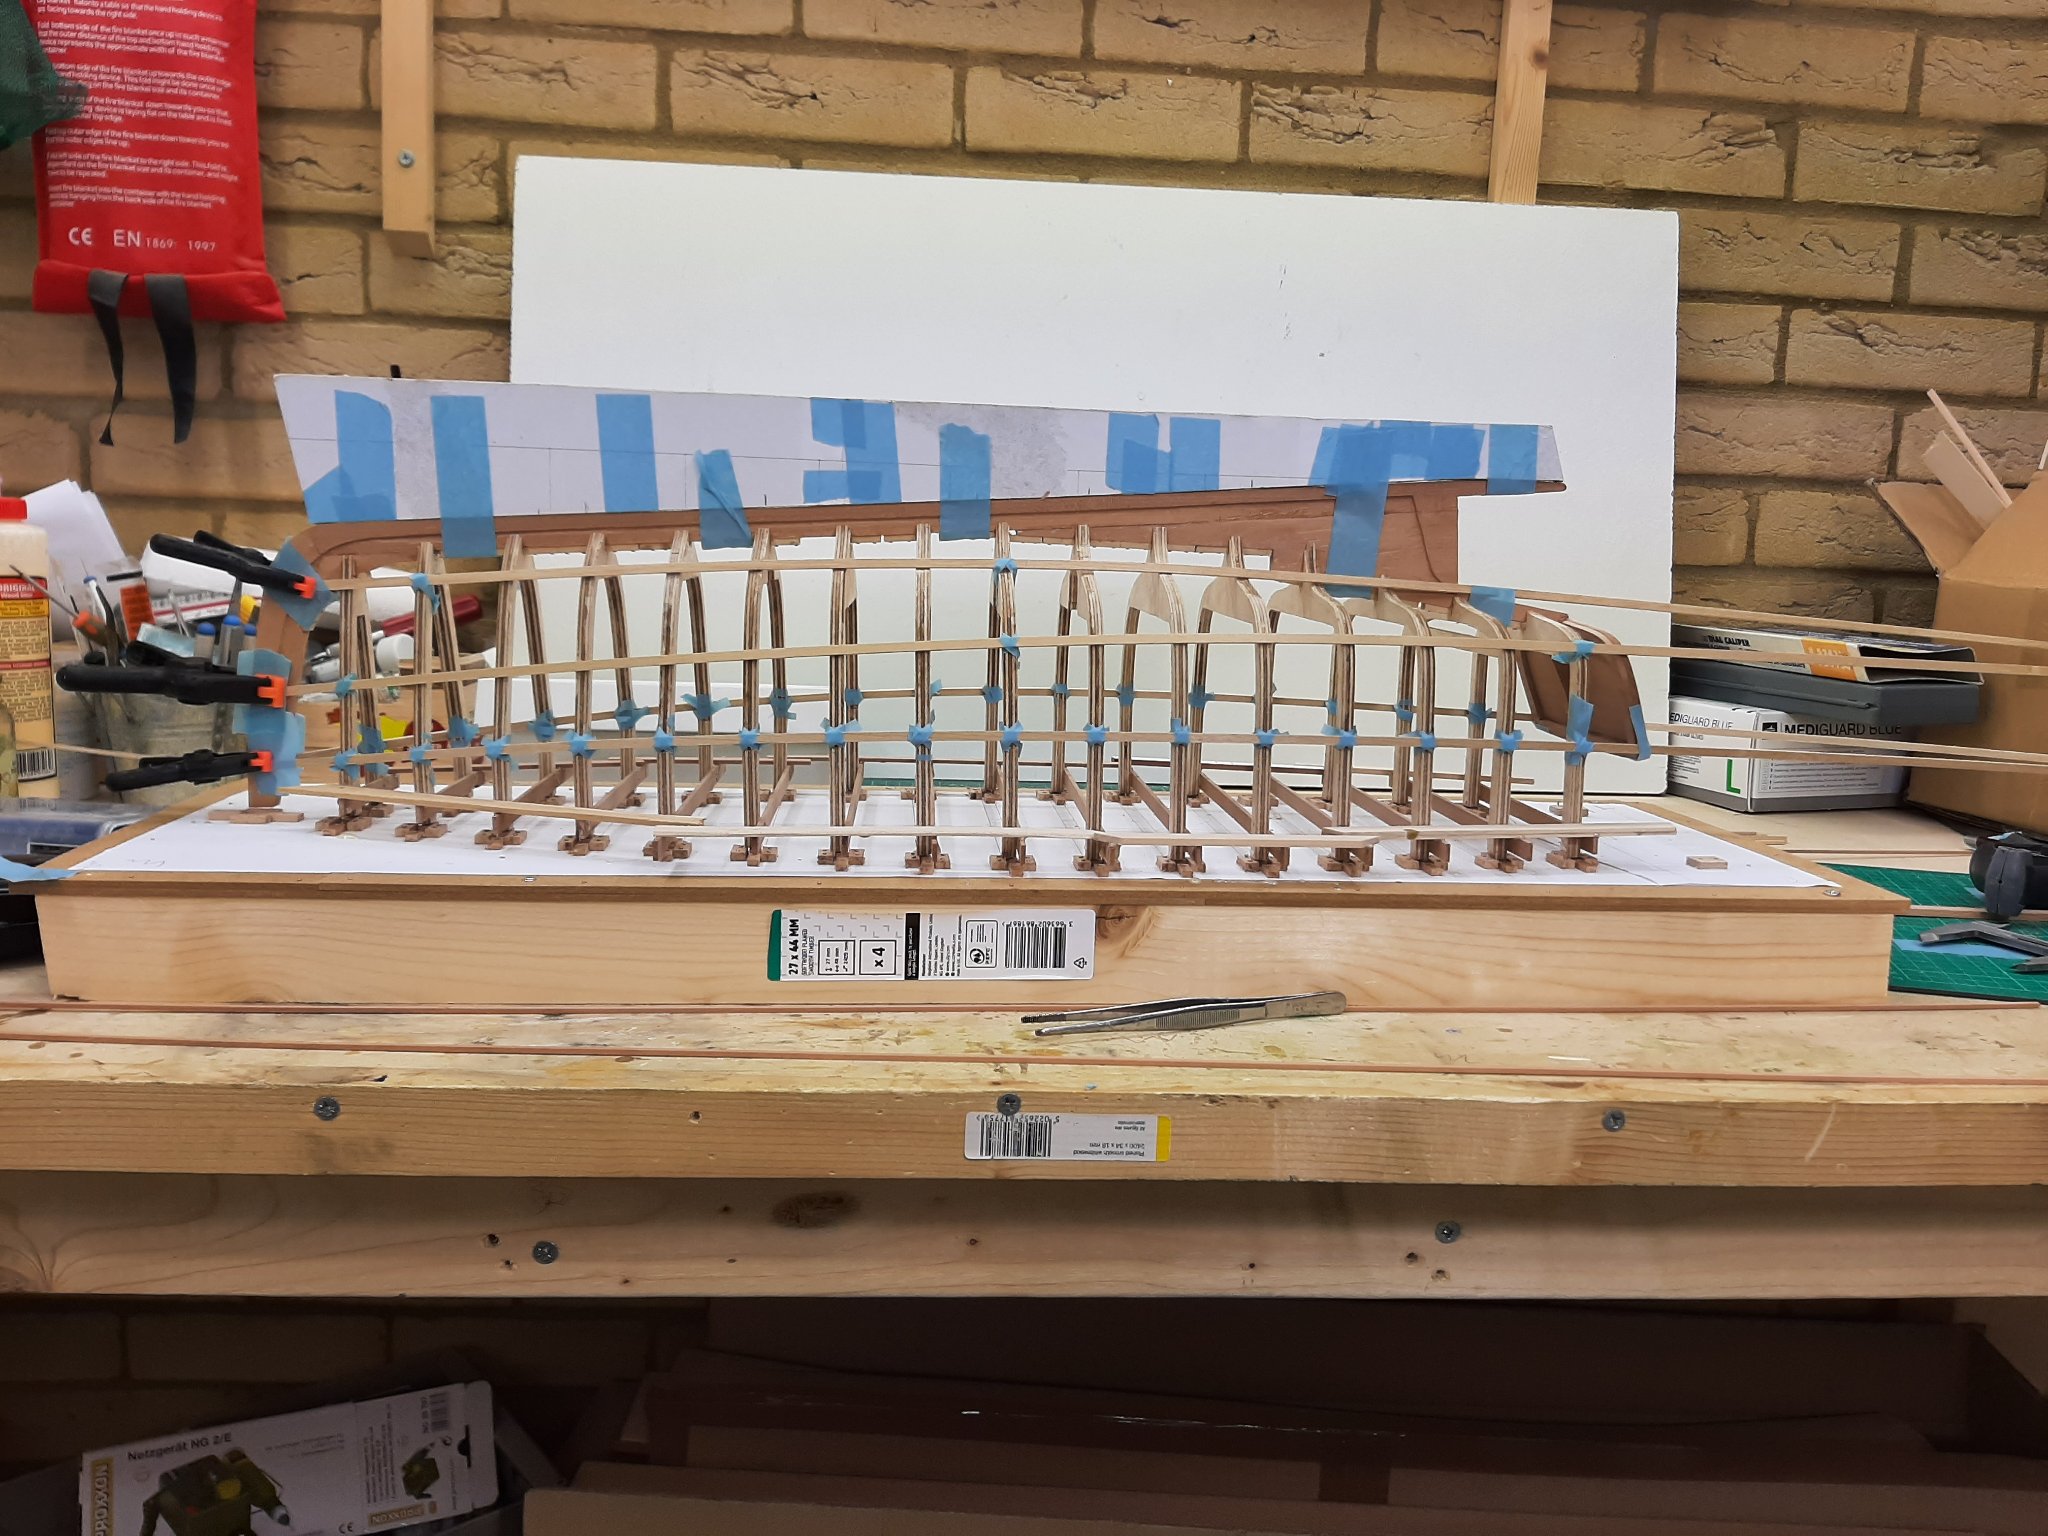
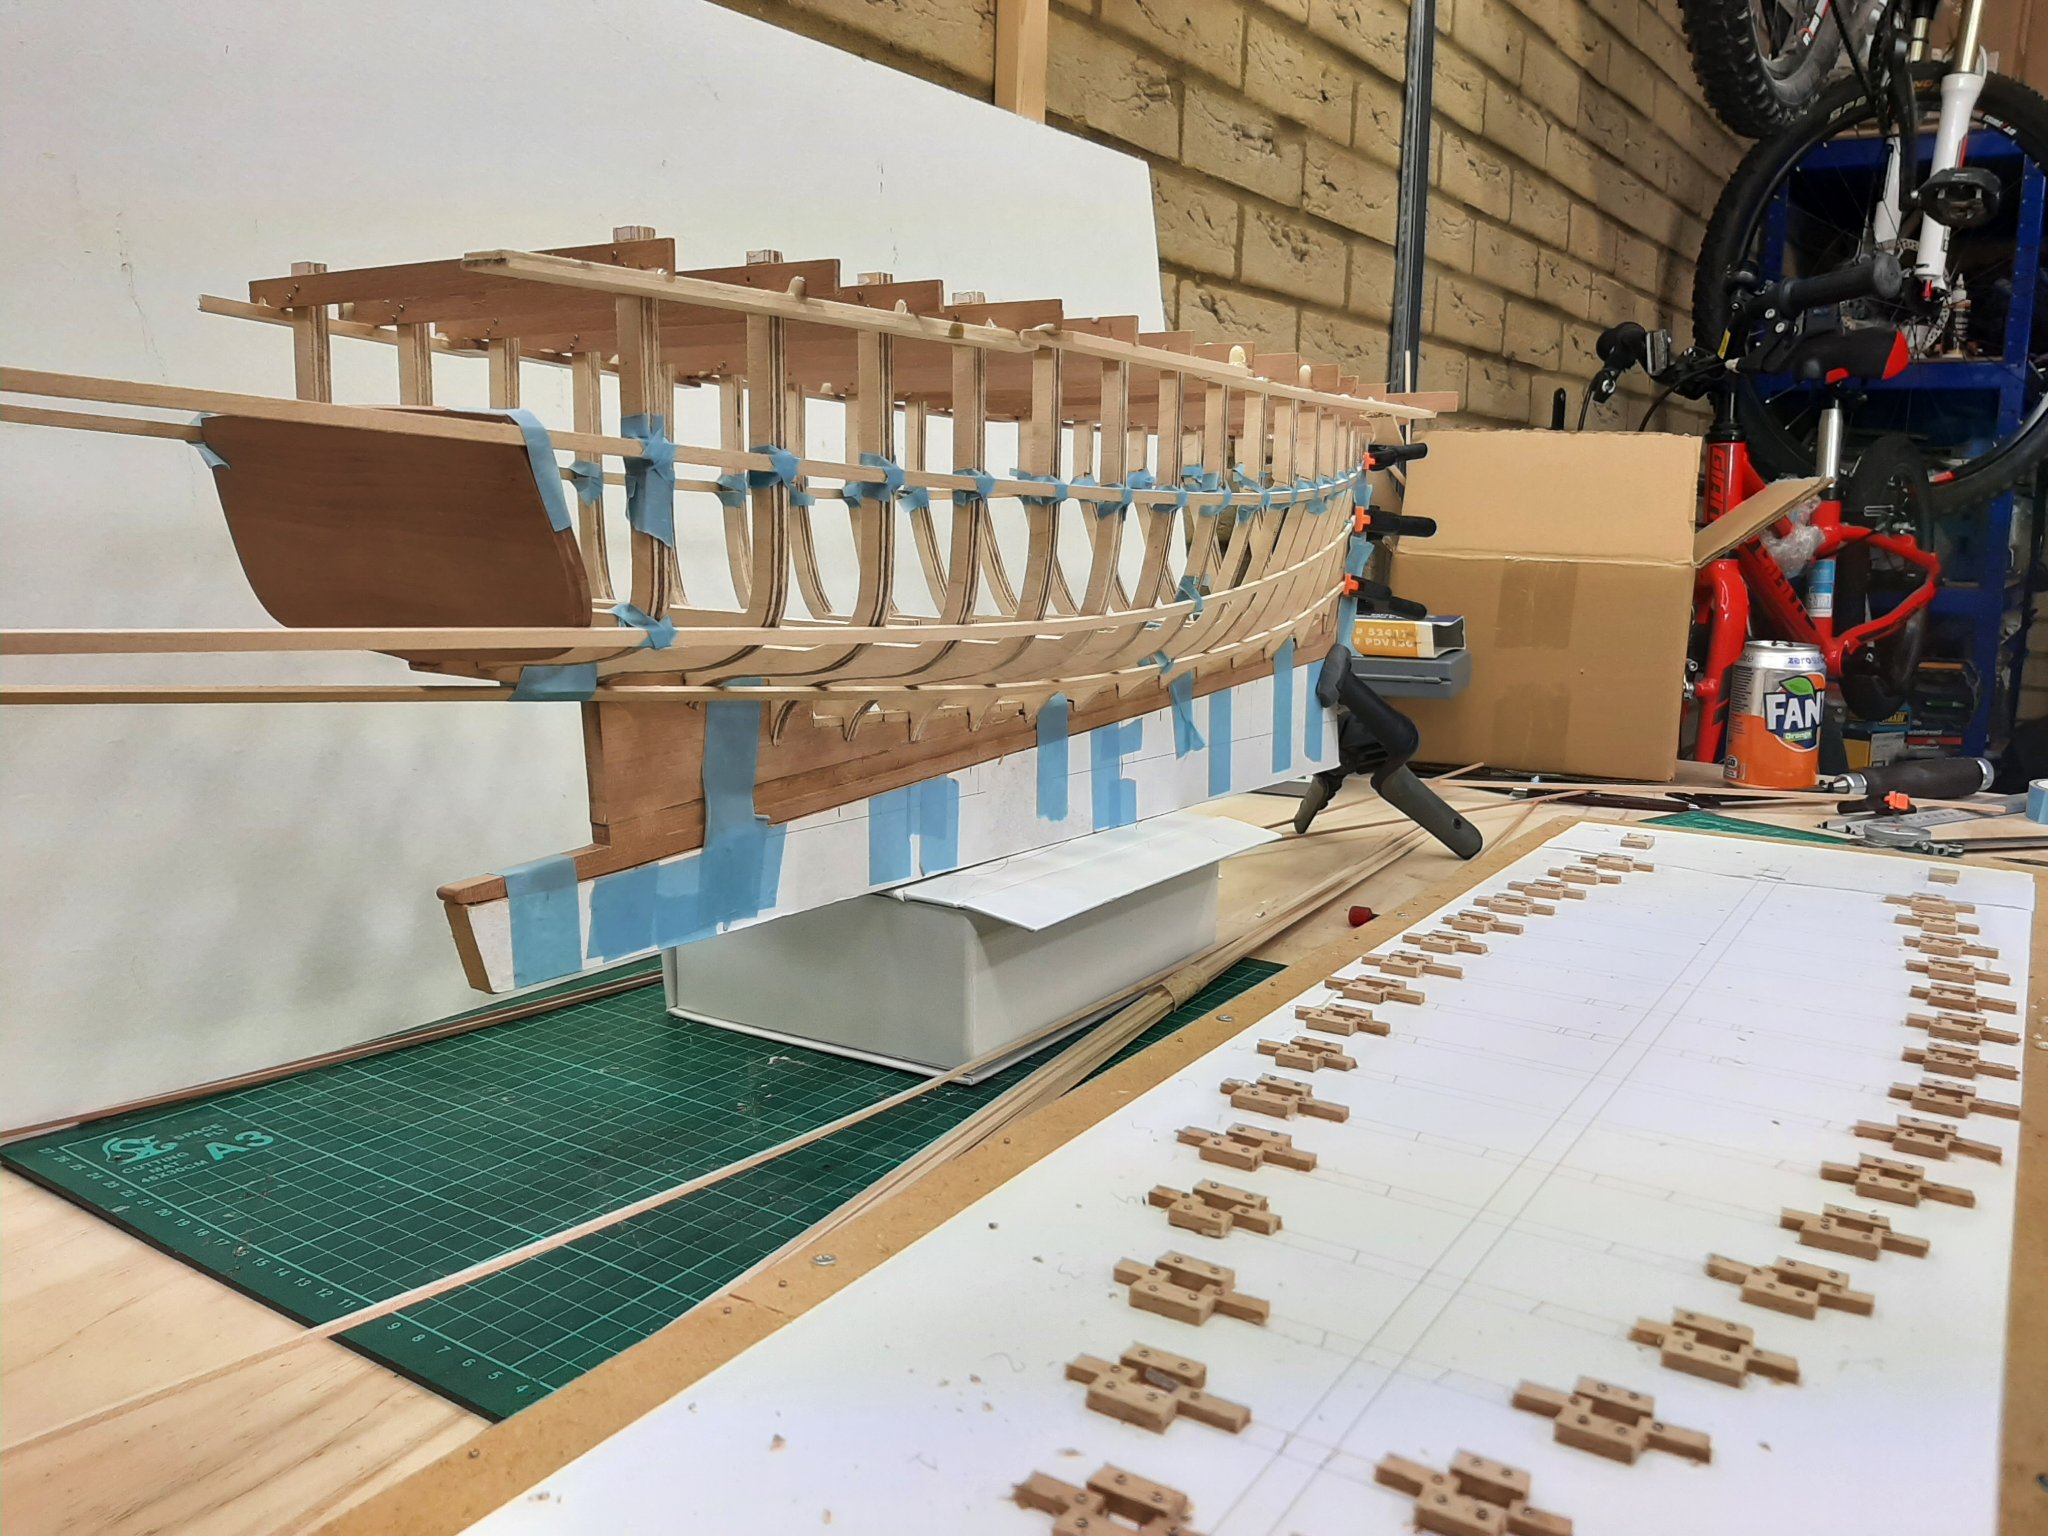
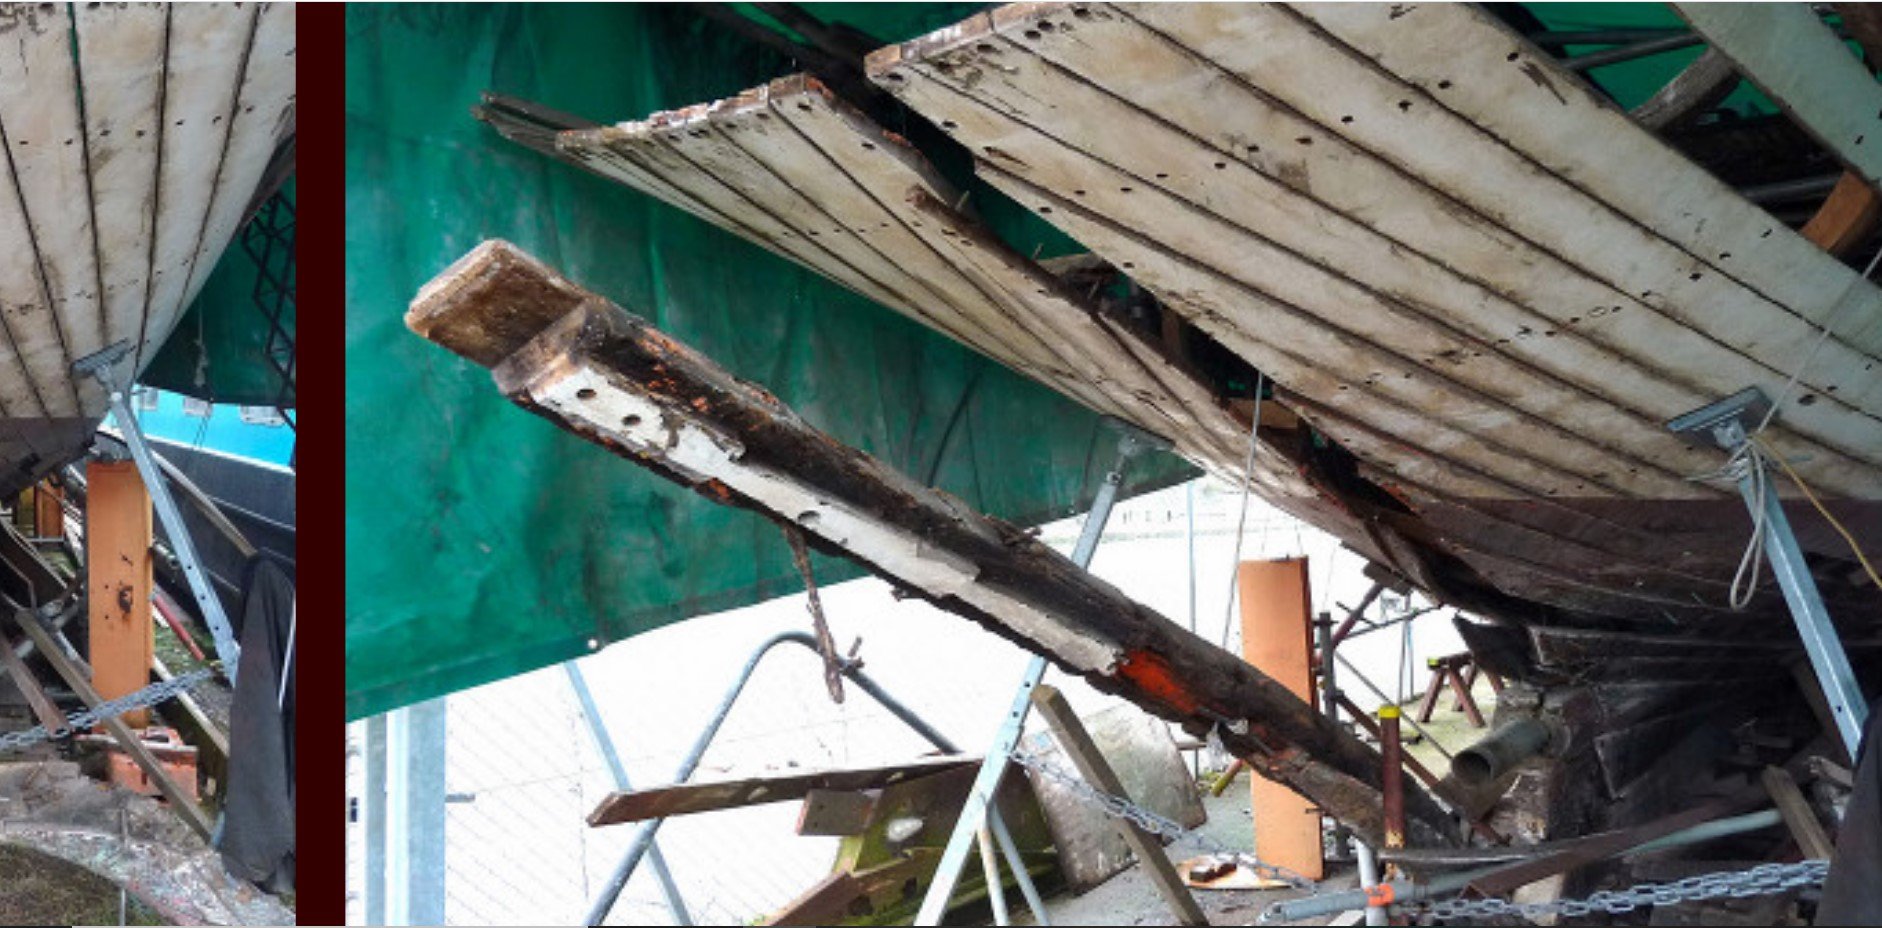
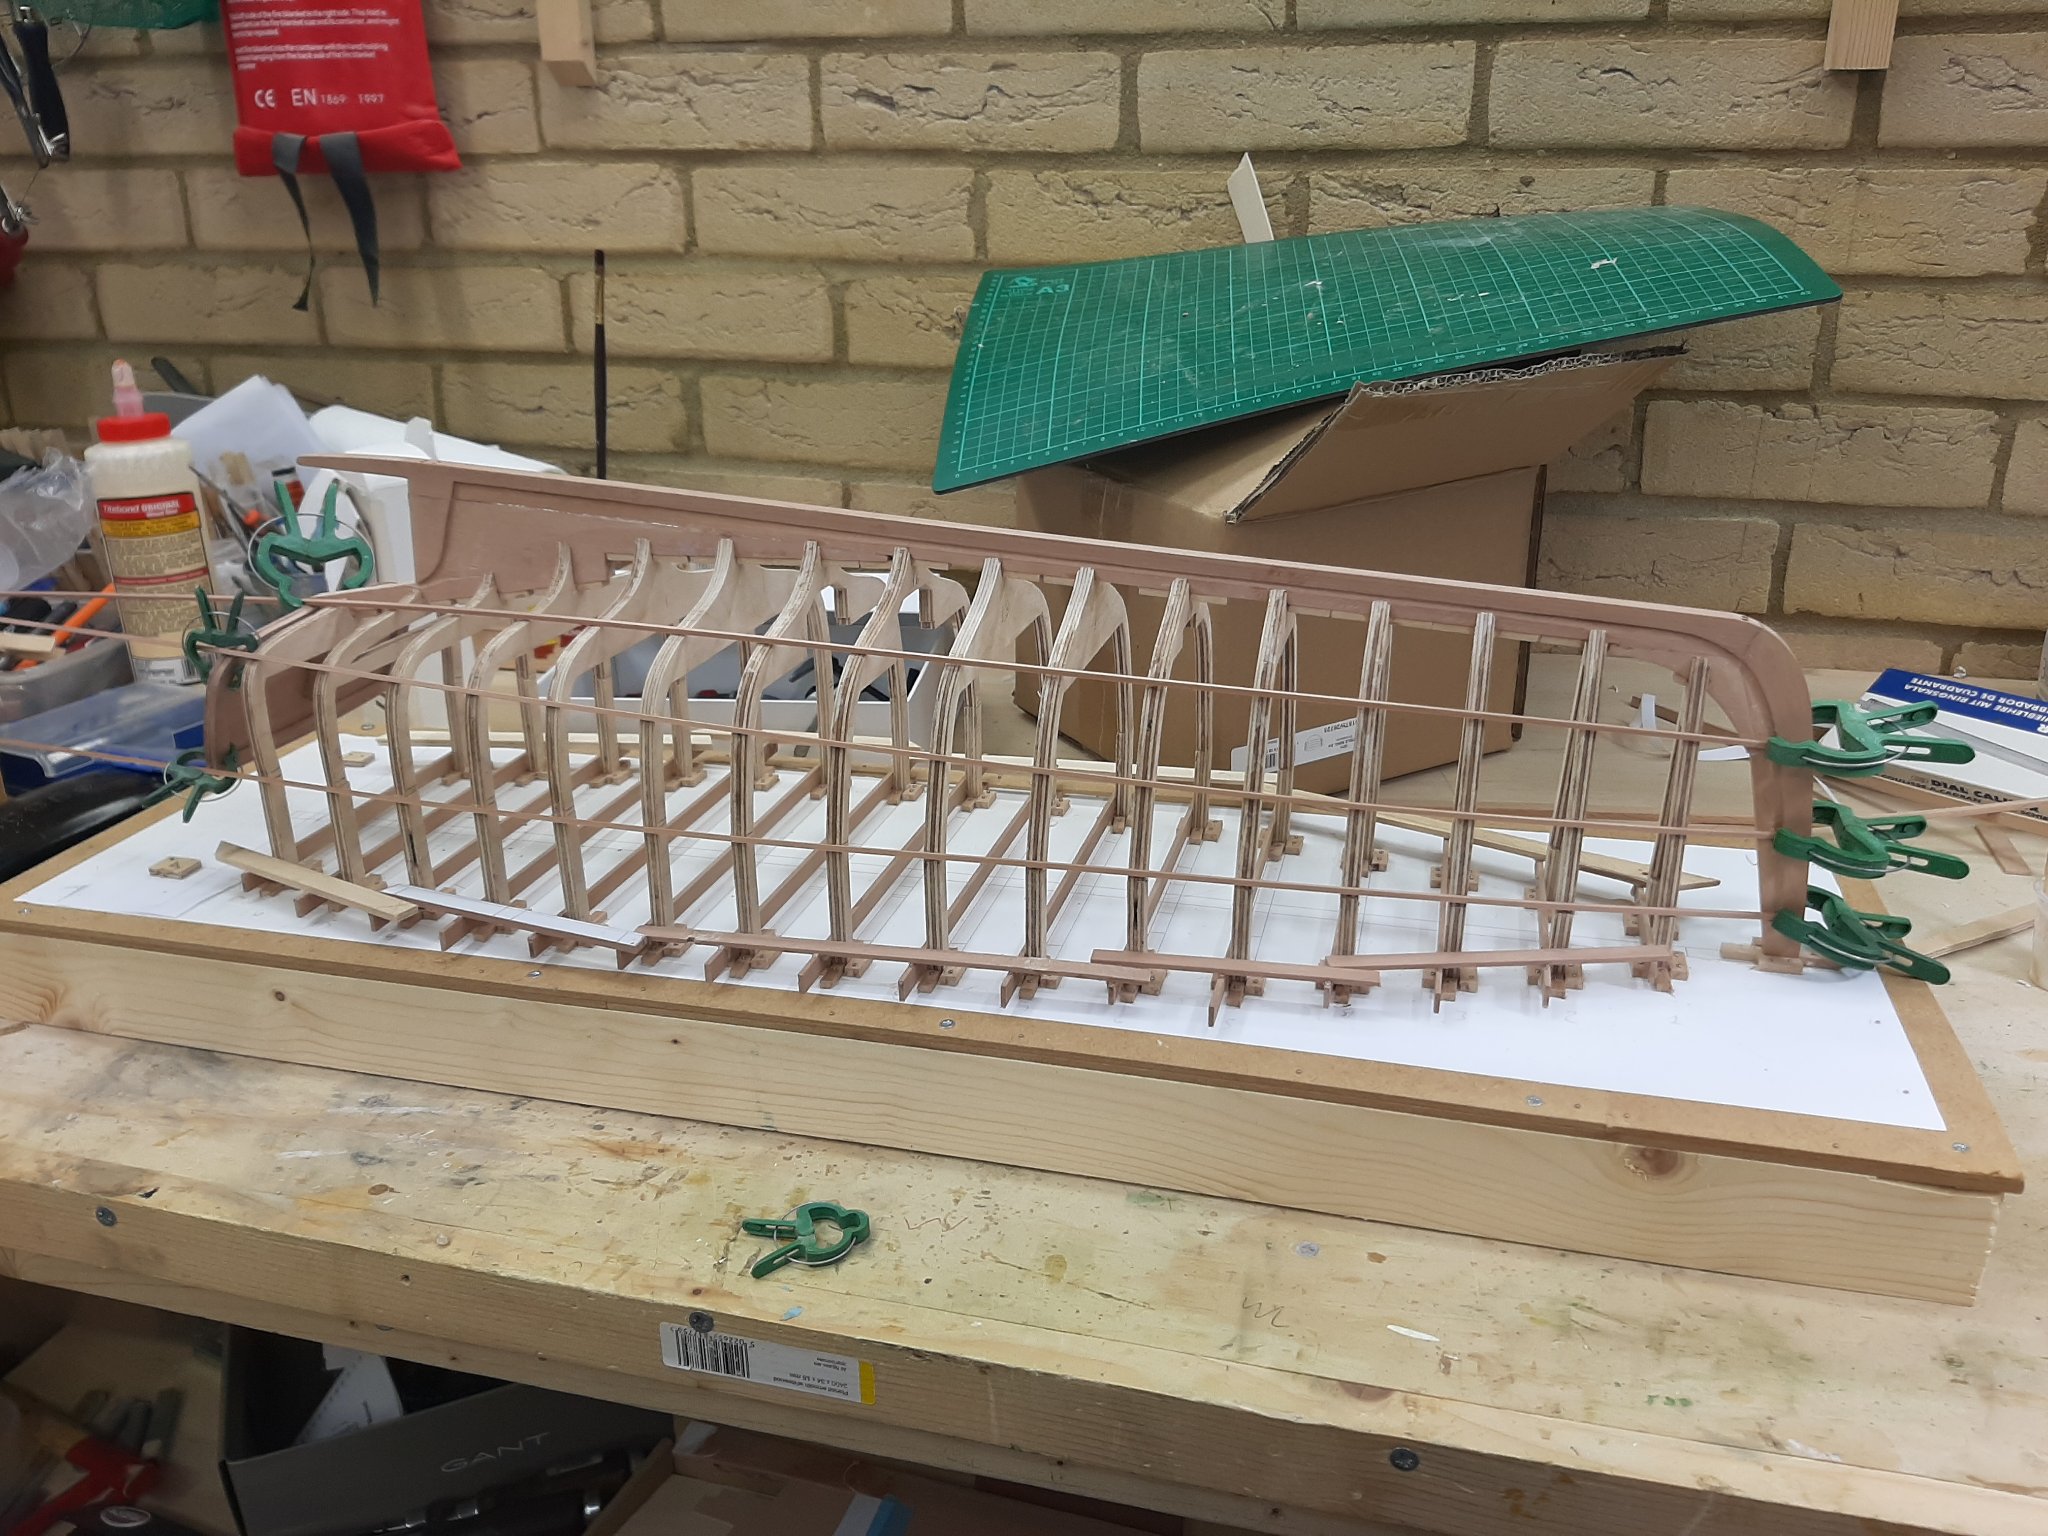
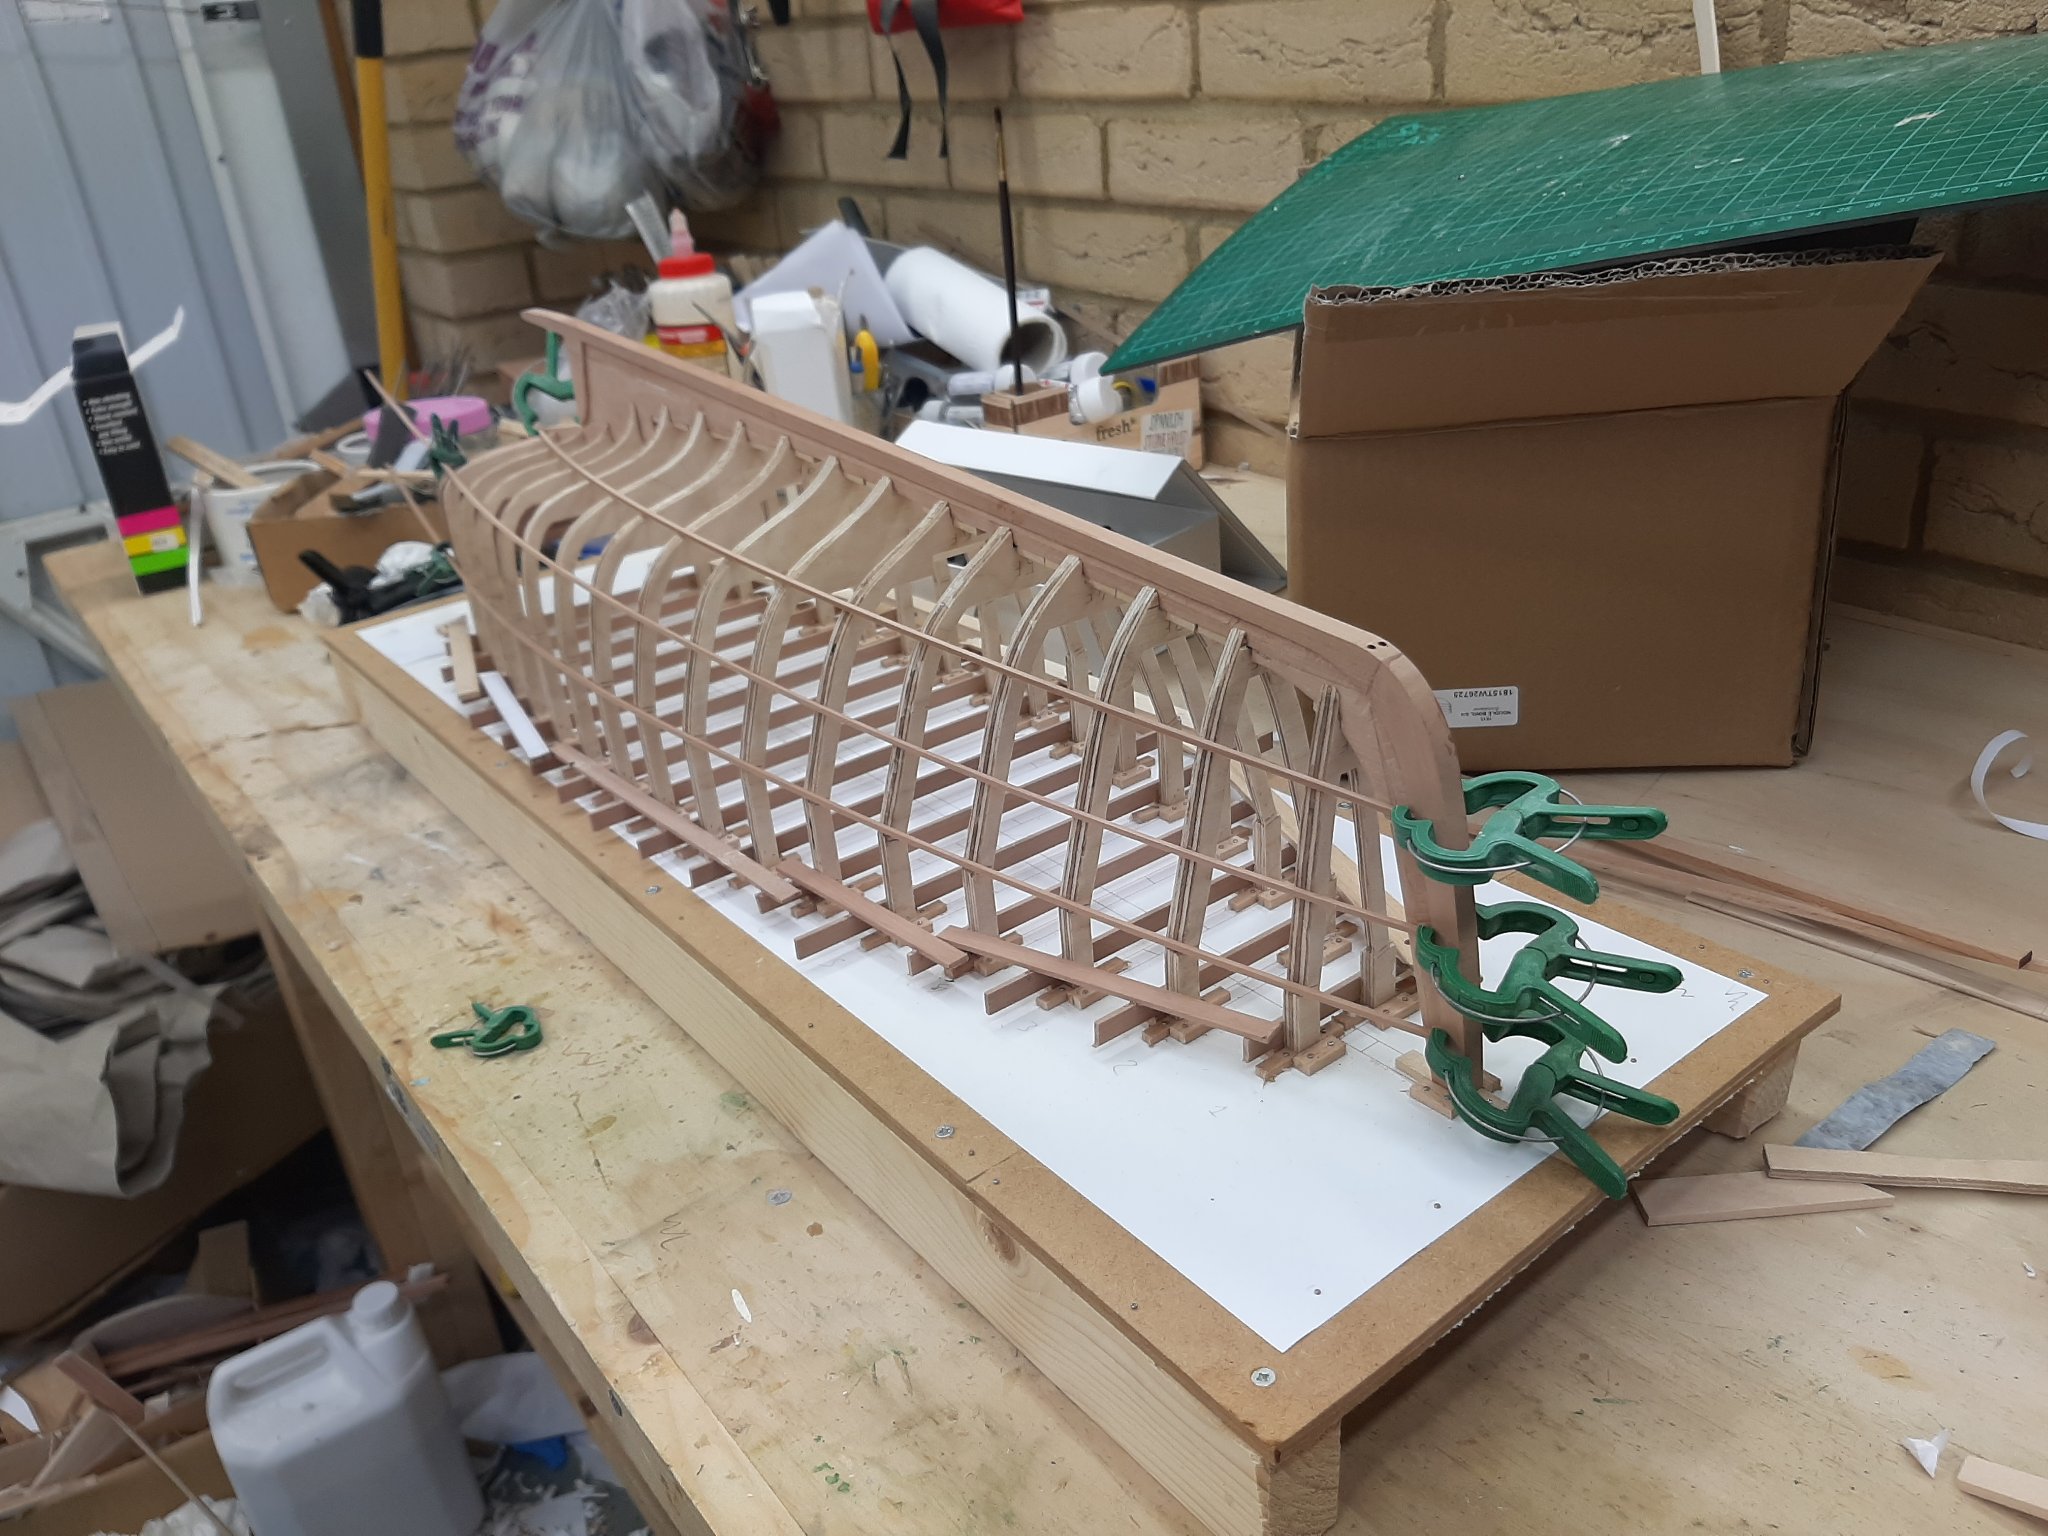
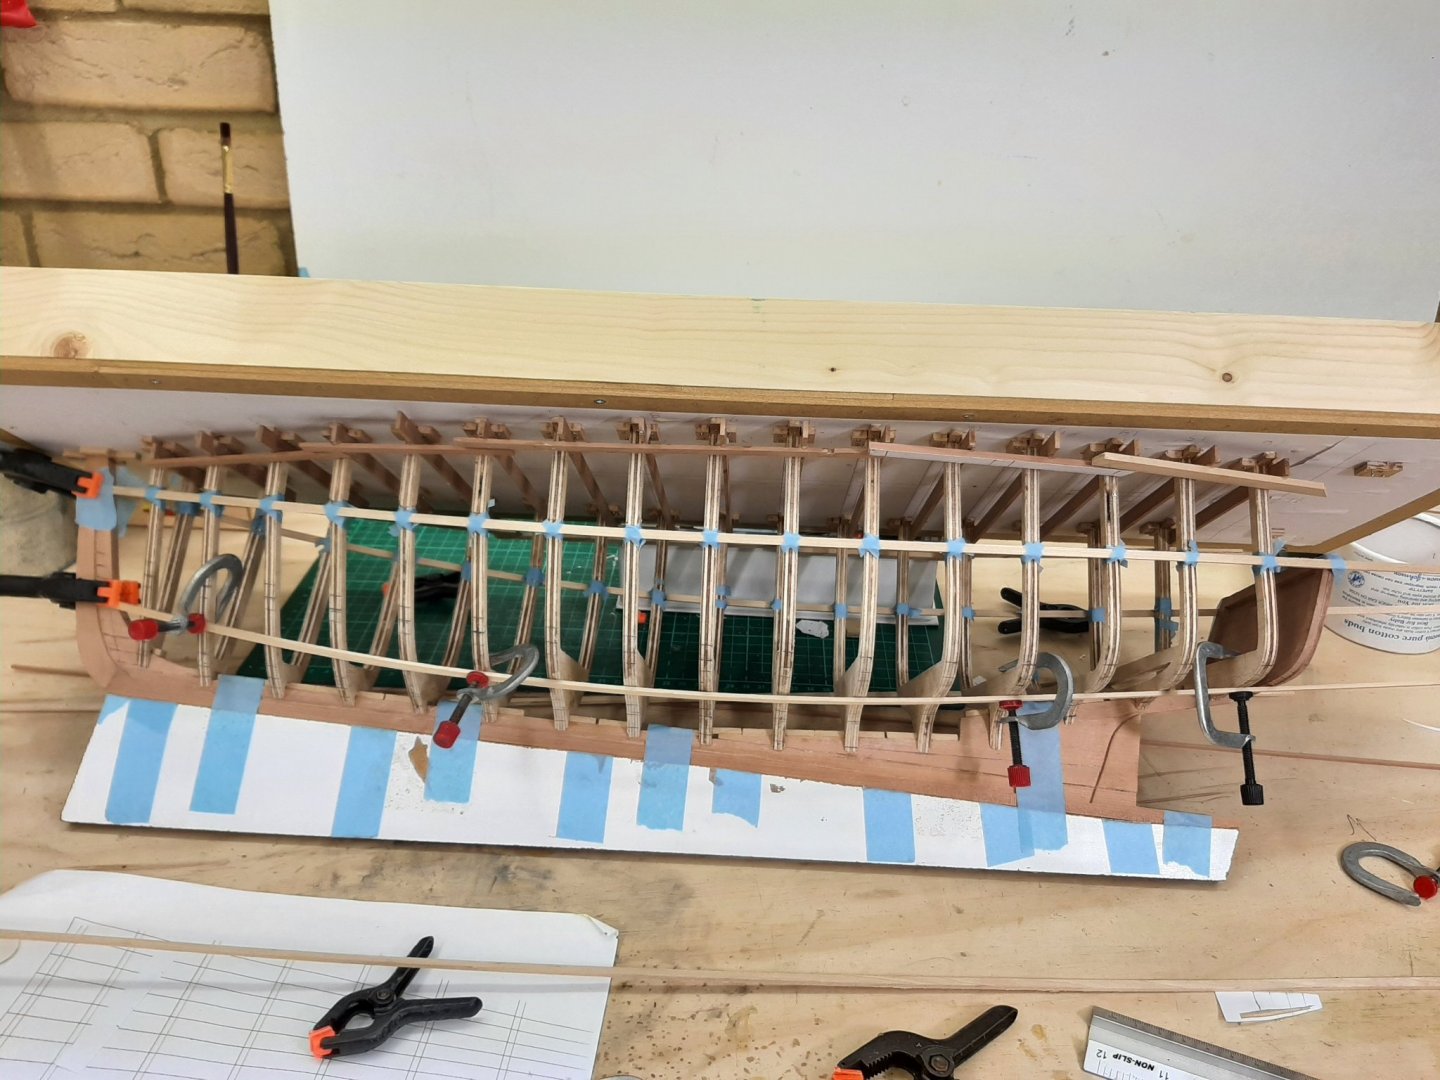
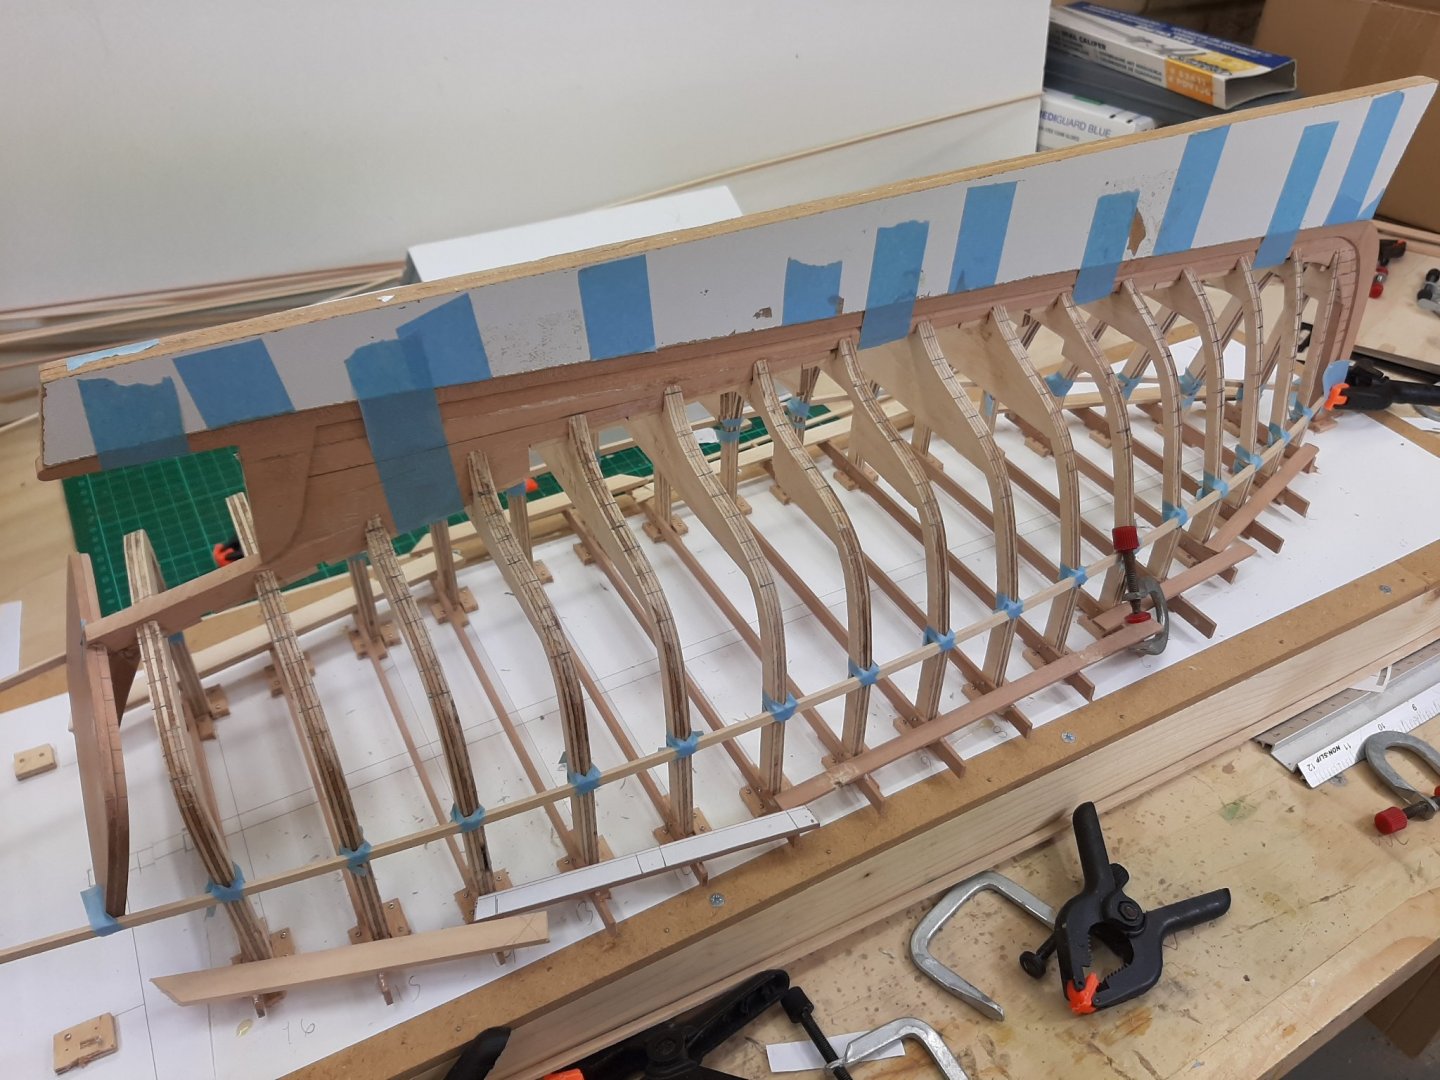
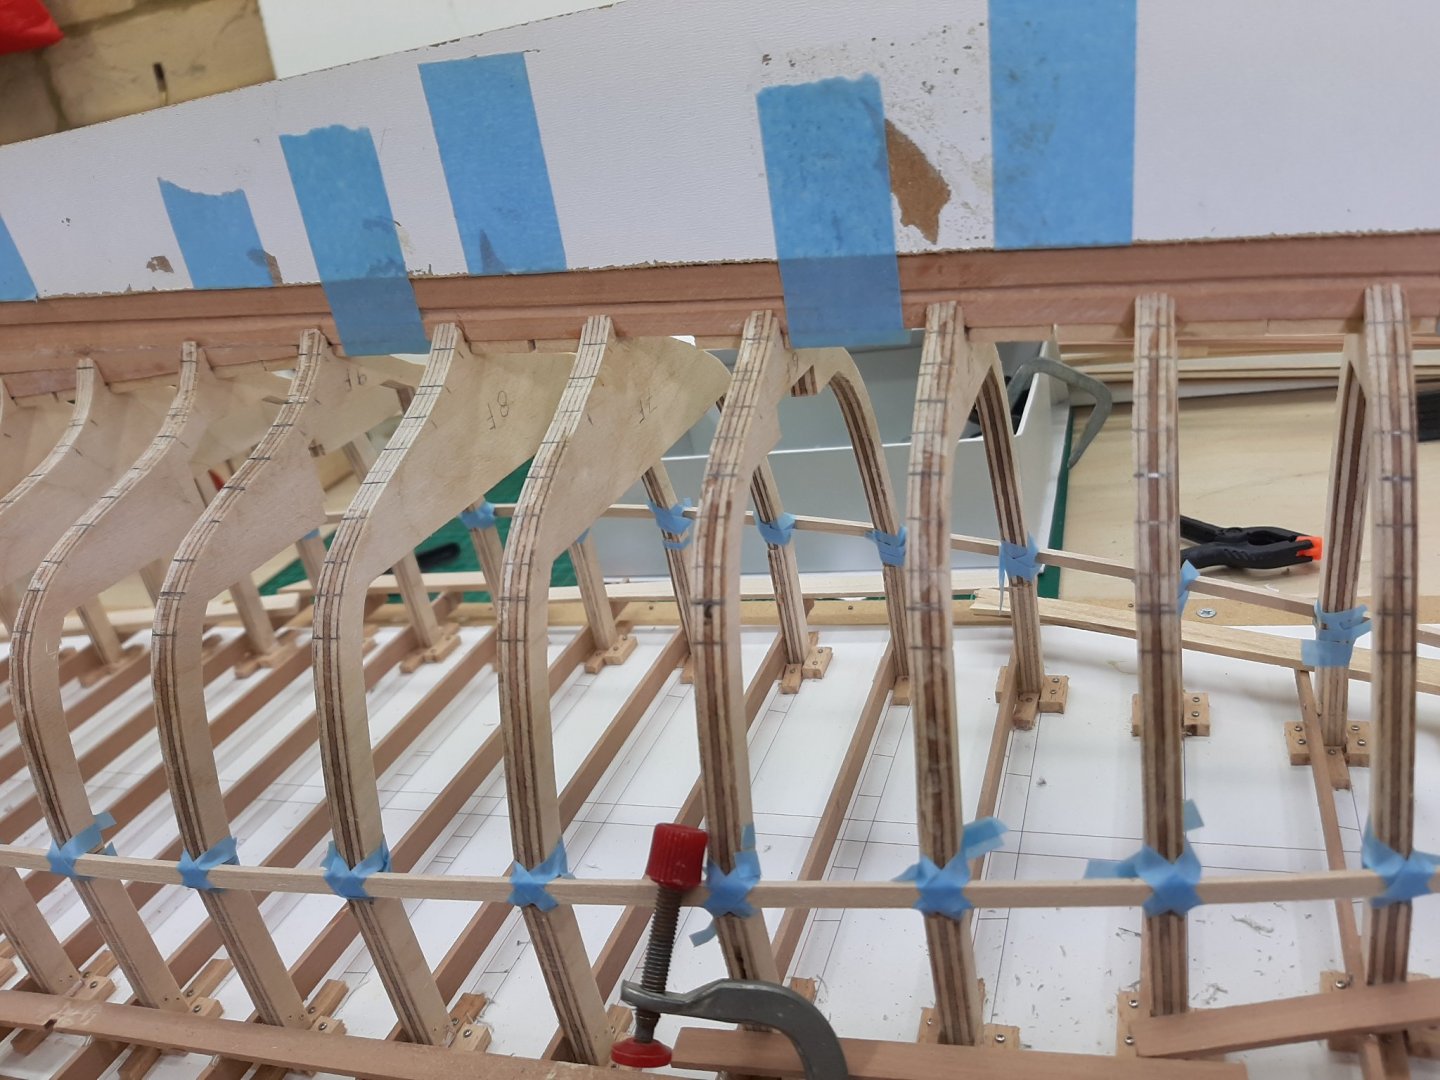
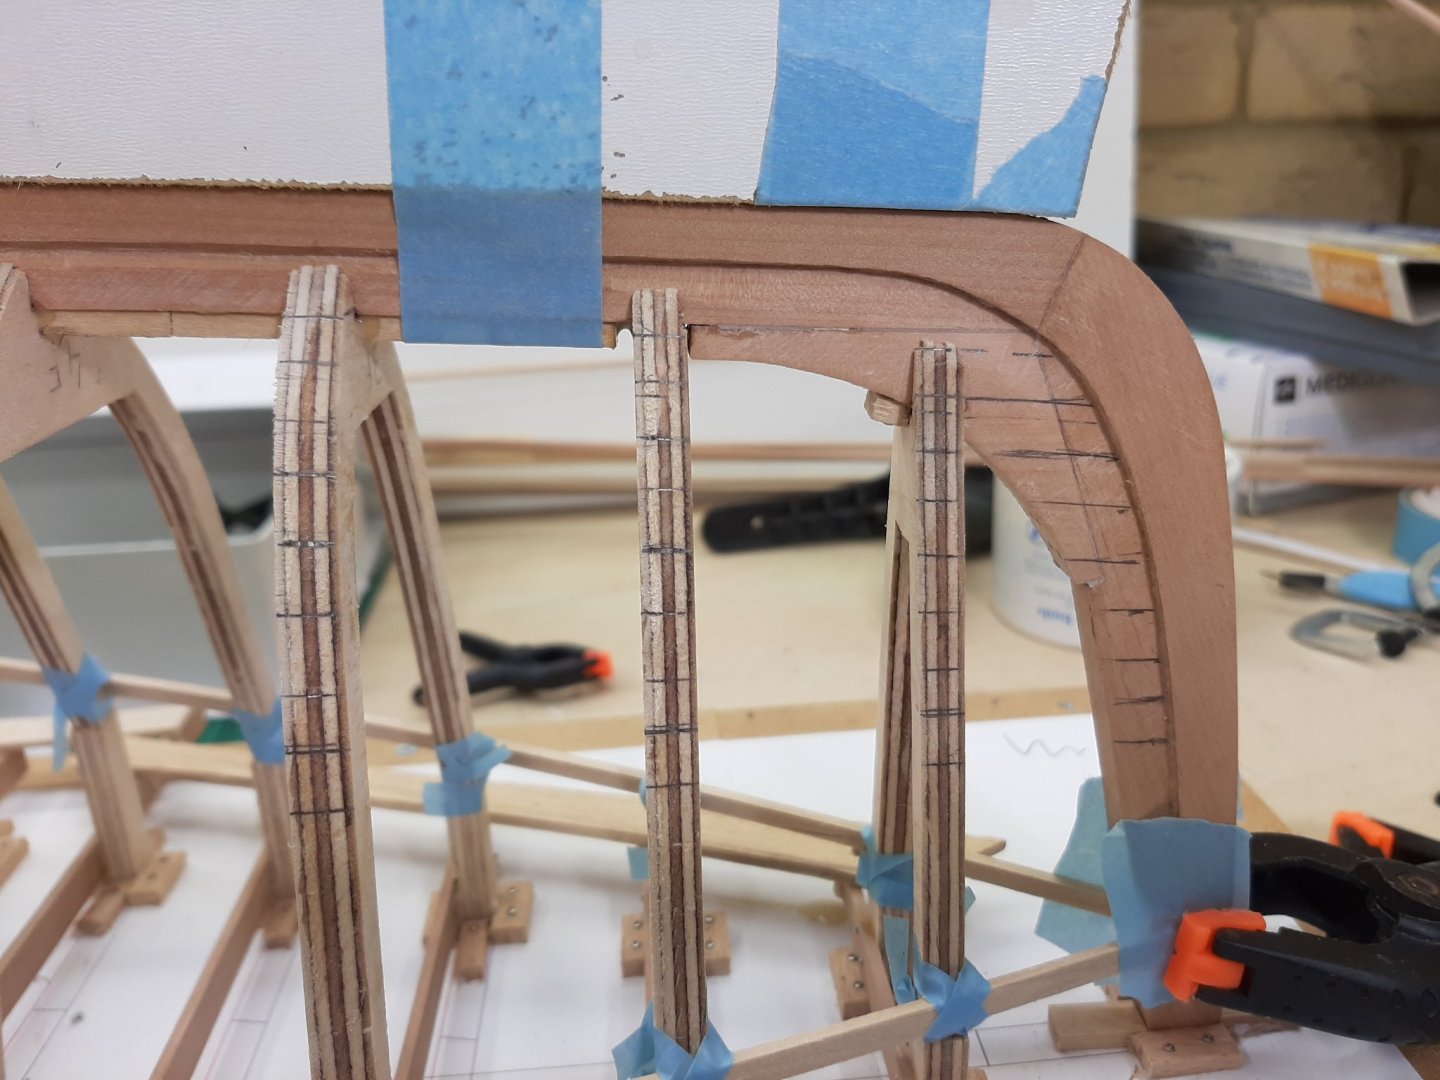
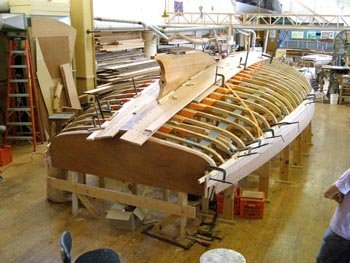
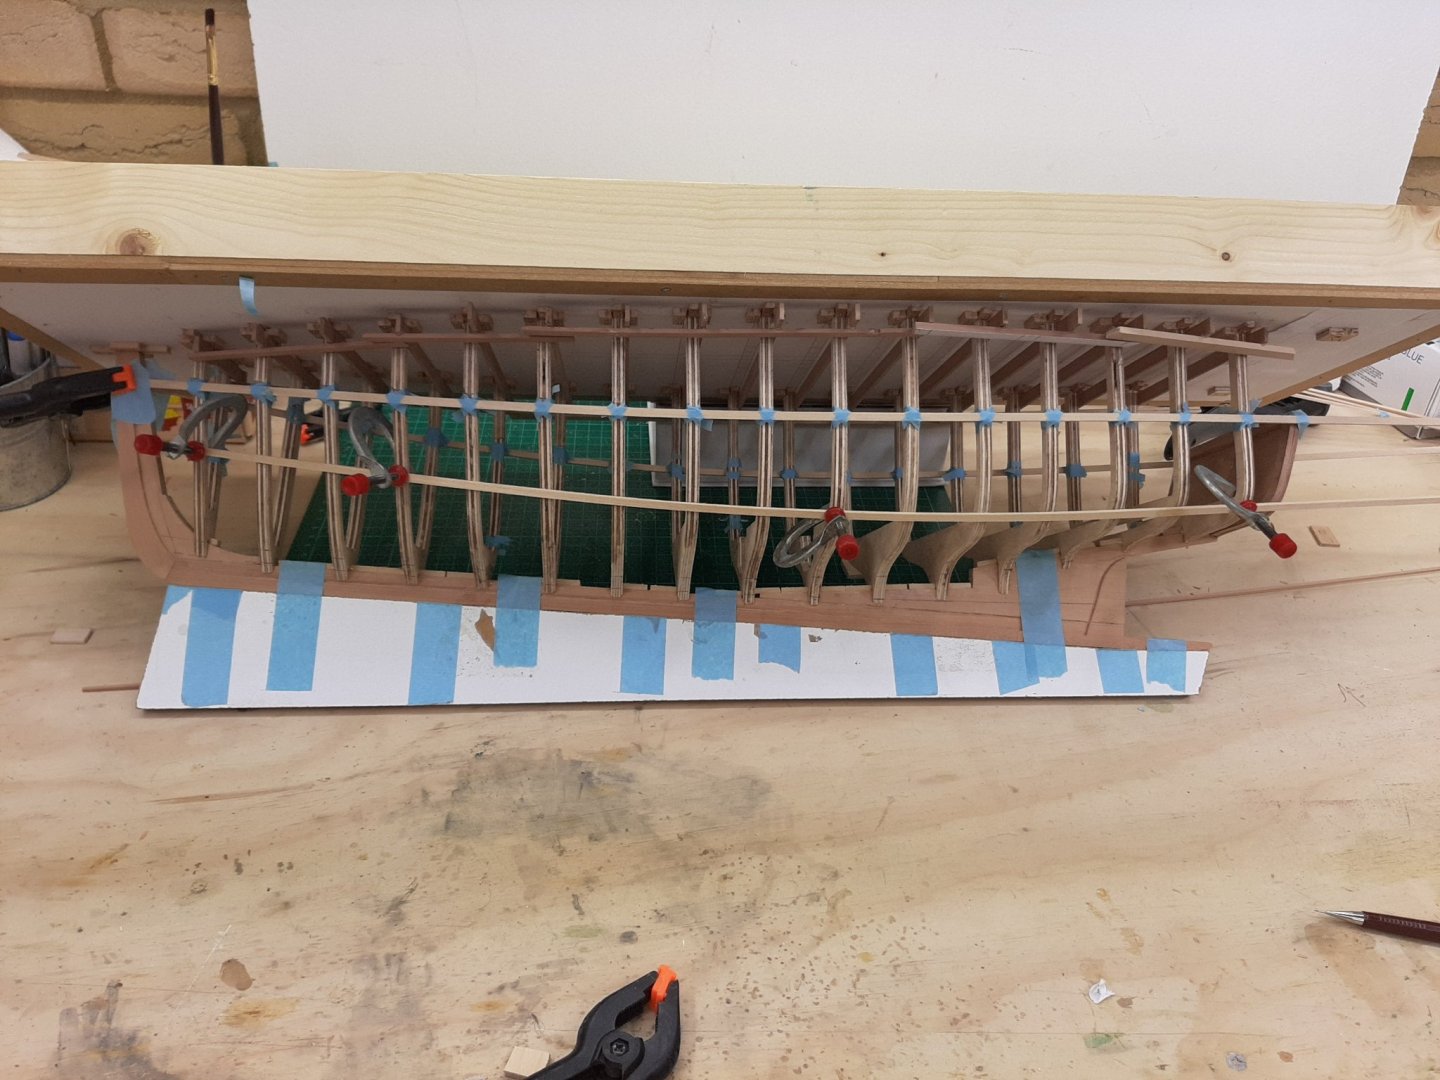
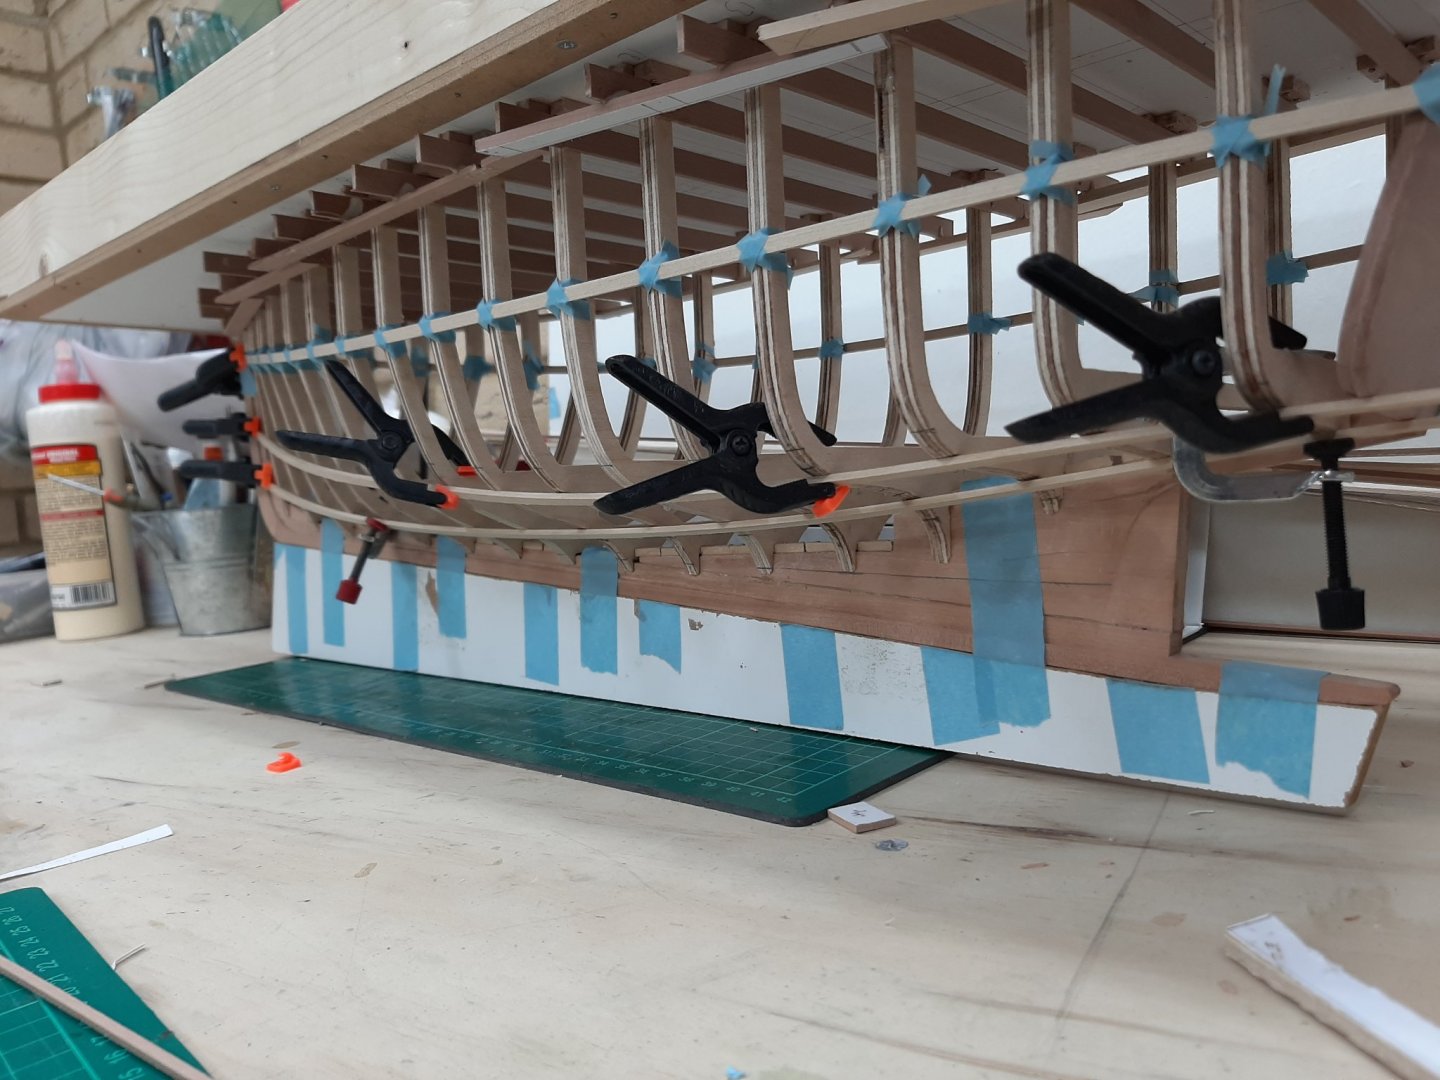
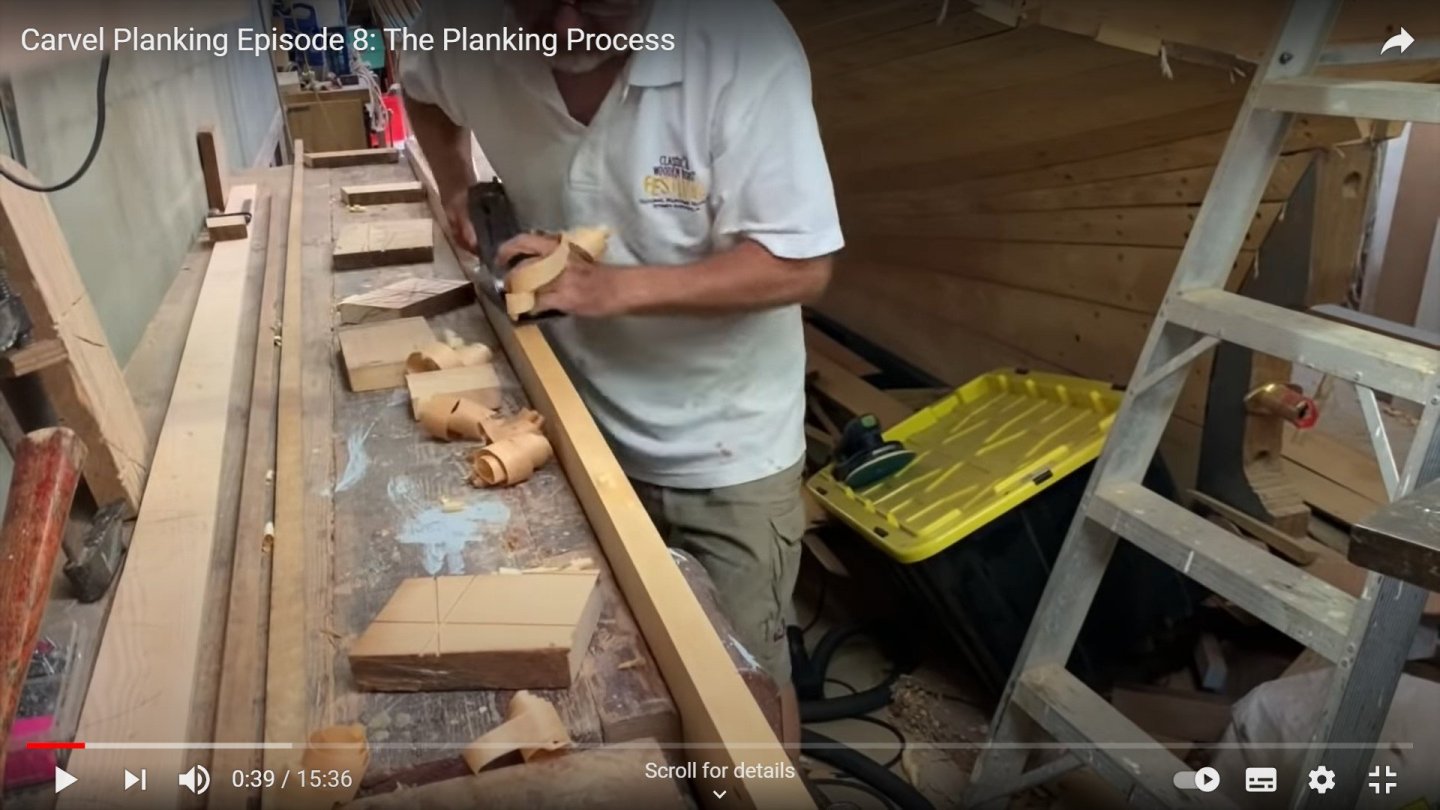
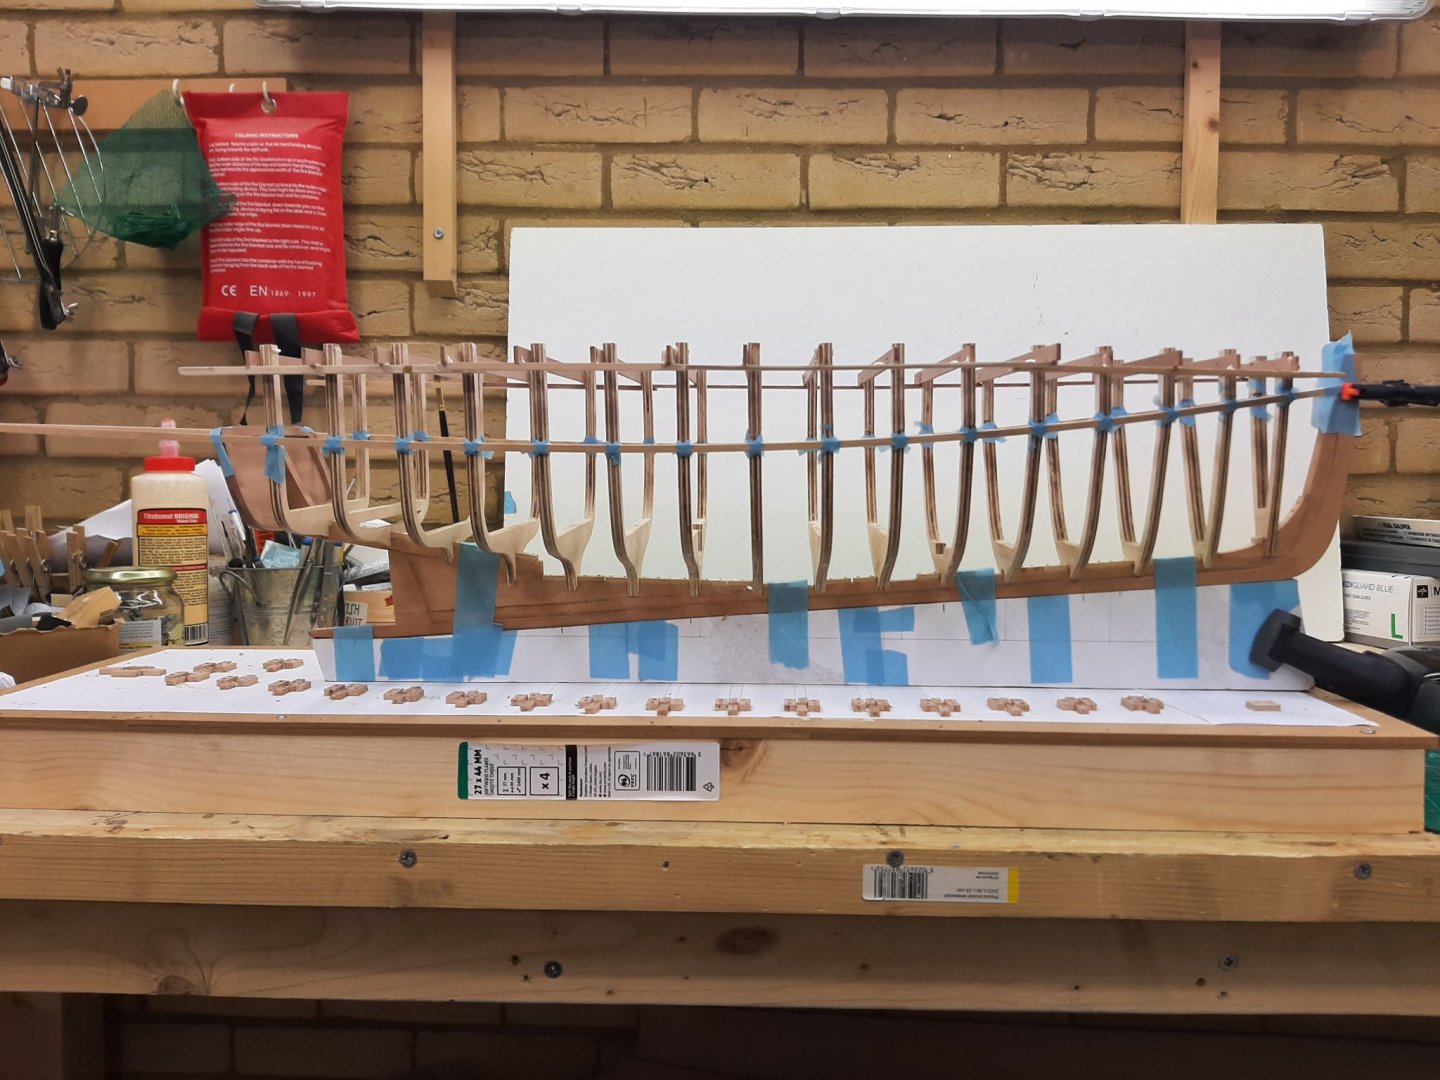
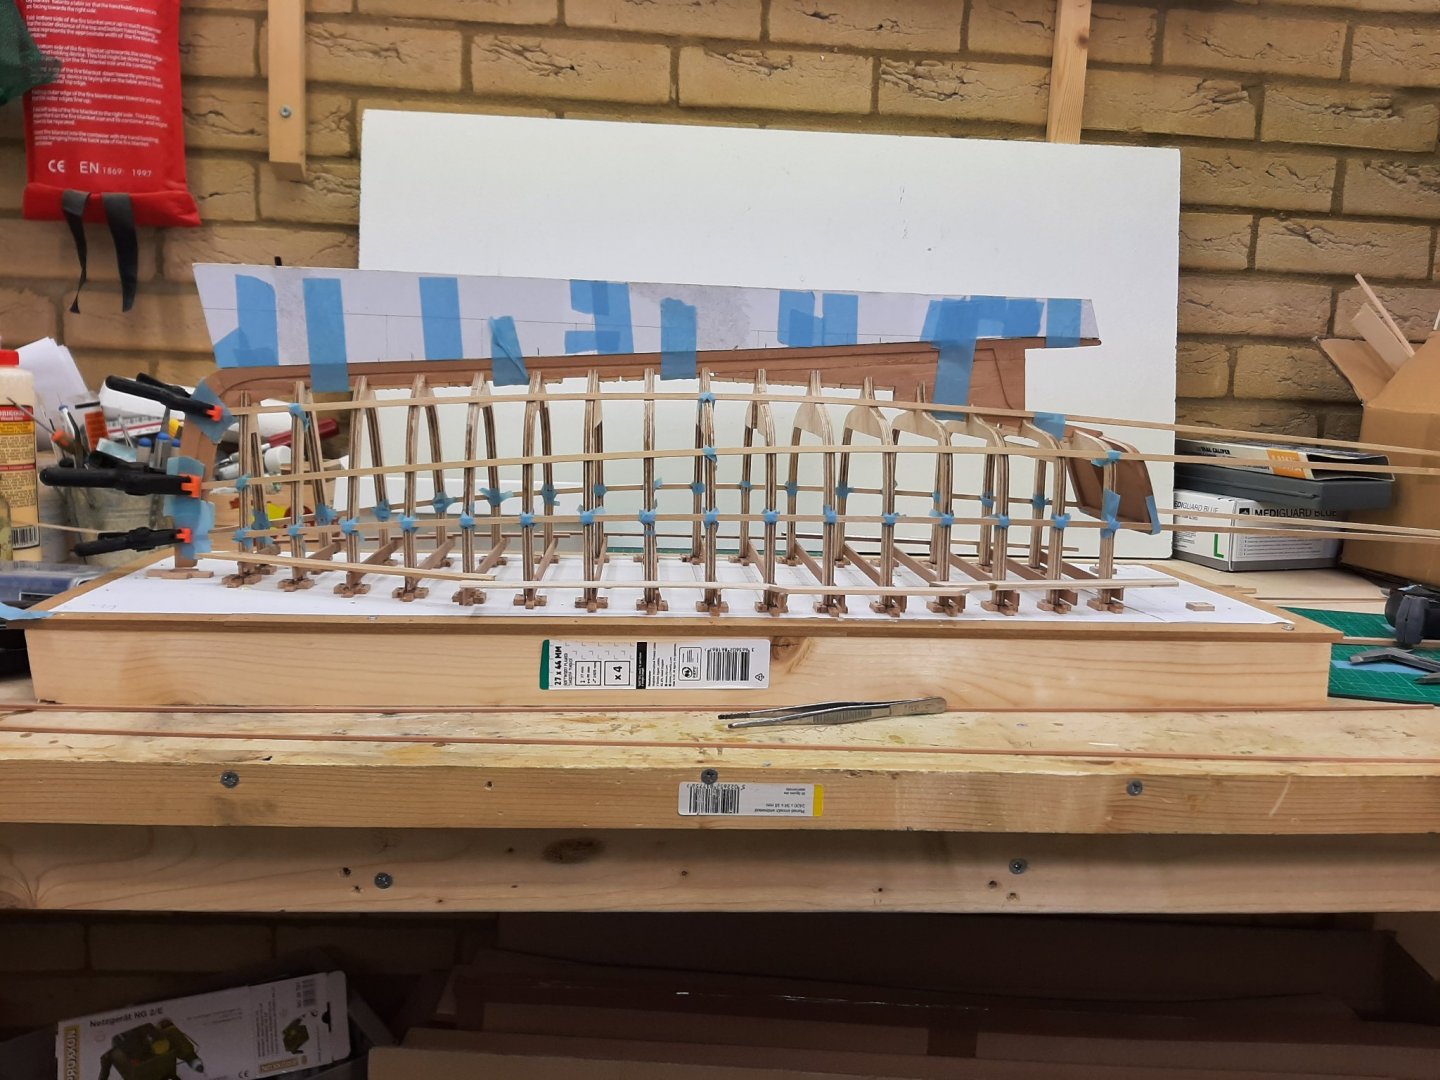
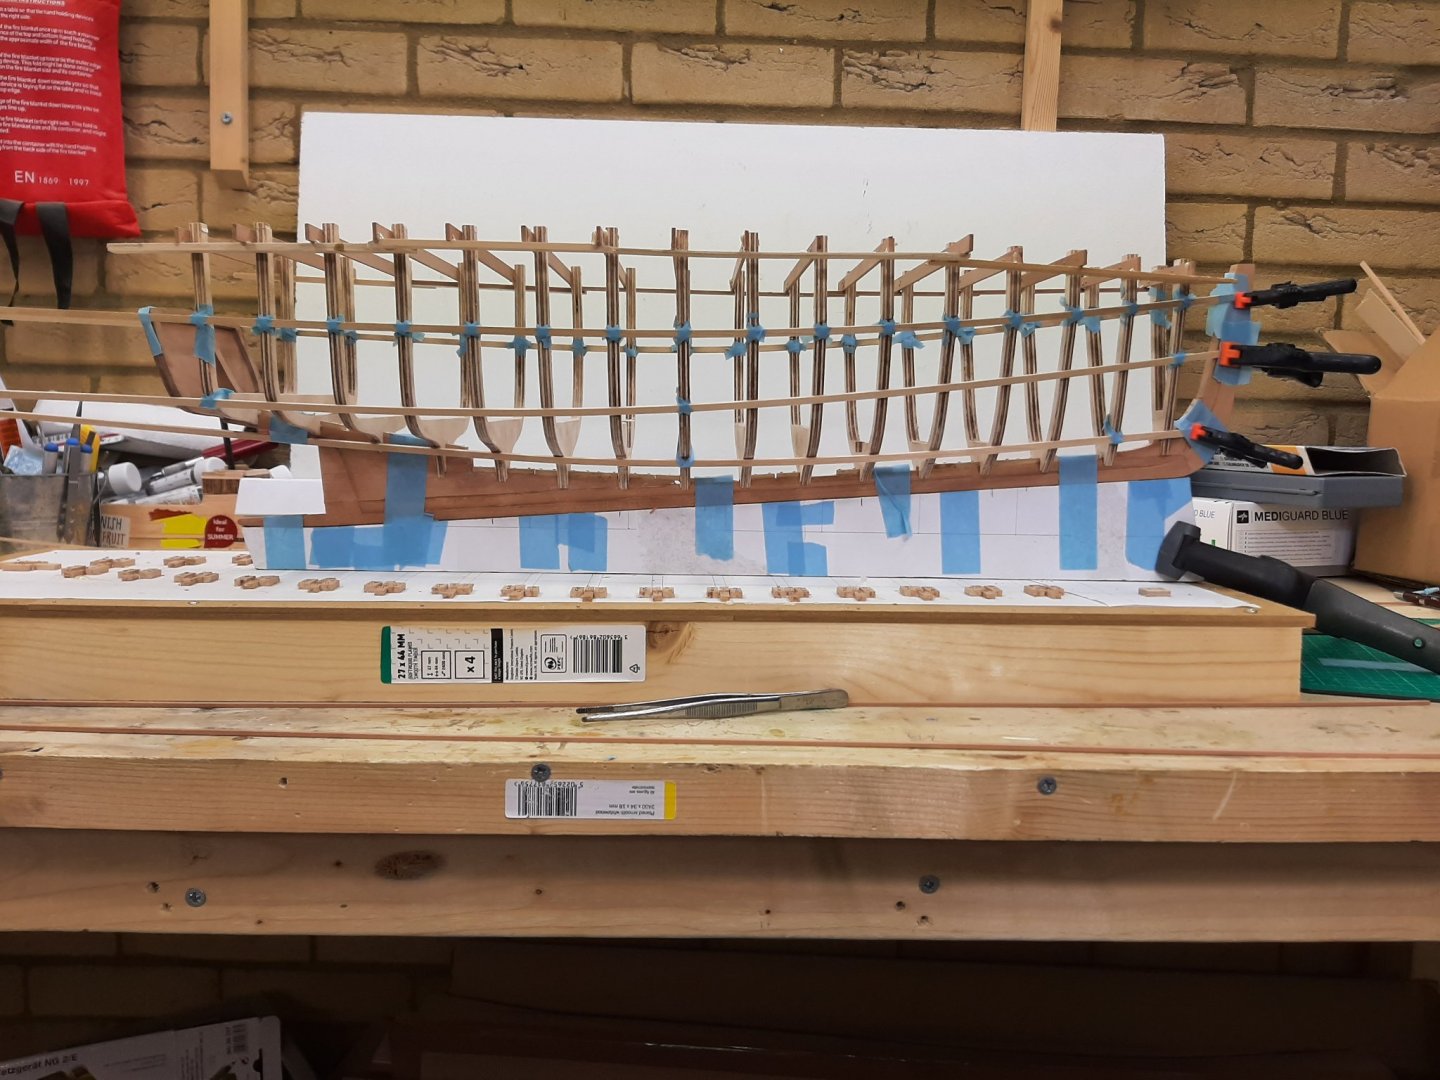
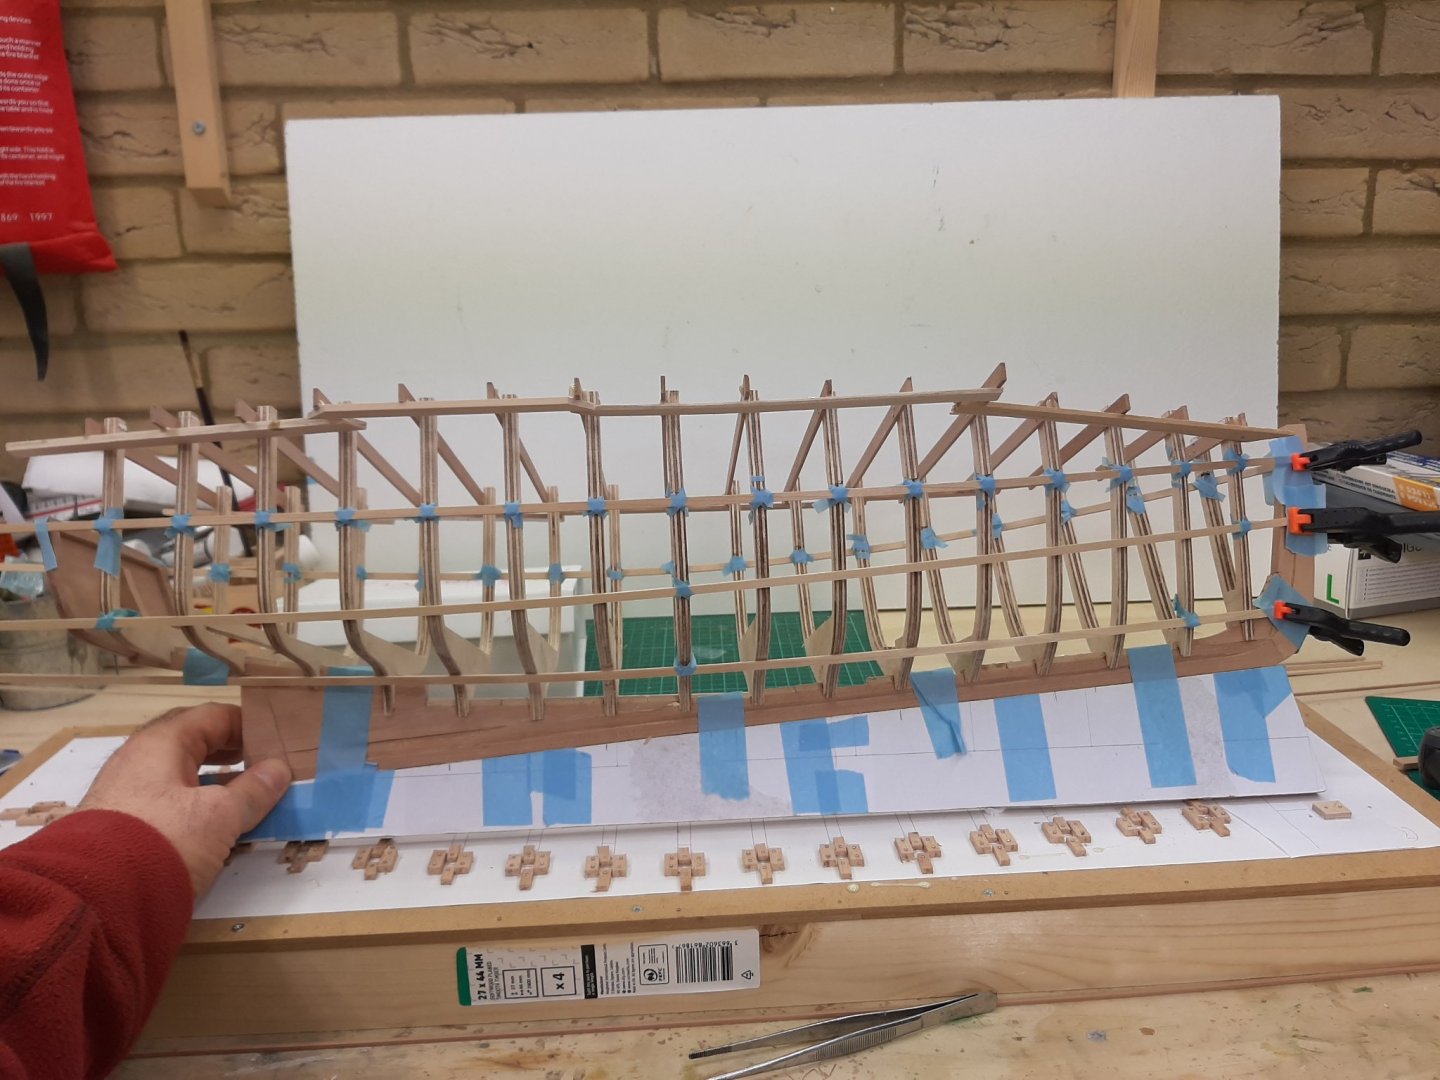
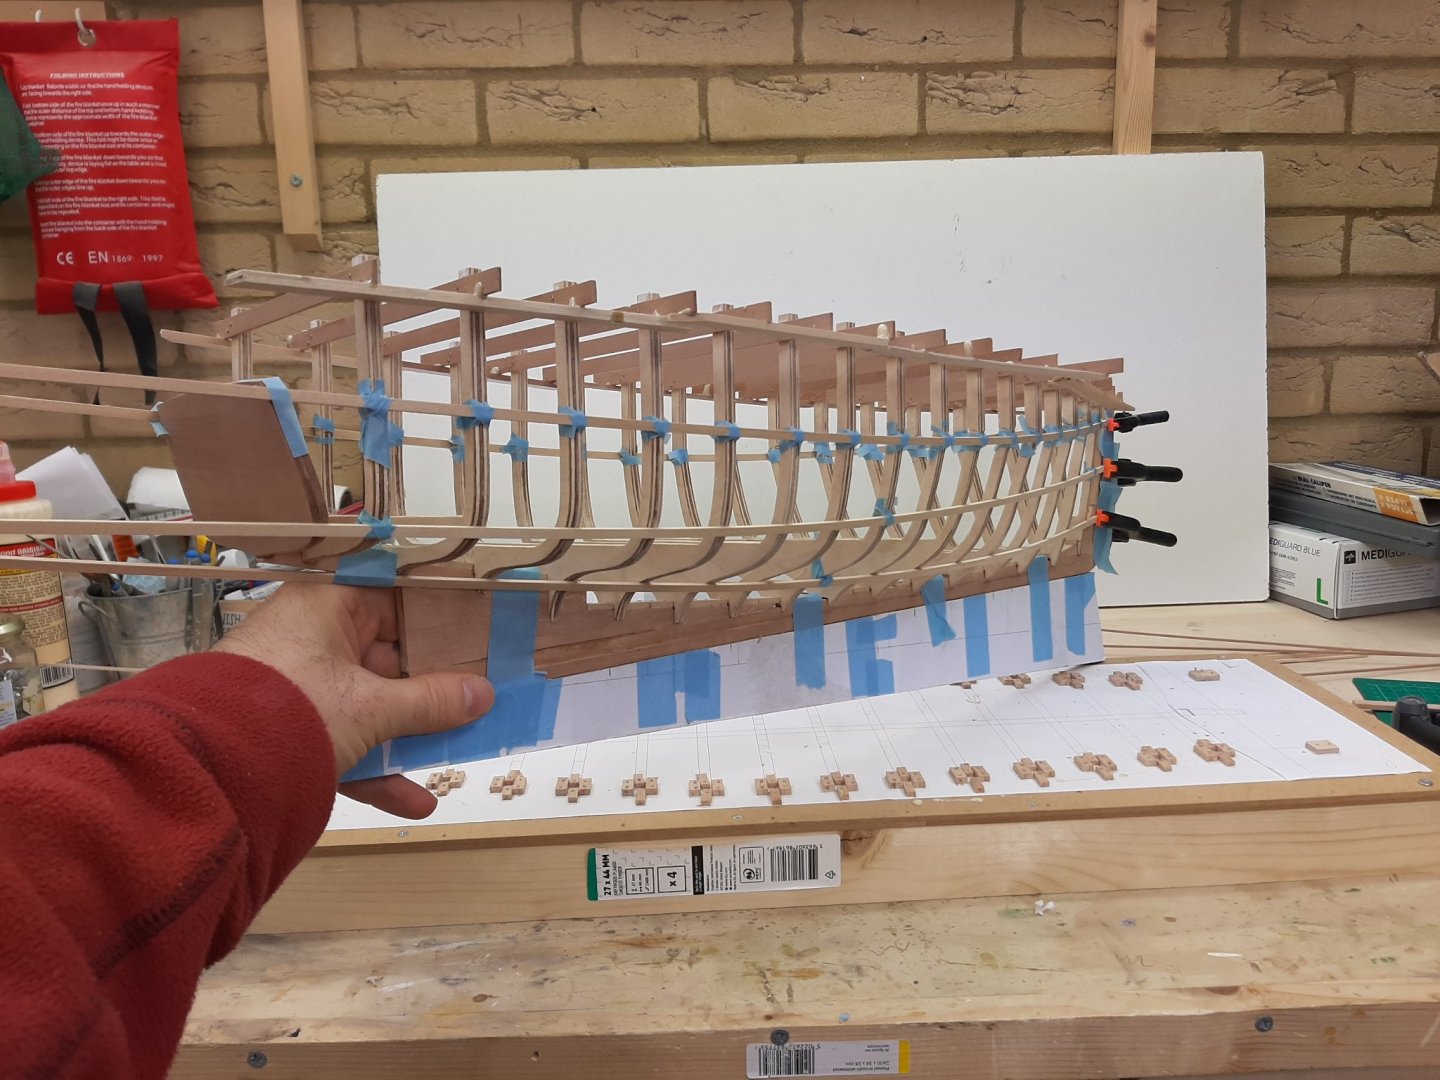
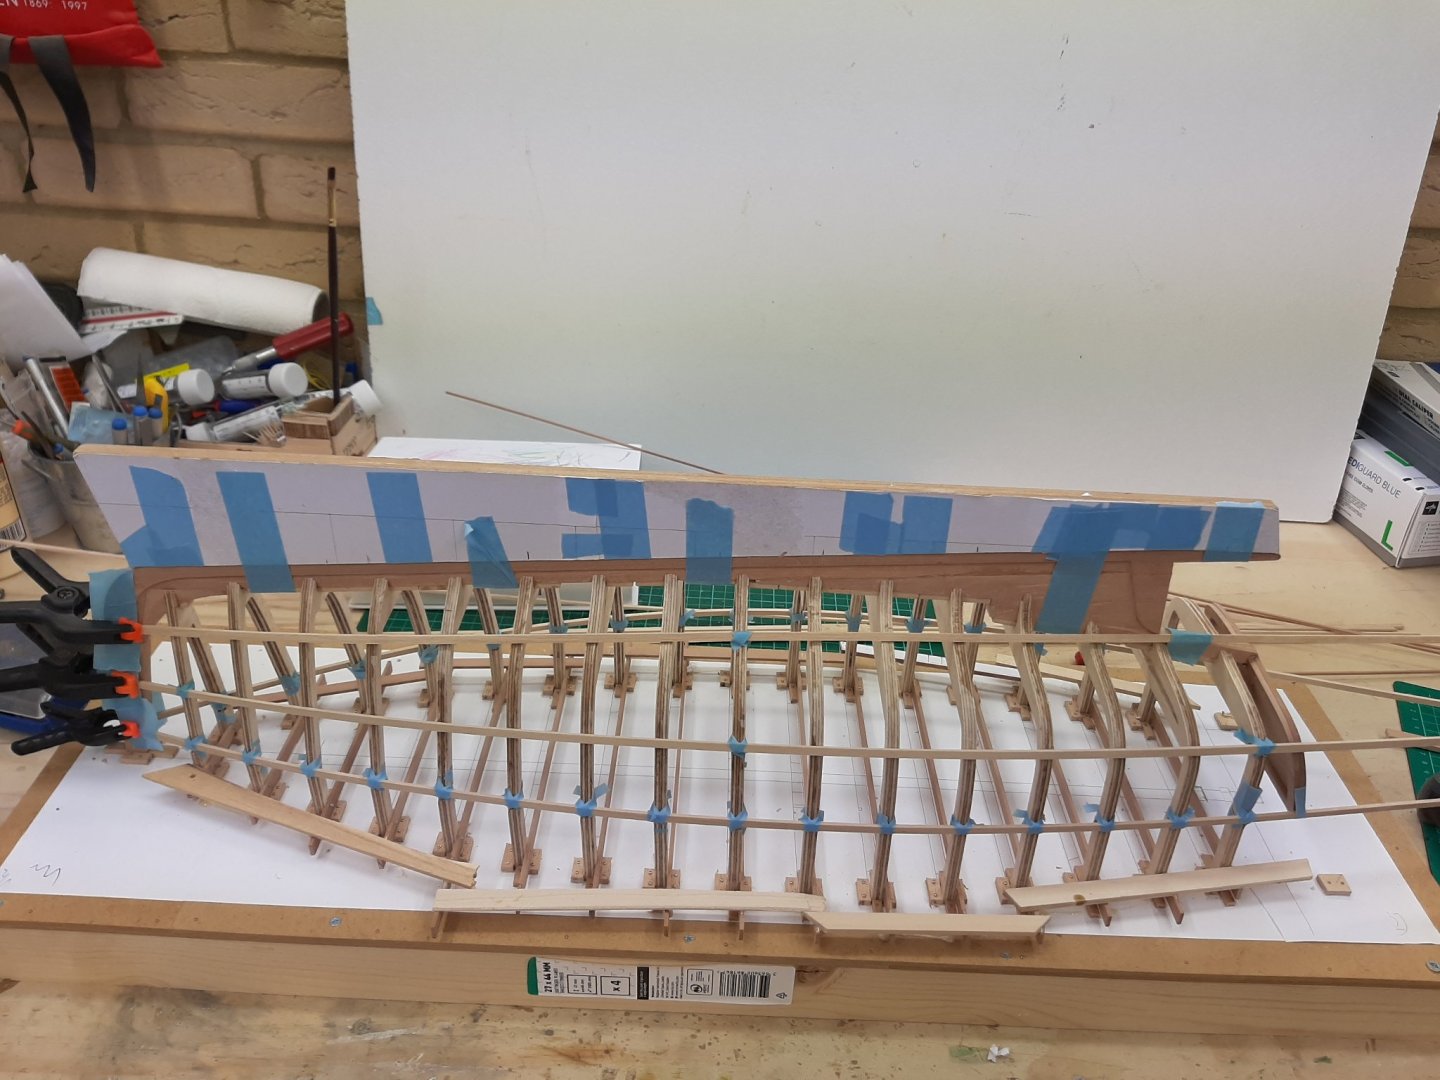
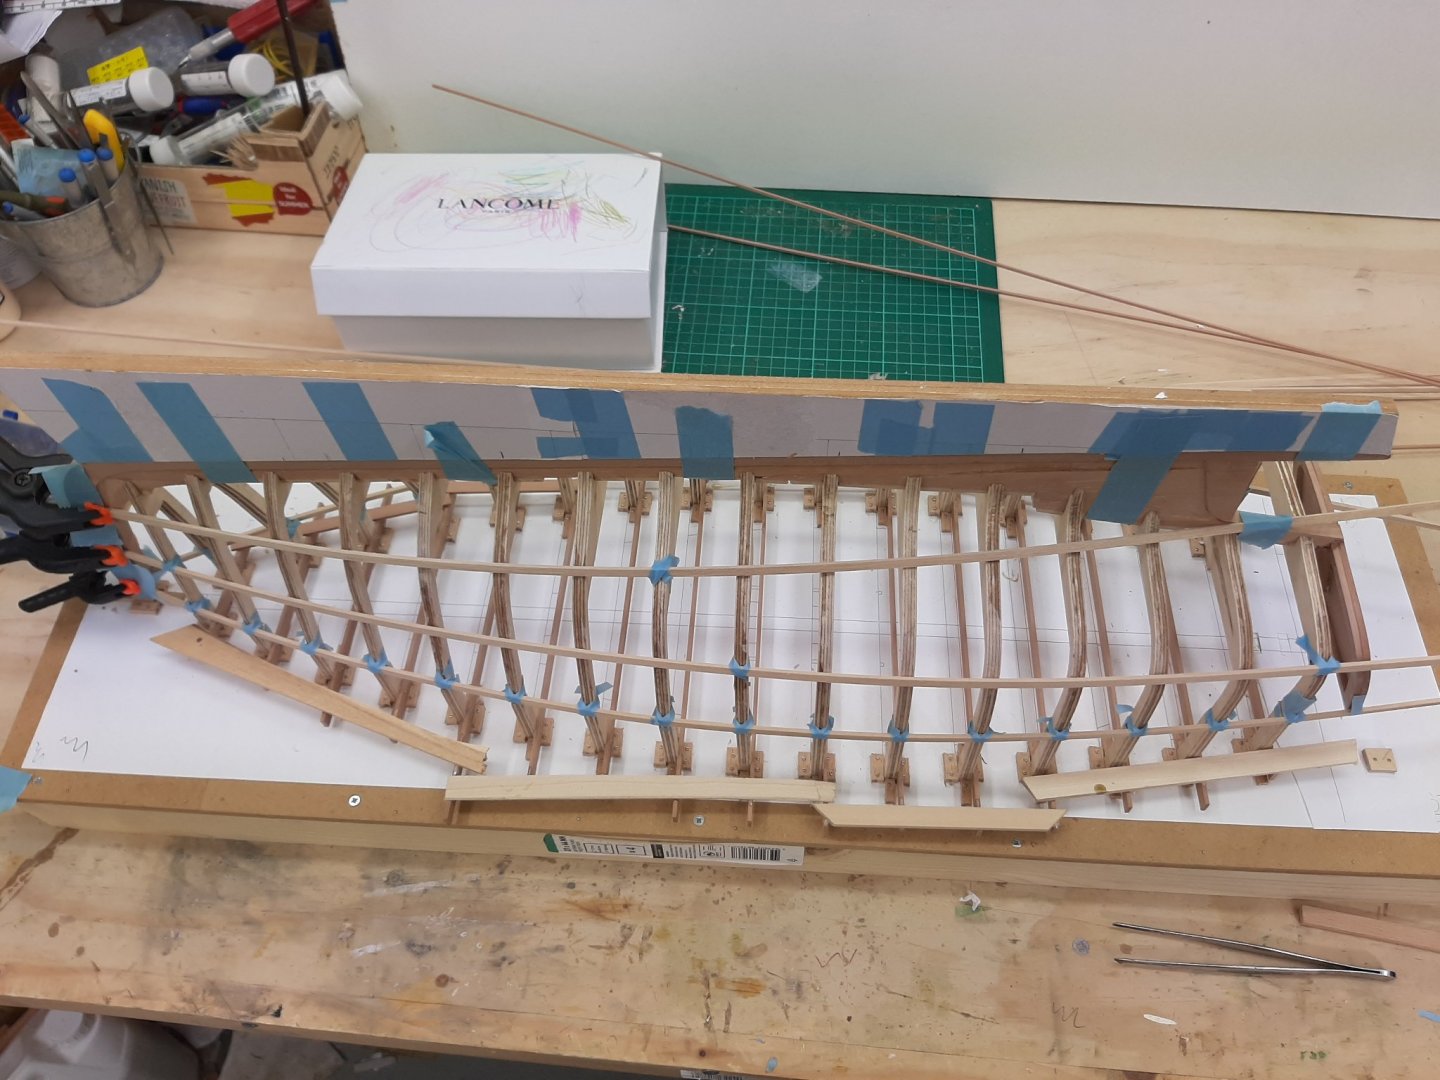
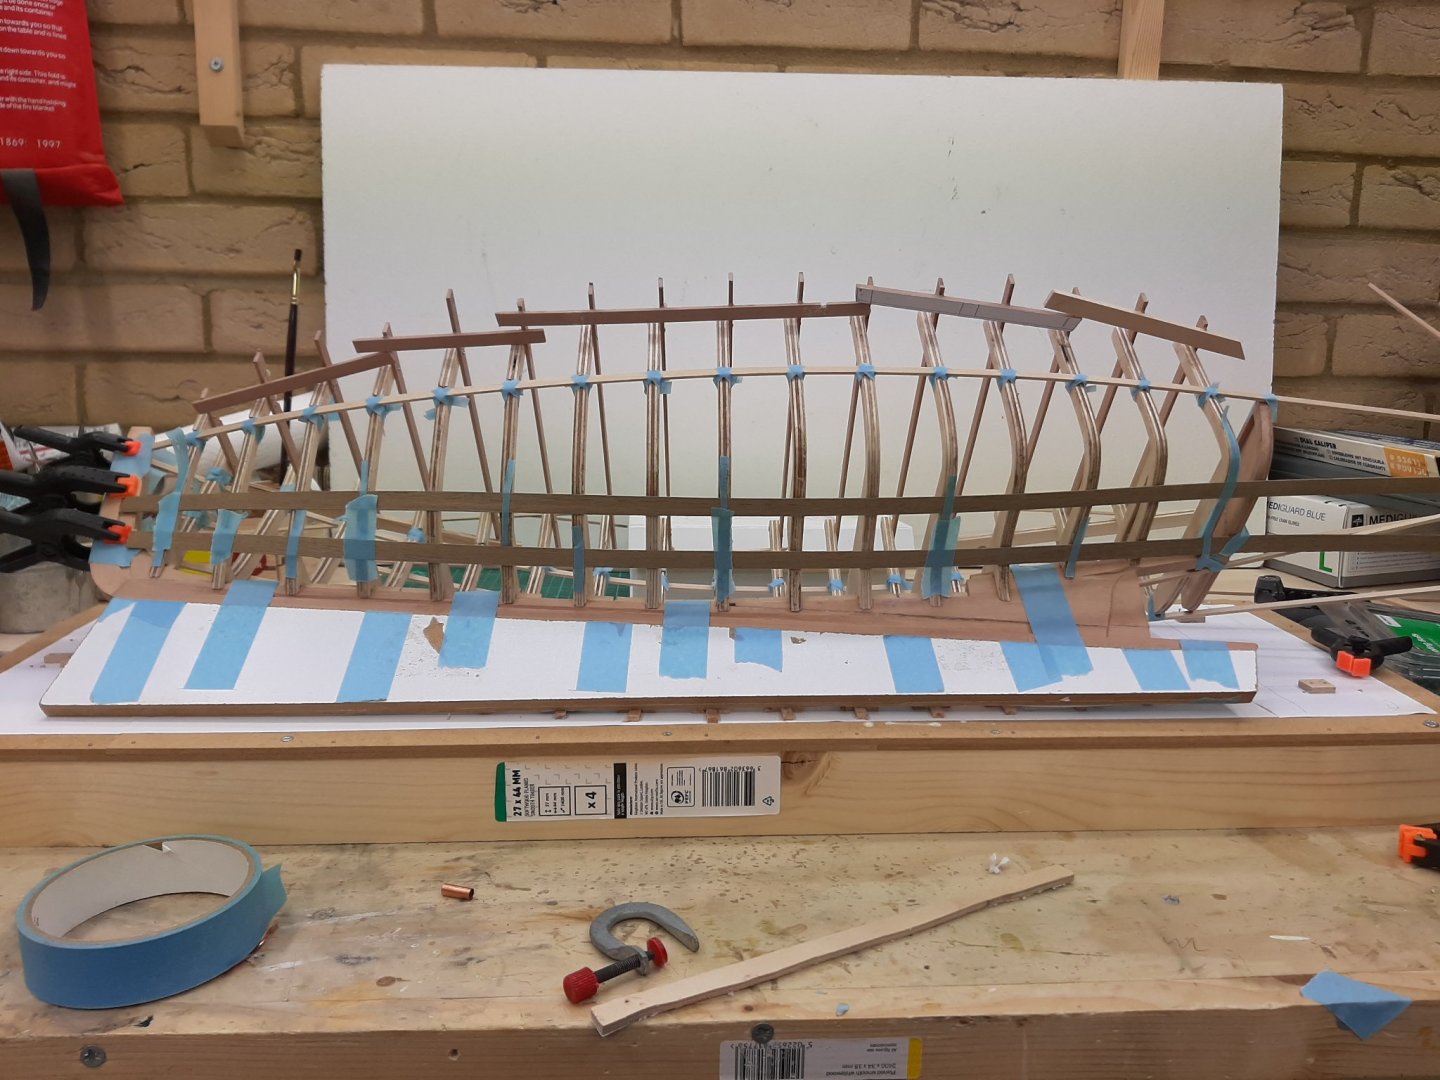
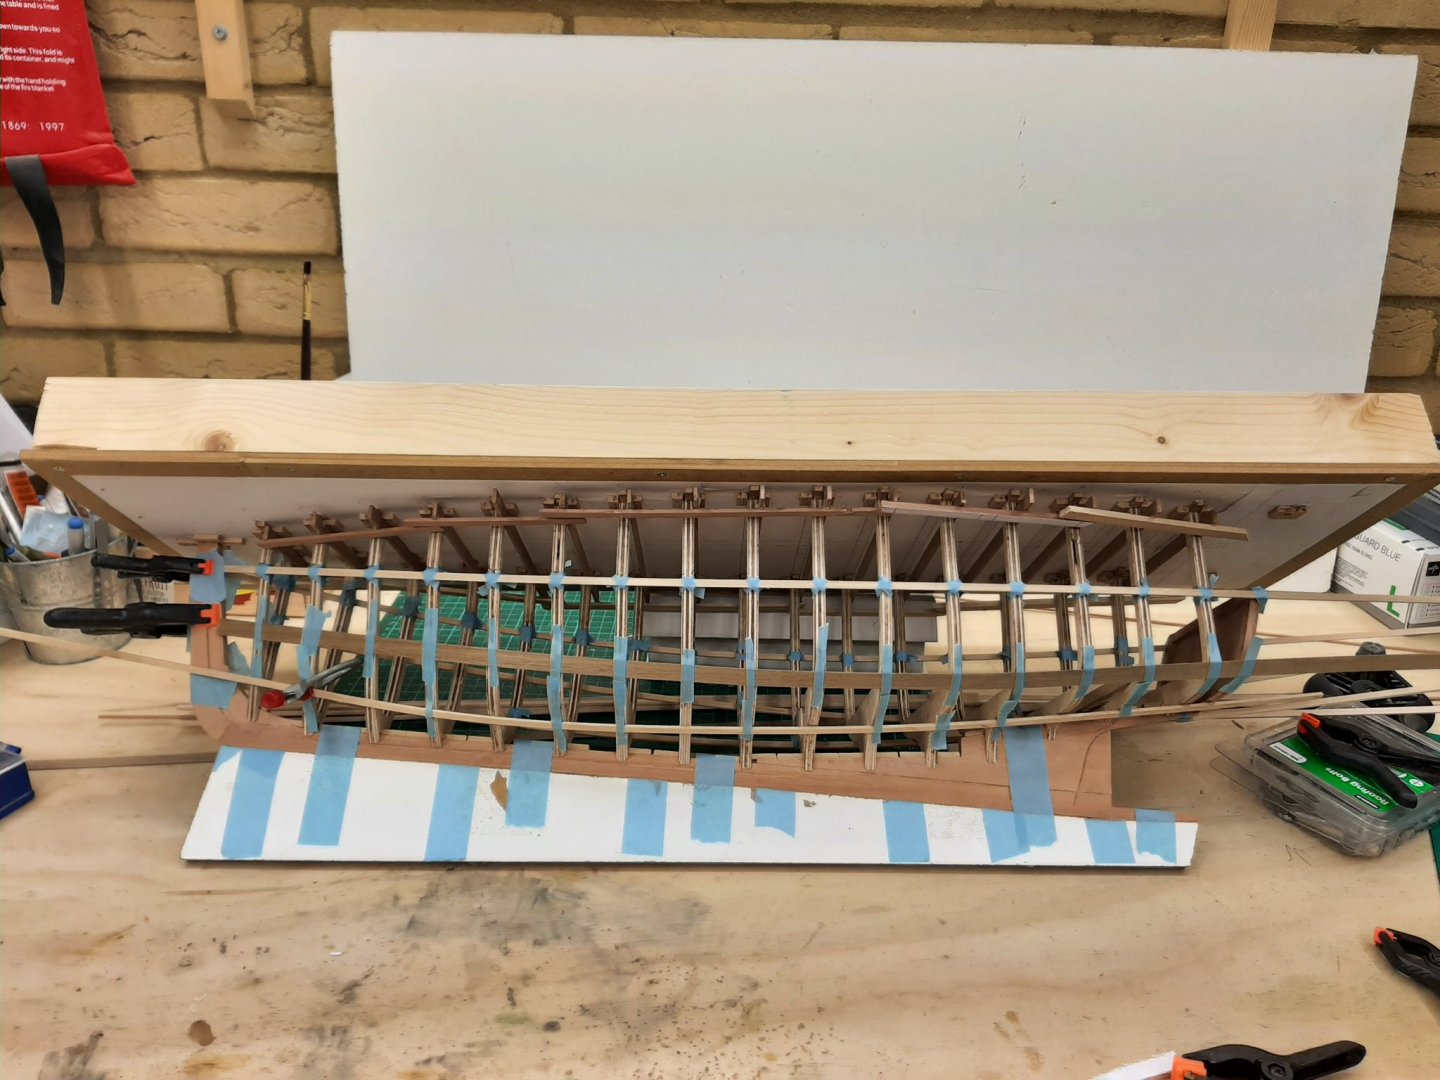
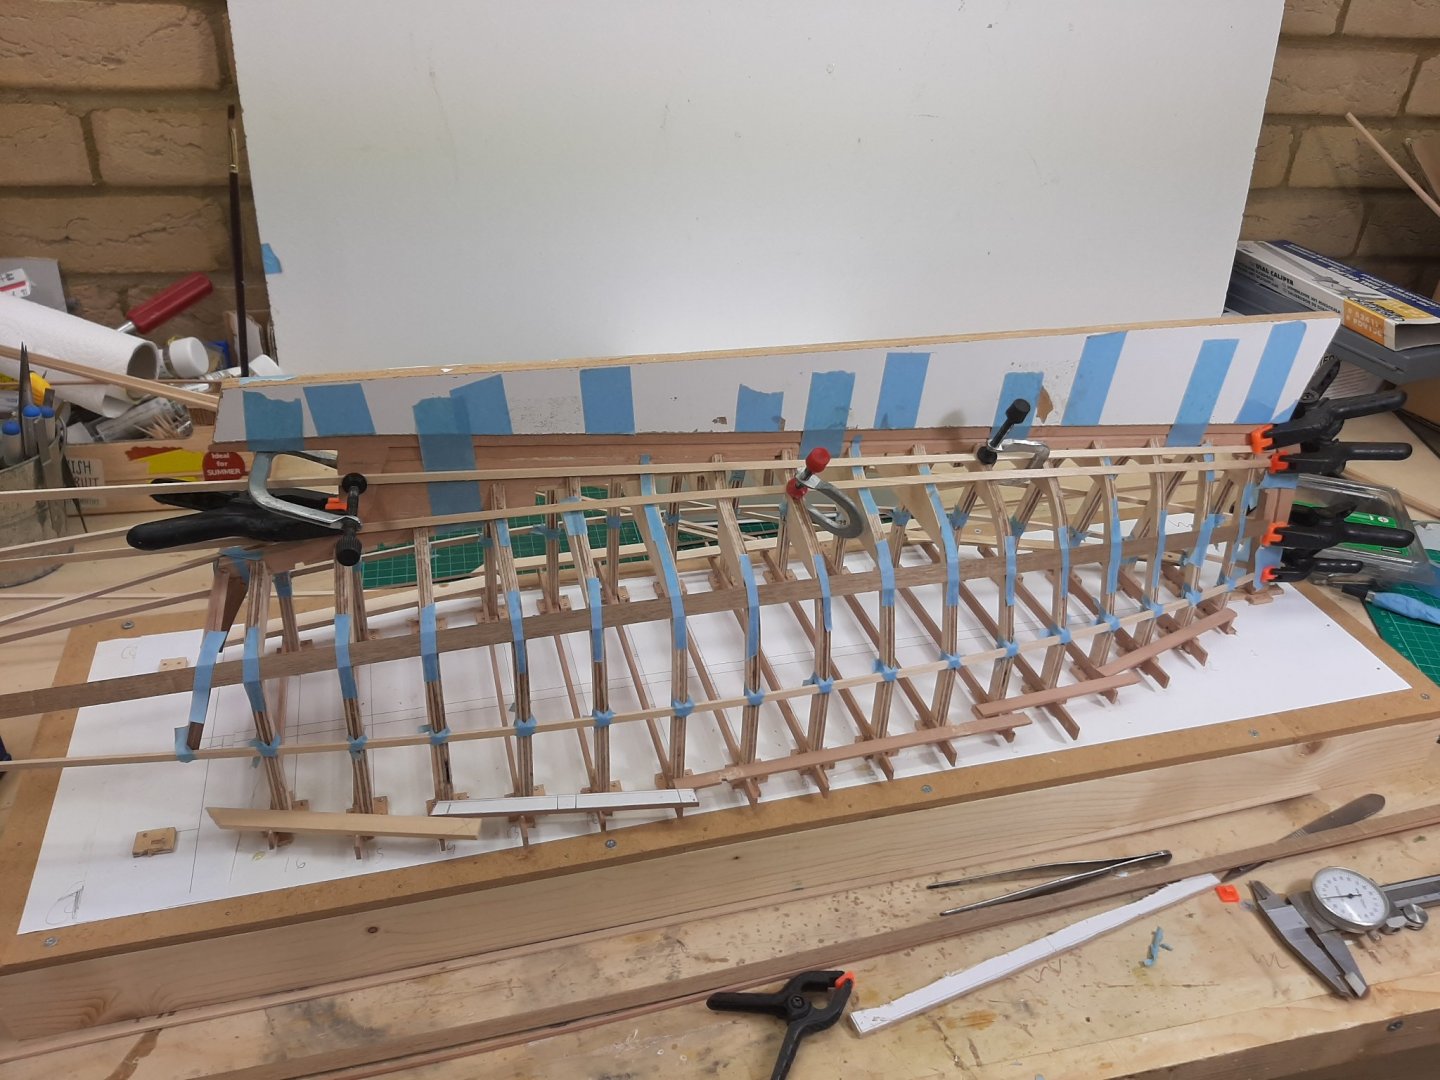
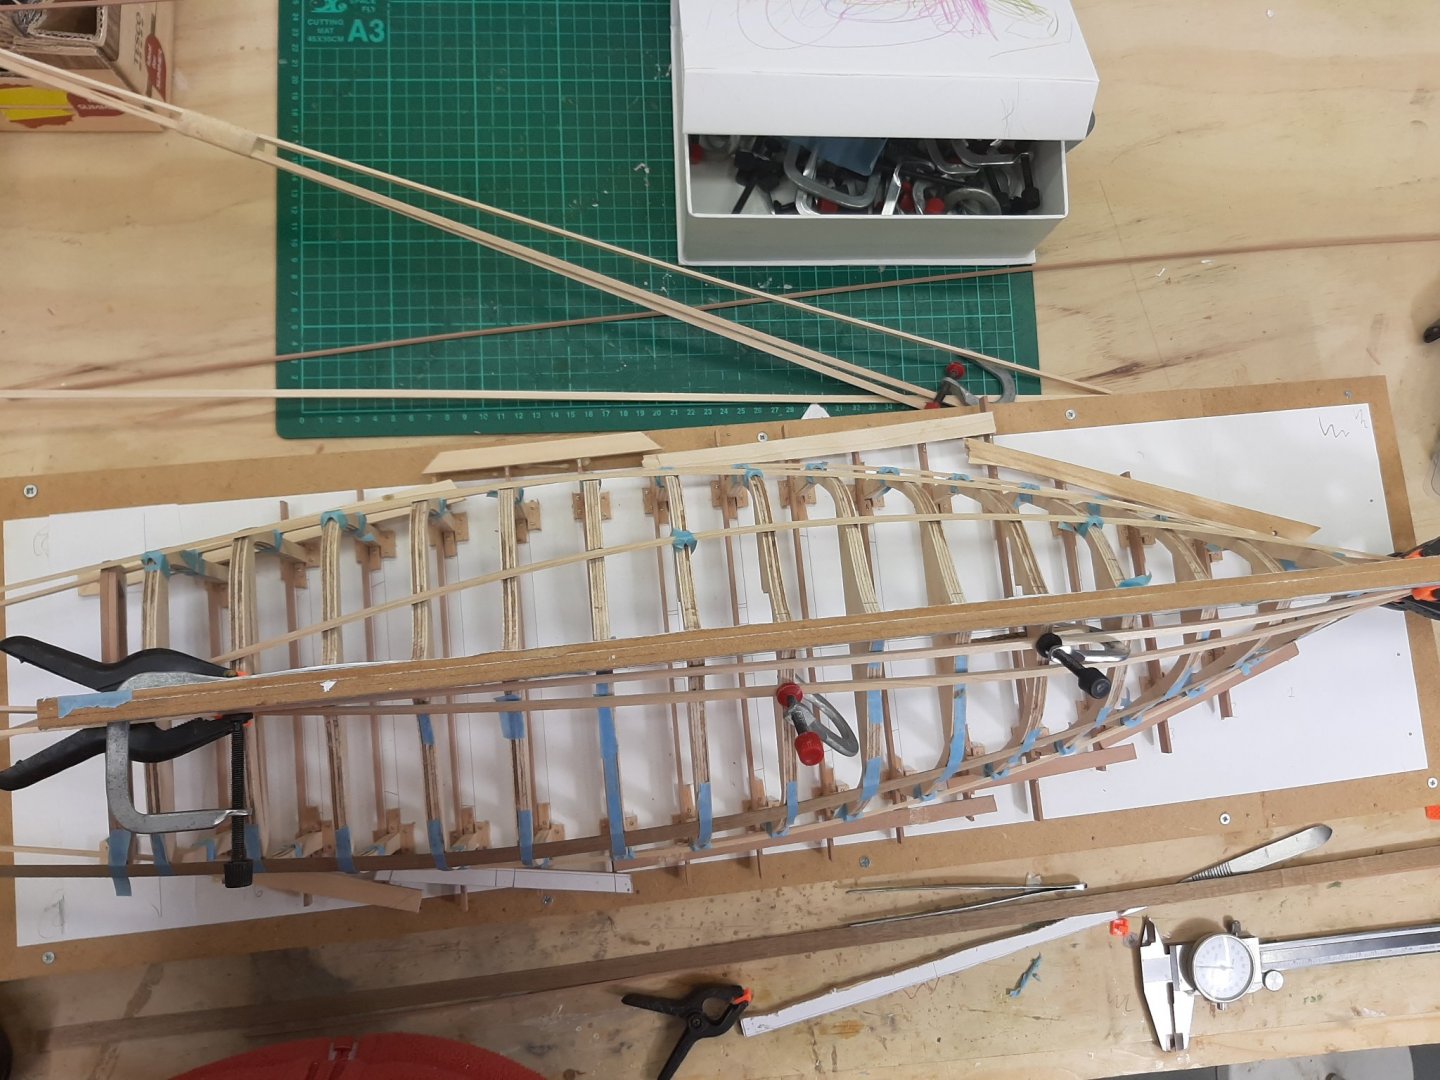
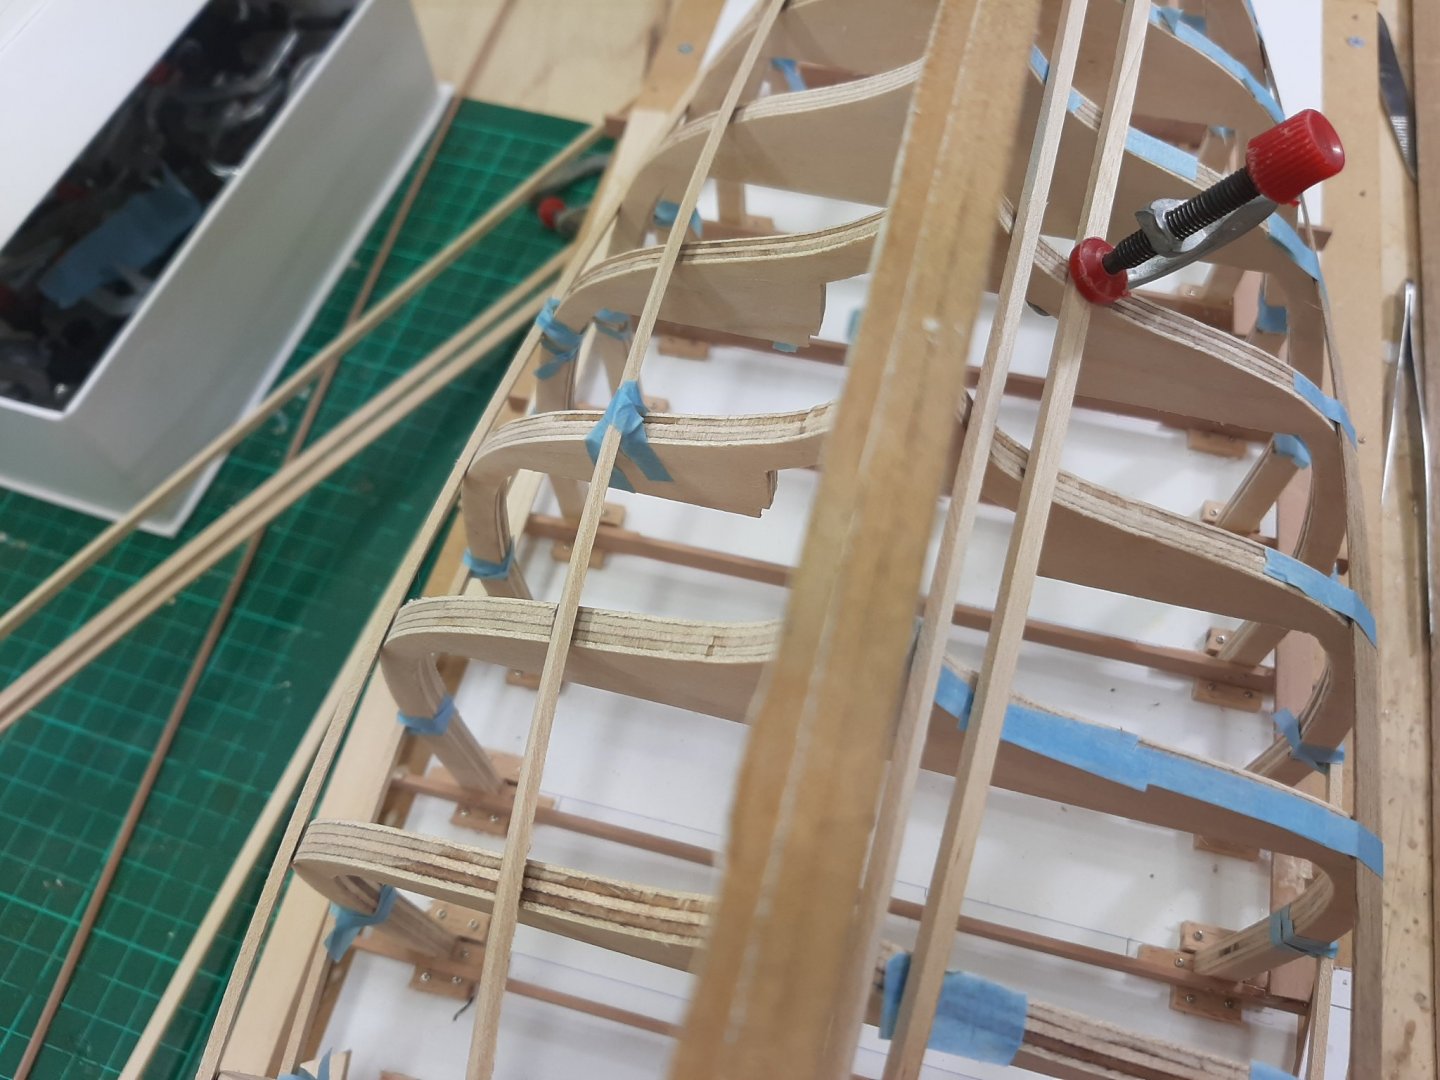
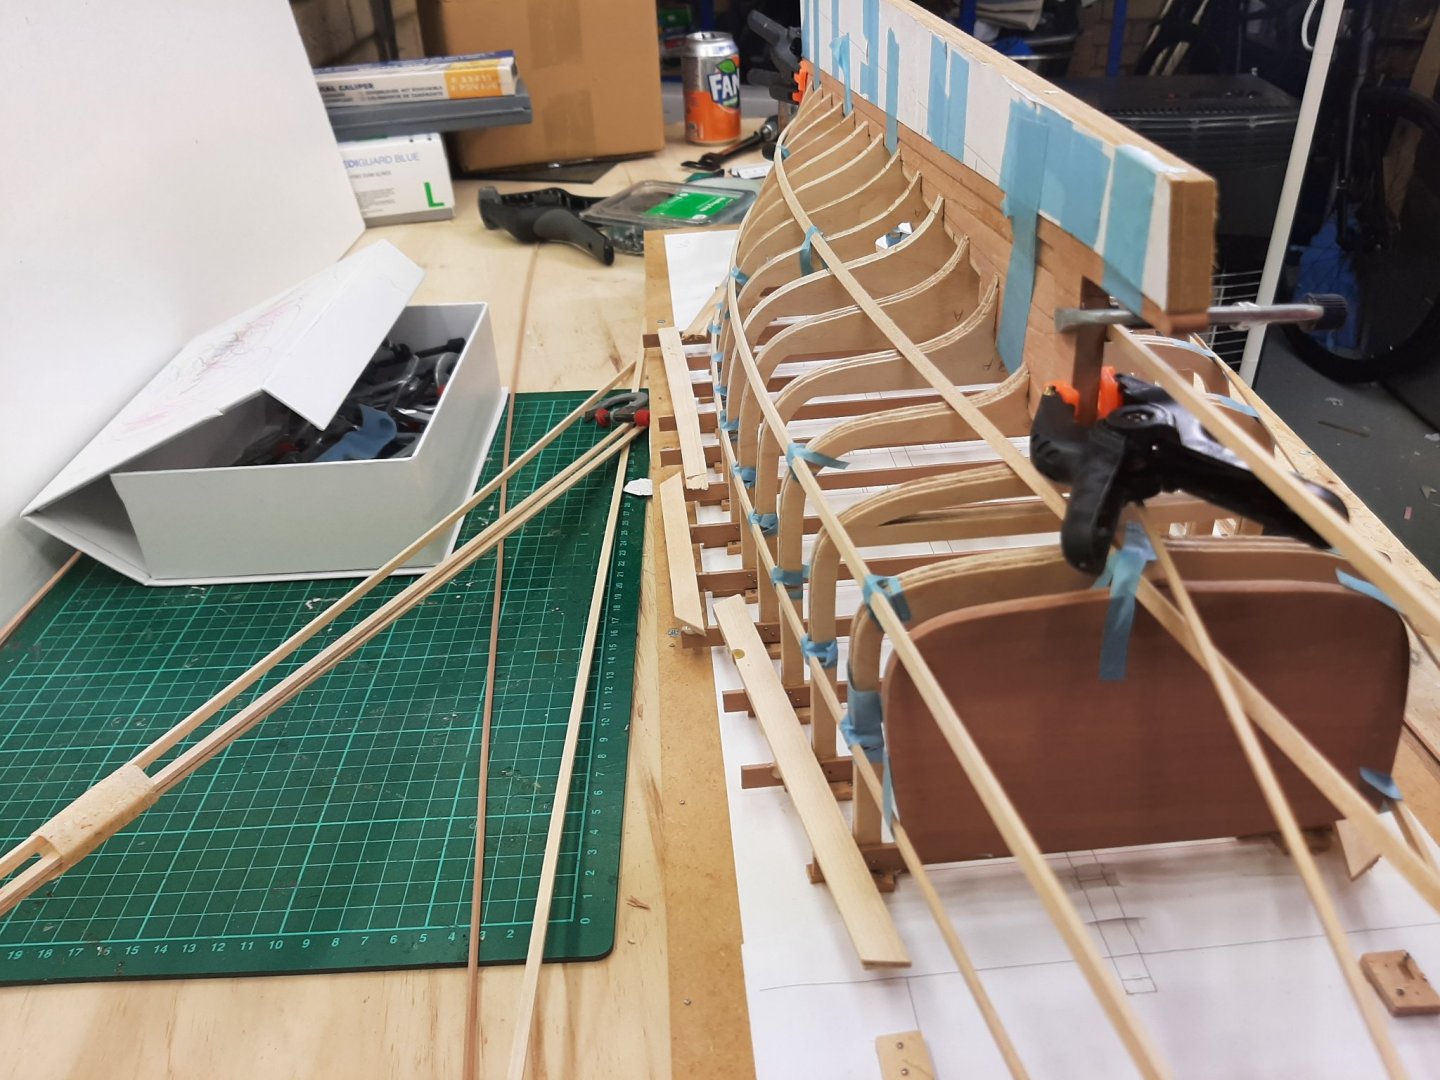
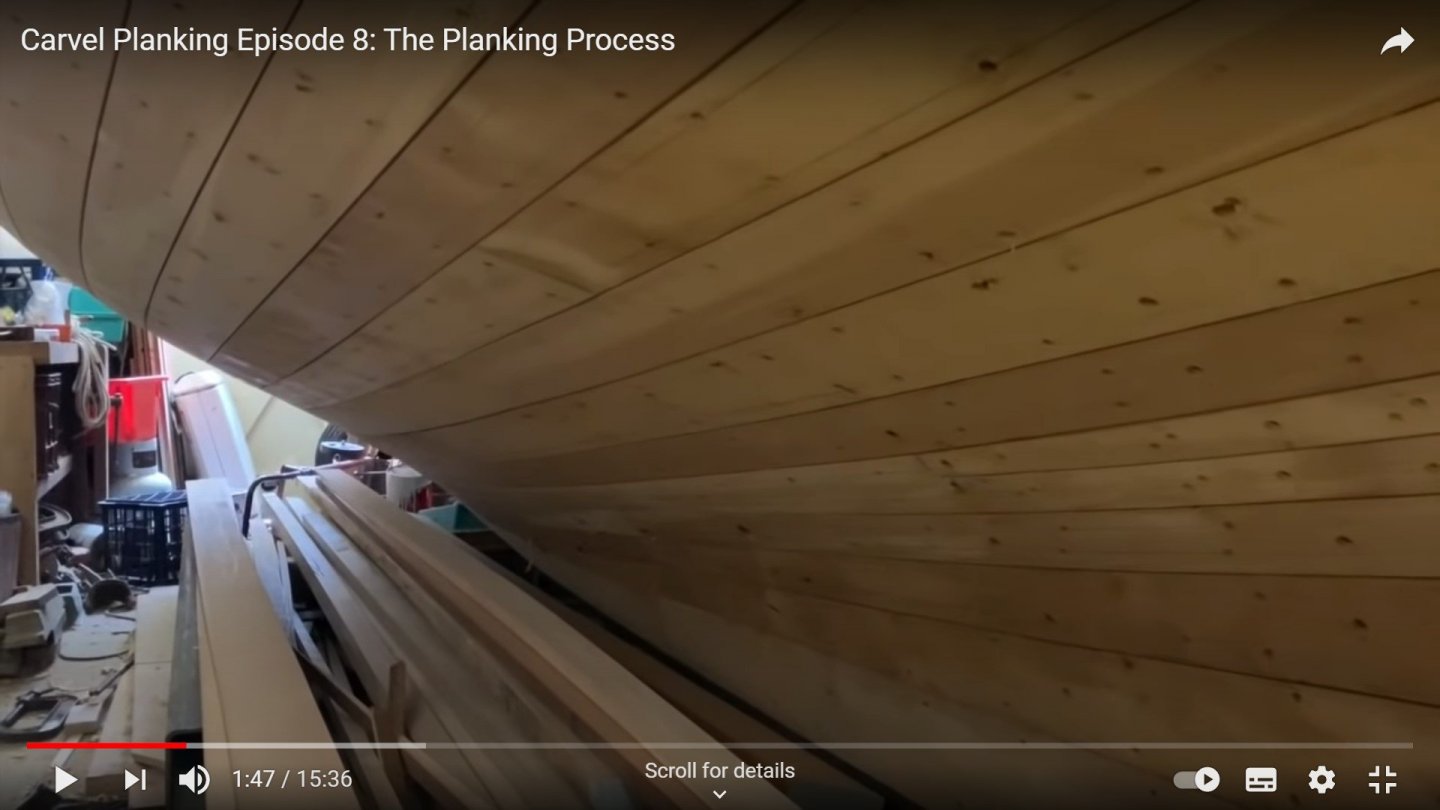
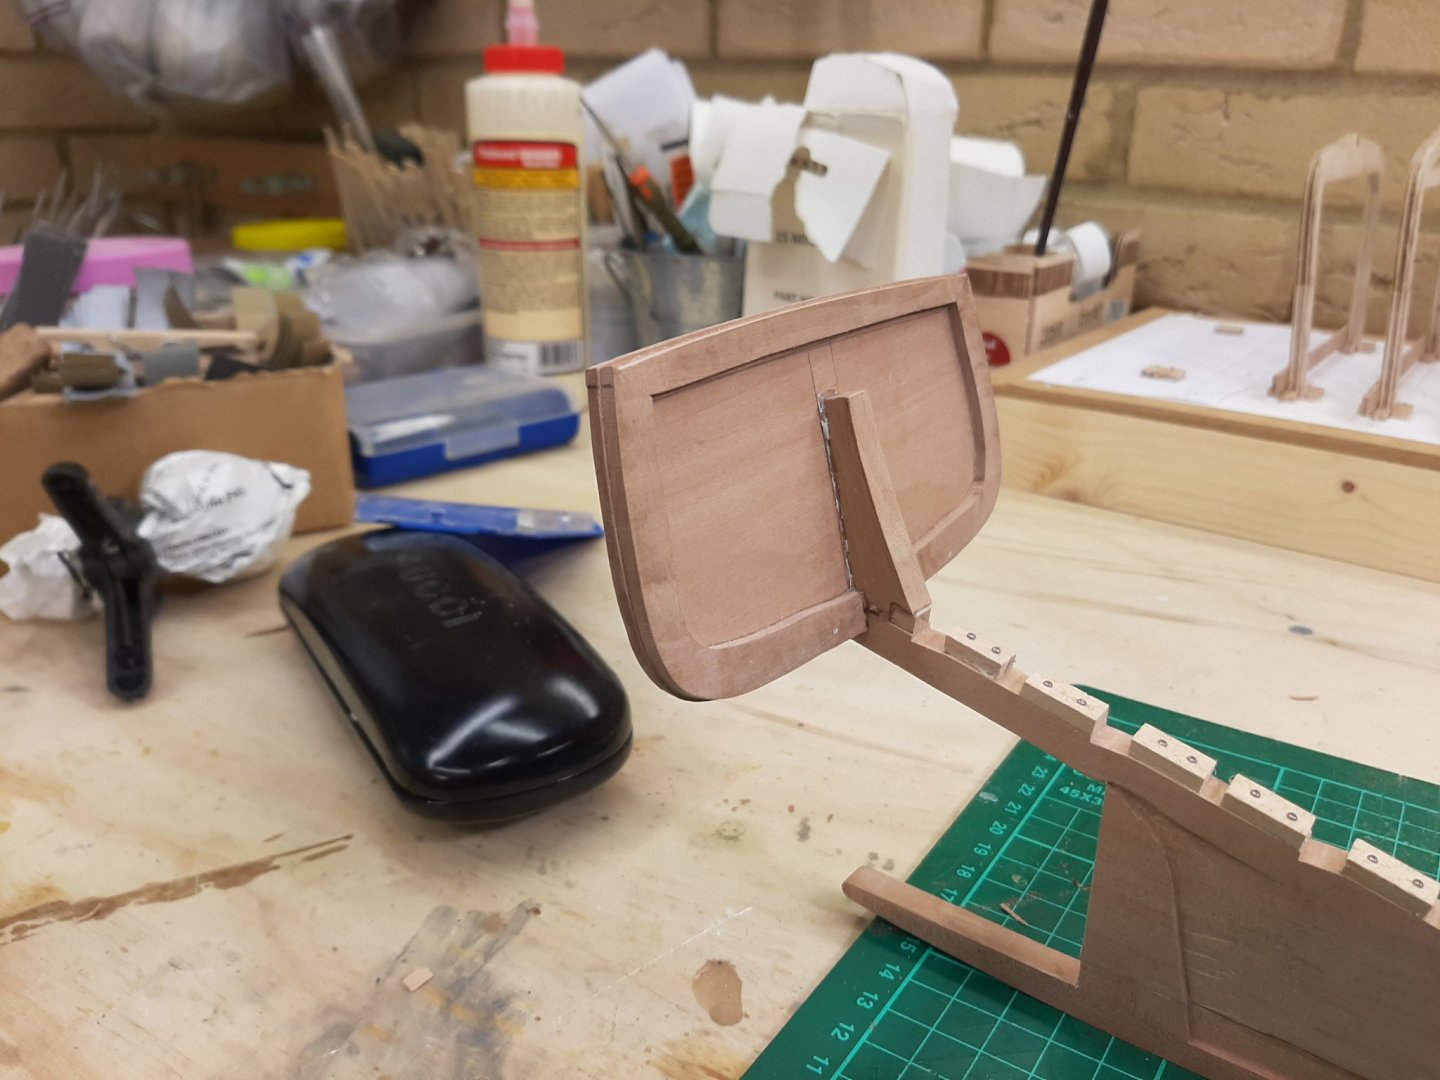
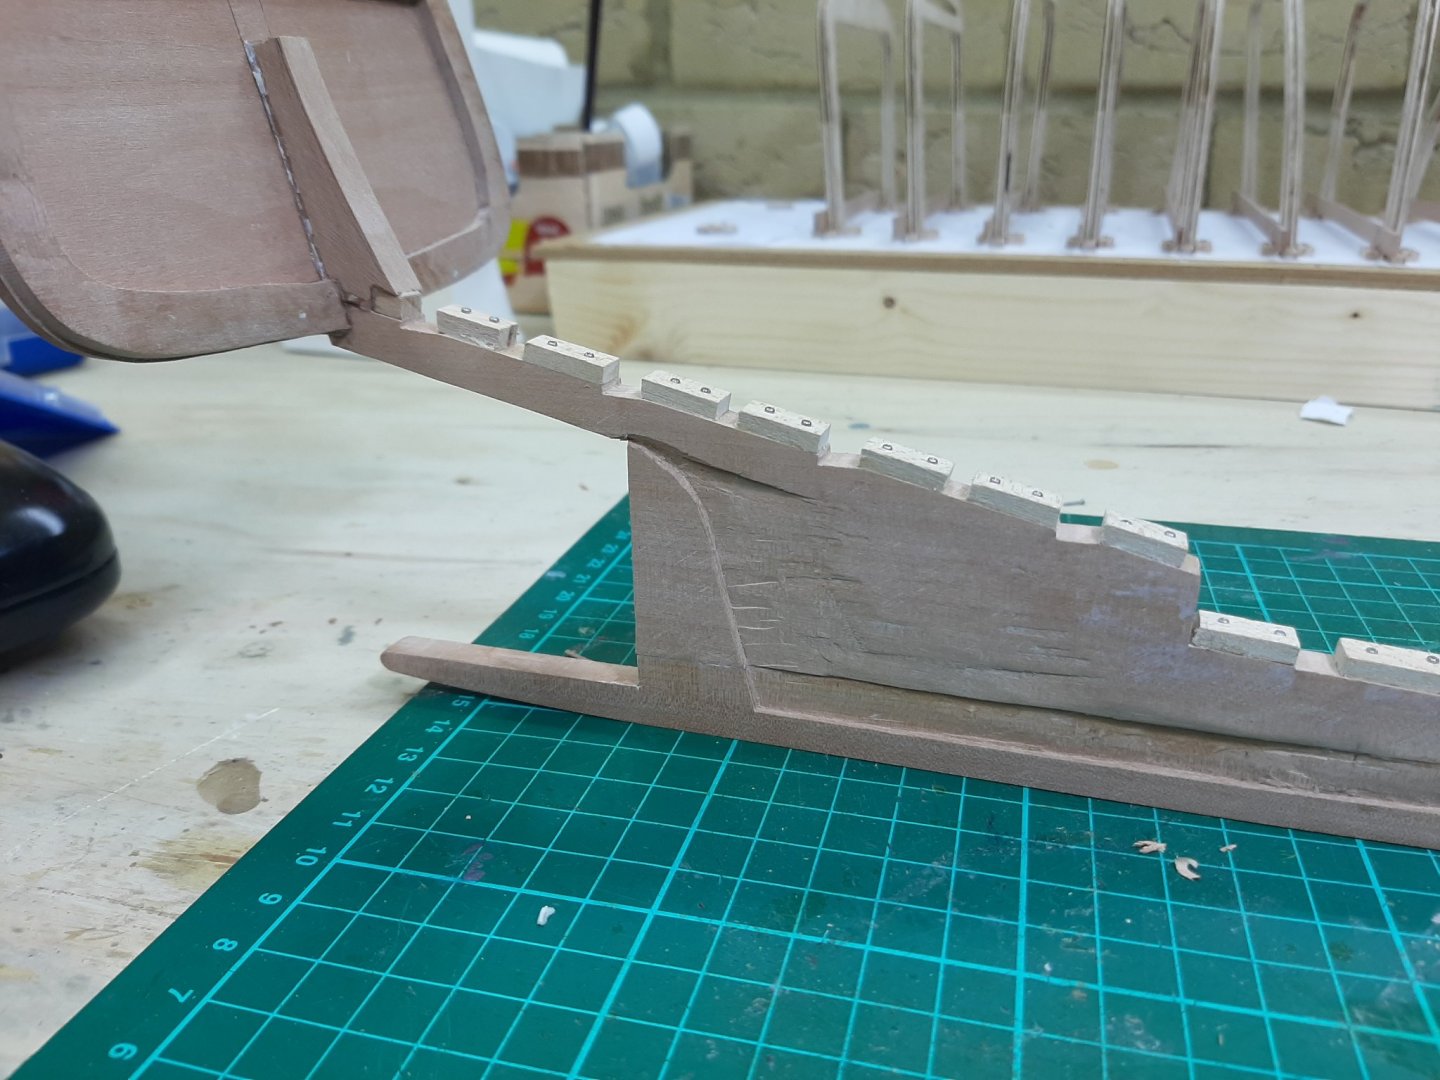
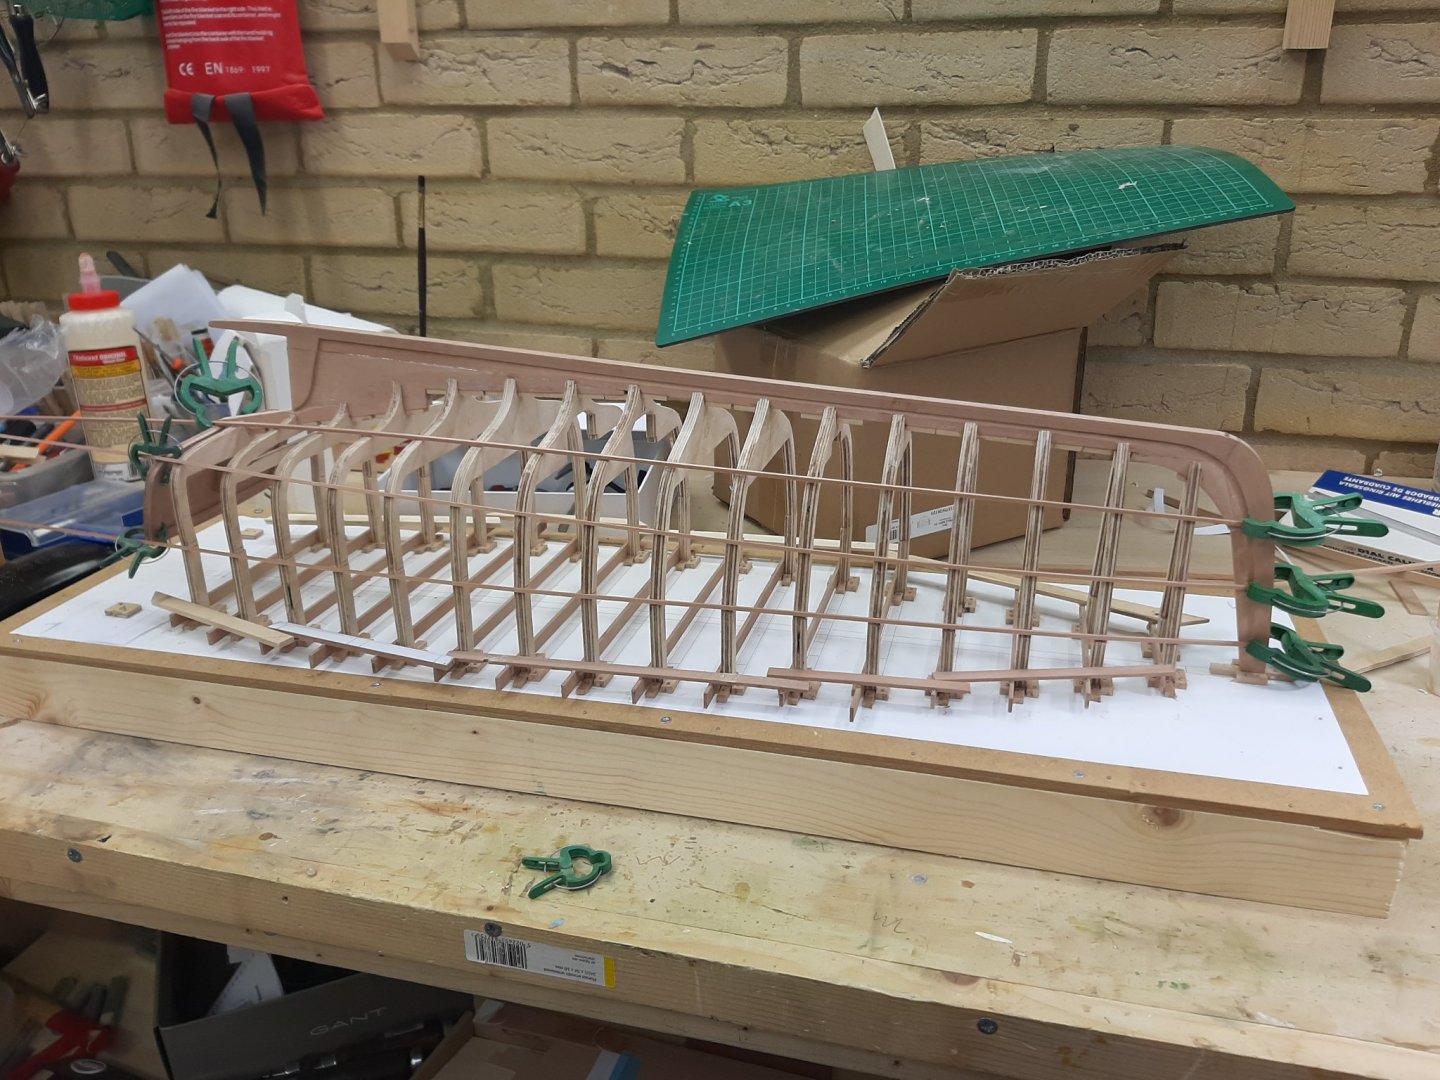
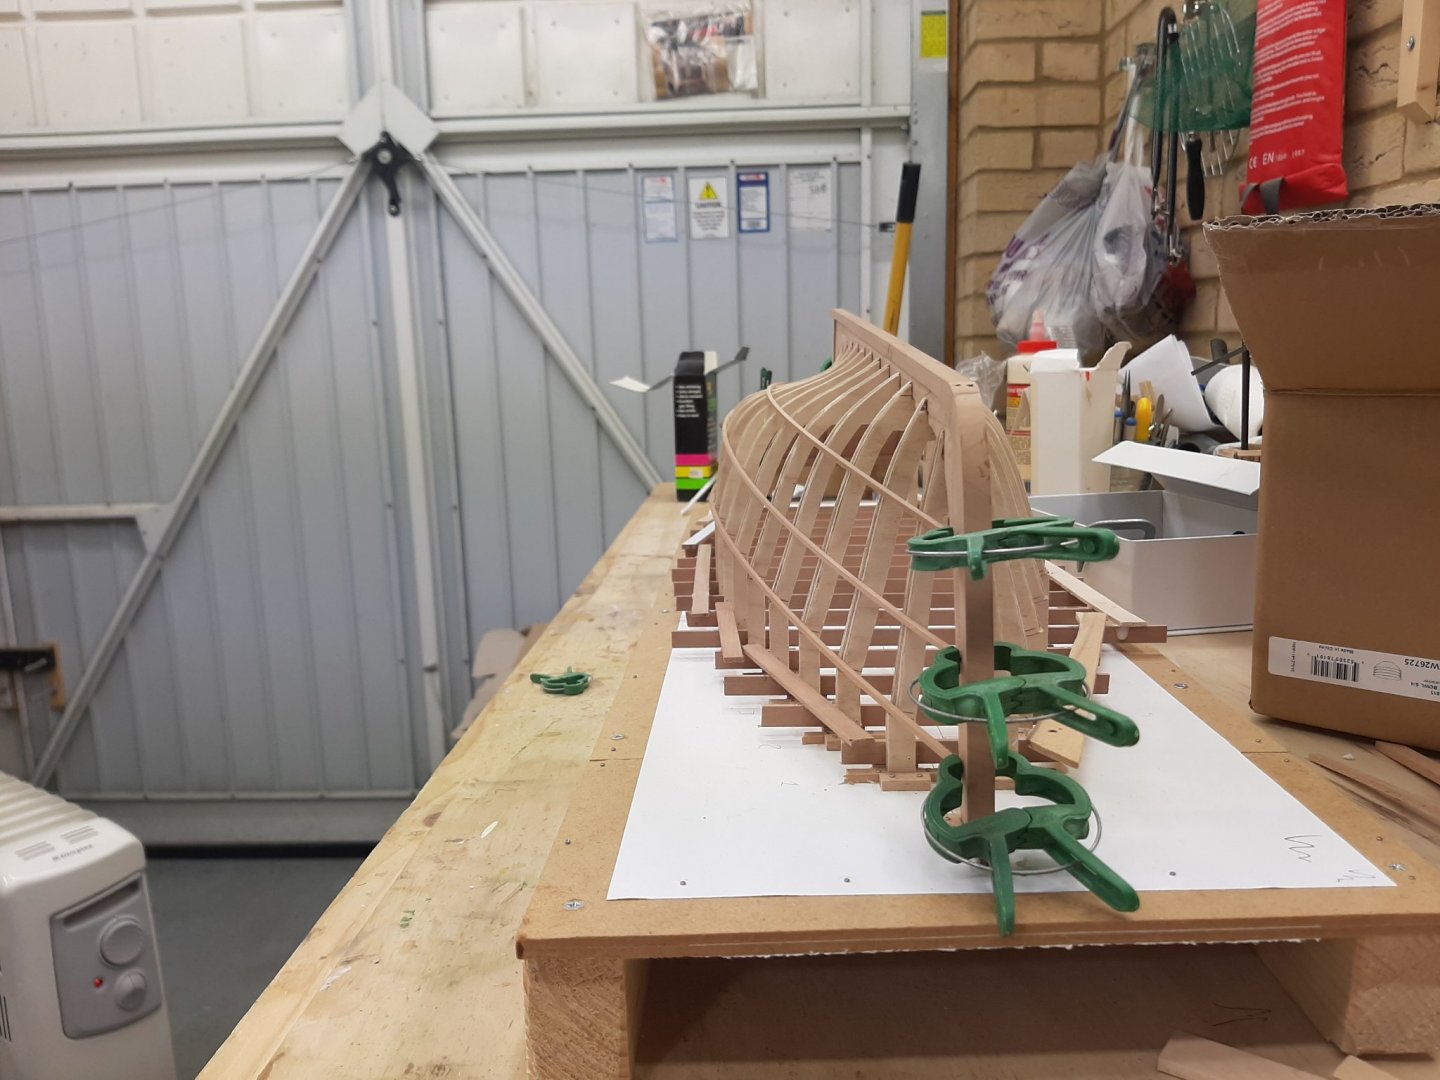
Many thanks to all for your likes! BobG, Jim, Mark and GL, your support is much appreciated! Now Mark, it will indeed be carvel planked but in regards to the garboard please bear with me! It is coming (I think). Be warned, this will be a long post! Now, I have only a few moments to spare as work and family demand most of my time. I also need to shed some of the considerable weight I ve picked up during the lock downs which means cycling as much as possible, weather permitting. So I can only steal a few moments here and there to work on the boat. For the last few days I ve been laying battens in all directions trying to understand the hull. It is a difficult one, there is a huge mismatch between stern and bow and the horn timbers are not helping either. There is also something strange happening with the fairing, the last two frames seem to have a disagreement with the transom-this can wait until the planking is figured out. First, I properly defined the sheer. Despite the CAD plans and the accurate marking, the baten showed a slightly different sheer. It is pretty close though, almost identical in both sides and really fair. I also realised I can lift the boat of its cradle, it is very stiff. This helps to eyeball the lines of the hull. The following photos are pics I took playing with the battens. The battens are stiff beech 4x2, quite reluctant to be edge bent. Now, spilling planks, I probably could plank the boat in any way. But this is the wrong way to do it-planks need to be realistic and cannot be overly curved. The plank stock in a real boat can be up to a certain width so the planks must be arranged in such a way as to minimise the curve of the planks. Of course, planks can be scarfed but with proper planning, this can be kept to a minimum. In the next photos, very wide strips are used to define the course straight planks would take on the hull. These are walnut, I think 10x0.5 or something similar Now, beside the rabet and the sheer, there are two more lines that in this hull must be defined and respected as they will represent the edge of planks. One is the line that runs along the maximum curvature of the transom and frames. The other, starts from the point where the rabet at the deadwood meets the horn timbers (this must be an edge since the next plank will lie at a different angle) and continues towards the bow at a line where a straight plank would lie, essentially following the hollow of the turn of the keel. So with these two lines, we have now divided the hull in three zones. If we lay planks on these two lines, they should be more or less straight. That means that the rest of the planks that will fill the gaps, should need spilling but should not have an impossible curve. Now, we can define the garboard. The lower zone really can be filled by only two planks, one will be the garboard. These will not be enough to cover the stern - we ll get to this later. Now, the upper edge of the garboard needs to be straight. So, if we lay a baten, from the middle of the zone at the stem, all the way to a reasonable width at the stern without the baten having any edge bend, we have the upper edge of our garboard. The other will of course be the rabet at the keel. The next photos show how the garboard and first strake should go. It also shows how much the edge of the baten is raised on the initial marking of the run of the planks, which means that the spilling would need to be impossible. The rest of the gaps will be divided to equal widths, lines will be drawn and faired and the corresponding planks will be spilled. These planks will need to be more narrow where the hull has a large curve. The last thing remaining is the gap at the stern in the lower zone. This will need a stealer. I thought that stealers were not used in such small boats but I was mistaken-they do. Some images bellow Also, a few pics I found that show how the planks meet the horn timber Finally, this is a you tube video that I think is fantastic and explains the process in a very simple way. https://www.youtube.com/watch?v=BpI7B43KA3I One thing I need to be mindful of is the bevels of the edges of the plank. At this scale the planks will not sit well if they are simply cut vertically. Also, some planks will need to have the inner surface hollowed, this I am not sure how it can be done. This is of course just a bit of initial planning but I think we should not be far off. Regards Vaddoc


-
I use various blades: No 11 surgical scalpel, 18 mm retractable blades with snap off segments and for heavier duties the knife carpet fitters use. But for wood I use chisels
-
My first thought Mark was that the discrepancy in the plans was due to not projecting the transom as given in the plan to its angled plane. However, the transom in this boat seems to be pretty much vertical so this is not it. Anyway, you fixed the problem!
-
Thank Bob! I am indeed cheating though, all the frames are already bevelled as the whole boat is designed on CAD. However CAD accuracy is now gone-old fashioned ship building from now on. The sheer is also very accurately marked on the frames but I will use a batten for the final marking and let the wood find its own fair curve. The batens are held with clamps as I just wanted to get an idea on the run of the planks. This will be a tricky boat to plank. You are very right on the "exaggerated sheer". I followed the table of offsets and did not make any adjustments, I hope Chapelle took this into account...
-
Looking good Hakan. My solution was a butane gas heater, assisted by an electric heater around or bellow freezing.
-
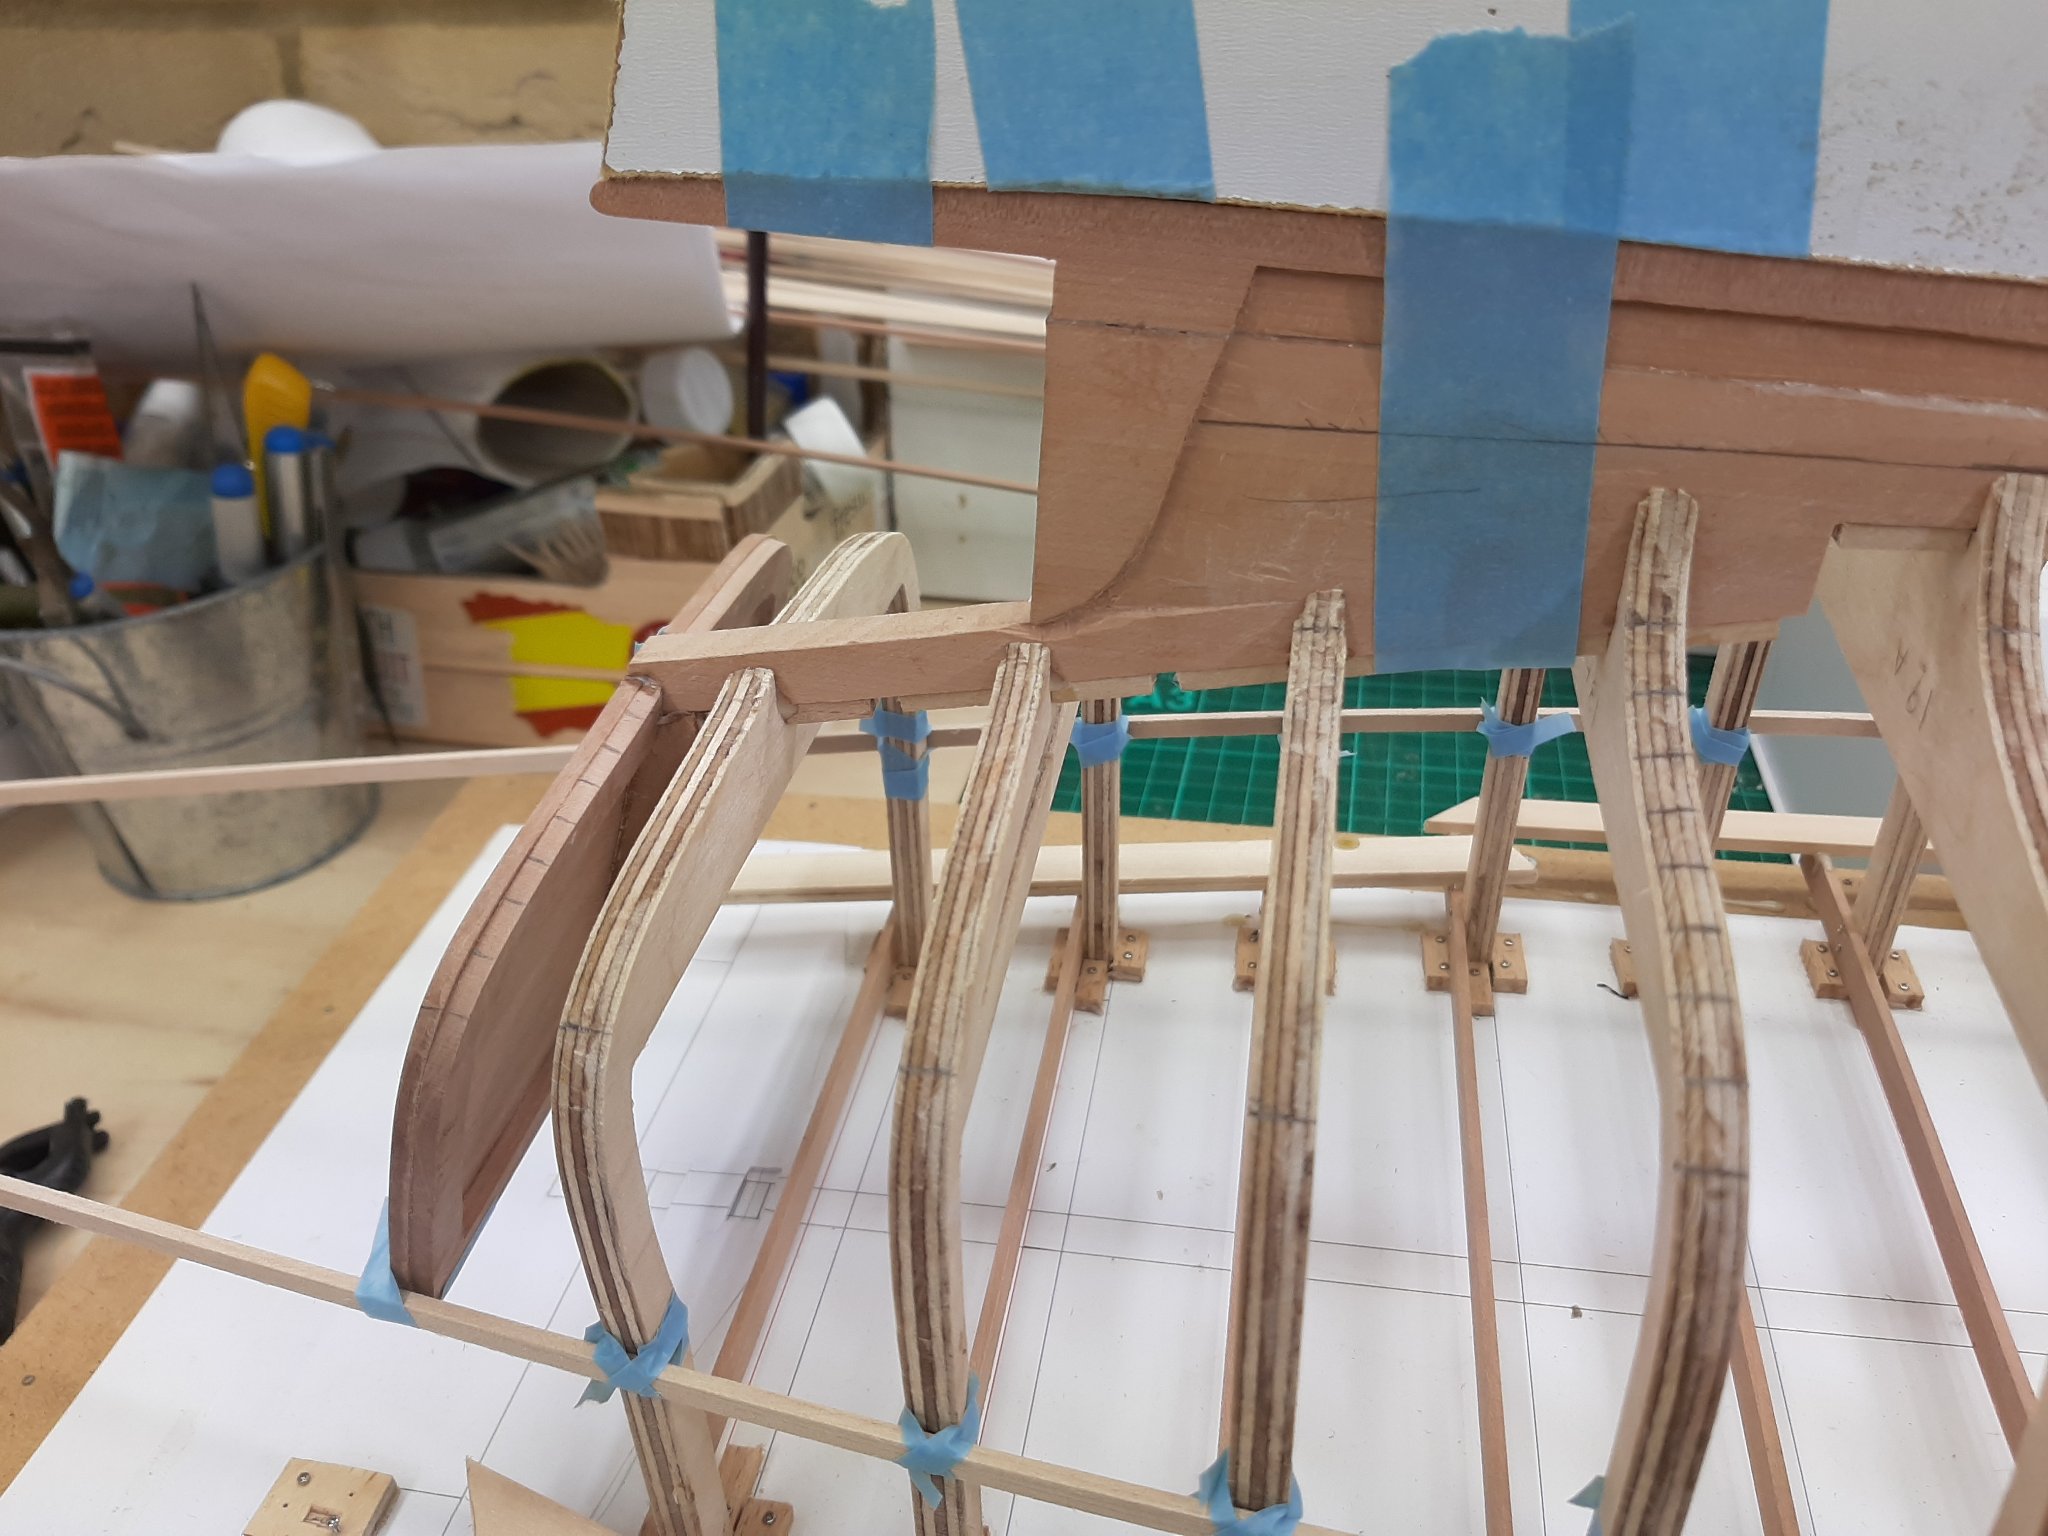
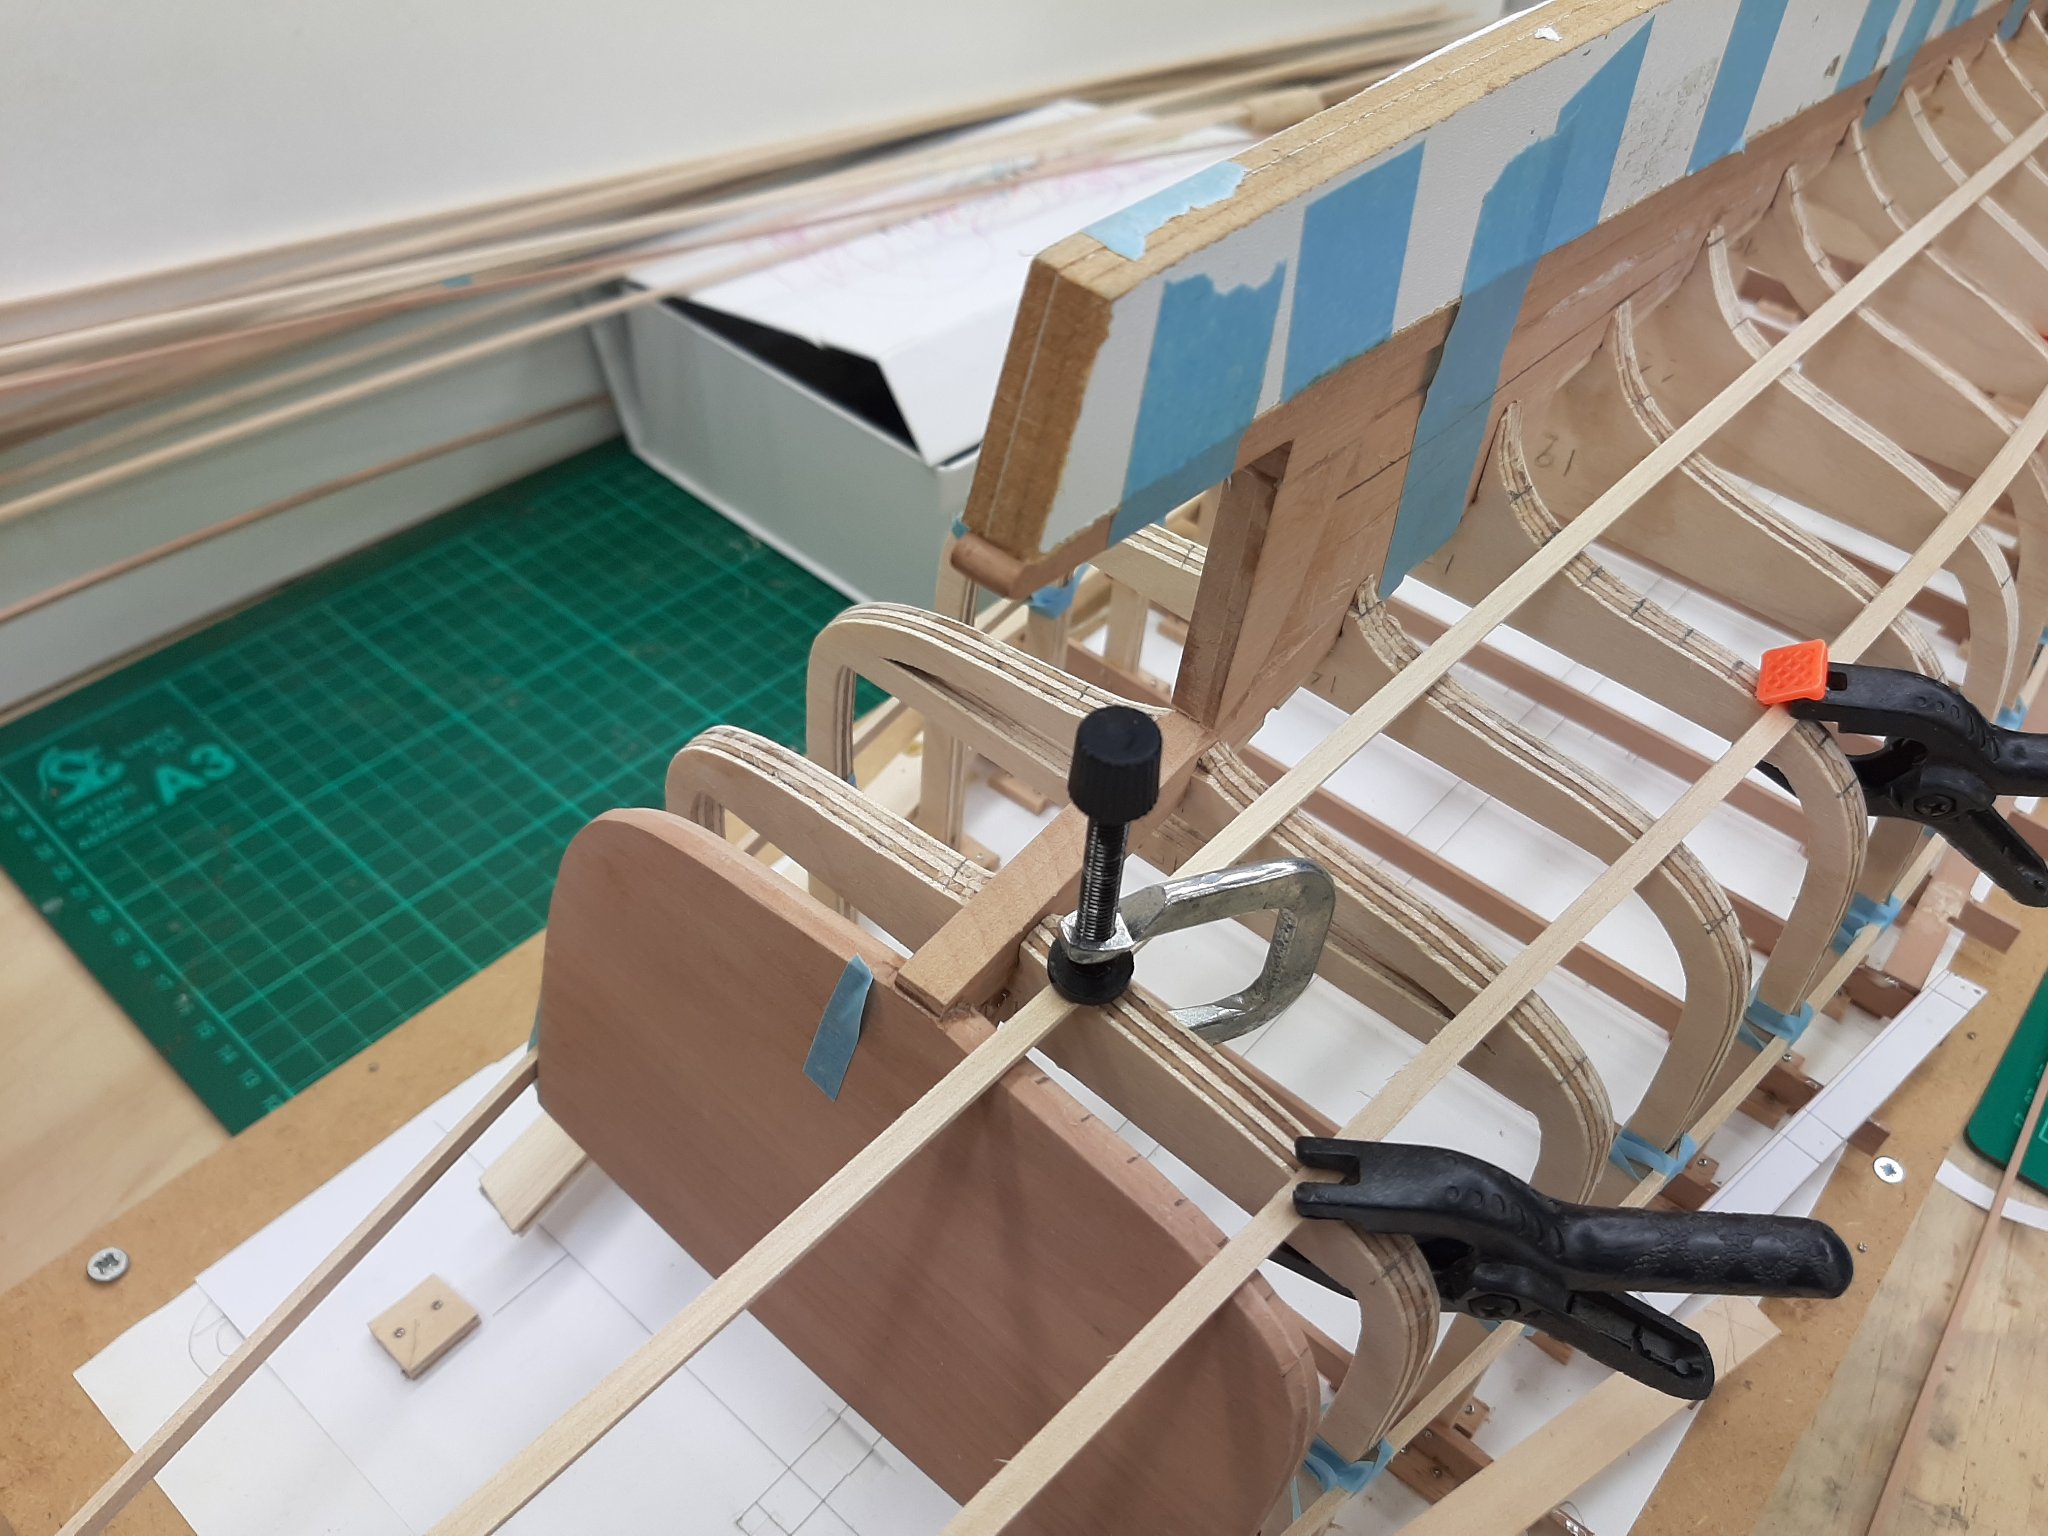
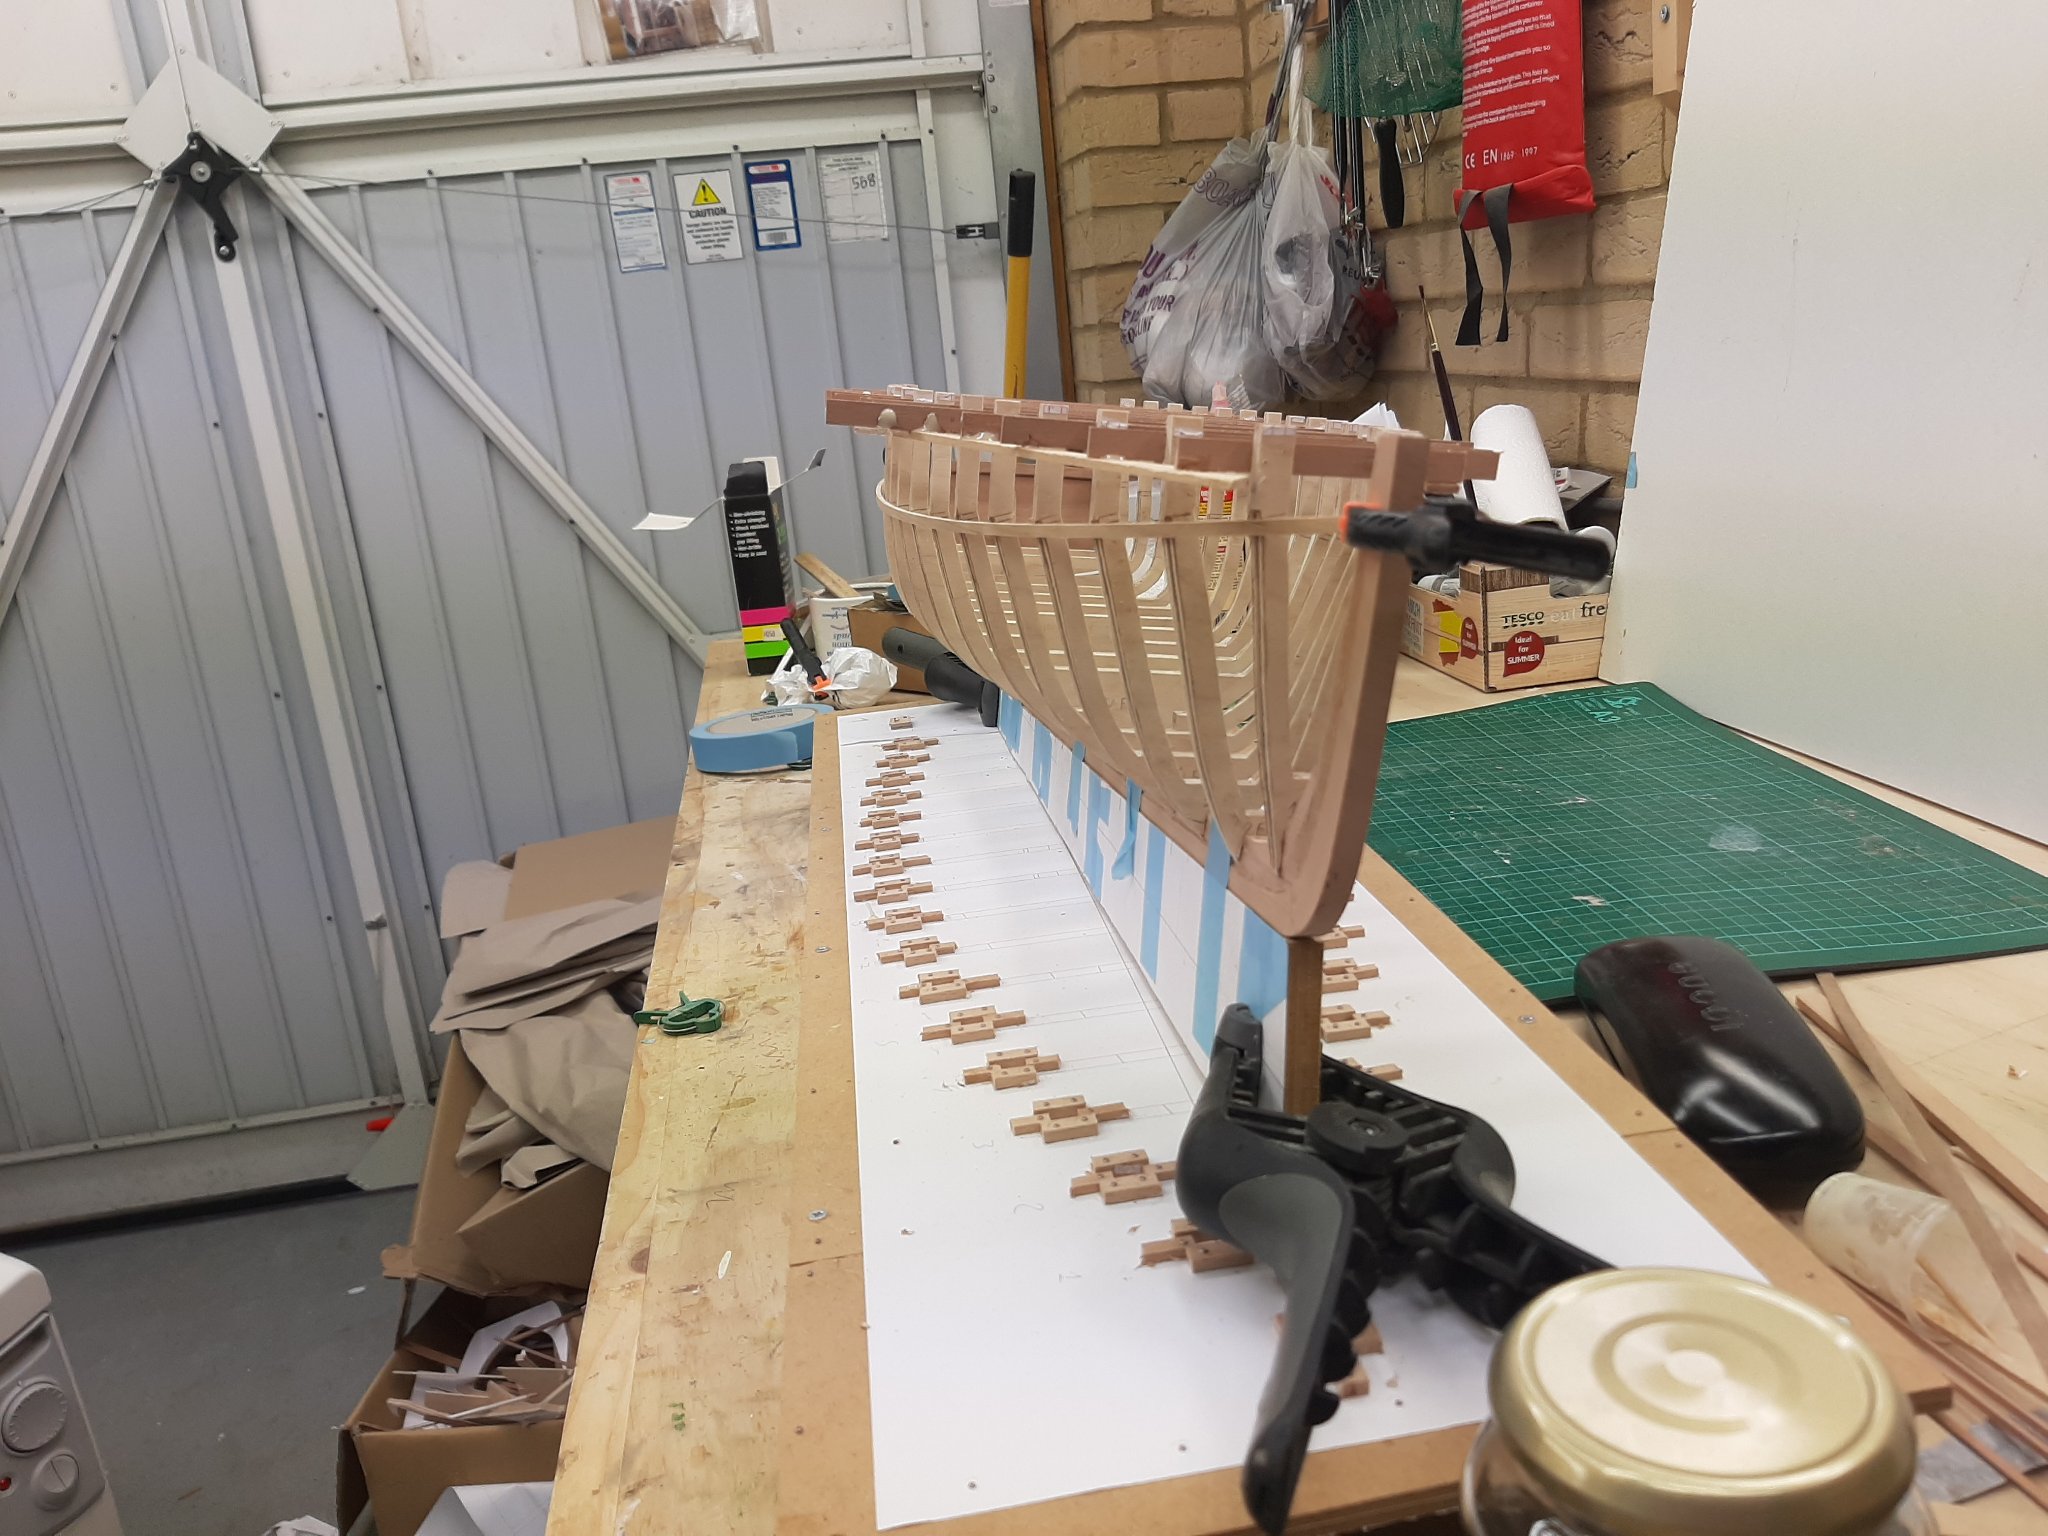
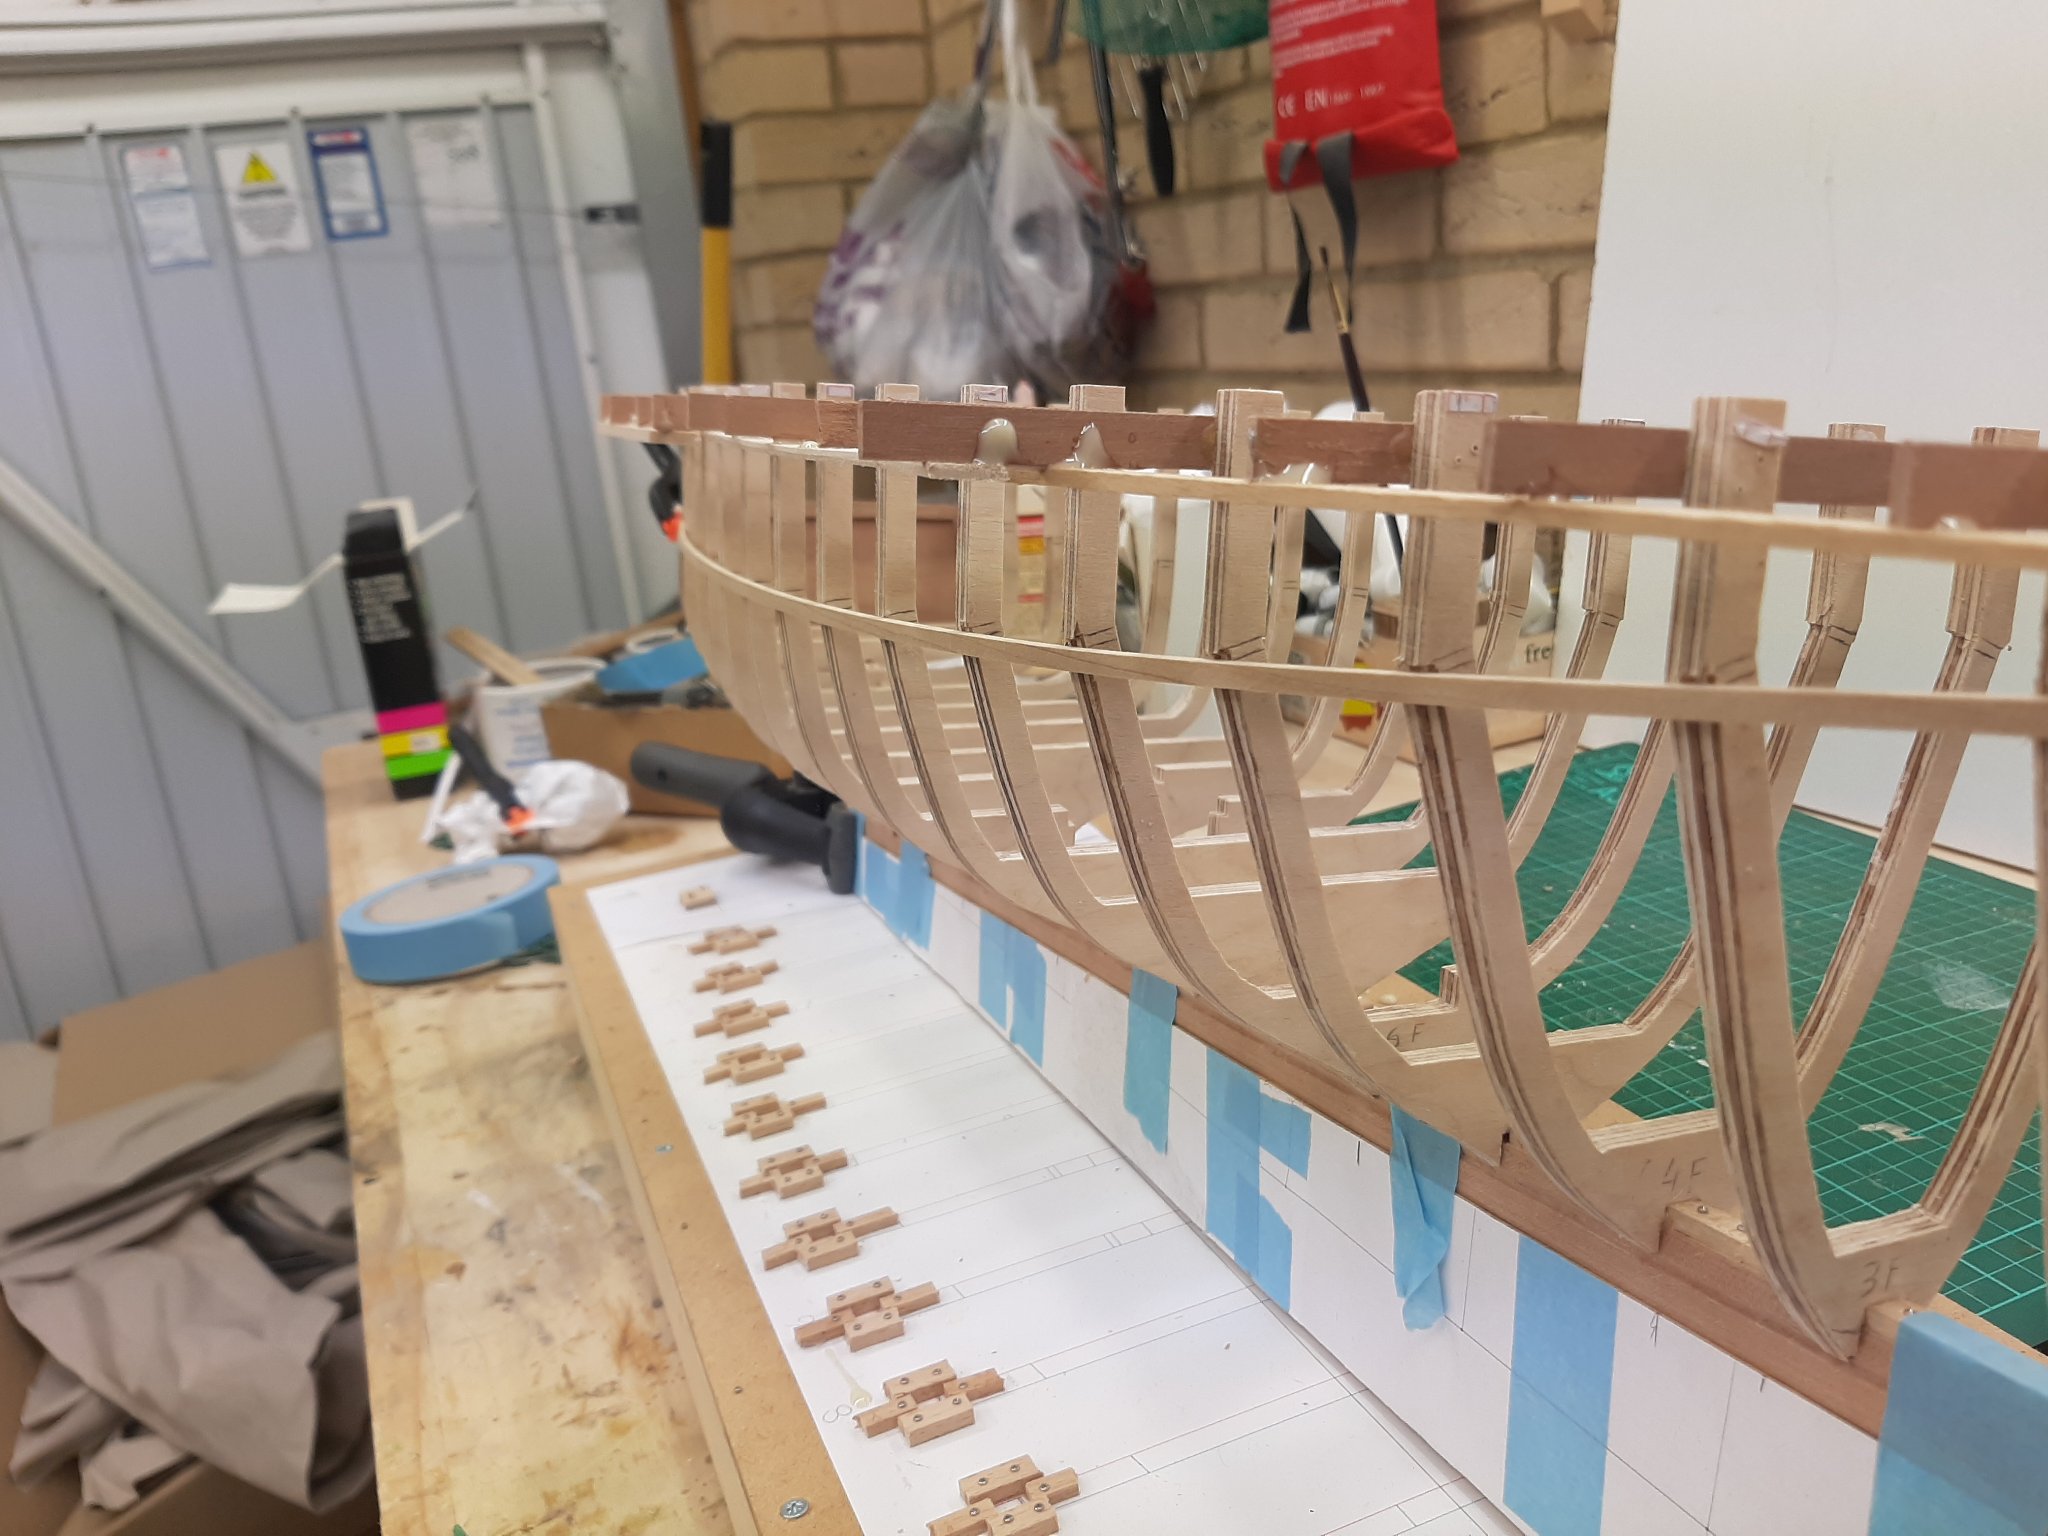
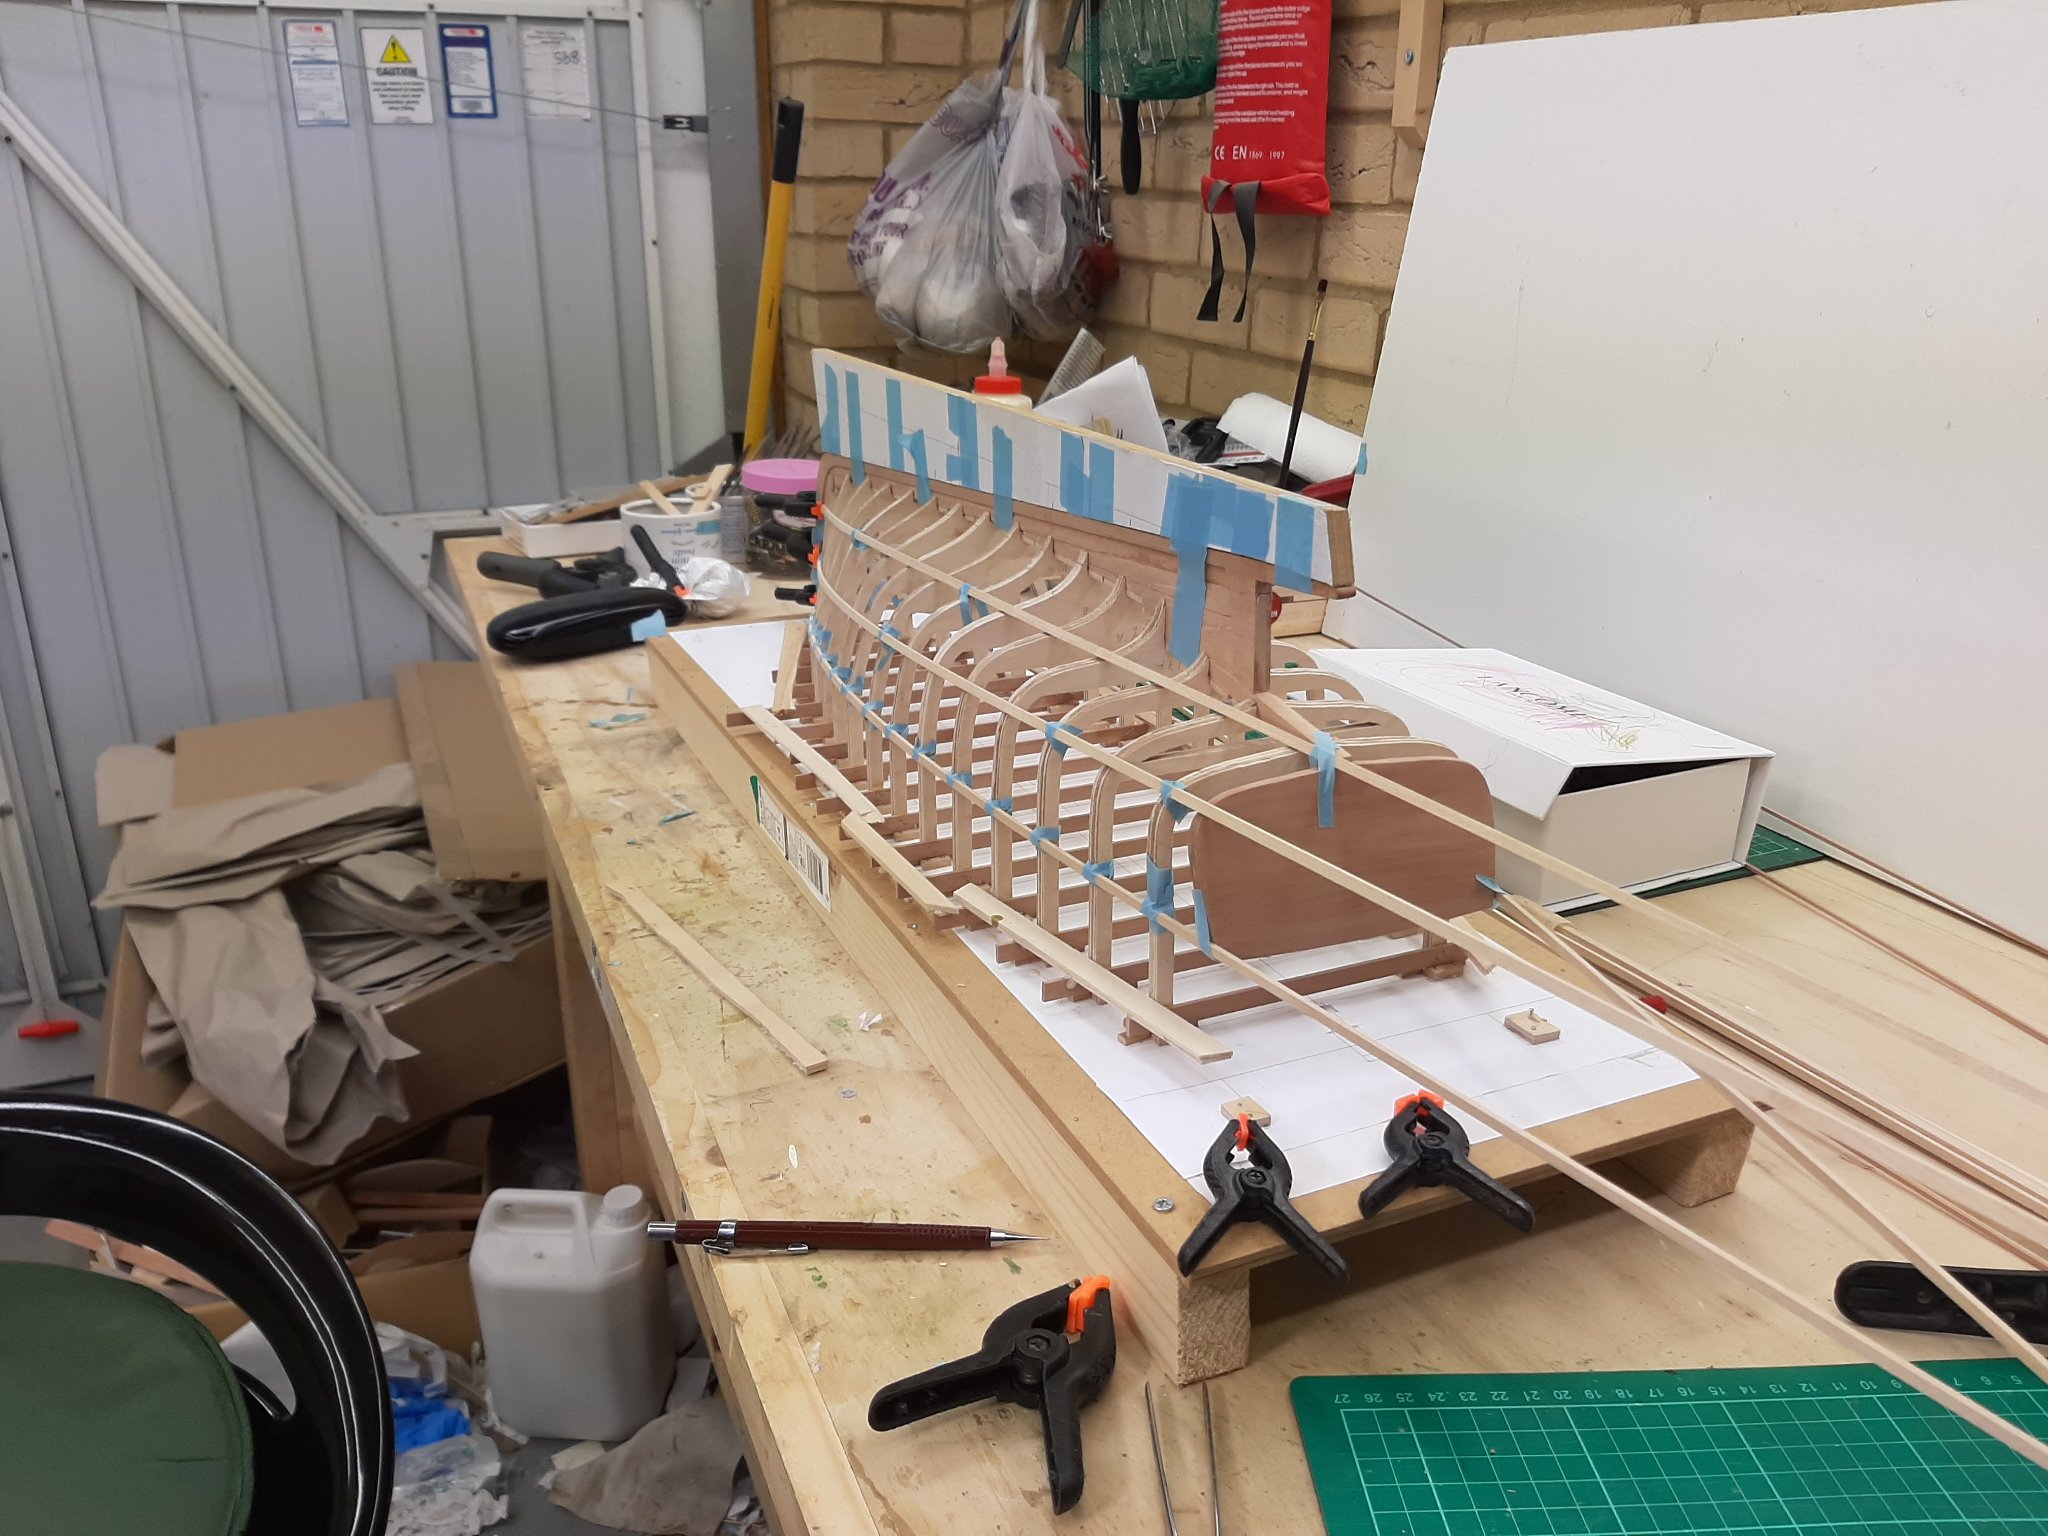
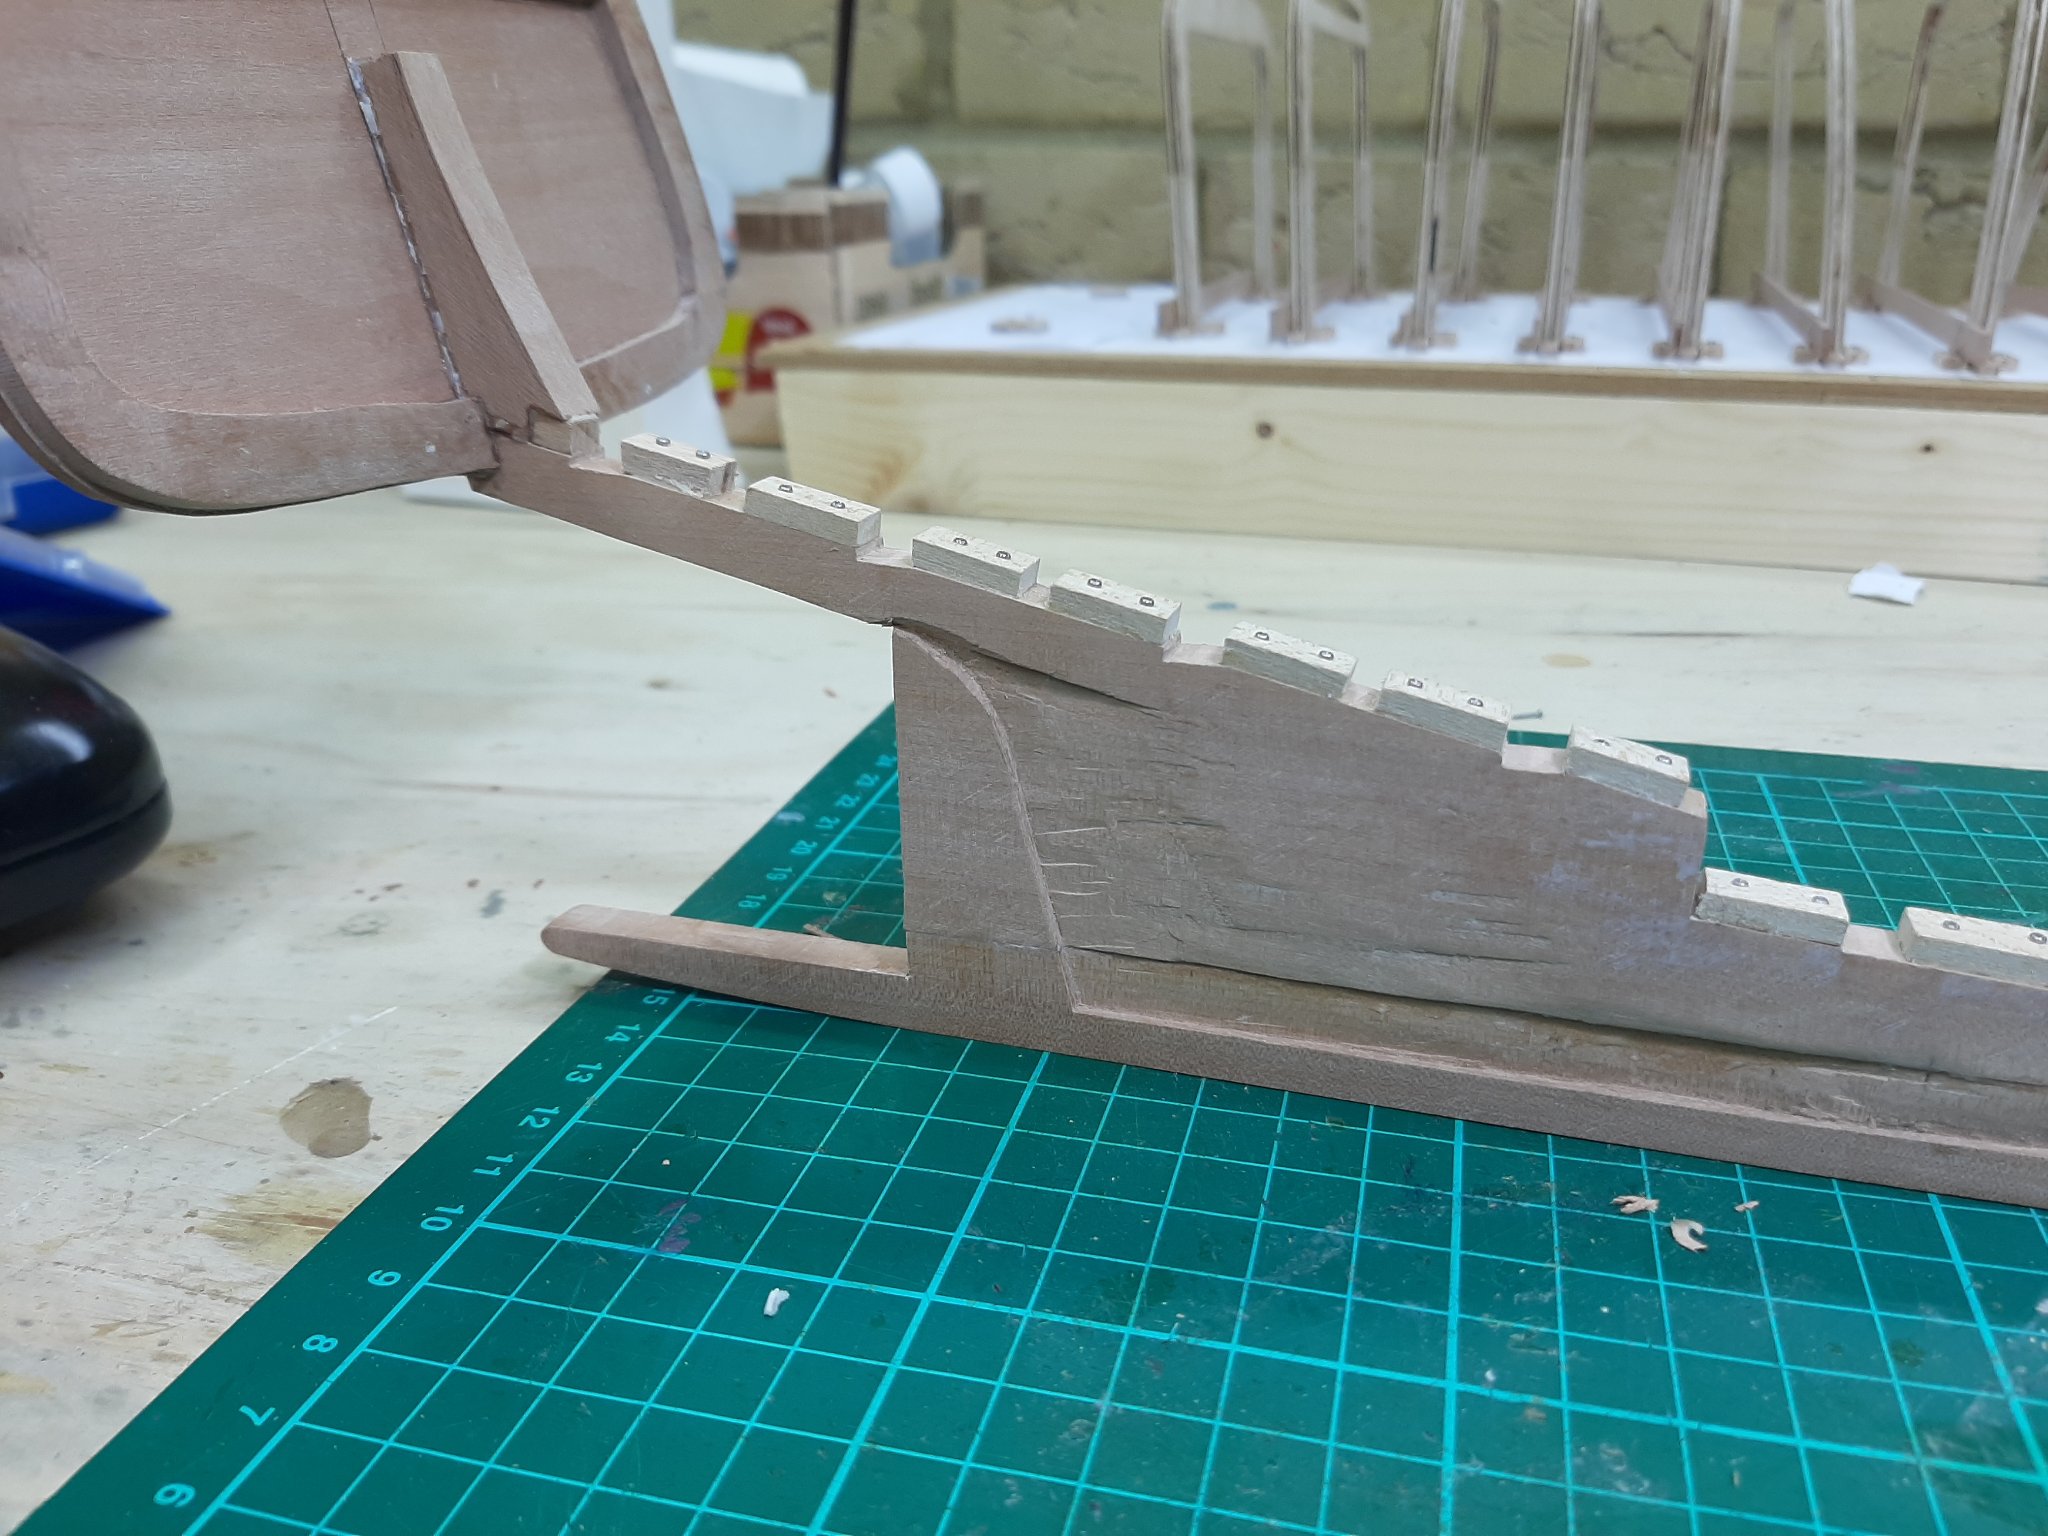
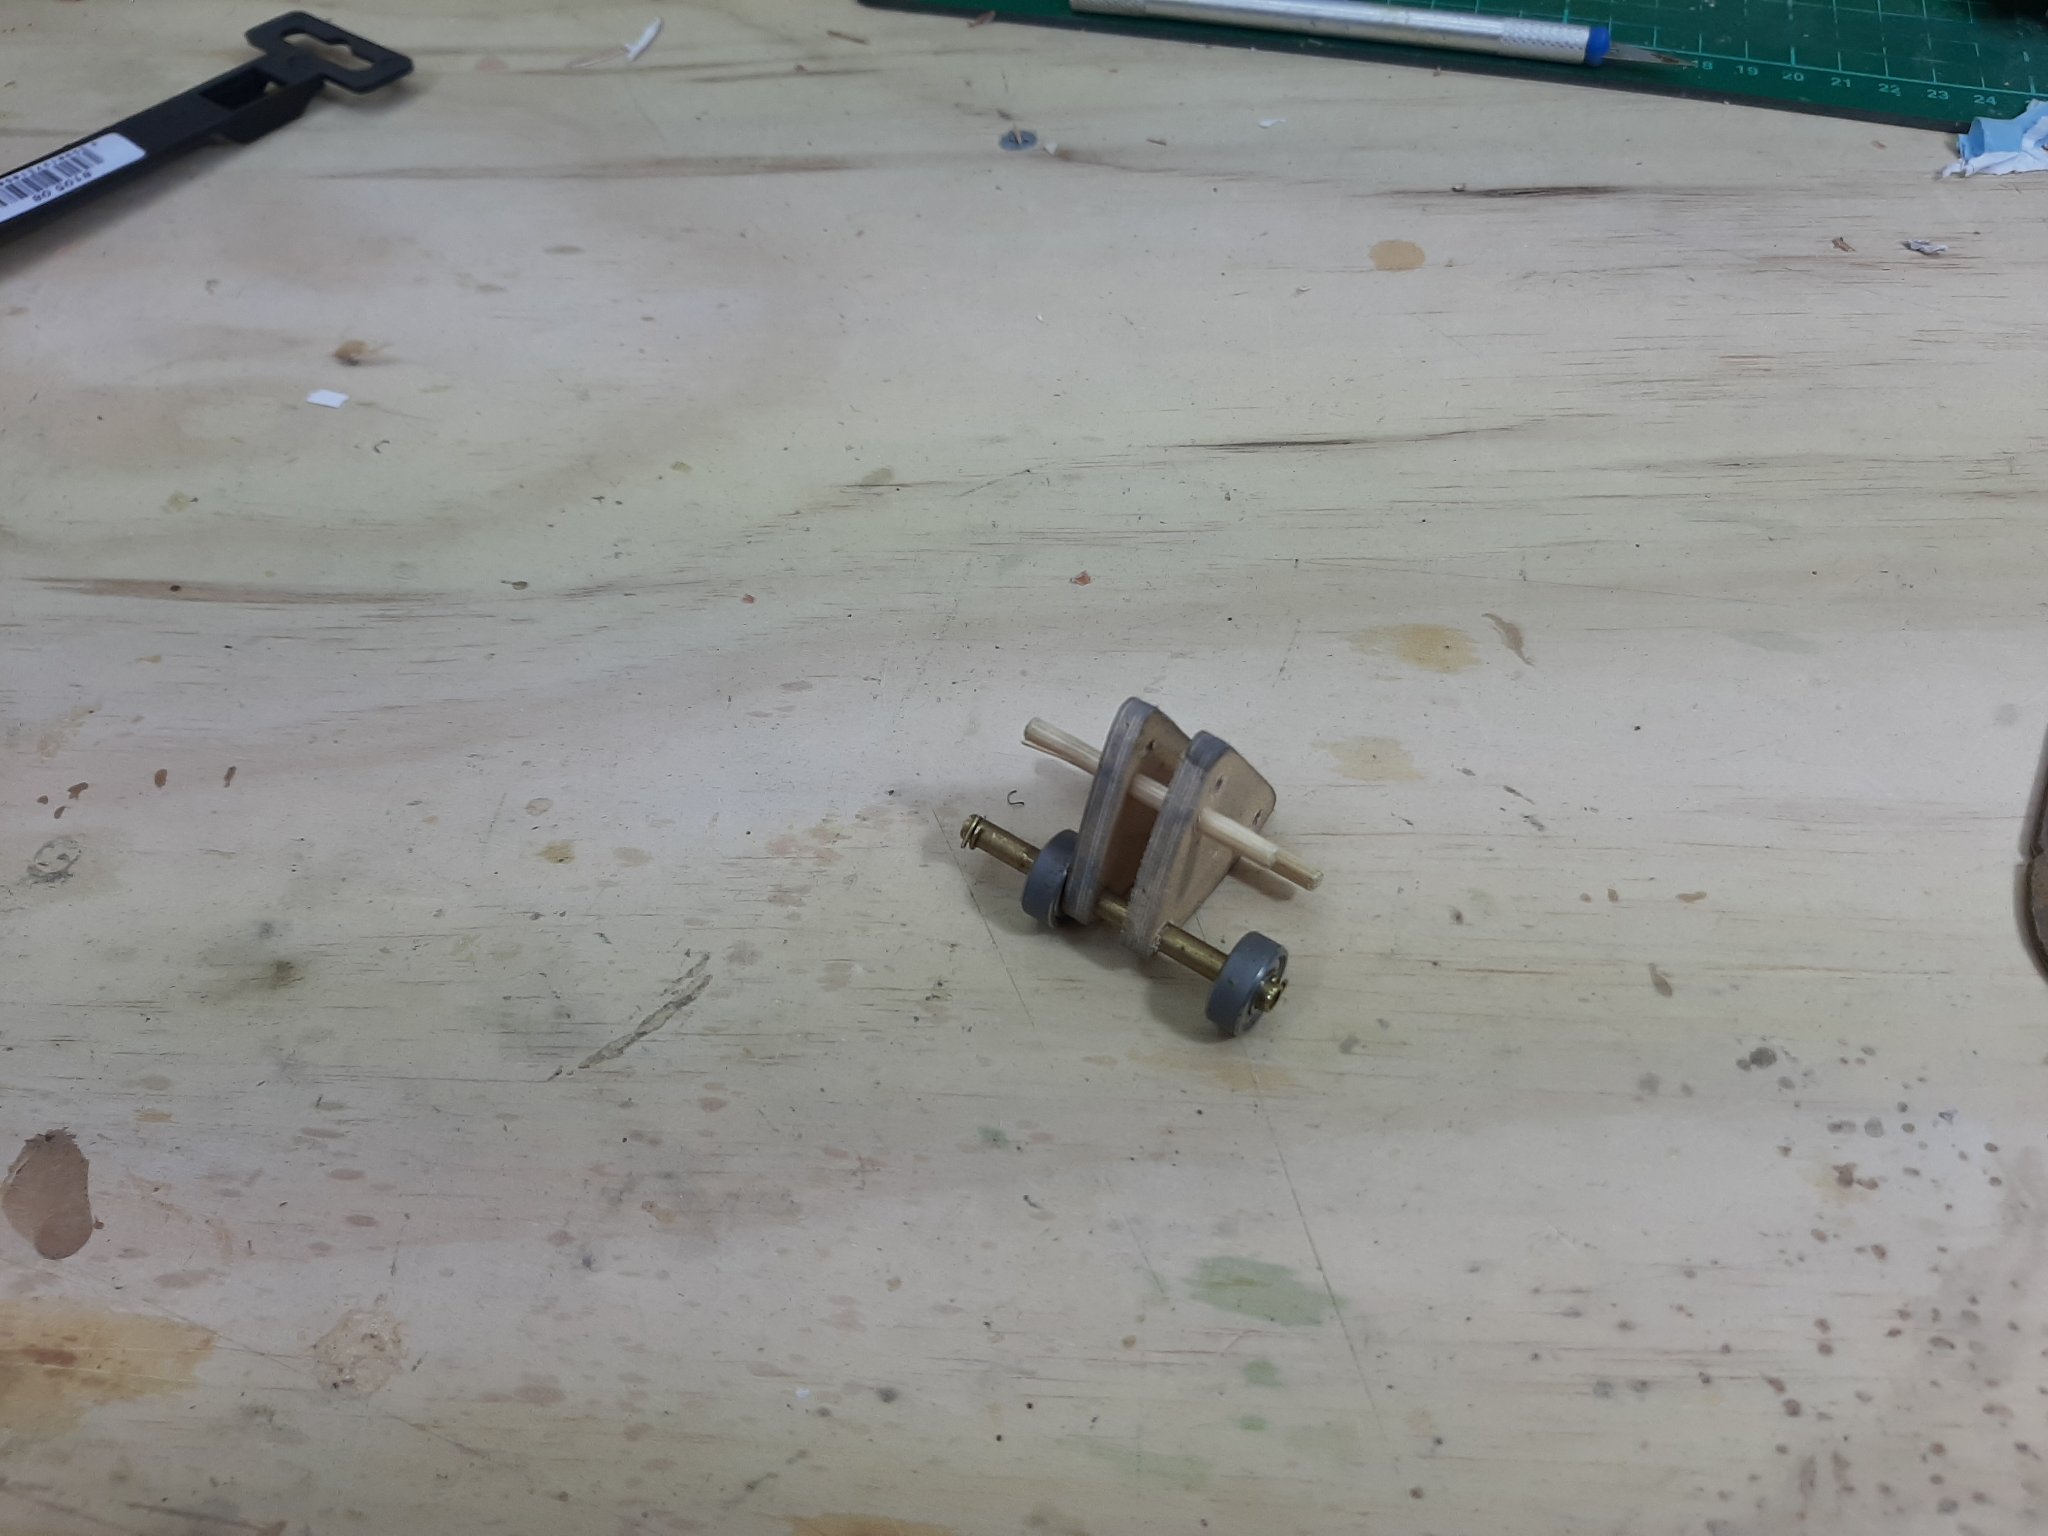
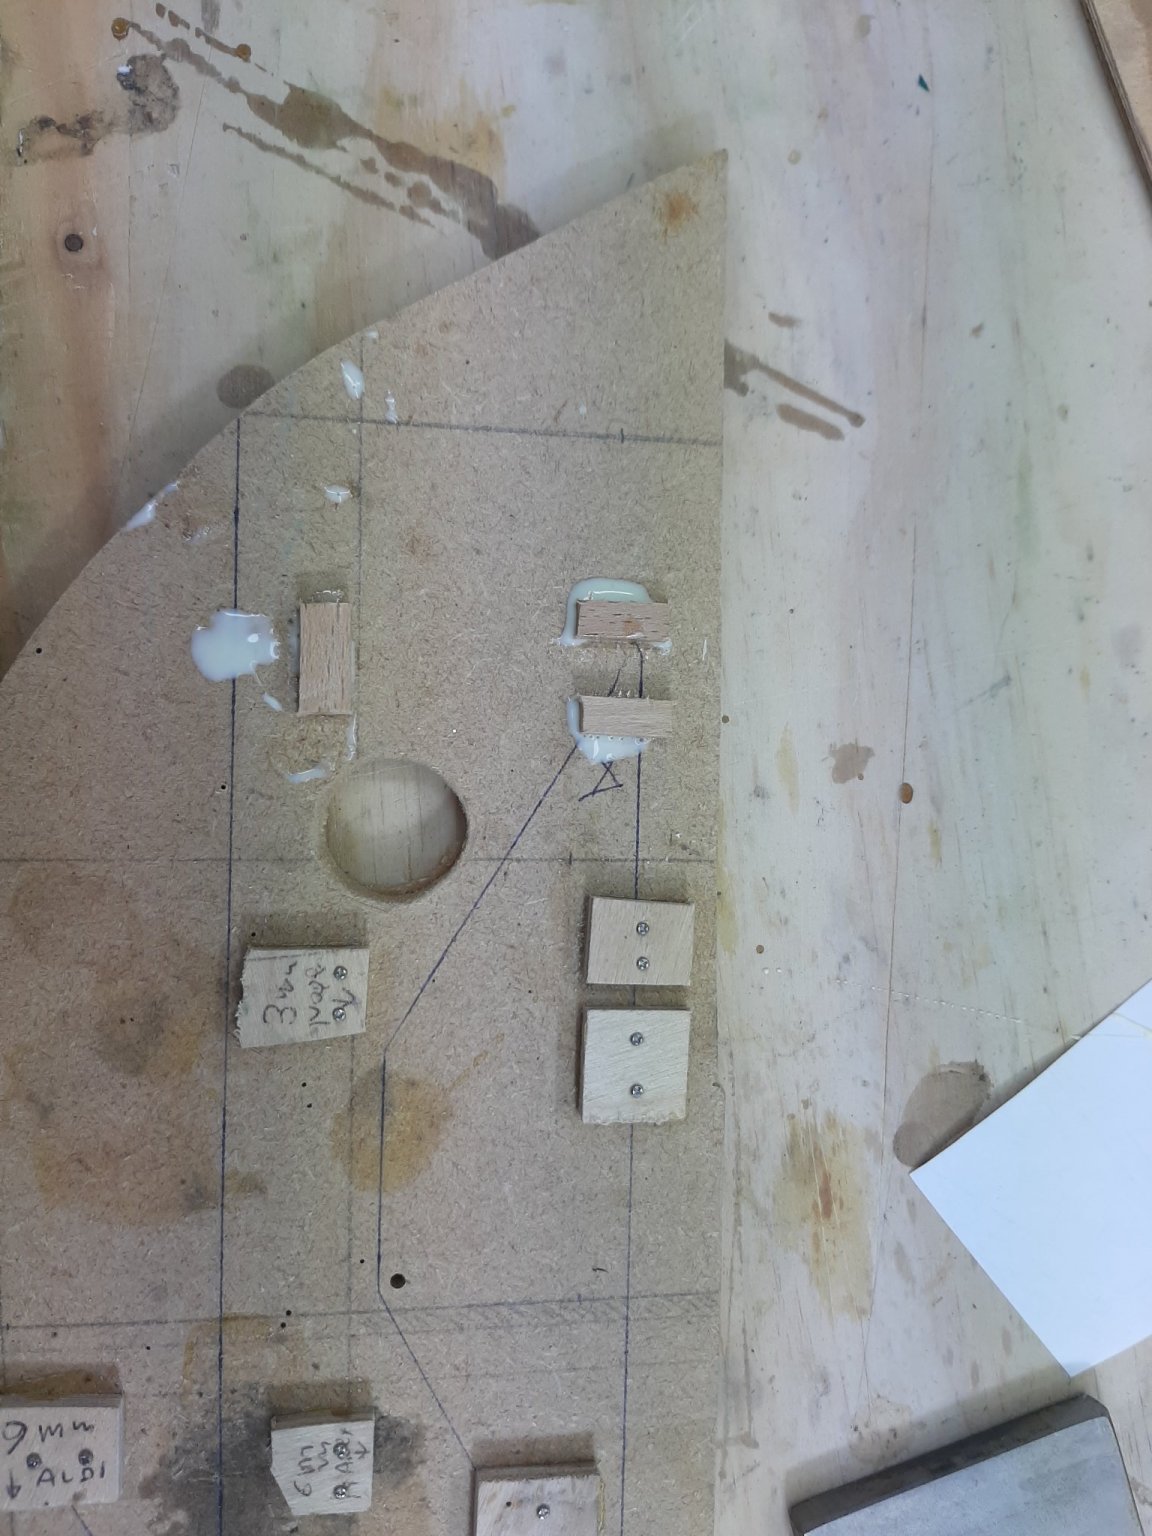
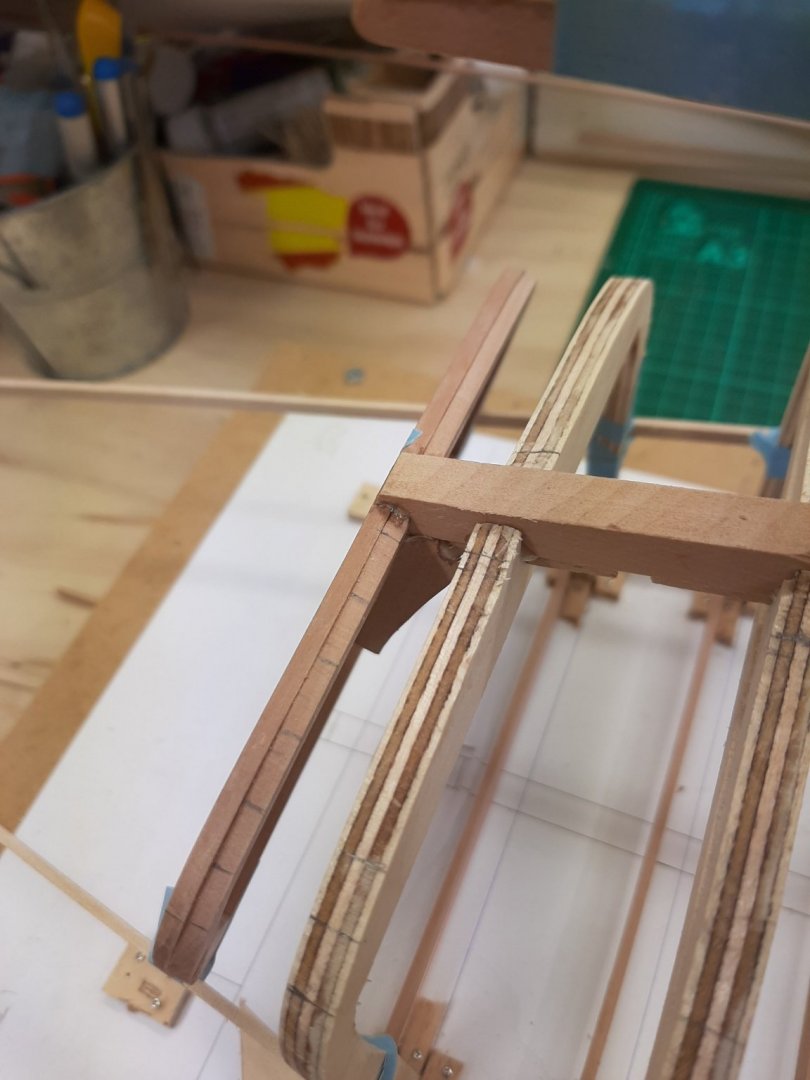
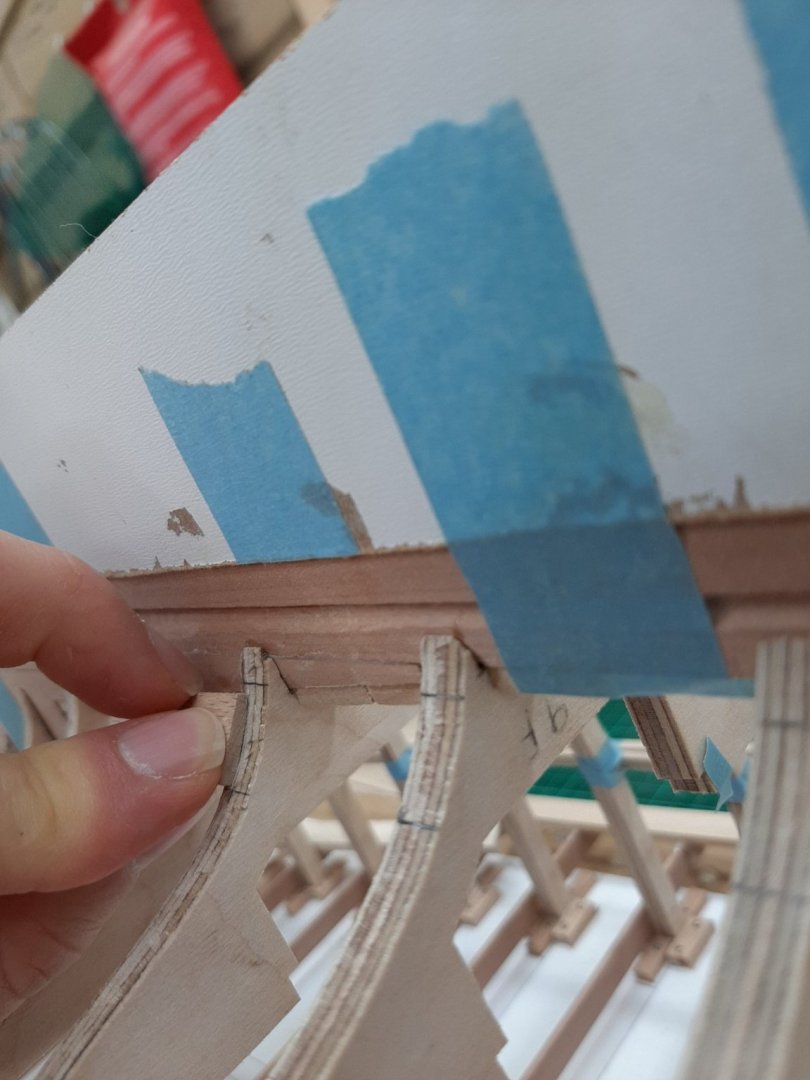
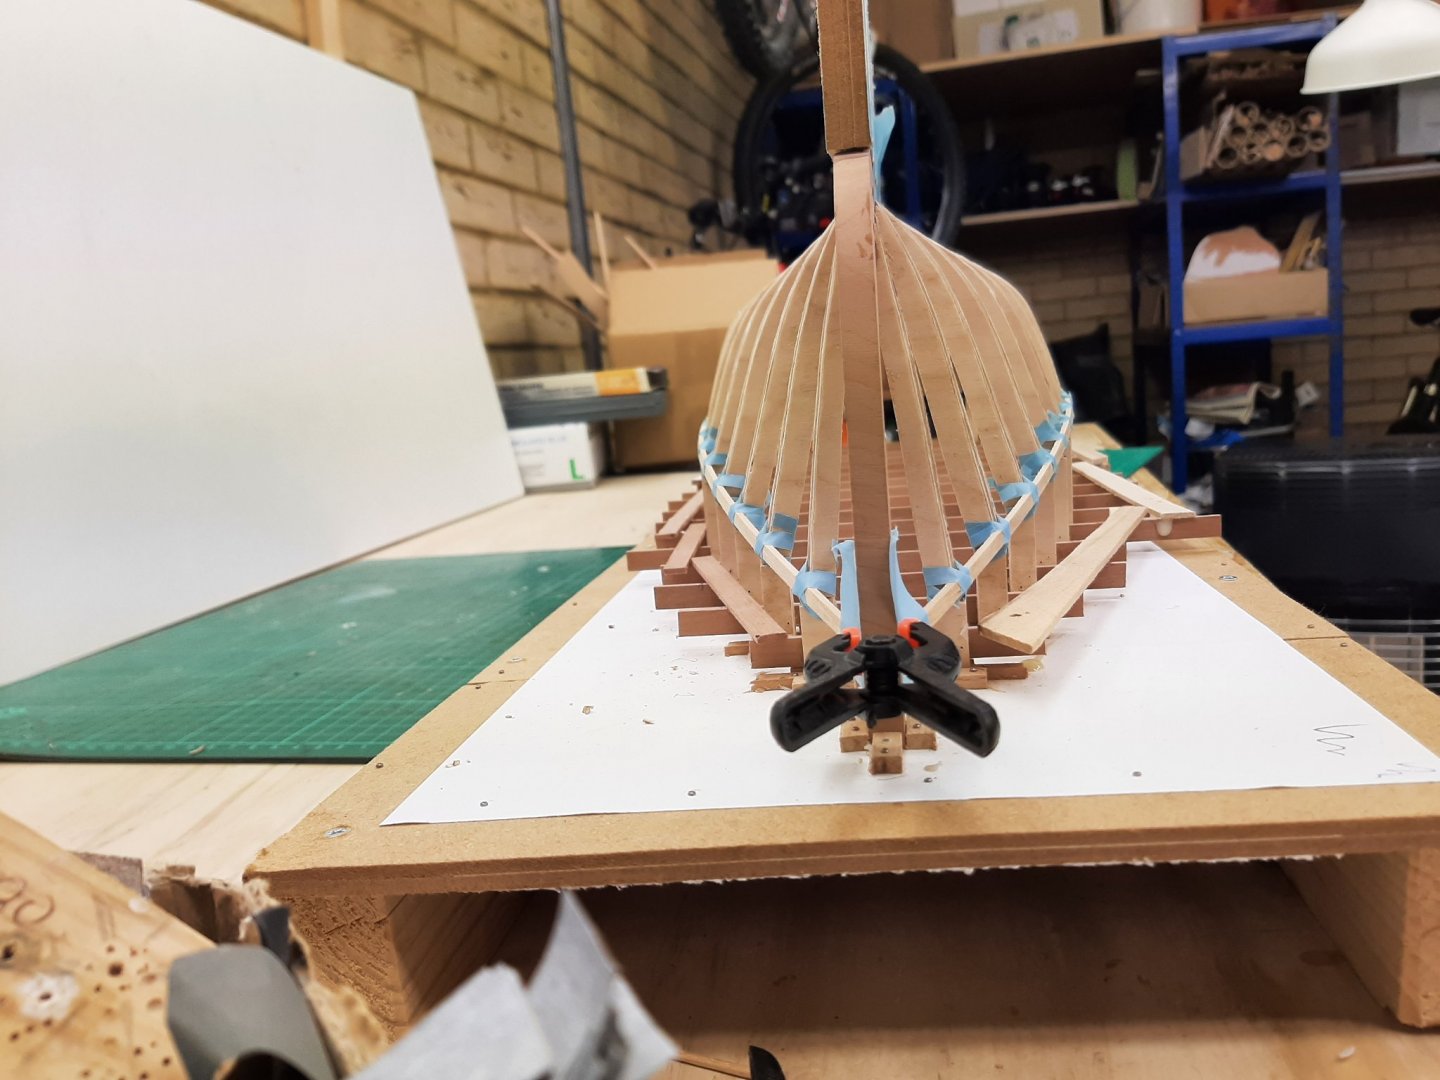
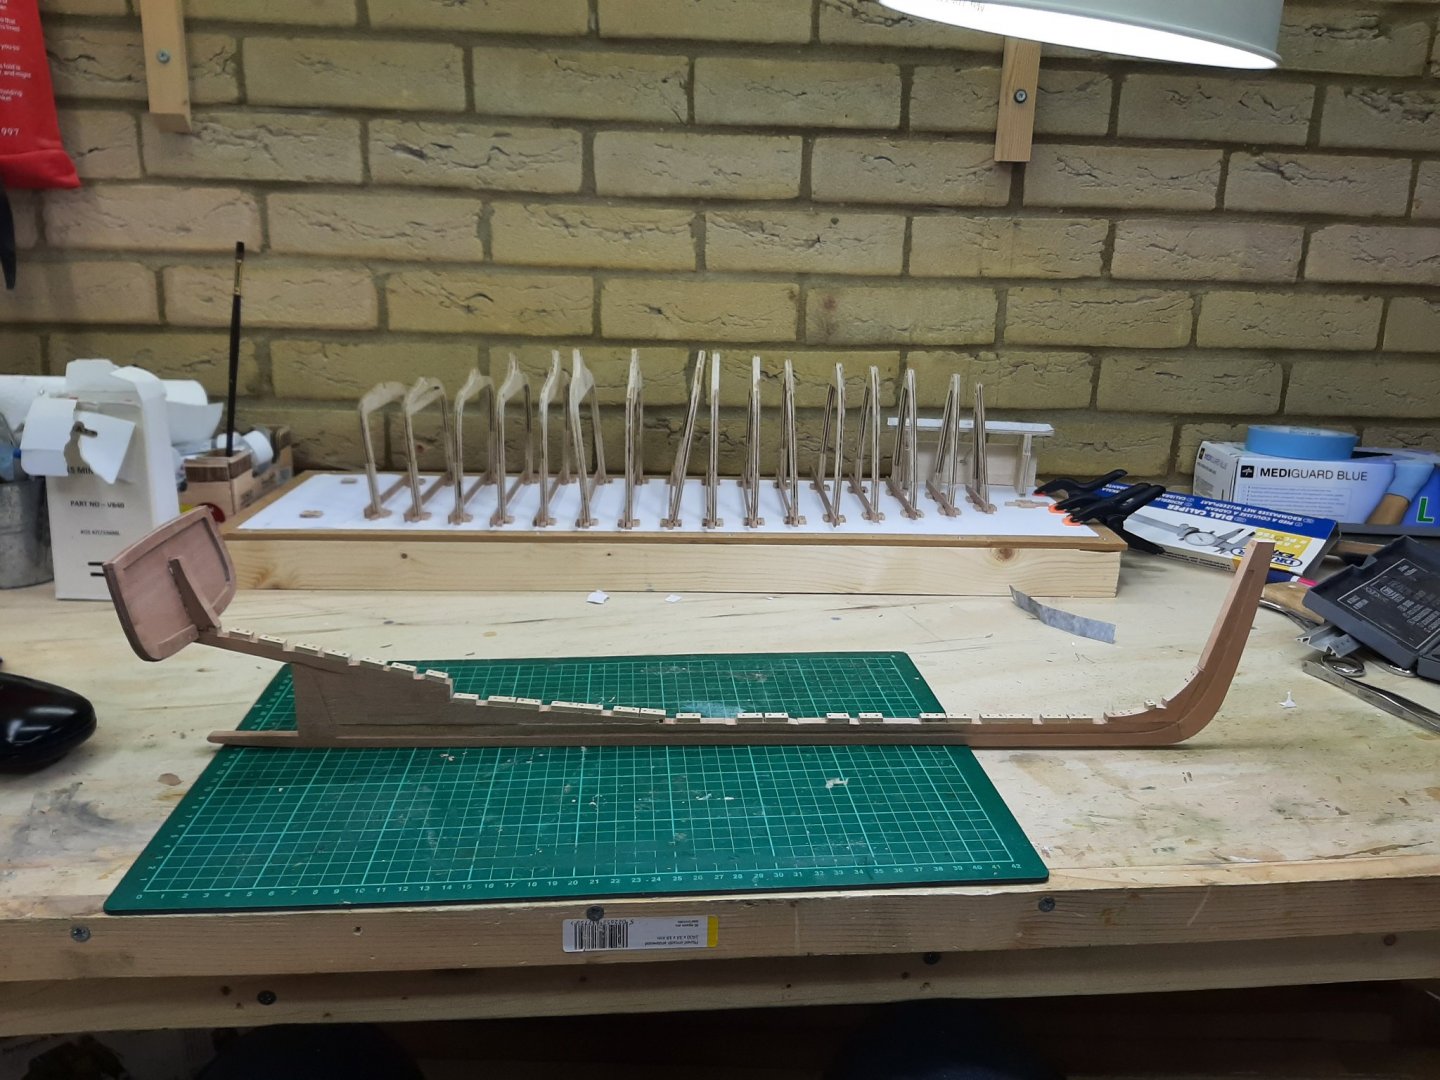
The last couple of weeks I ve been very busy to work on the boat, just managing to post a bit here and there. Today however I made some Bob, this one's for you my friend! So, I first glued the transom in place. Now, I did not design things very well and frame 16 is in the way of the transom knee so the knee had to be made much shorter. It does not matter though, it is rigid enough, it will not be visible and I have accepted from the start that I ll cut corners on this boat. I used epoxy thickened with gypsum. It actually is dead square but I think this is more luck than skill. Now, I ve been trying to figure out the planking and there was something wrong with the rabet. Looking at the plans it should end at the junction of dead wood and horn timbers but I had it finishing further in. Easily extended with a sharp chisel. Then I glued the frames to the keel and glued strips to secure all the frame cross members in one unit. Frame 2 is positioned wrong, it should rest on the little piece of wood on the left and not the stem. The difference is about 3 mm, I hope it is not going to be an issue. The frame cannot be moved, the epoxy has cured. Now, the epoxy had not even hardened but I thought it is time to lay some batens on the hull to see how the planks would run. This is a strange boat to plank, I think the stern might even need stealers. I used pear strips 2 x 2 mm. Immediately things started taking shape. Doing this on CAD would need buckets of digital sweat! I ll need to turn the boat upside down to better see things and most importantly, to define the sheer. Regards Vaddoc


-
Introducing Colin. Currently living in South East England.
vaddoc replied to colpatben's topic in New member Introductions
Lovely models Colin, welcome! -
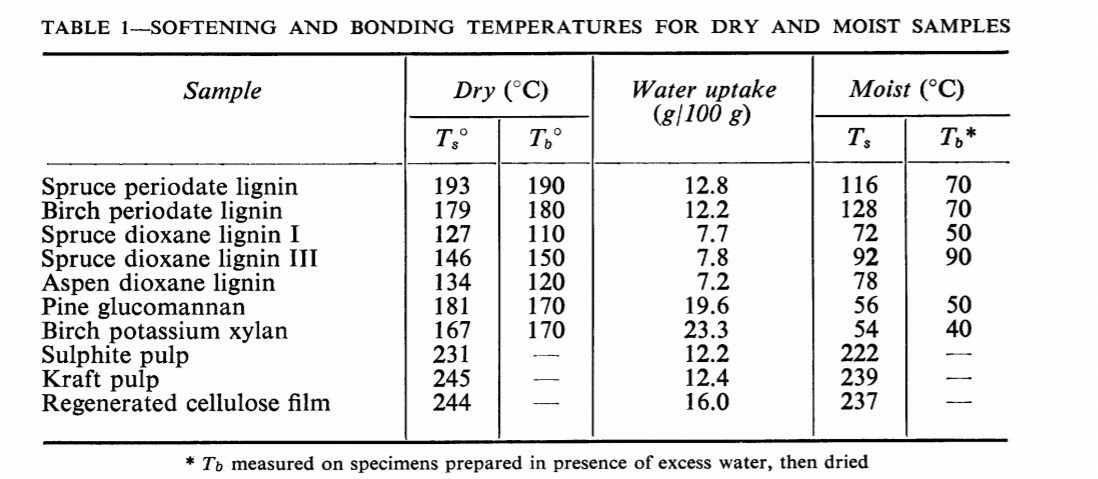
This is very interesting Roger. So the ship builders heating those massive planks with steam actually only achieve 100 degrees C at best. I did a bit of googling and found some info: "Softening temperatures of lignins ranged from 127-193°C. Birch xylan and pine glucomannan softened at 167° and 181’C, respectively. Sorption of water by lignin and hemicellulose caused pronounced decrease of the softening temperature-in some cases, to as low as 54°C." https://bioresources.cnr.ncsu.edu/resources/thermal-softening-adhesive-properties-and-glass-transitions-in-lignin-hemicellulose-and-cellulose/ "The structure of lignin is rich in phenolic hydroxyl and it offers the possibility to create intermolecular hydrogen bonds. Water molecules can break these hydrogen bonds and segmental motion can occur easily. The Tg of lignin decreases with increasing moisture content until the wood or the lignin reaches its water saturated point. The number of hydroxyl groups influences the amount of water bound to lignin" https://link.springer.com/article/10.1007/s00107-020-01637-3 This is completely out of my areas of expertise but it seems that while heat does the job, moisture helps a lot. Vaddoc
-
No worries Gaetan!
-
Dear Gaetan, I think you have misunderstood things In my post I mention what I have read from people that believe in micro bevels. I think it is useless. We are of the same mind in pretty much everything. Let's move on
-
I think that the idea behind the micro-bevel is that you still have a flat bevel to control the cutting but, when it is time to hone the chisel, only the microbevel will need honing so it will be much quicker and easier as much less metal will need to be removed. Also the microbevel will have a steeper angle so the edge will last longer. In actual practice I personally could not make it work. Every time the chisel needs honing, a guide needs to be used and the chisel needs to be positioned with perfect accuracy so that only the microbevel will be polished. This is time consuming and practically impossible. It might work for chisels made from some super exotic steel that need honing once a month but for the ones we use, it is much easier just to pass the chisel over the strops a few times. Modern good chisels retain an edge well but also are easy to hone.
-
A few years ago I did my research on wood bending, indeed Bob is right, it is heat that does the job by releasing the lignin or however it is called so that fibers can slip. Then when it cools, it locks the shape. The temperature needed to achieve this is more than 100 C, so steam is needed as, being gas, it can reach higher temperatures but also is easier to heat the wood. Still, my experience is that even lower temperatures will work. I have bent a lot of beech and maple and even leaving under running very hot water for 30 secs will dramatically increase their bending potential, even at 2 mm, a thickness where the strips are pretty solid. I am not concerned for the wood getting wet, thin strips will reach an equilibrium with the environment in no time. Even wood that is just wet for some reason will make bending a bit easier. In my last boat I used close to 100 beech ribs 2 x 4 mm which had to take a bit of extreme bending. Immediately out of the pot with boiling water, they would take any shape. A few seconds later, they would snap. I personally do not like using dry heat but it does work, at least for very thin strips. The above should not really work but they do, at least for me and the scale I like working at. Maybe the very thin strips we use behave differently to full scale planks. In all honesty I would much prefer to have a steam box and I though of making one but in my current set up it is just too difficult. Having said that, I now need to plank two boats so that will be about 70 planks, each 70 cm long, so may need to revisit this!
-
Can't remember, used it once years ago and it went very wrong. Then the bottle solidified and we both moved on...
-
Reminds me of Gorilla polyurethane glue
-
Sharpening chisels - my (relatively) simple way
vaddoc replied to vaddoc's topic in Modeling tools and Workshop Equipment
Pleasure Moab! -
I like large scale models so my planks are also large, 2 mm thick and up to 70+cm long. I tried lots of methods but really just very hot water from the tap is enough. After I cut the plank to proper shape, I take the model to the kitchen. I hold the plank with a clamp for 30 secs under the hot water and then immediately put on the model. The plank will take even very acute angles but must be bent immediately. For steam bent frames, I through them in a pot of boiling water, fish them out one by one and immediately secure on model. Steam is not really needed for the dimensions we work with, although a steam box will work very well. I do not like dry heat for planks. I do use the curly hair women machine sometimes to bend strips prior to laminating
-
This morning I spent a bit of time honing my new chisel and I thought it would be useful to record and post the process, essentially my way of doing it. I am no expert but the chisels do get sharp. Maybe it will be of help to others. https://modelshipworld.com/topic/27422-sharpening-chisels-my-relatively-simple-way/?tab=comments#comment-788347
-
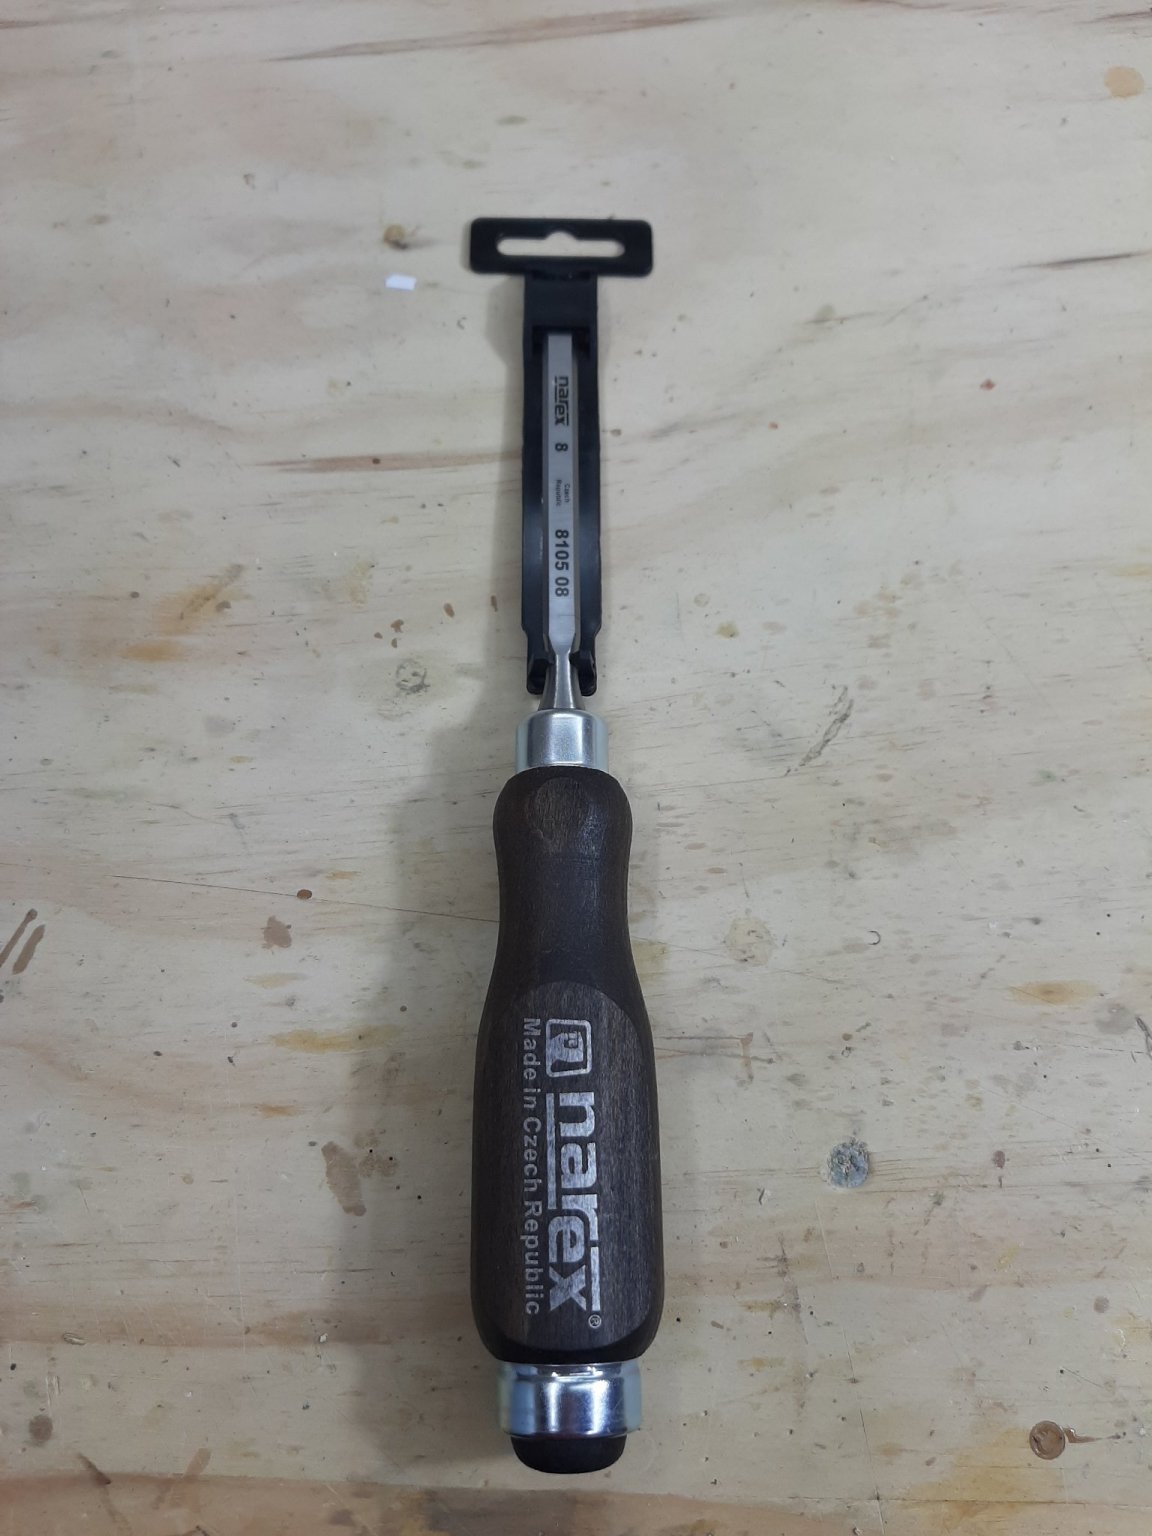
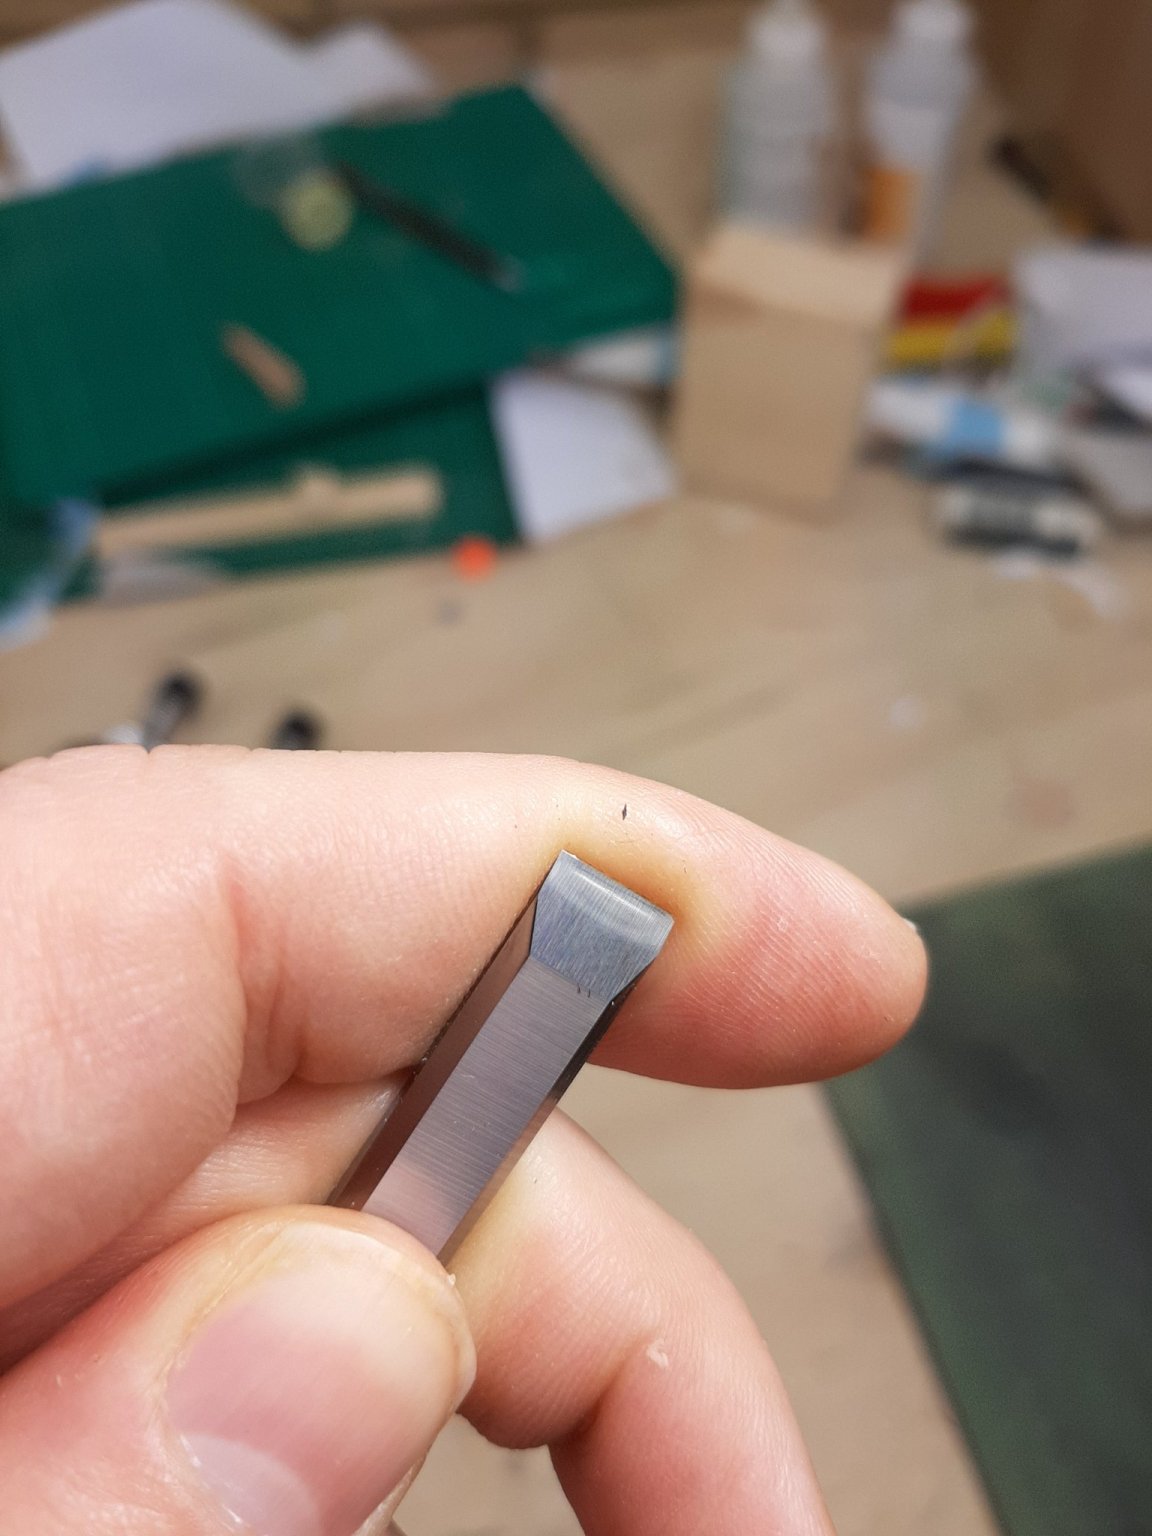
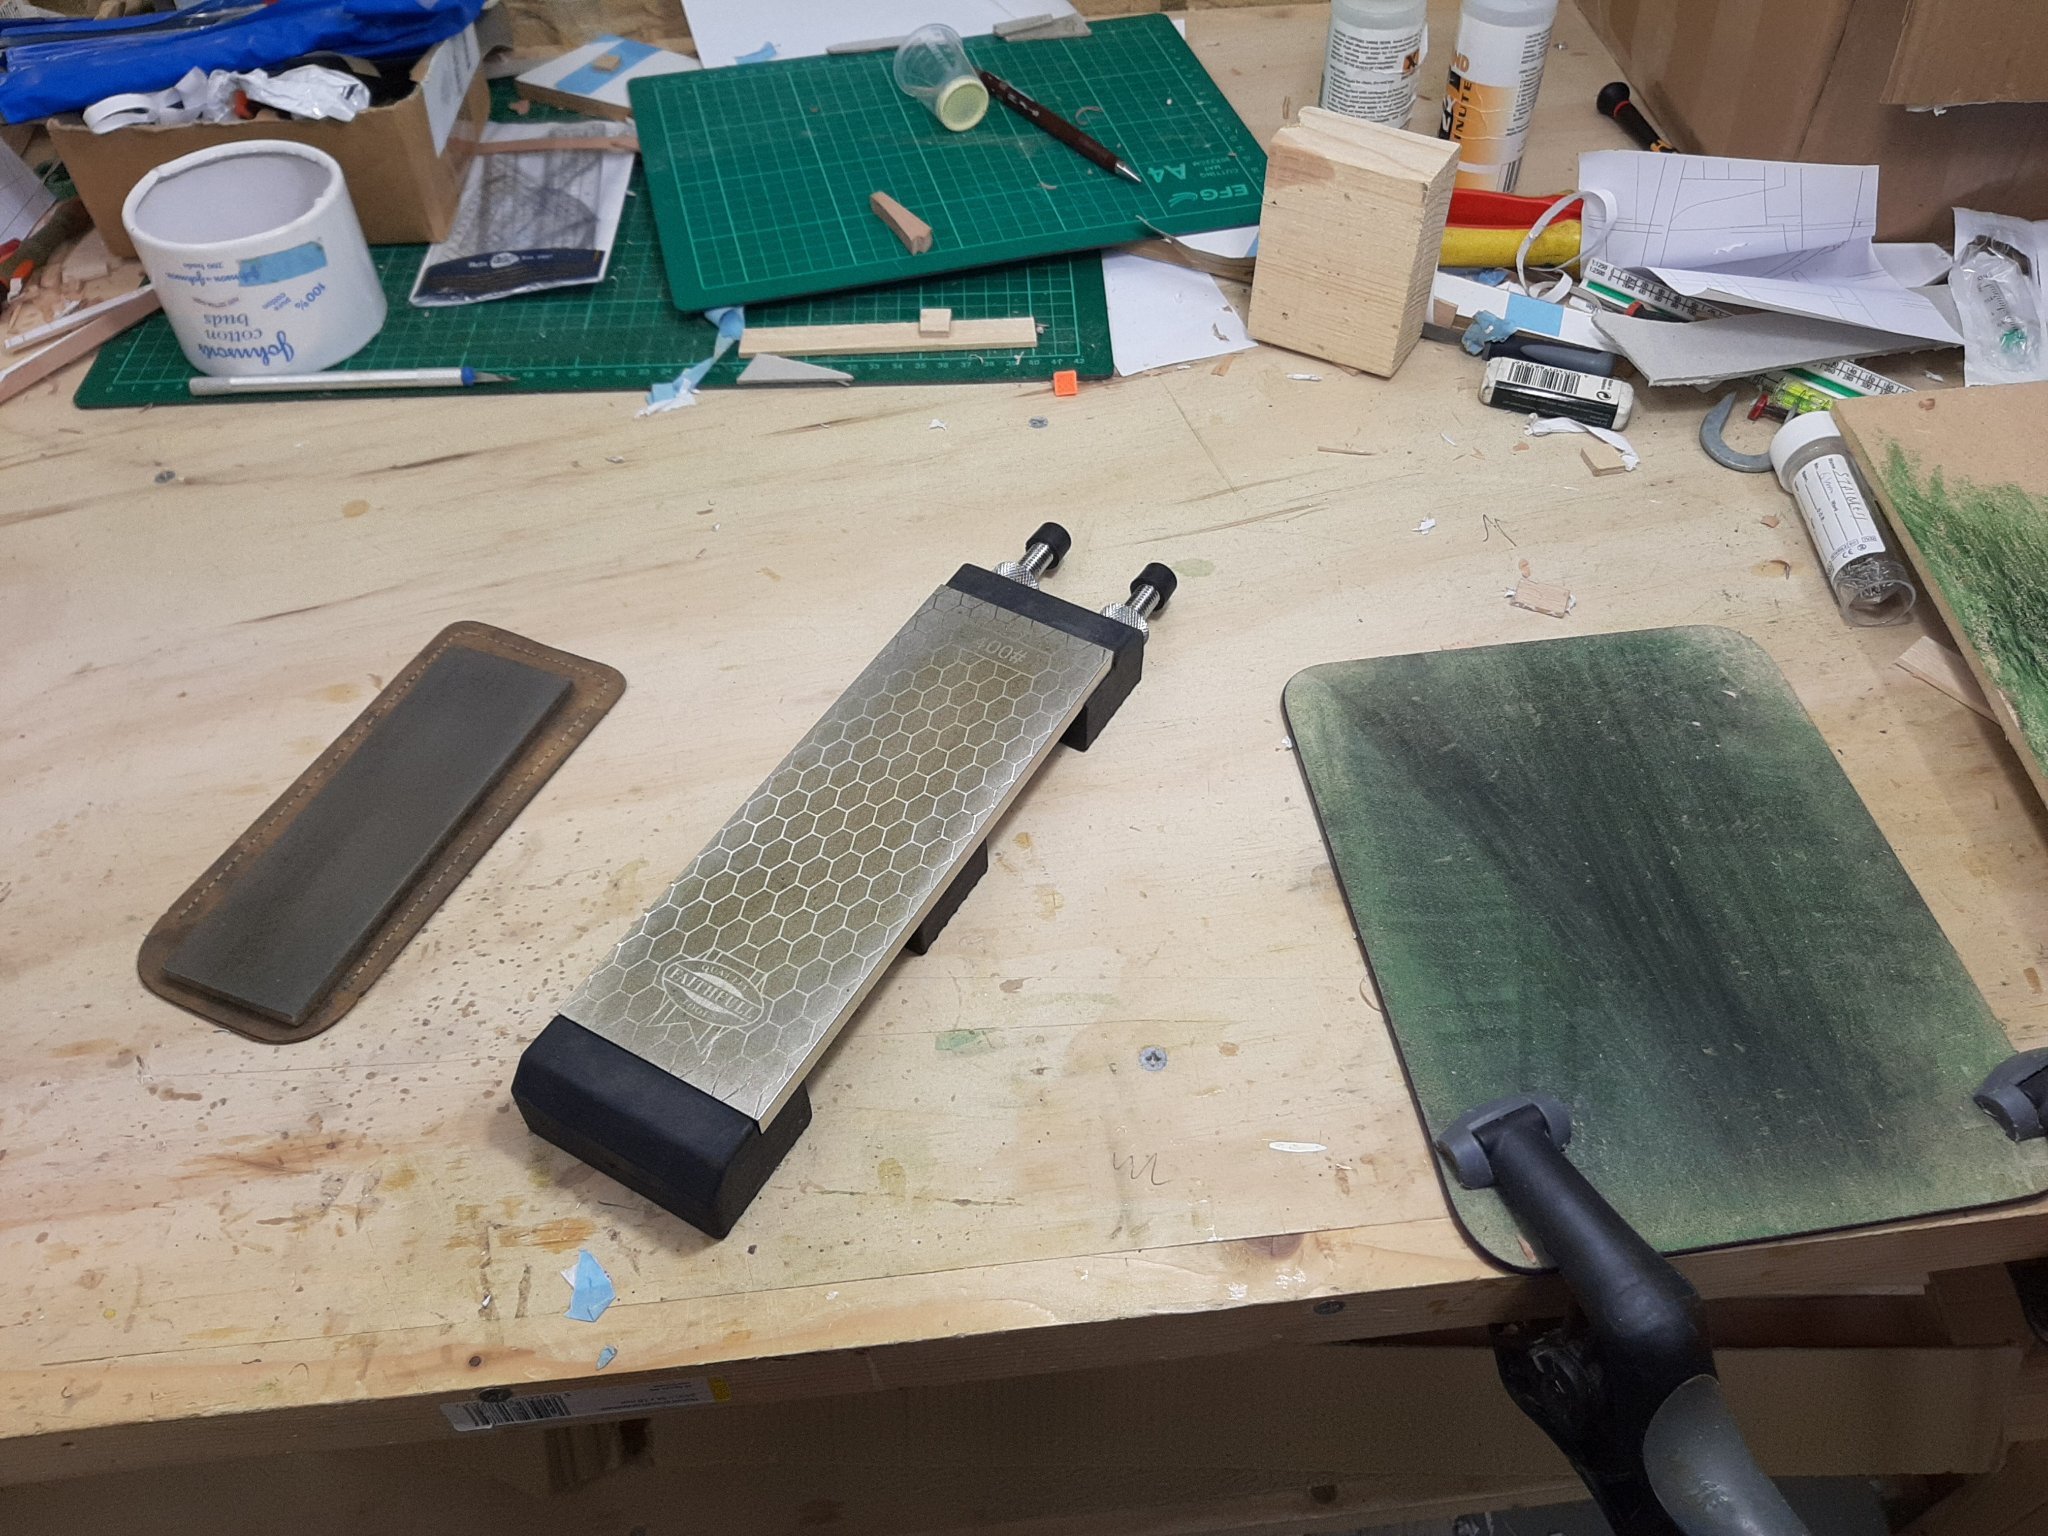
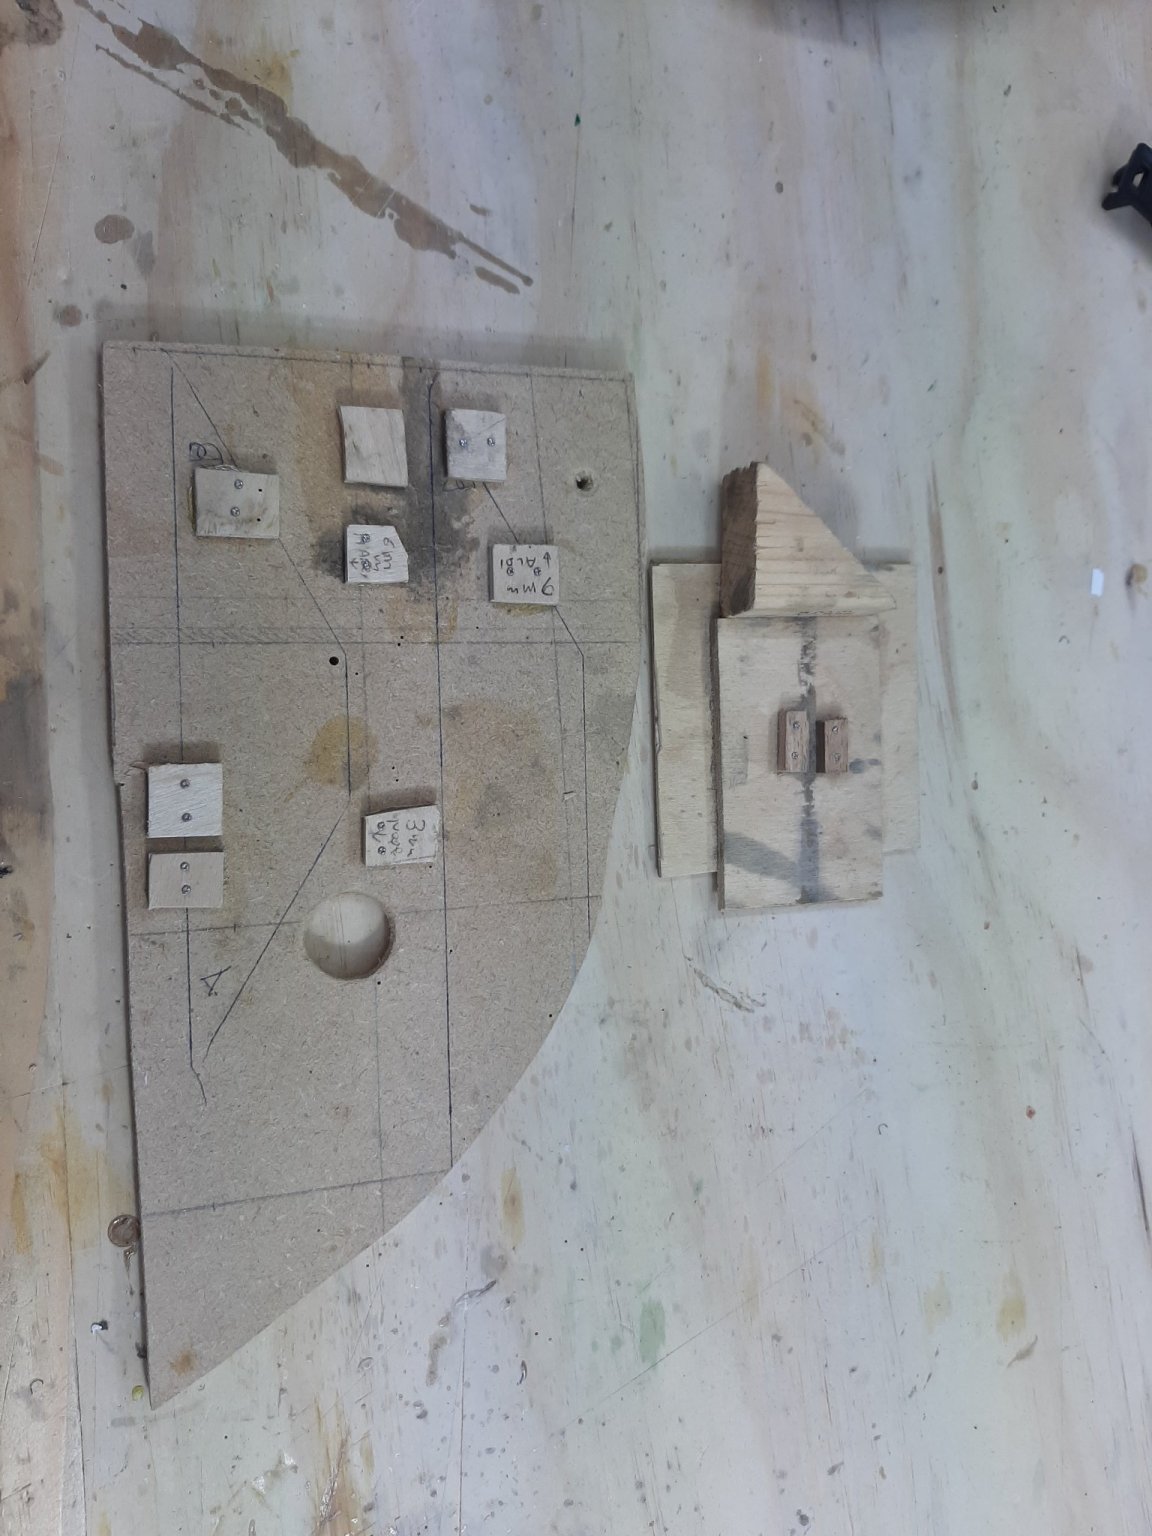
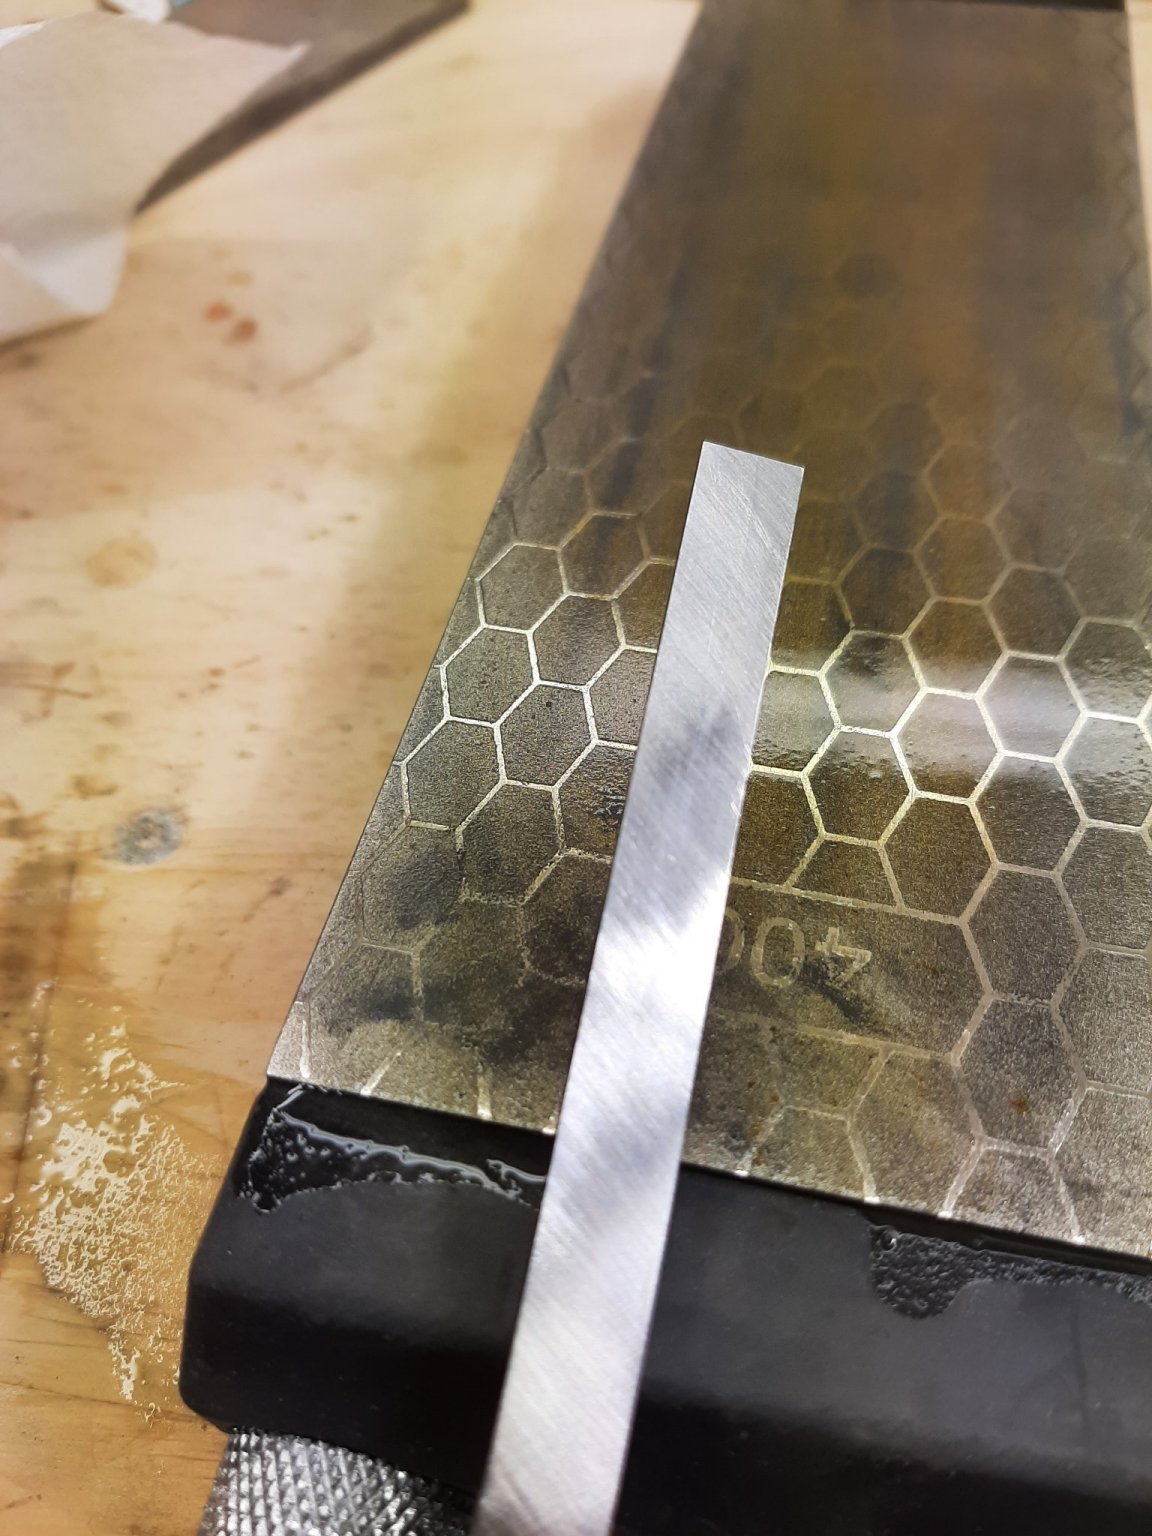
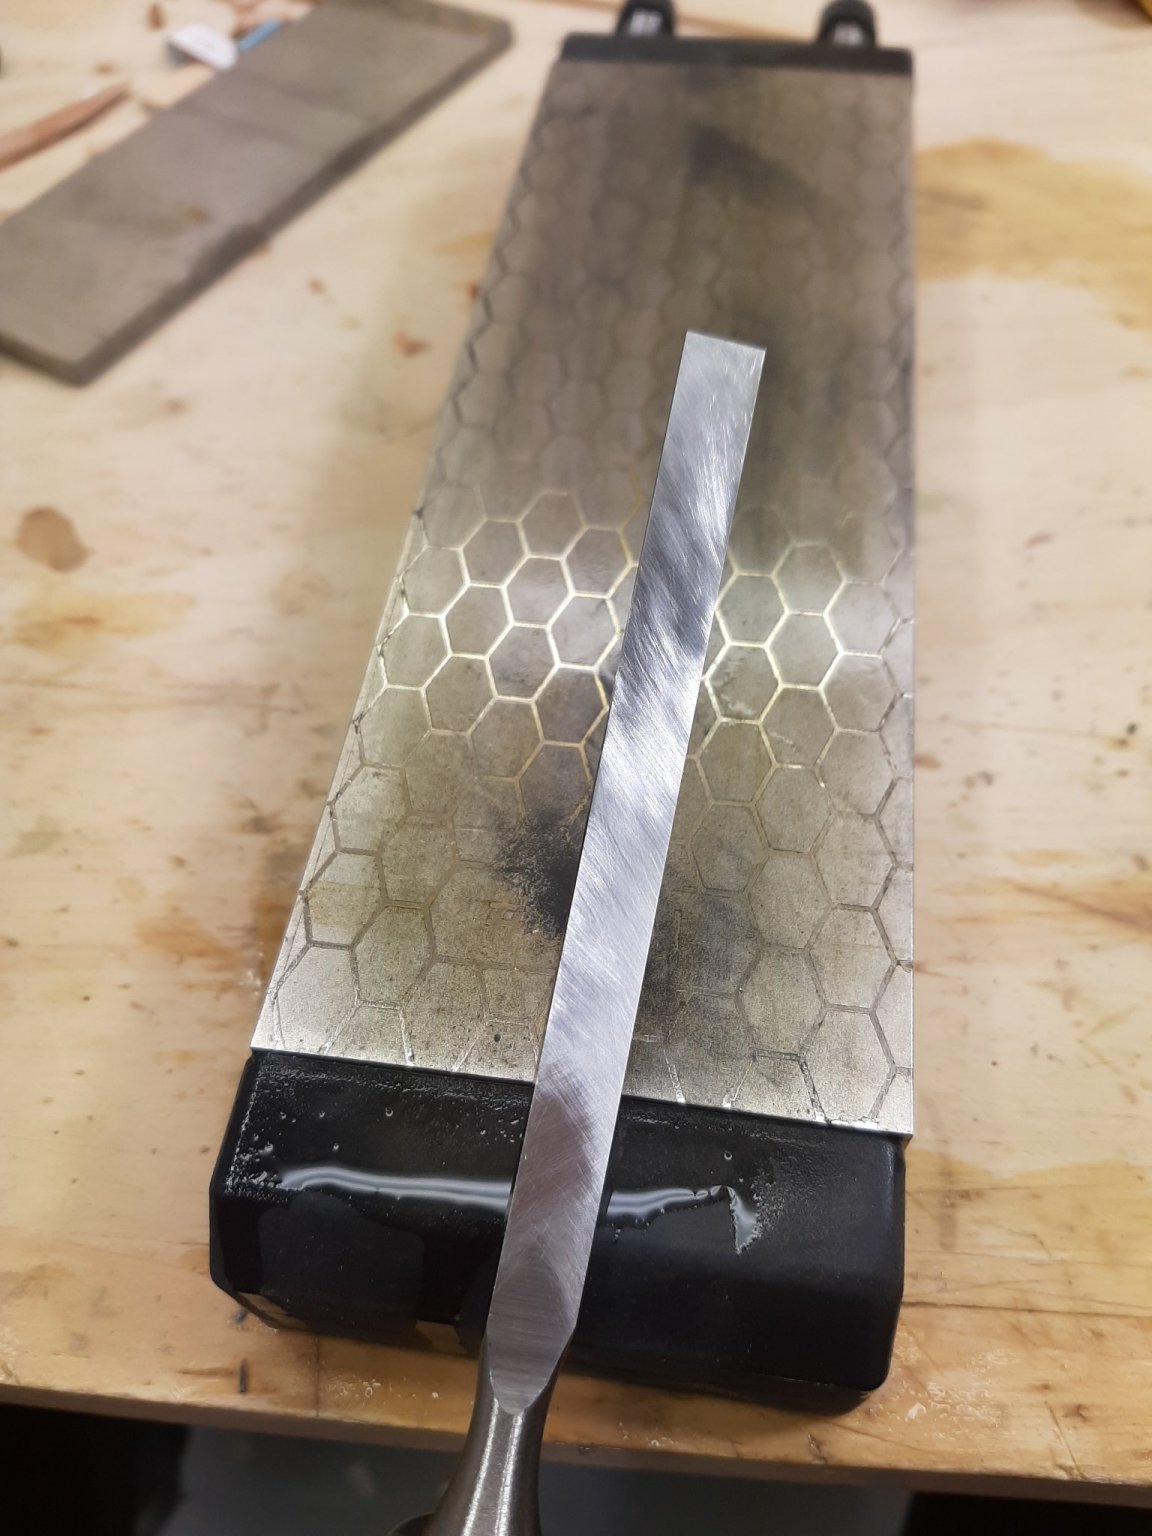
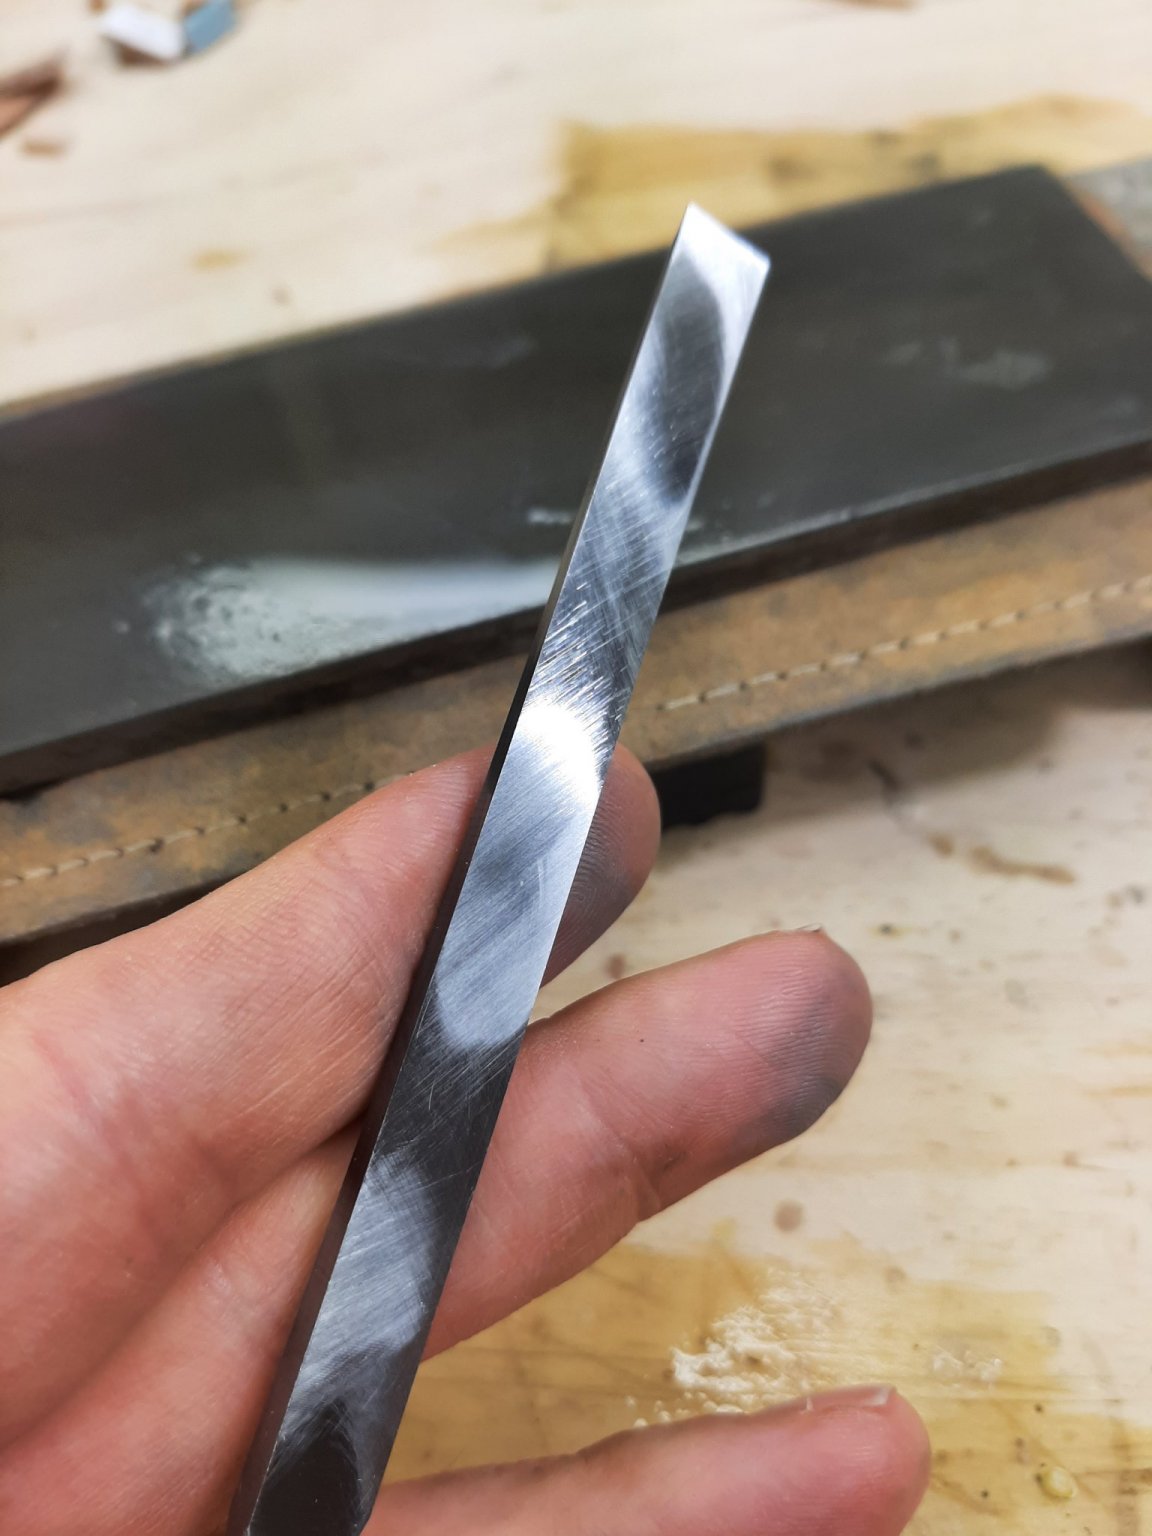
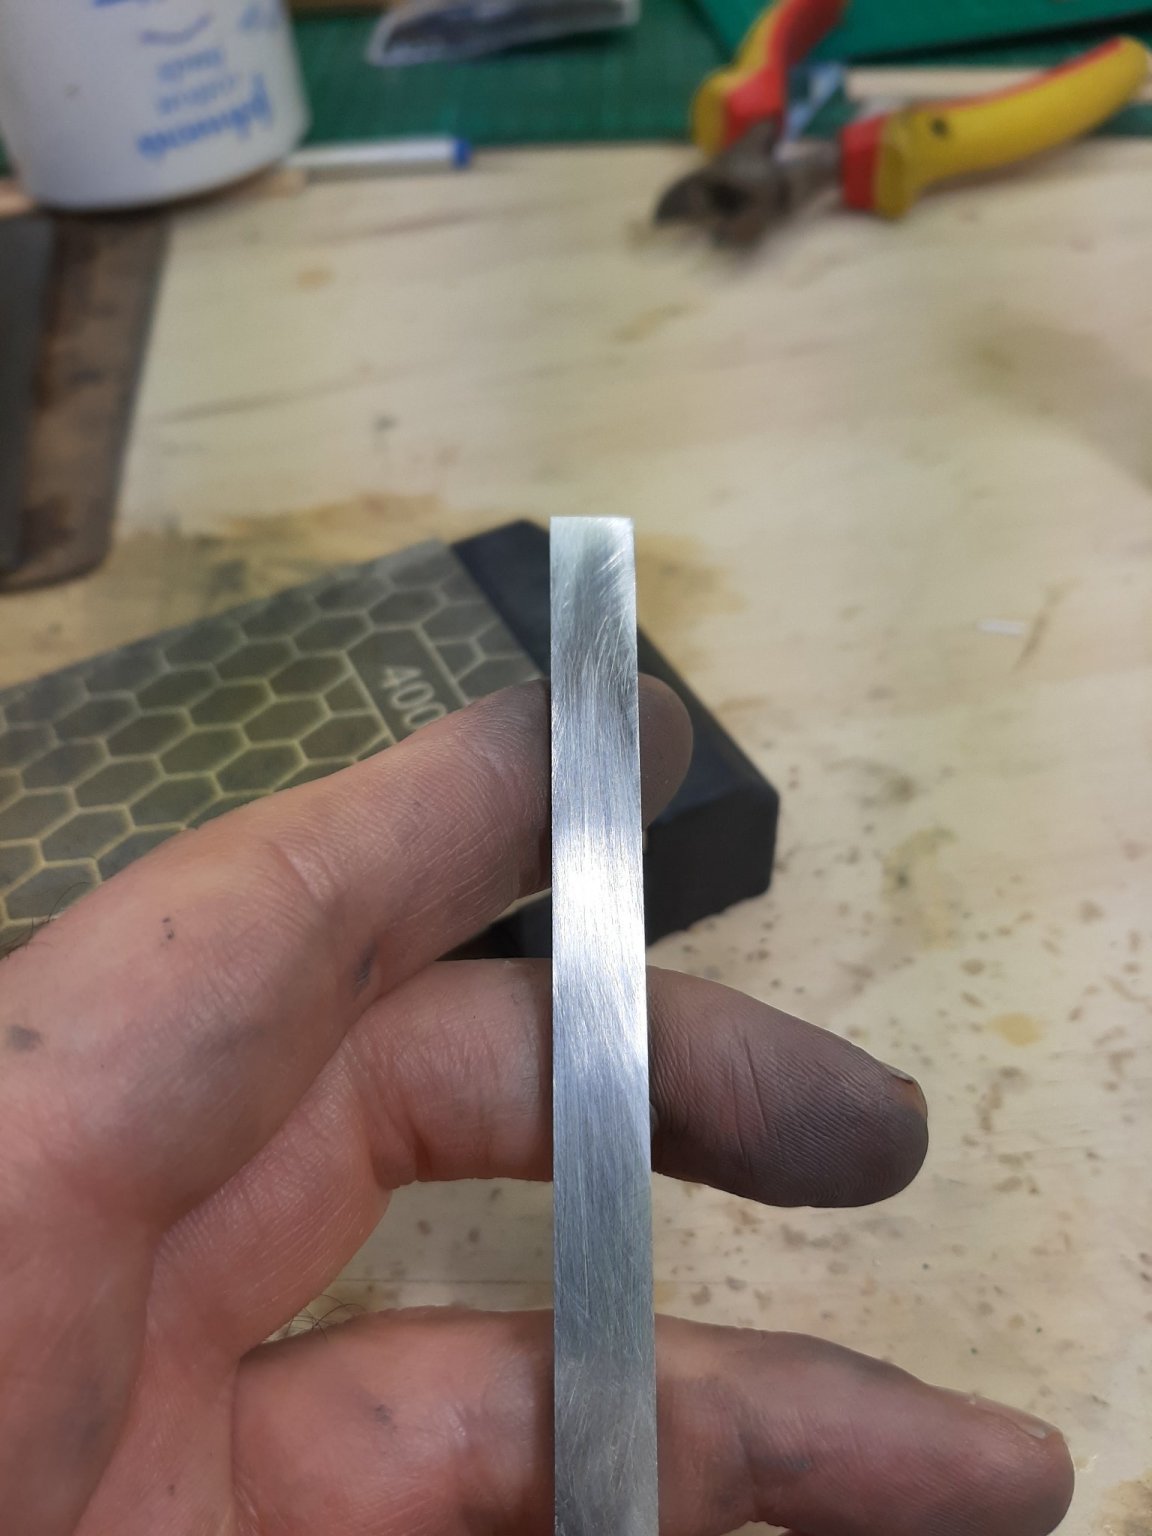
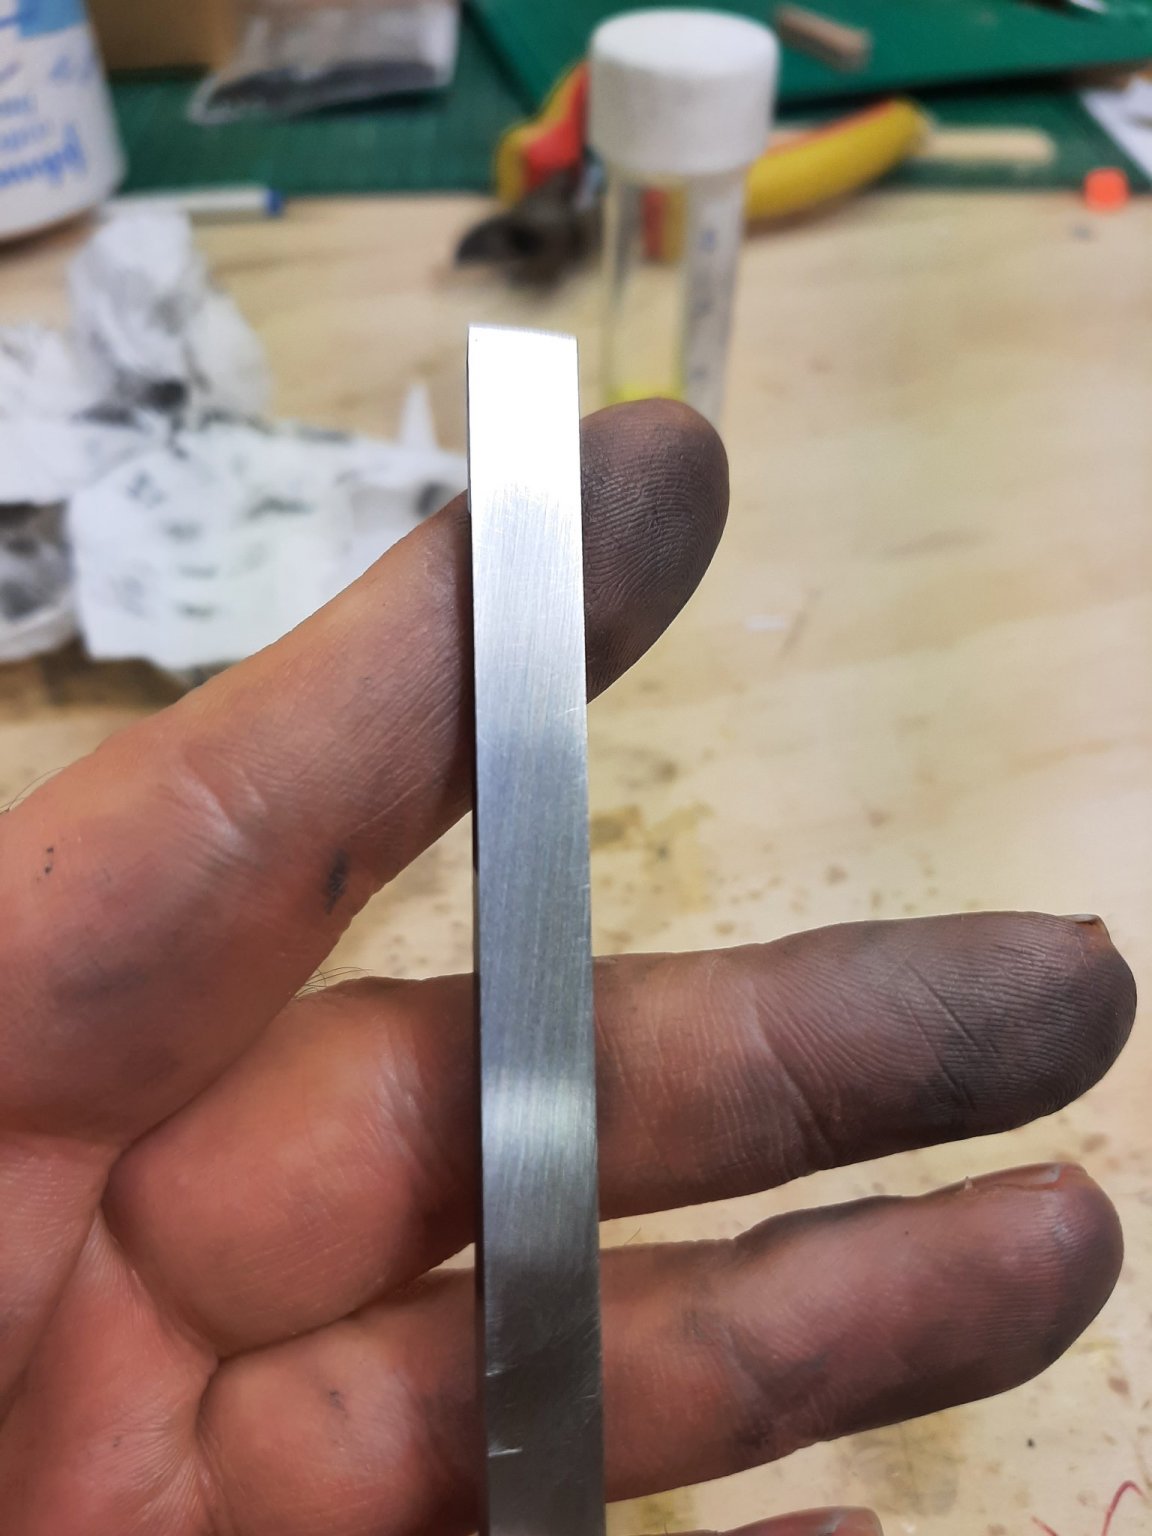
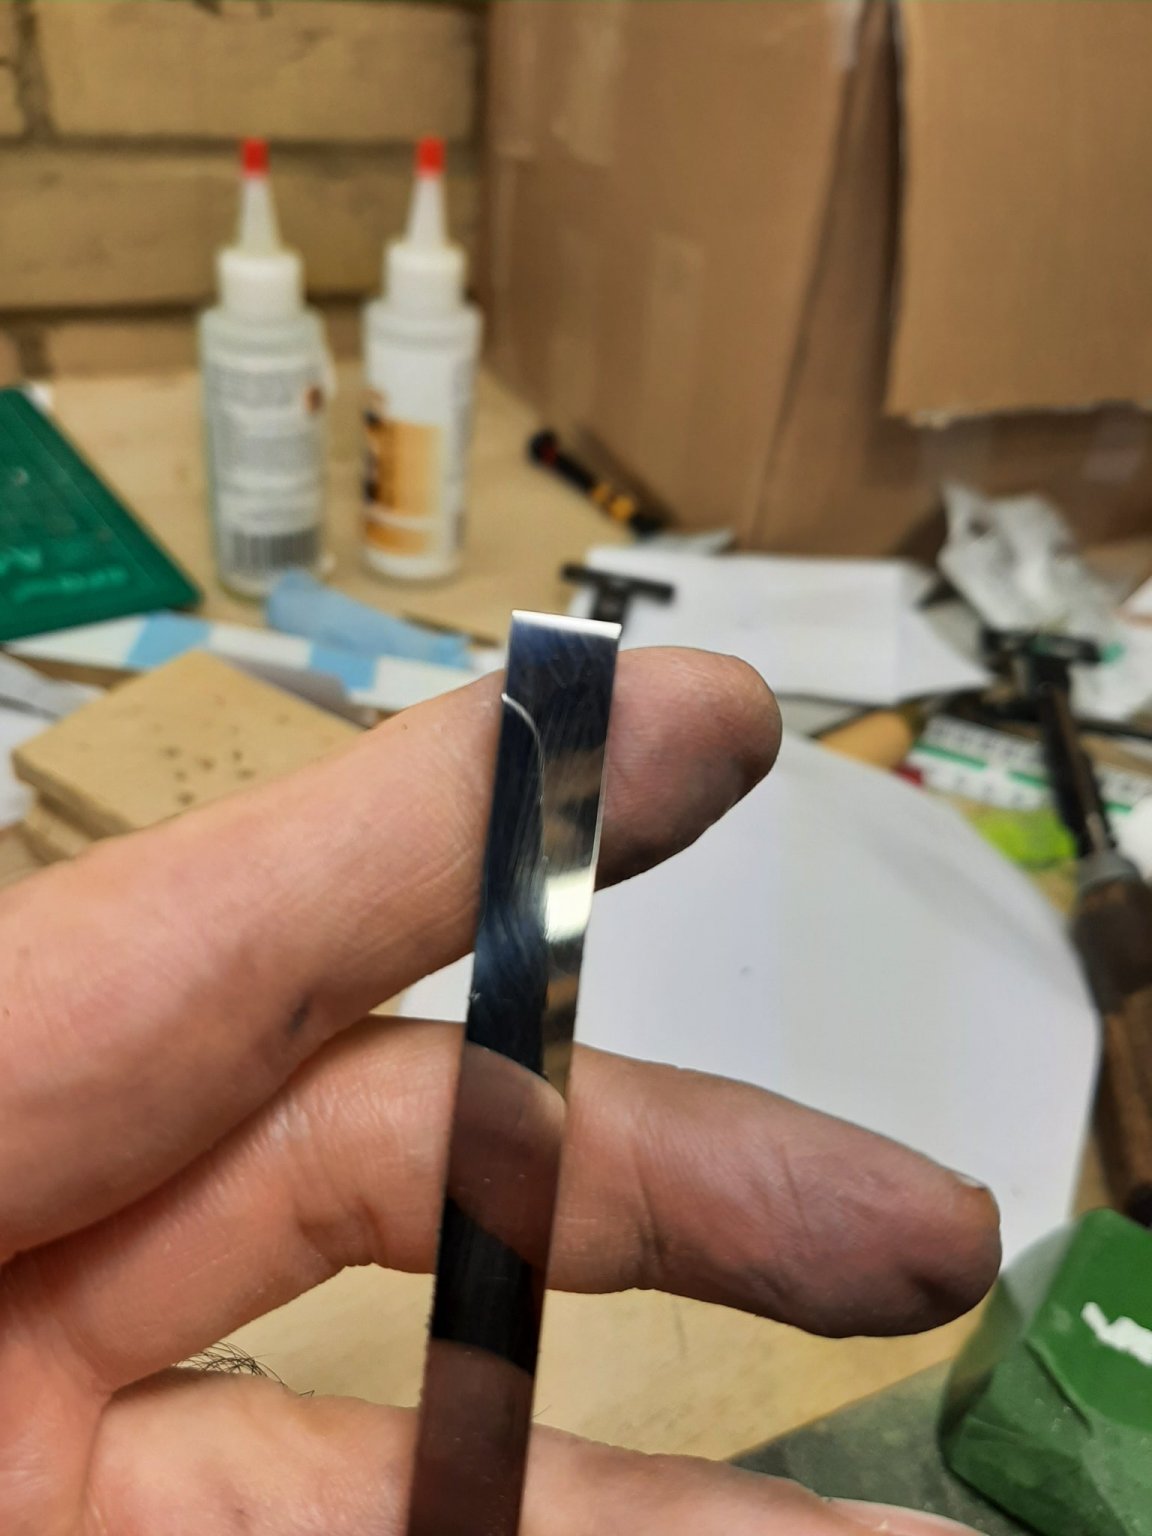
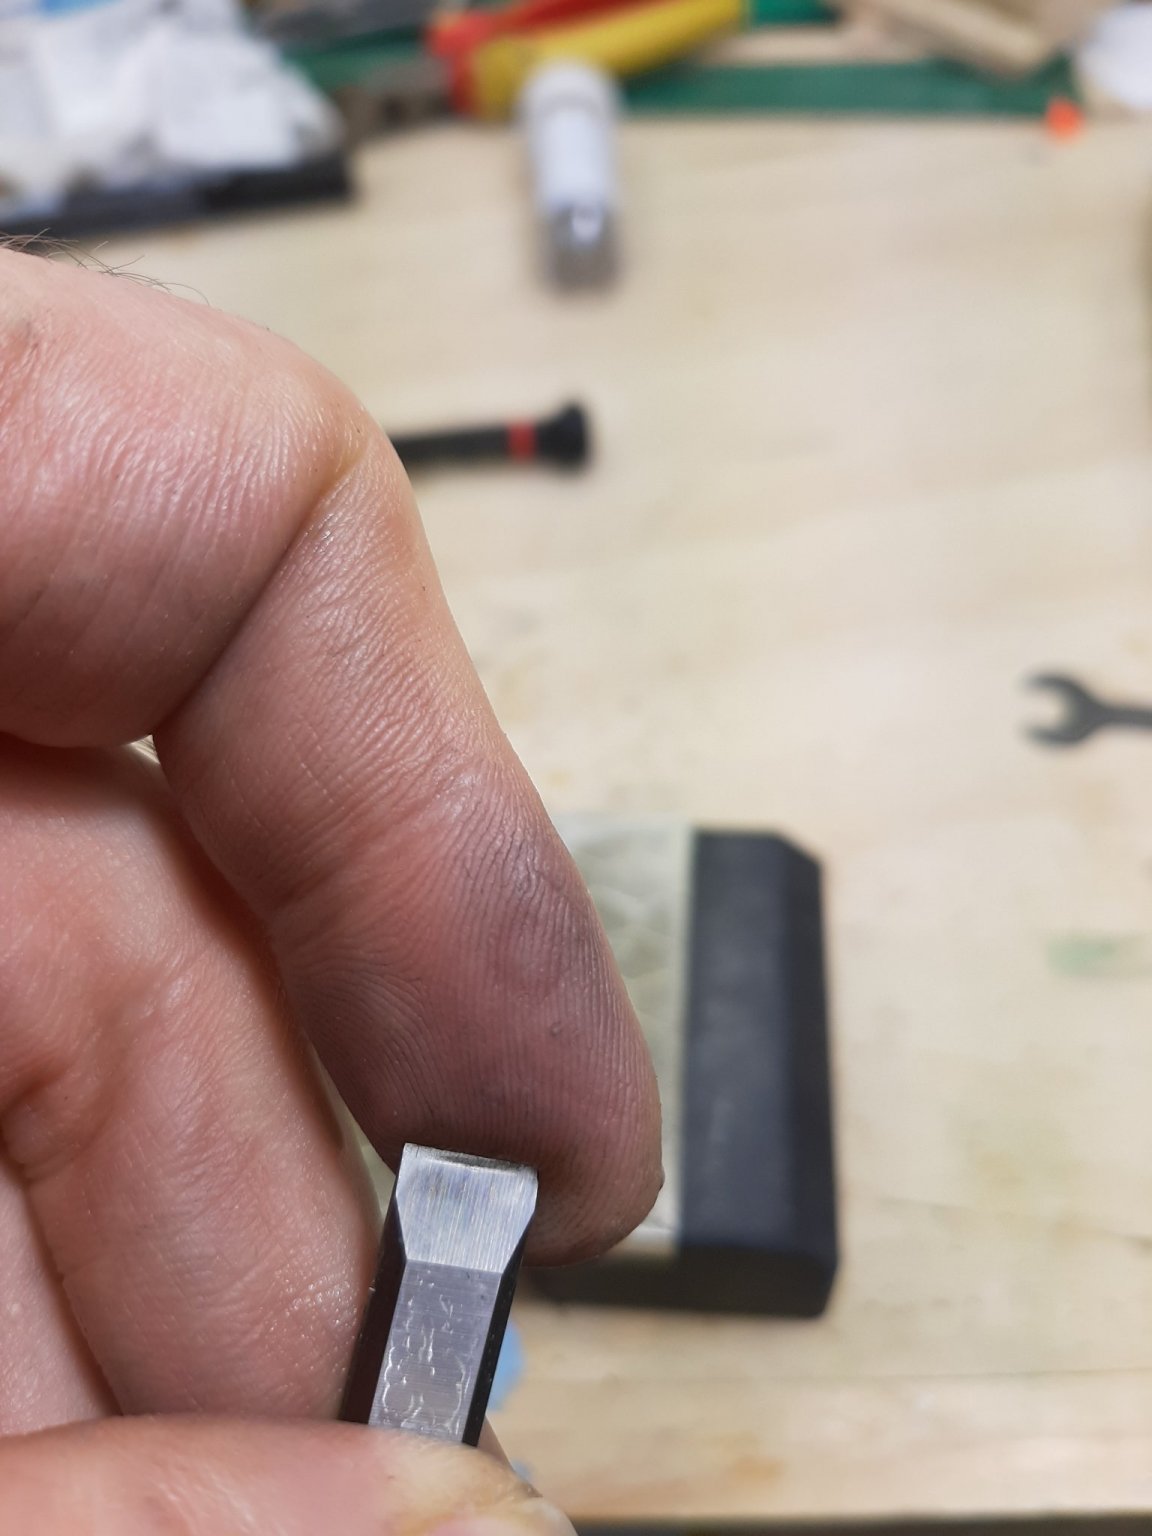
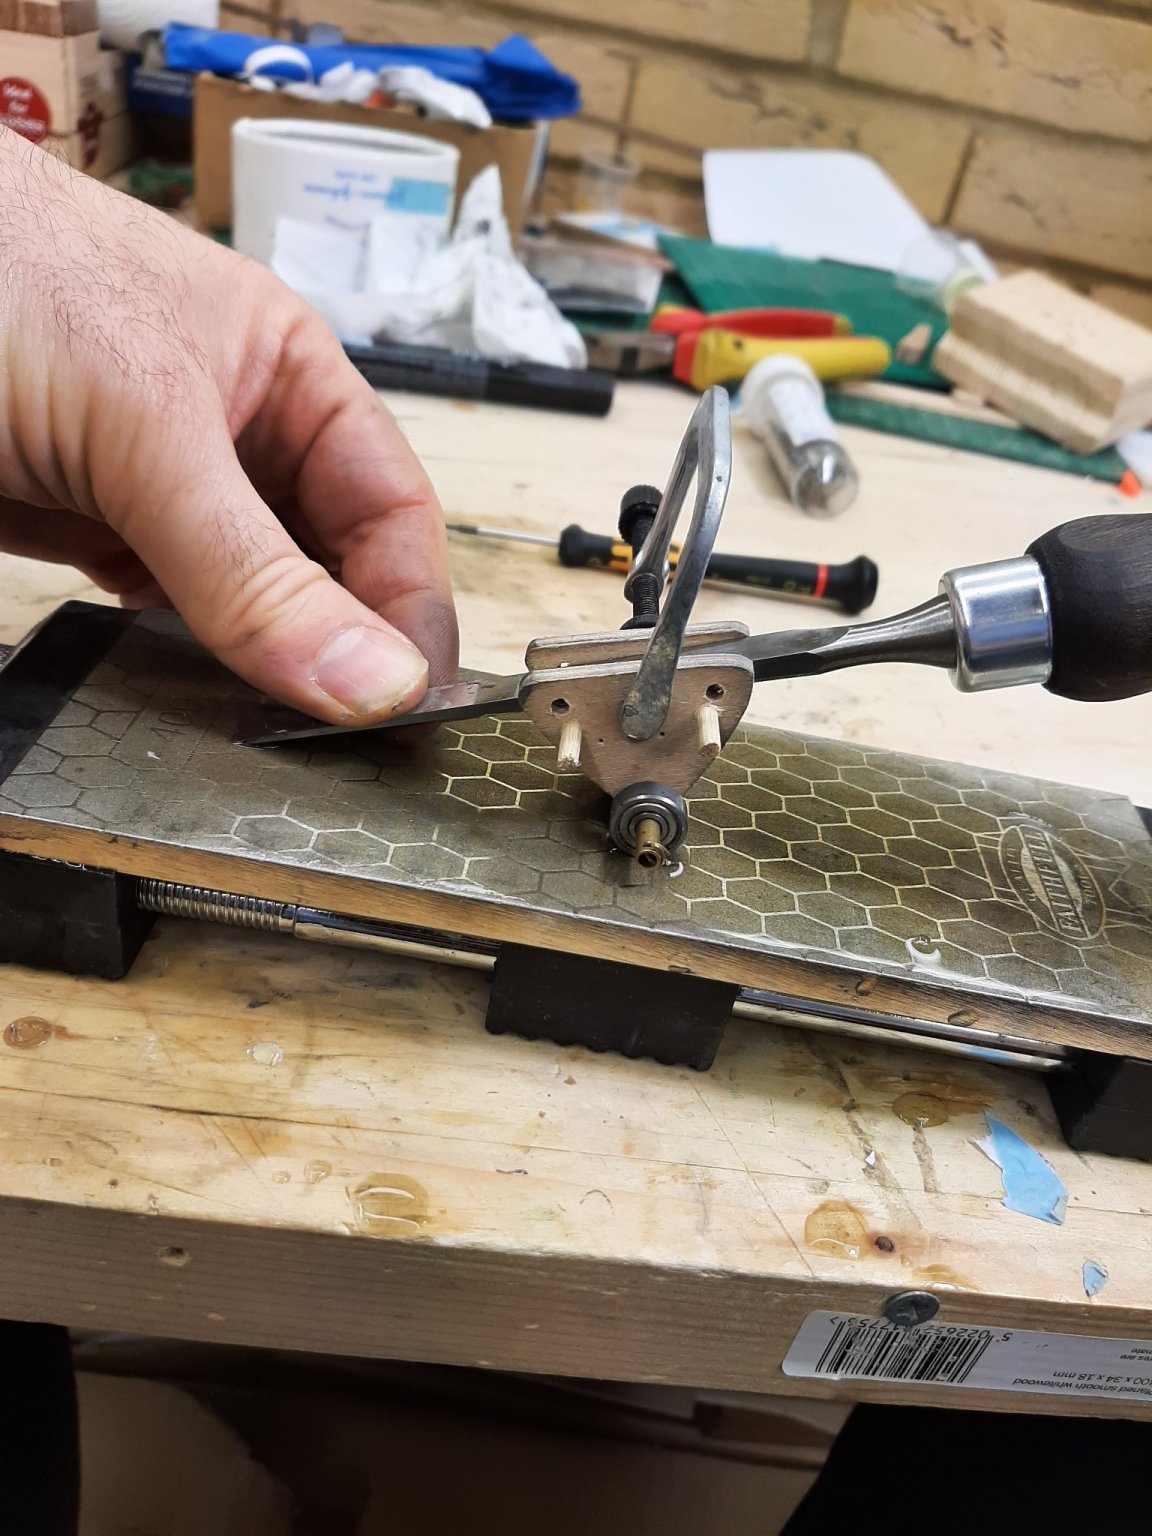
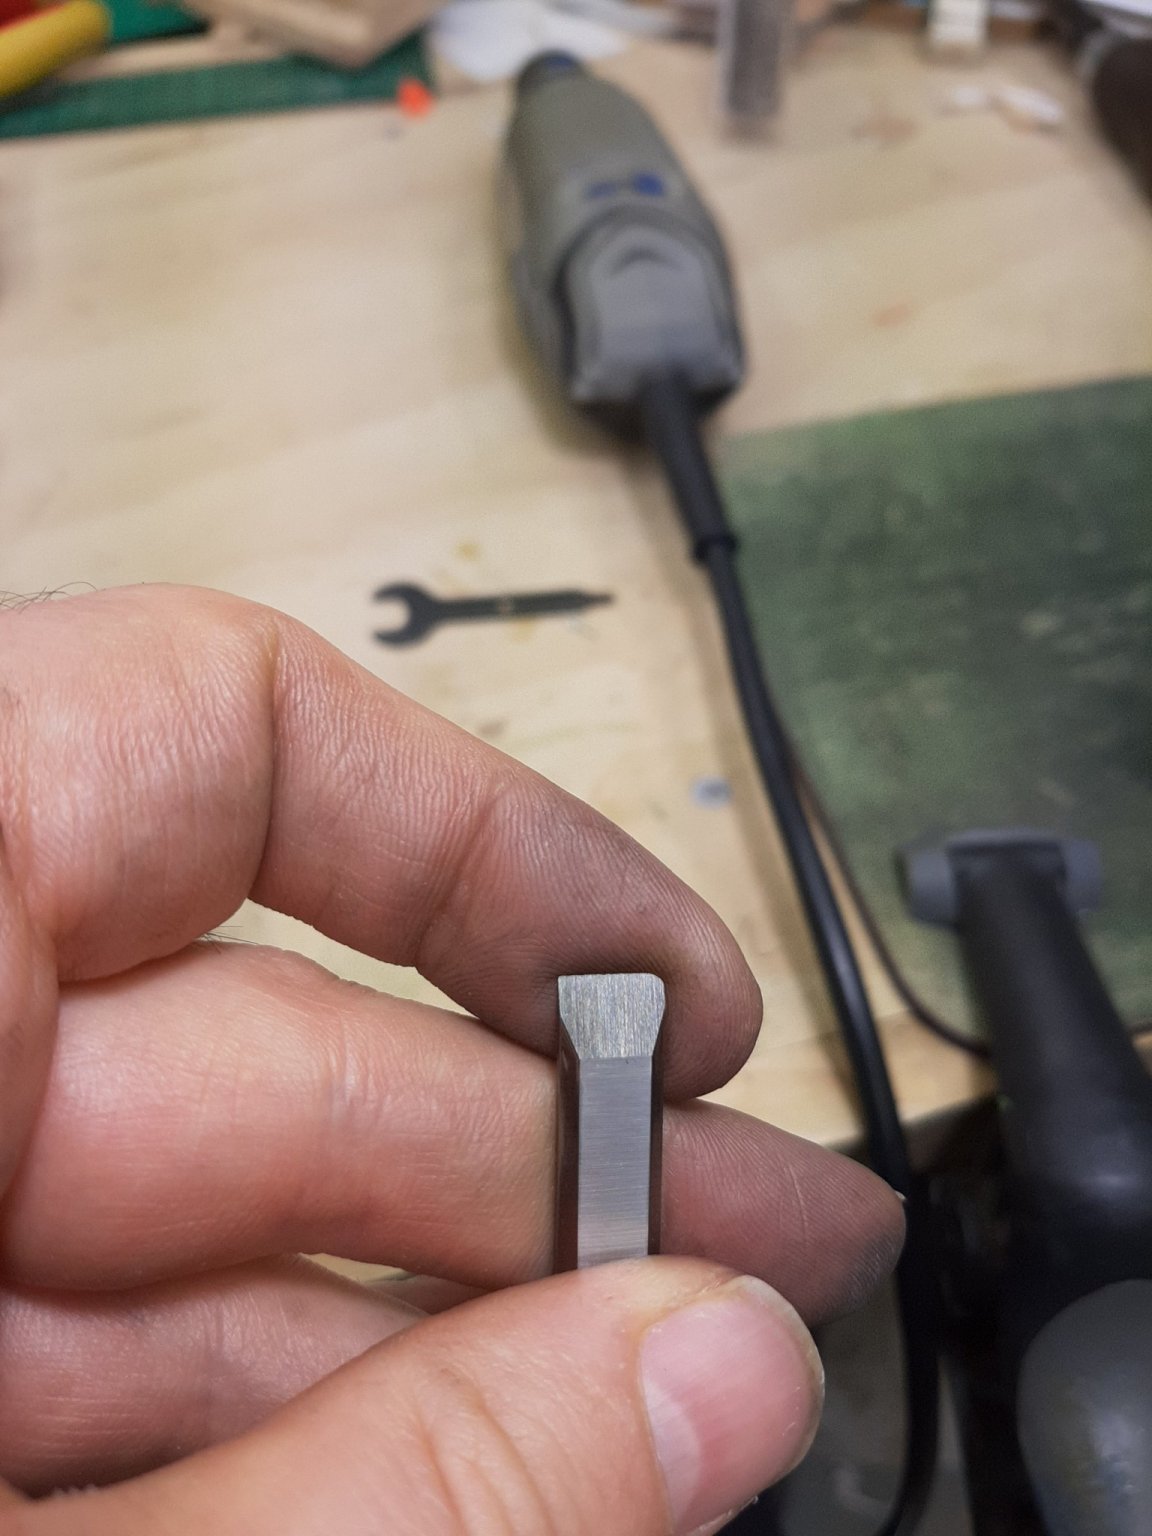
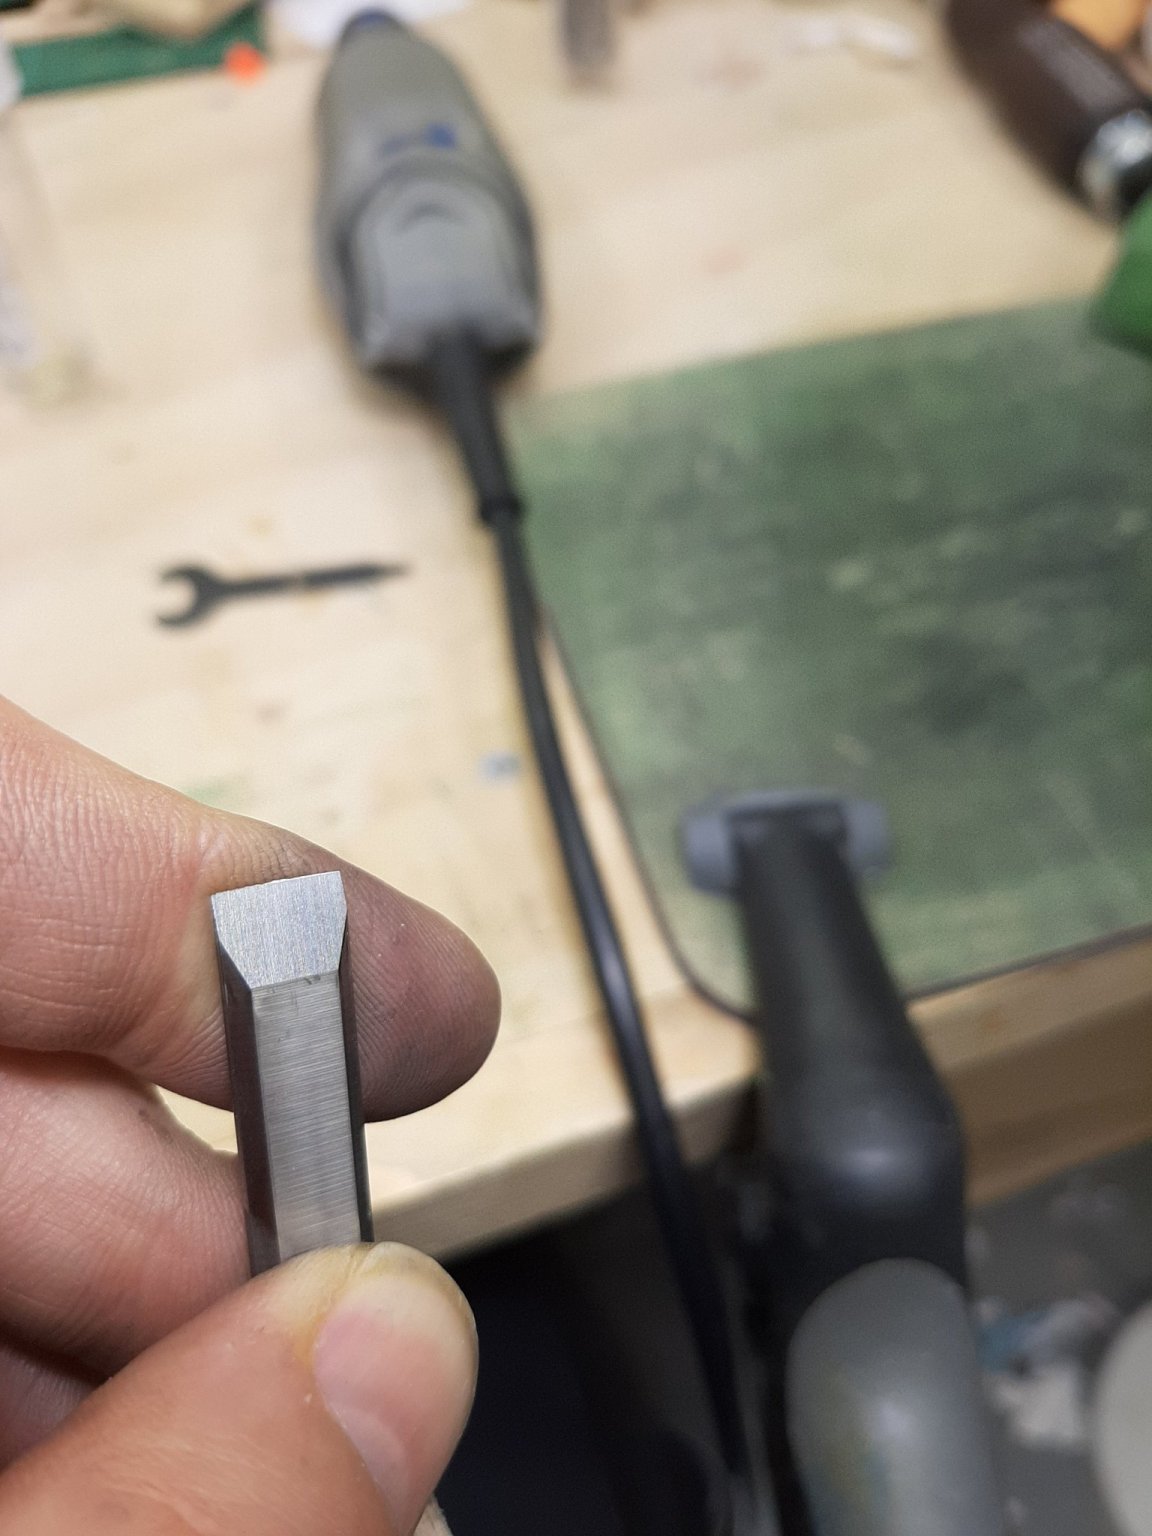
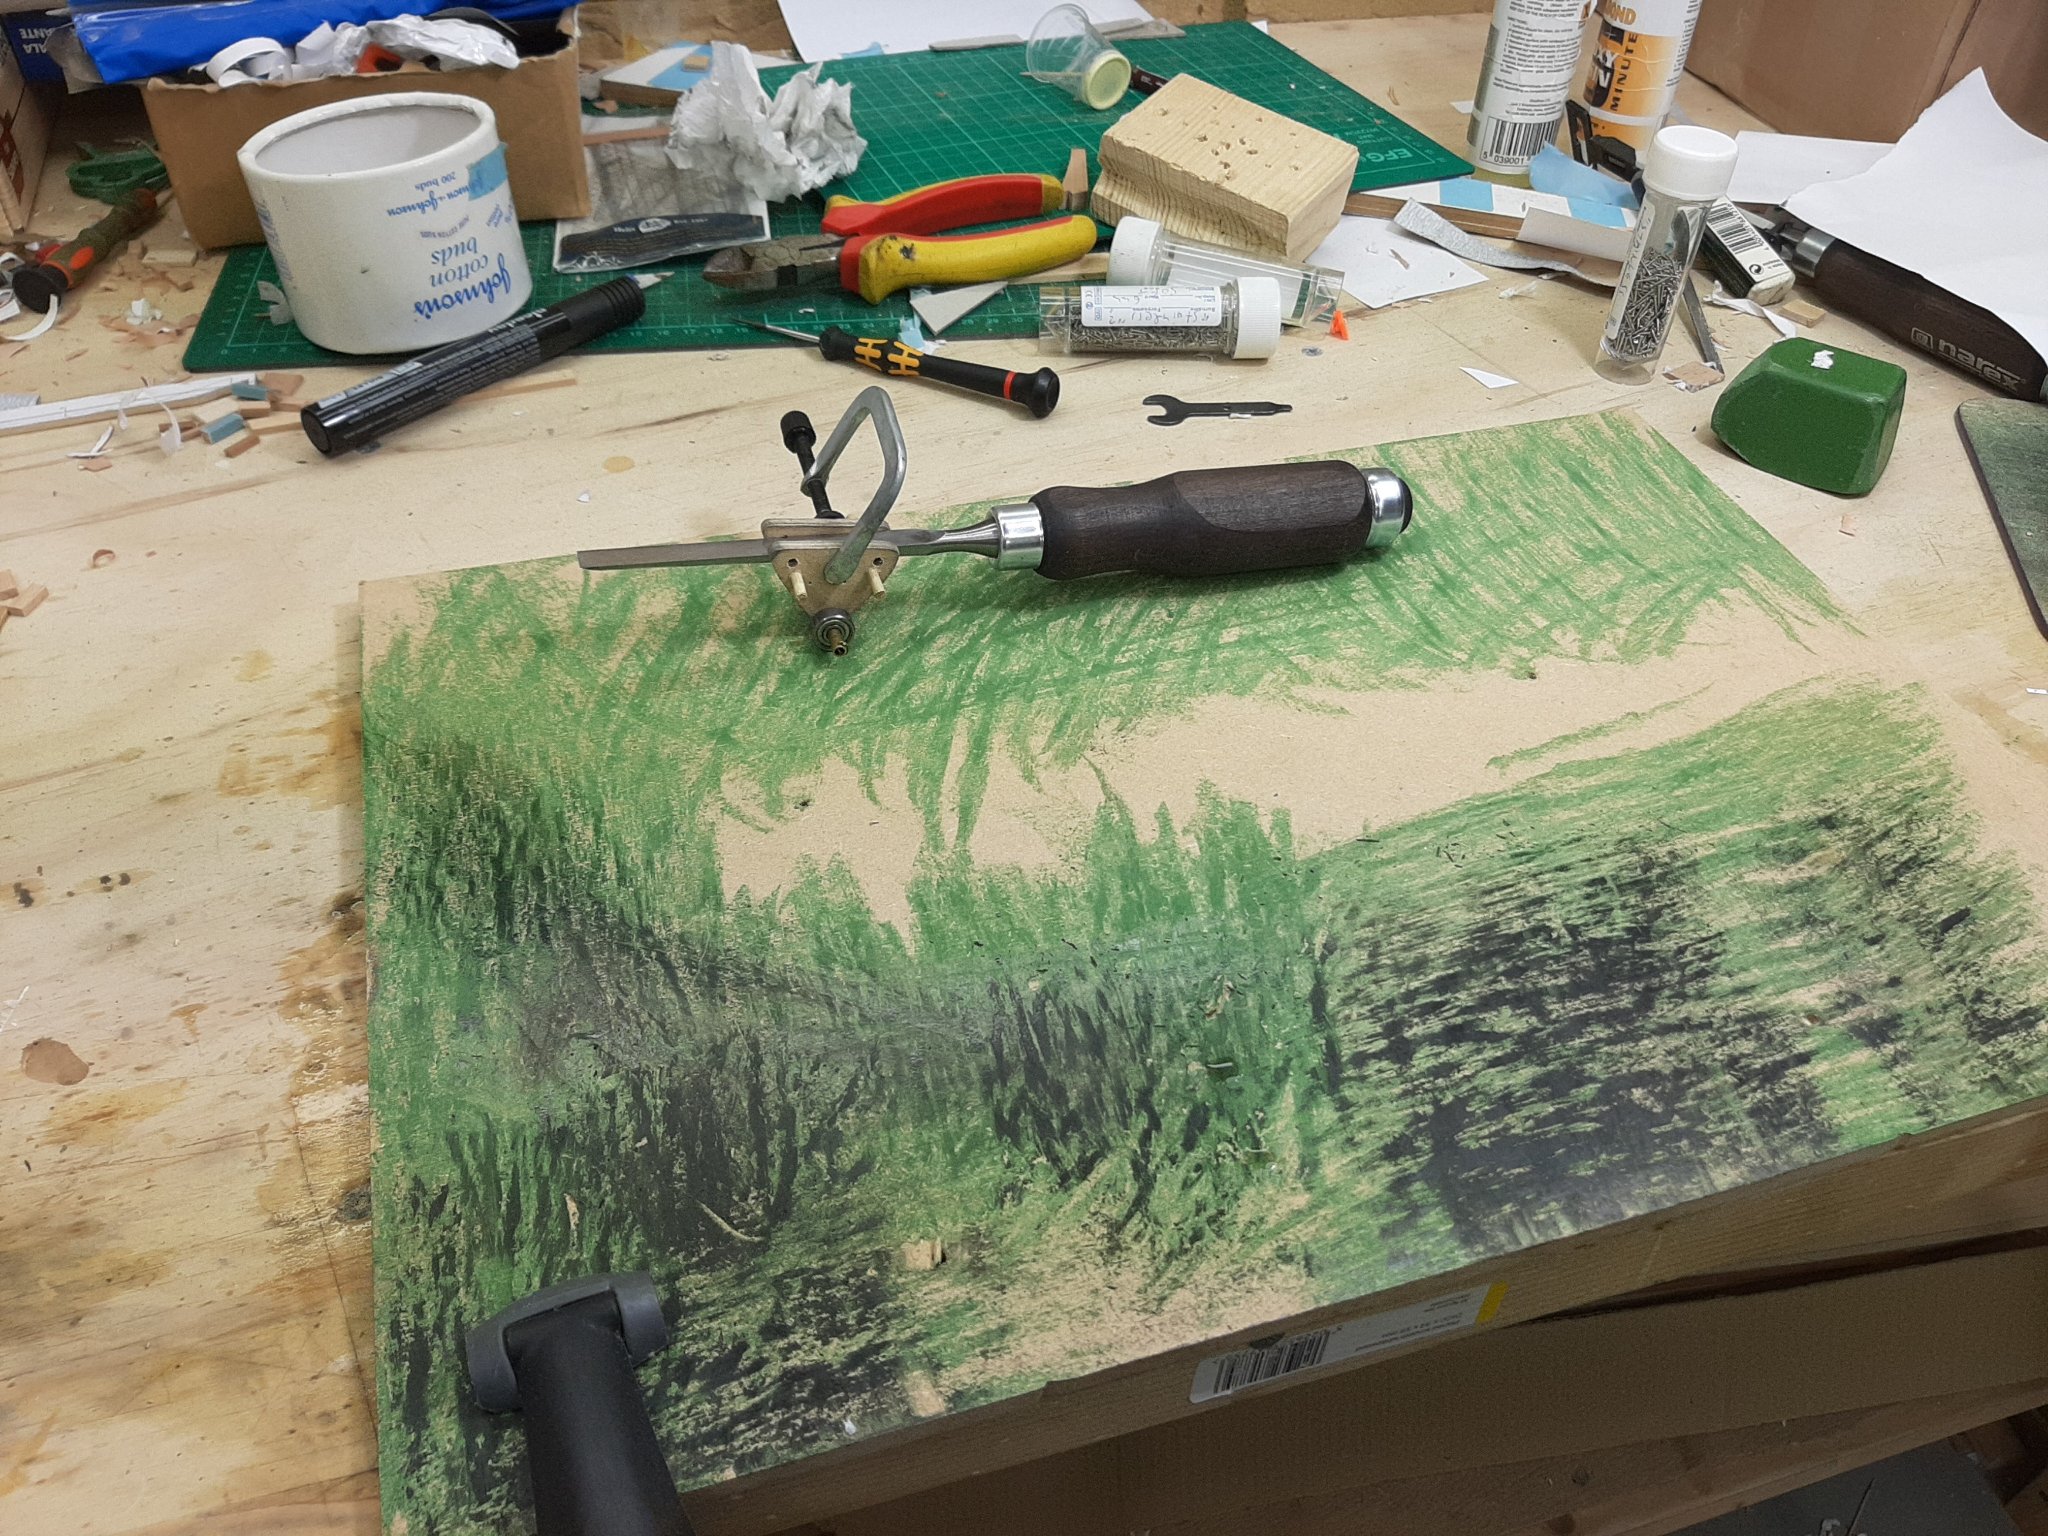
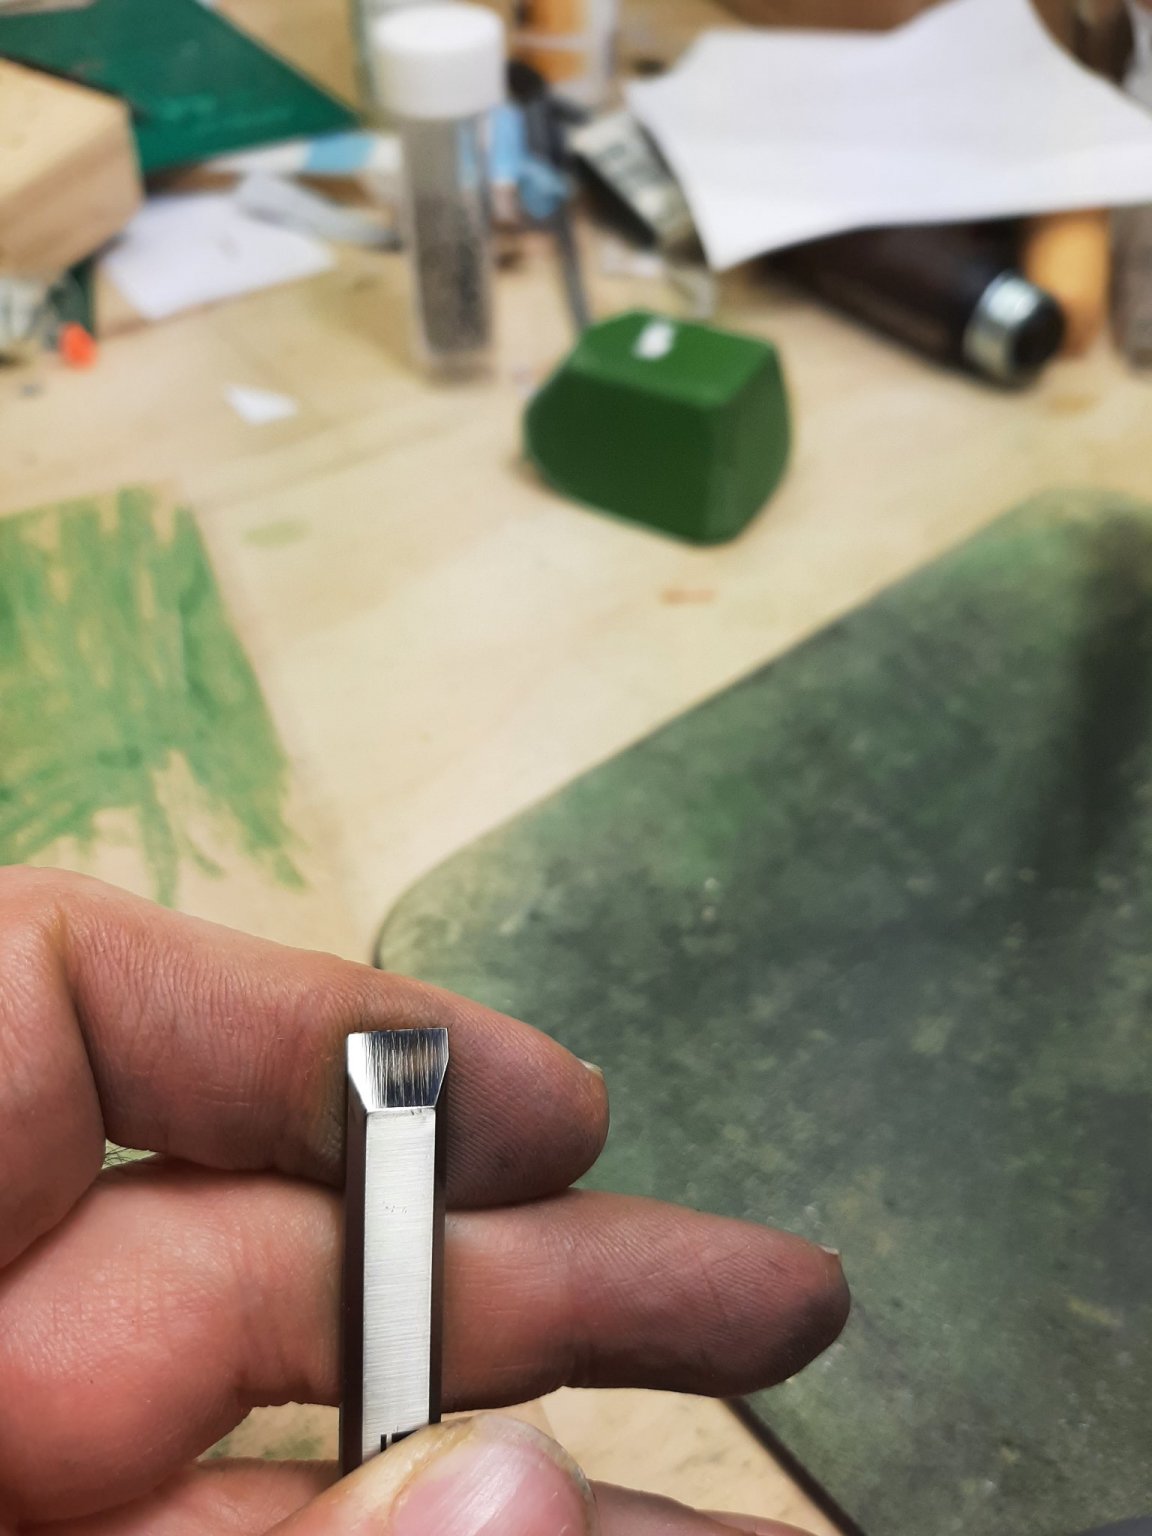
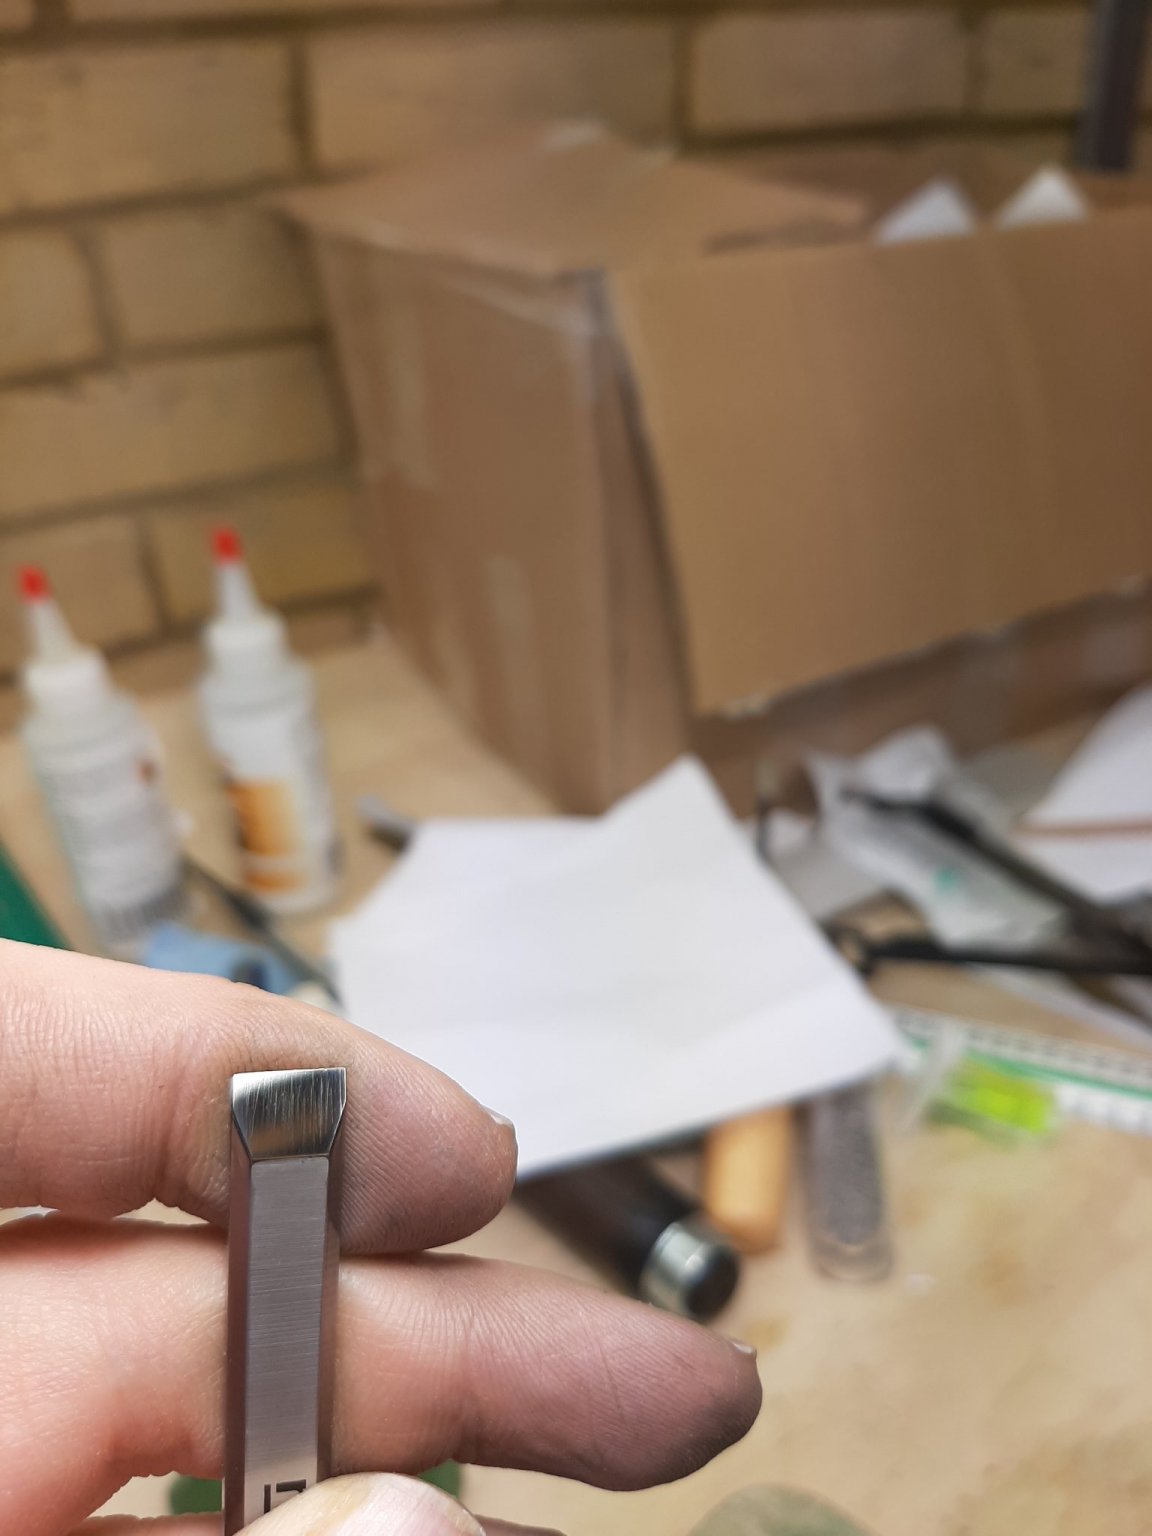
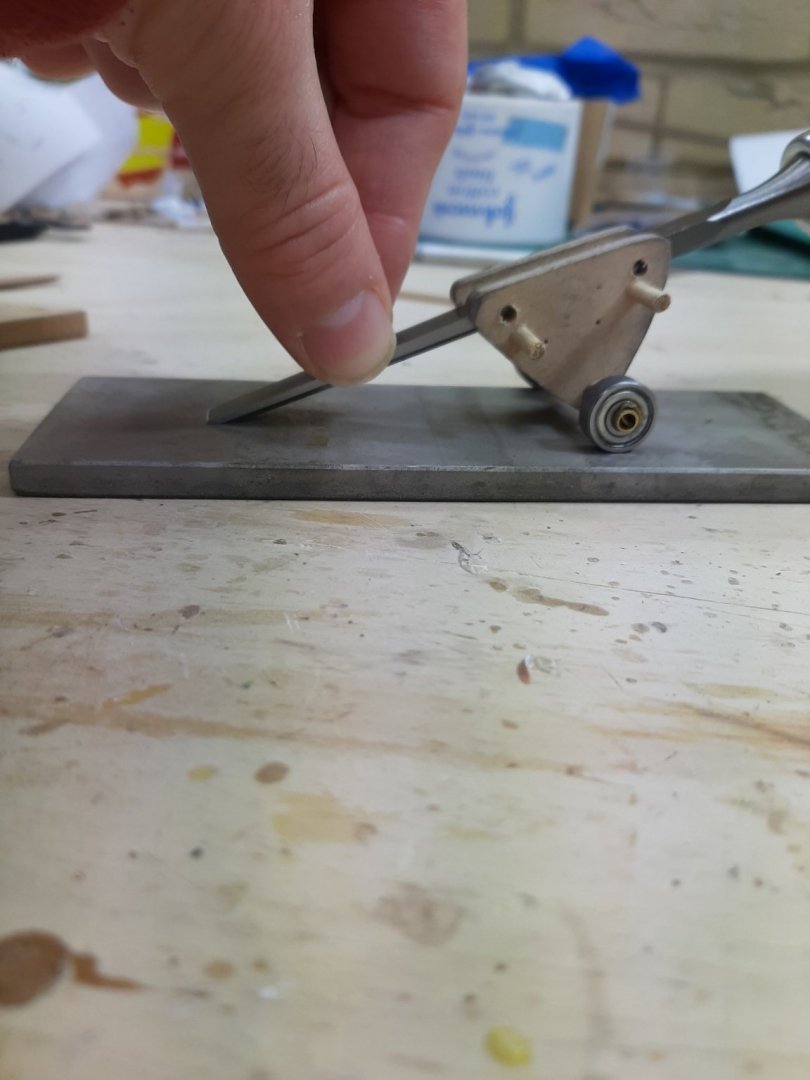
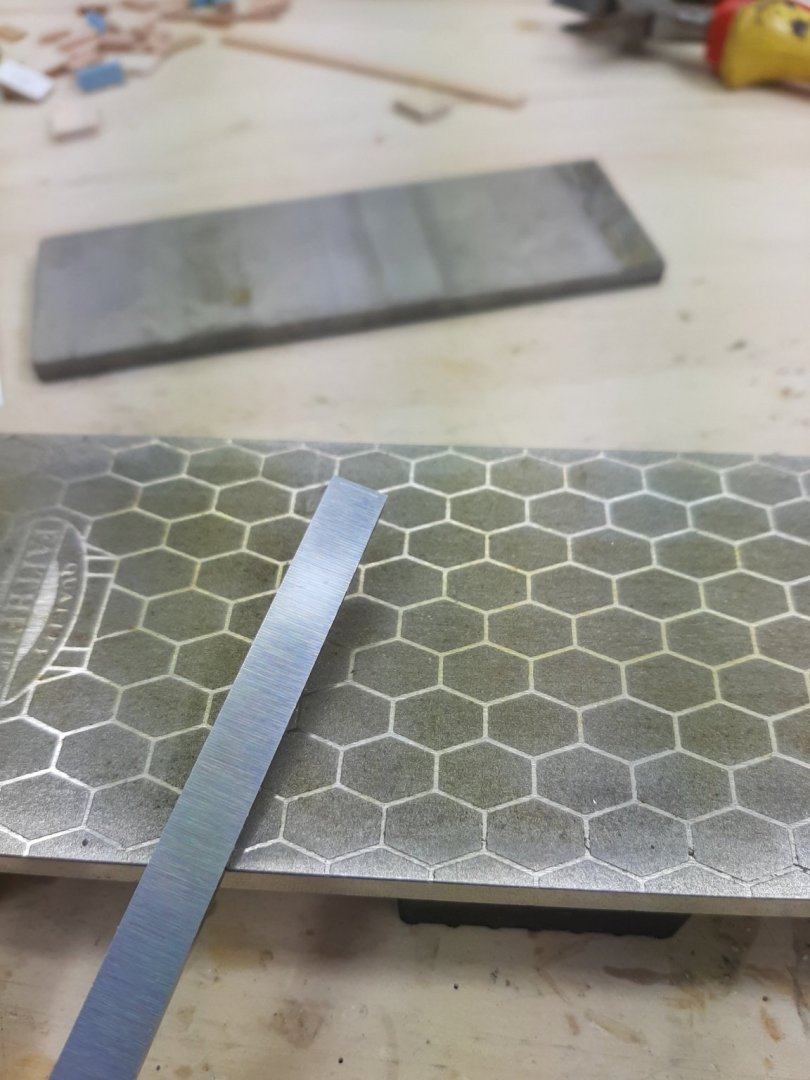
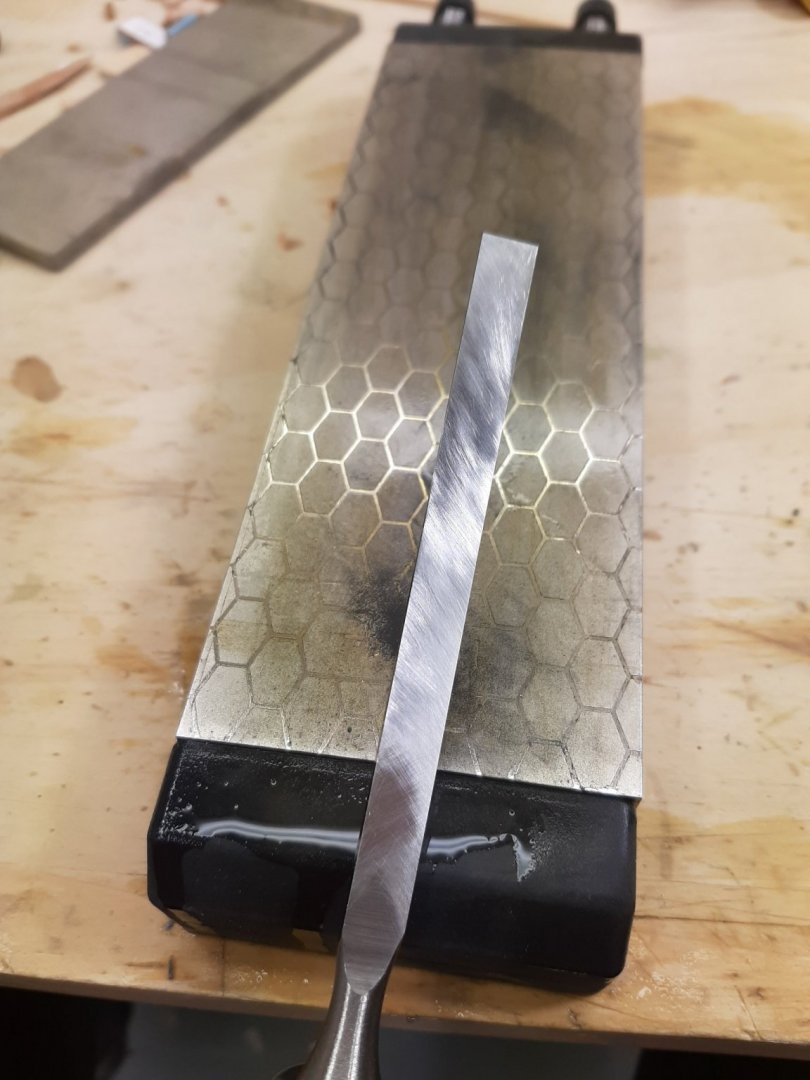
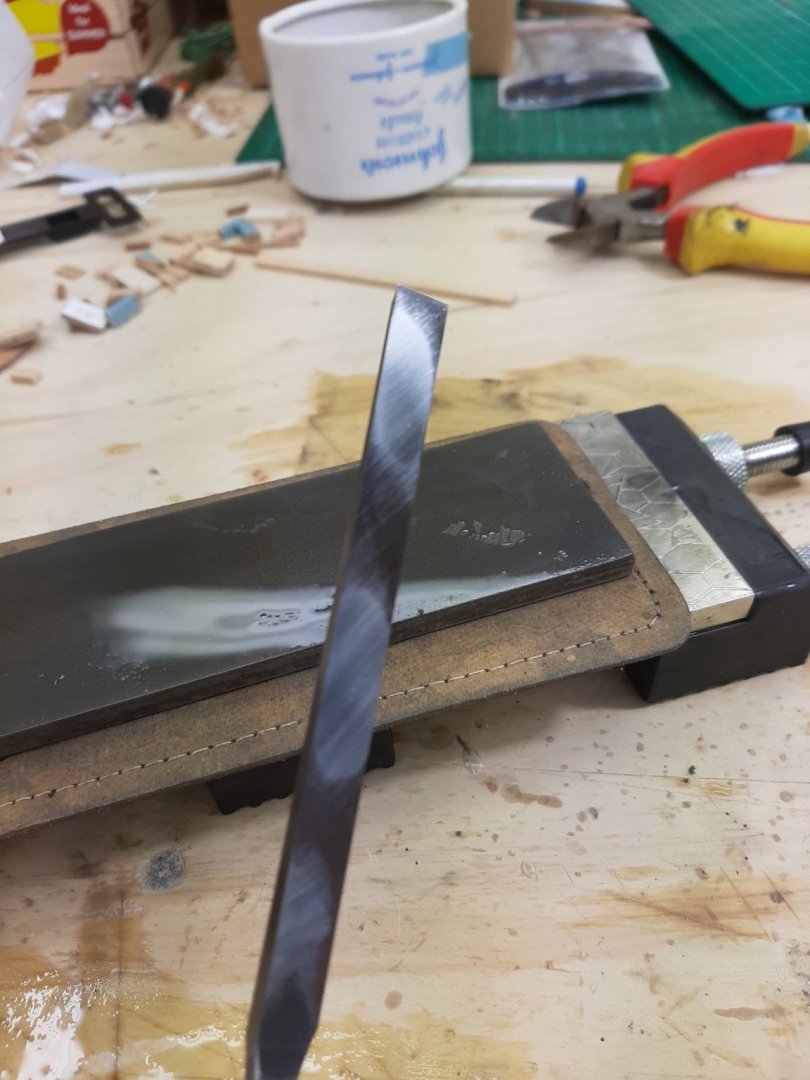
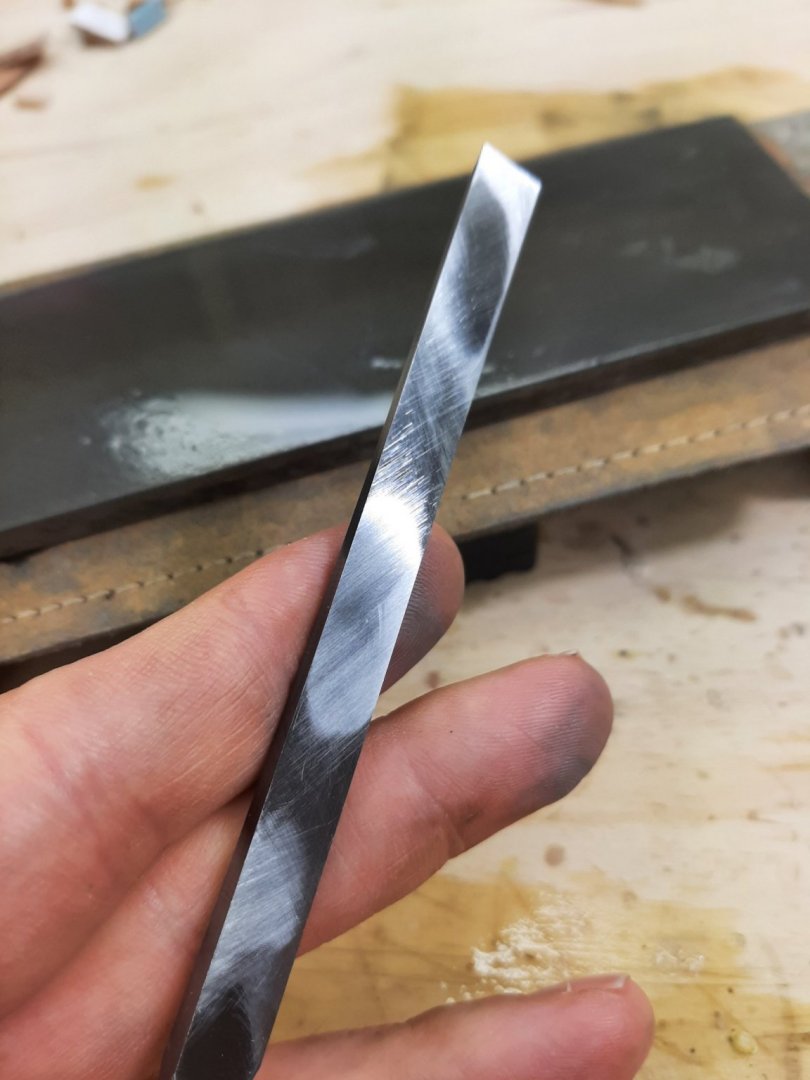
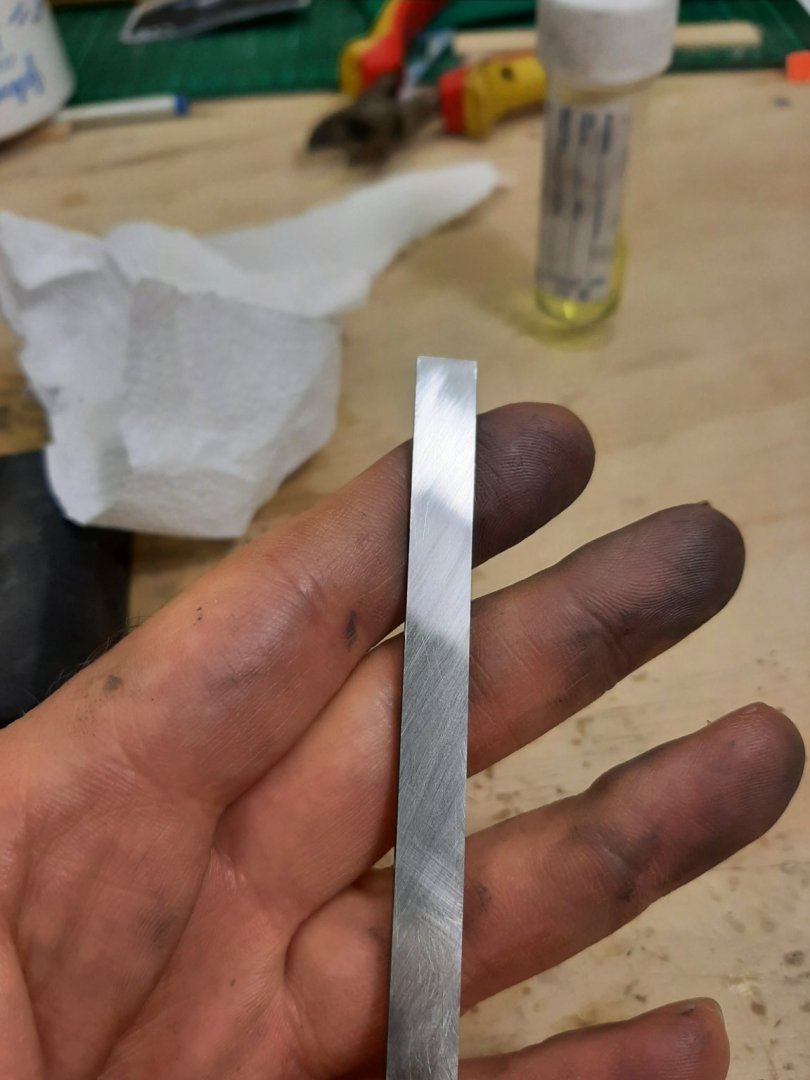
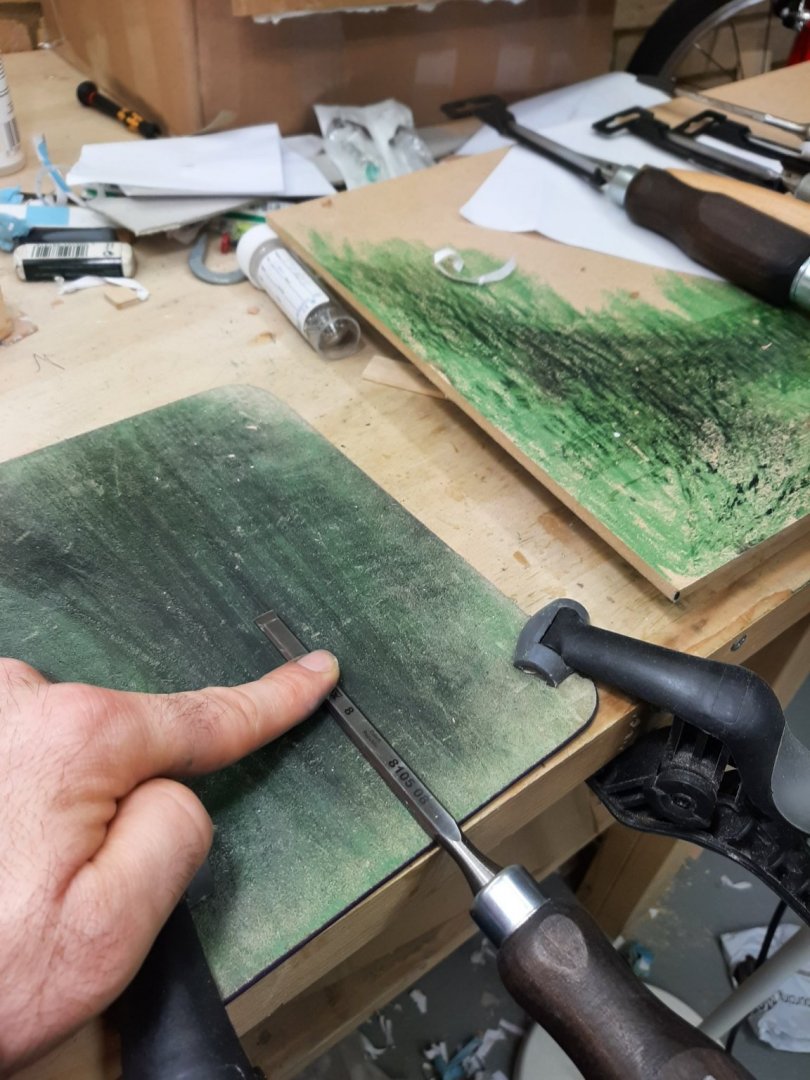
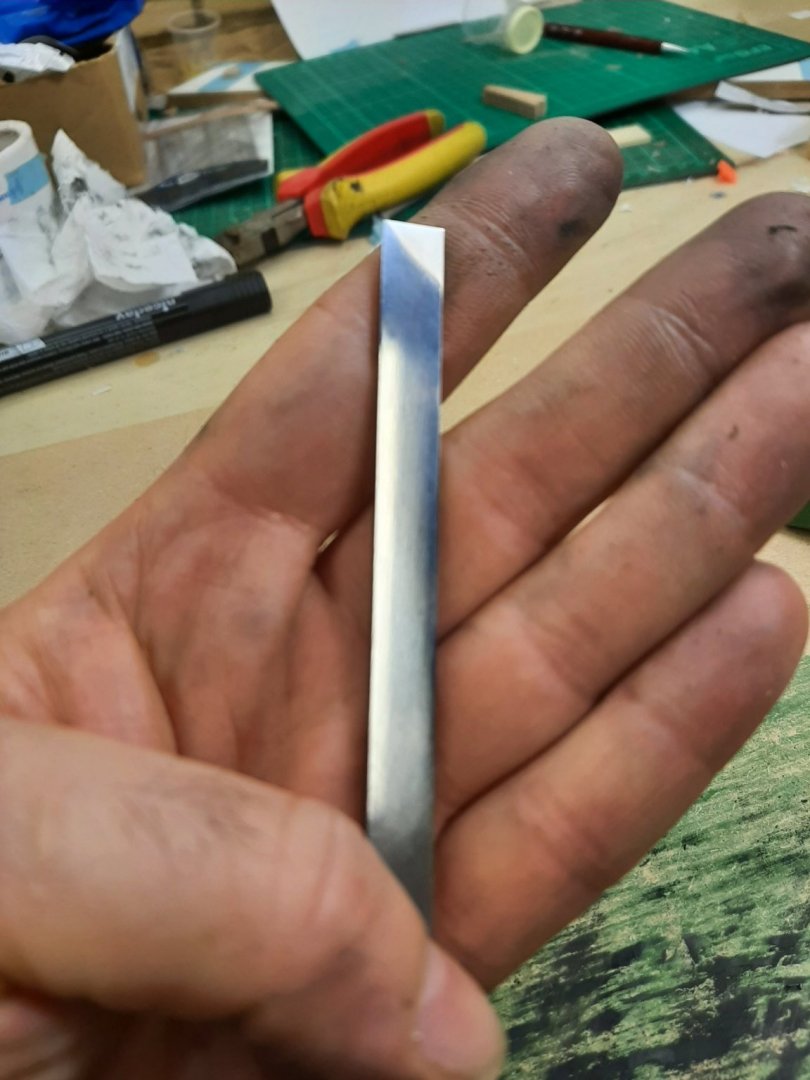
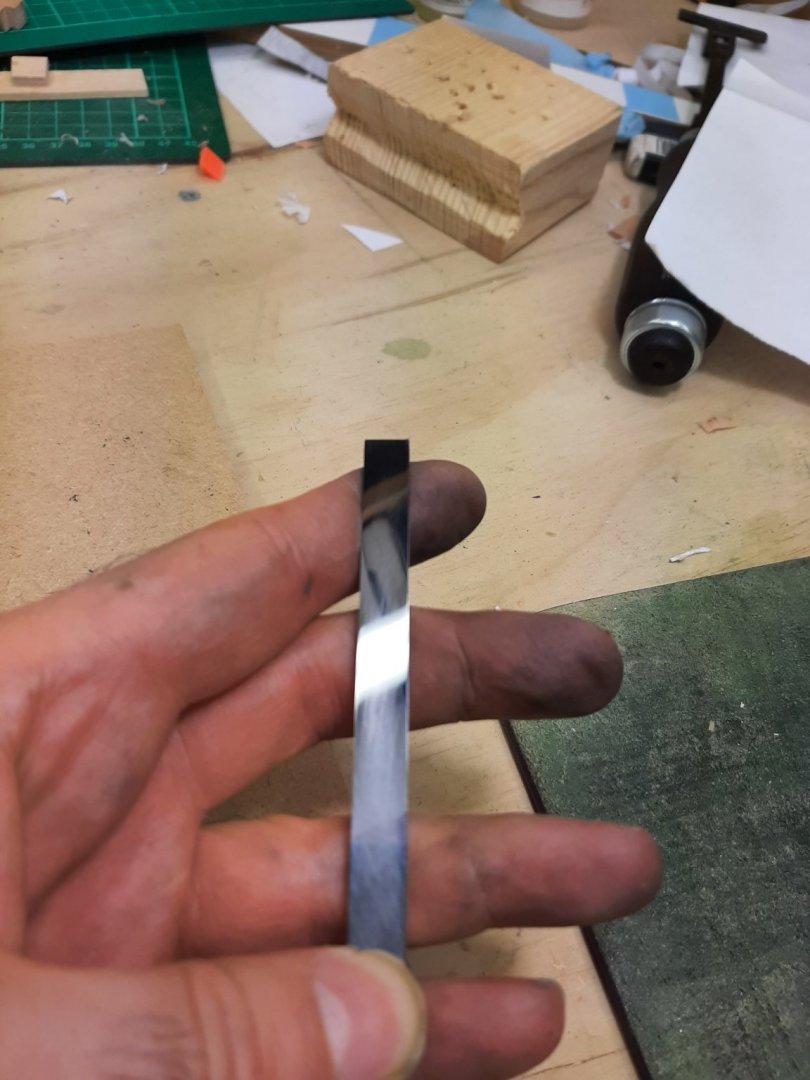
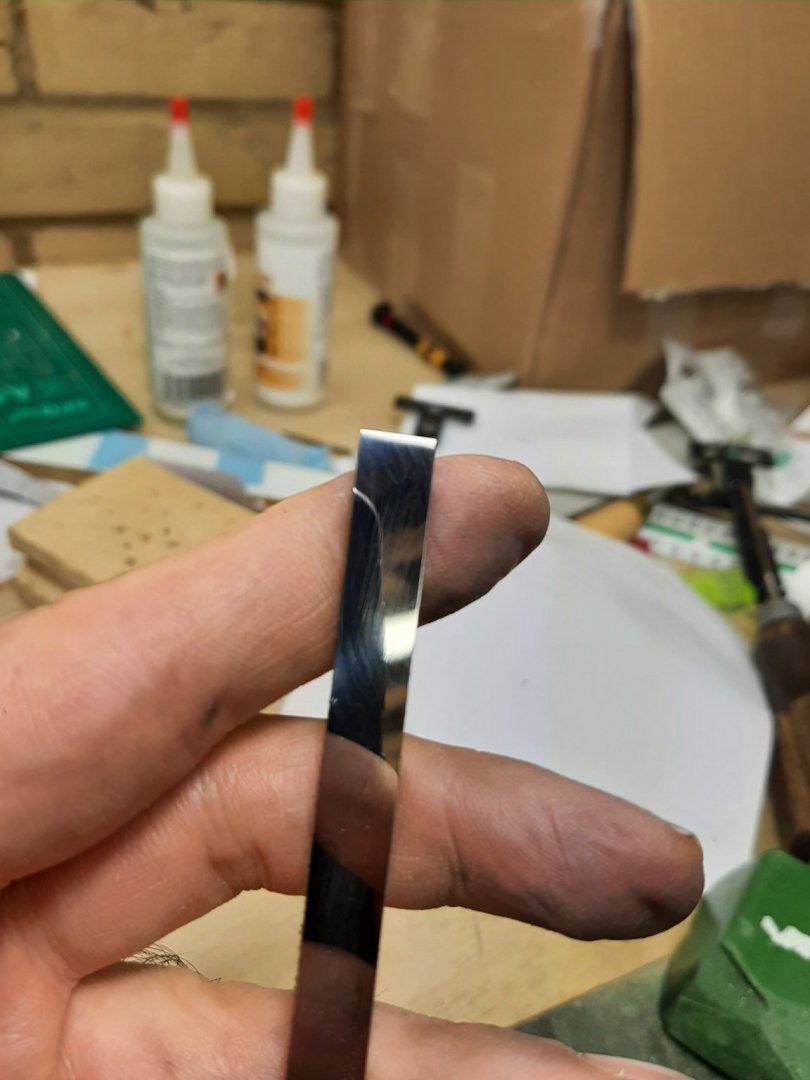
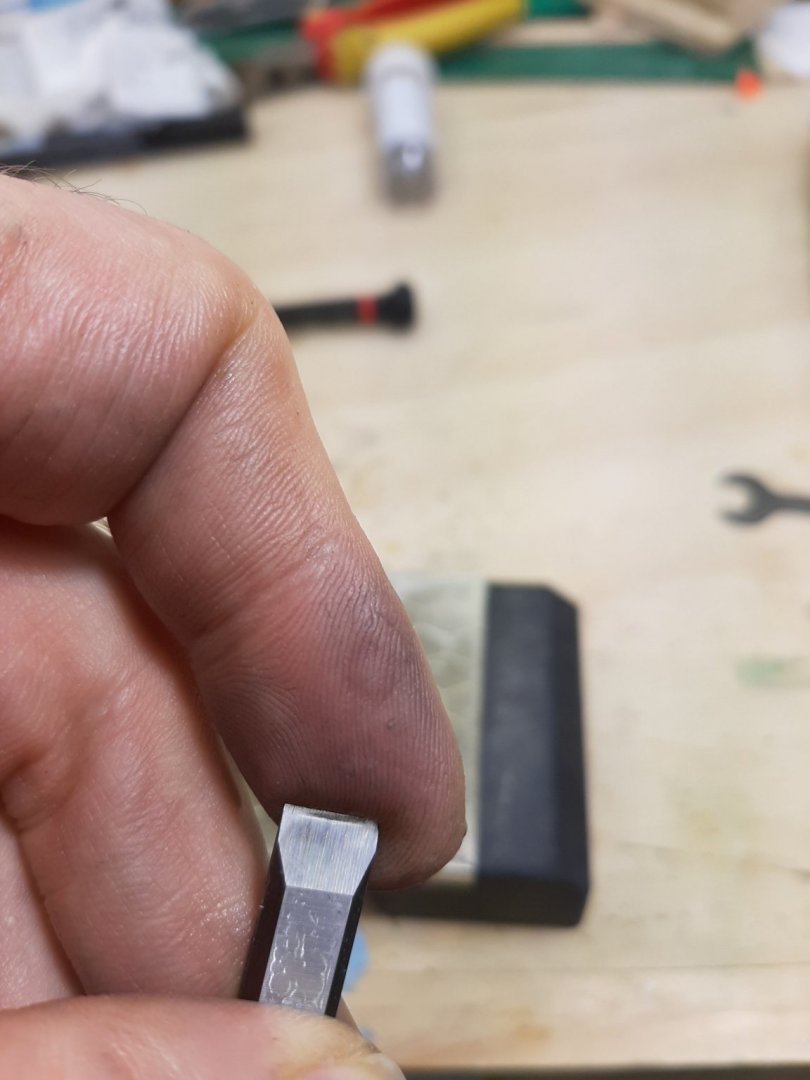
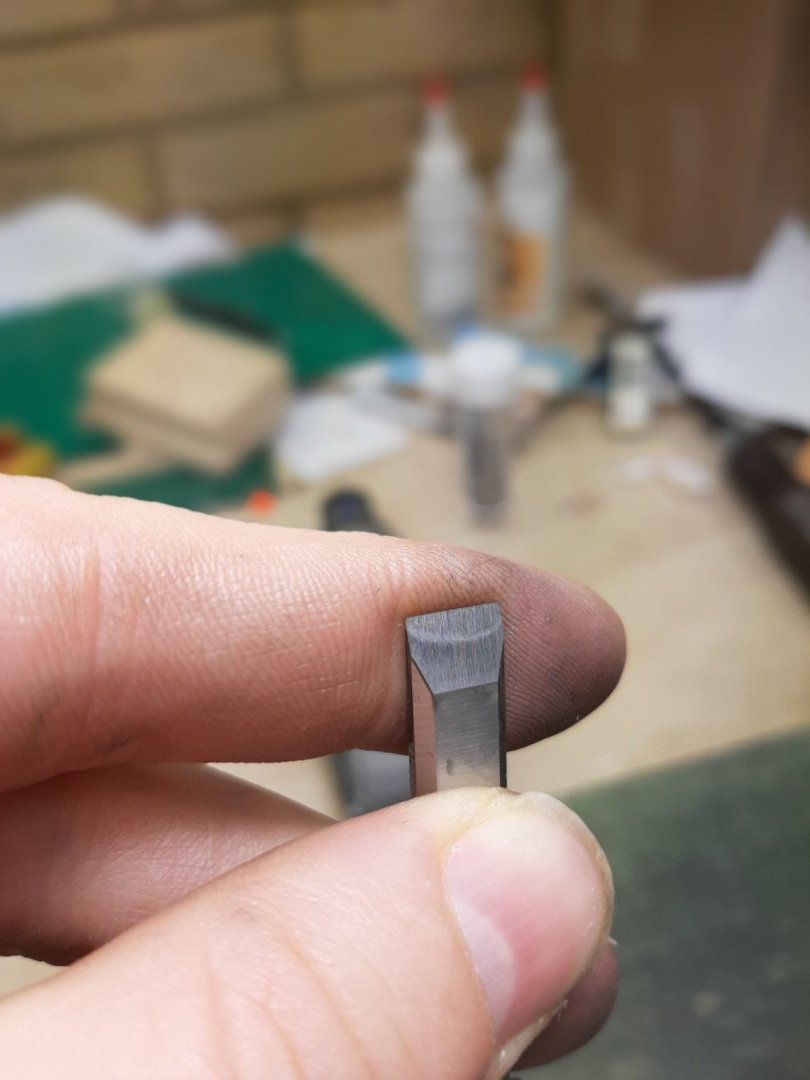
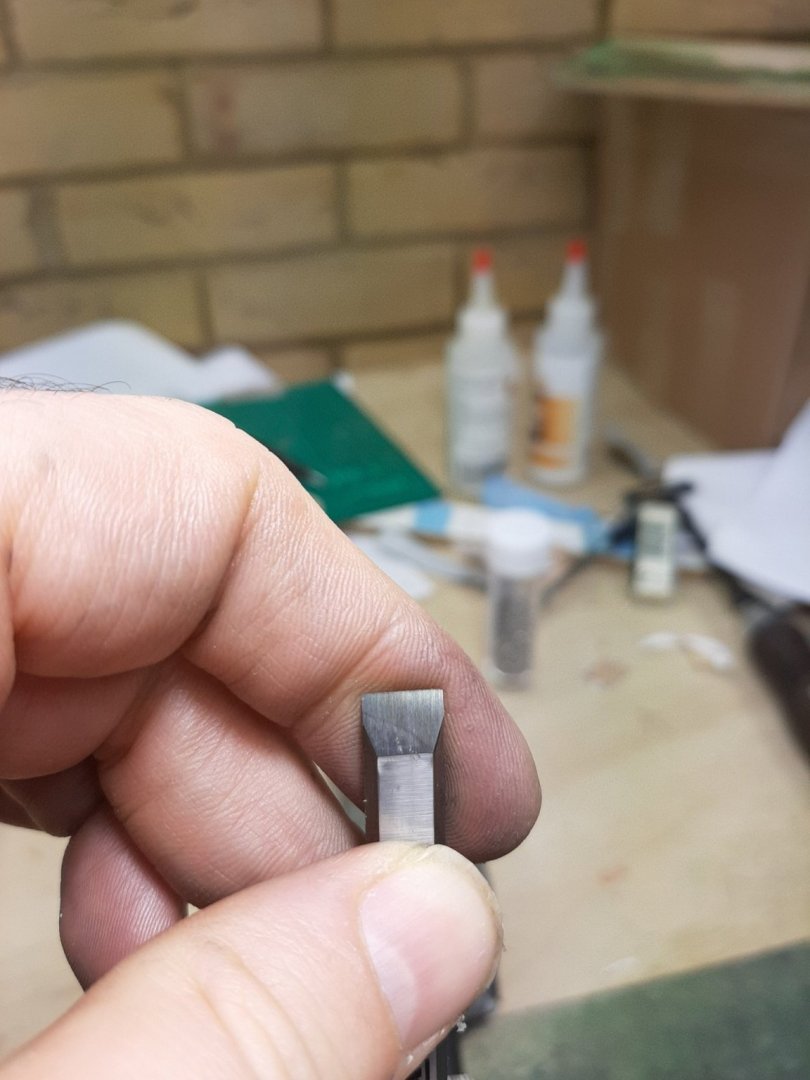
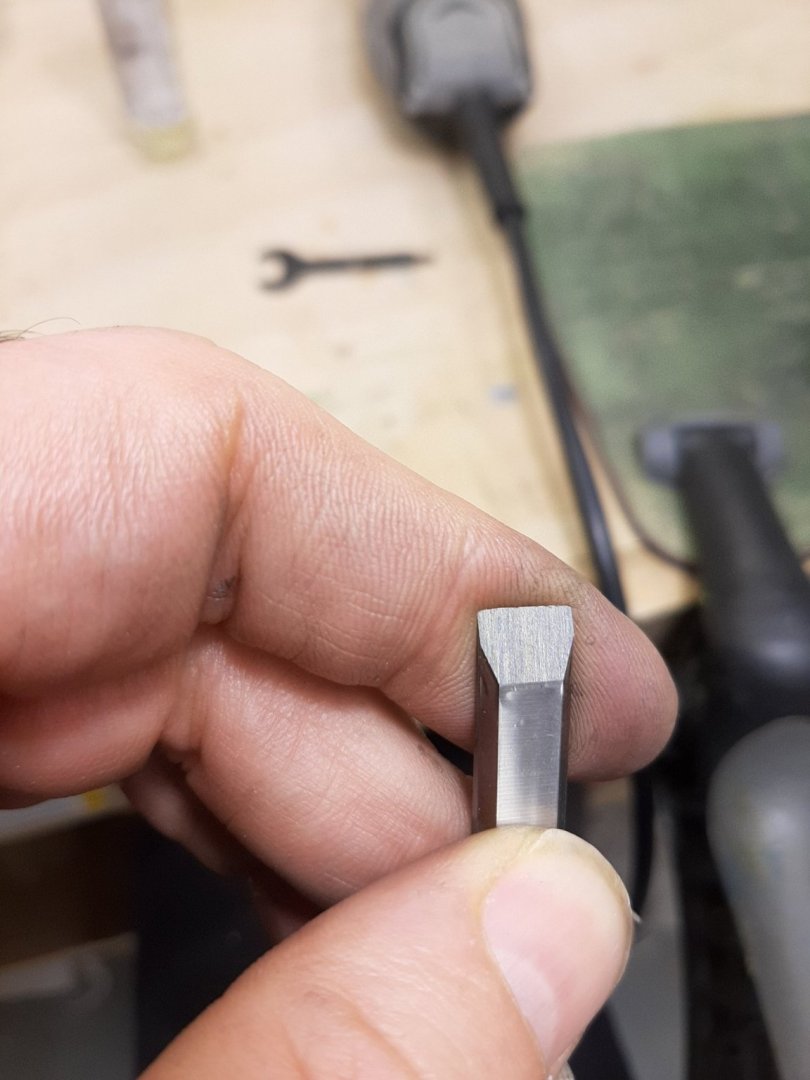
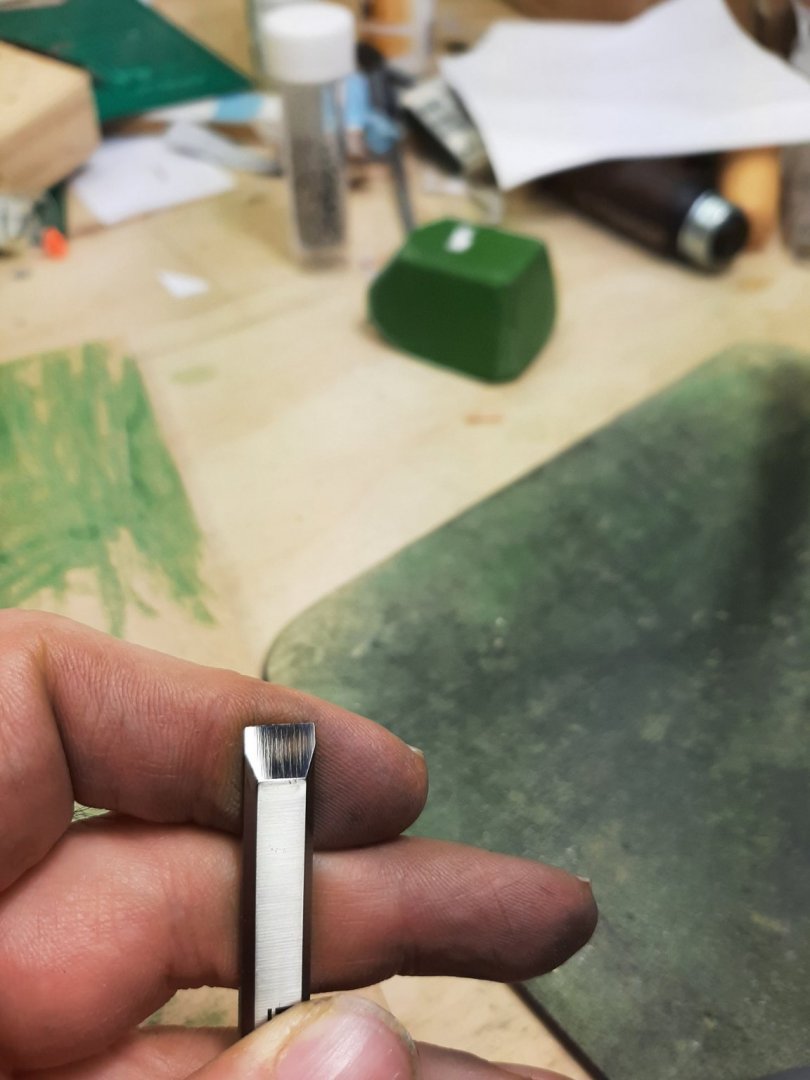
Dear all I am no wood worker but I have come to appreciate what a wonderful tool a very sharp chisel can be. However, no matter how expensive or cheap a chisel is, it will need to be honed continuously and will only work as intended if it is really scary sharp. There are many ways to hone a chisel and various types of stones and jig are available, some very expensive. Please allow me to share how I sharpen my chisels. Now, there are a few tools that are needed but are not too expensive and will last for a very long time. I recently bought a new chisel, an 8 mm Narex so I thought it was a good opportunity to show how it can be turned into a useful tool. I hope that this will be of help to others. I like Narex chisels very much but out f the box they are of no use at all. The tip is covered but some kind of lacquer and is not sharp. The bevel and the back of the chisel are very rough. Now, for the chisel to be sharp, both surfaces need to be as polished as possible. So lets start honing this chisel We will first concentrate on the back of the chisel. This surface will only be worked once, on purchase and will not be touched again. Until the back is flat and polished to mirror finish, we cannot proceed. I will use only a cheap combination diamond stone 400/1000 grit, a slightly more expensive 1200 grit diamond stone, an old leather mouse pad turned upside down, a sheet of flat MDF and green polishing compound. I also will use a honing jig I make myself. This jig is absolutely needed unless you have a very steady hand and lots of experience, it can be made with whatever scrap material but some accuracy is needed in its construction-basically a drill press or a very steady hand. Another thing needed is some kind of jig to make sure the bevel is grounded at roughly the same angle each time the guide is used. I just use scrap wood for this Now, we start by positioning the chisel on the jig, finding the angle and then marking this position on the scrap wood. The little pieces of wood are glued and then screwed on. Now we start honing. I start with the 400 grit trying to remove the machine marks. This is the starting point And this is how it looks after a few passes Then we move on to the 1000 grit. This is how it look afterwards Then on to 1200 grit, this is the result However there is a problem. The back is not flat as the next photo shows This is a problem. The back needs to be flat or better concave, so that less material needs to be removed making the job easier. So back to 400 grit to remove enough material to make the back completely flat, so the tip touches the stones. The diamond stones are very aggressive, they do not need any pressure, just to move the chisel back and forth. This is how it looks now at 400 grit... at 1000 grit... and at 1200 grit. The chisel is already very sharp but we have a long way to go. Next comes the strop. This is how it looks after a few minutes of stropping. I have found that the fastest way at this point is using MDF. I charged some MDF with the green stuff and starting polishing like crazy moving the chisels in all directions. After just two minutes the results are impressive. 30 sec later and after 30 more seconds of polishing, we are there. These are my fingers holding the phone shown on the surface, it is like mirror. Good, now we move on to the bevel. This is our starting point. Using the jig we made earlier, the chisel is positioned on the guide. However although close, the positioning is not accurate so we actually need to create our own bevel. So we start with the 400 grit. This is how the new bevel is progressively formed. Then on to 1000 grit... and to 1200 grit. Then we move on to the strop. The bevel takes much less time to polish than the back and actually the leather works better than the MDF. This is the result. We now need to do a few passes on the back to remove the excess material hanging of the edge. The chisel is now very sharp, sharp enough for what I needed for. It can of course be further polished, the green stuff I think is something like 25,000 grit but it is enough for now. During use, every few cuts, I make a few passes over the strop. With some use, it will get further polished. I hope this has been helpful for some, a video follows showing the surfaces of the chisel Regards Vaddoc


-
These indeed look very nice but are expensive. I make my own guides with scrap material and cheap bearings and they work very well, even for my 3 mm chisel.