


rlb
-
Posts
648 -
Joined
-
Last visited
Content Type
Profiles
Forums
Gallery
Events
Everything posted by rlb
-
 Dave, that is a great point. I have thought about it, and my initial thought was to greatly simplify the collar and do the canvas cover. Then I thought that fiddling with trying to make a cover, and realistically fastening it would be difficult. However, I didn't research to find out what it needs to look like and how others may have done it. Now I feel like doing some searching on this! I have no concerns that any work will have been wasted (after all, on one will ever see the stove!) At this point my options remain open. Ron
 -
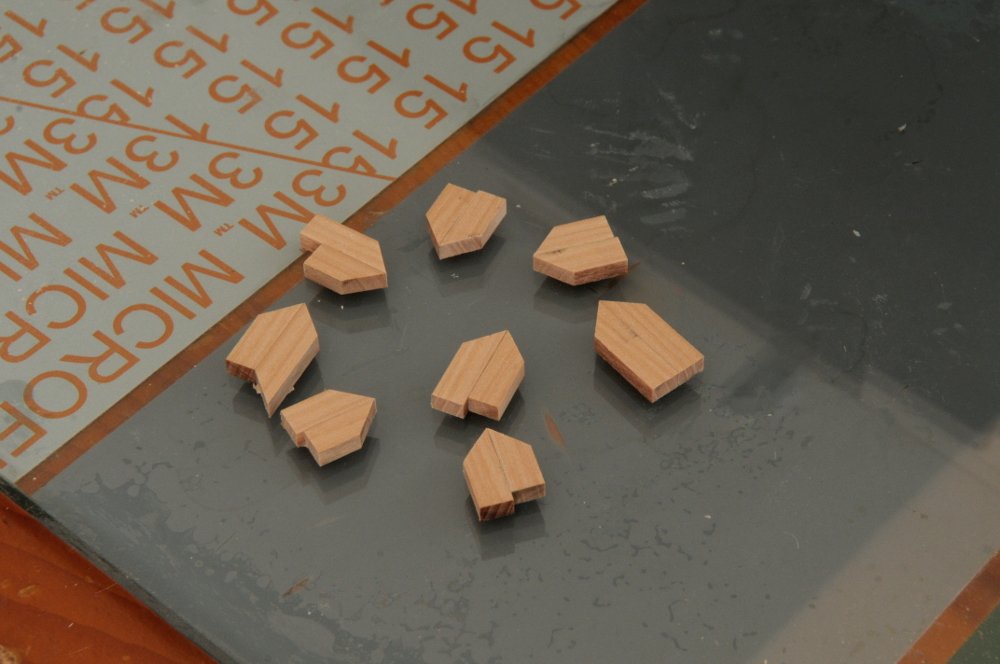
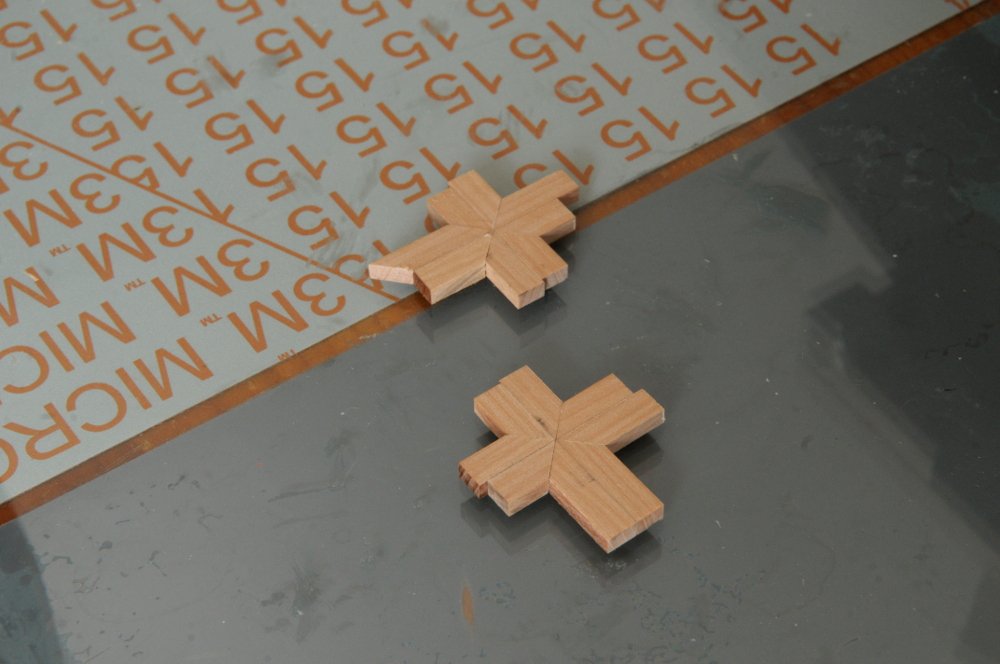
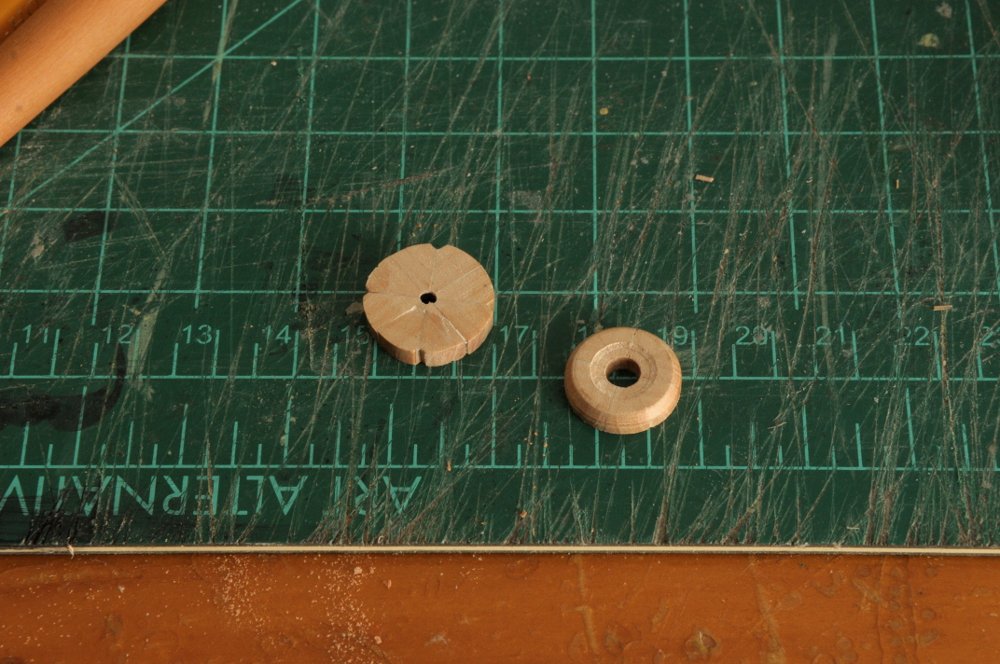
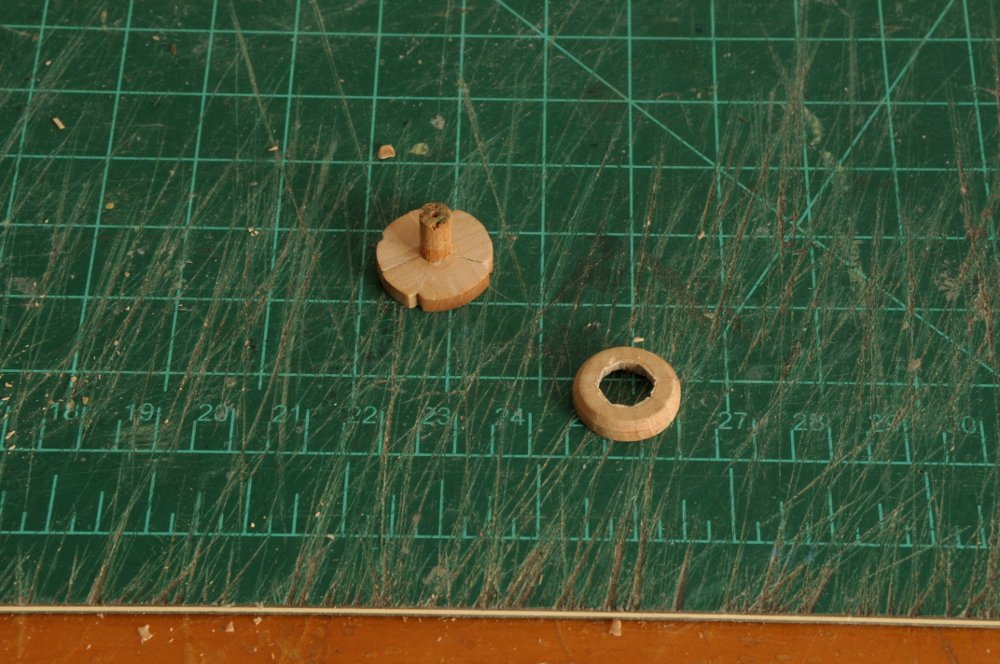
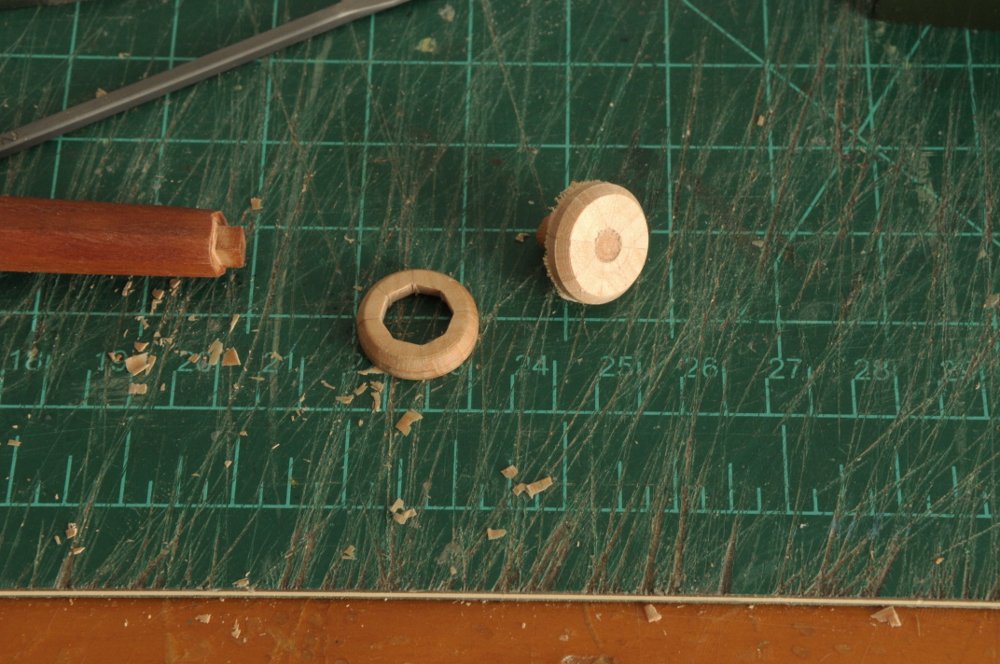
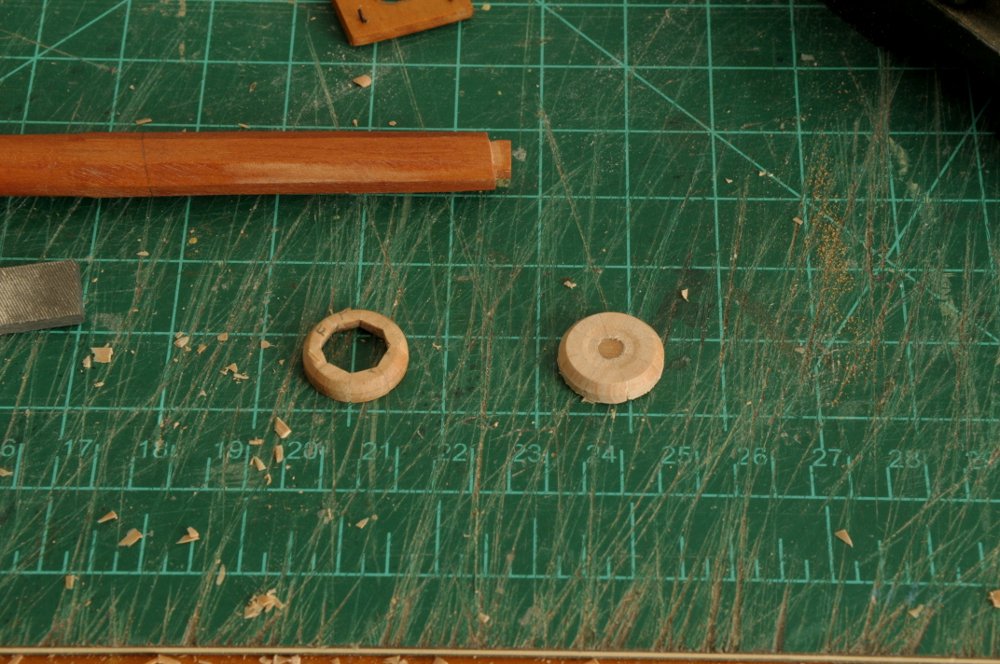
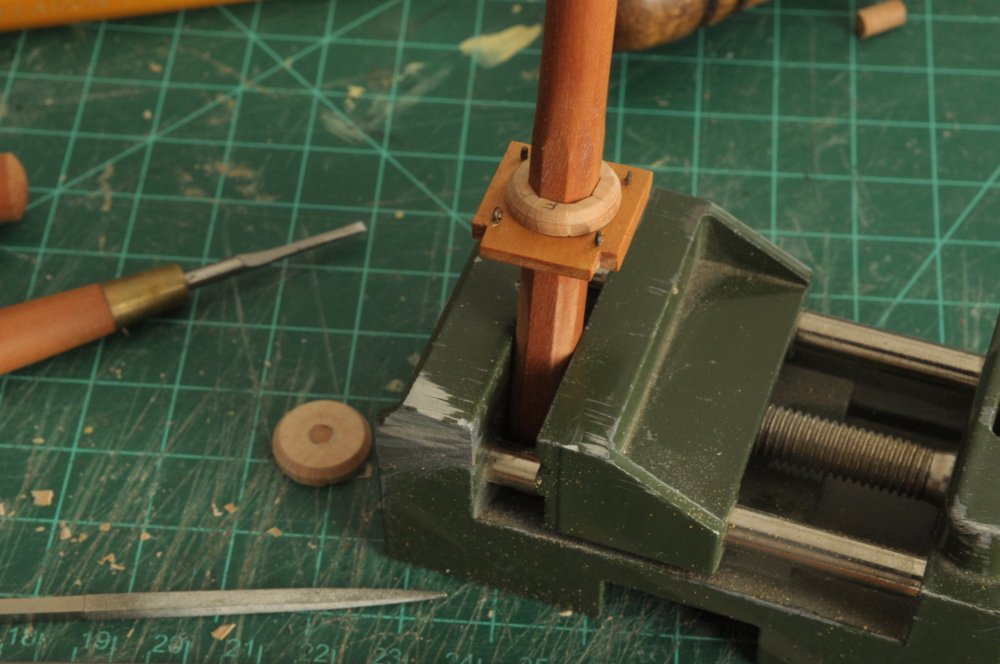
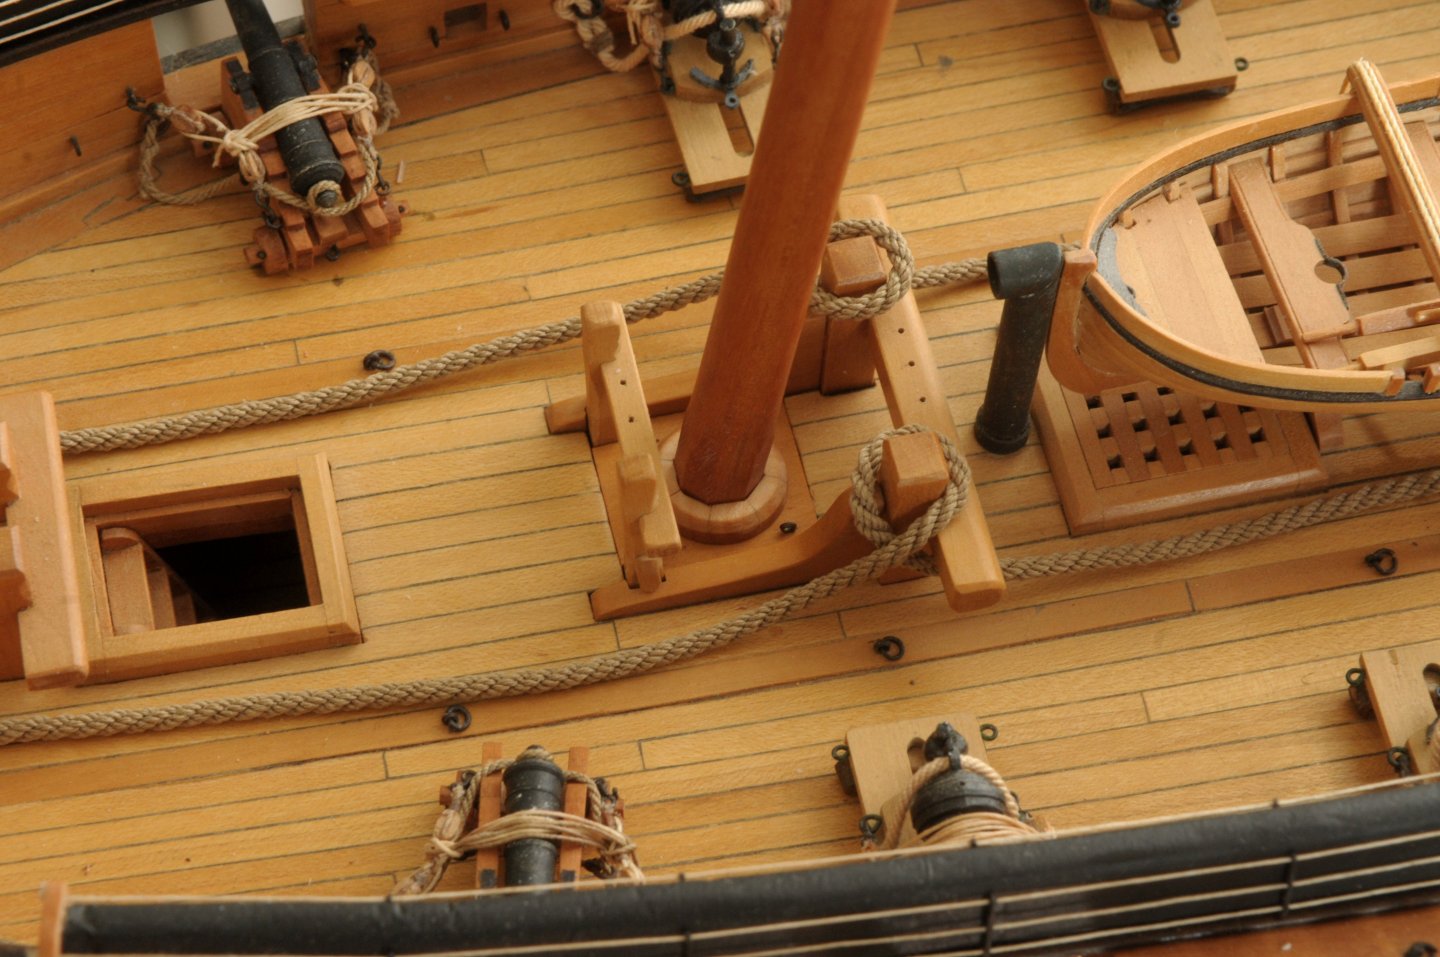
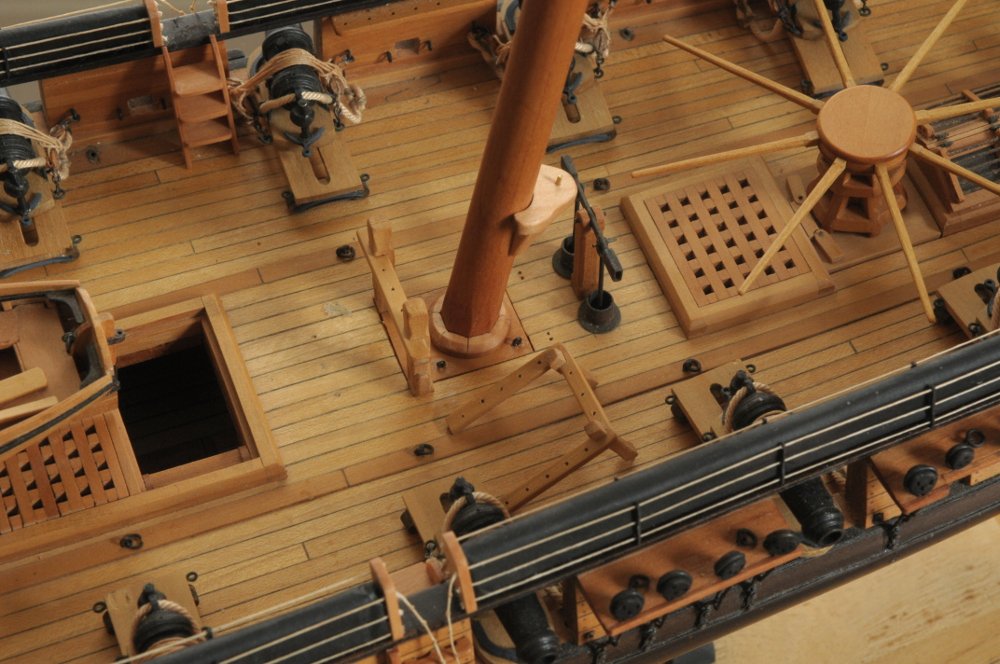
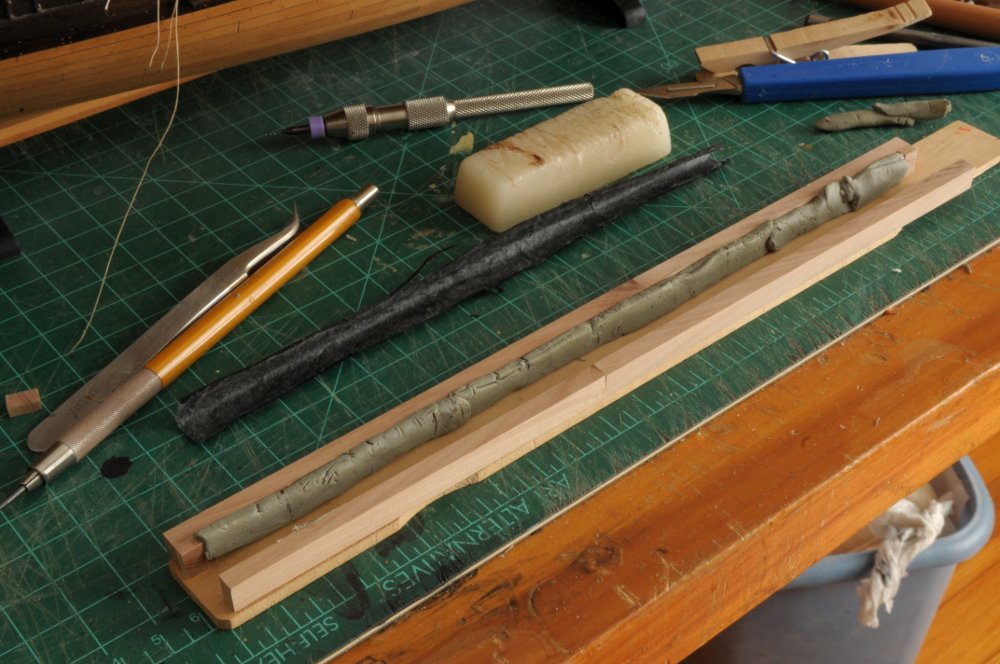
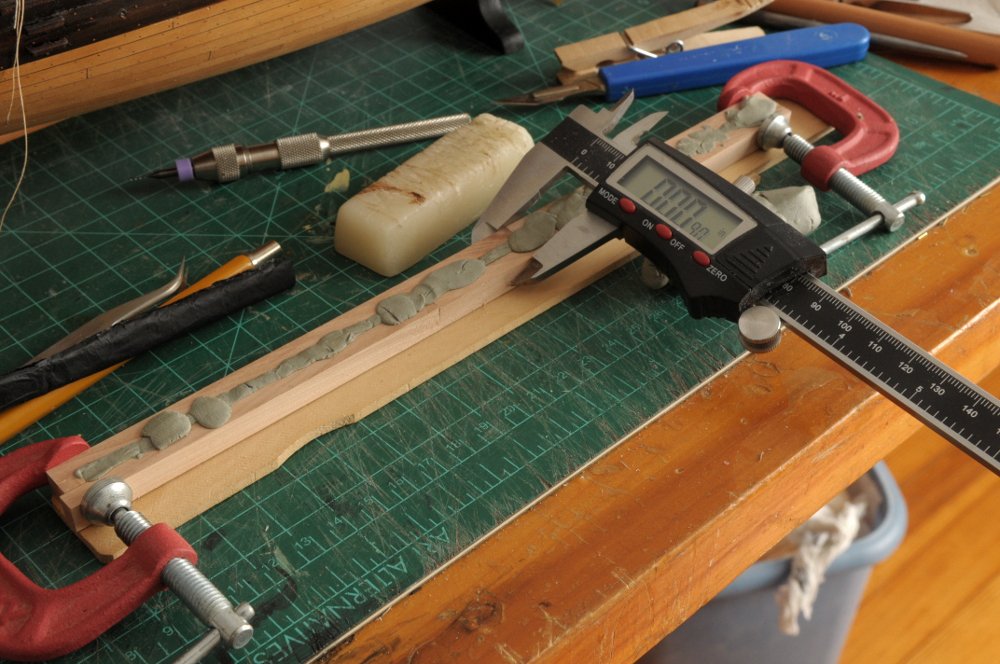
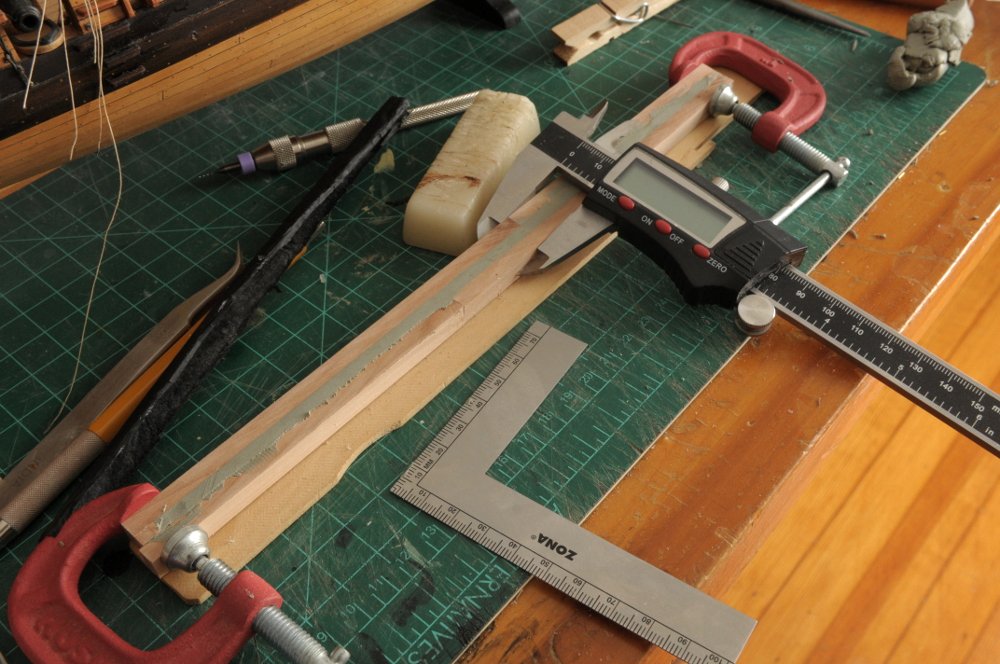
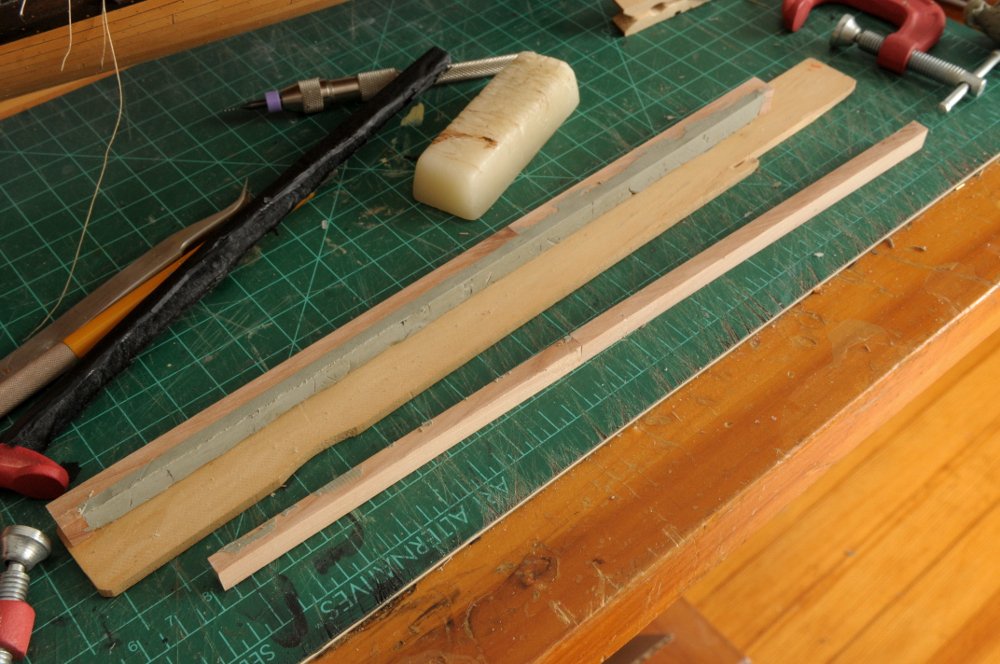
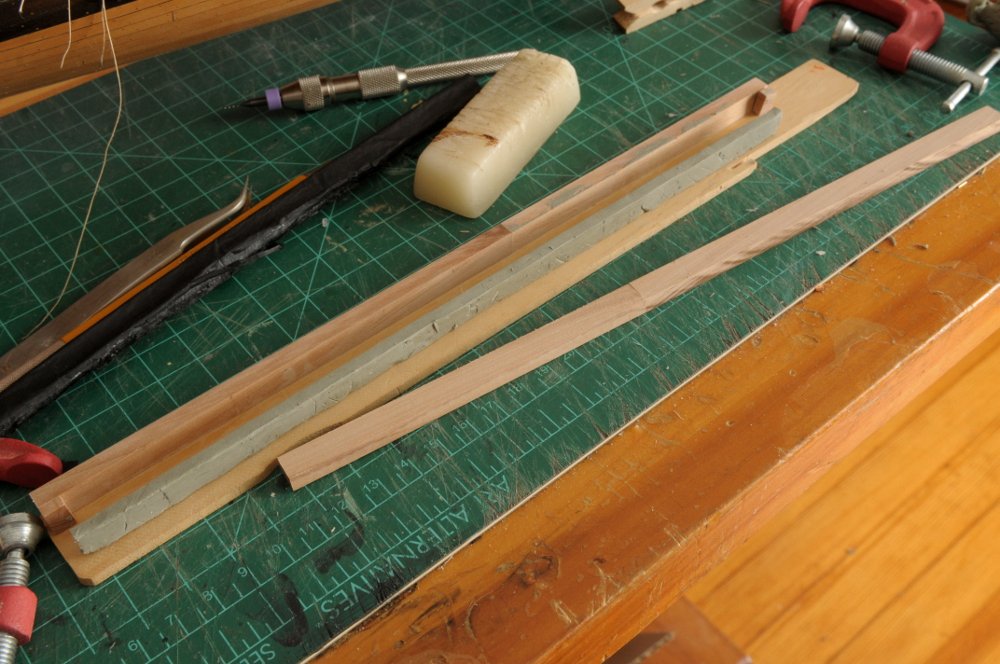
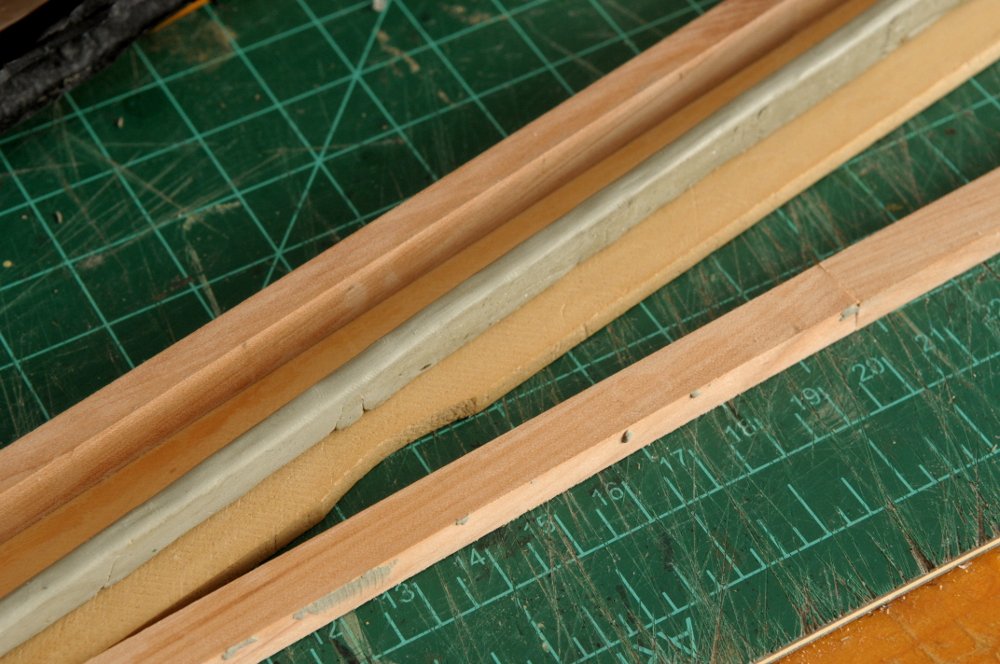
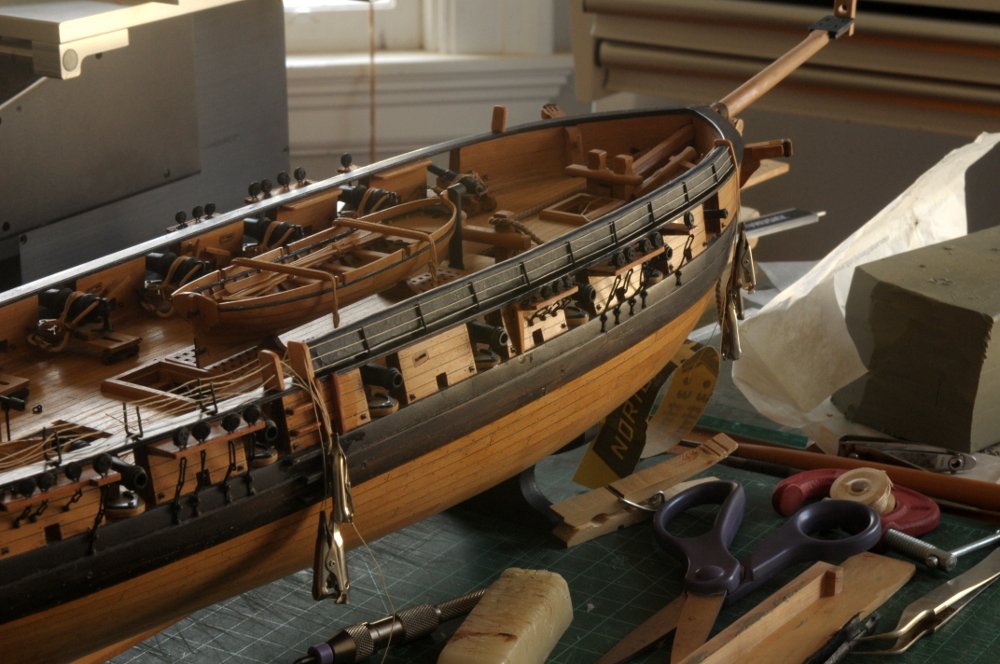
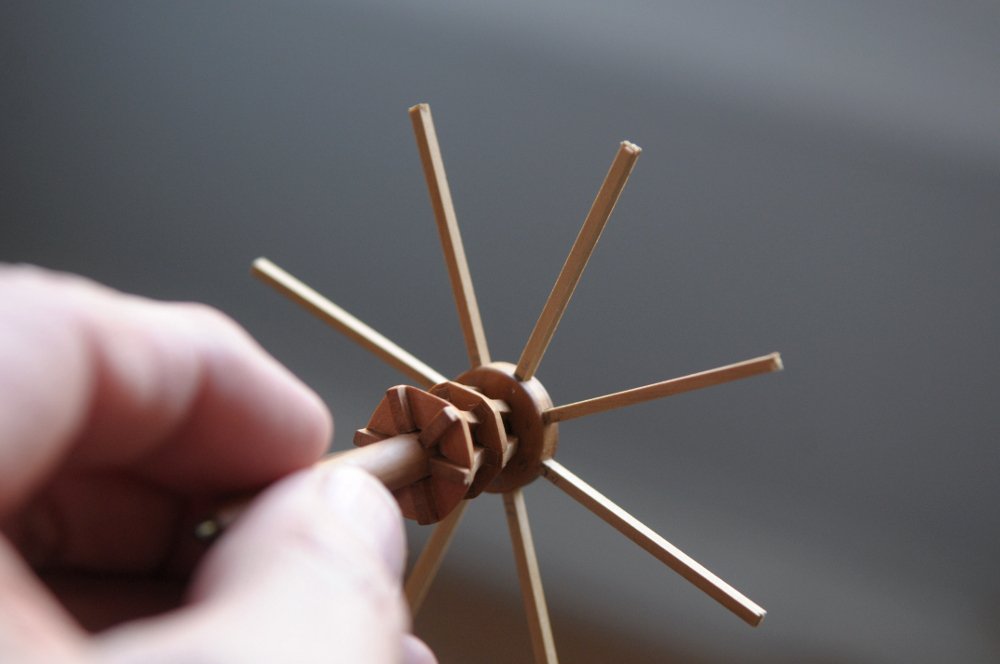
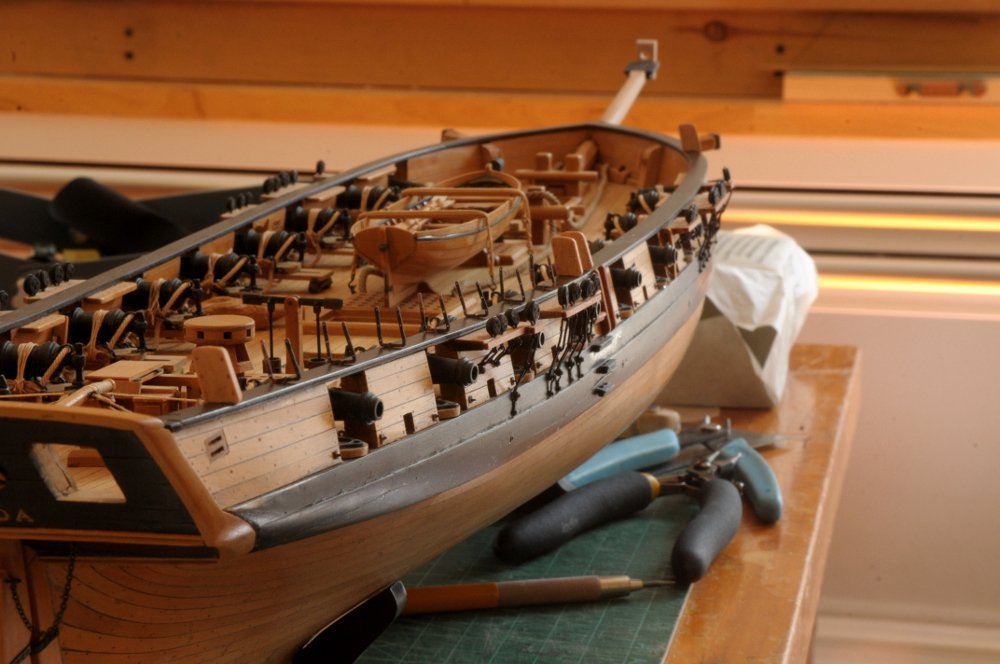
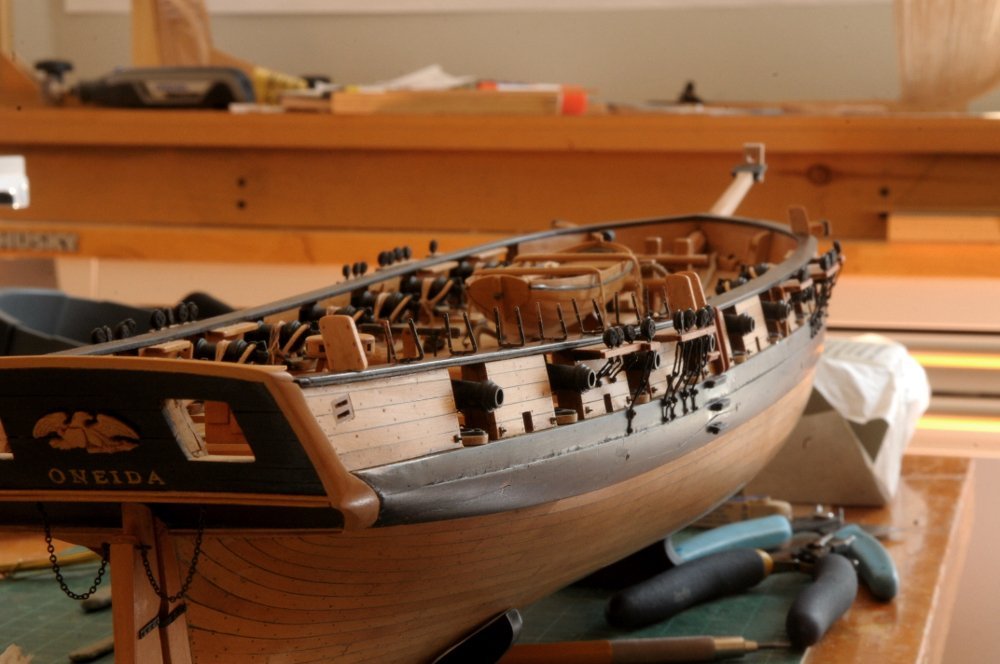
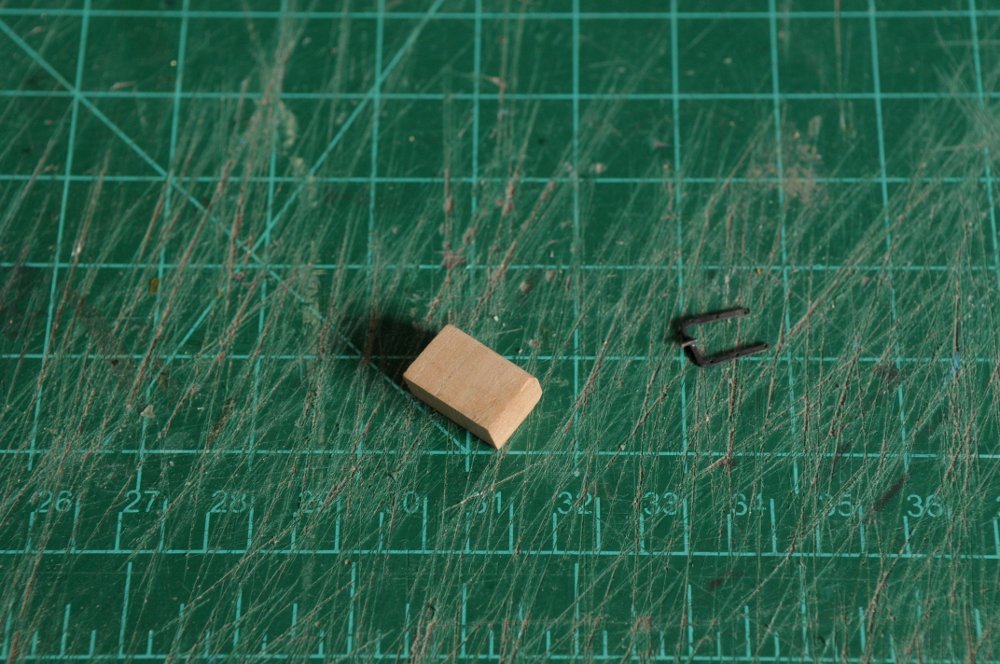
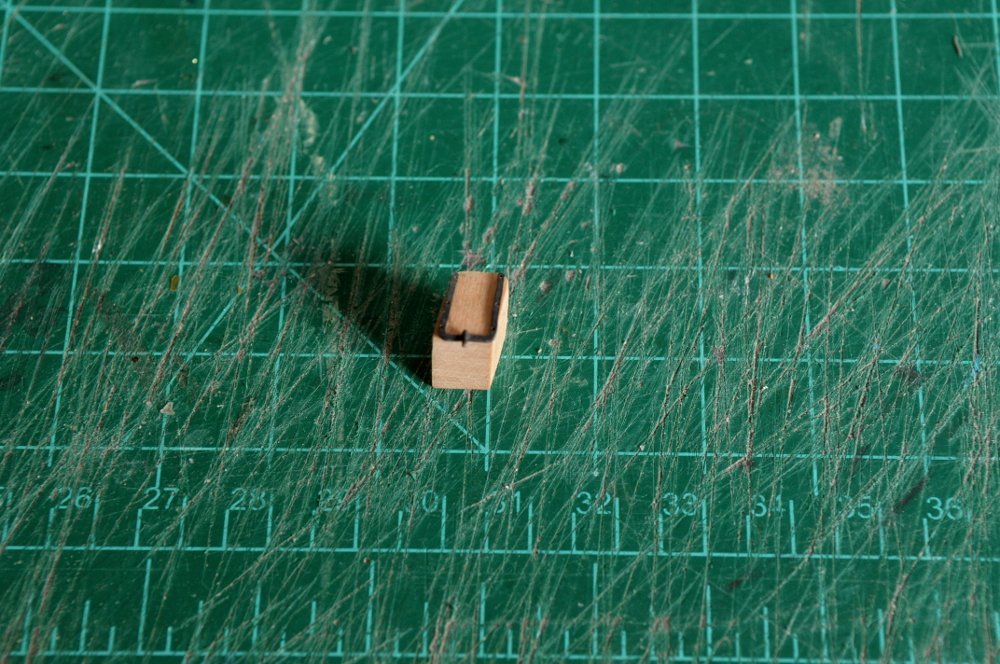
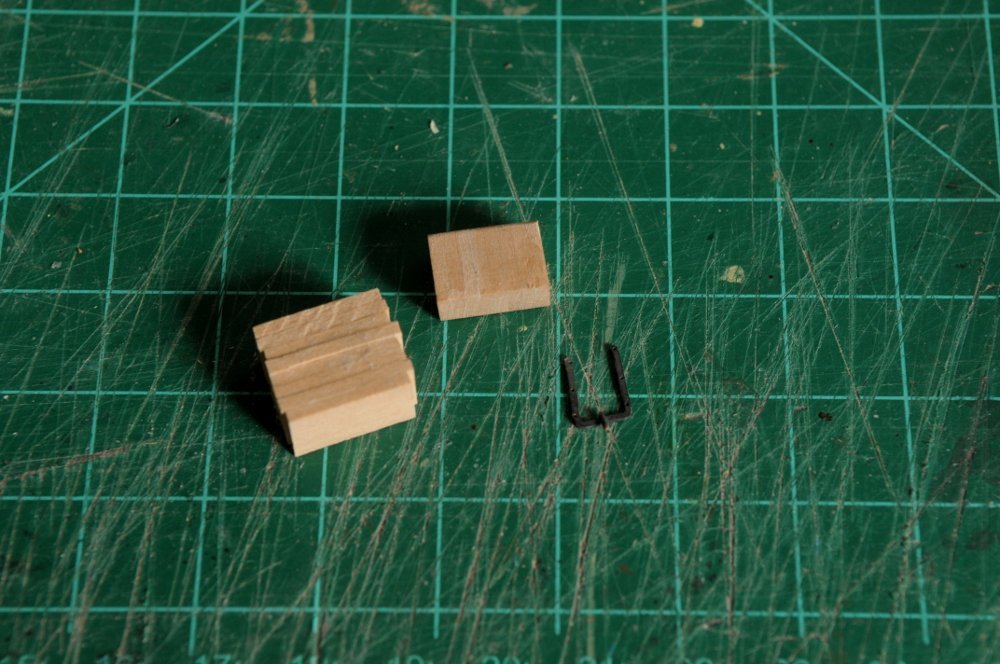
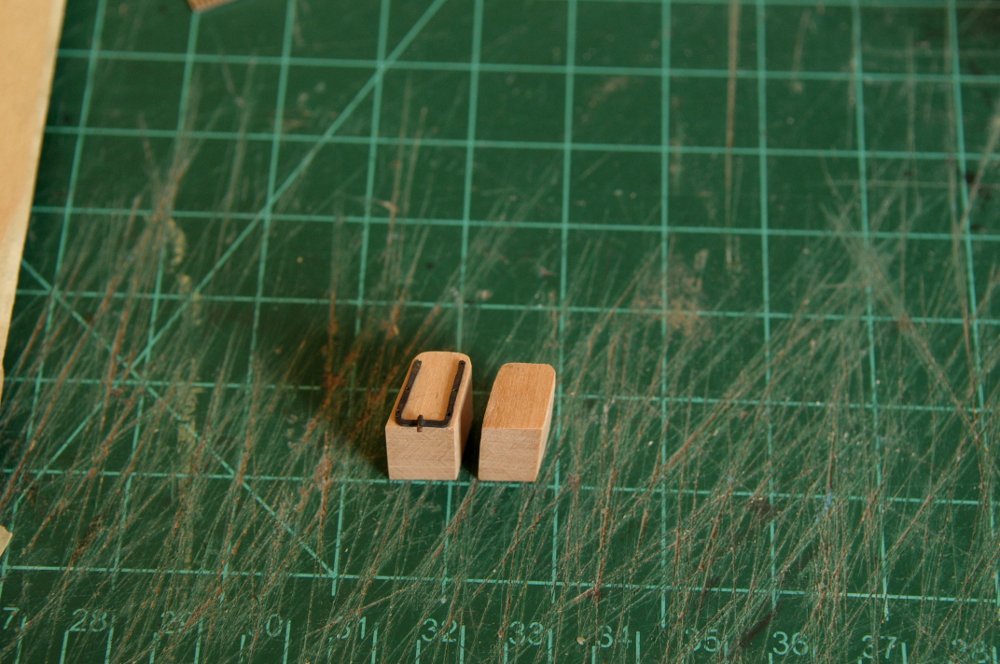
John and Dan, I enjoyed meeting and talking with you both. Always nice to get to know someone beyond their profile photo and user name! Mast collars: I started by cutting a bunch of pieces with a 45 degree angle and gluing them together. If I really wanted to get it right, I should have cut 22 1/2 degrees off each side of a piece, to have the wood grain radial. I was satisfied with just showing that the collar is made of eight simulated "wedges"-- These were then sanded roughly round-- Next I drilled out the center, glued in a short piece of dowel, and turned the piece round. After it was round, I drilled the dowel out-- Here you can see I've started roughing out the opening of the first one to fit the fore mast, and other has the dowel glued in-- I used my lathe, but lacking that I could have chucked the piece in a standard drill-- One difficulty was shaping the cut out to accommodate the rather sharp rake of the masts, especially the mainmast. In addition, my shaping of the masts was not perfect, with some variation in the eight sides. That and the rake made it so the collar will only fit on one way (hence the label "F"(forward) on each collar. Each one broke apart at least once as I was chiseling it out. That ended up being a good thing, as the joints became a little more pronounced after regluing. One down, one to go-- Here are some photos of the masts with the collars dry fit on deck-- I believe that is now a wrap for the hull and deck. I am not going to redo the gratings--the holes are only a tiny bit too large. They should be no bigger than 2 3/4", and they are 3". So with that, it's time to start making rope for the standing rigging. All for now. Ron


-
Thanks Joachim, welcome aboard! Ron
-
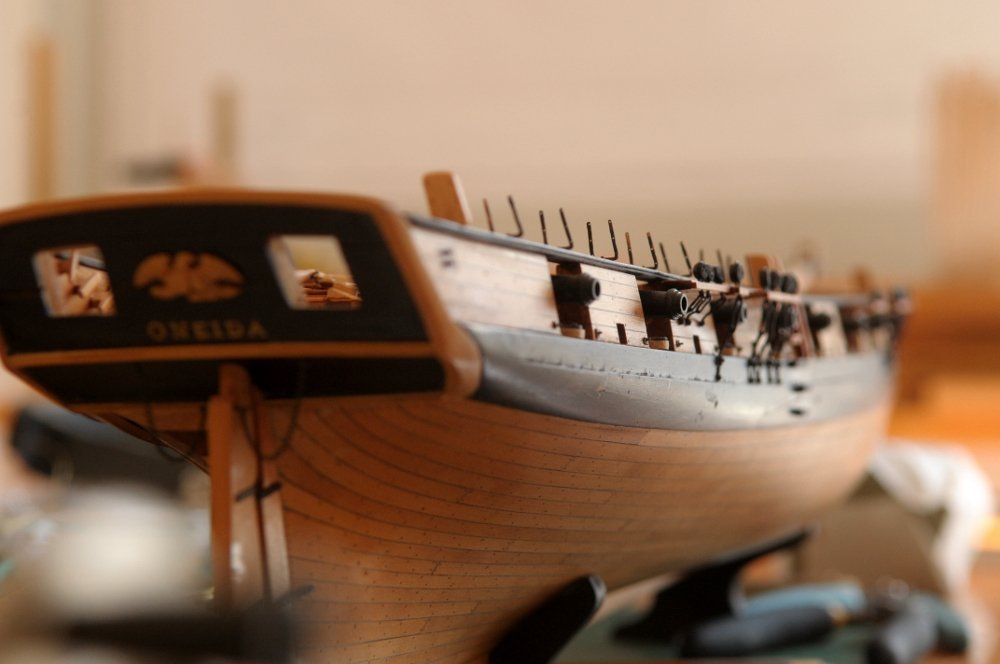
Oneida is getting ready for her playdate with the other ships tomorrow in New London, CT-- Ron
-
Congratulations on a beautiful model, hamilton! Ron
-
It's definitely a "forest of frames"! She's going to be a beautiful model, John, as your others. Ron
-
Hi Dan, I'm planning on going this year, but I was on the fence about taking Oneida, since I took her last year, and thought maybe I should wait until she's finished before bringing her out again. But with that encouragement, I think I'll bring her! Ron
-
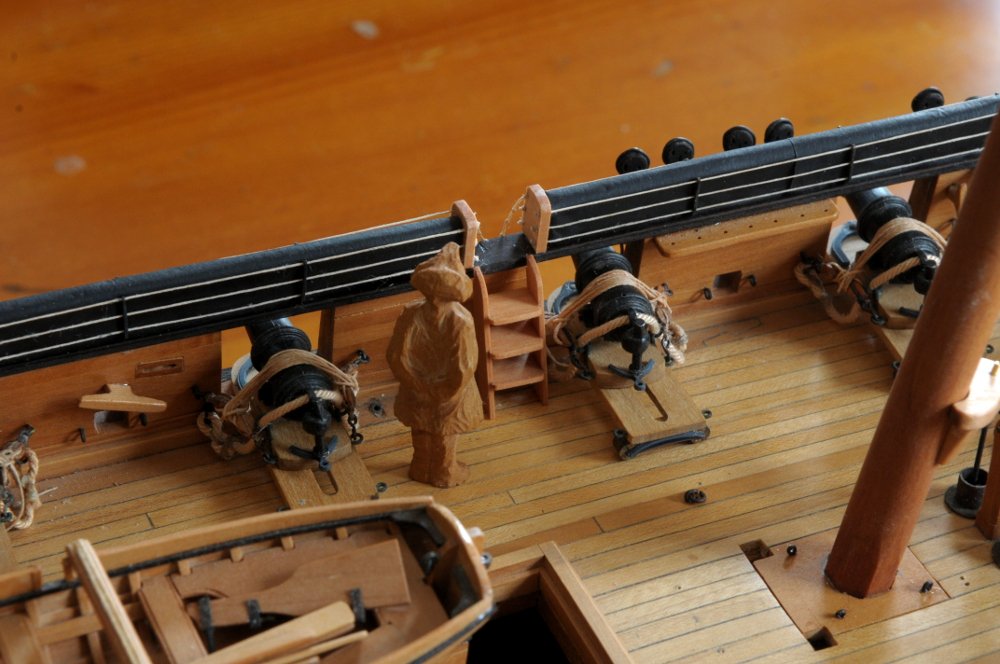
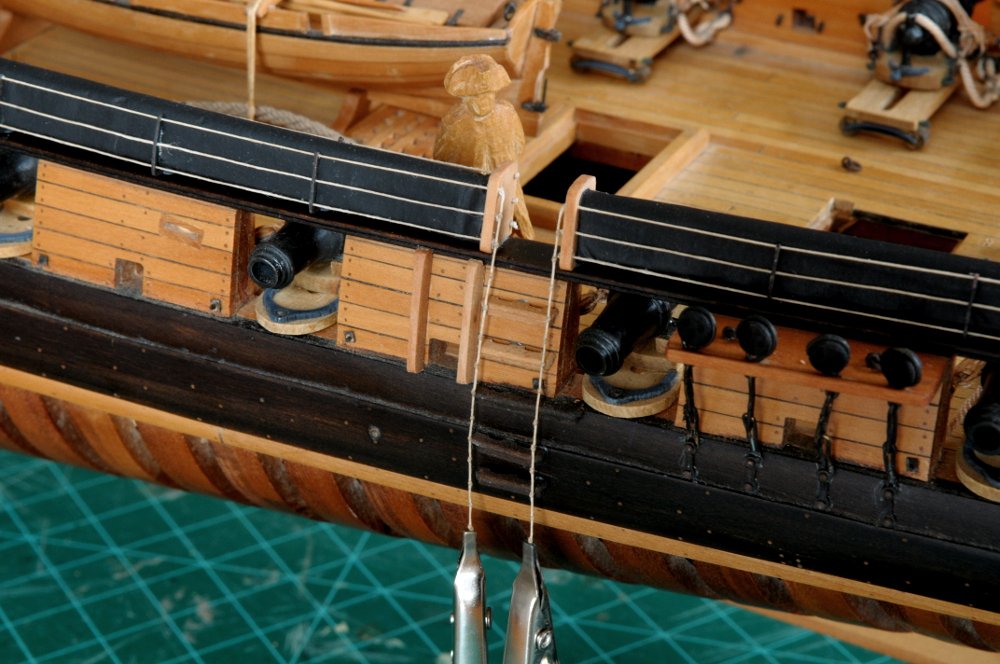
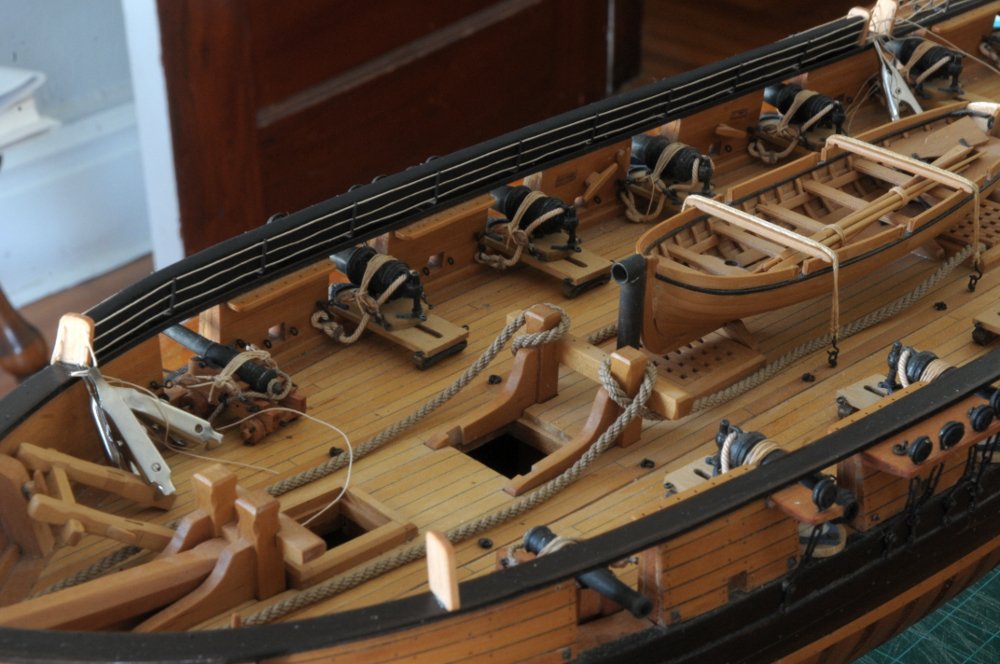
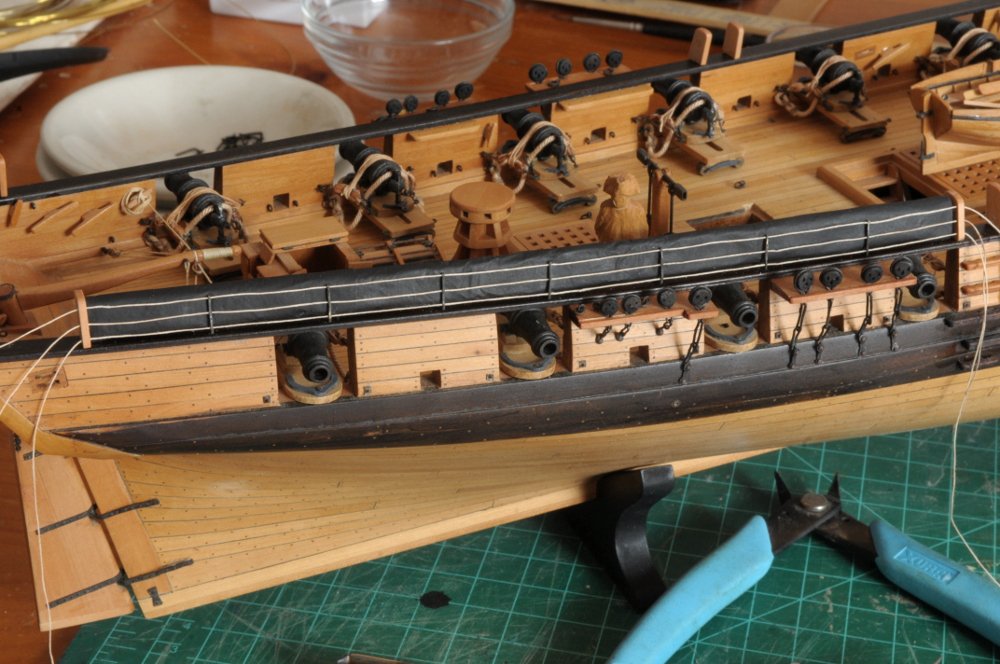
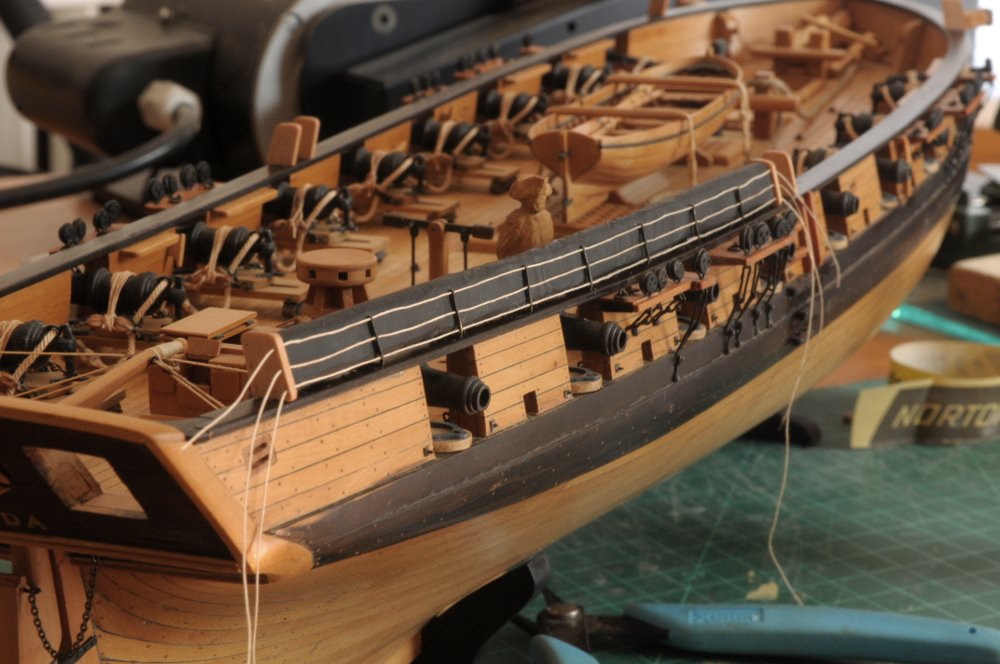
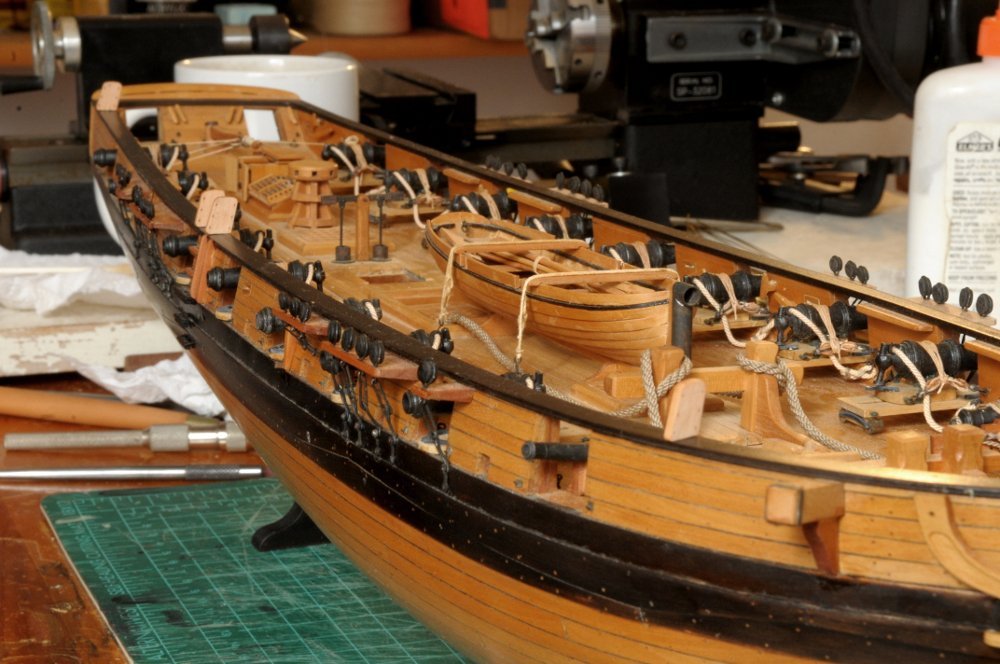
Boarding steps-- I would have made the steps the full width of the hammock opening, but the carronade position wouldn't allow it. The hammock position corresponds to Chappelle's sail plan drawing and also the location of the outboard boarding steps shown on the hull plan, but a little foresight may have warranted shifting the steps and opening just a bit. Ron
-
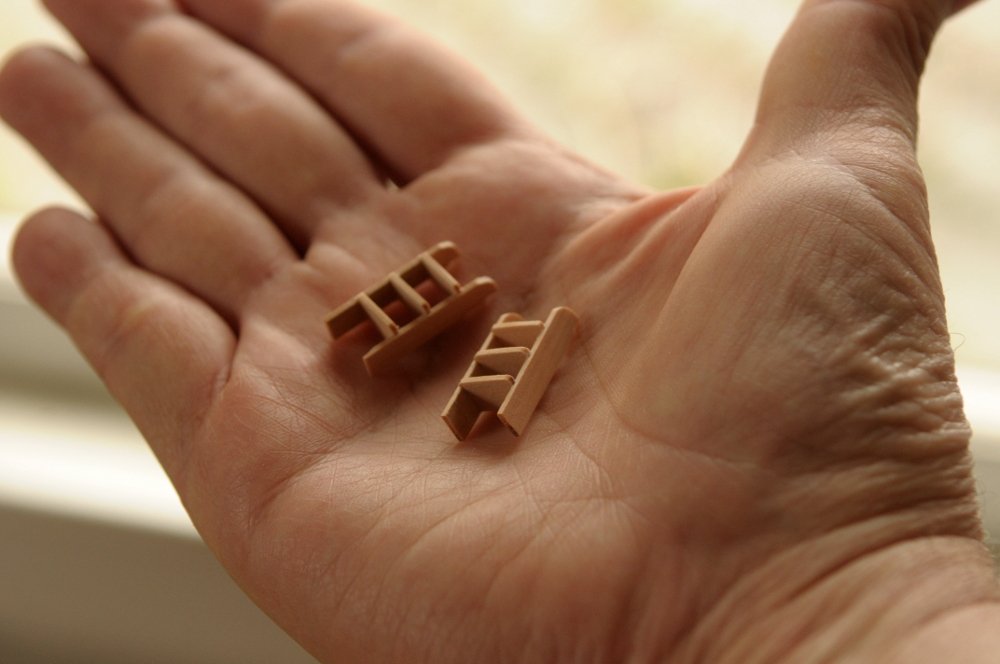
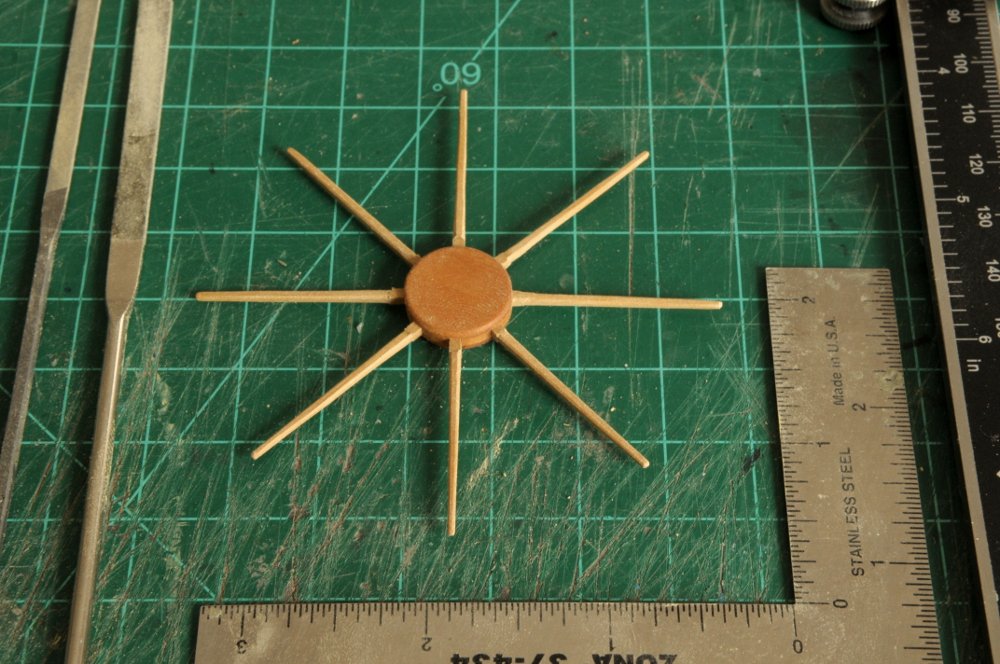
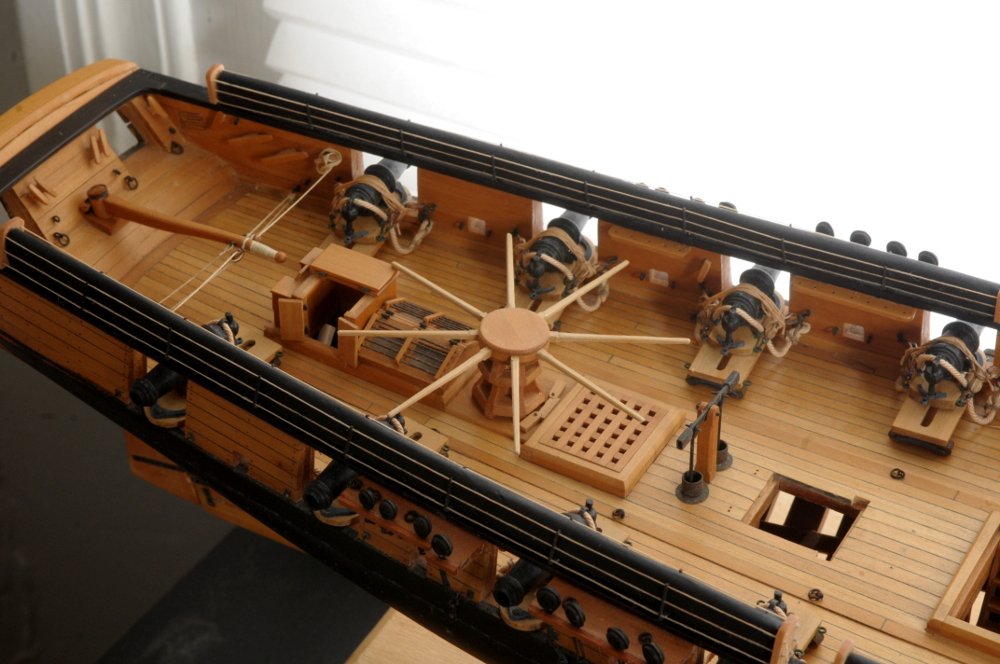
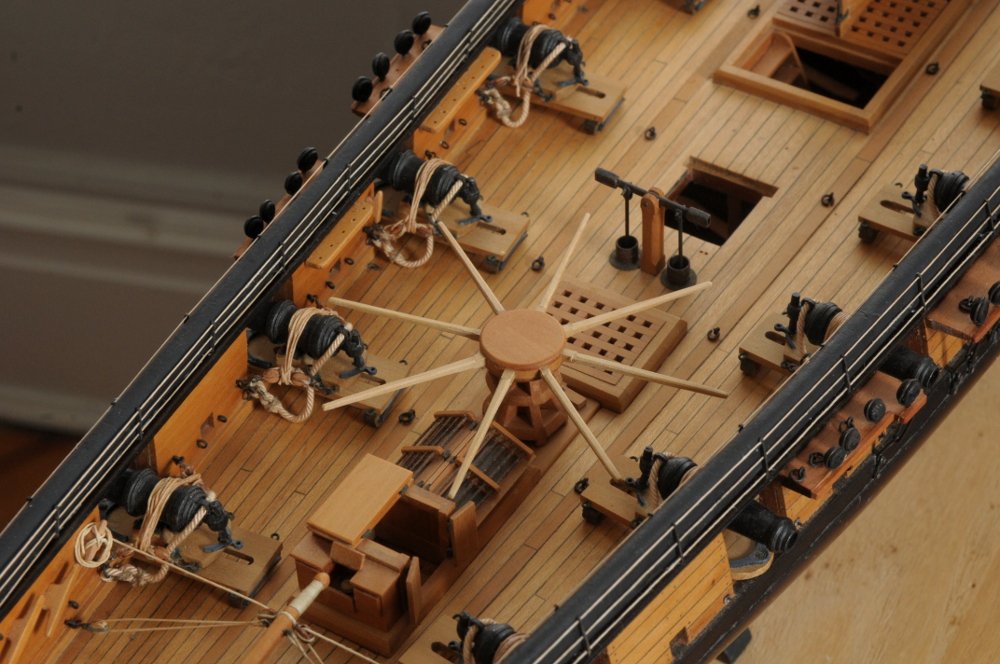
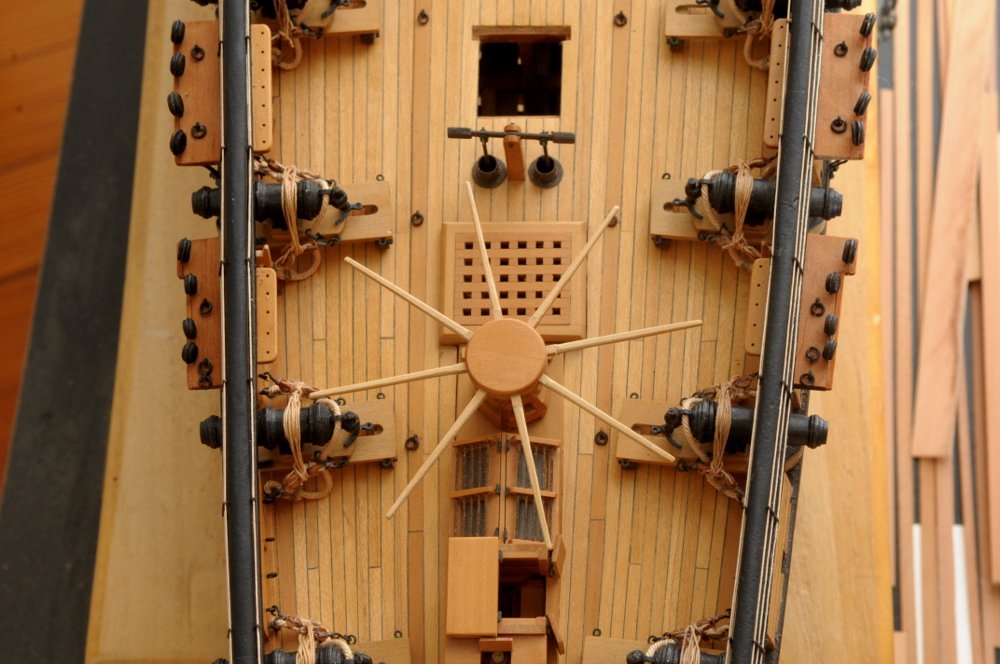
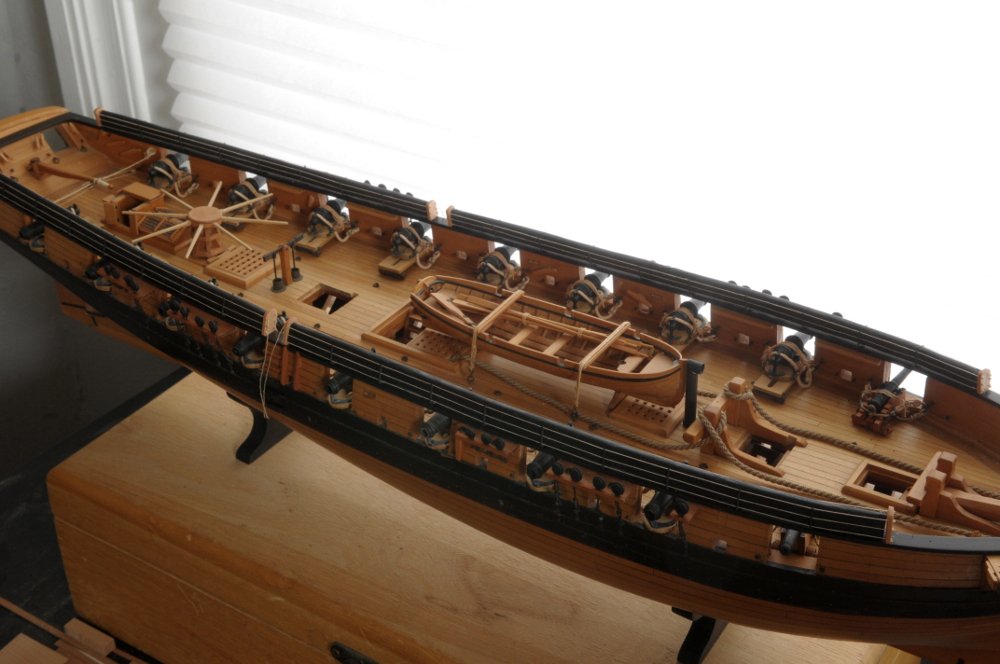
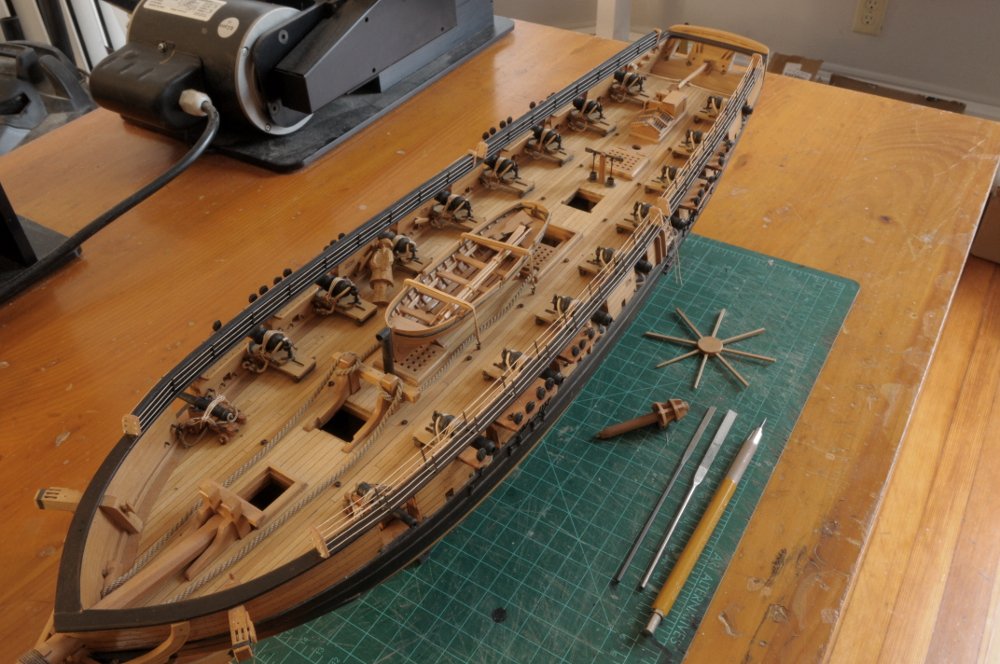
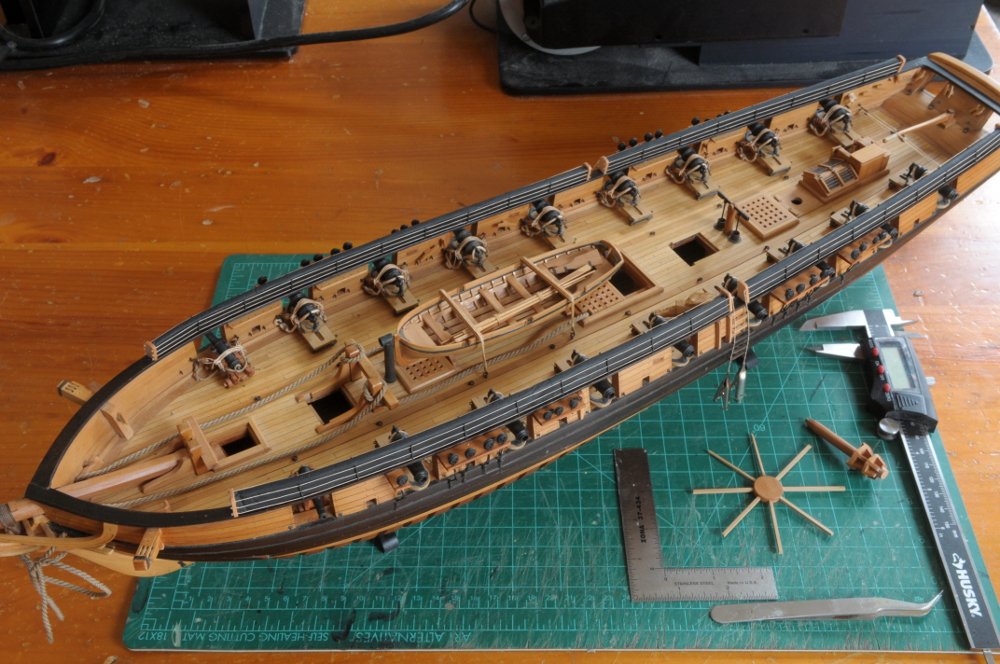
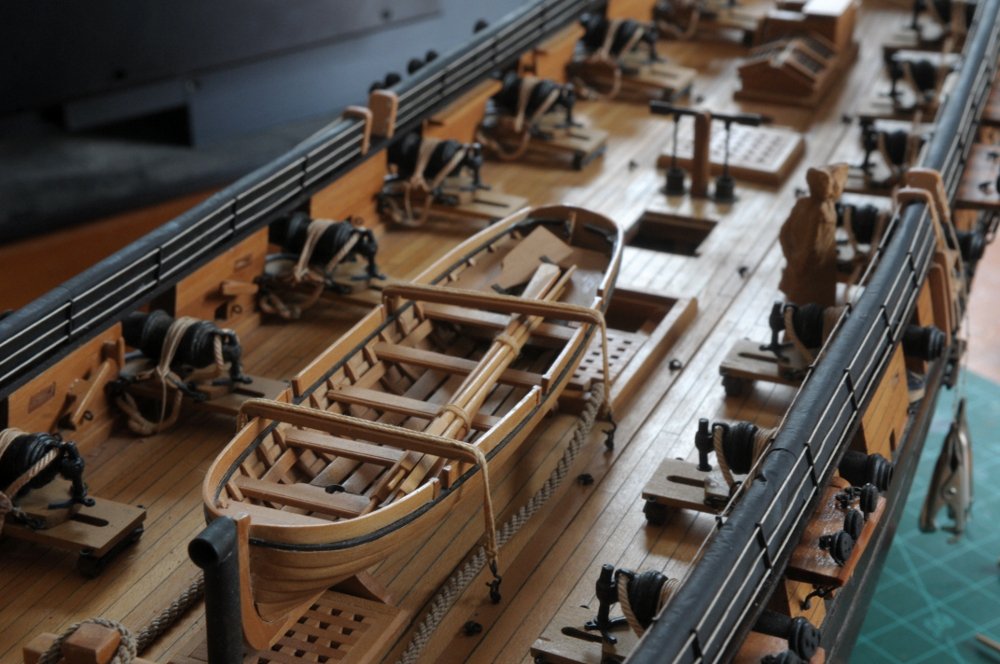
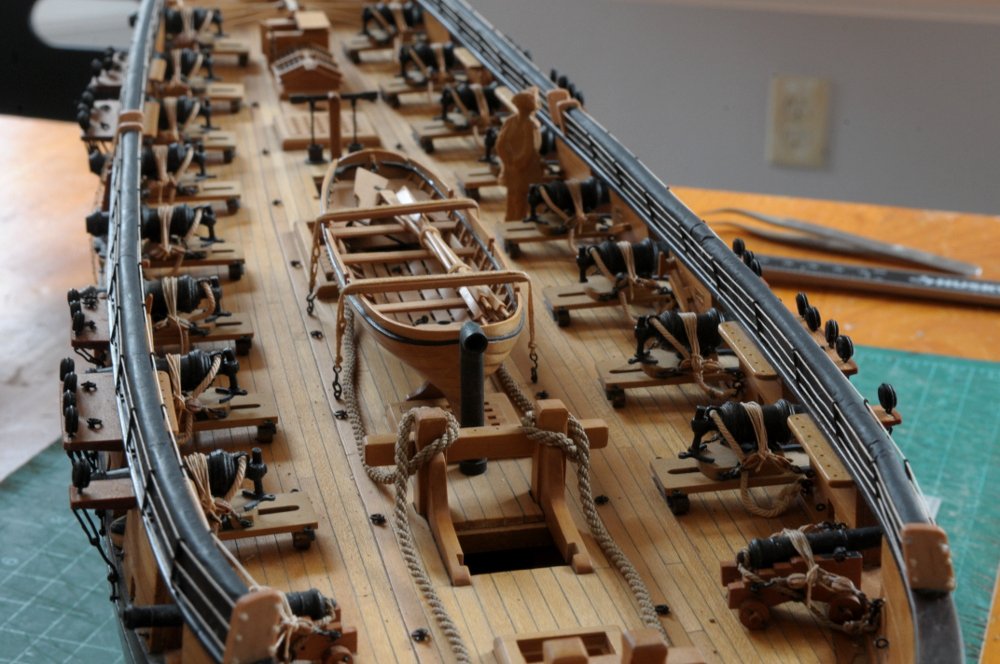
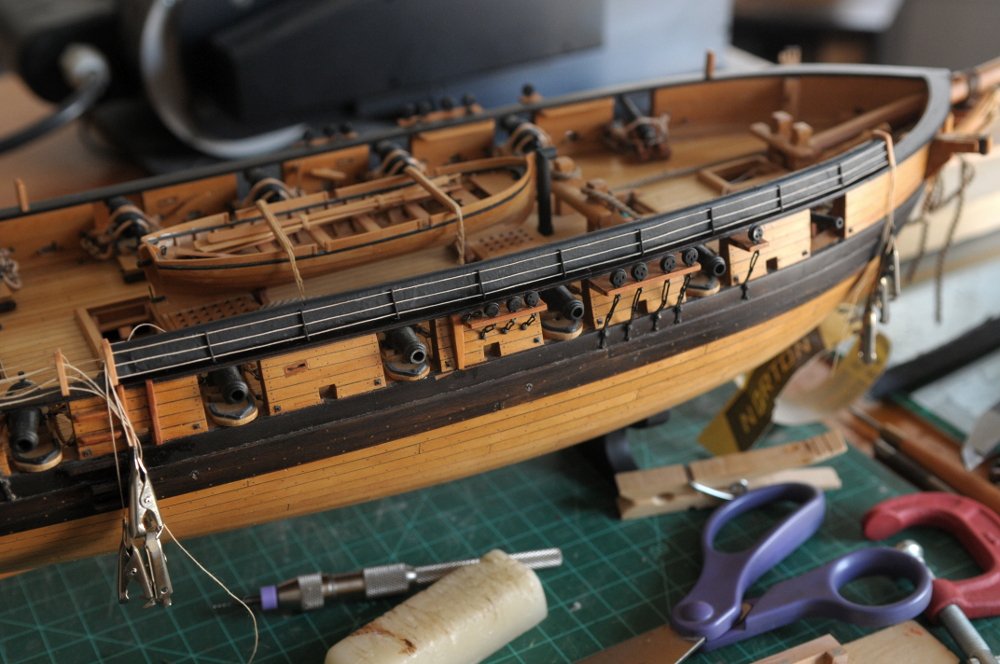
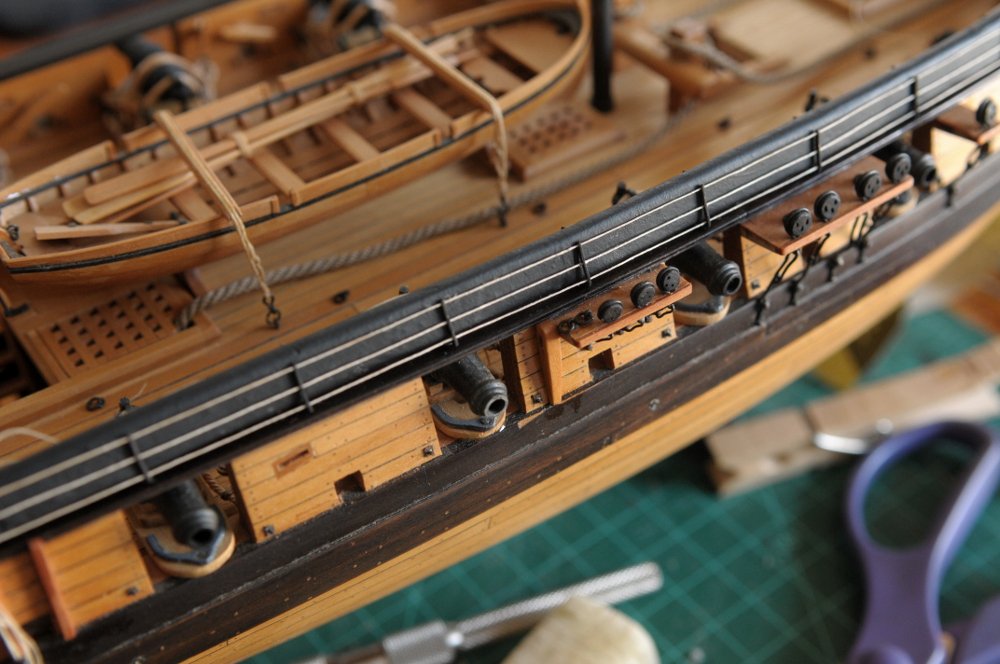
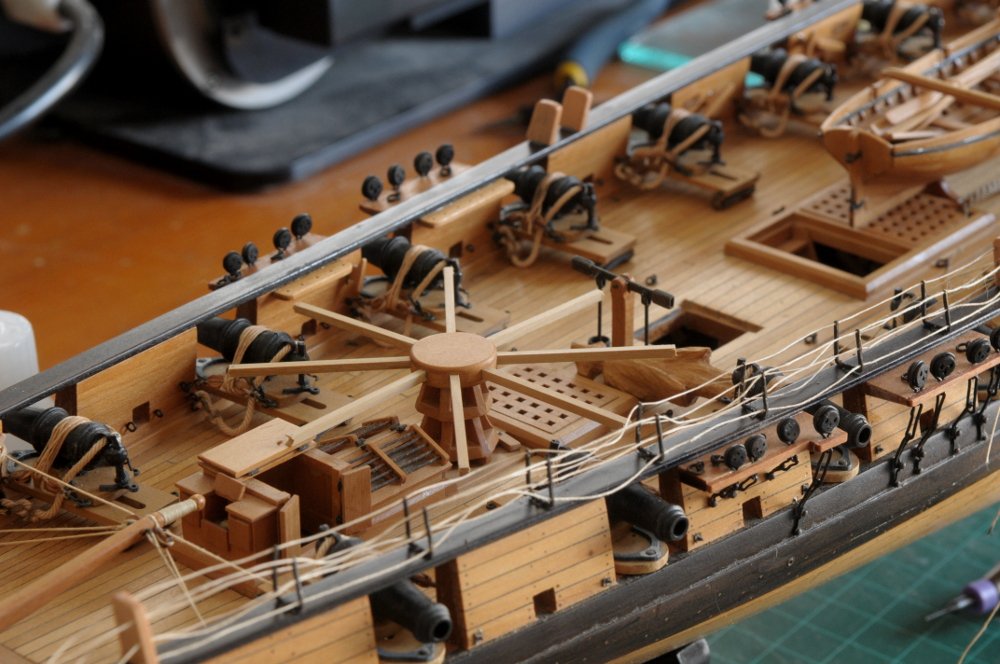
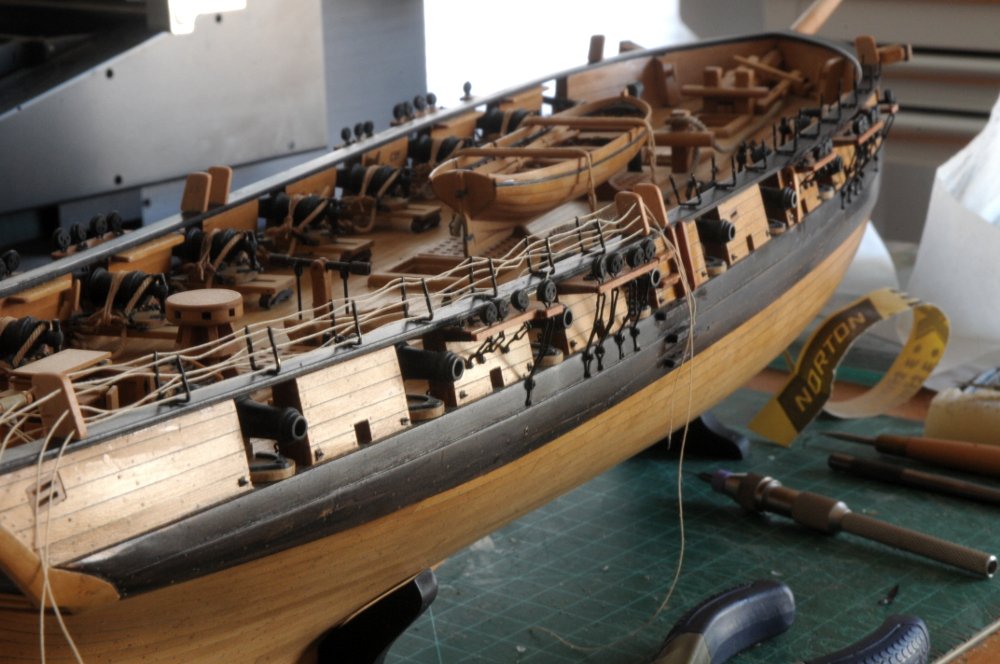
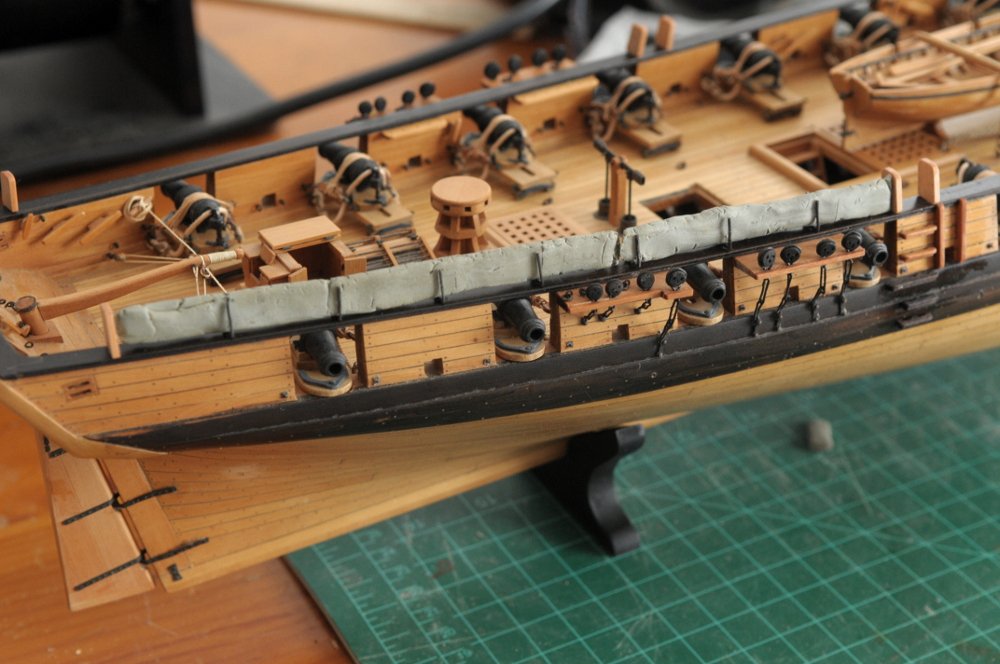
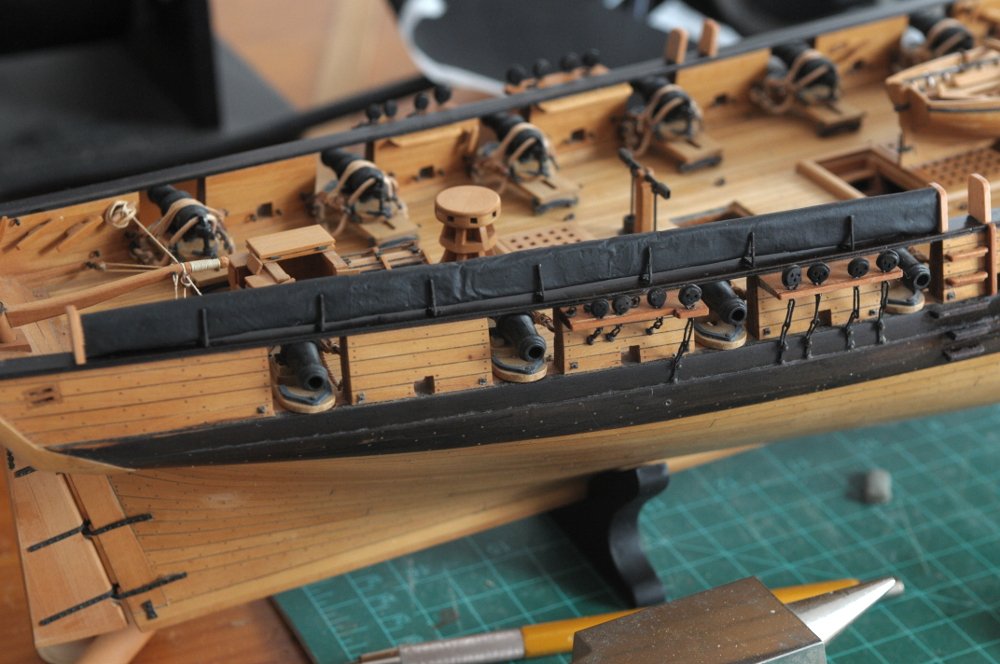
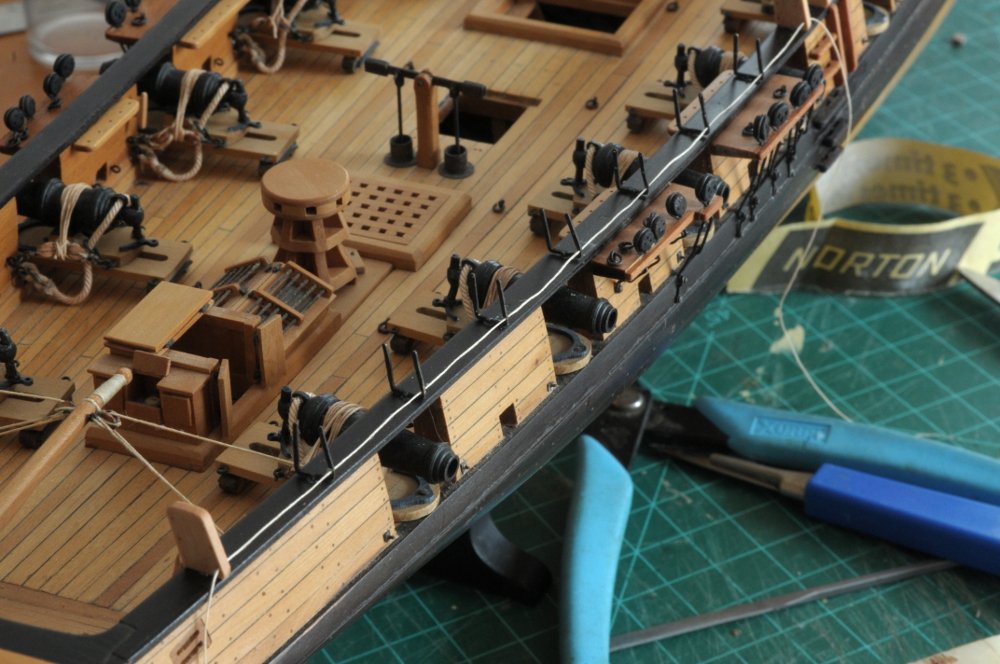
The capstan bars are roughed in-- I need to soften some of the transitions between the square end and the rounded part, but they are dry fit into the capstan head, and on deck-- They'll also need a coat of Tung oil finish when done. The list is getting smaller of what is still needed before stepping the masts and starting the rigging. At this point I still need some inboard boarding steps, and I think I'll make some mast collars. I am also contemplating redoing the gratings, with a tighter grid. All for now, Ron
-
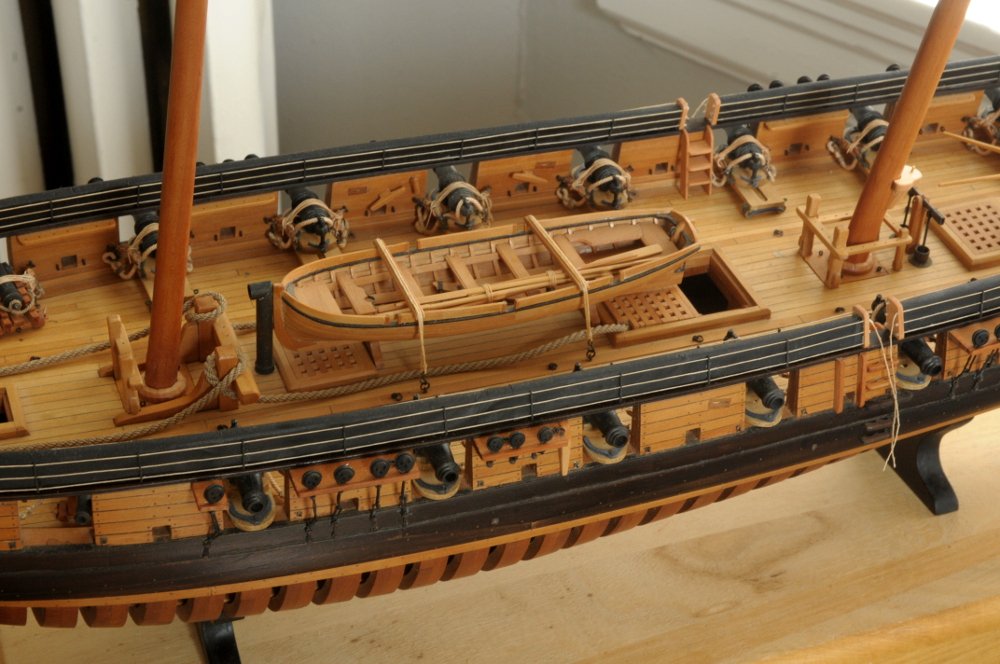
Thanks Joe, and all looking in. The hammock cranes and cloth are done. It was more work than I anticipated, but I think it was worth it. I got some practice making jigs and drilling small holes on the mill, and I learned about Silkspan. Here one side is done, and the other has been "strung". I was tempted to leave it this way, but elected to complete both sides-- Done. Work on the capstan bars continues-- Knotted boarding ropes hang over the boarding steps. I don't know why Lieutenant Woolsey is falling all over the deck in the previous photos, but he's found his feet here. I'll secure the ropes with a dot of glue on one of the lower steps, but for now the clips make them hang straight and give the idea-- I am reminded of something I read about Oneida being reported by an early crew member (I think) as being a "warm cozy" ship. They were probably talking about below deck, but the more enclosed and protected feeling with the hammocks in place on the rails does give me that impression-- All for now, Ron
-
HMS EURYALUS by Matiz - FINISHED - scale 1:56
rlb replied to matiz's topic in - Build logs for subjects built 1801 - 1850
Congratulations, Matiz, on your beautiful model. I will look to it often for inspiration. Ron -
I find it hard to believe there is a rat in a ship this clean. 😆
-
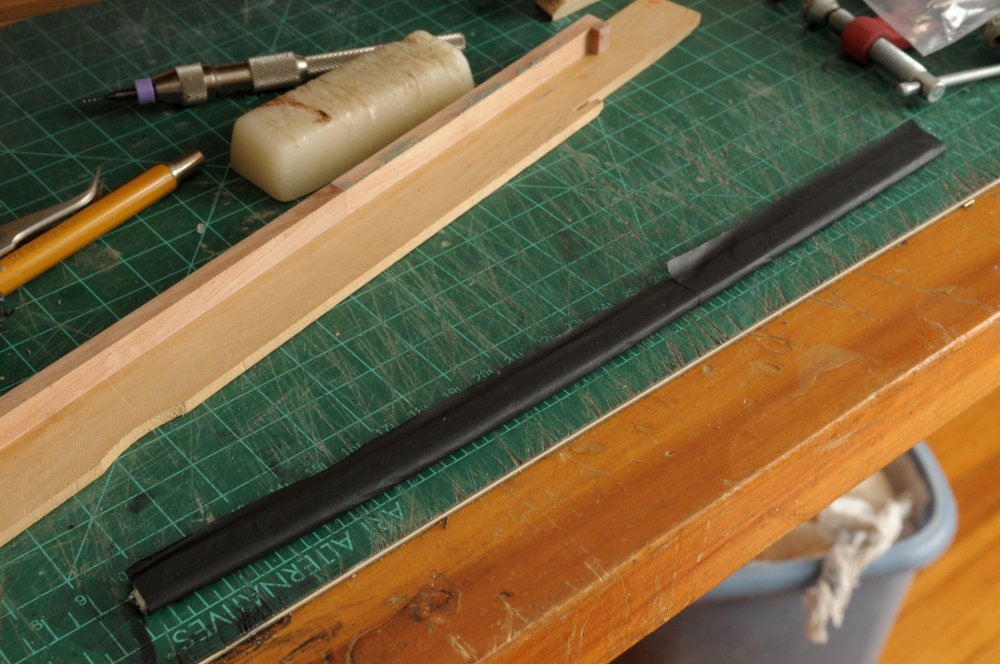
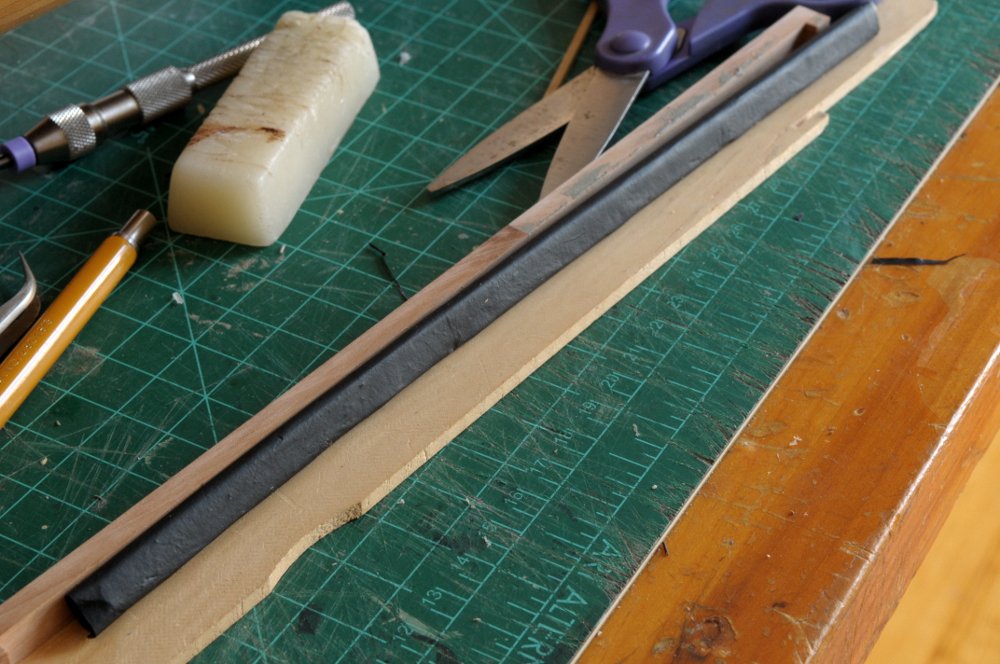
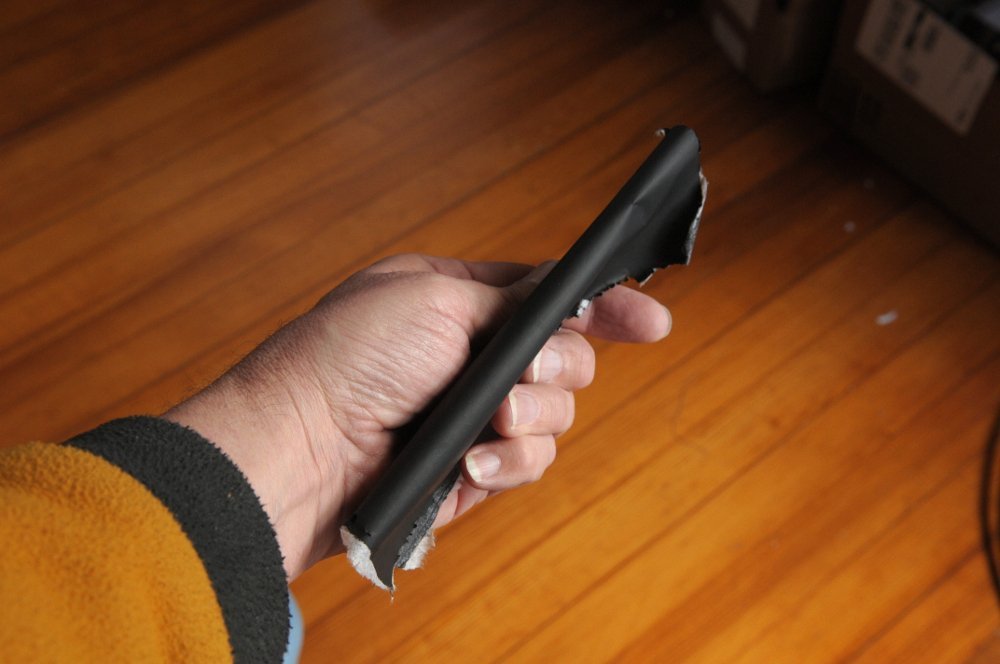
Just an additional note on the hammock cloth, and historical accuracy, since you don't see this black cloth depicted often. Usually you see some diagonal netting, and some folded over hammocks contained within. The netting is problematic for me. Whatever you can get "ready-made" is plastic and seems out of scale, and would be difficult to fasten realistically. So I liked Glenn Greico's black cloth--much simpler (I reference his model for the Institute of Nautical Archeology in Austin, Texas of the USS Brig Jefferson often, and in that context he HAS to be as historically accurate as possible.). But I am now realizing that I have seen it other places. A recent photo in archjofo's La Creole log led me back to post #783 where he shows his version of the black cloth. Very interesting that he used balsa (or similar soft wood) for the underlying form!! And then I remembered a black cloth in photos of Frolich's models of Swan and Cygne. I (we) look at so many sources for these details that I lose track of where I saw them, or even forget I even saw them. So I am feeling good about the approach. The bigger question of whether this ship would have even HAD hammock cranes is unanswerable. We don't know much about Oneida beyond the basic lines. I wish I was building an Oneida that I know is accurate, but I will continue on building an Oneida that I hope is plausible, and in the end for me, is a beautiful model.
-
More hammock crane work. I decided I needed a better way to make the modeling clay form for the hammock covering cloth. I had just kind of rolled it out and mashed it into rough shape, but it was a little TOO rough and varied in height and thickness. So I made a mold out of scrap wood. This is the length I need for the forward sections. The previous clay form and removed covering paper are above it-- Then I mashed the clay into one side of the mold-- And clamped the outer mold piece against it. There are spacers at the end to make the right thickness, and I used my calipers to make sure it was the same width at the middle. They also worked as a clamp. I mashed additional clay into the top where needed-- Then scraped the top smooth-- This gave me a piece of clay that was uniform in height and thickness-- I ran a finger along each side of the top to round and smooth it-- New pieces of Silkspan were moistened and folded around it-- When this dried, I tucked and glued the loose ends at the bottom, and let that dry-- Here it is fit into place-- I am much happier with this attempt. It may be more uniform than it really should be, but it will be easy to go back and make it a little "lumpy" if I decide it needs it. Here's a view from inboard-- As I finish up the hammocks I'm adding the capstan bars to the capstan. It's always one of the things on a model that catches your eye, and I've been waiting a long time to add this touch! I cut some blanks, and test fit a few times to get the length I thought was appropriate. They look pretty chunky, but they haven't been tapered or rounded yet, hence they are also not glued to the capstan yet-- I numbered each hole and bar on the underside just in case it matters which one goes where-- As the afternoon light starts to fade-- That's all for now. Ron

-
Continuing with hammock cranes. I was able to thread the three outboard lines and test the hammock covering cloth. I'm not truly happy with the covering cloth, I may redo that, but I do like the overall look-- It was blackening residue in the holes that was making it so hard to thread the line. And the end caps were clogged with Tung oil finish. I had to carefully try and get the drill bit through the holes and clean them out. The angle wasn't exactly right, and I probably should have just twisted everything out and re-glued them. Some became loose anyway (and many bent this way and that-thankfully none broke). But after clearing the holes, I found that I could get the thread through. By the last one, I found that with the tip just stiffened by wax, rather than CA glue, I could get them through quite well--didn't need to push and pull with the tweezers. The CA, though it stiffened the end, did increase the diameter a smidge. Here are the first set of lines through, and the next set of hammock cranes glued in. After all the lines are threaded, and the cloth in, I'll knot off the ends of the lines-- Now I'm off with my daughter to my parents' house in Rochester to try and see the eclipse. It's supposed to be cloudy, but maybe we'll get lucky. If not, we'll still have a nice, if brief, visit with my folks. Hoping the traffic will be manageable, but it probably will be pretty bad. All for now, Ron
-
Thanks Mike! Continuing on with the hammocks, I made a line of clay, which fit between the hammock cranes-- I wrapped this in the black painted Silkspan and tested the fit. It looks just okay. I may work a bit on the "wrinkles"-- I removed the clay/paper, realizing it would be much easier to run the line through all the hammock cranes without having it in the way. And it was FAR more difficult than I anticipated. I spent hours trying to come up with a way of stiffening the end of the line with superglue, and cutting a point on it, but the holes in the cranes were just too small, and some had become partially blocked with blackening deposits (I think). I spent a lot of time with a pin trying to open the holes--very awkward with them glued in place. Some cranes came loose from the rail, or bent (though easily re-straightened). I even tried supergluing a strand of fly tying thread to the end of the line to lead it through the holes, but that failed like all the other attempts. I finally searched for a thinner line in my stock, and found one. It was just enough thinner to work-- Hopefully I can get through the rest of the holes, and finally see what this looks like with the hammock paper inside. Also, trying to finish everything on the deck before rigging begins, I glued some eyebolts and rings to the deck binding strakes, and some to the channels, which can be seen in the photos. All for now, Ron
-
Mike, I understand the rustiness of starting again. My own modeling has been periods of good work, then long periods (sometimes years) of inactivity. It takes a lot to get back into the right mental frame to work, especially when you are working on something that requires checking sources, calculating things, planning the order of tasks, not to mention the concentration of doing the actual hand (or machine) work. When I start back up sometimes I can only work for 10 or 15 minutes at a time, for a few days, at least, until I build up my modeling stamina! Good luck on your progress! Ron
- 887 replies
-
- 4
-

-
- hahn
- oliver cromwell
- (and 1 more)
-
Continuing on. I'm going to try using clay to stand in for the hammocks. My plan is to wet the Silkspan, and wrap the clay. Hopefully when it dries it will shrink a little and take on the bumps in the clay. We shall see. First test is to size the clay filler, and determine the right width to cut the Silkspan-- I folded this piece over the clay, and held the ends down just to try and get some idea how it will work, and look. It hasn't been wetted, and it's also the thicker Silkpan, which I don't intend to use. But I can waste it to test, and determine the width piece that I need. I think I can trim 1/4 inch of the width of this piece-- I'm also ready to start locating the end caps and cranes on the cap rail. After epoxying a pin in each end cap, I located them on the ship, drilled holes and dry fit them-- Incidentally, I ended up narrowing each cap a bit. These looked okay in place, so I drilled more holes in the cap rail and tested the 7 aft starboard hammock cranes in place-- I discovered that some of the blackening on the cranes had either not taken, or had flaked off, so they will need to be re-blackened. I also see that the end caps need some adjustment of the top curve. The two at the entry steps are not uniform. When I narrowed the end caps I also adjusted the angle/curve of the tops, and apparently I "fixed" some more than others. The angles on the iron cranes will need fine tuning as well, once they are glued on. All for now. Ron

-
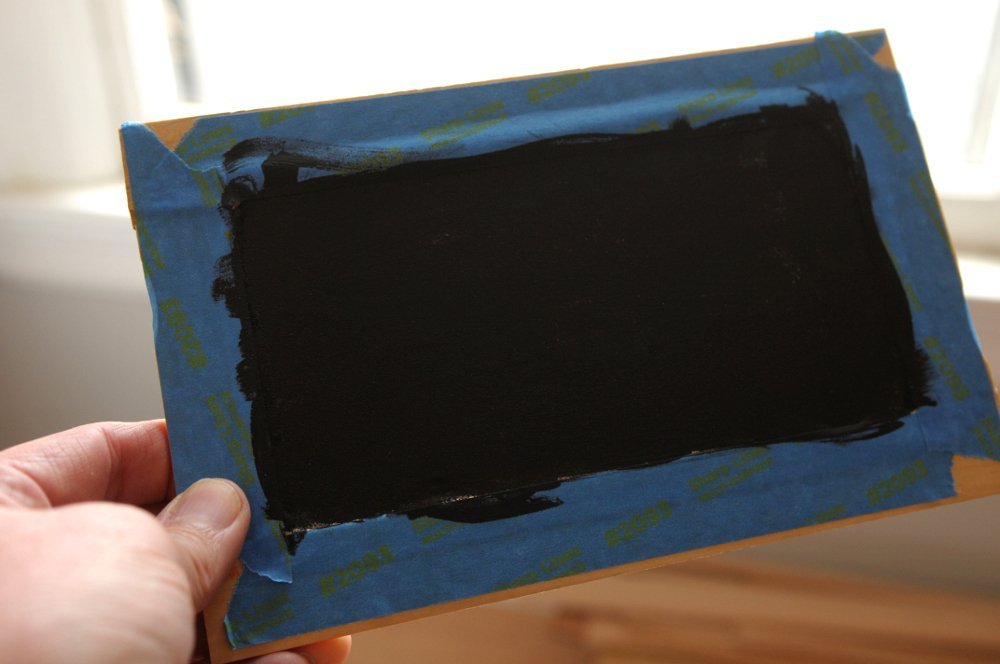
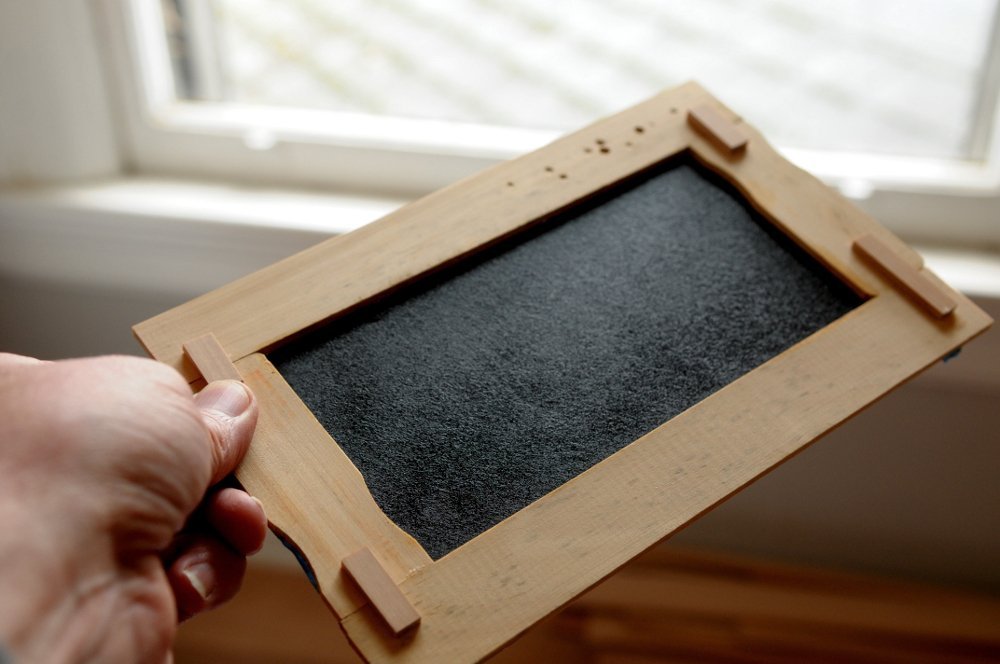
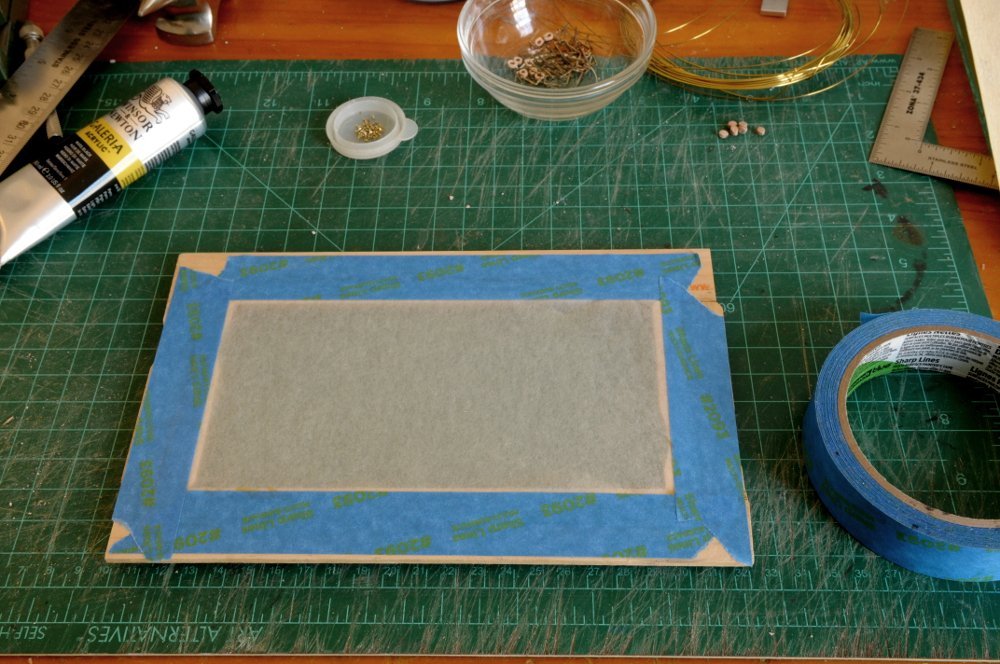
Experiments with Silkspan continue. After applying another couple of coats to the example in the previous post, I decided to try the "thin" Silkspan; the above post used the "medium" variety. There is a big difference in thickness. After wetting and taping a piece to my frame (and letting it dry), this time I applied acrylic matte medium to both sides of the Silkspan, hoping that this would fill in the fibers, so that I wouldn't need as many coats of black paint to make it opaque-- This seemed to work, and after three (I think) coats of black, I had a nice smooth, opaque surface- While coats of paint were drying, I glued eight thin pieces of wood into a block, to shape into the end caps for the hammocks-- I decided that I would follow the angle of the bulwarks, inner and outer, with the hammock cranes and the end pieces-- However, my shaping had reduced the "block" too much. It was too definitely too short, and too narrow for comfort, so I glued another set together- These should work-- I separated them, and because some had slight marks from prying them apart I sorted and numbered them to put the "bad" sides inward where they would be covered by the hammock cloth and not seen. I drilled holes in the bottom for pins-- I marked and drilled the holes for the six lines in the end caps. Here also are two sheets of painted "thin" Silkspan, which I will use-- I'll now experiment with how to shape and place the hammock cloth within the cranes, and epoxy the cranes and end pieces to the ship. I'll probably need another sheet of Silkspan also. All for now, Ron
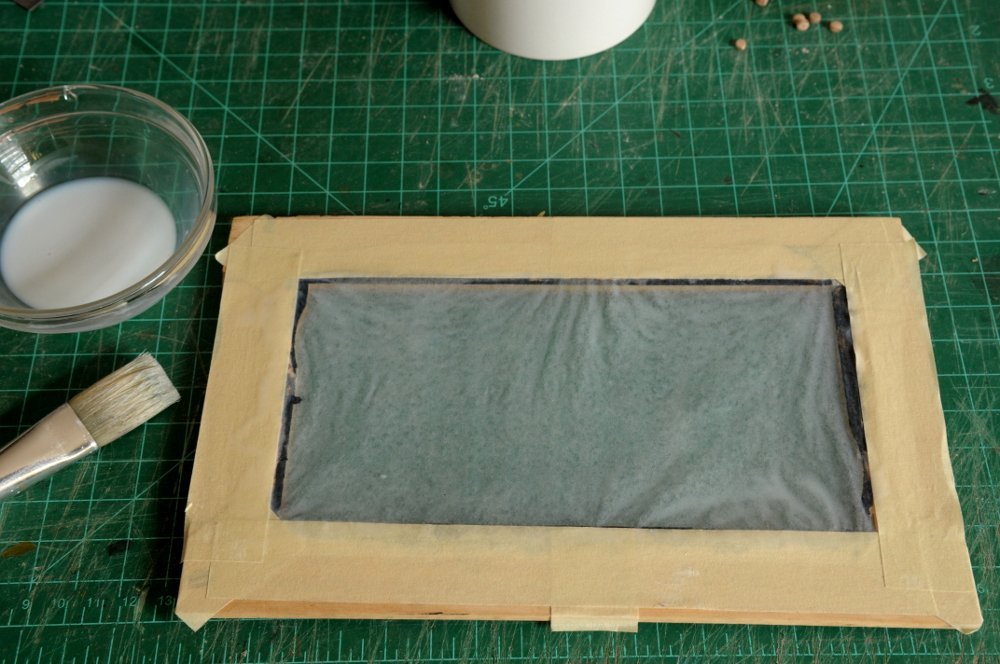
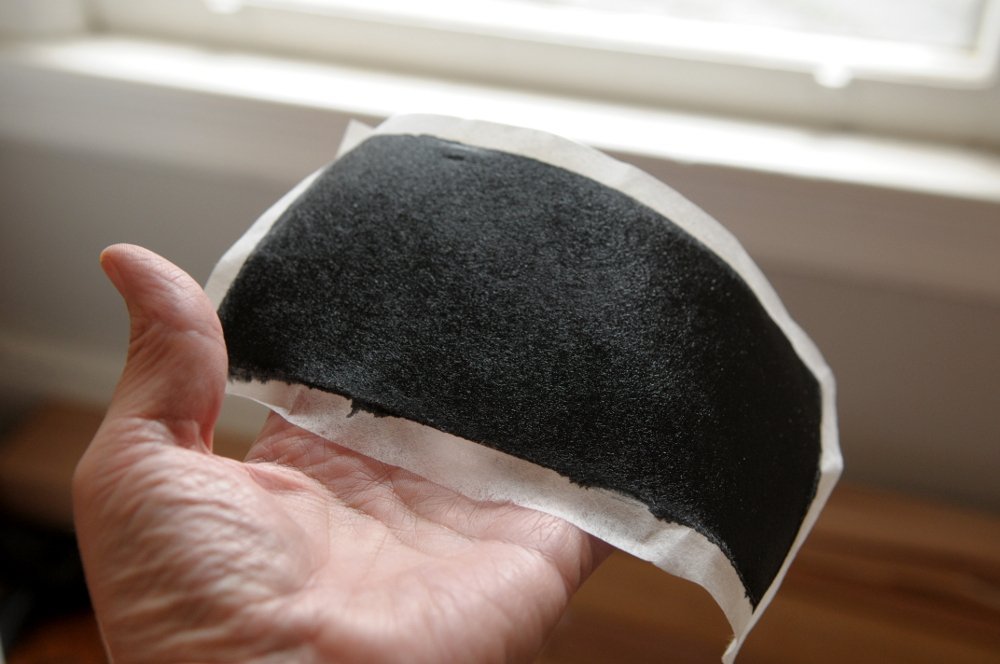
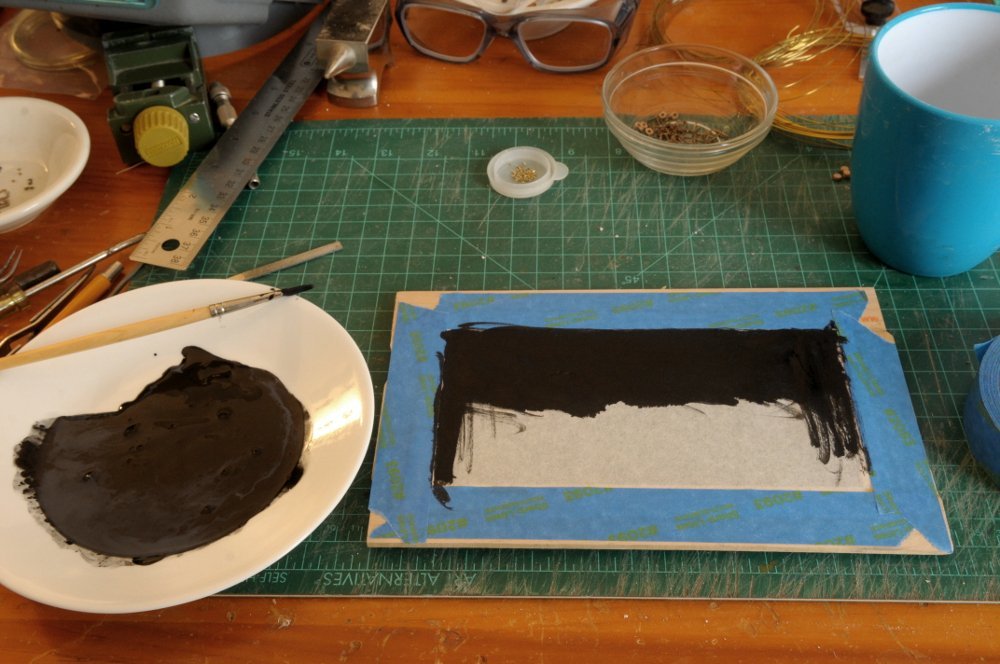
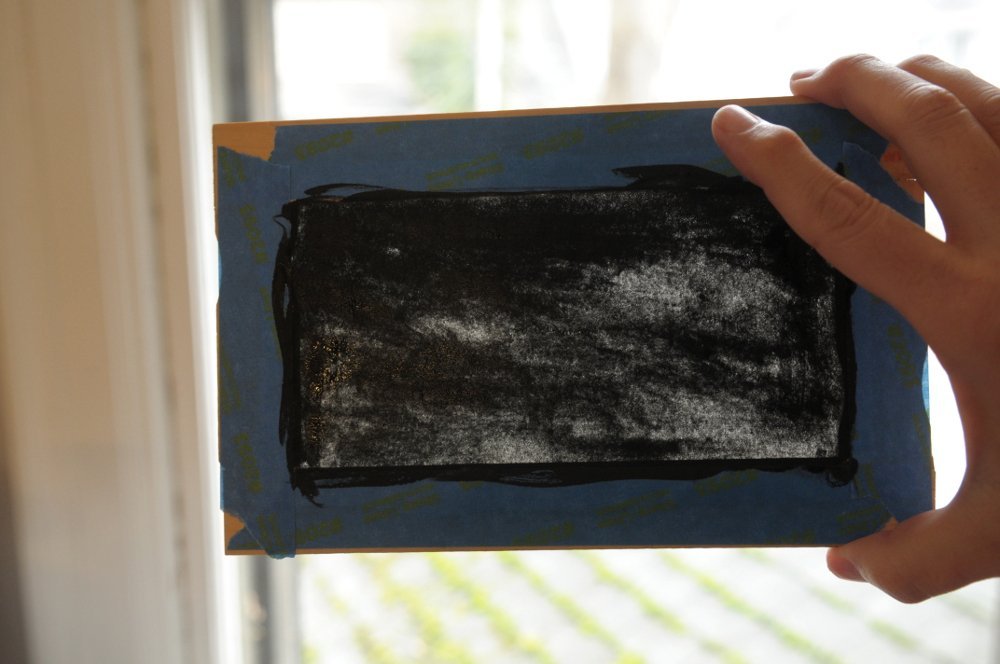
-
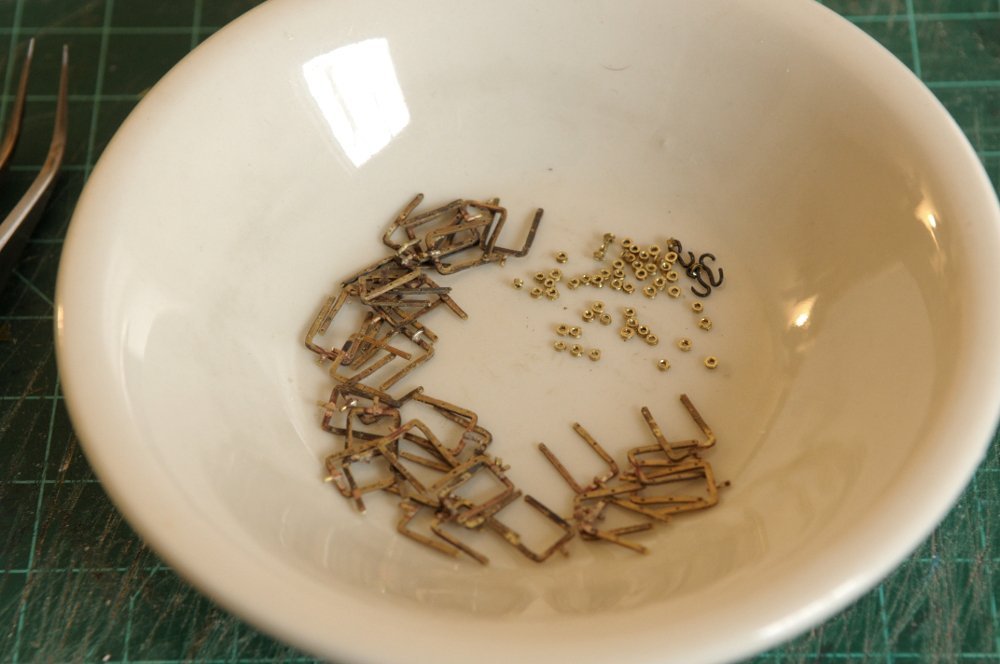
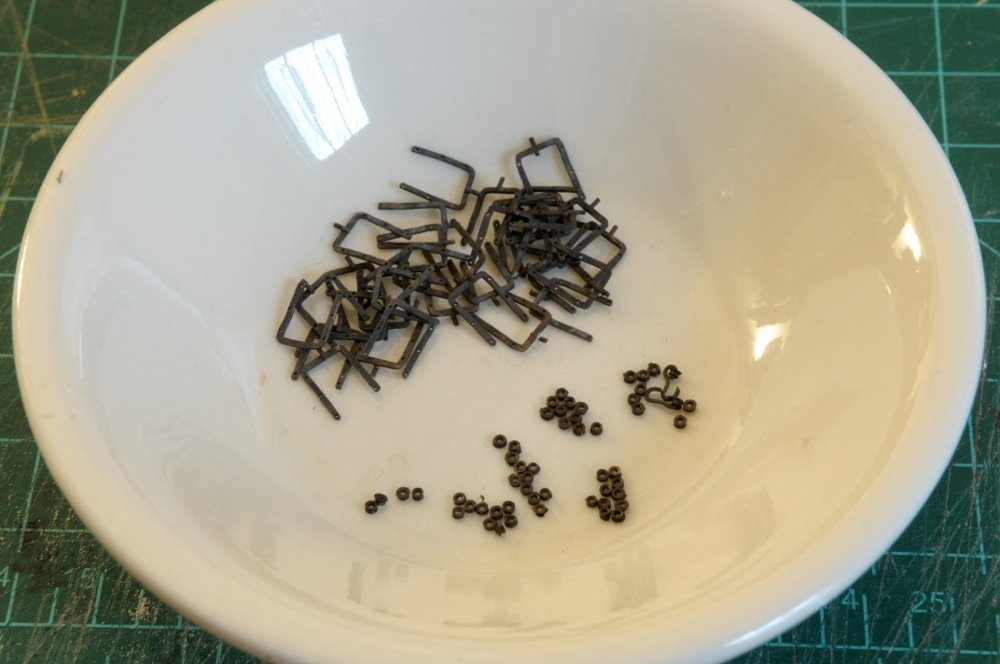
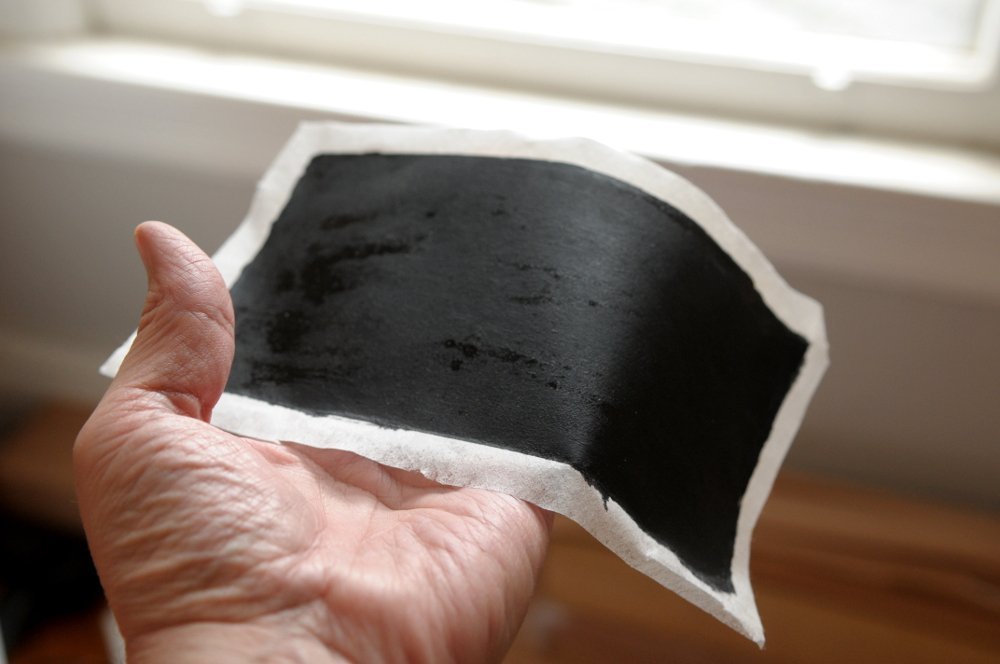
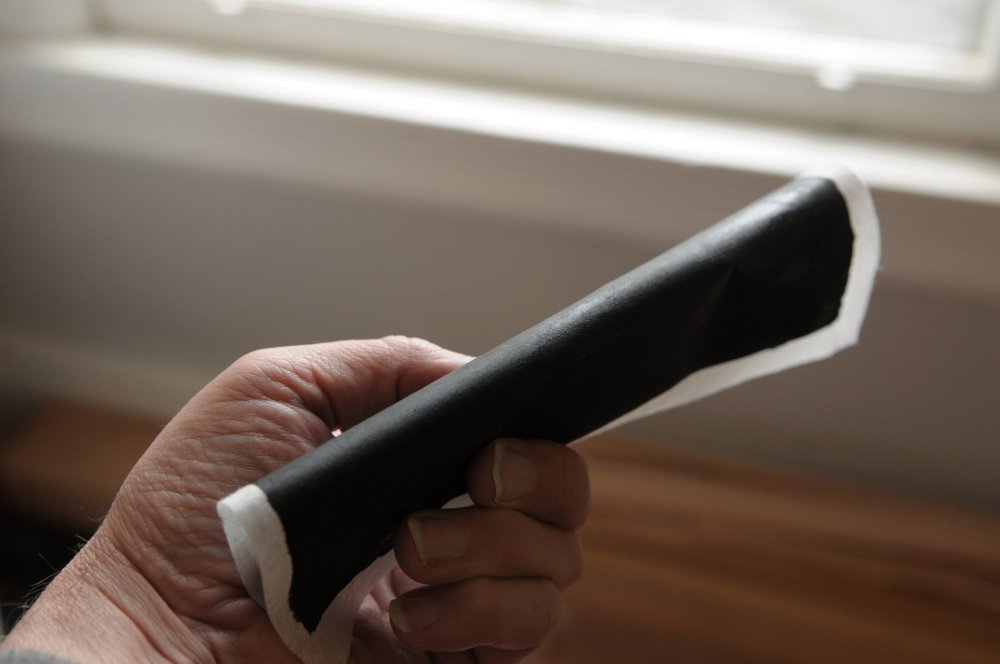
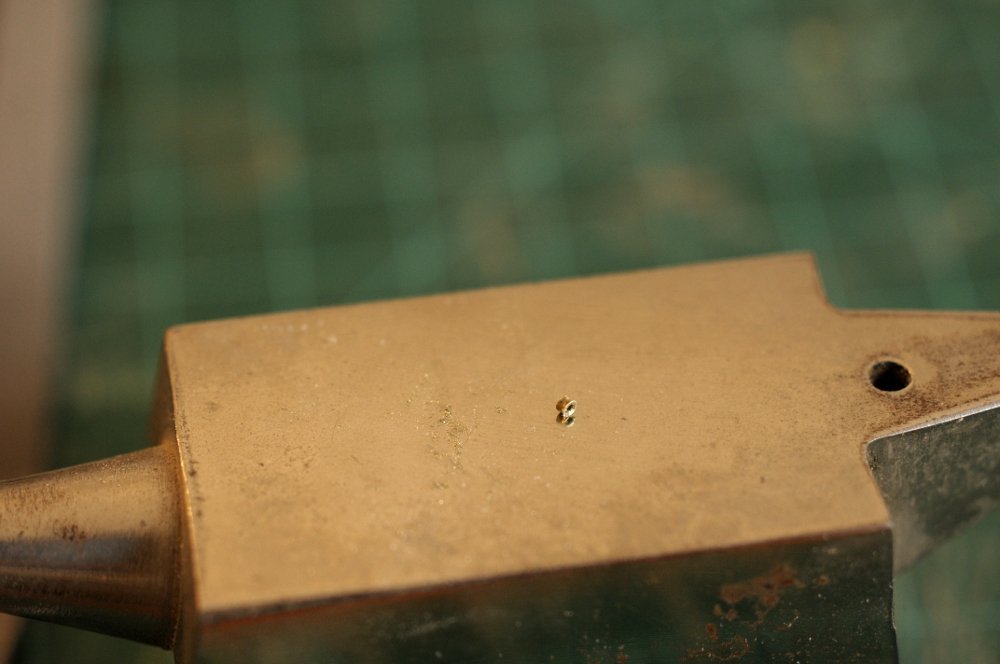
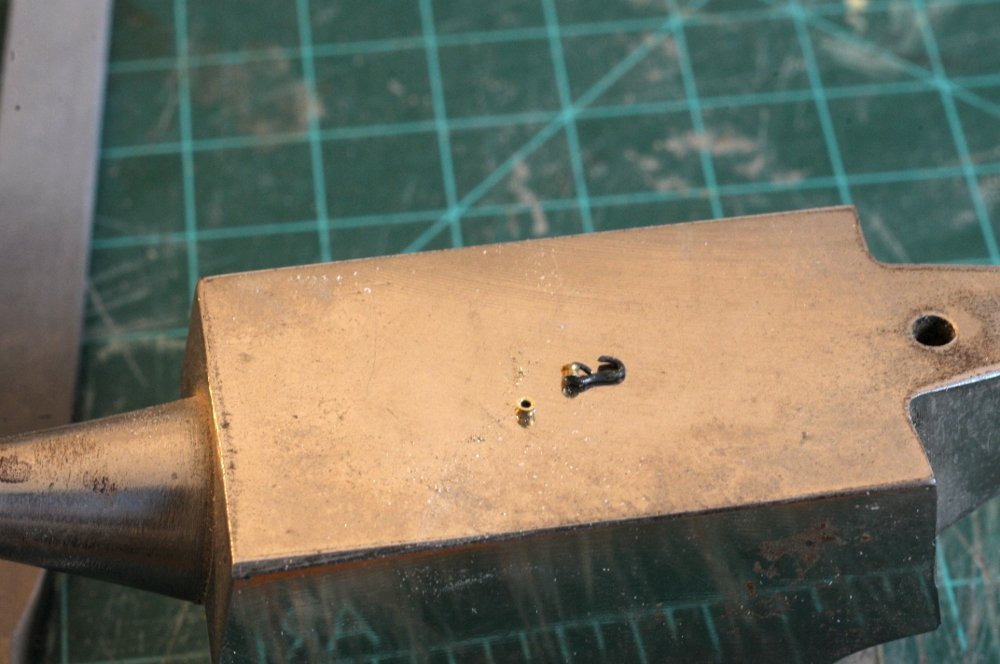
I continued work on the hammock cranes, and also punched out a number of thimbles. I'm happy to report that my success rate improved greatly, and I only lost one!! These are now ready to blacken-- After blackening-- The thimbles are in groups of ten, plus four. Fifty-four in all. Hopefully enough, though I may need a few that are bigger. I don't know. On to the Silkspan. After putting a second diluted coat on the piece, it was just as transparent as before when backlit--not so much when viewed normally. So I painted a coat on undiluted-- It was pretty opaque, but there were now brushmarks that would be out of scale. It was also uneven coverage. Most of it was smooth (though with some brushmarks), but some areas still showed the fibrous texture of the Silkspan. All in all not a satisfactory result. I also wasn't sure it had enough sheen to look like oiled or tarred cloth. So I tried painting the back side with Tung Oil finish to see how that looked-- It really accentuated the texture. Not at all to scale. What was worse, the Tung Oil seeped through the thin areas on the "front" side, making that side kind of a mess-- Off the frame this is the back side-- And this the front-- When doubled over, similarly to how it will be seen on the model, the sheen of the painted (front) side may be okay. Maybe less than actual oiled cloth (I'm not even sure!), but as is typical with scale models, gloss looks better if it's toned down-- So I will try another piece. I'll build up the layers with diluted paint, until the fiber is filled in evenly without brush marks. I'm also using a much larger brush. I don't feel like I'm "scrubbing" into the material nearly as much. After the second coat it was much more opaque than the first attempt, even though I don't think the paint was any thicker. This is coat number three. I'll need at least one more-- All for now, Ron

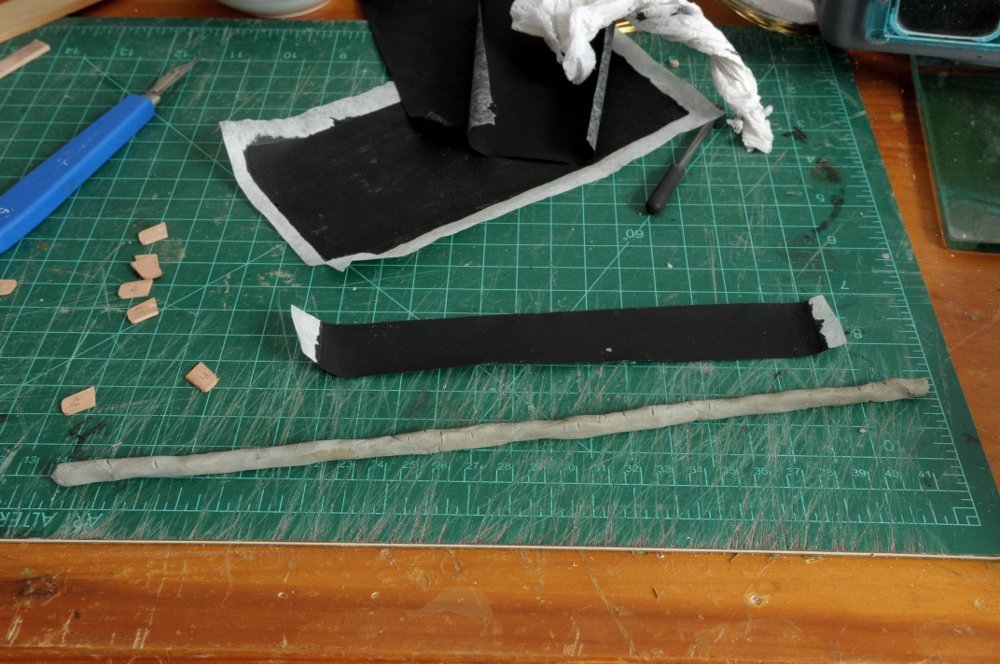
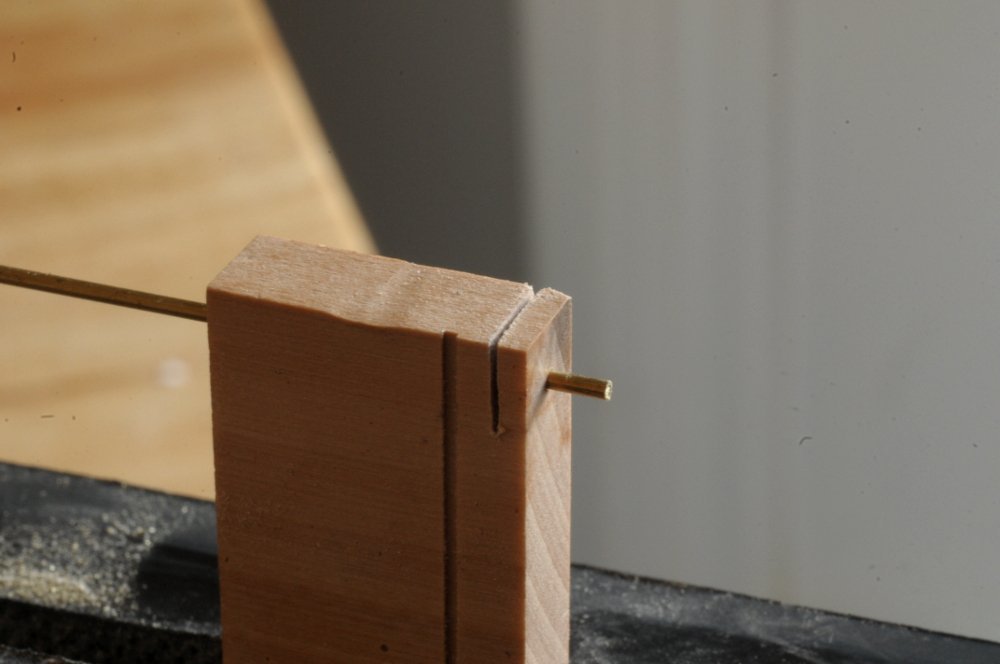
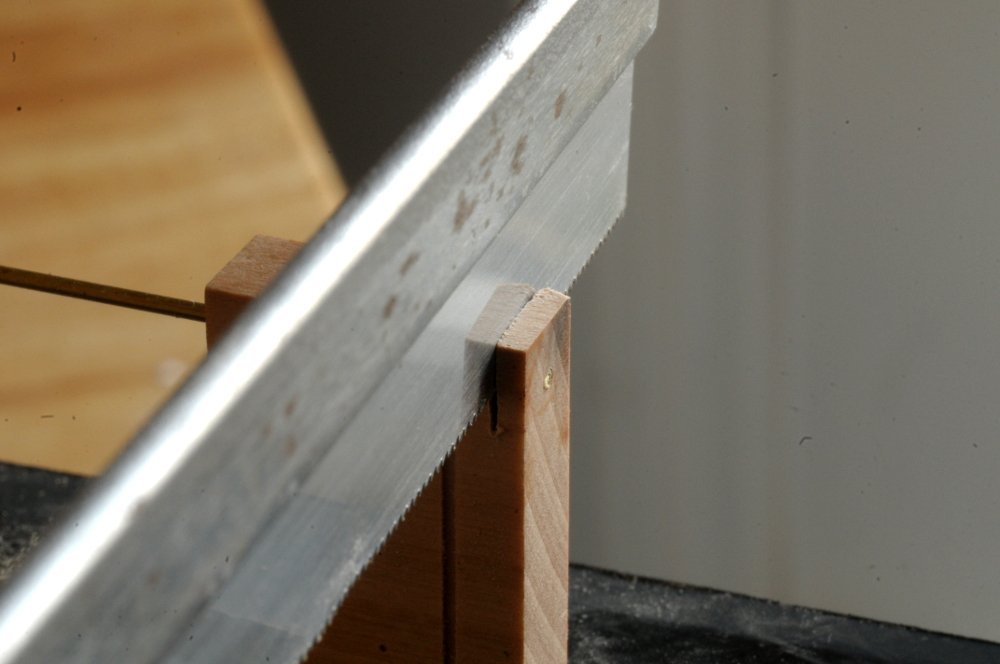
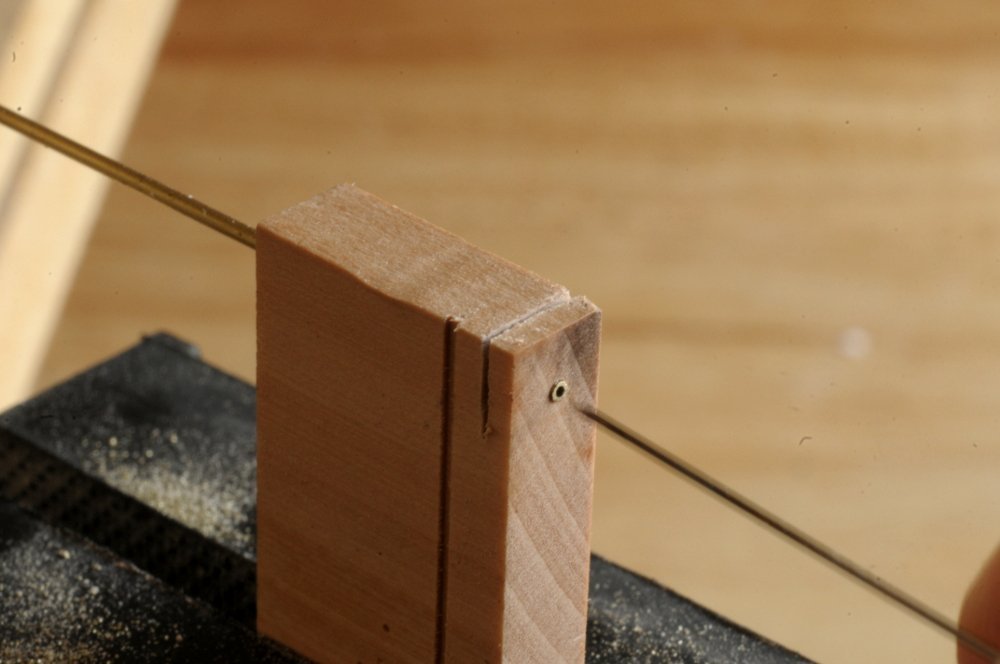
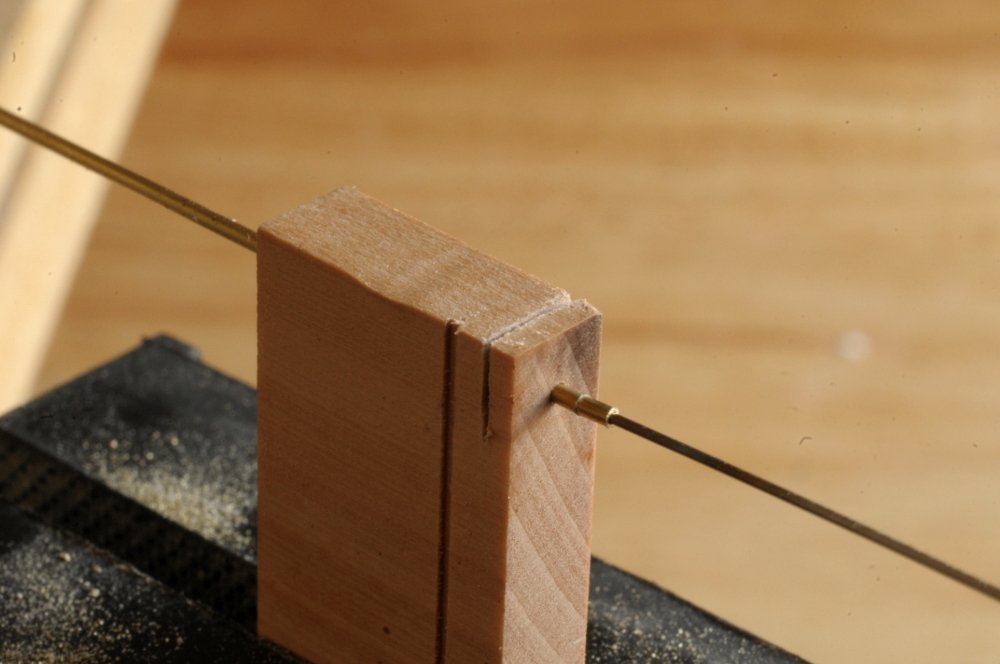
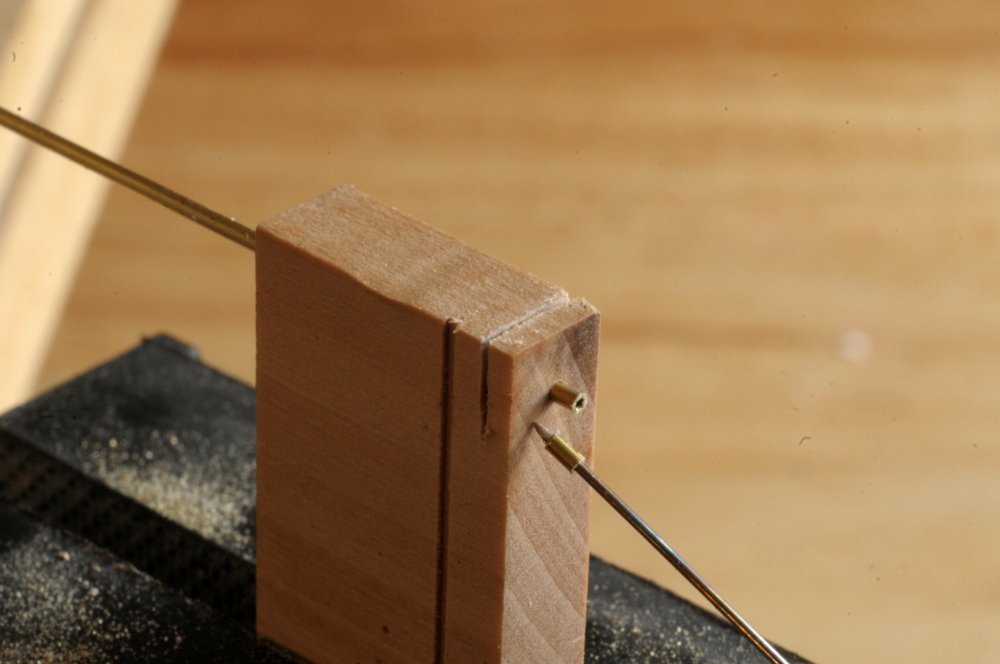
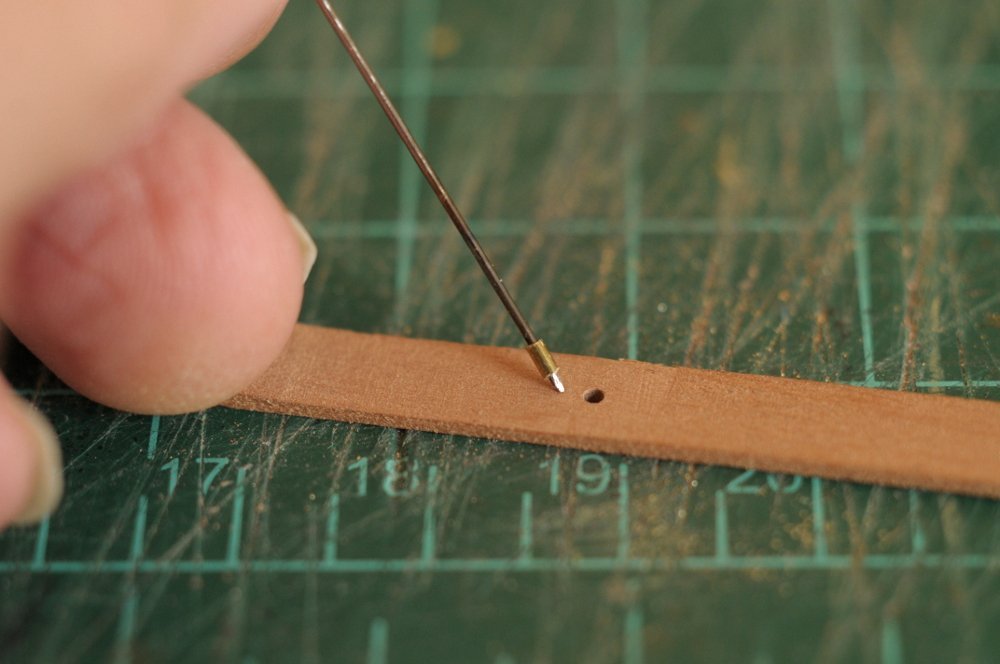
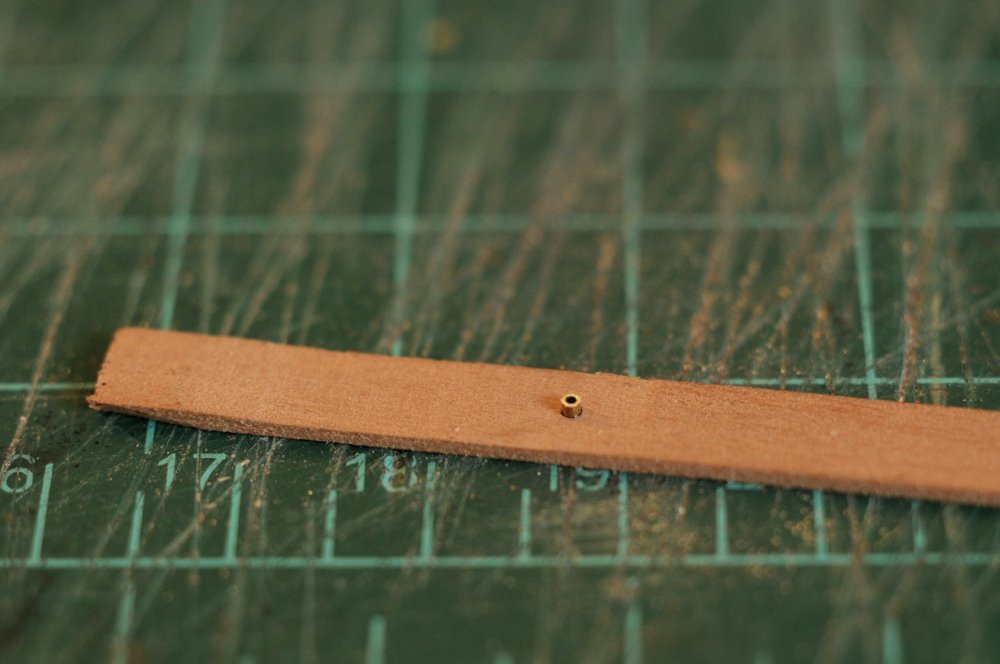
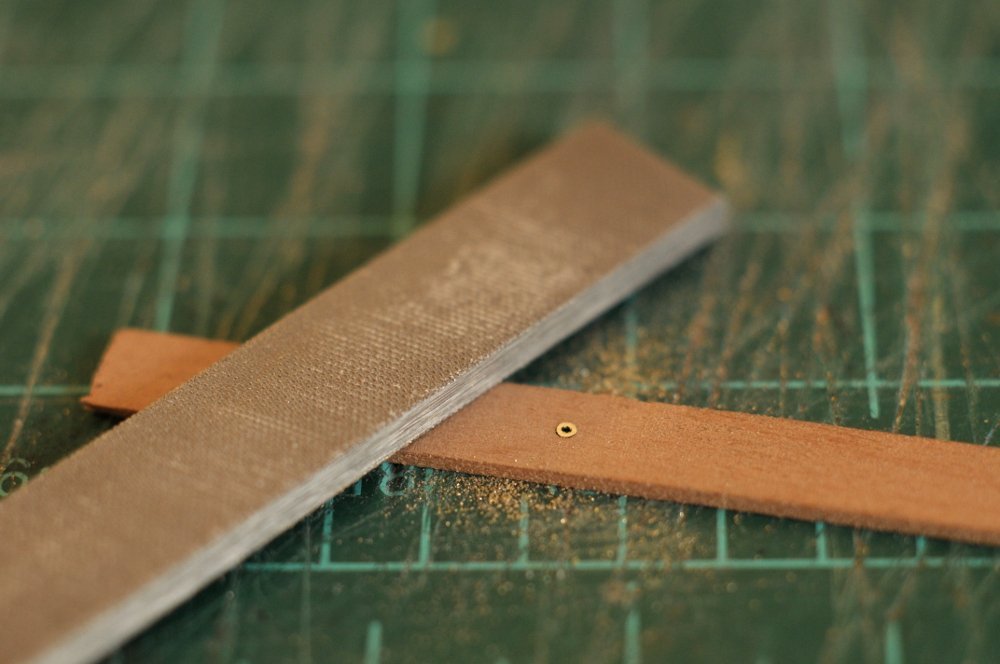
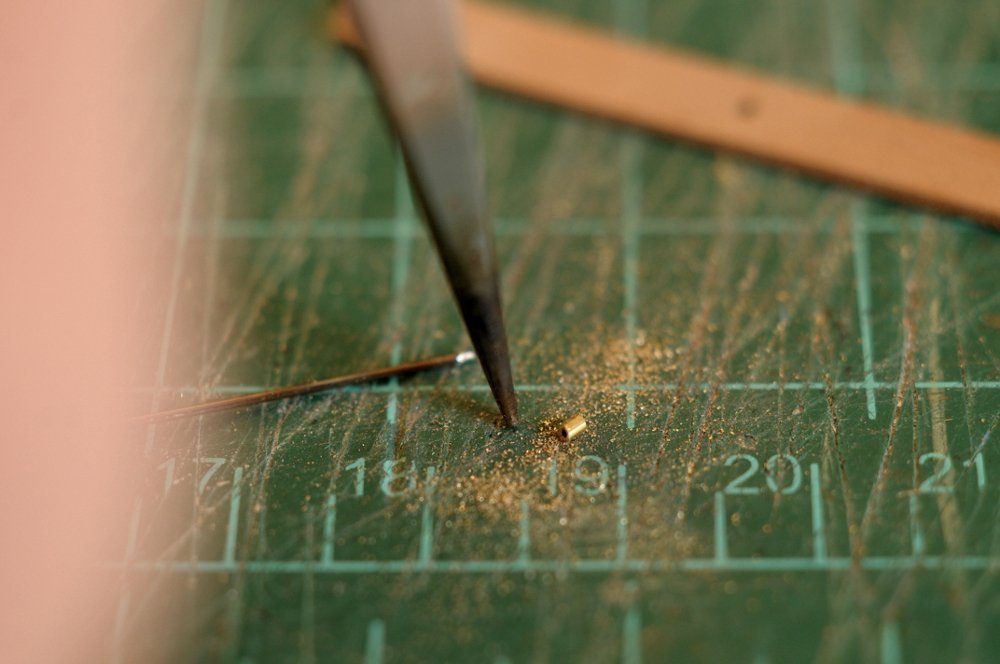
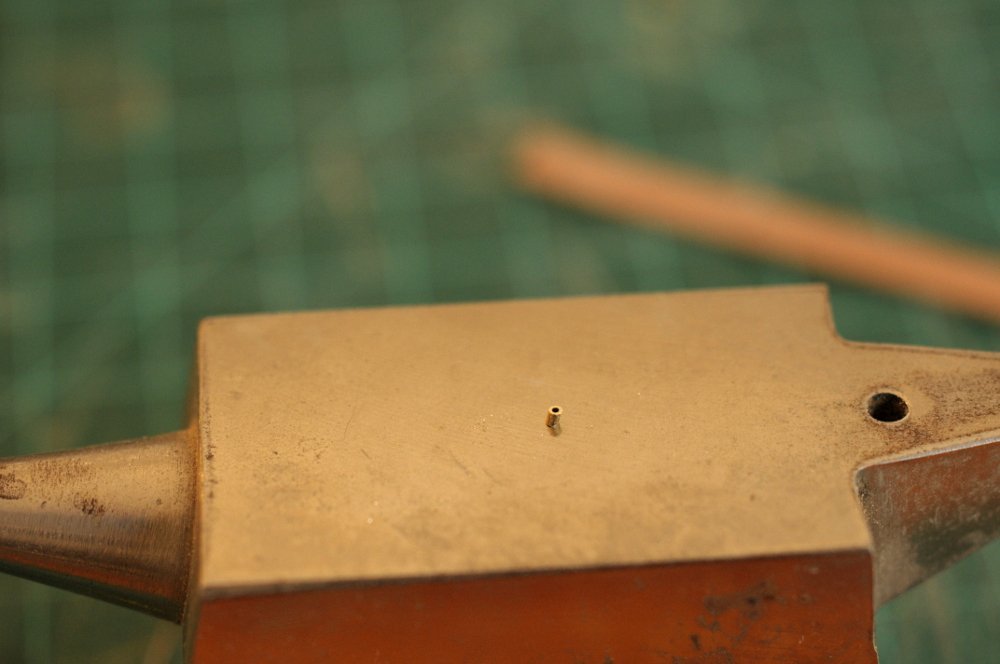
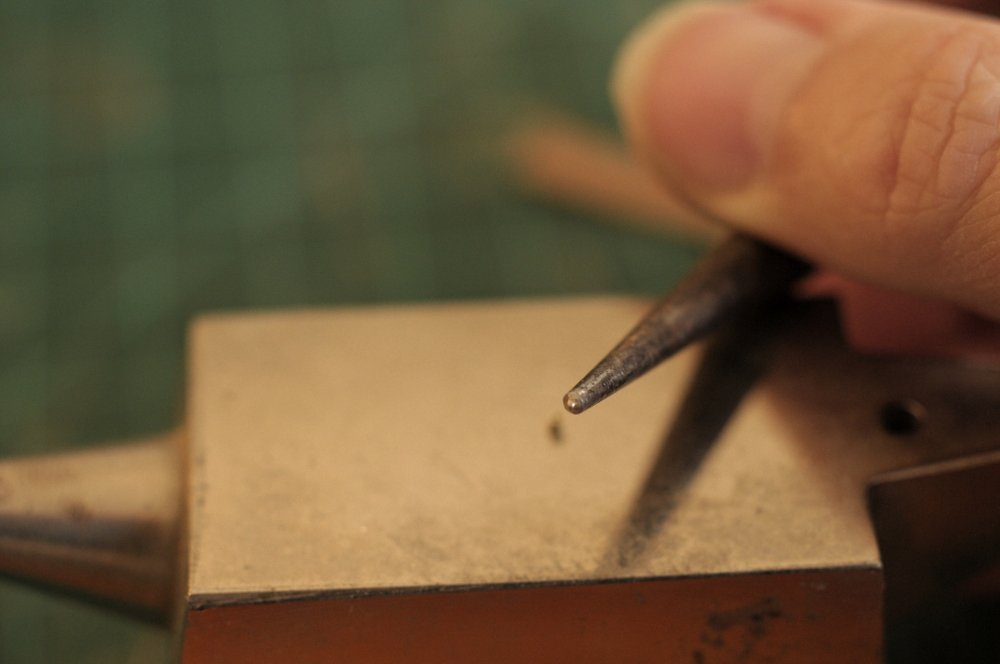
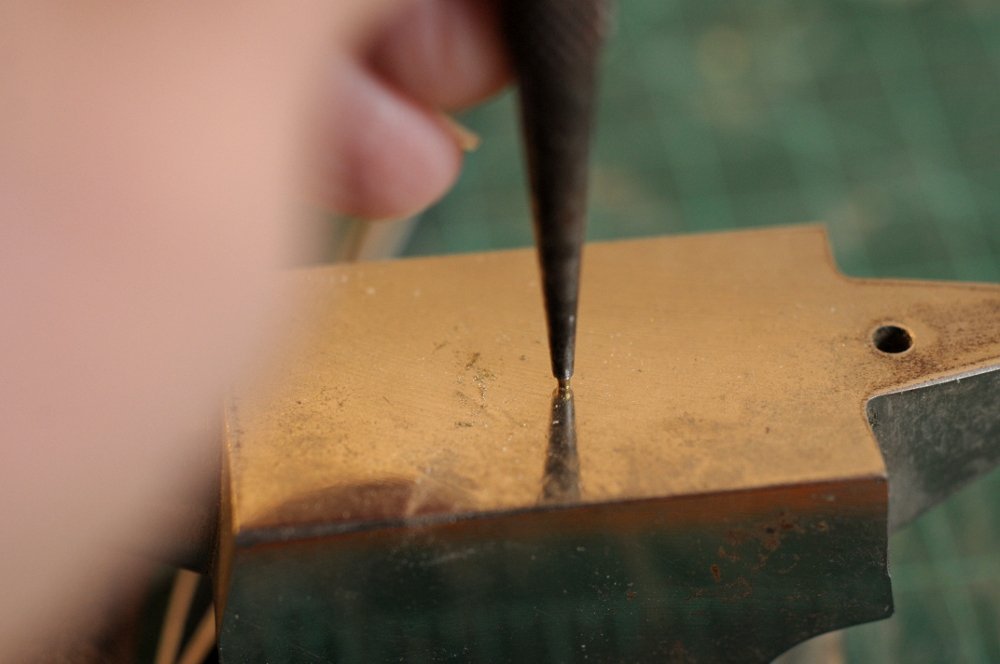
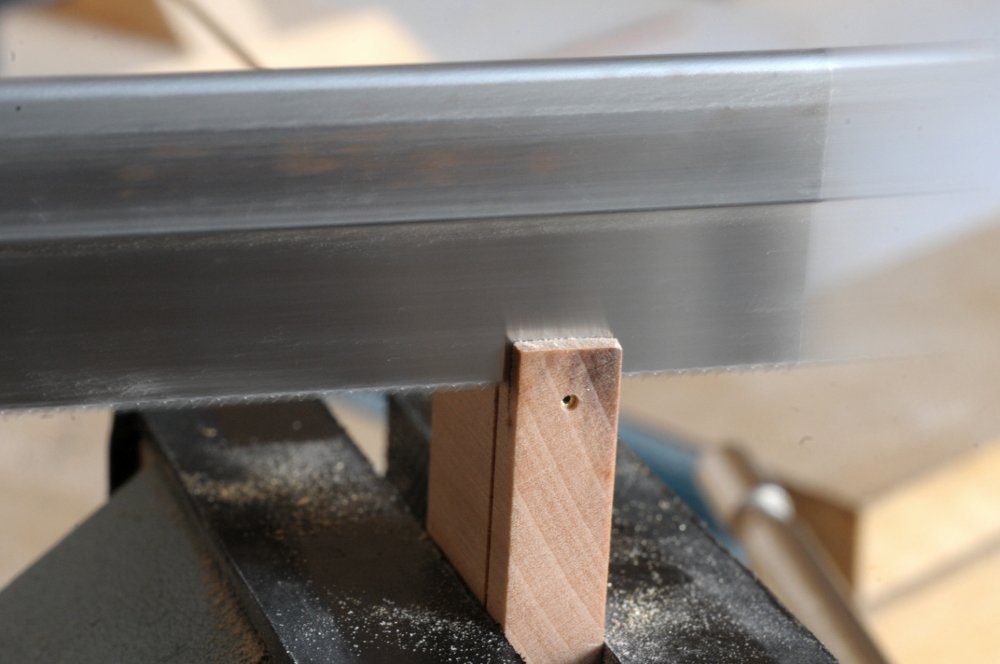
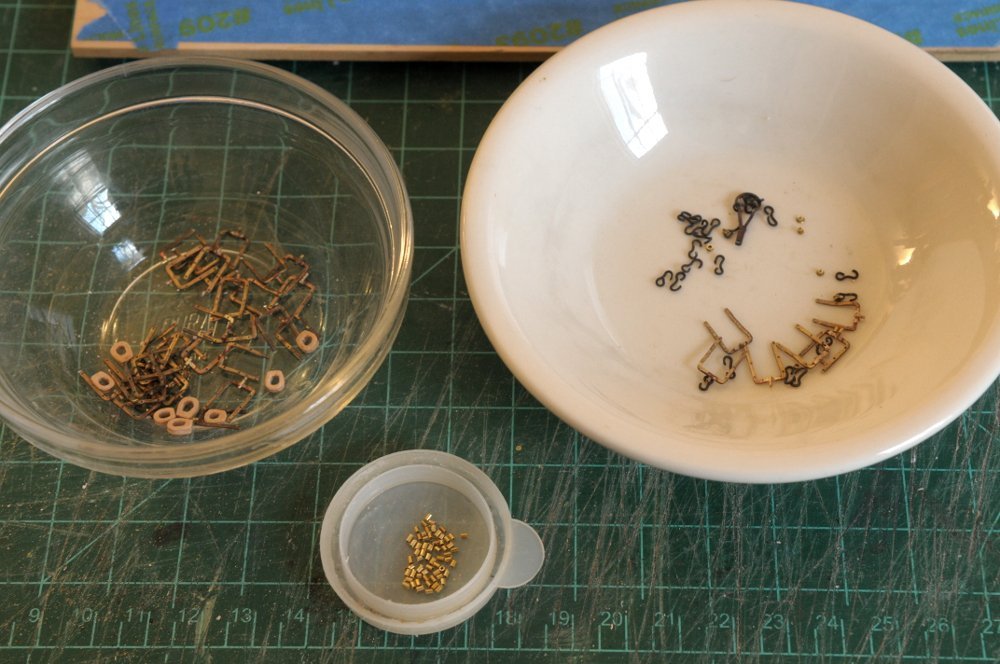
-
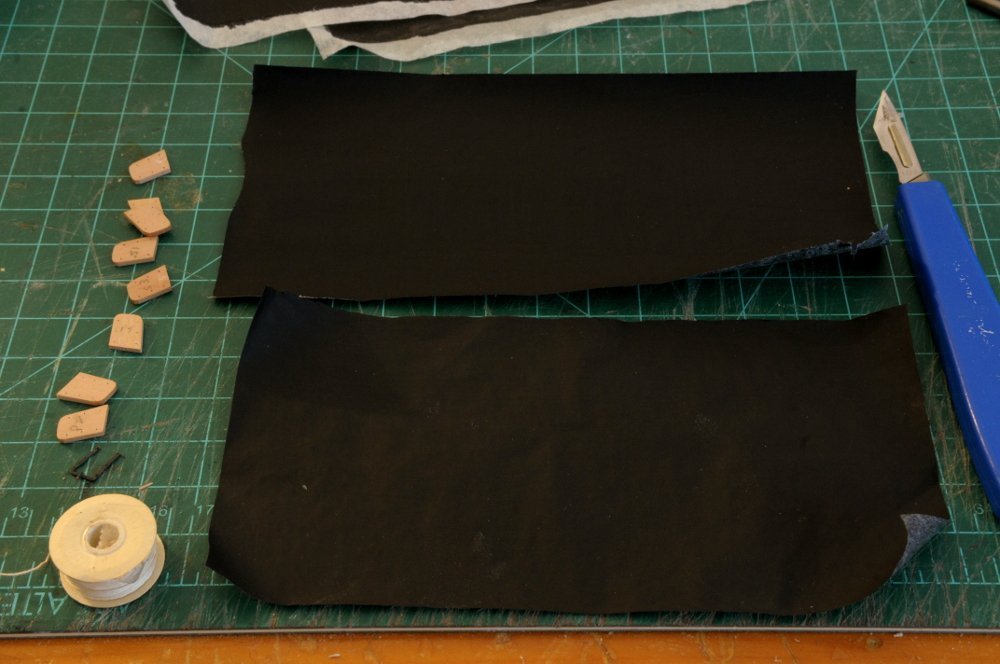
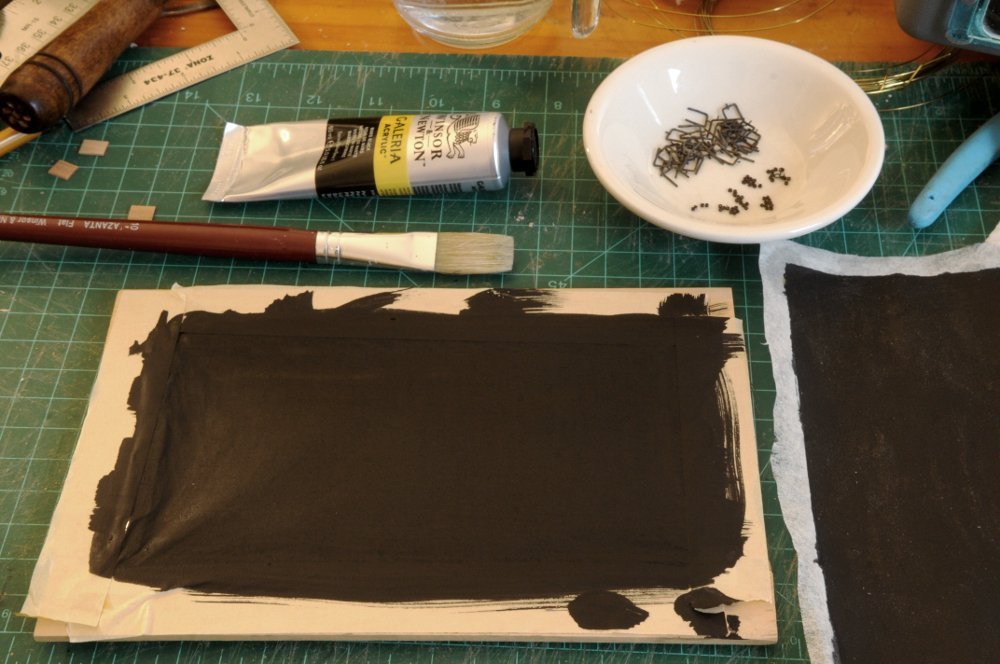
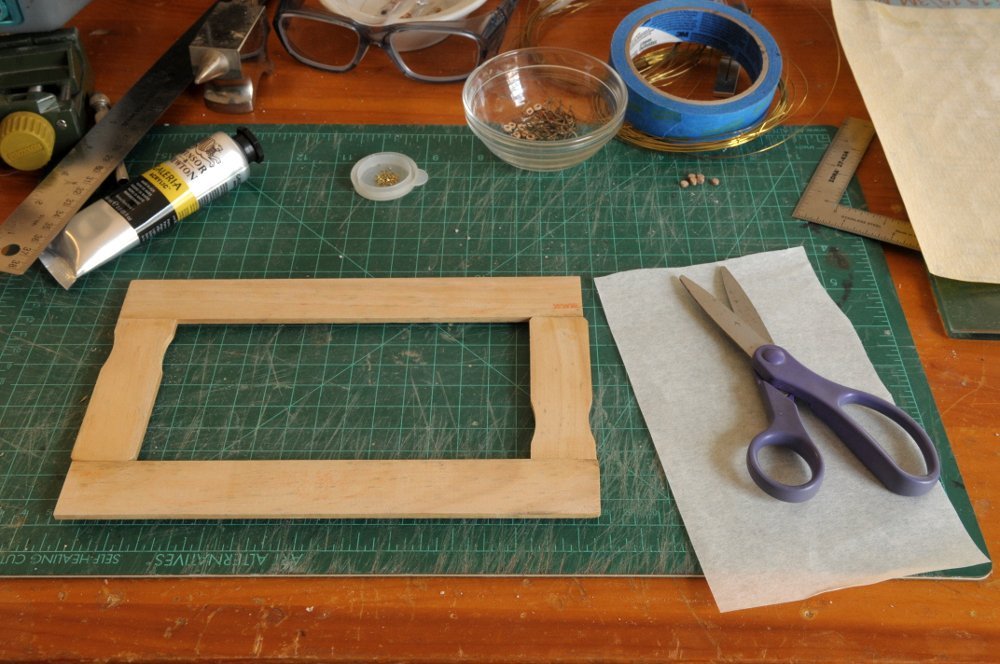
Dave, I think I want a light color for the hammock crane line, so actual rope seems to be my best option. But I appreciate the suggestion. And we do tend to be pack-rats. "Never know when I might need this!" Dowmer, yes, Silkspan seems to be an option here, and you will see my attempt at it. As I work on the hammock cranes, soldering the pins on and finishing them, I am also sidetracking into another project: making a bunch of metal thimbles for the rigging. When I get to blackening the hammock cranes, I want to be efficient, and the thimbles are something else that needs to be blackened, that I will need soon; so I will show my progress on making those now. Basically, I need to cut pieces of brass tubing, and flare them out. Easier said than done. They are tiny. To cut the pieces, I first tried using a my Zona saw with the 1mm OD wire held in a groove of scrap wood. Nope. Then I tried the rotary tool with a cut-off wheel. Nope. The biggest problems were holding the wire firmly enough to get a clean cut, and not losing the tiny cut-off piece. I settled on a method where I drilled a 1mm hole through a piece of scrap wood, and pushed the tube through-- The tube was then pushed back flush with the edge, and sawed through-- Then, a pin (which just happened to be the perfect diameter) was inserted into the end of the tube-- And the tube with the cut piece pushed through-- The pin held the cut off piece securely-- That piece after being sawn is too long, but it was made that way because I was afraid of snapping off the bit of wood on the edge, if I had made it thinner. So the next step was to drill another hole in some scrap wood of the right thickness (this part is described in David Antscherl's TFFM)-- And the piece then filed-- This worked sometimes, but what began to happen more often (as the hole got a little loose, or my filing not square), is that the piece ended up with skewed ends, as on this one-- The next step was setting the thimble on a hard surface, and punching it with a modified nail set punch-- This took some practice to get a good result. The end of the tube on the punch would flare, but not the bottom. Then I would turn it over, and the flared end would just flare more. After a few failures, I seemed to have better success if I barely started the flare, and then turned it over before punching again. I had a success rate of about 1 in 5. Partly because of the problem mentioned earlier about the skewed ends. If they were skewed, no dice, it would just skew more when punched. Here is a successful one, and another attached to a hook-- So decided to skip the filing step. Maybe it would have worked just fine if the pieces were closer to the right length to begin with. In the end I just pulled back a little (by eye) on the tube, rather than having it flush-- This gave me square ends, and the right length (more or less). I cut 20 or 30 of these this way, but haven't started punching them into thimbles yet. Hopefully I'll do better than 1 in 5. Now for some exploration into the Silkspan hammock covers. This is my first experience with this material. I made a frame out of old unused paint stirring sticks, and cut a piece of medium weight Silkspan-- This was then wet, and taped to the frame to dry-- Painter's tape is probably not the best choice, because it doesn't stick well when wet, but it seemed to work well enough. I then used some acrylic paint, diluted just a bit with water, and painted it on-- After drying partway it looked opaque enough, but when I held it up to the light, it seemed pretty transparent-- I'm going to give it another coat, and see how it looks. So, a number of things going on: fine tuning the hammock cranes (which consists of rounding the cut off ends and general straightening), making thimbles, and experimenting with the Silkspan for the hammock covering-- All for now, Ron
-
HMS EURYALUS by Matiz - FINISHED - scale 1:56
rlb replied to matiz's topic in - Build logs for subjects built 1801 - 1850
Beautiful work, Matiz! Ron -
Chuck, Since your captain clearly loves a good book, you will need a bookcase. Not too big, though. Ron


