


rlb
-
Posts
655 -
Joined
-
Last visited
Content Type
Profiles
Forums
Gallery
Events
Everything posted by rlb
-

HMS Euryalus 1803 by rlb - 1:48 scale
rlb replied to rlb's topic in - Build logs for subjects built 1801 - 1850
That's great news Mike. With Allan's and Wayne's help I was able to get pdfs of the plans. And I'll order the book as soon as it's available!- 122 replies
-
- 5
-

-
- Euryalus
- Plank-on-frame
- (and 4 more)
-
HMS Euryalus 1803 by rlb - 1:48 scale
rlb replied to rlb's topic in - Build logs for subjects built 1801 - 1850
Ahh, I think having a lot of scraps in your scrap box doesn't necessarily mean you make more mistakes. (Though it's true in my case!) I think it can also be directly proportional to how much of a perfectionist you are!- 122 replies
-
- 8
-
-
- Euryalus
- Plank-on-frame
- (and 4 more)
-
HMS Euryalus 1803 by rlb - 1:48 scale
rlb replied to rlb's topic in - Build logs for subjects built 1801 - 1850
Greg, Yes, that was humbling. I think I understand what you did, but I'm not sure. In any event, though I have a Byrne's saw now, I never would have thought to use it for the air spaces; so much to learn! I'm sure it was much more precise and uniform than my hand filing. Ron- 122 replies
-
- 4
-
-
- Euryalus
- Plank-on-frame
- (and 4 more)
-
HMS Euryalus 1803 by rlb - 1:48 scale
rlb replied to rlb's topic in - Build logs for subjects built 1801 - 1850
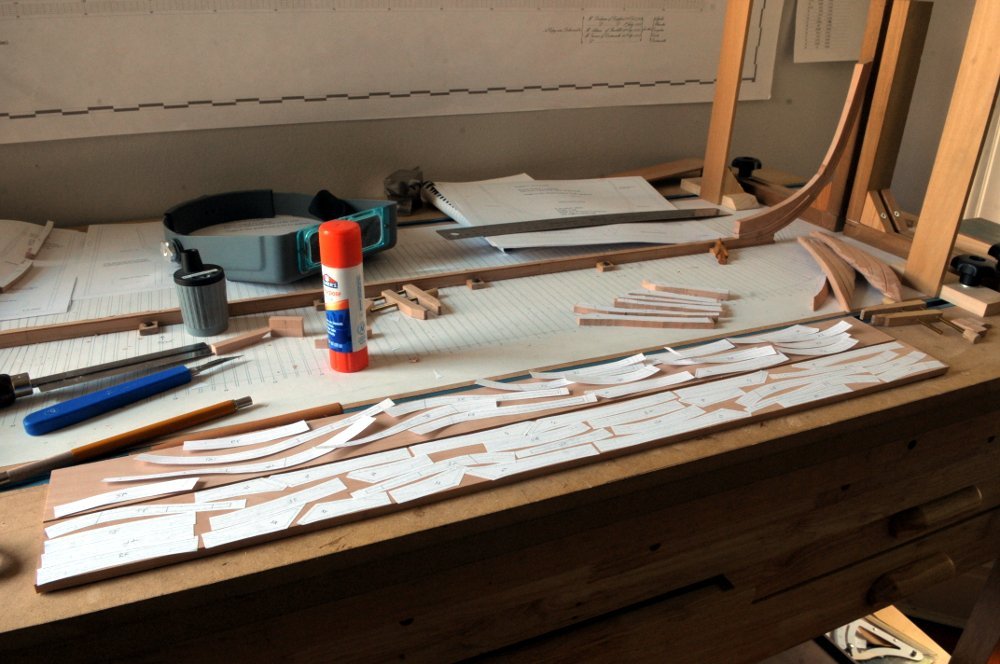
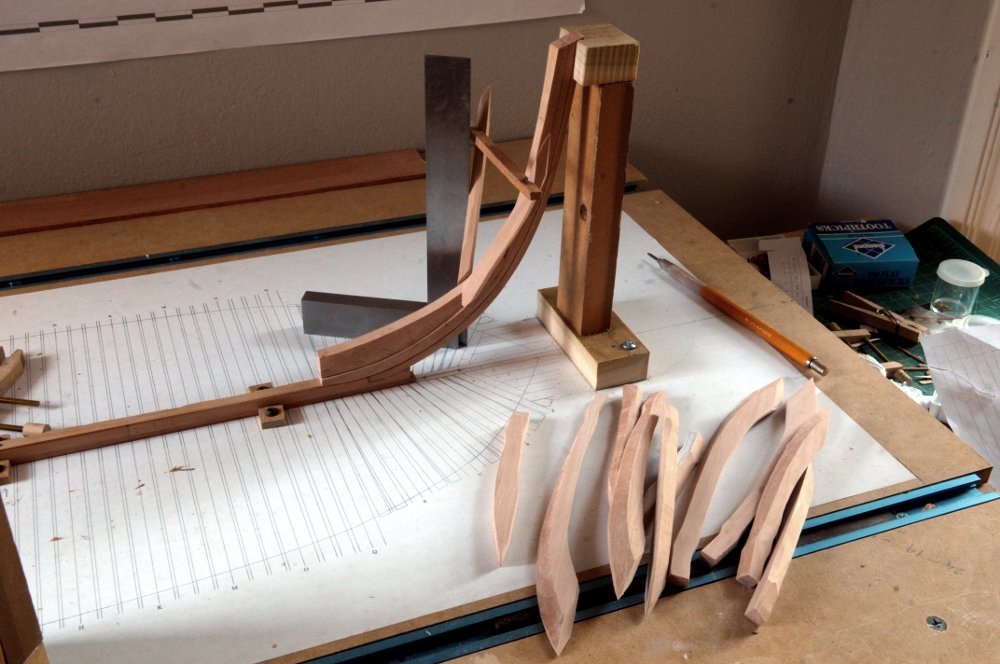
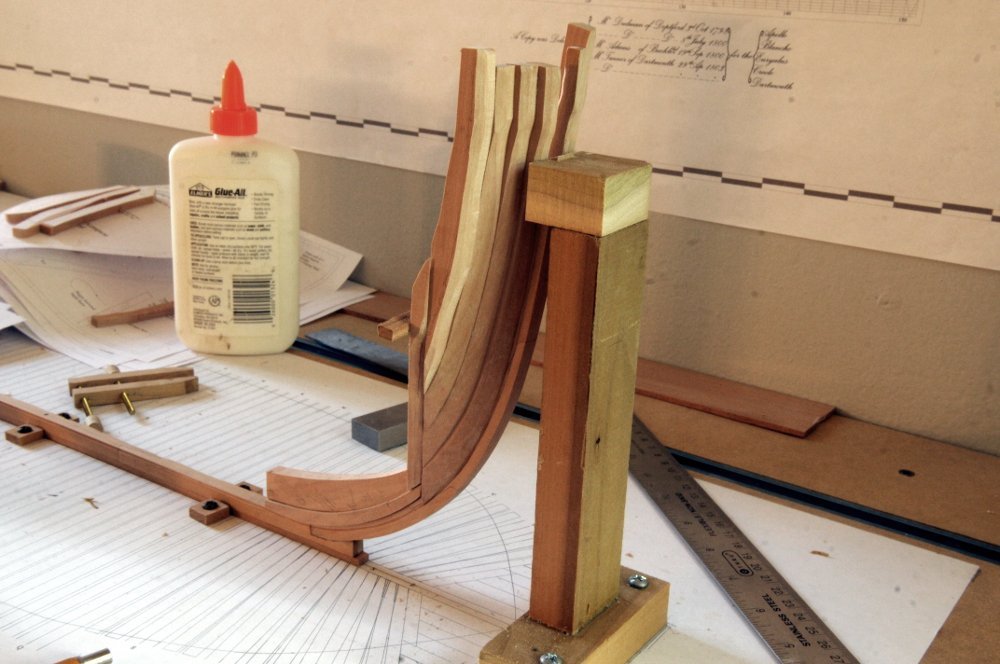
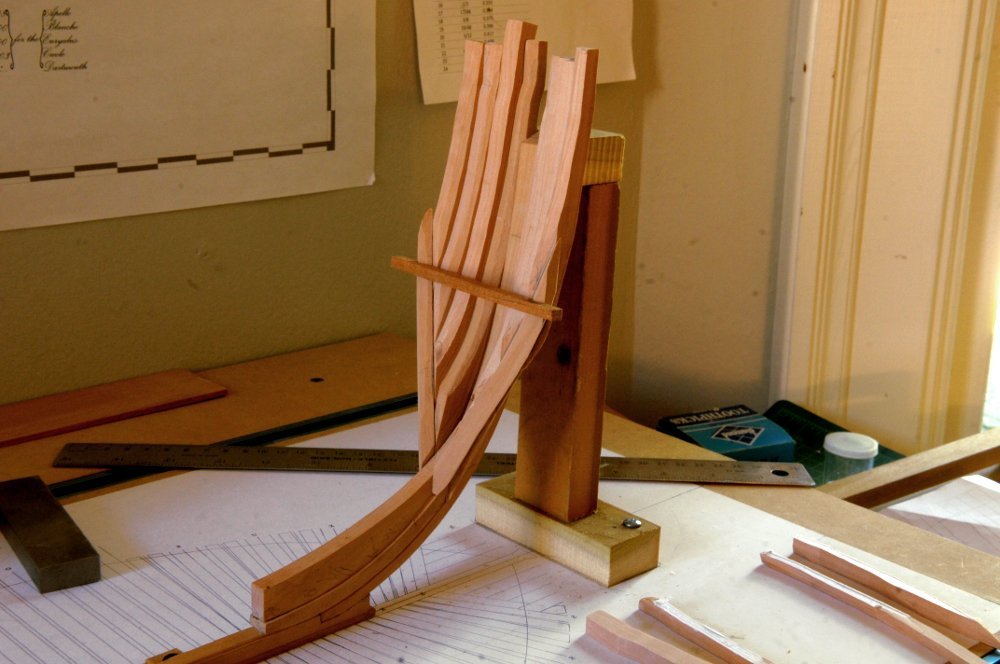
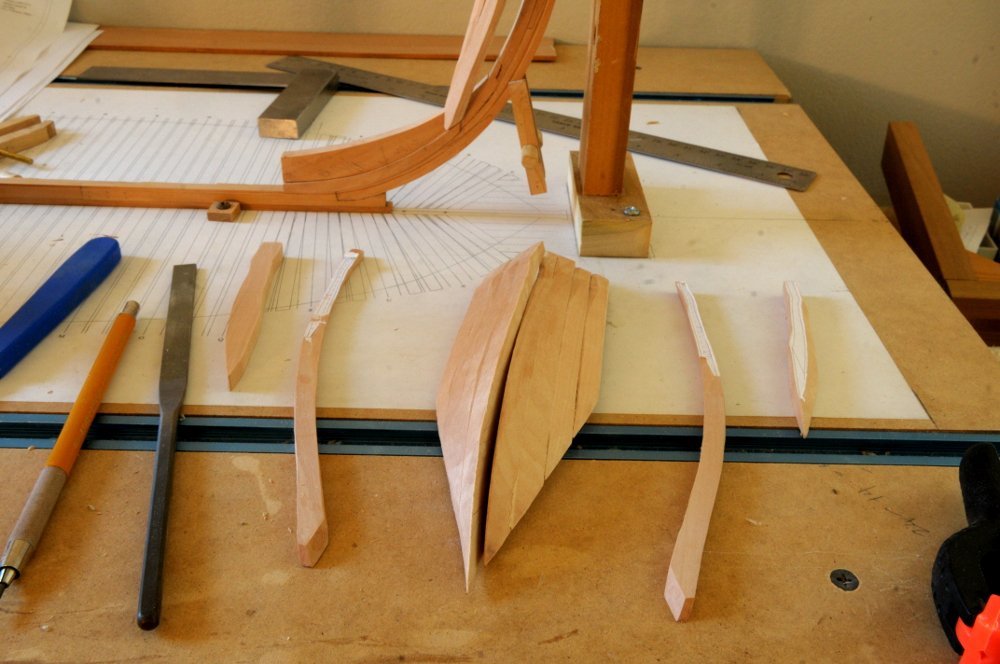
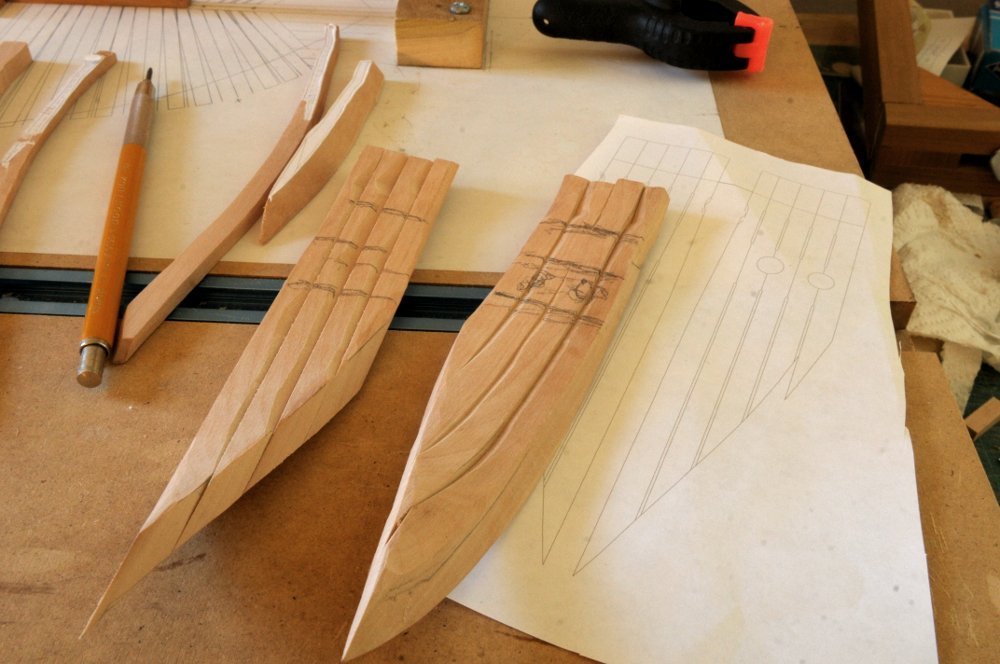
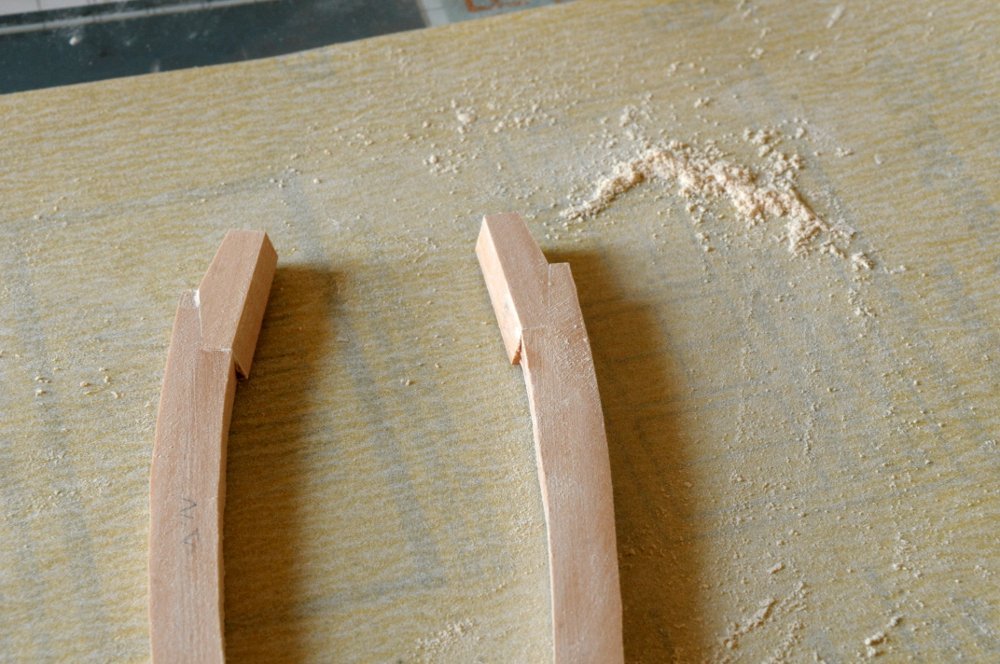
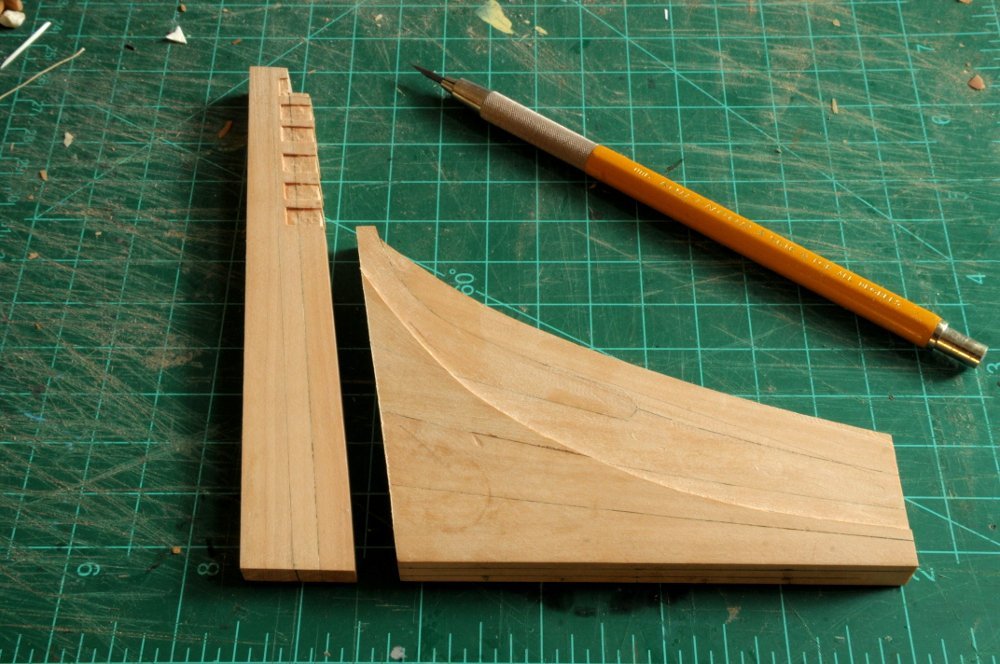
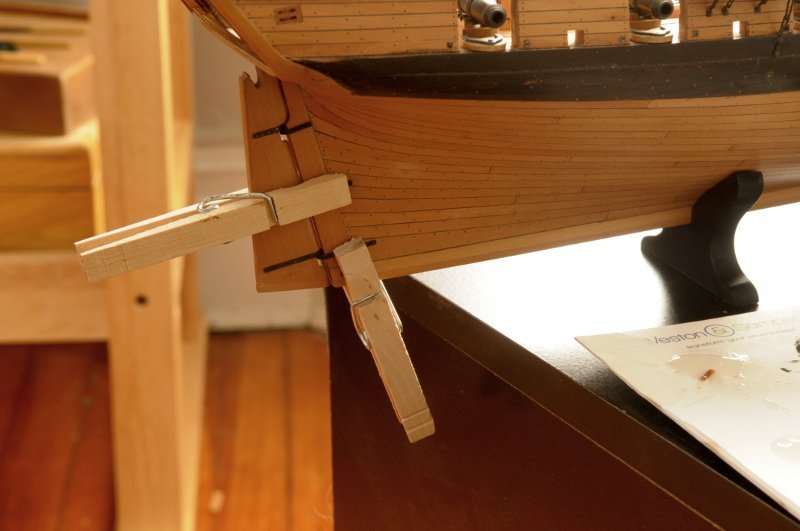
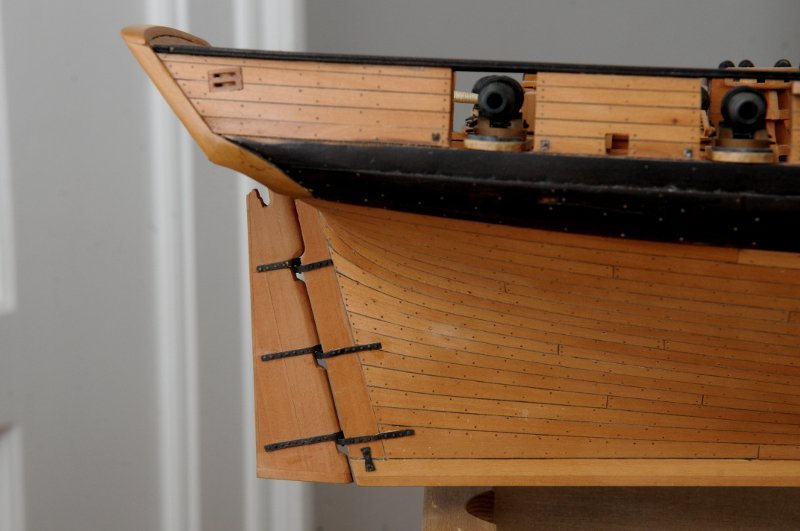
Unfortunately, I mismeasured the location of the gaps, and didn't realize it until I had filed them into one set of timbers. On to the third try. I felt like I wasted precious wood, with the way they are curved, and as they are some of the largest timbers on the ship. The most disheartening was re-making the Bollard timber, as that has to have a concave taper to match the stem. It was not fun to make that timber 3 times. I hope I've got it now, though I won't be 100% sure until I have more of the cant frames mocked up, and I finalize the rabbet. The rabbet seems to need extra shaping to transition to the foot of the Bollard timber and the bearding line. We will see. The rejected timbers are in front, and the temporarily glued together Bollard and Hawse timbers (with their gaps) sitting in place between the first cant frame and the stem-- The masking tape is just holding the group of timbers against the stem. The timbers still need a lot of fairing, and some adjustments to the length of some of the upper gaps. The isopropyl alcohol in the background was heavily used over the last couple weeks, as the timbers were glued together for rough shaping, unglued to make the gaps, and glued back together, unglued to make fixes, reglued again, etc. Ron
- 122 replies
-
- 15
-
-
- Euryalus
- Plank-on-frame
- (and 4 more)
-
HMS Euryalus 1803 by rlb - 1:48 scale
rlb replied to rlb's topic in - Build logs for subjects built 1801 - 1850
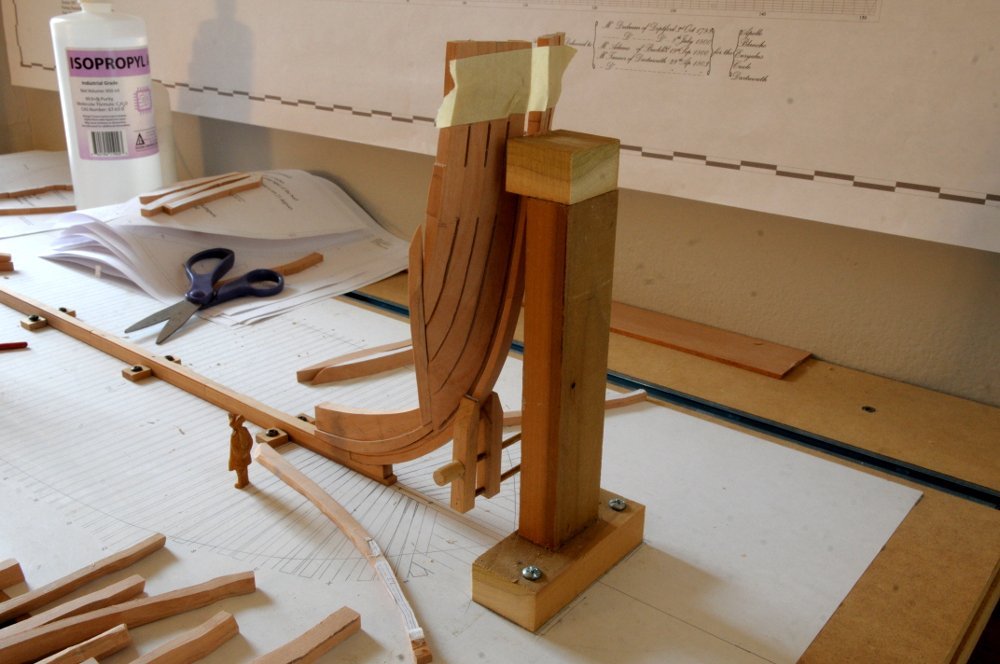
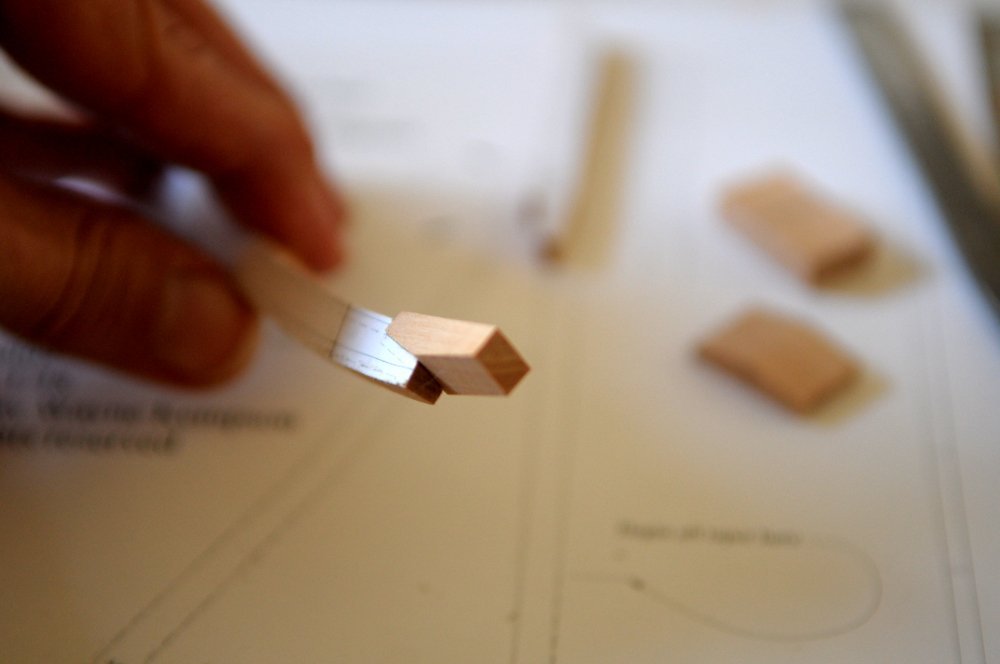
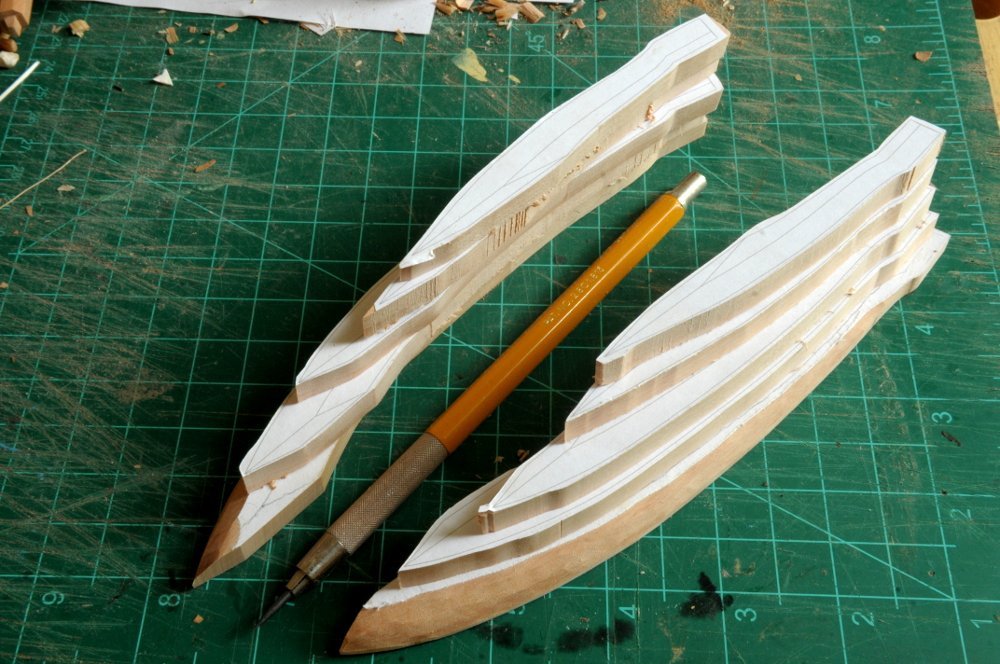
I realized as I was rough shaping the glued together Bollard and Hawse timbers, that I would need the first one or two cant frames to be installed temporarily in place to check the correct angles, amount of wood to remove, etc. Going a bit further than the first frames, Zf (forward), and Za (aft), I cut out ALL the forward cant frame pieces-- In between other tasks, I'll assemble these. But to get on with the Bollard and Hawse timbers, I temporarily glued up the first frame Zf. As I fit the glued together and roughly shaped group of Bollard and Hawse timbers between the stem and this first frame I realized I had removed too much material from the starboard group. It wasn't going to mate to the first frame satisfactorily. The port group was more salvageable. The two groups of timbers were separated, and I would try again, one at a time with the timbers, and the Zf frame-- Having the Zf frame in place, the required shape of the Bollard and Hawse timbers finally clicked in my mind. The angle to the keel (deadwood to be precise) of the Zf frame (55.24 degrees) is the key to all the Bollard and Hawse timbers, and if you cut (sand) that angle correctly into the "foot" of each Bollard and Hawse timber, the rest of the shaping of them follows. I started with the Bollard timbers. When I had the correct "foot", I lightly glued them to the stem, then on to the next Hawse timber, lightly gluing each in place to the previous one, as it fit. All the "first try" starboard timbers had to be thrown out and recut (indeed, the outer starboard Hawse timber needed multiple tries), but only one of the port timbers. Here they are in place-- They look very ragged and inconsistently sized, but they fit right at the foot, which is what, I think, seems to matter. We'll see, I wouldn't be surprised if I have redo them again! The two glued together groups were separated back off of the stem and first frame, and some further rough shaping done-- At this point they were marked (oh so crudely!) for the locations of the gaps, and will now be separated into individual pieces again to file those gaps into the timbers--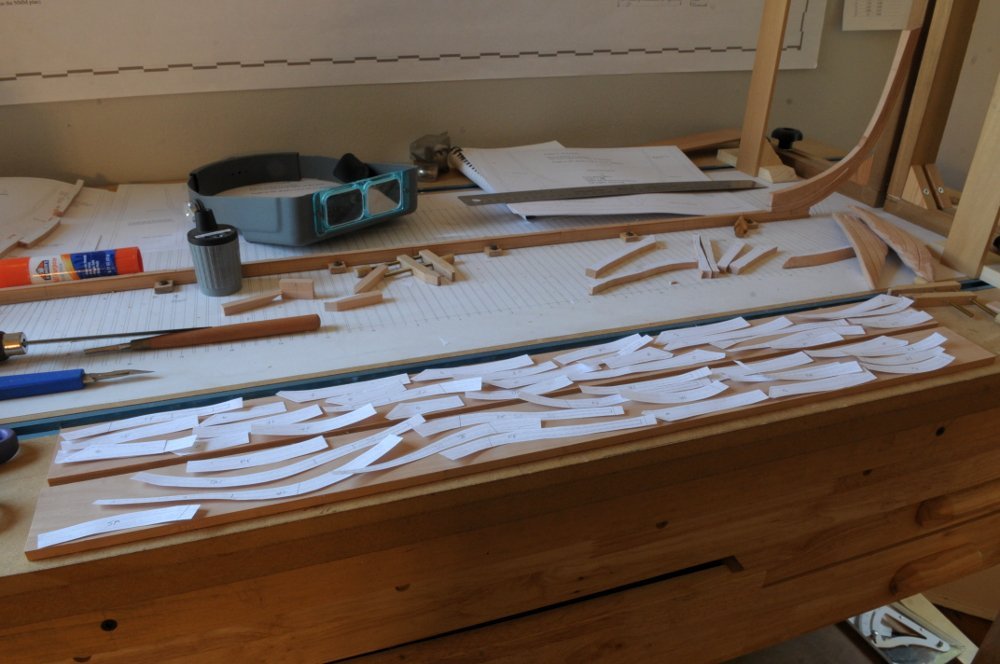
- 122 replies
-
- 16
-
-
- Euryalus
- Plank-on-frame
- (and 4 more)
-
HMS Euryalus 1803 by rlb - 1:48 scale
rlb replied to rlb's topic in - Build logs for subjects built 1801 - 1850
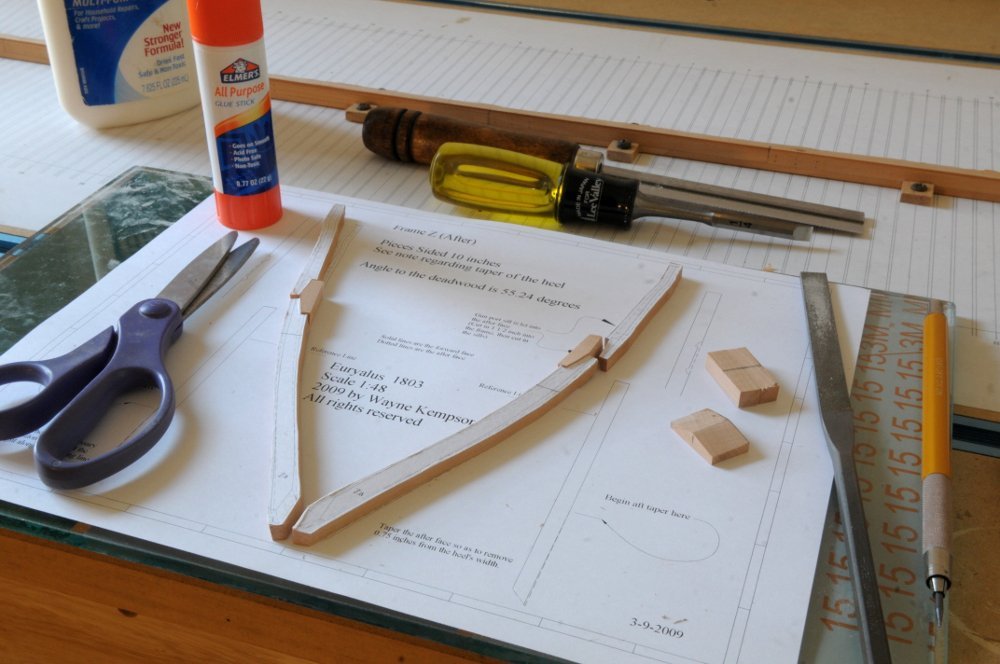
That's smart, Greg. On this frame I'm using the paper copy underneath to make sure my frame keeps the right shape, and finessing the chock cut-out on the second futtock if the chock is slightly off. I'll experiment with other methods as I go forward. Ron- 122 replies
-
- 7
-
-
- Euryalus
- Plank-on-frame
- (and 4 more)
-
HMS Euryalus 1803 by rlb - 1:48 scale
rlb replied to rlb's topic in - Build logs for subjects built 1801 - 1850
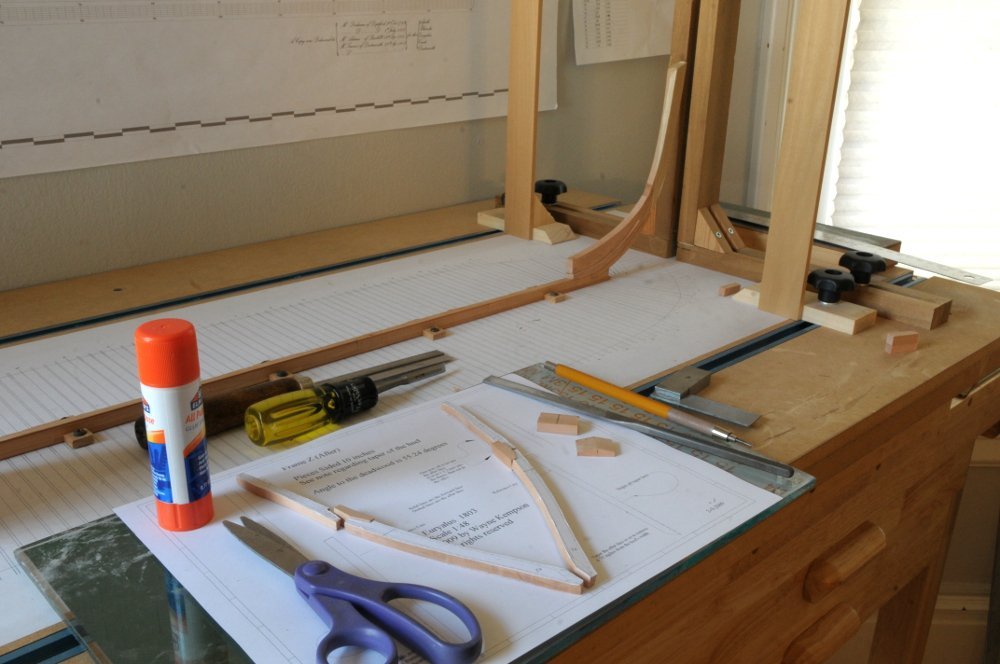
Thanks Rick. Continuing with rough shaping of the Bollard and Hawse timbers, they are glued together, and sanded. After they are close to the right shape, they will be separated and will be filed to form the correct gaps between them. To the left, the first cant frame "Z (Forward)" is also cut out-- The second cant frame "Z (After)" is made up of two pieces each, with a chock. This is my first time building a chocked frame, and the chocks need to be skewed to accommodate the inner and outer bevels of the frame-- The skewed chock is made oversize and glued to the first piece-- Then it is sanded flush on the side without the paper pattern-- Here are the frames with the second piece ready to be glued. However, I discovered that the upper starboard futtock (the one on the left in the photo) is misshapen. The paper pattern became distorted when I glued it down. I had had to lift and reposition it on the wood billet, and during that process it warped. I will need to make some more paper copies, and cut another one-- Ron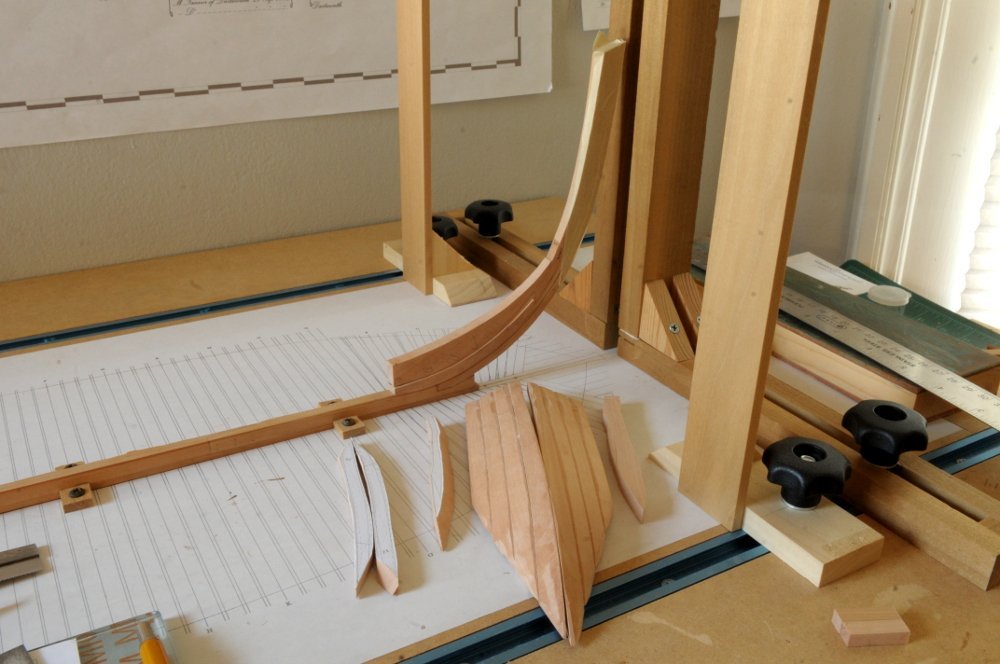
- 122 replies
-
- 16
-
-
- Euryalus
- Plank-on-frame
- (and 4 more)
-
HMS Euryalus 1803 by rlb - 1:48 scale
rlb replied to rlb's topic in - Build logs for subjects built 1801 - 1850
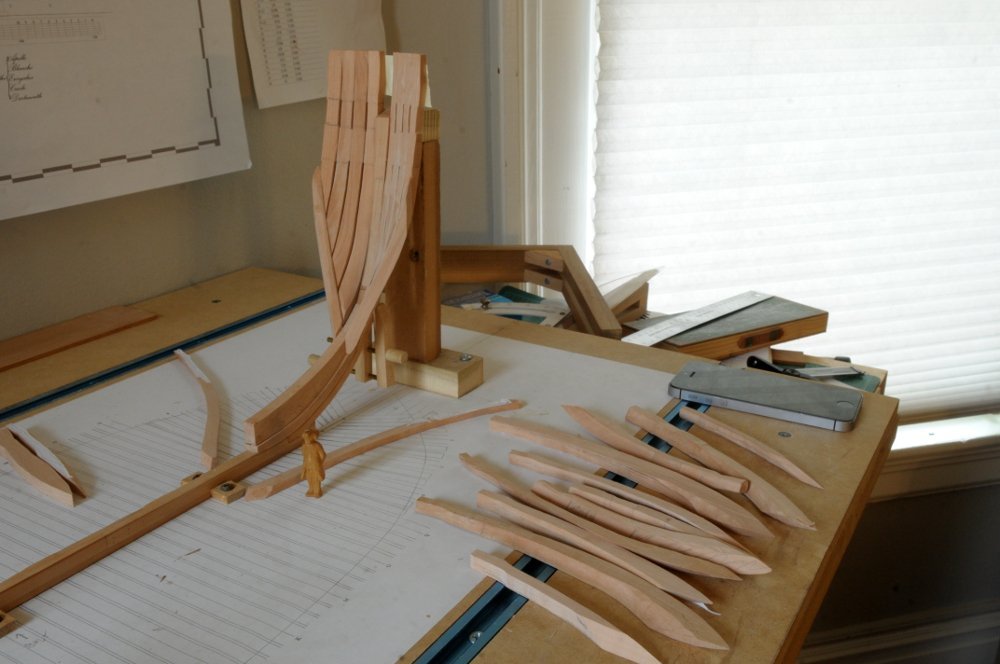
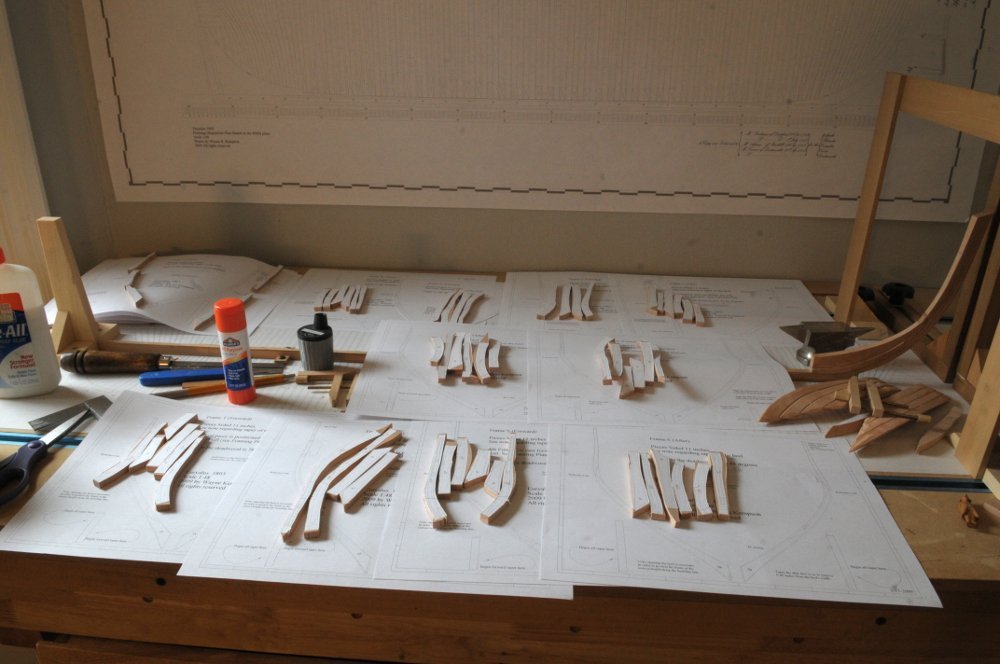
I have a little bit more work to show. Final shaping is not done, but I've glued together some of the pieces that make up the bow and stern framing-- The bow assembly- The sternposts and deadwood assembly-- And the rough cutting out of the bollard timbers and hawse pieces-- Ron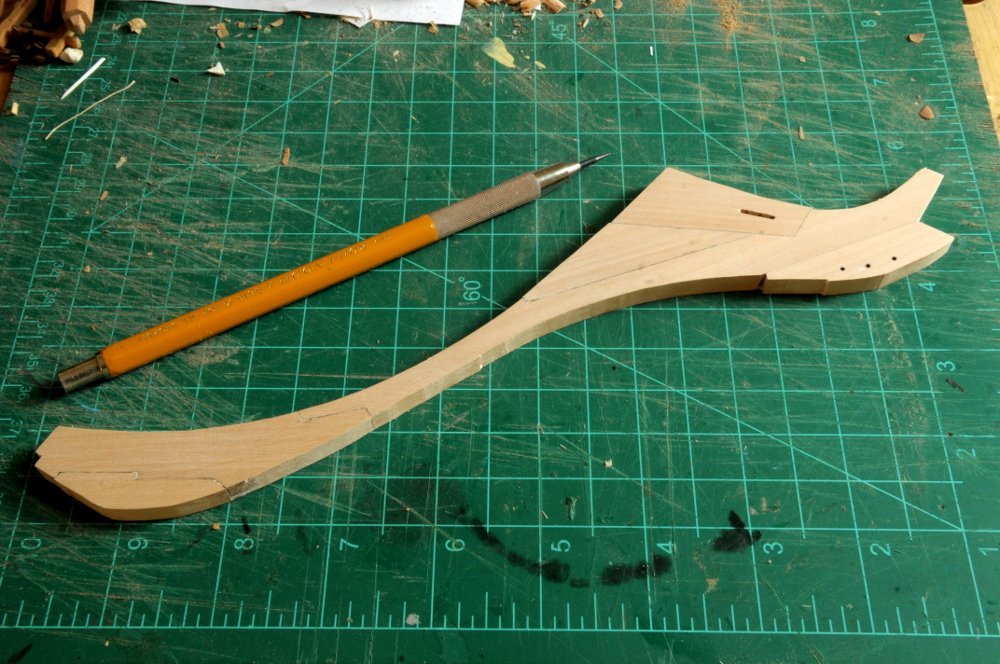
- 122 replies
-
- 19
-
-
- Euryalus
- Plank-on-frame
- (and 4 more)
-
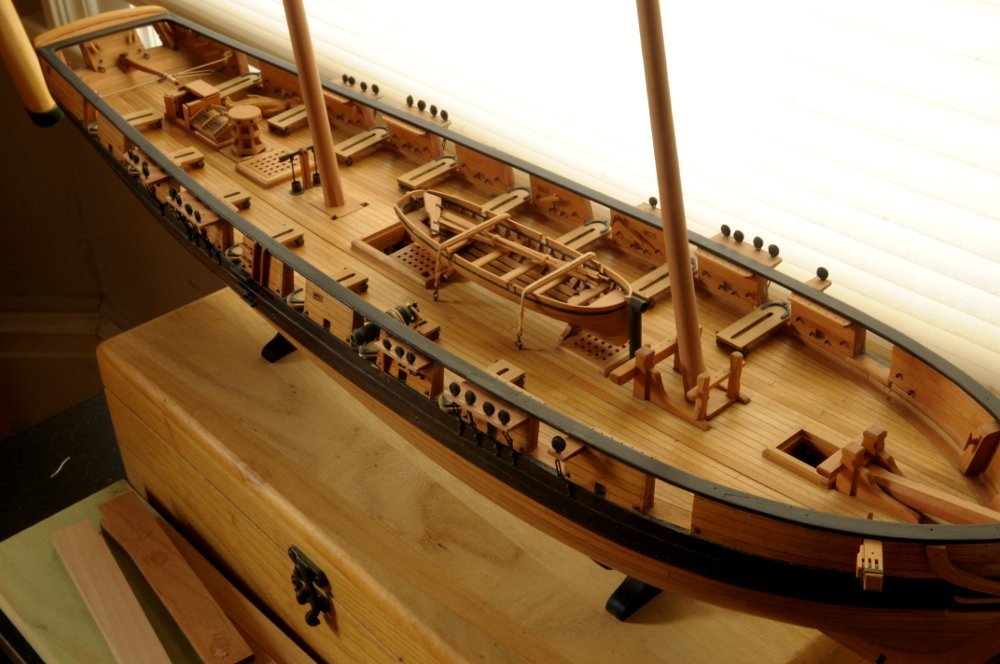
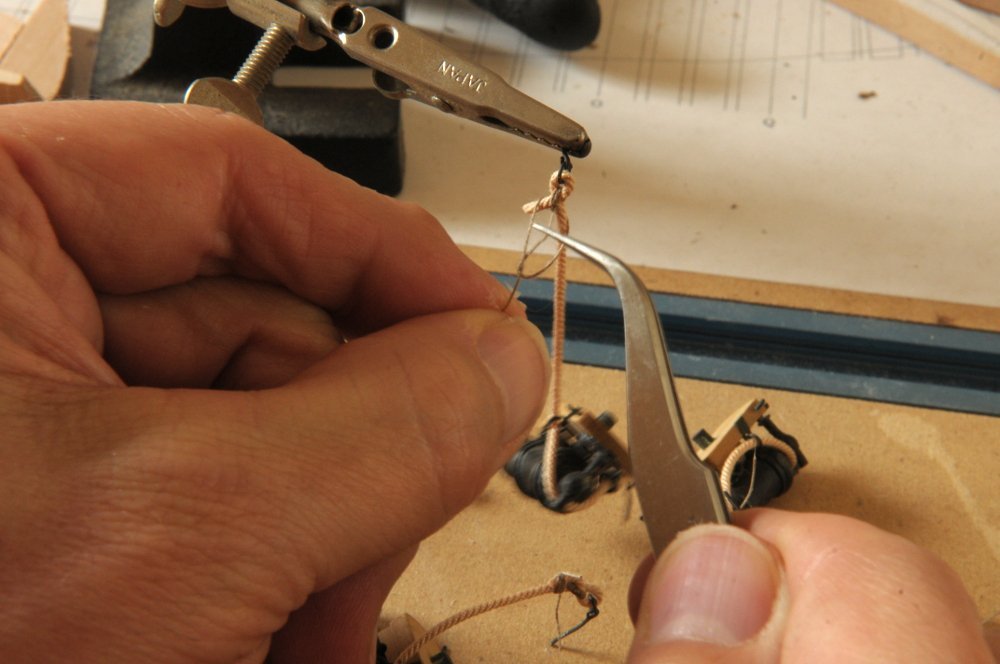
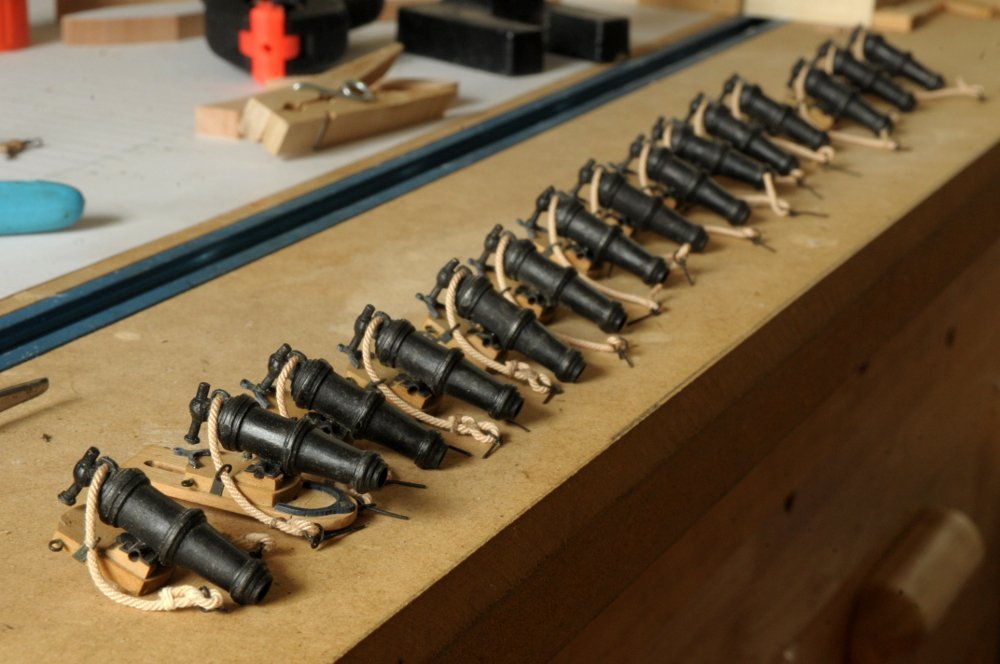
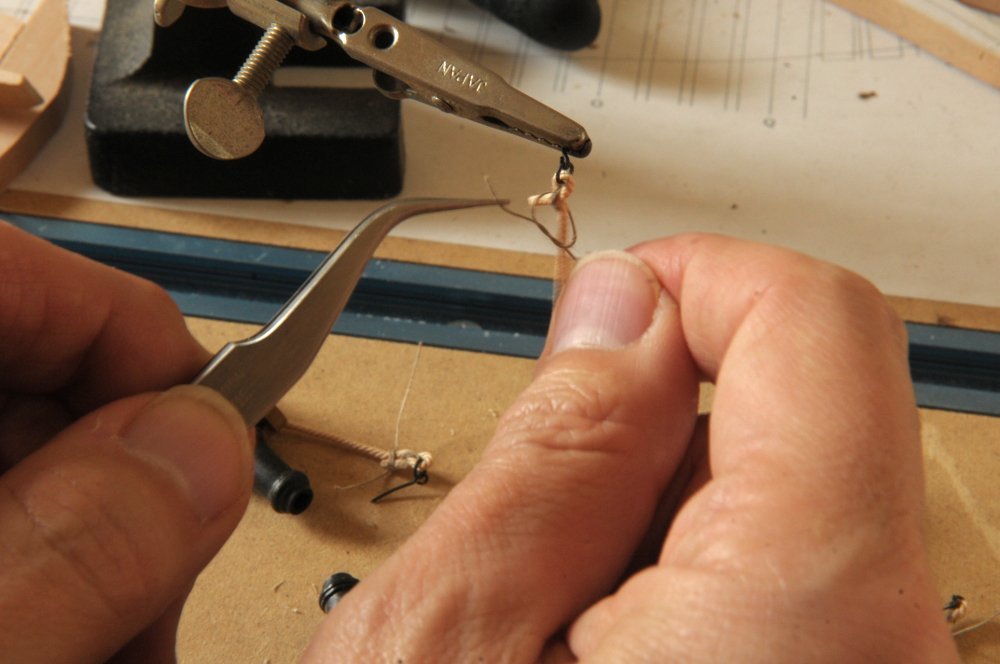
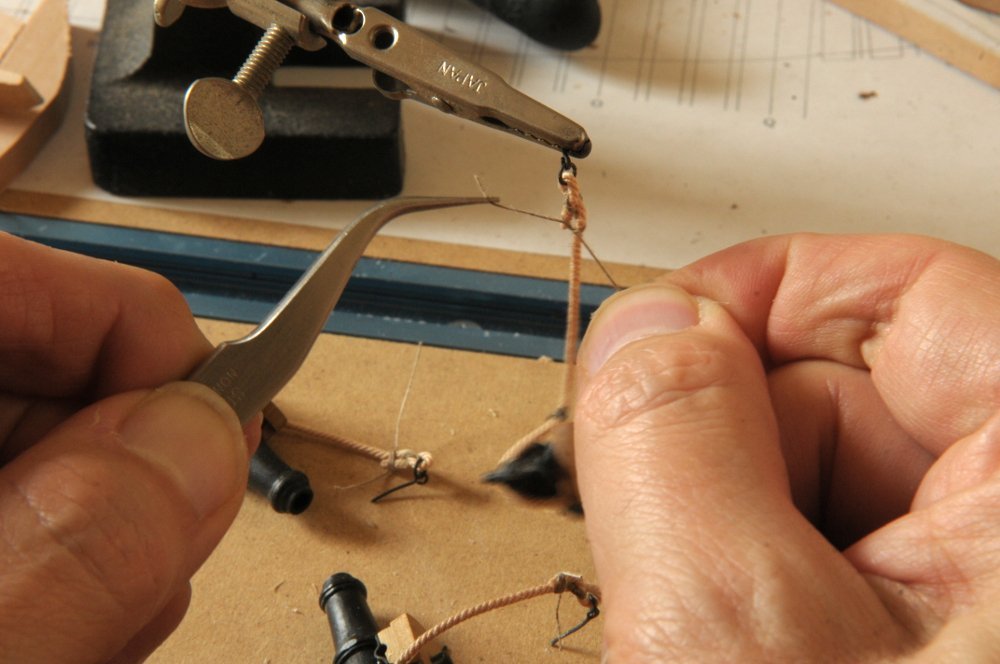
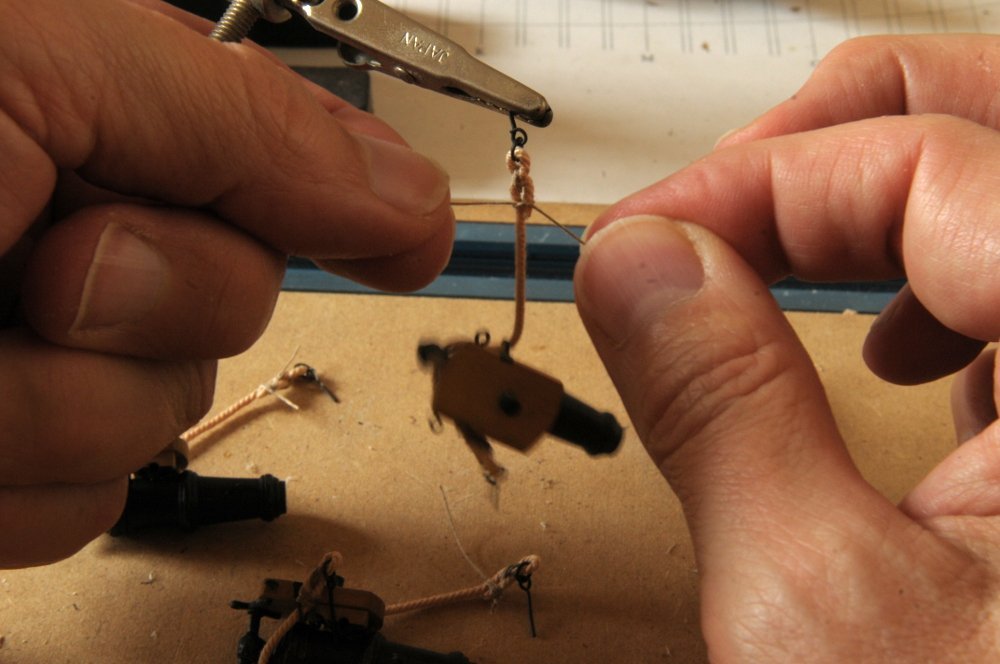
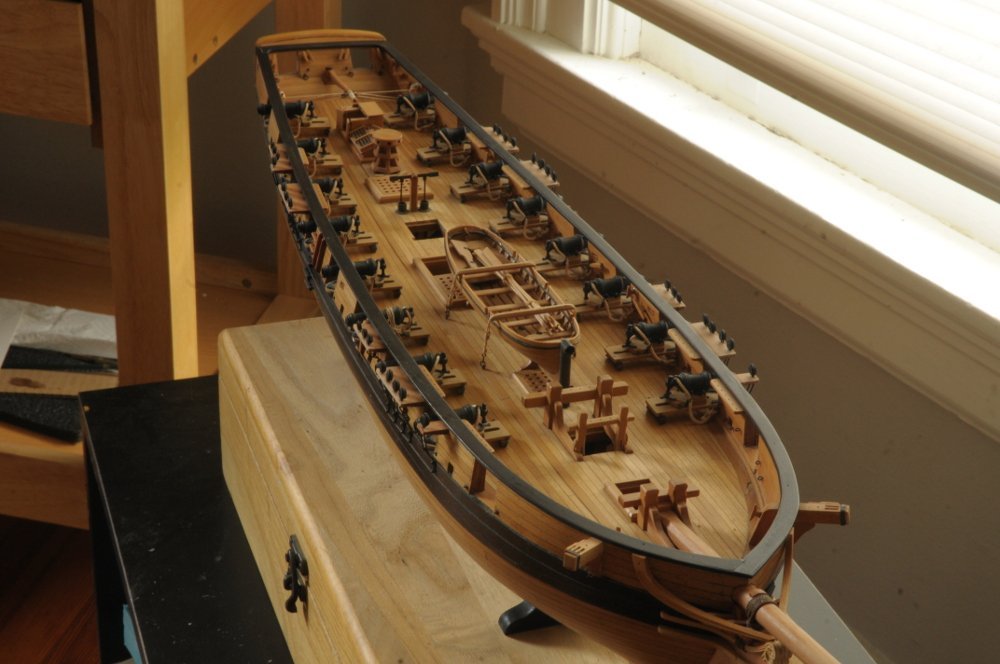
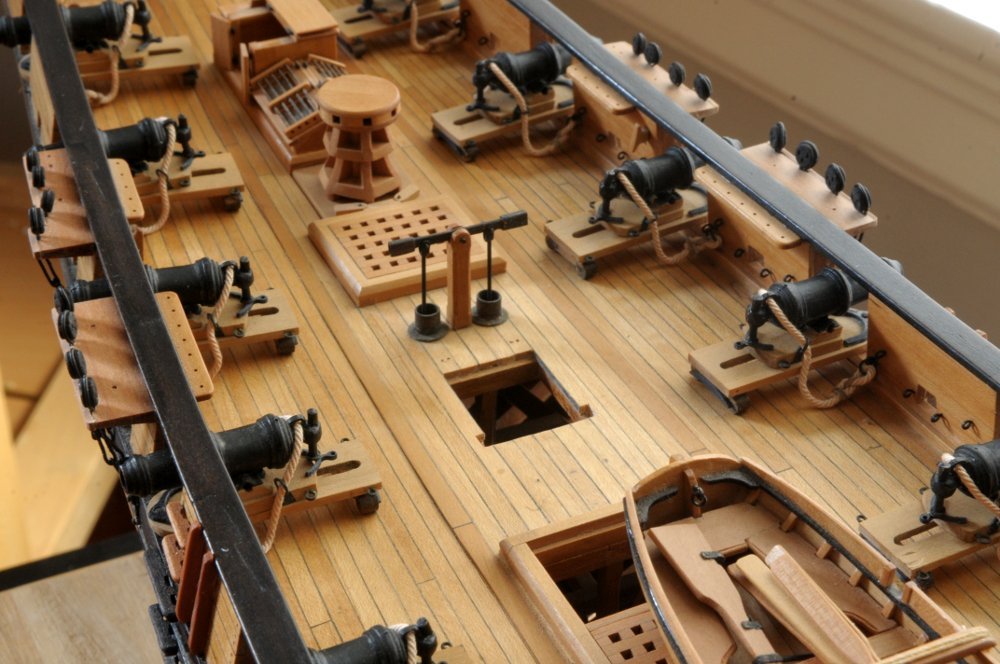
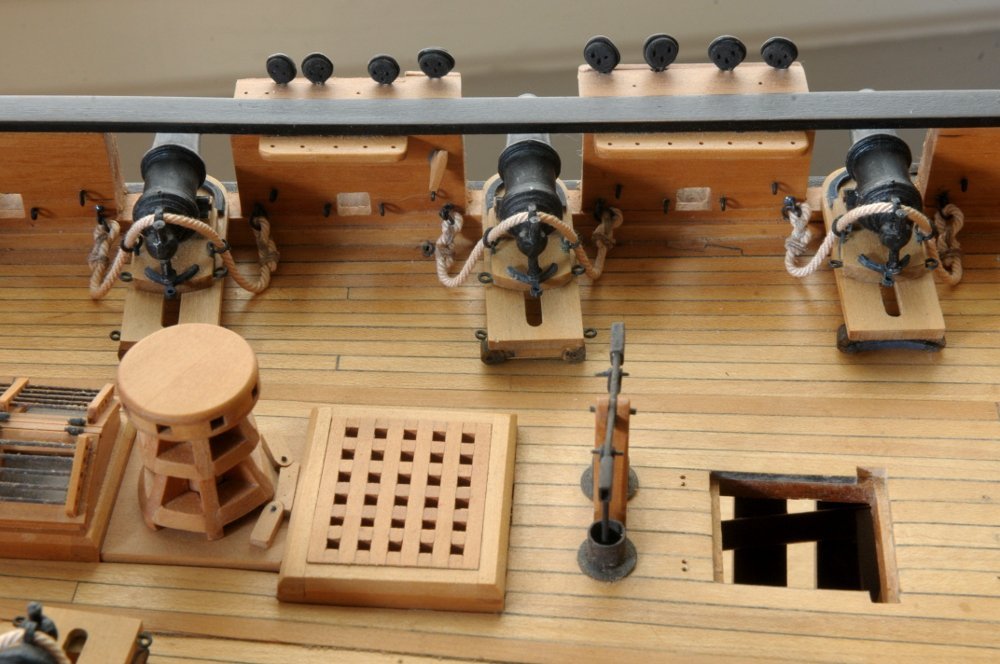
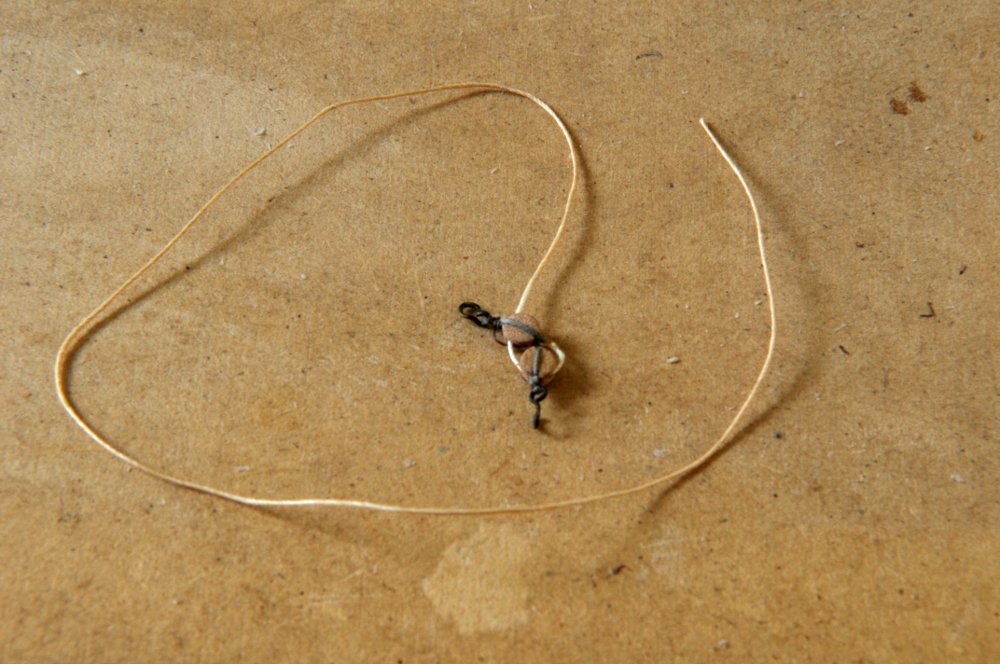
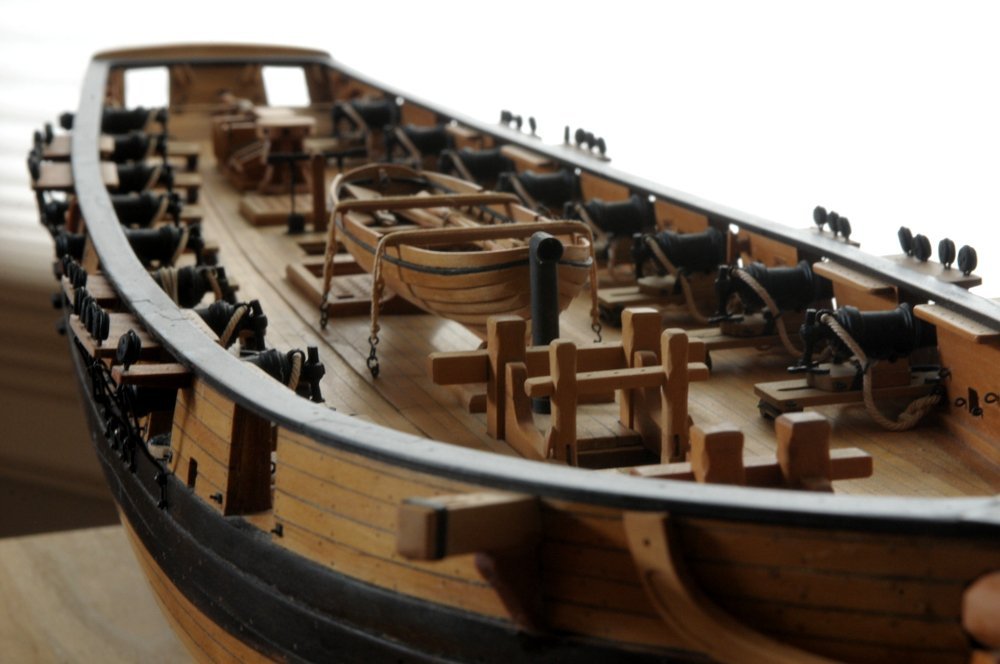
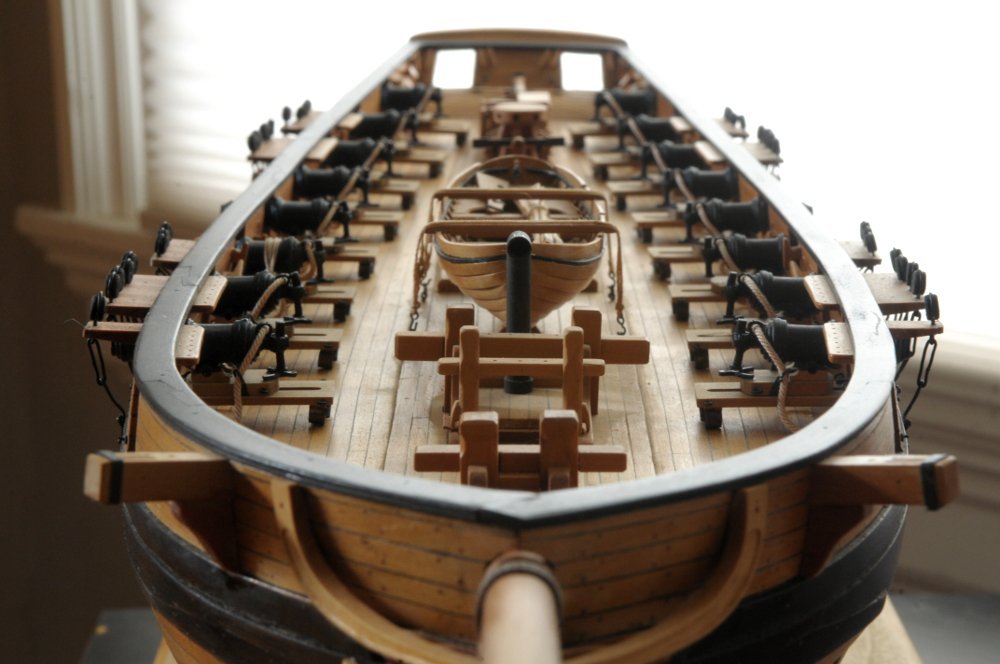
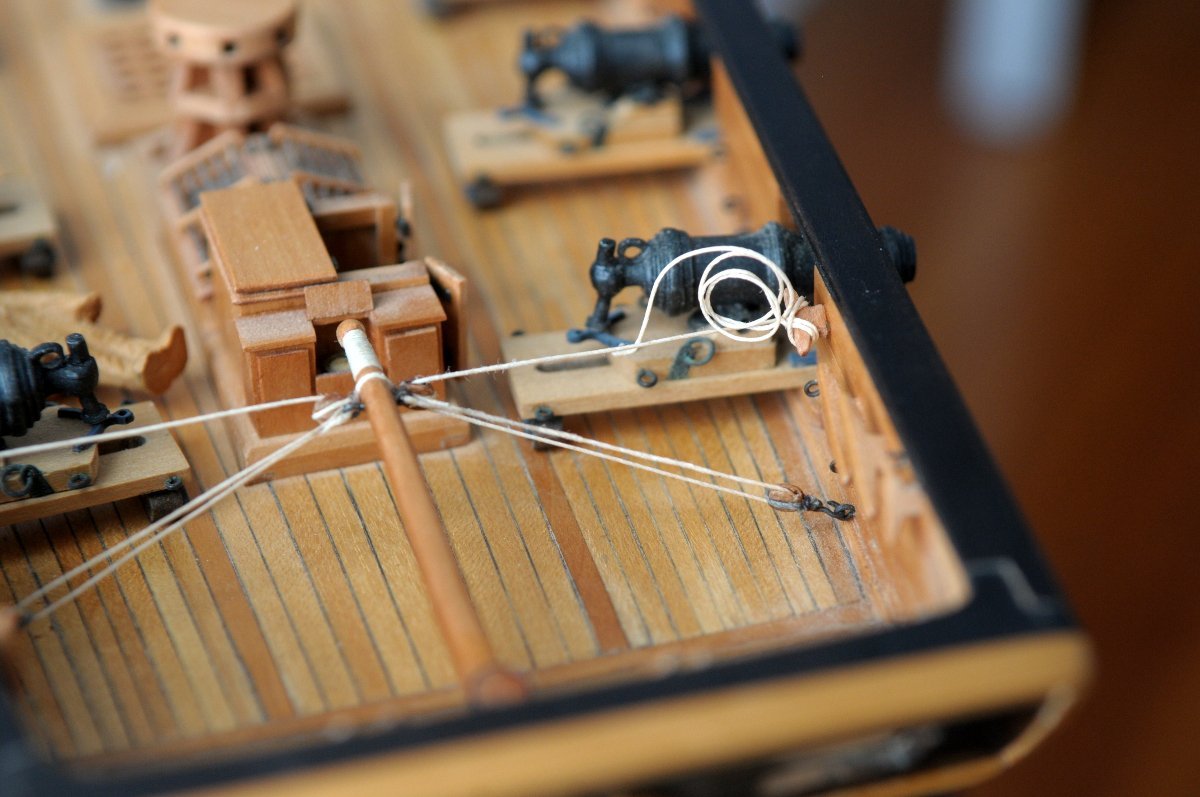
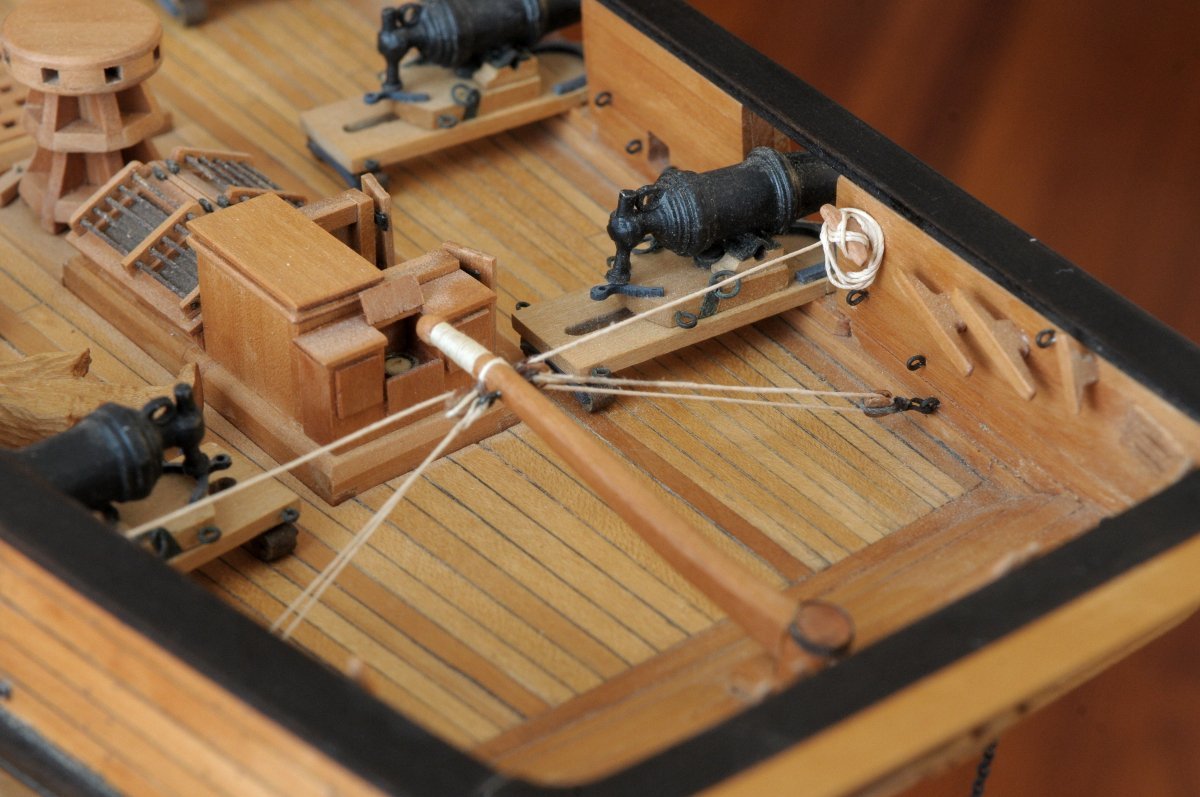
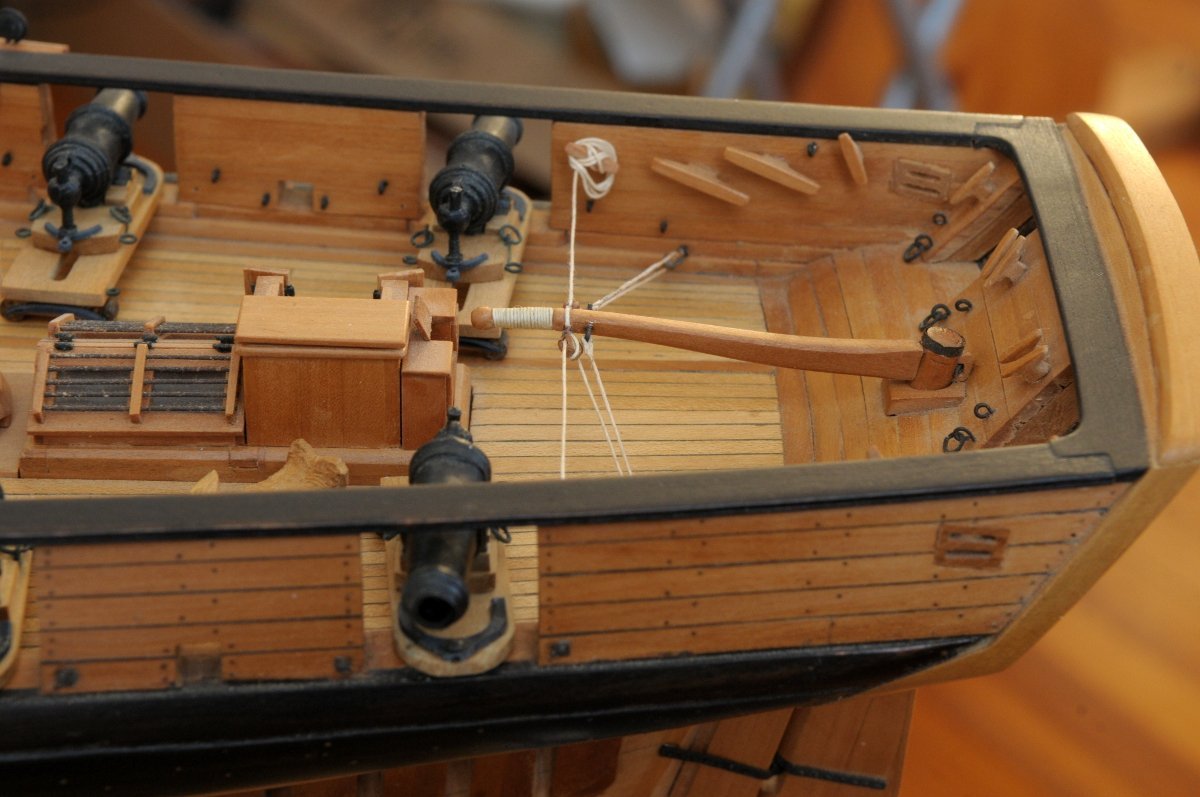
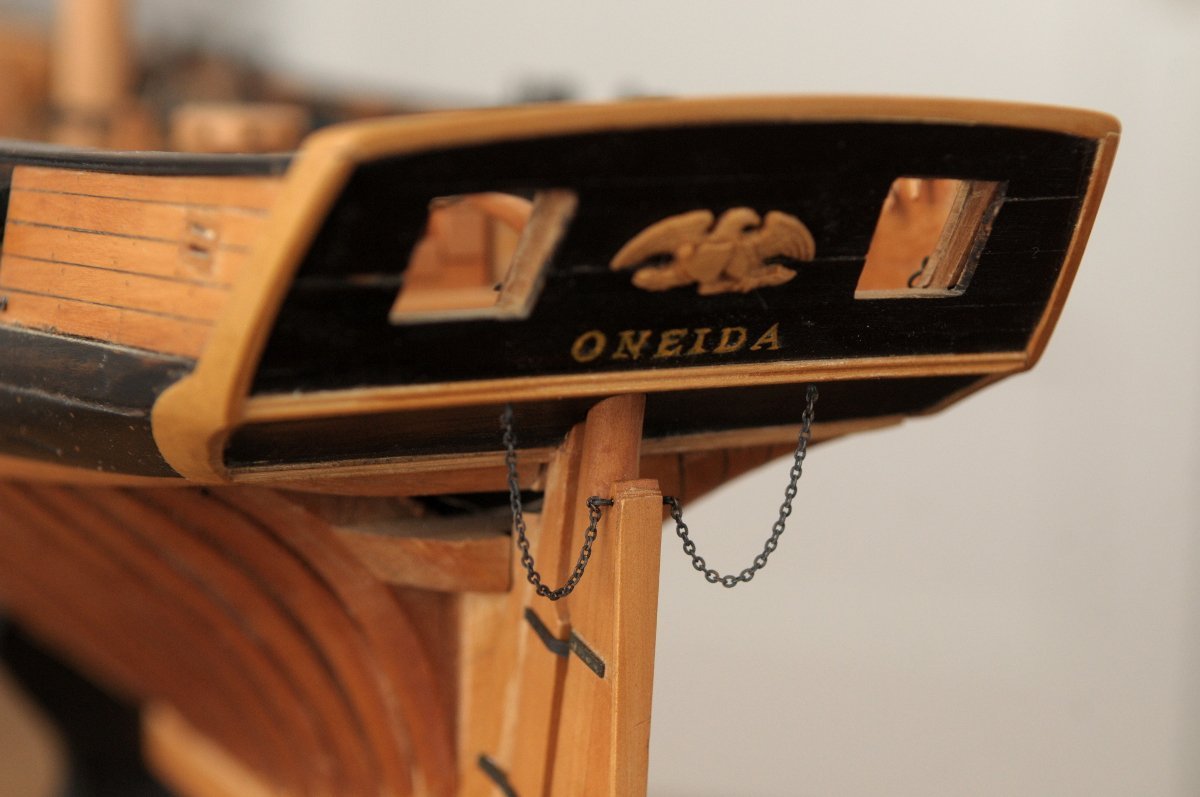
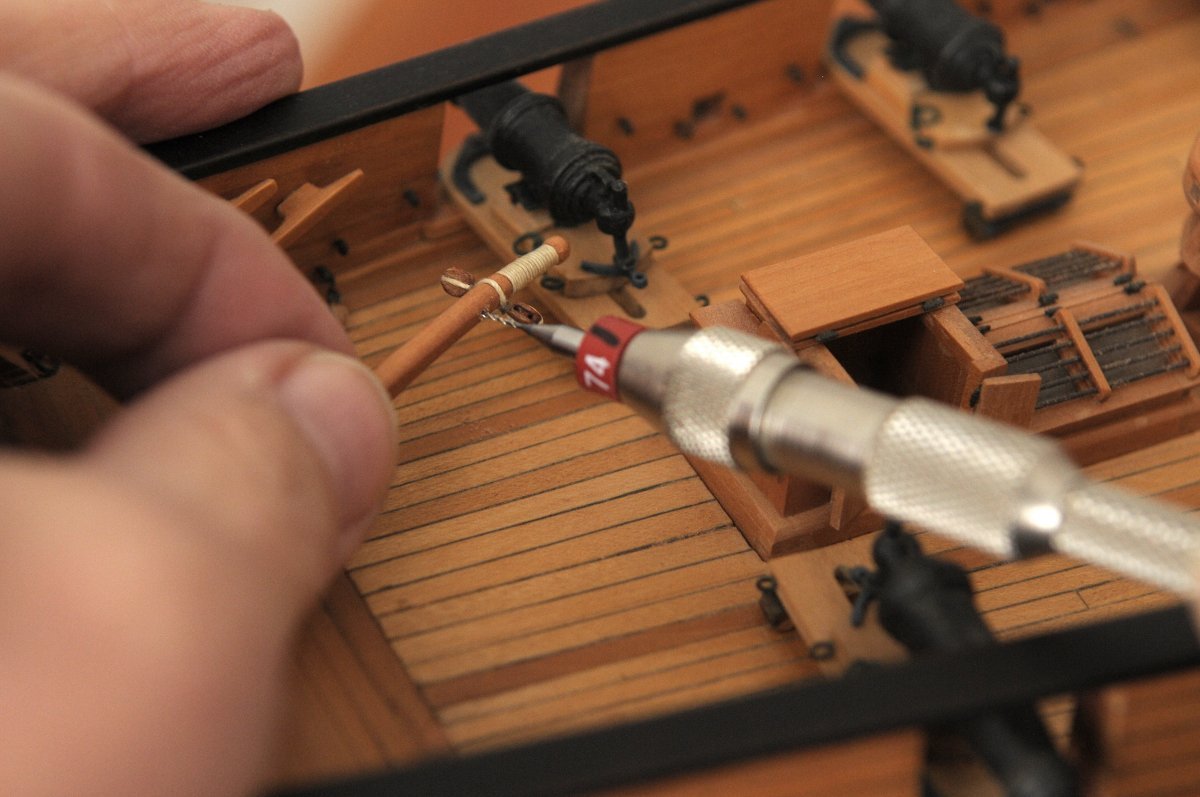
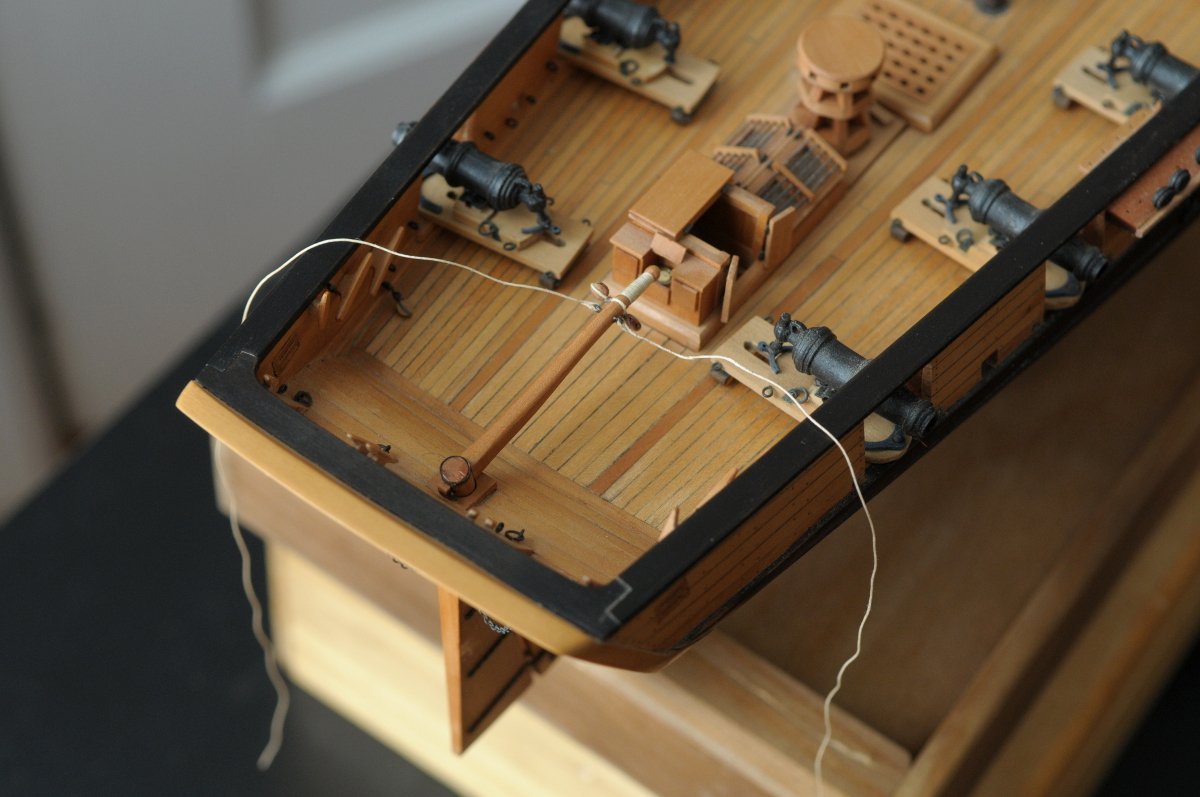
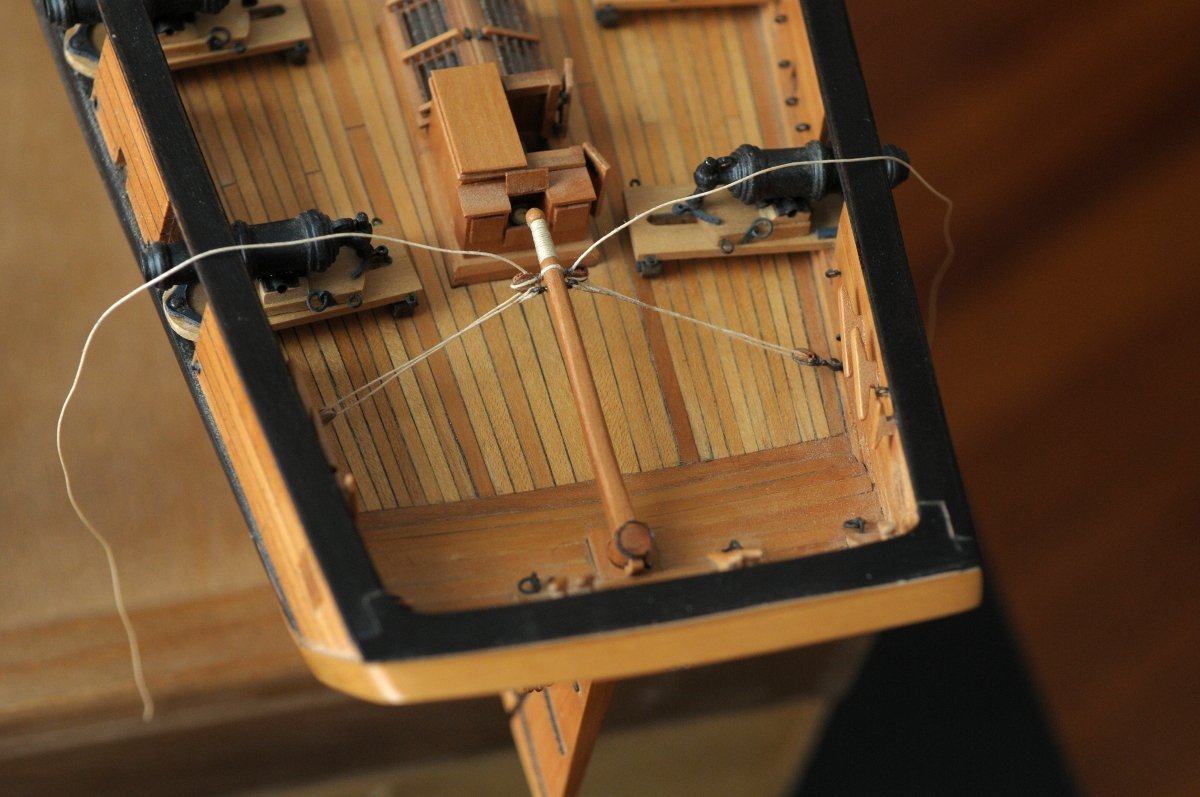
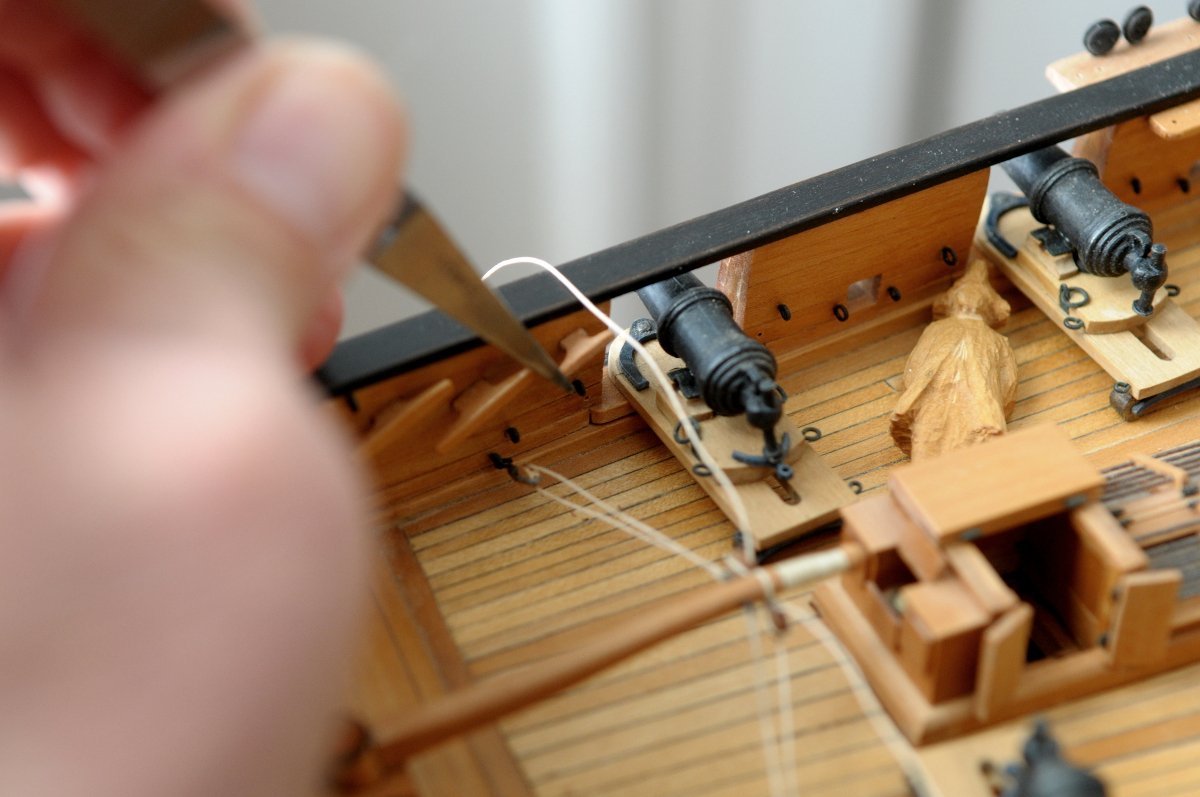
Thank you cisco. Thank you, Johann--your model is extraordinary, and I can only aspire to the accuracy and detail that you are able to accomplish! I have been working--very slowly. First, I realized that I need to remove the carronades to make the breeching ropes. Unfortunately, I had glued them to the deck!! Fortune smiled though, and the upper part of the carriages were NOT glued to the lower bed (except for one), and I was able to remove the carronades-- Here they are, with breeching ropes partly done. They need to have the correct knot and iron ring attached to each end of the rope. The first five (including the one carronade that I had to forcibly remove from the deck) are done. Beyond those are the rest which have the first end done, then the line threaded through the breeching ring, and the beginning loop of the second knot lightly glued to hold it for seizing-- This is my method for completing the breeching knot after the first seizing is done. Using a short piece of line, and tweezers, form a simple overhand knot-- Get it oriented correctly-- Position it at the right spot and pull it tighter-- Finish up by giving it a good tug-- The loose ends are then wrapped a turn around, and glued with a dab of white glue. After dry, the ends are snipped close. It's a shortcut, I know, but looks fine. Now the carronades can be reinstalled, and the eyelets glued into predrilled holes (done many years ago now!!) in the bulwarks-- Next, I will need to make about 30 more of these training tackles-- Closing with a couple photos of Oneida-- Ron
-
Thanks everyone for the compliments! Yes, Michael, you said that well. Ron
-
So glad to see you back in the shop, Michael. It's always amazing to see what you do. And the muse can be fickle, to be sure. Ron
-
Andrew, I have a friend who once owned a Lightning (I don't recall the number), and he built a very fine model based off the Dumas kit. Everything more accurate to the actual boat--I was impressed with his details on the mast. He's the guy who actually got me into modeling. Good luck with yours. Ron
-
Just catching up on your build, Håkan. I can tell it's going to be a beautiful model. Ron
-
Cutter Alert 1777 by Dali - FINISHED - scale 1:48
rlb replied to Dali's topic in - Build logs for subjects built 1751 - 1800
Piotrek, I wish I hadn't missed seeing this before now! You have built a beautiful model in every aspect. Ron -
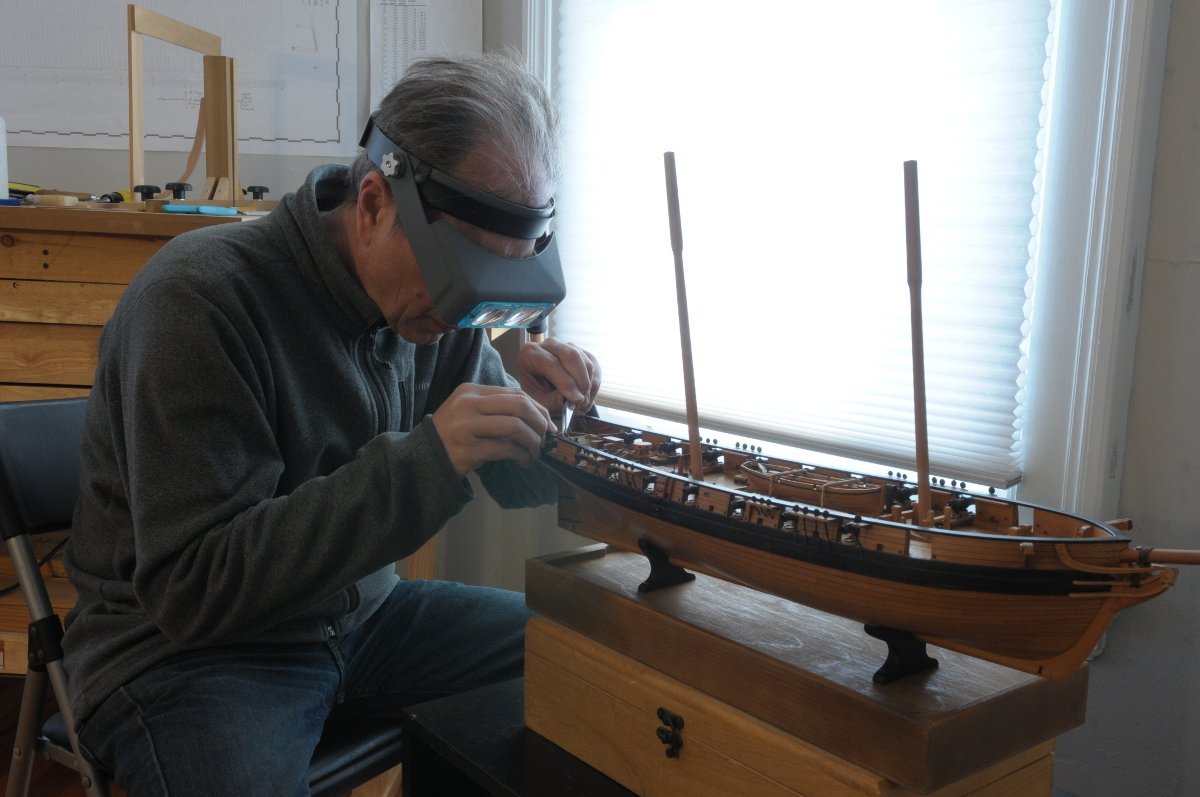
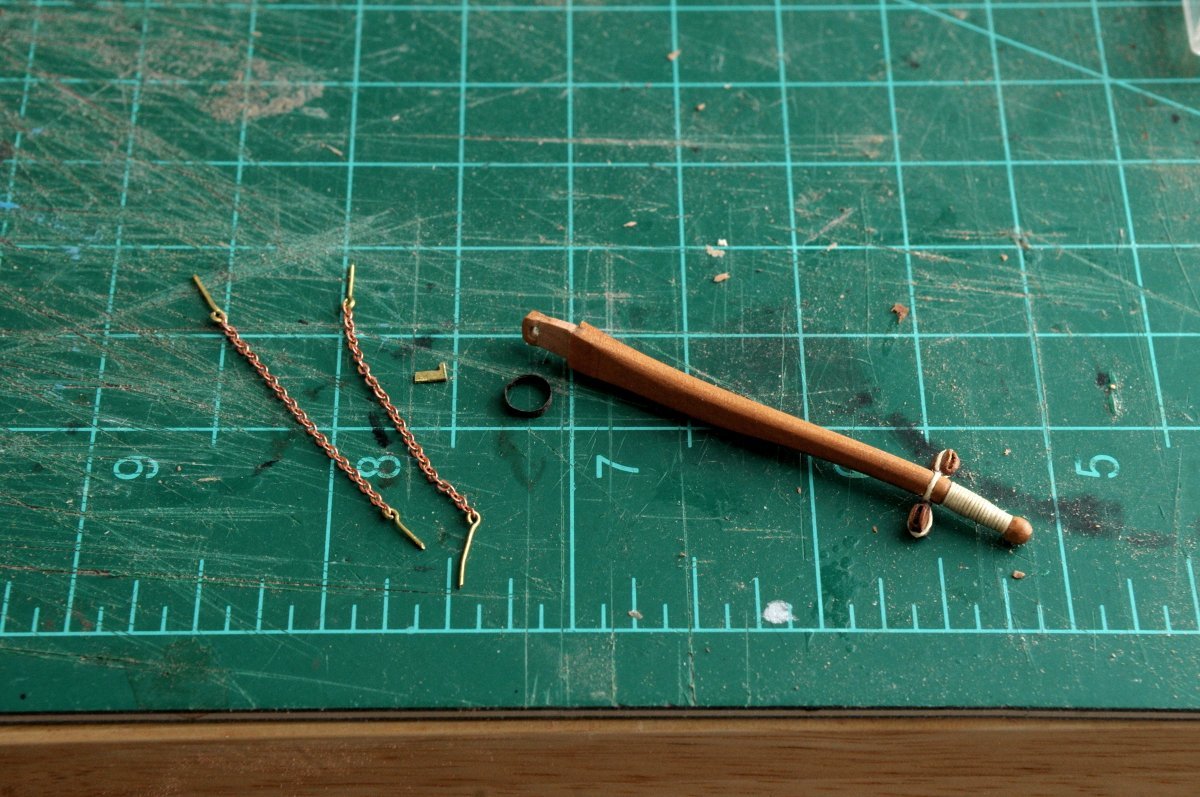
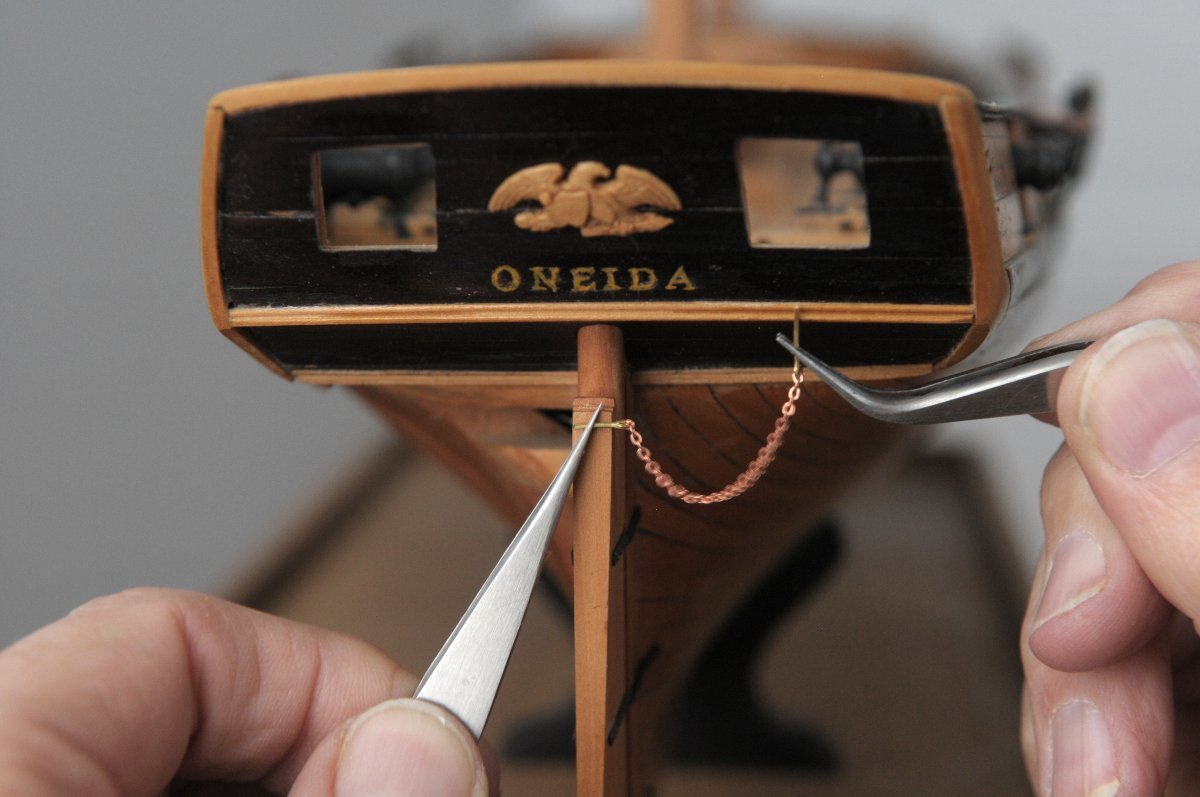
Thanks all for looking in, comments, and hitting the like. Continuing with the rudder work, here are the rudder chains, and tiller parts-- The chains are test for the length and drape-- And after blackening, attached-- I cringe at the poor planking of the transom (some shrinkage gaps), and my less-than-precise painting! After gluing the tiller to the rudder head, I realized I need to drill some holes for eyebolts for the tiller rope. Of course, this should have been done before gluing the tiller on-- Here are the eyebolts and tiller ropes attached-- Then threaded through the blocks on the bulwarks, and back through the blocks on the tiller-- Ah, but what to do with the loose ends? In the Charles G. Davis illustration that I followed for this, the ropes go to a ship's wheel. But there is no wheel in this case. I reasoned that there should be cleats on the bulwarks to fasten the ropes to. These had to be added-- I'm not sure why Lieutenant Woolsey decided to take a nap during this work. Maybe he overindulged last night. After tying the rope off to the cleat, a rough coil was made by wrapping the rope (wet with diluted PVA) around a drill bit-- This was draped over the cleat, with much massaging and rewetting, to try and get it to hang sort of realistically-- After finishing this (of course), I remembered that one of Bernard Frolich's brig models with a tiller may have shown me what to do here. I checked, and yes, there are cleats on the bulwarks. However, the arrangement of the blocks and rope is a little different, and it looks functionally superior to what I did. Here is yours truly working-- Ron
-
Thanks everyone for your replies and suggestions. Jeff, I wasn't sure where to go to see your method. (I found it.) I think the last one, from Thanasis, is the closest to what I remember seeing. Ron
-
I'm not sure if anyone can help, but 6-9 months ago, someone posted their method for stropping an eyehook to a block that looked miles better than the frustrating, fiddly way I was doing it. There was some sort of looping knot that they started with. I thought I copied the page, or the instructions, or saved an image, but I can't seem to find anything now. I'd be interested to see how you do it, or if you know what I'm talking about, before I start down the road of doing about 60 of these. Thanks for any help, Ron
-
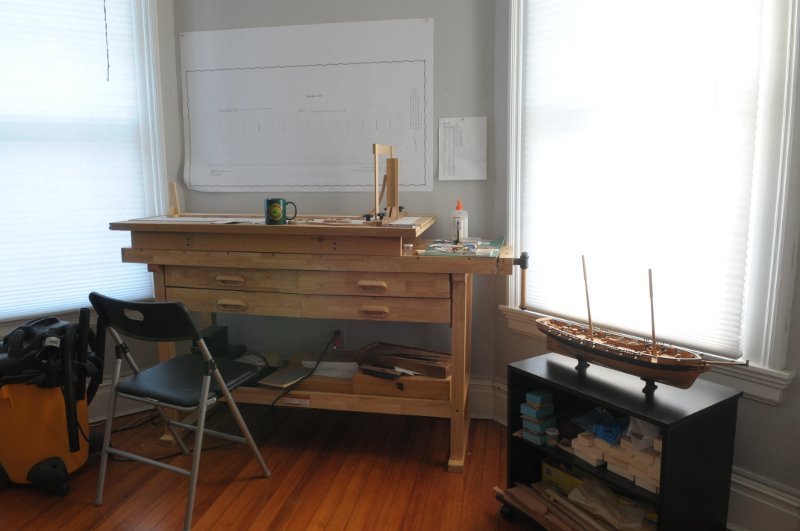
Thank you, Roger. Some activity in the shipyard!! Euryalus has left my living room and has come upstairs to join Oneida in the workshop. This displaces Oneida to a smaller area, but I think that will be okay-- The carronades have been glued in place-- Next, they will all be "stowage rigged" as the one third from the right on the starboard side in the photo. I just have to remember how I did that one--about 10 years ago. The rudder has been glued on-- That's all for now, Ron
-
HMS Euryalus 1803 by rlb - 1:48 scale
rlb replied to rlb's topic in - Build logs for subjects built 1801 - 1850
Thanks again, Allan! Ron- 122 replies
-
- 2
-
-
- Euryalus
- Plank-on-frame
- (and 4 more)
-
HMS Euryalus 1803 by rlb - 1:48 scale
rlb replied to rlb's topic in - Build logs for subjects built 1801 - 1850
Hi Hakan, Yes, Allan and Wayne, the authors of the Euryalus books and plans, were able to help me out. But I am still looking for a used copy of Vol 1 (with the plans included). Ron- 122 replies
-
- 3
-
-
- Euryalus
- Plank-on-frame
- (and 4 more)
-
HMS Euryalus 1803 by rlb - 1:48 scale
rlb replied to rlb's topic in - Build logs for subjects built 1801 - 1850
Allan, Yes, I am watching Matiz! Stunning progress! His log is (and will be) a great resource. Also Clay (cfn1803) looks like he may be working on his again. Ron- 122 replies
-
- 3
-
-
- Euryalus
- Plank-on-frame
- (and 4 more)
-
HMS Euryalus 1803 by rlb - 1:48 scale
rlb replied to rlb's topic in - Build logs for subjects built 1801 - 1850
Thanks Hakan, you are welcome to pull up a chair, though not much is happening at the moment! This is going to be a real learning experience for me--hope to make some more progress soon. Ron- 122 replies
-
- 4
-
-
- Euryalus
- Plank-on-frame
- (and 4 more)
-
Brig Le FAVORI 1806 by KORTES - 1:55
rlb replied to KORTES's topic in - Build logs for subjects built 1801 - 1850
This ship will be beautiful. Thank you. Ron

