


rlb
-
Posts
655 -
Joined
-
Last visited
Reputation Activity
-

 rlb got a reaction from Elia in US Brig Oneida 1809 by rlb - The Lumberyard - 1:48 scale - POF - Lake Ontario Warship
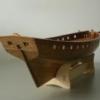
I spent the last week lashing down the carronades--
At the bow are the tackles for the two 6-pounder cannon, and also their breeching lines.
The two carriages are nearing completion here, black monofilament fishing line was used for the truck "pins"--
After they were finished, fitting the breeching lines was next. One end was lashed to it's eyebolt and temporarily fixed into the bulwark. The line was checked for length, allowing for a loop around the cascabel, and the fastening to the other eyelet--
The cascabel loop was temporarily tied, as well as the first lashing of the eyebolt, and the length was checked again--
As the first breeching line was finished, the second could be made up more quickly using the first as a guide, without needing to check it in place on the ship--
I've reached my stopping point for the day.
Ron
-

 rlb got a reaction from kgstakes in US Brig Oneida 1809 by rlb - The Lumberyard - 1:48 scale - POF - Lake Ontario Warship
I spent the last week lashing down the carronades--
At the bow are the tackles for the two 6-pounder cannon, and also their breeching lines.
The two carriages are nearing completion here, black monofilament fishing line was used for the truck "pins"--
After they were finished, fitting the breeching lines was next. One end was lashed to it's eyebolt and temporarily fixed into the bulwark. The line was checked for length, allowing for a loop around the cascabel, and the fastening to the other eyelet--
The cascabel loop was temporarily tied, as well as the first lashing of the eyebolt, and the length was checked again--
As the first breeching line was finished, the second could be made up more quickly using the first as a guide, without needing to check it in place on the ship--
I've reached my stopping point for the day.
Ron
-
rlb got a reaction from Elia in US Brig Oneida 1809 by rlb - The Lumberyard - 1:48 scale - POF - Lake Ontario Warship
Thanks, JJ.
Now that I have finished stropping the blocks, the ship comes out on to the table for rigging the carronades, and two 6-pounder cannon--
.
Tackle lines have been cut, dyed a little darker, and are in process of tying to an eyelet in one of each pair of blocks--
I had assembled one of the 6-pounder cannon carriages a while ago, now I need to assemble the other one, as well as finish the first with cap-squares, breeching rings and other eyelets. I have two extra axles pieces here!--
All for now,
Ron
-
rlb got a reaction from Elia in US Brig Oneida 1809 by rlb - The Lumberyard - 1:48 scale - POF - Lake Ontario Warship
Thanks Håkan.
Only a few photos today, but I'm happy to report that I worked up the motivation to finish the carronade tackle blocks. This shows the 13 sets that were done, and last four sets (16 blocks) I still needed to do--
The total here is 17 sets, because one is on the already rigged carronade that has been on the ship for years. And here they are done--
That was probably the least pleasant task I have had to do on the build so far (literally taking me years of off and on work), and I'm glad they are finished!
And here is one of the topgallant masts roughed out, next to a topmast, and the other topgallant blank--
Next is rigging the carronades, and continuing work on the masts.
All for now,
Ron
-
 rlb reacted to Blue Ensign in HMS Indefatigable 1794 by Blue Ensign - FINISHED - Vanguard Models - 1:64 scale
Post One Hundred and Thirty-nine
Channels
I made up the channels and trial fitted back in January (Post 127).
3194
Now that the inboard fittings have been done this is an opportune time to complete the job.
3543
Small weights are used to maintain the level until the glue sets.
3546
The brackets are added before painting, the underside of the channels were painted before fitting.
3548
3552
3555
3556
3560
A final tidy-up of the Topsides can now be done.
B.E.
04/02/2024
-
 rlb got a reaction from j21896 in US Brig Oneida 1809 by rlb - The Lumberyard - 1:48 scale - POF - Lake Ontario Warship
I spent the last week lashing down the carronades--
At the bow are the tackles for the two 6-pounder cannon, and also their breeching lines.
The two carriages are nearing completion here, black monofilament fishing line was used for the truck "pins"--
After they were finished, fitting the breeching lines was next. One end was lashed to it's eyebolt and temporarily fixed into the bulwark. The line was checked for length, allowing for a loop around the cascabel, and the fastening to the other eyelet--
The cascabel loop was temporarily tied, as well as the first lashing of the eyebolt, and the length was checked again--
As the first breeching line was finished, the second could be made up more quickly using the first as a guide, without needing to check it in place on the ship--
I've reached my stopping point for the day.
Ron
-
 rlb got a reaction from Dowmer in US Brig Oneida 1809 by rlb - The Lumberyard - 1:48 scale - POF - Lake Ontario Warship
I spent the last week lashing down the carronades--
At the bow are the tackles for the two 6-pounder cannon, and also their breeching lines.
The two carriages are nearing completion here, black monofilament fishing line was used for the truck "pins"--
After they were finished, fitting the breeching lines was next. One end was lashed to it's eyebolt and temporarily fixed into the bulwark. The line was checked for length, allowing for a loop around the cascabel, and the fastening to the other eyelet--
The cascabel loop was temporarily tied, as well as the first lashing of the eyebolt, and the length was checked again--
As the first breeching line was finished, the second could be made up more quickly using the first as a guide, without needing to check it in place on the ship--
I've reached my stopping point for the day.
Ron
-
rlb got a reaction from kgstakes in US Brig Oneida 1809 by rlb - The Lumberyard - 1:48 scale - POF - Lake Ontario Warship
Thanks, JJ.
Now that I have finished stropping the blocks, the ship comes out on to the table for rigging the carronades, and two 6-pounder cannon--
.
Tackle lines have been cut, dyed a little darker, and are in process of tying to an eyelet in one of each pair of blocks--
I had assembled one of the 6-pounder cannon carriages a while ago, now I need to assemble the other one, as well as finish the first with cap-squares, breeching rings and other eyelets. I have two extra axles pieces here!--
All for now,
Ron
-
 rlb got a reaction from bhermann in US Brig Oneida 1809 by rlb - The Lumberyard - 1:48 scale - POF - Lake Ontario Warship
I spent the last week lashing down the carronades--
At the bow are the tackles for the two 6-pounder cannon, and also their breeching lines.
The two carriages are nearing completion here, black monofilament fishing line was used for the truck "pins"--
After they were finished, fitting the breeching lines was next. One end was lashed to it's eyebolt and temporarily fixed into the bulwark. The line was checked for length, allowing for a loop around the cascabel, and the fastening to the other eyelet--
The cascabel loop was temporarily tied, as well as the first lashing of the eyebolt, and the length was checked again--
As the first breeching line was finished, the second could be made up more quickly using the first as a guide, without needing to check it in place on the ship--
I've reached my stopping point for the day.
Ron
-
 rlb got a reaction from usedtosail in US Brig Oneida 1809 by rlb - The Lumberyard - 1:48 scale - POF - Lake Ontario Warship
I spent the last week lashing down the carronades--
At the bow are the tackles for the two 6-pounder cannon, and also their breeching lines.
The two carriages are nearing completion here, black monofilament fishing line was used for the truck "pins"--
After they were finished, fitting the breeching lines was next. One end was lashed to it's eyebolt and temporarily fixed into the bulwark. The line was checked for length, allowing for a loop around the cascabel, and the fastening to the other eyelet--
The cascabel loop was temporarily tied, as well as the first lashing of the eyebolt, and the length was checked again--
As the first breeching line was finished, the second could be made up more quickly using the first as a guide, without needing to check it in place on the ship--
I've reached my stopping point for the day.
Ron
-
 rlb got a reaction from ccoyle in US Brig Oneida 1809 by rlb - The Lumberyard - 1:48 scale - POF - Lake Ontario Warship
I spent the last week lashing down the carronades--
At the bow are the tackles for the two 6-pounder cannon, and also their breeching lines.
The two carriages are nearing completion here, black monofilament fishing line was used for the truck "pins"--
After they were finished, fitting the breeching lines was next. One end was lashed to it's eyebolt and temporarily fixed into the bulwark. The line was checked for length, allowing for a loop around the cascabel, and the fastening to the other eyelet--
The cascabel loop was temporarily tied, as well as the first lashing of the eyebolt, and the length was checked again--
As the first breeching line was finished, the second could be made up more quickly using the first as a guide, without needing to check it in place on the ship--
I've reached my stopping point for the day.
Ron
-
rlb reacted to matiz in HMS EURYALUS by Matiz - FINISHED - scale 1:56
Hi,.......Thanks, master Alberto, thanks to all for the like ❤️
-
rlb reacted to KORTES in Brig Le FAVORI 1806 by KORTES - 1:55
I went back to the old technology. And got the expected result. Now the filling has to be done.
-
rlb reacted to Wintergreen in Atlantica by Wintergreen – Scale 1:30 - POF - sail training ketch - a smack of English heritage
Thank you @Mark Pearse, too kind 🙂
So, drilling for the prop shaft then... or probably arboring, right?
It seemed from the plans that the shaft is parallell to the keel. That's convenient. So I dreamed up a small contraption to get hight and angle (mostly) right.
With a sharp drill bit I bore away.
It came almost at right height. Lucky me I'm not installing an engine. The surface where it surfaced is the mizzen mast step. There was a neat little cavity to step the mast in. That cavity is a fair bit bigger now, and makes for easier stepping. You have to look on the bright side of life 😉
If you think that the interior has somekind of shine to it, it is correct. I brushed on a layer of lacquer, water based. Another thing you can admire is the tight to no gaps between the planks. It seems I made something right during planking 😄
(no, I am not being humble today. This cold I got really doesnt wanna give in, so I trying my best to keep the spirits high. No @KeithAug , not THOSE spirits!)
Pax et bonum
-
rlb reacted to CPDDET in How to "unstick" this chuck from the mill spindle?
I use a piece of brass round stock . Same diameter as the sherline knockout bar which didn't come with my sherline mill. I've always been fearful of ruining threads using the bolt method.
-
rlb reacted to druxey in How to "unstick" this chuck from the mill spindle?
And now, a really good clean up, I think.
-
rlb reacted to Roger Pellett in How to "unstick" this chuck from the mill spindle?
Correction of my post from this AM. The knockout bar furnished by Sherline for removing tools from the #1 Morse taper headstock is 5/16” diameter, not 1/2”.
-
 rlb got a reaction from Canute in How to "unstick" this chuck from the mill spindle?
Got it!! After a few more vigorous taps (still with a very small hammer) it came loose--
Thanks everyone for your help--this case is now closed.
Ron
-
 rlb reacted to KORTES in Brig Le FAVORI 1806 by KORTES - 1:55
I made a technological mistake and here is the result. I will have to try again.🙂 Meanwhile I am tuning the Proxxon circular saw, a gift for the New Year. Some components are very crude and require some changes. My best regards
-
 rlb got a reaction from CiscoH in How to "unstick" this chuck from the mill spindle?
Got it!! After a few more vigorous taps (still with a very small hammer) it came loose--
Thanks everyone for your help--this case is now closed.
Ron
-
rlb got a reaction from Canute in How to "unstick" this chuck from the mill spindle?
Thanks for the video, Dziadeczek. He looks like he is tapping harder and with a bigger hammer than I did, so I will probably try this again. The mill sat unused for many years, which might make the chuck harder to dislodge. I did try with a wooden wedge, but the wedge broke apart.
Ron
-
rlb got a reaction from Canute in How to "unstick" this chuck from the mill spindle?
Thanks everyone for your advice.
Sherline does sell a "knockout bar" as described by Roger Pellet, so perhaps they expect light tapping (with a soft hammer) would not be harmful? I do take mnl's caution seriously though, and I have also looked into the Jacobs chuck wedge sets. With shipping and tax one of those would be around $30, not the end of the world, but it would be easy enough to make a similar "U" shaped hardwood wedge that I think I will try first.
-
 rlb got a reaction from mtaylor in How to "unstick" this chuck from the mill spindle?
Got it!! After a few more vigorous taps (still with a very small hammer) it came loose--
Thanks everyone for your help--this case is now closed.
Ron
-
rlb got a reaction from Canute in How to "unstick" this chuck from the mill spindle?
Thanks Pat and Alan.
I was able to find a draw bar in the box of accessories, and thread it into the top of the chuck through the spindle assembly.
I gave it a few taps with a small hammer but it didn't budge. I'm nervous of hitting it too hard. But am I on the right track?
Ron
-
 rlb got a reaction from thibaultron in How to "unstick" this chuck from the mill spindle?
Got it!! After a few more vigorous taps (still with a very small hammer) it came loose--
Thanks everyone for your help--this case is now closed.
Ron