


Bob Cleek
-
Posts
3,358 -
Joined
-
Last visited
Content Type
Profiles
Forums
Gallery
Events
Posts posted by Bob Cleek
-
-
3 hours ago, wefalck said:
But beware, it may make you drool, when you see what kind of attachments etc. once were available.
And still are available on eBay or from after-market manufacturers... for a price.

Check out "Mr Pete 222" or "Tubal Cain" (same guy) on YouTube. He's a retired shop teacher with great instructional videos on the Atlas/Craftsman 12' lathes. Everything you even wanted to know.
I believe you can look up the age of yours with the serial number on lathes.co.uk under the Craftsman entries. There were a number of refinements over the several decades that this lathe was manufactured. There are many of them floating around and so parts are readily available. They are somewhat of a cult thing now. They aren't state of the art anymore with CNC and DRO features, but they'll do anything you could possibly need to do (including milling with the milling attachment) on a medium to light duty 12" manual lathe. If you have one that hasn't been "destroyed" along the way by misuse, they are certainly worth restoring. They're worth money even if they are trashed because of the continuing market demand for parts. (Threading gear sets are still available if you are missing any. Be careful not to "crash" the gears and damage the gear teeth. The gears are made of Zamac, a relatively weak alloy and it's not difficult to break teeth if you don't know what you are doing operating the lathe. Not to scare you off, but lathes are not a machine you ever want to learn how to use by just "fiddling" with them and they can be very dangerous in the hands of an untrained operator. All the operating manuals for these lathes are available for free online. Google them up.
I love mine. I picked it up along with just about every possible attachment (except a taper jig, darn it... but those are still made by an aftermarket manufacturer) from a retired old school machinist's widow for a very reasonable price.
-
2 hours ago, paul ron said:
i once asked the same question many years ago and no one heard of doing a ballentine. flat coils will foul if allowed to run.
when i spent time on an old schooner, i learned the proper way to coil a working rope using a ballentine technique described below...
https://captnmike.com/2011/10/03/coiling-line-using-the-ballantine-coil-on-the-adventuress/
was this ballentine method of coiling ropes used in the 1800s?
That's an excellent explanation of how to make a Ballentine coil. There are a number of ways to coil falls for the same purpose as a Ballentine coil. Other's make use of "figure-eight" faking, and so on. The original question, if I understand it correctly, addressed a "Flemished" line coil where the line lays in a tight flat coil on the deck without any overlapping turns.
- Keith Black and Scottish Guy
-
 2
2
-
On 4/29/2024 at 6:13 PM, BANYAN said:
However, I must offer a point of difference in opinion WRT to how they were unwound. When reforming the coils, or taking the coil in hand, we would 'unwind' it from out to in by grasping the rope/line near the block or securing device, then walking the line out. This was the opposite to the way it was made up, which minimised the risk or tendency of the rope to kink, and allowed the rope to unwind with its lay. That said, other Services/ships may have done it differently.
Yes, you have stated it correctly. I got it bass-ackwards. Sometimes it's a lot easier to do something relying on "muscle memory," than it is to write an instruction on how to do it!
The photo above is indeed correct. What I should have said was that the coil begins with the bitter end in the center and is rotated until the line is fully coiled with the working end of the line running off of the outside of the coil. Obviously. it one tried to rotate the coil on the flat of the deck with the working (belayed) end in the center, the line would twist up between the center of the coil and the belaying point and get all kinky! Thanks for spotting the error!
BOB
- Keith Black and Scottish Guy
-
2
-
-
13 hours ago, Marcus.K. said:
- and whenever I will be in New England: this for sure is one of the oh-so-many places I will visit!
It's just a short drive from Mystic Seaport in the town of New Bedford a couple of blocks from the waterfront. It's not in a real "touristy" area, or wasn't when I was last there years ago. New Bedford is, or was, still a working waterfront back then. If whaling is your thing and you're in the area, take the ferry from Hyannis to Nantucket and check out the whaling museum there. It's a very good one as well.
- Marcus.K., mtaylor and Scottish Guy
-
3
-
11 hours ago, Marcus.K. said:
Thanks Bob, for that very intersting insights.
Any idea about the year that New Bedford Flags Signal Flag "Poster" was done?
Hard to say the date on the New Bedford Flags poster. I tried to enlarge it, but I couldn't get a legible look at the date, if any. It's from a Pinterest post that credits it to the New Bedford Whaling Museum's collection. (Home - New Bedford Whaling Museum) You could probably call them and ask. You might get lucky and connect with somebody who could check for you. The "poster" does contain the identity of the printer, although I can read it, and it probably has a copyright date on it somewhere. It looks to have been a printer's advertising "give-away." The New Bedford Whaling Museum isn't a large museum and so staff may be accessible by phone or email, unlike much larger institutions. It's a great museum nonetheless and definitely worth a visit. (Also the home of the largest whaling ship model in the world, Lagoda at 1:2 scale. Lagoda - Wikipedia )
- mtaylor and Scottish Guy
-
2
-
11 minutes ago, allanyed said:
I REALLY appreciate the history and you taking the time to share this information Bob.
Thank you!
Allan
Happy to oblige, Allan! If it weren't for opportunities to share this trivia, I'd have no excuse for storing all of it in my cranial hard drive!
- mtaylor, Scottish Guy and thibaultron
-
1
-
 2
2
-
On 4/27/2024 at 3:09 AM, allanyed said:
This is an interesting question. I did not realize schooners flew pennants with the vessel's name on it but assuming they did, why would the name be backwards on one side? Weren't the letters painted or sewn on each side? If that is the case, there is no reason to have one side backwards. I am curious to know if they actually flew pennants with the name and if so, were they backwards?
Allan
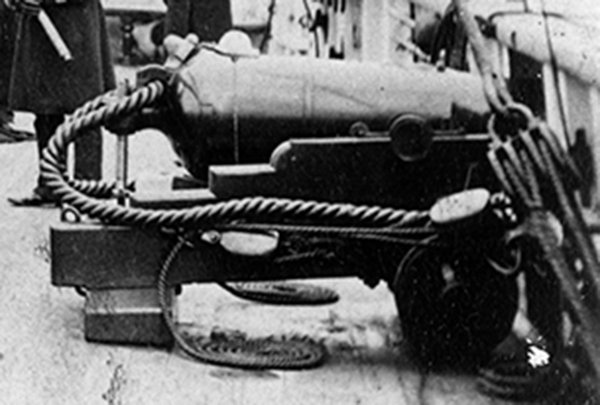
Pennants used to identify individual vessels, be they naval, merchant, or pleasure craft, were commonly carried prior to the wider use of code signals (flags) to indicate the code (usually "five level" - five letters and or numbers) assigned to the vessel by navies, marine insurance companies, and national documentation agencies.
Pennants were rarely opaque with lettering on both sides. Actually, in practice, it was much easier at a distance to identify a signal that wasn't opaque because the sun would shine both on it or behind and through it. If a pennant or signal were opaque, its "shaded side" would appear black at a distance. Additionally, there are advantages to a pennant or signal being made of light cloth which will readily "fly," in light air. In fact, when a square-rigged vessel is running downwind, her signals, ensigns, and pennants on the ship moving at close to the speed of the wind itself, would cause the signals, pennants, and ensigns to "hang limp" and be difficult to see at any distance.
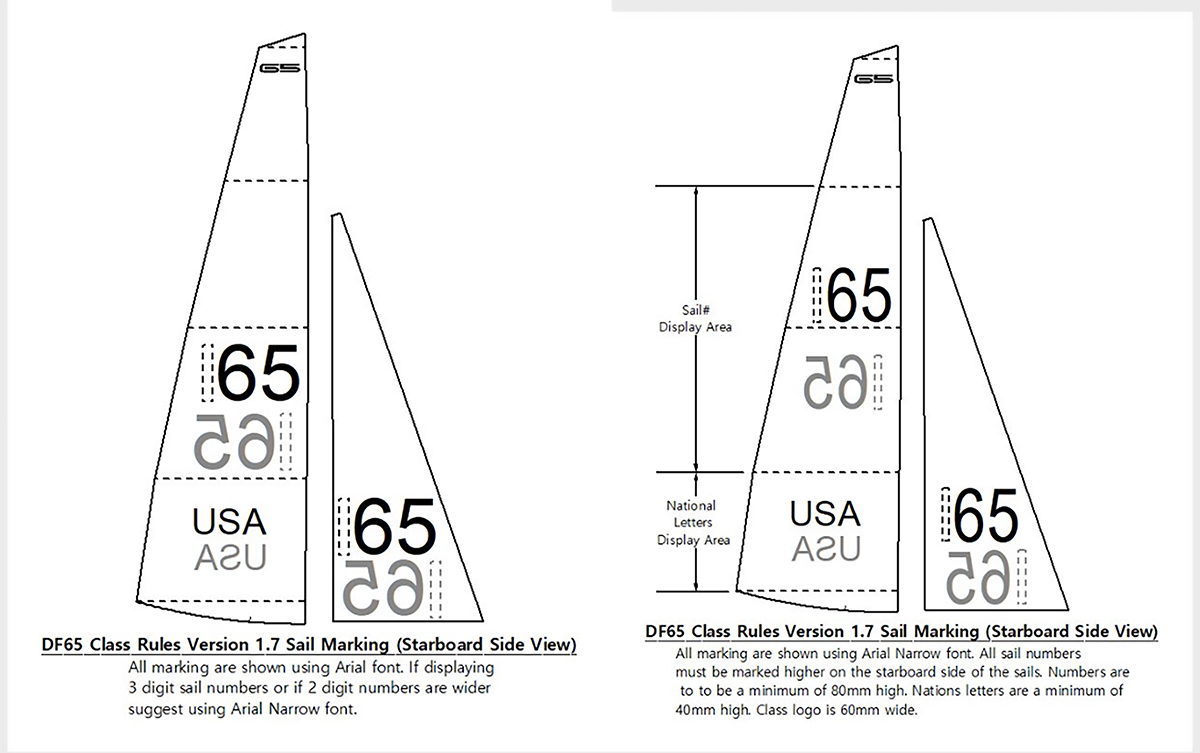
Even today, when racing sailboats routinely show "sail numbers" on their sails to identify themselves, the numbers must appear reversed on the "back side" and no attempt is made to overcome this. The international racing rules require that sail number and class logo, if appropriate, must be shown on both sides of the mainsail in that case each side of the sail will have the number shown "in the right direction." There are very specific universal regulations for the placement of sail numbers on racing yachts which specifically dictate how the obverse and reverse lettering must be applied to a vessel's sails. (See: TRRS | Identification on sails (racingrulesofsailing.org) Today, adhesive-backed numbers and letters are applied to synthetic fabric sails. In earlier times, the letters and numbers were cut out and appliqued to the sail.
In earlier times, several systems, other than identification code signals, were in common use and these are what we commonly see on contemporary paintings. The two primary signals used were a large flag or pennant with the vessel's name on it, or the owner's name, or company name, on it, or a logo of some sort. The latter were usually called "house flags" which designated the identity of the owner of the vessel. When steam power came on the scene, these owner's "house flags" were supplemented by painting the funnels of the steam ships with the colors and logos of the owners' house flags as well.
House flag chart from the 1930's or so:

The house flags and ship name pennants we see in the contemporary paintings serve to identify the vessel in the painting, but in order to fully appreciate the purpose of "naming pennants" and house flags, it has to be understood that until radio communications came into being (first Marconi transmission at sea by RMS Lucania in 1901 and first continuous radio communication with land during an Atlantic crossing ... RMS Lucania in 1903.) there was no way for a ship owner to know much of anything about their vessel until it returned home which, in the case of whaling vessels could be two or three years. Shipping companies, marine insurers, and maritime shipping companies, among others, had a desperate need for news about their ships, but they could only know the fate of their ships, crew, and cargo (though not necessarily in that order!) when the ship showed up. Ships at sea would hail each other when they ran into one another at sea: "What ship? What port?" and sometimes get word back to owners that their ship was seen, on the Pacific whaling grounds, for instance, months or even years earlier, but there was no way to know what was going on with a ship until she returned to her home port. Businesses ashore were desperate to know the fate of ships and shipments and being the first to learn of a particular ship's arrival in port gave a businessman a particular advantage in making investments, commodities trades, purchases, and sales. This was especially true in the United States before the construction of the transcontinental telegraph system owing to the immense size of the nation "from sea to shining sea." For example, in San Francisco, which was for a time shortly after the discovery of gold, isolated from communications with the East Coast, things as simple as newspapers would arrive only by ship and when they did, the race was on to get in line to read the "news of the world." An organization called the "Merchants' Exchange" was created to operate a semaphore telegraph system from Point Lobos at the farthest west point of the San Francisco Península to what came to be called "Telegraph Hill" to communicate the identity of ships arriving off the Golden Gate often many hours before they actually docked and to make East Coast newspapers and other information sources available to local subscribers. On the East Coast, seaport homes had their famous "widows' walks" where the ship captain's wives would look for their husband's ship in the offing to know whether he'd ever return, and they'd know by the house flag which ship was which.
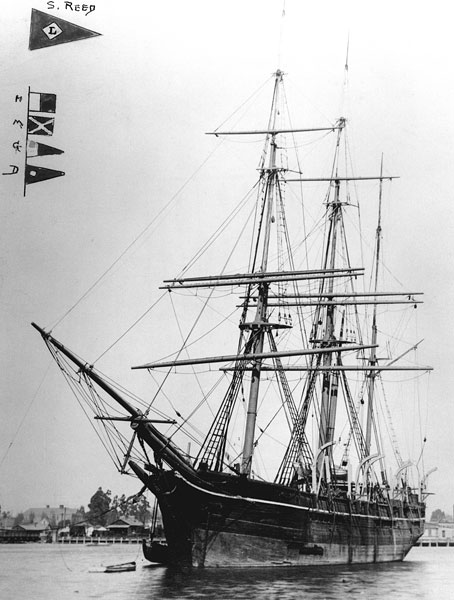
 5 hours ago, Dr PR said:
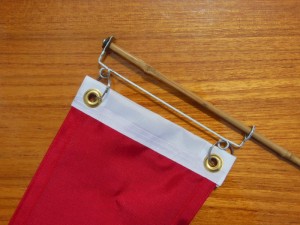
If I remember correctly (it was just a brief bit of the video showing them raising the pennant) the pennant was on a short spar. It appeared one end of the halyard was attached at about the middle of the spar, below the pennant. It lead up to the truck and back down (like a flag halliard), where the other end was attached to the bottom of the spar. As it was hoisted some drag was applied to the line on the lower end to hold the spar upright. When it reached the top both ends were belayed together at a pin rail.
Yes. That's a good description of the device used to set pennants and house flags "flying." The device is called a "pig stick" as it is a short stick similar to what a pig farmer would use to herd his pigs. A pig stick has a wire or wooden "auxiliary stick" from which the flag or pennant is flown independent of the main stick. This device, pictured below, prevents the signal or pennant from wrapping around the "pig stick" and fouling on the pole or otherwise becoming unreadable.

The middle two paintings of ships posted above show those two ships simultaneously flying a "name pennant" from the maintop, a "house flag" from the foremast top, and a "five level code" (likely assigned by Lloyds Insurers.) identifying the vessel in a commonly redundant fashion at that time.
- thibaultron, Scottish Guy, mtaylor and 5 others
-
5
-
 3
3
-
Well, that would depend upon whether you wanted to color them differently from the natural color of whatever you made them from, no? The color of blocks will depend largely upon the period of the ship one is modeling. Some blocks were oiled bare wood. Later, blocks were painted, usually white or black.
- Canute, mtaylor and Scottish Guy
-
3
-
3 hours ago, BANYAN said:
I will try to describe the technique I use for 'cheesing' the tail ends of tackles.
Interesting. I've never heard the term "cheesing" used before. I presume this is a reference to a "wheel" of cheese. It's also called "Flemishing" or a "Flemish coil." I suppose this was a reference to where it was commonly done. Banyan gave a number of good reasons against flemishing line on deck. There's more. Long exposure to weather and UV will cause uneven deterioration on the surface of the line is another one. A properly Flemished coil will run fair, however. This requires that the working end of the line is pulled from the center of the coil. The "bitter end" should always end on the outside of the "coil" (pad) and not in the center. The way a Flemish coil is created in real life is that the coil begins in the center and the entire (growing) coil is turned round and round on the deck while lying flat until the bitter end is reached. As Banyan said, it was only done for display purposes at formal inspections, but was never done in ordinary use.
- Scottish Guy, mtaylor, Keith Black and 1 other
-
4
-
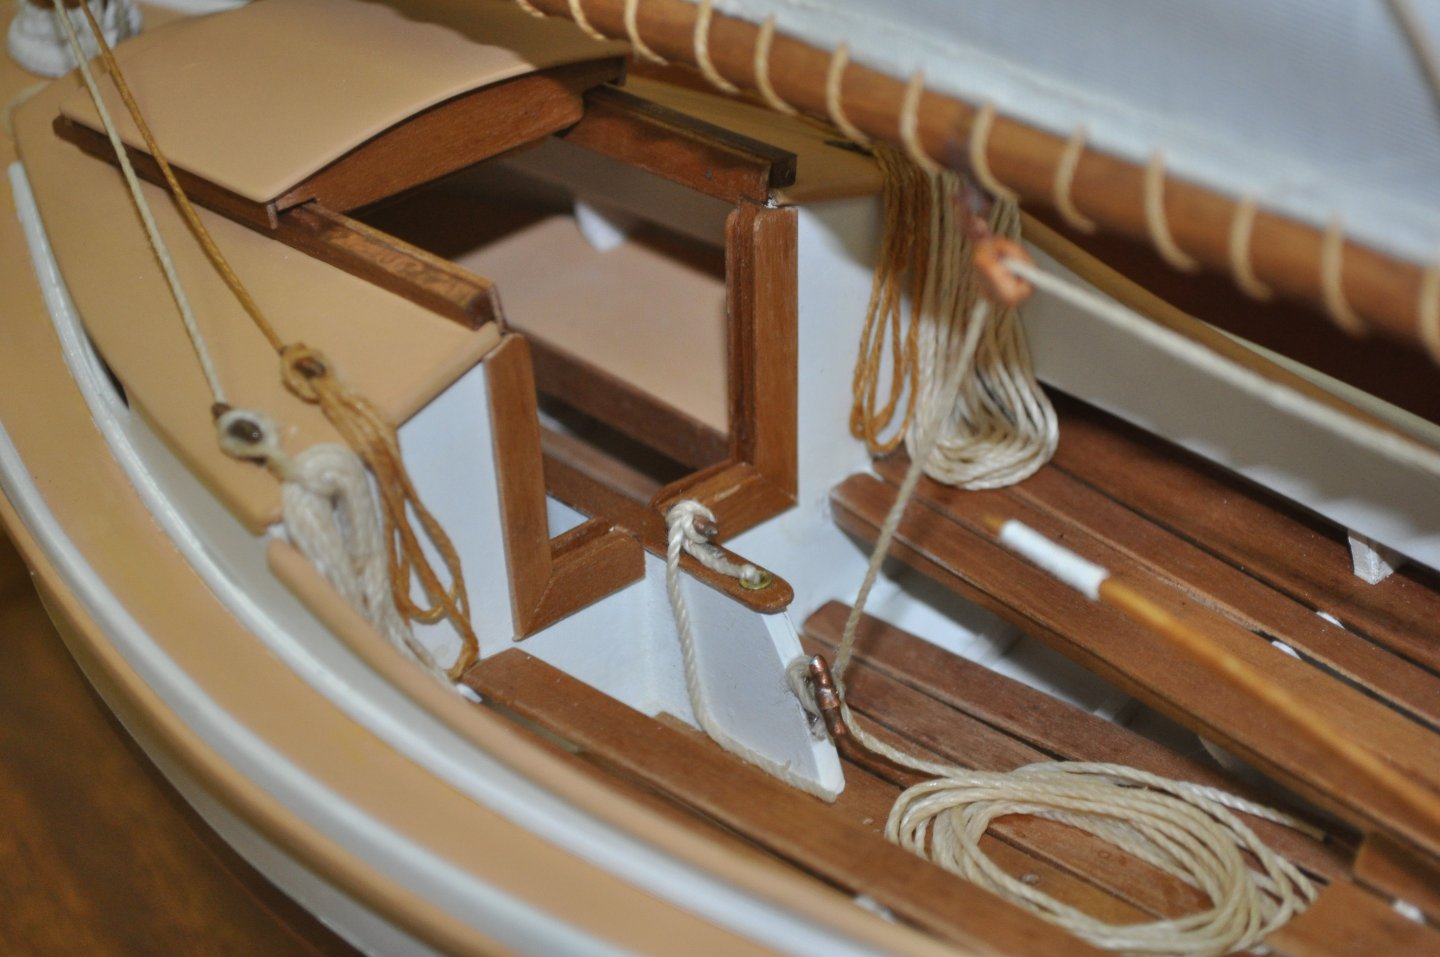
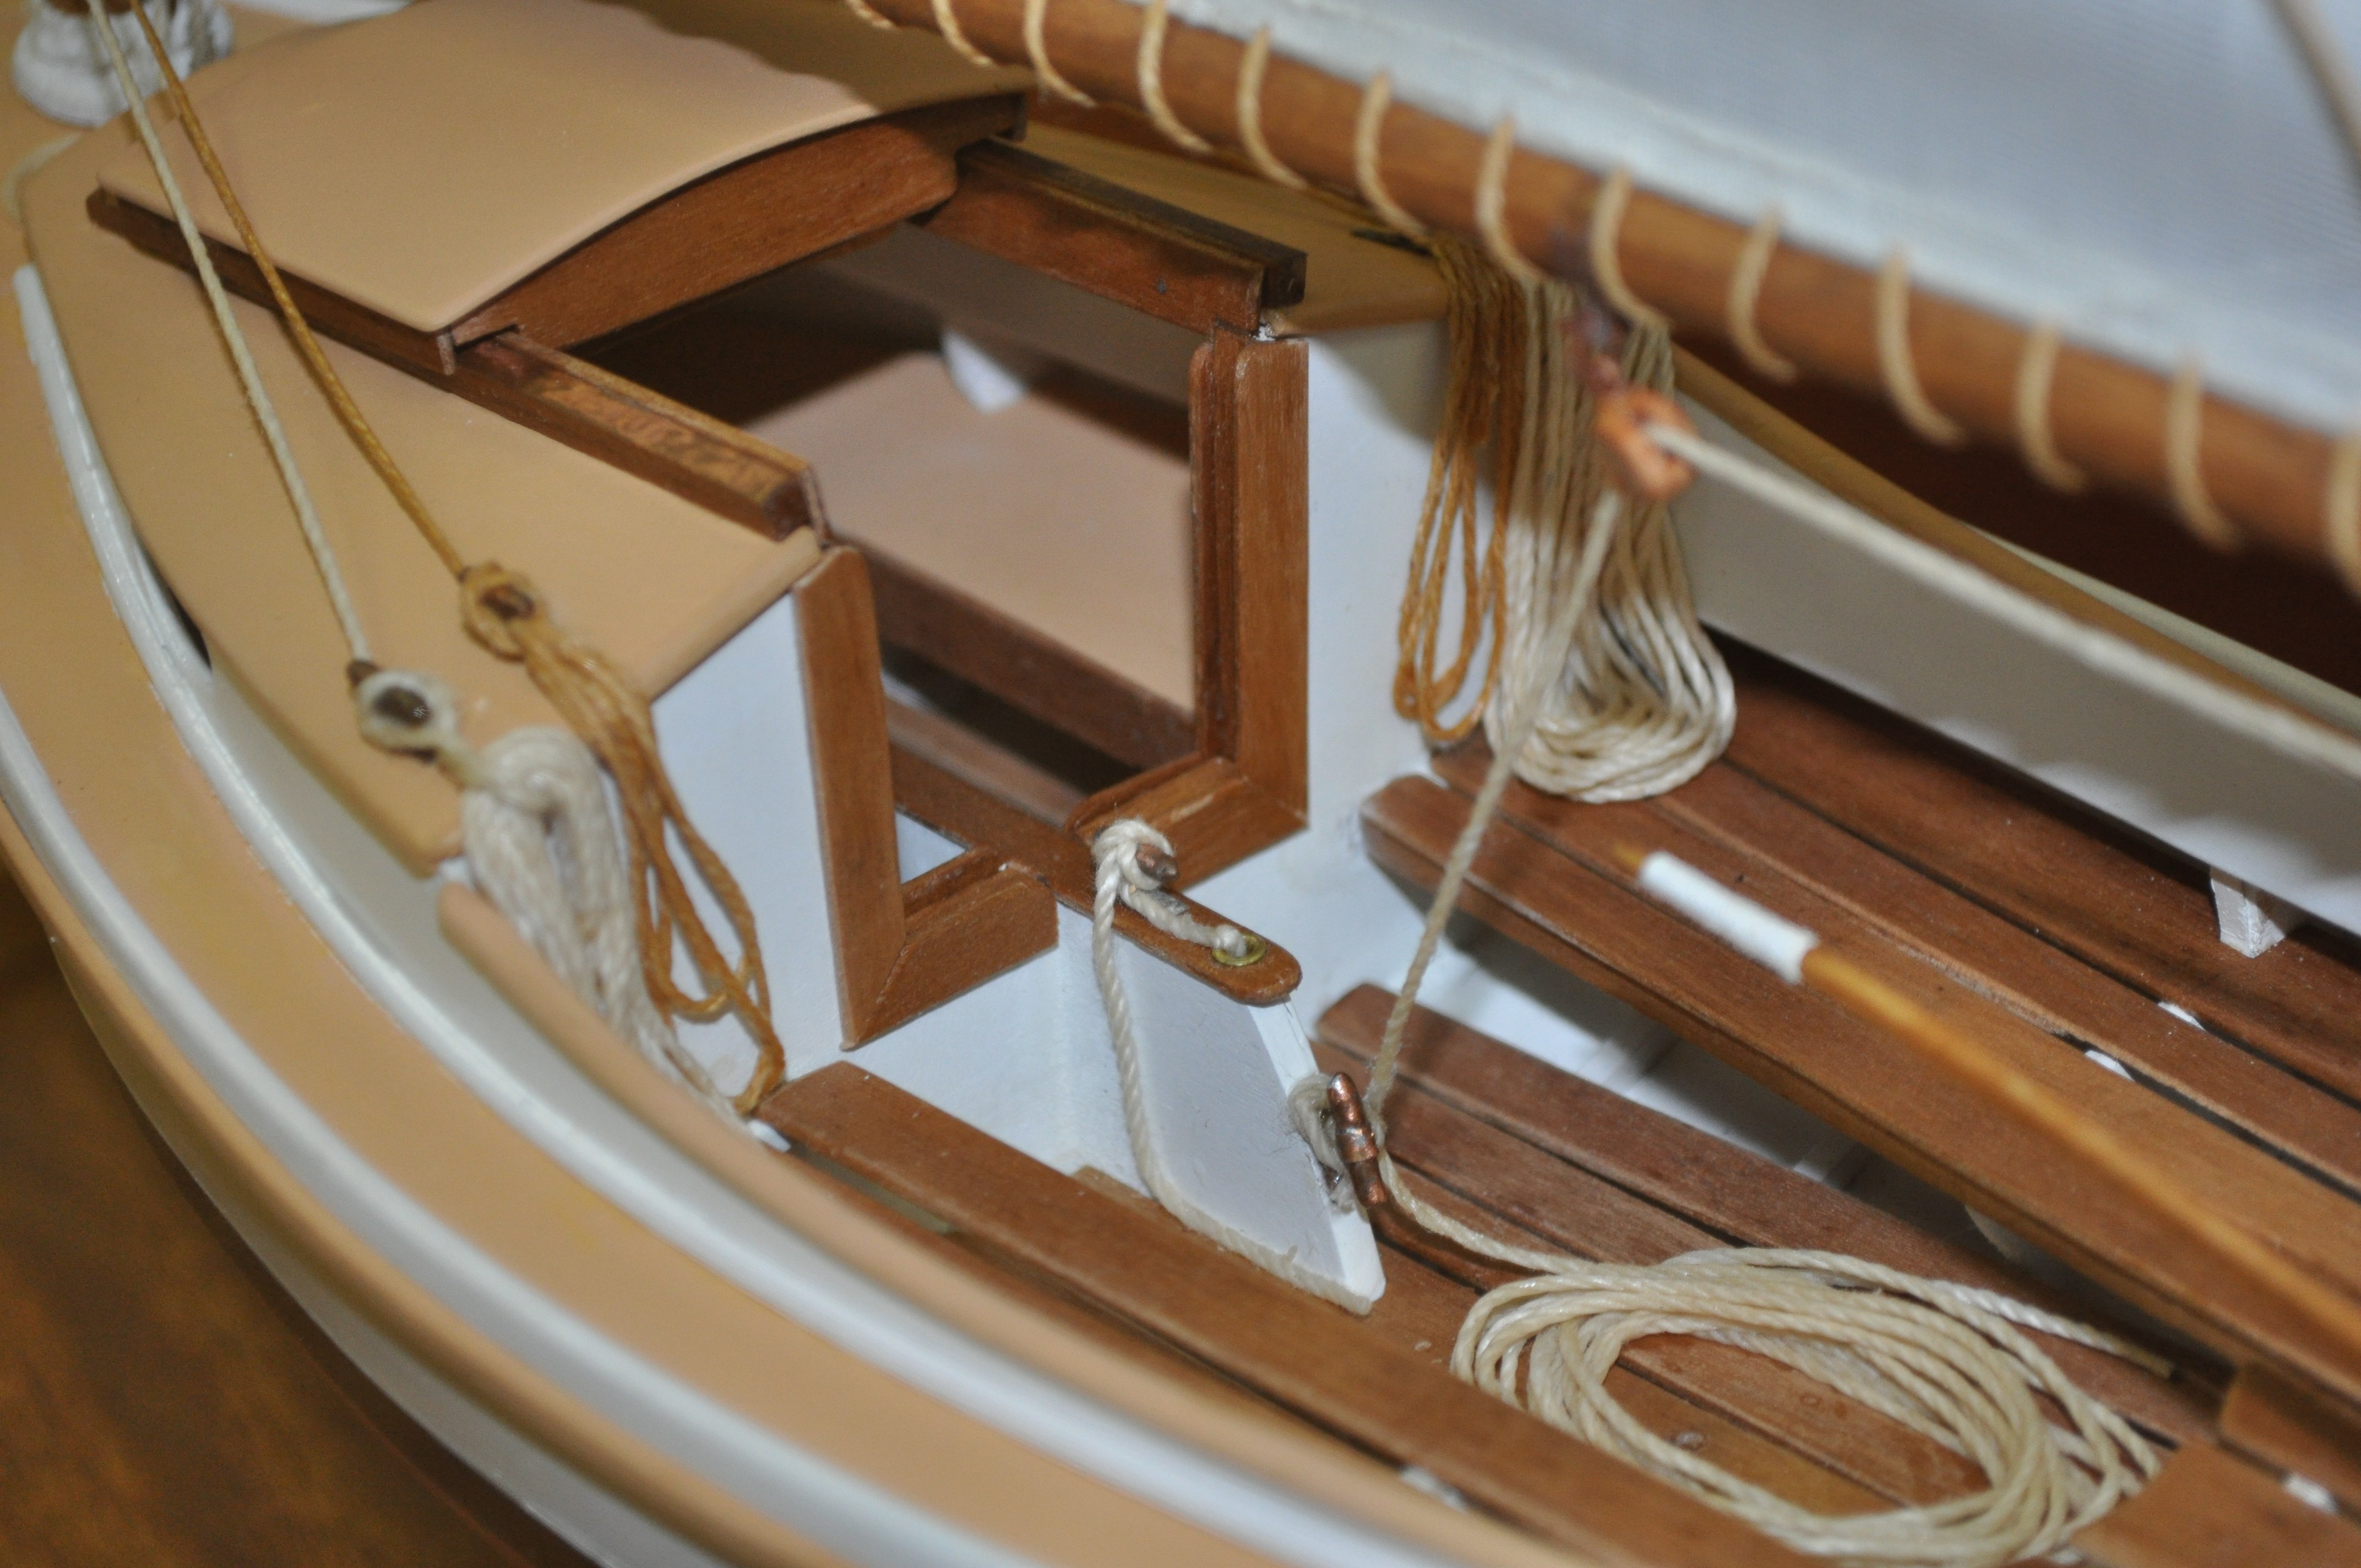
Use canned clear shellac (about a 2 pound cut - Zinsser Bullseye brand or equivalent) to cause the line to stiffen. Shellac is dissolved in alcohol. As the alcohol evaporates, the shellac soaked into the line will begin to harden and the line can be formed into any shape. Once the shellac has dried (within minutes) the line will be stiff and hold whatever shape you have given it. If more working time is needed, simply apply additional alcohol and the shellac will soften again.
Results example below. Coils made on a form consisting of map pins placed into a wooden base around which the coils were wound. Coils were installed on the model, softened with alcohol, and formed in place to depict normal hanging behavior of full-size line.
-
6 hours ago, Frank Burroughs said:
that gives me a start.
I had the link for Quadhands work bench open when a nap overcame me. When I woke my friend had ordered it for me. She seen how small the blocks are and took pity on me!
QuadHands are "finestkind." You'll love them. Nobody should waste their money on those near useless ball-jointed "helping hands" that you have to adjust by tightening wing-nuts. They are really junk. (And, like so many others years ago, I bought one, too!
)
One thing to be careful about, though, is to make sure you buy the real QuadHands fixtures. There are "carbon copy" Chinese knockoffs all over the internet, but they aren't the same quality at all. The QuadHands uses high quality alligator clips for one thing. Cheap alligator clips are a dime a dozen, and they don't hold well at all. Don't subsidize intellectual property theft. Buy the real McCoy!
- Canute, tlevine, jpalmer1970 and 4 others
-
7
-
Sorry about that. I got interrupted writing the above post. In the meantime, it looks like you "pulled the pin" and ordered a vise from Micro-Mark when you could have ordered it from Walmart for ten bucks less. I won't rub it in, but only to say that it always pays to shop around before buying anything from Micro-Mark.
- Canute, Old Collingwood, Egilman and 1 other
-
4
-
On 4/23/2024 at 6:15 PM, Jack12477 said:
Would this Universal Clamp from MicroMark work ?
An excellent tool that everybody should have. However, you should shop around on the internet to find the lowest price. As usual, Micro=Mark has more tools for modeling than most any catalog, but nearly always at a considerably higher price. For example, see: Universal Work Holder Peg Clamp Jewelers Engraving Hand Tool for Jewelry Making - Walmart.com
This tool has a handle that can be screwed off and the base neck is hexagonally shaped so it can be placed in a bench vise. That's often a more convenient way to use it than holding it in one hand and some tool or paintbrush in the other.

Fancy articulated bench top holders are made for it, or sold with this vise, but all are of questionable utility (often too weak) and overpriced. The best option is to buy a decent small 2.5" or 3" bench vise with a clamping attachment for $30 or less. E.g.; $23.50 Clamp-On Swivel Vise - Lee Valley Tools

Another option that is very handy to have is one of the extremely versatile QuadHands holding platforms. These are heavy iron plates with flexible arms holding heavy duty alligator clips that attach to the base plate with rare earth magnets. Sold on Amazon and elsewhere. They are really useful for lots of applications, particularly holding parts for painting, gluing, and soldering. This is a commercial grade tool made for and marketed to the electronics assembly industry. Beware of identical-appearing Chinese knock-offs. The quality is not the same. "QuadHands" is the brand you want. See: QuadHands® - Helping Hands Tool They come in several sizes and additional "arms" and attachments are available, starting at around $40. Also sold on Amazon.

- mtaylor, Old Collingwood, Egilman and 1 other
-
4
-
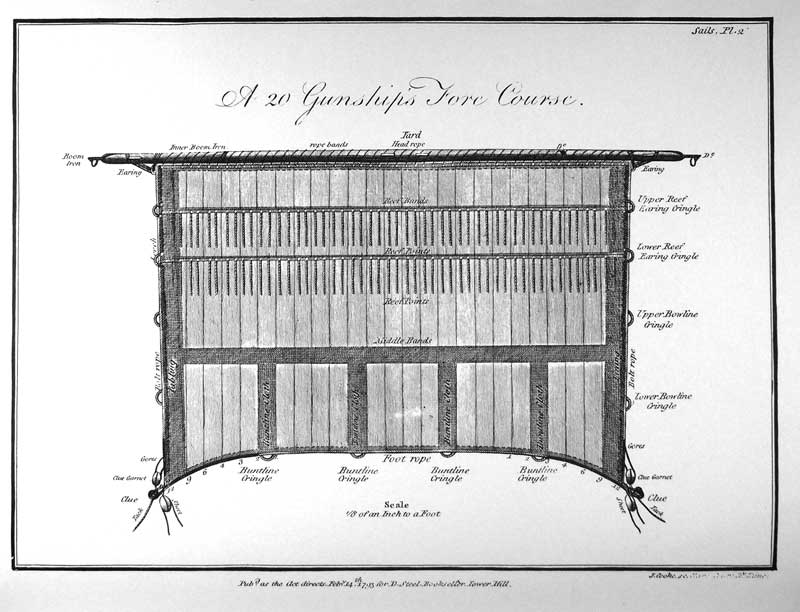
12 hours ago, Jsk said:
I understand that the lines further up the sail would be longer than those lower down because they needed to encompass a greater amount of reefed sail.
You might want to reconsider the above. In practice, it appears that reef points on any given sail would all be of the same length in any event.
The "rule of thumb" from Falconer's above sounds right, but here again the maxim, "Different ships, different long splices." applies. The reef points need to be long enough to conveniently encircle the mass of gathered canvas in the sail to be secured. Therefore, the size of the sail is the determining factor. In different periods, the common square sail sizes varied. In later times, particularly with merchant vessels, the size of the sails was reduced to permit easier handling and, thus, smaller crews, which meant more profit in the operation of the vessel. Obviously, a longer square sail will require longer reef points than a sail that's half as long. Naval vessels would furl sails very tightly such that the sail gathered and tied on the spar would not exceed the diameter of the spar. On the other hand, a merchant vessel would characteristically be less fastidiously maintained, and sails might be furled less tightly, if not just making a sloppy job of it sufficient only to get the canvas under control and out of the way and so might have longer reef points.
Not to make you crazy or anything, but depending upon the scale you're working in and the level of detail you are depicting, note also that reef "points" were so called because they were "pointed" by working a taper into their ends. There were general standards for the length of the reef points. (Note the term "reef points" references the pointed shape of these lines. It does not have anything to do with the gromets worked into the sail through which reef points are passed, as is modernly a commonly heard misuse of the term.) A bit of research in the appropriate sources for the period of your model will answer your questions much more specifically. For example, see "Steele's" for both the Admiralty and merchant marine practice circa 1794: https://maritime.org/doc/steel/large/pg148.php There you will also see the number of gaskets that are required for each rate of ship (by the number of guns) to tie the completely furled sail to the yard. Illustrations are also provided.
For example, excerpts from Steele's:
GASKETS. Braided cordage used to confine the sail to the yard, when furled, &c. ARM-GASKETS; those gaskets used at the extremities of yards. BUNT-GASKETS are those used in the middle of yards. QUARTER-GASKETS; those used between the middle and extremities of the yards.
GASKETS are made with three-yarn foxes. Those for large ships consist of nine foxes, and those for smaller of seven. Place four foxes together, but lay them of unequal lengths; mark the middle of the whole length, and plait four foxes together, for eight or nine inches; then double it and plait the eight parts together for five inches, and work in the odd fox. The whole is then plaited together for eighteen inches in length; then leave out one fox, and so keep lessening, one fox at a time, till you come to five. If the foxes work out too fast, others must supply their places, till the whole length is worked, which is from five to seven fathoms long. To secure the ends, make a bight, by turning upwards one of the foxes, and plait the others through the bight, then haul tight upon that laid up.
(Obviously, few modelers will actually plait their reef points as described by Steele, but an understanding of the full-scale practice better enables the modeler to depict such detail as they may wish secure in the knowledge of what it's supposed to look like.)
POINTS, short pieces of braided cordage, plaited together as gaskets are; beginning in the middle with nine foxes, and tapering to five at the ends, and from one fathom and a half to one fathom in length. They are used to reef the courses and topsails.
ROPEBANDS differ from gaskets only in their length, being from seven to nine feet long.
POINTING. Tapering the end of a rope, or splice, and working over the reduced part a small close netting, with an even number of knittles twisted from the same, to prevent the end untwisting, and to go more easily through a block or hole.
REEF. That portion of a sail contained between the head or foot, and a row of eyelet-holes parallel thereto, which portion is taken up to reduce the surface of the sail when the wind increases. Sails, according to their sizes, have from one to four reefs. A BAG-REEF is the fourth, or lower, reef of a topsail. A BALANCE-REEF crosses boom-mainsails diagonally, from the nock to the end of the upper reef-band on the after-leech.
When modeling, the best approach is to experiment with a sample of the sail material you'll be using and simply measure how much line it takes to tie the reef lines and let that be your guide for the length of reef lines and gaskets. Many will reduce the model's sail size in order to more easily depict a tightly secured sail on the spar, in which case a similarly sized sail sample will yield the proper length of reef line or gasket needed.
-
30 minutes ago, GGibson said:
Totally NEWBIE input here, but from how "drastic" he is needing the brass bent into a Z shape, would it be better to simply solder three pieces in that shape rather than attempt to bend, even with the annealing process? 🤷♀️👍
Probably.
For a good example of brass skeg fabrication see:
- GGibson, mtaylor, Scottish Guy and 1 other
-
4
-
1 hour ago, Scottish Guy said:
But I think he´s talking baout a boat like that (even if you can´t see the hull properly on that picture.
It's not about the type of vessel or style of hull. He has as 10" x 1/2" x 1/8" piece of "hard" brass to use as a skeg which he wants to bend in order to make it "3/4" lower at the middle to clear the prop." If the stock is to be a skeg, given it's dimensions, I'd expect he wants to know how to bend it 3/4" across the 1/2" wide vertical face of the skeg. "Hard" brass can easily be annealed with a torch, but there are limits to "bending across the flat" which would seemingly be exceeded in this scenario.
- mtaylor and Scottish Guy
-
2
-
-
39 minutes ago, Windships said:
p.s. I have lost track of Jerry and Arlene Blair. Have you heard from him?
I don't recall the Blairs, so cannot pass on any news about them. Sorry.
- mtaylor and Scottish Guy
-
2
-
1 hour ago, Windships said:
Although they can be used to produce a lovely model, his is not an accurate depiction of this brig, based on newer research by my late friend Raymond Aker of Palo Alto, California, and my own c. mid-late 1990s.
...
Having just begun my 80th year, I am considering gathering my research and posting it on the new website established by the Drake Navigator's Guild
https://nasoh.org/news-and-announcements/f/new-digital-journal-the-bowsprit
It's nice to hear of another who remembers Ray Aker, a man who certainly deserved greater fame than he realized during his lifetime. He was a very good maritime historian and one of the better draftsmen around. I still have the copy of his beautiful technical drawing of the remains of the 1840 whaling bark Lydia uncovered during excavations for the 1978 construction of the San Francisco Peripheral Sewer project which he gave us when I knew the archaeological impact report consultants on that project.
http://library.mysticseaport.org/ere/odetail.cfm?id_number=1961.72
Without passing any judgment pro or con regarding your posting your research records on the Drake Navigator's Guild's website, as a fellow member of our generation, I would urge you to strongly consider making provision for the donation of your research files to the J. Porter Shaw Library at the San Francisco National Maritime Museum at Fort Mason, San Francisco. As you probably know, the J. Porter Shaw is the best recognized repository for such subject matter these days.
- mtaylor and Scottish Guy
-
2
-
9 minutes ago, Scottish Guy said:
I know of the difference, unfortunately the search in the UK Amazon doesn´t bring up any results for the name of the author "Bernard Frohlich" nor under the name "Bernard Fröhlich". When I put in the name of the book I only get the result that it "currently is unavailable".

Sorry for the confusion. I was in the middle of an edit, so you caught only the beginning of the post.
Check out the link I provided above to the U.S. Amazon and eBay websites and you'll see they are both offering new and used copies. Beyond that, I expect the cost of shipping is prohibitive. We keep hearing that in recent times on all sorts of modeling essentials. The cost of an item on the opposite side of the Pond seems to almost double when the shipping is added. We have U.K. books listed on U.S. eBay, so I'm not sure why it doesn't work the same the other way around. Is it possible the "not available" status is a result of some sort of E.U. customs issue?
- mtaylor, Canute and Scottish Guy
-
3
-
44 minutes ago, Scottish Guy said:
Unfortunately "currently not available" here in the UK
 but the expected price of GBP 99 I think is also a bit... overpriced. I always thought there is a pricebinding to books, at least in Europe it should be...
It was an expensive book when first published and seems to have remained so. Apparently, it was until rather recently only available directly from the publisher, Ancre, in Nice, France. The Art of Shipmodeling - Bernard Frolich - Ancre There are now new and used copies available on U.S. Amazon (The Art of Ship modeling: Bernard Frolich: 9782903179847: Amazon.com: Books) and U.S. eBay: (https://www.ebay.com/sch/i.html?_from=R40&_trksid=p2334524.m570.l1313&_nkw=The+Art+of+Shipmodeling+by+Bernard+Frolich&_sacat=0&_odkw=The+Art+of+Shipmodeling&_osacat=0)
Believe me, we feel your pain over here, as well. We have to pay the same exorbitant shipping costs from the U.K. to the U.S. that you apparently must in the opposite direction. I believe this increase in shipping costs was attributable to the fact that all shippers seem now to be sending everything air freight. Time was, you could order something from Europe and it might take three or four weeks to get here, but the shipping didn't break the bank unless you wanted to opt for air freight. Now it's all air freight whether you need it or not. On top of that, you may also be paying the price for "Brexit," but I'm not really all that familiar with that issue, of course. Perhaps you might consider having a friend who is making a run to the South of France "smuggle" a copy back for you from Ancre.
It's really a valuable resource.
- Canute, mtaylor and Scottish Guy
-
2
-
1
-
6 hours ago, Frank Burroughs said:
The Art of Shipmodeling - Bernard Frolich looks very good
I believe that The Art of Shipmodeling has reached that pinnacle of universal reference work that it is simply referred to by its author's last name: "Frolich." I see where, inexplicably, Amazon has it for sale new for $70.00. That's a steal at less than half the price most of us paid over the last 22 years since it was first published. I'd grab a copy in a hot minute if I were you. There's a wealth of information in it.
But beware! Do not confuse The Art of Shipmodeling by Bernard Frolich with The Art of Ship Modeling by Richard Mansir, which is an entirely different book. It's "Frolich" that you want to make sure you are buying.
If it's classic books on modeling technique and "tricks of the trade," I'd strongly recommend:
The Techniques of Ship Modeling, by the late Gerald Wingrove: The Techniques of Ship Modelling by Wingrove, Gerald A. Hardback Book The Fast 9780852423660 | eBay There are always a few used copies on eBay (both hardcover and quality paperback) so shop for the lowest price, usually less than ten bucks used.
Ship Modeler's Shop Notes, Volumes 1 and 2 from the NRG. There are always used copies of these on eBay and Amazon. New copies are available from the NRG store through this forum. As for Volume 1, I'd advise you get a newer printing with the spiral binding which permits the books to be laid flat on a workbench or tabletop when working from them. The original binding was a glued spine paperback and the glue dried out and the pages come loose. My copy of Volume 1 is held together with a bulldog clip. I should bring it to Staples or one of those places and have them spiral bind it for me.
William Frederick's (1874) Scale Journey: A Scratchbuilder's Evolutionary Development, by Antonio Mendez C. This book was "remaindered" on eBay a couple of years ago for seven bucks a copy and I grabbed one. It's focus is radio controlled sailing scale models, but its content is a survey of technique, and it is full of subjects not found elsewhere, especially regarding tools and shop practices. It would take you years of following build logs on MSW to pick up but a fraction of the how-to-do-its in this book. Unfortunately, it appears to have become something of a collectable at this point and Amazon is now selling them for $47.00. If you watch out for a copy on eBay, you may get lucky and snag one for closer to the price when they were selling off the remainders new. William Frederick's (1874) Scale Journey: A Scratchbuilder's Evolutionary Development: mendez, antonio: 9780975577202: Amazon.com: Books I checked eBay just now and see where they have three between $50.00 and $169.00! (Let this be a lesson to modeling library builders everywhere!)
Plank-On-Frame Models and Scale Masting and Rigging, Vol. 1: Scale Hull Construction and Plank-On-Frame Models and Scale Masting and Rigging, Vol. 2: Scale Hull Construction by Harold A. Underhill. This two-volume set is a classic and there are lots of used copies on eBay for surprisingly reasonable prices. (Still in print, new copies run around $90 per volume!) plank on frame models underhill for sale | eBay
Masting and Rigging: The Clipper Ship and Ocean Carrier by Harold Underhill. This is what I'd call the Bible of the last days of commercial sail. If you are interested in clippers and windjammers, as well as general rigging practice at the highest level of its evolution, this book is it. Used copies are available very reasonably priced on eBay. Masting and Rigging: The Clipper Ship and Ocean Carrier for sale | eBay
These titles are recommended for their treatment of general modeling practices and techniques more than for specific research data on specific types and periods. When your interest becomes focused on a particular type of vessel in a particular period, there are specific reference works that become "must haves," but they tend to be expensive (some running more than a hundred dollars and up) and sometimes very difficult to find. If you continue to pursue your interest in ship modeling, you will find yourself acquiring a library of some value and doing that easily becomes a related hobby in and of itself.
- Canute, mtaylor and Scottish Guy
-
3
-
On 4/11/2024 at 10:40 PM, Dr PR said:
I would be sure to wash the wood thoroughly afterward to remove any remaining acid before using it on a model.
Definitely. Any acidic residue in or on the wood is to be avoided. A mild soap solution, dishwashing liquid, or the like, should be sufficient. For the particularly obsessive types, a short dip in a baking soda and water solution should neutralize any acid, I expect.

Atlas craftsman lathe
in Modeling tools and Workshop Equipment
Posted
Indeed it is! I should have looked more closely at the photos. They appear quite a bit alike. The 6" is a sweet small modeling lathe, but they don't seem as available on the used market as the 12"-ers.