


Bob Cleek
-
Posts
3,374 -
Joined
-
Last visited
Content Type
Profiles
Forums
Gallery
Events
Posts posted by Bob Cleek
-
-
-
3 hours ago, Bill97 said:
Got the new ModelExpo 2023 catalog today! These guys are killing me! This is like a kid looking at a Christmas toy catalog. All these wooden ship models are incredible. How in the world does anyone ever decide.
Many gave up trying long ago and "went over to the dark side" and became scratch-builders! (Not to mention that the cost scratch-building is nothing compared to the price of quality kits!)

There are many build logs and discussions of the various Endeavour kits, including OcCre's version. I've been out of the kit arena for some time now, but a quick glance may indicate that the Caldercraft kit is the more historically accurate version. More reading assignments for you at: Searched for 'Endeavour' in All Content (modelshipworld.com)
-
5 hours ago, Bill97 said:
And as a life long wood worker I enjoy the beauty of the different wood species. I know my ego will over rule by brain when the time comes to purchase my first wood model. I should probably start with a starter type model to get the feel for it, but I have no doubt I will go big from the start.
As a life-long woodworker, you are well on your way to success, but be forewarned, aside from rigging and painting, there's very little similarity between plastic and wood kits. One assembles a plastic kit, but one must build a wooden kit. Wooden kits require far more time, and skill, to complete than plastic kits. If you "go big from the start," and if you are like most wooden ship kit builders, you can expect to spend as much as a year, or more building a wooden "tall ship" model from a kit. It can quickly become a daunting task that no longer is much fun. Then the enterprise is abandoned, and you become another novice who's bit the dust.
Not to be pedantic, and certainly not wishing to dampen your enthusiasm for building a wooden kit model one bit, I must say, if you haven't already, you would do well to read the following thread before doing anything impulsive in buying a wooden model ship kit.:
After that, I'd urge you to read the following detailed building instructions ("practicums") by Chuck Passaro, a master modeler and forum member, in order to get a good idea of what is involved in building a rather simple, but not "dumbed down" kit of an 18th Century pinnace, and an intermediate difficulty level model of an American Colonial square rigged schooner:
BuildingAn18thCenturyPinnace.pdf (thenrg.org)
ColonialSchoonerSultana.pdf (thenrg.org)
If you're not thoroughly intimidated at that point, read the following general article on what to expect in a wooden ship model kit:
Nautical Research Guild - Article - Model Ship Kits (thenrg.org)
Thereafter, you may wish to read any number of the instructional articles in the "Articles" drop-down menu in the forum's caption:
Nautical Research Guild - Articles and How Tos (thenrg.org)
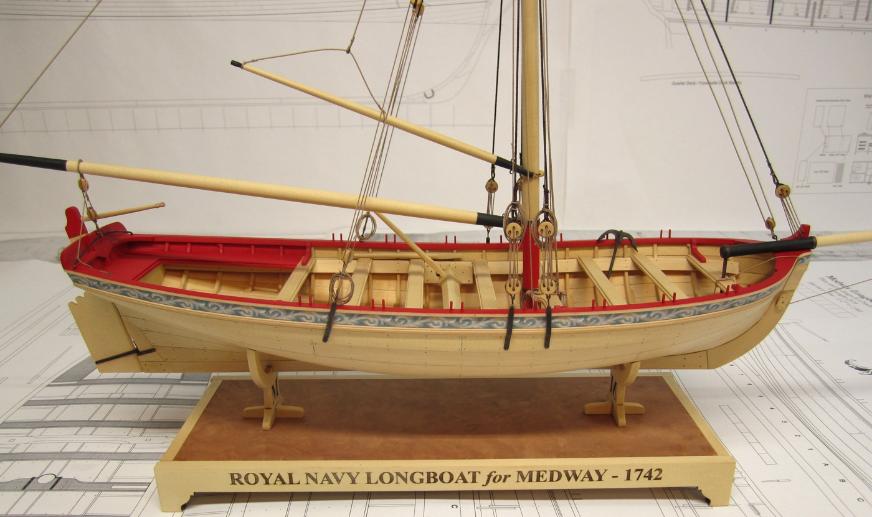
As will most any experienced wooden ship modeler, I will repeat the suggestion that you "start small" and do not let your "ego overrule your brain when the time comes to purchase my first wood model." Your first (or second and third) kit doesn't necessarily need to be a "beginner's model," but you should beware of letting yourself get ahead of the necessary learning curve before dropping a grand on a poor quality HMS Victory kit. A relatively simple model doesn't not need to be crude. If done well, even a model of an 18th Century ship's boat can be a thing of great beauty and pride of accomplishment. Because you do have your skills from plastic kit modeling and extensive woodworking experience, may I suggest you consider for your first venture into modeling ships in wood and bits of string and metal, Syren Ship Models' kit of the HMS Medway's longboat of 1742. See: Medway Longboat (1742) (syrenshipmodelcompany.com) This isn't a "beginner's model," but rather an intermediate to advanced level challenge, so your ego will not be compromised in the least, The instructions for building this plank on frame model are on the linked page as well, so you will be able to see the magnitude of the work involved and the challenges that may be encountered in building this really elegant model. Not only does Syren Ship Models offer some of the best model kits around, but more importantly, in my opinion, at least, Syren offers the best building instructions around which I think is often the most important feature to consider when selecting a kit. (And, believe me, some of the kit model instructions are real nightmares!) I believe there are also some "build logs" of this model on the forum.
-
7 hours ago, Dan DSilva said:
The Pequod is a very old ship when the story takes place, but I figure the equipment that's most easily replaced (e.g. boats, harpoons, lances) should be pretty modern.
Whaling voyages could run for years once the New England fleet had to hunt in the Pacific. Ships were outfitted anew for each voyage and customarily would carry new, or at least very lightly used, whaleboats for each voyage. It made no sense to carry anything but new or relatively new boats on a years-long voyage. The same went for all the other gear, as well.
- mtaylor and Dan DSilva
-
 2
2
-
There seems to be two sources. One, the original, in the British National Archives at Kew and the other, the same captured code book, in copy form from the Dreadnaught Project website. (Apparently, you have to sign up for that forum to get access to it.)
Imperial German Navy Code Books - The Dreadnought Project
Hope this helps.
-
3 hours ago, Dr PR said:
Bob,
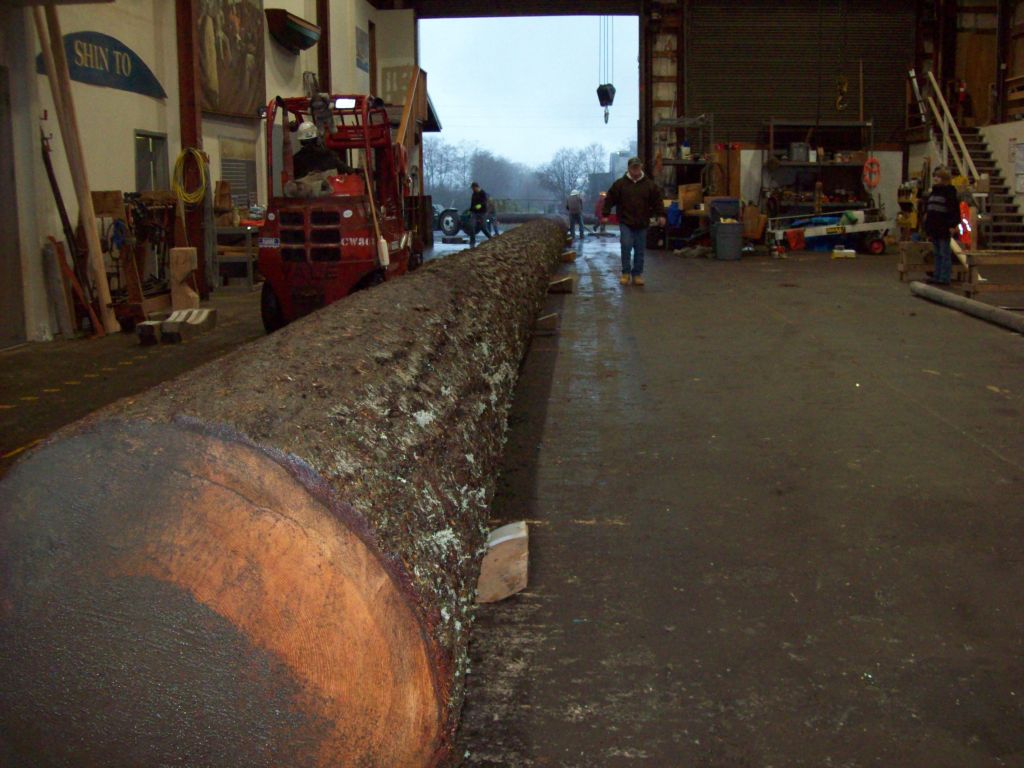
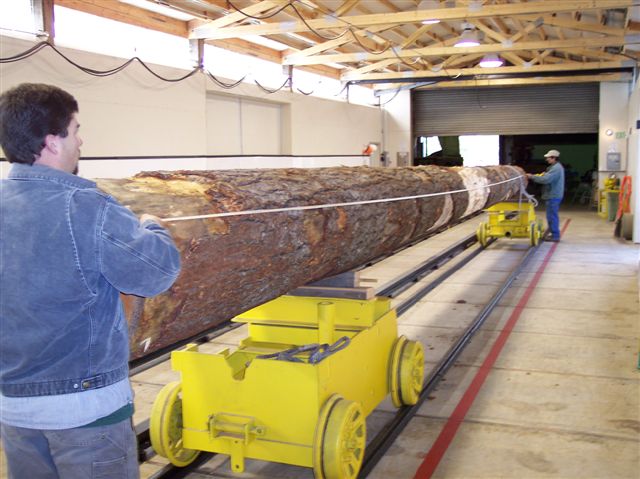
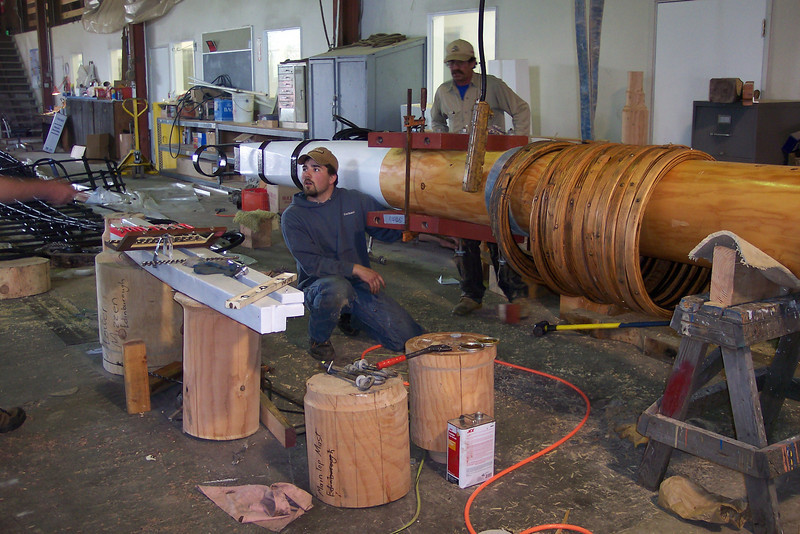
Your "big prime Doug fir" in the photo in post #19 appears to be only about 3 feet diameter. When I moved to Oregon in the 1970s loggers scoffed at such "toothpicks" - they weren't worth bothering with. A really BIG Douglas fir was about 15-17 feet diameter. Each piece was hauled out of the forest on a single railroad car. We used to see a single tree going down the road on three log trucks. One carried the huge base. The next carried the large second piece an perhaps the top. And the third truck carried two to four pieces from just below the top.
But now they have cut most of the big trees, and what few are left are locked up in wilderness areas. Now we see trucks loaded with dozens of sticks less than a foot diameter. They are chipped to make "oriented strand board," a fancy term for garbage.
A 120 foot long 3 foot diameter log has about 10,000 board feet. Douglas fir is currently selling at about $700-$800 per thousand board feet (milled). So an ordinary log that size would sell for less than $7000 to $8000. However, there is a premium paid for long poles (they are really difficult to get out of the forest on typical sharp curved logging roads). And really clear logs from trees with no lower limbs (knots) bring a high price for making plywood veneer (I worked many years automating plywood lathes). A $100,000 tree would be VERY special!
True dat! In the late '70's, I lived in the mixed second growth redwood and Doug fir coastal forest in Northern CA, I remember seeing huge redwoods harvested, too, but nothing like what they were cutting in the late 1800's. I looked it up and discovered that today only 29 sawmills remain in California, along with eight sawmills that are still standing but inactive. In addition, there are 112 sites in California where sawmills once operated. The NWP RR out of Eureka that primarily hauled milled redwood south is no more and the semi's hauling milled lumber are getting scarcer. The monster Georgia Pacific mill in Fort Bragg is no longer operating. We still see some redwoods and Doug firs getting hauled north to the few small mills still operating, but it's "odds and ends" from one or two felled at a time or deadfalls. In the '70's we still had log trucks with three or four trunks on them, but now it's almost always small stuff. I think the big trees are being cut up in Canada now days. (And thanks to climate change, there's tons of dead yellow cedar standing all along the coast from BC to Alaska, fully dried and dead standing is still harvestable for about 90 years, but nobody seems to be able to get to it to harvest it economically.)
The $100,000 value of the pictured Doug fir was the quote from the website and it may be their exaggeration. I don't know diddly about the value of raw timber, but from what they said, it was a VERY special tree. In order to turn a tree into a mast, the tree has to be perfect. The growth rings, which taper successively smaller from bottom to top, have to be really straight grained and tapered the same rate as the mast so that there's no grain runout when it's turned. It also has to be as relatively knot- and defect-free as possible. They have to find the tree standing, get a permit to cut it, and go in and fell it and haul it out without damaging the wood. The economies of harvesting in quantity don't apply. As you know, that's really prime stuff. Way too good for two by fours!
From this:

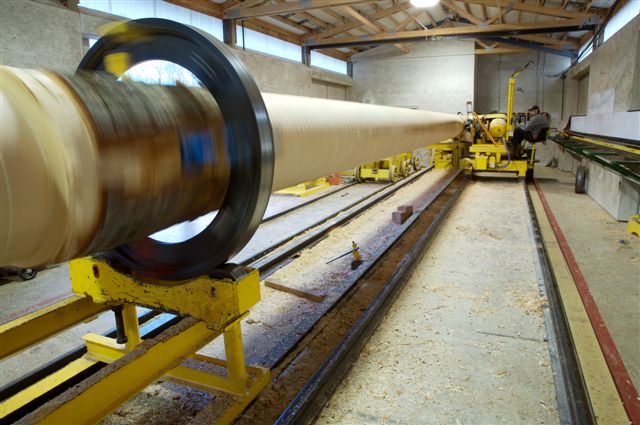
To this:

To this.

From 1970's:

To 2020's:

So it goes.
-
13 hours ago, wefalck said:
I gather, the classic source on whaleboats is
ANSEL, W.D. (1983): The Whaleboat.- 147 p., Mystic, Co. (Mystic Seaport Museum Inc.).
It has plenty of drawings based on examples in Mystic and on original drawings. If you are building a whaler, this book probably is a must.
Strongly agree. It's important to note that there was quite a bit of evolution occurring with (whaling fishery) whaleboats throughout the 19th Century. If one is modeling a particular whaling ship at a certain date, they should take care to identify the type of whaleboat in use at the time depicted by their model. Planking types varied, some being lapstrake below the waterline and carvel planked above at different times. (The lapstrake planked bottom was intended to give the whalers a handhold on an upturned boat. The carvel planked topsides to provide a quiet entry through the water.) Most notably, in the mid-1850's or so (you can look up the exact date in Ansel's excellent book,) centerboards became common. This was coincidental with the depletion of the right whales and the expansion of the sperm whale fishery. The centerboard permitted the whalers to approach resting sperm whales, which were particularly wary, as stealthily as possible by sailing, rather than rowing upwind upon a pod without spooking them by noise or scent. (One can only imagine the distinctive scent of a whaling man after a few months working on a whaling ship!
) Thus, if you are modeling whaleboats after about 1850, they should have centerboards; before 1850, not.
- Dan DSilva and mtaylor
-
2
-
12 hours ago, wefalck said:
Resting the stick now on the corners of the octogon allows you to work it down quickly to a 16-sided stick (hexakaidecagonal stick).
And today's internet new vocabulary word of the day award goes to Eberhard!
Thanks for occasioning an interesting educational detour. I learn something new every day!
"In mathematics, a hexadecagon (sometimes called a hexakaidecon or 16-gon) is a sixteen-sided polygon.
A regular hexadecagon is a hexadecagon in which all angles are equal and all sides are congruent. Its Schlafi symbol is {16} and can be constructed as a truncated octagon, t{8}, and a twice-truncated square tt{4}. A truncated hexadecagon, t{16}, is a triacontadigon.


-
2 hours ago, ChrisLBren said:
I bought the JET and am very happy - now I have an entire array of saws without having to change any blades - the mini Preac, Jim Byrnes table saw, Dewalt Scroll 788, JET 10 inch Bandsaw and Dewalt 10 Inch Table Saw all suited to their various purposes in the shop. Fingers crossed I can focus on model building vs honey dos around the house !!!!!
He who dies with the most tools wins!
-
4 minutes ago, ChrisLBren said:
I already own a Dewalt 788 Scroll Saw (great for curves) along with a Byrnes Saw (and his other tools) and have a with a fully equipped shop including two mills (Proxxon and Taig) a Unimat Lathe and various sanders - thickness and oscillating etc. I am about to start on a fully framed build in 1/36 and want a saw that does not stall making dead straight cuts in 1/2 - 1 inch hardwood that is safe and handy (unlike my full size Dewalt 10 inch circular saw) which is a scary beast.
It would be great to have the ability to handle other household jobs (shelves for the wife and wainscotting etc) but accuracy for my ship modeling with a solid fence is most important.
Ah ha! Why didn't you say so?
I'd say your Dewalt scroll saw covers all the bases on any curved cuts you'd ever encounter making models. Have you tried making "dead straight cuts in 1/2-1 inch hardwood" on your Byrnes saw? I regularly run seasoned oak for making case frame stock through mine with no problems at all. The Byrnes saw may have a maximum cut depth of a smidgen less than an inch, but that's not a problem. All that needs be done is to flip the piece over and make a second cut on the other side and you can realize a depth of cut of at least an inch and three-quarters off the Byrnes saw. I have a Delta 3hp Unisaw and it's a scary beast, too. I avoid it like the plague for small work. My Byrnes takes over where my nerve leaves off!
Band saws aren't really a tool designed to make "dead straight cuts." I know they are all sold with four-inch tall flat-sided fences these days, so I suppose they've gotten better over time, but I can't remember any bandsaw I ever saw in a commercial shop having a fence on it. (Nor did any table saw ever have a blade guard, come to think of it!) Band saws are primarily for cutting curves. They are also used for resawing, but bandsaw blades have a tendency to "wander" or cut at an angle and not want to cut in a straight line. You really have to fiddle with them to get one to want to cut dead straight. For resawing, I've always used a shop-made "guide." I take a piece of wood sufficiently high to support the plank to be resawed and I cut a "pointed" end on it. Sometimes that requires that a taller pointed edge for resawing so the plank can be supported perfectly vertical against the point and so the pointed piece has to be supported on a flat base. The "point" guide is clamped to the table with the point exactly as far from the teeth of the blade as I want the width of the resawn piece to be and just a smidgen before the point of the blade. I run a mortice gauge down the length of the piece to mark the width of the cut I want to make. Then I rest the plank on edge on the table and against the point and feed it into the blade, following the cut line marked with the mortise gauge. In this fashion, when my bandsaw blade wants to cut at an angle (as most seem to,) I can feed the plank through at that angle, having pivoted the plank to accommodate the blade's whim. It seems to me that is a better approach than trying to get a blade that wants to run through at a slight angle to cut a straight line by holding the plank against a long flat fence. (I don't expect the resaw cut to be perfect, so I cut a bit wide of the line, expecting to run the piece through my thickness planer or, for small stuff, my Byrnes thickness sander.From what you've described in terms of tools on hand, you may want to do some experimenting and see if you really need a bandsaw at all, considering that you have access to your friend the cabinetmaker. Just sayin'. Maybe I'm just an old luddite, the methods described work for me, for model-sized work, at least. Your mileage may differ, but you may be able to save yourself spending the money on a bandsaw you may not need by using the excellent selection of capable tools you already have.
-
Why a 10" bandsaw if you will only be cutting 1" thick plank stock and won't be resawing? If that is all you are intending to use it for, it would seem you'd get by just fine with a saber saw or even a quality scroll saw, which would be far more useful for modeling purposes than a bandsaw of any kind.
On the other hand, if it is a bandsaw you want, despite the fact that you'd pay half again as much for it, you'd be getting far, far, more saw for the money buying a standard 14" 1hp bandsaw from a quality retailer like Grizzly. The Classic 14" Bandsaw at Grizzly.com The "classic" fourteen-incher is the highest rated and most popular bandsaw in its class and will cut thicker material and resaw just fine if you ever find the need. (Like if your cabinetmaker friend moves away.) The Grizzly is probably made in the same Chinese factory as the Jet, as well. If the extra $300 or so bothers you, consider that saving up that little bit more will provide you with a bandsaw that will hold its value much better and be easily marketable if you want to get rid of it someday. Because these are so popular, there is a ton of after-market blades, belts, and other parts and accessories available for them. Alternately, you can usually easily find one on the used market for a reasonable price and, if necessary, they are easily tuned up and rehabilitated if need be.
It really depends on what you want to do with it. If you are only going to be cutting 1" thick plank stock, I'd expect you'd do much better spending your money on a scroll saw that will cut rings around (and inside) anything a bandsaw can do, even with a narrow blade.
-
On 4/22/2023 at 10:23 AM, Roger Pellett said:
BI have read that the masts for the large multimasted American Schooners c 1880-1918 were single piece made from very large Douglas Fir logs that were shipped to the East Coast from the Pacific NW on specially built rail cars. These could have been turned on equipment like the one shown in Joseph’s post.
Roger
At the end of the Nineteenth Century, at least, they were regularly turning large masts and spars on lathes, as indicated by the documentation posted above. As I recall when Ernie Gann (Fate is the Hunter author) donated the new spars for Hal Sommer's restoration of Wanderbird (Elbe No.5) in the early 'seventies, they came from a couple of Doug firs on Gann's ranch up near Seattle, Washington and were turned on a big spar lathe they still had operating up there. They were then shipped down to Sausalito, California where they were stepped into the vessel.
The largest spar lathe I know of in operation today is up in Aberdeen, Washington. It's got a capacity of 122 feet long and owned by The Spar Shop and is the go-to place for large spars. They have their own forest resources for Doug fir and have done the spars on vessels like Amistad. Spar Shop at the Historical Seaport (woodweb.com)
A big prime Doug fir like this one is valued in the neighborhood of $100,000!
Large metal-working lathes, particularly for turning large artillery barrels like the 16" Iowa class battleship guns, were also a standard feature of naval shipyards. A few of these have been picked up as surplus and also have been used to turn masts and spars.
Amazing swarf coming off this metal lathe:

-
1 hour ago, Dziadeczek said:
But I found that polyester is even more "springy" and has this undesirable tendency to suddenly unravel once you cut it... 😕
Indeed it does!
Read the below threads (from the "articles - more" drop-down menu at the forum masthead) which address the problem of rope unraveling generally and polyester rope unraveling particularly. Note Chuck Passaro's method of "heat treating" polyester rope to eliminate unraveling. The information in these threads will probably solve your problems with unraveling.
- Dziadeczek, mtaylor and thibaultron
-
2
-
 1
1
-
As with all structural materials, wood has its structural limitations which vary from species to species. There is very little that can be done to treat wood in order to enable it to exceed its inherent strength limitations. All wood is substantially stronger along its grain structure than across its grain structure, although some species have an interlocking grain structure which affords much greater strength across the grain than parallel grain structured species. This additional cross-grained structure is not, however, sufficiently strong to afford sufficient structural strength in most any application. Obviously, the smaller the piece of wood of any species, the less structural strength it will have.
I've worked with wood for a long time and I know of only one method of strengthening wood that affords any real improvement over the wood's inherent structural properties and even that is rather limited. This method employs a particular cocktail of somewhat exotic solvents and epoxy resins which penetrate the surface of the wood. The solvents carry the epoxy resin into the wood and when the solvents evaporate and the epoxy resin which has soaked into the wood cures, the epoxy-soaked wood is essentially "plasticized." The cured epoxy employs the wood structure to form a matrix which is stronger than the wood or epoxy alone.
Some employ this mechanism by applying thinned epoxy resin to wood, the epoxy being thinned with solvents such as acetone, xylol. or toluene, but testing indicates that this simple approach is not as effective in penetrating the wood than commercially available proprietary "penetrating epoxies." The only proprietary penetrating epoxy formulation which has shown greatly enhanced abilities to penetrate (i.e. soak into) wood, both into end-grain and the face of wood surfaces is called Clear Penetrating Epoxy Sealer(tm) or CPES(tm). This product is manufactured by Smith and Company of Richmond, California. it is, however, repackaged and sold in some marine chandleries and hardware stores as "Rot Doctor." CPES has been around for probably fifty years now. It was originally developed for use in the preservation and restoration of decayed architectural embellishments such as gingerbread" fret saw work, turnings, and carvings on Victorian wooden buildings. It was never designed nor advertised to be used to add strength to structural wood, but rather only to preserve trim. That said, it was quickly embraced by the wooden boatbuilding community because CPES was an excellent sealer beneath wood in the marine environment and a very good primer for bonding epoxy structural laminations in wooden boatbuilding. I've used gallons of the stuff over the years and can attest that, to the depth it soaks into a piece of wood, it adds strength, and particularly impact resistance, to the epoxy-treated wood. A full explanation of this product can be found at Smith and Company's website: http://www.smithandcompany.org/CPES/ (This product, which isn't cheap, but has a long shelf life, can be purchased in most marine chandleries and by mail order from the company's website. Other "penetrating epoxies" are also marketed, but I've been using the original Smith's product for almost 50 years and I don't know a commercial boatyard that has ever used any of the "off brands.")
Because there's a limit to everything, I can't say CPES is going to turn all your modeling wood into hard epoxy resin, but it will provide some additional strength to small pieces and "sticks." Whether it provides enough for your purposes will depend on the use to which the piece is put and you'll just have to experiment with it. (It's also an excellent primer for wooden hulls which will be placed in water, whether they be painted or resin-coated.) With respect to "sticks" like small scale yards and such, you might consider abandoning wood altogether and going to brass or copper. The construction standards for many museums and institutional model collections sometimes specify the use of noble metal spars in smaller diameters to minimize the chance of breakage otherwise present in thin wooden spars.
In conclusion, frankly, if your wood piece isn't strong enough, I'd think you'd be better off using a stronger species of wood or using brass for that part. It goes without saying that if your piece is "cross-grained," there's no point in expecting it to ever have much strength at all.
-
7 hours ago, Roger Pellett said:
Having said that, my son has an overly friendly female Golden Retriever that is about as subtle as a medieval battering Ram. She could destroy any well built ship model in nothing flat!
My wife breeds and shows champion basset hounds. One of her young bitches got ahold of a couple of my favorite books and chewed up the covers. I went ballistic, but it was my fault for leaving the books where she could get at them, not my dearly beloved's for leaving the door open to my reading room. Rationale: I should know better. The dog doesn't know any better.
Cats, dogs, kids, the cleaning lady... just about anything will pose a danger to a ship model that isn't properly cased.
- Keith Black, mtaylor, allanyed and 1 other
-
4
-
I've sure someone will respond with copies they can share. Better it was the plans pages and not the finished, fully-rigged model, as has been the case on repeated occasions. In the meantime, write 100 times, "Cats and ship models don't mix."
Consider losing the cats and getting a dog.
-
6 hours ago, Ian B said:
Thanks both , I shall use an artistic guess.if it looks right then it must be lol. Look out for it soon on my Bismarck build log 😃
What scale are you working in? Degaussing cables were generally at the waterline. Some went down the entire length of the vessel and others only part way. Some were ever moved around from time to time. Was that 240mm cable 240mm in diameter or circumference? There's a big difference between a nine inch diameter and a three inch diameter. That's a lotta copper either way!
-
Good question. I don't know. That said, there were and are many degaussing cable arrangements and many more of the related "deperming" system which serves the same purpose. It is quite likely that a variety of cable arrangements would vary from ship to ship and from location to location. (Of course, the "pole" of a ship's induced magnetic field has to be reversed as the ship travels from one hemisphere to the other in order to achieve the magnetic neutrality necessary to defeat detection by magnetic mines and so the configuration of the degaussing cables may have changed from hemisphere to hemisphere, as well. See: Degaussing — National Museum of the Royal New Zealand Navy (navymuseum.co.nz)
I'm going to guess and say that the cable was probably fairly substantial, but it's size and physical positioning would vary from vessel to vessel.
-
2 hours ago, Dziadeczek said:
I also noticed that shellac gave some shine to the rope - a bit undesirable...
If you are getting a gloss finish from the shellac, you are putting too much shellac on. Just apply a single coat of thinned shellac (out of the can if premixed, 2 pound cut if not) and let the line soak it up. If that is allowed to dry without excessive shellac build-up, the clear shellac should be invisible. If you put another coat on top of the thinned shellac, you will start seeing a gloss effect. You should be able to remove most, if not all of the gloss shine by wiping the shellacked line down with an alcohol-soaked piece of cloth or a cotton ball.
- druxey and thibaultron
-
1
-
1
-
-
48 minutes ago, KeithAug said:
Ah yes, "two peoples divided by a common language" as they say.
In Cangarda's case, it's entirely proper to allow her bronze to acquire a patina. Hers seems to have turned a verdigris green. Often, the bronze weathers to a "tarnished penny brown," but i suppose the verdigris is a function of the amount of tin in the alloy. Her iron fittings require chipping and repainting. (The modern zinc paint undercoaotings would save a lot of work in this regard!) I did also note that there's a bolt missing from the steam line union on the anchor windlass. That definitely requires replacement before steam pressure is put to that union! On a "gold plater" of Cangarda's quality the original blocks on the anchor crane tackle would have been internally bronze-strapped varnished teak or lignam vitae-cheeked or all cast bronze open-web-cheeked. There wouldn't have been any stainless on her as built in 1901. It's this old sailor's "bosun's eye" that catches such details.

- druxey, Keith Black, mtaylor and 3 others
-
6
-
5 hours ago, Roger Pellett said:
Mr McNeil was apparently an advocate of “authentic” restorations. In Coronet’s case, this meant no auxiliary engine or electric lighting, even though he had planned to use the vessel for long distance voyages. This philosophy also influenced Cangarda’s restoration, and quite possibly her resale value. While he could have fitted her with modern Diesel machinery, she was instead powered with a carefully designed steam plant complete with reciprocating engine, generator and pumps. He then went a step further by deciding that this complex collection of machinery would be run with a unattended engine room. This required the development of a sophisticated computer system as well as elaborate instrumentation and sensors. Whether a new owner wants to take on the operation and maintenance of this machinery remains to be seen.
An interesting point, Roger. Of course, were she repowered with diesel and lost her steam power, the historic value of the vessel would be reduced tremendously. The steam engine is an historic thing unto itself. With respect to our questions about her hailing port and registration and McNeil's decision to "electronically automate" her steam plant, there may well be a few flies in the ointment. I know a bit about steam power and am relying on my memory here, so don't hold me to it, but, as I recall, under the USCG regulations, at least, a steam powered vessel over fifty feet in length used for any commercial purpose (which would include charter service) must operate with a USCG certified marine steam engineer on duty in the engine room and, as might be expected, the steam plant must be thoroughly safety-inspected on a regular schedule. Then there's the issue of obtaining insurance which would add a big chunk to her annual operating budget! I doubt she's capable of anything other than coastal voyaging, as she can't possibly carry enough fuel for ocean crossings. She's not a toy for anyone on a budget, so I doubt even giving her away would be an easy task, let alone trying to sell her for anything remotely close to what McNeil put into restoring her. We all can thrill to the accomplishment of her restoration, but in the end she may turn out to be a very expensive white elephant. Then again, as "the rich get richer," maybe another billionaire just might be crazy enough to take the bait.
-
3 hours ago, KeithAug said:
The one obvious anachronism in this approach is the fitting of the stabilisers. To me they look quite out of place on this style of hull.
They certainly didn't have stabilizers like that when she was first built, as far as I know, but she probably required them, particularly when she was carrying the top hamper of two masts. I wouldn't be surprised if she was quite a "roller." What surprised me in this regard was the absence of a bow thruster. These are a simple bit of kit these days, particularly since they were essentially building a whole new welded hull. It would make a huge difference when bringing her alongside a dock or quay.
- FriedClams, KeithAug, mtaylor and 1 other
-
4
-
3 hours ago, KeithAug said:
Bob. The brass isn't in a great state which in my book is a crew duty.
It wasn't the brass to which i was referring, but rather the exterior varnish work. (Which may also be a crew duty, depending upon the management of the vessel and the skills of the crew.) There may be a difference between American and British English. On this side of the pond, we generically refer to brightly varnished woodwork on a vessel as "brightwork." Brass is just "brass" to us, e.g. "...polish the brass..." vs. "varnish the brightwork." That said, the brass looks like it hasn't been regularly polished, but that wouldn't be unusual if she were laid up for the winter. The varnish takes longer to show the ravages of UV and, given that she was certainly wearing a professionally applied "eight coats" when she was restored, the fact that it is wearing through to the wood on the horizontal surfaces indicates she probably was in the sun with the brightwork uncovered for a couple of years, at least. Once it gets to showing bare wood, it must be entirely stripped and a new thick coating of varnish coats must be applied to restore a uniform finish. To maintain brightwork, a light sanding and a coat or two every six or eight months depending on the UV exposure is necessary and even more is needed in the tropics.
- mtaylor, FriedClams, KeithAug and 2 others
-
5


Plastic or Wood models? Your Favorite?
in Modeling tools and Workshop Equipment
Posted
Not if one has properly spiled their planks and mastered the techniques of heat-bending the planks to fit before fastening them. The difficulty of planking a "bluff" or "apple-bowed" kit hull is in large part dependent upon the design of the kit model. The plank ends of a sharp-bowed kit hull are frequently set into a rabbet in the stem, or finished flush with the inner stem and covered by a false stem on top of the inner stem and plank ends. As I understand it, never having encountered the problem myself, some bluff-bowed kit hulls simply butt the ends of the bent planks against the side of the stem, which creates a poor glue joint faying surface due to the planks' end grain and little to fasten to mechanically. Your mileage may differ, of course.