


Bob Cleek
-
Posts
3,374 -
Joined
-
Last visited
Content Type
Profiles
Forums
Gallery
Events
Posts posted by Bob Cleek
-
-
6 hours ago, modeller_masa said:
The Shipyard cardboard kit combines elements of both wooden and plastic model kits. Painting is essential to completing this kit, like a plastic sailing ship model kit.
Ah! My bad! I thought that was a wooden hull, not a card model. Take that as evidence of your great skill in creating a faux finish with oil paints! Forget what I said about using stain. You've done a great job once and after you sand off the lacquer, you should be okay if you just reapply the oil paint faux wood finish (with a bit of drier added.) You can then wait for it to dry well (a few weeks should be enough since the coating will be thin) and then apply two or three coats of shellac and, when dry, hand-rub it to a nice perfectly smooth satin finish. At least, that's what I'd do. As before, be sure to do a test run first, but the shellac should be completely compatible with the oil paint and the alcohol shellac solvent shouldn't have any effect on the oil-based paint.
-
10 hours ago, Jaager said:
Why not over coat with shellac instead of an organic solvent based polymerizing oil like linseed (with a catalyst) = (oil varnish). You do not need a hard shell for this application.
I think he wants to stain the wood and then put a high gloss lacquer over it. Not something I'd advise, but any stain would have to be applied before any shellac. No?
- Canute, modeller_masa, Jaager and 1 other
-
 4
4
-
28 minutes ago, Snug Harbor Johnny said:
The 'Chicago ' variable speed flex-shaft drill (sold at Harbor Freight) I've enjoyed BOTH power and lower speeds (modulated by a foot control - like my 'ild school' sewing machine).
Speed is a poor substitute for torque.
- Knocklouder and mtaylor
-
2
-
It's difficult to tell from the photo exactly what's happened to the finish, but from what I can see and you've described, it appears that the spray lacquer employed a very "hot" solvent which reacted with the oil paint, "skinning over" (drying quickly on the surface with greatest exposure to the air) and when the lower level of the lacquer dried, it "shrunk" and created the "crackle" finish on the drier top of the lacquer coat. Such problems are almost always the result of incompatible coatings with different drying or adhesion characteristics.
It may also be a function of the incompatibility of the acrylic basecoat and the oil paint over it. Some reaction between the "hot" lacquer solvent and the oil paint causing the oil paint to soften may have resulted in the oil paint being pulled away from the acrylic base coat as the oil paint dissolved by the lacquer solvent shrunk when the solvent evaporated.
The different result you had when you tested the coatings on the "coating paper" may have been due to the paper's porosity or surface flexibility permitting the lacquer solvent to evaporate without creating tension between the lacquer and the lower coating layers.
Another possibility, and this is a wild guess, is that the drier you used on the oil paint reacted with the lacquer solvent, causing the lacquer to dry more quickly than it should have which caused the crackling in the lacquer.
This is all speculation, of course. It would take a chemist to evaluate the compatibility of the various coatings used. Generally speaking, "water and oil don't mix," and water-based acrylic paints and oil-based paints and lacquers shouldn't be considered compatible in any event.
You may be able to remove a fair amount of the lacquer and oil paint using lacquer thinner to soften it and wipe it off. Similarly, you may be able to remove the acrylic coating with alcohol or some proprietary acrylic stripper. In any event, a gentle scraping and careful sanding down to bare wood is in order. From there, it depends upon the finish you desire. High gloss finishes are usually avoided on models as the high gloss destroys the impression of reality and makes a model "look like a toy," as some have described it. If you wish to darken the wood, as you apparently tried to do, the proper coating schedule would be to apply an oil based wood stain to the bare wood. Thereafter, the wood could be coated with an oil based varnish and after that had dried well, hand rub the varnish with pumice and rottenstone until the desired level of low gloss was achieved. Alternately, a "wipe on" polyurethane finish containing stain might also be used, but only after testing this on the same wood species with which you used to plank the hull.
I'm sorry to see the problem you've encountered. Unfortunately, there's a certain degree of alchemy involved when dissimilar coatings are used, particularly when modern synthetic coatings are used. You just never know what you are going to get. Myself, I entirely avoid using "rattle can" spray coatings and water-based coatings on models because I've had similar difficulties to what you've experienced when I've done otherwise. Fortunately, the damage can be undone with a bit of work.
-
-
-
-
1 hour ago, Jaager said:
I have found Duco to be unreliable where there is significant shear force and the surface area of the bond is equal or less than the surface area where the force is applied.
Very true! For this reason, mechanical fastenings are to be preferred in all instances.
I've found the same to be true of every other adhesive I've ever encountered. I've discovered through empirical analysis as well that the incidence of unreliability increases in direct proportion to the increase in shear force applied, regardless of the ratio between the surface area to which the shear force is applied and the surface area of the bond.
I believe this is known in physics as the "bigger hammer principle."

-
6 hours ago, KeithAug said:
I am not sure that he would be interested in seeing a model when he owns the real thing - lucky man.
Actually, in my experience, the number one most likely purchaser of a fine yacht model is going to be the prototype's owner. Yes, they have the real thing, but who doesn't enjoy admiring the beauty of their own yacht, whether it be a model or the real thing. Besides, having a great model of your yacht on display in your office or home is an understated way to make a "casual" statement of great wealth. That said, there are reportedly a number of models of Cangara extant, some at Fulford Place National Historic, the original owners' estate in Ontario, so maybe he's already got one.
-
5 hours ago, Dr PR said:
I have been using Duco Cement or similar glues for at nearly 70 years and it keeps forever. It contains acetone and other volatile chemicals, so if you live in California you should worry that it will cause your ears to fall off. I know it isn't "fashionable" these days, but it works very well with wood. It does dry clear, but it leaves a visible film.
I have to confess I've used Duco Cement almost as long as you and I still do, perhaps because I'm used to it. Because I try to the greatest extent possible to create a mechanical connection when joining fittings and parts, I find it is much easier to work with than epoxies when gluing a metal mounting peg into a wooden hole. Duco is nitrocellulose that's been dissolved in acetone, so a lot of people in California get their knickers in a knot over it, but so far it's still available in most hardware stores. A homebrewed approximation of Duco Cement can easily be prepared, athough with a styrene base instead of nitrocellulose, by dissolving styrofoam packing material in acetone until a sufficiently thick consistency is achieved. It takes a surprising amount of styrofoam to accomplish this, but i always seem to have plenty of the stuff on hand. Both nitrocellulose and styrene are probably not very archival, but when used to cement pegs in holes, they seem to do fine.
-
No idea for sure why the rattle can gloss lacquer clouded on you. The defect you describe is usually related to high humidity in the environment when the lacquer is applied. Alternately, the moisture content of the wood itself may be an issue. Wood readily absorbs moisture and automotive clear lacquer is designed to be applied to metal, not wood.
If I were you (and I admit I'm not,) I'd strip it to bare wood. Sand perfectly smooth. Apply a sealer coat of thinned spar varnish to soak into the wood and then eight coats of spar varnish, sanding lightly between each coat to key the surface (don't sand off the previous coats. The object is to build up a thick coating that provides some depth to the varnish that enhances the wood grain. (Use a tack rag to remove all traces of dust before varnishing.) If you really want to get fancy, after the eight coats of spar varnish dry well, hand rub the knob (or machine polish it if you have a wheel) with rottenstone and pumice until you obtain the level of gloss you desire. (Obtainable at any paint store. Follow simple instructions on the container.) This will provide a deep fine-furniture finish that won't look garish like high-gloss varnish alone can often look and its incredible smoothness with be a pleasure every time you touch it. (This is how Rolls Royce finished the interior trim on their now-classic motorcars. Modernly, Rolls Royce coats the wood trim with a number of proprietary resin coats that are then baked to cure the resin, after which they polish the surfaces with fine abrasives like pumice and rottenstone in the old fashioned manner.)
-
In terms of shelf life? Obviously, it depends on the type of glue. As for modeling glue, PVA will let you know it's past its expiration date when it gets thick, if not hard, in the bottle. Epoxy doesn't seem to have a expiration date as long as its containers are kept tightly sealed. CA adhesive will last practically forever if you keep it tightly capped in a sealed zip-loc plastic bag in your freezer between uses. Shellac will last forever and can be reconstituted by adding additional alcohol to the mix. As for the rest, which aren't particularly advisable for use in ship modeling, see: Wood glue - Wikipedia and read the instructions on the containers.
The only perfectly clear glues used in modeling that I know of are CA and Duco, a nitro-cellulose glue formerly popular for styrene model assembly and balsa model airplane construction. PVA (e.g. Titebond) will dry without color, but is somewhat cloudy and not perfectly clear, although when used to create properly formed joints, PVA should not be visible at all. (Some actually add black color to PVA in order to accentuate the joint lines in decks and timbers in bright-finished models.) As for which are "good" and "clear," I would say Titebond PVA in any of its permutations is about as good a wood glue for modeling as is available these days. Epoxy and CA have their place in joining dissimilar materials, particularly wood and metal. Beyond that, most "modern" adhesives pose risks associated with out-gassing and less than optimum archival qualities. See: Nautical Research Guild - Article - Specifications for Construction of Exhibition Models of U.S. Naval Vessels (thenrg.org) and Nautical Research Guild - Article - Ephemeral Materials in Ship Models (thenrg.org) for detailed discussions of materials to be used in ship modeling.
-
What Jaager and maylor said. And now moving from the novella to the encyclopedic treatise...
We all own Dremel Moto-tools of one model or another, or, in many cases, we own several. Over time, they seem to secretly breed in dark tool drawers. There are lots of handy uses for a Dremel tool, such as grinding small metal parts, using cut-off wheels for cutting metal, stirring modeling paint with a length of coat hanger wire with a little loop bent in the end, trimming your dog's toenails, and so on. Drilling with tiny numbered-sized bits, however, is not one of them. Neither is drilling in the Dremel "drill press" which mounts the Moto-tool in a cheesy, lightweight and way-too-flexible press. [While not the best substitute for a dedicated full-sized bench top drill press, the much higher quality Vanda-Lay Industries Dremel- or Foredom handpiece-powered drill press is better than the Dremel offering by an order of magnitude. The same goes for their Dremel- or Foredom-powered mill and other accessories. Vanda-Lay's lower-powered offerings do provide a less expensive option for sometimes expensive machine tools, keeping in mind that Dremel tools trade speed for torque which works okay for sanding and grinding, but not so much for drilling and milling. See: HOME (vanda-layindustries.com]
Numbered drill bit sizes really aren't designed for powered hand-held drilling at high speeds. Even at a Dremel's low-end 15,000 RPM speed, the slightest movement of the motor out of line with the bit is likely to snap the bit. Similarly, hand drilling with a pin vise requires a very steady hand, a sharp bit, and light pressure to avoid breaking the bit. Use in a drill press, with metal particularly, requires center-punching before drilling and a slow speed and light pressure is to be preferred. There's really no way around these facts. Numbered bits are skinny little things and they can't handle a lot of stress. One thing than goes a long way towards preventing bit breakage is to "choke up" on the bit by chucking as much of the bit as possible and leaving only enough of the bit extending beyond the pin vise or chuck to drill as deep as you require. This really cuts down on "whip" and stiffens up the bit shaft. If a deep hole is to be drilled, it often pays to only extend a short length of bit and drill down as deeply as it will reach, then extend the bit a little farther from the pin vise or chuck and lower the bit into the previously drilled hole and drill a bit farther until the bit is fully buried in the hole, repeating this process until the entire depth is drilled. The trick is to have as short a length of bit between the hole and the pin vise or chuck as practical, which will keep the bit shaft more rigid and less able to "whip" and snap.
Bench top drill presses can be found on sale second-hand and "old 'arn" is often a good investment as long as the machine hasn't been destroyed by a generation of abuse in a high school shop or daily hard duty in a commercial shop. (If you are really lucky, you may find a 1950's vintage Craftsman bench drill press made by King-Seeley which has a threaded quill that permits exchanging the Morse taper mounted Phillips chuck for a quarter-inch collet chuck that converts the drill press into a light milling machine when a suitably sized X-Y table is mounted on the press table.) It would be a good idea to bring along a dial indicator to test for excessive quill run-out before buying a used drill press... or even if buying a new one of those $79.00 Chinese-made mini-drill presses. A drill press that "wobbles" the bit may work for use with larger bits that can take the abuse and drill a less than round hole, but a tiny numbered bit won't survive excessive quill run-out.
- HardeeHarHar and mtaylor
-
1
-
 1
1
-
Ages of Sail (agesofsail@gmail.com), a ship modeling store, is located in the San Francisco Bay Area in San Lorenzo, CA and are a forum sponsor. Hard to believe they don't ship within the U.S. Maybe you were looking at the Amati link. Anyway, good move on upgrading the kit castings. Quality varies widely between manufacturers and it's a rare kit that can't be improved by some aftermarket parts. At least a 1984 vintage kit will probably have Brittania alloy castings instead of lead-based castings like the older kits. The lead castings had a bad habit of developing "lead bloom" or "lead leprosy," when they started oxidizing and crumbling to dust.
-
1 hour ago, KeithAug said:
I have made contact with Jeff who has been very helpful, I just don't want to push my luck by placing too big a demanding of his resources.
I bet Jeff and Bob McNeil, Cangarda's owner, would be thrilled to see you build a model of her. Have they seen your Germania? It don't get much better than that!
- druxey, FriedClams, mtaylor and 2 others
-
5
-
4 hours ago, KeithAug said:
In due course I may be putting out a plea to MSW members for any photographs they may have.
I may have mentioned it before, but I'd bet Jeff Rutherford of Richmond, CA, the fellow whose boatshop restored Cangarda, would have a lot of photographs taken during her rebuild. (His phone: (510) 233-5441)
- mtaylor, druxey, FriedClams and 1 other
-
4
-
Just order a couple more from one of the parts suppliers. They'll be the same, if not better, than what came in the kit.
- mtaylor, Knocklouder and Scotty W
-
3
-
45 minutes ago, Jim Lad said:
What sort of ship arr wtalking about, Bob. in most ships, the bow and stern are just the areas where we see the most alteration in plank width on the hull.
John
Absolutely. As I mentoned, I really don't understand what the problem is. He needs to explain it more understandably.
-
I don't know about anybody else, but I'm not sure what you mean by "as I bend them around the bow I MUST keep their width in the bend the same as the width of any planks I have not cut out ie the straight planks that came with the kit." Pictures would help.
The "straight planks that came with the kit" only are useful for slab-sided areas where you'd may as well be laying hardwood floor or clapboard siding. On the other hand, if you are spiling your planks from a flat sheet, you should get a plank that fits perfectly, bend or not, since you've spiled the exact shape required. Are you sure you are spiling correctly? Have you evenly divided every frame shape by the number of planks that should be required to plank the hull? If so, your plank shapes should be fine. If you are spiling from an elevation plan, the plank seams may all look parallell to the baseline of the drawing. There is no way you can accurately derive a plank shape from that because the elevation will only show the height between the plank seams as viewed orthographically. In the bows, the planks tend to be hung at a greater angle from plumb, farther away at the bottom and closer to the viewer at the top. The greater width in three dimensions rather than apparent height in two dimensions has to be taken into account.
When spiling plank, the entire hull has to be "lined off." This can be done with thread or tape. The limitation as to width is only the scale width of available plank. When lining off, you have to judge the fairness of the plank seams by eye. There isn't any rule that every seam is going to be the same width, except perhaps amidships on a large vessel. When you have "lined off" all your plank seams, you can then measure the width of the plank at each seam intersection on a frame or bulkhead. This is how you account for the actual shape of a plank on a curved surface that has been drawn flat in two dimensions on the plans.
Hope this helps. If not... never mind. I had to guess at what the problem was.
-
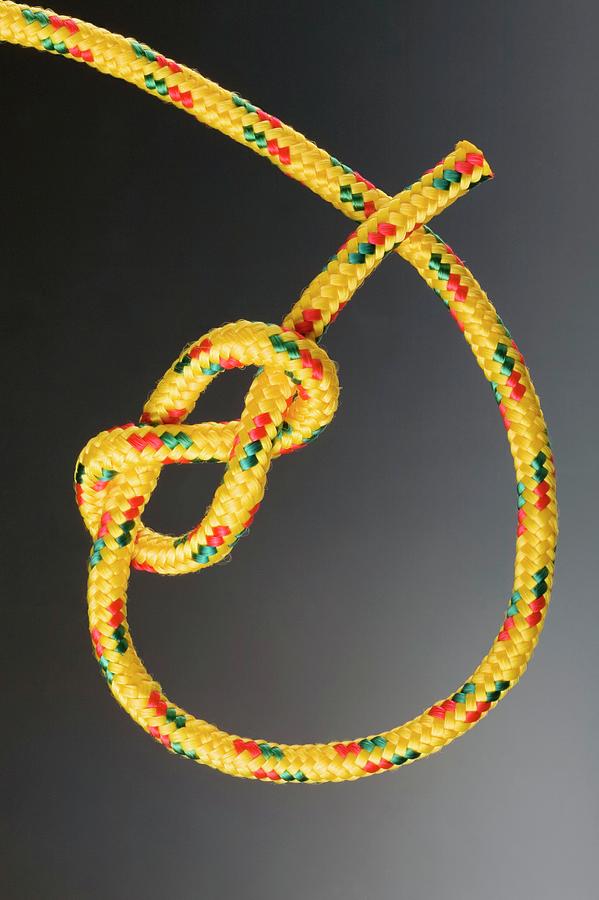
Since you are experiencing difficulty, yes, there is an easier way to tie in "reef points" on a sail. Real reef points have a "figure-eight knot" tied into the line on either side of the sail. The figure-eight knot will not jam and is easily untied, no matter how much tension has been placed on the knot.
Figure-eight knot, also called by some a "stopper knot:"
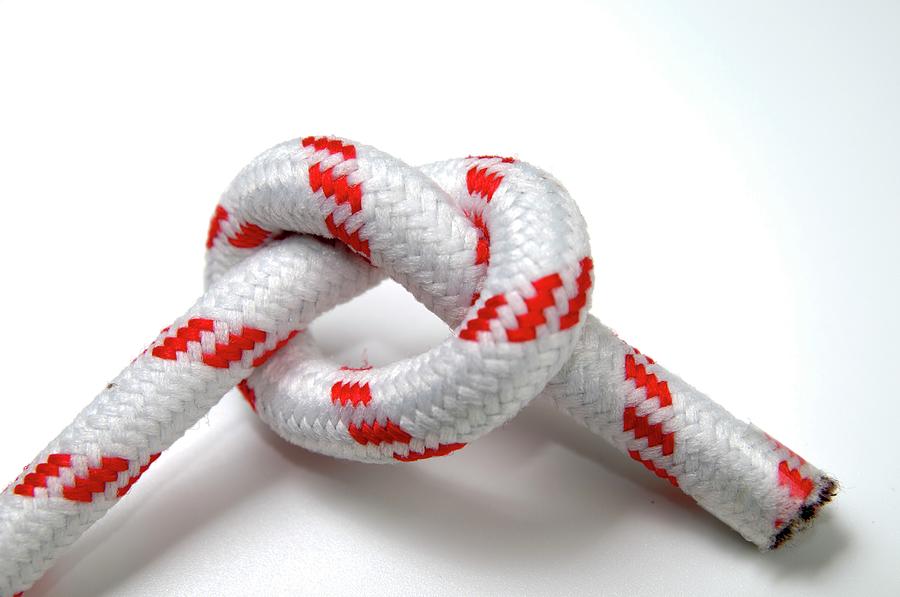
At all common modeling scales, a simple overhand knot is sufficient to portray a reef secured to a sail.
Simple overhand knot:
The easier way to tie overhand knots in scale rigging cordage is to employ the surgical suturing technique known as an "instrument tie." This requires the use of a surgical instrument called a "needle holder" or the equivalent, which could be some sort of tweezers or the like. A long needle holder works best for modeling, since its length permits access inboard of the stays and other hard to reach places. Another handy instrument to have is a long tweezers or a second needle holder. These instruments take the place of fingers, which are much too large (and perhaps short) for the delicate tasks at hand, be it sewing up a wound or tying scale rigging knots,
A picture is worth a thousand words and a video is better than that, so I've attached three videos of various flavors produced for the purpose of instructing medical students in performing a basic instrument tie. Get yourself a needle holder or three. They are handy for all sorts of modeling tasks. (eBay is full of dirt cheap ones or ask a friend who works in a hospital to obtain one for you.) Watch the videos and practice until you get the hang of it (which should take one or two tries... it's very simple.) Once you have the basics down, you can then apply the instrument tie technique to a wider range of applications than just simple overhand and surgeons' knots.
As for tying in reef points, the simple overhand knot is tied first, then the reefing line is sewn through the sail with a needle, making sure that you've left yourself enough length to accomplish the following exercise. Approaching the single end of the reefing line from the knotless side, the bitter end of the reefing line is held in the non-dominant hand while a turn (or two if you prefer to use a "surgeon's knot" for the purpose... which is explained in the videos) is thrown around the needle holder. (This is sometimes more easily accomplished by grasping the line with the needle holder and twisting the needle holder to wrap the line around it, which is why you need to leave yourself some surplus line at the beginning.) Then, instead of grasping the other end of the reefing line as in the case of suturing knots shown in the videos, you grasp the standing part of the reefing line with the point of your needle holder (the same way as if making an overhand instrument tie) with the needle holder clamped on the reefing point as close as possible to the point on the standing part where it comes out of the sail. Then, with the needle holder clamped to the standing part of the reefing line as close as possible to the sail, using your fingers, a tweezer, or another needle holder, carefully slide the line wrapped around the needle holder down the jaws of the closed needle holder and over the standing part of the reefing line to form the overhand knot and then carefully coax the bitter end through and pull it tight. Easier done than written, but you should be able to figure it out once you have the principle of the instrument tie down. (This is similar to the method described by VitusBering above, but the point of the needle holder replaces the needle he uses in his method. The "needle method" works fine, so long as you have the room to get your fingers where they need to be.)
Needless to say, all knots should be secured after they've been tied with a dab of shellac, thinned PVA, or CA. Myself, I prefer shellac because if the knot needs to be untied for further adjustment, the shellac can be softened, and the knot untied by simply applying alcohol to the dried shellac. I don't like thinned PVA because it takes a while to dry, can get messy, and is hard to reverse if need be. I avoid CA adhesive wherever possible because it's just nasty stuff, expensive, and hard to clean up if it goes where you don't want it. Another thing I like about shellac is its adhesive properties. When modeling reefing points, they will inevitably stand straight out or up or everywhere other than in a plumb fashion hangling down against the sail like the prototype. I use shellac, which is very viscous, to saturate the reefing line. As the alcohol in which the shellac is dissolved evaporates, the line will become increasingly stiff and sticky, but still pliable. (This is a very quick process, since the alcohol evaporates very quickly.) When it becomes pliable and sticky, the reefing line can be pushed against the sail and it will stick where you want it, making it very easy to achieve realistic looking reef points with all your reef lines hanging straight down and parallel to one another.
There are many YouTube videos on surgical instrument knot tying and much to learn by watching them. Learning use surgical instruments to tie knots will significantly speed up your rigging tasks and reduce the level of frustration that rigging often otherwise occasions.
Learn how to Tie a Surgical Knot with an Instrument - Bing video
Instrument Surgeon's Knot Tying - Bing video
How to make a square knot and a surgeons knot - instrument tie - Bing video
- thibaultron, mtaylor and VitusBering
-
2
-
1
-
Keith, thanks for taking the time to share this remarkable build with all of us. There was so much great information, particularly the metalworking, that taught us all a lot. A wonderful accomplishment!
On to Cangarda! I'd expect she'll be an easier build, given the simpler rigging and less deck hardware, unless you decide to do a cut-away and depict below decks and the engine room. In that case, probably twice the work, at least!
Or... how about a working steam-powered pond model?

- mtaylor, FriedClams, KeithAug and 2 others
-
5
-
If you are looking for a recommendation for a finish, I guess the first question is, "What do you want to accomplish by spraying flat varnish on your model?" Any finish recommendation will depend in the first instance upon what kind of wood it is and how you want it to look. Since you are going to be portraying bare wood decks and spars, leaving the wood without any coating of varnish would make the most sense.
"Satin" varnishes, which is to say simply gloss varnish with fine powder mixed in to kill the gloss, add thickness to the finish coating without any corresponding benefit. The flattening compound not only dulls the gloss, but it dulls the "depth" of the finish below it. "Satin" finishes are simply a product which poorly mimics a traditional hand-rubbed finish.
If you want to change the color of the bare wood, a stain is in order.
If you want to accent the figuring of the wood (which most would not, since the figuring is likely hugely over-scale) two-pound cut white (clear) shellac will do that neatly and without any gloss whatsoever.
From my personal perspective, I don't understand why folks want to spray "satin finishes" on their models, but I know that they do. Rubbing on something as simple as a 50/50 mixture of boiled linseed oil and turpentine with result in a very nice satin finish with no discernable build-up of the coating. When it comes to painting and varnishing a scale model, "less is more."
Any finish that is too glossy can be rubbed down with rottenstone and/or pumice or even with a Scotch-Brite pad.) This results in a level of gloss (or "matte," depending which direction you are coming from,) which the modeler can control themselves, depending upon how much rubbing they do, There is no finer finish than a hand-rubbed one. The smoothness of a rubbed finish has to be experienced to be believed. The flatness or "satin" appearance is a function of the polishing of the primary reflective surface of the piece, not from finely ground dirt mixed in with all the coats of varnish applied.
I know some swear by water-based coatings, but it's my opinion that although some are quite good, Limiting the materials list to the fewest basic natural materials possible yields a model of the highest archival quality possible.
- wefalck, Canute, Roger Pellett and 7 others
-
10
-
Two pins, actually. Drive them at opposing angles so they hold better. Your rigging lines will belay to these cleats and you don't want the tension on the lines pulling them off. Simply gluing them in place won't provide sufficient shear strength to prevent pulling them off.
As for finish, it may well depend upon the period in which your prototype was built. Generally speaking, wooden cleats are left bare because this provides the better friction to hold the belaying hitches in place. They may also be oiled, in which case they'd be very dark brown or black at a scale viewing distance. Sometimes, too, though, they may be painted the same as the surrounding area or white for visibility at night. There aren't a lot of hard and fast rules on cleat colors. This is an area where the modeler gets to exercise some artistic license in the absence of any reliable historical record for a given vessel.
-

Oil paint varnish help
in Painting, finishing and weathering products and techniques
Posted
Yes, we do agree that shellac works well as the last layer of the coating system.
I mentioned stain because I thought he was working on real wood and not card. My mistake. Stain could go over shellac, but it wouldn't look the same as stain on bare wood. This is because the grain structure of the bare wood absorbs the stain at differing rates and enhances the figuring of the wood. Shellac can do this to a certain extent (especally a darker shellac,) but if the shellac is put down first, it soaks into the wood and any stain will only uniformly darken the workpiece. I agree using shellac before a dye would be a bad thing for the reasons you stated.
My use of the work "stain" wasn't careless, it was just wrong, since I thought it was wood to which he was applying the finish instead of cardstock.
The ship modeling world would be a better place if we could just convince our colleagues to only use shellac and artists' oils and avoid all the "better living through chemistry" that seems so fashionable these days. Not likely we'll live long enough to see that happen though.