


Bob Cleek
-
Posts
3,374 -
Joined
-
Last visited
Reputation Activity
-

 Bob Cleek got a reaction from mtaylor in angle of attack of my blade
Precisely. That's what I'll be doing in the future. I'll pick some up at the stationery store as soon as our "lockdown" ends. With a nod to Mark, I may even stick a couple on the ends of a pair of chopsticks.
I've never connected the metal band on a pencil with the blade, but I'd expect the metal being rather thin, the blade would simply cut through it.
-
Bob Cleek got a reaction from mtaylor in angle of attack of my blade
Yes, indeed. I never pass up the opportunity to grab one when I can. I have pieces of plastic chopping board screwed into my woodworking bench vise's jaws to cushion the workpieces. The Record woodworking bench vises, as most all, are sold without jaw pads and shop-built sacrificial wood jaws are screwed to the metal jaw faces. I've found pieces of cutting board to be just the ticket for this. I don't bother with wooden jaw pads anymore.
-
 Bob Cleek got a reaction from Altduck in angle of attack of my blade
Yes, indeed. I never pass up the opportunity to grab one when I can. I have pieces of plastic chopping board screwed into my woodworking bench vise's jaws to cushion the workpieces. The Record woodworking bench vises, as most all, are sold without jaw pads and shop-built sacrificial wood jaws are screwed to the metal jaw faces. I've found pieces of cutting board to be just the ticket for this. I don't bother with wooden jaw pads anymore.
-
Bob Cleek reacted to wefalck in Serving Rope
A half-hitch and shellac at the end to prevent unravelling ... once installed, the part can be lightly soaked in dilute shellac or (black/brown) acrylic varnish to secure things. I prefer something that can be softened with solvent in case one needs to make adjustments.
-
 Bob Cleek got a reaction from Mark P in angle of attack of my blade
A plain old number two pencil with an eraser on the end makes a great "push stick" for micro-saws. Use the eraser end to hold thin strips down flat on the table. Use two, one in each hand, so you can feed through, one leap-frogging over the other, to keep control of the workpiece as it moves past the blade.
-
Bob Cleek got a reaction from Mark P in angle of attack of my blade
Good point! I always bring the cheap chopsticks from the Asian restaurants home with me for use in my shop. I've got tons of them. I miss the higher quality old fashioned big ones they used to use, though. The new ones that are just routed out of a single piece and you break apart for use aren't as high a quality of bamboo as the older and longer ones. I do like the rubber on the erasers. Perhaps I'll try to find some of the old larger pencil erasers that slip over the end of the pencils. I'll have to be careful to avoid "shrapnel," though! (I never, ever, stand in line with any sort of spinning saw blade.)
Just checked. They're on sale for $1.68 a gross, just slightly more than a penny a piece!
https://www.officesupply.com/school-supplies/student-teacher-supplies/basic-school-supplies/pencil-erasers/integra-pencil-erasers/p46499.html?ref=pla&utm_source=google&utm_medium=cpc&adpos=&scid=scplp46499&sc_intid=46499&gclid=EAIaIQobChMI47qirqmW6QIVRT2tBh0UjQj6EAQYASABEgIDlPD_BwE
-
 Bob Cleek got a reaction from No Idea in angle of attack of my blade
A plain old number two pencil with an eraser on the end makes a great "push stick" for micro-saws. Use the eraser end to hold thin strips down flat on the table. Use two, one in each hand, so you can feed through, one leap-frogging over the other, to keep control of the workpiece as it moves past the blade.
-
Bob Cleek got a reaction from mtaylor in Standing rigging question
The "standing" rigging is "running" rigging because lateen "yards" ("antennae,") would foul on the shrouds if the shrouds were fixed. The lee shrouds, actually "running backstays," were cast off and the windward shrouds set up when tacking. The tackles permit setting up the shrouds as required.
-
 Bob Cleek got a reaction from bruce d in angle of attack of my blade
Good point! I always bring the cheap chopsticks from the Asian restaurants home with me for use in my shop. I've got tons of them. I miss the higher quality old fashioned big ones they used to use, though. The new ones that are just routed out of a single piece and you break apart for use aren't as high a quality of bamboo as the older and longer ones. I do like the rubber on the erasers. Perhaps I'll try to find some of the old larger pencil erasers that slip over the end of the pencils. I'll have to be careful to avoid "shrapnel," though! (I never, ever, stand in line with any sort of spinning saw blade.)
Just checked. They're on sale for $1.68 a gross, just slightly more than a penny a piece!
https://www.officesupply.com/school-supplies/student-teacher-supplies/basic-school-supplies/pencil-erasers/integra-pencil-erasers/p46499.html?ref=pla&utm_source=google&utm_medium=cpc&adpos=&scid=scplp46499&sc_intid=46499&gclid=EAIaIQobChMI47qirqmW6QIVRT2tBh0UjQj6EAQYASABEgIDlPD_BwE
-
Bob Cleek reacted to mtaylor in angle of attack of my blade
That would work but I don't like the idea of metal things anywhere near the saw so I use cheap chopsticks.
-
Bob Cleek got a reaction from bruce d in angle of attack of my blade
A plain old number two pencil with an eraser on the end makes a great "push stick" for micro-saws. Use the eraser end to hold thin strips down flat on the table. Use two, one in each hand, so you can feed through, one leap-frogging over the other, to keep control of the workpiece as it moves past the blade.
-
Bob Cleek reacted to el cid in Serving Rope
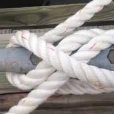
Not sure how this works at small scale, but this is how I serve bow strings...
-
 Bob Cleek got a reaction from thibaultron in Airbrushing without external exhaust
You can keep adding coats without worrying whether it's dried or not until just before it starts to sag on the vertical surfaces.
Sorry, I couldn't resist pulling your leg a bit there.
It's generally a true statement, but, of course, how does one know when "just before it starts to sag" is before it's too late? The answer is "practice."
Airbrush paint and ink drying time will usually be very fast. (Sometimes even too fast, with the fluid drying in mid-air. You don't want that.) Painting models, one doesn't want to put down any more paint than necessary so the detail isn't obliterated by getting filled with paint. Good, even color coverage is all you need. Take the time to play with your airbrush. First, use it with water alone to get the feel of the controls and spray it on a piece of paper. This will get you familiar with spray characteristics and nozzle settings and why the patterns look like. This will also give you a feel for how fast the material is being sprayed onto the paper. Once you've got that down, do the same using some paint. You can experiment and see how the paint covers and how much you need.
One hint is to keep the airbrush moving. Start your "stroke" and then start the fluid spraying. Let up on the spray and follow through with your stroke at the end. Move the airbrush parallel to the surface you want to paint. Don't spray in an arc such that the distance of the nozzle from the surface being sprayed varies. Move in straight lines across, never in an arc. Applying the fluid evenly is important to avoid unnecessary paint build up and possible runs. Practice makes perfect.
Always test spray on a piece of scrap card or paper before spraying anything "for keeps." This ensures you know that your paint mix is the right thickness and your nozzle is adjusted correctly. You don't want to start spraying a perfectly prepped hull without testing the airbrush operation first, only to discover that your nozzle is spitting and sputtering little globs of paint all over your surface! Test every time you refill the airbrush cup! Always.
YouTube is probably your friend here. I'm sure there are plenty of "how to airbrush" videos on there.
-
 Bob Cleek got a reaction from Cleat in Airbrushing without external exhaust
You can keep adding coats without worrying whether it's dried or not until just before it starts to sag on the vertical surfaces.
Sorry, I couldn't resist pulling your leg a bit there.
It's generally a true statement, but, of course, how does one know when "just before it starts to sag" is before it's too late? The answer is "practice."
Airbrush paint and ink drying time will usually be very fast. (Sometimes even too fast, with the fluid drying in mid-air. You don't want that.) Painting models, one doesn't want to put down any more paint than necessary so the detail isn't obliterated by getting filled with paint. Good, even color coverage is all you need. Take the time to play with your airbrush. First, use it with water alone to get the feel of the controls and spray it on a piece of paper. This will get you familiar with spray characteristics and nozzle settings and why the patterns look like. This will also give you a feel for how fast the material is being sprayed onto the paper. Once you've got that down, do the same using some paint. You can experiment and see how the paint covers and how much you need.
One hint is to keep the airbrush moving. Start your "stroke" and then start the fluid spraying. Let up on the spray and follow through with your stroke at the end. Move the airbrush parallel to the surface you want to paint. Don't spray in an arc such that the distance of the nozzle from the surface being sprayed varies. Move in straight lines across, never in an arc. Applying the fluid evenly is important to avoid unnecessary paint build up and possible runs. Practice makes perfect.
Always test spray on a piece of scrap card or paper before spraying anything "for keeps." This ensures you know that your paint mix is the right thickness and your nozzle is adjusted correctly. You don't want to start spraying a perfectly prepped hull without testing the airbrush operation first, only to discover that your nozzle is spitting and sputtering little globs of paint all over your surface! Test every time you refill the airbrush cup! Always.
YouTube is probably your friend here. I'm sure there are plenty of "how to airbrush" videos on there.
-
Bob Cleek reacted to druxey in Canadian Pacific Wood Passenger Cars by Realworkingsailor - 1:87 - scratch-built & kit-bashed
Nice clean work, Andy!
Don't get me started on thrown out archives. I once worked for a Toronto company - no longer in existence - whose library was assembled in the 1900-1930's time period. There were art books galore (it was an advertising company) and mementos of folk who once worked there. Canadian readers will recognise The Group of Seven, many of whom had been employed as illustrators there. All were thrown in a dumpster in the mid 1980's....
-
 Bob Cleek got a reaction from ~JC~ in Thread Magic vs Beeswax
Except that silicone is the corona virus of finish coatings. Once it gets into the air, it spreads and then settles and thereafter is always there. Microscopic dust specks of silicone will invariably create "fisheyes" in fine paint and varnish finishes and are near-impossible to remove. A work area contaminated with silicone is very difficult to decontaminate. I, too, belong to the "no silicone in my shop" club. "Flaming" thread also works well to eliminate "fuzz" on scale line. Using a proper type of polyester based thread has the same qualities without having to put anything at all on the line.
Beeswax works fine
-
Bob Cleek got a reaction from bruce d in Thread Magic vs Beeswax
Except that silicone is the corona virus of finish coatings. Once it gets into the air, it spreads and then settles and thereafter is always there. Microscopic dust specks of silicone will invariably create "fisheyes" in fine paint and varnish finishes and are near-impossible to remove. A work area contaminated with silicone is very difficult to decontaminate. I, too, belong to the "no silicone in my shop" club. "Flaming" thread also works well to eliminate "fuzz" on scale line. Using a proper type of polyester based thread has the same qualities without having to put anything at all on the line.
Beeswax works fine
-
Bob Cleek reacted to allanyed in Advice needed please
Welcome to MSW Damon!!
Which frigate are you looking to build and is it a scratch build or a kit? Kit models do often use a double set of planking over bulkheads in place of frames. British vessels were built with a single layer of planking on the outside of frames, and of various thicknesses with the wales being the thickest. They were also planked on the inside and these strakes also varied in thickness including thick strakes for the deck clamps and other thicknesses at various points inside the hull.
In general regarding planking, be it a single layer as the ships were actually built or the outer layer of a double planked kit, please take a little time and read the planking tutorials here at MSW. There are many ways of planking that wind up with a look that is not at all realistic and take away from the look of the finished hull but the tutorials will help you get the planking done nicely and yield a look that is realistic. I would urge you to start a build log and as you come to each point in the build, you can get answers to your questions and some guidance to avoid unnecessary do-overs.
Allan
-
Bob Cleek reacted to el cid in Thread Magic vs Beeswax
Big problem with silicone sealant contamination and fiberglass boat hulls...virtually impossible to get a decent paint job.
-
Bob Cleek reacted to bruce d in Thread Magic vs Beeswax
And on wood that will get a coat of poly, shellac, sealer or just about anything.
-
Bob Cleek reacted to allanyed in Thread Magic vs Beeswax
Bruce, We had similar issues at a client's factory making nail polish. A vending machine service tech came in one day and used silicone spray lubricant and it got into the air and in the nearby manufacturing area. When the polish was put on, it left fish eyes on the surface. Fortunately, this turned up in QA testing before the batches from that day were shipped and disaster with end users averted. No silicone sprays were ever allowed in the factory after that. If a model is being spray painted, the same thing can occur, so be diligent about having silicone spray products in the model building area.
Allan
-
Bob Cleek reacted to bruce d in Thread Magic vs Beeswax
Hello Bartley,
Not being a chemist, I must generalize quite a bit. A small amount of silicone completely ruined the finish on three projects underway in my old workplace quite a few years back. Someone had a trace on their hands (left hand from the evidence) and three of the four items we were sweating blood to get ready before a deadline had reactions when painted leaving finger and palm patterns where they had been handled. Besides the commercial crisis because of the need for the whole team to pull two all-nighters in a row to put right the damage there was considerable human fall-out.
The likely source was a can of spray lube for a garage-type door that had just been bought. We had a ceremonial can-burning, Wicker Man style. A friend in electronics then told me his own version of the problem and introduced me to 'silicone nodule migration' (yes, it is a thing).
Hence the NO SILICONE rule when I started putting together my workshop a few years ago in anticipation of woodwork and modelmaking.
I know most people use it and don't have a problem, but any silicone-bearing product in our little corner of heaven has to stay in the house, not the important area where I fiddle around.
-
Bob Cleek reacted to bruce d in Thread Magic vs Beeswax
Here is the link to the active ingredients ...
https://en.wikipedia.org/wiki/List_of_synthetic_polymers
… and silicon appears to be among the possible ingredients as does Teflon.
Silicon is banned in my work area, old bad experience. I would be interested to know if it is in the product.
Good find!
-
Bob Cleek reacted to M.R.Field in Another Airbrushing Noob
My airbrush of choice for simply painting rather than fancy graphics or weathering will always be the Paasche Model H. I have two. One for colour, one for clear. Bullet proof, easy to clean and with a very fine spray, what more do you want (apart from silly bragging rights!) But to paint larger objects i use a spotting gun, a small gravity spray gun meant for touching up spots and dents on small repairs.They are so cheap and beautifully made. Around £18 for a good one from your friendly auto paints shop (where I get all my paints).
Martin
-
Bob Cleek reacted to Chuck in Gutermann Polyester thread for making rope.
I just wanted to show you guys some rope I was making just yesterday. Its not packaged up yet. This is NOT Gutermann MARA. This is my poly/cotton blend stuff. Its supposed to be about 60/40 poly to cotton. But my guess is there is more poly. So yes I do still have to cook it.
Same procedure as I mentioned for the Mara stuff above. I have started making it just in case I cant get my Linen thread anymore. But I digress. I just wanted to point out how tightly it is laid up....
Many more initial twists of the individual strands.....so after you twist all three strands together in the opposite direction, you can achieve a tighter rope. Doing this with poly is much much easier than doing it with cotton or linen. The natural stuff wants to kink up on you. But because the poly is a bit more stretchy, it wont. Its more forgiving. It is also not as important to tie the strands to your ropewalk with the exact same same tension initially. Because its a bit more stretchy....again it tends to equalize and make a really crisp and clean rope when laid up.
This particular size rope is very small by the way. It is size .018
Also note the color difference between the mara stuff I posted. The mara stuff is a bit orange that the museum wanted so I chose this custom color for my new Syren ULTRA scale rope. Let me know if anyone has any questions.
and this is a larger rope which would be a huge challenge to make on one of those planetary machines. ( ,080) Note the cut end which isnt unraveling......no glue at all. Again this is a poly blend ULTRA rope. It hangs and coils very naturally.