
Supplies of the Ship Modeler's Handbook are running out. Get your copy NOW before they are gone! Click on photo to order.
×

Omega1234
-
Posts
6,060 -
Joined
-
Last visited
Reputation Activity
-

 Omega1234 reacted to Jim Lad in SS Michelangelo 1962 by shipmodel - FINISHED - 1/350 scale
A very nice job on the stern, Dan.
John
-
Omega1234 reacted to shipmodel in SS Michelangelo 1962 by shipmodel - FINISHED - 1/350 scale
Hi all –
I hope everyone has had a nice Easter, Passover, or other spring holiday of your choosing. Thanks, as always, for the comments and the likes. It is so nice to get feedback from our modeling family – both the in-laws and the outlaws. You can decide which you are.
The last segment concluded with me working on the bow to get the shapes right and the surface smooth, as well as cutting and installing the flared bulwark pieces.
While I continued to refine, smooth, and fair the bow, I turned to the challenges of the stern. As seen in the photo, it has a smooth, rounded, but flared shape with two decks that are each pierced with large openings for viewing. The lower ones are not as tall compared with the upper ones, or rather, the bulwarks are higher, as can be seen from the postures of the people looking out. In the upper openings the bulwarks are lower, but a single open railing is mounted on top for safety. This same solid bulwark and upper railing system is an almost universal design feature of the ship, and can be seen as well above the topmost bulwark at the stern. The lower deck also has a number of round and elongated hawse holes for mooring lines, so the bulwarks have to be pierced for them as well.
All of this meant that the model’s stern would have to be some sort of pierced shell, like a lacework Easter egg. To get that shell I first tried to drape-mold styrene in one sheet. I had already built up a solid stern block which I hoped to use as the form. I screwed it down onto the hull block and made sure all the edges met.
I then put a sheet of 0.020” styrene in a bath of simmering water. While it softened I heated the stern of the hull with a hair dryer. When I thought everything had reached a workable temperature I pulled the plastic out of its bath and pulled it down on the hull form. It did not behave. Pleats and wrinkles formed which could not be flattened. I tried several more times, making the plastic sheet hotter in an oven, moving around the points where I pulled on the plastic, etc. Ultimately I only ended up with half a dozen sheets of unusable plastic which had to be discarded. I will not embarrass myself by posting photos of the trash.
I decided that I would have to build up and pierce each deck separately, and then work on the seam between them. This would be slower, but used techniques that I was already familiar with. I first had to establish the shape of the stern with just the deckhouses and decks stacked together to get a feel for the internal structures. They were cut according to the deck plans, but a little oversize, and were temporarily screwed to each other and the hull.
These pieces were faired to each other with a sanding block, checking frequently to see that they created the flared shape desired. When I was satisfied, the upper wooden pieces were taken off, leaving only the lowest deck house and deck. A piece of cardstock was used to make a pattern for a curved piece of plastic sheet, much like the one that was created for the bow bulwark.
The plastic was cut oversize and then refined by trial and trimming until it fit well. As at the bow, a rabbet was cut into the solid hull to bed the edge of the plastic into. The piece was secured with gap filling cyano. When the glue was solid the gaps at the edges were filled with Squadron white putty in several layers to build up the filler to compensate for shrinkage as it dried. Then the surface was sanded flush with the hull, with special care being taken at the edges. You can see where my smoothing process went through the layers of white primer and into the grey primer below. The color change proved to be a good warning that I should not go deeper in that spot. Then the locations of the window openings were drawn on the plastic in pencil, and the centers were ground out with a small burr, staying well away from the lines. A sharp #11 knife was used to carefully whittle away the remaining plastic until the openings were the proper sizes and shapes. The hawse holes were done in a similar fashion.
From there I repeated the process for the upper deck. But first, the lower deckhouse and the underside of the lower deck were painted and permanently installed. At this point I was committed. It was no longer easy to remove the stern pieces and redo them. As before, a cardstock pattern was created, plastic sheet was cut and fit, glued into the rabbet and faired to the hull and the lower deck bulwark. The viewing openings were drawn on, pierced and whittled away as before.
In the previous photo you can still see some spots where additional refinement and whittling of the lower openings is needed. This was a continuing process and done very carefully. A slip here might mean that the entire piece would have to be stripped out and replaced. Fortunately, it ultimately came out as I wanted. After a coat of primer it is, I believe, quite difficult to tell that it was pieced together.
So here is the current state of work, with the rough superstructure laid on. It sure will be great when I can replace the plumbing pipe funnels for the lacework cages that Bob made up. Can’t wait.
But there are many more miles to go before I can reach that point, and many more postings. Until the next one –
Be well
Dan
-
 Omega1234 got a reaction from Elia in SHADOW by Omega1234 - FINISHED - Scale 1/300 - Luxury 60m Mega Yacht
Hi folks
Hope you're all going really well. A very quick update for you, once again. I'm still working on the Owner's Stateroom; principally, I've added the two bedside tables and the bedside lamps (they're the rectangular white lampshades, in case you were wondering).
Also, as in the full sized ship, I've added the two large potted shrubs which adorn the bulkhead. These are a bit hard to see, but, please trust me, they're there...you may just need to look really close!
Have a great week, everyone!
Cheers
Patrick
-
Omega1234 reacted to Mahuna in Kathryn by Mahuna - FINISHED - 1:32 - Skipjack Based on HAER Drawings
Thanks, Patrick. Lots of work still ahead.
Thanks, Albert.
Thanks, Popeye. To me, the knightheads are real important for the planking to sit correctly.
-
Omega1234 reacted to Mirabell61 in SS Kaiser Wilhelm der Grosse 1897 by Mirabell61 - FINISHED - scale 1:144 - POF - first German four stacker of the Norddeutscher Lloyd line
Martin,
thank you for your your nice compliment.
Have now completed the bridge front and the cabs. The roof platform remains removeable until the ship control devices underneath are permanently installed
Nils
The crow`s nest is maned with two sailors, safety reasons
-
Omega1234 reacted to Martin W in SS Kaiser Wilhelm der Grosse 1897 by Mirabell61 - FINISHED - scale 1:144 - POF - first German four stacker of the Norddeutscher Lloyd line
Icebergs! Oh no!
Great work, Nils. Like all your other fans, I enjoy seeing your updates on this truly impressive (sehr gross!) build.
Cheers,
Martin
-
 Omega1234 got a reaction from mtaylor in Kathryn by Mahuna - FINISHED - 1:32 - Skipjack Based on HAER Drawings
Hi Frank
Kathryn's definitely coming along very nicely. At the rate you're going, it probably won't be long before you start planking the hull.
All the best!
Cheers
Patrick
-
 Omega1234 got a reaction from Piet in SS Kaiser Wilhelm der Grosse 1897 by Mirabell61 - FINISHED - scale 1:144 - POF - first German four stacker of the Norddeutscher Lloyd line
Hey Nils
I like, I like, I like!!!
Thanks for sharing - it's aways a joy to open up your updates; this one being no exception.
Cheers
Patrick
-
 Omega1234 got a reaction from hexnut in Preussen by Chasseur - BOTTLE - barque
Hi Jeff
Please accept my sincere condolences to you and your wife for the sad loss of your Aunty and father in law.
I hope that you can take some solace from returning to the workbench.
Take care.
Patrick
-
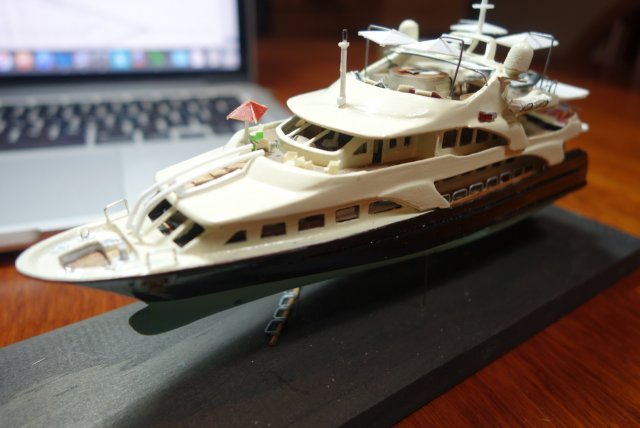
Omega1234 reacted to michael mott in Mystic 1928 by Omega1234 - FINISHED - 1:278 scale - 66' Motor Yacht
So you are telling us that you are taking up watchmaking next
Beautiful job and the base is great too.
Michael
-
Omega1234 reacted to captainbob in Mystic 1928 by Omega1234 - FINISHED - 1:278 scale - 66' Motor Yacht
Beautiful. Simply beautiful.
Bob
-
 Omega1234 got a reaction from Jack12477 in Kathryn by Mahuna - FINISHED - 1:32 - Skipjack Based on HAER Drawings
Hi Frank
Kathryn's definitely coming along very nicely. At the rate you're going, it probably won't be long before you start planking the hull.
All the best!
Cheers
Patrick
-
Omega1234 reacted to Angarfather in Statenjacht Utrecht by Angarfather - 1:36
Many thanks, guys!!!!
Bevor I can start to carve and bring in the figurhead (a lion ) I have to make some little parts to finish the bow.
The reinforcement of the stem to hold the loop for the gammoning ropes and the knee to support the sprit
The reinforcement is from 0,8mm brass. The loop from 2mm brass soldered into the brass sheet.
Besst regards Hartmut
-
Omega1234 reacted to popeye the sailor in Thermopylae by popeye the sailor - Sergal - 1:124 scale
thanks for the kind comments.....and to those who hit the like button. you might have seen that small imperfection on the starboard stern.....two small holes.....I took care of them. they were filled in and painted over. as I'm sure others do.......imperfections are fixed as we see them. we have our cameras as our worst critics......we have no need to do it ourselves I have four days off......
plenty of time to sit here and play my car inspection is due.......and I have a few things to do to it. one day I will have to get my butt in gear and get it done. I still have time.
there's an odd point made Bob........I haven't done too many small scale projects. the AmericA was the smallest I've done, besides the Gundalow......the Nordkap was the largest. the odd thing about this one is...I seem gravitated towards it.......so much so, that the trawler seems to have taken a back seat again. fear not trawler fans.......I haven't forgotten it. the Syborn, as well as the other two have been on my mind.......anyone's guess what will erupt from there but I guess that's the beauty in having so many projects.......I can gravitate anywhere, and never leave my seat
thanks for look'in in and following along....I appreciate your comments and suggestions
-
Omega1234 reacted to rafine in Thermopylae by popeye the sailor - Sergal - 1:124 scale
It's coming along beautifully Denis. I never cease to be amazed by what you accomplish in this small scale.
Bob
-
Omega1234 reacted to BANYAN in Thermopylae by popeye the sailor - Sergal - 1:124 scale
Ditto and with nice results.
cheers
Pat
-
Omega1234 reacted to Jim Lad in Thermopylae by popeye the sailor - Sergal - 1:124 scale
You do more in a day than I do in a week, mate!
John
-
Omega1234 reacted to src in Thermopylae by popeye the sailor - Sergal - 1:124 scale
Well done Dennis, it always amazes me how much you get done in a day. Not only quantity but quality too.
Sam
-
Omega1234 reacted to popeye the sailor in Thermopylae by popeye the sailor - Sergal - 1:124 scale
Ain't I da devil? we'll see.......it's supposed to be here tomorrow.
I didn't think I'd get much done......it doesn't seem like much. the stern is where I began...cutting out the transom railing.....both of 'em.
I figure I'd work on both of 'em......if one bites the dust, I still got the other one. the way the grain ran was the biggest problem....they did break in a couple places. but I'd glue them back together and continue on. while I was sanding them into shape, the chain plate assemblies were cemented in place.
sanding.......another break and fix......more sanding. cut 'em to size, and I had a winner............
then came the bars to hold the dead eyes in place......as mentioned, I installed them above the rub rail, instead of cutting the slots through it. fasten them down with brads after painting them, and touched them up.
I had painted the gun port lids {there's another term for them....I forget}.....now that the assemblies are in place, I have a better idea of their placement {the instructions and diagrams have them in awful places.
the lavatories are cemented in place........
but the fun stopped with the aft cabin. the mizzen mast runs through the cabin and through a hole inside. the aft cabin is just dry fitted at the moment, but the holes are off, and this gives the mizzen mast more rake than the others. I have a couple of ideas.....tomorrow I'll see which one is better.
I should hold off on the rest of the deck stuff anyway......I should do the rudder next.
-
Omega1234 reacted to Mirabell61 in SS Kaiser Wilhelm der Grosse 1897 by Mirabell61 - FINISHED - scale 1:144 - POF - first German four stacker of the Norddeutscher Lloyd line
Many thanks John,
hey mate, you got me there.....
you`re not only a knowledgeable and attentive observer, you also recognized that the pic is showing the engine room receiver telegraph, much appreciated, well then, "slow ahead" on both bridge telegraphs, when going through reported possible "iceberg region"
Nils
-
Omega1234 reacted to albert in Kathryn by Mahuna - FINISHED - 1:32 - Skipjack Based on HAER Drawings
Very nice work Frank.
-
 Omega1234 got a reaction from Mahuna in Kathryn by Mahuna - FINISHED - 1:32 - Skipjack Based on HAER Drawings
Hi Frank
Kathryn's definitely coming along very nicely. At the rate you're going, it probably won't be long before you start planking the hull.
All the best!
Cheers
Patrick
-
Omega1234 reacted to IgorSky in Preussen by Chasseur - BOTTLE - barque
Hi Jeff!
My sincere condolences to you and your family...
And good luck in the continuation of your project!
Be careful in combining CA and white glue - they do not always work well in close contact.
Igor.
-
.thumb.jpg.6fd4c1b78768bb3efd745ab810936005.jpg) Omega1234 got a reaction from vaddoc in SHADOW by Omega1234 - FINISHED - Scale 1/300 - Luxury 60m Mega Yacht
Omega1234 got a reaction from vaddoc in SHADOW by Omega1234 - FINISHED - Scale 1/300 - Luxury 60m Mega Yacht
Hi folks
Hope you're all going really well. A very quick update for you, once again. I'm still working on the Owner's Stateroom; principally, I've added the two bedside tables and the bedside lamps (they're the rectangular white lampshades, in case you were wondering).
Also, as in the full sized ship, I've added the two large potted shrubs which adorn the bulkhead. These are a bit hard to see, but, please trust me, they're there...you may just need to look really close!
Have a great week, everyone!
Cheers
Patrick
-
 Omega1234 got a reaction from cog in Preussen by Chasseur - BOTTLE - barque
Hi Jeff
Please accept my sincere condolences to you and your wife for the sad loss of your Aunty and father in law.
I hope that you can take some solace from returning to the workbench.
Take care.
Patrick