rvchima
-
Posts
693 -
Joined
-
Last visited
Content Type
Profiles
Forums
Gallery
Events
Everything posted by rvchima
-
 Harry, I just discovered the gallery for your magnificent Cutty Sark build. Wow, what a beautiful model! Cutty Sark Gallery by HOF00 Your profile says that you are also a cabinet maker. Did you make the cabinet that the Cutty Sark is in?
 -
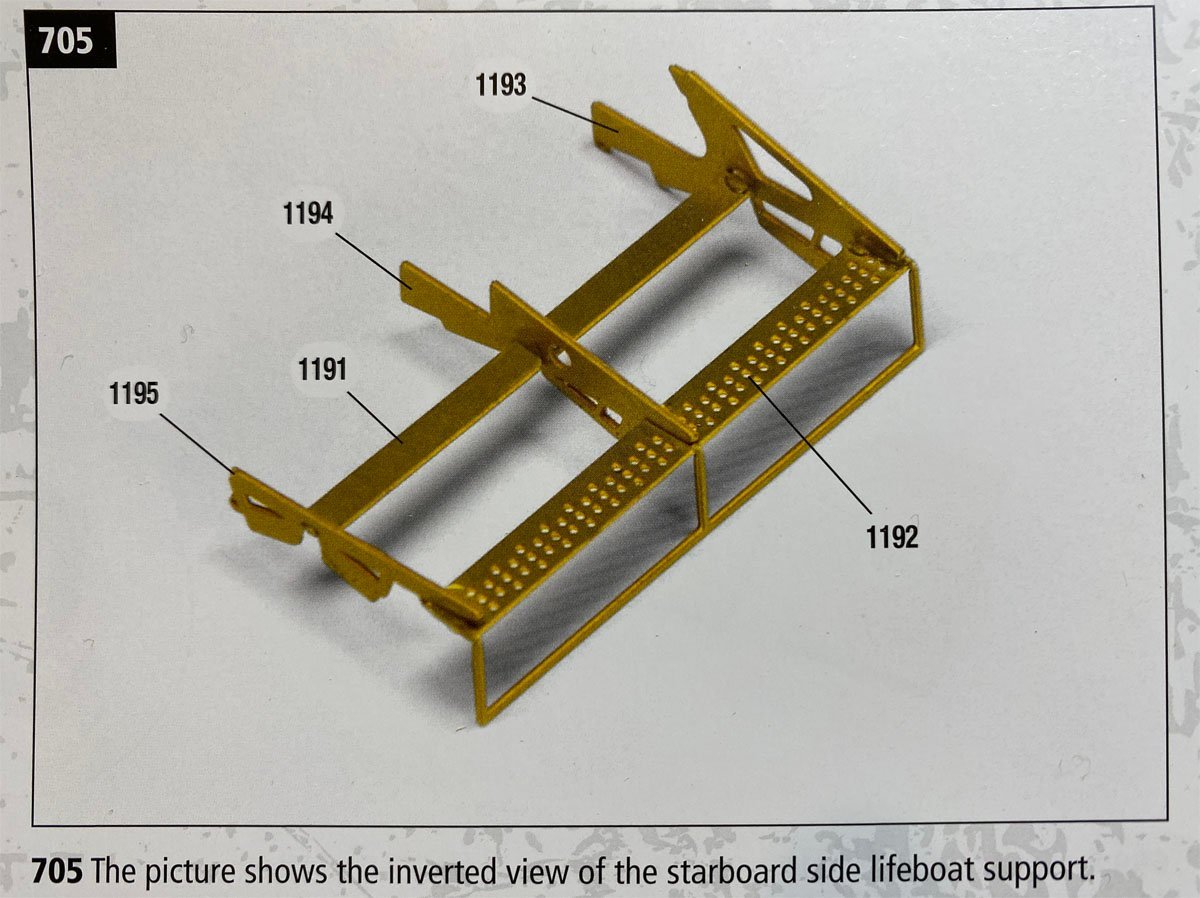
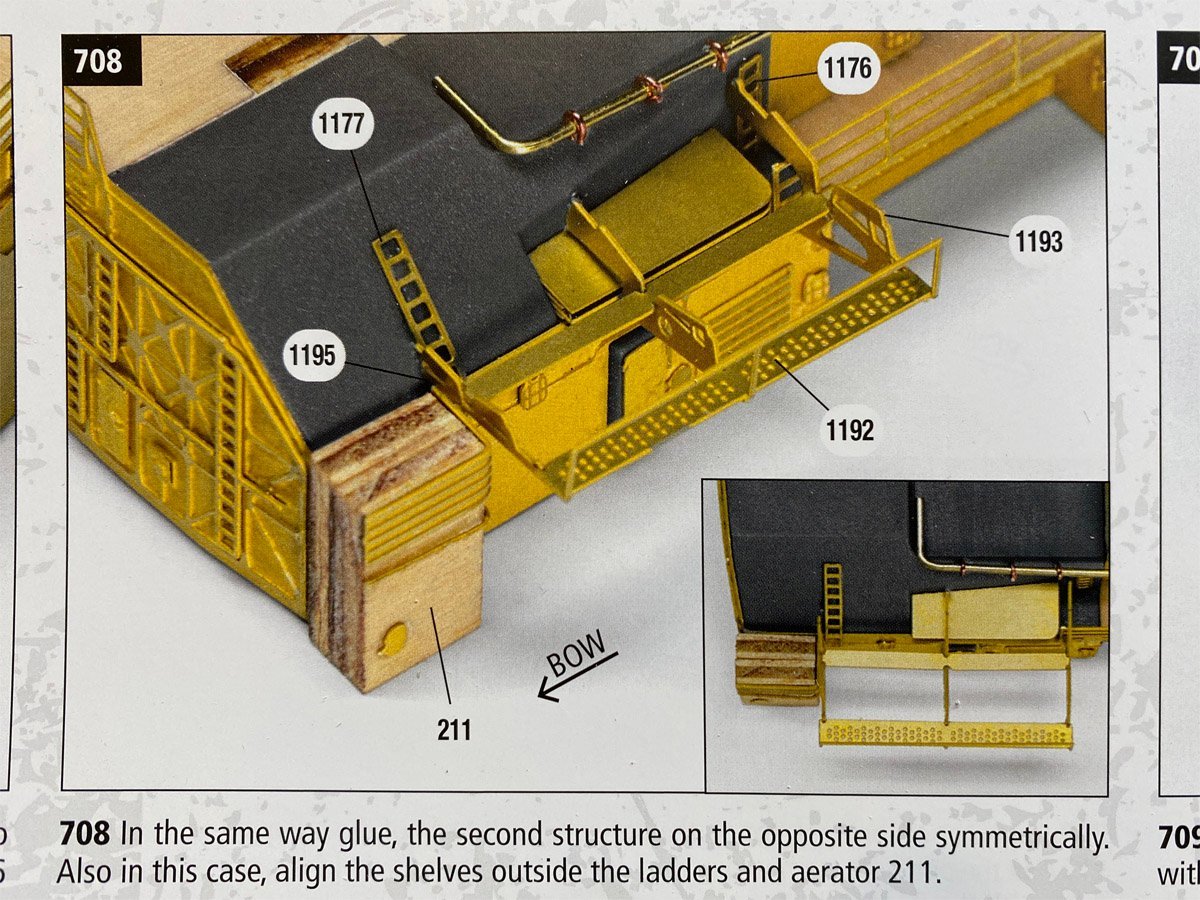
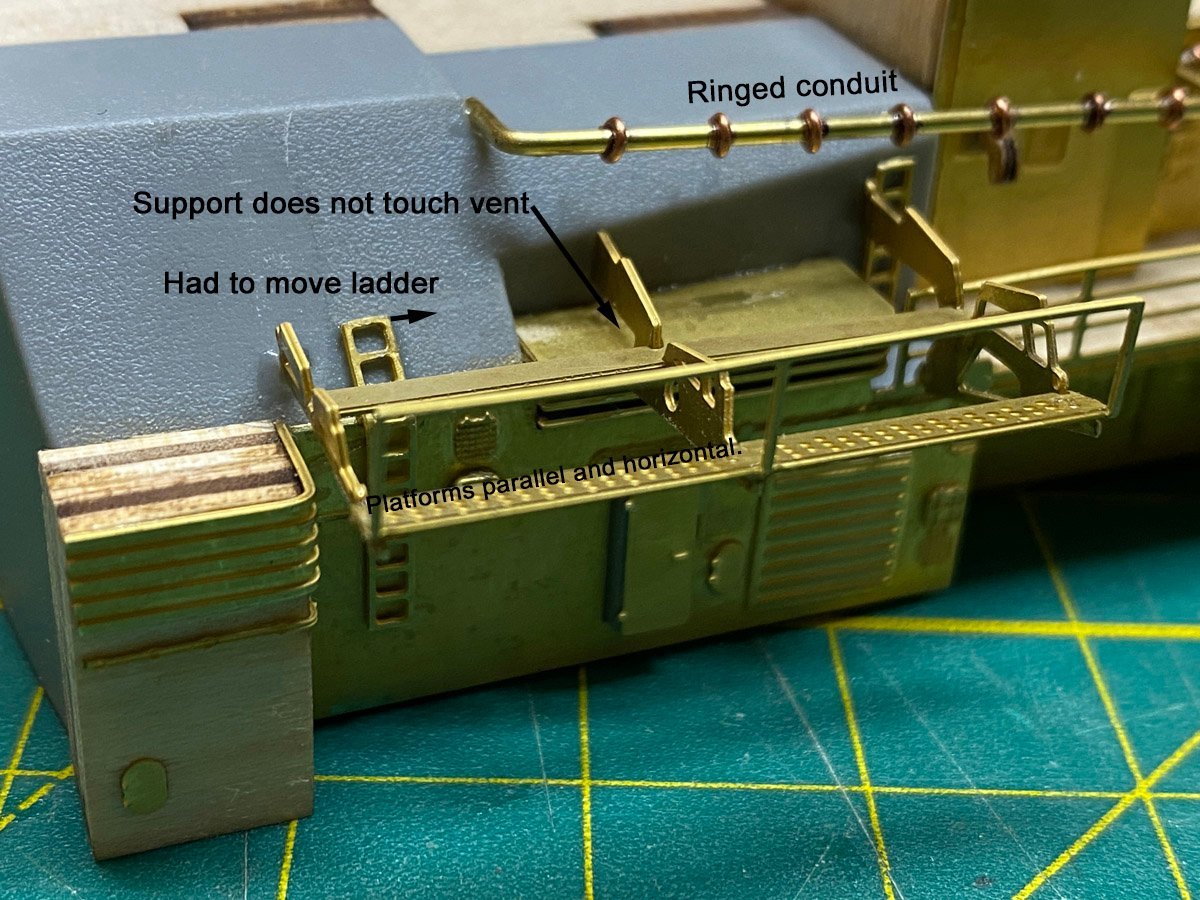
Tricky Lifeboat Rack I struggled with these photo-etched lifeboat rack for several hours today. (There are actually two symmetrical racks.) The instructions show them built up out of five pieces. Easy, right? The triangular supports are different sizes. First I built them with their bases flat on my bench, but the platforms ended up twisted. After some deconstruction I rebuilt them by first attaching the center support to both platforms, and then attaching the end supports while keeping the platforms parallel. This ends up with flat, horizontal platforms when attached. Then you have to attach the racks to the rear superstructure next to some existing ladders and vents that get in the way. I had to move two ladders. The instructions tell where the triangular supports should attach to the superstructure vents and rails. When I followed those directions the platforms ended up sloped a lot. Instead I attached the racks so that the platforms were horizontal. Here's the final result. Incidentally, I thought that the construction of the ringed conduit at top right was pretty clever. It's made from 1mm brass rod bent according to plan. The rings are 1mm eyelets glued in place with a drop of CA, then the shanks are cut off. Nice effect.
-
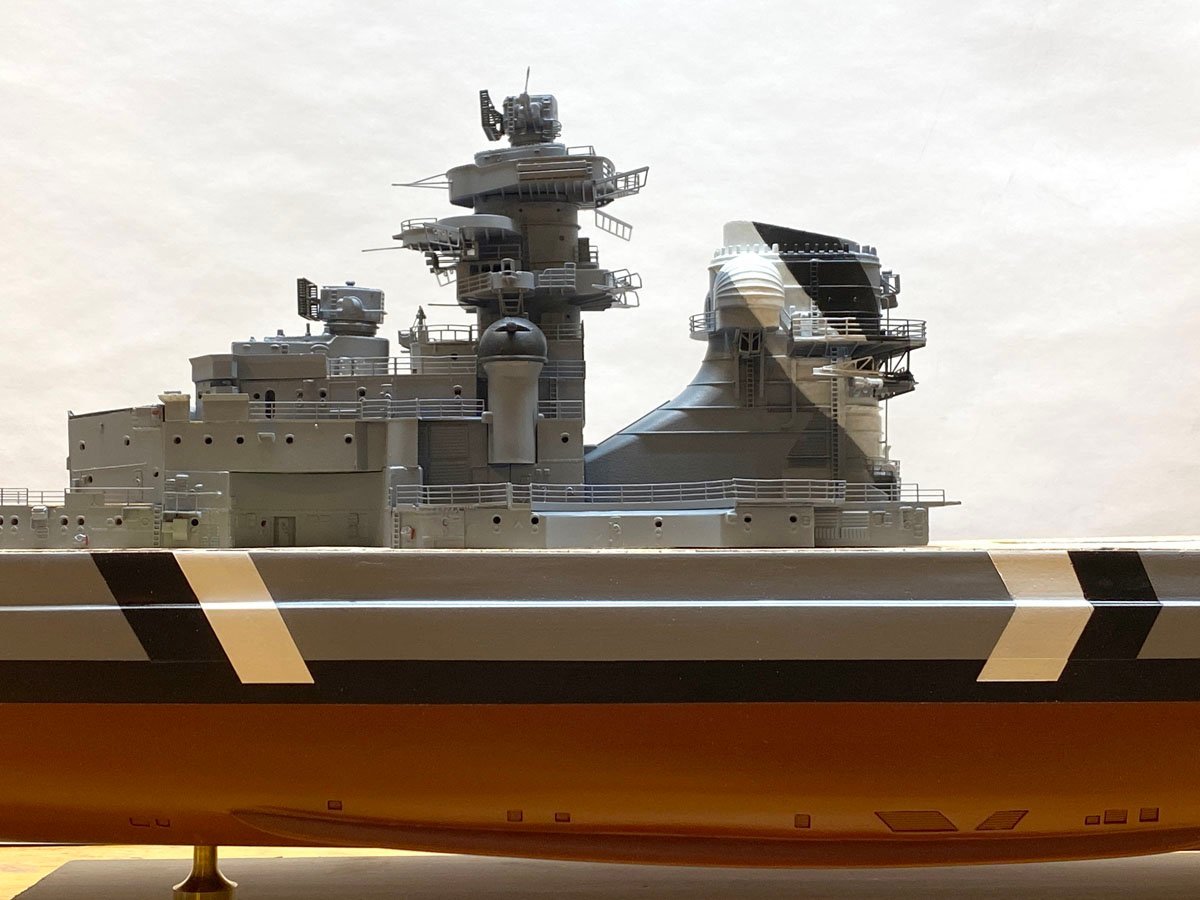
Dazzling Camouflage A few days ago I painted one set of dazzle camouflage stripes. It wasn't easy. I used some thin tape to temporarily mark the edges, then used a thin rule and penciled them in. I masked what I could and brushed the white first with thin acrylic. That took several coats. Then I outlined the black with a thin black marker, masked the black, and brushed that on. The black covered in one coat. Then I used my finest brush to touch up the gray. Note to other builders: If you plan to paint the dazzle camouflage, paint the stripes before you install the crane bridge. Here's the front superstructure with the stripes on the funnel. Regarding previous questions about what color gray I used, all gray parts in this image were painted with the same paint, but there is a huge variation in shade across the image. The one LED light I used is daylight white. I did adjust the white point in the levels for the photo to brighten the image.

-
Hi Harry, Take a pair of small flat jaw pliers and give some of the rungs a twist so that they are all parallel. You might be able to bend them up/down a bit to adjust spacing. Hit them with a tiny drop of thin CA with a glue looper when you're done. They'll be fine.
-
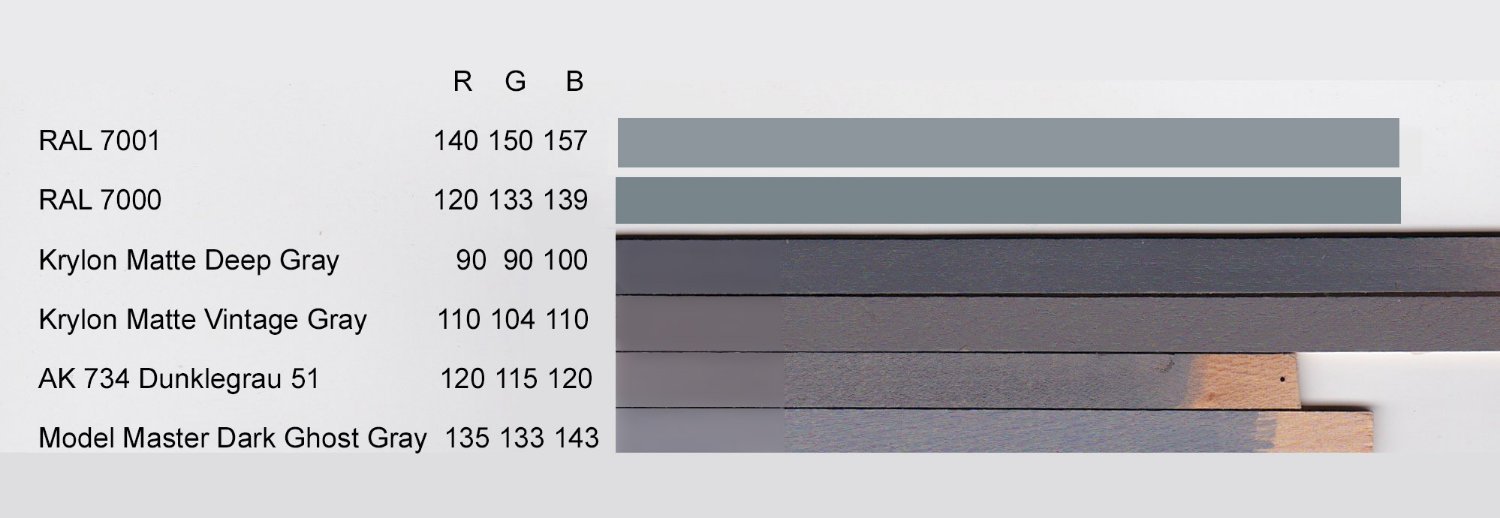
I agree that the photo seems very blue. I special ordered a can of RAL 7000 for the hull. When it came time to paint the superstructure I realized that it called for RAL 7001. I made up this comparison: On my monitor the RAL colors look almost identical, so I used my existing can of RAL 7000 for everything. In my shop the ship looks dark gray and not blue at all. I used an LED shop light for the photos. It seems to be bright white but may be adding a blue cast to the photos, even after white balancing with Photoshop. I'll experiment with lighting for the next batch of photos, but regardless it's too late to repaint.

-
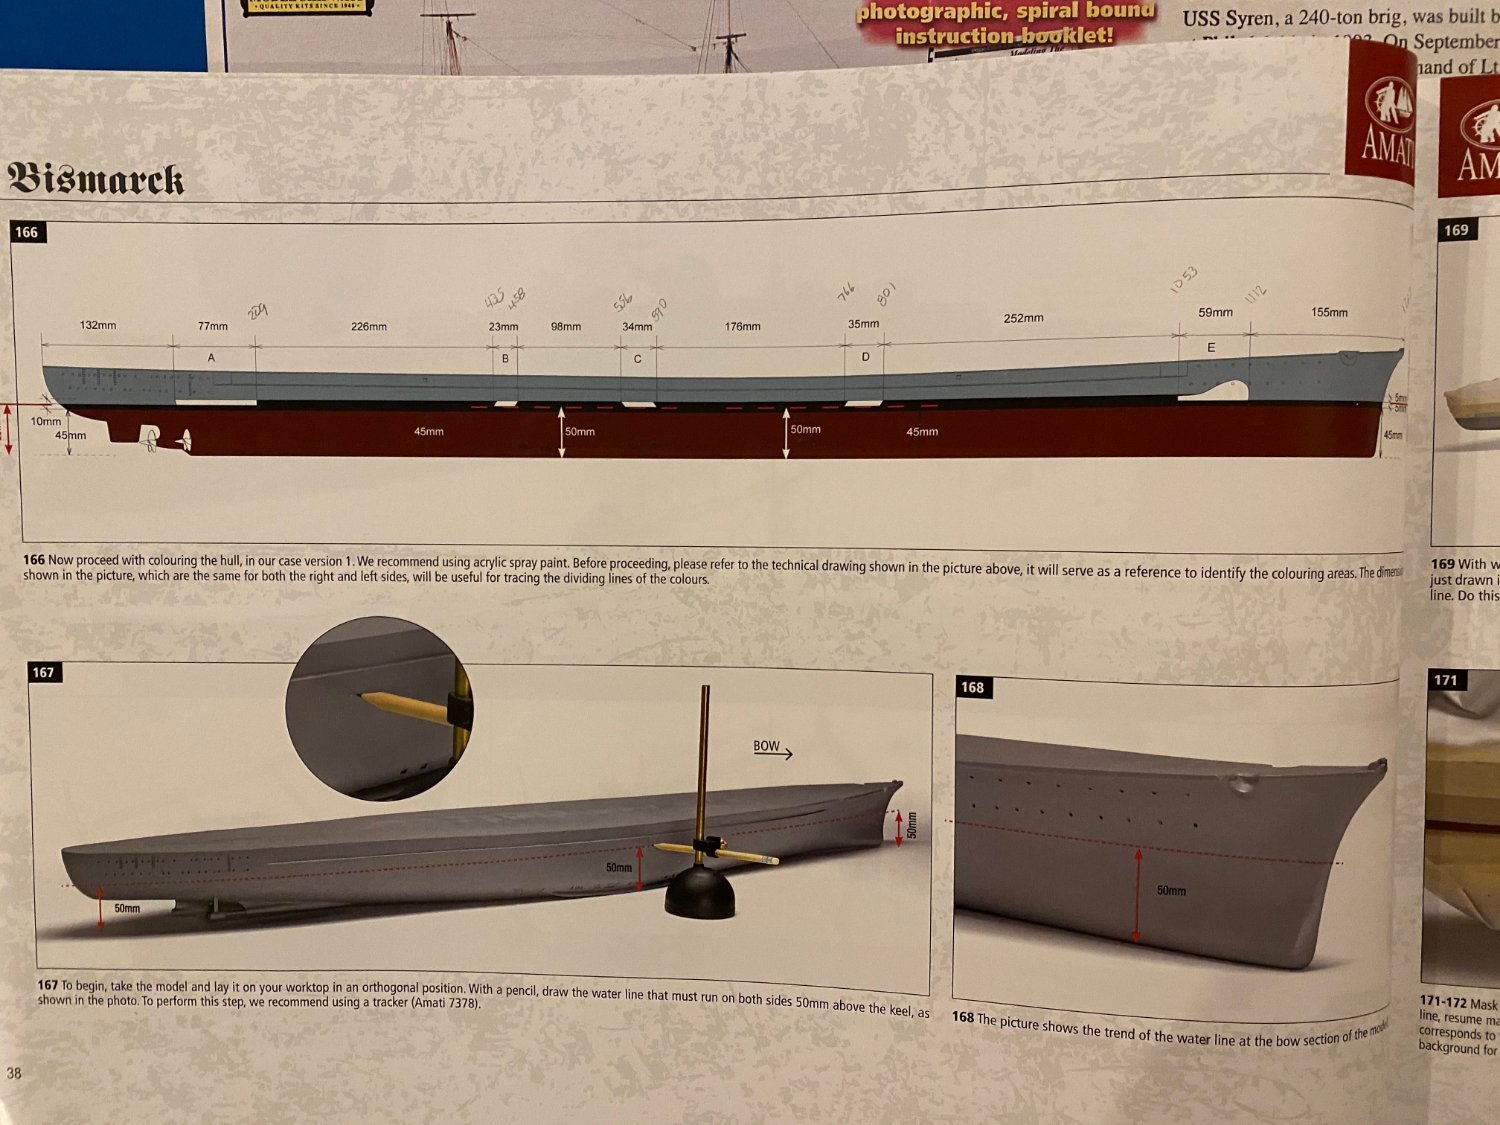
Here's the instructions from the manual. The centerline of the stripe is at 50 mm, and the stripe is 10 mm wide.

-
In my humble opinion you should complete the hull. While you are waiting for paint to dry you can spray some gray on the superstructure and hand paint the dark gray decks. It looks like the hull is nearly done, so in a week's work you will have a half-completed model rather than a stack of half-completed parts. Just look at how good your mast looks after a coat of paint - it's a mast-erpiece.
-
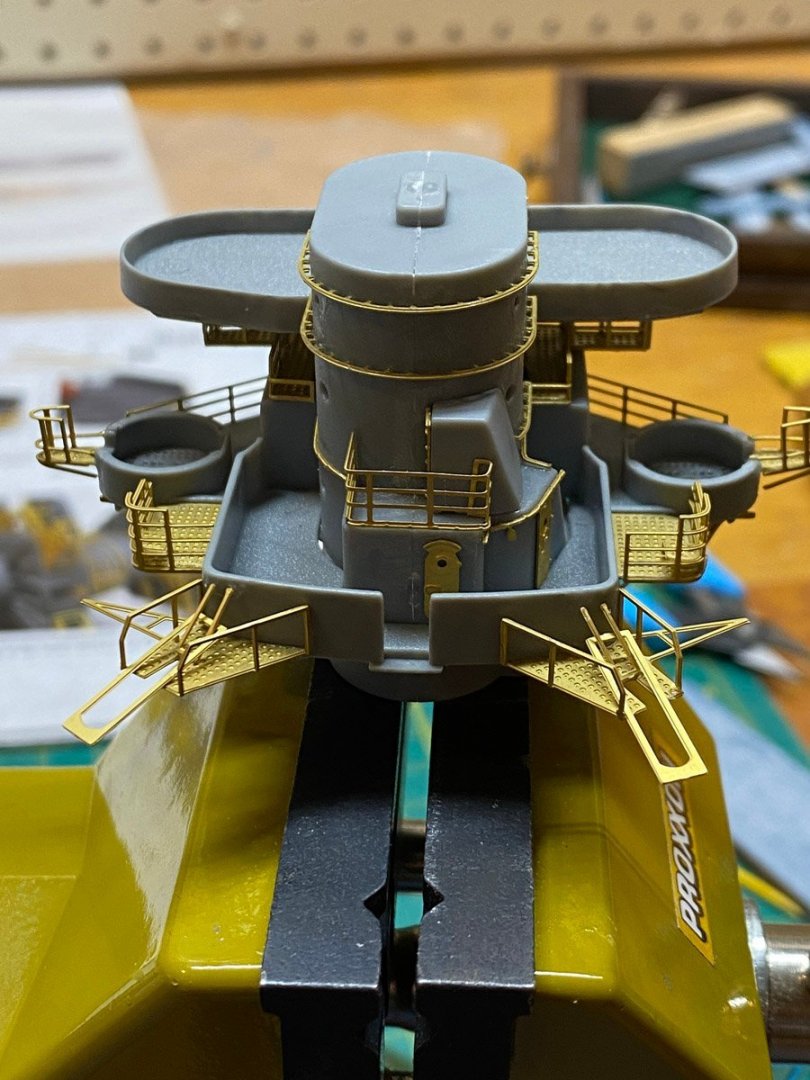
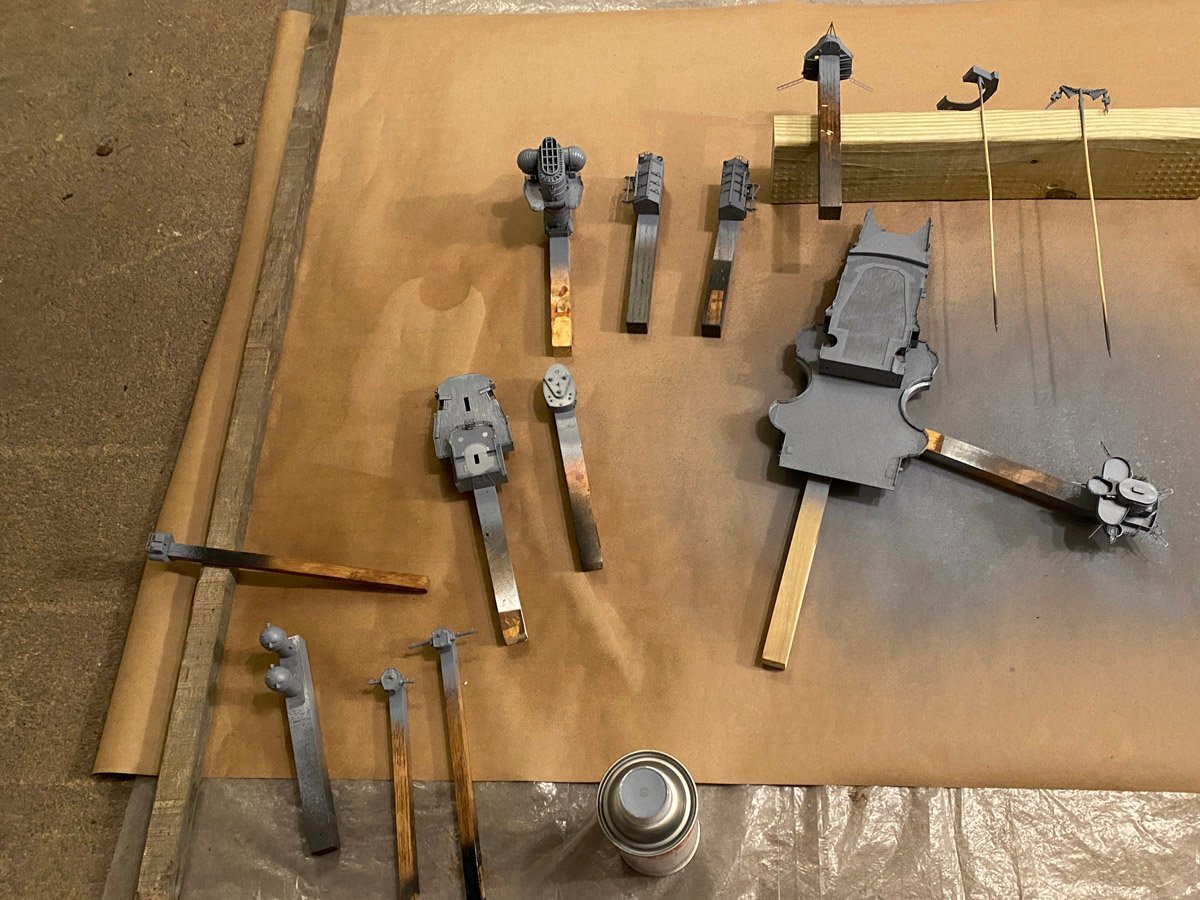
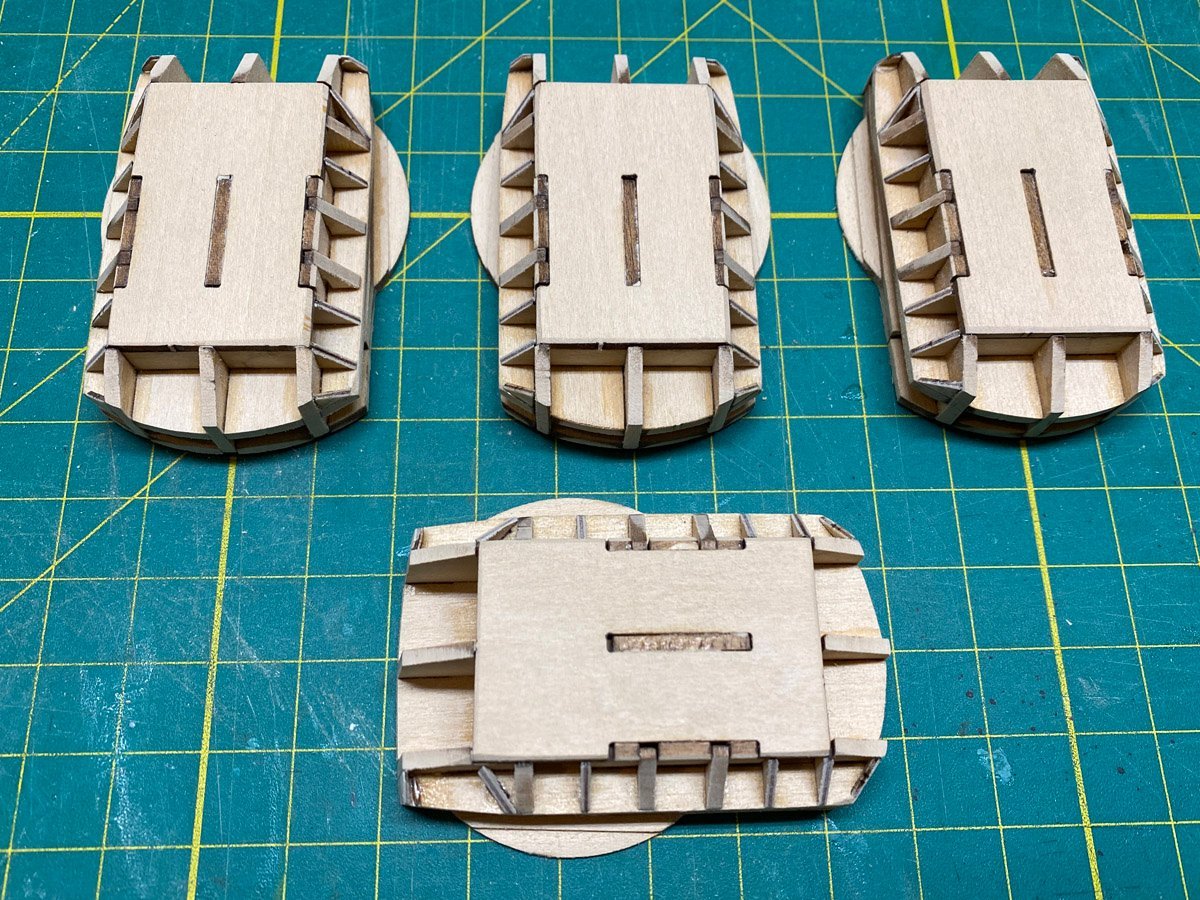
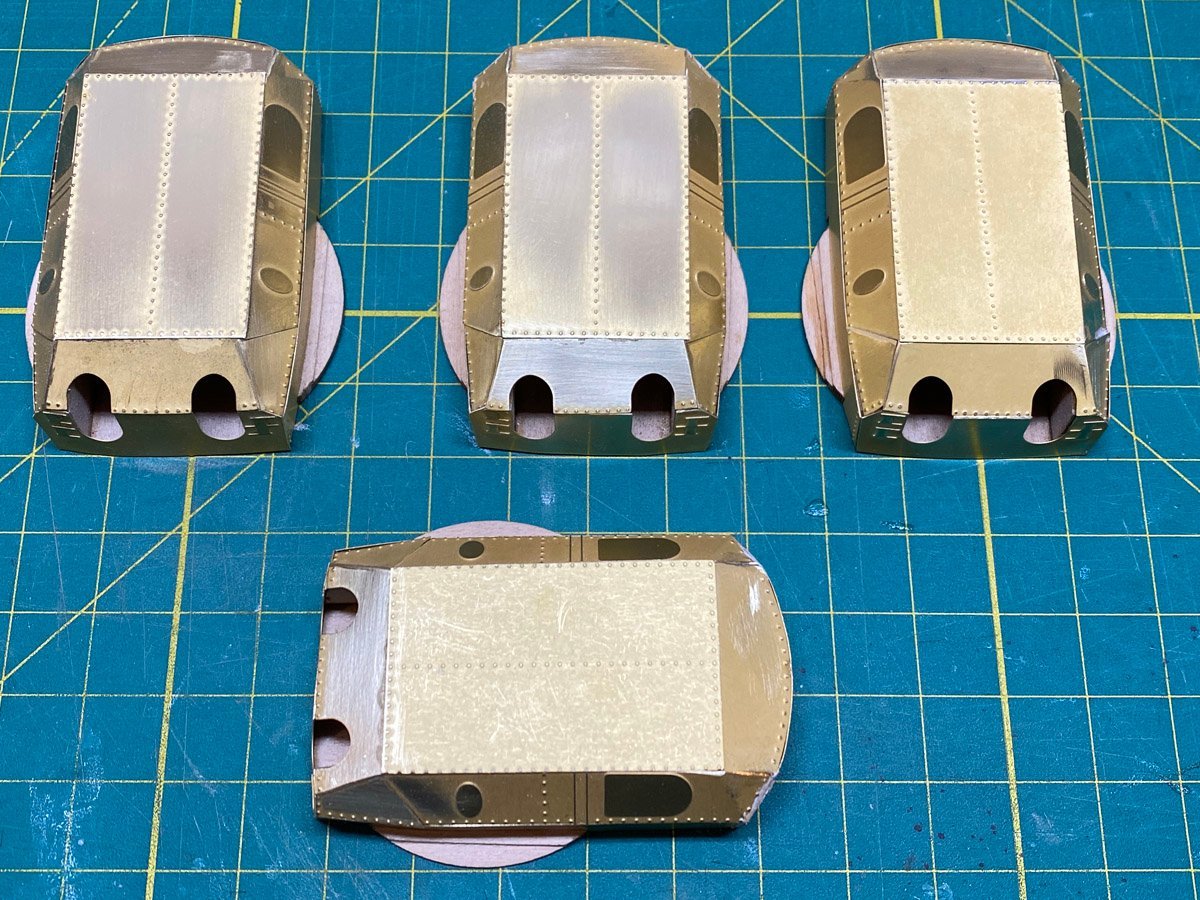
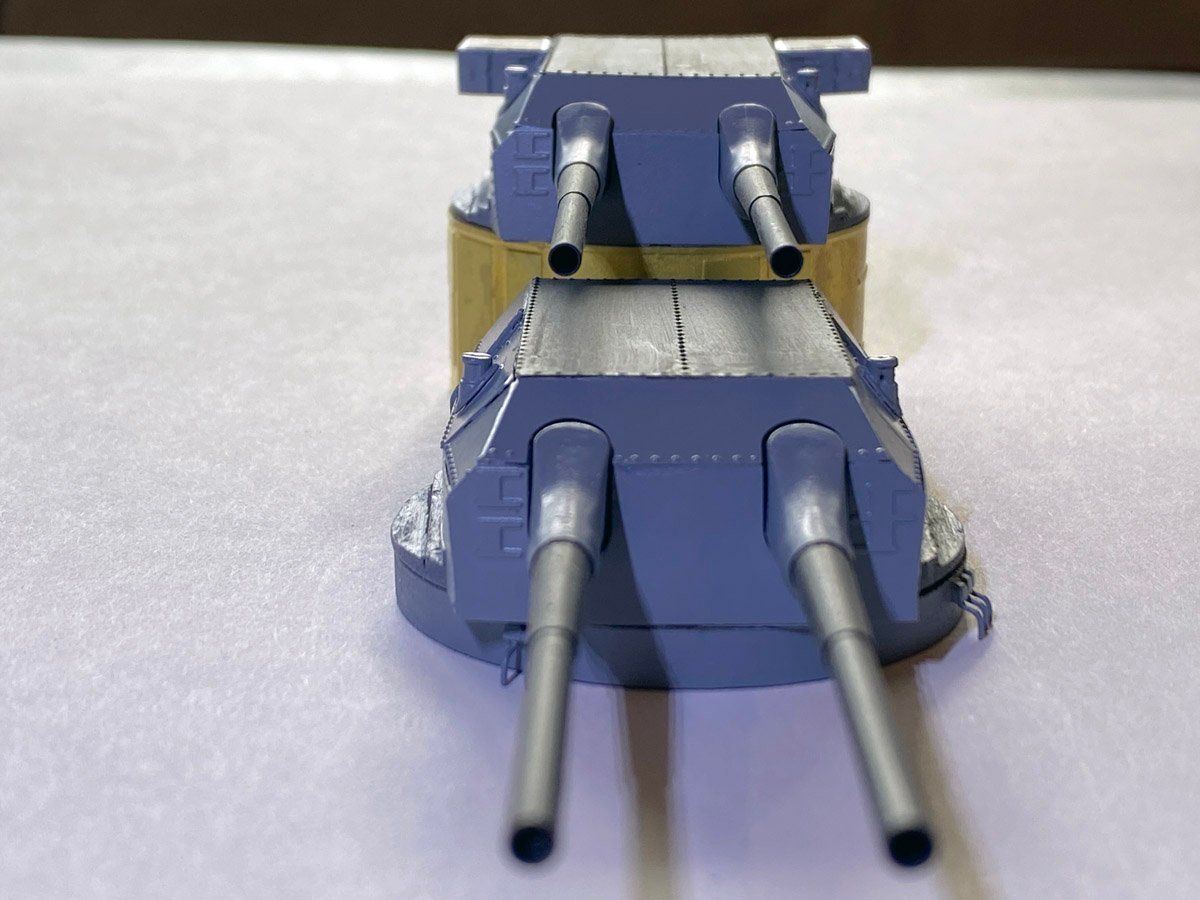
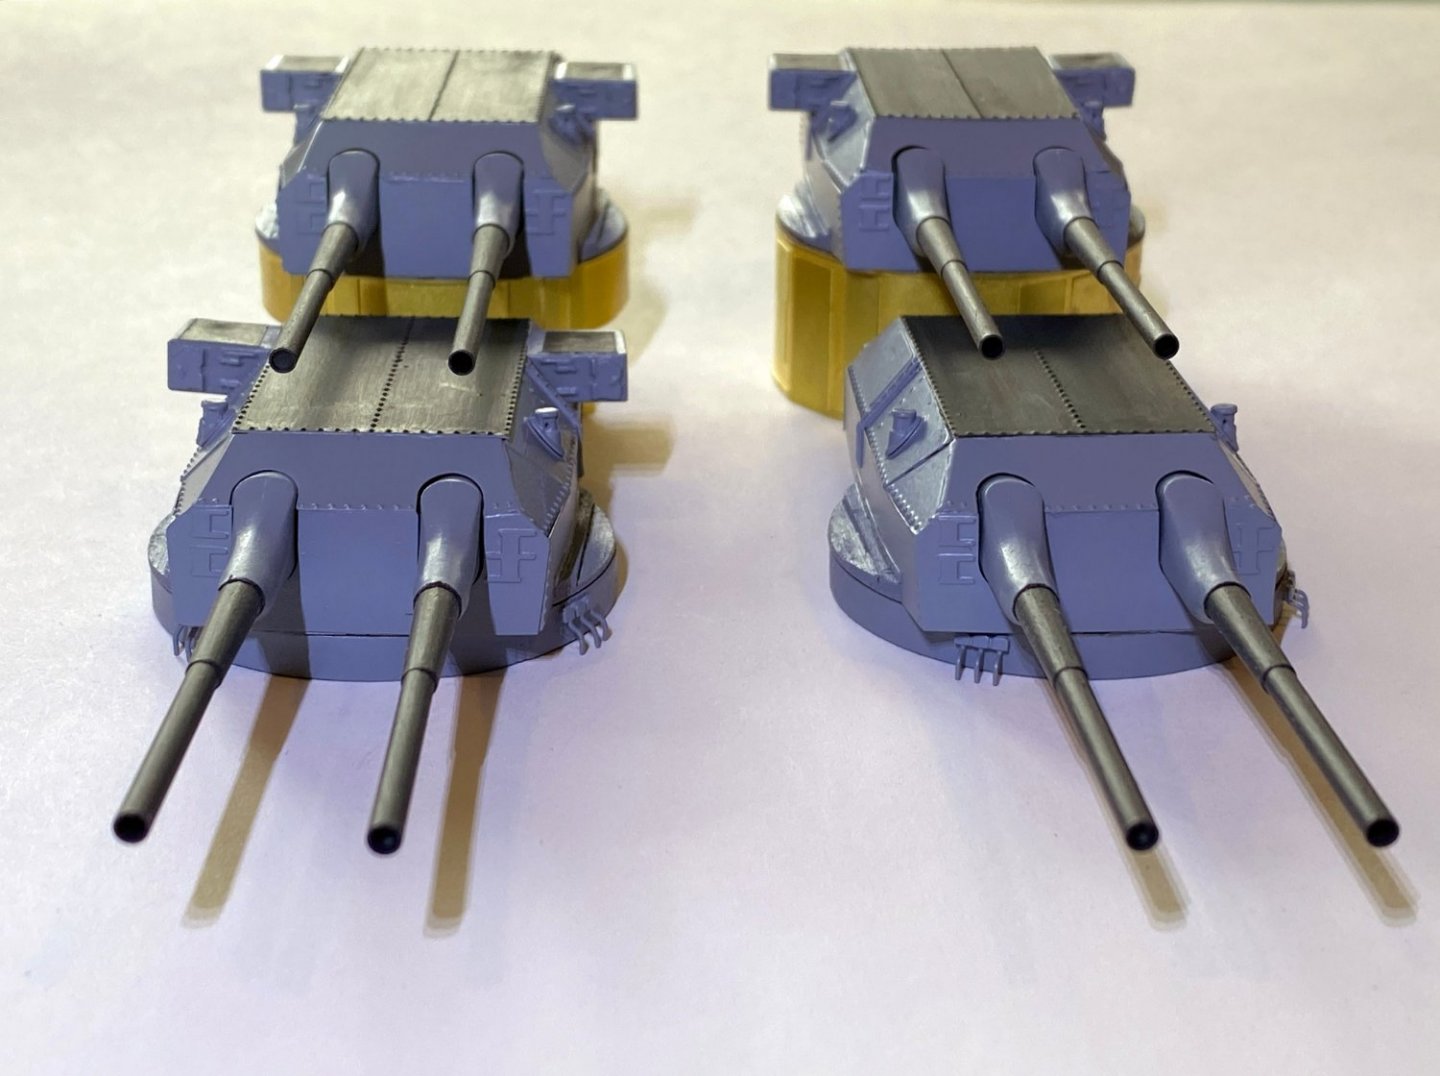
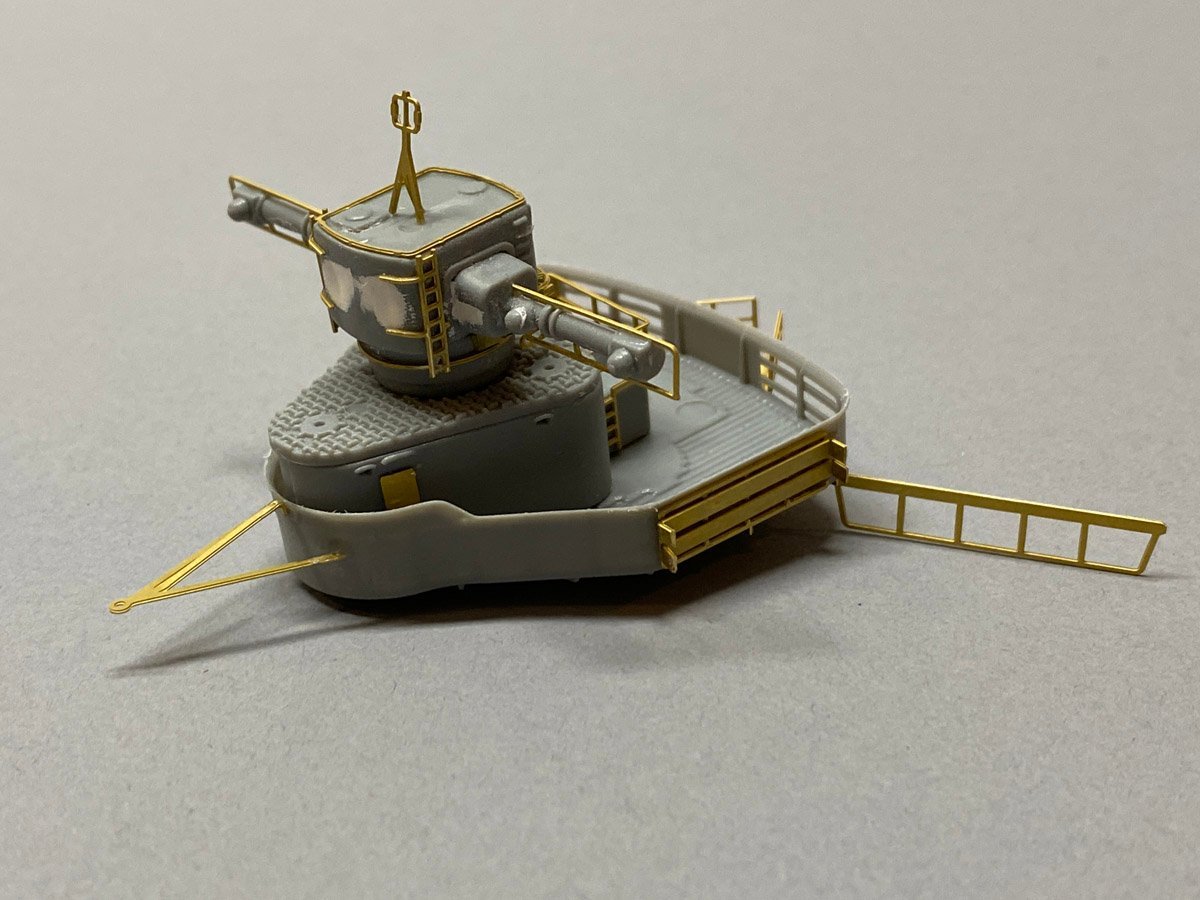
I Should Be Painting Camouflage, But ... Joe100, yes I plan to paint the Baltic Stripes. I know that they didn't last long but they look so cool. And I know what a pain they will be to paint so I decided to build the big guns instead. As usual, the Amati construction uses an over-complicated wooden framework skinned with PE brass and decorated with PE details. Each turret has two ladders about 15 mm long. There were 8 ladders on one sheet of PE that must have been left in the acid too long - the rungs were about the thickness of a spider's leg. There were 2 "spares" on another sheet that were OK so I put them on the first turret Anton. I managed to use the other ladders, but it wasn't easy. So far this is the only problem that I've had with the PE. I'll complain about the plastic parts in another post. Here are the finished turrets with guns and incomplete bases.

- 215 replies
-
- 11
-

-
Nice work on the hangars Harry. The little staircase and railings are a difficult build but you got them done.
-
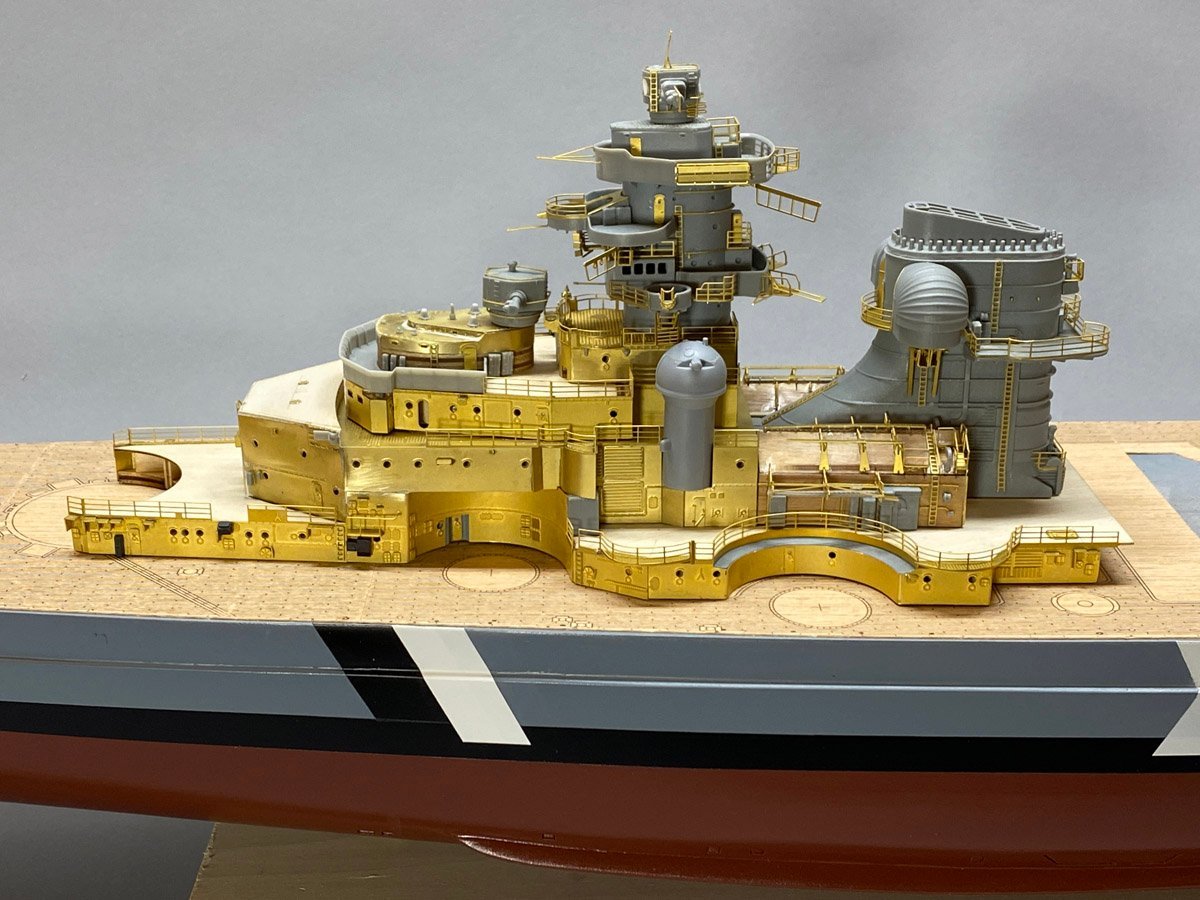
Forward Superstructure Nearly Complete - 225 hours, 93 days I got all the major components and painted, and have assembled a few sub-assemblies. There are a few fiddly parts left that need to be added. I will leave the sub-assemblies unattached for now until I paint the dazzle camouflage. It might be easier that way.
- 215 replies
-
- 10
-
-
Mini lathe for mast making etc.
rvchima replied to Charlie pal's topic in Masting, rigging and sails
Charlie, Try using an electric hand drill/screwdriver at its highest speed for short masts and yards. You may want to clamp it to a bench and find a way to lock the trigger. Leave a little extra material on one or both ends for the chuck. Use coarse sandpaper for rough shaping and a sanding block for final. Experiment with some scrap and see what you think. I've made all my masts and yards for several models that way, except with a drill press. -
Brilliant! I'm glad that worked out so easily. Did you use the disk sander? This PE very easily with a heavy pail of scissors.
-
Piet, I used Minwax Polycrylic satin spray. The parts came flat, curled a little when I sprayed them, and flattened in a few minutes when they dried. Can you flatten yours in a book or something?
-
Hi Piet, Thank you for helping both Harry and me with some build errors. Now we're all curious as to how far along you are on this model. Have you posted anything?
-
I'm going with 2 1" pedestals on 14" centers. Same as my Prinz Eugen. I already have them attached but with a temporary base.
-
Yves, I just watched the Wellington Trust video presentation on models in the collection of the Royal Maritime Museum by Curator Simon Stephens. He showed two photos of their magnificent model of the Bellona. They might serve as an inspiration, or might make you want to give up. They have been posting previous lectures here: https://www.thewellingtontrust.org/whats-on/events-past-lectures-and-exhibitions/ Today's lecture was recorded and should be up soon.
-
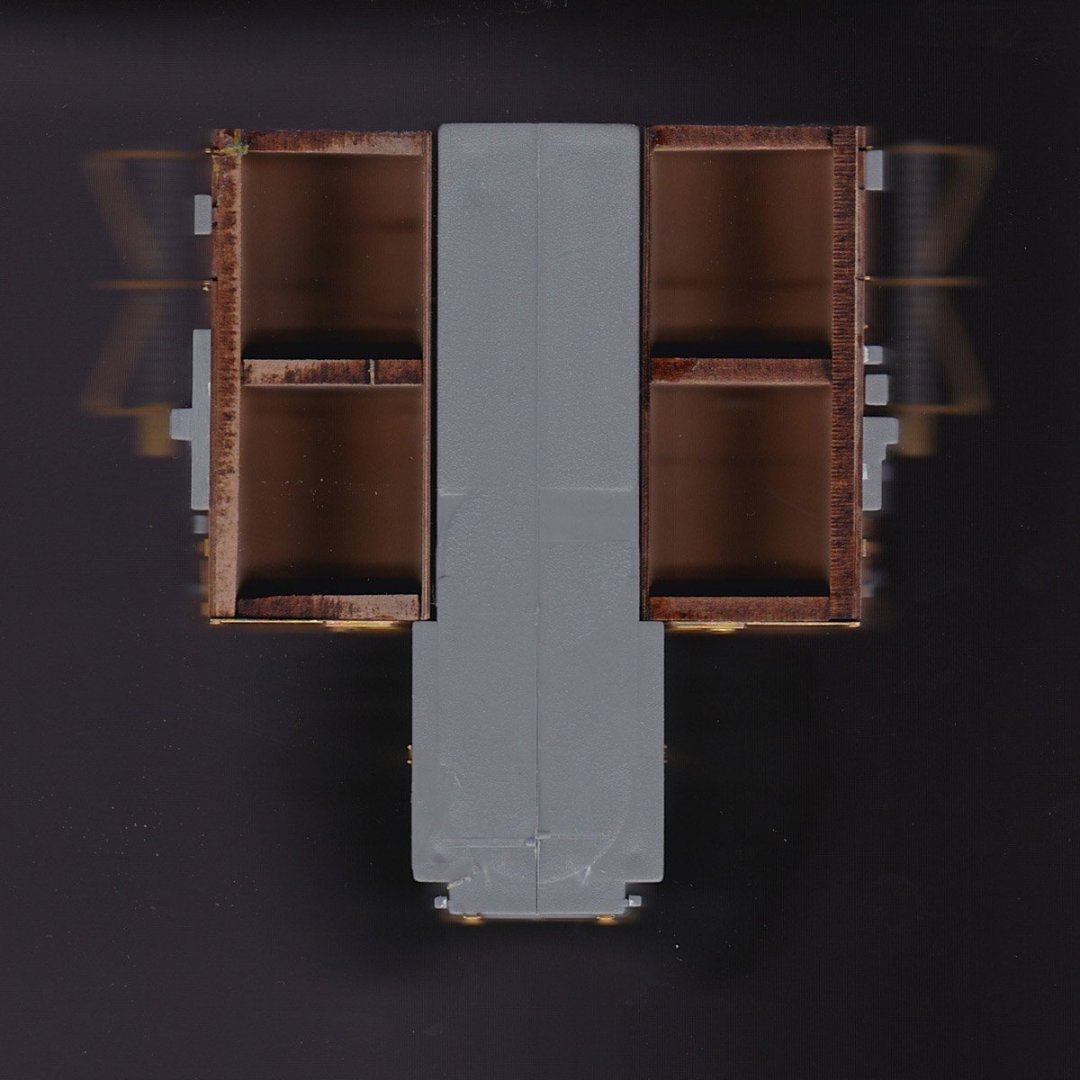
Harry, Don't know if this will help but it's worth a try. I set my hangars and funnel on my scanner and got a bottom view. The inner walls of my hangars are thinner than the other walls. They are NOT sloped. The PE hangar doors do have a triangular notch. I didn't know what it was at first, thought it was a fabric door or something but it matches the slope of the funnel. Here are your hangars (before funnel repair.) The slots in the hangar roofs all seem to be correct with respect to the funnel if everything is rotated 180 degrees. But you have extra flats on the inside edges of the roofs, marked with arrows. They must be due to the thick ply wall mentioned by Piet. If you remove those sides right up to the sloping roof and replace them with thin ply (or even card stock) everything should fit. But check the PE doors first.

-
The mast is beautiful with the primer! Nice on those bridge wings too. Those little PE constructs can be challenging and yours look great. I didn't realize that you had your funnel backwards. It certainly seems like it should go the way you had it - did you have the top piece glued on? Anyway, glad that you caught it before adding PE.
-
Handrails This morning I took a deep breath and drilled about 300 holes for the handrails. The manual calls for 0.7 mm diameter holes so I removed one stanchion and checked the fit. That was way too big but my smallest drill bit, 0.56 mm diameter, worked well. My deck planking was too close to the edge in many places and I ended up trimming little slivers off.
-
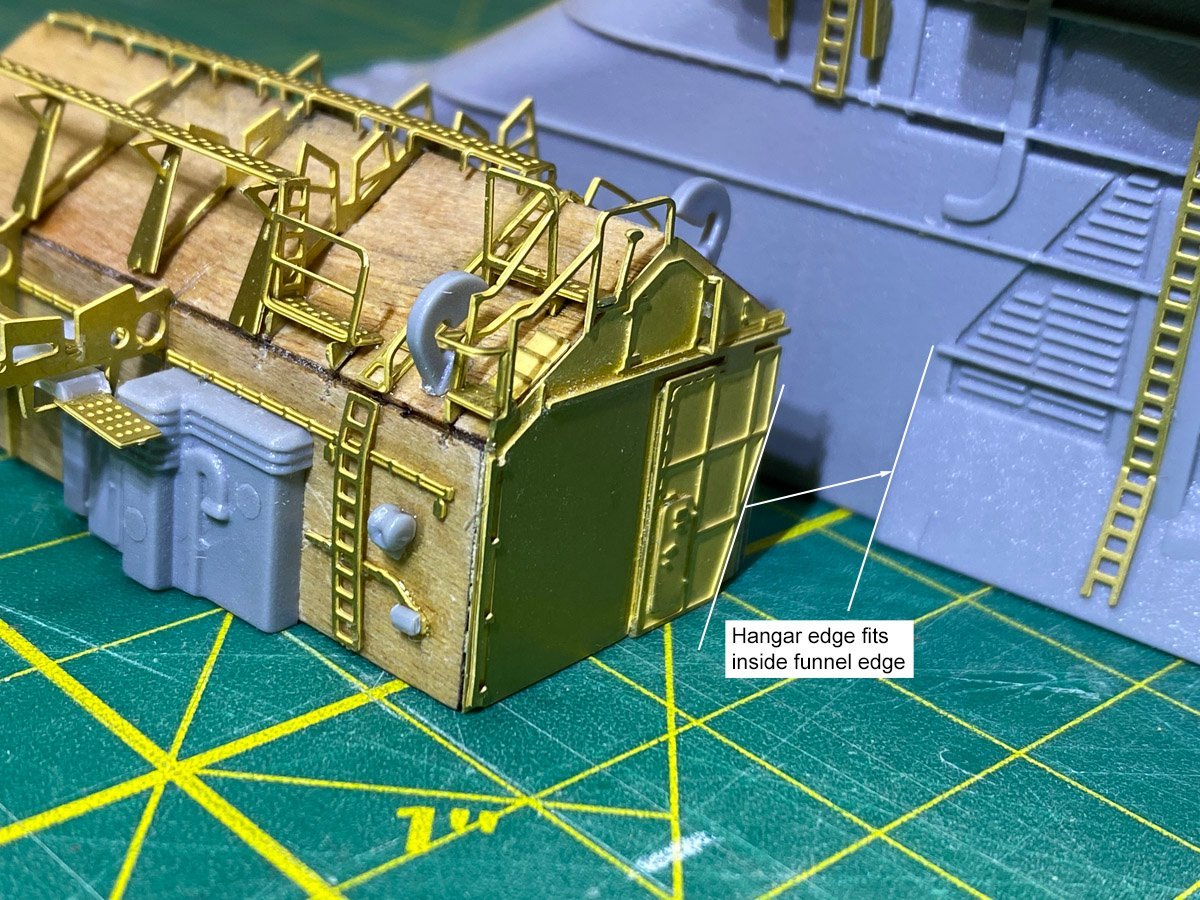
Harry, My hangars are 26.3 mm wide x 58.7 mm long. It took me a while to realize that the triangular cutout in the brass ends of the hangars fits exactly against a triangular step on the funnel. If you're not against that edge the hangars might protrude a bit.
-
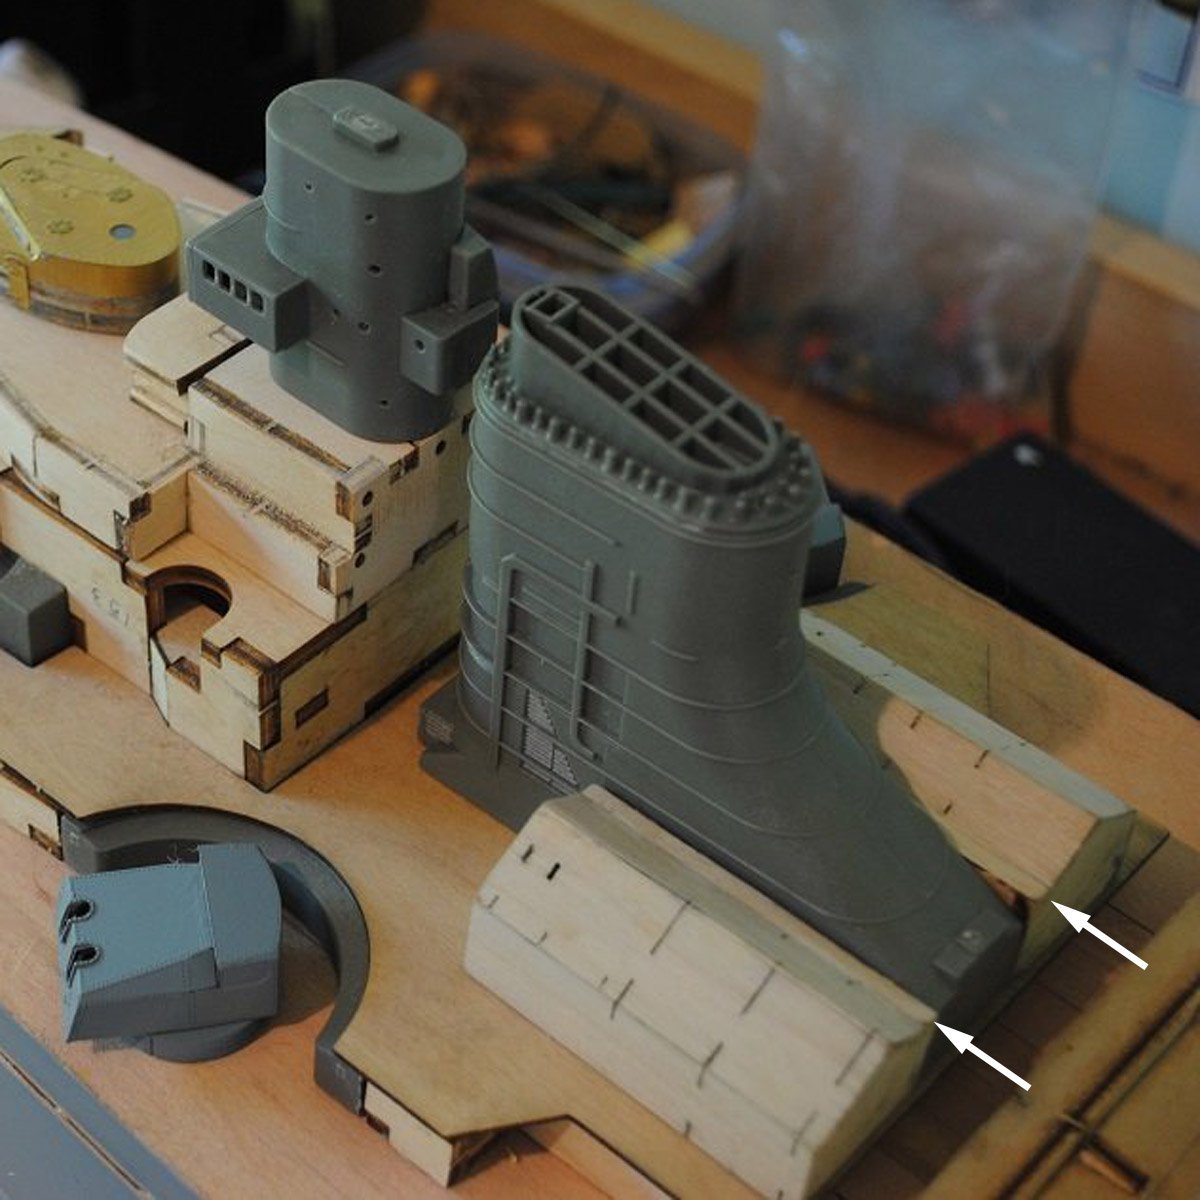
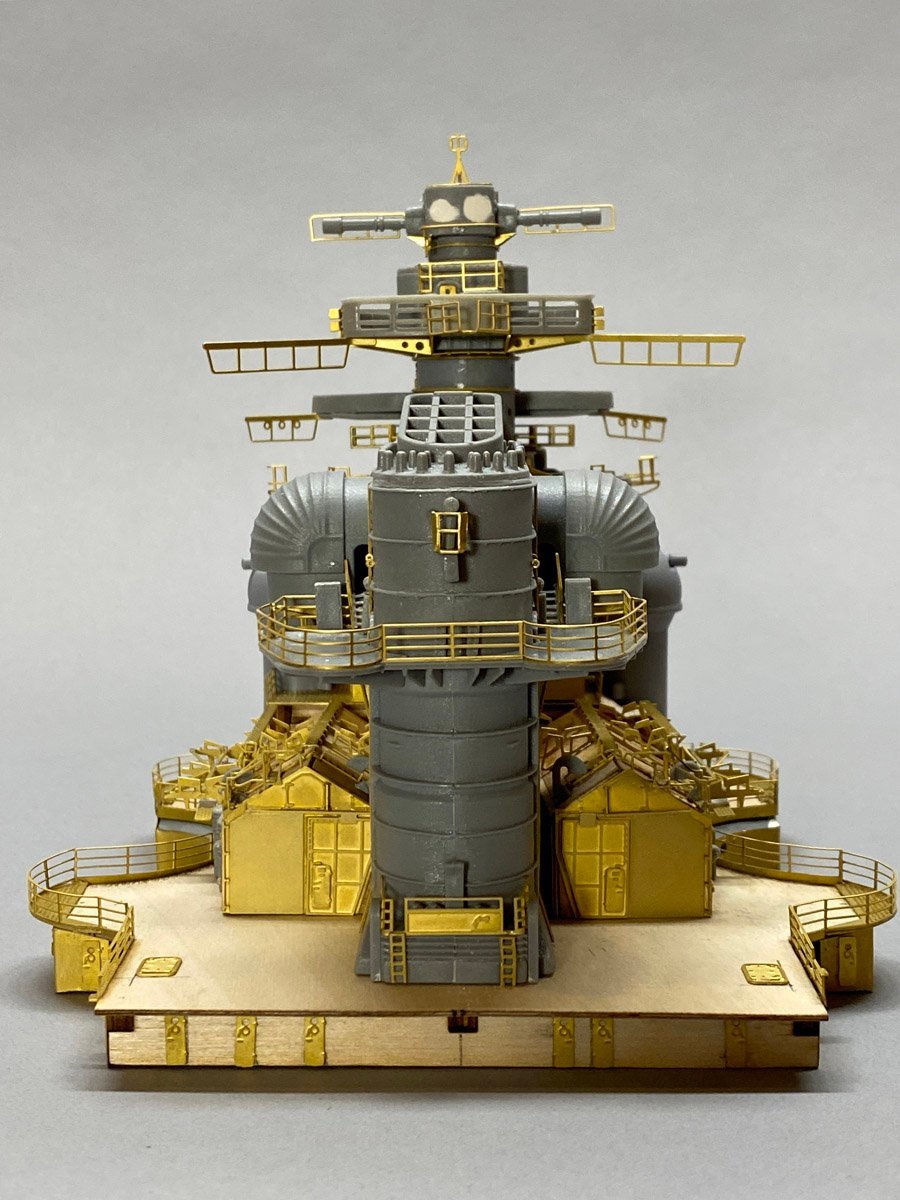
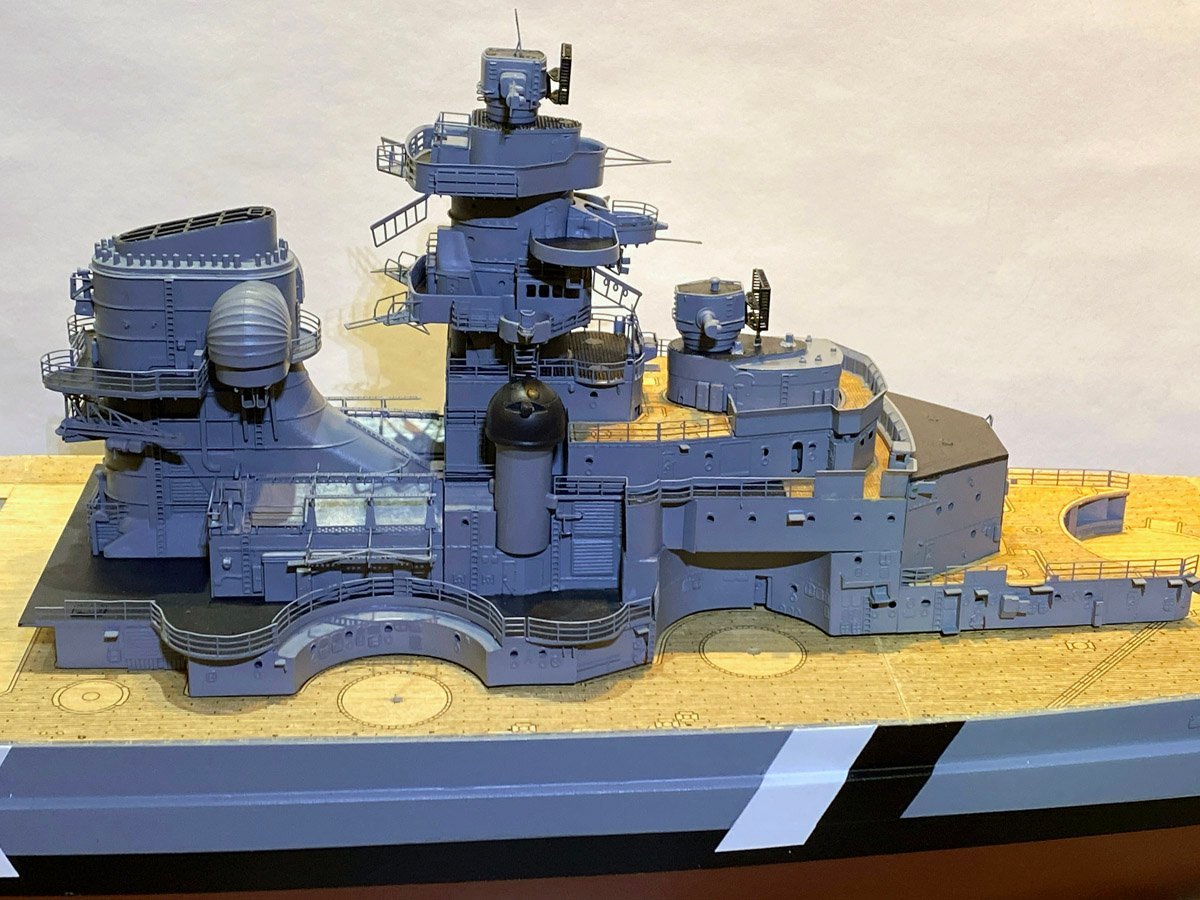
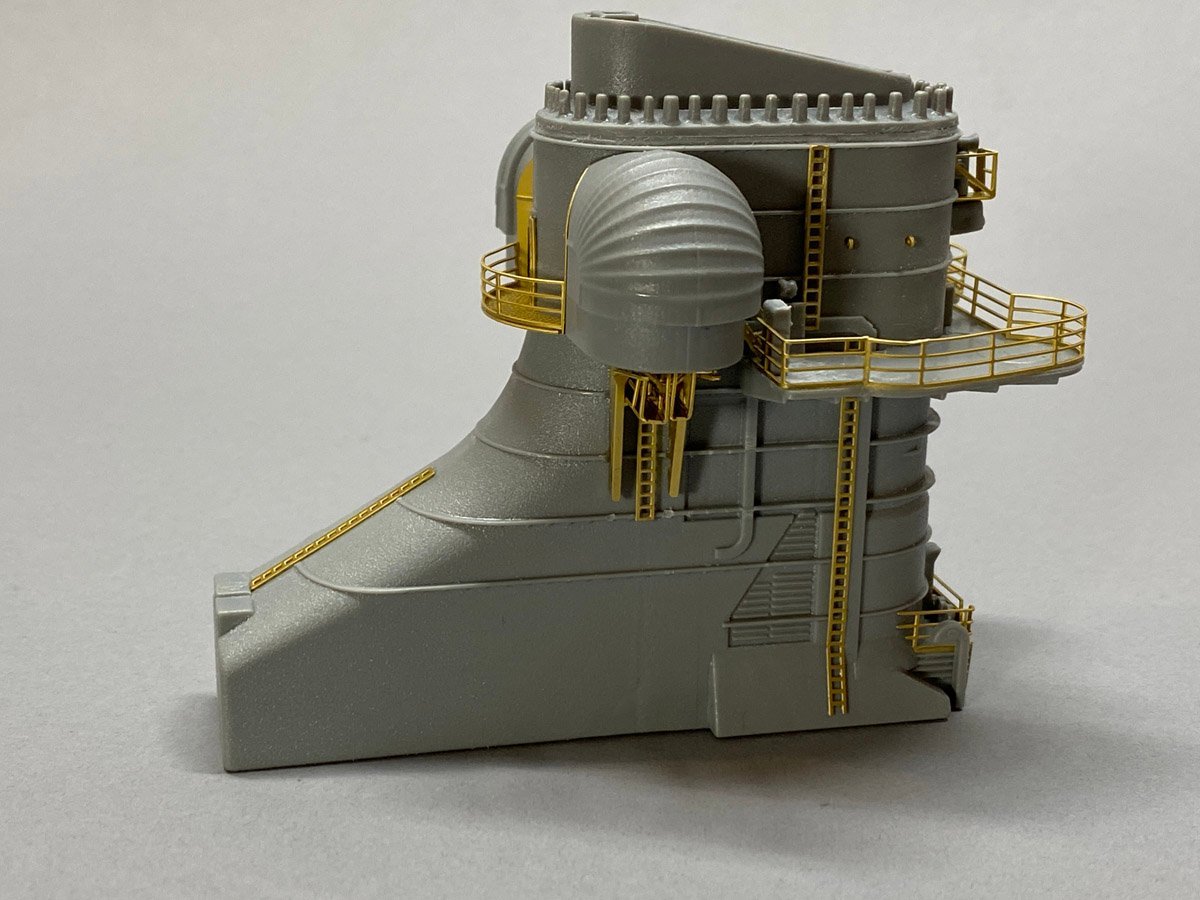
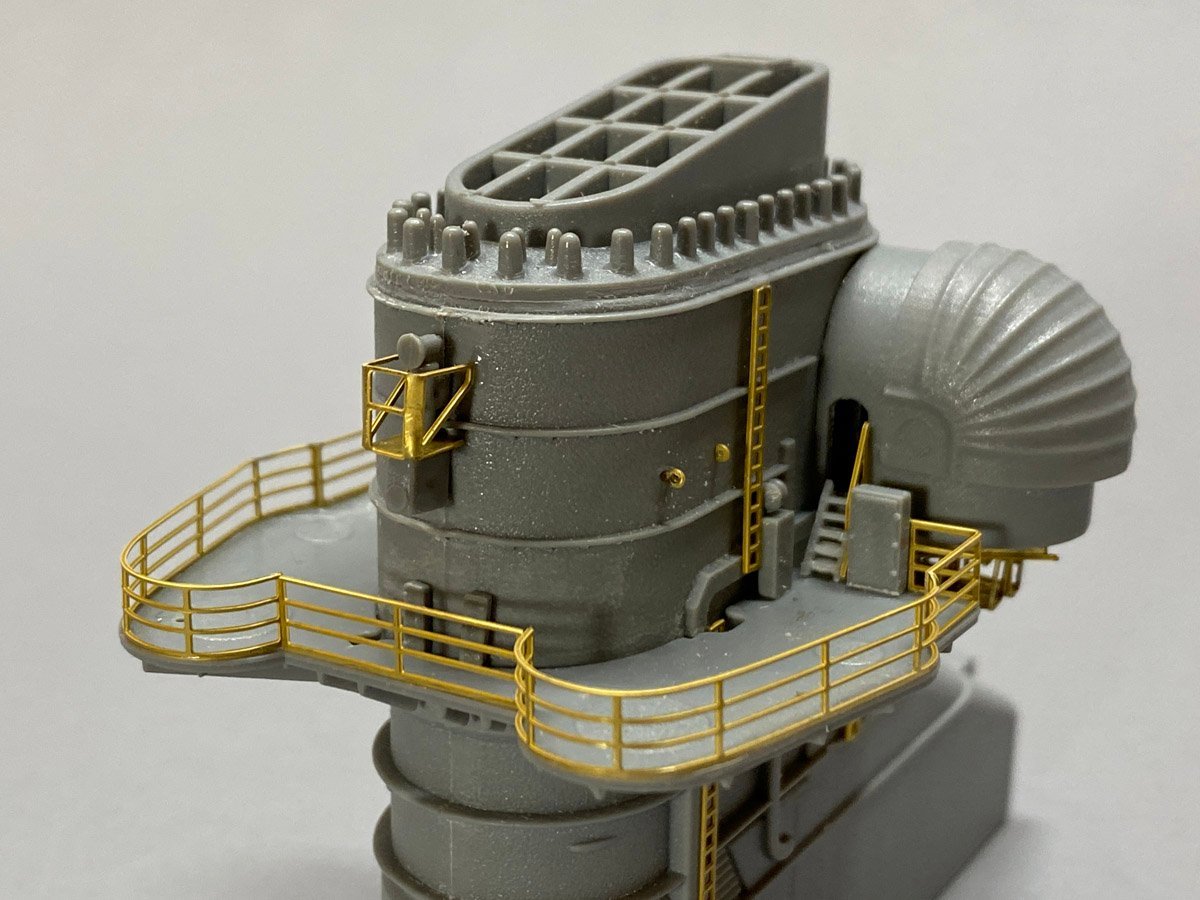
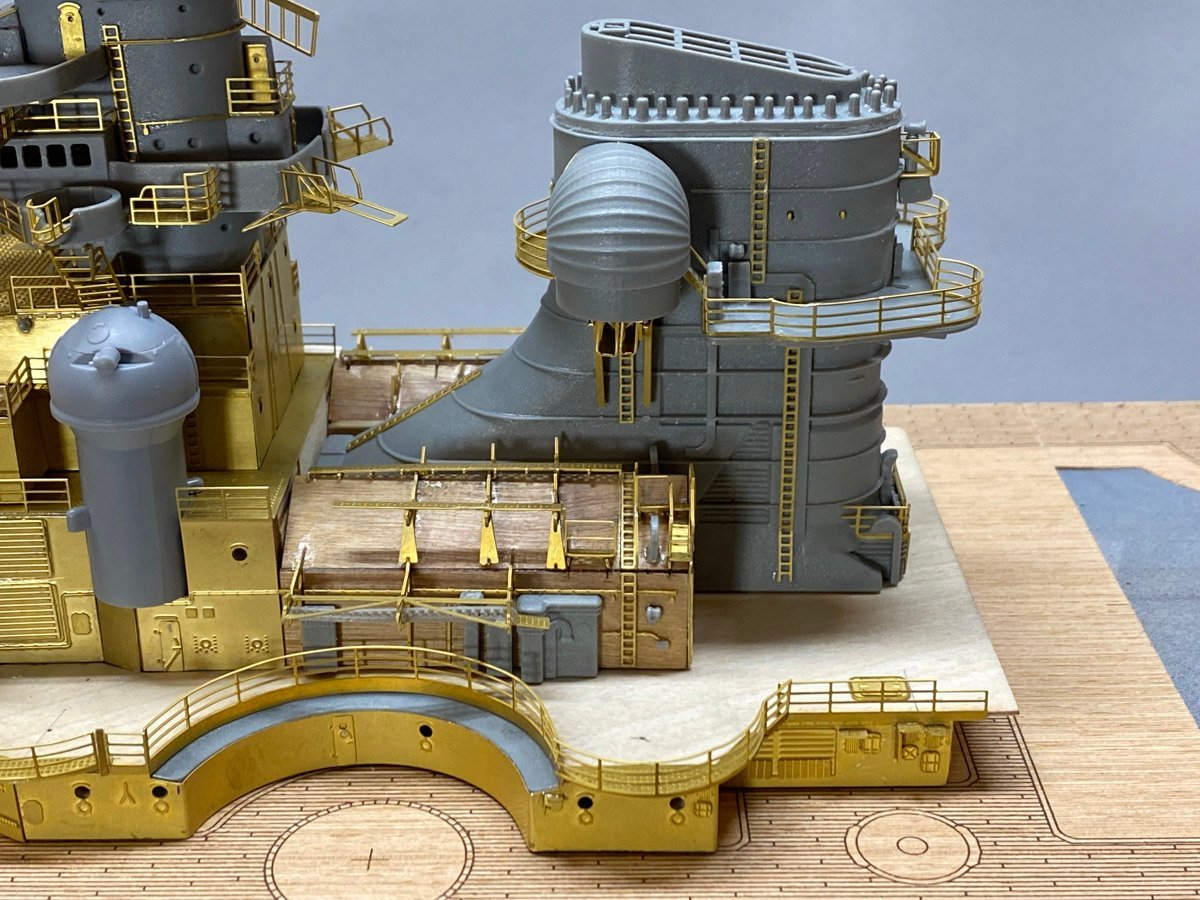
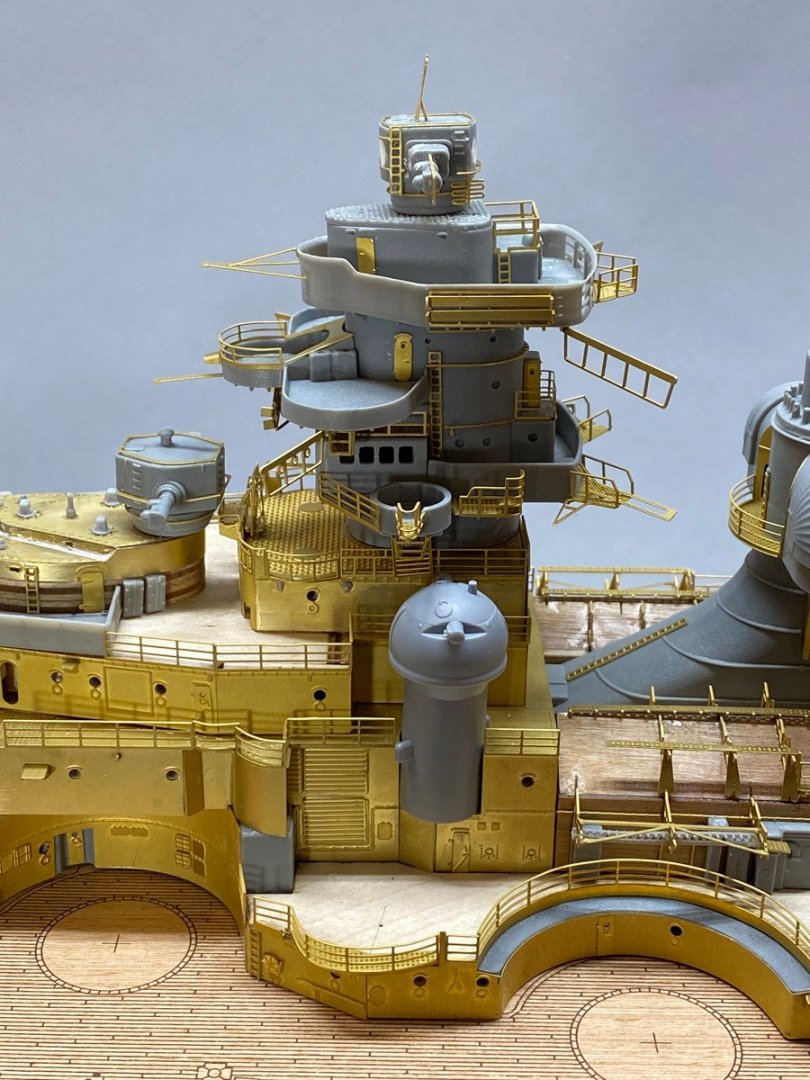
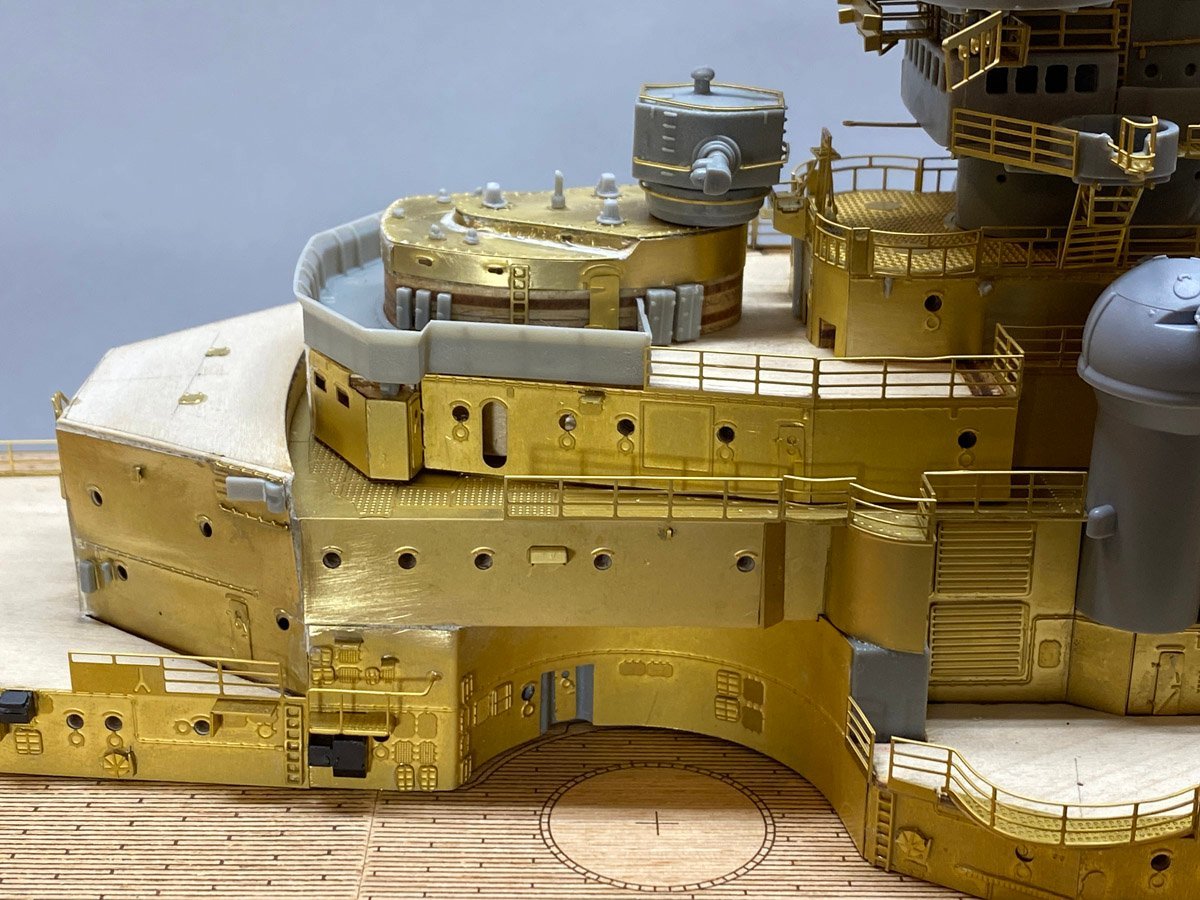
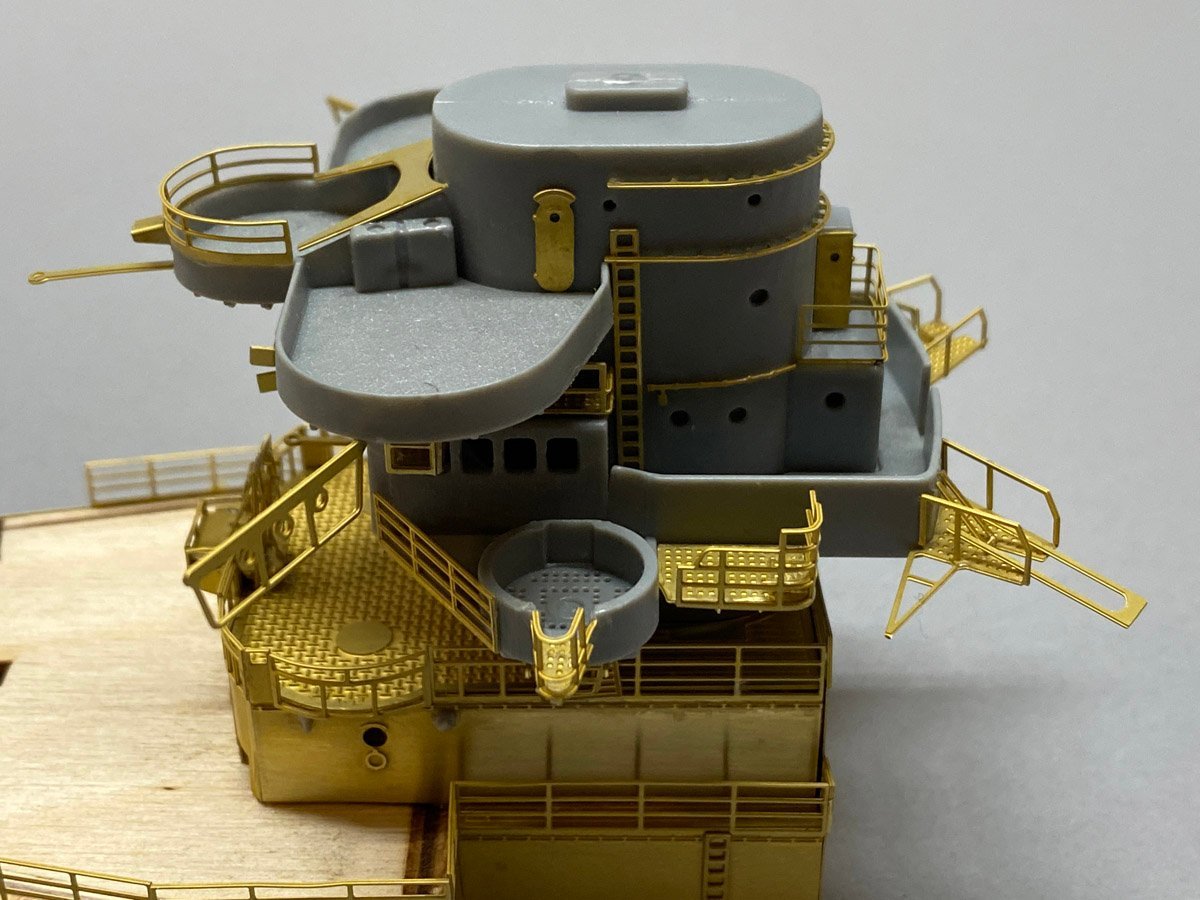
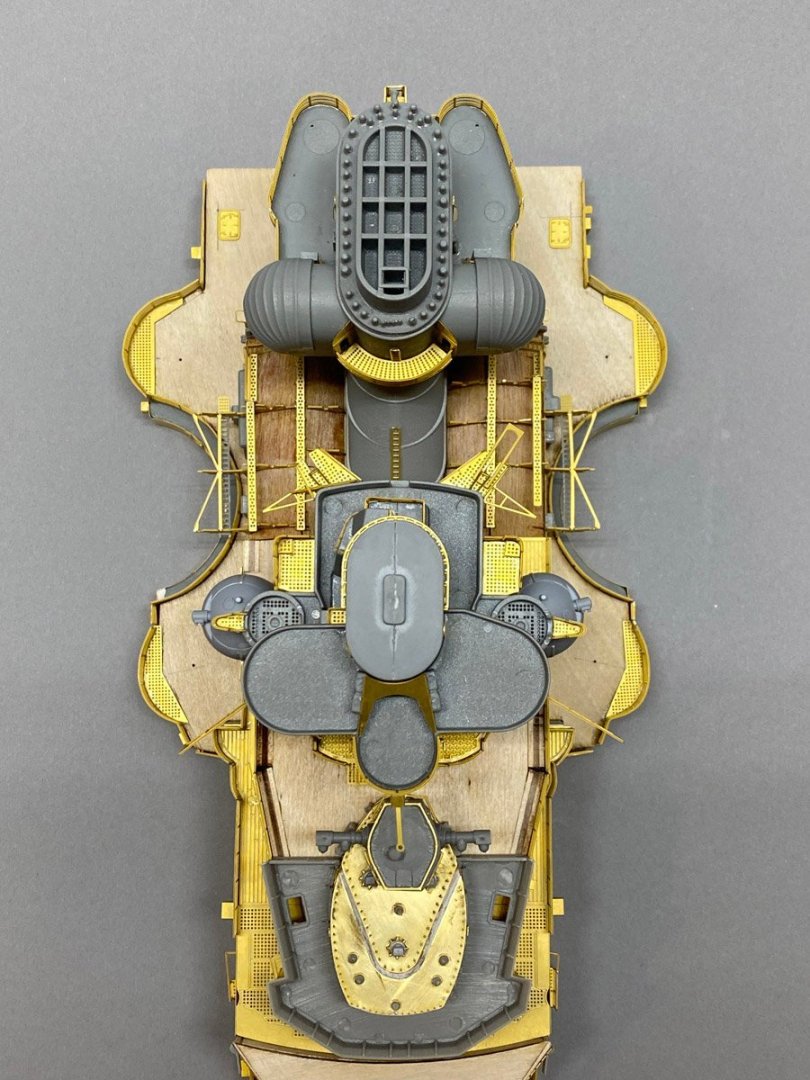
Forward Superstructure The forward superstructure is done to the point where I have to start painting. So of course we're expecting a major blizzard tonight and my car is safely in the garage where I'd like to paint. Anyway, here's where things stand. Overview This conning deck had very weird construction. It is built with a U-shaped groove between the top pieces. A piece of curved PE is dropped into the groove, then the groove is filled in with what ever putty you have. I'm still not happy with the putty. It would be so much easier to just laminate two pieces. I'm not much of a plastic modeler and don't know what's considered good moulding and what's not, but I think the plastic parts with this kit are not great. There's not much flash, but many parts have dimples where the plastic shrunk while cooling. This range turret had severe dimples that required filler. Now it looks like a little robot head on top of the Bismarck. The funnel was relatively easy to build. My Prinz Eugen model came with 2 blocks of wood to carve. It didn't have any of the myraid auxiliary pipes shown here, but I bought a brass detail kit made by Pontos for some plastic 1/200 Bismarck. Every pipe was a tiny piece of turned brass, and I glued them all individually. This was a lot easier. I love the details on this model. If you were Ant Man you could walk all around the decks. Front view with the little robot head on top. Back view. I have also finished the aircraft cranes but forgot to attach them for the photo. Fairey Swordfish view of the Bismarck.


-
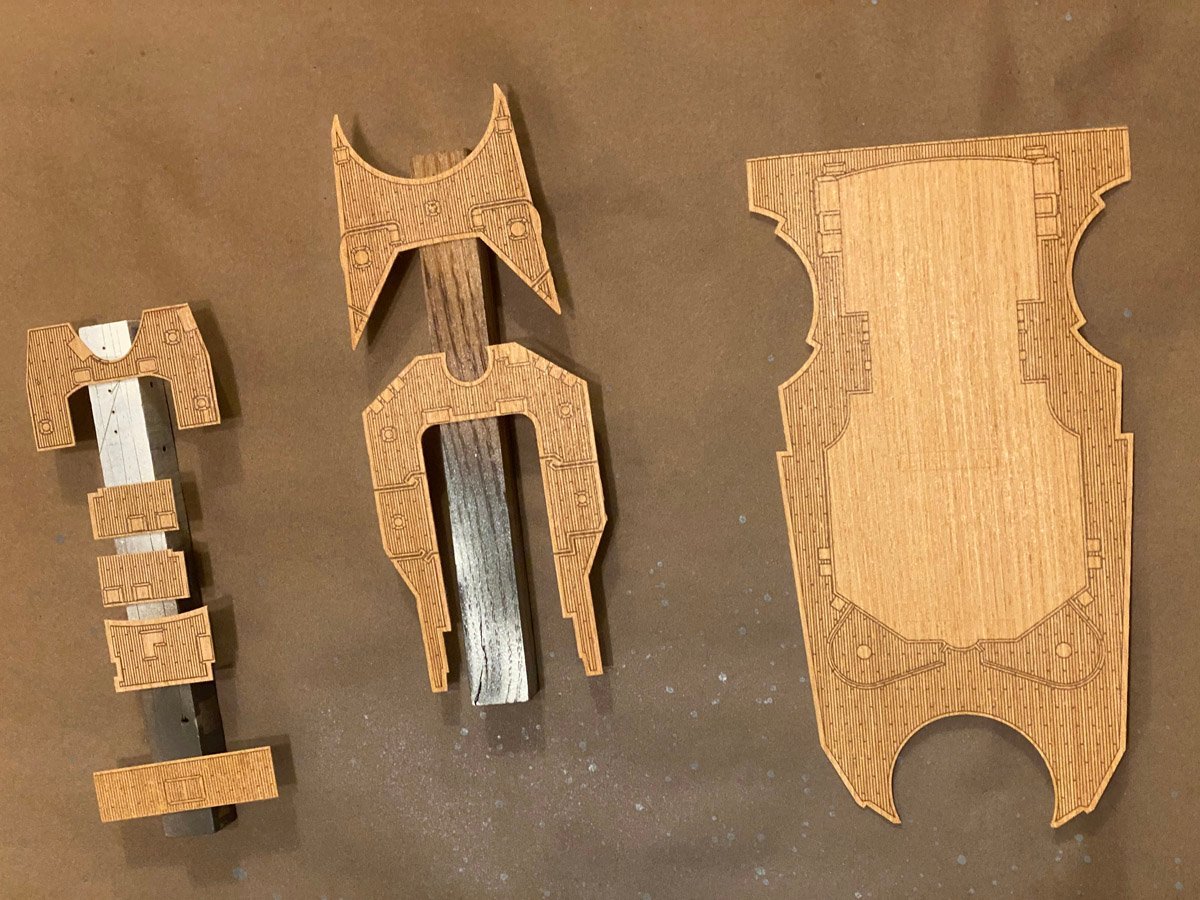
Admiral's Bridge & Hangars I've been very busy building forward superstructure, funnel, and hangars. Here's the start of the Admiral's bridge. Yesterday I started on the hangars. They were bigger than I expected, but also much harder than I expected. The framework is a mix of thick ply, thin ply, and particle board. I thought that I could just CA the pieces together while holding them against a square block of wood, but the joints are all loose because of the laser cut. My first hangar came out square but didn't sit flat. I had to break it apart and start over. The tops and one side of the hangars are thin ply with tiny cuts for brass inserts that must all be aligned. I got the first one reversed and had to break it apart and start over. Then I started to add the PE, but the thin ply sucks up the CA before you can get the brass in place. Last night I went to bed very disappointed with my first hangar. Today I remembered an old trick and wiped hangar number 2 with shellac. I just used a paper towel and it was dry in a few minutes. The shellac seals the ply and makes the CA stick much better. After that everything went together easily.