robdurant
-
Posts
843 -
Joined
-
Last visited
Content Type
Profiles
Forums
Gallery
Events
Everything posted by robdurant
-
 That's a nice neat painting line you've got there between the black and the wood... I always have my heart in my mouth hoping I won't end up with my head in my hands doing those jobs! Supply's come on in leaps and bounds since I last checked in. Keep up the good work Rob
 -
Hi @lraymo Really glad it's been a help! Let me know if you have any questions. Rob
-
She's coming along very nicely do keep posting. It's great to see your build coming together.
-
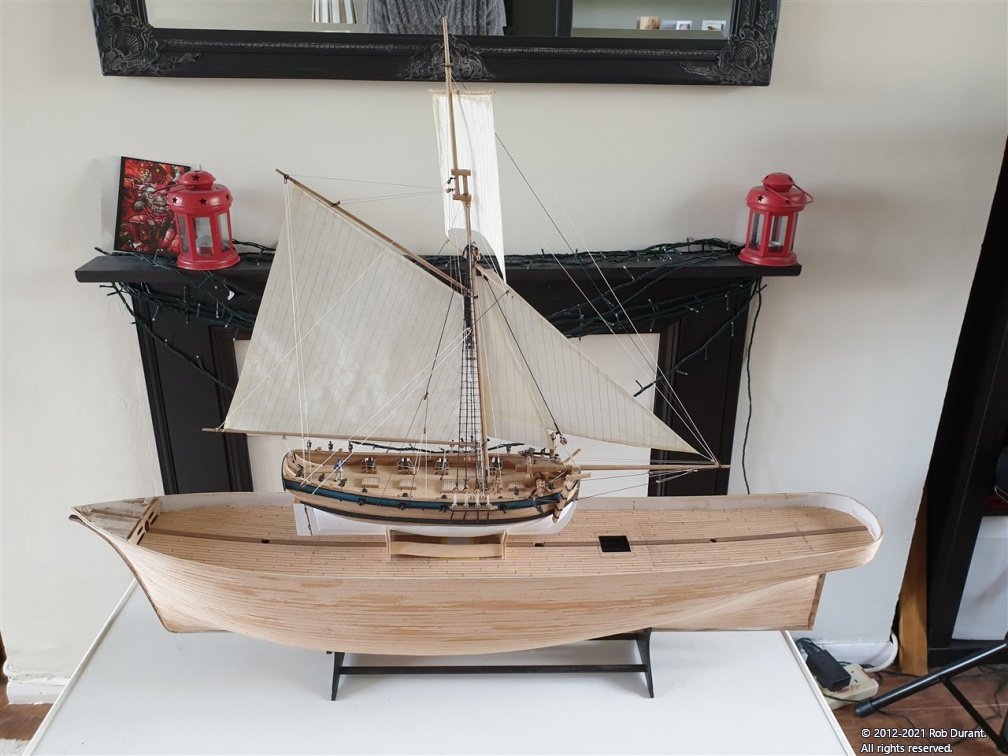
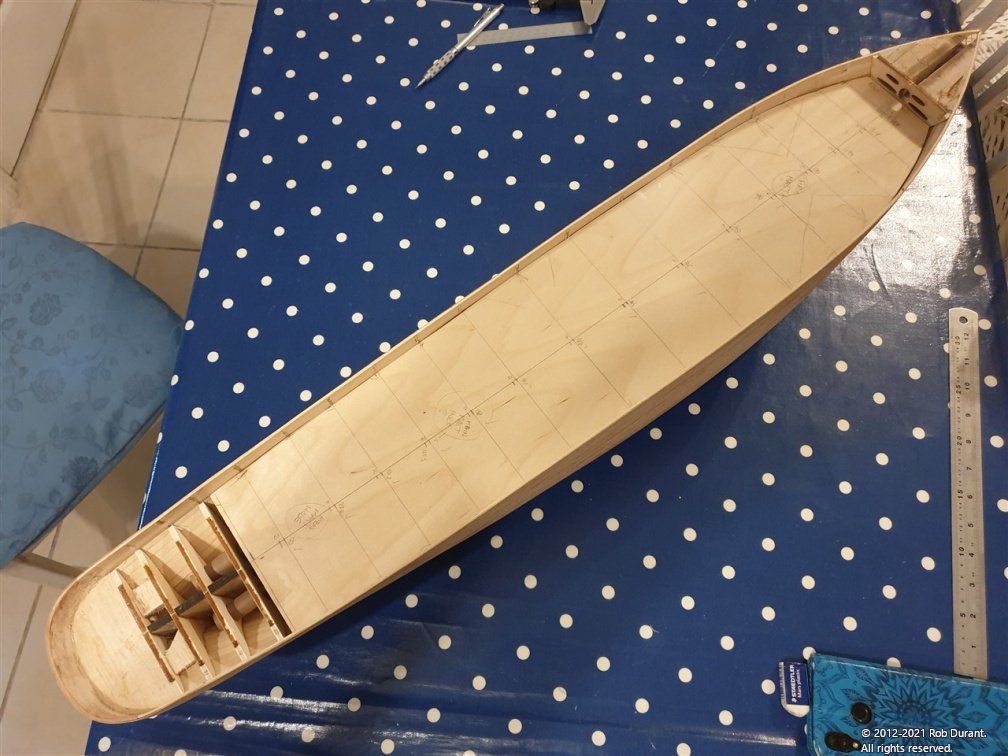
Okay - a milestone to report I've finished planking the deck. I also took the opportunity to get a photo with one of my other models in shot as a comparison. HM Cutter Sherborne (a Caldercraft kit). The paper cover is to stop the coal getting lots of dust on it from the build. I believe the next step is to start making the holes in the side of the hull for the scuppers and fairleads, etc... Happy building, and thanks to all who take an interest in the journey. Rob
-
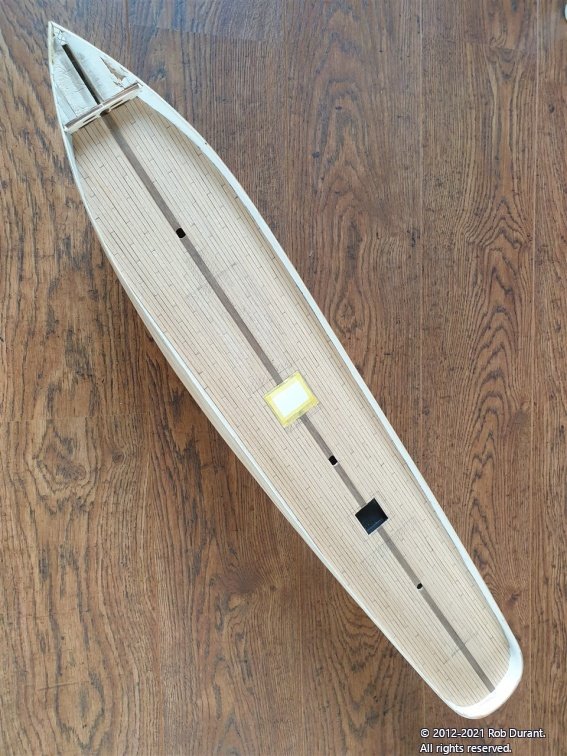
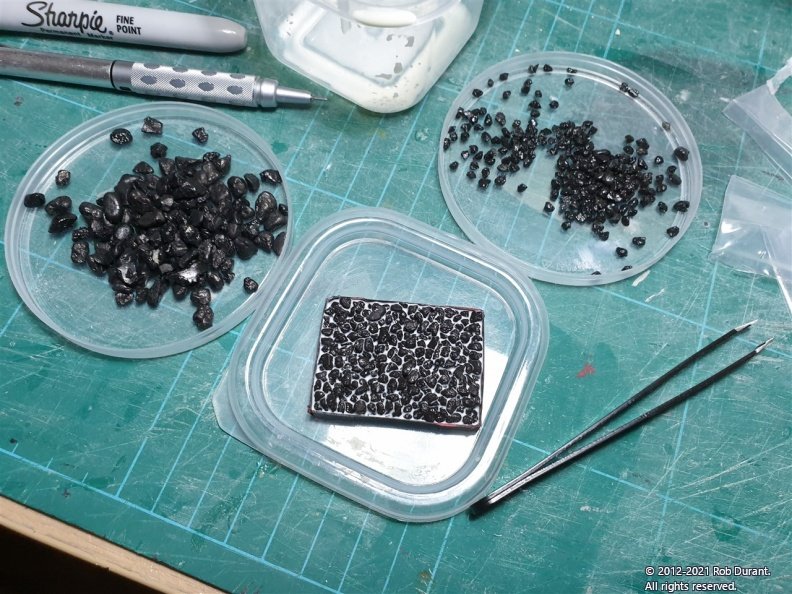
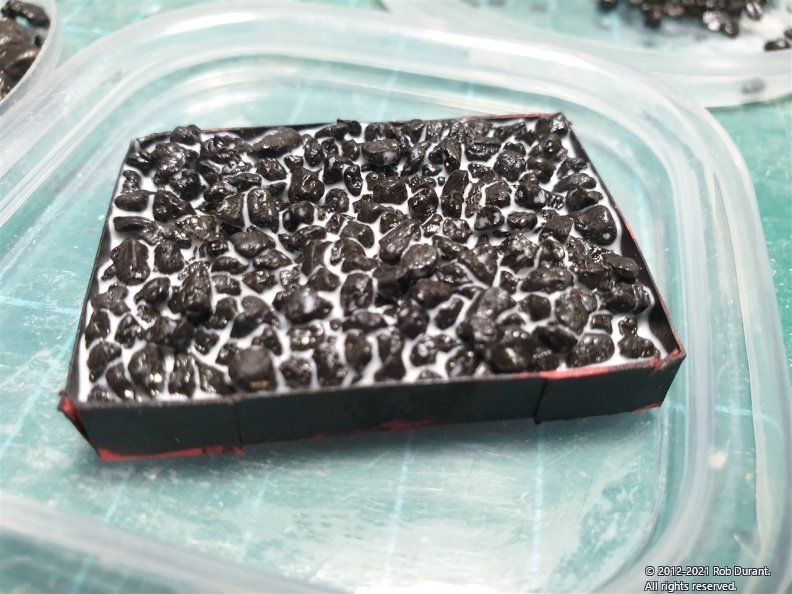
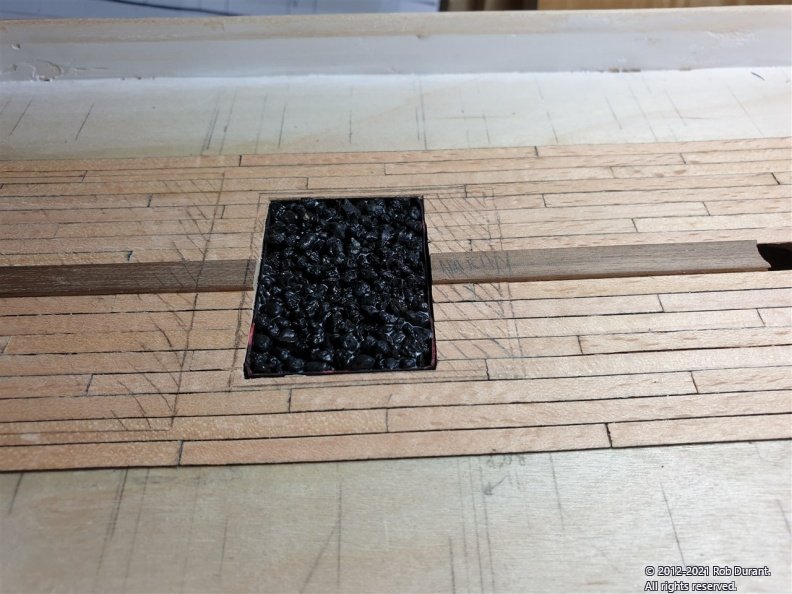
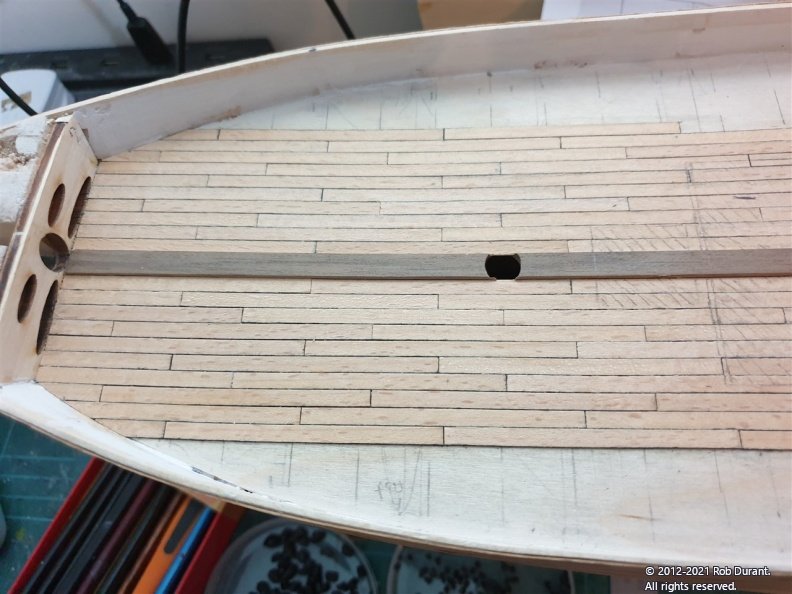
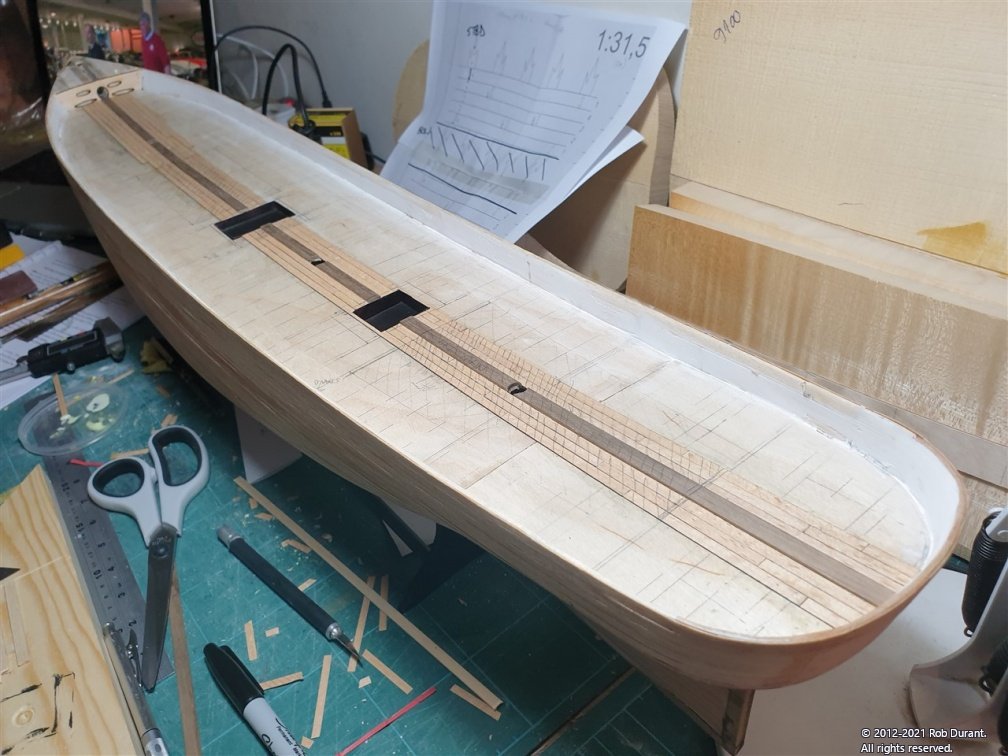
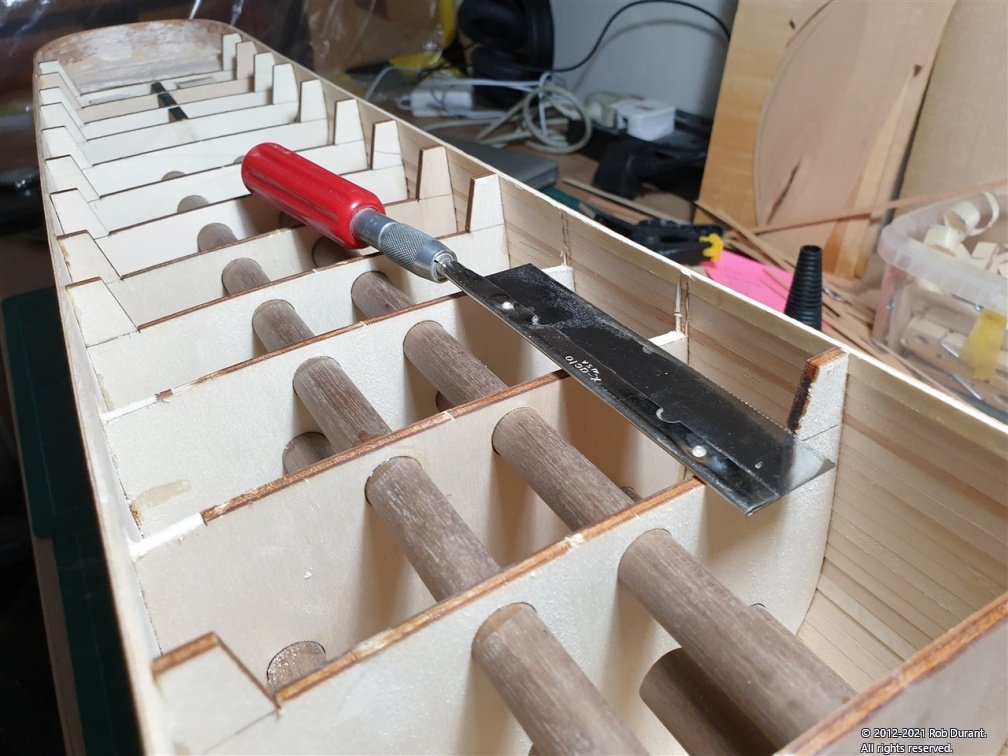
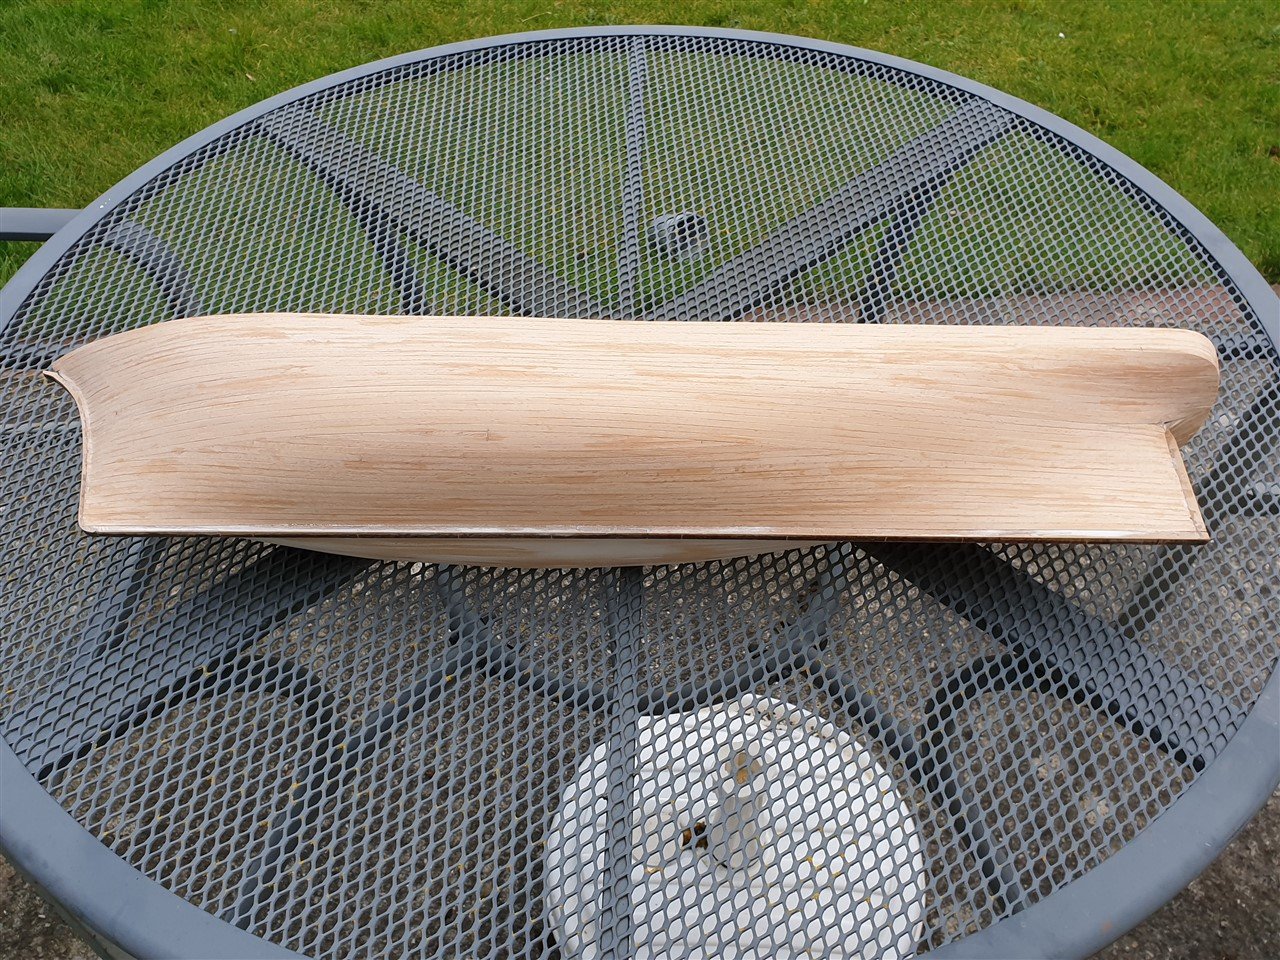
Thanks Eamonn. And thank you to everyone for your likes and encouragement. As always, they spur me on. The plank chopper works well, but usage has shown that pine was the wrong wood to select for the base. It's got pretty mashed up now, and doesn't cut as cleanly as I'd like. I'm almost there, though. Plywood would work much better I think. The model railway coal arrived, so I thought I'd have a go at filling the hatch insert. I used the smaller grade, and once it was packed into the holder, I poured watered down carpenter's glue into it. It made quite a mess, but I left it to dry overnight, sat on a plastic surface (so it didn't stick to it), and wiping the excess away, and it worked beautifully. Some pictures... The holder... Filled with coal... And the finished result... Once the coaming is in place, and a few of the covers left off, it should look really smart. Finally, a picture of the planking so far... The waterways will cover the edges here, but I'm enjoying trying to get a nice neat edge anyway. Happy building Rob
-
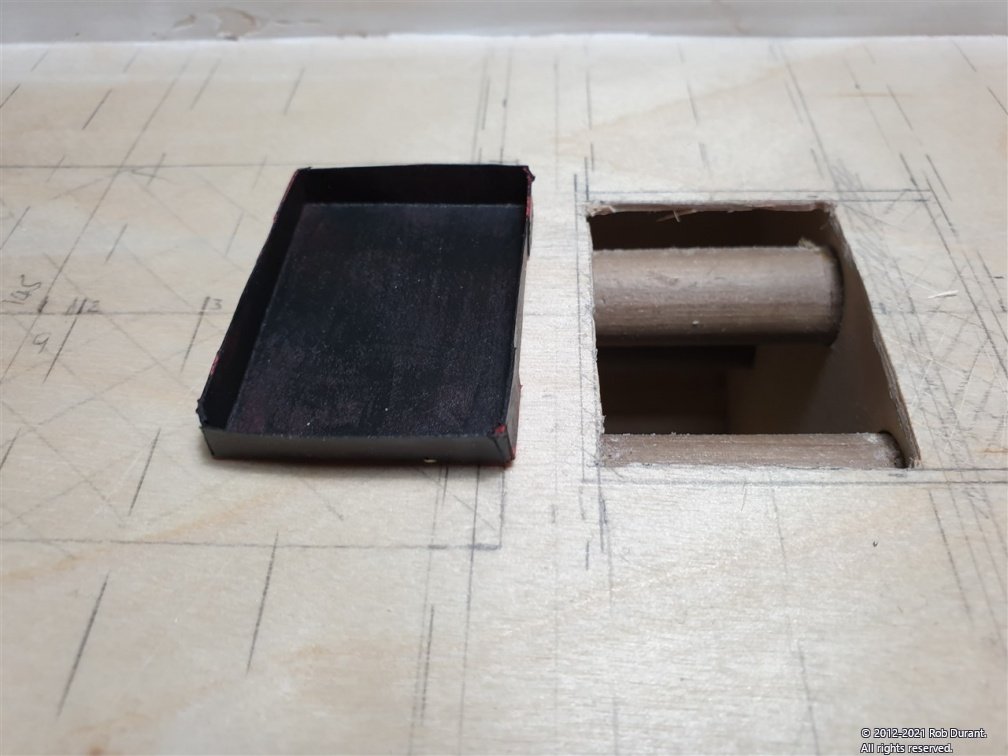
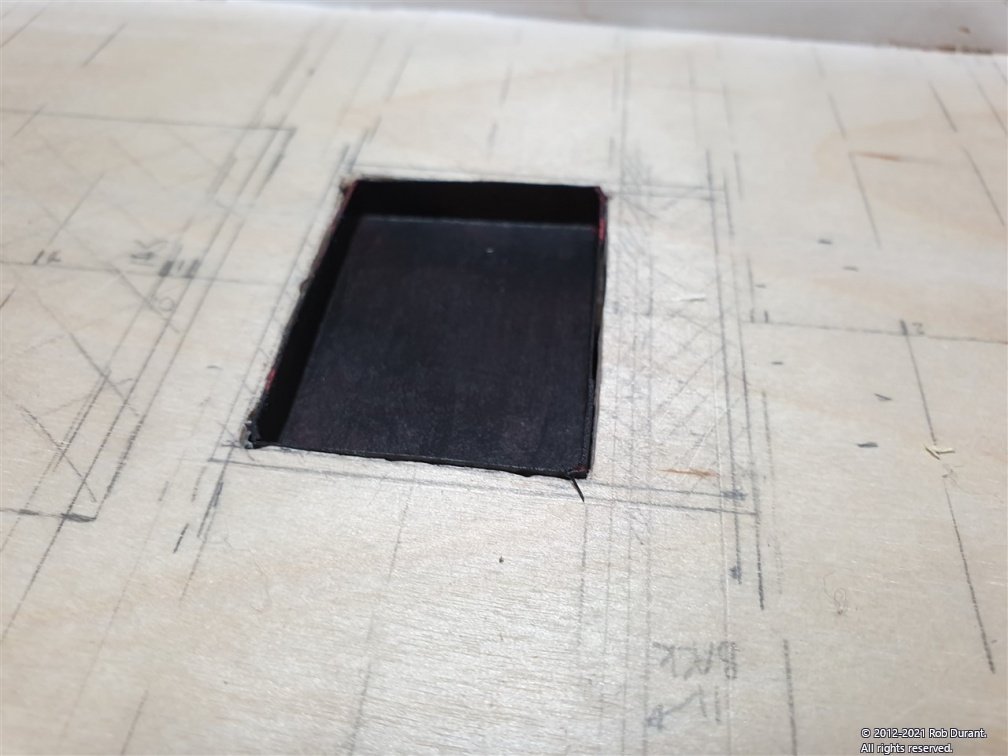
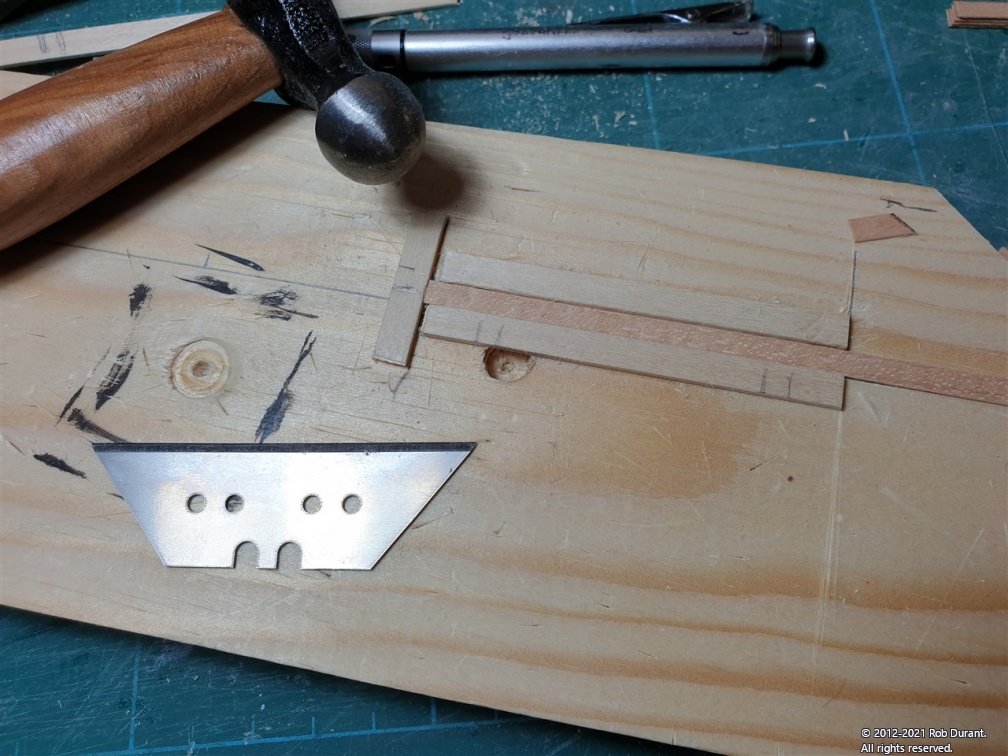
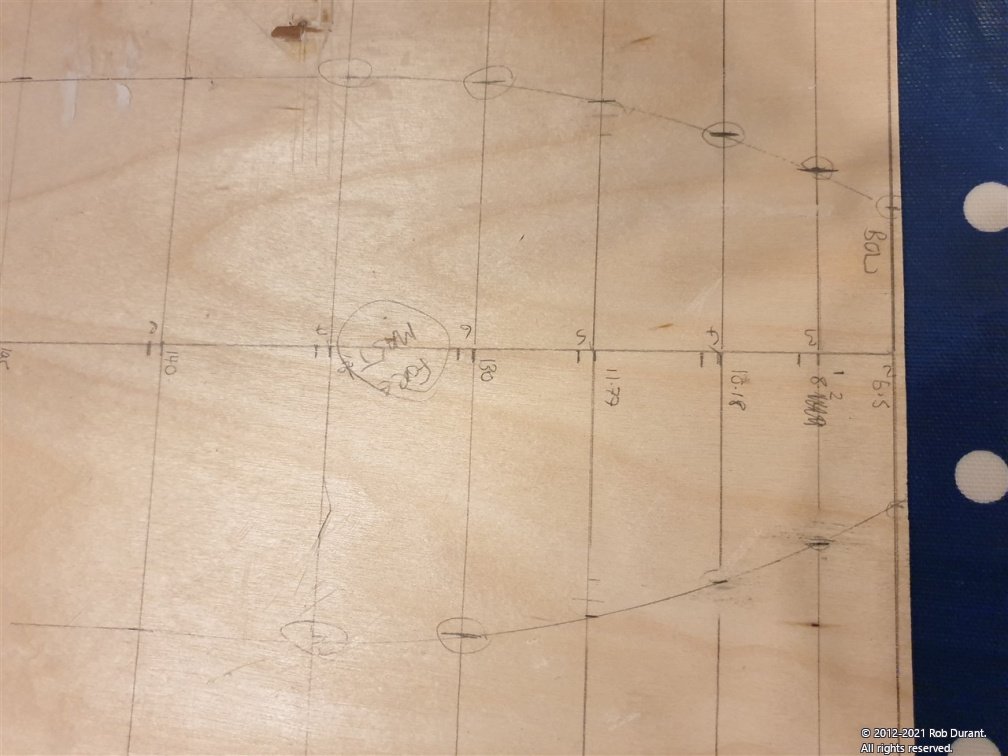
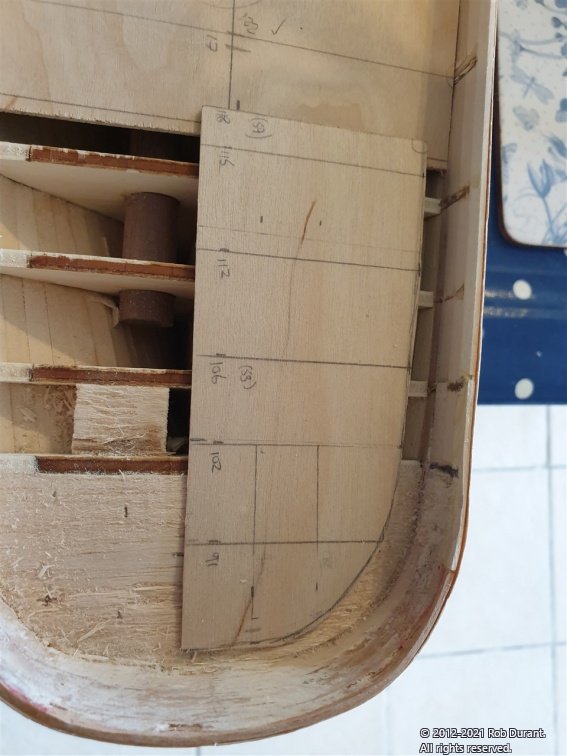
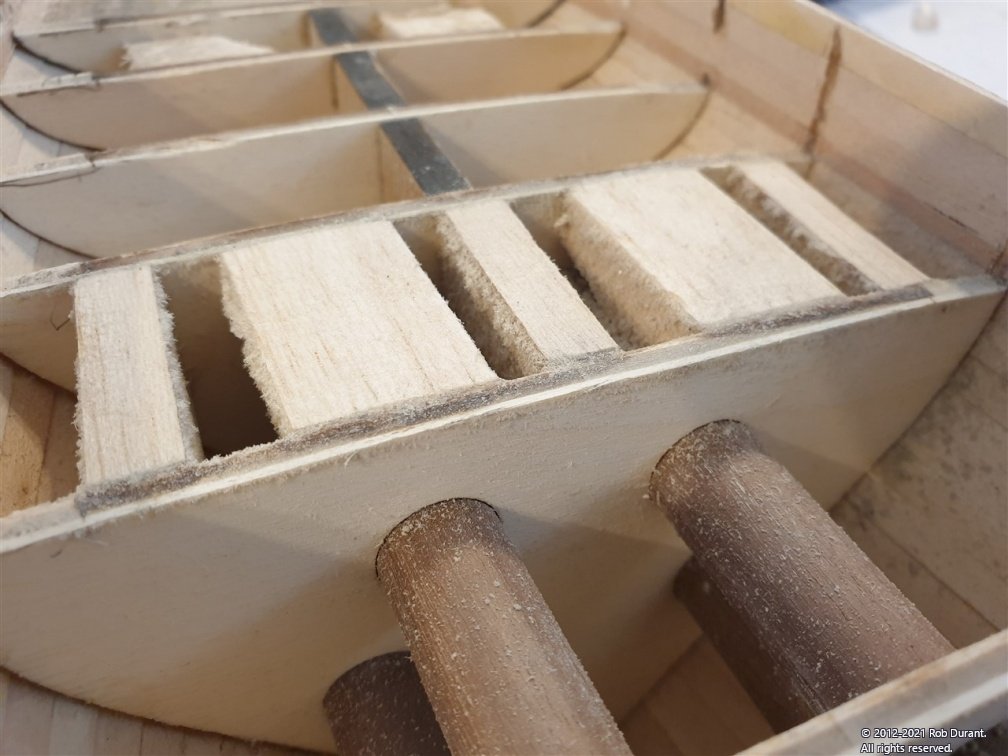
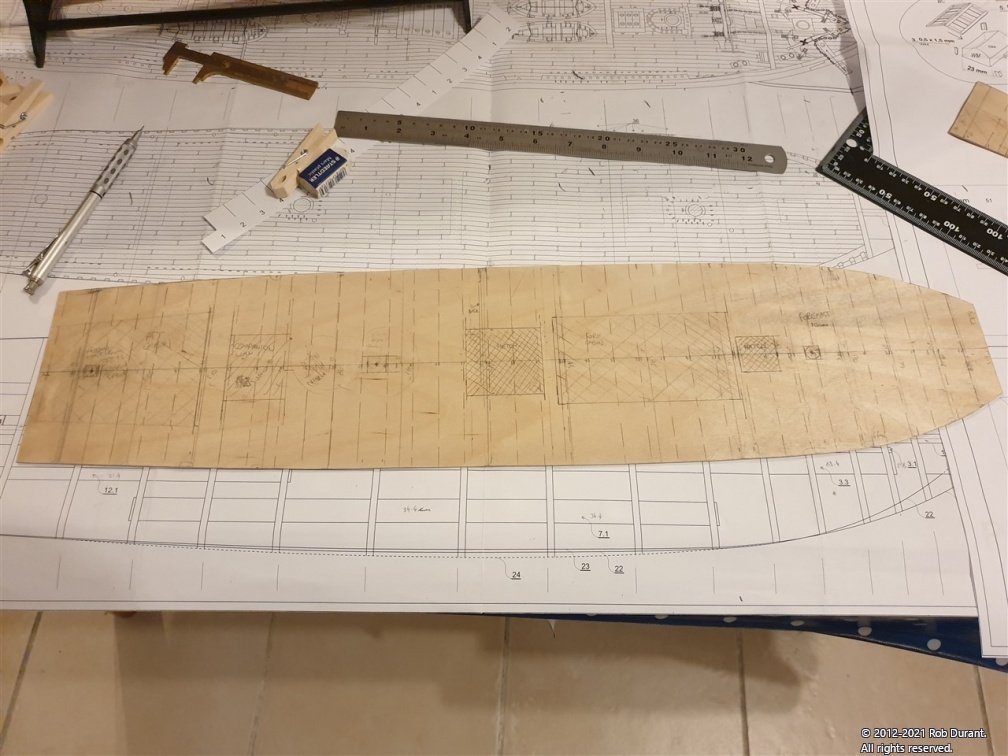
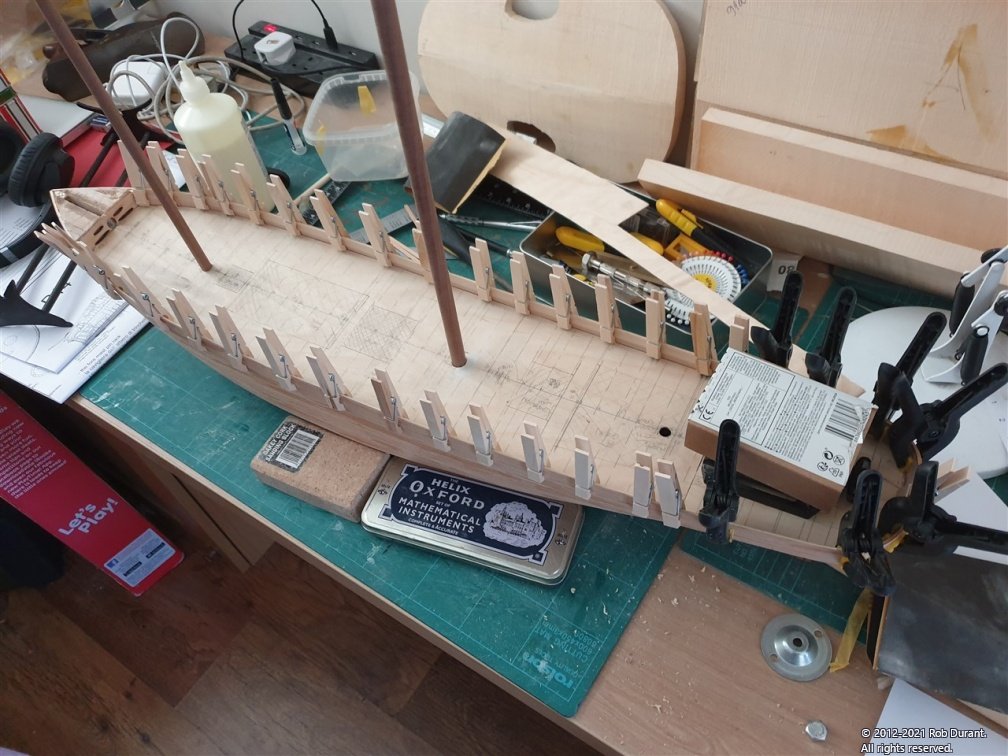
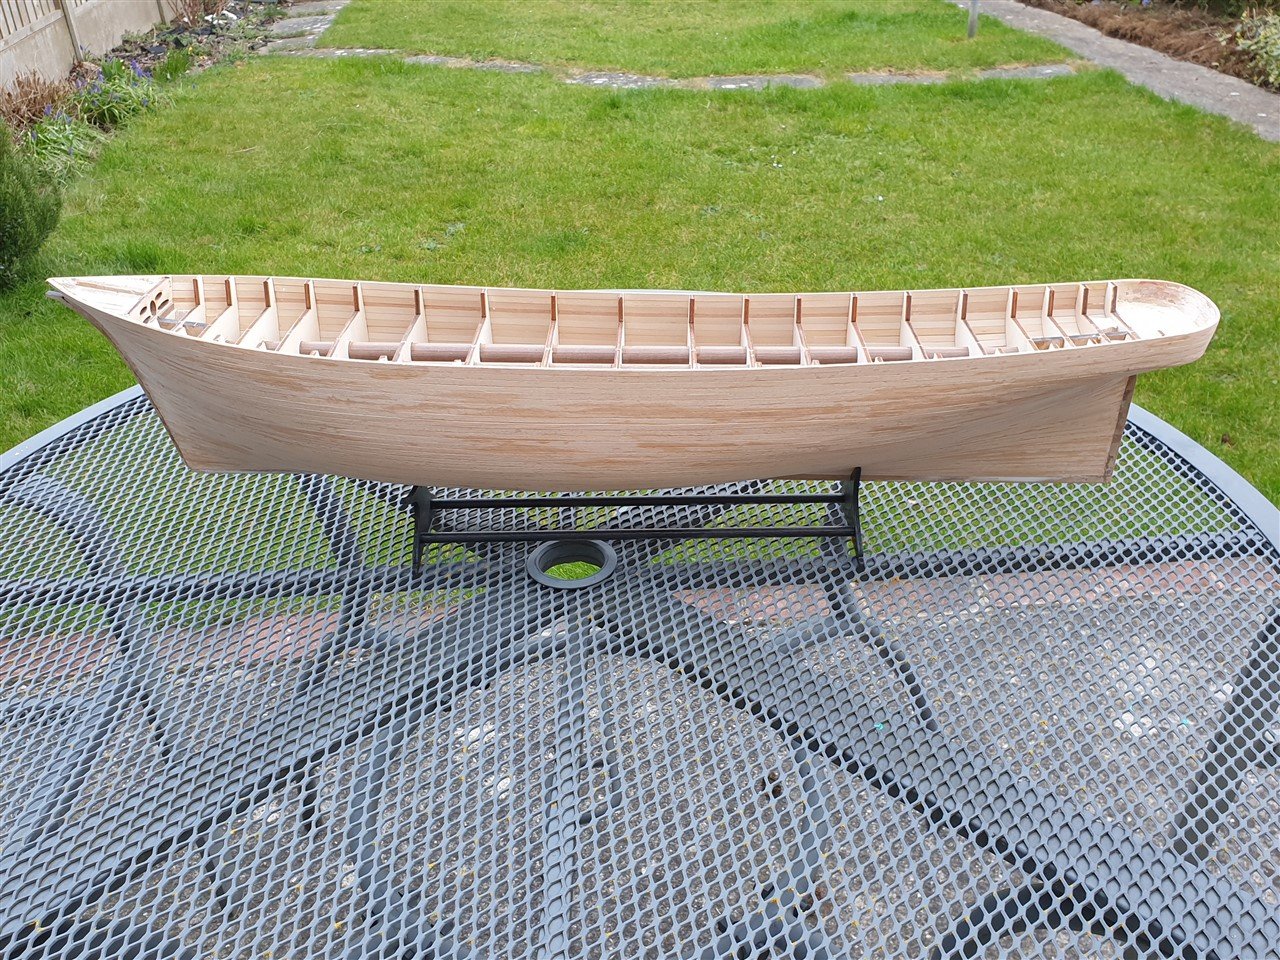
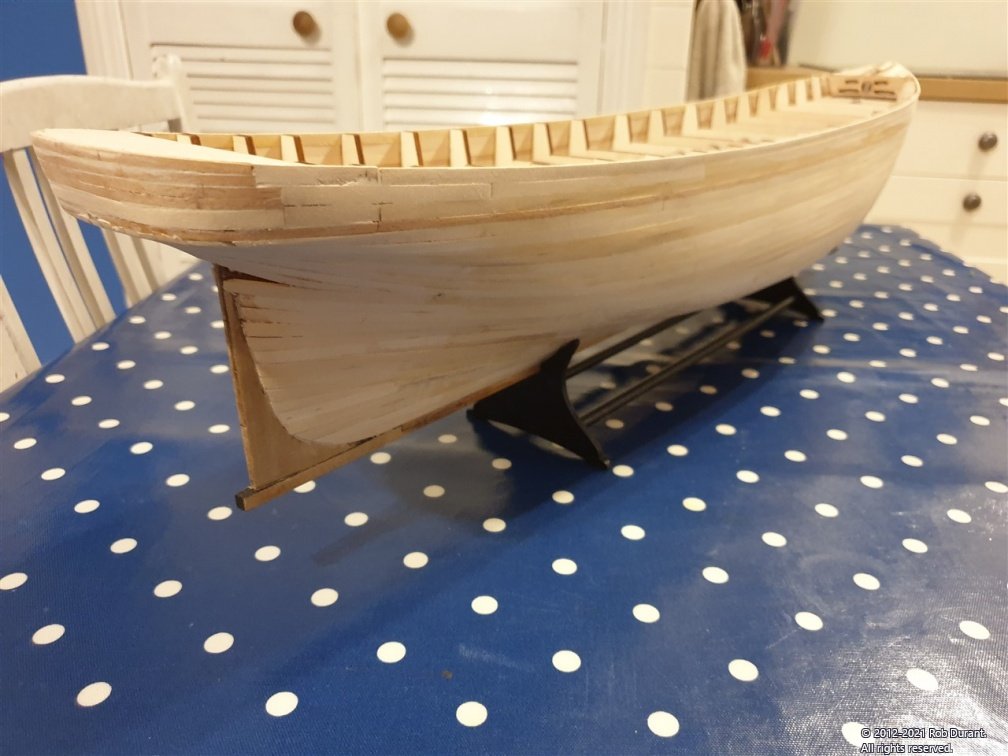
Hi all, Thank you for looking in and for the likes. I've sanded back the bulwarks, and they're now pretty smooth, so it's time to get the deck planked. But before I did that I was thinking it would be nice to inject a little more interest into the model, and that means showing that she's a merchant vessel that carried cargo. That involved cutting out part of the hatch, and for good measure I also cut out a section where the companionway ladder would go. Once cut out card trays were made and painted to sit in these sections and give the appearance of depth. Some model railway coal in two different sizes is on order to go into the cargo hatch. I remember reading that colliers were dangerous vessels to travel on because the cargo was transported as was, and could easily shift in heavy seas, unbalancing the vessel. So... A glimpse of coal in the hatch is the idea. I'll just have a few of the slats off the loading hatch as otherwise a heavy surgery would have to be done to one of the bulkheads. Now it really was time to plank the deck. I worked out from the plans that the planks are 66mm in length. I wanted to plank the decks with individual planks so that the wood tone changed from plank to plank. That meant something heading for 350 planks needed to be cut out, and I didn't want to have to measure each one by hand... so I created a very basic jig. The stanley knife blade is put to the right hand end flush with the ends of the guides, and tapped with the hammer to cut the plank. As long as the plank is held against the left hand end as shown above, the plank will be the right size. After doing this, I added channels to cut planks to 1/4, 1/2 and 3/4 lengths as well, and these were used for the first planks at the bow end to create the shift pattern as per the plans. The 7x1.5mm waterway was put on first. I've seen discussion about whether this is accurate or not. I've decided to include it as it's an interesting feature, and I'm planning to make the deck furniture from walnut, so it should tie everything together nicely. Time will tell! It was stuck in place in one piece, then the mast openings were cut out along with the hatch and companionway openings. I figured if it is for strength it would have as few cuts in it as possible, so it runs right through the deckhouses for my interpretation. The planks were marked on one long edge and one short edge with a black sharpie to simulate tarred caulking. I don't bother with treenails as having been onboard Victory and Cutty Sark, to my mind you can barely see them in 1:1 scale, let alone 1:63! I discovered very early on that the sharpie ink was leaching into the cut ends of the planks, and wicking up the plank a little way, which was a bit ugly... This was solved by dipping the end of the plank that would be marked in the carpenter's glue before marking it. It takes seconds to dry when the excess is wiped away, and this prevented the wicking. Planks were run right across the openings to maintain the distances neatly, and then the openings were cut out again once the glue had dried. I did this for each run as it made access for the saw easier. As I've planked, I've been copying the false deck markings onto the deck, so I don't have to measure it all out again. I'm mirroring the shift pattern between port and starboard. Here's the progress so far with three and a bit strakes on each side. So that's me up to date. Happy building Rob

-
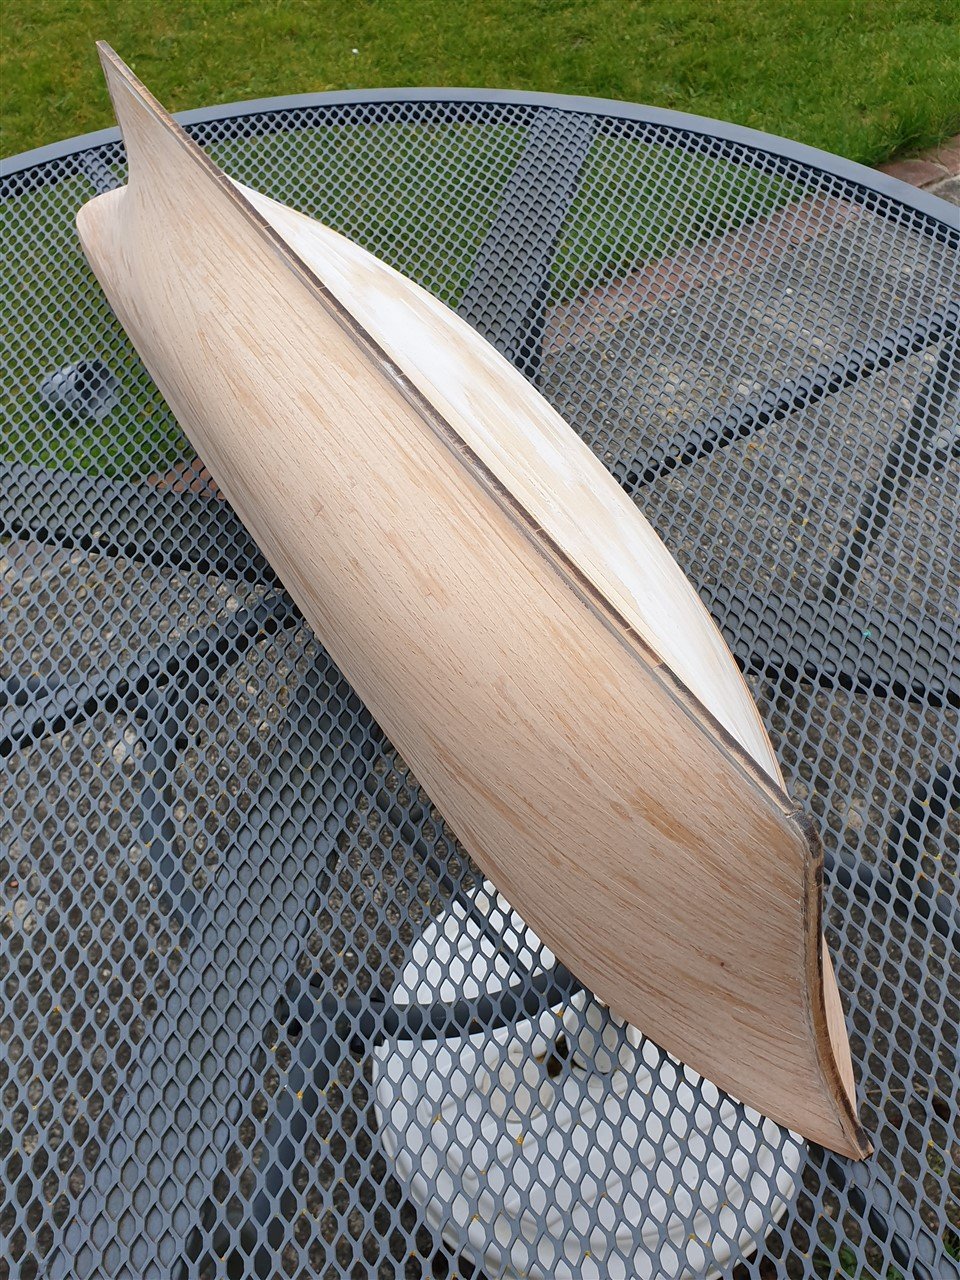
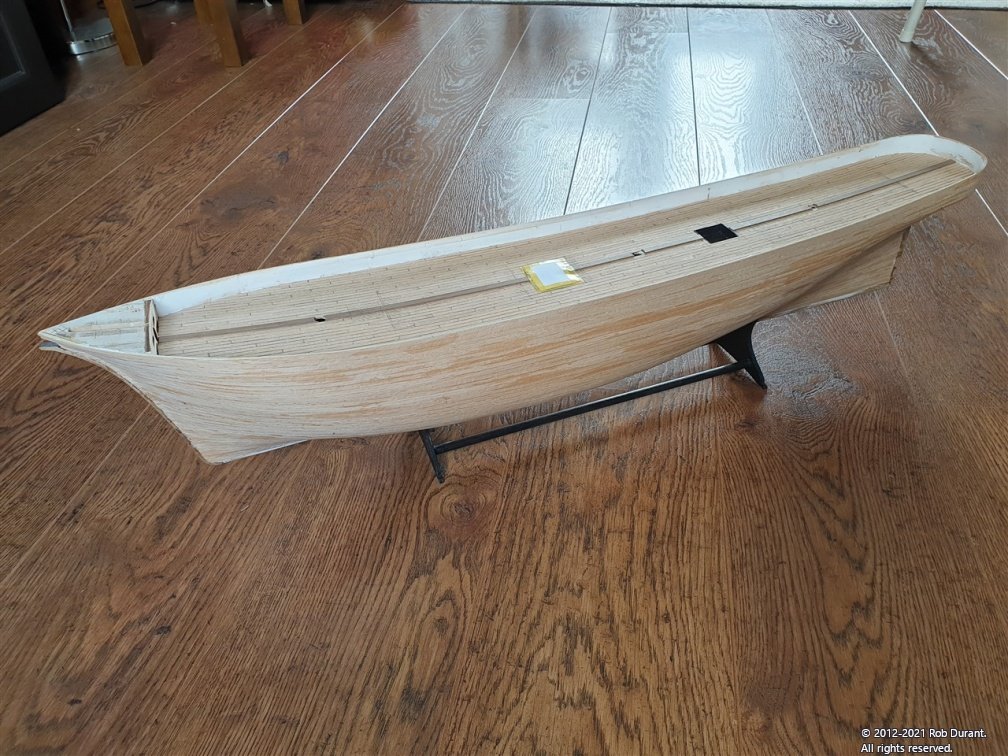
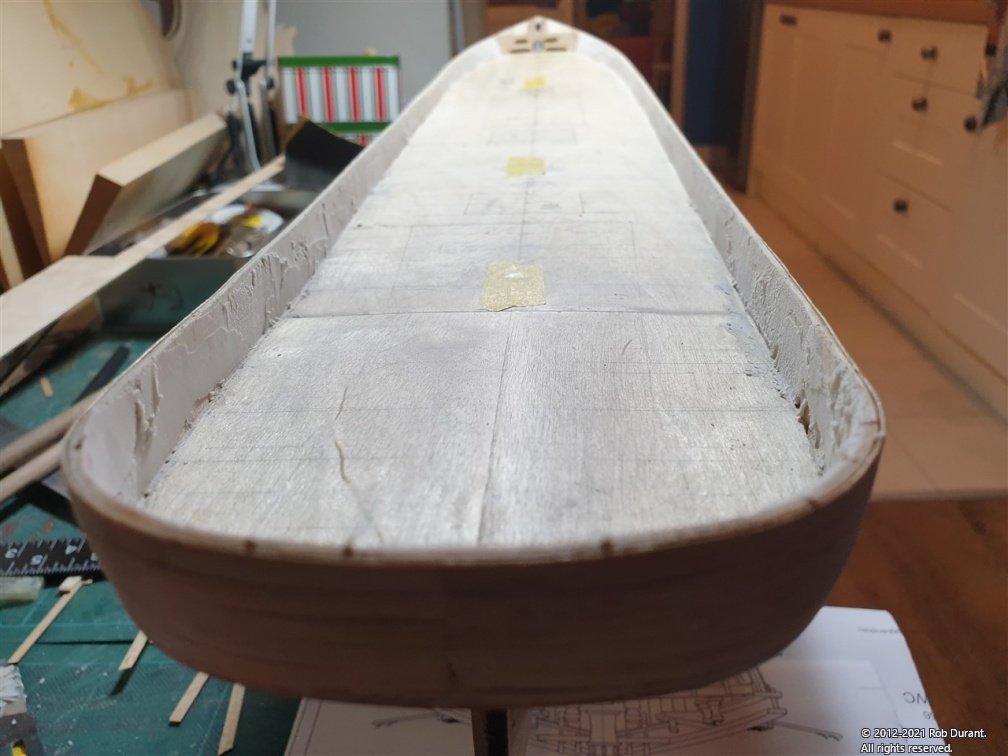
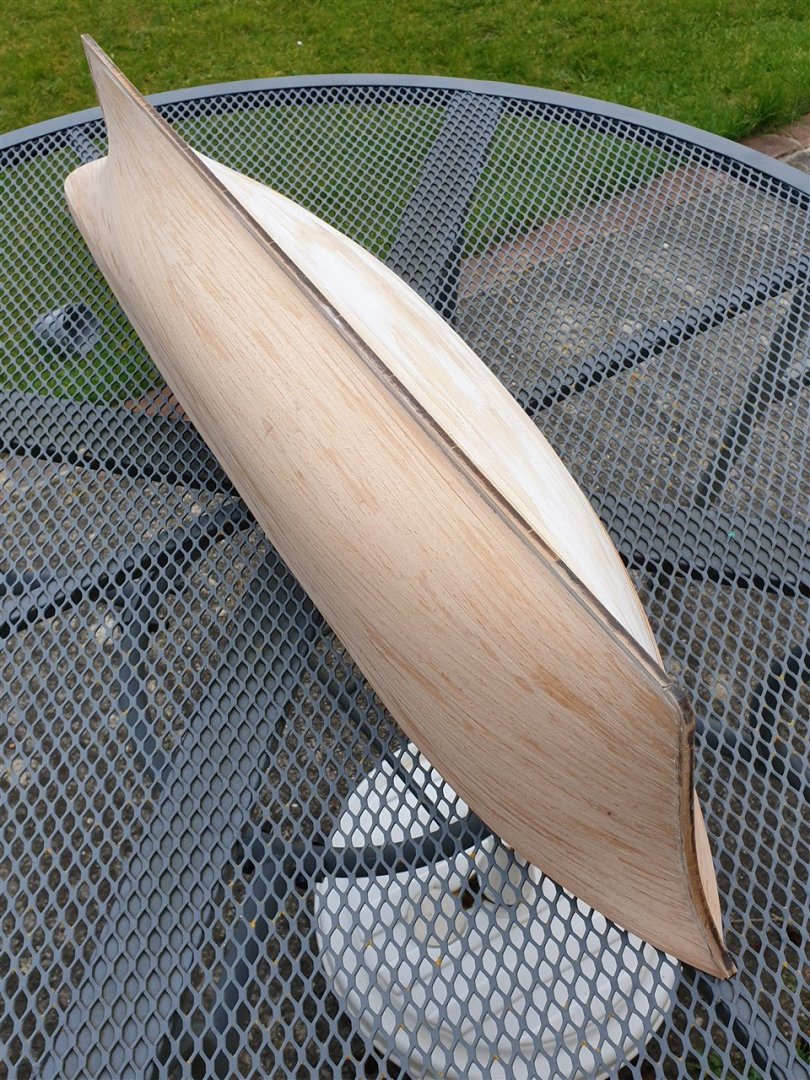
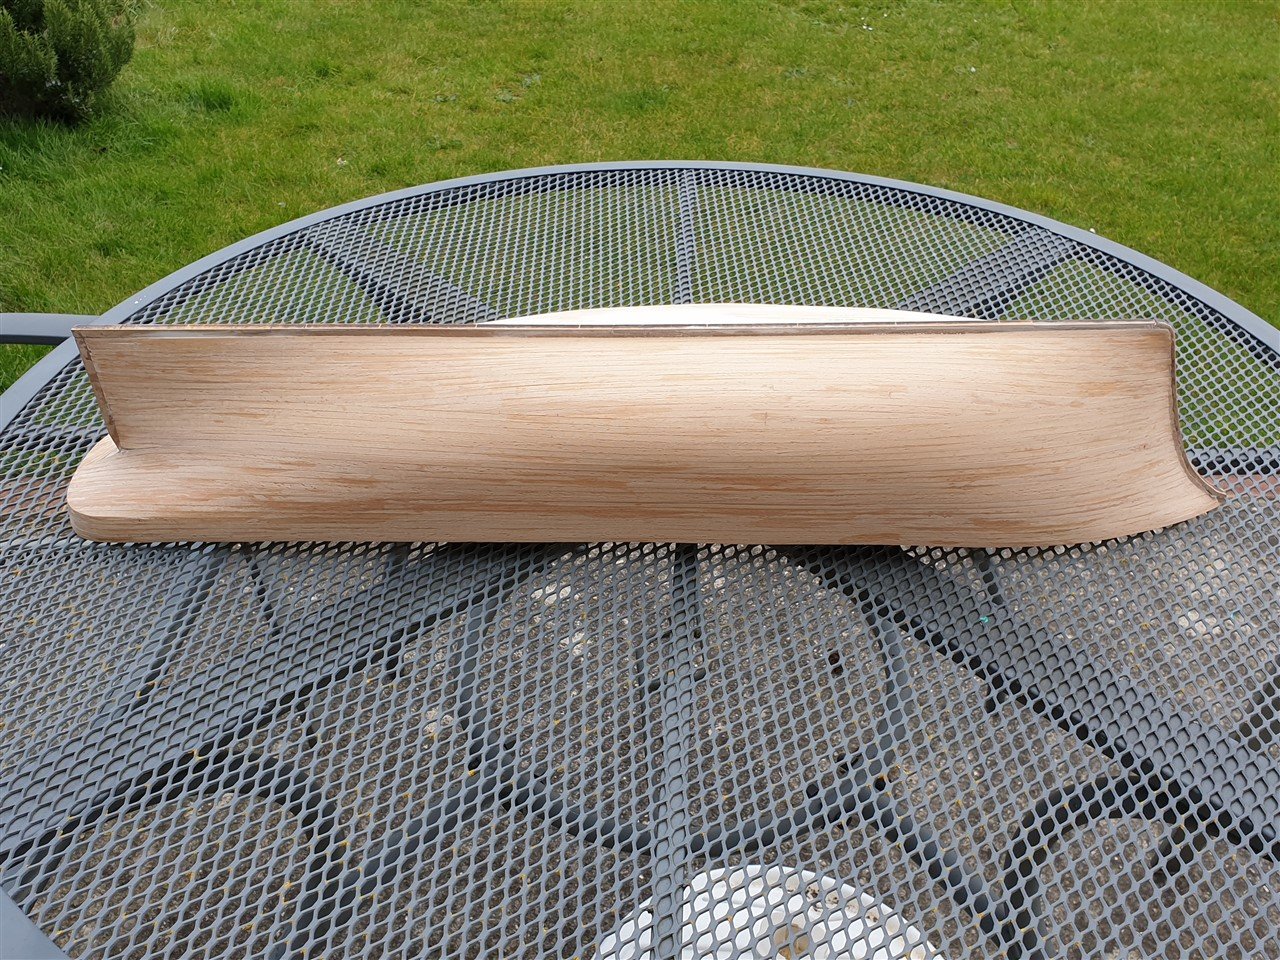
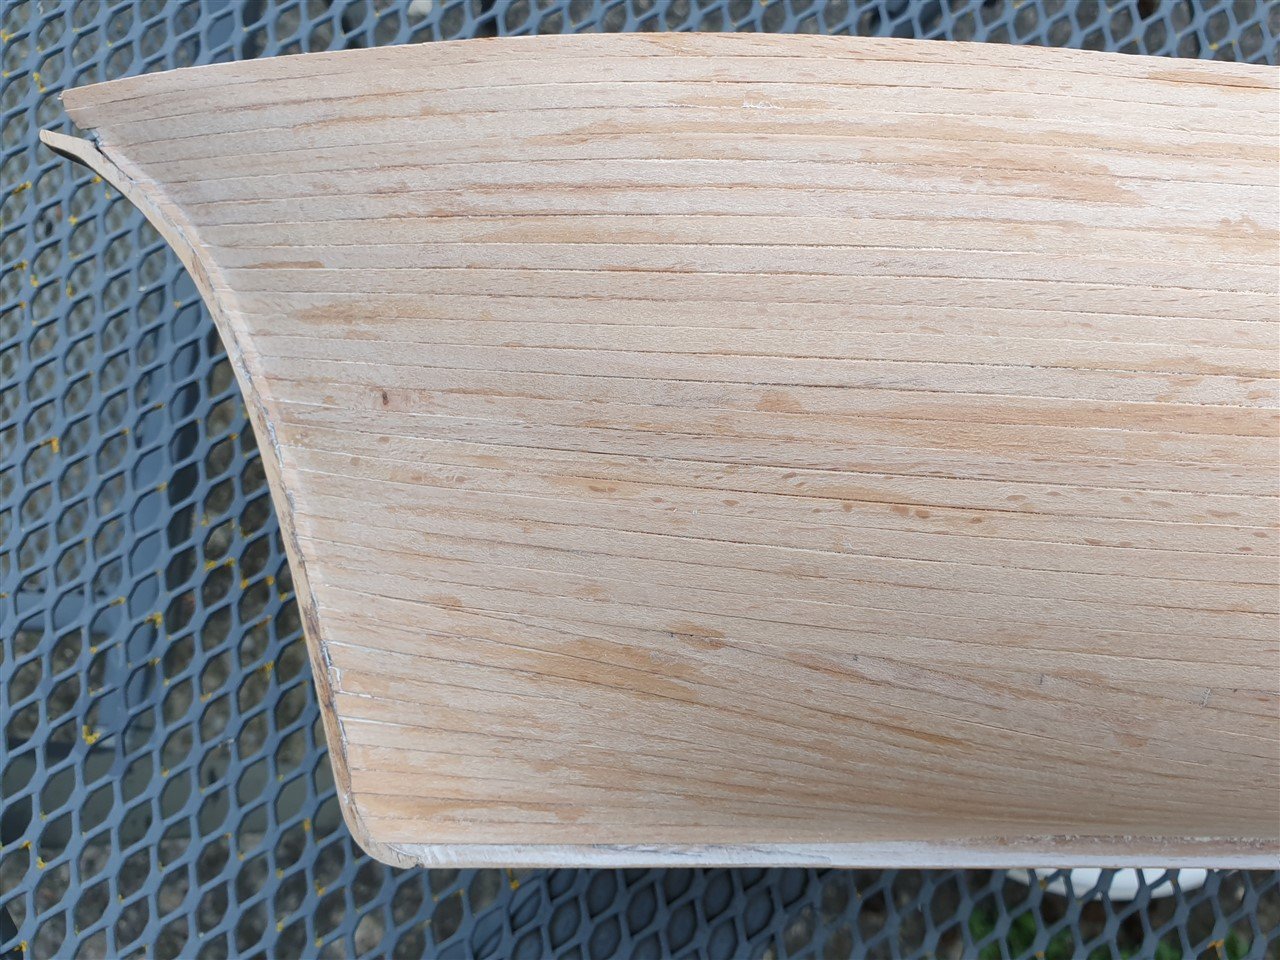
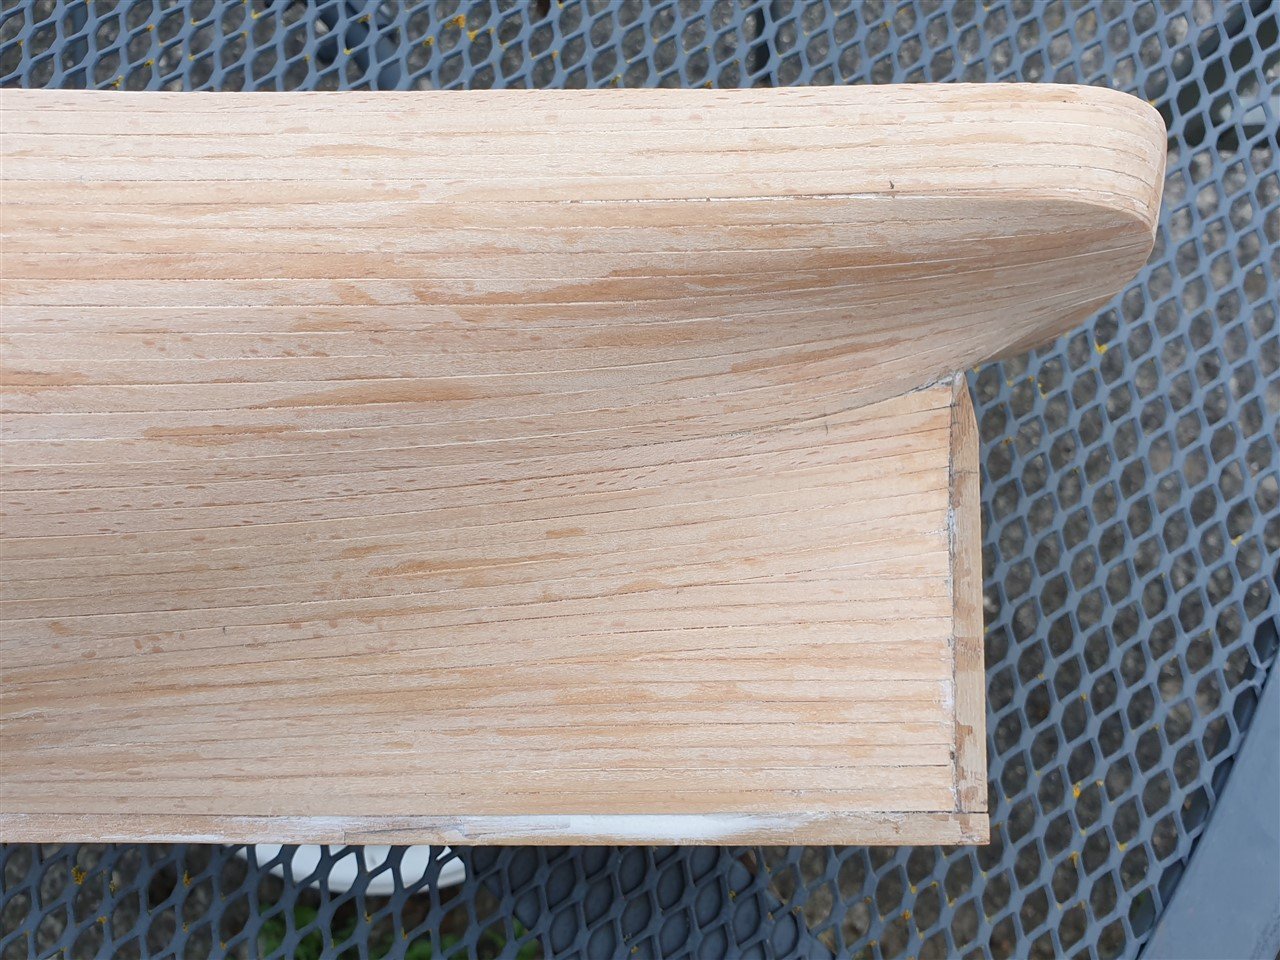
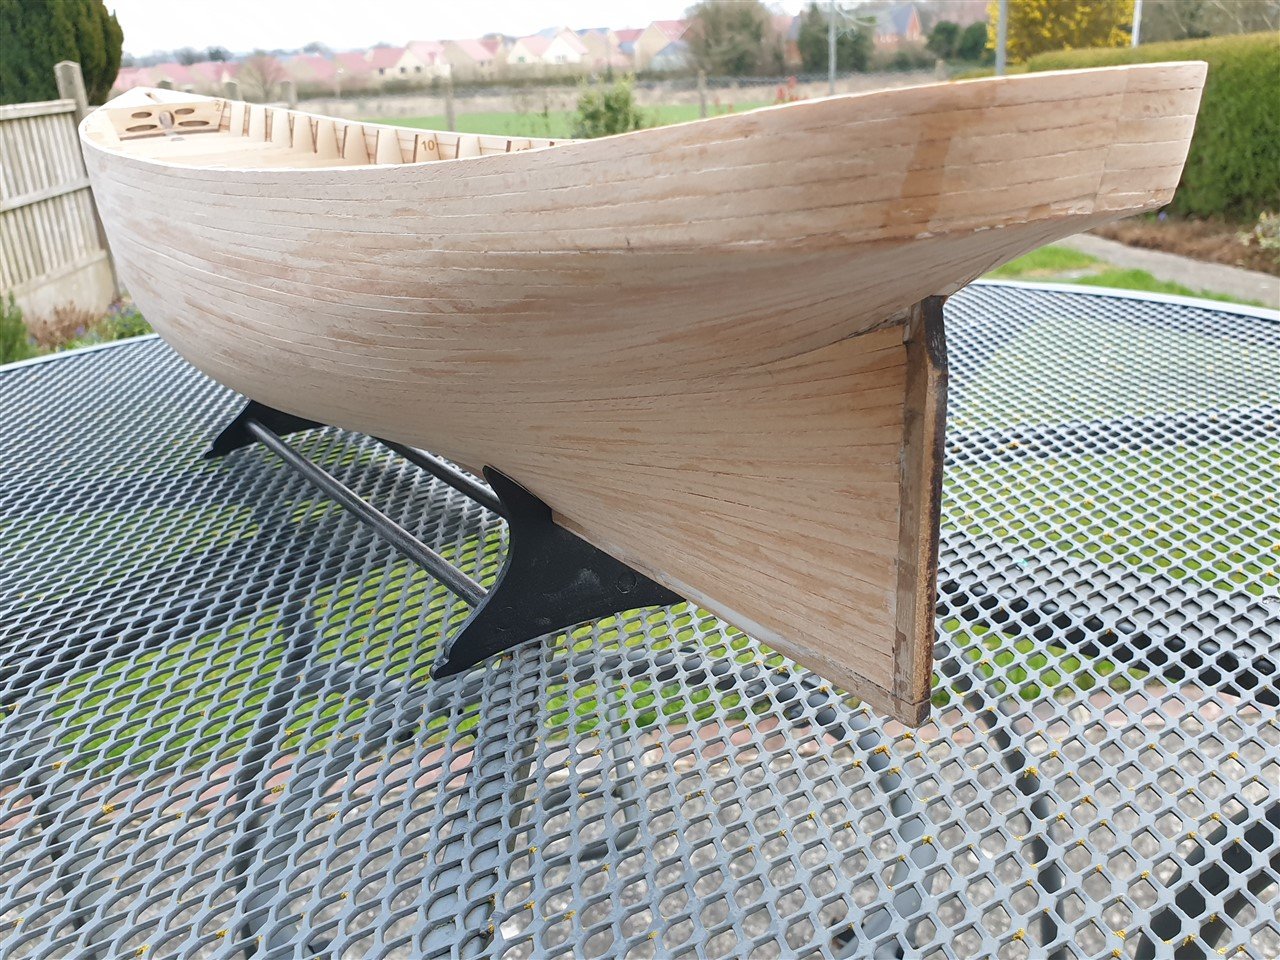
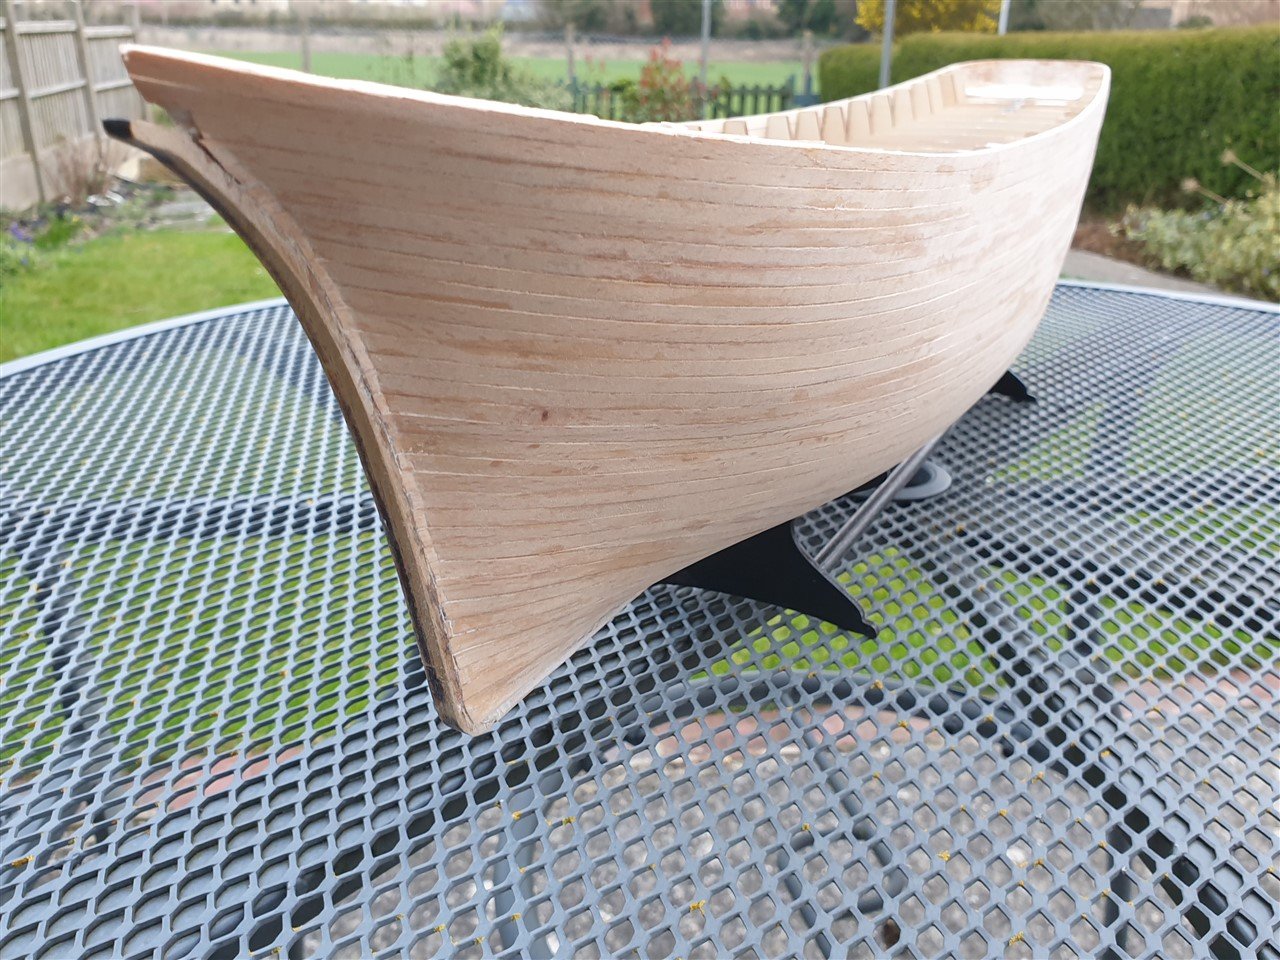
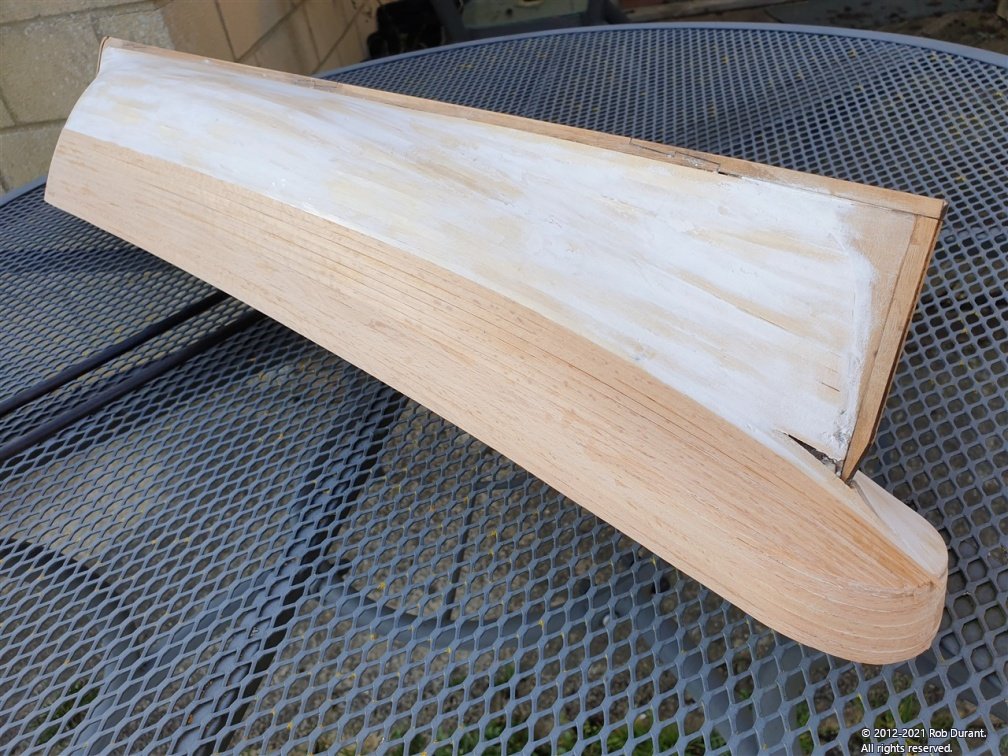
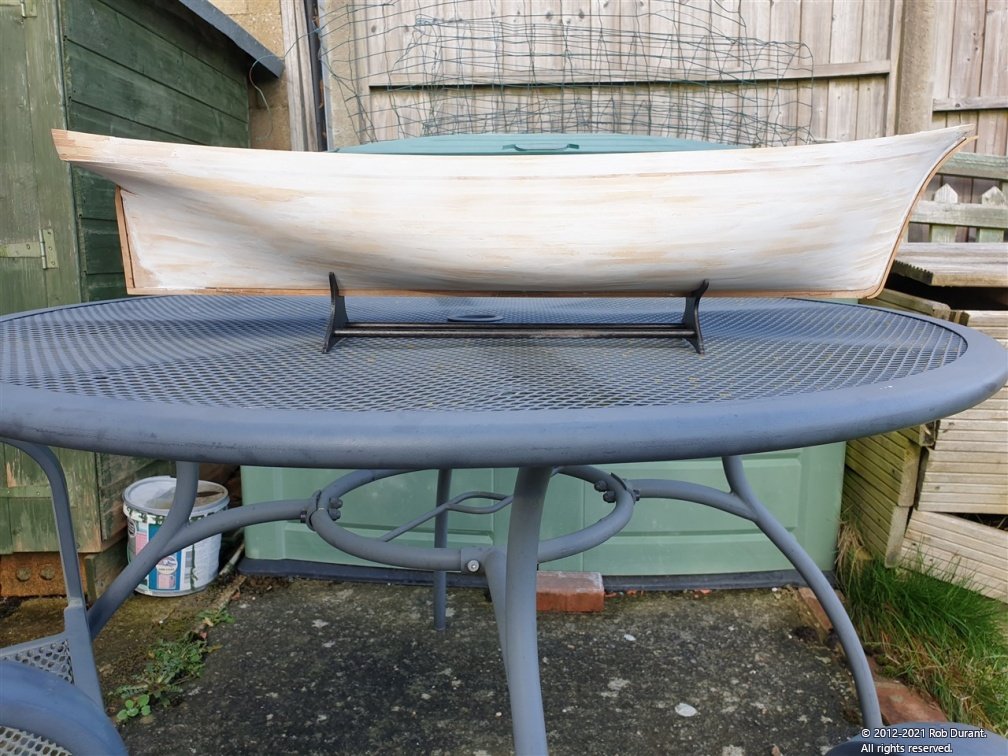
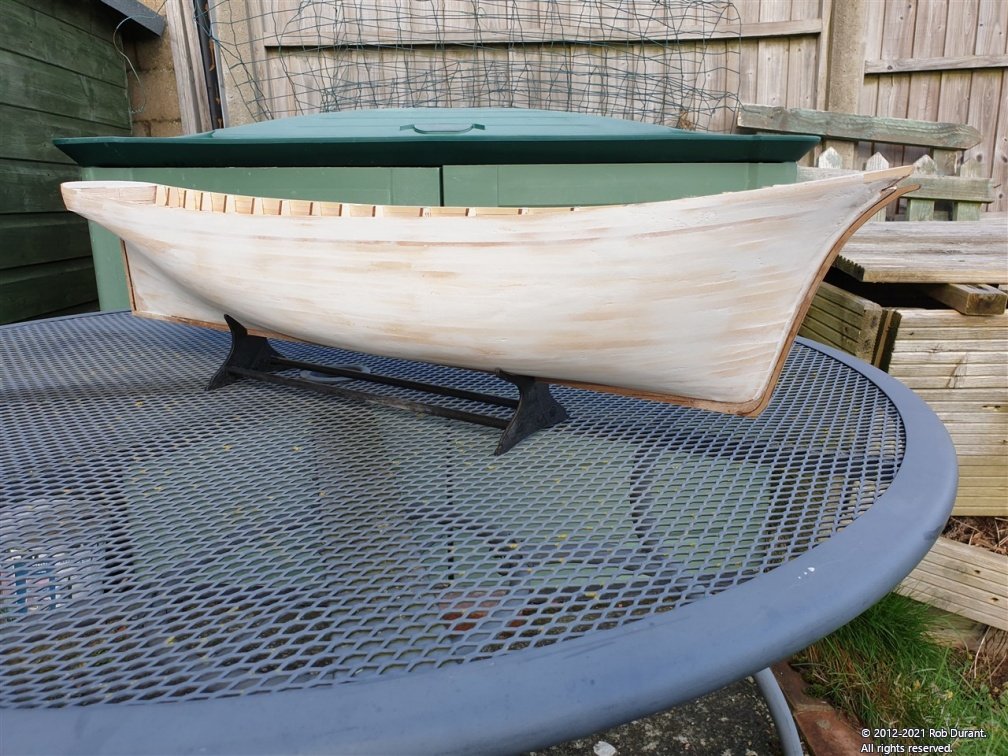
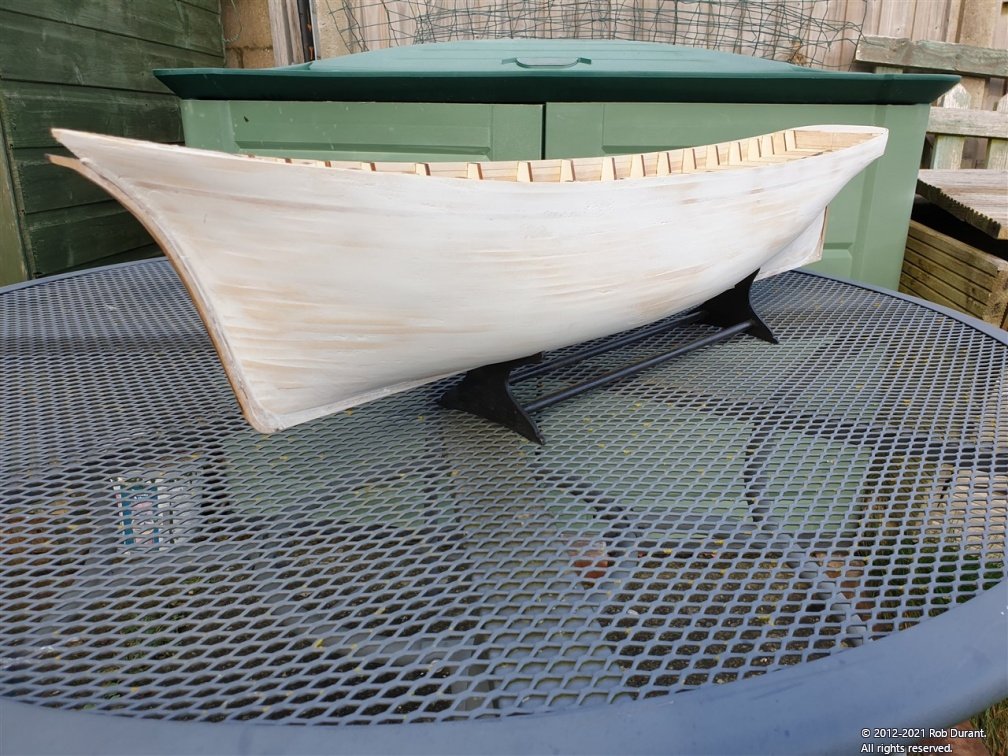
Thanks Eamonn I hope I don't rocket past you As a not inexpensive kit, I need to make this build last a while Quite happy to be the tortoise. I do look forward to seeing more of your work on Ballahoo... she's a very fine model, and she demonstrates the benefits of taking your time. It looks like you're well onto the home straight with her. I particularly like the building slip stand you've made. Did you design it yourself? It certainly looks the part. I've finished the second planking, and I'm really pleased with how it turned out. Minimal sanding was required to get a nice finish. I won't bother putting any photos of that up, as they're pretty much identical to the ones above. The next step is removing the bulkhead tabs and I wish I'd had a flush-cut saw to do this, but an x-acto saw did the job okay. Once removed, the balsa in the stern can be carved out using an x-acto knife down between the transom and the balsa, and then a mix of the x-acto saw, a chisel and some light sanding to get the balsa block down to the level that will support the deck. I was a bit nervous about this, but actually it wasn't too bad. Now it was time for the first layer of deck. I was concerned that I'd end up with an uneven deck if I tried to plank it for the first covering, so I decided to break from the instructions and use some 1.5mm ply I had left over from another project. Digital calipers were used to measure off the width at the front of each bulkhead and this was then marked out onto the ply, checking back and forth. Once the marks were made, I used a plan bent along the marks and had my son draw along the plank. This resulted in a nice smooth curve. Sadly the ply wasn't long enough to go along the whole length of the hull, so the false deck ended up in three pieces, but it ended up a pretty near fit. A stanley knife worked well for cutting out the shape, and then a light sand along the edges to make sure it was a nice fit. I was concerned that the curve of the deck would not be maintained where the deck parts joined, so I added some balsa supports between these bulkheads and sanded them down flush to the tops of the bulkheads. Once it was done I took the opportunity to mark the following items onto the false deck. 1. Mast positions 2. Deck furniture positions (cabins, hatches, companionway, etc...) 3. Mark the plank termination positions for the shift pattern ready for planking the deck. I was pleased with how this went, but before I glued it in place, I wanted to make one more check (and I'm SO glad I did!). I drilled out the mast holes, to check the angles of the masts when stepped, and with the intention of using stub masts to help with locating the deck when I glued it in. This test showed that the main mast hole was marked almost 10mm too far aft resulting in a crazy rake... far greater than on the plans. I'm not quite sure how this happened, but it did... (I made the false deck so it's definitely my bad and not the kit!) Anyway, I filed the hole forward until the mast was at the correct rake, then fitted a reinforcement piece underneath the false deck to complete a mast cutout in the correct position, filled the missing bit of wood in with wood filler (it's going to get covered up anyway, and the strength will eventually come from the reinforcement, planking, and mast collar), and tried it all in place again. This time, the rake is correct. So, the deck has been glued in place with Aliphatic resin (carpenter's wood glue) and clips all round the bulkheads to maintain the curve of the deck both front to back and side to side... It's rock solid now, and will make a good solid base for the planking, with no chance of my stuffing it up I've sanded the freeboard (bulwarks) to remove the superglue marks from the first planking, and filled them with wood filler ready to sand them really smooth. I didn't get the bulwarks as smooth as I ought to have in Ethalion and it came back to bite me, so I'm going to spend a bit more time on it this time. And as I type this the wood filler will hopefully be going nice and hard ready to be sanded back tomorrow. So that's me up to date. Happy building, all Rob


-
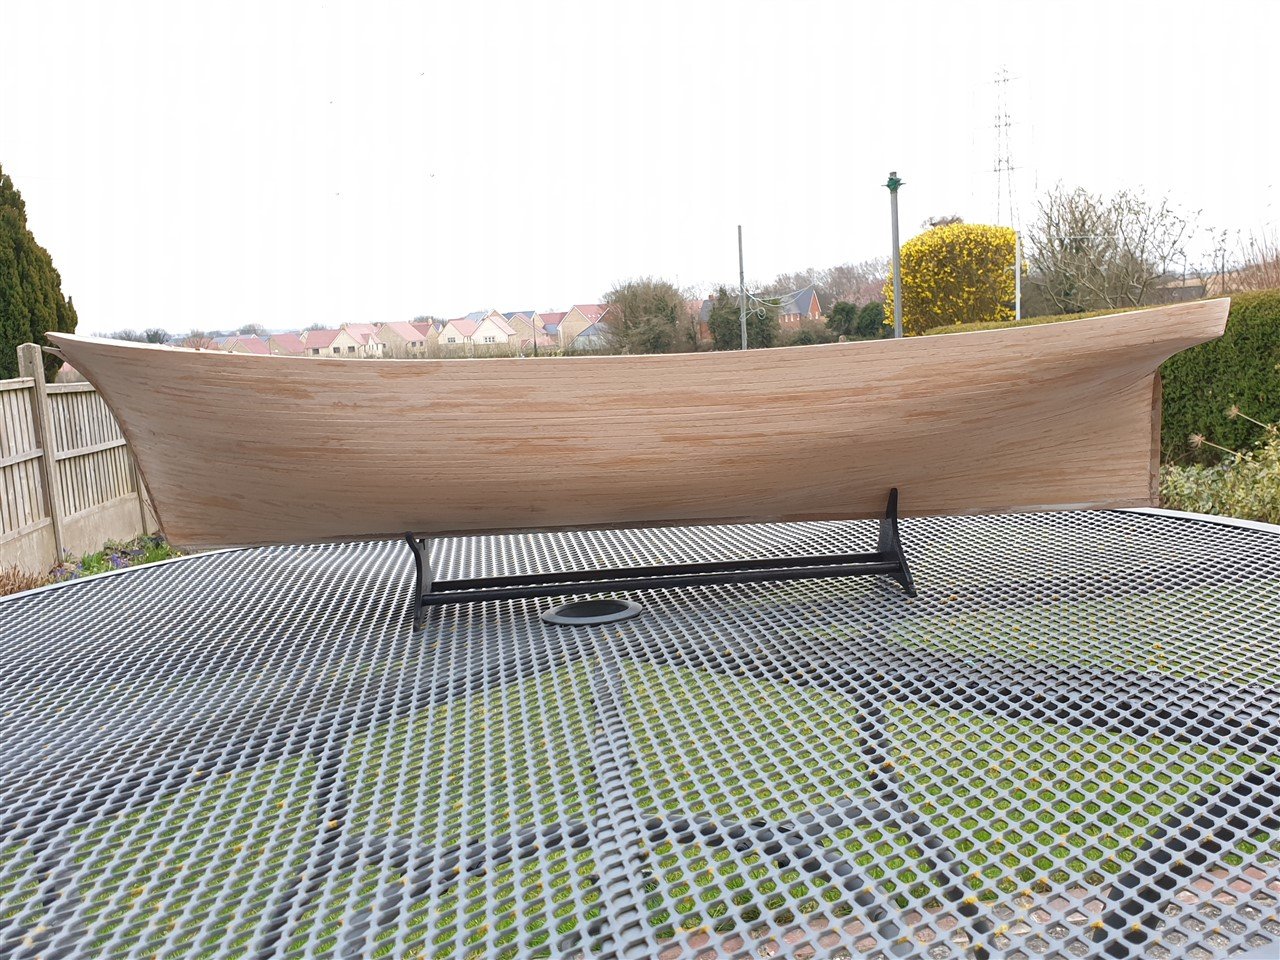
Hi all, A little update to show progress. I've finished second-planking the port side, (and I'm a good way down the starboard side, too). There were a few moments of doubt along the way, but I'm really pleased with how it turned out. Here are a few pictures showing the really lovely lines that these working vessels had... I'm not bothered about the marking from the superglue, because it's all going to be covered up. But the superglue did make the whole job MUCH quicker. I went from 4 1/2 months on Ethalion, to under a month on Stefano from first plank, to this point. Looking back I notice now that I hadn't sat the model on the stand properly, but thankfully nothing amiss happened. The stand is surprisingly sturdy, and a very useful part of the kit. Now... back to planking! I'm hoping to have the port side complete in the next couple of days. Happy building Rob

-
That's really helpful. Thank you. And I agree about the tedium... a good audio book goes a long way for me
- 79 replies
-
- 1
-

-
- marisstella
- barque
- (and 1 more)
-
Hi Doug, I've just been re-reading your log picking up on ideas and tips for the next few stages once I finish second planking of Stefano... Just one question, hope you don't mind... how did you go about cutting all the copper plates out? Did you use side-cutters? And did you have any troubles with the plates bending as you removed them from the sheet? I've coppered a hull before, but the plates were already separated, so this will be a new thing for me. It's lovely to be reminded that the messy, dusty, time-consuming steps lead to such a beautiful looking vessel... I was getting slightly stuck in the doldrums trying to get the second planks to go round the stern transom... a tricky step for sure. Hope you'll have a chance to get back to Stefano soon Rob
-
Looking great. I missed the sweep ports on my build and wished I'd added them at the stage you had. I didn't think they'd look right stuck on so I just left them off but yours look great. As far as lining the ports goes I lined them all at this stage. You just have to be more careful getting the edges lined up on the second planking so you get the recessed edge. But it's definitely doable with a little care.
- 310 replies
-
- 1
-
-
- Diana
- Caldercraft
- (and 1 more)
-
Welcome Looks like a solid start. Welcome to the forum. Do start a build log and check out the other bounty logs on this site, and you'll be sure of some help along the way. It's a friendly site to be a part of. For example... Rob
-
Hi Eamonn, Overall it's a very simply hull to plank, but the counter is a bit of a pest. Mainly because the plank needs to be shorter on its lower edge than on the upper edge, so it naturally wants to clinker at the lower edge. I resorted to water, steamed on the plank-bender, bending it between my fingers, and then when I thought it was pliable enough (i.e. just about to break if I bend it any further!), getting it in place on the model using superglue, and often clamps a centimetre or two at a time... It still wasn't perfect by any stretch, but I managed to get it close enough that sanding brought it level without it breaking through the depth of planking in any places. It's solid enough now, so no harm no foul I finished planking the counter yesterday on the port side, so I'm probably feeling a bit more positive about it than I was early on yesterday. I'm please with the lines over all, although I do wonder whether the line that leads into the counter should dip less... I guess the lines on the wale should hopefully hide this, as long as they take the correct line, once the hull is painted. And I can always sand it back a bit further if necessary. I'll double-check against the plans later. I carved out the balsa in the stern to just above deck level and was pleasantly surprised by how solid it all seems. Thanks for looking in. Rob
-
Hi all, Just to say I've updated the pdf documentation for Picture Resizer to include the latest functionality, and I've also finally got round to writing a proper website for the application. As always, you can find it here: https://durant.biz/pictureresizer/ Thanks Rob
-
Thanks Bob Not much progress to show but I have been working little by little on the second planking. None of these planks are tapered but a single stealer was put in at the stern to help the run under the transom. I'm not a great fan of the beech(?) veneer. It's pretty splintery and not very forgiving but this hull will be painted so it's not really a big deal. Careful application with superglue seems to be working out okay. I'm about half way down on the starboard side so far.

-
That's looking great 😀
-
Thank you all for your kind words. I have begun Stefano and have made some progress finishing the first planking and beginning the second. You can find the build log here:
-
Hi! Looks like you're doing a great job of this iconic vessel. Hope you don't mind if I follow along.
- 70 replies
-
- 2
-
-
- calypso
- billing boats
- (and 1 more)
-
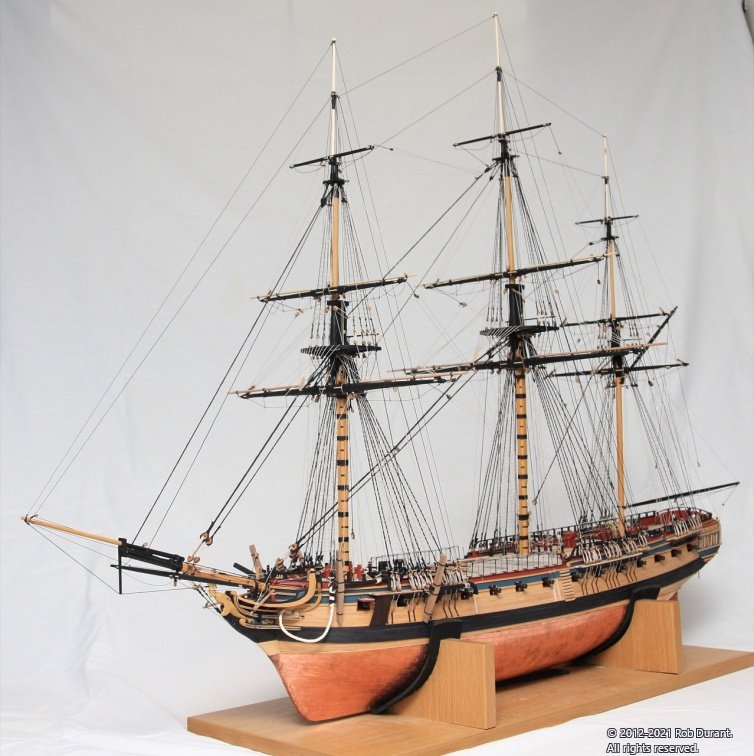
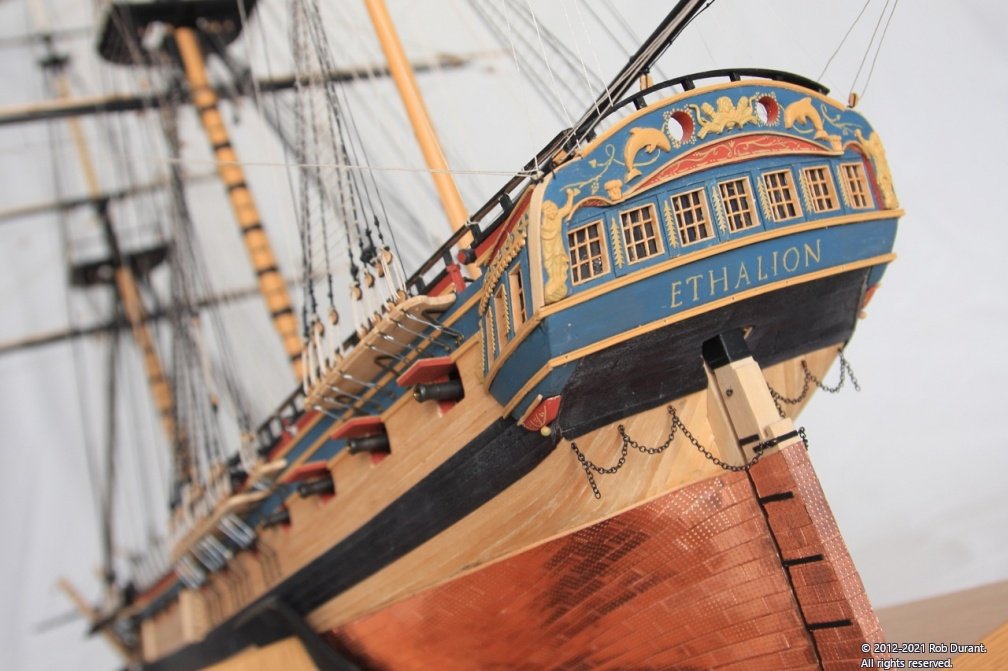
Okay- the rigging is complete. I'm waiting for a case to be made, so Ethalion's under a cardboard frame with a plastic dust cover over her at the moment - not her best look. I shall take some better photos and post them when she re-emerges. I shall add (at least some of) the ship's boats around the model rather than on the skids as they hide so much of the deck beneath. But for now I'm going to call this one finished . Thanks so much to everyone for your encouragement, interest, wisdom, likes, ideas, etc... Especially Barbossa, Ray, Beef Wellington... I've taken so much inspiration from your builds! Here's just a few photos... She's in much need of a nicer stand, but that will happen when the case arrives Thanks again. Rob
- 275 replies
-
- 20
-
-
I neglected to do this properly, and it shows on my final model, so I think you've done a great job there. The more work you do to really get it sanded down neatly and ready for the second planking, the easier that will prove. It's a great start well made If you work it out again as you go every few planks, you can accommodate for the inaccuracies and push things back into line... it's the only way I find will work for me, as my planking is never accurate enough to get it right first time. The mix of planks that are never perfectly the dimensions I think they are, and slightly off marking, and slightly off cutting mean I'm never quite where I expected to be.
- 310 replies
-
- 3
-
-
- Diana
- Caldercraft
- (and 1 more)
-
Thanks Bob. I'm gradually learning. I think I probably over-engineer a lot of my solutions, but I have fun doing it, and it's a hobby, so what's not to like
-
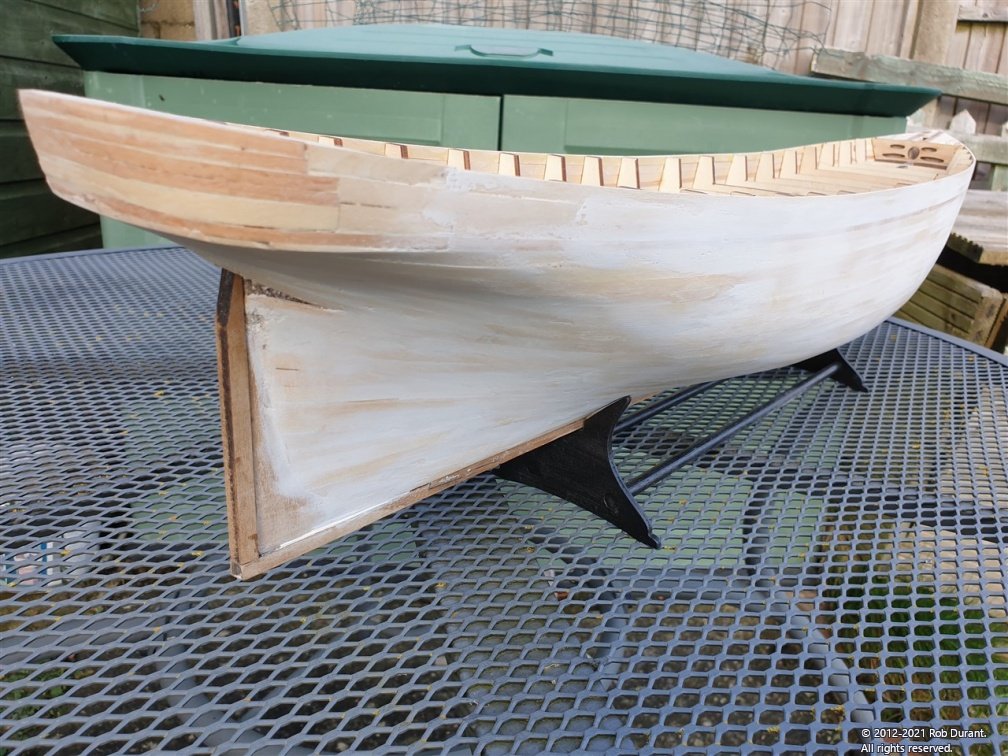
First planking First I should probably say that I went back and added a rabbet at the bearding line, as on Ethalion, as I figured that would give the best chance of a neat termination for the planks at the stern post, once the second planking was in place. The lime wood planks provided with this kit are lovely - really well cut and nice and easy to shape... even so, the stern transom of this ship is a challenge... Using an app called conecalc, I worked out the radius the plank would need to be bent to laterally to sit flat round the stern... it's pretty severe, and my first few efforts at bending the plank like that were dismal. I ended up using 3x1.5mm beech I already had in the end so that I could get the bend. And even with soaking, and using a rib-bending iron, it was still quite the task. The planks were added with superglue, and once the whole hull was first-planked, I painted watered down carpenter's glue (Aliphatic resin) over the hull to stick the planks together. This seemed to give a really nice solid base. The rib-bending iron is great... in a matter of seconds, you can get something like the the result below (and the wood is dry from the heat before it goes onto the hull, so it isn't going to shrink, either...) With carefully edge bending using the rib iron, and gently teasing the planks, I managed to plank half way down the hull, and also the garboard strake and the two planks above without tapering any of them... The rest was then filled by letting the planks lie as they wanted to. Once the hull was closed up on both sides, a liberal coat of wood filler was added, and the hull sanded back to get a really smooth finish, ready for the second planking. The sternpost, and the strip that adds onto the bow? were also added now that the sanding was mainly done and they wouldn't get damaged. After taking these photos, I went over the whole hull and sanded it down further, as I realised there was more filler left than I wanted, but it gives an idea of the result. It'll do for a first planking. I've begun the second planking, but no photos to show yet. So that's me up to date. Thanks for all the likes and for looking in. Rob

.jpg.78f43bf2b4c2161594dab1acd9fb0eb5.jpg)
- 286 replies
-
- 10
-