robdurant
-
Posts
843 -
Joined
-
Last visited
Content Type
Profiles
Forums
Gallery
Events
Everything posted by robdurant
-
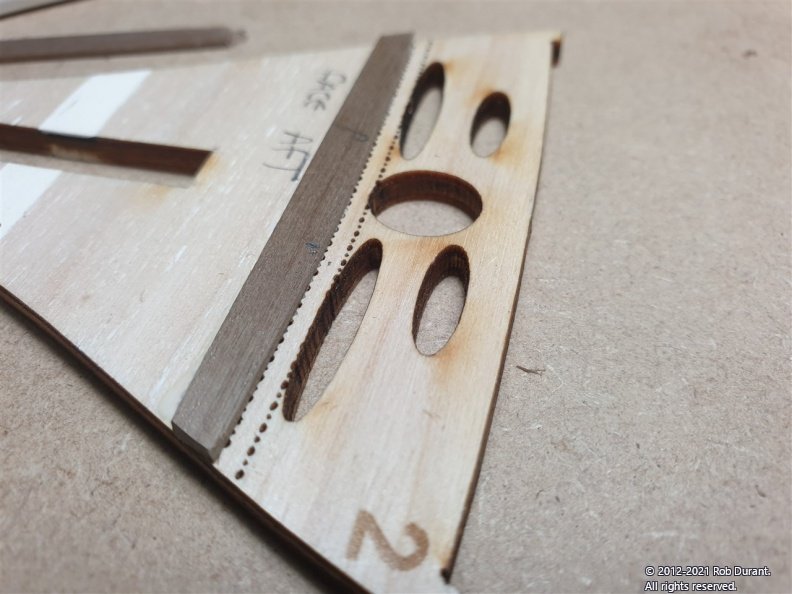
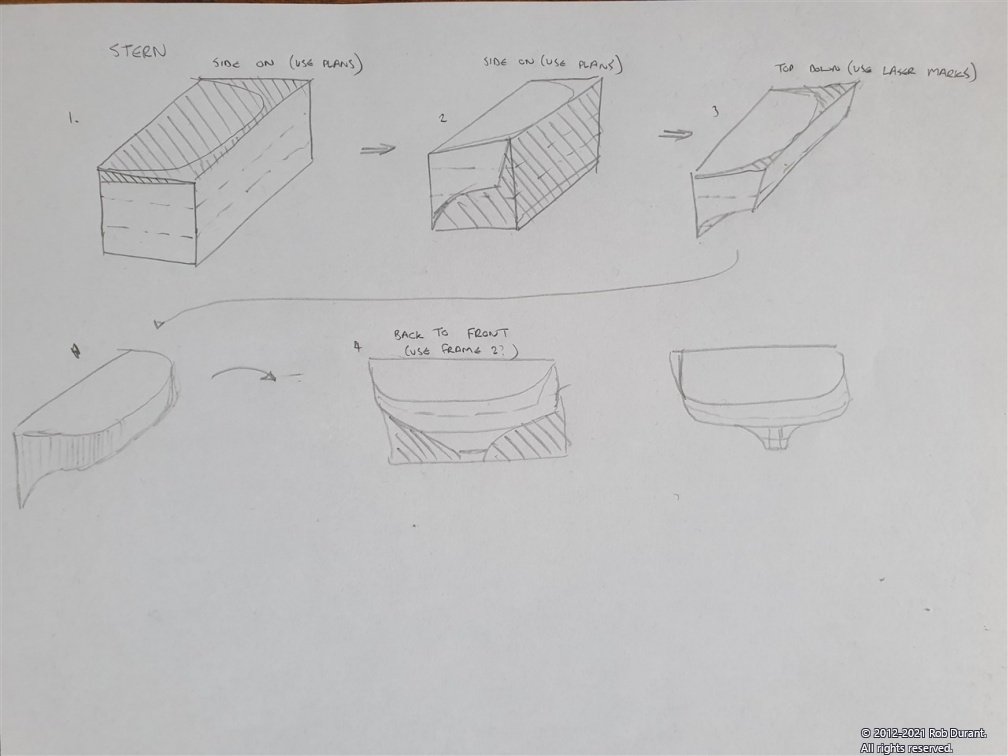
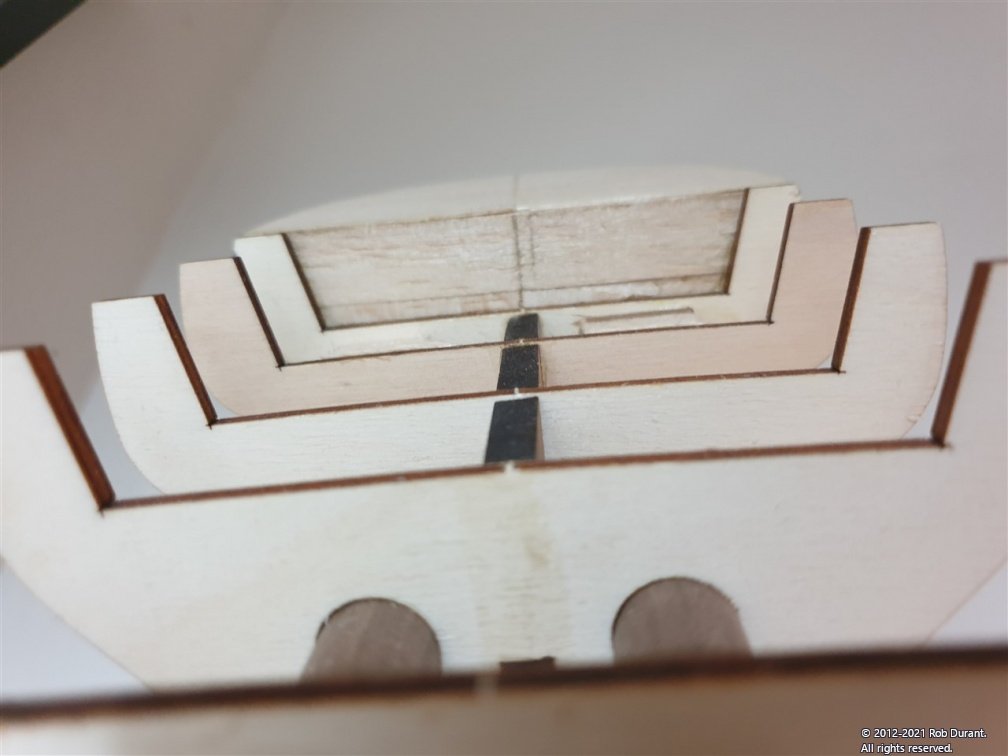
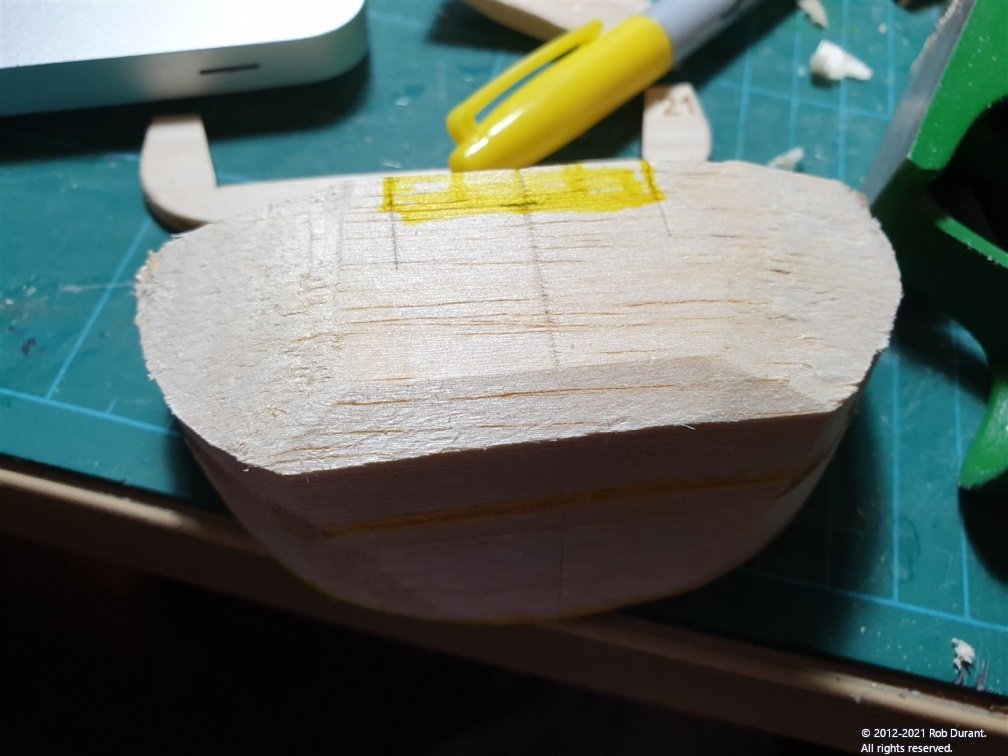
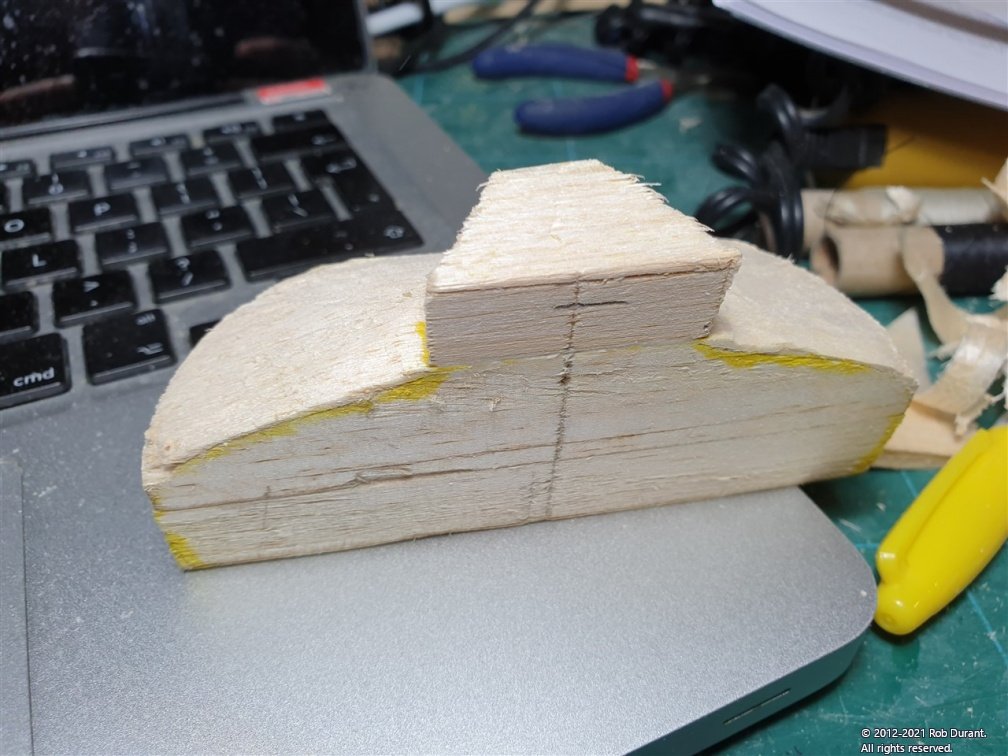
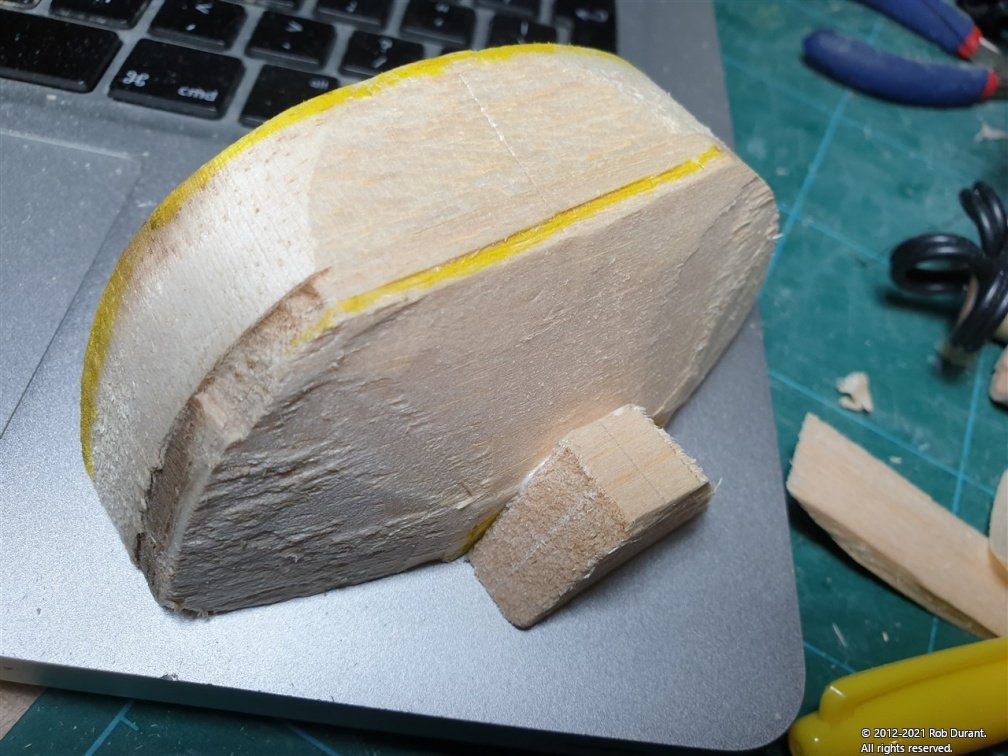
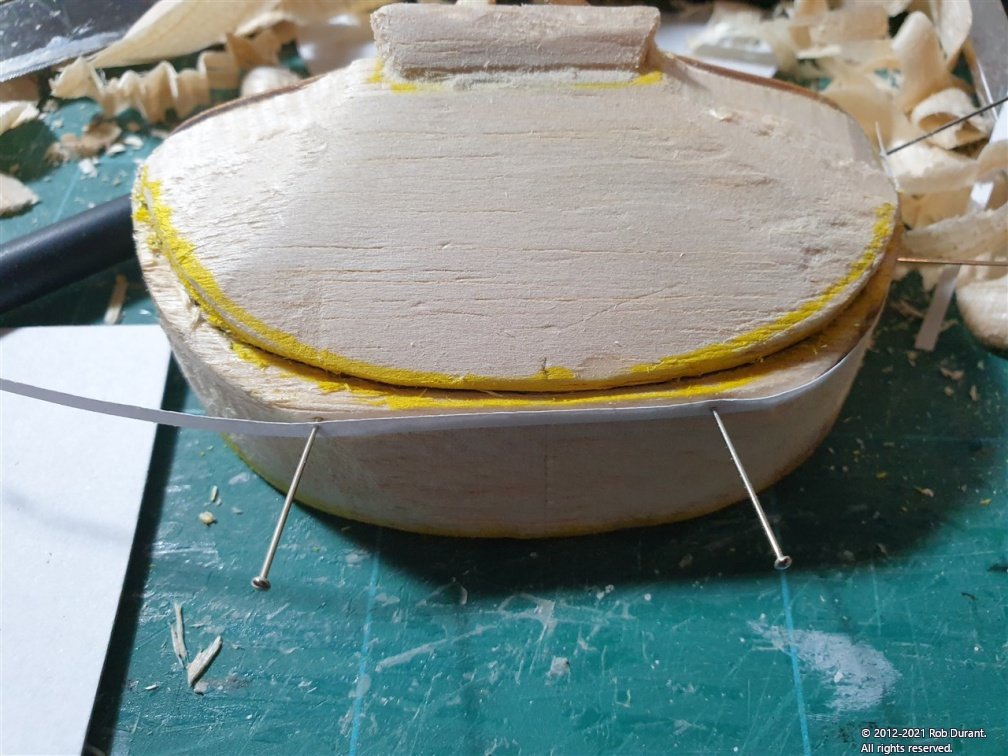
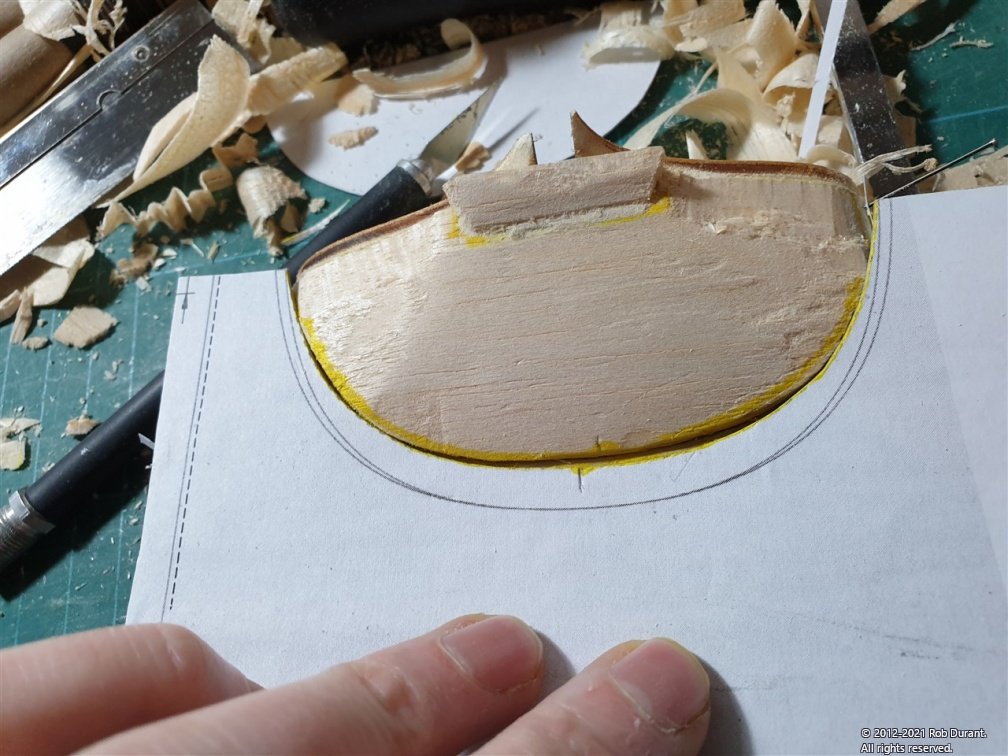
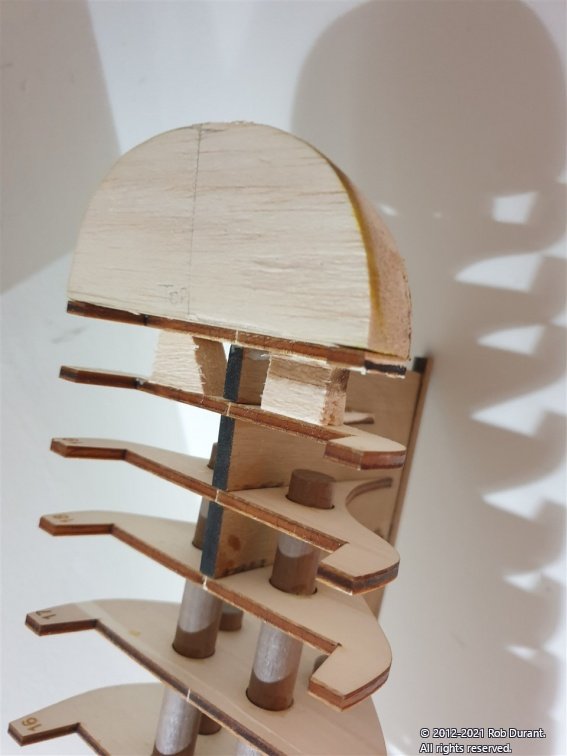
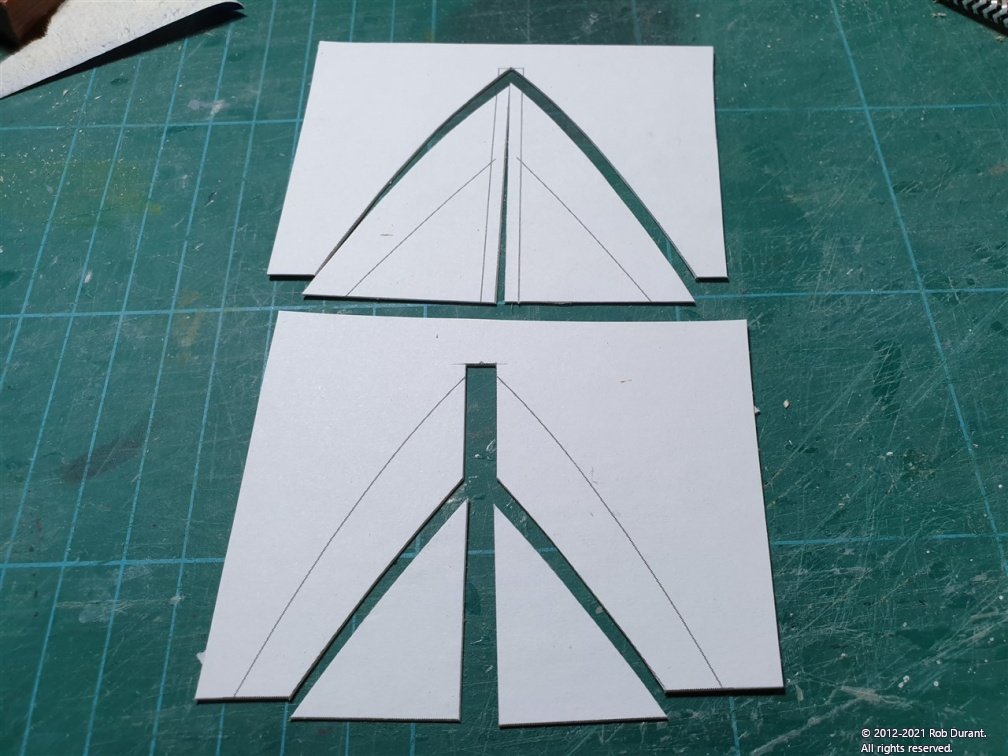
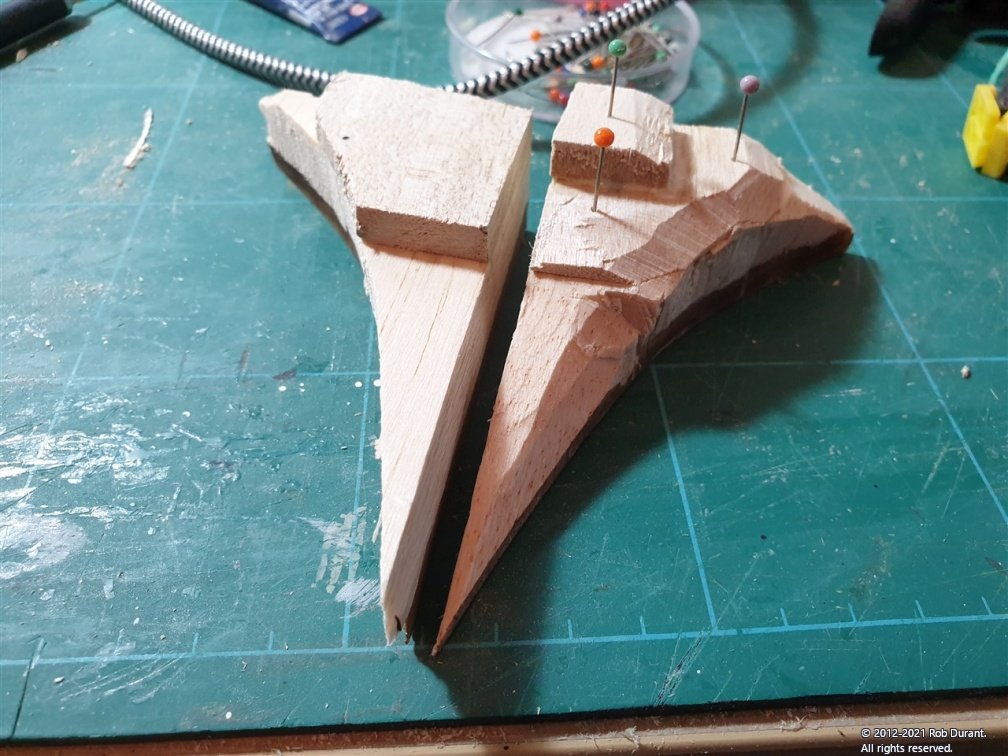
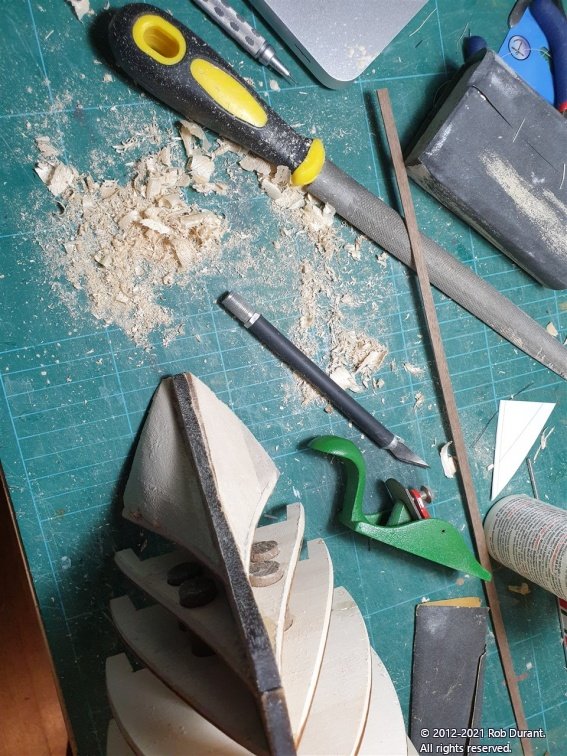
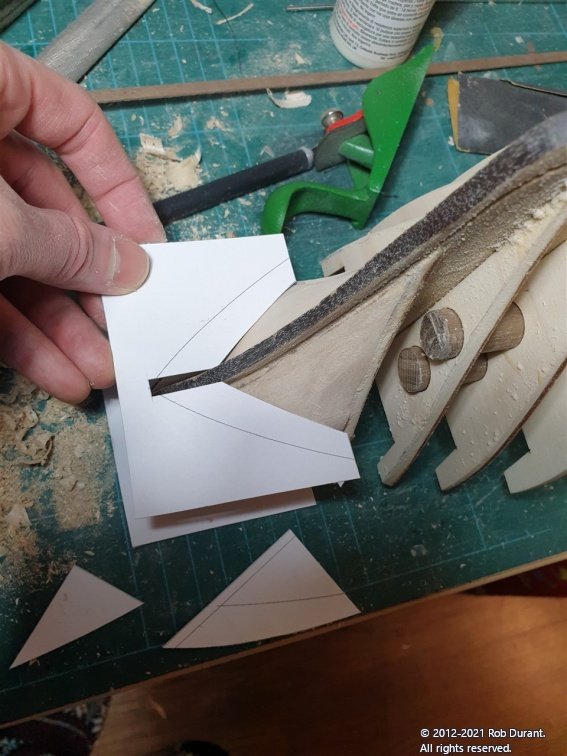
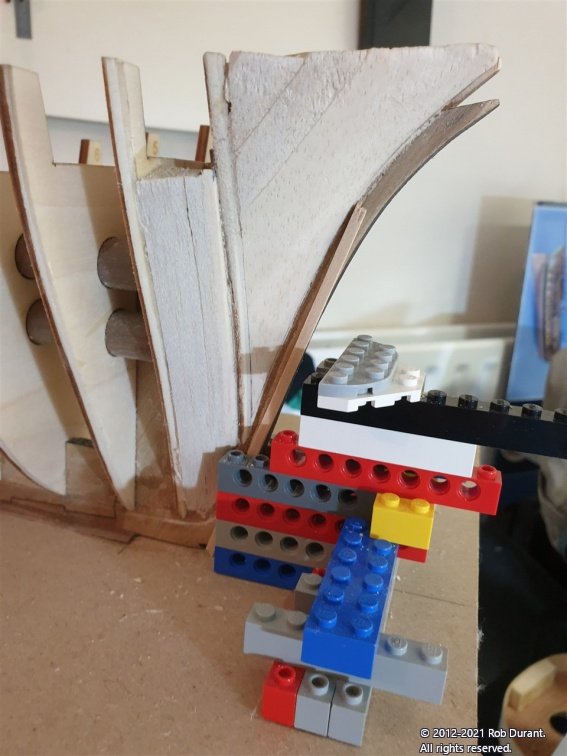
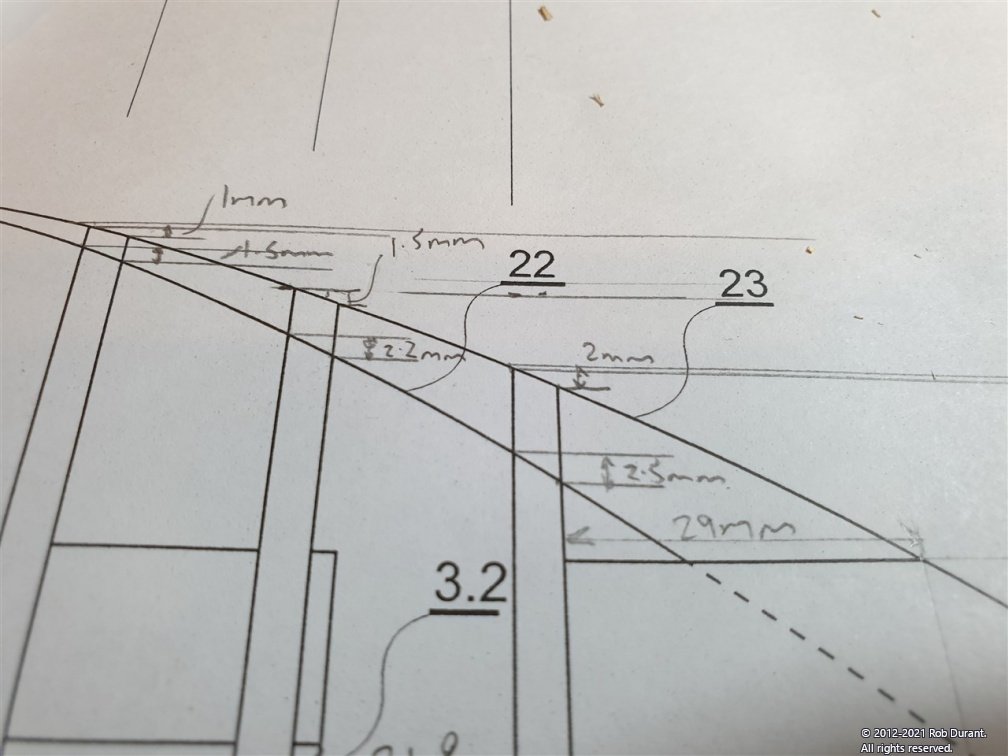
 The stern former As with the bow, the stern is shaped using balsa formers. These are a little more tricky than at the bow, as it's one single piece that is entirely responsible for the eventual shape of the stern in all three dimensions. It all begins with three identical balsa blocks of equal shape. Again, I made a cad drawing of the plans given by MarisStella so I could take some measurements off it and put extra lines onto it. The extra lines showed where the balsa blocks should start and finish on the x, y and z axes. This enabled me to cut them down to rough shape in the vertical and horizontal planes before sticking them together. I've tried to draw a picture of how I went about this... hopefully it gives some idea... basically the idea is to take away what you know WON'T be in the final shape one axis at a time, and then see what you're left with... when you've done that, you can start to take off the edges back to the curves you will eventually want. As they say, the way to eat an elephant is slice by slice! When done this way the whole thing feels much more achievable. The first wood I removed was the angle at the top - This forms the continuation of the line that runs along the tops of the bulkheads, and is not horizontal... it is higher at the stern than at the final bulkhead. (see 1 on the diagram.) This was achieved by marking the difference in height from the plans, and then sawing off the majority and sanding flat with sandpaper laid on a flat surface. The slope can kind of be seen below: Here are some more photos of progress... I marked the outline of the third balsa block - this is more than all that will be left of it once shaped, so why stick on the rest? It'll only need to be sanded or cut away... And here it is cut down and attached... Then I marked the angle of the backside of the stern (the transom) - again, this is not vertical... the curve of the stern at the top of the block sticks out more than the curve at the bottom of the block... I started this shape by removing the excess straight across the stern. Then, using a template made from the plans, I shaped the lower curve so that it was the right shape... (slowly and carefully, checking progress lots...) As I got closer I used a strip of paper pinned into the balsa to mark the line of the wale... And in this way, the shape gradually took form... Once it was close, I stuck it on to the bulkhead (using gravity to keep it in place as it stuck - which was either brave or possibly stupid, but I seemed to get away with it... ), hence the angle of this photo... I noticed that the angle of the rear bulkhead could easily be wrong, so I used balsa blocks to wedge it up and make sure it stuck in at right angles to the false keel. (There are no dowels through this bulkhead to help you out! Final shaping was then done on the model. Next up is first planking. But again, that will need a separate post.
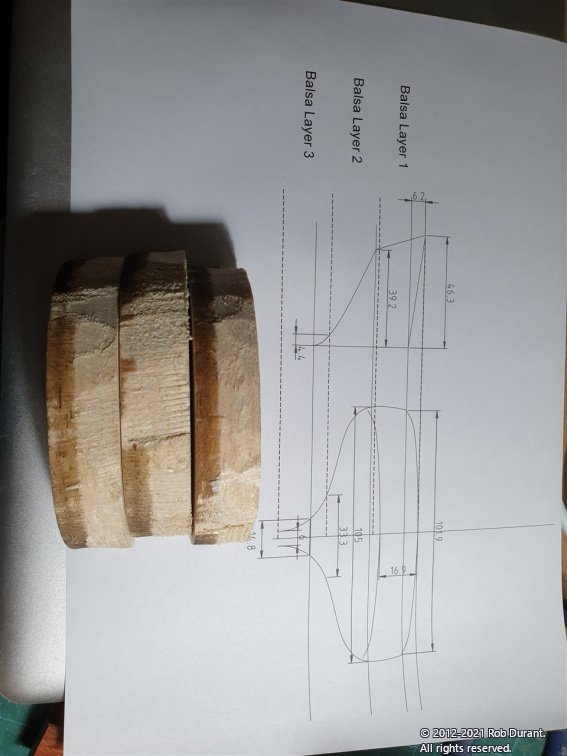
-
Okay - with the gradual wrapping up of Ethalion (the rigging is completed), it's time for an update on the Barque Stefano. With the bulkheads roughly faired, we finished last time with them glued into place, save the final bulkhead at the stern. The next task is to fair the balsa blocks that provide shape for the bow and stern. I scanned the plans, and created CAD copies of the pertinent outlines to help me shape the blocks, and once these were stuck onto cardboard and cut out, they made good templates... This was done before the balsa was stuck on, and then I rough shaped the balsa off the model using a coping saw to stop the room being consumed by a pile of shavings... The false keel and bulkheads gave the rough pattern for what shapes these parts should be. The block was built up so that the gap that would be left on the outside was filled at the bow so the whole area would be solid in front of the front two bulkheads. (Sorry - an ugly sentence, but hopefully the picture explains) (Remember these are handed - they have to fit either side of the bow!, I almost forgot.) It doesn't have to be pretty at this stage... it's all going to get sanded down and up soon enough. The blocks are then stuck into place. I quickly realised that sanding was going to take forever to remove this much material, and still created buckets of dust, so I switched to a small plane... Finishing off was then done by sandpaper folded to make it fairly firm, and in broad sweeps to get nice curves... And here are the profile templates... The gap between the first and second bulkheads was also filled at the outer edge... and then sanded back to make a smooth curve... Next up is the stern balsa former... But this post is long enough already.

-
Hi David, It was these guys. And it was really really lovely wood - just what you'd expect from a luthier's supplier. https://shop.exotichardwoods.co.uk/castello-boxwood-guitar-banding-800-x-6-x-2mm.html They do, however, have a minimum order, so I got some sheets of Castello Boxwood at the same time, which I used for the replacement stem and rudder post. In retrospect I wish I'd bought more of these banding strips. I ran out. Rob
-
It's a long slog to get that deck planked but it looks like you've done a great job. The bulwarks add lots of strength for planking which is a great help. Far less risk of snapping off the bulkhead tabs. Hope the 5mm planks turn out to be well milled.
- 310 replies
-
- 1
-

-
- Diana
- Caldercraft
- (and 1 more)
-
Seeing that angled break on the stempost, I was expecting to see it's matching break on the bow of the model... It looks like it could be pretty vulnerable if it were stuck on too early in the build. You've made a great start. Those gunport linings look really neat. Hope you won't mind if I follow along.
-
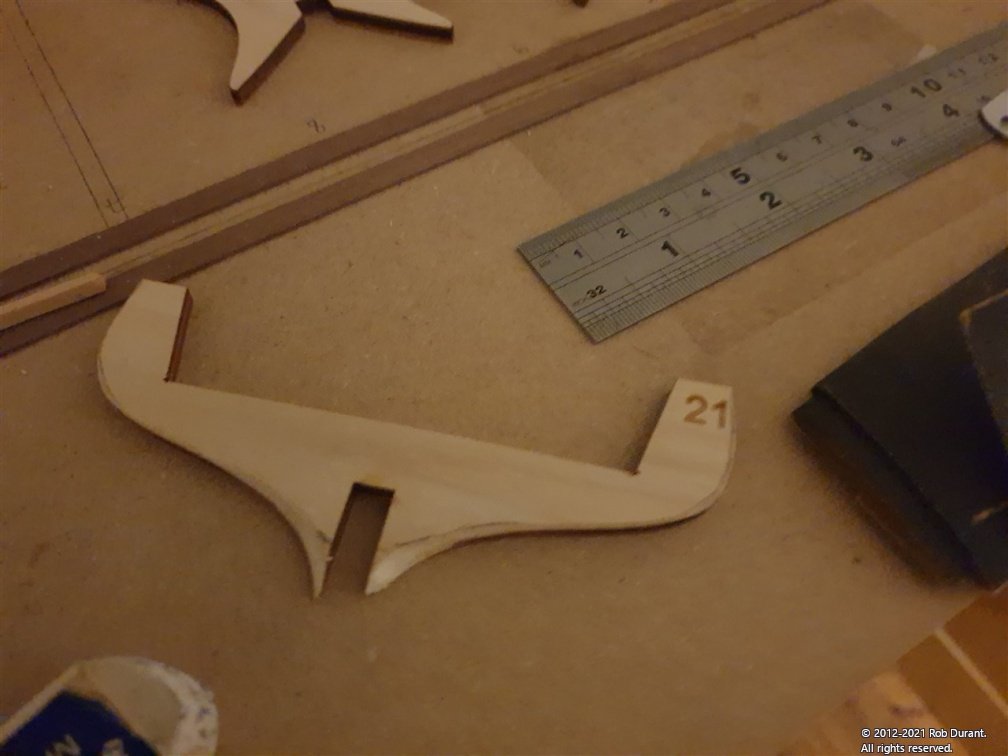
Yes, it's 21, compared to 17 in HMS Diana by Caldercraft (the only similar example I have personal experience of), which makes a hull almost identical length. This is particularly at the bow and stern, where the bulkheads are closer together, and this should make a big difference when fairing for the first planking, especially in avoiding the bumps and flats where the planks can get pulled too tight across the bulkheads.
-
Welcome to the build
-
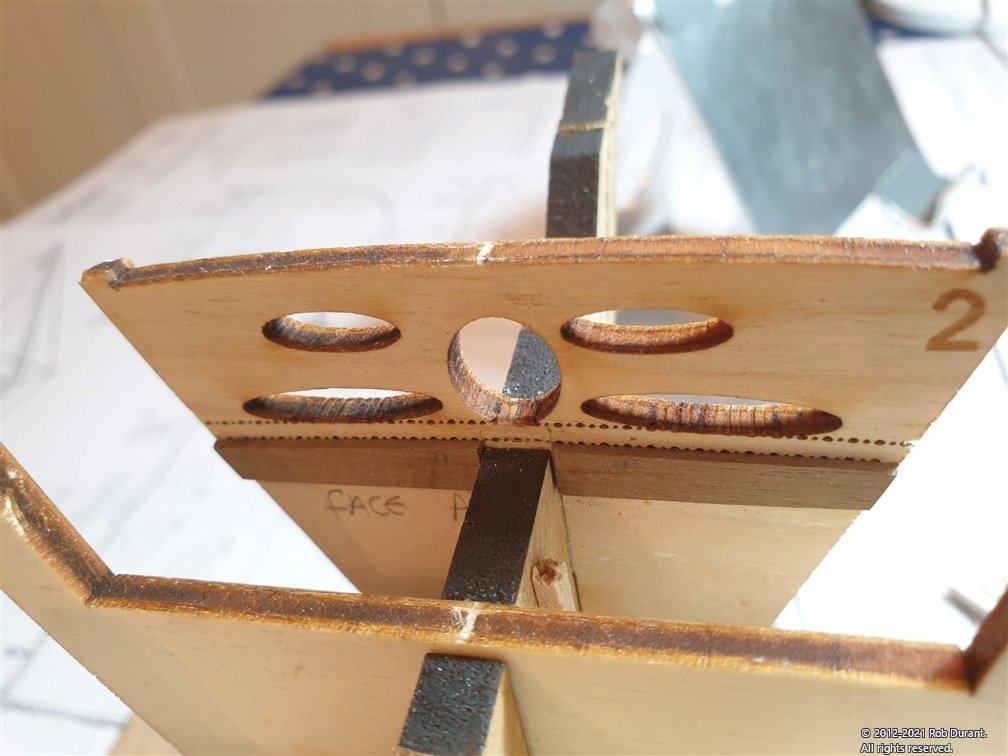
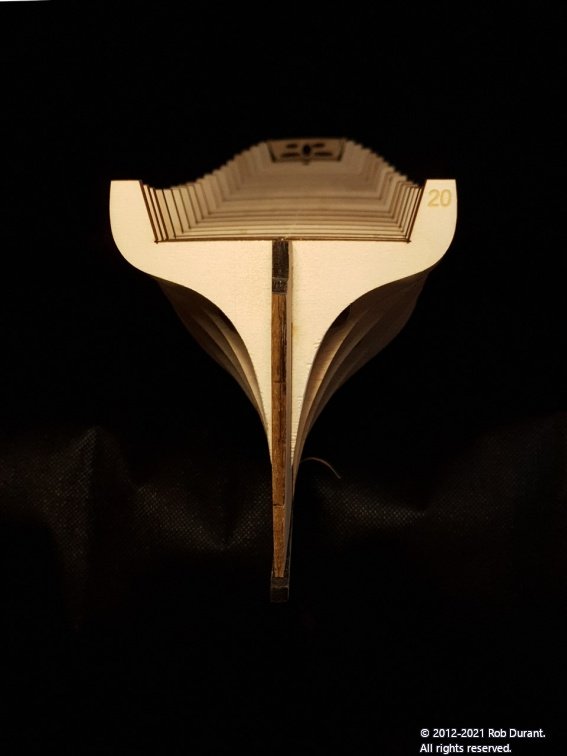
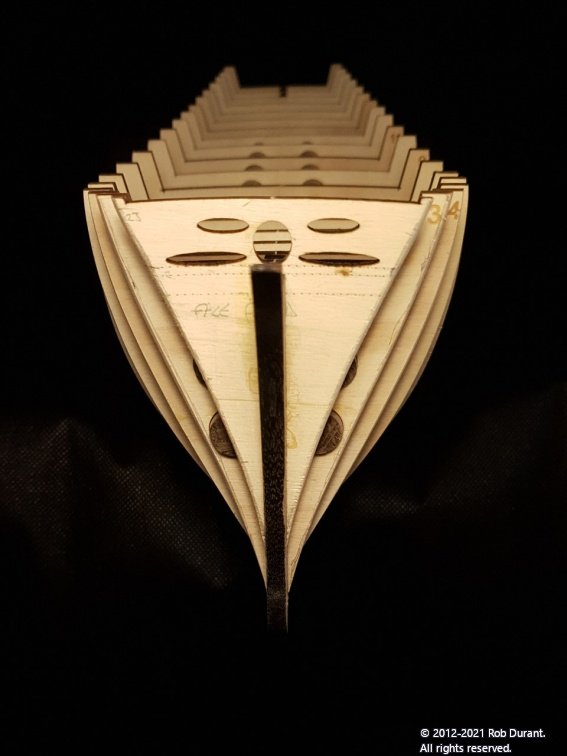
So here's a little update. The next step in this build is to fair the bulkheads. The plans (specifically an overhead view, P5 on plan sheet 3) provide lines at three levels. Specifically the main rail along the top of the hull (where the planking stops at the top), the deck level, and a third level... This was defined in the plans as the "highest wooden plating line".... Some head-scratching was done, and comparing the widths of that profile at the bulkhead seemed to confirm that this is in fact the highest copper plating line. This being the case, it's effectively the shape of the hull at the waterline. Once I'd figured that out, I went on to work out the difference in bulkhead width from front to back, as below. These were then carefully marked out at those three levels on forward three frames... and the shaping began, with a mix of a sharp x-acto blade and some files. Bulkhead two was roughly shaped off the model, and then glued in place where the balsa blocks will be added and the shaping will be finessed. Once the time came to fit bulkhead two again, I realised that the part I glued to the back side was blocking it going into the slot. So the bar across the back was modified as shown below. Bulkhead two was then glued in place. The same was done for bulkheads 20 and 21 at the stern. I haven't glued bulkhead 21 in yet, as I'm still feeling my way with this build a bit. Finally, a few shots taken this morning of the build so far. It really shows the accuracy of the laser cutting off, doesn't it! Okay - more soon Happy building. Rob
- 286 replies
-
- 11
-
-
Hi Bruma, Sorry it's taken me so long to get back Yes, it's a beautiful boat. Not much progress so far, I'm afraid, as I'm still rigging my frigate, but I've started marking up and shaping the bulkheads. I'll post some pictures in a bit. Rob
-
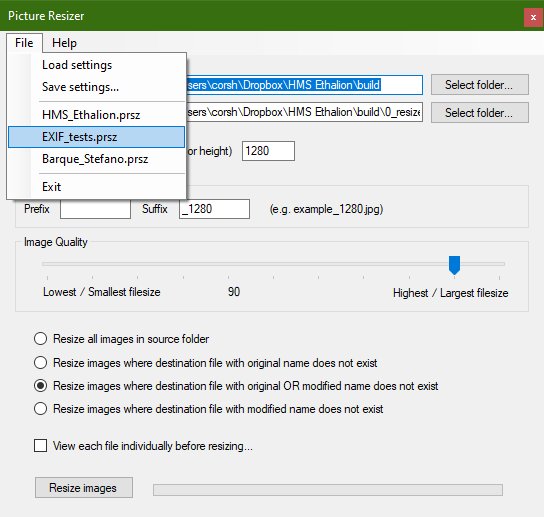
A minor update in v1.0.7. I've added a Recent Files list in the File menu so that you can get back to recent profiles more easily. The list will be empty when you first use the app, but it'll fill in as you save settings files and start using them. As always, this completely free (cost-free, licensing-free, ad-free) app is available at: https://www.durant.biz/pictureresizer/ I think this is probably the last update for a little while, and I'll work on getting the documentation in a bit better shape. It's a few versions behind right now. Here's a screenshot of the recent files list in action:
-
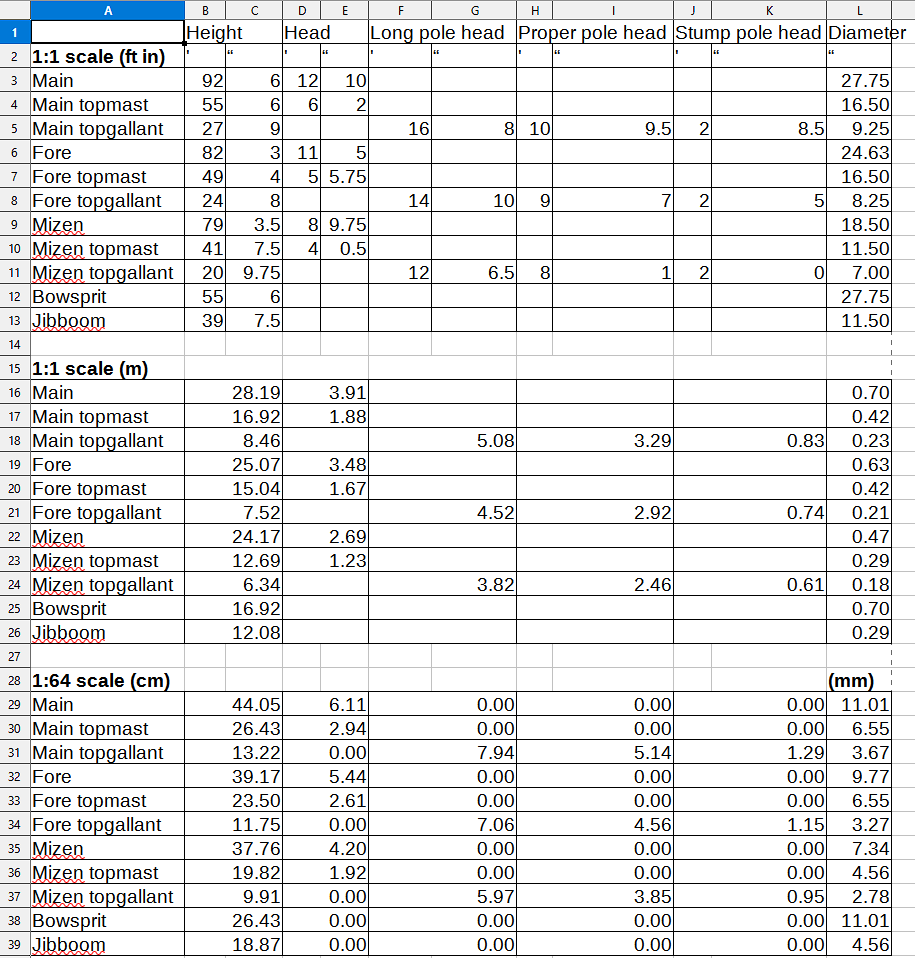
Hi Jason, It's been a productive month or so I've attached my calculations below which are based on AOTS. The first page shows mast dimensions (with long, proper and stump additional measurements for topgallant (add the first column "height o/a" to the stump / long / proper)). These measurements are shown 1:1 in feet and inches, 1:1 in metres, and then 1:64 in cm. I opted for the long, but I have to say, it does add quite a lot to the height of a case!... It looks really smart, though, and gives the masts a sense of really gracefully stretching out above the hull. Please do check these yourself before you start cutting wood, because my mind's a little foggy on how I went about this, and I wouldn't want to steer you off course If you download this pdf, the second and third pages are all of the yard dimensions from AOTS. Spar dimensions at scale.pdf I drew all of these out in CAD and used those as the basis for making the spars. Unfortunately I lost those drawings with some computer troubles, otherwise I'd share them here. Hence not being quite as sure as I would have been as to what I decided. The rigging is all roughly per the kit, but looking at Lennarth Petersson's book to help me get it right... Those are the places where I used deadeyes instead of the special blocks Caldercraft provides.... (fiddle blocks?). Altogether I think they're pretty similar. My model is not going to be a completely accurate rendition as I've already realised that I missed out a shroud on the main mast, which has been repurposed as a topmast shroud so that the deadeye is occupied. And I missed the cleats on the masts, so the belaying points are being reworked a little. But I'm satisfied the overall effect will be sufficiently accurate to look workable. Thanks to all for the encouragement and interest shown. Rob
-
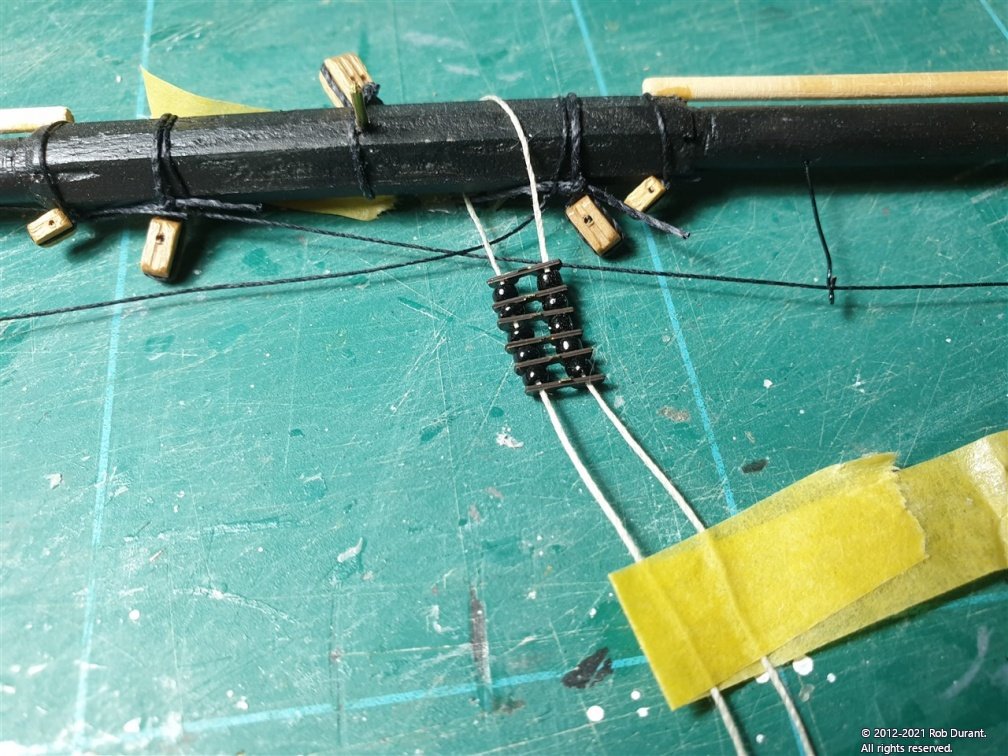
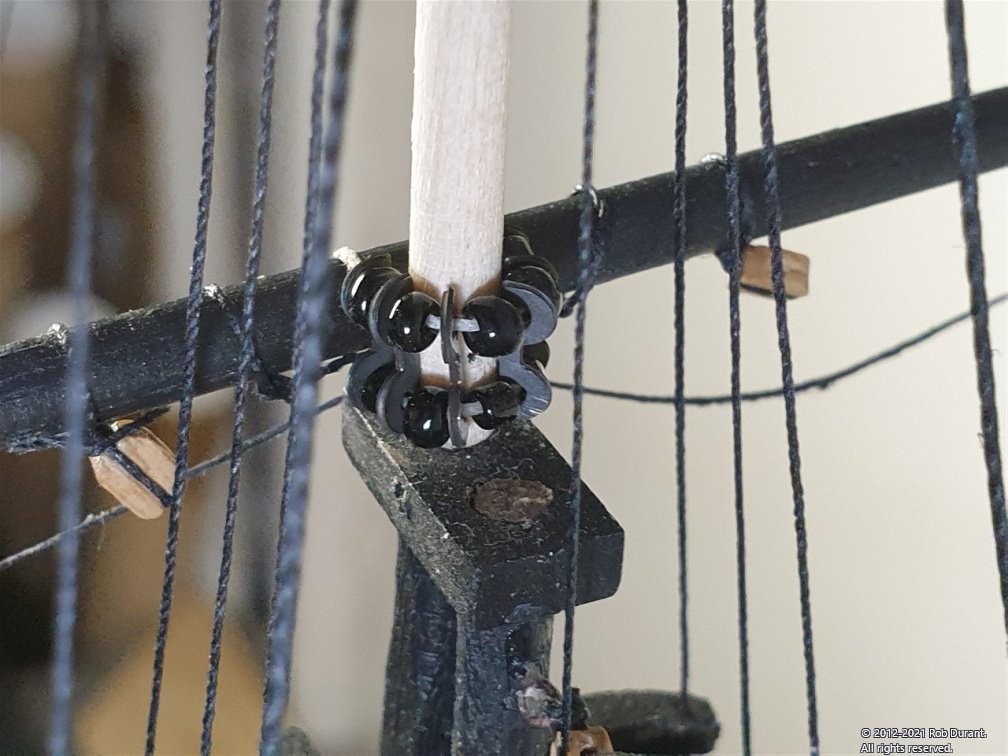
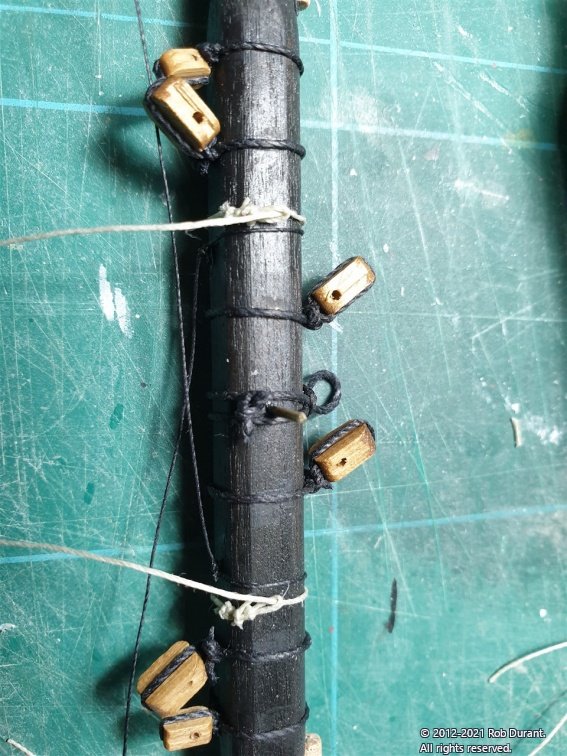
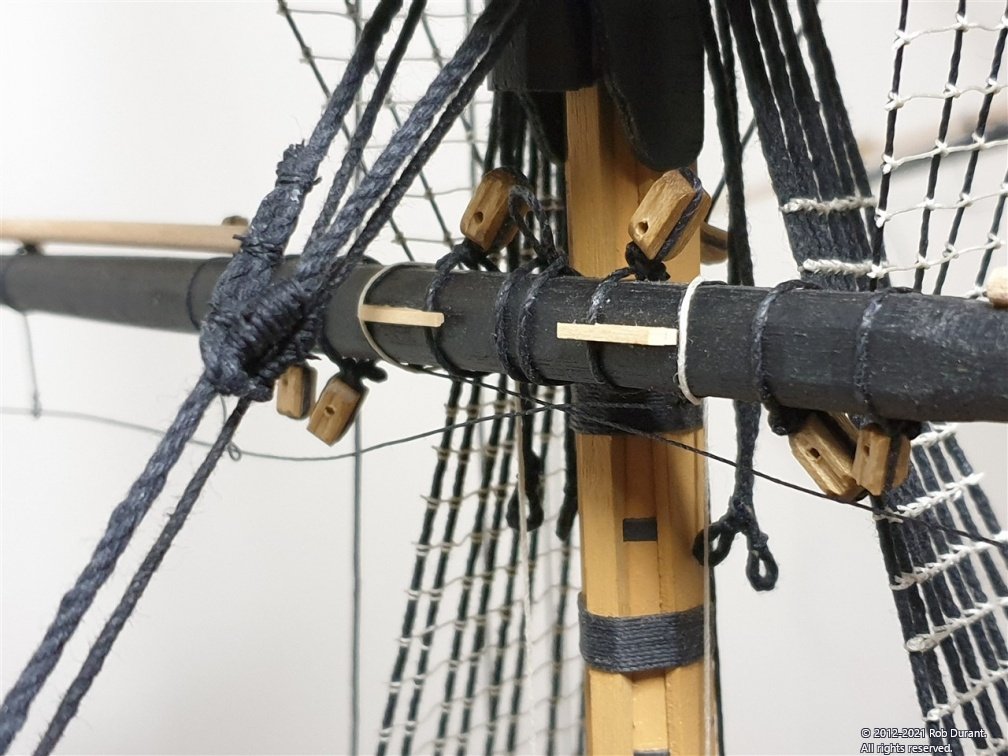
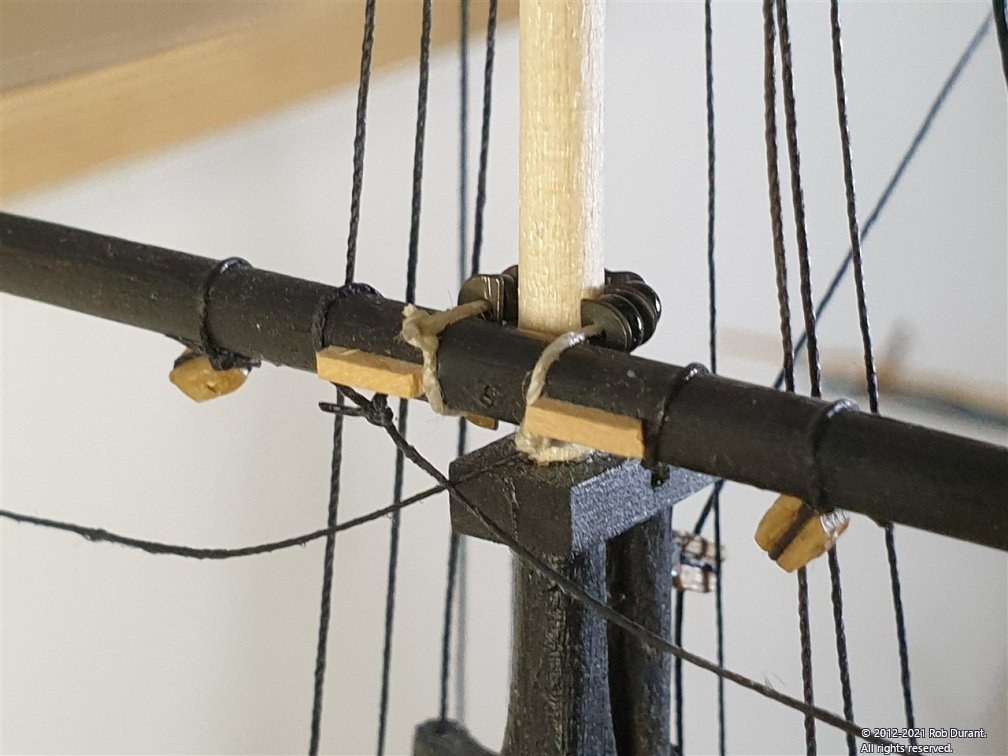
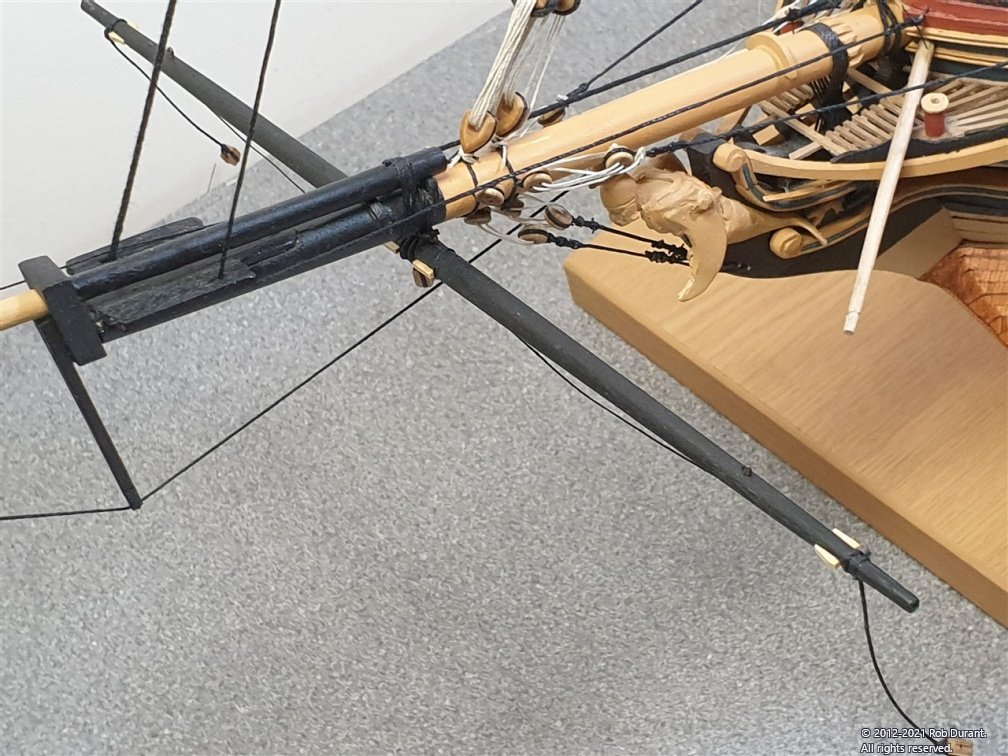
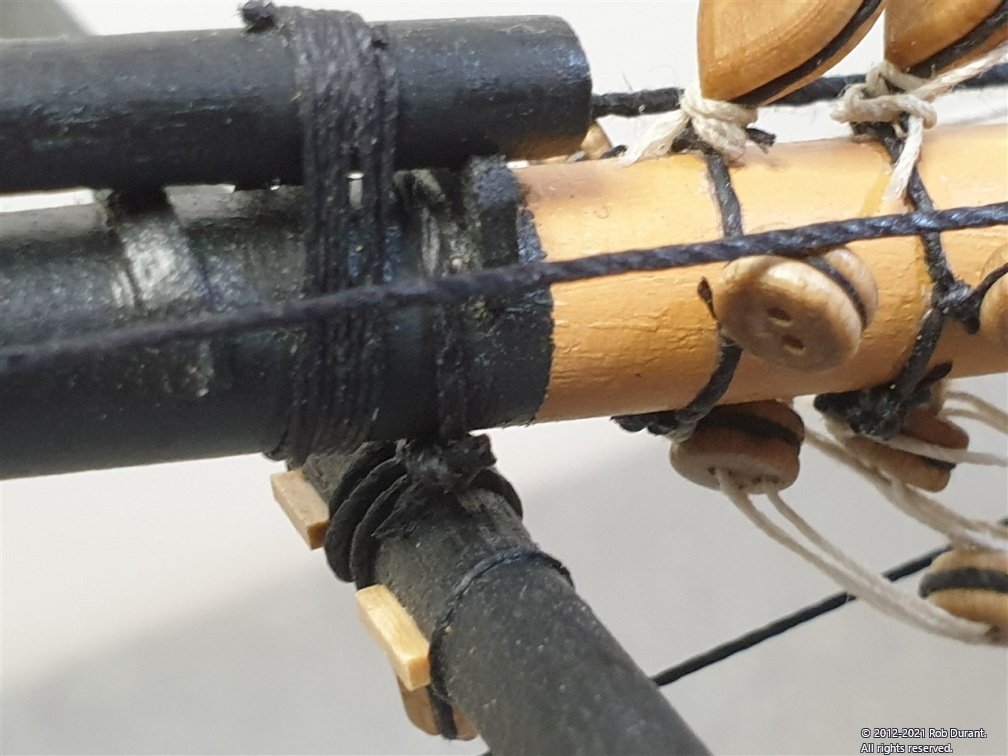
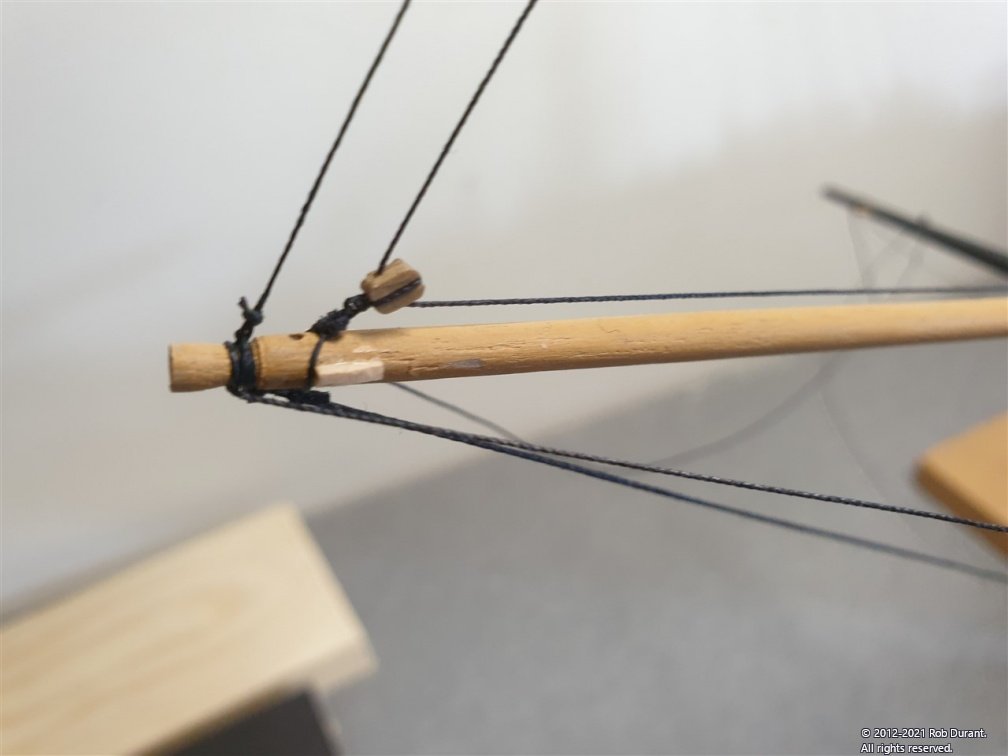
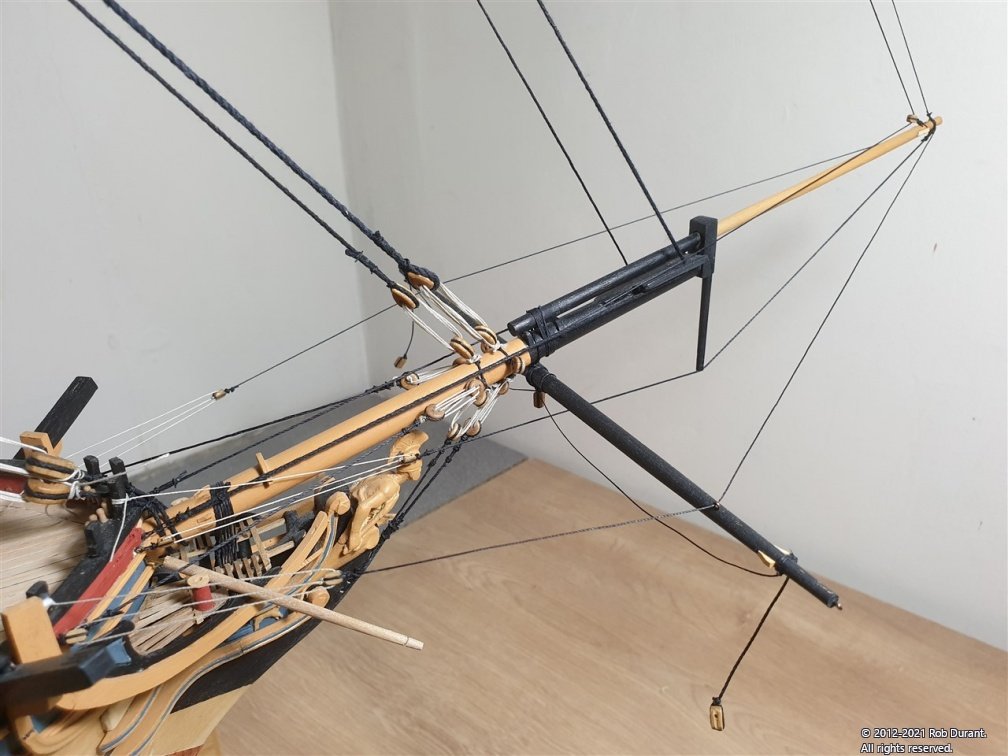
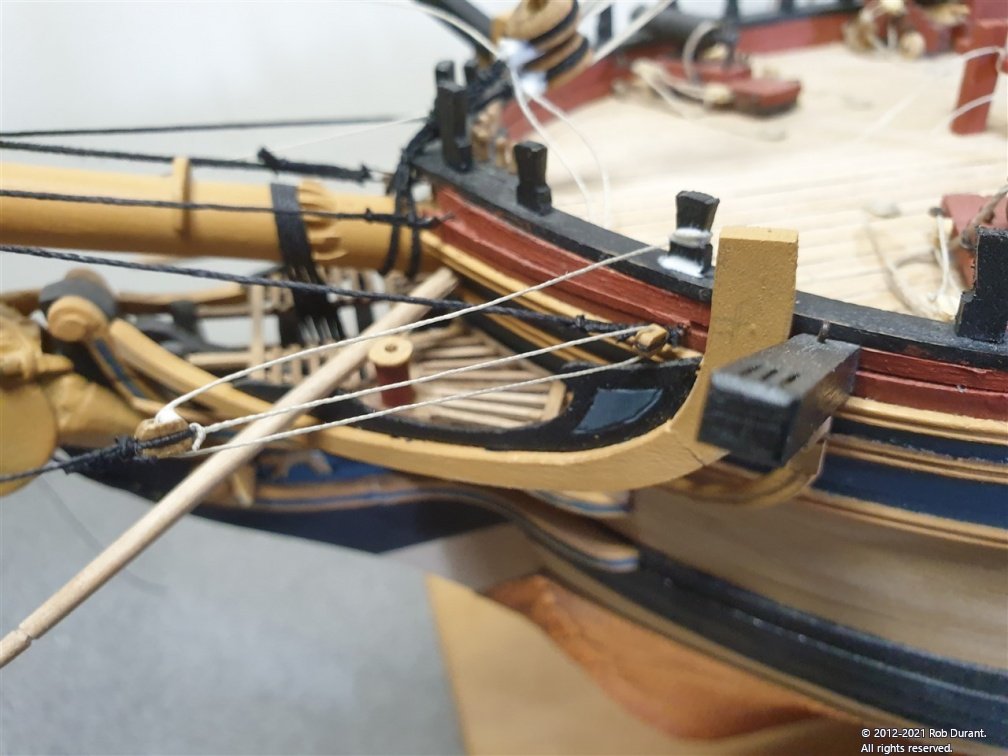
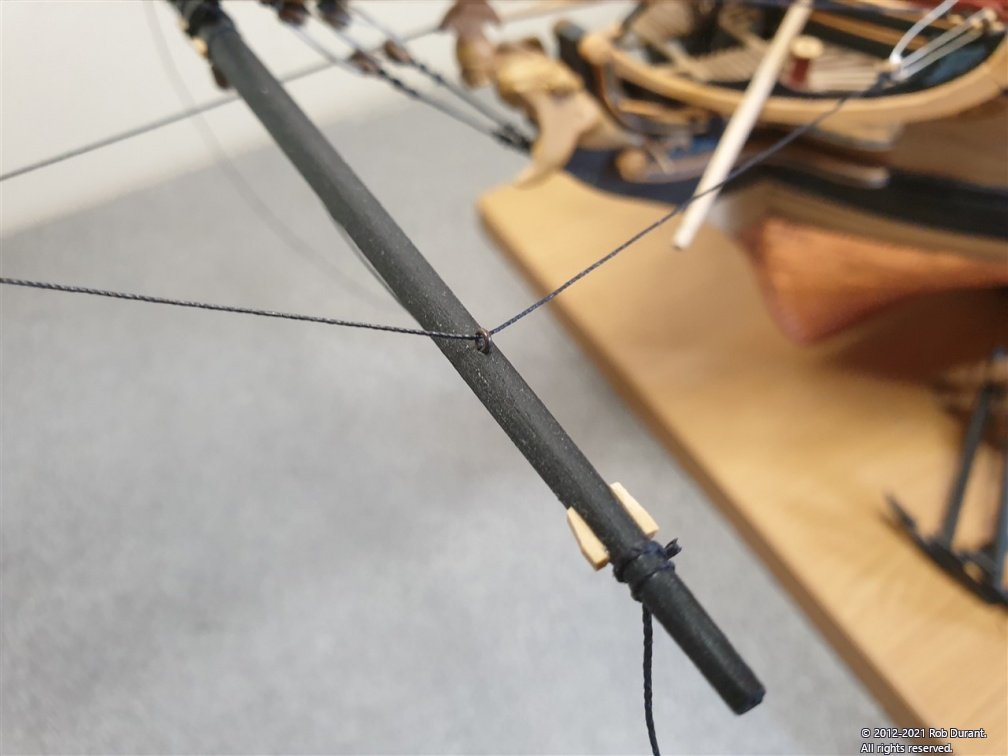
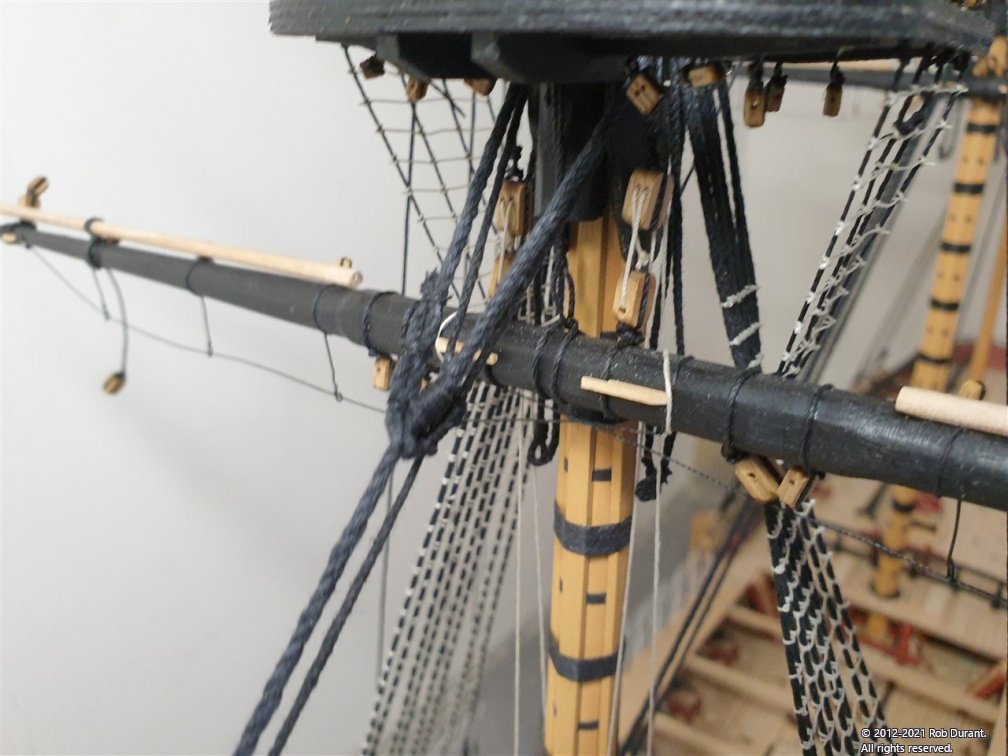
I've just completed the main mast stays - topmast, topgallant, and royal stays, as per the fore mast. And in doing so I ran out of .5mm natural thread.... again... but not before I got all of the yards attached to the masts, and the spritsail yard attached too with their trusses and parrel beads as appropriate. Here's what I did (although I'm aware that in various places it may be a little unorthodox - not least because I forgot to put the cleats on the masts, and it's way too late to start at this stage! Lesson learned! The bits that hold the yards up (trusses, parrel beads, and halyards?) Main yards and cross jack The main, fore and cross jack yards (those that are lowest on the masts) are fixed with trusses. I formed these by tying two lengths round the yards with loops in the ends at the yard. This was done off the model. Then the yards were put back in place, and the opposite ends passed through the loops and then down to the deck and fixed tied off to a double 3mm block opposite a single block hooked into the eyelet on the deck just behind the mast with a lanyard which ends on the cleat on the mast (or on the bitts if you've forgotten them!). There's a good illustration of this in the instructions, and an even better picture in Lennarth Petersson's book... but here's my attempt. Parrel beads (top / topgt yards) The maintop, maintopgallant, foremaintop, and foremaintopgallant yards have parrel beads in two rows with parrel bead separators between them. These are noted as being castings in my instructions, but were in fact brass etched. They need blackening / painting before you begin. Then you have to start the tortuous needs-five-hands-at-least task of getting them rigged. To make this easier, I did as much as I could off the model. .5mm rope was looped round the yard through the footropes, where it would finally end up, and parrel beads were threaded onto the rope, interspersed with the spacers - currently only on one rope (paying attention to which way round the spacers are - the curved edge will face out from the mast when fixed). Then, the other end of the rope was passed through the other hole in the spacers. The picture will make it more clear, hopefully... Once done, masking tape is applied to the loose ends to stop it all falling off... ...and the yard is then attached to the mast (it's pinned). Then the loose ends can be passed round the mast on the inner side of any rigging, ensuring that it isn't above or below any blocks that it shouldn't be... and fastened with a knot into a loop in as inconspicuous fashion as possible. I'll admit, I'm not great at this... but it's done for another model! I've seen others put extra layers on from this point to go round the middle of the parrel beads, but I call it a day at this point... or my head hurts too much! Here's an end shot. The fore and aft booms on the mizzen mast are secured with a single thread with parrel beads on it, but no spacers. Spritsail yard This is placed in a sling as shown below... A loop is tied round the bowsprit, and then another round the spritsail yard. It's all tied off in the middle. The spritsail yard stay can then be rigged... Finally, the heavy loops that support the weight of the yards, and are formed with suitably heavy rope along with the big 7mm blocks which were rigged and pass down to the deck to be rigged to the eyelets just fore of the mast being tied off on the bitts. So far so good. The gaps to fit one's hands in are growing smaller... but we're getting there. Rob


- 275 replies
-
- 10
-
-
Thanks for your kind words
-
Great start Hope you won't mind me pulling up a chair and sitting in on this build. I used Original Marquetry for my boxwood and they were really helpful (even ringing up to check details on the order), and the veneer seemed to me to be very good quality. I found it pretty tough to get it to sit flat on the hull as I put down the second planking, but that was my skill level, not the wood's fault! There's less wriggle room than with the thicker planks. I don't regret using it. It has a really lovely colour.
- 310 replies
-
- 1
-
-
- Diana
- Caldercraft
- (and 1 more)
-
Hi David, Many of the ideas are from other builds on this great forum, so I can't claim them for my own, but please do take whatever you find helpful and use to your heart's content. I'm very glad to hear that the software is proving a help as well. I look forward to seeing lots of updates as you progress. Diana makes up into a stunning and very impressive model! Thanks Rob
-
Okay - the new video describing the functionality in v1.0.5 is now live... and since then I've updated it to v1.0.6, which also brings support for GIF, TIFF and Windows Bitmap (.bmp) files. https://www.durant.biz/pictureresizer/ Hope it's helpful. All questions / comments, welcome. Here's the video.
-
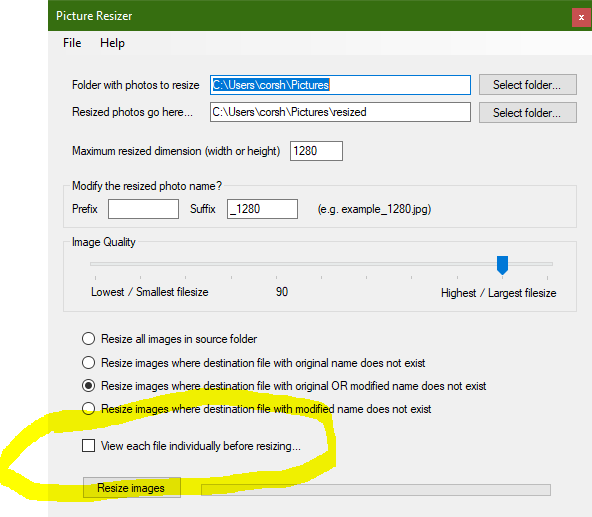
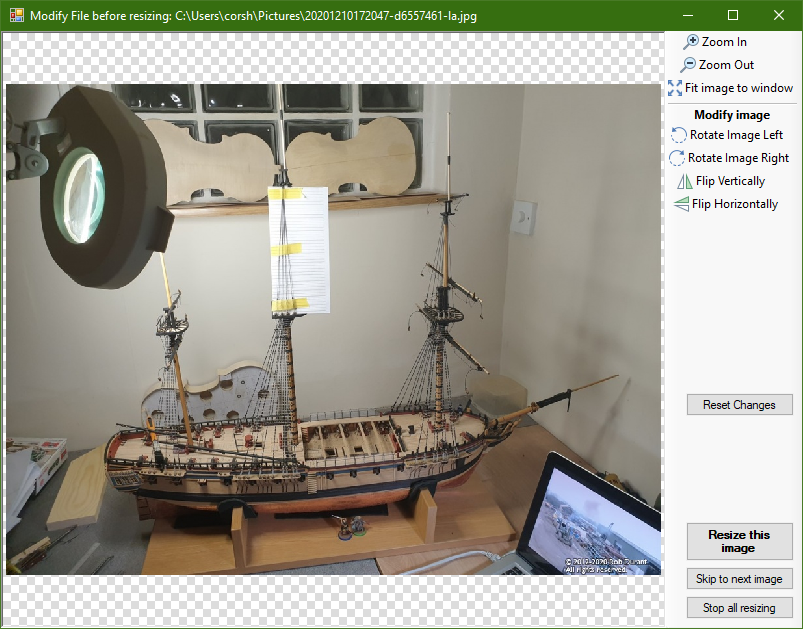
More functionality. Version 1.0.5 is on the website: https://www.durant.biz/pictureresizer/ If you check the checkbox that says: "View each file individually before resizing", it'll come up with an image preview window for each picture that's going to be resized. In that window you have the option to manually rotate the image, and/or flip it horizontally or vertically. Then you can either resize that image, or skip it, and it will go on to the next image that's queued up to be resized. Again it doesn't make any changes to the original file. Just the new one. I haven't documented it yet, but I will when I get a moment, and I'll do a video too. Hope it's helpful. Rob
-
I used one of these too. They certainly make life easier, and if marks are put regularly enough, you can make pretty good curves. I have a violin rib bender that I'm going to try this time round, which I'm hoping will be even quicker, and will leave no marks on the back (especially useful where you want to make concave curves, where the inside of the curve will be visible when fixed. Looks like you're making quick progress, and the 1.5mm lime will give plenty of room for sanding back any rough edges. [EDIT] scrolling back up I see that you've made lots more progress than that - those gunports are tricky, and you've done a lovely job. The first planking looks like a good smooth platform for the next one too. Nice job!
-
Thanks Bob, Hopefully I'll make it through, and perhaps if I take lots of photos, it will help others - or at least, help them avoid the mistakes I make
-
Welcome to Modelshipworld - it's a really friendly place, and if you start a build log you should get a bunch of people willing to offer advice and encouragement.
-
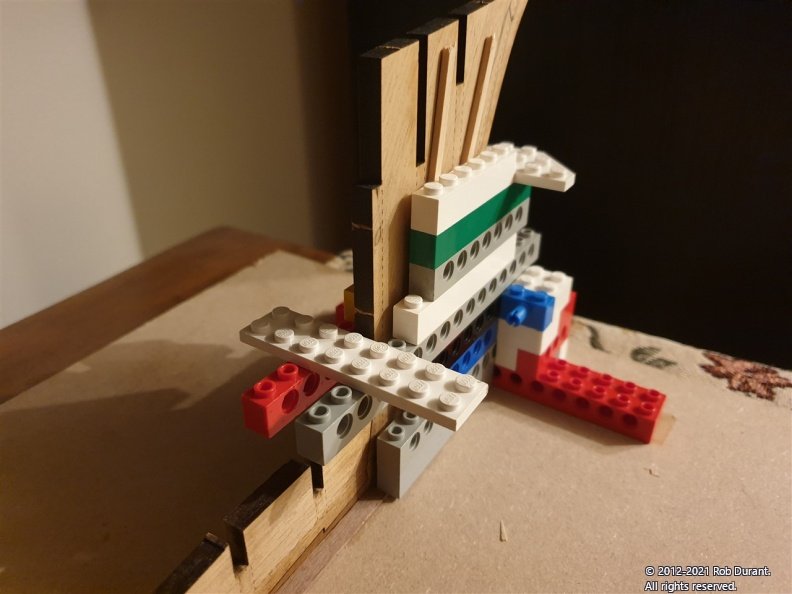
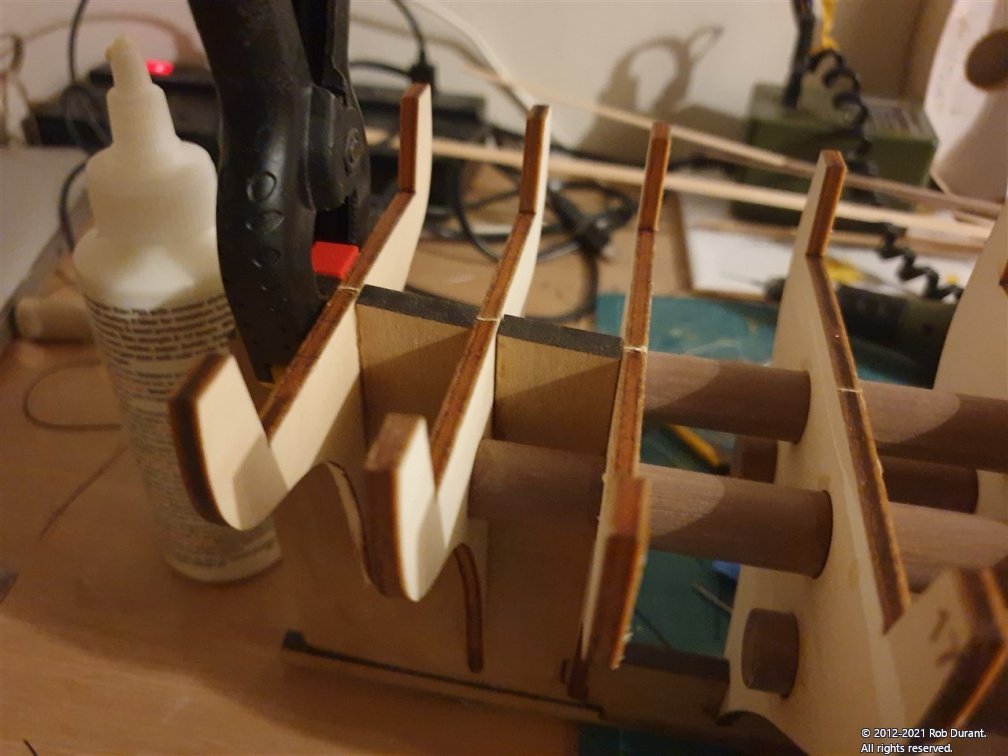
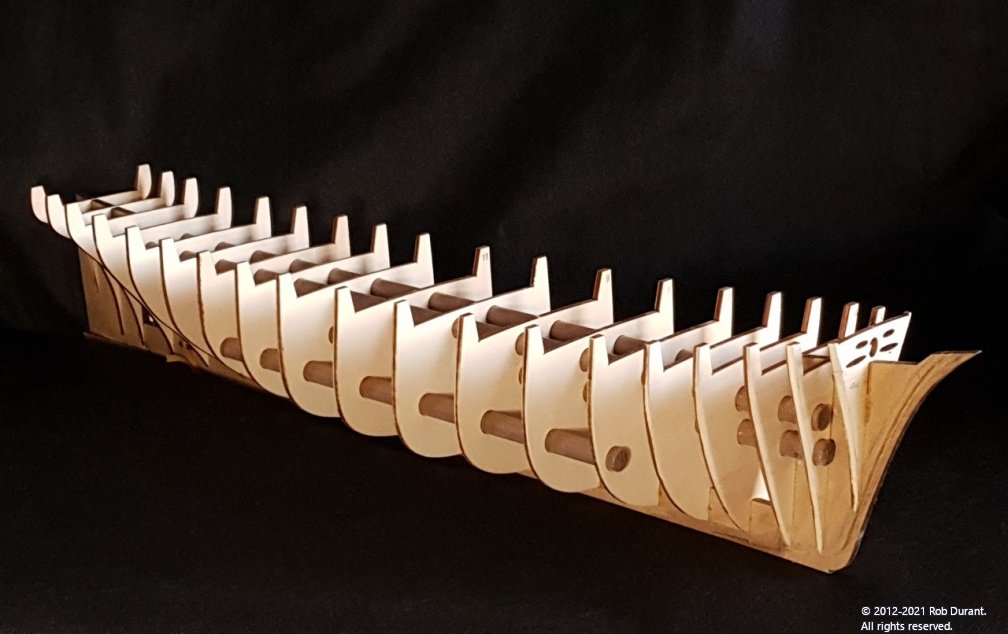
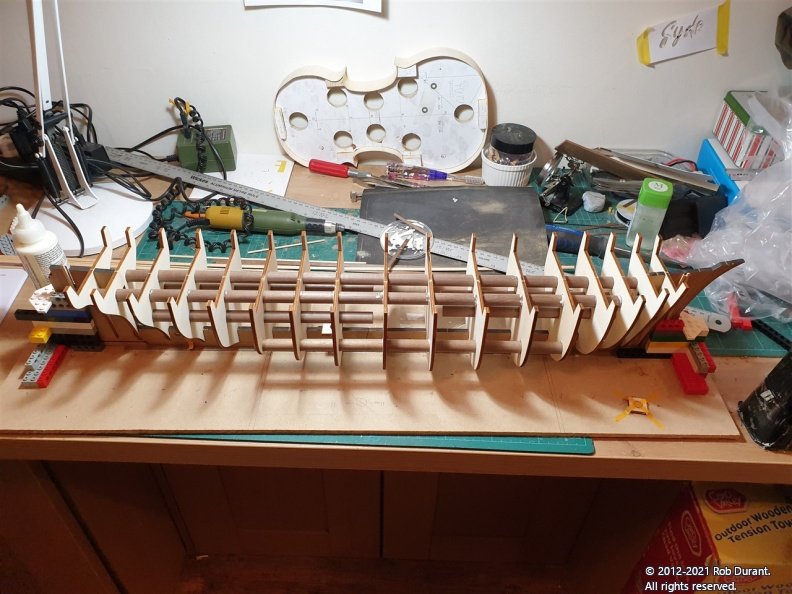
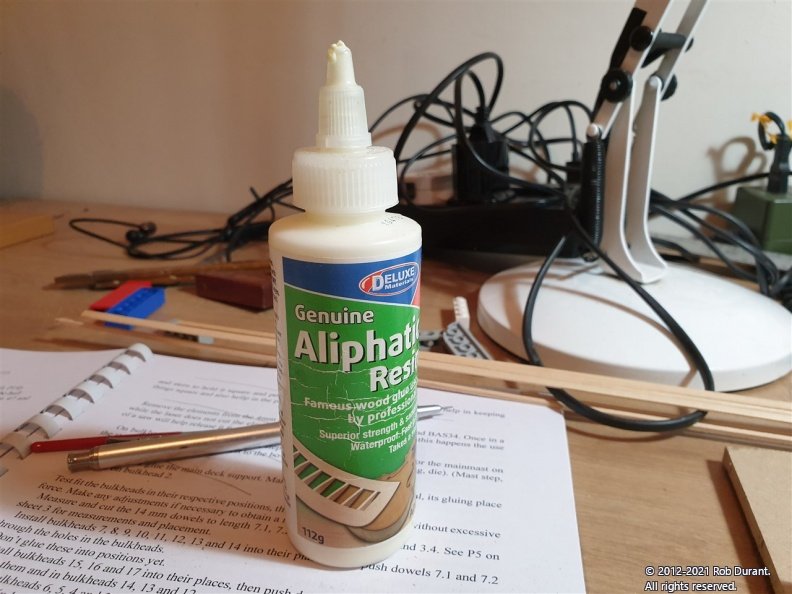
The next stage is to trial fit the bulkheads, checking that they are a comfy, but not stressed fit. This was remarkably easy - again the accuracy of the laser-cutting was great... When I tried putting in the wooden dowels they slid in really easily - one dowel was a little oval in cross-section, so I sanded it down, but the holes for the dowels were perfectly placed, and when sighting along the hull with the dowels in, I was thrilled to find the hull was really nice and smooth... (bulkhead fairing excepted) Lego was employed to check squareness. As HeronGuy noted, the dowels will make a wonderfully rigid structure, but you do need to check it's all straight. Once satisfied with the vertical and widthways squareness of the parts, I took the whole thing apart, and glued it bit by bit with carpenter's glue. This diverted from the instructions which suggest brushing on watered down glue. I wasn't confident that the glue would work effectively enough for my liking, and I didn't want things coming unstuck during the fairing process. I had one oopsy moment, where I realised that I'd got a bulkhead slightly high, but pushing it down, the dowels fitted like a glove. The carpenter's glue gave Just enough time to double-check things to make sure all was square, and that brings us up to date. It's now going to be left overnight to glue nice and solid ready for fairing tomorrow. Here's the glue I've been using (for every model I've built so far). I can't fault it. Good strength, quick grab, plenty of moving time, and waters down brilliantly for the rigging. It dries clear with a dull sheen. (And no I don't work for them ) I've ordered some extra balsa, which will hopefully arrive in the next few days. I wasn't expecting to get so far so quickly, but it's testament to MarisStella that I have. One last photo... Ethalion and Stefano in the same room... They're very comparable in size. I think I'm going to rig this model with yards braced round, as per some contemporary models in the Maritime Museum in Greenwich. e.g. https://collections.rmg.co.uk/collections/objects/66318.html It could help with the space 🤣 So far, I'm falling just as in love with this kit as with Ethalion, which bodes well for the next few years! Happy building Rob

-
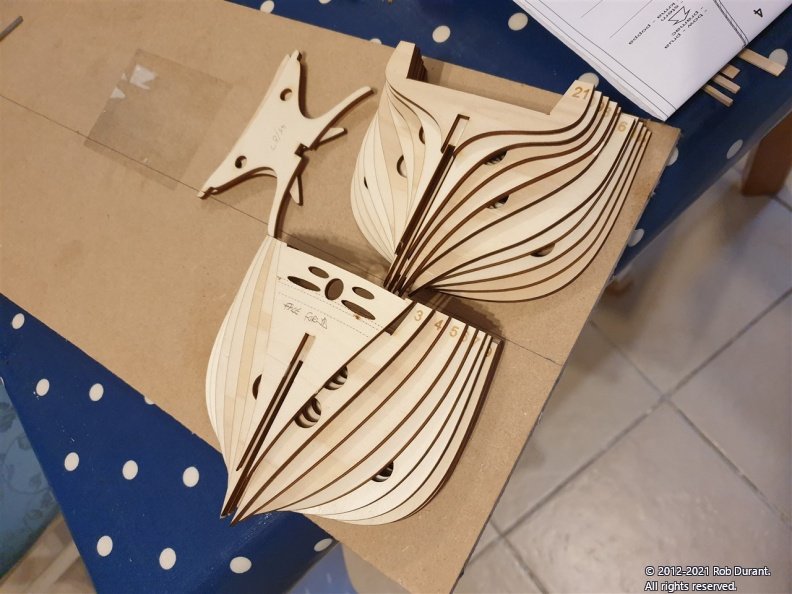
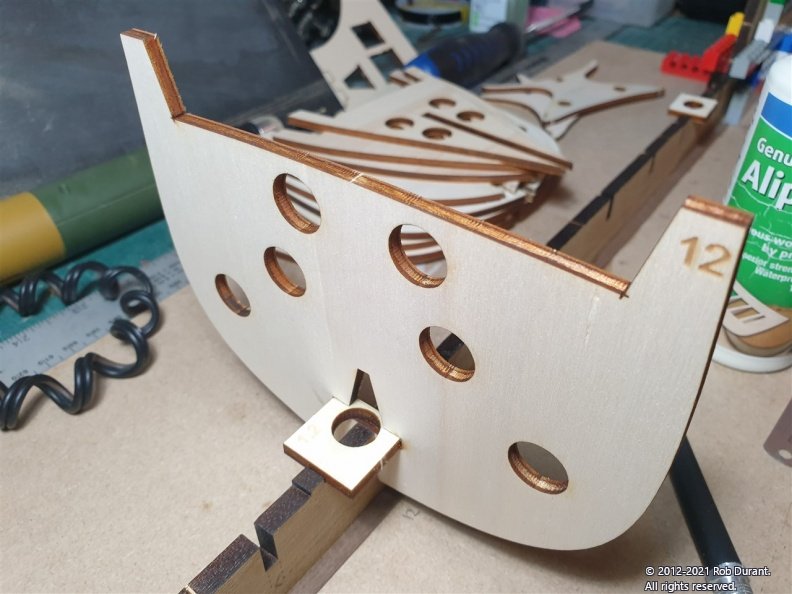
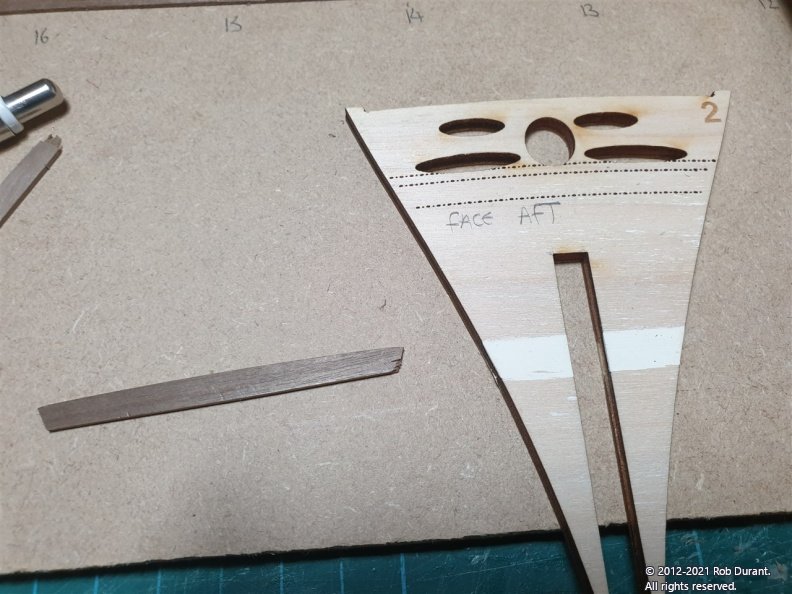
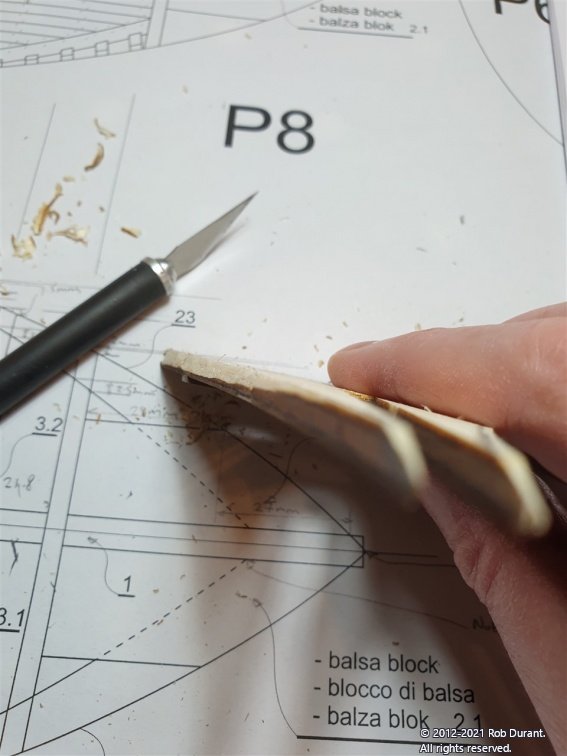
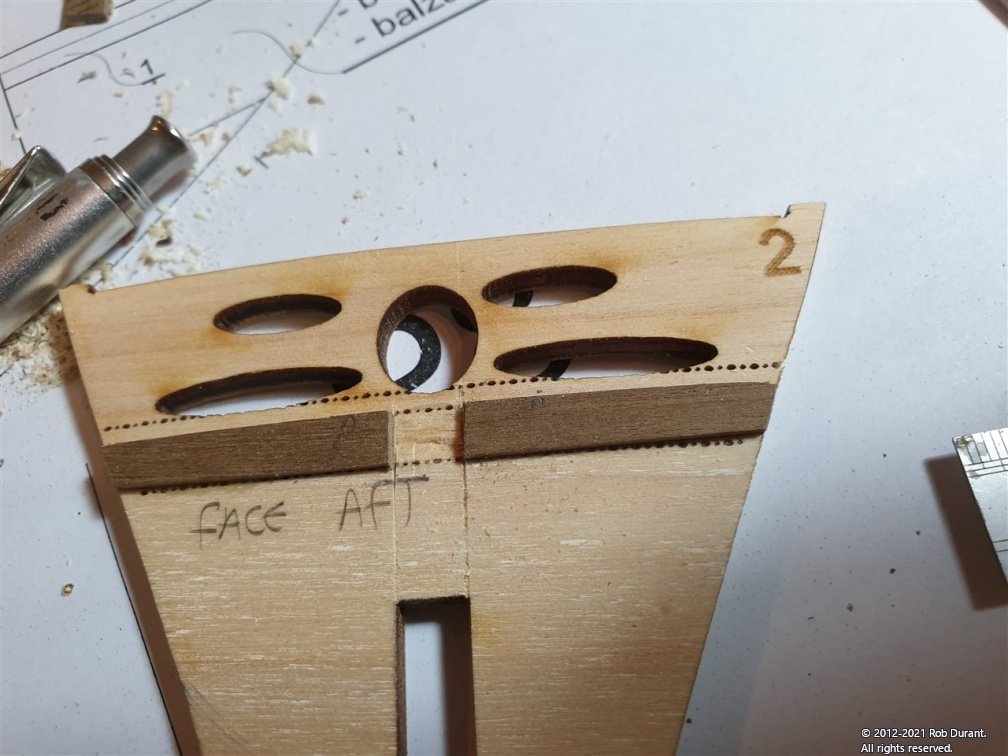
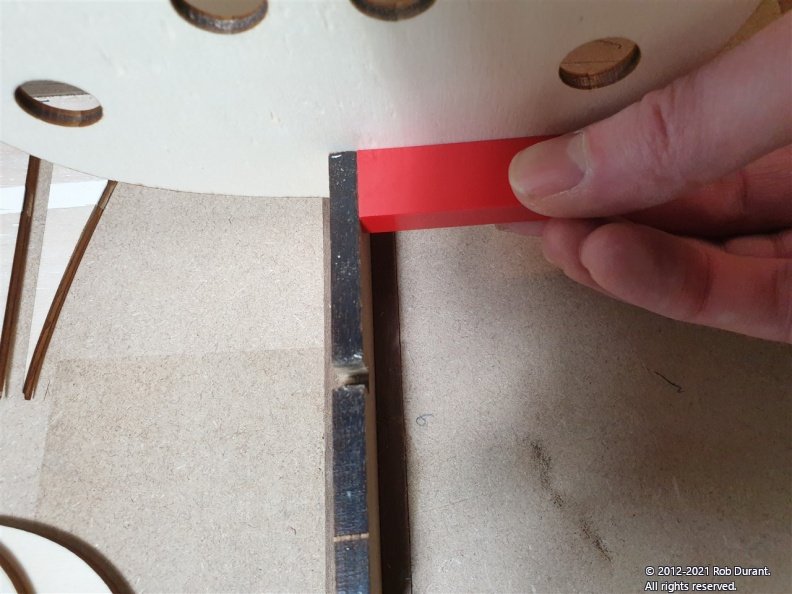
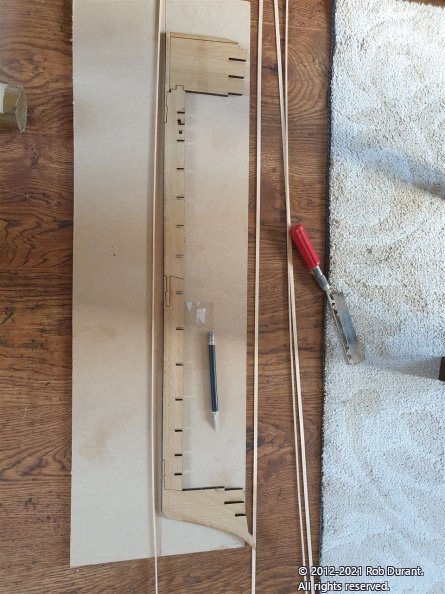
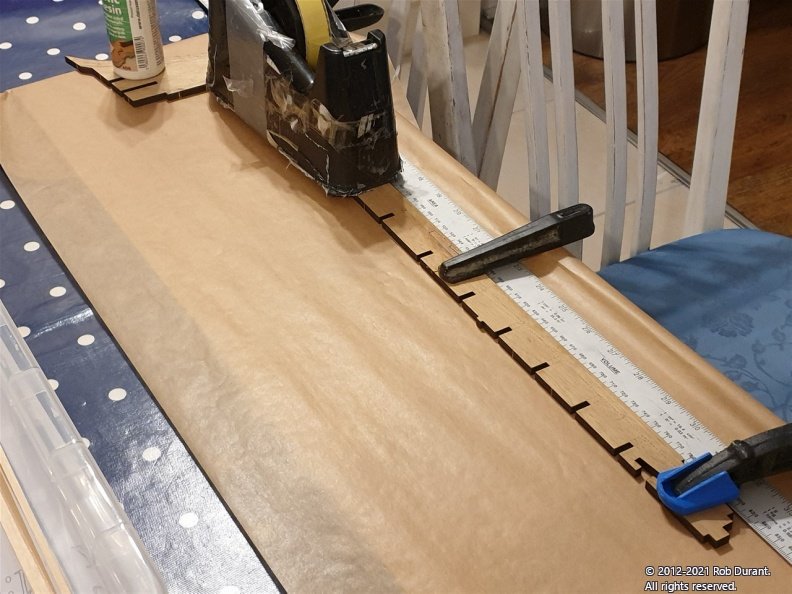
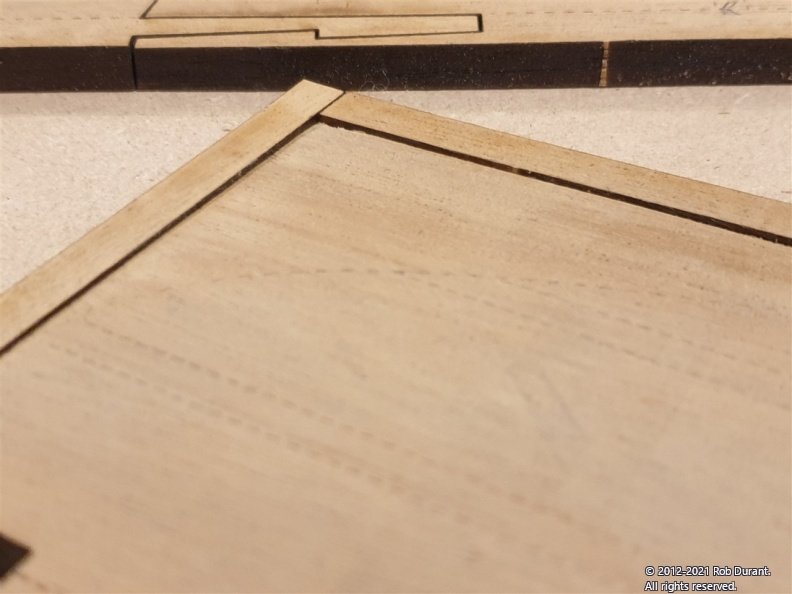
Well, it finally happened. Lockdown began in the UK, and I ran out of the rope I needed to continue with Ethalion... so, it was over to Stefano for a bit... The build begins with the parts for the false keel being taken out of the walnut sheet. These are laser cut and fit well. Here they are laid out... The angle on the cut was quite significant (I don't know whether it's more than on other builds, as I've only built CNC cut parts before. I didn't sand these down as they were a snug fit already, and I didn't want to make the joint loose. Instead, I glued it as was (but NOT the stern post or the front of the bow part... I want these to be nice and neat, so I'll add them later). I spent some time thinning down the stern so that the planking will not stick out from the stern post when added. The stern post will not be added until at least the first planking is complete, and that way I'll be able to thin the first planking down to 1mm short of the width of the post, so that it fits nicely when the second planking goes on... Here's the thinning in progress (test fitted with the other parts) And how it looks once glued... Here they are being glued (I discovered that baking paper DOES stick to carpenter's glue *sigh*... The metre ruler makes sure that the keel is glued straight. Having glued the parts together, I spent a little time working on a rabbet at bow and stern to provide a guide for the planking. This was done with a proxxon mini drill and an engraving tool... it's a bit messy, but I'll tidy it up once the balsa is in. The next day, I noticed there was a little twist in the keel - but I'm not expecting this to be an issue once the hull structure is together. I made up the building board with some highly engineered parts being used for the bow and stern supports (courtesy of my son!) - it turns out if you leave one dot between the side supports, then add 2mm of wood, it makes the perfect width for the walnut to fit in. I went ahead and took out the bulkheads... These are beautifully cut. No issues at all about shaping... They look perfect. Trial fits confirmed that they are indeed very accurate... The 14mm dowels that connect them together were cut to size as per the plans (nb: the top and bottom plans measure slightly differently on sheet 3... I used the bottom measurements which are P5, as mentioned in the instructions. The difference isn't major, but certainly one to watch out for. The main-mast step is fitted into bulkhead 12. This has to fit so that the step goes back to the notch on the false keel, but with the hole itself sitting slightly inside the extent of the bulkhead so that the part is flush with the forward edge of the bulkhead. It makes sense when you put it together, and the plans and instructions are well done. Whatever you do, don't do what I nearly did and glue it onto the false keel blocking the way for the bulkhead to be inserted! At this stage bulkhead 12 is glued to the mast step, but nothing is glued to the false keel. A strip is added to bulkhead 2, which will act as the deck support. I used some leftover walnut from Ethalion, but it does tell you which wood you can use in the kit. The top side is curved... I didn't try to edge bend the wood, I just sanded a curved profile in it. This was nice and easy. You'll notice in the images below that the upper two holes in Bulkhead 2 are assymetrical (the left hand hole is further from the bowsprit hole... There's no mention of this as far as I can tell in the instructions... I'm working on the assumption that I can fix it later easily enough if I need to, but in the meantime, I looked at the MarisStella.hr log, and copied their prototype... Hence the pencil marking for aft / fore on either side. You'll need to work this out before you stick on the strip because it goes on the aft side. All this gets hidden under the raised deck platform at the bow, so I'm not too concerned about looks. No-one will see it, from what I can tell. This post is quite long enough, so I'll start another one. Happy building Rob
.jpg.7a08dc186f909555b5ed35cc1ee20c9e.jpg)