Kevin
-
Posts
7,033 -
Joined
-
Last visited
Content Type
Profiles
Forums
Gallery
Events
Everything posted by Kevin
-
lol - oh another target
-
might as well
-
no its not, it is fact HMS SCEPTE off RFA Dilligence GOA India lol - perhaps that's why very few post submarines
-
http://naval.histofig.com/Painting-of-Napoleonic-Spanish.html this is intresting, where it appears that different colures were used to define category's of class of ship
-
 jack will you please put a profile picture of all your builds into the following link, others will like to see your work http://modelshipworld.com/index.php?/topic/1589-latest-full-profile-photograph-of-your-build/
 -
lol - British and not traf class, please dont let me win and have to repost
-
HMS Victory by Yon - Caldercraft 1:72
Kevin replied to Yon's topic in - Kit build logs for subjects built from 1751 - 1800
WELL DONE -
Thank you Paul
-
Not traf class
-
well one part is right - lol it's not the subs name- infact i cannot see shrug as any nations named vessel - ill let you dwell over yr hot chocolate- or what ever you drink this time of day
-
here is my entry 1 point submarine 1 point support vessel

-
Chance" (1902)
-
a poorly coppered hull looks worse than a poorly planked hull, must be the scale thing, and not being able to touch up with a bit of filler.But like all my modeling skills practise makes perfect (well a little bit better in my case), i like to see a coppered hull
-
Paul would you like to put your build (profile photo) into the following topic please, so that others may see your work http://modelshipworld.com/index.php?/topic/1589-latest-full-profile-photograph-of-your-build/
-
i am continuing doing the stbd side, the cat head is finished and fixed/pinned, and i managed to successfully make the strip underneath it, cutting the wale was my biggest heartache, as i found it hard to mark everything and get the angle right, but like everything else, it will get done, all a learning curve i used the brass profile, and bent with molegrips and a vice, then used fine wet and dry to rub out any marks, and yes it is fairly acute angle
- 1,319 replies
-
- 1
-

-
- caldercraft
- Victory
- (and 1 more)
-
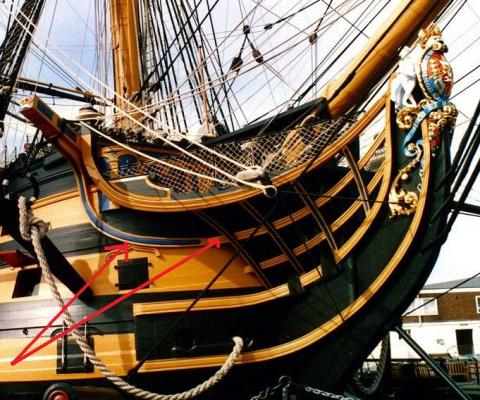
i googgled for a photo, so i don't have a date, the photo stock didn't provide it https://www.google.co.uk/search?q=hms+victory+bow+photo&hl=en&rlz=1C1GGGE_en-gbGB473GB473&tbm=isch&tbo=u&source=univ&sa=X&ei=KE9iUdHOCInT0QXzsoGwBg&ved=0CDsQsAQ&biw=1680&bih=937
- 1,319 replies
-
- 1
-
-
- caldercraft
- Victory
- (and 1 more)
-
HMS Victory by Sven - FINISHED - 1:600 scale
Kevin replied to Sven's topic in - Build logs for subjects built 1751 - 1800
Wow - she looks better than mine at 1/72 -
http://modelshipworld.com/index.php?/topic/1589-latest-full-profile-photograph-of-your-build/ have a look in here, that's one of the reasons,why i started it
-
i reduced the thickness of the side rails of my ladder to fit within the coaming, as i remember i had a similar problem
-
Not much to show for the few hours i have put in on the build this weekend, the bow timbers that fit into the head timbers are giving me a nightmare, with the decorative strip that flares in from under the cat-head, The rail that comes from under the cathead cuts unto the upper wale and stops where the the upper head timber strip comes into contact with the hull
- 1,319 replies
-
- 2
-
-
- caldercraft
- Victory
- (and 1 more)
-
HMS Victory by EdT - FINISHED - 1:96 - POB
Kevin replied to EdT's topic in - Build logs for subjects built 1751 - 1800
WOW thank-you so much for reposting -
http://modelshipworld.com/index.php?/topic/1589-latest-full-profile-photograph-of-your-build/
-
There's a simple answer Piet but it's not a simple matter. The simple answer? You can put a boat on a ship but you can't put a ship on a boat, or one man can make a boat but one man can't make a ship. It might take many men to make a boat but it'll always take a lot of men to make a ship. A friend once answered the same question like this: that's how i was told
-
i was looking for a British company that provides a service like Lumber-yard, providing different lumber sets in different woods to complete semi scratch models, apparently there are not any.