HOLIDAY DONATION DRIVE - SUPPORT MSW - DO YOUR PART TO KEEP THIS GREAT FORUM GOING! (Only 27 donations so far out of 49,000 members - C'mon guys!)
×


harvey1847
-
Posts
528 -
Joined
-
Last visited
Content Type
Profiles
Forums
Gallery
Events
Everything posted by harvey1847
-
Hello Mike! Is it that a ship or a skyscraper? Four decks!!! Are you going to put the cannons and all the iron stuff? That means 28, fourteen in each side, exactly the same amount of my project,,, I will follow your log for sure! Keep going! We´ll be here watching. Daniel.
-
Hello Piet, Nice pictures. I am saving lots of them to print them and put on small frames at home. Can I ask the purpose of those "teeth plate" at the stem? The same that has on the rudder. I am wondering since the post when you were fixing the propellers. Thanks! Daniel.
-
Really nice Antony! Can you explain us a little bit more your method for "curve" the beam? To make the camber. Thanks in advance, Daniel.
-
Beautyful Ed. Looking your log so clean and neat makes me laugh and cry when I see mine with two wood boards, nuts, iron bolts, annotations... One thing that has help me a lot is to clean the PVA glue usig water like you an others do. How you clean the epoxi one? If I use brass instead of copper, how can I blackened? Because the L.O.S won´t work, will it? Best wishes! Daniel.
-
Jim Byrnes Model Machines
harvey1847 replied to Mahuna's topic in Modeling tools and Workshop Equipment
Happy Brirhtday Jim! Still saving money to buy your famous plate for Christmas!! have a Good day! Daniel. -
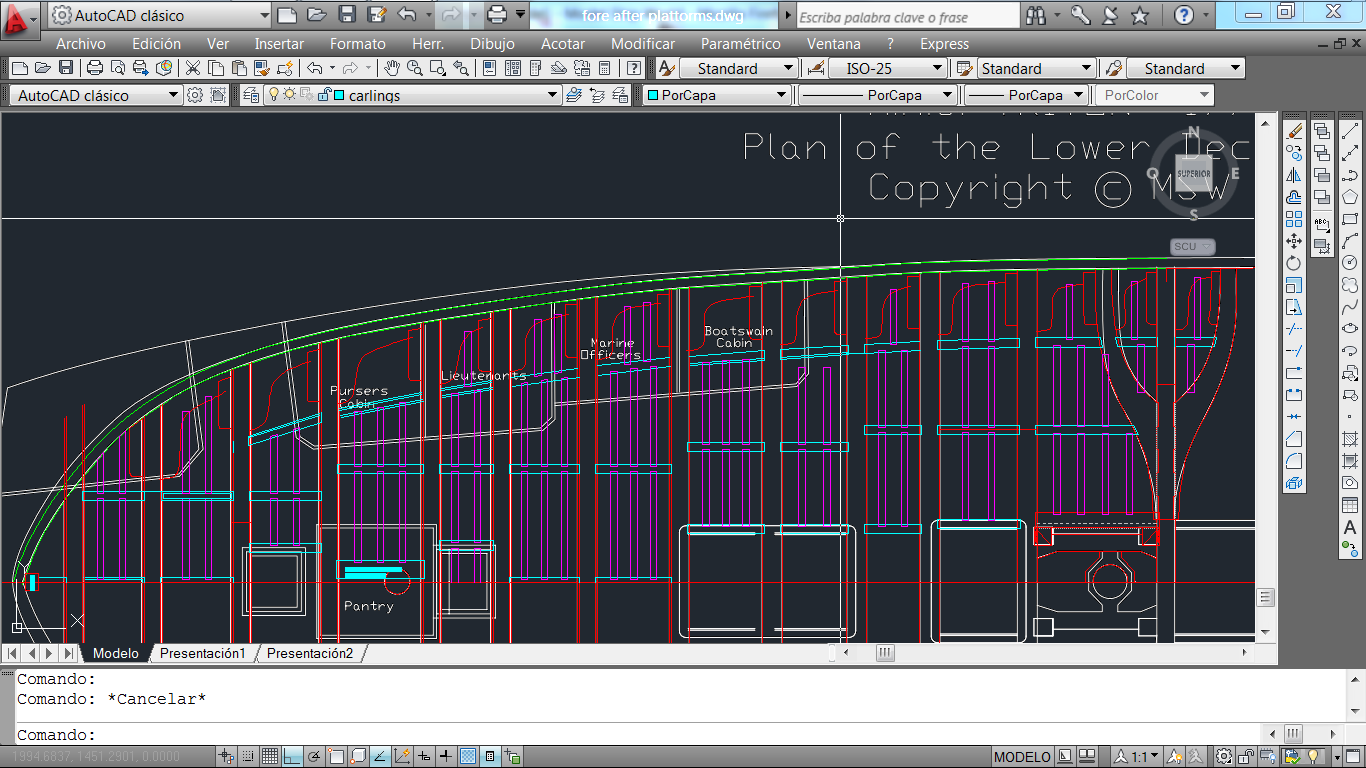
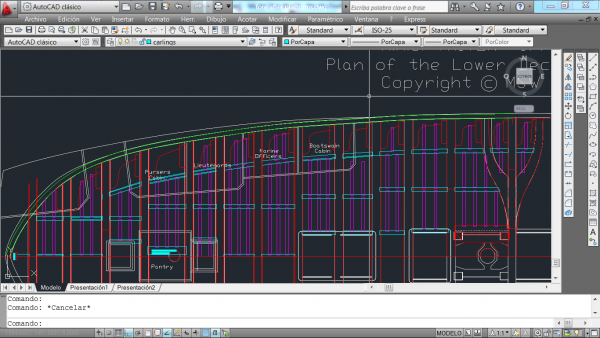
Hello All! I have finished the drafting of the lower deck. I´ve used AOS HMS Diana to “inspire” me. I have done two versions, one with carlings in the middle of the horizontal axis (“X”) and another one with none. I think It looks stronger the V_01 version. I guess would be easier to do version two with no ledges in the middle. Do not know what to do. What do you think?! The pdf´s are non-scaled. When I´ll take the decision I´ll attach them on 1:48 as I did before with the fore and aft plattforms. I have omitted all the cabins. I´ll draw them this weekend. I was much more excited about the structure of the deck than the final fittings. That´s why I have not detailed the hatches frames or the ladderways. lower deck V_02_ok.pdf Waiting for your answers or suggestions,,, Daniel.
-
Helloo Boys and Girls! Still working and alive. i do not Know what is harder to make, CAD drawing or sanding frames... If I end this who Knows when,,, I will gift myself a present like a plastic ship in a nice beautyful box, with intructions to read, plans of how to be painted, some decals and thousands of pieces numbered... I have been drawing since yesterday. Now I´m going to sand and sand again. best wishes to all! Daniel.
-
WOW! All I can say visiting your web, specially with those "custom scale structures" for raiway modelling. Beautyful! BEST whishes Bruce! Daniel.
-
Way to go Richard! I am designing the lower deck now with the help of AOS HMS Diana book and I am kind of cutting things just to make it easier. The question always is Where you stop on detailing the ship. I like your mantra. Best wishes. Daniel.
-
Beautyful Ed. Can you show us the secret recipy for the dark glue? I mean 3:1, 4:2, 5:1.5 ?? of PVA and black dye... With the Triton I am only using white glue (PVA) and it is looking awfull when I sand the frames. An another one, Do you think that by adding this black dye, you "weak" the sustance, the glue or it´s something unreliable. (?) Maybe are silly questions. Regards. Daniel.
- 3,618 replies
-
- 2
-

-
- young america
- clipper
- (and 1 more)
-
All the best like Antony said! welcome aboard "camarada"! daniel.
-
Glad to see her back! I do remember the copper sheets. What a beautyful lines! Best wishes Bruce! daniel.
-
Excellent Piet! Another "practicum" that I have saved in my "researh folder"!! Thanks for that. Daniel.
-
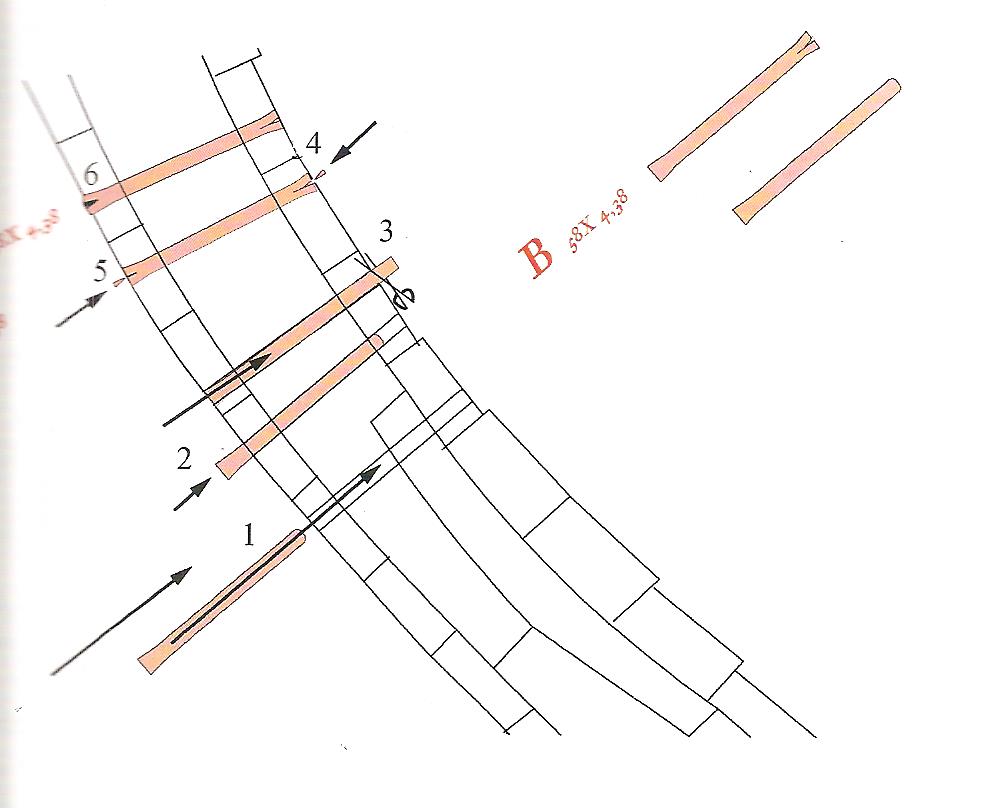
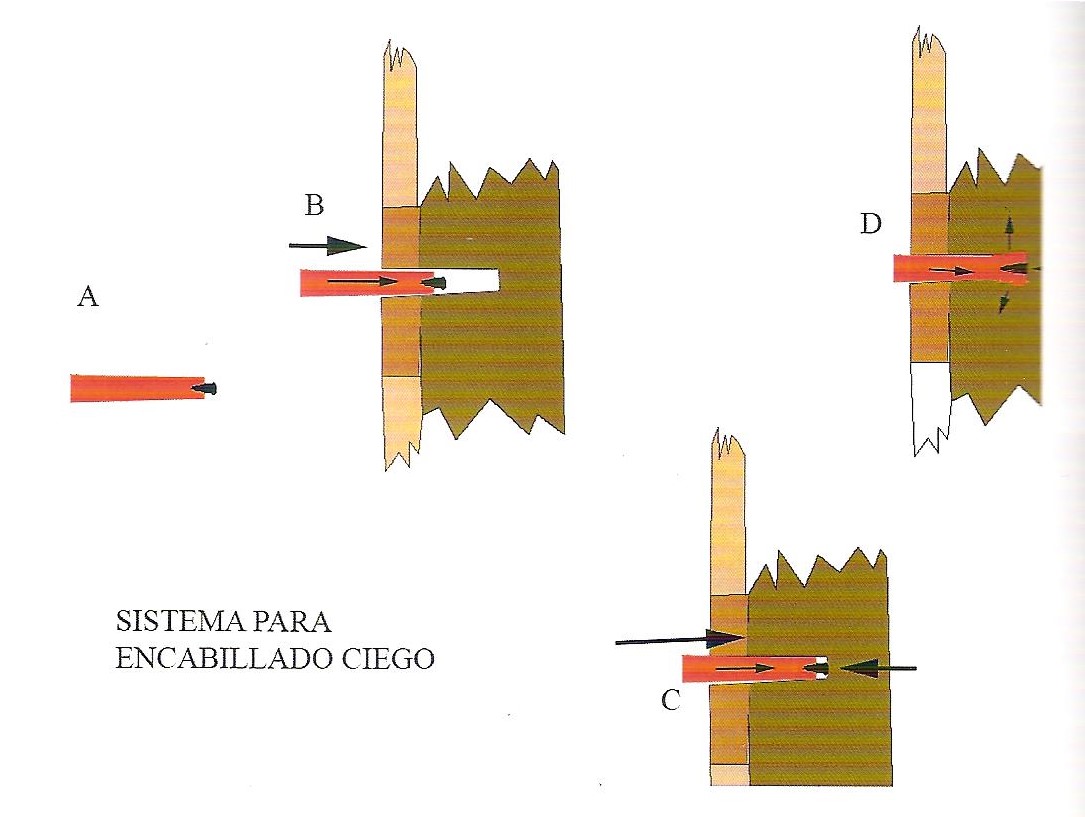
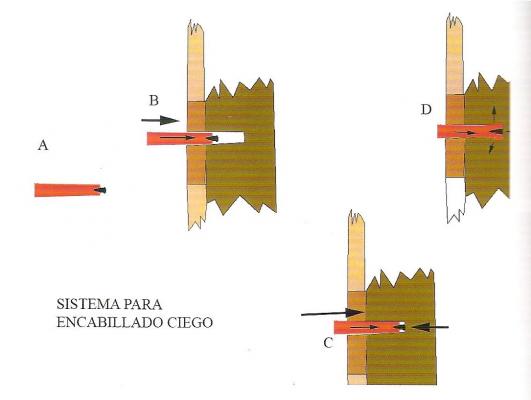
Hello Ed! Wiht that "cadency" of frames I am sure that you will end the hull in two moths or so...not two years! Look what I have found about the treenail question. I have tried to translate it the best I could. The sketches talk by themselves but the way it was done in the XVIII century amazed me. It is the Rooth system, around 1752. (1) A drill is made that pass through the external planking the frame and the interior planks; A treenail of the same diameter is then selected (for a “B” treenail type in this case*) except the head of it which is a few inches bigger; the length of the treenail should be one foot more than the hole drilled. The treenail is spread with lard and is introduce (2) with a hammer. When we reach to the head where the diameter is slightly more, we need to hammer strongly, that’s why the head is reinforced with spunyarn rope, this avoids the treenail to split. When it has been introduced to the maximum and it extends on the inner side, both heads are trimmed to the face of the planks (3) then a treenail wedge or spile is force in both sides of the treenail (4-5-6) so no free movement is allowed. The sketches of the “blind treenails” talk by themselves so I am not going to translate the text of the same period. Beautyful work and posts like always. Daniel.

- 3,618 replies
-
- 5
-
-
- young america
- clipper
- (and 1 more)
-
Hello Richard and all! today I have finished the fore cant frames. I mean they are all in place and glued. In the last picture of the post #61, the one that shows the horseshoe, I can see that you have cut the right hand of the step of -w- frame inclinated foreward. It should be square to the horizontal line. 90 º . You´ll be in trouble if you attempt to glue this W frame with that inclination. Maybe the sheer plan tricks you. Maybe you can put it straigtht and fill the space (or leave it empty). the hawse pieces will fullfill that gap. Damn how I miss my camera...!! Happy Saturday! Daniel.
-
Congratulations Piet! Best thing about the primer coat is that reveals all that little dots or errors on the hull. Yours looks fantastic and so smooth. Have you thought again about simulate the rivets? and another one, Are you going to "age" her or is it going to be a neat and clean model? like the picture you put in your first posts. Best wishes! Daniel.
-
Hi Pete, Guy and all. Yes! This afternoon I could set four of the fore cant frames. The pdf patterns I made with CAD plus the tilt table of the sander has been very very helpful. I hope to finish tomomorrow. There is only two more frames to set on. Guy I took lots of pics of me, or precesly my arm, my hair, half of my head... It´s kind of tricky to take pictures holding the computer with one hand and clicking with the other hand. hahaha I will not do this again. too much effort for that "..."result. I´ll go back to the village and rescue my camera from the oncoming winter. See you! daniel.
-
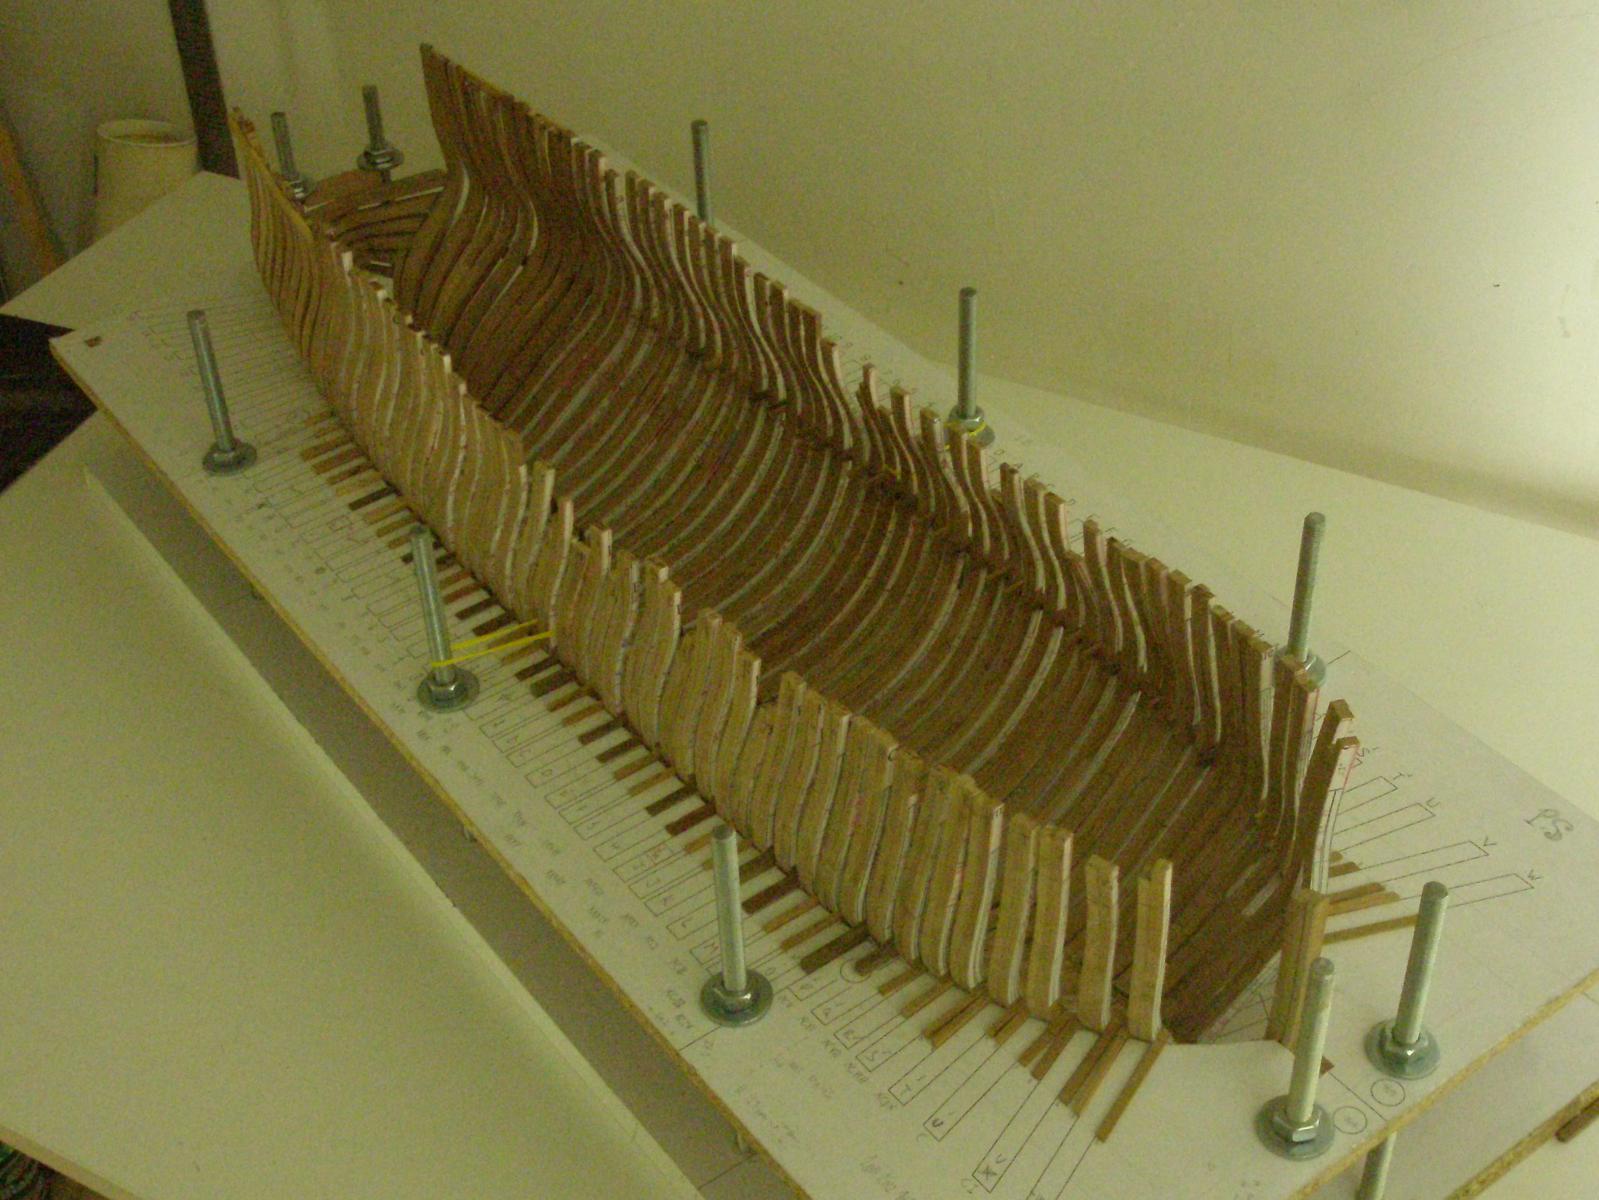
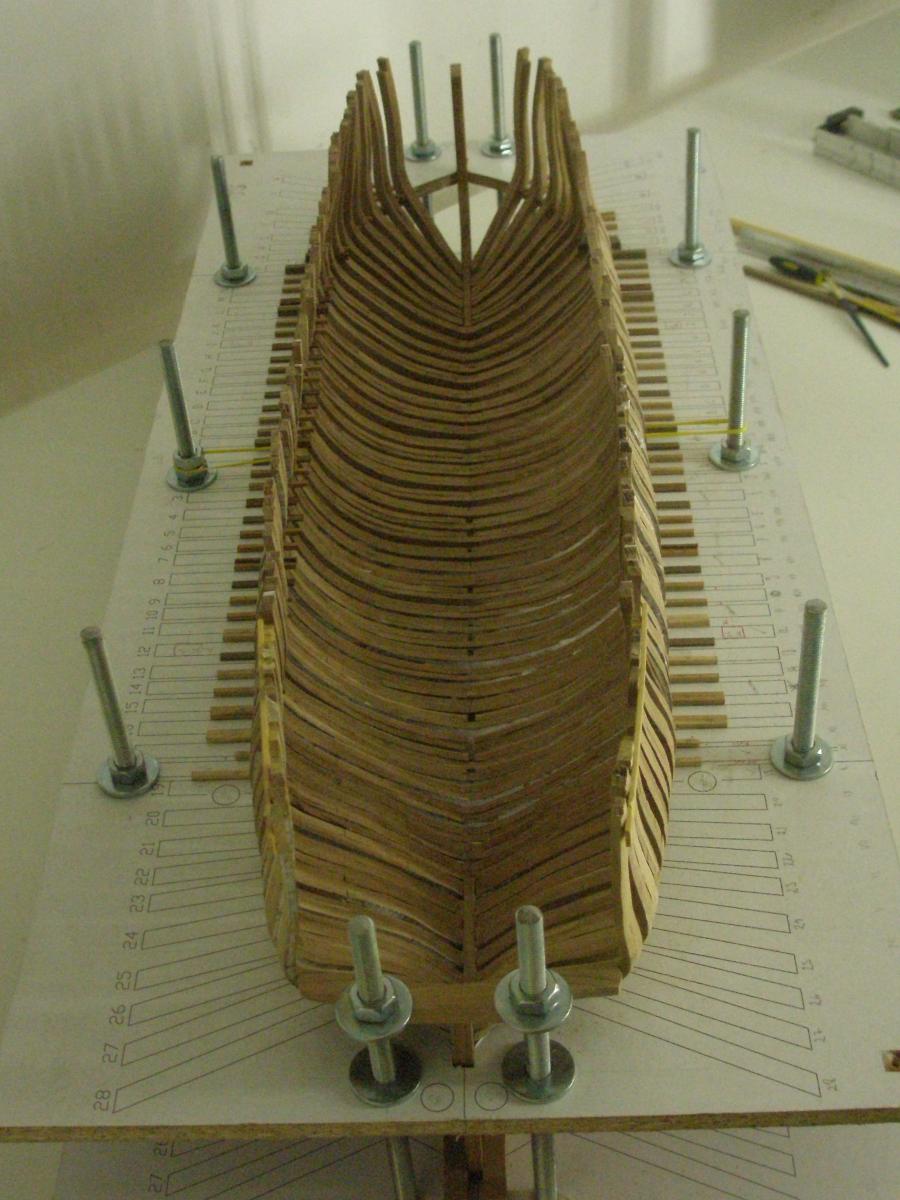
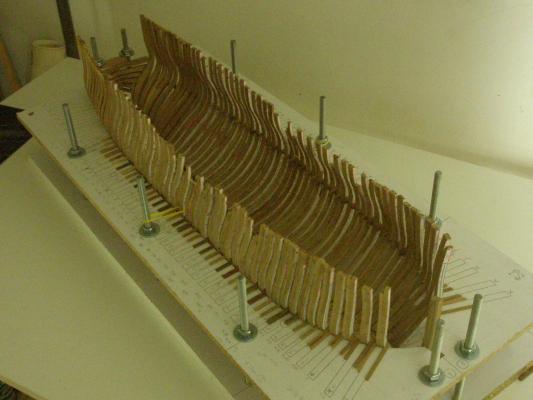
Hello Boys and Girls!! I have finally been able to set all the square frames from #19 to the one before the fore cant frames. In the last post they all were set but not with the spacers. It has taken me three days to put all that little pieces of deadwood on the keel and the top platform. It has been really fun. The ones on the upper wood are already glued. Different widths but all measuring 35mm. I glued them putting the PVA on the wood with a little brush, not to the little piece of timber. I removed immediately all the excess with a wet brush. The ones on the keel are glued with “scholar stick” that red one so well Known. I will remove all this chocks on the keel because… Some poor pics. (updated, no more skipe around!!) As you can see I have not glued the gripe and the fore pieces. I have to bevel it. I will glue it at the end sanding at the same time the keel and the gripe. There is a lot of gaps between the frames and the top board so I will glue them to the keel first. With rubber bands I will tight them to the platform and glue a timber on the top of the frame. Back to post #9. Next step, the fore cant frames. It only took me two years and three months to get here…and here they are (updated) Best wishes to all. Daniel.


-
voronDIV… I think you´re aiming TOO high with this. You want to make both projects at the same time? Please correct me if I am wrong. Both, the cross section and the full hull model are “long term practicums”. Besides, we do not know anything about you. Not you but your model skills. If you have done before, a kit model, a scratch one, plastic, etc., if you´ve been in other forums…Where you come from... I HAD no problems at all when I started back in 2011 by following the rules. So go back to your workshop, build the keel, put the pics and everything will be fine. I recommend you to start with just one of the practicums, NOT both of them. It´s just a suggest. With respect. As you say. Daniel.
-
Congratulation Richard! There is something magic when you rise all the frames and you start to see the shape of the hull at last! Don´t you think? Have you remove all the patterns in all the frames? I am leaving the fore patterns, the red ones, just to realize where to bevel more or less. Specially in those aft and fore. Since I have no camera I´m going to see if I can take pics using the web cam and skipe. fingers cross. Your are doing an excellent job and It took you less than me. Hurray! Daniel.
-
One of the best speeches about scratch I have seen in a while... If I have learned something from 2011 till now is that there is no shortpaths in the scratch building. The best tools I ever bought are the the scroll saw and the band disc sander. Now I am looking for the vertical mill but It will have to wait. Of course lots of books no specially expensive and many many hours looking arround in MSW. Best wishes! Daniel.
-
Hello people! It´s been hard, tough and complicated but, Yesss… It´s Friday! No pics but during this week I´ve been able to fit all the square frames. No worries because I have to remove all of them and put them in place permanently. I´ll make some pics next week cause I forgot my camera don´t Know where. WoW! The size of the Triton is amazing. I cannot even thing about the size of a 74 in my workshop. One thing is to see her in a plan or by pieces and another one is to see it on a 3D real thing. More than a “thing” I am starting to see it as “jewel” This is just a post to tell you all I am alive and kicking (like someone says) Have a good weekend! Daniel.
-
Hello Antony, just found your log as Bob did. Amazing work you have done so far. Believe me that if your next project is to make de Triton, mine is to make a cross section. One of 74 or 100 guns. I have been reading this summer “The last sailing battlefleet” by Charles D. Lambert and there are lots of cross section models that are master pieces by Symonds, Seppings… I am thinking to do it at the same time of the Triton project. It´s just an idea. With a cross section you get pretty quickly to the fun stuff, the interior work, metal work, pumps, etc. I am not saying it is easy but I guess is someway “easier” to get to that stage. Anyway, I will follow your build for sure. Best wishes. Daniel.
-
And here is me buying clamps and more clamps to put together my pair frames… What a Clever idea! And those drills will be filled with the treenails, I guess, so you don´t have to drill them again. Is the iron pin the same diameter of the treenail-bolt? Always a pleasure to read your post Ed. Best wishes. Daniel.
- 3,618 replies
-
- 1
-
-
- young america
- clipper
- (and 1 more)