harvey1847
-
Posts
528 -
Joined
-
Last visited
Content Type
Profiles
Forums
Gallery
Events
Everything posted by harvey1847
-
Simply Beautyful! Love the colors of the different timbers you have used. Glad to see your log back. Daniel.
-
Happy Happy Birthday Martin!
-
Way to go Rocker! It is amazing the amount of wood that a disc sander eats so do not worry about leaving one or two milimeters of "extrameat". I cut mine in this way and is more relaxing than trying to go exactly throuhg the line of the pattern. Like the "left" and "right" literature on the patterns. I started writing P.S and S.B. trying to be an erudite and all became a mess. Now I just put a P.S (port side) (right) and nothing on the other one. I don´t Know why but I do not follow the rule of "Keep it simple". By the way yesterday I glued all the patterns till frame -W-. It has been a tedious work for me. Best wishes Rocker and keep going! Daniel.
-
Very nice work paddy! I read again the whole log and it´s amazing your skills for this your first year of Aprentice!! Best wishes! Daniel.
-
Your post should be moved to the "stickies topics"... What a nice bunch of practicums with the rope, blocks, hooks... With pretty good pics and very well explained. Congratulations! Daniel.
-
Beatyful indeed! What a nice logs arround... Daniel.
-
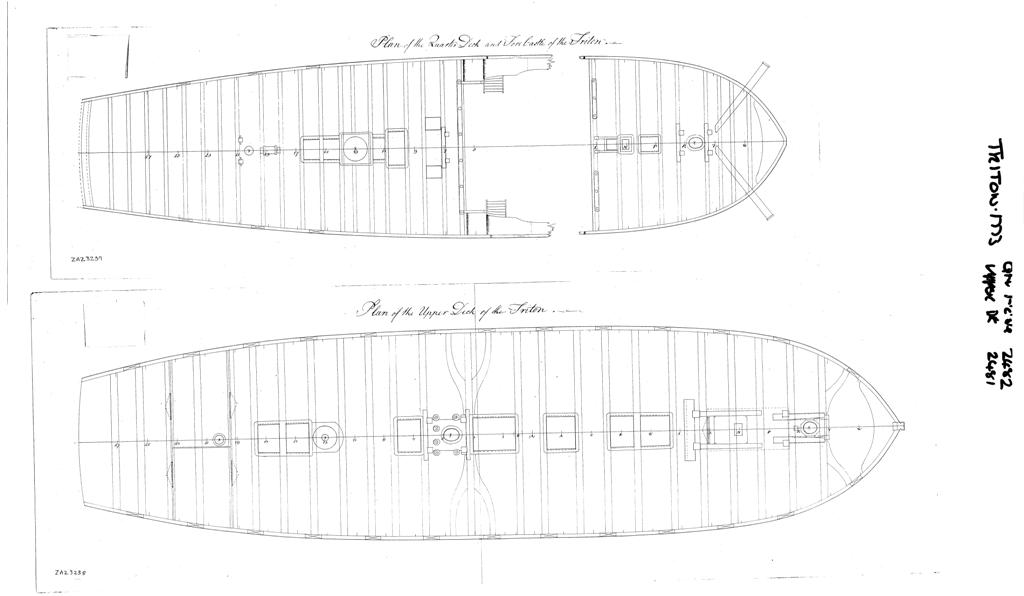
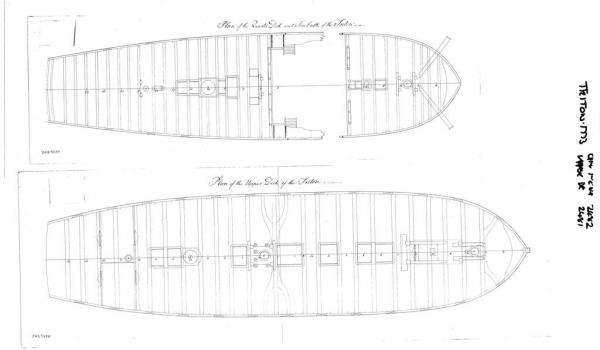
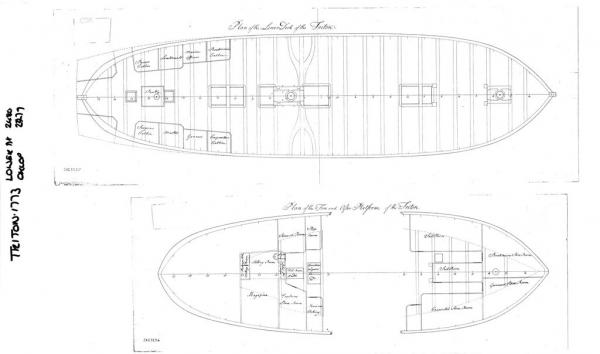
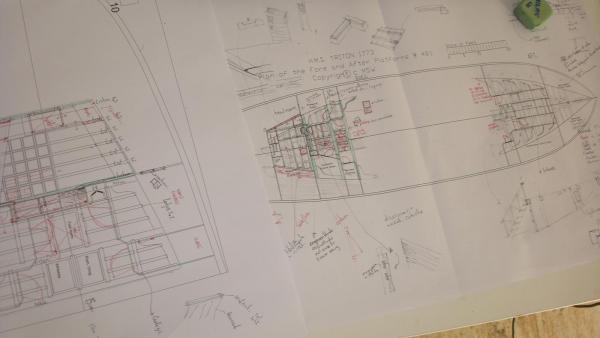
Hello Guy Christian and All! Lots of work arround and no time for the hobby. I have the wood at home since three weeks... Christian, I have those plans. As I said I will change some things. I was much more worry about the knees, carlings and ledges but then I started to draw the storerooms an try to realize how the thing could be done. I´ll change the Capstain store and leave it as the original and the size of the squares of the magazine. Hope to have some time during the weekend. I need to complete all the frames. I am willing to start with all the interior work. Thanks all. Here are the plans I have. They are pretty pretty small. Quarter Deck & Fore Castle - Upper Deck. Lower Deck - Aft & Fore plattforms. Best wishes. Daniel.
-
Those signal lamps are huge! Can not wait to see it finished. Excellent work Paul! Best wishes. Daniel.
-
Keep going Richard! Now I am sure that you are actually enjoying this project!! I am going to print the full plan of the Triton (A0). The one you have already on your work table... Best wishes! Daniel.
-
Guy! Have a look to the Wang´s log page no. 3 & 4, he made a good job with the stem deadwood. I am in the same proccess. Cheers! Daniel.
-
THANK YOU VERY MUCH Grant! I will keep that tutorial in my "research folder" for sure. Thanks again. Daniel.
-
Wellcome aboard Richard! I´m sure you´re going to enjoy this ship!! Best wishes! Daniel.
-
Truly Nice Bob! How I envy you guys... talking about planking, treenailing... Ays! I´ll have to wait much more to get to that point, I guess. Good work again Bob, keep going! Daniel.
-
How is it going?
-
Beautyful color Rusty! Is it that blood wood ? What a nice contrast between the beams and those hatches... Daniel.
-
Hello Grant! Really nice machine. I guess you´re going to save a lot a of money by doing the rope by yourself. Can I ask you to post a sketch of the whole system? I do not understand how the thing works, specially why they are fix to the table the machines or if they move with a rail or something. Just a hand made sketch. Coukld you? Best wishes! Daniel.
-
Lovely work Paul. Can not wait to see all that structure painted...! Regards. Daniel.
-
Hello Rummy. What I am going to do is as Randy said to me, make the keel in two pieces. I guess it would be easier to sand the iterior. So go for the keel but do not glue the whole thing. Best wishes. Daniel.
-
Really nice Snowman... Can you describe a little bit the process of restoring the blade? What liquid did you use to erase the rust? Thanks in advance. Daniel.
-
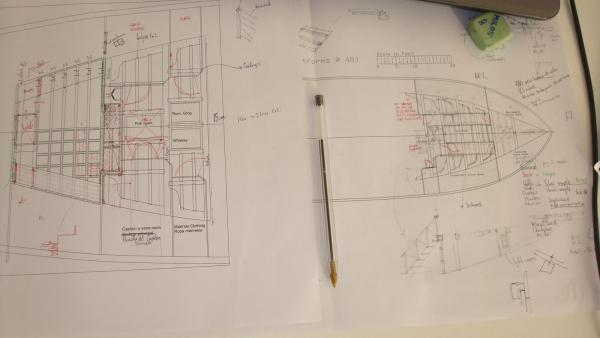
Hello All! Thanks Mark, Christian and Pete for the answers has been very helpful. Here are the timber I have asked for...: .- Frames (10 more to go), deck beams,carlings, ledges, Knees: Cherry. .- Bulkwarks and planking: Maple and "Coto" (No translation for this but it is a white wood) .- Decks: Maple. .- Hatches and various: Mahogany and "Pachyloba" .- pillars and others: Walnut. .- bulkheads: Ramin That´s all. Waiting to see all of it at my log. The attached files are just an "storyboard" to follow. I will probably change some things when the time to build might come. I use Ed Tosti (part 33) log, Wang´s log and the AOS book about the HMS Diana. So do not take it as a reference. My intention was just to draw the internal structure with the Knees, carlings and ledges but once you start to draw, one thing gets you to another and you end drawing the rum bottles... Best wishes! Daniel. Decks_fore_platt_differences.pdf Decks_fore_popa_plattform.pdf
-
Congrats Bob! The milestone like the people around say is done. Now starts the fun time when you actually see how the model grows... Good work! Keep Going! Daniel.
-
Hello all! I am waiting for your answers about the timber you have used... I have been talking with the wood supplier, here in Spain, and is going to be quite difficult to find the Holly timber. arrgh! Meanwhile I am with the CAD drawing the decks. God! this project is getting quite complicated. At the same time is giving me lots of beautyful moments trying to figure out how the deck arrangement were done. Here is the pdf file (1:48) I am going to follow in order to complete the fore plattform. If it is helpful for you it is okey. Is the one I am going to follow by myself. Wang´s log and other sources has been very very helpful. Cheers! Daniel. P.S. I have edit this post adding a pdf showing the differences between the original plan an the one, I insist, I am going to do (hope so). The other one is a new version with no deck clamps. Decks_aft _proa_diffrences.pdf Decks_aft _proa_plattorm.pdf
-
Thank you very much for the pictures Rusty! Can you tell us the size of the ledges and the carlings? I am studing right now the plans of the decks and I can´t see these pieces around... at least in the plans I have for the complete model. I am using the book of the AOS series about the HMS Diana to figure out how to do the decks. Thanks again. Good work. Daniel. p.s. now I can see a little gap on pic number...
-
Welcome aboard Giku! Have you thought about using a darker wood for the false keel? Are you going to simulate the caulking between the pieces? Best wishes and Happy Birthday!! Daniel.
-
Pretty clever indeed! I did not realize how big is the cross section to 1:32 till I have seen it on your Knees!! It´s BIG Big BIG... Regards. Daniel.