vossiewulf
-
Posts
1,477 -
Joined
-
Last visited
Content Type
Profiles
Forums
Gallery
Events
Everything posted by vossiewulf
-

Preprinted lines
vossiewulf replied to achuck49's topic in Building, Framing, Planking and plating a ships hull and deck
Although I largely agree with you in this case, you're judging others' basic methodology and that's not fair. For example if your intent is to scratchbuild a model that will go in a museum one day (as more than a few in the scratchbuild section are doing), you better be treating it like nuclear plant design and manufacture or you'll miss your mark by a mile. People who pursue that end of the hobby will spend years assembling and comparing documentation until by the time they're ready to build, they've laid out the build process in excruciating detail, nothing is left to chance and they'll build absurdly complex jigs to ensure absolute perfection in the build execution. -
source for steel bar stock?
vossiewulf replied to Griphos's topic in Modeling tools and Workshop Equipment
Roger is right about aluminum, if you want to use that you have to machine the U, which means removing a fair amount of metal, although with aluminum it goes quickly. I made some very small ones once that got lost in a move and haven't had call to remake them yet, but I did machine the U on the mill into a bar, and then used a slitting saw to split them off into four clamps. If you just have a lathe, you can put the end mill in the chuck and clamp the bar to the cross slide and machine the U that way. But I think Mike's solution is probably best combo of cost + difficulty of making the clamps. -
source for steel bar stock?
vossiewulf replied to Griphos's topic in Modeling tools and Workshop Equipment
T5 or T6 (hardness) 2024 (alloy) aluminum should work fine in a small clamp, as does brass as Mike has shown. My only suggestion with Mike's clamps is to cross-drill the knurled knob so you can slide a 3/16 steel rod through for extra torque when needed. -
B.E.'s suggestion to look at thinner woods for second planking and deck planking is a good one. Should reduce costs for you, maybe make more suppliers available, and I've always wondered why the second planking is so thick on kit ships where the builder isn't following contemporary building practices in the first place. Complex curved surfaces are veneered, scraped, sanded and finished every day in furniture pieces with a relative thickness of only a small fraction of that of a typical ship kit second planking.
-
source for steel bar stock?
vossiewulf replied to Griphos's topic in Modeling tools and Workshop Equipment
Keyway Key stock as I recall is not tool steel but it has been hardened, and it's not a good idea to try to machine hardened steel. If nothing else the tools required are quite expensive. -
source for steel bar stock?
vossiewulf replied to Griphos's topic in Modeling tools and Workshop Equipment
Since Roger beat me to the punch, and while we're at it, if you're looking for ground stock (or anything else having to do with machining), you can get it at Victor Machinery Exchange. I've been buying from them for 10 years or so. -
source for steel bar stock?
vossiewulf replied to Griphos's topic in Modeling tools and Workshop Equipment
Echo...echo... -
source for steel bar stock?
vossiewulf replied to Griphos's topic in Modeling tools and Workshop Equipment
Another good one is Online Metals, I order from them sometimes. -
Holding small parts for soldering
vossiewulf replied to BETAQDAVE's topic in Metal Work, Soldering and Metal Fittings
I've yet to try it, but will at some point- most jewelers use thermoplastic for clamping operations when soldering. Heat the plastic with a torch, embed your pieces into it, let it cool, then solder, as long as you don't use excessive heat the plastic is supposed to hold fine. -
That pretty much describes me, Larry. I recommend you start with something similar to what I did, a cutter model or a longboat, or something else with a single mast. There is a tremendous amount to learn just building something like that before you step up to the plate for the Constitution. I have that kit in my closet but it will stay there for a while yet before I feel like I'm ready to do it justice.
-
Yes yes yes! Also, YES!
-
Can anyone recommend a miniature hand plane?
vossiewulf replied to Bettina's topic in Modeling tools and Workshop Equipment
There is nothing special about the Kunz plane, the steps you take to make it operate well are the same for all planes of all sizes: 1) Bottom of plane is dead flat, 2) bed for the iron is dead flat, 3) back of the plane iron dead flat. The biggest problem with the Kunz is the large, fixed throat opening, this is optimally much smaller but the only way you could really fix it is by welding or silver soldering a piece of cast iron/steel/brass into the throat, and then filing it to the narrow opening that you want. Any of these books will help with setting up any plane you purchase. -
Hola Isidro, bienvenido a MSW! Google Translate se está volviendo bastante bueno en estos días, su mensaje fue comprendido fácilmente. Muchos constructores que no hablan inglés lo usan para sus registros de compilación todo el tiempo. Teniendo en cuenta que aproximadamente 4/5 de todos los libros en inglés de Age of Sail podrían ser retitulados. Sin embargo, otro libro sobre la Royal Navy, me complace ver que traiga más libros de historia naval en español al mundo de habla inglesa. Me gusta el RN muy bien, pero es más interesante un libro sobre un tema sobre el que sé poco (diseño del barco español).
-
Interesting, you're right but I have honestly never seen that, and I've used CA on maple before. I suggest trying a different CA glue if you can and see if it does the same thing before you totally rule it out for future use.
-
Can anyone recommend a miniature hand plane?
vossiewulf replied to Bettina's topic in Modeling tools and Workshop Equipment
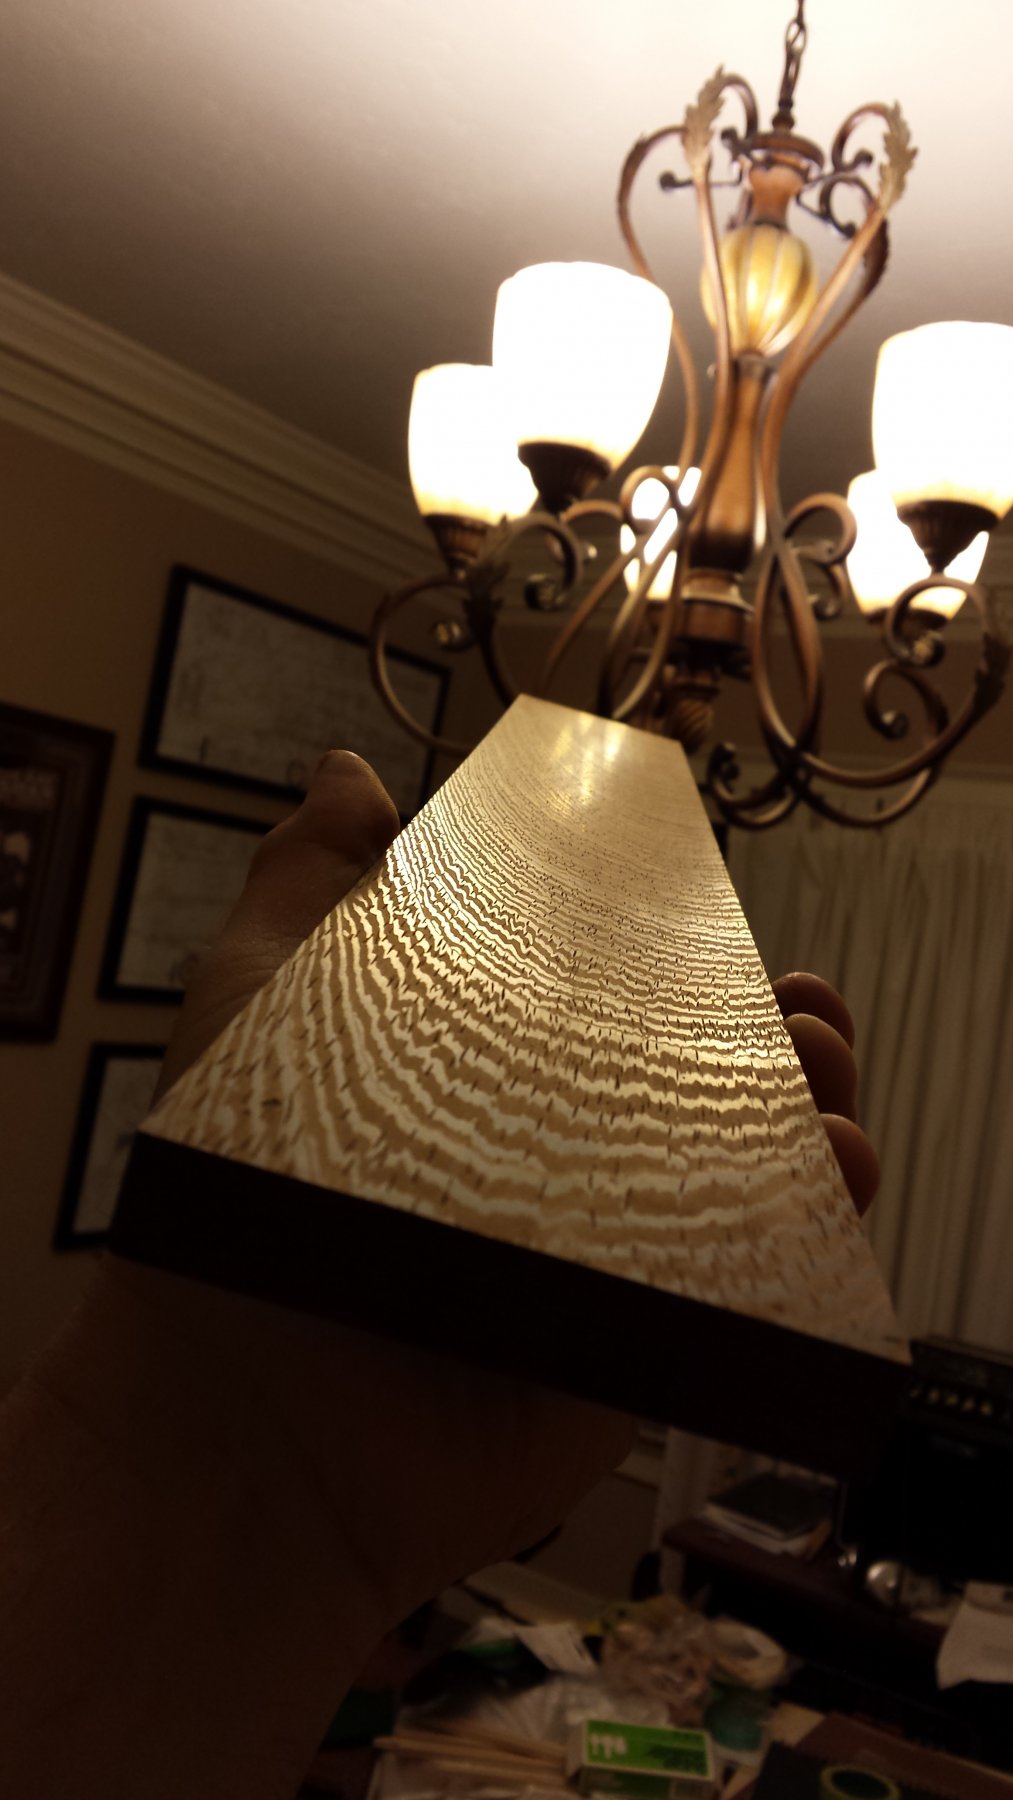
I also agree with Bob that while the miniature tools from Lee Valley are cool (and I have a few of them), they are NOT the best small scale tools for exactly the reason he cited: as they are, they're designed for tiny little doll hands and they don't work as well as other options designed to work at that scale with normal human hands. I keep the shoulder plane on my bench because it can get into places other tools can't, and I use the block plane occasionally, but for example I never bought the chisels because I don't know how you're supposed to use them with the tiny handles. Lee Valley does however sell my favorite mini-planes, because they are very ergonomic, you hold them with the handle in the palm, and your index finger down on the toe of the sole- they are very precise and controllable when held this way. Veritas Detail Palm Planes Mark F., you might want to take a look at my tools thread here, you may find some useful items. Also Mark, regardless of which plane(s) you get, on any straight plane remember to round the corners of the cutting edge, and even better is to relieve each corner about .001-3" (depending on width of the cutting edge, wider gets more relief) relative to the center of the cutting edge, so the entire edge is a very slight curve with rounded corners. Sharpened this way, you won't get corners digging into your work, and with overlapping passes you can plane a surface perfectly flat. Example of a wenge board planed with a larger plane (Veritas low-angle smoothing plane), but sharpened the same way: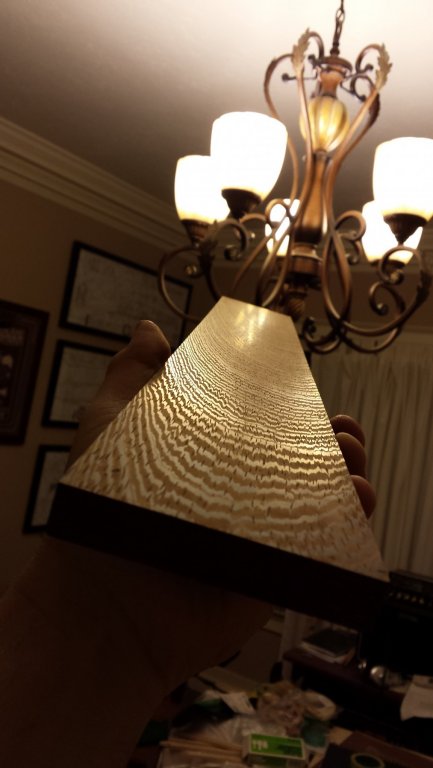
-
Can anyone recommend a miniature hand plane?
vossiewulf replied to Bettina's topic in Modeling tools and Workshop Equipment
That appears to be a Mujingfang plane, they have a huge range. I have that one plus a couple others. Steel is reasonably good, and the iron is relatively thick for a small plane, which cuts down on chatter. All in all a good plane, at least if that's not a bad copy, which I question at $10 - Mujingfang planes from Japan Woodworker are more like $40. If you want one slightly bigger, try the model maker's plane from Lie Nielsen. Everything LN makes is extremely high quality, I own this plane also and use it regularly. -
High strength PVA glues designed for woodworking. Here the most common is Titebond. Are you sure the yellow shade from CA isn't a very thin layer of CA near the joint? I've seen that with several light woods, but only when there was an actual layer of CA on the surface.
-
You can also read it online for free via Google Books, it's a somewhat better copy than the PDF. We now fully return you to the creation of an awesome racing schooner by Keith
-
Thanks for sharing that Keith, I found a version on Google books and have continued reading
-
Agree. luthiers use epoxy resin all the time as their grain-filler, but they spread it squeegee-style with plastic spreaders, I've never heard of anyone trying to spray it. Also Bob is correct that you need to account for the relative flexibility of the glue, epoxy once fully cured is very rigid and replacement of the wood is a better idea. If it's not possible, use yellow glue as it remains flexible to a degree after curing. There are also some (apparently) good newer CA glues that remain flexible after curing, but they don't have much of a track record yet, and that's important in a model intended to last for decades at least.
-
Hello.... I am new here to the forum
vossiewulf replied to mfrazier's topic in New member Introductions
With those skills Mark, you'll do very well. Even so, stick with a single mast for your first ship, there's plenty of complication in learning everything needed just for a simple cutter like mine. -
Appears to be called Manilkara or Bulletwood. Here is one store in Canada offering it and it's not terribly expensive. Domex in the US claims to carry it but the photos looked very different.
-
Whenever I slash myself for the first time working on any project, I'll put some blood in an out of the way place that I remember, just for that reason Like all of my chip carvings have little blood stamps on the back. And Louie, the pumps look great.
-
Green Elephant funny car by jct - FINISHED - 1/24 - PLASTIC
vossiewulf replied to jct's topic in Non-ship/categorised builds
You have to explain the roof/body damage. So the story needs to include the sentence "[a]t that point I was inverted at 180 miles per hour."