
MORE HANDBOOKS ARE ON THEIR WAY! We will let you know when they get here.
×


vossiewulf
-
Posts
1,477 -
Joined
-
Last visited
Content Type
Profiles
Forums
Gallery
Events
Everything posted by vossiewulf
-
 Pat, the correct descriptive term is engraver's block, although many call it a ball vise, and mine is from GRS and it's their standard model (6"). Unfortunately they have become pretty stupid expensive. I would recommend looking on EBay either for a used GRS or a new Pepe brand. Sam, I haven't received the fly head cement yet, I'm using CA here and dabbing it with a fingertip to prevent it from forming a gloss coat. However the result is quite stiff of course and that's not very helpful in most cases, so I'm going to try both a flexible CA and the flexible fly tying cement to see if either of those work better. WRT waxed vs. unwaxed, the thread does have a tendency to come apart but not so much that it strays out of the width of the stripe I am winding about the line. So that's ok to me, I'm using unwaxed because I assume gluing the waxed version isn't going to work nearly as well, although I haven't tried it.
- 714 replies
-
- 2
-

-
- lady nelson
- victory models
- (and 1 more)
-
Wouldn't this be better in the masting and rigging section?
-
For anyone interested in how I'm doing these breeching ropes, although it seems pretty straightforward to me. I'm using dark brown 14/0 unwaxed fly tying line for the small stuff to do the seizings, it's pretty close to correct for scale. I think. Actually I have no idea how you could do this without using fly tying line, trying to do seizings with the bigger stuff that comes in kits would be challenging. As you see, I spent at least a good five minutes turning a couple of posts for my ball vise as a jig. It works well enough, but I need to add clips so I don't need to use tape. I'm not entirely happy with using CA here, so I ordered some flexible fly tying head cement, it's a clear glue used to seal the heads of finished flies.
- 714 replies
-
- 11
-
-
- lady nelson
- victory models
- (and 1 more)
-
I would do the serving, but I'm fairly high on the stickler for details scale. Look at it this way, chances are you'll end up working in 1/64 or 1/48 and they will seem easy after doing it correctly in 1/85. That said, taking an easier route through your first model isn't a horrible idea; you learn so much during the building that it probably won't end up at the front of your display cabinet. Just getting a feel for rigging and masting and hull construction in your first effort and then buckling down on the accuracy and difficulty in the next might be the best way.
-
As Johann said, you let a professional do it Any decent sized town will have a jeweler that does custom work. The easiest thing to do is get jeweler's wax and carve/build up a master, they can then make a mold and do the casting. It shouldn't cost too much. I've had parts made that way for projects, and I also made some rings for an ex-admiral.
-
Round 2 with Syren light brown .018" rope. Color is much better, but it's a bit darker than what Chuck's web site is showing- since I ordered a bunch of light brown line for the running rigging, I'm waiting for Chuck to confirm whether he changed his colors at some point to decide whether I roll ahead now, or wait until that line order arrives. I don't want to make these up only to have to replace them for clashing with the other running rigging. When I was a teenager I did a lot of fly tying, relying on that experience here.
- 714 replies
-
- 6
-
-
- lady nelson
- victory models
- (and 1 more)
-
Glad to see they're working out for you Gaetan I hope you use them for many, many hours of fun modeling and the creation of beautiful ships.
-
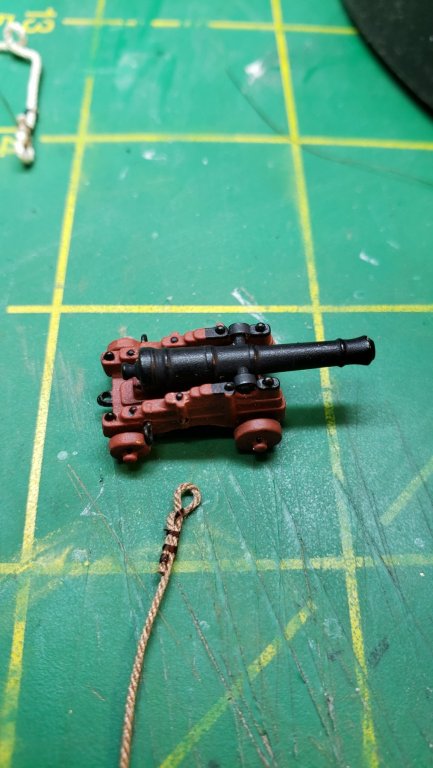
Another note before an eagle-eyed ship modeler notices: the cannon are upside down. They should be with the trunnions at the bottom, but I would have had to make significant modifications to white metal carriages to make that work, and they would have been too high in the ports as well - Chris designed the kit with the Amati 3 pounders sitting low. So I flipped them with the trunnions on top, it's not too noticeable. I hope.
- 714 replies
-
- 1
-
-
- lady nelson
- victory models
- (and 1 more)
-
No, that would be the hardest place as the rope is being bent severely at that point, getting two parts to line up would be extremely difficult. The only place I can see cutting and gluing working is behind the breeching rings. Mike, yes I think it will work. I will put some glue on the tip of the loops and bisect them there, that leaves a clean joint. I can then slide them on the breeching rings and glue them closed where the joint will be obscured by the breeching rings and eyebolts. That's my theory, at least, will see what happens.
- 714 replies
-
- 1
-
-
- lady nelson
- victory models
- (and 1 more)
-
Thanks Chuck. I was wondering about that, whether it was too heavy. Unfortunately if it is, I will have to order something else- no other natural color line in similar sizes. Can you or someone explain why modelers make the breeching rope white? I would have assumed that white rope was a modern invention. And I've wondered why the rope would be a different color for the breeching rope than all other lines on deck.
- 714 replies
-
- 1
-
-
- lady nelson
- victory models
- (and 1 more)
-
The ladder looks good Mark, congrats on a nice scratchbuilt part. I'm sorry I didn't mention black under the grate, I thought that was fairly obvious. If you want to be very realistic of course, you can cut away the deck and false deck under the grates. Ship's wheels were a fairly late innovation, until then the steering was done with some form of tiller, and small boats (like cutters and such) maintained tiller steering all the way through the age of sail.
-
Oh I realized that after I put them in, but yes that might be a better way. The other one I didn't think of was the rings on the carriage- they're all installed but a pre-made breeching rope ain't going through those rings. I will probably have to yank them off the carriages, I don't see a good way to make the actual breeching rope in two halves.
- 714 replies
-
- 1
-
-
- lady nelson
- victory models
- (and 1 more)
-
The way I put it recently is that to build a really good ship model, you have to entirely build it in your head first, working out every detail and process and tool. If you say I'll just figure that out when I get there, the gods of ship modeling will definitely smite you. Welcome to your first smiting It won't be the last. Don't worry about the photo upload problem, just create an account on http://www.imgur.com and upload your photos there. That also allows you to paste in the photos in a certain order and to comment them as you go.
-
And finally I get to start playing with rigging, starting with breeching ropes. I was going to put on the seizing in the middle of the loops that go around both parts of the rope, but decided you probably couldn't even see them if I did. Also I like this thread, but it appears a bit too white to me, what do you all think? Plan is to put some glue on the top of the loop in the breeching rope and slice it there and install on the model that way. I saw no reasonable way of making them in situ.
- 714 replies
-
- 8
-
-
- lady nelson
- victory models
- (and 1 more)
-
Looks good Mark, nice progress.
-
Good eye, unfortunately I didn't think of it at gluing time They're stuck there, but I definitely won't forget the next time.
- 714 replies
-
- 2
-
-
- lady nelson
- victory models
- (and 1 more)
-
Jason @ Crown Timberyard is back online. It takes typically 20 business days for him to deliver though, so you have to order a month out. I just received an order for square Castello boxwood stock to make masts and yards.
-
What first wooden ship kit should I buy.
vossiewulf replied to SHIPSCAT's topic in New member Introductions
Rigging Period Ship Models -
Two other books I recommend: Rigging Period Ship Models (excellent detailed drawings of everything) The Masting and Rigging of of English Ships of War 1625-1860
-
With stays (standing rigging that just holds the masts and bowsprit in place), including the shrouds, they were actually wormed, parcelled, and served. A serving machine is not difficult to make, search for serving machine here on MSW for self-built ideas. Otherwise I would recommend the serving machine from Syren Ship Model Company. You still have to put it together, but it works well and is not expensive ($55). It's very possible they simplified the rigging, as you say it's an entry level kit and that almost always means simplification. You're about to be confronted with the biggest mass of confusing terminology there is anywhere when you face ship rigging for the first time. You pretty much must get some books to help explain that terminology and what all the standing and running rigging did and how they were made and set up if you want to know what you are doing and to make a rig that is actually sensible. Another good move is to go to Syren and replace all the line that came with the kit with Syren rope, it's far, far better than average kit line and the entry level kits get the worst line. Very fuzzy with threads sticking out a scale foot or more. BTW don't use beeswax on your lines, it's acidic and will eat away the rigging over time. If you must use wax, use paraffin. But IMO the best rigging is just good line with no wax. And you're zooming right along, so make some decisions and order some things so you don't get stuck waiting for supplies to arrive. That's always very frustrating when you're on a roll with a build.
-
If you're set on that, you're replacing cheap wood with definitely not cheap wood. The preferred options are Swiss pear and Castello boxwood, with the former being a little more reasonable than the latter. As others have noted, you can also go with much less expensive maple or cherry, and since it's likely to be stained dark it may not be worth it to go for boxwood or pear.
-
The correct answer is real knife, but not necessarily a violin maker's knife. You're welcome //but you should keep around an Xacto for cleaning out dried glue and cutting sandpaper and the like
