DONATION DRIVE - SUPPORT MSW - DO YOUR PART TO KEEP THIS GREAT FORUM GOING!
×


barkeater
-
Posts
411 -
Joined
-
Last visited
Content Type
Profiles
Forums
Gallery
Events
Everything posted by barkeater
-
To work with, I like walnut a little better than mahogany. However, color wise, mahogany gets my nod and the color contrast in your case might be more attractive than walnut alone. Since I don't see a big difference in usage between the two, I would favor going with mahogany. Richard
-
Working with blackend brass.
barkeater replied to SiriusVoyager's topic in Metal Work, Soldering and Metal Fittings
Here's a pic of the chain plates. This is of the Unite as refit 1796 by the British which I'm currently working on, and the empty chain plate is as depicted on the original French design. Richard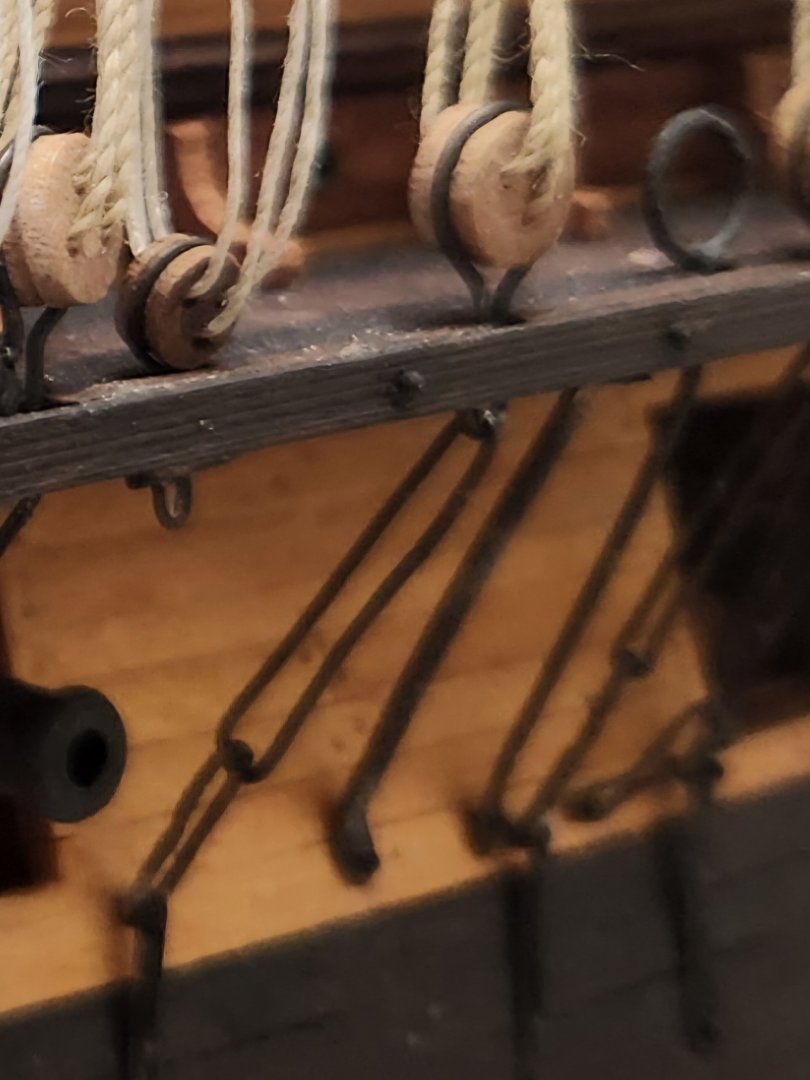
-
Working with blackend brass.
barkeater replied to SiriusVoyager's topic in Metal Work, Soldering and Metal Fittings
I bend the chain plate piece around the deadeye how I want it first. Then I pop the deadeye out and do my soldering and attach any other meatal segments if it is a multi-piece chain plate. I then blacken and coat it with varnish (Testors dull coat) which helps to lock in the blackening since it is a powder coating. I then reinsert the deadeye. I haven't had a problem doing it this way. I make the circle fairly tight but I'm able to squeeze back in the deadeyes. As I recently said in another thread, I use silver wire, but this should not make a difference. Richard -
Brass wire: it bends, it breaks!
barkeater replied to Mollusc's topic in Metal Work, Soldering and Metal Fittings
As an alternative, you can use silver wire sold for jewelry making. It is stronger than the brass wire sold in craft stores and comes in a variety of gauges and hardness. It solders well using silver solder paste and blackens nicely with brass black. I use it instead of brass wire. Richard -
First timer introduction and needing some advice
barkeater replied to Stuka's topic in New member Introductions
Good choice. Have fun. Richard -
I use 5x glasses which can be bought for about $10 on line. I fly fish and also use them for fly tying and keep a pair on me when fishing to tie on tiny flies. Richard
-
Amazing some of the **** you learn here.😁
-
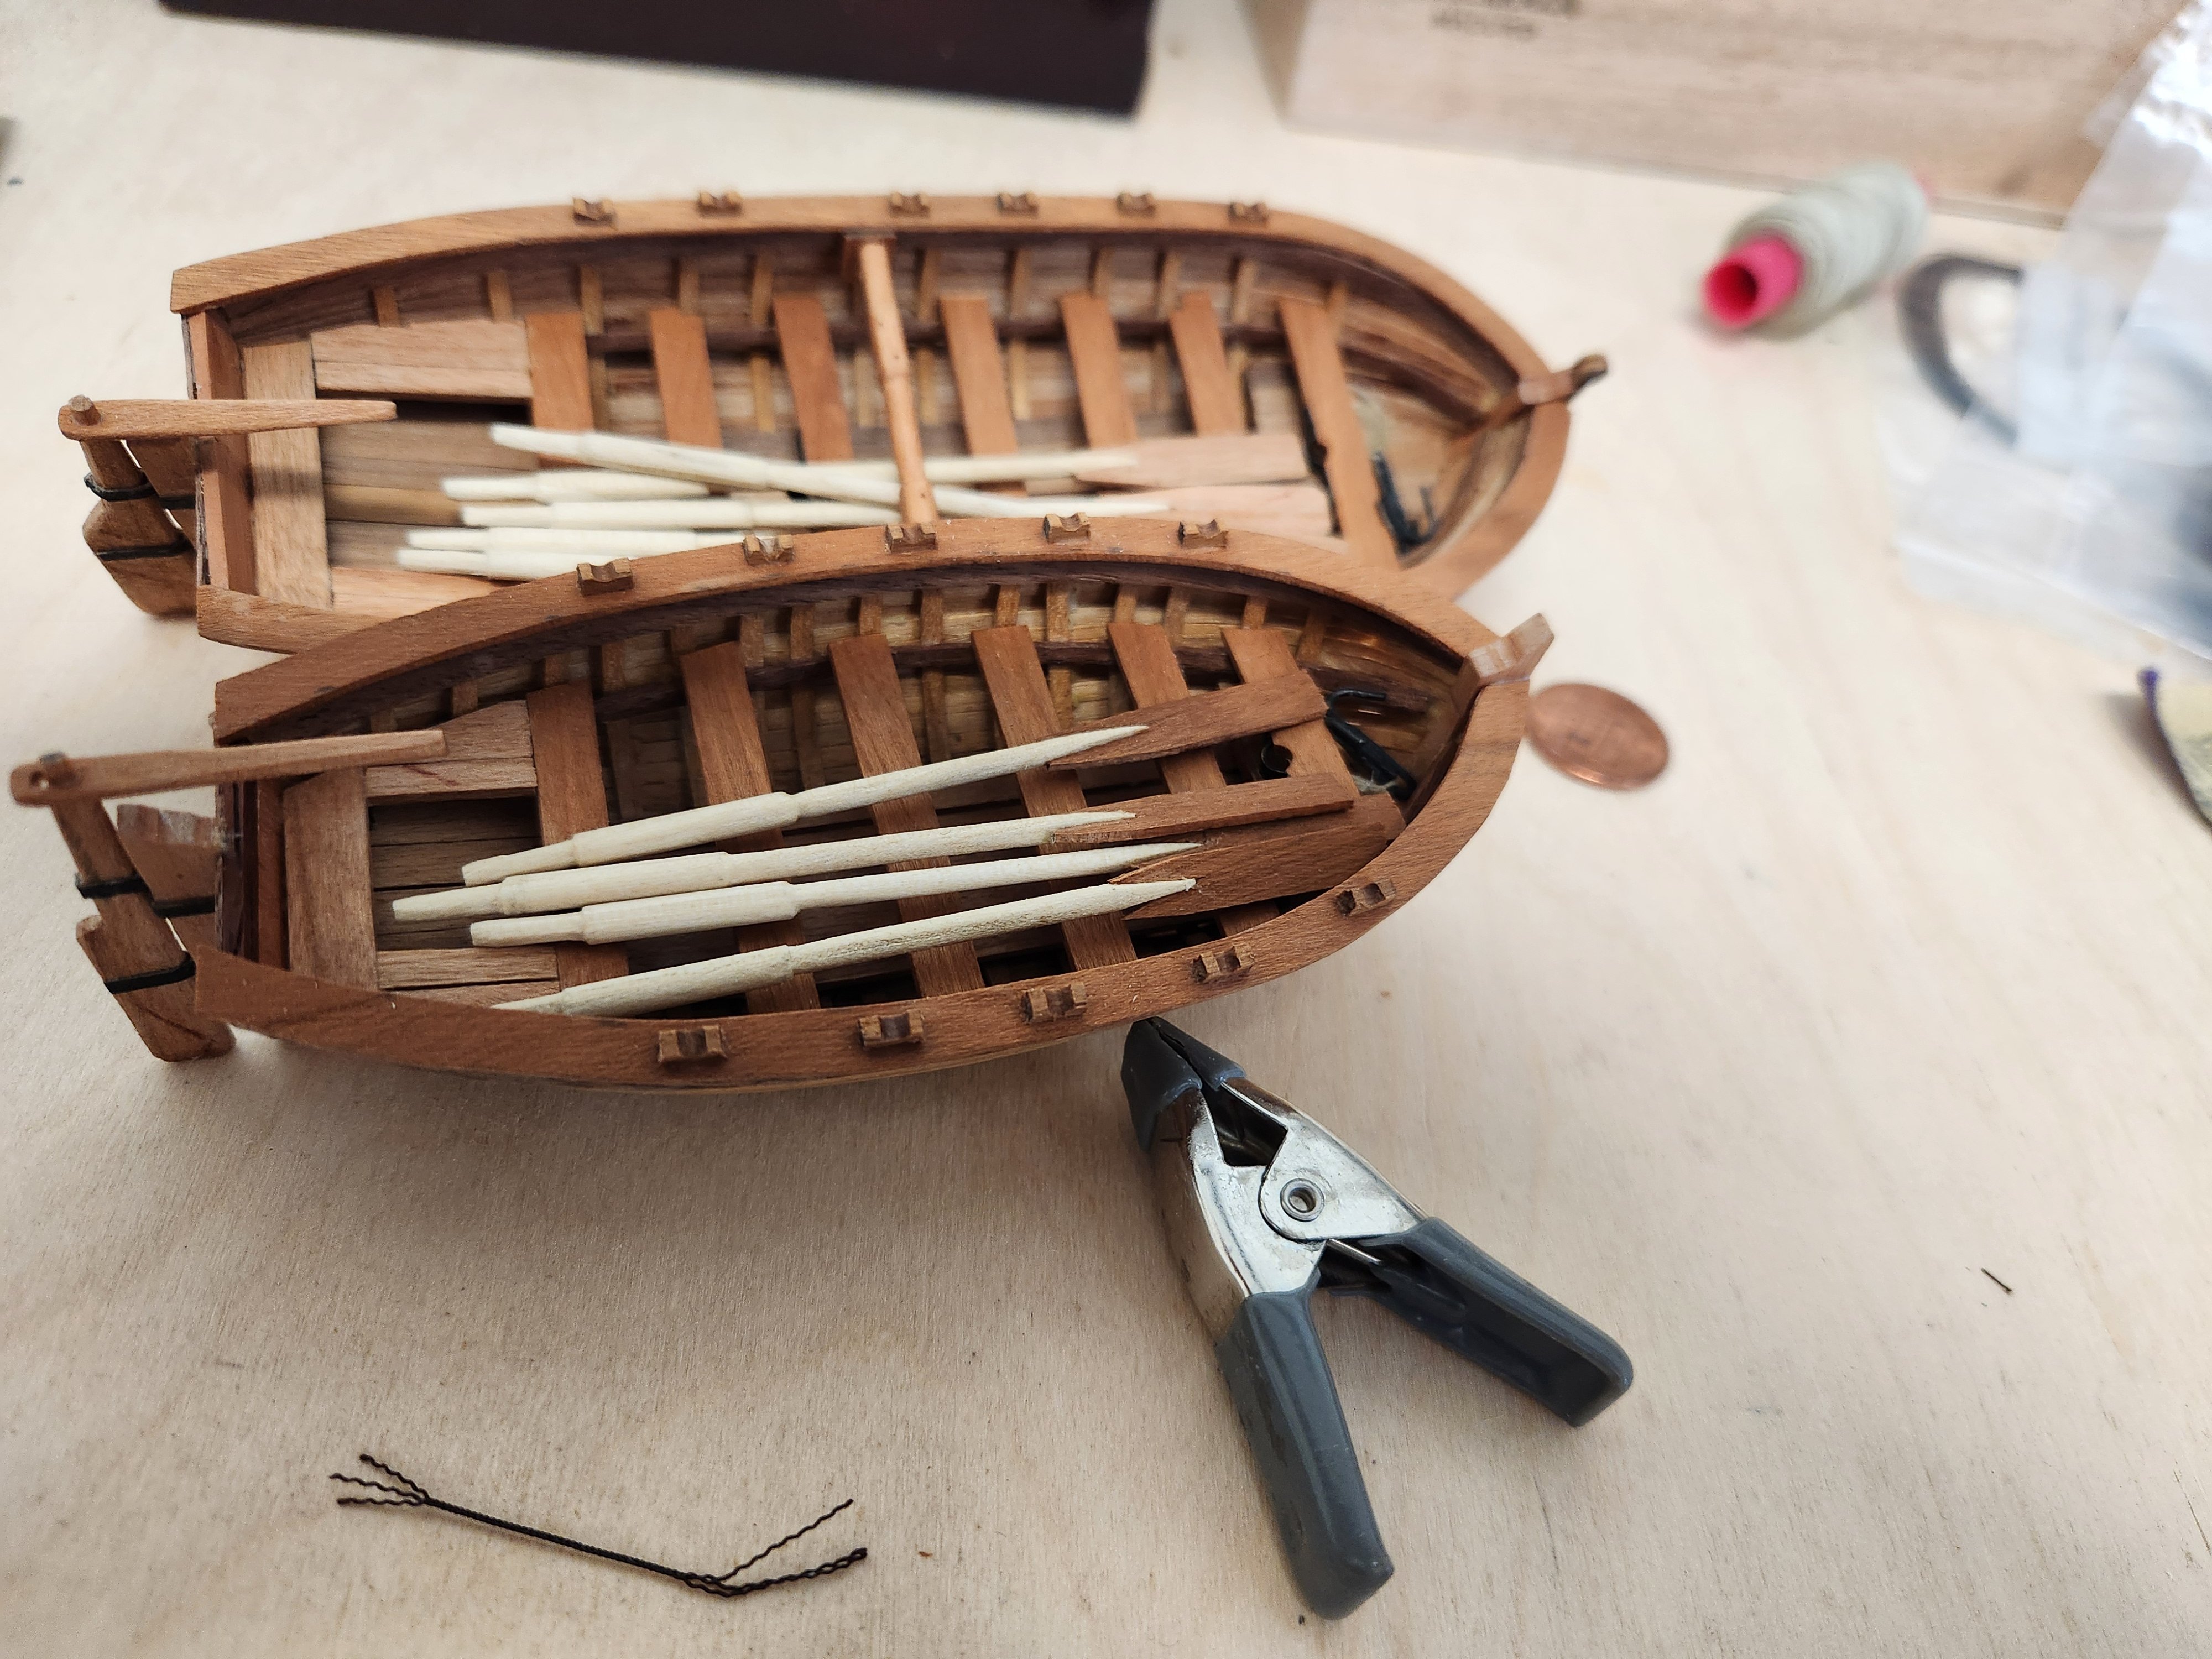
These are ships boats I've been working on. The oars were made from a thin dowel from a craft store (Hobby Lobby) for the shaft and a strip of cherry for the blade. The scale is 1/48. I don't know what scale you are working on. Rich

-
Proxxon mini lathe verdict
barkeater replied to Srenner's topic in Modeling tools and Workshop Equipment
Just to be clear, I have the Proxxon db250 which online goes for $230-270 with one add for $97, although with that price I would be quite skeptical. I forgot how much I paid but it was well worth it in time spent and the decreased wear on my wrists given the dozen or so yards I did as well as the ornamental balustrades on my current model. Rich -
Proxxon mini lathe verdict
barkeater replied to Srenner's topic in Modeling tools and Workshop Equipment
I have the Proxxon and use the add on 3 jaw chuck like Rob. The pass-through ability is key as it allows for longer stock and helps avoid whipping. The two shown by Gregory don't seem to have this pass-through feature. Overall, I'm well satisfied with it and the money I spent. I've done larger oversize pieces down to 3-4 mm thickness. Rich -
The problem with using CA for planking is that it stains any exposed surface and is just about impossible to sand out because it penetrates. This persists when you overcoat with varnish or shellac. A stain can even be seen when you paint over the area because you lose the grain of the surface as it is replaced by plastic. A good rule of thumb is to use PVA on wood or any wood product such as paper and leave the CA for bonding metal or plastic to wood. You can use it where you need a quick bond but if you've shaped your wood beforehand this is rarely necessary. PVA clamped by hand if you can't get a mechanical clamp on it and counting count to 100 usually is enough to hold your bond. Rich
-
I do not pin or glue my yards and don't have a problem in getting them how I want them. Since I've never done it, I can't say from experience but the thought of drilling holes in my masts after they have been stepped makes me nervous. Another example of different modelers taking different approaches. Rich
-
I can't really add much to what Steve said. Hopefully you can figure out most of it by comparing the instruction list to the dimensions of the wood supplied along with the quantity supplied for each. I would add that walnut, can also be used for the second planking. Rich
-
For identification try The Wood Database which lists many different types with pictures. To identify I really need to see the grain. I do wonder if the dark grey/black wood is dyed. The dowels are probably birch. The brown wood is probably walnut and or mahogany. The light colored could be bass or not. Hopefully someone here has built this kit. Good luck, and welcome to ship building. Rich
-
I realize that others have shown this or similar. Mondfeld's was an easy reference point to illustrate what I was talking about in a widely owned and relatively cheap book. Rich
-
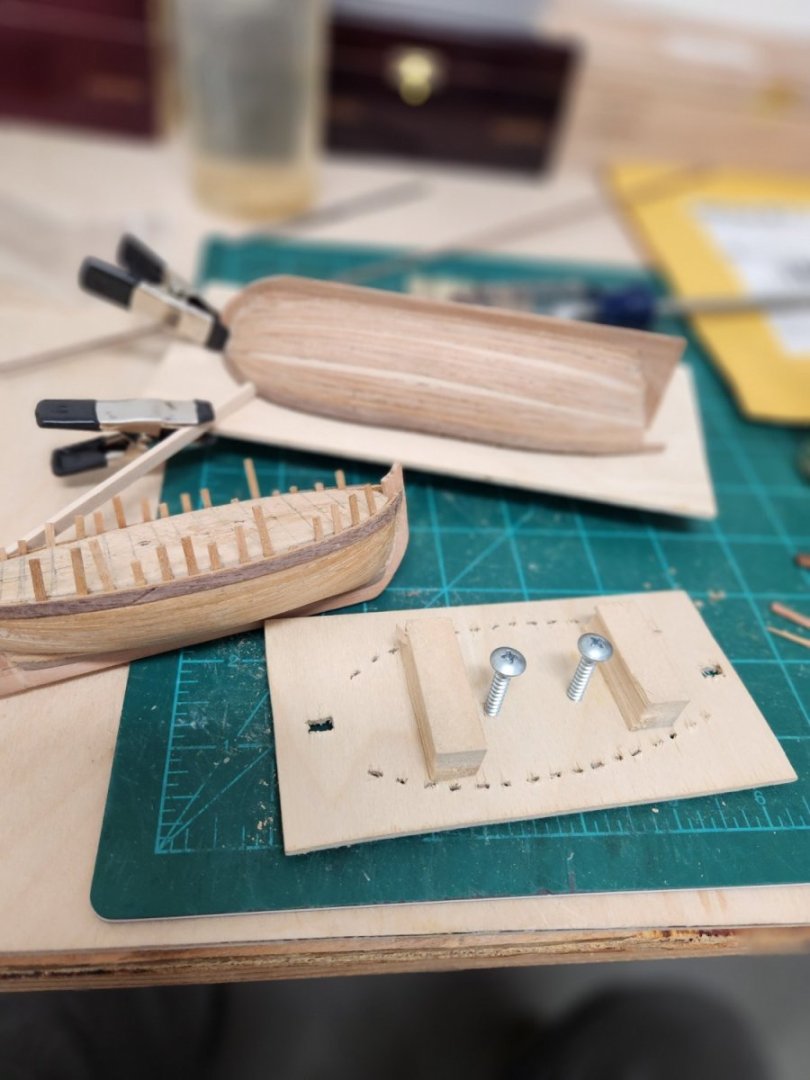
The picture shows my modification of Mondfeld's ships boat making jig in "Historic Ship Models". I had used this type of jig previously but as I got ready to do some ships boats for my current build, I decided to modify the jig. The result was a more stable to work with jig where the work piece being temporarily fused together gave greater stability and allowed for easy construction and sanding. Where the original jig had the mold or plug placed in a cut-out of plywood, I used a solid piece temporarily joined by two screws to the mold. The outline is then drawn around the mold on the plywood, and the position of ribs marked. The screws are then removed and holes for the ribs are made using adjacent drill holes cleaned out with a scalpel. Two blocks are then glued to the undersurface to give elevation so the screw heads will not keep the jig from sitting flat and to allow for the ribs to project beyond the plywood and so be well seated. Screws are then reinserted, and the ribs are then steam bent and placed in their respective holes. The temporary fusion of the mold to plywood makes the bending and placing of ribs much easier and steam bending can be finished with the ribs in place on the form giving better results. The keel, post and transom which were previously made to fit the mold are then placed over the ribs and glued in place. Mondfeld shows notching along the keel for the ribs, but I just glued them without making notches. This eliminated the chance of having an inaccuracy between the notches on the keel and the holes for the ribs in the plywood. I was worried that this would give instability to the boat when removed but after planking and adding an external wale, the little boat is tight. The ribs projecting beyond the planking can be snipped with a pair of scissors. Finally, when carving your mold remember that there was no uniform design for ships boats which were built locally so you don't have to go crazy in exactly coping plans. Just try to keep it bilaterally symetric. Rich
-
I've used cherry a lot. It is relatively easy to carve as long as you make sure your piece has no knots. It is not quite as easy as pear to carve but close and it has far better color and grain texture. Rich i've used
-
"Was thinking...can you pre drill so nail slides in with glue? " Yes, use cyanoacrylate to glue metal to wood. The problem then becomes that you can't remove them. Much easier and nicer looking to not use them and rather pre-bend and glue. Rich
-
This topic comes up on a fairly frequent basis. Those little nails tend to split the wood or bend as you've probably already found out. You can predrill to prevent the splitting but then you are left with holes or nail heads. I don't use them at all planking either first or second layer. You are better off pre-bending the plank by wetting it and using heat or a jig. Remember to let the wood dry (at least the second planking) as there can be some shrinkage. I just apply pva (wood) glue and hold or clamp in place. If I'm manually holding the plank in place, I usually only have to hold for 1-3 minutes to get a bond. I try to stay away from cyanoacrylate as it stains and is very tough to sand out. The nails are however very handy in pinning furniture such as the ships wheel or stanchions in place. Rich
-
I'm not really sure what your question/situation is. If you are talking about installing planking, I usually drill my trenail holes after the planks have been glued in place with a #72 drill bit and a twist drill or pin vise. Need more info as to your situation. Merry Christmas and Happy Holidays. Rich
-
Who uses nails?
barkeater replied to bigcreekdad's topic in Building, Framing, Planking and plating a ships hull and deck
I never use metal nails for planking. I trenail everything. That being said I use the nails to attach furniture, to strengthen joints as well as using them to simulate bolts. A lot of times I hide the nails, so they won't be seen from the outside when I need a joint strengthened. I have to admit that although a lot of us complain about the nails and the hundreds that seem to be included with kits, I have had to actually order more as I've run out since switching from kit construction to scratch building. I need to do gun port lids coming up and I'm going to need 4 for each lid with 28 lids. Although I can't see them for planking, they sure are handy for ship modeling. Rich -
San Cristobal especially Revelation series but you could probably get as many as you want from a cigar store as they get thrown away. Rich
- 341 replies
-
- 3
-

-

-
- Sophie
- Vanguard Models
- (and 1 more)
-
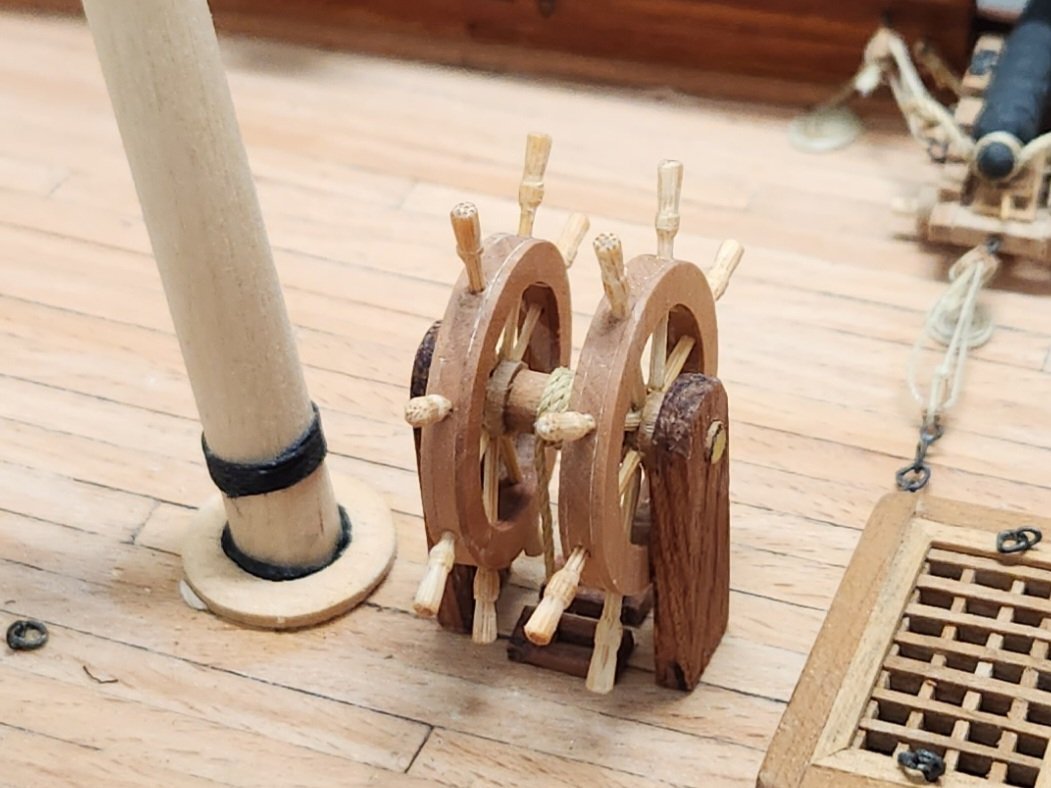
Okay, back to the drawing board. My wheel is 3.5 mm thick. In your scale it would be 2.525 mm. This is the best I can come up with If you want to give it a try. In cigar boxes they use a divider for top and bottom layers which is 1mm sheet of what I presume is cedar. I have used it to simulate complex mast construction (see picture). If you used this, it would give you a thickness of 3mm which you could sand down to 2 1/2 mm. Spokes would be tiny. Perhaps you could use bamboo thinned like a you make trenails with a draw plate. Rich Rich
- 341 replies
-
- 6
-
-
- Sophie
- Vanguard Models
- (and 1 more)
-
You may want to try this. I work in 1/48 scale. I take thin sheets of wood (2mm or 1/16 in my scale) and cut out 3 circles of the desired diameter. I have used cherry and pear. Glue these together at 45 and 90 degrees oriented to the grain. You now have a plywood type piece with strength in all directions. Next trace the inside diameter of your wheel. Using a thin hand drill you drill all along this line cutting out the center. Microfile to smooth. If your tri-ply piece is too thick you can sand to thin. Next figure out where your spokes go and drill the center thickness of your wheel to insert the spokes. The spokes are actually two pieces, inside and outside the circular wheel so your drill holes do not have to be as large as the spokes as you can taper the ends to fit into the holes. Now repeat the drilling on a piece of dowel for your center pin or axle. You then cut tapered spokes to fit in between your central pin and the wheel. Once this is assembled and glued add your spoke ends exterior to the wheel. Rich
- 341 replies
-
- 8
-
-
- Sophie
- Vanguard Models
- (and 1 more)
-
You can also try Modelers Central. Not USA but they ship here reasonably fast. Micromark has limited choice and Model Expo lists in inches. Rich