DONATION DRIVE - SUPPORT MSW - DO YOUR PART TO KEEP THIS GREAT FORUM GOING!
×


barkeater
-
Posts
411 -
Joined
-
Last visited
Content Type
Profiles
Forums
Gallery
Events
Everything posted by barkeater
-
"I'd only add that if your plank is properly shaped before it is offered up to the framing, use of an electric plank bender or the equivalent to apply heat to the plank at the point of attachment will speed the evaporation of the PVA's water-base and hasten the PVA's taking hold. Care must be taken not to scorch the plank face, of course" One point here. You do not want to glue a soaked or wet plank as it can shrink as it dries depending on how long you soaked it. To get the best result steam bend then let the entire plank dry before gluing. I usually glue the course I did the day before and the I'll bend the next batch once my glue is dry enough which is not long. I also trenail the batch I glued the day before so there is plenty to do and drying is not holding me up.
-
I do not use nails in my planking as they split wood and have to be removed leaving holes. I glue either clamping or applying pressure with my fingers and then I drill and use trenails which look authentic to the period I am doing. Having said that, a #72 drill bit fits most nails fairly securely and I use them for pinning furniture and where a bolt would have been used. Also, concerning trenails, the #72 bit fits the 28 or 26 size on Byrne Machines draw knife for reference. Richard.
-
Getting back to Lavery's Arming and Fitting. Very good purchase. I use it as a reference all the time. Richard
-
I'm originally from the Mohawk valley/ Adirondack region and still have family there. It always drives me crazy to hear people talking about "upstate" when they are talking about a town 20 miles north of NYC.
-
Try using a needle threader which are easy to find at brick-and-mortar stores such as hobby shops, fabric stores or online. They are sold in packs. They are cheap which is good as I break them frequently. Richard
-
I use thinned wood (white) glue on all of my knots. It is invisible at least to my eye when it dries. As has been said, experiment to see what looks best and works best for your situation. Richard
-
Welcome from a fellow New Jerseyan. Rich
-
looking good.
-
Swivel guns
barkeater replied to tlevine's topic in Discussion for a Ship's Deck Furniture, Guns, boats and other Fittings
My Badger 1777 under finished scratch build shows how I installed them. The pictures might be helpful. They were made out of toothpicks and brass. Richard -
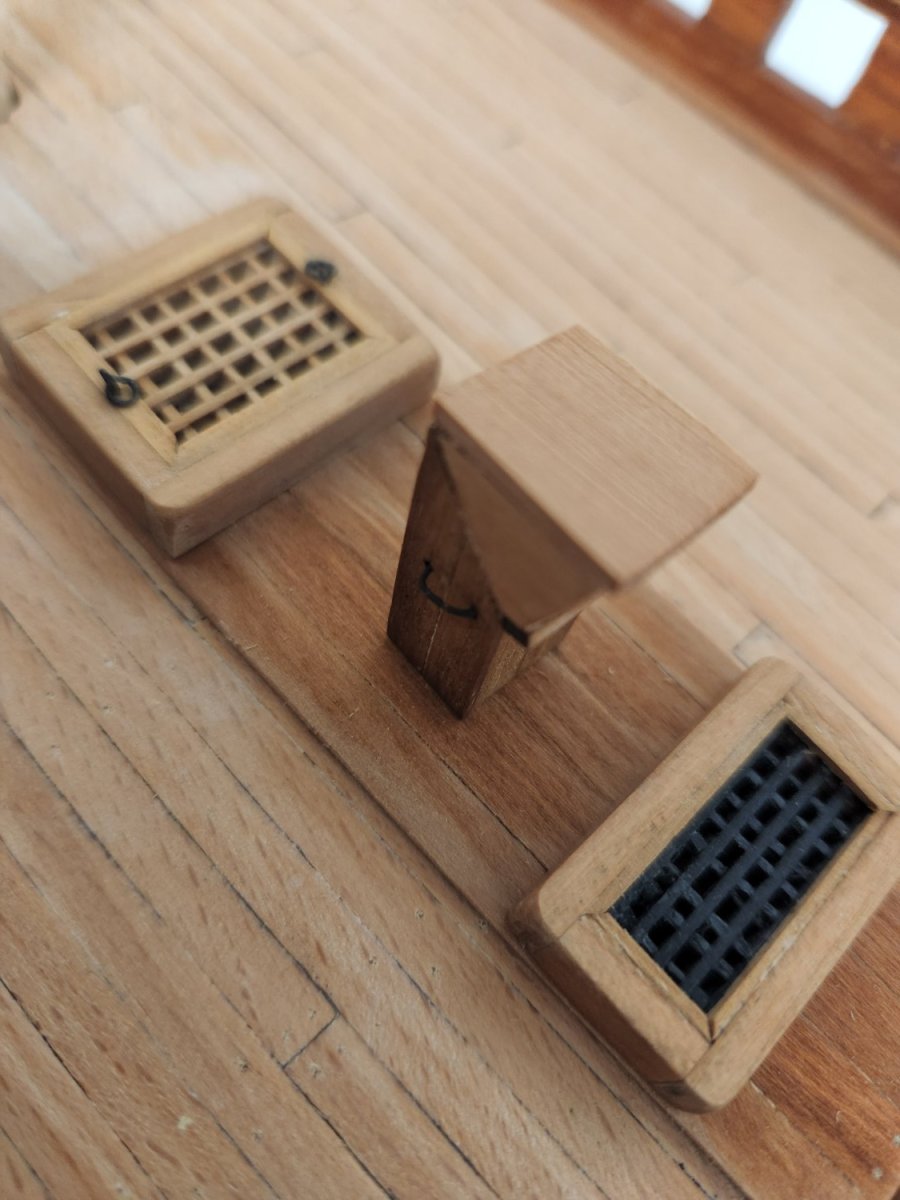
As a follow-up, I simulated iron gratings. Richard

-
I also would recommend Monfelds as your first book purchase. I have a dozen or so books and more often than not I find what I'm looking for in his book. Richard
-
If I'm understanding this correctly, you need to put a curve in a 2x4 mm piece of plywood. You could just cut a piece of wood and steam bend in this case. Since it is originally plywood, I assume the finished piece will be hidden or painted. In that case you could use whatever wood you want. You may be able to find a 2x4mm and a 2x5mm piece in the lengths you need already cut from walnut or bass in one of the many online stores. The thicker the wood, the harder to steam bend but 2 mm is readily doable. I'm assuming you have an electric steam bender. If not and you don't want to get one you could soak and make a jig to let it dry in the proper curve, but a steam bender is a cheap and worthwhile tool to have and pretty much a necessity for ship building. Richard
-
I don't know if this would help since I'm not fully clear on what you need to do and what tools you have but thin plywood sheets are readable available in different thicknesses. I've bought them on Amazon. I believe they were birch and have used them for bulkheads as well as an undercoat for deck planking. Richard
-
I do mine out of wood. Pear wood would be your best bet and has already been suggested. I use ebony which is hard to work with but has the right color as I like the look of natural wood. Richard
-
I would also guess that they would be iron as iron gratings replaced wood ones in the next century. I would like to verify if anyone knows. Thanks. Richard
-
I'm building out the deck furniture on Unite as refit by the British dockyard 1797. The plans call for steam gratings above the stove. Every other grating is marked as just grating on the plans. I can't seem to find if there was a difference or not in construction between steam gratings and regular cargo gratings. Does anybody know the answer? Thanks. Richard
-
Real knots verses what is practical for scale ships
barkeater replied to Srenner's topic in Masting, rigging and sails
I do try to get it tight. Do 1 knot, check the tension and then add the second and if still happy the third. An overhand knot can be undone fairly easily if you need to adjust. You want the knot as tight as you can when you finish up and then lock the knot in with the glue. I do 1/48 scale. Richard -
Real knots verses what is practical for scale ships
barkeater replied to Srenner's topic in Masting, rigging and sails
One of the problems you have to consider is the thickness of the knot itself. You want a low profile to better approximate the real thing. You also want to avoid pulling on the line as you tie. This can be a real problem when you are dealing with a ship which has a lot of rigging. You also want something simple and easy for those tight spots. I tie three overhand knots with thin thread of the appropriate color and place them against one another as if I was rapping the line to simulate the seizing. You can adjust this knot for tension if needed as you counterbalance with its opposite line if it is a starboard/port configuration or standing rigging on the center line. I then make sure it is tight and hit the knot with a tiny amount of thinned pva (wood glue) to lock it in. The glue can't be seen once it dries. Richard -
I have a MM scroll saw and table saw as well as a Byrnes thickness sander and a Proxxon mini lathe. The scroll saw is fine. You have to go slow but you want to go slow when cutting irregular shaped pieces. The table saw is ok as long as I don't cut anything over about 1/4 inch. (Note: I do use a lot of very dense wood.) I'd love a Byrne's table saw and I might upgrade for the next build when I have a lot of lumber to cut for the hull. The thickness sander is great. On my current build I ripped planks of ebony for the wales before I had it and did not realize that the board I was cutting from was not of uniform thickness which caused the planks to have different widths along their length. Unfortunately, I did not realize it until I was on the third of six courses. It was a pain to wind up with an even wale but it came out fine. With the Byrne's now I can even out any board and avoid this dilemma. Just used it to taper my keel from head to foot. The lathe I just got and have not had a chance to use it yet. Good luck with your scratch build. Richard
-
Your post asked for minimum tools for scratch build. Like most other scratch builders, I use a lot of hand tools so micro files, scalpels, sandpaper, miter saw and box, and different picks and scrapers are what I use most. I'm not a big fan of rotary tools such as a Dremel as I feel I have more control with hand tools. The one power tool that you use most for scratch building is a scroll saw. If you want to rip your own planks rather than use commercially available wood strips, then you need a table saw. A lathe is not necessary. A mill or thickness sander is also nice, but the scroll saw, and table saw are what you are going to get the most use out of. Richard
-
I have had the same problem. It has shied me away from some suppliers who are out of line in their shipping.
-
I have done all my masts and yards by hand so far. If you taper down to size by squaring it with a file, then make it eight sided this works quicker than sanding alone. Sand when you are done with filing to round it out. Just remember to keep checking with calipers. Even if you use a lathe, there are portions of masts and yards which need to be done by hand. Having said this, I recently acquired a lathe which I hope will speed up the work. Richard
-
Welcome aboard. There is a lot of information available here. If you have a question on how something is done or why just ask and I'm sure someone will be glad to answer. The more you do, the more you learn, the more detailed your work will become. Richard
-
I would suggest Testors Dulcote as a finish. It is a matte finish and as such will not be shiny. It coats evenly and is simple to use right out of the bottle. Also, it is sold in small bottles, so you don't wind up with a lot of unused product. Richard