


hexnut
-
Posts
406 -
Joined
-
Last visited
Content Type
Profiles
Forums
Gallery
Events
Posts posted by hexnut
-
-
Nice work, vaddock!
As a Rhino user myself, I can say now that the hard work of getting the stations, water and buttock lines to agree is over, turning the hull into a water-tight solid will allow you to cut bulkheads, rebates, keel parts, deck beams,etc, as well as figuring out all of your scale material thicknesses.
Incidentally, I love the "environmental reflection" setting for checking surface continuity on hulls....
Looking forward to seeing more of your work!
-
One thing that will help immensely-- if you have not already done so-- is to compile all dimensions that you have and use those as your guidance, even when they don't agree with drawings. If your plans have a table of offsets, that would be very useful. I like the idea of building in 1:35 scale, as there are many very nice figures and details in that scale that can be used or adapted. The more you have a set of "good" numbers to drive your work, the less you will have to worry about plan distortion, line variance, etc...
When setting up stations on the keel, determine all of your bulwark positions to the center of whatever material you are using, so that you can control spacing and tolerance stack-up. Having a nice straight keel is critical for a ship of model of this size and aspect ratio, and being 'fussy' about the dimension numbers in the beginning makes the modeling so much easier in later steps. (Of course, I only know this because I have tried the "don't worry, just jump in!" approach instead of the "fussy" approach--it did not work nearly as well...
 )
)I am really looking forward to seeing your continued progress...
- Canute, Moony, avsjerome2003 and 1 other
-
 4
4
-
Never tried the Diet Coke trick, I'll have to check it out, thanks. I usually go light mist coat, then cover coat on the primer, I love the Tamiya water-borne lacquer in the rattle cans--it goes in really fine, won't blur details. (Although for really fine work, like photo-etch mesh/gratings in 1/350-1/700th I spray a bit through a length of soda straw into the cap and pour it into the airbrush.)
-
This looks really cool, hydrofoils are awesome.
You probably already know this, but the big deal with airbrushing is as much or more in the prep than than the actual painting--washing the resin with bleach or tire cleaner to remove mold release, nice, light even coat of primer (especially if using acrylics) etc..
- Canute, Elijah, justsayrow and 1 other
-
4
-
Nils did a magnificent model of the Bohuslan (I think based on the Billings kit):
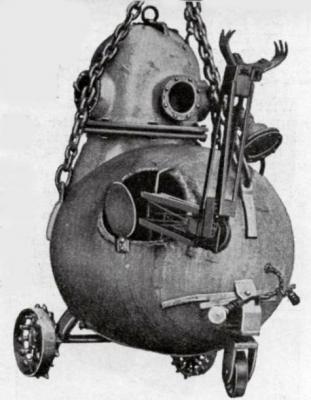
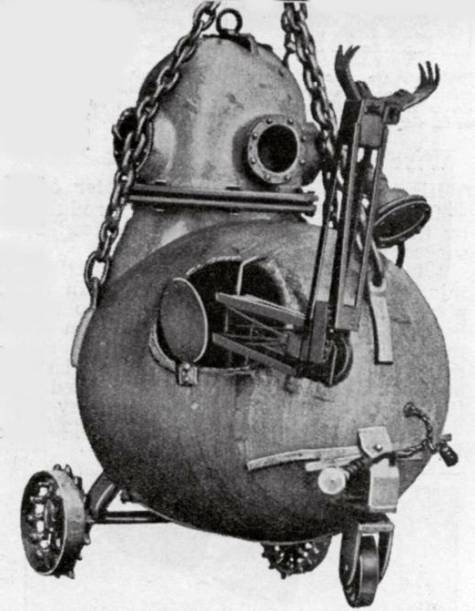
The Curtis-Wiley Diving machine used in the 1929-1934 salvage operations of the Islander was an amazing piece of steampunk gear--might make an interesting diorama...
- avsjerome2003 and mtaylor
-
2
-
This is not all that similar, but maybe close enough for a "practice build" until you can scratchbuild the ship you want?
http://atlastmodels.se/bohuslan/
The Canadian-Pacific "Islander" shown was actually built in Scotland in 1888...
- mtaylor and avsjerome2003
-
2
-
-
Ouch. I had that happen with an old Frog glider model I bought used, ended up scratch-building 1 fuselage 1/2, but this is considerably more serious. Try and get them to send one of each hull half so you can build a companion receiving ship...

- Piet, mtaylor, avsjerome2003 and 1 other
-
4
-
Freigeben Ihrer wunderbare Arbeit transzendiert alle Sprach ... Vielen Dank!
Sharing your wonderful work transcends all language...Thank you!
- mtaylor, Omega1234 and Dimitris71
-
3
-
I thought that this model was much too nice to put in water, but it looks wonderful floating in it's "home"!
- Dimitris71, Omega1234, Panagiotis and 1 other
-
4
-
I apologize for clogging up your "like" button, but I can't help it. This is wonderful work, thanks for sharing.
- Canute, popeye the sailor, RGL and 1 other
-
4
-
What helps for me is to either copy a section of the plan or draw out what I want on paper, then cut out the parts I want and paste them on the wood bits with lo-tack glue. That gives me an immediate reference for where everything should be, as well as an aide to avoid over-trimming. I do use a small power disk and belt sander up until the last .060 or so, but I resquare the table often...
The next thing is to spend some time making small, very square sanding blocks of various grits. I then work on a surface that I know is flat. This way, I'm only making mistakes in one dimension at a time.

-
-
The best way would be to plank it in basswood--lay out the lines in pen or pencil by tracing battens directly to the hull, assisted by Chuck P's handy "fan template". It will look great and with craft store wood, end up cheaper than a can of resin...
-
-
I have no idea who that is but thank you for the great complement
She had a very long and successful career in top fuel 1/4 mile drag-racing. Probably a bit more force than you want to subject your nice little sailboat to, but inspirational none the less....
Your CBF is coming together really well...
-
-
Sorry for the rookie-type question, but what is the "symposium" ?
-
Cool. Tamiya deck tan (X-55) over white primer is pretty good as well, with just a touch of pastel in the shadows ...
- GLakie and popeye the sailor
-
2
-
Thanks Matija!
Bob, Carl, here the link with these photo - http://modelshipworld.com/index.php/topic/1589-latest-full-profile-photograph-of-your-build/?p=306141
Best Regards!
Igor.
Thanks! The technique was as I suspected, but the way that you implemented it is beautiful and provides a very convincing illusion.
-
Wonderful presentation! I have to ask--how did you do the cross-pin through the stopper? (Did I miss that step in the log?)
- Salty Sea Dog and IgorSky
-
2
-
The good news is that there have been a lot of re-issues of the Big Daddy kits, you can get most of 'em fairly cheap, in case you need to...
(They just re-issued the Surfite with a nice bonus figure, BTW...http://www.modelroundup.com/product-p/rmx-4347.htm)
-
My personal advice on primer is Tamiya rattle cans--the gray primer right out of the can puts out a very nice, easily-controlled finish.
It is a water-borne lacquer, so it sticks and covers nicely, but won't damage plastic. I'm not a big fan of brush painting acrylic over large areas of plastic...
-
I want to ask folks - does any have any advice on the coloring the planking to make it look as authentic as possible at this scale?
I believe that Artwox, Pontos and KA all make laser-scribed wooden decks for this model, in my opinion well worth it.
I recently got a deck set for another model I'm working on, and now I don't think I'll ever go back to painting...
Sultana figurehead discussion
in Nautical/Naval History
Posted
On a more boring note, making an original figure head is a laudable goal, but I would recommend a couple of intermediate steps to greatly improve the learning curve--
First, do some rough sketches. No Davinci stuff required here, if you can draw a hull plan or even mark planks for spiling, you have the required skills to draw schematic figures with the basic pose and proportions. Work with just a front and side view. Start larger than your final scale--5 or even 10x bigger. Work on tracing paper so you can trace over what you have right and redo the parts you don't like yet. When you have the basic proportions, use photo reference details of faces, hair, hands, props, etc. (you can use a similar technique for your carving pattern, reduce your large drawing to scale and it will look awesome.)
Second, get some Sculptey from a craft store, make a simple aluminum wire armature, and do some quick maquettes, still working in large scale. Does it look right? Scale it down to your final size and make another quick model. Does it still look right? Why or why not?
At some point, the 'roughs' will turn into 'keepers' and you still haven't used up any boxwood.
Most figures I've seen aren't let down by carving technique or lack of detail, but by proportion and basic anatomy. Eyes are in the middle of the head, nose bisects eye-line and chin, mouth halfway between...elbows end at bottom of ribcage, wrists aprox. at hips, etc... Limbs bend only at certain angles, and only at joints. ("rubber arms" are a frequent sculpt error, especially in small scale)
I hope this helps, I look forward to seeing this develop!