

jhearl
-
Posts
355 -
Joined
-
Last visited
Reputation Activity
-

 jhearl got a reaction from John Allen in rigid ratlines
Here are two examples from real ships. The first is from the whaleship Morgan at Mystic Seaport. The second is fishing schooner. As you can see, they're just lashed in place.
Cheers -
John
-
 jhearl got a reaction from hornet in rigid ratlines
Here are two examples from real ships. The first is from the whaleship Morgan at Mystic Seaport. The second is fishing schooner. As you can see, they're just lashed in place.
Cheers -
John
-
 jhearl got a reaction from dvm27 in rigid ratlines
Here are two examples from real ships. The first is from the whaleship Morgan at Mystic Seaport. The second is fishing schooner. As you can see, they're just lashed in place.
Cheers -
John
-
 jhearl got a reaction from Jim Rogers in rigid ratlines
Here are two examples from real ships. The first is from the whaleship Morgan at Mystic Seaport. The second is fishing schooner. As you can see, they're just lashed in place.
Cheers -
John
-
 jhearl got a reaction from mtaylor in rigid ratlines
Here are two examples from real ships. The first is from the whaleship Morgan at Mystic Seaport. The second is fishing schooner. As you can see, they're just lashed in place.
Cheers -
John
-
 jhearl got a reaction from russ in rigid ratlines
Here are two examples from real ships. The first is from the whaleship Morgan at Mystic Seaport. The second is fishing schooner. As you can see, they're just lashed in place.
Cheers -
John
-
 jhearl got a reaction from BETAQDAVE in rigid ratlines
Here are two examples from real ships. The first is from the whaleship Morgan at Mystic Seaport. The second is fishing schooner. As you can see, they're just lashed in place.
Cheers -
John
-
 jhearl got a reaction from AntonyUK in Byrnes saw sled
I thought I'd make one other suggestion that, in retrospect, makes me feel dumb that I didn't think of it immediately. You don't always need that depth stop part. I mean the little hangy-down part on the right. I had gotten into the habit of removing it and laying the piece of metal and the screw down on the bench. Doubtless, everyone elses' workbenches are neat and tidy at all times, but mine quickly becomes a disaster zone while I'm working. So small parts like that can often get moved out of sight or separated from each other by the gremlins who live in my shop. The simple and obvious solution is to simply turn the part around and hang it down on the back side of the fence. Like I say, I feel dumb that it didn't occur to me to do that until yesterday, but maybe it's something that hasn't occurred to someone else yet either. (Not saying you're dumb! )
Cheers -
John
-
 jhearl got a reaction from Canute in Byrnes saw sled
I thought I'd make one other suggestion that, in retrospect, makes me feel dumb that I didn't think of it immediately. You don't always need that depth stop part. I mean the little hangy-down part on the right. I had gotten into the habit of removing it and laying the piece of metal and the screw down on the bench. Doubtless, everyone elses' workbenches are neat and tidy at all times, but mine quickly becomes a disaster zone while I'm working. So small parts like that can often get moved out of sight or separated from each other by the gremlins who live in my shop. The simple and obvious solution is to simply turn the part around and hang it down on the back side of the fence. Like I say, I feel dumb that it didn't occur to me to do that until yesterday, but maybe it's something that hasn't occurred to someone else yet either. (Not saying you're dumb! )
Cheers -
John
-
 jhearl got a reaction from druxey in Byrnes saw sled
I thought I'd make one other suggestion that, in retrospect, makes me feel dumb that I didn't think of it immediately. You don't always need that depth stop part. I mean the little hangy-down part on the right. I had gotten into the habit of removing it and laying the piece of metal and the screw down on the bench. Doubtless, everyone elses' workbenches are neat and tidy at all times, but mine quickly becomes a disaster zone while I'm working. So small parts like that can often get moved out of sight or separated from each other by the gremlins who live in my shop. The simple and obvious solution is to simply turn the part around and hang it down on the back side of the fence. Like I say, I feel dumb that it didn't occur to me to do that until yesterday, but maybe it's something that hasn't occurred to someone else yet either. (Not saying you're dumb! )
Cheers -
John
-
 jhearl got a reaction from Archi in Byrnes saw sled
I got my sliding table last week. The little plastic-topped screws for the depth stop really annoyed me - too hard to grab and start in the holes. So I went to the hardware store and got some brass 6-32 machine screws and knurled brass nuts. I glued the nuts to the screws with a bit of medium CA. I find these way easier to use.
Cheers -
John
-
 jhearl got a reaction from Landlubber Mike in Byrnes saw sled
I thought I'd make one other suggestion that, in retrospect, makes me feel dumb that I didn't think of it immediately. You don't always need that depth stop part. I mean the little hangy-down part on the right. I had gotten into the habit of removing it and laying the piece of metal and the screw down on the bench. Doubtless, everyone elses' workbenches are neat and tidy at all times, but mine quickly becomes a disaster zone while I'm working. So small parts like that can often get moved out of sight or separated from each other by the gremlins who live in my shop. The simple and obvious solution is to simply turn the part around and hang it down on the back side of the fence. Like I say, I feel dumb that it didn't occur to me to do that until yesterday, but maybe it's something that hasn't occurred to someone else yet either. (Not saying you're dumb! )
Cheers -
John
-
jhearl got a reaction from Landlubber Mike in Byrnes saw sled
I got my sliding table last week. The little plastic-topped screws for the depth stop really annoyed me - too hard to grab and start in the holes. So I went to the hardware store and got some brass 6-32 machine screws and knurled brass nuts. I glued the nuts to the screws with a bit of medium CA. I find these way easier to use.
Cheers -
John
-
 jhearl got a reaction from Bill Tuttle in Byrnes saw sled
I got my sliding table last week. The little plastic-topped screws for the depth stop really annoyed me - too hard to grab and start in the holes. So I went to the hardware store and got some brass 6-32 machine screws and knurled brass nuts. I glued the nuts to the screws with a bit of medium CA. I find these way easier to use.
Cheers -
John
-
jhearl got a reaction from Canute in Byrnes saw sled
I got my sliding table last week. The little plastic-topped screws for the depth stop really annoyed me - too hard to grab and start in the holes. So I went to the hardware store and got some brass 6-32 machine screws and knurled brass nuts. I glued the nuts to the screws with a bit of medium CA. I find these way easier to use.
Cheers -
John
-
 jhearl got a reaction from Ryland Craze in Byrnes saw sled
I got my sliding table last week. The little plastic-topped screws for the depth stop really annoyed me - too hard to grab and start in the holes. So I went to the hardware store and got some brass 6-32 machine screws and knurled brass nuts. I glued the nuts to the screws with a bit of medium CA. I find these way easier to use.
Cheers -
John
-
jhearl got a reaction from mtaylor in Byrnes saw sled
I got my sliding table last week. The little plastic-topped screws for the depth stop really annoyed me - too hard to grab and start in the holes. So I went to the hardware store and got some brass 6-32 machine screws and knurled brass nuts. I glued the nuts to the screws with a bit of medium CA. I find these way easier to use.
Cheers -
John
-
 jhearl got a reaction from jchbeiner in Marine Walk
I am no expert on glass or much of anything for that matter! During the time I was there, the house underwent a major restoration and a great deal of effort was put into determining what parts of the house were original. There is also a well-documented chain of ownership of that house. The majority of the window sashes were determined to be original to the house. There was at least one replaced after the American Civil War because a cannonball penetrated the house, largely destroying at least one window. In any case, the experts were able to determine which panes were original and which were replaced in the 1880s. Exactly how, I can't say. Perhaps through examination of the paint and glazing around them or perhaps some sort of examination of the glass itself. As best I can recall, they didn't remove any of the panes during the restoration but the restoration started about 2 years before I went to work there. Window glass in the 1700s was made in a different way than glass made in the 1800s so it had a different appearance. A web search on "dating window glass" will turn up a good bit of interesting material.
-
jhearl got a reaction from mtaylor in Marine Walk
I spent 12 years working in a Colonial American house museum. http://kenmore.org/ The house was built in the 1770s. Most of the glass in the 16 large windows in that house still have the original glass. Some of the panes were replaced in the 1880s. It was easy to tell which glass was original because it looked much better than the 1880s glass. It was as clear and transparent as any glass you would see today. The 1880s glass had a number of blemishes and bubbles. It was still clear however.
Cheers -
John
-
 jhearl got a reaction from Dee_Dee in MS Katy of Norfolk kit issues and parts replacement
Given the nature of your questions, it would appear that ship modeling is new to you. Perhaps it would be wise to shelve Katy for now and start with a more modern kit with better instructions until you gain some experience? Once you've built a few models, you'll have a much better idea of how to approach making and/or sourcing the parts you need. If you're determined to press ahead with Katy, Bluejacket, Model Shipways, and Ages of Sail are all good sources for fittings.
Cheers -
John
-
 jhearl got a reaction from flying_dutchman2 in Rocket 1888 by Jack12477 - FINISHED - 1:24 scale - 50' Gaff-rigged Ice Yacht
For the rubber bushing, if you can get to a hardware store, you can find a large-diameter rubber o-ring of the appropriate thickness and cut a small slice out of it. A large diameter is desirable because the smaller the diameter, the tighter the curve. A small slice from a large o-ring will appear to be straight. You can drill a hole through the center of that slice so it will slip over the tiller shaft.
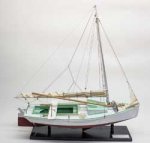
Below is an example where I used an o-ring to make the rubber bumpers on a main-sheet horse. This was at a scale of 1:32.
Cheers -
John
-
 jhearl got a reaction from iosto in Bluenose II by Osmosis - Artesania Latina - 1:75 - First POB
This is stretching my memory a bit, but I'll do the best I can. You want to wind up with the thickness of the false keel and planks being no wider than the width of the exterior keel. That exterior (visible) keel is added on top of the false keel so it and the outsides of the planks should blend together. The false keel and exterior keel are both 6mm thick, so that means you have to taper the false keel some to allow for the thickness of the planking. It's not easy to see in the attached pic, but it's the best one I have.
It looks like you need to add more shim material to bulkhead 2 in the pics above. One tip about shim material - instead of cutting the material so the grain runs in the direction of the bulkhead, cut it so the grain runs across the bulkhead (fore and aft). That will make it much easier to bend around the curve.
However much fairing you do of the bulkheads, the outer edge of the bulkheads at the false deck should match the outer edge of the false deck. So, for example, in the pics above, it's clear you're going to have to narrow the false keel as discussed above, so the false deck will have to be narrowed right at the end as well.
Hope that makes some sense -
John
-
 jhearl got a reaction from grsjax in Kits to start with and avoid?
I like to steer beginners to Midwest models for several reasons: they are inexpensive, have very clear instructions, require a minimum of tools, don't take very long to build, and are very good looking models when finished. There is quite a learning curve when it comes to building wooden ship models and you can't learn everything at once. If you start with too complex a project, you greatly diminish your chances of ever finishing. Even with a simple project, you might find that you don't enjoy wooden ship modeling and if you have only made a small investment in a kit and minimal tools, you won't feel that you've lost much. But if you complete a simple model well, you will have learned a lot about the hobby, you'll have a great sense of accomplishment, and even simple models are something you can be proud of. Here is a link to the Midwest site - http://midwestproducts.com/collections/boats I'm particularly fond of the Muscongus Bay Lobster Smack and the Sakonnet Day Sailer as good starter kits.
I do not recommend AL kits for a couple of reasons: they tend to be historically inaccurate and the instructions are minimal at best. I'm also not a fan of double planking, but that's a personal choice. You mentioned historical accuracy and double planking with thin veneer strips is anything but. Of course, there's plenty of help available on the forum for when you get into difficulties so if you find yourself drawn to an AL model, you can probably get it built despite the lack of instructions. Sometimes your passion for a particular boat can overcome a lot of problems with a kit.
Cheers -
John
-
 jhearl got a reaction from popeye the sailor in Rocket 1888 by Jack12477 - FINISHED - 1:24 scale - 50' Gaff-rigged Ice Yacht
For the rubber bushing, if you can get to a hardware store, you can find a large-diameter rubber o-ring of the appropriate thickness and cut a small slice out of it. A large diameter is desirable because the smaller the diameter, the tighter the curve. A small slice from a large o-ring will appear to be straight. You can drill a hole through the center of that slice so it will slip over the tiller shaft.
Below is an example where I used an o-ring to make the rubber bumpers on a main-sheet horse. This was at a scale of 1:32.
Cheers -
John