
HOLIDAY DONATION DRIVE - SUPPORT MSW - DO YOUR PART TO KEEP THIS GREAT FORUM GOING! (78 donations so far out of 49,000 members - C'mon guys!)
×


AON
-
Posts
2,863 -
Joined
-
Last visited
Content Type
Profiles
Forums
Gallery
Events
Everything posted by AON
-
 Thanks Druxey. The upwards bow is the same thing they do with truck bed frames.
 -
I thought it was mainly for water runoff to direct it to either side.
-
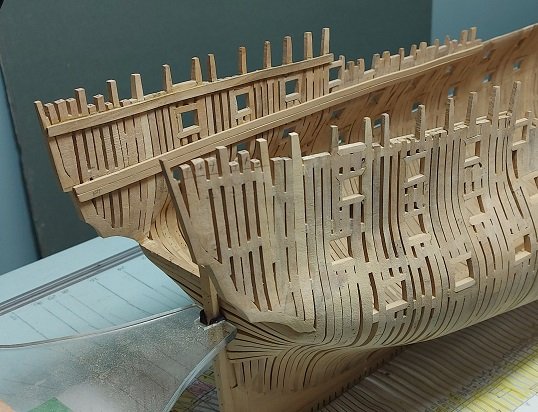
Slowly getting there. Installed two short outer counter timbers as seen in the photo below, two more slightly longer ones to go. I also made and installed the roundhouse counter beam. I made it to size, assuring I didn't transpose the radii which is easier done then one would want to admit, and then I marked off and chiselled a groove on the inboard side for the deck planks. I measured up 5-1/2", the height of the roundhouse beams and marked that, then measure up 2-1/2", the height of the deck planks and marked that. Used a micro chisel to cut out a trough between the scribed marks. This is different from the way I had done all my scrap pieces. The plan shows the piece as having a nose extension that the deck runs under. I found these to make the part fragile with the counter timber notches cut in. This time I decided to assume a deck beam was under the nose and the whole thing was a bit stronger for it. I'll get those last two short counter timbers made and installed and then do the quarter deck and upper deck counter beams. Then cut out the quarter gallery doorways.
-
Might I suggest 1. Rubber cemented applied to both pieces. Let it dry for a couple minutes then stick them together. You can pry them apart carefully with a thin putty knife. Try it on some scrap to prove it. 2. Or PVA and use rubbing alcohol to get it apart. Soak a cotton ball and wrap it over the pieces with clear wrap (saran wrap) over night and it will lift off easily.
-
Golden Hind by Rock_From_Korea - 1:48
AON replied to Rock_From_Korea's topic in - Build logs for subjects built 1501 - 1750
Well done! -
Having discovered my error with the roundhouse beam I now find the timbers almost fit exactly correct per my drawings. They just needed a wee bit of fine tuning because of the slight differences between my drawings and my build. So I now have the (long) stern timbers and most of the (short) counter and offset counter pieces made and dry fitted, two more short sets to go. Then I will fit the horizontal transom beams. The two groups of three assembled timbers are presently rubber cemented together. These have been marked off to be cut to proper lengths after which they will be PVA glued together. The tops are taller than they should be. These will be marked and trimmed after the roundhouse transom beam is made and fitted. Below is an image from the original plans and a build update photo taken today.
.jpg.d600b9b49fb7bc1ffdf4e340b222a7e1.jpg)
-
Don't you love it with things work for a change! Also, she's looking quite smart.
-
Niagara by Alex-Ks1 - 1:7 Scale
AON replied to Alex-Ks1's topic in - Build logs for subjects built 1801 - 1850
Crap! I thought that might help. Don't tell my wife I was wrong... she's keeping score. -
Where did you buy the glue 'n' glaze? It looks very good indeed.
-
It took longer than intended to get back to this but I have. In this photo below you see that each level rises and also rolls outboard. These dimensions are all different at each level. I made outboard guides to rest my beams against. These have been PVA glued with a dot of glue on to my side counter timbers so they can easily be removed later. This are made in soft pine so if anything should break off it will be the pine. I rubber cemented cardboard on the inside lip of the wing transom to act as a stop and hold the foot of the counter timbers from sliding inboard. I also rubber cemented a cardboard ledge protruding slightly inboard on the upper deck outboard support onto which the step in the timber can rest (you will see this later... baby steps). The underside of this piece has a radius upwards as the steps will rise with their relative position. I will first make/fit cardboard templates in position to prove them. Then I will cut and fit the timbers in place...and build it up. Once I have it done I can make the inside beams to suit. With things going on in my life presently it might take a couple weeks. All this might seem like a bit much but as I could not visualize the assembly to identify my problem this seemed a logical move to help me. I believe building it up and on the model will assure it is all correct. Which brings me to my original problem that brought me here in the first place. I discovered with this process that I had transposed the up/out radii of the Roundhouse beam that interlocks with the counter timber tops. This caused the timbers to lean inwards at the top, pulling the timber foot out and off the wing transom. The dimensions don't seem like much at 1:64 scale but the moment arm or twist over the distance certainly was. That mystery solved!
markedup.jpg.4d4e2976fc62285597ebcdbeceb5d3eb.jpg)
-
I appreciate the elegance, not the seeming complexity. I drew it in 3D years ago and of course it worked fine. Somehow when cut in wood it doesn't quite fit up neatly. Sorry, no photos for now, this will not beat me.
-
Here is my problem... The transom is rounded horizontally (out the stern) at different radii at various elevations, and also vertically (height), just to complicate things. There is also a step in the outer side counter timber that becomes less deep as you approach the centre beam at which point it disappears completely. I have my paper templates for the shapes but they just do not seem to fit into place when cut out in wood. If I get them located properly out the back they do not reach the wing transom. I'll get nothing done this weekend, too many other things planned. Next week I will have to make mock ups (cardboard and wood) to fit and better visualise the different pieces. Once I can do this I can make them.
-
Niagara by Alex-Ks1 - 1:7 Scale
AON replied to Alex-Ks1's topic in - Build logs for subjects built 1801 - 1850
That is terrible news. Dumb question- if you wear a patch over the bad eye will the eye strain (headache) disappear? I know for me the brain does wonders melding the images from both eyes. Possibly that is your next battle, removing the one blurry image from what the brain has to deal with. Of course I am no doctor so this might be something to discuss with yours. -
Niagara by Alex-Ks1 - 1:7 Scale
AON replied to Alex-Ks1's topic in - Build logs for subjects built 1801 - 1850
Have you seen an eye doctor? I get an injection in my left eye every 9 weeks for going on 5 years now for one problem, and just had cataract surgery in both eyes last year. If it weren't for my regular eye checkups I'd be blind permanently in the left eye and going ( but reversible) blind in the right by now. As it is I now have 20/20 vision in both eyes except for a tiny spot just off centre at about 7:00 that is white if reading type (books) when I am tired, otherwise the other eye fills in the blank. -
I buy my wood in billets (about 4" x 6" x 6 feet) Cut them to about 18" in length on my table saw. Cut those small slugs into slices length wise (thicker than what I needed). Pass these through my 13" thickness planer to get them flat on both sides. Pass those through the Byrnes model Machine thickness sander to get the required thickness. Cut my pieces from that with a Byrnes Model Machine Table Saw and/or my 16" scroll saw.
-
I spent a considerable amount of afternoons this week working and reworking the stern timbers and beams to close it up. When I came up today the wife asked: "how did it go?", and I responded: "I learnt so much today", and she said: "what went wrong?" There's no pulling the wool over her eyes. No photos until I master this part... or at least earn an "atta boy".
-
Two clamps removed and they've set perfectly. The dog leg Frames are repaired. The clamps will be glued in place this afternoon.
-
You just had to put that out into the universe didn't you! 😳 It is easy being brave when you don't know better. I'll fix them BOTH tomorrow.
-
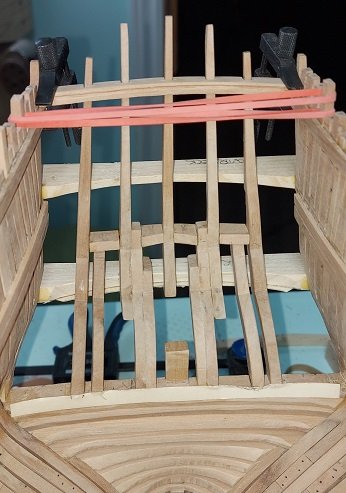
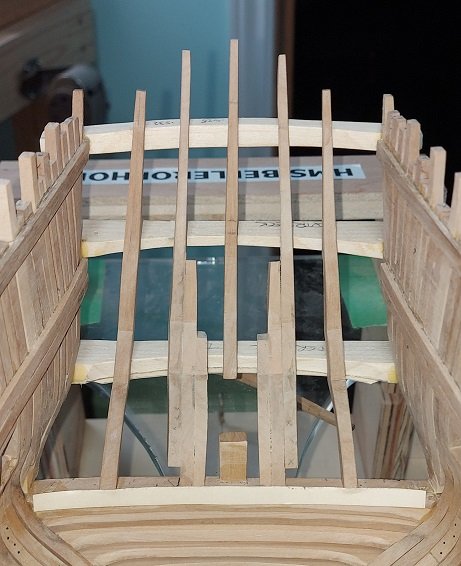
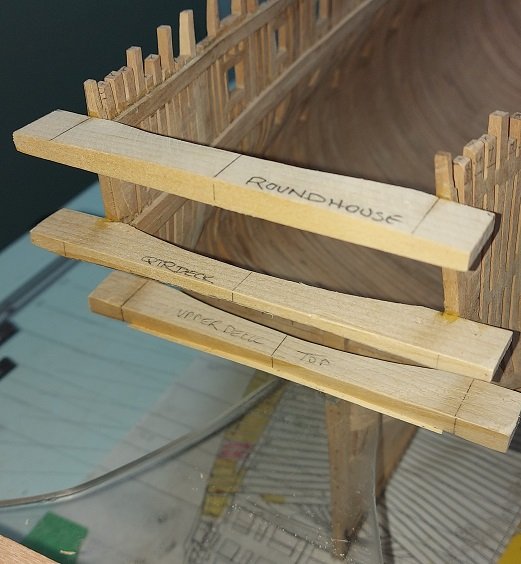
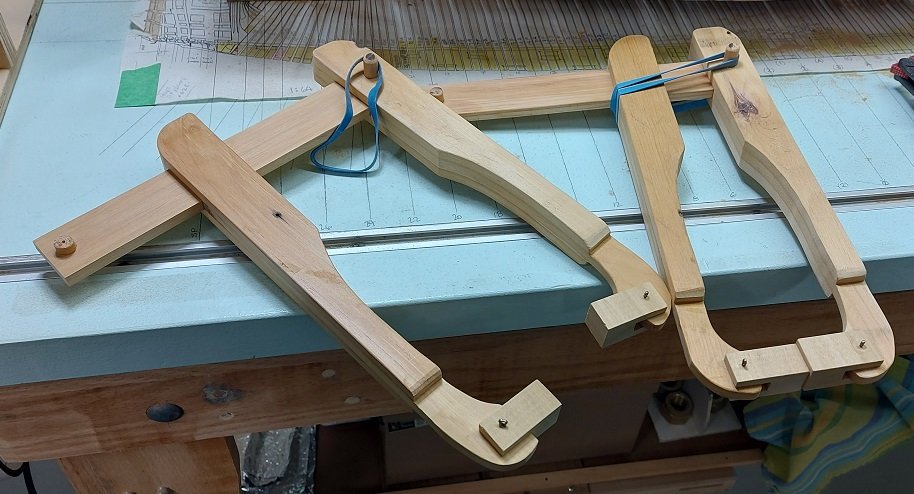
Roundhouse and quarterdeck clamps installed each in one length. Steamed and clamped the forecastle clamps. They formed up quite nicely with twist and camber but the knuckle doesn't set against the hull so I will do them again with more clamps. I had propped them out at the bow with a spacer to accommodate spring back and that seemed to work for the most part. Speaking of (spring) clamps to hold the wood strip deck clamps to the hull. All mine are quite short and lack the reach needed for the upper deck at the bow and stern, the gun deck and the orlop deck (if I'm putting this in). I could make something to reach through the gun port which takes care of 80% of the clamping needs but what about the rest, and the orlop deck has no gunports to reach through. I found a YouTube video by an airplane modeler (key words for your search are "elastic band operated clamps") and decided to make a couple and see how they work. Once set they do not open one iota. I made a few modifications to how the elastic connects, the bar stop assembly and the clamp nose piece assembly (cotter pins) and my dowels are dry friction fitted so the whole thing can come apart if needed. They are made of hemlock with pine nose pieces and maple dowels. Extremely light and as they are a soft wood, if they topple over nothing gets damaged. I estimated worst case I needed a 6" reach and they provide 8-1/2". Now I'll likely make a couple narrower ones for nesting closer together, and a few much smaller to reach through the gunports.

-
I see it now. Funny how the mind goes where it wants to. Regardless, when the time comes I think you can set a reasonable gap by adjusting the angle ever so slightly. But then again... I am no Druxey! 25 years eh? and I thought I was taking long. Thanks for making me feel better.
-
If only I was. ☹️
-
Regarding the bowsprit clearance. Can't that be done by changing the angle ever so slightly to suit. No one will be taking a protractor to it.
-
Niagara by Alex-Ks1 - 1:7 Scale
AON replied to Alex-Ks1's topic in - Build logs for subjects built 1801 - 1850
Go to your very first post and pick the three dots at the top right. That will open a menu. Pick edit. You will see the title displayed and you can edit it. Pick save. -
Niagara by Alex-Ks1 - 1:7 Scale
AON replied to Alex-Ks1's topic in - Build logs for subjects built 1801 - 1850
Hello Alex. I am not aware of your location but if it will be of any help I have some photos of the Brig Niagara. I was on the replica for a day cruise and banged my head quite a few times when down below. She was quite shallow because of the sand bar entering or exiting the bay in which she was built. Even at that they had to remove the guns to lighten her up more to clear and the British were there waiting but didn't realize she had no guns so didn't attack. You might want to correct the spelling of the ship's name in the title... you're missing a letter.

