


AON
-
Posts
2,874 -
Joined
-
Last visited
Content Type
Profiles
Forums
Gallery
Events
Everything posted by AON
-
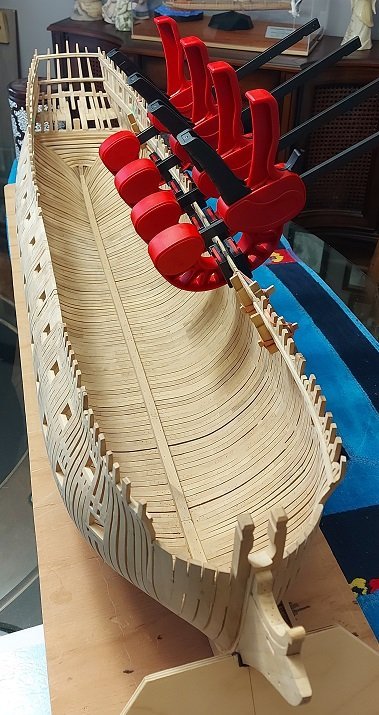
 Installed one length of the upper of three gundeck clamps using my large wooden clamps to hold them in place while the glue sets. Found the pivoting shoes didn't work so I rushed and removed them. Clamped without elastics but need a spacer block so I used a shoe. I'll get the other long piece on the other side tomorrow and work my way through them. I decided I will install the orlop deck clamps.
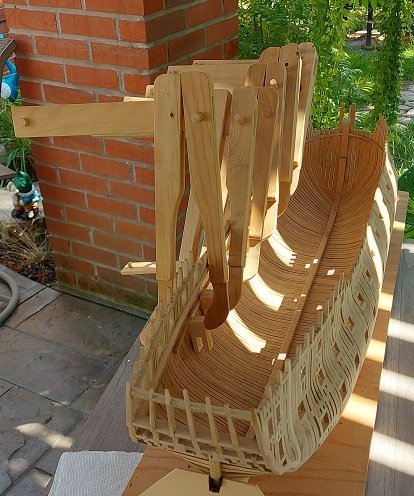
-
Stern counter beams done. Short stern quarter upper deck clamps steamed and clamped in place for shaping. I should have those on permanently tomorrow. Then I'll work on the gundeck clamps. I've not bothered posting photos as it isn't at all that exciting.
-
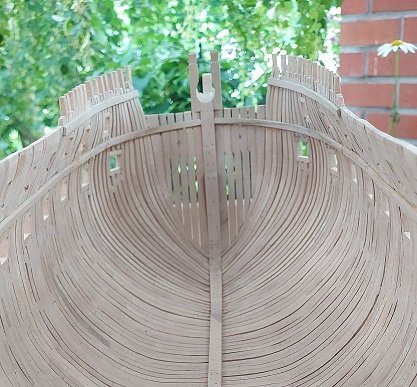
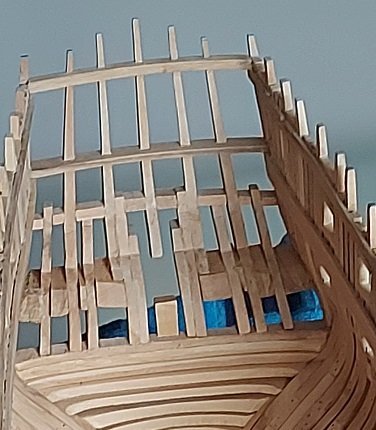
I used some string to measure the length of upper deck clamp required for the curvature of the bow. Cut my length, steamed and clamped it in place to dry. Glued and clamped that on the next day. Below you see it running up to the stem post. Today I sanded the stern counter beams. A little more work to go on them before I install the upper deck clamps back there. I wasn't really happy with my work closing up the stern but after today's sanding effort I feel much better about it.
-
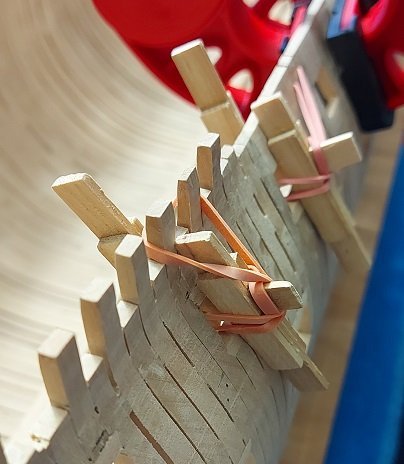
Completed the sanding and installed an extra long length of the port or larboard side Upper Deck clamp yesterday. The contract reads that they were 4'-6" long scarphs "to be tabled into each other with hook and butt". As the actual connection will not be seen and I've yet to master such a joint I decided to give myself a break and do simple square end butt joints. The top edge of the deck clamps are about 3/8" below the gunports. I marked the upper location with a pencil to help locate them. Wood glue was applied, deck clamp put in place and holding clamps installed and left overnight to set and cure. I decided to run about 2/3rds of the length in one strip as I could just reach most of the length with my bar clamps and only needed to use three of the homemade elastic band wooden clamps through gunports. There is a short length required at the stern quarter and another at the bow. The bow piece will need to be steamed and clamped to shape. Moments ago I installed a similar long piece on the starboard side and I'll not touch this again until tomorrow. I'll work on the short pieces next, and then the Gun Deck clamps will be made in shorter lengths and clamped with the elastic band wooden clamps alone. I've still not decided if I'll bother with the Orlop deck. She is stiffening up quite nicely.
-
Yup...and they either connect to the sewer, run off to the street and collect in the sewer, or a stone pit at the far end of the yard. That works wonderfully until your run off water is overflowing (ground water flood) causing the sewer system to backup because it cannot handle the volume...then you have a flood in the basement.
-
All dry, water sensor/alarm installed, and a standing pipe and floor drain gasket on order from New Jersey (they don't sell these in Canada). I made a mess of the nice clean shop floor yesterday, cut and sanded my upper and gun deck clamps. Went to install them and it seems I hadn't quite done a good enough fairing job inboard at the upper deck level. So I'll be at that today.
-
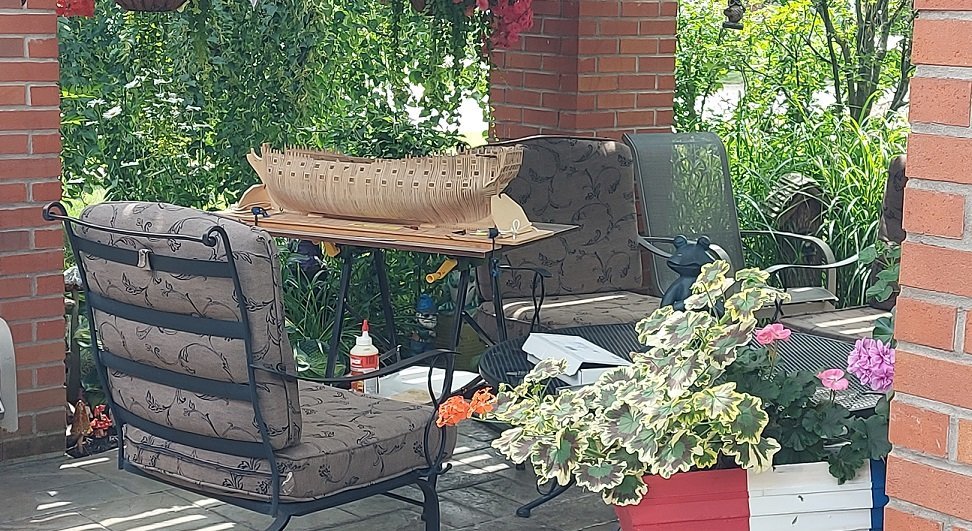
It is almost back to normal now. Should be 100% by tomorrow night. We've lived here over 20 years and this is the second rain storm that the sewer system couldn't handle the run off. After the first we made sure to get everything off the floor but over time the memory fades and we get lazy. Not too much lost but the perimeter drywall got a good soaking. Some boxes ruined, stuff for donation turned to garbage and one extension cord to our cycle gone kaput. Most stuff was in rubbermaid tote boxes so that was fine No tools lost but all my sawdust was caked to the floor of the shop with a trail to the drain. Three stains on the floor to deal with. I built extra shelves well off the floor yesterday for any new stuff. The fans have done a good job drying things out but the humidity has gone to my paper plans hanging in the corner. At least the model was upstairs on the dining room table so she is fine. I'll be installing a stand pipe rubber gasket in the floor drain for next time.
-
Since it was raining quite alot this weekend I decided to go down to my basement shop to make the additional deck clamps. Discovered about 2 inches of water had flooded the basement coming up from the floor drain. The wife and I have been purging, cleaning, drying it all out since. Taking our first trip to the city dump tomorrow morning.
-
The pieces are quite deep (long fore and aft) so once again I did them individually.Next will be sanding and filing. When this is done I will get my other deck clamps installed and then make my fore and mizzen lower masts... then the mast steps and deck beams.
-
Finished the repair work and sanding. Last item before turning my thoughts completely inwards is to install the lowest transom beam, located above the wing transom and the two aft gun ports. Seems to be called the helm port transom beam. I've also been thinking about closing this log as it has grown quite large and opening a Part Two build log that will deal with my tackling the installation of the decks and onwards.... but first that last transom beam.
-
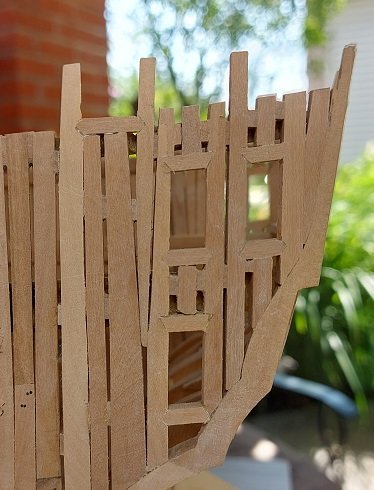
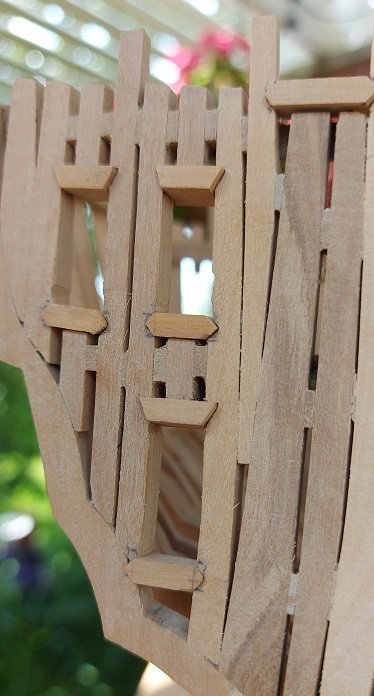
Finally got back to it... working outside. Cut and installed the cills at the starboard galley door locations and the aft poop deck gun location for the carronade. Presently working on a larboard or port side and fixing an error. I accidentally cut the timber tops down at the wrong location for the carronade. Removed the centre timber stub and sarphed the outside two. Added a scarphed block to the forward timber... did likewise aft... and installed the new centre stub. I need to add the chocks, do some sanding and I can move on.
-
The Foredom is like a Dremel in my mind and my Dremel is occassionally possessed by evil spirits when carving with proper carving bits. I cannot imagine the difference when using an exceptionally high speed Turbo Carver that sounds like it is designed for the job.
-
I tried printing a flag on thin tissue paper once but didn't like the results. The ink bleeds through to the other side as expected... just the colour seemed off.
- 366 replies
-
- 1
-

-
- bellerophon
- victory models
- (and 2 more)
-
You can always tell a real sailor by their colorful language... You did a great job with the flag. Nice and crisp looking.
- 366 replies
-
- 1
-
-
- bellerophon
- victory models
- (and 2 more)
-
Might I suggest... If you dilute white PVA glue in water (50/50) and brush this on the rope it will dry in the shape you set it. Don't use CA glue as eventually the rope would become brittle and fall apart. Alan
-
Yes. Above the "As" line. But when going by colour one person's red can be another's orange! This is the case for my wife and I. It has to do with the number of cones in your eyes. So it is better to go a little higher then to find you were to low... but we aren't building rockets so maybe it isn't so important.
-
and lastly... Most industrial heat treat companies soften their steel by cooling it very slowly, over hours of computer controlled heating temperature drops in a heat treat furnace. This forces it to cross the transformation lines higher on the curve so the material is even softer (HRC25?). This would be ideal but we hobbyists do not have the means or time to do this. From what I've learned today about home quenching in oil I would personally avoid it. Hot water should work as well but the blade is so thin that allowing to air cool shouldn't take an unreasonable amount of time.
-
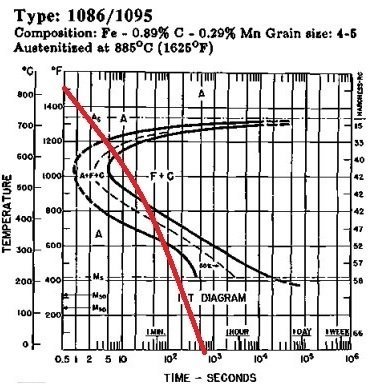
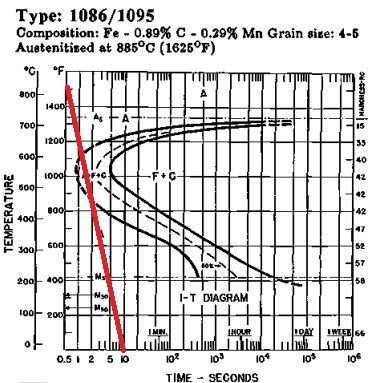
In this figure we are showing air cooling from 1500°F to warm in 600 seconds = 10 minutes (?). We pass completely through the transformation curve. Where this happens is in the Pearlite phase and is about a hardness of HRC40. Once it completely cross that third line it cannot become anything else. This is considerably softer and easier to machine than Martensite. I believe this is what Druxey described he does. As his scrapers are not for production use he does not bother to re-Harden, Temper and Age his scrapers. If you were to do this it would be a case of heating the scraper to 1500°F, allowing it to air cool to become warm to touch, only because it was worked on and any localized heating may have changed the microstructure in the area. Then Temper it by re-heating it to 275°F in an oven and holding at that temperature for more than one hour to phase to achieve a hardness of about HRC63 to 65. Finally you would shut off your oven and let everything cool naturally in the oven to room temperature to Age it, make it more ductile, less brittle. If you did do all this you would have a harder/tougher/longer lasting scraper... but is it necessary?
-
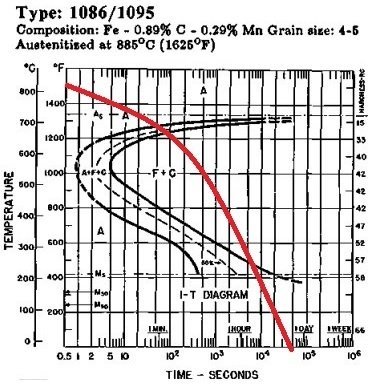
Good evening Kevin. I will do my best to explain what it all means... I was taught to read these diagrams 50 years ago so if there is a professional metallurgist out there that can do this better than me please step in. I will explain the Isothermal Transformation Diagram (T-T-T) as simply as I can in three postings - this being the first. Hacksaw blades are made from high carbon steel (C1095) and this is the Time-Temperature-Transformation diagram for it. On the left is a scale for temperature. On the bottom a scale for time in seconds. On the right a hardness scale in Rockwell C (Rc) where Rc15 is soft and Rc58 is hard... so soft is towards the top of the graph. There are three swerving curves in the middle of the diagram. The one on the left is the start of transformation from one structure to the next. The one on the right is completed transformation. The one is the middle is 50% transformation. You can interpolate 25% and 75% from that. You must heat the blade above the "As" line, a horizontal line at about 1375°F to completely transform into Austinite. So you heat the high carbon steel blade to a Red colour which would be above 1400°F... in the "A" or Austenitic zone and to soften the material you want it to cool at a rate that will cross all the transformation lines in the upper "F+C" zone. Once it crosses that far right line it is fully transformed and cannot become anything else. F+C is Ferrite (soft) and Cementite (hard). The higher you are the more Ferrite is formed and the softer the material will be. This is the Pearlite phase. The lower you are the more Cementite is formed and the harder the material will be. This is the Banite phase. At the very bottom of the graph is the M zone... Martensite. This is very hard and brittle. The hacksaw blade is very thin and so heats up and cools down very quickly. What you did was oil quench from 1400+°F to warm in possibly 10 seconds (?) or more. If you draw a line from 1500°F to 10 seconds (red line on the diagram) you see the material passes through the knee of the transformation curve but does not completely transform. Instead it passes into the "M" zone and becomes mostly Martensite, hard and brittle at possibly HRC66.
-
Kevin The chart is SAE not Imperial so that would be about 1000°F. The fire extinguisher needs to be for oil. What type oil did you use? I believe Druxey's method was correct and I will explain later tonight after our company has left ... or tomorrow. Alan

