AON
-
Posts
2,874 -
Joined
-
Last visited
Content Type
Profiles
Forums
Gallery
Events
Everything posted by AON
-
 You have done an excellent job creating a worn out beat up dory. If you removed your hand and changed the setting for your photos I could easily believe it was the real deal. Fantastic. Well done (BZ)
- 43 replies
-
- 1
-

-
- Lowell Grand Banks Dory
- Model Shipways
- (and 2 more)
-
thumb and push stick - that has been my limited experience also. I should have bought mine years ago! (instead of late last year)
-
Christmas and New Years Day celebrations are over. Tomorrow afternoon I will be sanding my counter and filler timbers... then come the door cutouts and cills. Meanwhile, over the last few days I was inspired to look at the small boats. Per The Boats of Men of War by W.E.May the 74's of my time period were issued the following six small boats: 1 each x 31 ft Launch 1 each x 32 ft Pinnace 1 each x 28 ft Pinnace 2 each x 25 ft Cutter 1 each x 18 ft Cutter After seeing a couple people present how they built their small boats and studying David Antscherl's published article in the NRJ Vol 55-1: An 18 ft Clinker Built Cutter Model, where he builds it over a plug. Then having followed Druxey's 28 ft US Cutter build on MSW... I decided to draw up the small boats for my ship. Here they are below, ready to start anytime I wish, at 1:64 scale. AON - 18 ft cutter lines -31DEC2022.pdf AON - 25 ft cutter lines - 3JAN2023.pdf AON - 28 ft pinnace lines - 2JAN2023.pdf AON - 31 ft launch lines - 4JAN2023.pdf AON - 32 ft pinnace lines - 4JAN2023.pdf
-
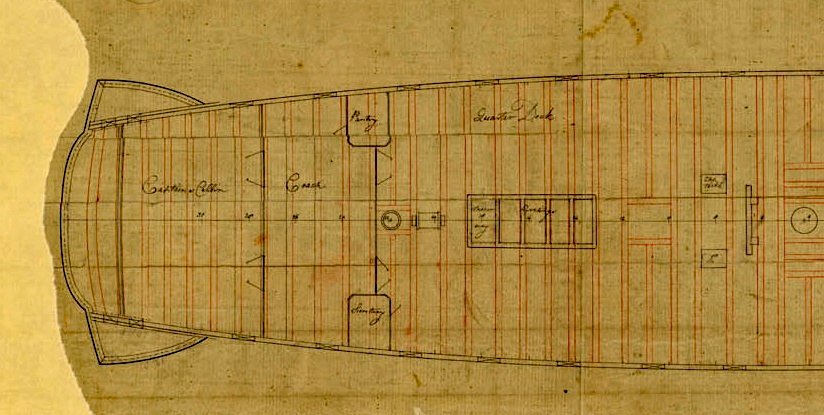
No it does not. I had to clean up the resolution to see the marks were numbers and not columns! This is part of the Elephant deck plan.
-
Good morning. I have the plans of both the Elephant aand Goliath. I don't recall seeing the location of the columns shown but will look again after breakfast. I believe the quarter galleries were used by all the officers... on both sides.
-
Off original plans it measures approximately 27 feet wide in this cabin. Head clearance under the beam is approximately 5 feet.
-
Good evening Yancovitch, Every time I leave my shop I surprise myself with what I have done. No one knows how impossible I feel every new task will be for me. There are a lot of "do overs" and I have become very comfortable tearing pieces off. But I continue to crawl forward, never give up, always face the new challenge. I know I will fail at some the first or second time, but I get better and learn with each attempt. I am still a novice. Mark That is exactly my approach, extra wide! Good night all.
-
I'm no smarter than anyone else, I've just accumulated a good reference library! Happy to share.
-
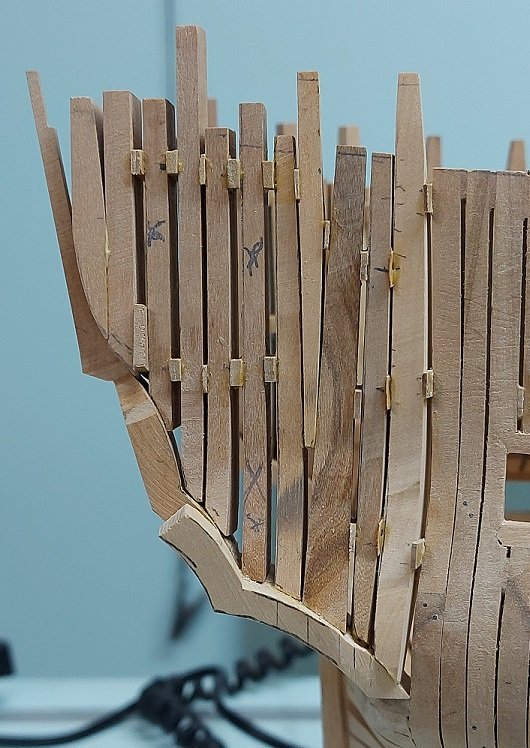
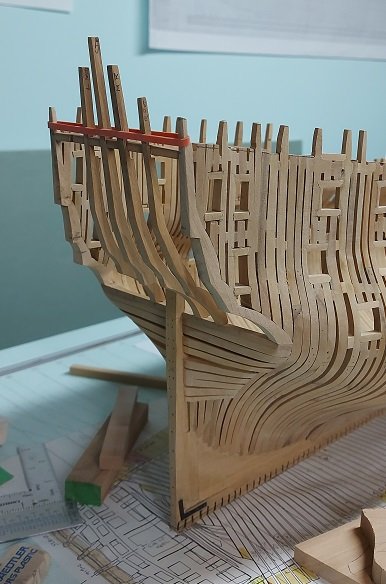
Completed installing the last of the side quarter filler frames. I will start sanding them to proper thickness (port/starboard) and height next week. Then I cutout the door openings in the frame and install the cills. And then finally the stern frames to close her up.
-
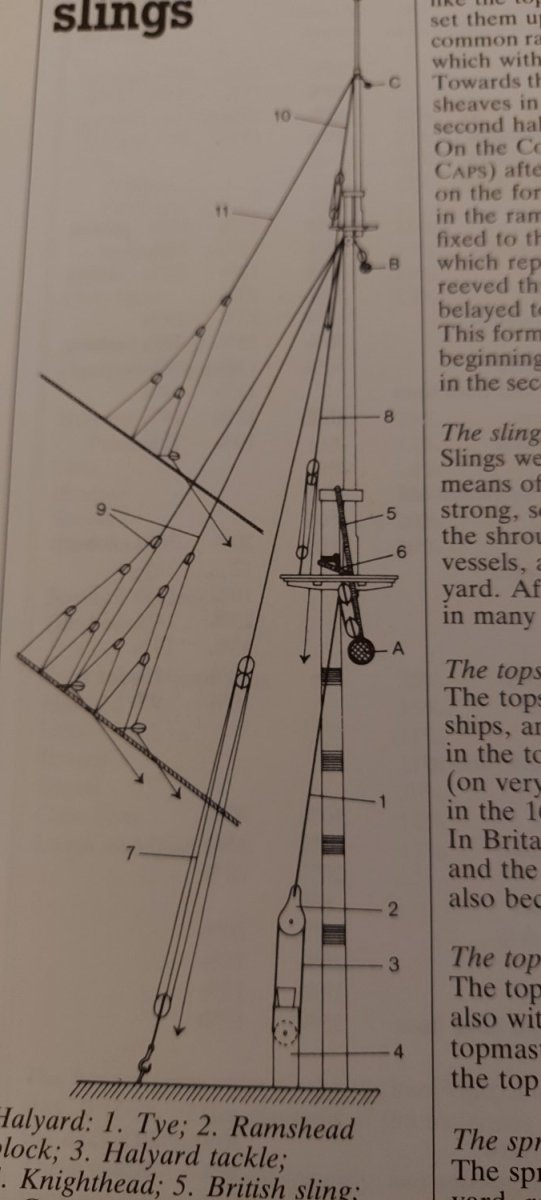
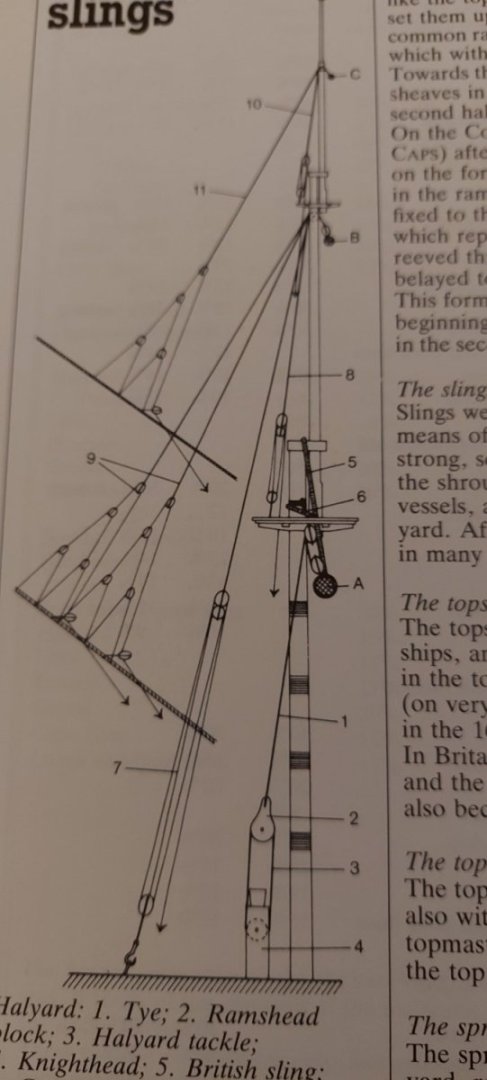
The tie or tye is the halyard that raises/lowers the lower yard. Item 1 in this image from Historic Ship Models by Wolfram zu Mondfeld, page 310.
- 366 replies
-
- 2
-
-
- bellerophon
- victory models
- (and 2 more)
-
According to The Construction and Fitting of the Sailing Man of War 1650-1850 by Peter Goodwin Page 179 figure 6/10 The backing piece was called the LINING. The front piece that bottomed against the lower cheek and rose to half the hawse hole and had a radius in it that the holes for the bend of the cable passing over it was called the ELM BOLSTER. The hawse hole had an oak lining in barrel stave fashion, between 8 and 12 segments. This was covered with lead or heavy gauge copper, the latter being used in the 2nd half of the 18th century (1750+), in some cases lead only.
-
I'll be studying these pics much more closely!
- 366 replies
-
- 2
-
-
- bellerophon
- victory models
- (and 2 more)
-
In the days of sail in the RN the crew was divided into two parts, Port or Larboard and Starboard watches. and those were split into as many as nine divisions with each division commanded by a Lieutenant. Each division (I believe) was assigned to an area of the ship. If you were on watch only a minimal number were required to man stations, the remainder carried out ship's husbandry duties (maintenance, cleaning, etc.). A great number of the crew were landsman that were only good for cleaning, polishing or hauling on lines when told to do so. If your work was completed you could rest but best not to be to obvious about it. If you weren't on watch you had leisure time or time to sleep... unless extra hands were called to duty on deck. Trimming sails wouldn't necessarily require extra hands but changing direction and resetting sails might. Battle stations was a definite all hands to duty. These situations would definitely impact your sleep time!
-
Now that is roughing it. I feel so bad for you having to survive all that sunshine and warm ocean breezes. (Had to put on my long johns, scarf, toque, winter coat, heated gloves, just to check the mail box today)
-
I don't know anything about scissor lifts on an aircraft carrier but in industry they can be mechanically screw jack operated, pneumatically operated or hydraulically operated with piston type cylinders. If using a cylinder the body is arranged to lift on the pull so the cylinder rod does not buckle. Would still be one massive diameter rod. Likely not air as it would be spongy. So that leaves mechanical screw or hydraulic operated cylinder. Was it a screw? If a screw was it turned by a hydraulic rotary cylinder?
-
I thought the model was exceptional... your base board is something to die for. BZ
-
Yes. And it comes in different densities too. I just got a small piece of the green stuff from a good friend in our club. Started rotary carving late yesterday. Easier but also easier to make mistakes. Like everything else it must take practice.
-
From out of the shadows ...my first post!
AON replied to RobTBay's topic in New member Introductions
Welcome from down under (the lake). Looking forward to seeing your build log. -
I always find moments like those to be a good time to practice all my sailor words 🙄
-
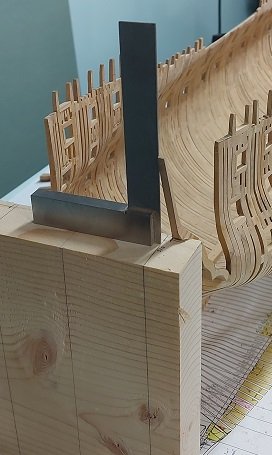
Started over on Tuesday by making two new side counter timbers and installing them. These are shaped properly in the upper third of their length, straight, flaring inwards, not outwards. I went downstairs early Wednesday morning with my reading glasses and noticed the small marking I had on the supports marked "o/s" indicating the line was to the outside top edge of the timber. When I installed it I wasn't wearing my reading glasses and didn't see the small "o/s". Yup...... I installed it inboard of the line. "Ping" followed by another "Ping" was the sound made as these were removed and moved over to the proper side of the line. Why is there always time to do it twice. Hold on. This is technically three times. I won't be posting more photos until I get further along with this.
-
Came off easier then putting it on... crying just stopped moments ago 😢 It doesn't have to be perfect.. just a bit closer to correct and then I'll be happy.
-
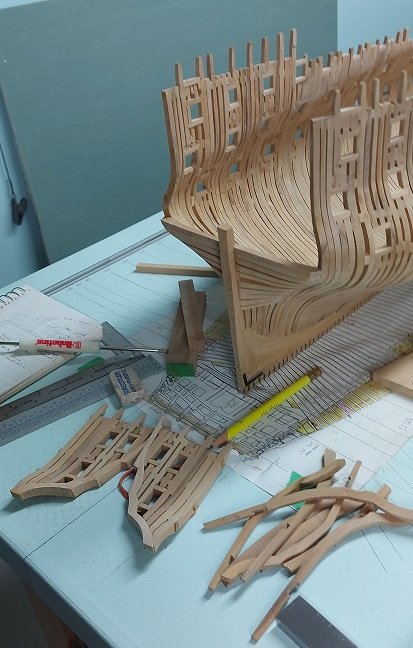
Nothing done on my build the last couple weeks. Recovery from another needle in my eye, 47th wedding anniversary, 69th birthday. But I was back at her today. Dry fitted the timbers to the roundhouse transom beam. My timbers were made taller on purpose so they could be trimmed after fitted. Learnt quite a bit so it was all worth the effort and delaying the inevitable.... then tore it all off. The next time will be better.
-
He does know his stuff (and then some)! 😇