AON
-
Posts
2,874 -
Joined
-
Last visited
Content Type
Profiles
Forums
Gallery
Events
Everything posted by AON
-
 I practised with a scrap piece of plywood to assure I had the treenail dowel drilled hole size and the scribed caulking line cut technique correct. I scribed the line with my Veritus Scriber drawn against a cork backed straight edge held down firmly with one hand. I then went over the lines with a mini Vee notch chisel to widen the line. The line was darkened with a sharp HB pencil. The pencil required continuous sharpening to assure it reached the bottom of the notch.
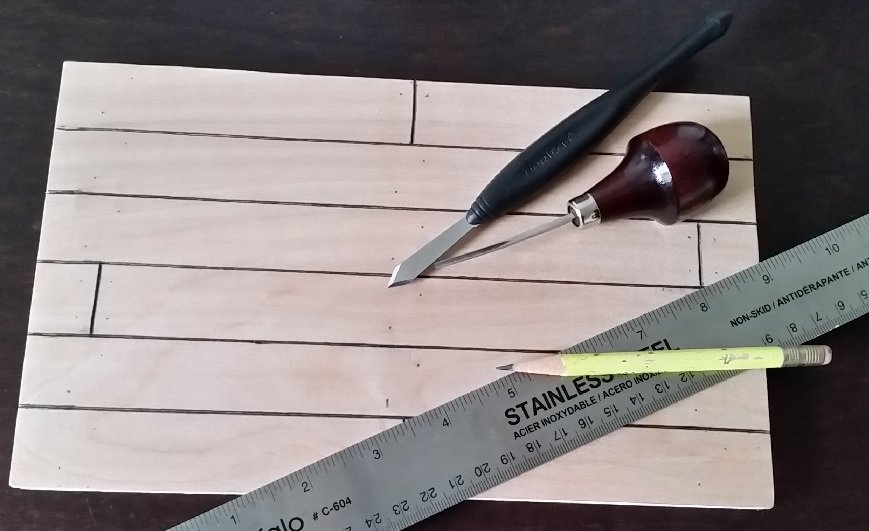
- 125 replies
-
- 7
-

-
- 9 pound naval cannon
- 3d cannon barrel
- (and 1 more)
-
Prior to starting the other metal pieces I decided to cut and lightly mark (with a soft HB pencil) the deck plank and treenail layout.
- 125 replies
-
- 6
-
-
- 9 pound naval cannon
- 3d cannon barrel
- (and 1 more)
-
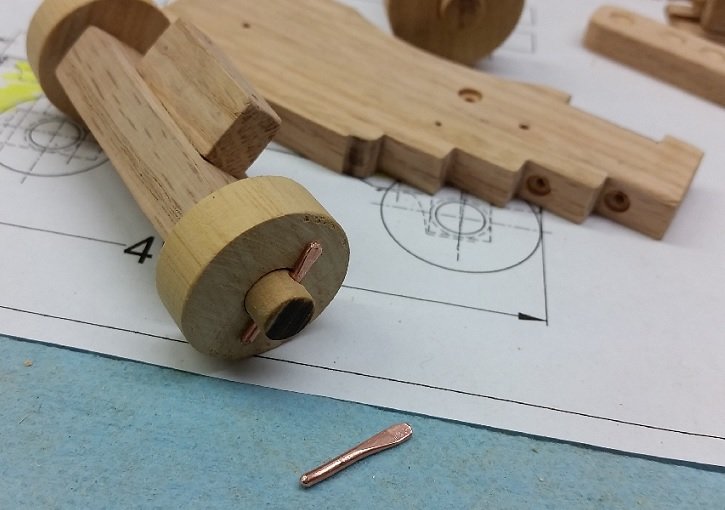
LINCH PINS were made from copper wire. One end flattened in the vise then filed to shape. Measured and cut to length and the lead "pin" end was filed round. The wire was straightened as best as I could and test fitted. Three of the four wheels needed to be sanded thinner so the pins could be driven into place.
- 125 replies
-
- 5
-
-
- 9 pound naval cannon
- 3d cannon barrel
- (and 1 more)
-
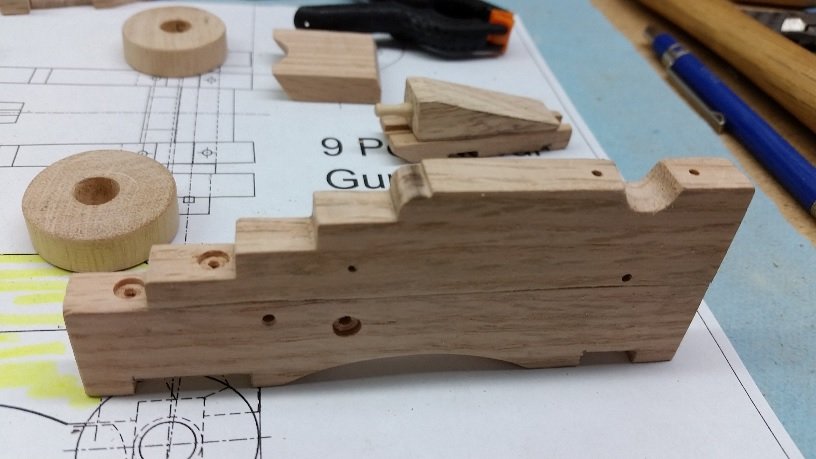
I went back to the BRACKETS (CHEEKS) and slightly countersunk three holes in each using a small brad bit. Then I drilled in the missing bolt holes on the top for the trunnion Cap Square and the bottom for the Fore Axletree support bracket. This was followed with some light sanding
- 125 replies
-
- 5
-
-
- 9 pound naval cannon
- 3d cannon barrel
- (and 1 more)
-
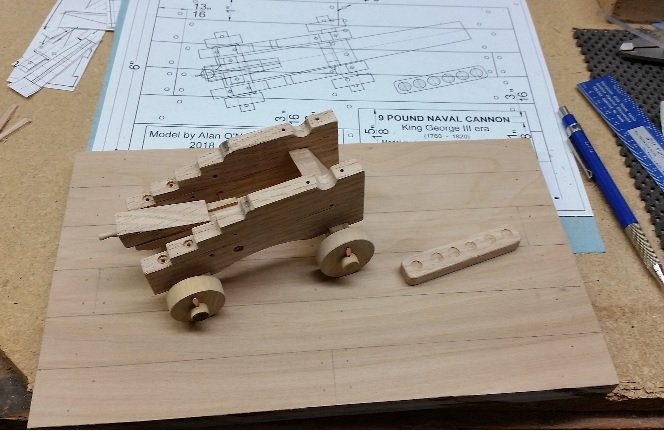
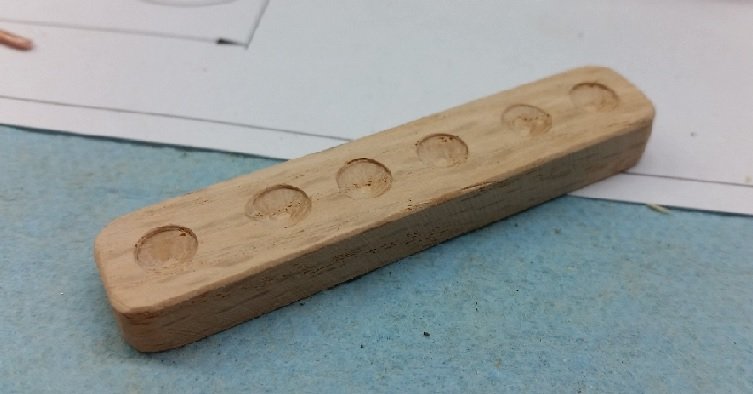
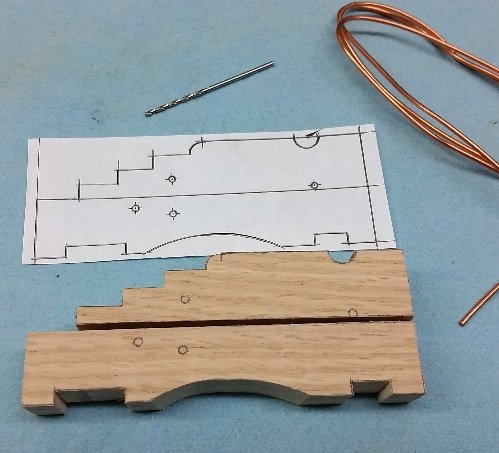
I have a sheet of 1/2" maple finished plywood that I can make the mounting base from. The planks can be scored in and the joints darkened with a lead pencil. The treenails holes can be drilled and filled with 5/32" diameter dowelling. The mounting base will be placed on a sub plate that will create a ledge for the Plexiglas case to rest on. The Plexiglas will be pinned to the mounting base so it doesn't separate from the base if picked up by the glass. The outside of the sub plate may be completed with finish moulding. My next part to work on was the CANNON BALL RACK. This was cut out on the scroll saw, sanded and the divots were marked off and drilled in. I am considering leaving this single piece unpainted as this is how they seemed to be when mounted on deck.
- 125 replies
-
- 5
-
-
- 9 pound naval cannon
- 3d cannon barrel
- (and 1 more)
-
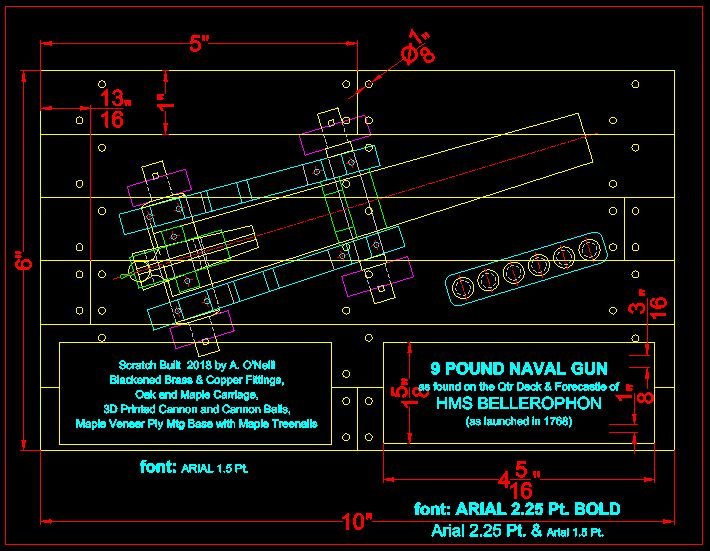
Prior to this, I decided to put my thoughts down on paper for the display case. The topic of our October Model Shipwrights of Niagara club meeting happened to be on building display cases. If you are interested in downloading a very informative PDF of this presentation go to the blog page of our website ( https://modelshipwrightsofniagara.weebly.com/ ) and search for October 2018. I copied the top view of my carriage and added a crude tracing of the cannon to get the overall size so I could pick a display mounting base size. To this I added the cannon ball rack to get the full effect. 6" x 10" seemed perfect. The inside of the Plexiglas case would fit over this. I decided the model would be displayed as if it were on a ship's deck. I drew the planks at 12" width, added a few staggered butt joints and the treenails. Then I created the information plates and decided their placement. I have yet to decide if they will be engraved brass or white on black lamacoid labels with bevelled edges... or something else. I've also played with the text quite a few times and am still not quite happy. Less is usually more but sometimes not enough. 9 Pdr Naval Carriage Display Board Size Dwg - AON - 28OCT2018.pdf
- 125 replies
-
- 3
-
-
- 9 pound naval cannon
- 3d cannon barrel
- (and 1 more)
-
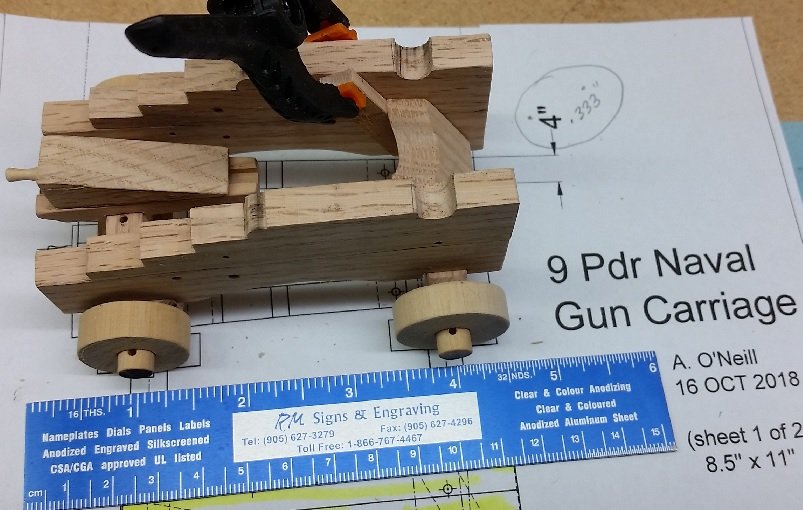
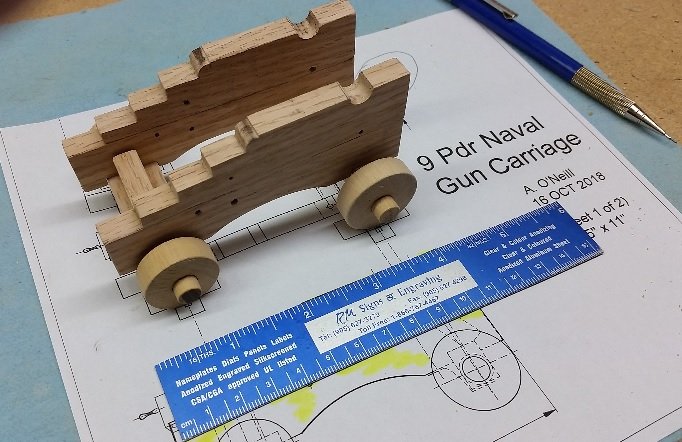
Here is the final dry fitted assembly. The Transom is held in place and kept from falling with a small temporary shelf board clamped to one Bracket. It requires a few more holes to be drilled in the brackets before I start on the hardware.
- 125 replies
-
- 10
-
-
- 9 pound naval cannon
- 3d cannon barrel
- (and 1 more)
-
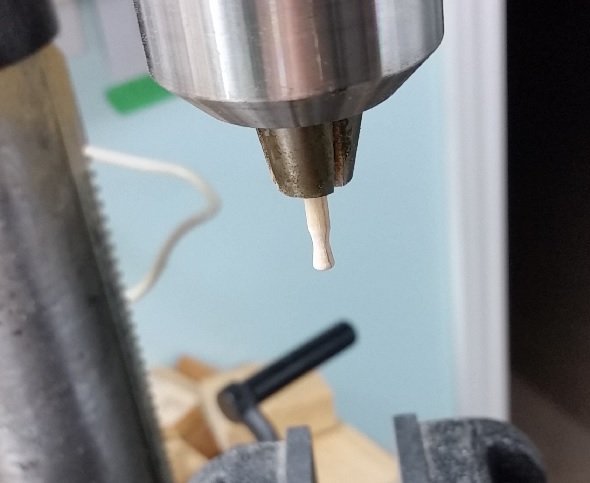
The QUOIN HANDLE was made of maple dowelling, filed and sanded to shape while mounted in the drill press chuck. A pocket was drilled in the Quoin with the nearest sized number drill I had and the Handle was filed once again to fit quite snuggly in the hole and so is one of the few pieces not glued.
- 125 replies
-
- 9
-
-
- 9 pound naval cannon
- 3d cannon barrel
- (and 1 more)
-
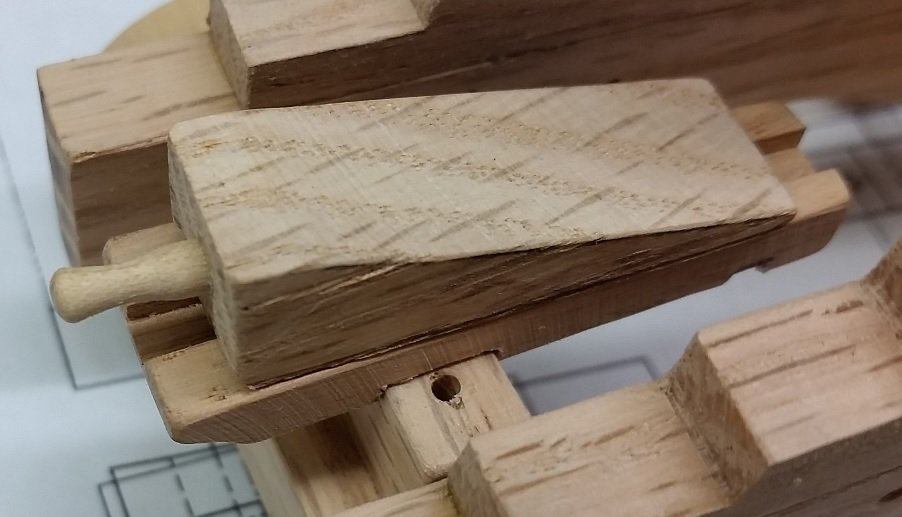
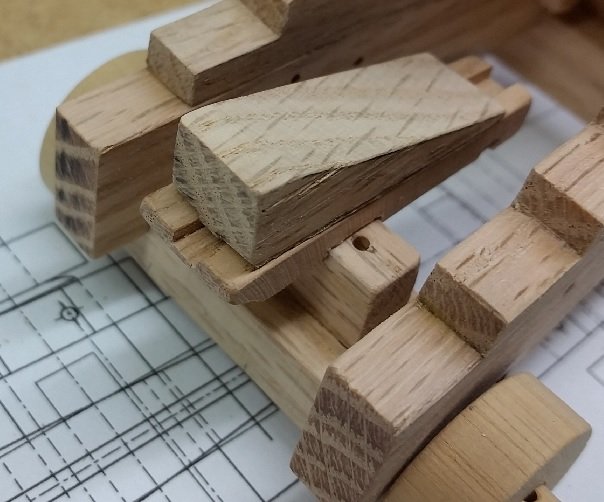
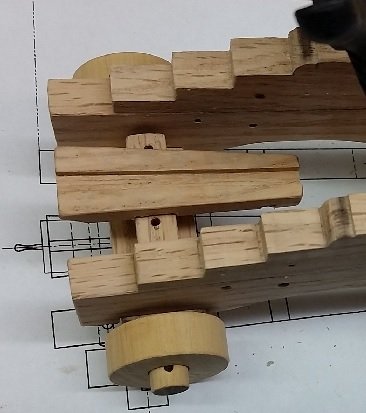
The QUOIN was made similarly with the key fitted to slide in the keyseat.
- 125 replies
-
- 8
-
-
- 9 pound naval cannon
- 3d cannon barrel
- (and 1 more)
-
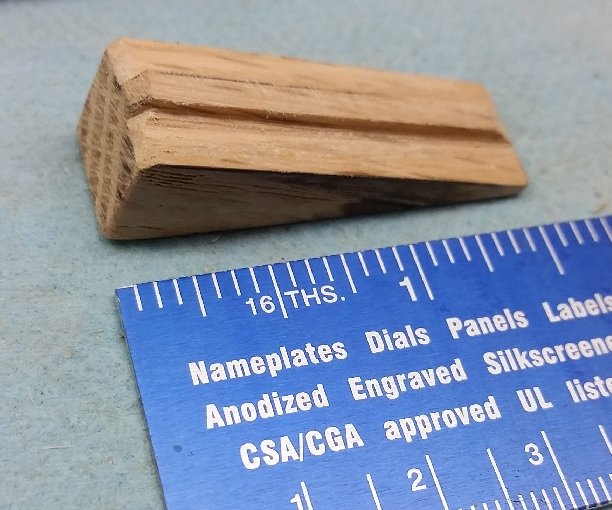
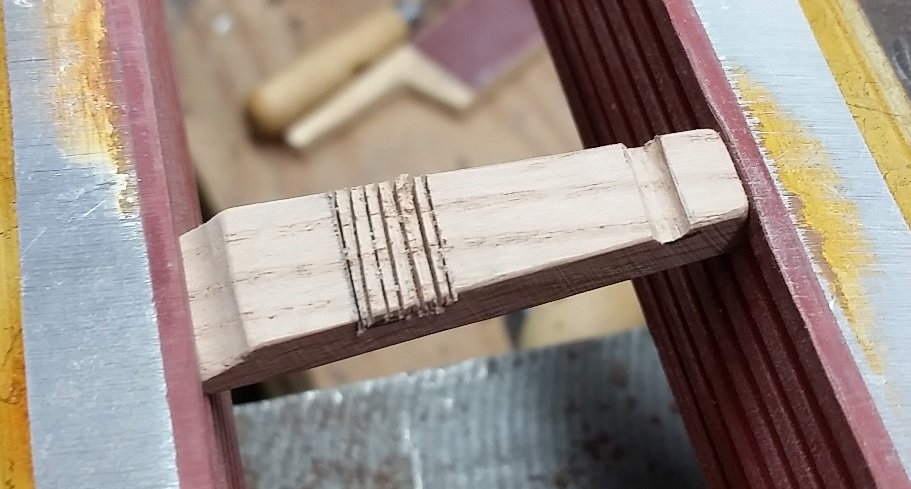
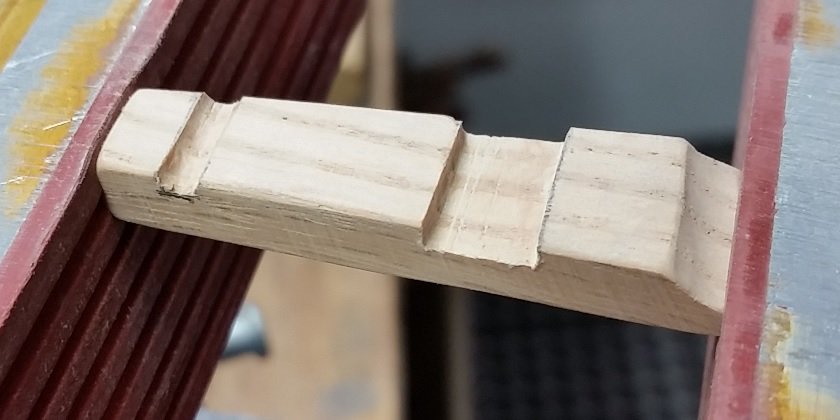
The last wooden pieces were the STOOL BED and QUOIN (wedge) used to set the firing angle of the gun. These were the toughest parts to research as there seems to be quite a bit of conflicting information. Some show their mating surfaces to be flat. Others show a keyseat or pocket in the Stool Bed and a key extending below the Quoin to fit into it. Yet, others show the top of the Stool Bed and underside of the Quoin to have engaging sideways racks of teeth to lock the Quoin in place (keep the Quoin from slipping). Some show multiple stacked wedges being used. Some have a handle on the Quoin whereas others do not. The Stool Bed on some were square sided whereas others were tapered on the sides. I chose to taper the sides of the STOOL BED and simplify the engagement with a simple keyseat and key. The keyseat was sawn with a fine 24 tooth saw, chiselled out with mini a chisel and finally filed to shape.
- 125 replies
-
- 7
-
-
- 9 pound naval cannon
- 3d cannon barrel
- (and 1 more)
-
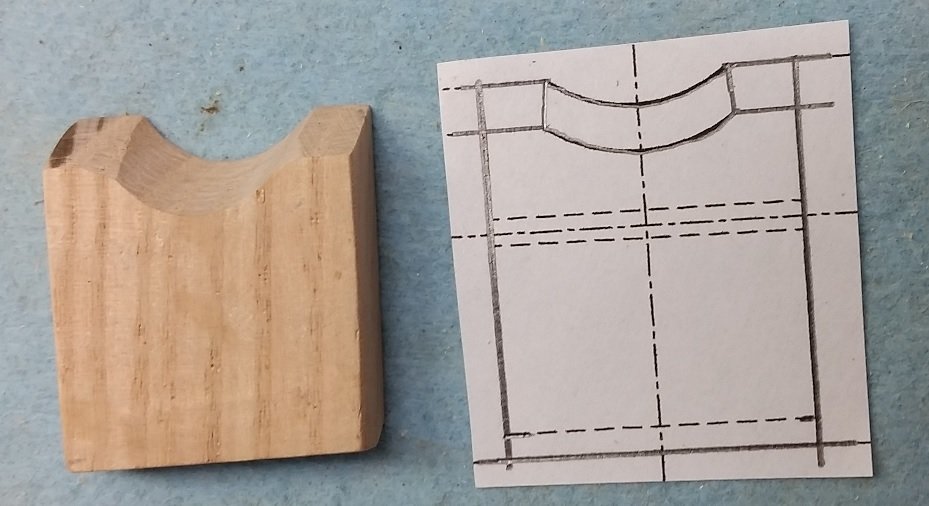
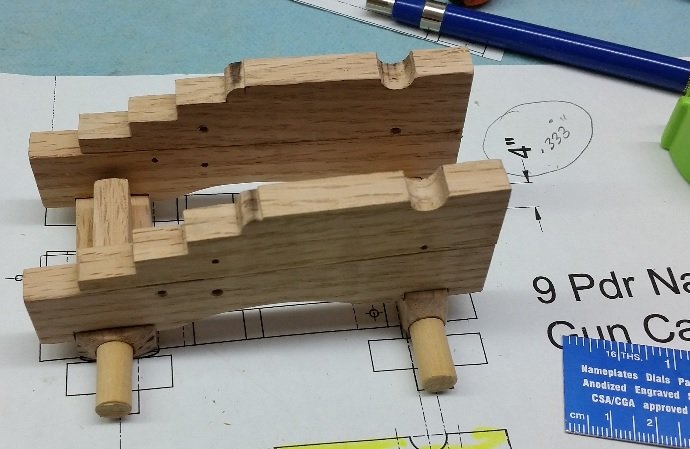
Then came the TRANSOM. This item sits under the cannon Trunnion pockets, between the Brackets and directly on top of the Fore Truck set at an angle leaning aft. The sides mating to the Brackets (set at 7°) needed to be sanded slightly at opposing angles to butt properly.

- 125 replies
-
- 8
-
-
- 9 pound naval cannon
- 3d cannon barrel
- (and 1 more)
-
The third pieces to make were the HIND and FORE TRUCKS (or wheels). These were also made of maple dowels of diameters just larger than required and sanded down on the lathe. I sanded down a length adequate for two trucks, then scored the proper widths leaving a 1/4" gap between each truck. I drilled the axle hole through on the drill press, and lastly cut between the 1/4" gap with my band saw. The individual trucks were then sanded to the score marks. I chose to make my TRUCKS in one piece as I understand the bolted two layer/four piece sandwiched Truck with grains running at 90° was a feature that followed at a later time. I did not use metal trucks as they were never used on the wooden decks of ships since they would cause too much damage to the deck.
- 125 replies
-
- 14
-
-
- 9 pound naval cannon
- 3d cannon barrel
- (and 1 more)
-
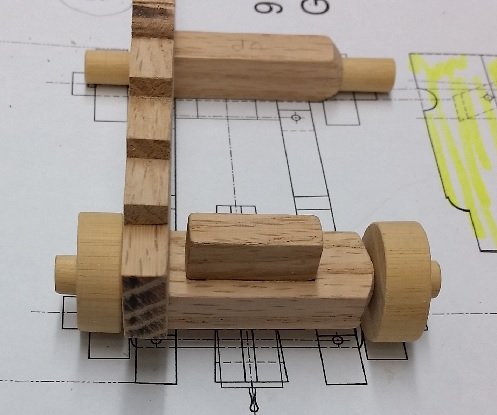
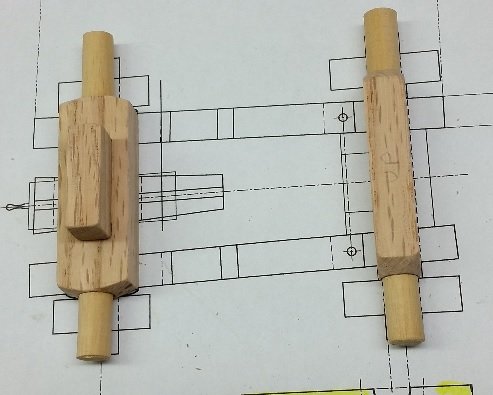
Next came the FORE and HIND AXLE TREES. I decided to make each of these in multiple pieces. The round axles would be made of maple dowels sanded on the lathe to the proper diameter. I drilled pockets into the oak blocks and later glued (yellow wood glue) the maple rounds into them. The dowels were purposefully made about 1/4" too long. After curing overnight I sanded these down to the proper projected length. Note that both ends of the rectangular block parts are rounded to the pockets prior to gluing the dowels in place. I will not be adding metal bands at the end of the rounded dowel parts as to my understanding this was a feature added later in time. The BOLSTER was simply a rectangular block of wood... easily the simplest part to be made!

- 125 replies
-
- 10
-
-
- 9 pound naval cannon
- 3d cannon barrel
- (and 1 more)
-
While waiting for the 3D printing course I decided to build the carriage assembly. The first thing was to select wood material. The real carriages were originally made of elm and later this changed to be oak. As a scaled down version the normal choice would be something with a tighter grain. Since the wood was getting painted it really didn't matter what I used but the song "Hearts of Oak" came to mind so I decided to use oak. I have old oak shipping planks that needed to be cut down to near size on the table saw and then sanded to thickness. The first items made were the two piece BRACKETS or CHEEKS. I've found them called by both names. The pattern was transferred from the plan to the wood using carbon paper and a pencil. I decided to soften the edges by rubbing them with fine sand paper. This was done to all pieces I made for the carriage. Although initially cut square, the axle tree and gun barrel trunnion pockets needed to be filed at a very slight angle because the brackets are set at 7°.
- 125 replies
-
- 7
-
-
- 9 pound naval cannon
- 3d cannon barrel
- (and 1 more)
-
I then created a 2D drawing of the carriage assembly and details using the free downloadable software version of DraftSight. I inserted images and scaled them to full size so I could refer directly to these to create the drawing. This was drawn full size, fitted on 8.5 foot x 11 foot rectangular borders scaled up from the dimensions of a standard A size sheet of paper (8.5" x 11"). I added a cannon ball rack as an afterthought. Below is a screen shot and a downloadable PDF of the 2 sheet templates on the left. 9 Pdr Naval Carriage Dwg (1 of 2) - AON - 25OCT2018.pdf 9 Pdr Naval Carriage Dwg (2 of 2) - AON - 25OCT2018.pdf

- 125 replies
-
- 8
-
-
- 9 pound naval cannon
- 3d cannon barrel
- (and 1 more)
-
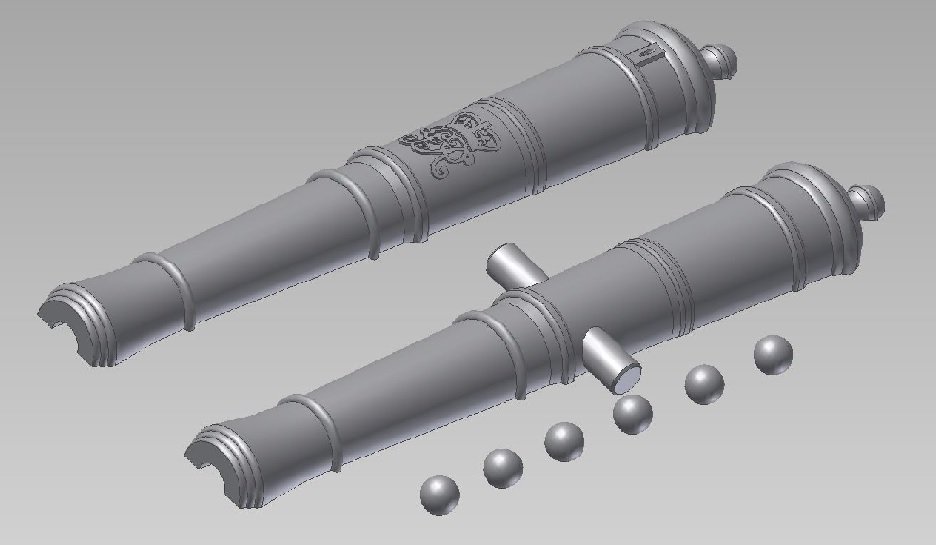
One had brought in a naval gun assembled from a kit and the other had 3D printed various size naval cannon barrels at his local library. I found this fascinating and now had an itch to build my own naval gun. Our local library posted a notice of a 90 minute compulsory course (on the evening of 20 November) to allow library card holders to use their 3D printer, so I signed up. A search on their website revealed they allow a 8Mb maximum size STL file of any non-copyrighted 3D image. The build area size is 230 mm long (9") x 150mm wide (5.9") x 130mm high (5.1"). They have a variety of colours and black is an option. I started my research on this forum, and concluded with a wider search on the internet and books in my personal library. I decided on a 9 Pound Naval Cannon that would be found on the quarterdeck or forecastle of HMS Bellerophon (1768), a 74 gun Man of War. Having gathered all the data I could, I made a full size model using Autodesk Inventor. I would rescale it to 1 inch = 12 inches (1:12) later. I settled on this scale because the dimensions of the 9 Pdr fits the 3D printer build area size at 1:12. I brought my info to the October meeting of the Model Shipwrights of Niagara and was told by the single member with experience that the 3D printer needs to start the build on a flat surface (so the object doesn't roll away). This gentleman had made several very small prints in one file (all at once) and oriented his cannons to stand on their flat muzzle. It was suggested by a well weathered modelling member I might split the cannon in half to create a flat surface to build up from and then glue them together afterwards. My model was altered and I added six cannon balls (with a flat underside) to add to my display. The STL file for these items is 7.68Mb in size. I may need to make changes after I attend the compulsory 3D printing course.
- 125 replies
-
- 8
-
-
- 9 pound naval cannon
- 3d cannon barrel
- (and 1 more)
-
I will be getting back to my slow progressing scratch build of HMS Bellerophon with a goal to complete all the frames before next summer... but after a summer of home renovations, grass cutting, fishing, and a little carving, I found myself being drawn to something a couple members of our local club (Model Shipwrights of Niagara) brought to one of our monthly meetings earlier in the year (before the summer). This project was started on 24 October 2018.
- 125 replies
-
- 2
-
-
- 9 pound naval cannon
- 3d cannon barrel
- (and 1 more)
-
Simple. I am the Admiral on my ship. However, please do not disturb Her Majesty with this info.
-
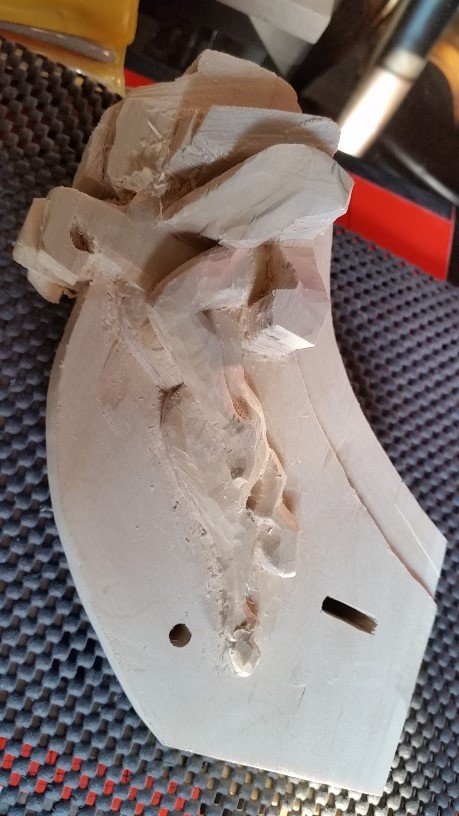
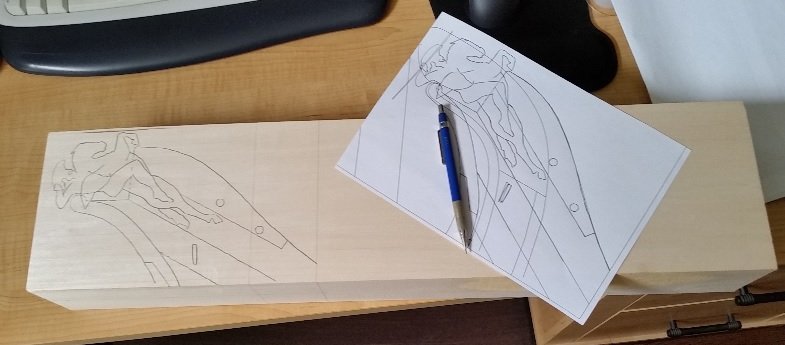
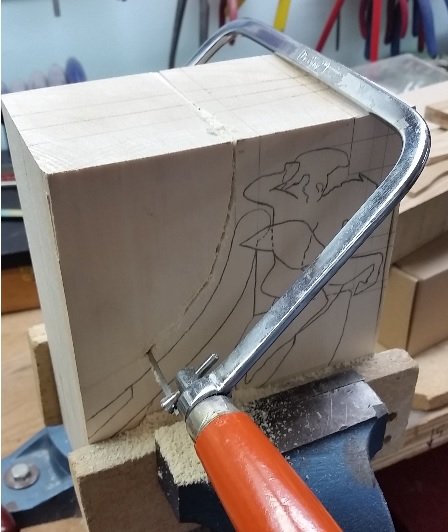
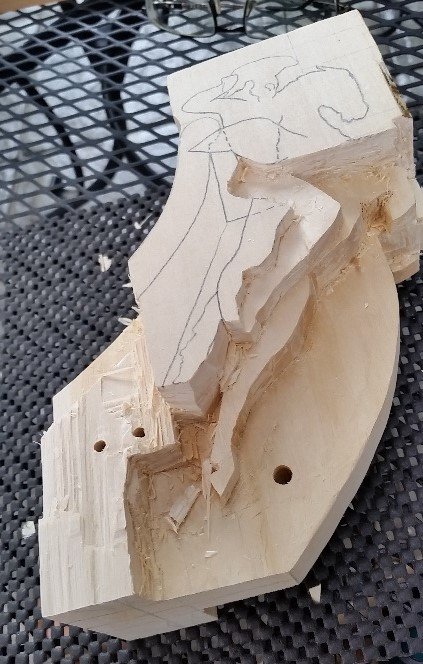
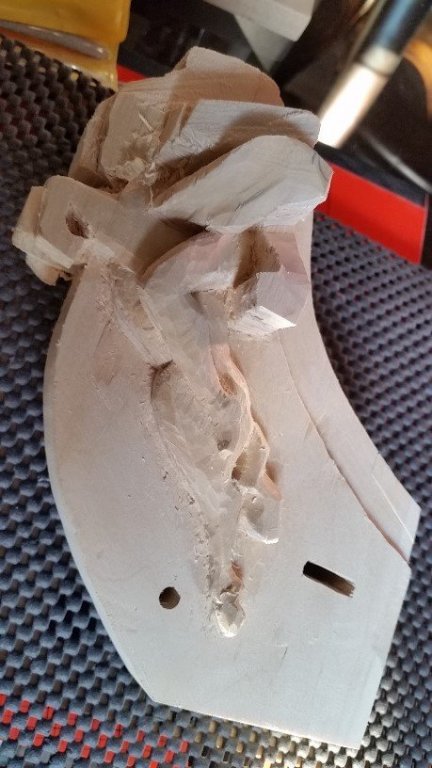
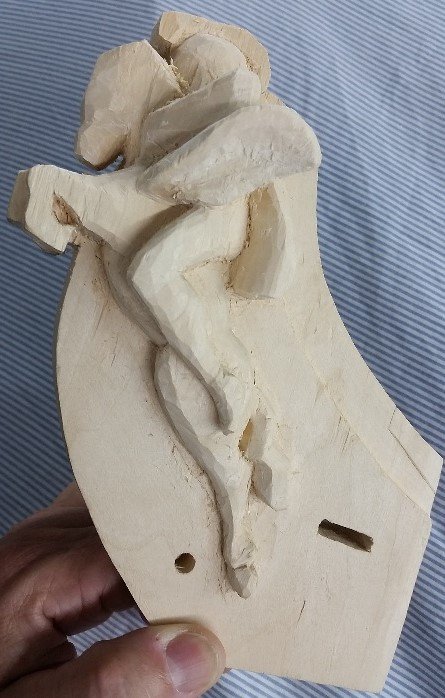
No progress on my build. The windowless playroom in the basement lost out to the call of the sun outside... but now summer is over, laying about is done, too cold and wet for fishing for these bones, and the grass seems to have stopped growing. Two bathroom renovations are done and the flooring of two other rooms is done and over. Time to get back at her. My goal this season is to get all the frames done and expect to start in the next couple weeks after yet one more diversion project is completed. I had got some progress on my first crack at carving the oversized X3 (too large for the model) figurehead. I had been working on it while sitting outside on the patio under the shade of the pergola and willow in late August. Took it to our September club meeting. Below are some pics. Still a considerable amount of work left to go on this... for later when I get bored. There is a small diversionary project on the go and I expect it will take another week or so before I finally get onto the Billy Ruffian once more.
-
Happy to see you are back. I completely understand the impact of summer distractions and the need for short term diversions. Wonderful pic of your dad. Looking forward to continuing to follow your progress. BZ Alan
-
Kurt I do exactly the same thing. I put put mine in the bedroom clothes closet... top shelf. May be you should start looking on your top shelf. 😉 Alan
- 3,618 replies
-
- 1
-
-
- young america
- clipper
- (and 1 more)
-
This might help with laying out your scarph joints. The Elements of Wood Ship Construction - Scarph Joints - W.H. Curtis (1919).pdf
- 969 replies
-
- 3
-
-
- hahn
- oliver cromwell
- (and 1 more)
-
It likely seems dumb but I would like to know how you have refined the process if you could explain😎