HOLIDAY DONATION DRIVE - SUPPORT MSW - DO YOUR PART TO KEEP THIS GREAT FORUM GOING! (89 donations so far out of 49,000 members - C'mon guys!)
×


AON
-
Posts
2,866 -
Joined
-
Last visited
Content Type
Profiles
Forums
Gallery
Events
Everything posted by AON
-
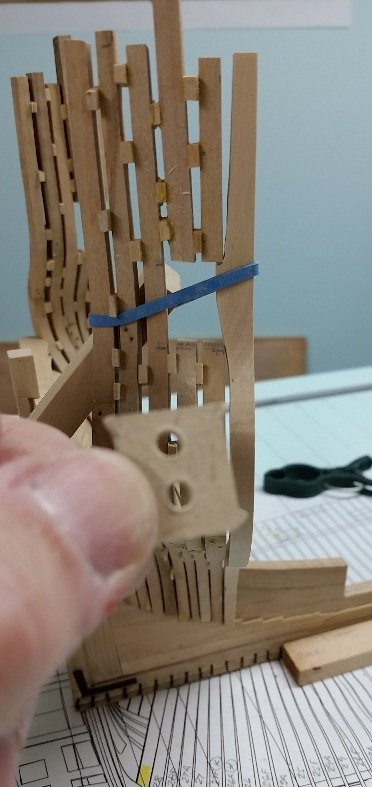
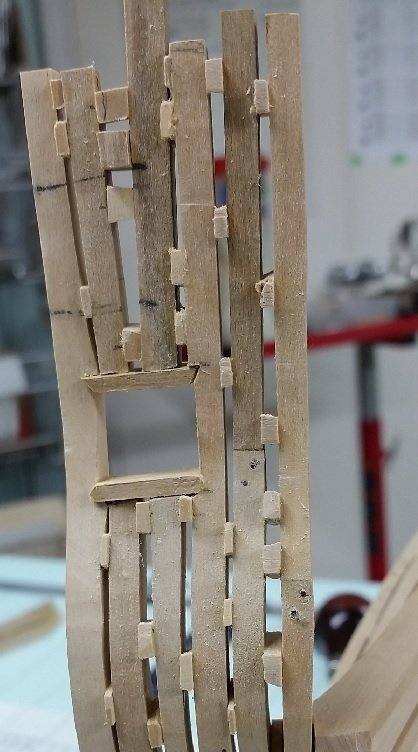
 Spent about 90 minutes visiting (at his invitation) one of our local model club members. He understands this is my first ever scratch build ship and we both understand I know next to nothing. As my wife said to me as I went out the door: I am so blessed to live so close to such a skilled model maker. There are few real gentlemen and just plain thoughtful and sharing people in this world. Came home and tore everything off the port side to match the starboard side to allow me to follow his suggestions. I must admit it didn't hurt to remove them this time. I believe I have become immune to the pain. He recommended I consider making and spot gluing all the frames in place so I might remove them later. They need to be marked (I'll do this at the heel) with their station numbers. As a group are installed I should sand them to shape while I can still easily reach inside. Once all are installed I can apply a batten at the proper distances above the gun decks and lightly mark off the gunport top/bottom openings in one step, marking an X on each frame to indicate what to cut out. Then I should remove the frames and cut out each gunport individually. The loose pieces above need to be lightly marked with station numbers on the same face as the lower portion, and indicate which end is the top (an arrow pointing upwards) so they get reinstalled properly. Then (finally) reinstall them permanently. He also spent time demonstrated to me how make clean shallow cuts for the cills (sills) with a chisel, and described how he would make cills to match and fit, which was almost identical to what I had done (making the cills, not the cut outs). So I am back to making the same frames, over, again. I admit, that part just plain pisses me off. It will be worth it in the end. It will be worth it in the end. It will be worth it in the end. I purposely haven't mentioned the gentleman's name as he doesn't share his knowledge or personal time for any acknowledgement. He does it because it is his choice, because he can, and it seemed to him I might be heading down a road filled with aggravation. Since he had been there many years ago, he might save me from some of it if I wasn't too thick headed to listen. (Okay, I added the thick headed part because I know me). Once again, thank you. I hope to return the favour by sharing with some unfortunate modeller down the road... after I am blessed with some skill to share.
 -
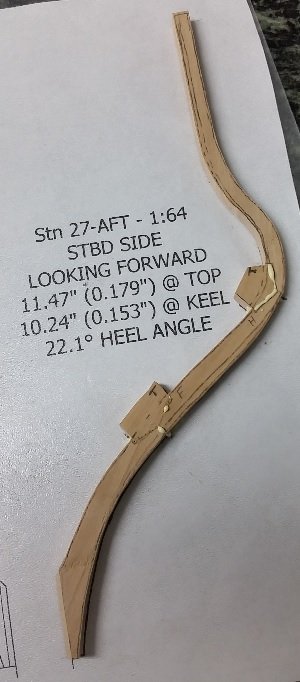
Made (remade?) my frame: starboard 27 aft. set it aside to dry and cure. Worked on the port side gunport; filed the opening and installed the cills (sills). I will prepare the new frame tomorrow (shape the chocks, sand to thickness, install the bolts) for installation, and I'll cut out the upper port side gunport.
-
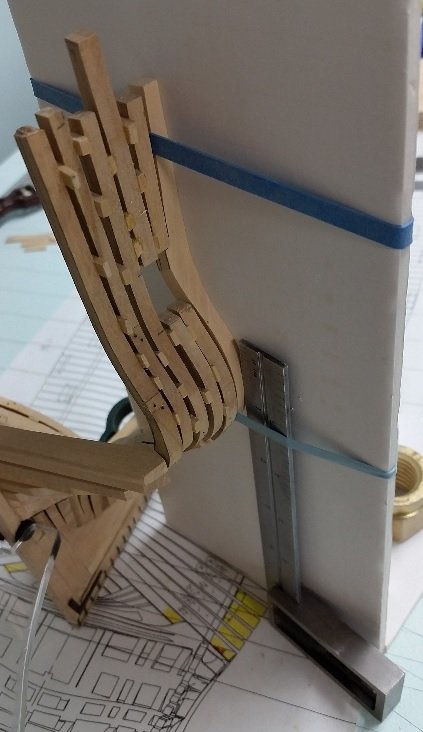
took them off cleaned it up walked away
-
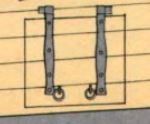
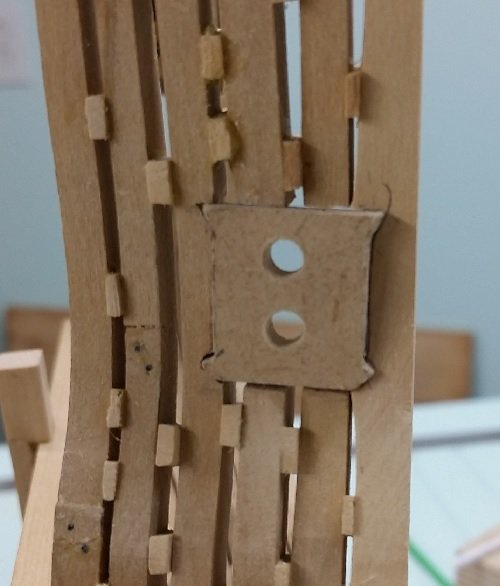
Good morning Jaager. I have looked and see square and parallelogram shapes. I believe the square is simplifying the ports. I believe you are correct. I could not understand how a parallelogram shaped port could swing open without binding. Then I found the answer. In The 74 Gun Ship, Volume 2, page 35 fig. 125 I found the following figure. At the same time moments ago I received a private e-mail from Druxey explaining exactly the same thing! The hinges are square to the vertical sides, not parallel to the skewed top. You can see in the image that the left hinge is higher above the top to the cover than the right hinge. I've looked and cannot seem to see how I might salvage my first ever gunport. If I cannot, I will be tearing out four frames on the starboard side. Having done it before (tearing frames out), I cannot say it is getting easier.
-
Good evening Jaager My aft gun ports are higher aft but the opening is square. The draught I am looking at is a 2D image of a 3D object. I read it to be a standard square opening with simple square port covers. I have not seen one in real life so this is what I understood the frame draught to be showing me. Alan
-
Druxey I understood your Sunday post clearly and planned to follow it (which was my original plan) once these four are done. Are you suggesting that I should remove the installed frames that are chocked and glued, disassembling them, clean them, cut the ports, and then reassemble them? This seems riskier than cutting one more upper gunport. Looking forward to discussing this in person! Alan
-
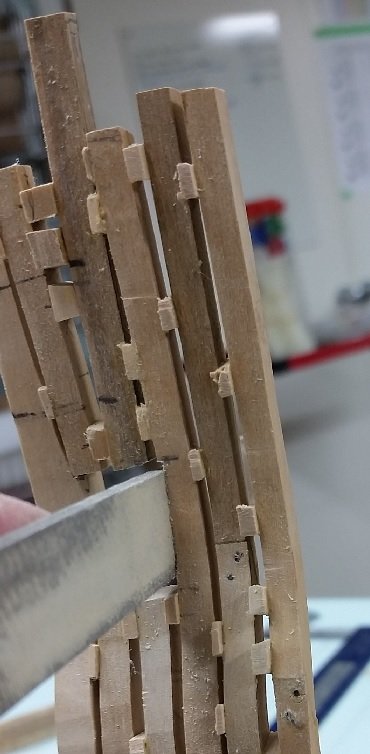
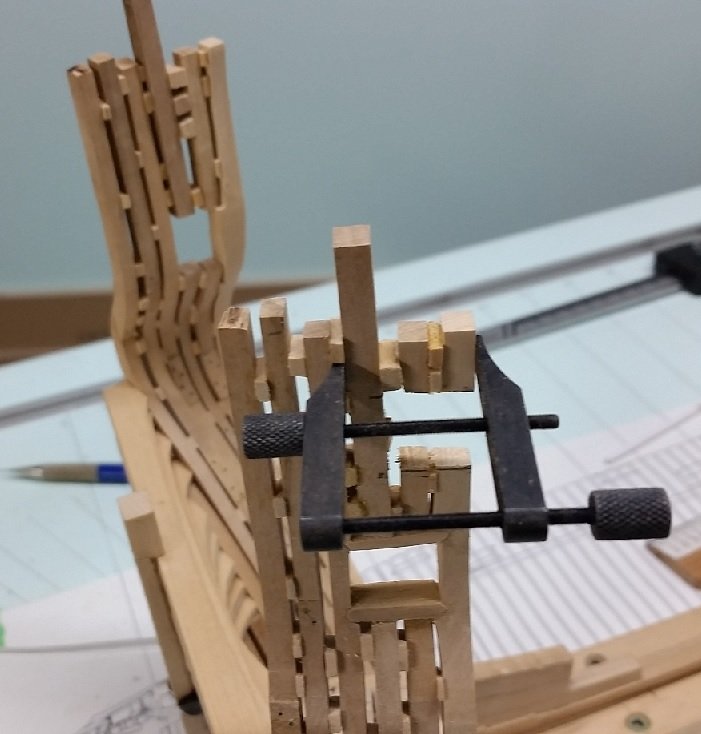
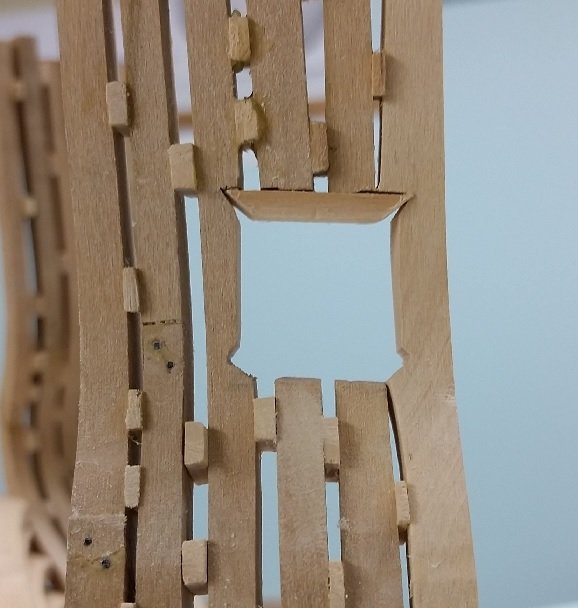
Well, it happened. I made my lower cill (sill) and installed both upper and lower permanently. Let the glue dry and set. Shaped the next set of frames in readiness as they reach into the upper gunport opening (similarly to the lower opening) so when installed they will add support. Then I carefully, very light strokes, sawed the frames for the upper gunport. Cut through the first timber with out incident... the toptimbers snapped off with the next cut. So, they are glued on and need to set before I attempt anything more. I was going to take it to our club meeting tomorrow but I feel it is too delicate... particularly with the ice and more snow on it's way tomorrow. Regardless, I am looking forward to the rope walk demo. I will take it to the next meeting at Lee Valley Tools in Niagara Falls next month.
-
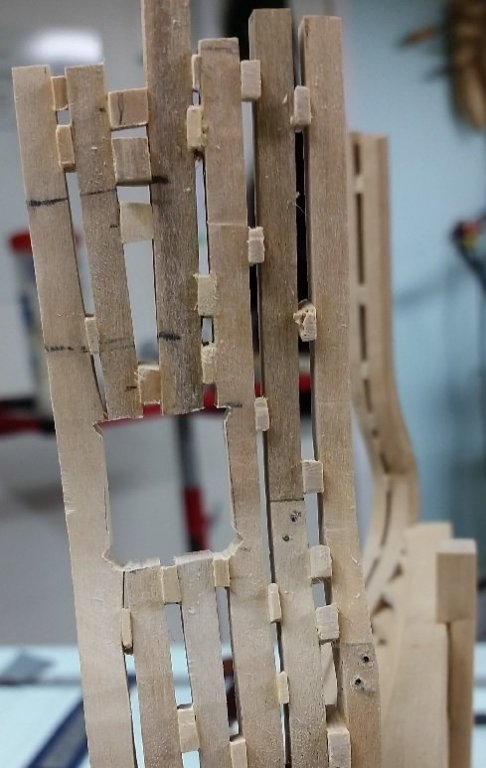
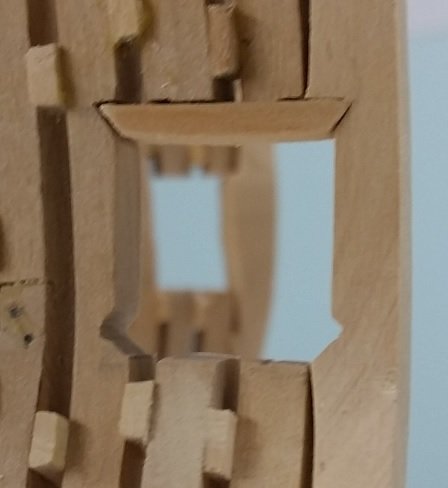
Mark and Gary, Thank you for the suggestions. I understand both... your explanations were very clear. I find sanding on a stationary grit platform works well until the pieces get so small I start sanding my finger tips! So I tried putting the tiny piece on the stationary grit and used a sanding board above. Normally the small piece stays stationary if the bottom paper's grit is large enough to hold it and the sanding board above does all the work. Some times the small piece rolls. That is when it gets frustrating. This happens with my tiny chocks that fit between frames as some are very thin. I've thought of trying double sided tape. As soon as I started cutting out the gunport with one end open I started to worry about the top half breaking away. My original idea was to assembly with a roughed in opening and then sand to a scribed line. At least this way the gunport would be closed on four sides and better supported/stiffened. I listened to people in our club that had some experience as I have none. (Of course this was the day David Antscherl couldn't make the meeting) It must have worked well for them, but leaves me worried every time I draw on the saw. I had to go very very lightly. I am committed with this method on this set and the one above but will revert to my original method on the next set to see if it is any better. I really want to install the gunports as the timbers go up. I will try the card stock method to get a better fit on the cill. On another note. The photo shows every deformity. Looking at it in real life is a whole other story. That last upper cill looks pretty darned good and I might keep it. I'll work on the lower cill and see if I feel the same way by the weekend.
-
Good morning Carl. I only use the template to check layout and check the gunport opening. The cill is beveled slightly and checked for fit, sharpened a bit and checked again, and repeated. Once it is close I mark off the length and start the bevel process on the other end, keeping the length a wee bit proud (too long). When that seems correct then I shorten the length sanding at an angle and checking the fit very often. Once I have that then I sand the thickness. This last one was exactly 6" thick... I almost went too far.
-
That was my original plan but at the last MSoN meeting they suggested this method. I forsee other cutting out issues at the moment and may flip back on the third set of gunports
-
getting better.
-
It was a very busy weekend and I didn't get to put in the time on the ship I had thought I might. After transferring/marking the four corners I filed and sanded one gunport. Double checked it with my gauge which nearly slides in. I fear if I work at it much more it might be too large. I then worked at a trial for the gunport upper cill using a piece of scrap hemlock. The height thickness is 6" (0.094" or 2.4 mm). I cut the length a bit longer and then placed in on a strip of rough sand paper to hold it in place while I sanded it from above using a sanding stick, checking the thickness with my caliper as I went along. I wasn't worried about it being exact thickness, having it a wee bit thicker is better than too thin. I bevelled one end and it seemed to fit well but it could not be inserted because the piece was still too long. I transferred/marked off the length and then sanded it down while bevelling. I kept trying the fit until I had the length correct... but you can see the bevel is all wrong. I need to work at this to get a better fitting cill. Once I figure this out I have the joy of the lower cill. I will not shaped the port gunport until I get this one figured out.
-
Regarding not enough clamps: I know the feeling well, even when you have enough they are the wrong size. Regarding fit and cockeyed: I am sure the actual ship was not perfectly symmetrical, and they had gaps by design that were stuffed to make her water tight. Sometimes I believe we strive too much for perfection. It is difficult enough just trying to be human. She looks beautiful to me.
-
Thank you all for the encouragement. After the slow go of it (too many irons in the fire... one being a four letter word - WORK), I welcome it all. I try to concentrate on others claims , it is not a race; treat every part as a model. I hope I never loose sight of those words. As for fairing... dare I think of the time. It seems to be ages away but there is a light at the end of the tunnel. I retire on November 30th so I like to think I'll have all the time in the world then. But alas the retired fellas in the modelling club tell me I'm wrong. Thank you for visiting.
-
It was September 25th when I tore all the frames off back to the transom and filler pieces. Today is January 28th and I have finally caught up and installed one frame beyond with another set glued together and drying. It has been slow going. The gunport has been cut out, filed to size, checked with my port gauge and will be filed to receive the timbers (upper and lower cills) to finish it off as soon as I get the mating frame in and they have had time to set.

-
I appreciate the incremental postings. Please do not stop.
-
I don't know if I should be looking at your ship or your shop. Both make me jealous.
-
Holy moly! No time for the barnacles to attach to your bottom, eh? That is quick work.
-
Looking forward to watching your progress
-
We remain our own worst critics. If I had your talent I could throw mine in my scrap wood pile
- 504 replies
-
- 5
-

-
- washington
- galley
- (and 1 more)
-
Mark, I stumbled on the information while trying to figure out what was in his left hand. Then, while transcribing hundreds of old newspaper reports on the comings, goings and actions of the Bellerophon I stumbled upon the report of the loss of her figurehead.
-
Good morning all and thank you for the likes. Mark: those figurehead images you are looking at are the second figurehead made for the first ship. The first figurehead is described as: Before it was damaged the figurehead represented Bellerophon as a nude figure draped in a red cloak riding Pegasus, his right arm raised, holding a javelin. The horse’s wings were spread. (source: http://figureheads.ukmcs.org.uk/?p=1715 ) On 14 July 1793, southwest of Scilly Isles HMS Bellerophon collided with HMS Majestic in gale force winds where she lost her bowsprit, foremast, main top mast, figurehead and cutwater was smashed. The figure head was replaced with something a bit simpler as the Royal Navy was issuing orders to try and control the expense on ornamental carvings on the ships of the time. All that remains of the second figurehead of the first ship named Bellerophon, is the head seen in many photos, which was all that could be salvaged due to rot. Alan