Bob Cleek
-
Posts
3,341 -
Joined
-
Last visited
Content Type
Profiles
Forums
Gallery
Events
Everything posted by Bob Cleek
-
Yes, as shown in the second picture. This is the way the sails are hung in order to dry them before furling when they won't be used for a period of time, whether they will then be "sent down" and stowed, or furled on the yard. The pictures show the way sails are dealt with when the ship is not sailing and the sails are not drawing. It was necessary to dry them before such storage in order to prevent mold and rot deterioration to the sails. If you intend to display the model with sails "set and drawing" as if the vessel were sailing, you have a much more involved task, since the sails will have to be formed to be "full" and all rigging set up to correctly portray the angles of the yards given whatever point of sail you want to show that the vessel is on (i.e. the direction from which the wind is blowing) and the model should be mounted at the proper angle of heel, if not sailing directly downwind. That portrayal is generally considered to require a few figures on board attending to the tasks required to sail the vessel to provide realistic detail. Such "sailing" presentations are usually seen on "waterline" models mounted on a molded "sea" base with appropriate bow waves and such.
- 1,503 replies
-
- 1
-

-
- Le Soleil Royal
- Heller
- (and 1 more)
-
Stepping the mast with a plum bob...two questions.
Bob Cleek replied to HardeeHarHar's topic in Masting, rigging and sails
A plumb bob would be a huge PIA to try to use for this purpose. It will get in the way and you'll probably knock it around trying to measure the angle off of vertical while it's hanging there. John is 100% right that, for several good reasons, you don't want to glue your mast rigidly in place. It is best to use your rigging to adjust the angle of the masts as is done in real life. How this is done depends upon the construction of your model. If your hull is a solid block, you're going to have to drill a hole, a bit larger than the heel of your mast and (hopefully) at the angle necessary. If your hull is hollow, you'll have to deal with however that hull is designed to hold the mast. For your purposes, you want a loose fit. To set up your mast, you must have your hull positioned dead level on its waterline in all directions. Note that some lines are drawn with the bottom of the keel parallel to the baseline and others not. You need to measure the rake of the mast on the plan using a level waterline as your point of reference. With your hull perfectly level on its waterline, build yourself a card stock jig against which you can compare your mast's positioning. Think "carpenter's or machinist's square with a fixed angle matching your mast rake, or a fancy "double ended" one with one side of the "arm" at a right angle and the other side cut to the angle of your mast rake. (Get out your Martha Stewart hot melt glue gun for this job. ) Select a convenient flat physical reference point on your hull. Usually, there will be a space from rail to rail where a flat base for such a jig can be laid. If you are using a building board and can mount your hull on an even keel with its waterline parallel to the building board, you can also build a reference jig which stands on the level building board, possibly straddling your hull. In this fashion, you can compare your angles "from the top down rather than the bottom up.") To build a cardstock jig, just erect from a flat reference base a perfectly perpendicular "fin" running fore and aft relative to your hull to form a "T" section. Use bracing triangles at the joints if you have to make it rigid, but you want this "fin" to stand perfectly plumb on your perfectly flat base that is perfectly parallel to the hull's waterline. The forward edge of this "fin" should be cut to the same angle as the mast as shown on the plans. The aft edge of this "fin" should be perfectly perpendicular to the base. The perpendicular edge will serve as your reference right angle for the mast's fore and aft perpendicularity and its angled edge will serve as your reference for your mast's rake. When you duplicate the mast rake angle from the plans, be sure to measure it from the center of the mast! Because the mast will usually be tapered, if you measure your rake angle from the outside edge of the mast section drawing, it will be wrong because of the error created by the additional taper angle of the mast. When you use this jig to set the angle of your mast, again take notice of matching the angle of your jig to the center of your mast. I suppose you could just measure the rake angle on the plans from the edge of the section drawing of the mast and then just compare that angle of the side of the tapered mast to your tapered mast and get the same result, except that the opportunity for error seems greater in the latter approach. There are a few ways to adjust your mast using your jig. The most obvious is to adjust your mast by using your standing rigging as it is done in real life. One uses the stays to adjust for rake and the shrouds to adjust for perpendicularity port and starboard. This is primarily done by taking up on the deadeyes and headstay and backstay lashings. This process will be necessary in any event if your rigging is to be properly taut and not hanging slack, but it's often difficult to accomplish in practice without the mast being fairly rigidly oriented as you would wish to begin with. For that reason, I advise leaving your rigging slack and using one of the following methods to orient the mast somewhat rigidly first, and then take up the slack in your rigging. One way to secure your mast independent of the rigging is to adjust the angle of the mast at the mast step and mast partners at the deck by using the mast step as the fulcrum and placing wedges or shims between the partners (or hole in your deck or solid hull... whatever)) to adjust the orientation of the mast. Another less tedious way to do this is to use a malleable material such as soft wax or modeling clay packed between the side of the mast and the mast partners. This will allow you to position your mast by moving it, with the malleable material repositioning itself to accommodate the mast's movement, while still holding it in position after it's moved. I would not advise using a "malleable material" which will harden over time if it is going to make it difficult to remove the mast if that is ever necessary for servicing or repairs. I suggest that the non-hardening "malleable material" be supplemented or replaced by wedges or shims to ensure greater rigidity once the mast is properly oriented. After the mast is properly oriented, the slack in the standing rigging can be taken up. Be careful not to overdo the tightening, though. You don't want to pull the mast out of its proper position. Don't forget as well that sometimes the mast rake isn't the same in each of a vessel's masts. Check the rake of each mast independently to be sure. It may be off only slightly, but it may make a significant difference in the appearance of the model. Also remember that the longer the mast, the greater the distance of movement at the far end when adjusting it. Keep in mind that it only takes a very small bit of movement at the partners of a mainmast to move its topmast truck a noticeable amount. If you are only setting up a "baldheaded" mainmast, it can look fine, but be noticeably out of whack later after you've rigged all the tophamper! You can come very close but understand that you'll probably never get it perfect. Few, if any full-scale ships can say their masts are perfectly oriented and sailing ships are meant to pitch and heel in a sea, anyway, so who's going to know the difference? The inexact positioning of a mast is but one of the factors which virtually guarantees that every sailing vessel will always be faster to windward on one tack than on the other. . -
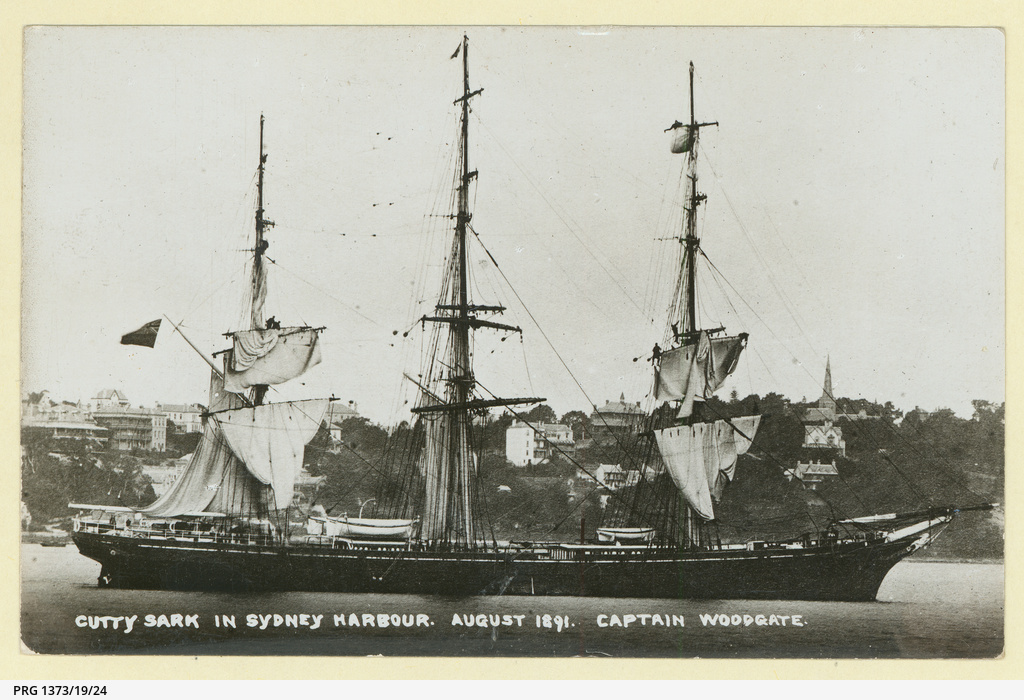
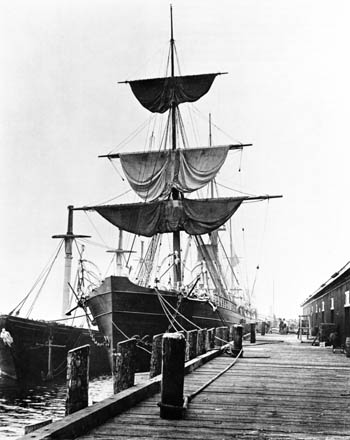
To put a bit finer point on it, the purpose of reef tackles is not to "pull the sail up when the wind is blowing." The reef tackles are attached to the garnets on the leeches of a square sail at the reef bands for the purpose of pulling the garnets of the "new" head of the reefed sail, i.e. the ends of the reef band, tautly out to the ends of the yard from which the sail is hung. This is done prior to tying the reef lines, which serve to gather up the surplus canvas created by the reef. The reef points also serve to secure the new "head" of the sail created by the reef tackles stretching the reef band to the ends of the yard to the yard itself. While the reef tackles do haul the reef band upward and outward on the yard, gathering the reefed sail up isn't their primary purpose. When reefing, first the buntlines are used to haul up the body of the sail to the yard, while the sheets are tailed from the deck to keep the clews under control, so the sailors aloft on the yard can attach the reef tackles to the garnets on the sail's leeches, haul the reef band tight along the yard, and then tie off the reef points. Without the buntlines hauling the body of the sail up to the yard, the sailors would in most instances never be able to reach the garnets at the reef bands on the sail in order to attach the reef tackles! The reef tackles attach to the garnets on the leeches at each reef band. There is just one reef tackle for each leech, port and starboard, and it is moved to the appropriate reef band when a reef is taken in. To take a second reef, the sheets would be cast off and tailed by deck crew to better control the sail during the reefing evolution, the buntlines would be used to haul up the foot of the sail so that the reef tackles could be removed from the first reef band and attached to the second reef band and the new "head" of the sail at the second reef band stretched tightly between the ends of the spar. The reef points on the first reef are left in place where they continue to secure the surplus canvas created by the first reef to the yard. The reef points on the second reef band would then be tied off around both the previously tied-in reef with its reef points left tied, and the surplus canvas created by the latest reef to secure at the same time both the first and the second reef to the yard. The buntlines would then be slackened, and the clews of the sail sheeted to set the sail. To "shake out" a reef, the process was simply the opposite: The reef tackles were cast off the leeches and generally secured beneath the yard, perhaps attached to the head cringles on each side, although the head would be secured to the yard or jackstay separately and remain so unless the sail were to be removed from the yard. The reef points would be untied, and the sail let fall, or the reef be "shaken out," and the sheets hauled to set the filled sail. Note, however, that if only the most recent of multiple reefs taken was to be shaken out, the reef tackles would be moved to the reef tied in immediately previous to the one being shaken out the clew garnets of the previous reef hauled tightly outboard, rather than securing the reef tackles beneath the yard. In this fashion, when the reef points of the most recently taken reef were cast off and the buntlines slacked, the sail was set, reefed, and ready to be trimmed without any further attention to the preceding reef. There was no problem identifying the reef points of each reef because the latter reef's points are obviously the ones tied over the former reef's points. (Depending upon the size of the sail, the length of a square sail's reef points may vary, with the reef points on the second, and third, if there is one, reef band(s)' points being longer than its predecessors to accommodate the greater volume of gathered canvas it must secure. This detail is very rarely seen in modern models and perhaps is dependent upon the period. I can't say for sure.) If the sails were to be dried (often in port), they were frequently loosely gathered up by the buntlines and their clews triced up to the center of the yard to keep the clews from flailing about (or the sails filling if the wind kicked up and the ship sailing off on its own!) This practice is seen in many period photographs. Cutty Sark with crew aloft in the process of setting sails to dry in port. Note the fore and mizzen courses with their buntlines brailing up the leeches. Note the crew at the ends of the foretopsail yard apparently in the process of securing the clews to the center of the yard. What that looks like when completed is seen in the second photo below. When the job is finished, it will look something like this if done "shipshape and Bristol-fashion:" When a sail is stowed furled on a yard, whether with a reef or more already tied in, or without any reefs tied in, the sail is secured with gaskets which work much like reef points, but are not permanently connected to the sail. Rather gaskets live attached to the yard or jackstay and when in use they are tied all around the yard and gather the sail at points as required along the length of the spar in the same manner as reef points. However, as gaskets must circle the entire sail and spar (unless tied through a jackstay,) often with more than a single turn taken (unlike reef points,) they must be considerably longer than reef points and when not in use are coiled and left hanging from the yard (or jackstay.) I am not certain whether this practice is applicable to all periods, though. In earlier periods, the gaskets may have been sent aloft with the topmen when needed. One would have to do further research on that one, but if you are shooting for building a "hundred pointer." details like properly coiled and hung gaskets are not to me overlooked! This video better illustrates the use of the sail gaskets and provides a good idea of how a life-size square yard looks and works:
- 1,503 replies
-
- 1
-

-
- Le Soleil Royal
- Heller
- (and 1 more)
-
Great progress, Keith! Congratulations on the great outcome on your surgery. Just a thought in passing: These days (in the US, at least) many of the surgical instruments used are "disposable." It's not worth the cost in time and labor to autoclave and sterile package them after each use as was done in the good old days. Regrettably, I expect some of these discards are piled up for sale in large lots to resellers on eBay or to be resold in Third World countries and a lot of it is now sent to the landfill as "bio-hazard waste." You might mention to your surgeon that you'd appreciate it if s/he would save the disposable instruments for you. There's probably a nice Castroviejo iris scissors in your surgical tray, along with maybe some nice tweezers. The eye and micro-surgeons have the best medical instruments to repurpose for modeling use. Unfortunately, I lost my "connection" for "dull," (a relative term) dental burrs some time ago when my friend, and institutional dentist working for the state, told me they were now under an order to "bio-hazard bag" all their discards without exception. I suppose that's a prudent protocol, but I hate to think that for every kid that makes a trip to the emergency room, there's a nice needle holder that goes into the trash bin.
-
That was exactly what I thought. Once you get down to eight or sixteen sides, rounding it up is a piece of cake with a sheet of sandpaper. (In real life, they might rough out the shape of a solid mast or spar with an adze, but the finish work would have been done with a spar plane, which would have a concave sole and iron sized to match the circumference of the spar. It would take a set of these to get an accurately rounded spar.) I was thinking of a similar arrangement, but rather than a shim that slid under the spar, there would be a grooved "bench hook" base to hold the spar for planing and a threaded "jack" that could be finely adjusted to raise the base and the degree of taper one desired. Once the measurements were identified, an "inches per foot" taper index for each of the scales one used could be attached, making setup even less tedious. A plane would run on a "sled" or in a level track to cut the taper set by the amount of rise above the track set by the "jack" adjustment. This sort of a jig could also be used for cutting scale scarfs. It's the way many scarfs are made in full-size construction these days, often with a router base mounted on a sled running on an angled base.
-
I've heard good things about that HP-8 plane. (They also sell a stainless and titanium "commemorative model" for $300.) The Bridge City catalog is very entertaining. They seem to be the Tiffany's of tools and priced similarly as well! Real jewelry for tool nuts. See: Planes – Bridge City Tool Works (bridgecitytools.com) Bridge City offers a chopstick tapered planing jig that uses the HP-8 plane called the "Chopstick Master." It seems that with a little bit of re-engineering, it could be a really neat tool for making tapered scale masts, spars, and dowels. The catch, of course, is that this jig system would probably cost you more than a Proxxon wood lathe! It's worth taking a look at it if anybody is considering building a jig for planing "sticks." Bridge City makes theirs fancy, of course, but the principles of their jig may be adaptable for modeling use. See: Mini Workshop – Bridge City Tool Works (bridgecitytools.com)
-
Yep, what Jaager said. Twenty years old isn't as old as I had in mind when I started reading this thread. I was thinking more like maybe fifty or sixty years old, back to the old Model Shipways "yellow box" kits. Still and all, unless you are prepared to do a complete build from scratch, using nothing but the old kit plans (which are easy to come by without buying the kit,) and the price for the plans is not too dear or the plans not too inaccurate, old kits are almost certain to disappoint a modeler today. There has been a tremendous increase in the quality and sophistication of ship model kits in recent times. Even the difference between kits sold just twenty years ago (and which may have been designed twenty or thirty years before that!) and today's CAD-designed, and CNC-manufactured laser cut models is much the same as comparing the Academy Award winning quality of Ray Harryhausen's "stop-motion" model animation movie special effects of fifty years ago with the computer-generated imagery common in today's movies. The problem isn't just the quality of the wood. Even today's lower-quality kits are full of poor-quality wood. The older kits are nowhere near as well designed for ease of assembly, nor are their instructions, such as they may be in any event, anywhere near the quality of today's state-of-the-art kits. The fittings should be much better in modern kits. Older model kits frequently used lead-based cast parts which are prone to corrosion and turning to dust before your eyes in a few years. Older kits were notorious for period-inappropriate and/or out of scale fittings, as well and this is a problem that continues in lower-quality kits today. The old kit rigging blocks and thread will nearly always be so far beneath current expectations of quality and accuracy of appearance as to mandate their complete replacement. This isn't to say that a competent modeler can't turn out a rather nice model from an old kit, taking into account their ability to upgrade the kit from scratch as they go along, but at the end of the day, any modeler is going to have a much more pleasurable experience and a much better looking result assembling one of the higher-end American- or British-made kits which have been designed and produced within the last several years. As Jaager sagely observed, it's all about the investment in time. Even the cheaper cost of an old kit considered, I'd say anybody who is going to spend any money on a model ship kit will find both their money and their time better spent on a modern kit. In any event, do be sure to check the forum's model kit database for reliable reviews of any kit you might consider acquiring. REVIEWS: Model kits - Model Ship World™
-
Help for blocks with hoop required.
Bob Cleek replied to Tony28's topic in Masting, rigging and sails
Nice work! Your edges are crisp and your finishing is excellent. It appears that you are simply pushing up against the limits of what can be done with your kit at its scale. In real life, a shackle would slide on the sheet horse (metal bar) and the shackle would hold the block which would have an internal metal strop with a tab with a hole through which the shackle pin would run. In this case, the kit manufacturer has anachronistically "mixed apples and oranges." There would not have been rope-stropped blocks on a Banks schooner of Bluenose's period. You'll just have to dance with the gal ya' brought and "fake it." Perhaps the easiest way to accomplish the task is to take a length of thread and tie it first around the block, forming the strop on the block. Tie off the "strop" with two or three half-hitches going in the same direction at the bottom of the block. (If your "one-holed" blocks are like most kit blocks, the hole will be at one end of the block. Tie your "strop knots" at the end of the block which is farthest away from the end closest to the hole so that the run of the line through the block will look correct.) Leave the bitter end of the knotted thread free for the moment. You will now have a block which is "stropped" by the knotted thread. Now the other end of the thread with the block attached and tie that end closely around the sheet horse with two or three half-hitches just as you did the "strop loop" previously. You will want to tie the stropped block as closely as possible to the sheet horse in order to simulate a block fastened closely to the sheet horse with a seizing. The block should not appear as if it is on a pendant attached to the block. When you tie the half hitches for the knots holding the stropped block to the sheet horse, tie as many half hitches as you need (It shouldn't be more than two or three) around the standing part of the line until they fetch up against the side of the last half hitch tied on the block strop end. The appearance, if done correctly, will be of the stropped block attached to the sheet horse with a short series of half hitch knots spiraling up between the block and the sheet horse. The shorter this distance, the more realistic it all will appear. Use as fine a thread as you can manage, as the half hitch knots will increase the diameter of the knotted rope between the block and the sheet horse. You may wish to experiment and use two turns of your thread around the block and around the sheet horse before tying the respective half hitches. This may mimic the appearance of a single thicker strop around the block and sheet horse with the half hitches around the connection between them appearing closer to the diameter of the doubled thread visible around the block and sheet horse. Some thickened paint, shellac, or surfacing putty can be applied between the doubled thread around the block and sheet horse to mimic the appearance of a single piece of rope. When you have fastened the block to the sheet horse in this fashion, without cutting the two bitter ends of the thread, secure the knots, and the turns around the sheet horse and the block, for that matter, with a touch of thin shellac (two pound cut, i.e., "out of the can" if using prepared canned shellac) or thinned PVA glue and allow it to dry. When the shellac or glue has dried, cut off the two bitter ends of the thread as closely to the knots as possible with a sharp scissors or hobby knife. If the shellac or glue is dry, the knots will hold. If not, you run the risk of having one of your half hitches pop loose when the thread is cut and you won't have enough free thread at the end to tie it again, with will require you to start from scratch and do it over again. This is the technique that appears to have been used in the photo above. Note that the thickness of the thread used has created a thicker "seizing" around the throat of the "strop" between the block and the sheet horse than appears realistic. Use of a thinner thread, perhaps using the "double turn" method mentioned above, would have perhaps resulted in a thinner "throat" between the block and the sheet horse. Because the object of this exercise is to "fool the eye," the less prominent this attachment method can be, the better. What is wanted is that a viewer's eye will not be drawn to it and it will not get noticed, in which case, the viewer's brain will simply "fill in the blanks" with a correct assumption of what it thinks should be there. If that approach isn't challenging enough at 1:100 scale, another comes to mind which, although requiring a bit more work and perhaps skill, would produce a more period-correct appearing un-stropped block. You could make up an "eye bolt" out of suitably-sized wire, drill a hole in the end of your block closest to the "sheave hole," but not so deep that it runs through the "sheave hole," (or drill the hole at an angle so you miss the "sheave hole") and cement the shank of the bent wire "eye bolt" into the wooden block body. This will simulate a period correct wooden-shelled iron-framed block. Use something that holds well, like cyanoacrylate or epoxy to glue the shank in the hole. A faux "eye bolt" shank is best made by twisting the two ends of a length of wire tightly around a drill bit shank of the desired size and then removing the bit and cutting off the shank of twisted wire at the desired length. This results in a "spiraled" shank which will hold better than a smooth piece of wire when glued in the hole and provides an "eye" that will not bend open or need to be soldered to prevent its doing so. The drawback, however, is that the twisted shank requires drilling a larger hole to accommodate it, which may or may not be possible in a small block. Care should be taken to ensure that the eye is correctly oriented when glued into the block so that the when the block is attached to the sheet horse with a ring between them, the lead of the sheet running through the block's "sheave hole" will be fair. Once the eyebolt is firmly set into the block, its neck can be bent so that it appears to lead fair from the block, if necessary. You now have a block with an "eye" at its "top end" (closest to the drilled "sheave hole." and it is then easy to make a small ring of suitably-sized wire which will fit through the "eye" on the block and around the sheet horse bar, just as the shackle does in the prototype and the drawings. You can then "blacken" the "iron work" with a "blackening" agent (for copper or brass wire, liver of sulphur or the equivalent proprietary product) or with black paint. This method doesn't require that it be made as unobtrusive as possible because it is more realistically detailed than the knotted method described previously. One last point to mention is that, from an engineering standpoint, perhaps you may want to give a bit of thought to how strongly built you might want this (these?) block to sheet horse connection(s) to be. The sheet horse should be well-glued in place and, if a bent copper or brass ring is used to hold the block onto the sheet horse, that ring will be the "weak link in the chain." One of the most frequent catastrophic injuries ship models suffer is some sort of impact on the extremities of the rigging which is mechanically transferred to some structural attachment point which then breaks. You might question whether the ring connecting the block to the horse should be strong enough to handle the stress load of sudden tension from an impact that causes the sheet to yank hard on the block. A strong connection would usually mean soldering the ends of the ring together, which would be difficult to do if the sheet horse were already installed on the model. On the other hand, if the ring's ends aren't soldered, any pulling force on the block coming from the sheet is probably going to bend the ring's ends apart and pull the ring off the sheet horse. While "all the books" say such rings should be soldered for strength and appearance, leaving the ring's ends unsoldered would actually serve to prevent greater damage to the rigging structure in the event of a mishap. Reattaching the block to the sheet horse by bending a ring back into alignment is certainly a much easier than to broken sparts and rigging line elsewhere. -
Steel is correct and, although you appear to have misunderstood Steel, your color instincts are relatively accurate, it appears you are confusing Steel's "tarred yarn" with your own concept of "tarred rope." Natural fiber yarns used to traditionally make ordinary cordage for use in the marine environment were and are always "tarred" by being placed in a bath of thinned pine tar to impart a relatively thin coating of tar to the individual strands before they are laid up into rope. The thin tar coating on the yarns serves the important purpose of improving the water-resistance of the yarns, the greatest part of which are "inside the lay" and not as much exposed to the drying air. This light tar coating on the yarns increases the rope's resistance to decay in the wet marine environment, and to a lesser degree, the tar's "tackiness" helps to bind the laid-up rope together better. The greater the amount of tar applied, the more water-resistant the cordage will be, so, as Steel notes, "Yarn for cables requires more tar than for hawser-laid ropes." because cables spend a lot of their time underwater or stowed wet in the cable lockers, so the greater amount of tar provides a greater amount of water-resistance and hence resistance to strength-weakening decay. Most top-quality fiber for traditional marine rope making, such as sisal, flax, or hemp, is naturally quite white, or almost nearly so, whether naturally or from being bleached. The addition of the thin pine tar coating to the near-white yarns produces the characteristic "honey/straw" color of brand-new fiber rope (as well as its agreeable pine tar aroma.) In use, however, hawser-laid cordage (i.e., three-strand running rigging) will weather in the marine environment to the color of a light grey-tan. In other words, as you correctly expected, running rigging is "rope colored." On the other hand, all served standing rigging, served footropes, and any other rope requiring chafe protection, (as well as deadeye lanyards after the standing rigging had been stretched well and the lanyards more or less permanently set up,) was kept coated with routine applications of "slush," a paint made of pine tar, linseed oil, and lampblack, or the equivalent, depending on whatever was available, such as pine tar, varnish or paint, and lampblack. ("Slush" is sailor slang for any thick liquid residue. The word was also used to identify the thick sludge of fat and salt that remained at "the bottom of the barrel" of salted meat aboard ship. This residue was saved and sold to renderers upon making port with the proceeds then used to buy something for the crew's benefit... hence the term "slush fund.") As "slush" was often made up of leftover paint and varnish in the bosun's locker, lampblack was used to uniformly turn the concoction into a black paint. "Slushing" was the last step in the standard water-proofing technique known collectively as the "service" of a rope which kept the rope dry and protected it from being weakened by chafing. The technique was to first worm lengths of "small stuff," (appropriately sized laid cord) by tightly wrapping them laid in the larger rope's "contlines," (the proper nautical term here Bowdlerized for the benefit of delicate ears), then heavily applying thick pine tar to the wormed rope and parceling it by wrapping strips of canvas, bandage-fashion, spirally around the wormed and tarred rope, then, serving the wormed, parceled, and tarred rope by very tightly spirally wrapping a covering of tarred marline or other appropriately sized small laid line around the wormed, tarred, and parceled rope. (When steel cable came into use as standing rigging, the method of its service was exactly the same as with rope, although the thick tar applied before parceling was often replaced with a thick coating of white lead paste as a rust-preventing bedding compound.) So, the color of running rigging depends upon how the modeler wishes to portray the vessel. Is it to be portrayed as "brand spanking new" or as she looked once the "new car smell had worn off?" If the latter, taking appropriate color compensation for "scale viewing distance into consideration," running rigging would be a somewhat "grey/tan" for running rigging, or what might be called a "used rope color." As dirt tended to collect in the contlines of rope and the more prominently exposed outermost surface of the rope tends to bleach some in the sun, used rope on a sailing vessel will end up showing a darker color in its "contlines" than on the raised outer face of its strands. A particularly detail-oriented modeler may want to experiment with various stain-washing techniques to see if they can duplicate the contrasting light and dark areas of a warn piece of rope exposed to the marine environment. Any rigging that is served (or was in the prototype but was omitted in the model) should be colored flat black, not because of the amount of tar on it, but because the "slush" used to coat it was jet black. Now, the standing rigging of small craft was generally not served, in which case it would presumably appear the same as running rigging, so in any given instance with small craft, some research may be necessary to identify whether the standing rigging of a specific small craft was or wasn't served. A picture is worth a thousand words department: Having worked over the years on a few movies as a technical advisor and "boat wrangler" (responsible for the boats used), I always have a practiced eye open for the "production values" of any movie within my areas of expertise. More often than not, the job of a technical advisor is to tug on the set decorator or director's sleeve and say, "Excuse me, but that detail is incorrect" and not argue with the response, "Nobody'll notice it and we're on a budget, you know." Period naval movies are my favorite hunting grounds for catching directors "driving on an artistic license." It's a rare "swashbuckler" that doesn't have a few glaring rigging anachronisms with which to find fault, among the more frequent being synthetic cordage on period ships. (Note the Dacron line in the Hornblower TV mini-series example below.) I'd heard the scuttlebutt before its premiere that an incredible amount of effort was being put into ensuring authenticity in the Russell Crowe movie Master and Commander - The Far Side of the World and when I saw it, I was very impressed with their success in that effort. If you want to know what running rigging really looked like during the Age of Sail, they got it exactly right. (See: Master and Commander photo below.) I'm still not too sure what's supposed to be happening with that block and it's stropping in the foreground. I think it's supposed to be part of some shot-away top hamper that's fallen to the deck.


-
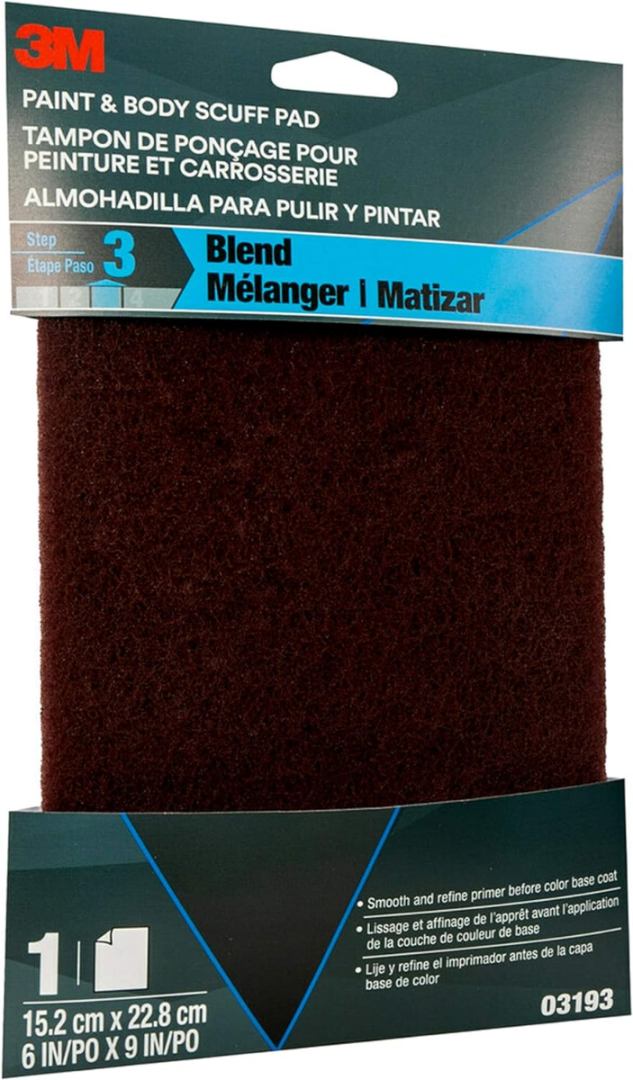
They are and will be found in the paint department. That said, I have not seen the full range of grit sizes in the DIY warehouse stores that will be found in an auto painting supply store. The pads in the big box stores are for general prepping for house painting and are fairly coarse for model finishing work. The grit size you want for modeling is much finer than that, down around the 300 to 600 sandpaper grit range. The abrasive pads are available in auto painting supply stores down to ultra-fine grit sizes suitable for "rubbing out" auto body finish defects. Most towns of any size will have an auto painting supply store nearby, or even a DIY auto parts store, that will carry a range of different grit grade abrasive pads. You might also stop by a local auto body and fender repair shop and ask if they have some they will sell you. Like most abrasives, I'm sure there's a big price break on purchasing larger quantities. The pads last quite well, so it's not like you need to buy more than a few at a time in a small range of grit sizes (or in just one grit size, depending on your uses...) if they are only going be used for modeling work. If all else fails, you can always make a donation to Mr. Bezos' retirement savings account and buy them from Amazon. Beware of the peg-rack packaging prices in retail stores, though. There's a huge difference in price between the "civilian" retail prices and the "commercial" lot-packaged prices, as well as between the "Scotch" brand pads, which were once all that were available, and the wide range of generic brands available now. Scotch peg-rack package of one pad: $8.88 Amazon.com: 3M Paint & Body Scuff Pad, 03193, 6 in x 9 in, 1 Per Pack : Everything Else Tonmp 10 Pack 4.5 x 10 Inch Hand Pads Coarse Medium Fine Superfine 5 Different Specifications Assortment General Purpose Scouring Pad: $8.99 ($.89 per pad) Amazon.com: Tonmp 10 Pack 4.5 x 10 Inch Hand Pads Coarse Medium Fine Superfine 5 Different Specifications Assortment General Purpose Scouring Pad Ideal for Garden Tools and Grills,Automotive Body Tools : Health & Household
-
It sounds like your shellac sealer coat is working exactly as it should, so don't feel bad at all. It appears that you aren't happy with your shellac job because you are expecting it to do something it's not able to do if you expected it to look like a "pure tung oil finish." (Which is more a product of the finish coating manufacturers than it is the seeds of the tung tree, but that's a story for another night.) It appears the use of shellac as a finish requires some clarification. Shellac can be used as a finish and is, most famously in the "French polish" method of traditional fine furniture finishing. Shellac can also be used as a finish by building up successive coats, much as one would with a varnish, and then wet-rubbing them down with very fine abrasive powders or simply attempting to apply thick shellac as one would a varnish, which is very difficult to do without encountering brush strokes, given the speed with which alcohol evaporates. These now antiquated finishing methods have been widely replaced by modern finish coating materials over the years, beginning with sprayed clear lacquers and more recently polyurethanes and epoxy finish coatings. The classic shellac finishing techniques are only seen in very fine custom furniture and in refinishing antique pieces these days. When we talk about shellac as often used in ship modeling, we are generally talking aboout using shellac as a sealer, rather than a finish. This is to say that many of us use shellac on our models precisely because it's "almost a non-finish." That's how it's supposed to look. A coat or two of thinned shellac soaks into the surface of the wood and seals the pores, but does not build up a thick coating that would serve as a finish coat with any of the depth needed to accomplish what one would consider a finish on the wood. A very thin varnish application will, also bring out the figuring in figured woods, but enhancing the figuring of wood is decidedly not something one would want to do on a ship model and figured woods are avoided wherever possible in any event. What a thin coat of shellac does as a finish on a ship model is to mimic the appearance of bare wood while invisibly protecting bare wood from exposure to the elements, dirt, and greasy finger stains. (Heavier cuts of shellac are also used as an adhesive and medium cut shellac is particularly useful in cementing knots in rigging work and stiffening lines to create realistic catenary shapes.) When used as a sealer shellac on a model used to portray bare wood is theoretically a "finish," but not one intended to be seen. When shellac is used solely as a sealer, it is exceptionally effective beneath subsequent finish coats of paint or varnish. I know of no finish coating which will not adhere well to shellac. It is compatible with everything. Shellac is a particularly effective feature if subsequent coatings are water-based because water will soak into the pores of most wood species and, to one extent or another, "raising the grain" of the wood as the water-wet wood expands, which makes achieving a perfectly smooth finish virtually impossible. Shellac does not raise the grain when applied to bare wood and when dried may be lightly sanded without creating the "fuzzy surface" that results when sanding many softwoods, such as basswood, commonly found in ship model kits. While no coating is entirely impermeable to moisture, shellac is recognized as one of the most impermeable coatings we have available. Shellac's ability to slow the exchange of moisture between the wood in a model and the ambient humidity of the environment in which the model is kept is often a valuable contribution to the life of a wooden model which otherwise must endure the shrinking and swelling, however microscopic, of its separate parts as the moisture content of its wood fluctuates, a process with can, over time, weaken glue bonds and cause the structural integrity of the model to deteriorate. Now, if one desires a "finish" on their model, I would not advise attempting to achieve a "finish" on a ship model using shellac simply because the intricacy of the parts virtually preclude the rubbing and polishing required to achieve a traditional "hand rubbed" shellac finish and because the thickness of the shellac coating required would, in any event, operate to obliterate the fine detail on the model, a fault commonly seen in models built by modelers inexperienced in the nuances of finishing miniatures. If your model is now shellacked, and providing you haven't sanded off the coat you applied (another mistake often made and easily corrected by applying another,) you've properly prepared and sealed your surface for the application of the finish coat of your choice. That choice is entirely up to you and will depend upon what you want the finished product to look like. If you are seeking to portray a compelling impression of reality in miniature, a "furniture finish" would not be appropriate and, in fact, the "bare wood" appearance of shellac alone would serve the purpose well. If on the other hand, you want to finish the bare wood on your model as if it were a piece of furniture without regard for the actual opaque paint colors applied to the prototype, an artistic effect which seems in vogue to some degree these days, you will have to either hand-rub wax over the varnish sealer, a traditional furniture finishing technique that is best left for flat table tops than any modeling application, or use a varnish or polyurethane coating. These are quite subtly varied in appearance, and you will have to experiment to determine which product creates the finish appearance you like best. A lot of modelers who prefer the "all wood look" on their models use what's called "wipe-on poly," This product is apparently not available in Europe, whether this because of VOC content regulations or some other reason, I don't know, but "wipe-on poly" as marketed in the U.S. is simply thinned clear polyurethane coating, produced in a range of stain tints. As it says on the can, it may just wiped on with a soft cloth and it will yield a matte finish of whatever depth one wishes to apply.
-
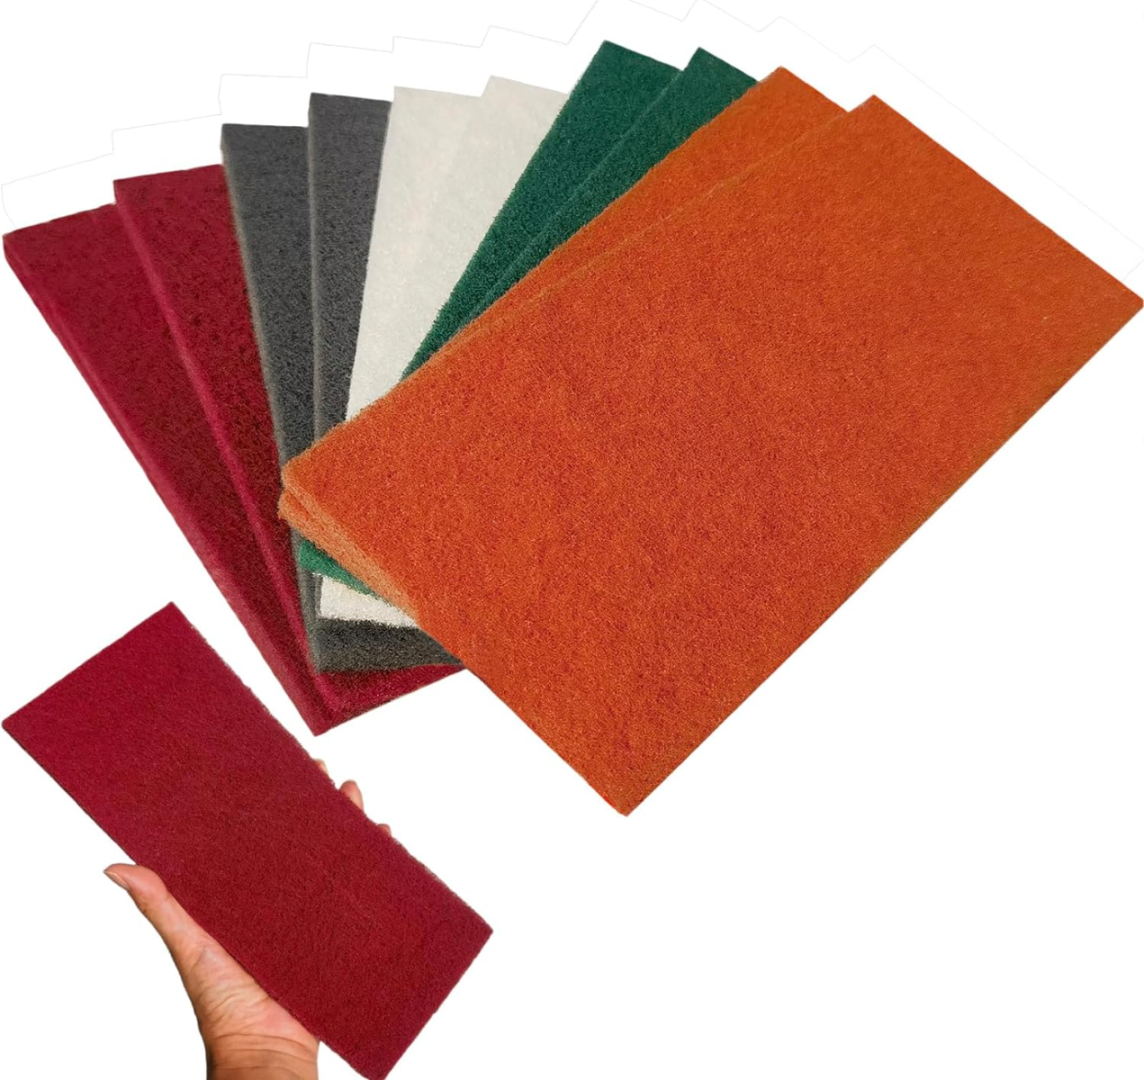
A lot of commercial finishers, particularly in the auto painting business, are now using Scotch-Brite abrasive pads instead of steel wood or superfine abrasive paper. These are the same things you see on the back of dishwashing sponges, except that they are available in a range of ten abrasive grits. One big advantage they have, which perhaps isn't all that big a deal in modeling, is that they can be used wet and hung to dry and be used over and over again. The Scotch-Brite ones are color-coded as to the grit size. There are now other brands besides the ones made by Scotch that are available at a lower price point. They are carried by any auto paint supply store and a lot of paint stores. As many know, "satin" varnishes are just gloss varnish with chalk added to it. "Satin varnish" is marketed to mimic a true hand-rubbed finish achieved with rottenstone and pumice, which can be a lot of work. Now, a good "hand-rubbed" varnish finish can be achieved with a lot less "elbow grease" using these plastic abrasive pads.
-
If you are using a traditional thin wash of linseed oil, solvent (turpentine?), and a dash of color from pine tar or raw umber tubed artists' oil paint, I think you will find the result very pleasing. Capillary action is exactly the ticket. You'll probably find also that the slightly greater amount of wash that finds its way into the corners, joints, and seams and perhaps around the fastenings, will produce a slightly darker color that will add interest and realism to the finished product. It's a really nice model. In my opinion, we don't see enough small working craft modeled. Most modelers seem more interested in building huge historic ships of the line than humble workboats with just as much historic importance.
-
That's some beautiful work! Even at large scale (1:12 ?), real clinched-nail fastened clinker planking is quite an accomplishment. I'm looking forward to your posting the finished model! Ditto to what everybody else said. I will only add that it's unclear whether you intend to "paint" the entire model with opaque paint or plan to leave a fair amount of the interior finished "bright." (Meaning that the wood would be finished with some sort of clear coating such as shellac, varnish or an oil. I've done my share of refinishing traditionally-built full-sized boats of that type and, as you probably know, even "in real life" that sort of finishing job is a real challenge to get the less accessible areas covered. It's for this reason that most clinker planked traditionally framed boats often have their interiors "washed" with what we call "boat soup" here in the U.S. (i.e., a half and half mixture of linseed oil and turpentine, with a dash of pine tar) instead of being coated with glossy varnish or paint. Wiping on a flat (matte) sealer coat of a clear oil-based finish is a lot less of a chore as it rarely requires more than a wash-down for preparation and the "soup" can be wiped on with a sponge or rag without worrying about brush strokes and cutting-in where opaque paint edge meets the "bare" wood. (When refinishing the oiled wood, which is required periodically, a thin clear coating can actually be wiped on right over the edge of a painted area and then wiped off the paint before it dries without any masking required at all.) For a model, gloss finishes are generally avoided, so you might want to consider applying some sort of thinned clear "wipe on" finish on the inboard areas, just as is done with the full-size prototypes. Thin clear (sometimes called "white" or "bleached") shellac (e.g. "2 or 3 pound cut"...the consistency of water) or even well-thinned varnish, linseed oil, or clear polyurethane coating could be applied relatively easily using cotton tipped swabs or, better still, those foam tipped applicator sticks they sell for applying cosmetics. The foam swabs will carry more liquid than the cotton ones and not pose a risk of leaving bits of cotton on the surface. A well-thinned coating material can even be "flooded" into the nooks and crannies and the excess that collects in the corners wiped or "blotted" up once the coating has soaked into the bare wood. You might even consider pouring a considerable amount into the bilges and just sloshing it around and then draining off the surplus and wiping up the excess on the surfaces thereafter. Keep in mind that I'm not saying I've done it this way before on a model, so experimentation is required before you do anything to that beautiful workmanship which cannot be undone, but I've done enough finishing over the years to think it should work fine. I'm not suggesting that you try to put a high gloss varnish finish on it in this manner way at all. This is simply an application method for applying a sealing coat that will bring up the color of the wood and protect it from stains and such. This approach is best done before any painting with an opaque coating is applied to other portions of the model, but you may have to "dance with the girl your brought" and avoid staining what you've already painted with masking tape. Once it dries, a thin application of any good oil-based clear coating should be easy to cover with your opaque paint where the edges of the two meet. Keep in mind, however, that care should be taken to be sure that the different coating materials you use are compatible. Not all are. Here, again, experimentation before application to the model is imperative. Always test coating combinations on a scrap of the same surface material you intend to use them on and let them dry well before proceeding to apply them on the finished work. This is particularly true of any of the more "synthetic" coatings such as the polyurethanes, epoxies, and acrylics or anything advertised as an "eco-friendly" replacement for traditional coatings. These modern coatings, as good as many of them are, often contain exotic chemicals that don't get along with each other and can produce unexpectedly disappointing, if not disastrous, results when they are applied on top of each other. On the other hand, if it is your intention to paint the entire inboard area of the boat with an opaque paint, a "wipe on" solution for the hard-to-reach places won't work, in which case, I wish you much luck and may God have mercy on your soul!
-
I am unaware of and have no interest in the particulars of the above-referenced transgressions, but I do wish to address a related matter concerning the "twenty-five post sales rule" which you explain has occasioned this post. It is not uncommon for the heirs of both MSW members and "outlaw modelers" (to use a biker term) to join MSW for the purpose of posting an inquiry regarding how they should best dispose of the ship modeling effects of their recently deceased ship modeling relative. By the same token, it is likely that most of the MSW membership, particularly those "of a certain age," with varying levels of intensity are concerned about the disposition of our ship models, research library, and shop tools and materials once we "shuffle off this mortal coil." It is one thing to have subjected most of our "dearly beloveds" to the outrages imposed by cohabiting with a ship modeler's equipage during our lifetimes, but to leave it for them to dispose of prudently after we are gone seems particularly unkind. The models built by a late ship modeler may be of some sentimental value to his heirs, though never to the degree the modeler imagined as the models were being built. Other parts of a late ship modeler's detritus, however, may be of considerable value monetarily, although of limited marketability only to a relatively small niche group of ship modeling hobbyists. It is difficult to know what happens to a deceased modeler's shop tools and materials when the modeler's estate is distributed. Maybe some "big stuff" is sold at an estate or "garage" sale, or the heirs simply distribute it in kind, but it's not generally encountered thereafter in any form identifiable as belonging to a modeler. On the other hand, we do see large numbers of unbuilt kits and research library books which apparently seem to find their way to "pickers" and "flippers" in the resale market. The used book wholesalers buy up for below market value that which they know they can sell for a high premium on eBay and similar sites. Regrettably, from a modeler's perspective, financial advantage is taken both of the modelers' heirs who receive much less than the full value of what was left to them at one end of the transaction and advantage taken of the ship modelers who must purchase these used research volumes at often-inflated online auction prices at the other end. It is in this fashion large ship modeling research libraries that have taken the previous owner decades to acquire, often at very substantial expense, are bought cheaply, broken up, and the books sold piecemeal because the trade considers this the most profitable way to move merchandise. (And no disrespect is directed to used book dealers who are some of my favorite tradespeople, but if "middleman markups" can be avoided, so be it.) For the reasons previously mentioned, we'll never know the cost to the hobby of breaking up deceased ship modelers' workshops, but surely, the economics of the used tool market is no different than the used book market: "buy cheap and sell dear." Neither will we ever know how many cords of prized modeling wood stock have been used for firewood by those who knew not what they did! Although it is true that some ship modelers' modeling effects are distributed through the auspices of their local ship modeling club, in the "information age" the reality is that local clubs are fewer and farther between than they once were and the likelihood that a club is sufficiently large to provide a viable "customer base" for the marketing of a modeler's estate is not as great as it may have once been. For these reasons, it's not at all uncommon that a deceased ship modeler's heirs or estate administrator has no idea what to do with "his ship modeling stuff." Often, when ship modeler's estate liquidation inquiries come MSW's way, they are in the form of a first post by a new member. This is to be expected because anyone who doesn't know what to do with a ship modeler's models, books, and tools and materials isn't likely to be a ship modeler themselves at all and so not a previous MSW member. And, of course, this is where they run into the "twenty-five post sales rule" that often terminates any further exchanges with them beyond a polite suggestion to try to donate the models to a local library or yacht club or sell it all on eBay. While the "twenty-five post sales rule" serves the sound purpose of preventing unwanted (and possibly untrustworthy) commercial vendors from advertising on MSW without paying sponsorship advertising charges and limiting the use of the "Buying and Selling" forum section to genuine forum participants, in the case of ship modelers' estate sales, it operates to the disadvantage of the MSW membership and the heirs of serious ship modelers because it causes the estate to pay more to sell the property and ship modelers more to buy it. I propose that the Administrators consider making an exception to the "twenty-five post sales rule" in the case of deceased ship modelers' estate sales. This exception would, on a case-by-case basis, waive the rule in the case of a deceased modeler's heir, heirs, or estate agent, who wishes to offer for disposition to the MSW membership ship modeling related items from a deceased modeler's estate. Additionally, I propose that MSW could establish a policy that MSW members could dependably advise their future heirs that their models, books, tools, and materials could be disposed of through such an MSW "Buy and Sell" "Estate Sale Provision" if they wished, thereby providing the membership with a valuable benefit to assist their survivors in disposing of their modeling detritus fairly and at a reasonable return when they "join the Choir Invisible" and providing their heirs with the benefit of disposing of their modeling gear without having to pay the sales commissions charged by sites such as eBay. It might even be arranged that a local MSW member might make themselves available to personally inventory the deceased modeler's modeling things and advise a deceased modeler's heir or estate representative regarding their sale. Surely, making such forum resources available to our heirs and estate administrators would provide peace of mind to many of us who hope that their modeling hobby will not continue to be as cursed by our "significant others" after we are gone as it may be now while we're still here! It would also provide MSW with the additional competitive edge in the "internet membership sweepstakes" as a tangible membership benefit that cannot be underestimated. Some may express concern that to the extent MSW enables the sale of used modeling items, it negatively impacts the interests of its ship modeling retailer sponsors. While it may be true in theory that if someone buys an unbuilt ship model kit second hand from a ship modeler's widow, that's one ship model kit that isn't going to be sold by a ship model kit retailer. However, some retailer already sold it once, so it is not in any way unfair to the retailers if their previously purchased products are resold on the second-hand market. In fact, in the instance of hobby products, it's to the retailers' benefit that their unbuilt models are resold because they can then expect to sell other products to that same modeler, who often may be just coming into the hobby, and who will be a customer for years to come. Anyway, that's just my two cents' worth and I suppose advice is worth what you pay for it. I'd just hate to see some other ship modeling forum think of the same thing and beat MSW to it.
-
Yes, Birchwood-Casey Tru-Oil should work fine mixed with oil paints, although it's a quite expensive way to make paint. Tru-Oil is made for the shooting sports market as one of a large range of such niche market products marketed by Birchwood-Casey. (Many modelers may be familiar with Birchwood-Caseys "Brass Black" metal finishing product modelers use for blackening brass model parts.) Tru-Oil is simply linseed oil cut with a solvent with a little bit of a siccative added, the exact formulation of which is undisclosed on their MSDS because they deem it "proprietary." A siccative is an oil-based drying agent that accelerates (catalyzes) the hardening of drying oils. These catalysts were traditionally hydrocarbon carboxylate chelates of lead, but due to lead's toxicity, cobalt and other elements, such as zirconium, zinc, calcium, and iron, have replaced the lead in more popular products. Most driers are colorless but cobalt driers are a deep blue purple color and iron driers are reddish orange. These colored driers are therefore compatible only with certain darker pigmented paints where their color will be unseen. Separate drying additives for paints became necessary as zinc oxide-based paints were developed as an alternative to the lead oxide paints ("white lead") that had been previously used. Zinc oxide paints were developed in parallel with the introduction of "oil soluble driers" or "terebines" around 1885. These were lead and manganese soaps of linseed fatty acids or resin, also termed linoleates or resinates. Terebines had poor shelf life in mixed paints, as they auto oxidized and lost their effectiveness. As a result, early factory-mixed paints, unless fresh, were a poor substitute for fresh paint mixed by a painter on site from raw ingredients. This situation lasted until the late 1940s; by then further drier developments had superseded the terebines. In 1925, stable naphthenate driers were developed in Germany and commercialized in the US in the early 1930s, in parallel with the development of durable and fast-drying alkyd resin enamels. In the 1950s, metallo-organics based on synthetic acids were introduced as driers. Japan drier is a common lay term and generic product name for any oil drying agent that can be mixed with drying oils such as boiled or raw linseed oil and alkyd resin paints to speed up "drying". The name refers to "japanning", a term for the use of drying oils as an imitation or substitution for urushiol-based Japanese lacquer. (Full disclosure: I didn't know all of the above chemistry off the top of my head. I looked it up. ) The question whether Tru-Oil can be colored with artists' oil paint is a good one that is becoming increasingly important to many "thrifty" modelers. While there is a tremendous range of quality modeling paint colors available to modelers today, they are extremely expensive in terms of the amount of paint we get for our money. To be sure, most can afford six or eight dollars for a one-ounce bottle of "store bought" paint, but when the number of bottles on our paint shelf start to mount up and however many are found to have dried up since we last opened them, the savings, flexibility, and convenience of mixing an infinite range of paint colors and gloss levels from readily-available and substantially less costly components without the inconvenience of sourcing them from the internet or searching in a "brick and mortar" hobby store you hope has what you are looking for, starts to become a lot more attractive. Mixing your own model paint can certainly can be done using Tru-Oil as a base, but Tru-Oil is fairly expensive for what it is at around US$35.00 a quart. However, even considering the additional cost of several bucks for a tube of artists' oil paint, it's a bargain compared to the equivalent quart of seven buck an ounce hobby paint totaling US $224 ! Now, if you shop around, both boiled linseed oil and gum turpentine each cost about a US $10.00 a quart, so a quart of "half and half" mixed is going to run about US $10.00 from the big chain hardware stores, which makes Tru-Oil will cost you about three and a half times what its "homebrewed" equivalent will. By using boiled linseed oil and turpentine to make your own modeling paint, exclusive of the relatively negligible expense of the artists' oil paint which goes a long, long way, and other conditional additives that are used in very small amounts, if at all, you've avoided paying almost twenty-two and a half times the cost of commercially premixed model paint! Also, Tru-Oil cannot be shipped to or sold in California, USA, presumably due to California's restrictions on VOC content. (It may also be unobtainable in the E.U., given their often more stringent environmental regulations.) If one can't get Tru-Oil in their area, or simply wants to save some money, boiled linseed oil (which contains driers as packaged) thinned with natural gum turpentine, or raw linseed oil, natural gum turpentine and a dash of Japan drier "to taste," should perform as well at a huge savings. I've long used boiled linseed oil and gum turpentine mixed 50-50 as an "all purpose" furniture and rifle stock finish as well as a furniture finish "restorer" with results comparable to what Dr PR describes from Tru-Oil. Wiping it on and into scratched surfaces such as varnished kitchen cabinets, baseboards, stair bannisters, and case goods, etc. will usually cover the scratches well. (Used just like "wipe-on poly.") I routinely keep linseed oil and turpentine in half-gallon or at least quart quantities in my shop paint locker for mixing all sorts of painter's concoctions. Quality artists' oil paints (look for finely ground pigment in high concentrations) packaged in tubes can be mixed with boiled linseed oil (or raw linseed oil with a suitable amount of drier) and thinned with turpentine for use as excellent model paint for brushing, spraying, or airbrushing. Raw linseed oil (no driers) and turpentine with a suitable small amount of artists' oil paint can also be used as a stain. If the resulting dried finish's level of gloss is too high, the gloss of the dried finish can be knocked down from high all the way to flat matte by hand-rubbing with rottenstone and pumice, or Scotch-brite abrasive pads made for this purpose, or by mixing into the paint a "flattening agent" which is sold in small, over-priced quantities in art supply stores and in larger, much less expensive, quantities in paint stores. "Flattening agent" is generally just finely ground "whiting" (which is calcium carbonate powder, AKA "chalk" or agricultural lime.) sold in a suspension of solvent to expedite mixing it into paint or otherwise sold as a "bagged" powder like baking flour. Follow the instructions on the container. (Note that if the flattening agent is sold mixed in a solvent, the type of solvent has to match the type of paint. Alkyd enamels take one type, polyurethanes take another type, and so on.) A bag of "painter's whiting" is always good to have on hand for many uses including mixing up your own old-fashioned glazier's putty (and wooden boat plank seam stopping) which is why it is sometimes sold as "glazier's whiting." (When used as putty, it is mixed with raw linseed oil alone so it won't harden as quickly.) If an old-timer tells you that adding gasoline to your paint will work as a flattening agent, don't risk your life finding out. It used to be true. In the '50's and '60's we kids would use it on our plastic car models and it worked great, but that was then. Now, the lead derivative once used to make high-octane "ethyl" or "leaded" gasoline which were responsible for the flattening effect when we'd mix gasoline in our model paint or apply it directly to styrene plastic has been outlawed for public health reasons. (Back then, a kid's life was an adventure! We'd drink out of garden hoses, ride bikes without helmets, eat unpackaged Halloween candy, and all sorts of other really dangerous stuff. If your mother said you might put somebody's eye out doing it, you just knew it had to be fun. No wonder the younger generation today are such a bunch of wusses! ) There are lots of formulas online for mixing your own clear varnish that basically the same as the paint formula above, save for the addition of resins or differing oils, but for many applications an epoxy or urethane clear coating is to be much preferred over a low-tech traditional varnish and for any application where the finish will be exposed to direct sunlight, UV inhibitors are a must. At that point you get into more complex modern-day coatings technology and the traditional "DIY paint-making process" becomes more trouble, if not more dangerous, than it's worth and you are better off buying it mixed in the can from the paint store.
-
Gol-durn! You've really got some luck. You've got all the really good ones full of the best plans right there. From what I've seen over the years, that's pretty much as many as anybody's ever likely to find. They are numbererd and there are supposedly at least that many, but those are the only ones it seems anybody ever bought, or at least the only ones that show up in circulation these days. The Hathi Trust has digitized the first five volumes of MoToRboaTinG Magazine's Ideal series and has them available on line at http://catalog.hathitrust.org/Record/011692724. The first four volumes look to be mainly how-to-build Hand designs, all from 1920 to about 1922, both sail and power. There are also excellent sections on general traditional boatbuilding methods from start to finish. The fifth volume appears to be the first edition of "Chapman's Piloting and Seamanship. (Chapman was the editor of MoToRboaTinG (why the weird spelling, I have no idea.) This was originally the manual for a mail order course in piloting and seamanship which the magazine offered in the early Twenties. There's a lot to learn from the stuff in these books. The later editions were full of Atkin designs into the Forties and Fifties and are treasured additions to the wooden boat afficianado's library, but I've never seen the early volumes from the twenties before. (Used copies go for as much as $150 these days.) Juicy stuff! Knock yourself out! The William and John Atkins estate has now provided a link to a full index and PDF copies of every design in the Ideal Series. It may be found at: An Index of Plans and Articles in the MoToR BoatinG Ideal Series (boat-links.com) Click first on the links to the various volumes in the Ideal Series, then on the names of the designs in the chosen volume, and keep clicking on links within linked pages to "drill down." You will find the full "study plans" and comments for most every plan set. From there, copies of the full-sized plan drawings and table of offsets for each design are available, as indicated, from the Atkin design firm and/or Mystic Seaport plans outlet.
-
I don't know if it is the same in Sweden, but in the U.S., "raw linseed oil" is as it says, linseed oil with nothing in it. What is also sold as "boiled linseed oil" isn't boiled at all, but is rather linseed oil with some Japan dryer added to speed the oil's polymerization (drying.) Additionally, "food grade" (meaning "you can eat it") linseed oil and "flax seed oil" often sold in health food stores are essentially the same product, although sometimes produced by slightly different processes. Food grade flax seed oil is also produced according to safe food-processing protocols while non-"food grade" products are not and may be unsafe to eat.
-
Hah! I've yet to see anything in your great posts that I'd consider "unnecessary!" I'd say your skill and techniques are far more advanced than what most of us, here in the U.S. at least, are used to seeing regularly or capable of matching. I can't imagine what magic we will be watching you perform when you are no longer working under your present constraints. I have no idea how you can presently accomplish what you do. Please don't ever consider your advice unnecessary. I can't speak for the E.U., but from what I've seen in my country, the American amateur ship modeling hobby nowhere nearly as advanced as the Eastern European ship modeling hobbyists appear to be. While I'm sure each group has its "stars" such as yourself, here we haven't even begun to think of what we do in terms of the highly competitive "sport" that ship modeling looks like where you live. Please don't stop sharing your work with us!
-
That's an effect I've never encountered. Perhaps what's happening is that the resin you are using is rather thick and heat will thin it out if it's heated before the polymerization is too far advanced. That said, the mixed resin and hardener shouldn't ever be "just beginning to thicken on the hull of the model" before you have the time to wet down your glass fabric. (Here, many now use a non-glass fabric called Dynel which is more like stretchy Lycra that they make ladies' stretch pants out of than woven glass cloth. It stretches to conform to curved surfaces much easier than glass cloth does and it doesn't have the nasty habit of spreading microscopic bits of broken glass that gets on your skin and makes you itch like crazy!) A hull like that is a very small area. It sounds like you're using a very fast curing epoxy. If you don't have a slower hardener or some type of retarder, you can try chilling the resin and hardener before mixing. The lower temperature should retard the cure rate quite a bit and give you better working time. Any way you cut it, it sure should not be as challenging a job as it is for you now. I can understand, of course, that the present isn't likely to be the time for you to be complaining about the quality of the locally available epoxy. Here's to the day when you will be able to just order some of our slow stuff from Amazon without any hassles! We don't worry about getting a perfectly smooth surface when we sheath with epoxy and fabric (glass or Dynel) in applications like we are discussing. We just want to make sure the fabric is well saturated and flat against the surface to be sheathed without any air spaces between it and the surface. Instead, what is done is to "squeegee" the mixed resin into the cloth with a piece of flexible polyvinyl plastic card or the like just enough to soak the cloth completely. "Squeegee-ing" means spreading the mixed resin with the edge of the card like a scraper and using the flat of the card to work it in. The mixed resin is just poured, a bit at a time, as it is spread so that there isn't a lot of excess resin on the surface. When the cloth is fully soaked with resin and any excess scraped off, it is left to cure. There will be the texture of the cloth apparent, since all of the excess resin has been scraped off. You should be able to do this spreading and scraping quickly enough that there will never be any problem with globs of hardening resin kicking off while spreading the resin Glass cloth will have a bit of a texture of the weave on the surface when the resin is cured. (Dynel, on the other hand, has a bit of a "fuzz" to its surface, being very finely woven,) After the resin has at least cured sufficiently to no longer be tacky and you can work with it without getting stuck to it your self, we mix another batch of resin and hardener into which we add glass "micro-balloons" or some other "fairing compound additive." These are powders used to condition the epoxy for various purposes, in this case, to make the hardened resin and additive into an epoxy that is extremely easy to sand to a very fine, smooth surface. That batch of resin and sanding additive is then applied in the same fashion as the earlier coat of resin applied onto the cloth. It will have a thicker consistency than plain epoxy resin because of the powder additive and can be spread like soft butter or peanut butter. Spread it onto the surface no thicker than you need to fill the surface irregularities of the first resin application. When it hardened well, it can be sanded like soft auto body putty and when smooth can be sprayed with basecoat paint.
-
Horseshoe Plates
Bob Cleek replied to tmj's topic in Building, Framing, Planking and plating a ships hull and deck
No need for apologies. I find the same frustration with the search engine myself. (Sometimes opening up another window and "googling" a topic is actually an easier way to find it in the MSW forum!) In this instance, "horseshoe" was an easy one to search. Google would have yielded twenty-six "sponsored" advertisements for horseshoes and local farriers, I'm sure! What I'd like to know about these "horseshoes" used to reinforce scarf joints is why they were horseshoe-shaped. It seems to my "armchair shipwright's" mind that a squared flat plate would serve as well and be a lot easier to fabricate and install. I wonder if the shipsmiths actually just hammered flat old worn-out horseshoes to fashion these and didn't bother to take the time to forge straight, flat stock. Some of the horseshoe-shaped reinforcing plates are quite large, but draft horse hooves are quite large and there were a lot more draft horses around in those days than now. It just doesn't seem like the shape has anything to do with the strength of the fitting. -
Beautiful build so far! Not to distract you with petty questions, but I'm curious if something was "lost in the translation" of the above statement. I've done a lot of boatyard work with epoxy resin. As I am sure you know, the curing speed of epoxy resin is dependent to a great extent to the temperature of the epoxy. Reducing the temperature of the epoxy resin and hardener mixture will greatly slow the speed of the cure. With all my epoxy work, I try to mix the epoxy in a flat pan rather than a tall-sided container like a can. This expands the surface area of the resin mass to permit the greatest dissipation of the heat generated by the exothermic reaction of the curing process which otherwise can accelerate out of control dangerously. In some large laminating jobs, I've even put the epoxy container on ice to slow things down enough to get everything assembled and clamped before the resin "kicks off." (This can reduce the temperature of the epoxy enough to cause condensation to form on it, causing it to "cloud," but this moisture seems to evaporate on its own without any ill effects to the bond and the "clouding" disappears in due course.) I gather a "construction hair dryer" is what we call a "heat gun," basically a hair dryer that gets very hot. These have generally replaced the old open-flame "painter's blowtorches." Are you saying that heat applied to epoxy that is curing too quickly can be heated to reverse the polymerization process and thus "re-liquefy" it? In my experience, heat speeds up the curing rate of epoxy resin, making it harden faster. I've never heard of heating curing epoxy to reverse the hardening (polymerization) process. (Which isn't to say I've heard everything yet! ) In commercial work here in the United States, we use hardeners that produce a cure at varying rates of speed. I prefer using one rated for "tropical" use in hot weather which retards the cure rate substantially because I'd rather have the time to get the job done before the resin hardens and I have no reason to desire a fast cure in the work I do. (See: User Manual & Product Guide | WEST SYSTEM Epoxy translated into various languages.) I've heated cured epoxy resin with a heat gun when scraping paint that was applied over epoxy resin and found that the resin softens somewhat, but scrapes off in a dry, "crumbly," consistency and not "liquefied." If simply heating epoxy that is curing too fast with a heat gun reverses the curing process, that would sure be a good trick to know when working with epoxy. Please explain if you have time from your great work.
-
Horseshoe Plates
Bob Cleek replied to tmj's topic in Building, Framing, Planking and plating a ships hull and deck
The "search" thingy is our friend! See: -
Sounds like you're a heavy coffee drinker. I've broken a lot of mugs over the years, but I've yet to wear one out!
- 19 replies
-
- 10
-

-
-
Tiny "precision" drill press
Bob Cleek replied to Ron Burns's topic in Modeling tools and Workshop Equipment
Cute little gizmo, although I'm always leery of tools that trade torque for speed. It's the speedy ones that eat up drill bits. I suppose in all your excitement, you forgot to post the link to the source of the item. All we have is a picture. No brand name, no URL.. Can you tell us more? UPDATE: Never mind. I found it! Mini Bench Drill Press Precision CNC Table Milling Machine Portable Driller NePr | eBay It's interesting in that until now I haven't seen much more from the "Patriotic Chinese People's Machine Tool Collective "than marginal quality cast iron and plastic. 13MM of quill travel (the max drilling depth) isn't a whole lot, though. Does the chuck hold really small number bits well? is it possible to mount a collet holder on the quill instead of the chuck provided? Interesting tool. Have you put a DTI on it to check the runout?