

Chasseur
-
Posts
461 -
Joined
-
Last visited
Content Type
Profiles
Forums
Gallery
Events
Posts posted by Chasseur
-
-
A close friend of mine went to China for a business trip. He was amazed at all of the knock offs. He bought these fancy purses for wife and daughter that are supposed to resemble $3500 purses here in the west for $300 USD. He was told by a Chinese official you Westerner's have copy-write where as here in China we have the right to copy!
Go figure... Jeff
-
Very impressive work on the sails. You definitely went to a lot of work here. Well done Marc.
-
-
Yeah I learned the same lesson with two part epoxy but in a different scenario. I found a tip from a guy as follows: Get a bottle cap from a typical 2 litre plastic bottle of pop. Mix half and half in it vigorously. If you don't feel any heat from the cap after about 30 to 45 seconds you know you have failed as the chemical reaction needed never took place. No heat throw it in the garbage and start over!
She is looking wonderful Marc*
-
Simply outstanding work Marc*****
I love the detail you have put into this build. Some of your techniques I will incorporate into my SIB of the Preussen just at a smaller scale.
In particular your attention to detail on the sheets furled on the yards. Extremely well done here!
It's all really good to be honest ... Jeff
-
-
I agree with Allen. If you have the cash visit a shop that makes jewelry and purchase the smallest diameter of soft silver solder they sell. A jig is definitely the way to go to keep alignment. I also use a special liquid acid flux. The flux causes fumes so wear an N-95 mask. The low melting point silver solder will give high tensile strength and you can solder stainless steel, copper, brass, nickel alloys, nickel, chrome plated metal and iron.
The stuff is awesome!
Jeff
-
-
-
-
-
-
-
Hi Mike,
Years ago I picked up a Paasche double action brush and compressor for around 100 CAD. I did a lot of research before I bought it. Over the years the brush has been flawless. Here are my experiences:
Pressure and pattern is crucial.
The right paint and thinner consistency is crucial.
Never mix paints with other brands of thinners.
Acrylics are a bit tricky and you must use the same brand of thinner no exceptions!
Some guys swear you can thin acrylics with windex window cleaner and a touch of dish soap. I tried the aforementioned and I am not thoroughly convinced.
Some guys say you need a water separator and pressure regulator however I have never had an issue using my brush straight out of the box. The only caveat I'll add here is if you live close to the coast and relative humidity is high then get a separator if you see water vapour flying out of the tip. Remember H2O is considered a solvent and will thin paint so using water based paints is not an issue without a water separator.
I find the right size of tip/nozzle combination is the key to success for what you are trying to paint. I can get away with not using a regulator here as matching the tip and cup restricts flow and what is going on at the tip is where the rubber meets the road. The tatto guys are big on pressure regulation as they don't want inks to wash out but on model ships IMHO spray pattern and control is all that is required and... if you purchase a double acting brush you will achieve the aforementioned without the cost of an additional regulator.
Practice, Practice, Practice some more.
Learning how your brush operates is key and like everyone has said keeping it clean and free of dried paint is not an option.
When it comes to paint do not cheap out here. Buy the best paint you can afford that is designed for use in a brush. I personally prefer Testors Model Master Paints whether acrylics or enamels. What ever you do always wear at the minimum an N-95 respirator for acrylics and an Organic Vapor Cartridge type of half mask respirator when spraying enamels. If you do enamels be cognizant they stink the man cave up and the rest of your house for that matter. If you want to use enamels you'll need either a spray booth with filters or do it outside on a warm sunny day in the shade preferably with little to no wind.
One final note.... Preparation is 9/10ths of the job. Using the right shade of primer to match your base coat is key. Grey primer is good for lighter Colors where as red oxide is good for the darker Colors. Using medium to fine sand paper between coats will really enhance your finish. If you want an outstanding paint job Google the plastic car modellers sites on the Web. These guys go all out and are painting like automotive technicians do. Remember if it's a ship model the weathering is what will make your model stand out from the rest. Please don't over do the aforementioned and weather appropriately.
The more you paint with an airbrush the better you'll get. Practice and experience does make the difference here. Hope this helps ... Jeff
-
-
Life has a way of getting in between work and hobbies. The last year and most of this year to date has been trying for our family as we watched my Father in Law go from an old folk’s home to a cane, to a walker, to a nursing home and wheel chair. He has been diagnosed with Parkinson's and is basically bed ridden.
The aforementioned has been a huge stressor on all of us… especially my wife. BTW the Mother in Law has Alzheimer's disease. A man can count his blessings each day as he wakes and enjoys life with good health. Zero work has been done with regard to the Preussen as we have had to deal with hospitals, doctors, nurses, healthcare workers et al.
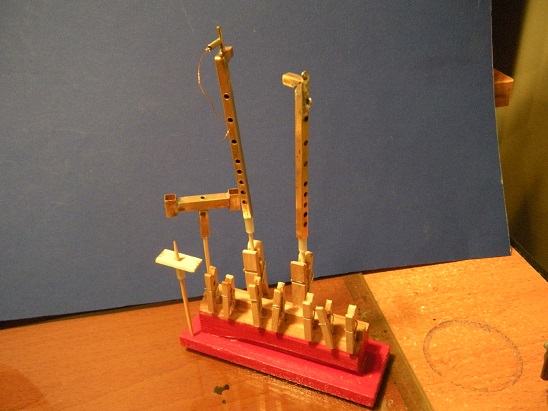
Between works, writing an article for Lone Warrior and working with my son on his 1973 Chevy SS Nova I do manage to get some hobby done here and there. I thought I would share this tool below I built for making ratlines.
Inspiration for this tool came from The Bottle Shipwright 1989 No. 1 Vol. 7, Page 12 ... Journal of the Ships in Bottles Association of America (SIBAA). Author: Hans de Haan Holland.
This tool was made to complete HMS Lady Prevost and USS Ariel (1:300 scale.) models for the L.W. article. I plan to eventually use the tool for making the ratlines for the Preussen as well and will use Ralph Preston's technique of installation with a minor tweak of my own to eliminate 150 strings coming out of the hull and bottle neck ... Story line in the future.
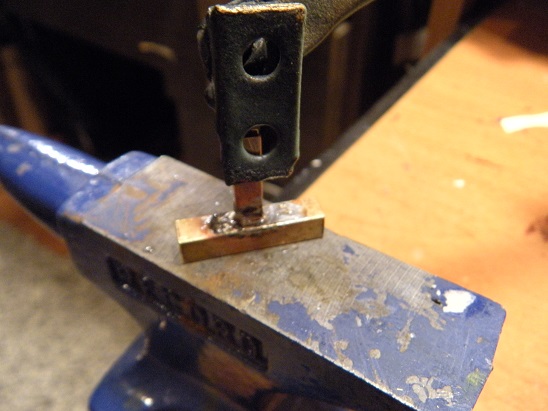
As with every tool I make the unwritten rule is the materials have to be had from within the man cave. I quickly hunted down some brass square tubing, a spring, screws etc. to fabricate this tool. Parameters were... it had to be adjustable for different mast heights, differing scales of model ships, and it had to fit into my fly tying vice for easy work access.
As with any soldering the trick with small parts is holding them down while you tin and solder the joints. My butane mini torch and pencil tip soldering iron came in handy while my adjustable second hand held everything square to the earth.

I chose a small spring to maintain spacing and tension to keep the lines taunt. This picture below shows my first feeble attempt while trying to glue things on a flat surface. If you look closely you can see that the glue gets bunged up and things got stuck to the first balsa wood jig I made which a nightmare was trying to remove the ratlines once completed.
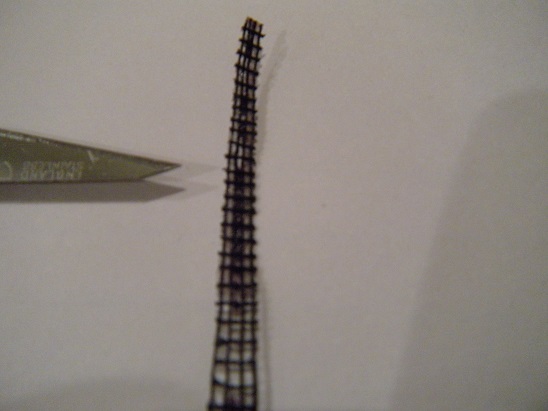

Above: Note the miniature Deadeyes made from paper to scale. Technique here is print them side by side, cut out and fold, then glue to thread.
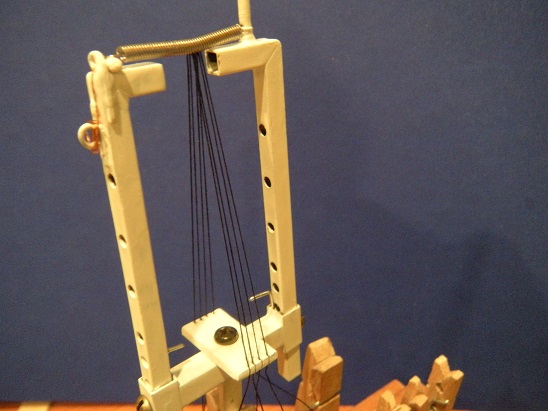
Next pictures show the new tool I fabricated and the steps to completion and paint.
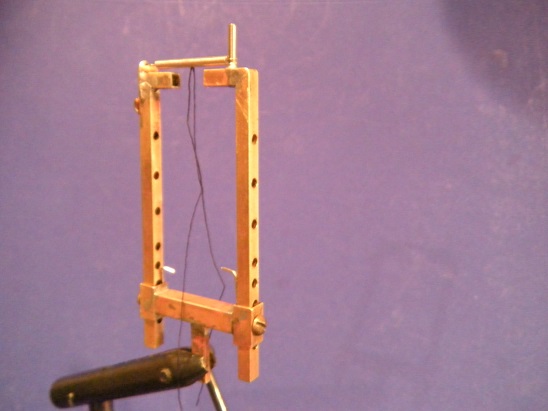


Above: You can see how the spring holds adequate tension and spacing and the bottom part is made to depict breadth and spacing of lines. I can even tweak the angle coming off the mast as well. From here all I have to do is cut small threads and glue them on as I climb up the lines. So there you have it a handy little tool to make a pair of ratlines for each individual mast. Hopefully this fall after the son’s car is running and the article is complete for L.W. I'll dive in full force to get some more work done on the Nitrate Clipper. I am chomping at the bit to get at her!

-
-
Hi Rob,
The copper metalic paint looks really good, tamed it down just right IMHO.
FYI ... I ordered a book today entitled; Description of the Largest Ship in the World, The New Clipper Great Republic.
I am thinking GR will make a really nice model in a commercial light bulb I have picked out. I will not start the project till 2018 Lord willing however watching your build will certainly get me excited about it and I am looking forward to see what the book has to offer.
BTW you are truly blessed the Man Cave looks awesome!
Is the painting above the fireplace the Cutty Sark or is it the McKay?
Jeff
-
-
-
I finally caught up to this one Patrick. Thanks for the link. Simply amazing as usual. This will inspire me to see what kind of detail I can put on my Preussen SIB at the scale I am working on. Good to see your getting lots of modelling time in

Bravo ... Jeff
- mtaylor, Elijah, Keith Simmons and 3 others
-
 6
6
-
I just caught up to this one my apologies. I went through the whole build. Always something to learn from chaps who model miniatures. Outstanding work as usual!
This will inspire me to get back to my build. I've been tied up with work and the wife's parents have health issues we're dealing with. What's on the agenda for your next project?
Jeff
-
Awe ... You finally found a representation of Howe's design. I love the painting. The painting style reminds me of the Late artist Thomas Kincade. The artist captured the moonlight just right. Everything is in its place. This photograph would make an outstanding screen saver. Thanks for posting this Rob.
-

SHADOW by Omega1234 - FINISHED - Scale 1/300 - Luxury 60m Mega Yacht
in - Build logs for subjects built 1901 - Present Day
Posted
Hello Patrick,
Always a pleasure to pull up a chair and watch a miniaturist in motion. I do like your technique and building method regarding the hull. I think us ship in bottle builders can learn a few tricks from you here.
Hull colour? ... Anything that you fancy it's your build!
Jeff