usedtosail
-
Posts
2,421 -
Joined
-
Last visited
Content Type
Profiles
Forums
Gallery
Events
Everything posted by usedtosail
-
 I love the Coke delivery truck Popeye. Looks so cool.
 -
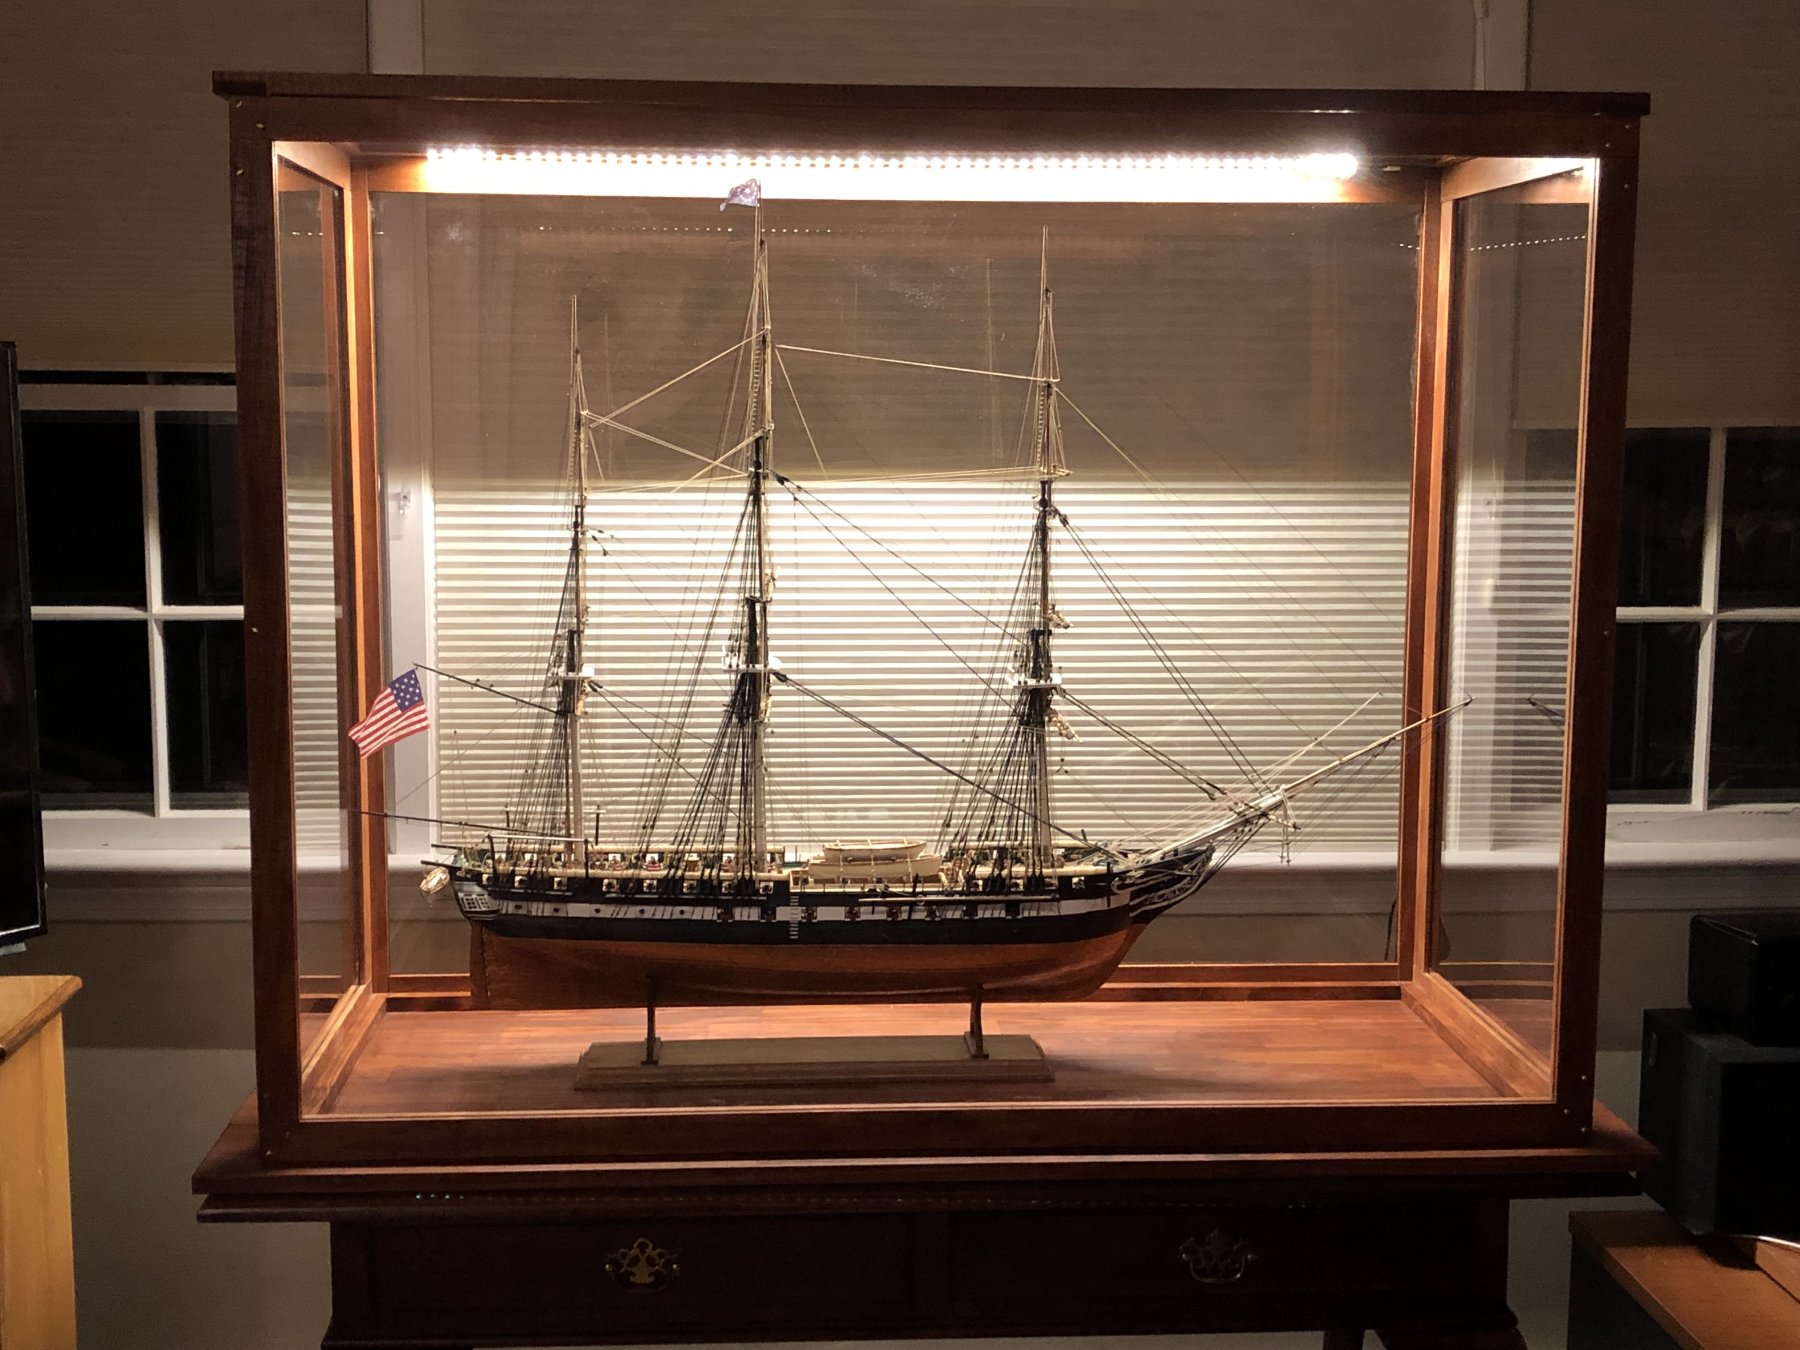
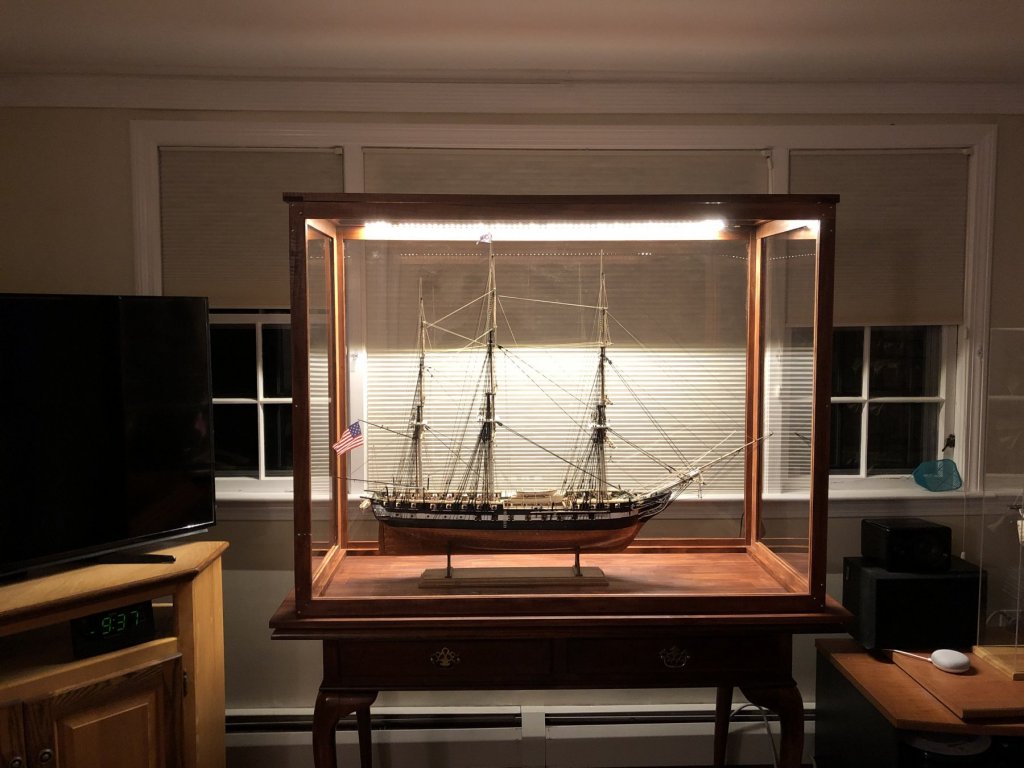
Thanks Stevinne, Rich, Popeye, Jonathan, Todd, Capt Steve, K, Dan and the likes. As for heirloom, I hope one of my kids wants this once I am dead and gone. I wouldn't blame them if they didn't, but hopefully they will find a good home for it. Let's hope that won't be a problem for many, many years. K - keep up the great work on your Connie. You are doing a great job on it and your build log is excellent too. Dan - I really enjoyed your articles in the NRG Journal on building QA's Revenge. Your are as talented a writer as you are a modeler. A couple of last pictures that I took last night after dark. I was really curious how the LEDs would look and I was very happy with the result. We started calling this the Museum Room last night.

- 1,354 replies
-
- 17
-

-

-
- constitution
- model shipways
- (and 1 more)
-
Thanks Fernando and EJ. Almost done with the starboard side and about half way on the port side. I will be happy to move on to the next phase.
- 131 replies
-
- 2
-
-
- santa lucia
- panart
- (and 1 more)
-
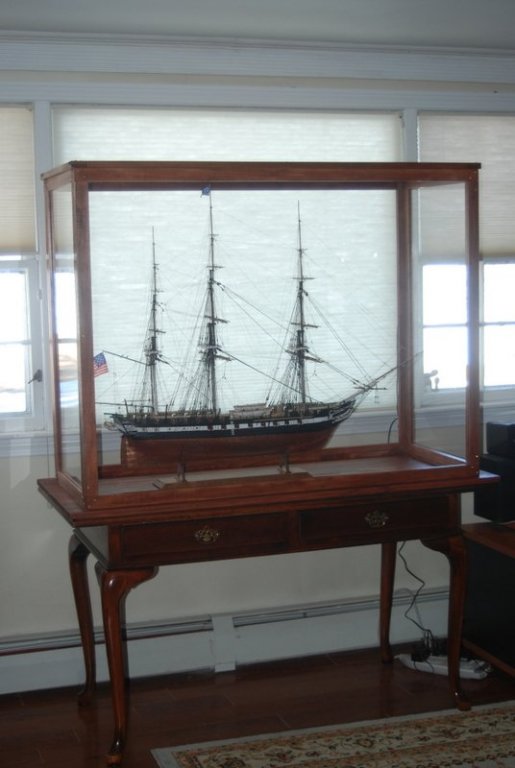
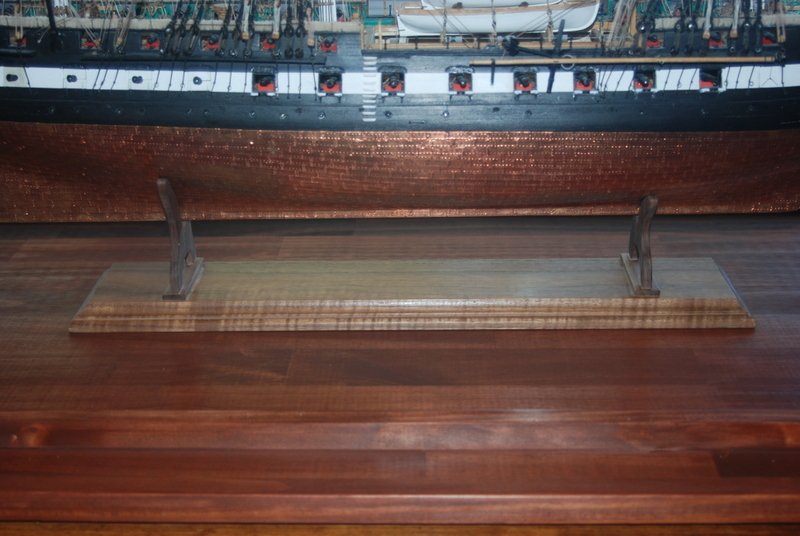
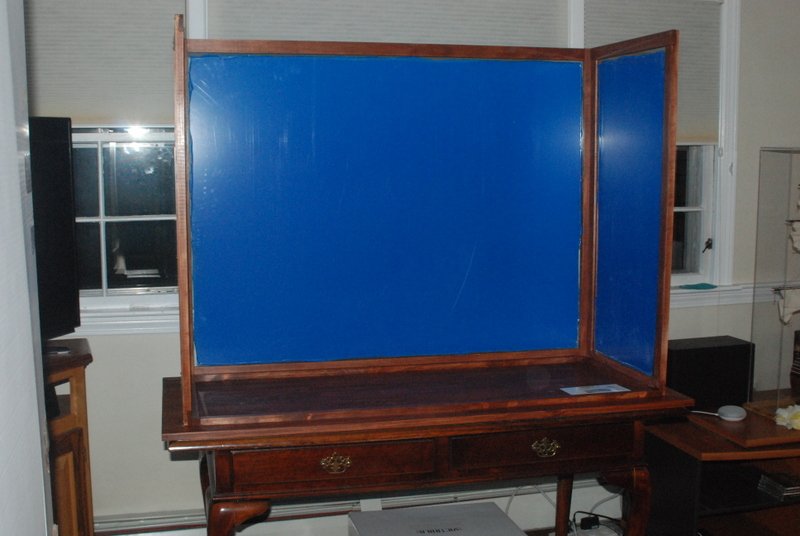
Thanks everyone. Well, now I can say this project is really finished. Here she is in her new home. I am really happy the way the case turned out. My full size woodworking skills leave a lot to be desired, but this project I tried to be a lot more precise. One thing I did over the last few days was to remake the cradle. I had originally made it a few years ago using 3/16" walnut for the supports. In all the moving they suffered a few dings and breaks that looked terrible, so I took them off the base board and remade them in 1/4" walnut. I am much happier with the result. That's it for this project. Thank you all who have followed along through the journey. I have certainly learned a lot and I much appreciate those of you who built this model before me so I could learn from your experiences. I also hope this build log will prove useful for those who build this model in the future. I would highly recommend the experience. Just make sure you have a big enough place to put it when finished.
- 1,354 replies
-
- 19
-
-
- constitution
- model shipways
- (and 1 more)
-
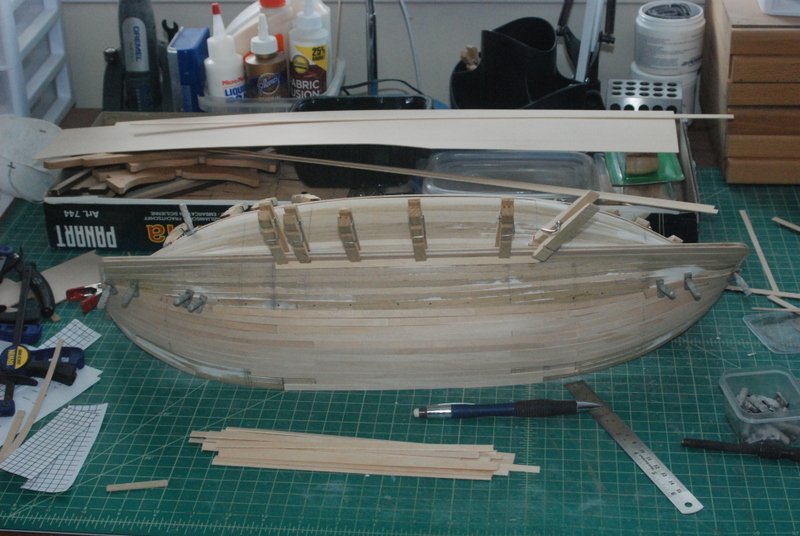
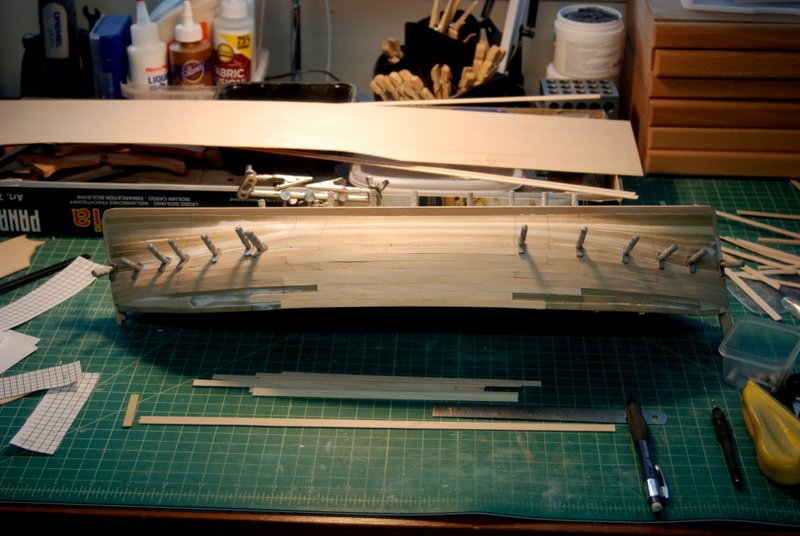
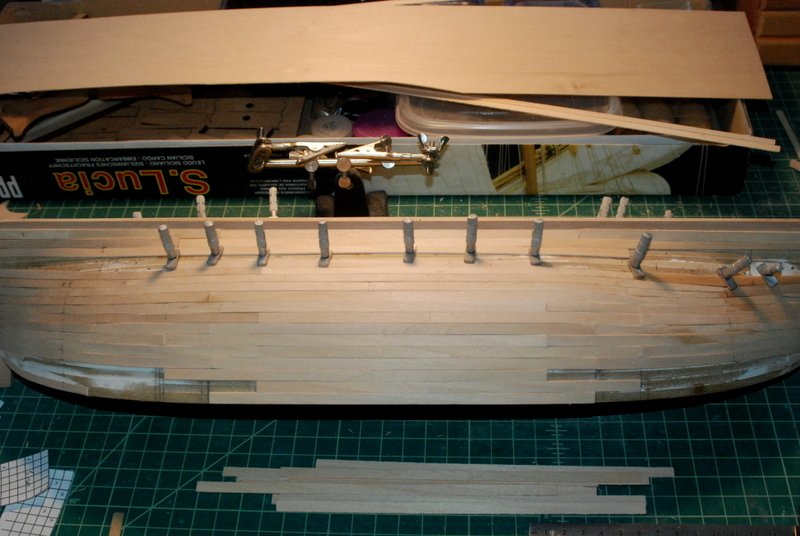
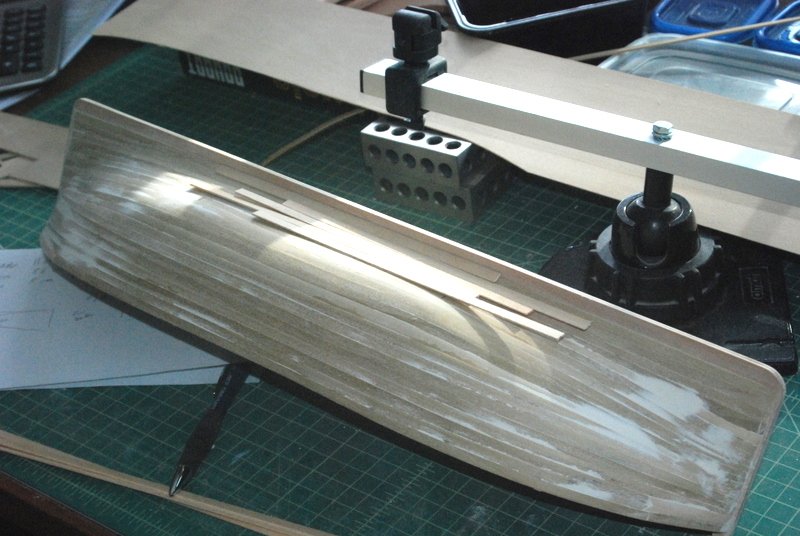
When I got close to the keel on the starboard side, I started planking down from the keel, so that I could use a shutter plank underneath the hull. This will be whatever width I need to fill the last gap, so I want it to be less noticeable. I am also planking both sides now. The port side is about half way there. On the starboard side I have now got to the point where I need to add two planks to finish the planking. I decided to use two planks that are slightly wider than the 6mm planks I have been using, as tis way there won't be one plank that is a lot bigger than the others. I cut a long strip 8mm wide from the 1mm sheet you see in the photos, and used it to create the last two planks in the middle of the hull. Here is the first one being glued in place. This morning I added the other one, so now I need to add the bow and stern planks in the gap, then tackle the planks at the sheer.
- 131 replies
-
- 6
-
-
- santa lucia
- panart
- (and 1 more)
-
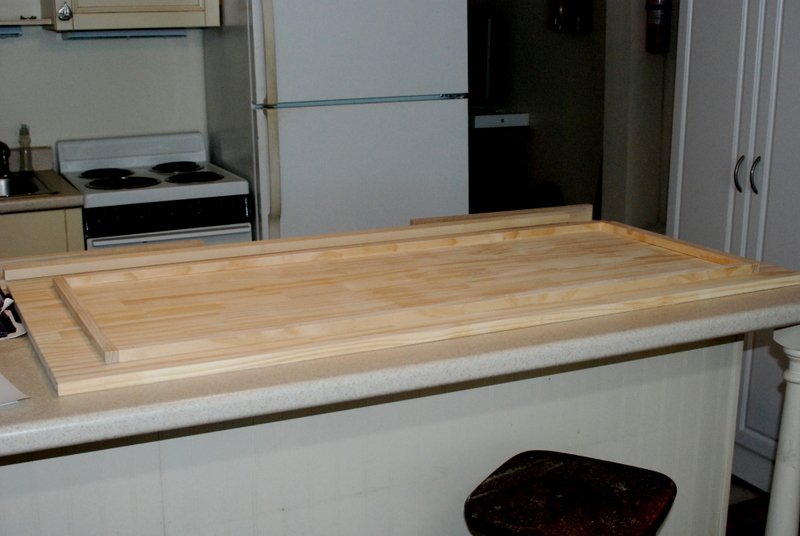
Here is the top almost completed. I made the back frame a little wider than the other frames so I had room to add the LED strip. It has an adhesive backing that stuck to the top very well. I created a groove in the back of the case for the wire to fit into, so when I add the top it will go over the wire. There is a control box that dims the lights and turns them on and off, which will hang down in the back of the case along one side. Adding the top to the sides is the next step.
- 1,354 replies
-
- 6
-
-
- constitution
- model shipways
- (and 1 more)
-
Thanks for the likes. K - the plexiglas panels are just loose in the channels, no adhesive. Once the panels are set on edge the Plexi doesn't seem to want to move. I suppose if it got breezy in the room they might rattle, but I have made previous cases like this and have not noticed that. The front panel and top panel will just be secured with screws, so I can put the ship in from the front, then screw the front and top in place. The top needs to come off so I can lift the ship high enough to set it on the cradle in the case. I could have secured the cradle to the ship but I like being able to separate them.
- 1,354 replies
-
- 1
-
-
- constitution
- model shipways
- (and 1 more)
-
Very nice K. I like your use of the templates to drill the holes.
-
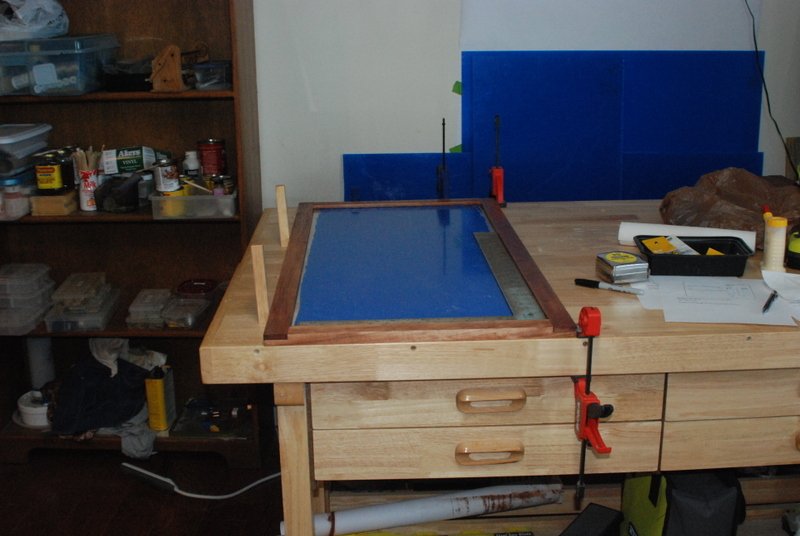
I have assembled the top, back, and sides. I used brass screws to hold the half lap joints together after gluing them. They came out sturdier and squarer than I anticipated. I then nailed the back and sides to the display board and each other. I am assembling the case on the table that the case will sit on when done, so I don't have to move it later. I am now in the process of making the top.
- 1,354 replies
-
- 9
-
-
- constitution
- model shipways
- (and 1 more)
-
I used a Cognac stain on the frame pieces for the front, back, and side panels, and the display board. It has a nice reddish color that matches the table I will be putting the case on. I also put two coats of Tung Oil Finish on these pieces when the stain dried. I have started assembling the side and back panels and should have them attached to the display board in a few days.
- 1,354 replies
-
- 4
-
-
- constitution
- model shipways
- (and 1 more)
-
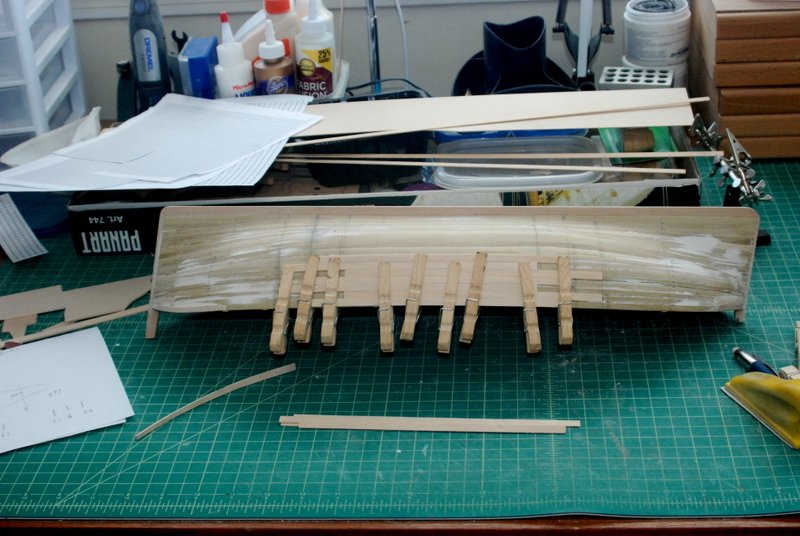
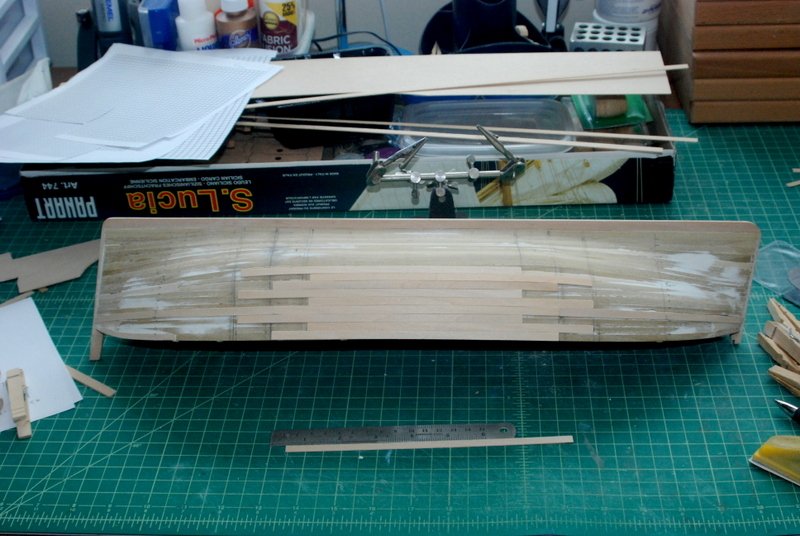
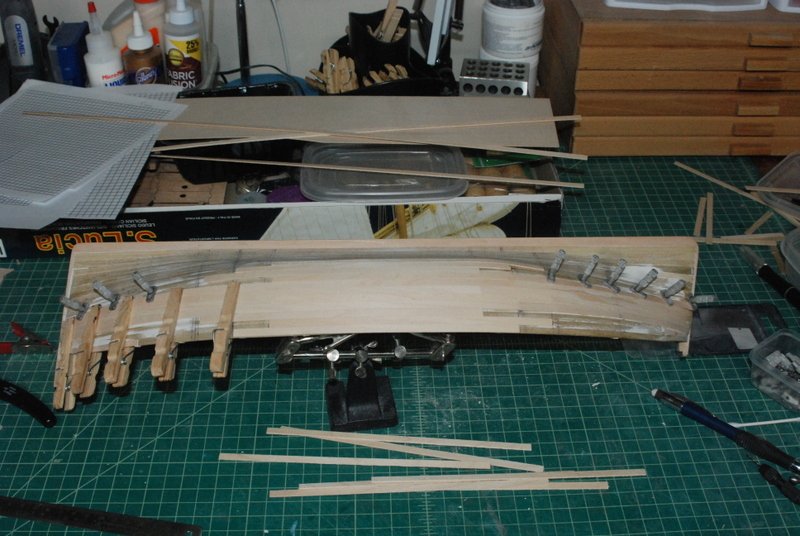
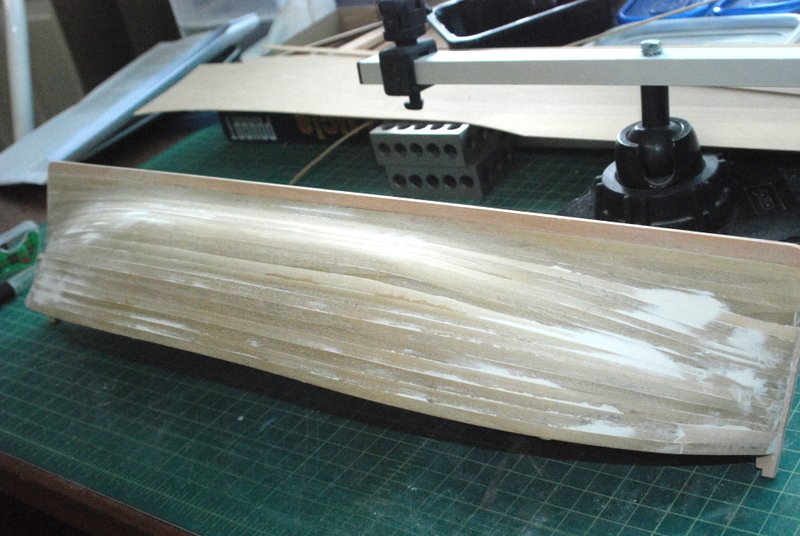
I haven't had an update for a couple of weeks but I have been continuing to add planks to one side. I started with a few middle planks then started adding the bow and stern planks from them. I am leaving the top few bow and stern planks until later as these will have to be spieled and probably dropped to fit the space. I was able to use clothes pins as clamps but now I am mostly using the screw clamps, with holes drilled into the first planking strips. I also use medium CA interspersed with wood glue on the middle planks that don't need to bend too much and hold them with my fingers for just a minute.
- 131 replies
-
- 3
-
-
- santa lucia
- panart
- (and 1 more)
-
I love it, Jay. Nice work.
-
That was fast work David. I have a different Chris Craft kit I'll probably be building next, so I am looking forward to following along with your build.
- 49 replies
-
- 2
-
-
- dumas
- Chris-Craft
- (and 2 more)
-
I have been spending most of my shop time building the case for the Constitution, but I have done a bit more work on the Santa Lucia. I finished the first sanding of the first planking and added filler in some low spots. This morning I sanded those down with medium grit sandpaper so it is now ready for the second planking. For the second planking the kit provides 1mm by 6mm wood strips. I am going to use 20' scale length planks that at 1/30 scale come out to 8" long. I can use full width planks in the middle of the hull then taper them towards the bow and stern. I'll use a 3 butt shift for the plank ends. Here are a few planks that show what it might look like. I need to figure out the widths and the tapering needed before I can start laying these down.
- 131 replies
-
- 4
-
-
- santa lucia
- panart
- (and 1 more)
-
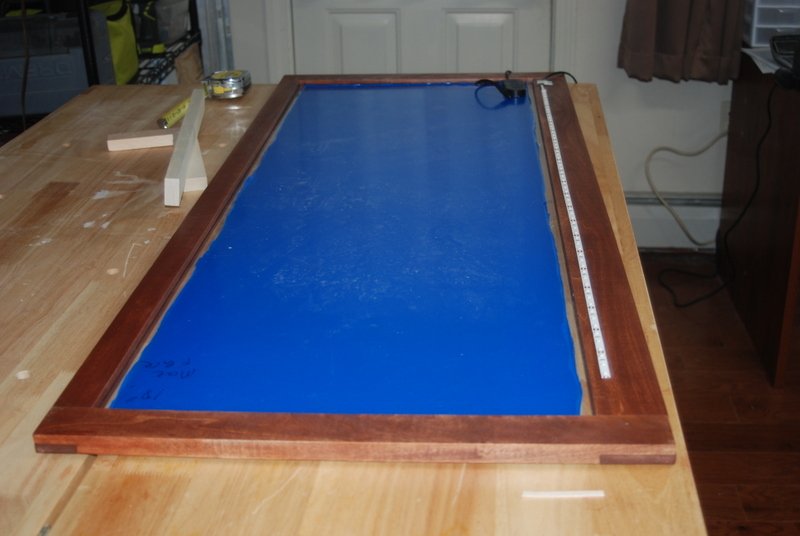
I have all the pieces for the front and back panels cut with half lap joints and a routed channel for the Plexiglas. Here is the front dry fit together to test if the depth of the channels are deep enough. So far so good. I will be cutting the pieces for the side panels next.
- 1,354 replies
-
- 4
-
-
- constitution
- model shipways
- (and 1 more)
-
Vossie, if you make the breach lines from a longer length of line, you can thread the line through the ring bolt and seize it to itself with a seizing that you can slide into position, at the same time adjusting the length of the breach line. I used this technique many times for seizings on the Constitution that I had to do in place.
- 714 replies
-
- 2
-
-
- lady nelson
- victory models
- (and 1 more)
-
Thanks Gerty. Your Willie Bennett looks really nice.
- 1,354 replies
-
- 2
-
-
- constitution
- model shipways
- (and 1 more)
-
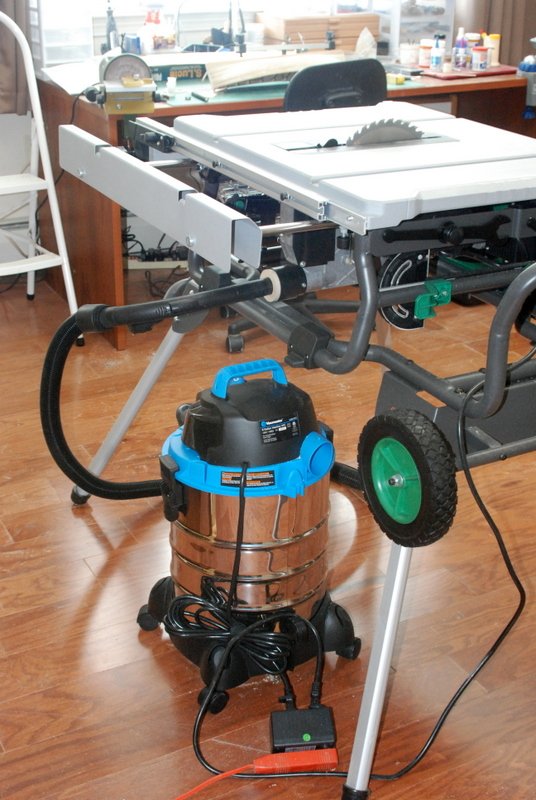
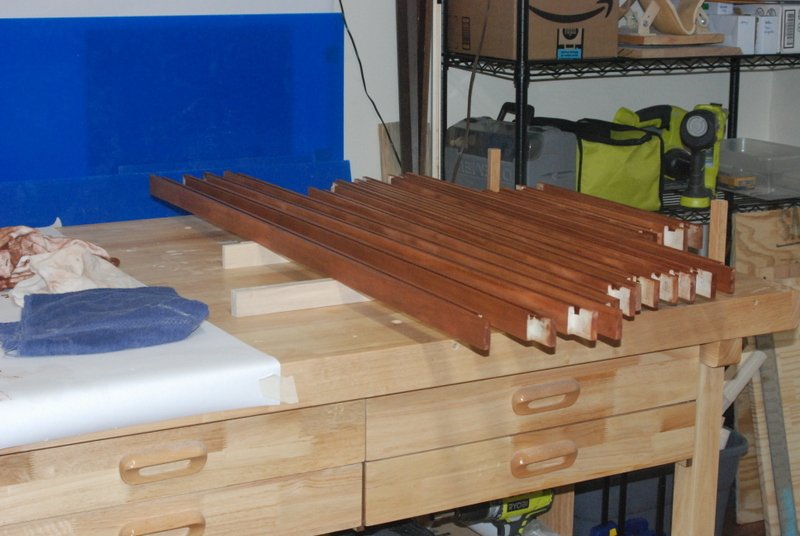
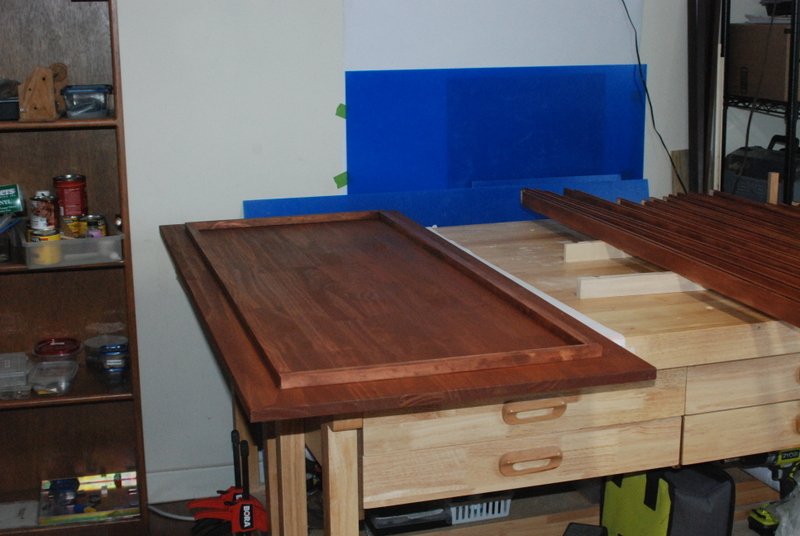
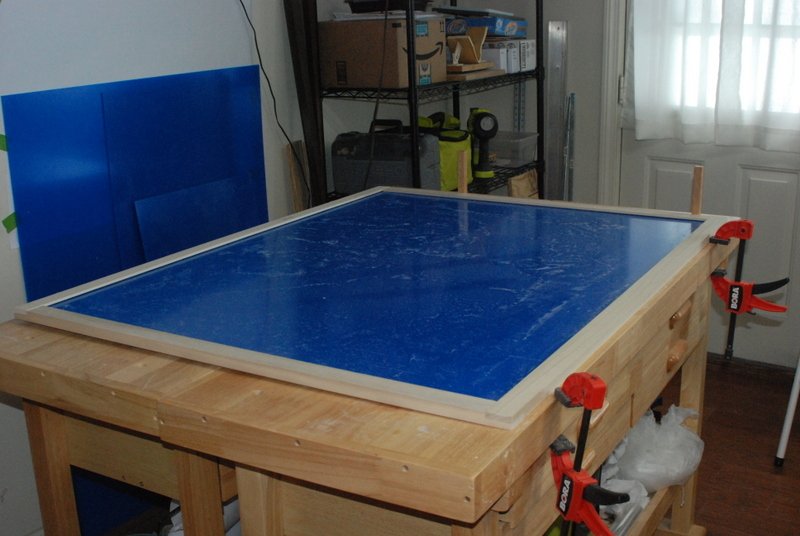
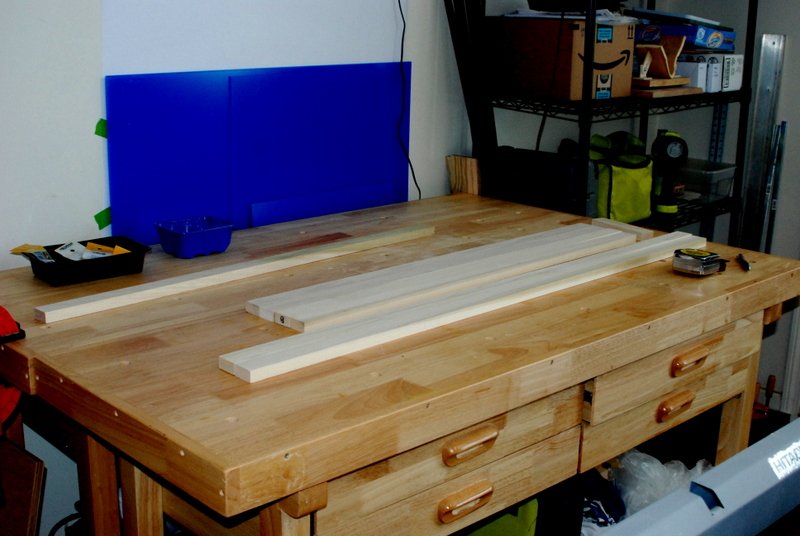
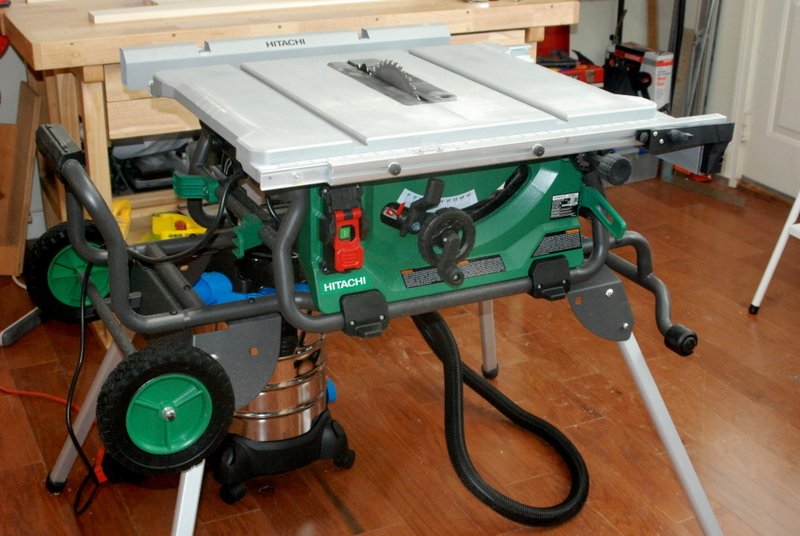
So this is a supplement to the build log which is a build log of the case for this beast. I was going to wait until Spring to build this, so that I could run the table saw outside, but I managed to arrange the shop so that I can make the case inside and still have room for the table saw. I ordered the plexiglas panels for the four sides and the top back in December. These are 1/8" thick. I will be making frames for the front, back, sides and top panel, but first I worked on the display board. This needs to be 24" wide, so I could have made it up from a few wide boards, but at Lowes I found this made up board that is already 24" wide. I started by adding the guide boards that the front, back and side panels will be attached to at the bottom. These are just 1x2 poplar boards that I split down the middle. I used a battery powered nail gun to attach them to the display board, which I have to say I was pretty impressed with. The nail heads are very small and not very noticeable. I will also be using a pretty dark stain for the case which will make them even less noticeable. With the base done, I then started making the front and back panels. I stared with these because if I screw up any of the frames I can cut them down for the sides. First I cut all the frame boards to length. Those blue panels behind the bench are the plexiglas panels. I had a pretty crappy old small Craftsman table saw that I knew wouldn't be up to this task, so while at Lowes to get the wood I was going to buy a small portable table saw that looked pretty good. Right next to that one they had this Hitachi portable saw that was much beefier and precise. It was originally about twice what I was going to pay for the smaller one, but it was marked down to only about $30 more than the smaller one, so after a bit of thought in the store I bought it. I am really happy with it. I had that small shop vac that is perfect to stick underneath it, but the hose was too small for the fitting on the saw. After searching online there was no adapter that would work, even though there were a bunch that claim to but when you look at the dimensions the outside diameters were too large to fit in the hole. So I chucked a square piece of 1x4 into my lathe and made one, which works great. I also bought a switch that you plug the saw and the vacuum into so that the vacuum goes on automatically whenever the saw starts up. So far that is also working great but there is some question on the longevity of these switches, so we will see how long it lasts. I can also use this set up with my other power tools, like the router table. I am in the process of cutting lap joints into the ends of all the frame boards for the front and back. Once that is done, I will then use a router table to cut the slots in the boards for the plexiglas panels to fit into, then assemble the frames around the plexi. Stay tuned for pictures of that step next.

- 1,354 replies
-
- 4
-
-
- constitution
- model shipways
- (and 1 more)
-
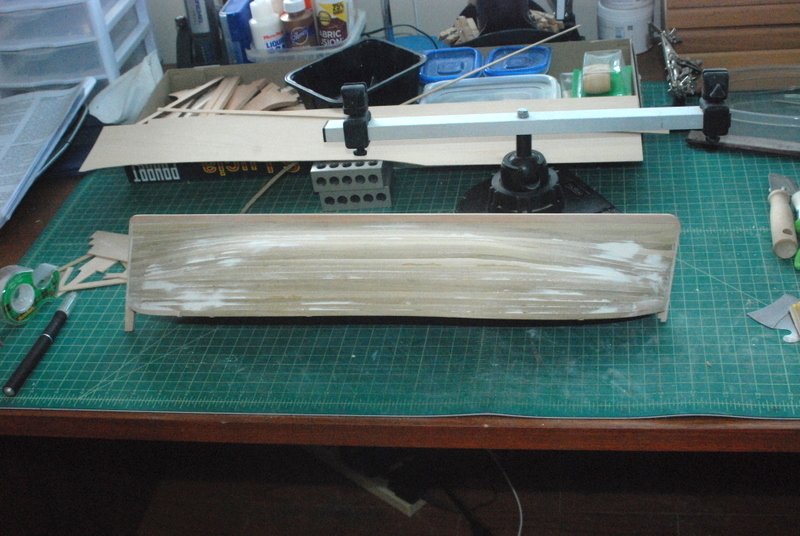
I have completed the first sanding of the first planking, both with rough and medium grade sandpaper. There are a few spots that need a bit more filler, so that is the next step.
- 131 replies
-
- 4
-
-
- santa lucia
- panart
- (and 1 more)
-
Been there, done that Rich. It is a wonderful feeling when it all set back up just the way you like it.
- 1,135 replies
-
- 1
-
-
- model shipways
- syren
- (and 2 more)
-
Thanks Popeye. That is good advice which I will use on the second planking.
- 131 replies
-
- 2
-
-
- santa lucia
- panart
- (and 1 more)
-
Is it the Beagle?