usedtosail
-
Posts
2,421 -
Joined
-
Last visited
Content Type
Profiles
Forums
Gallery
Events
Everything posted by usedtosail
-
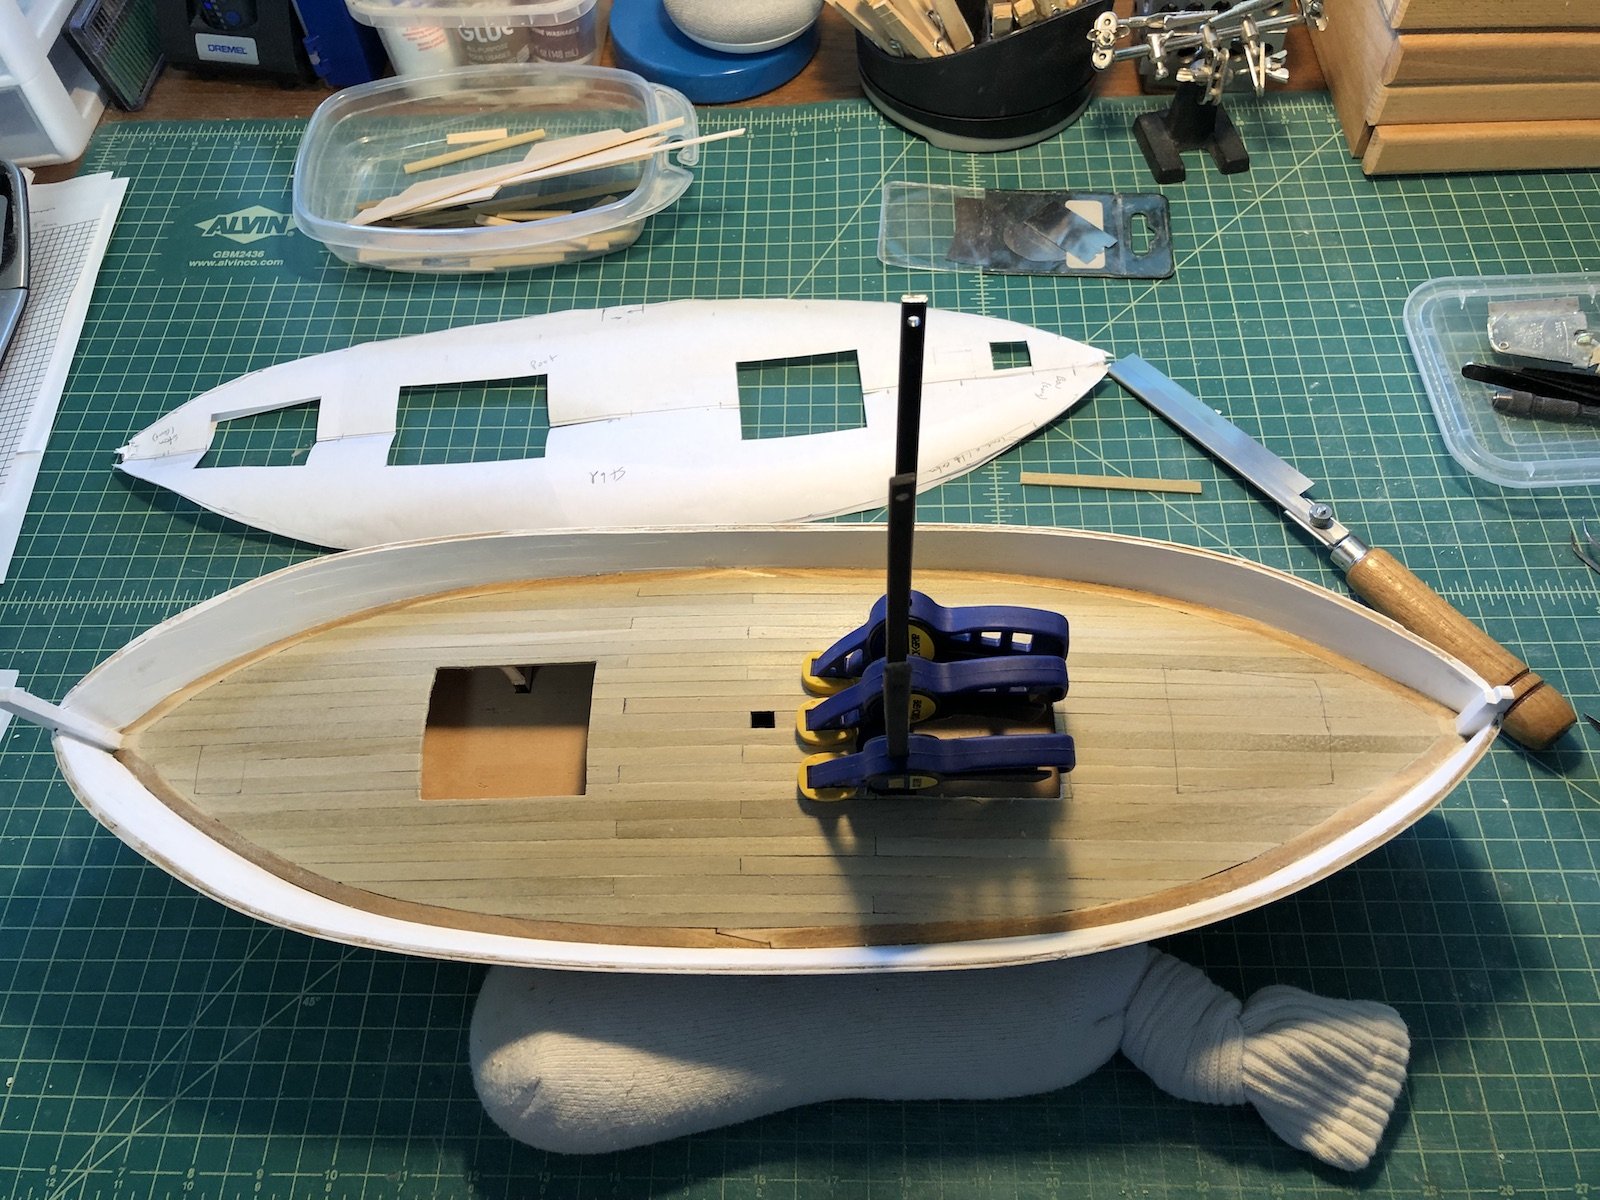
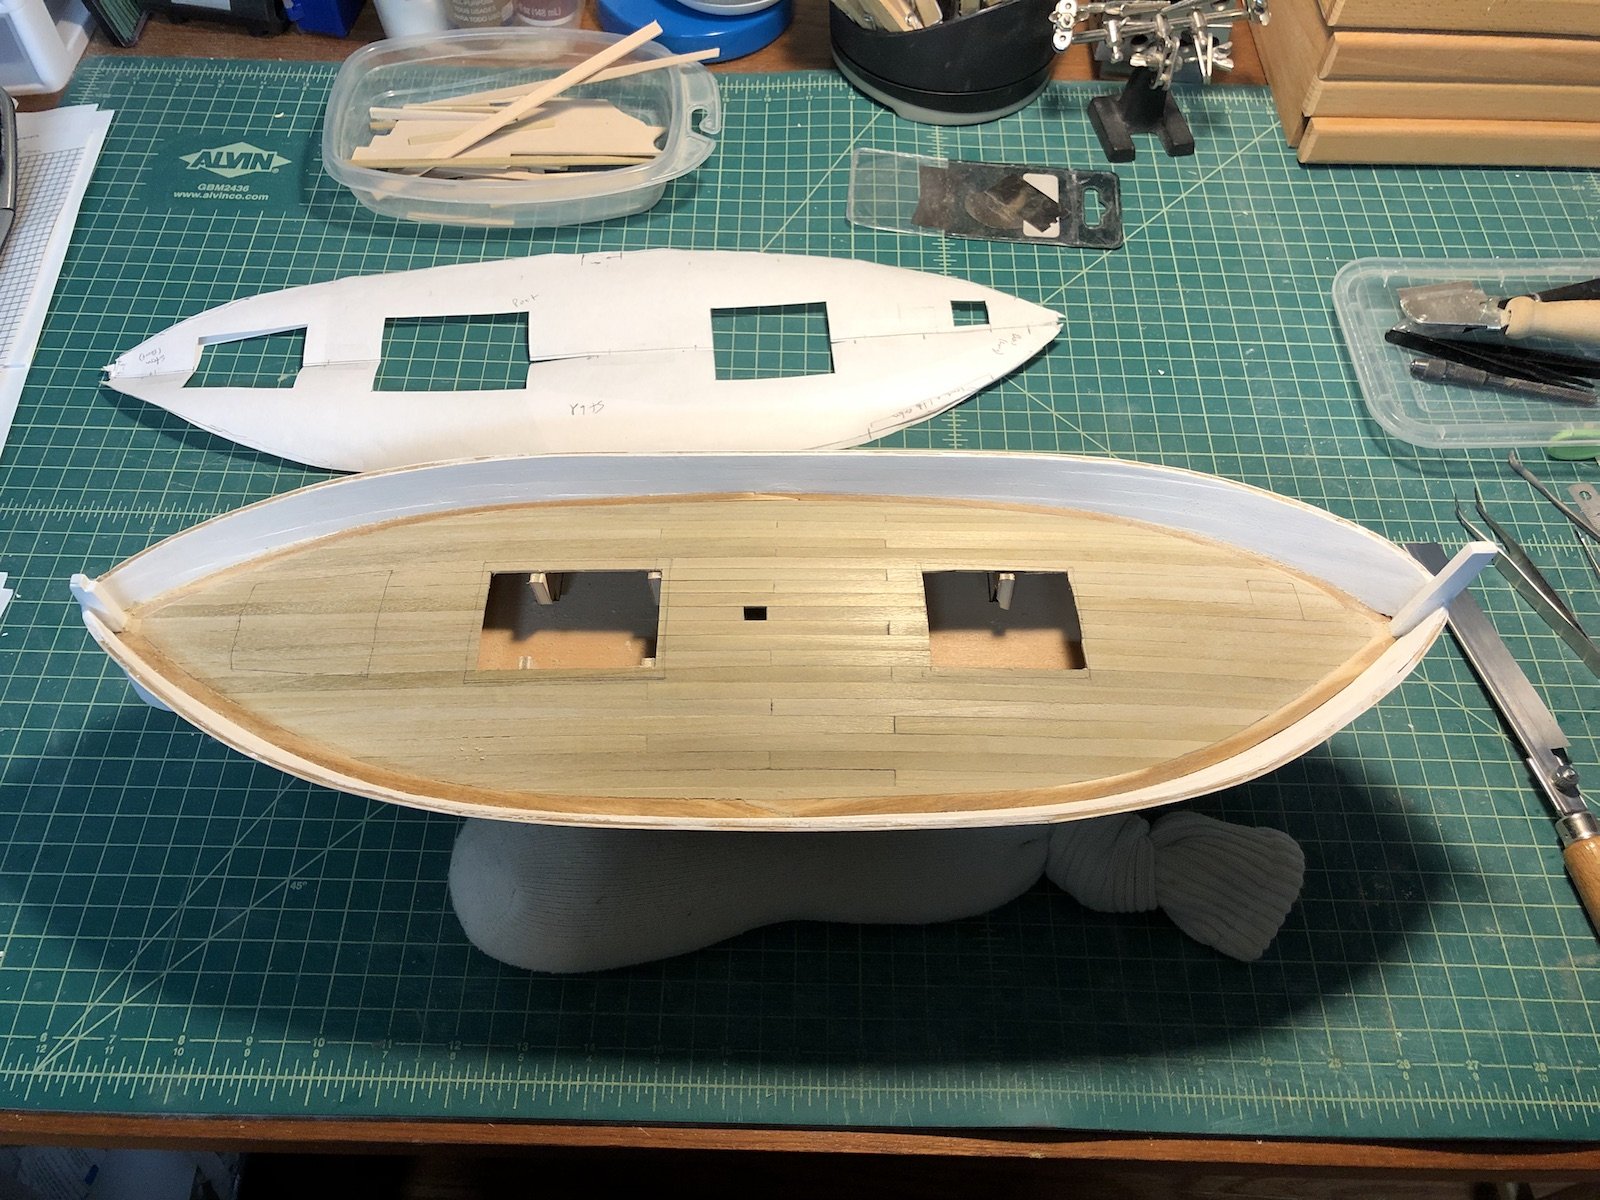
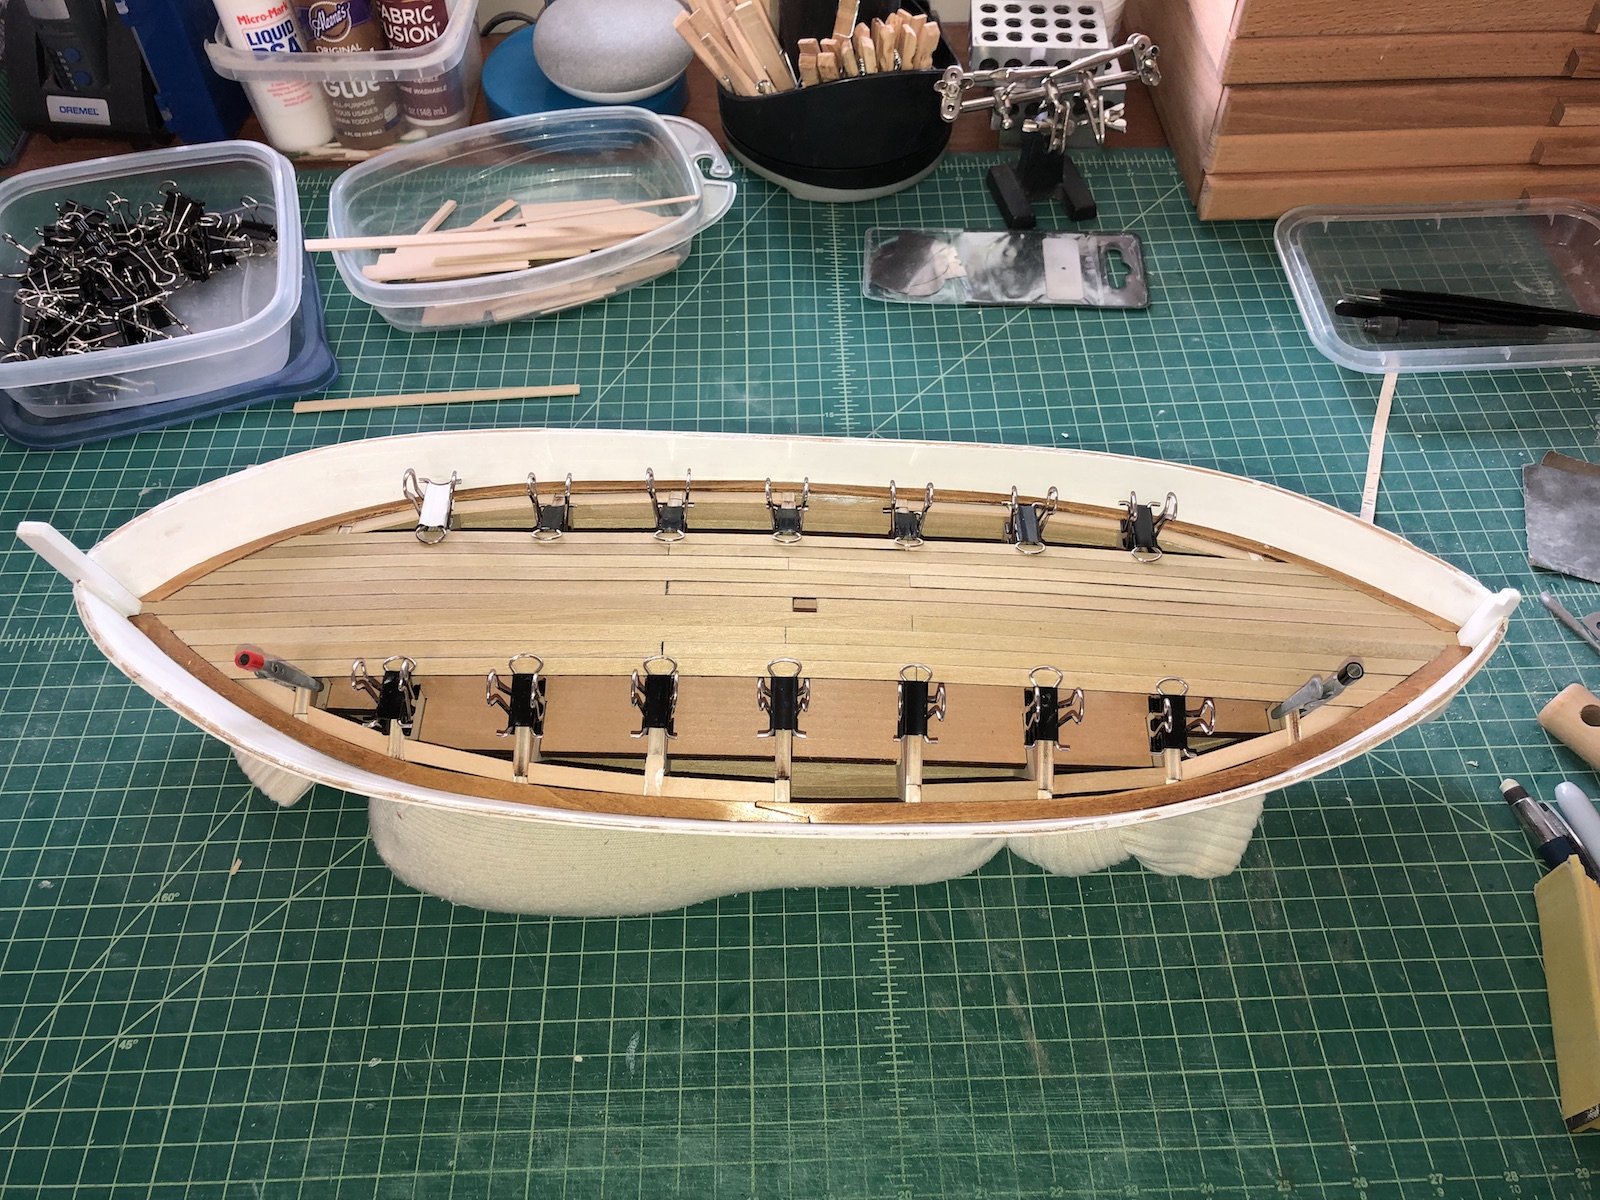
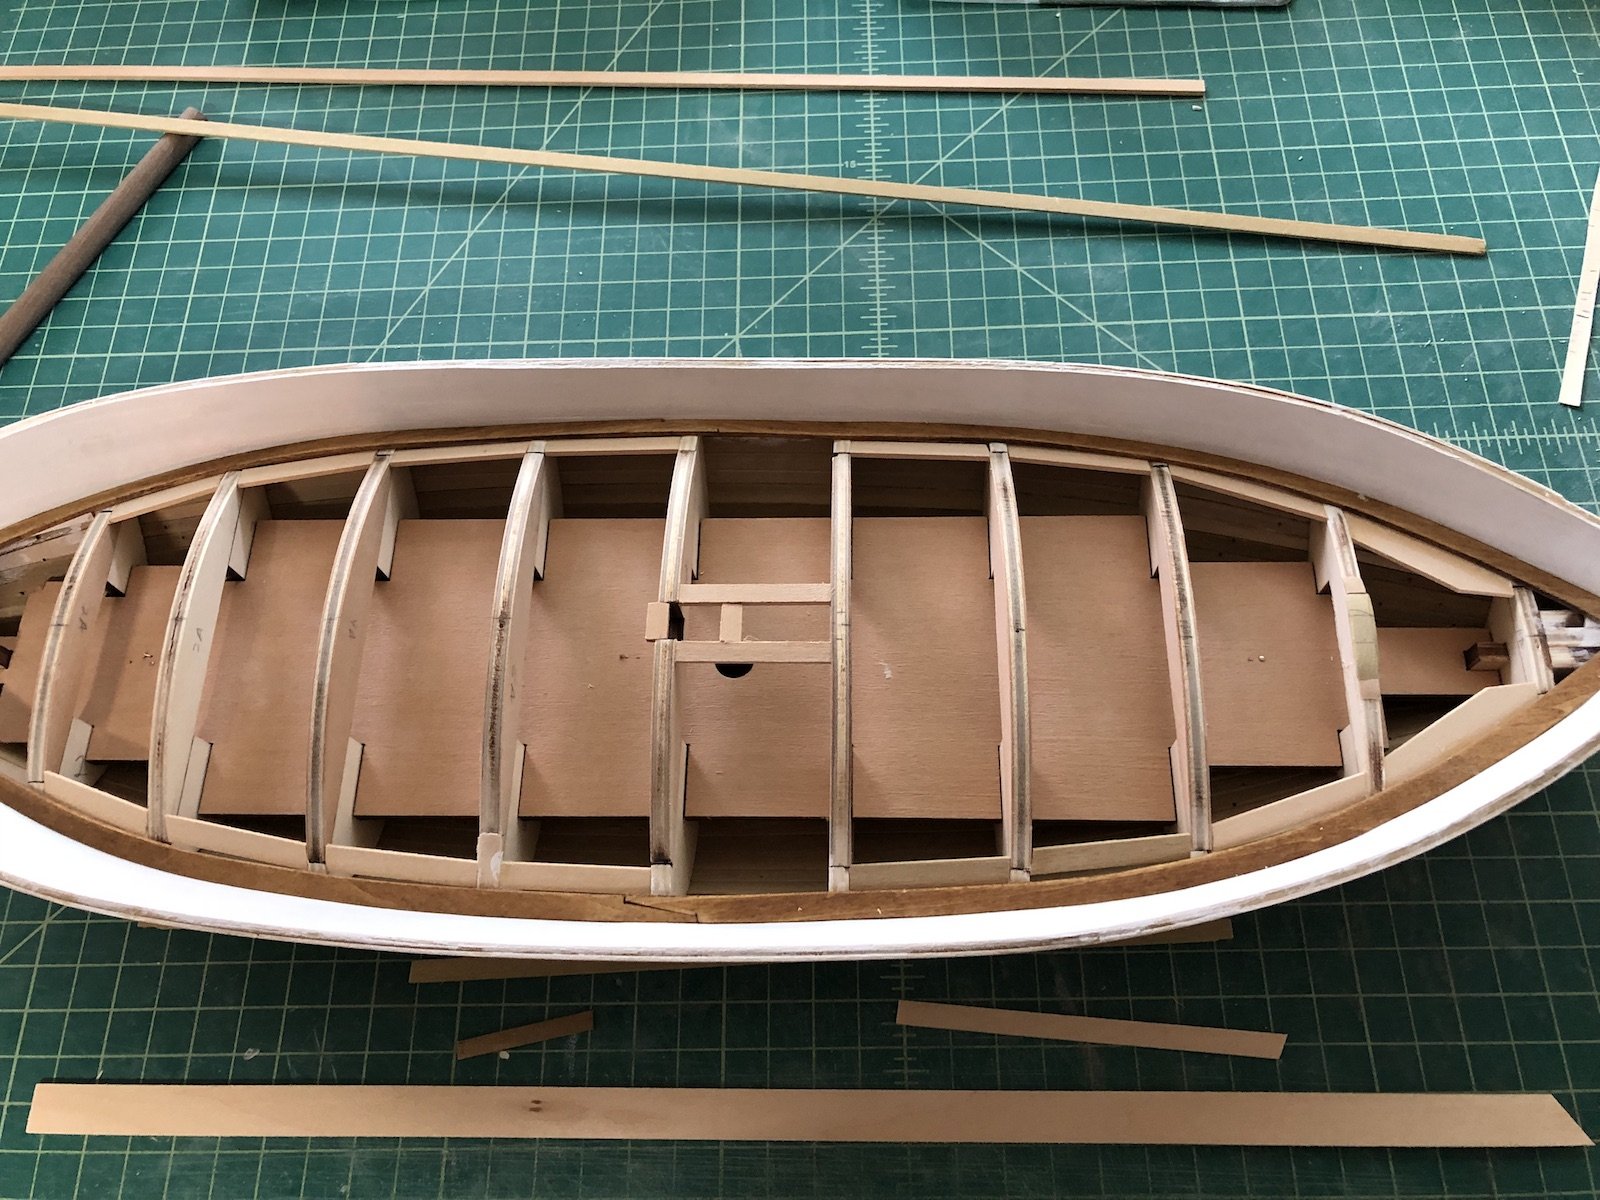
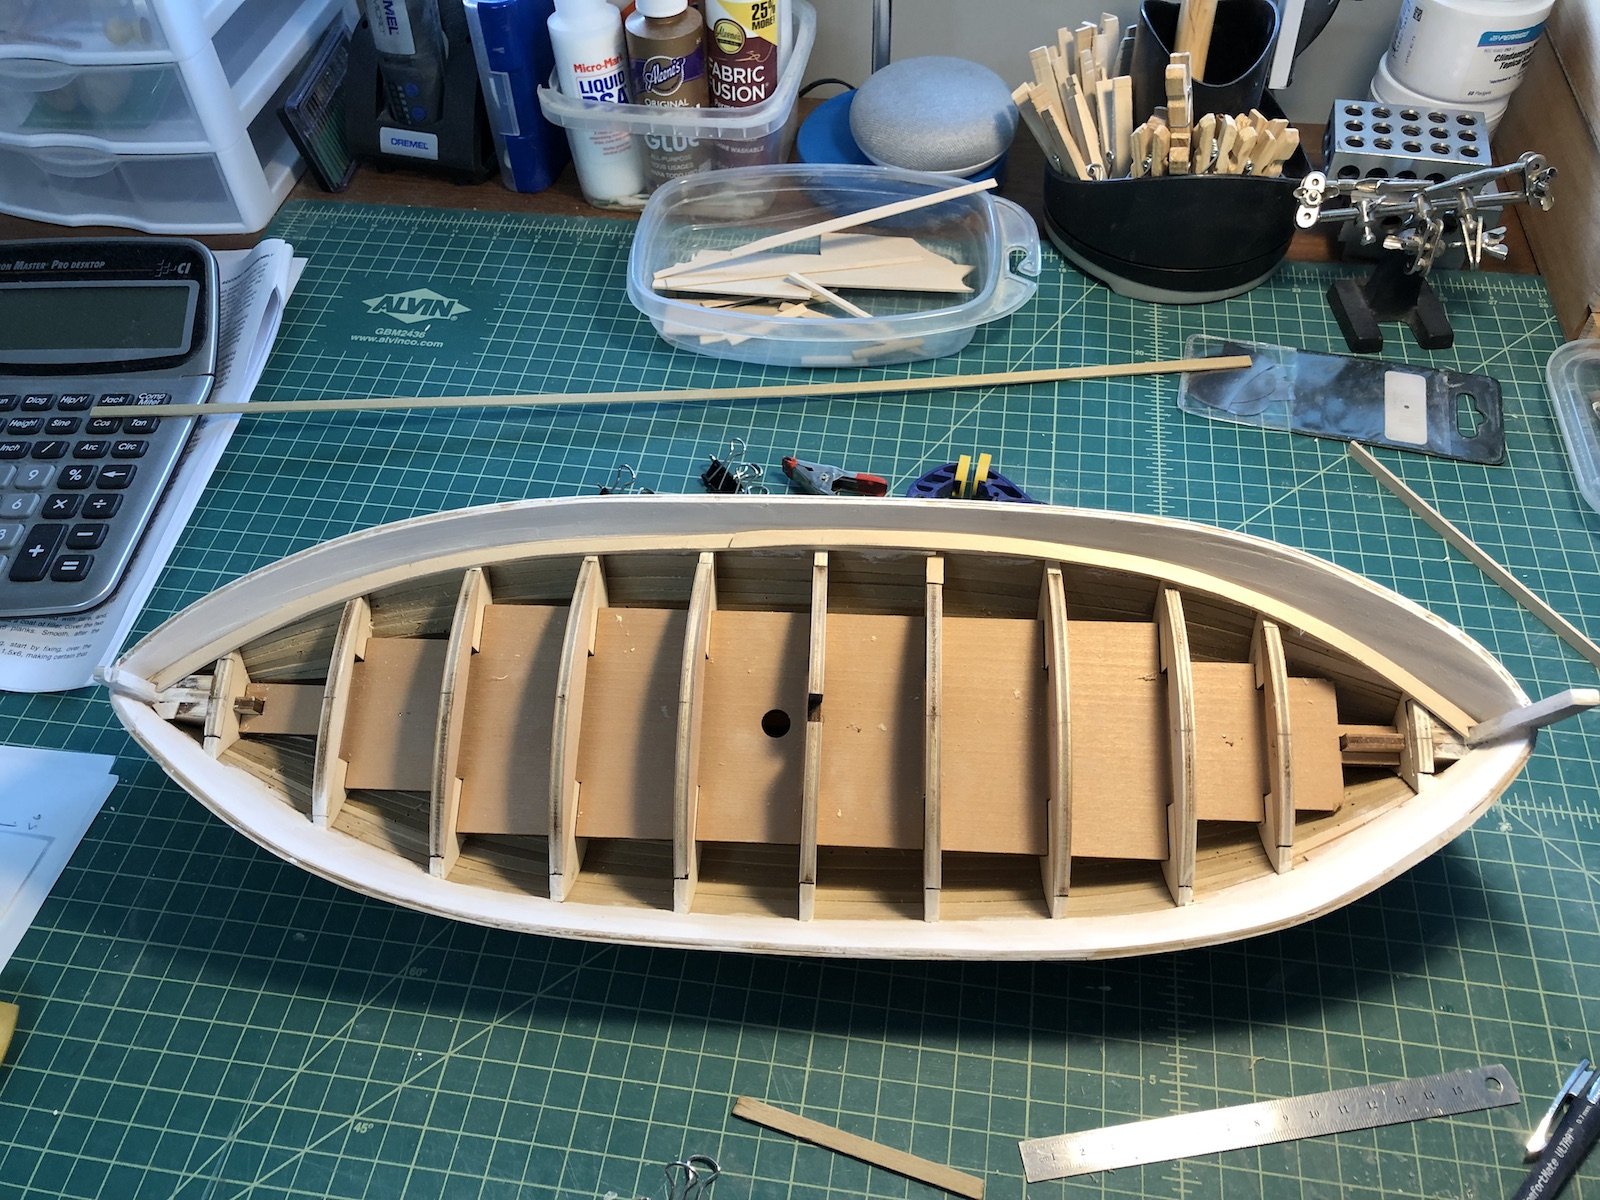
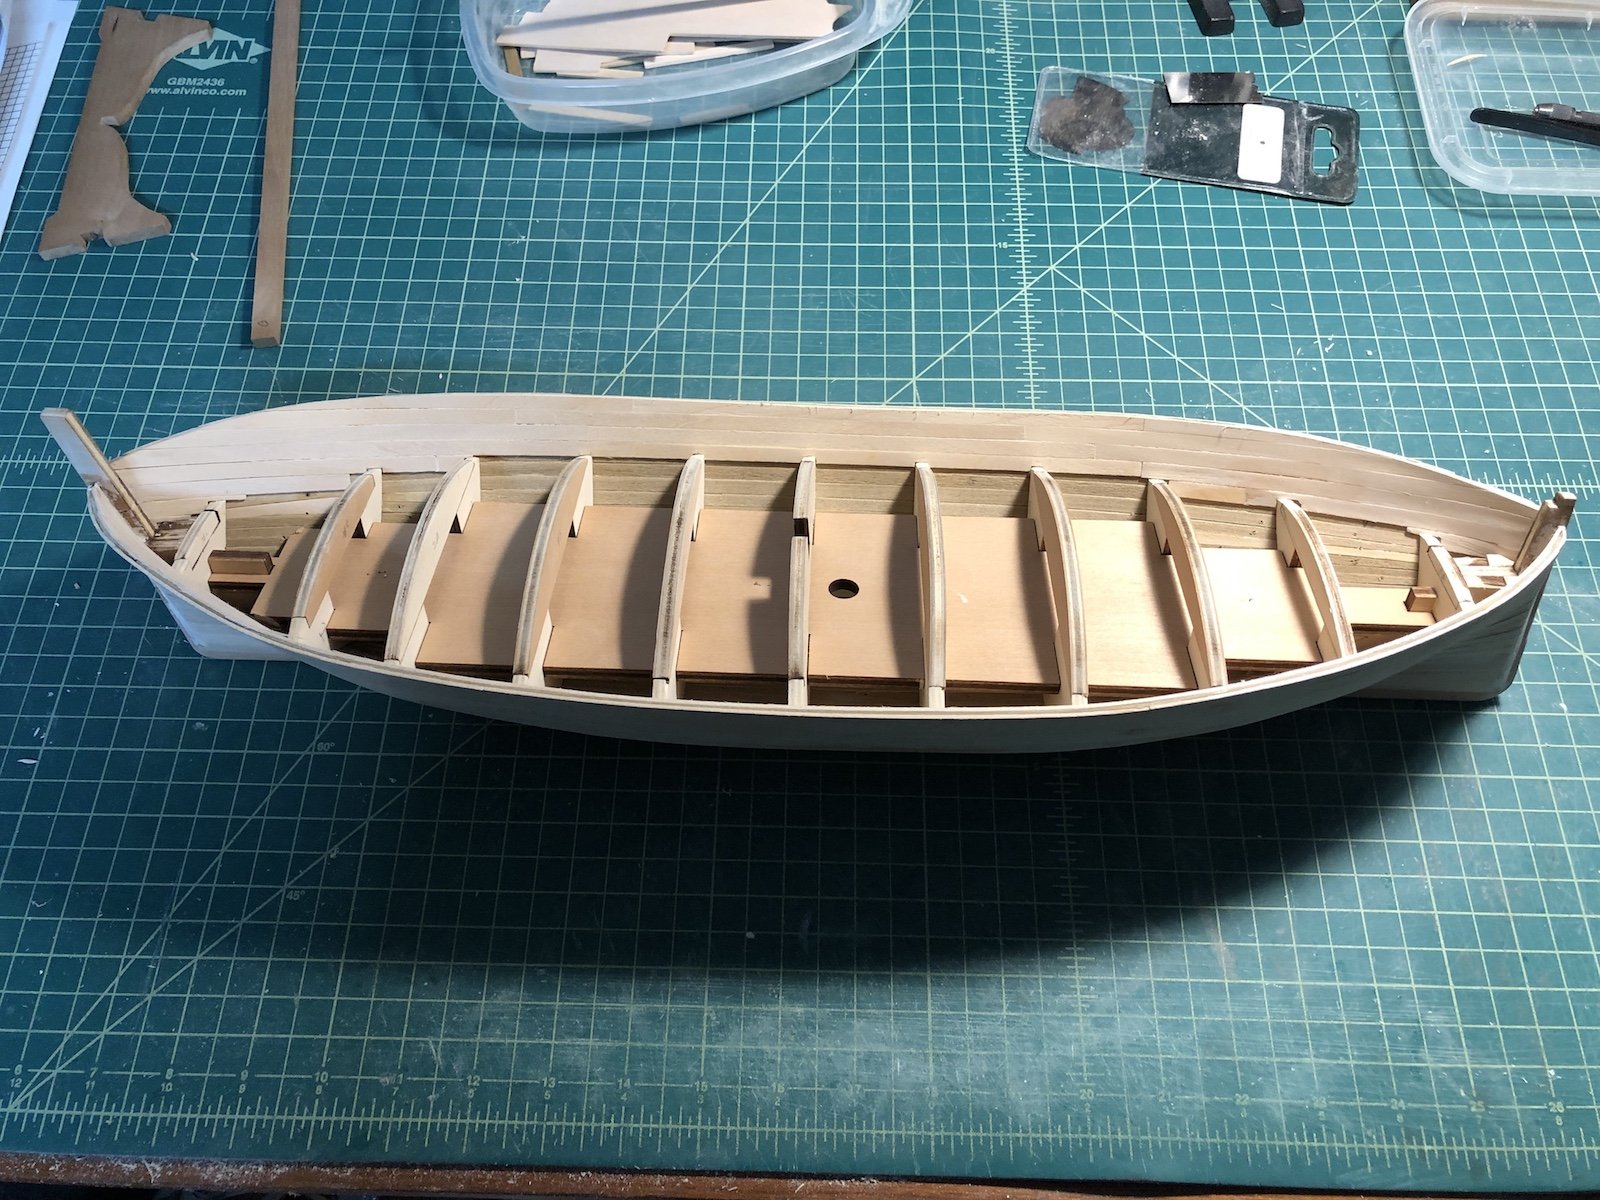
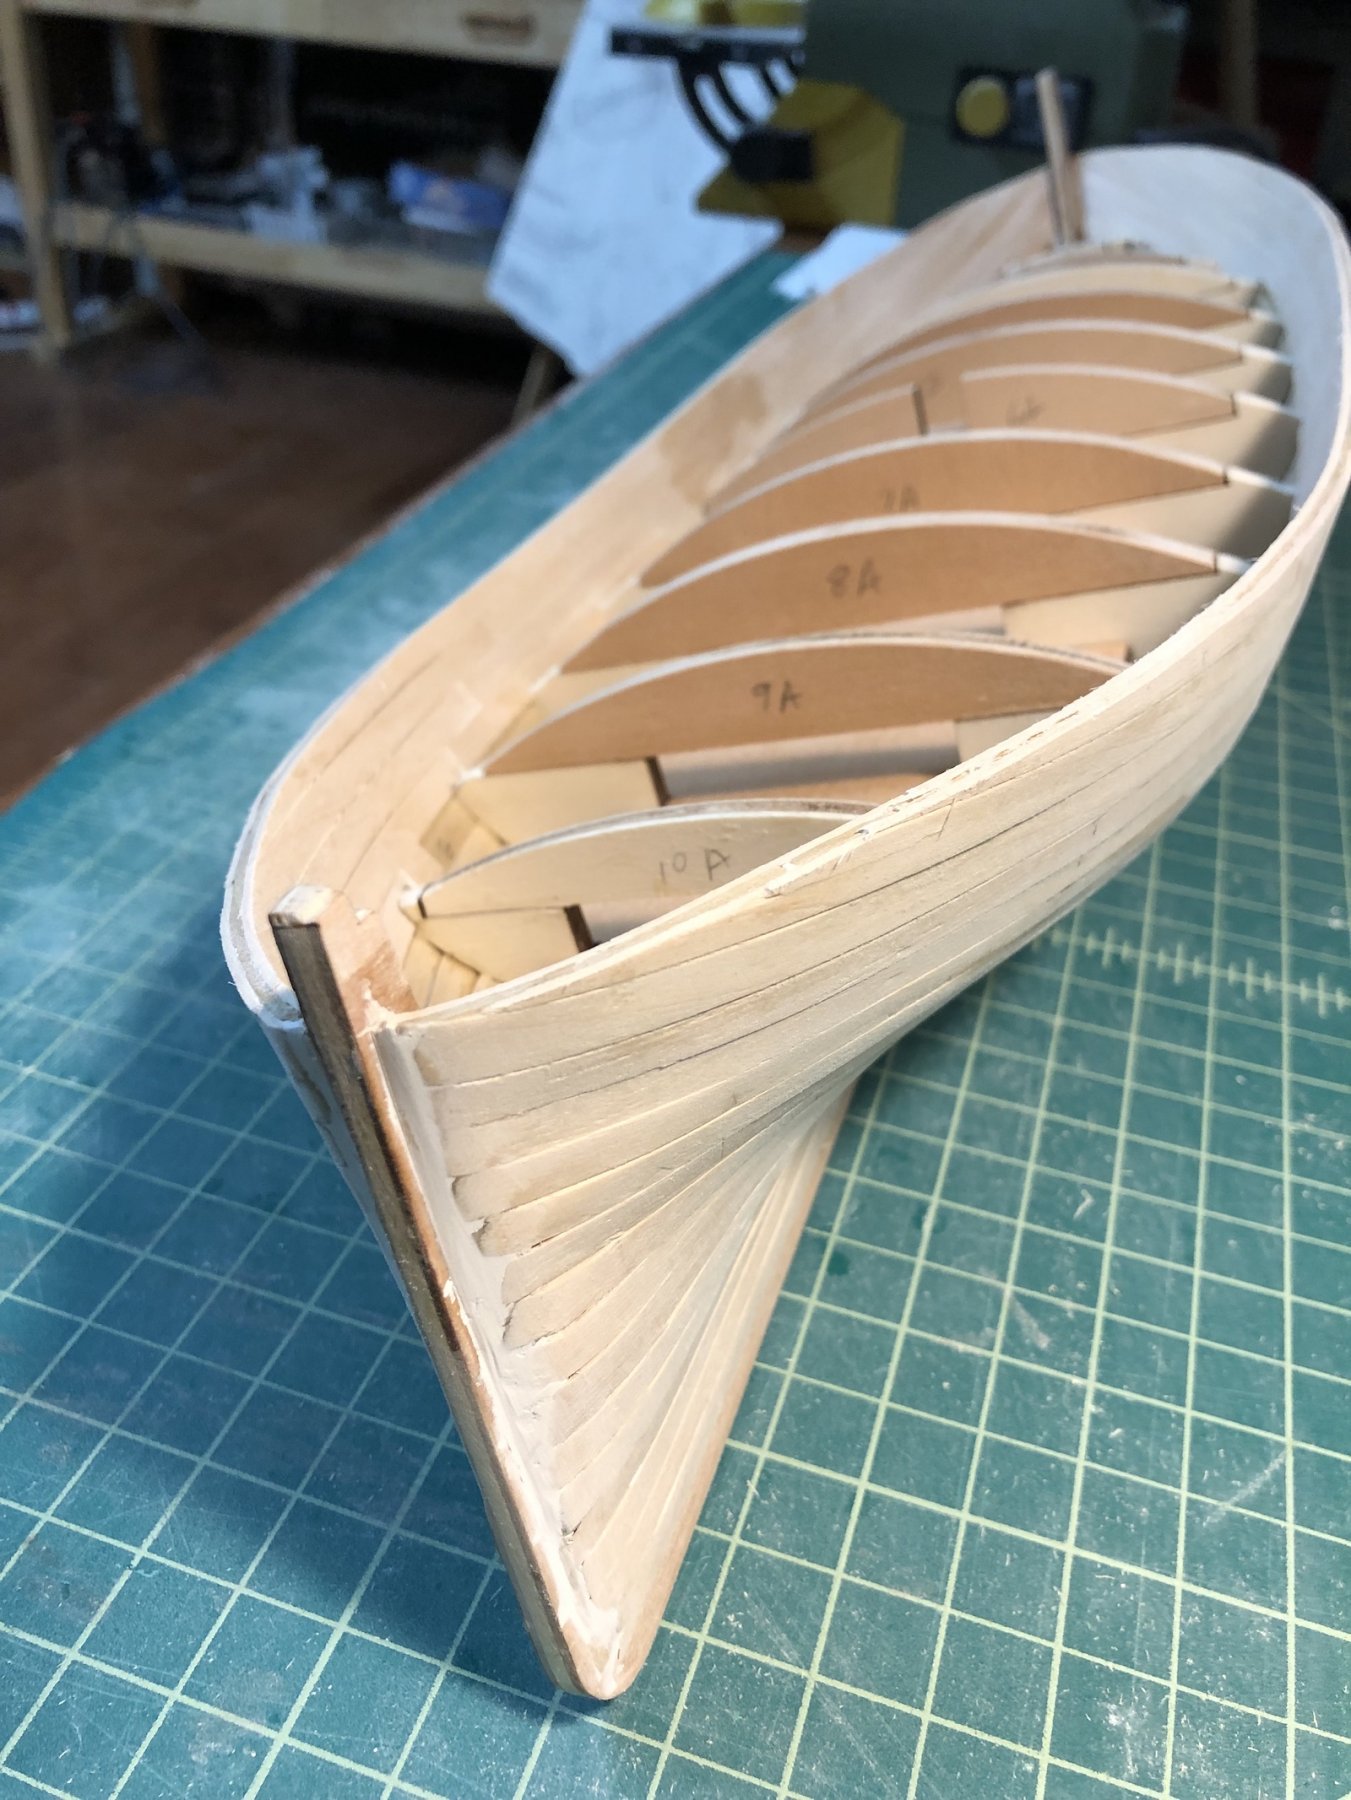
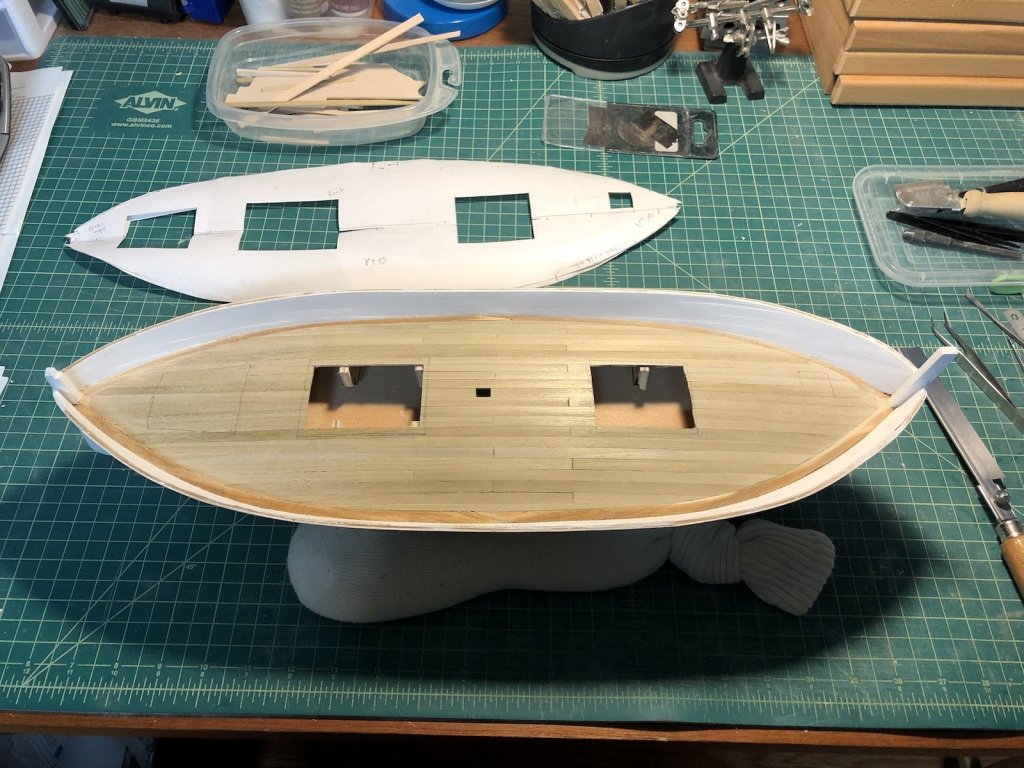
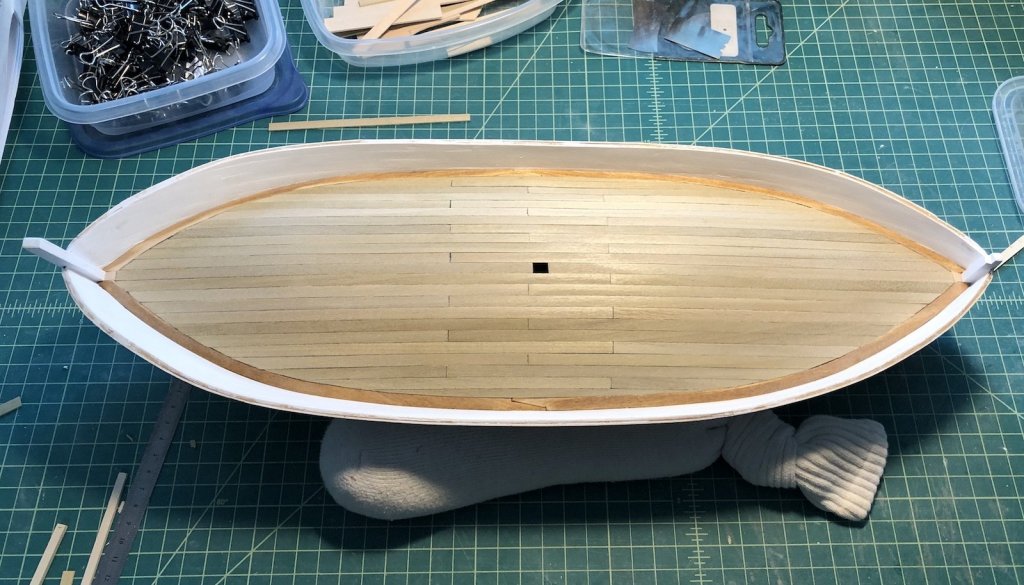
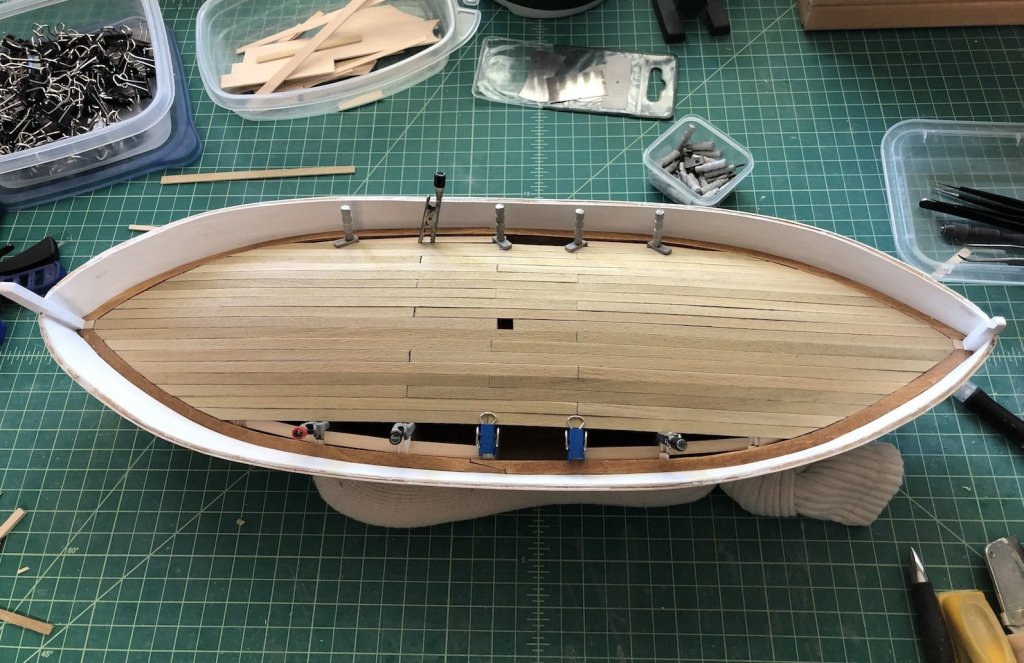
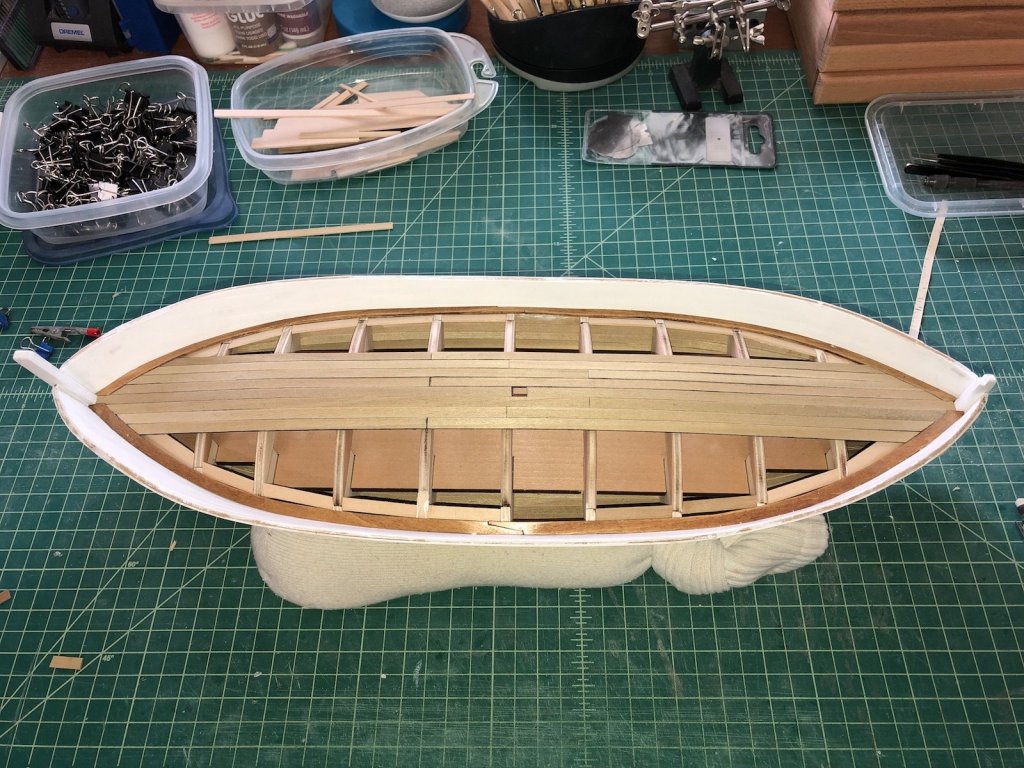
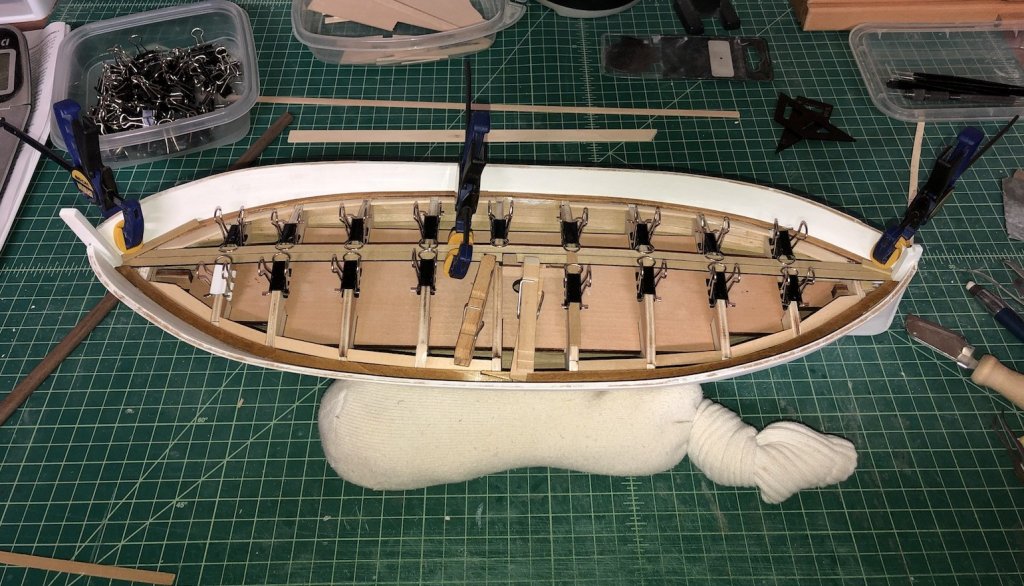
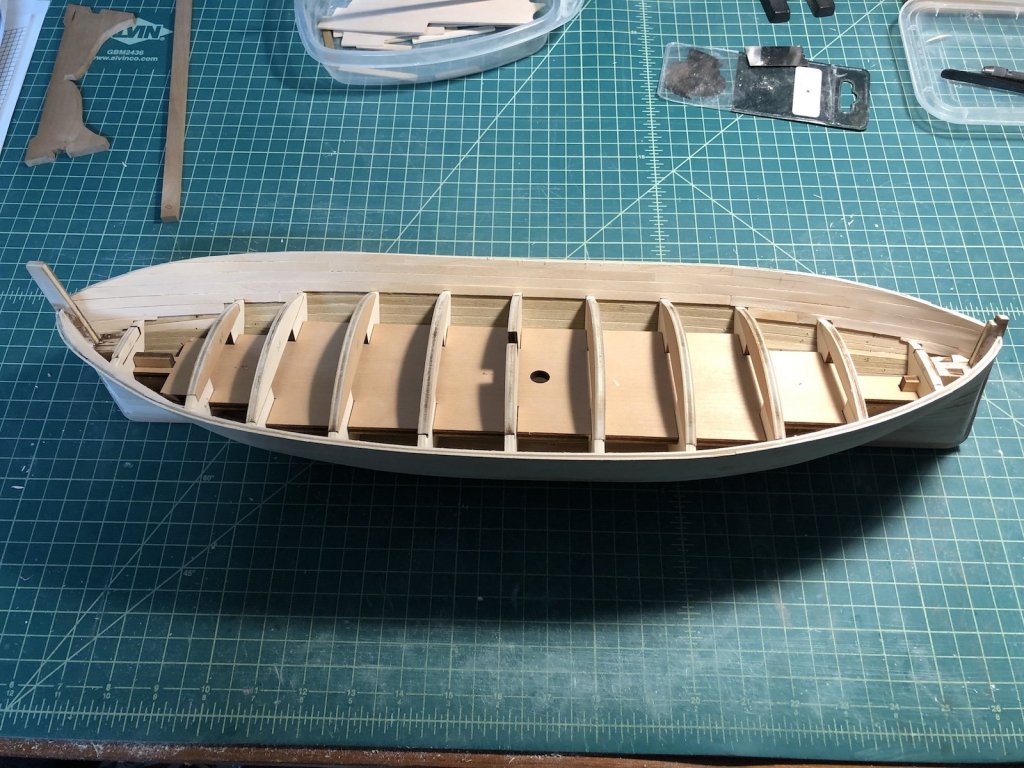
 I finished scraping and sanding the deck planks, then starting cutting holes into it. I first marked the four deck openings using the template I made, adjusting them as necessary so they were straight with the planks. I then used a razor saw to open up two of the larger openings. I cut well away from the line and removed the planks that were sawn all the way through. I then used the razor saw to cut away the frames that were in the openings. For the forward opening I used an X-Acto knife and X-Acto saw to cut along the edges of the opening, and again used the razor saw to remove the remaining pieces of frame. I also used a Dremel with a sanding drum to sand back to the line where the ends of the planks to cut were very short. I started to do this for the aft opening, but once I removed the frame under the forward plank ends I needed to glue a pice of planking under the plank ends to stabilize them, as they were now a long distance from the closest frame. Here you can see the forward opening is ready to go but more work is needed on the aft opening after the support piece is dry, and I still have the other two openings to cut out. I also decided not to add treenails to the deck for a couple of reasons. I don't know these boats very well so I am not sure they used them and also none of the pictures I have of the real boats or models show them, so I would rather leave them off.
- 131 replies
-
- 5
-

-
- santa lucia
- panart
- (and 1 more)
-
Thanks Geoff and REG. Here is what I have in my notes regarding the cannons on the Constitution: Gun Deck - 30 24lb cannons Spar Deck - 24 32lb carronades and an 18lb chase gun
- 1,354 replies
-
- 2
-
-
- constitution
- model shipways
- (and 1 more)
-
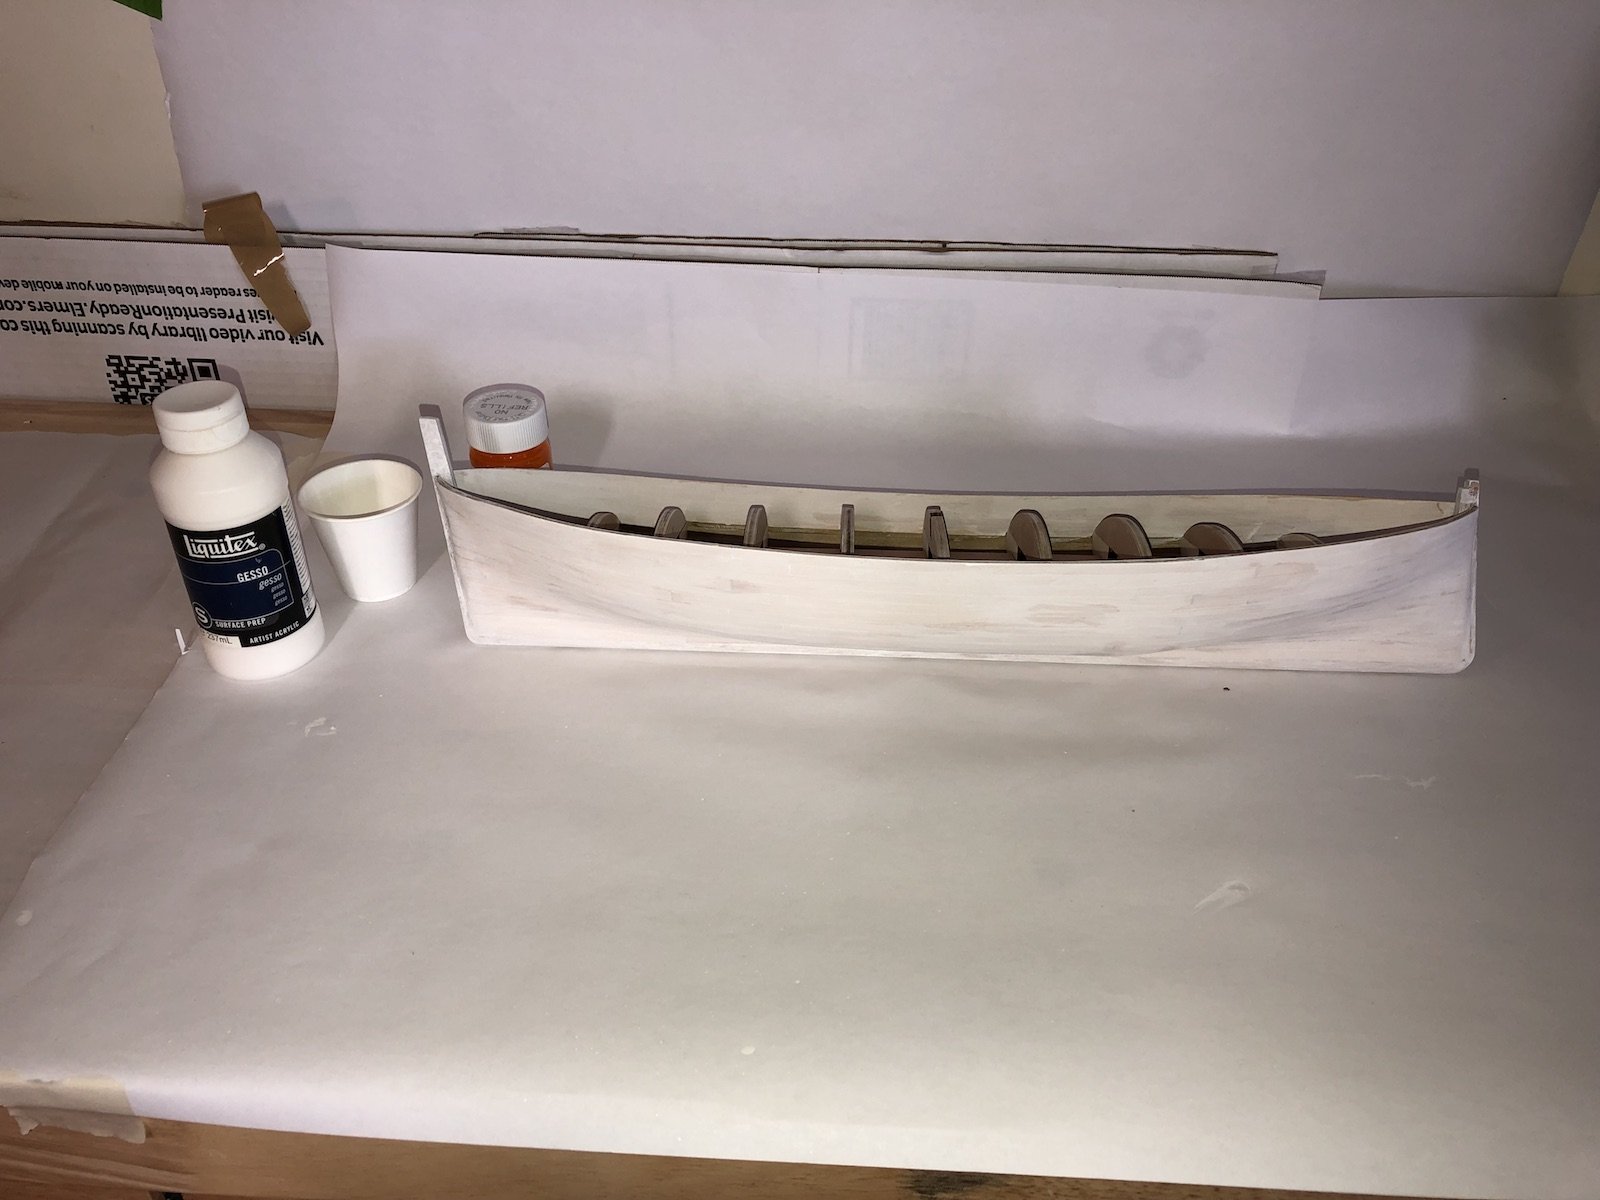
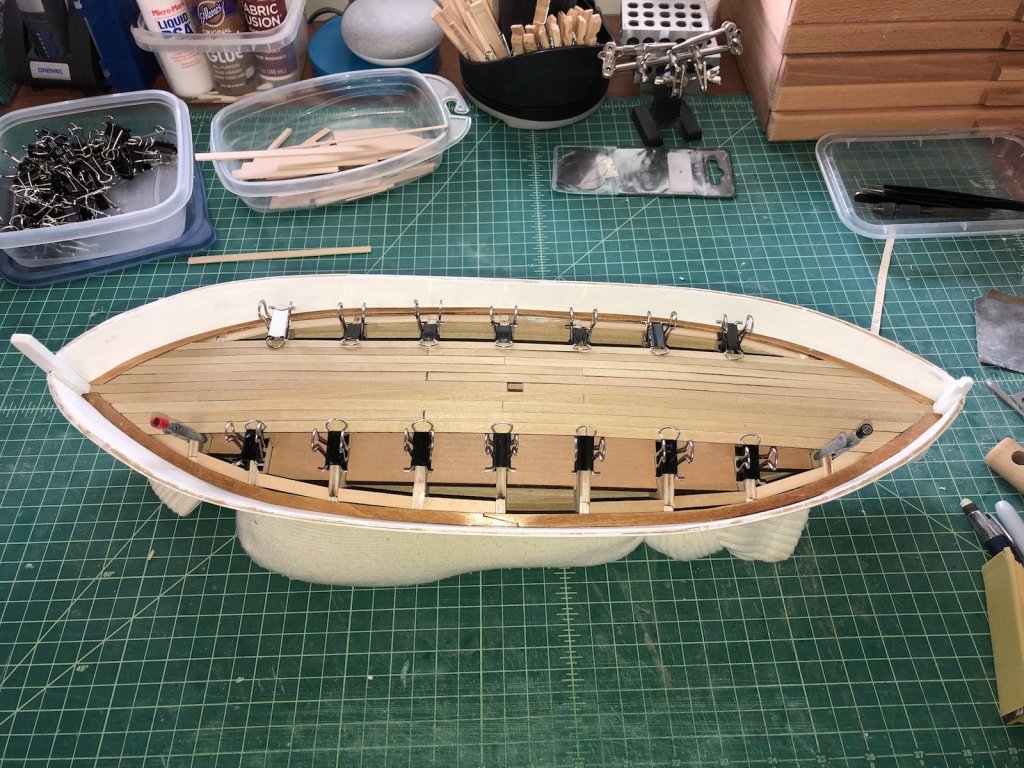
Deck planking is complete. I started scraping and sanding the deck and margin planks to even them all out. Next step is to cut the openings in the deck for the hatches, then I'll add tree nails and do a final sanding of the deck planks.
- 131 replies
-
- 4
-
-
- santa lucia
- panart
- (and 1 more)
-
Thanks Popeye and the likes. Deck is almost complete - just a few more planks to add along the edges. I decided I didn't like the center plank going all the way to the stem and stern posts, so I cut out the small rectangles at the ends and replaced them with the same material I used for the margin planks. I will sand all of these level and stain them as part of the deck finishing process.
- 131 replies
-
- 4
-
-
- santa lucia
- panart
- (and 1 more)
-
Deck planking continues. I apologize if this stage isn't too interesting, but I like how the shape of the boat is coming together as these planks are added. Those decks are very rounded in these boats and it is really starting to show that.
- 131 replies
-
- 5
-
-
- santa lucia
- panart
- (and 1 more)
-
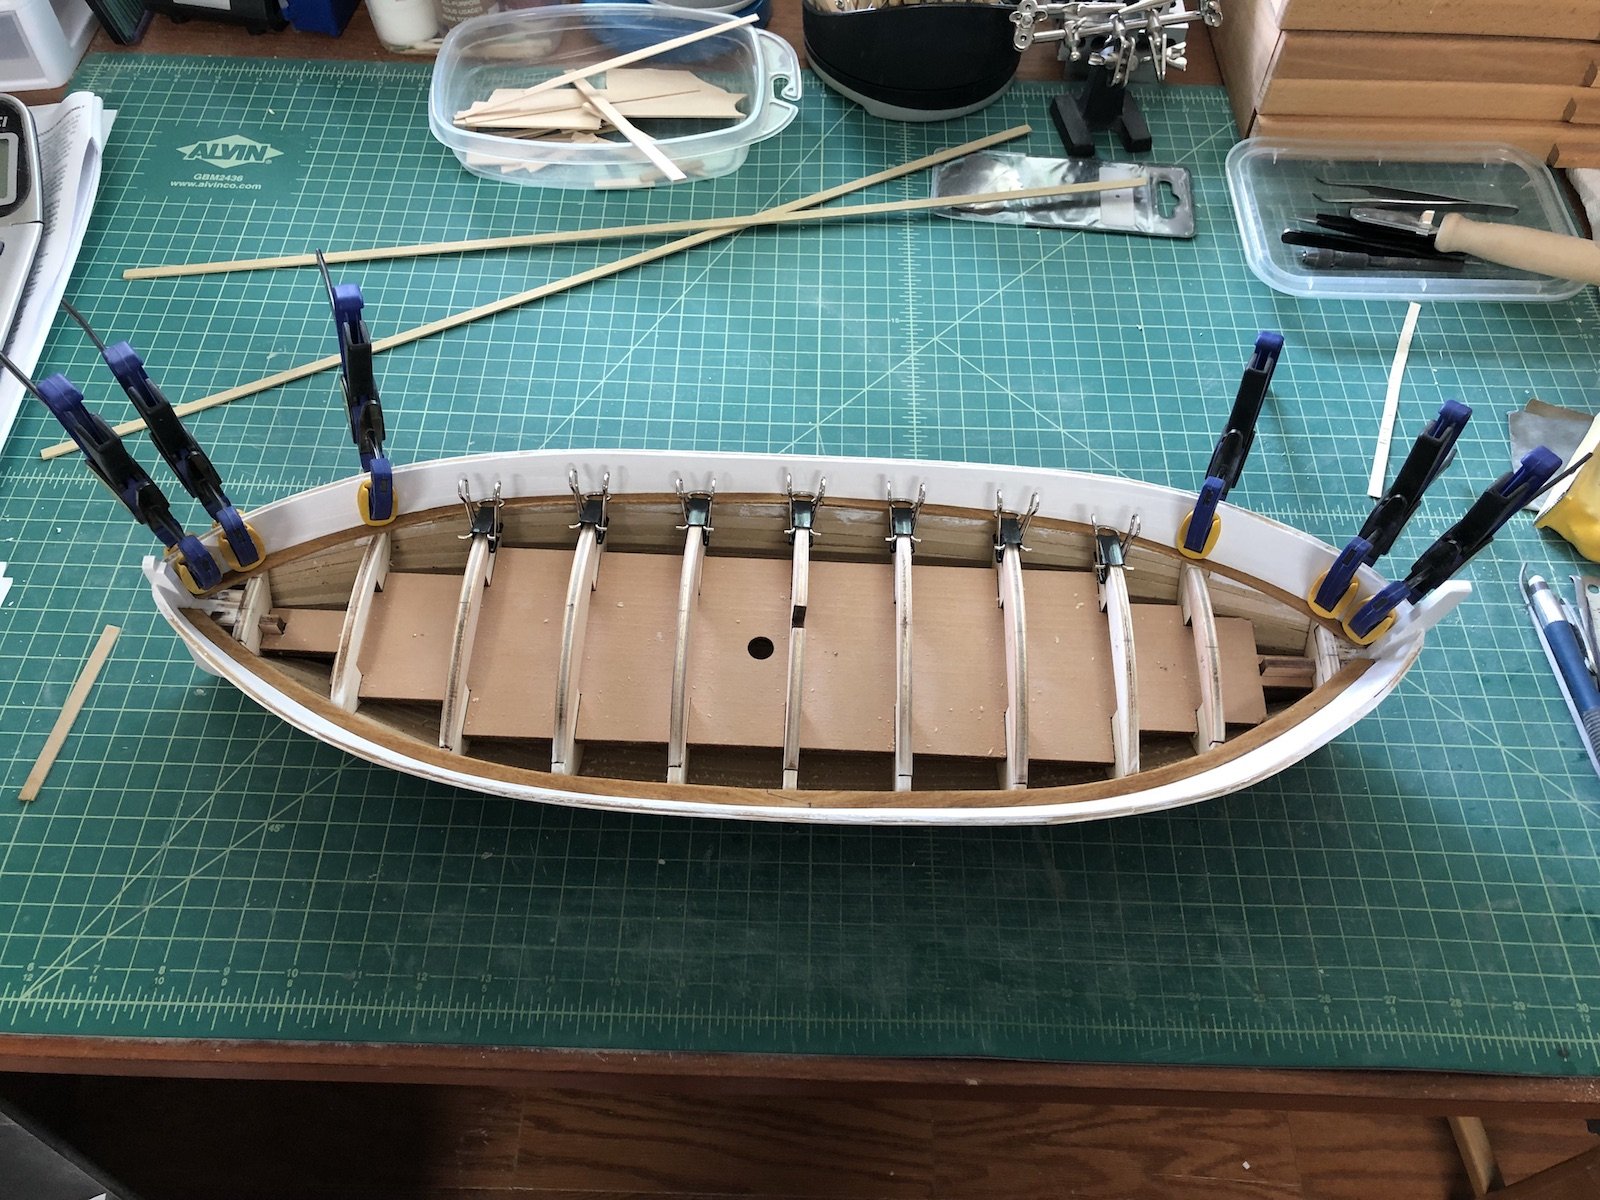
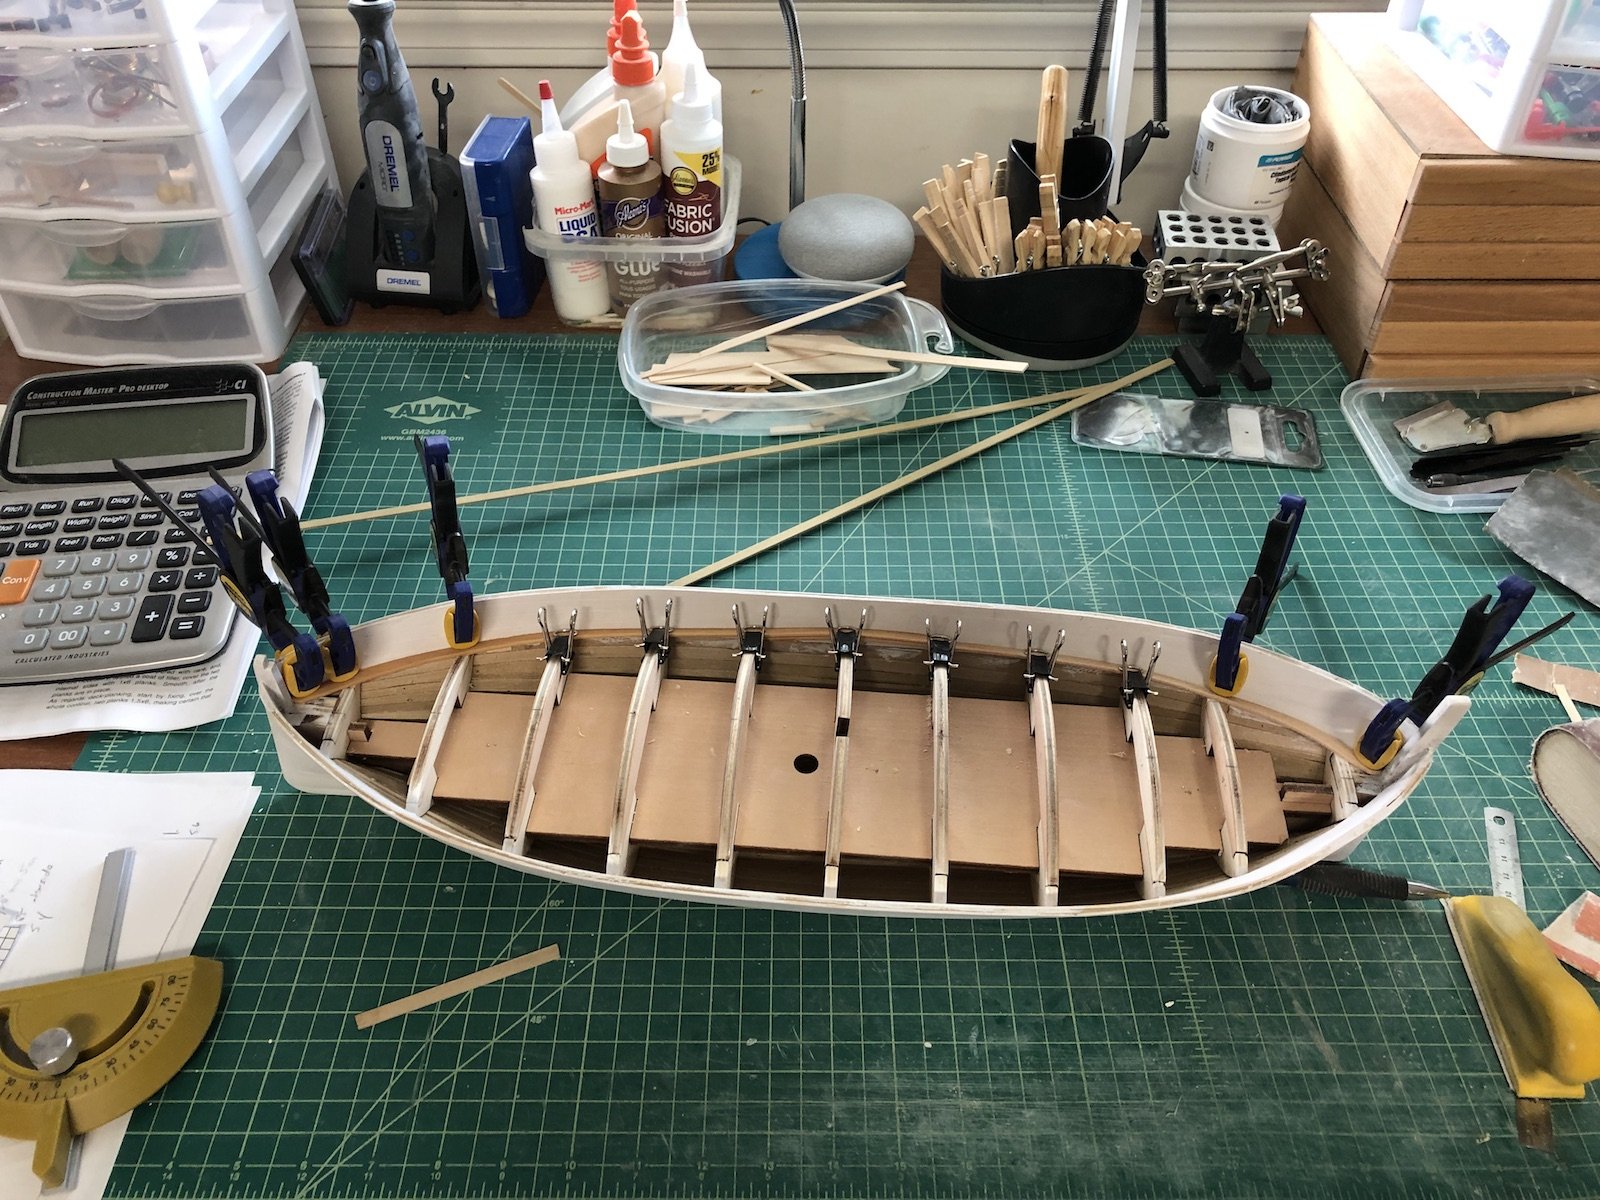
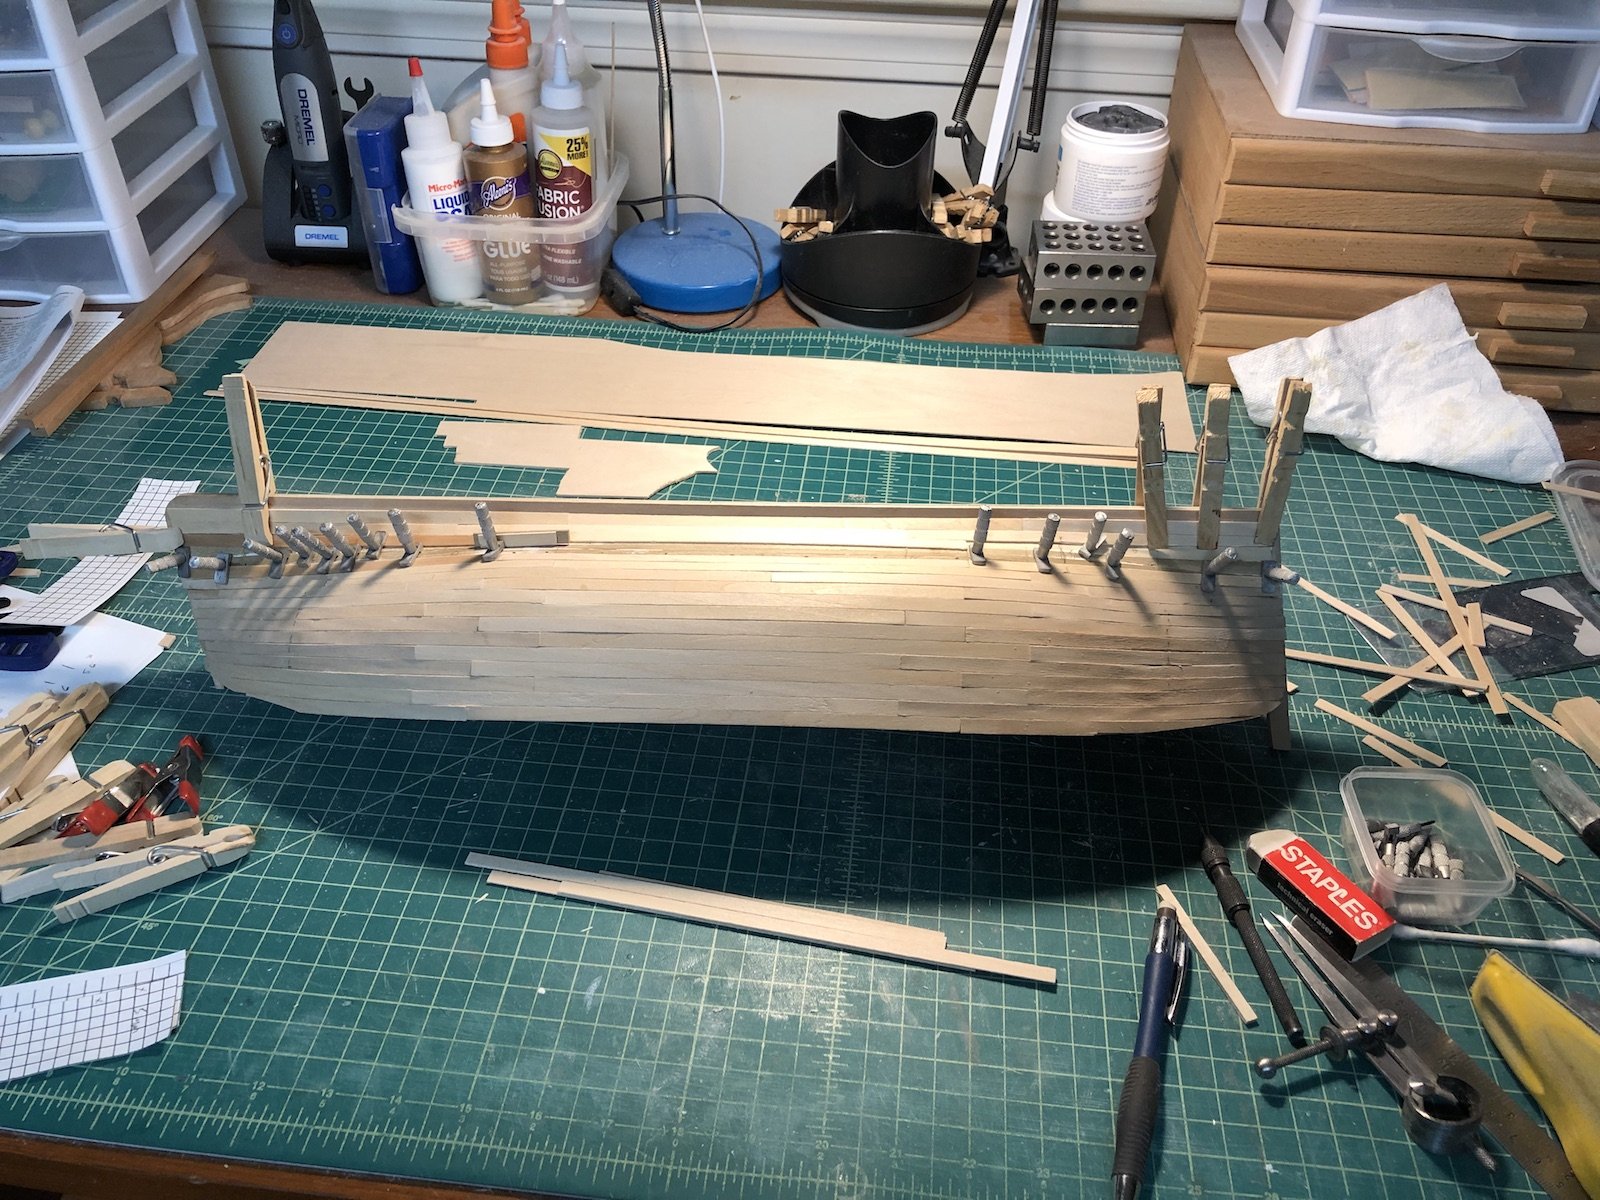
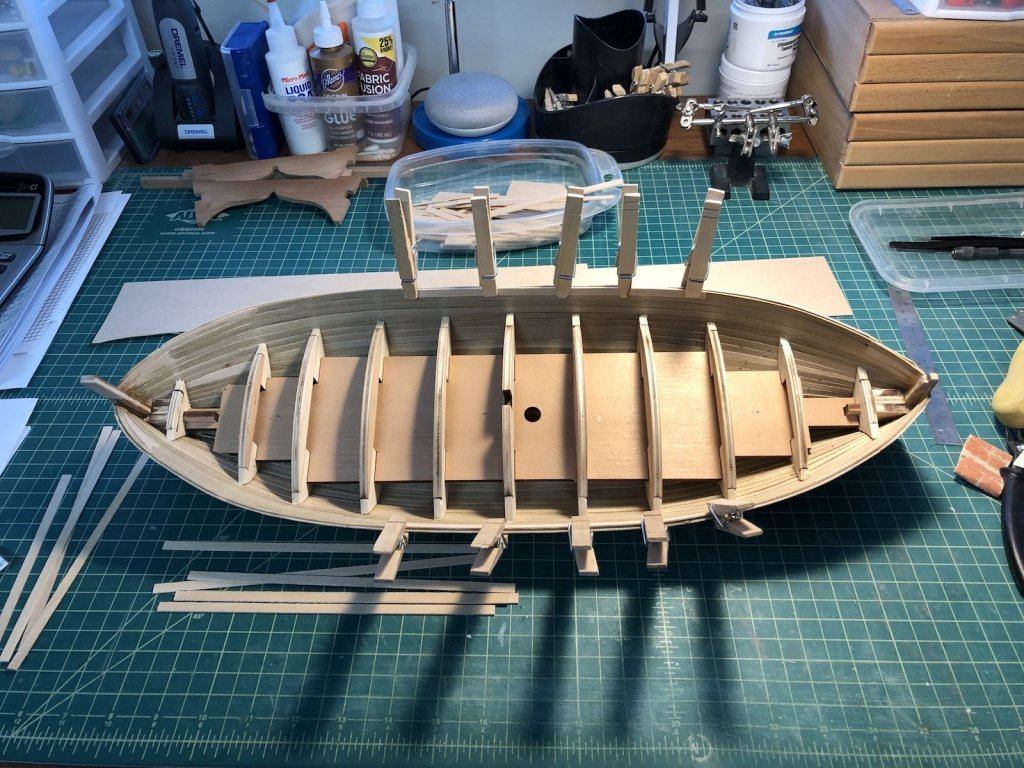
Started the deck planking last night. First note the high tech hull cradle I am now using - two tube socks filled with rice. I have used these before and they work surprisingly well. I have a Keel Clamper but the hull did not feel secure enough in it, so I went old school. I started with the plank down the middle of the deck. I ended up not adding filler pieces between the margin planks and just trimmed these planks to fill the gap. I then cut the two planks next to these, to help align them straight. I am using a 3-butt shift on the plank ends with black sharpie along one edge of each plank for the filler between planks. I glued and clamped these planks in place. And here is how they look after the glue dried. I have the next two planks on each side of these installed and drying now.

- 131 replies
-
- 3
-
-
- santa lucia
- panart
- (and 1 more)
-
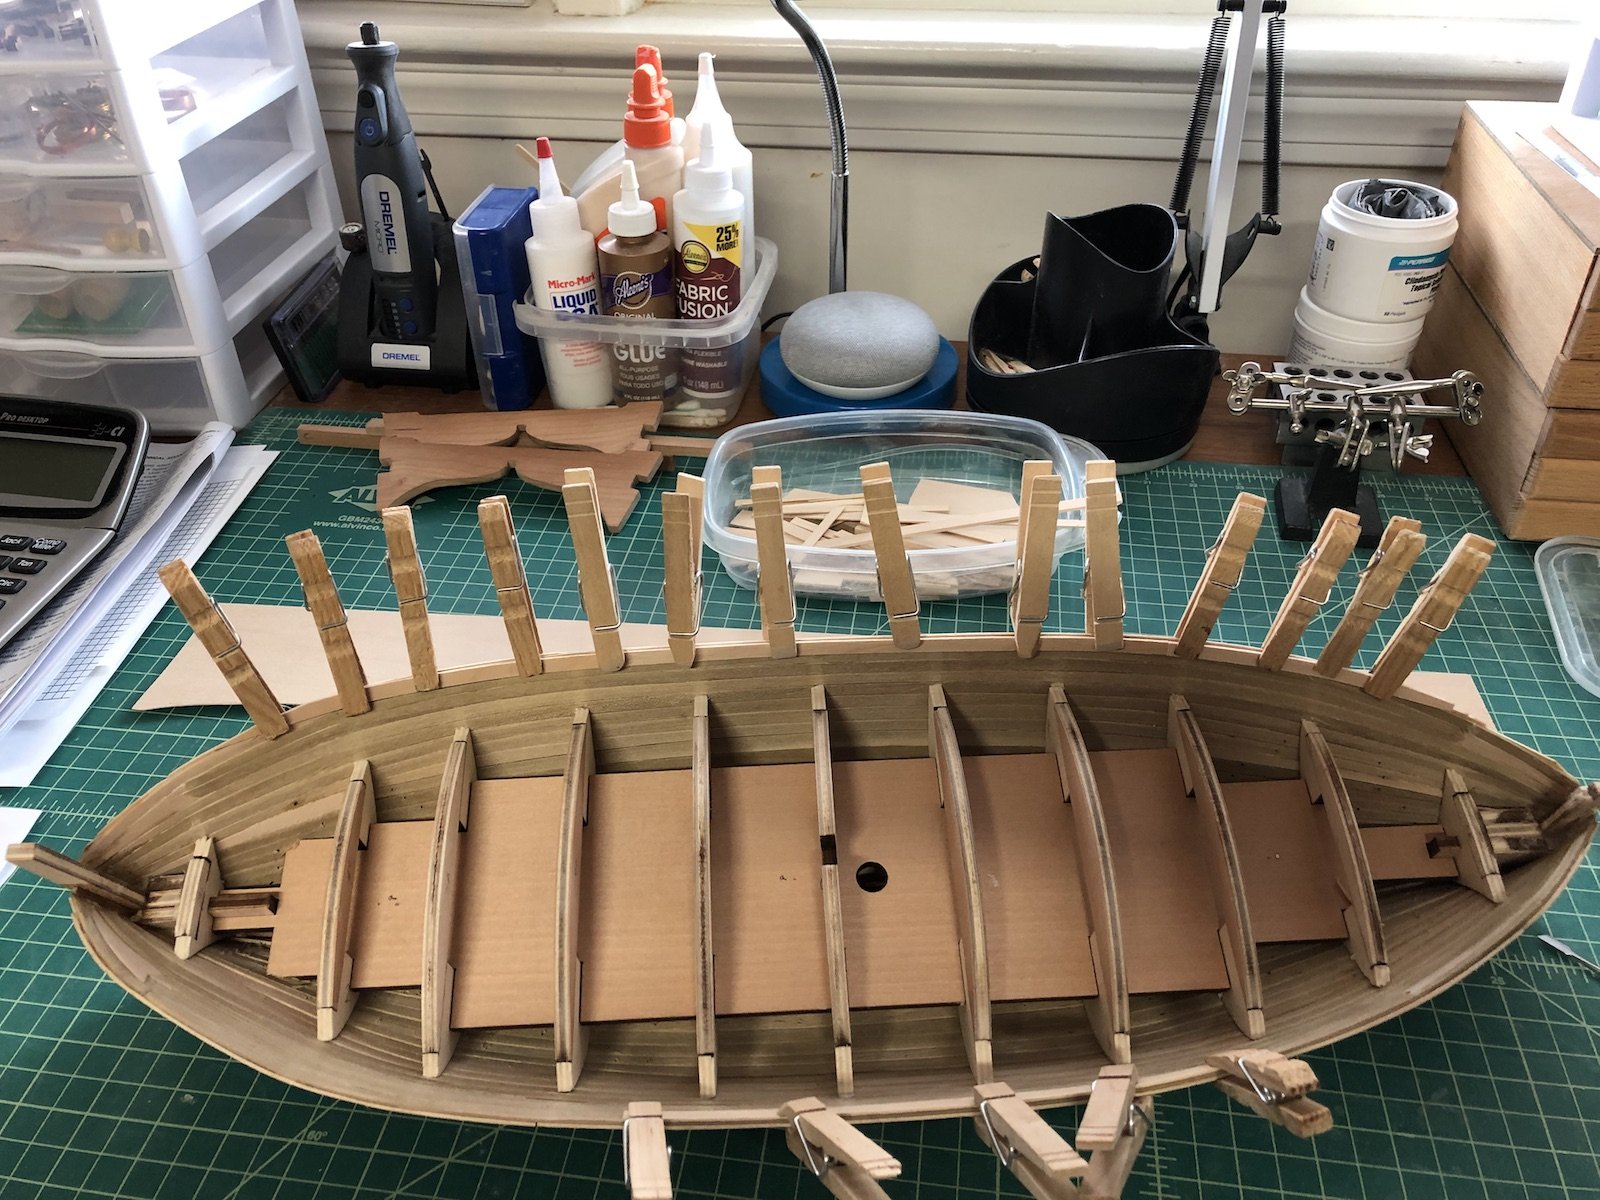
We had a nice warm long weekend here so I spent most of it outdoors. I did get a little time in the shop last night and this morning. I added supports for the ends of the deck planks around where the mast will come out of the deck. The mast is very raked so this took a little time to get right. I am in the process of adding the supports along the margin planks. Once they are all in I can start planking the deck.

- 131 replies
-
- 4
-
-
- santa lucia
- panart
- (and 1 more)
-
I just found this log Doc and this is another beautiful model of yours taking shape. It has also gotten me thinking of doing a scratch cross section. I am about to fully retire so I will have the time. I don't have the skills yet, so I don't want to tackle a full hull yet. This looks like a good way to start, though. Thanks for the inspiration.
-
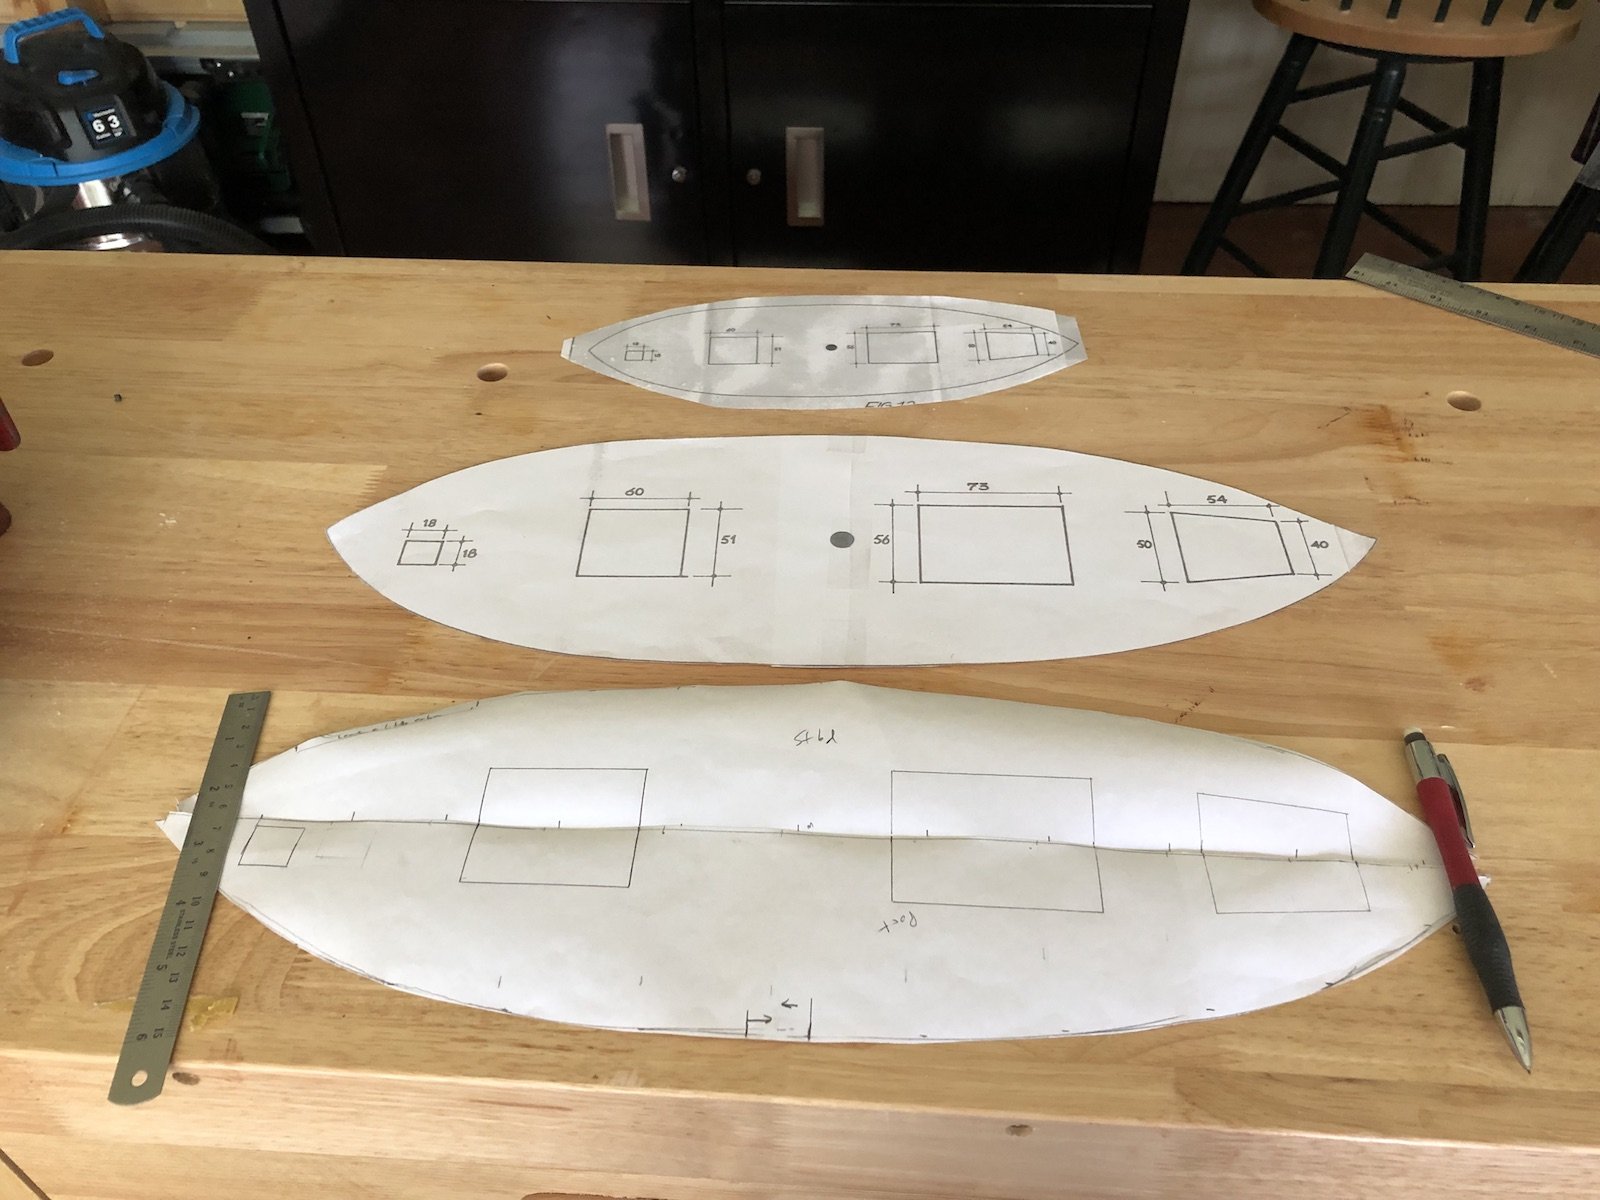
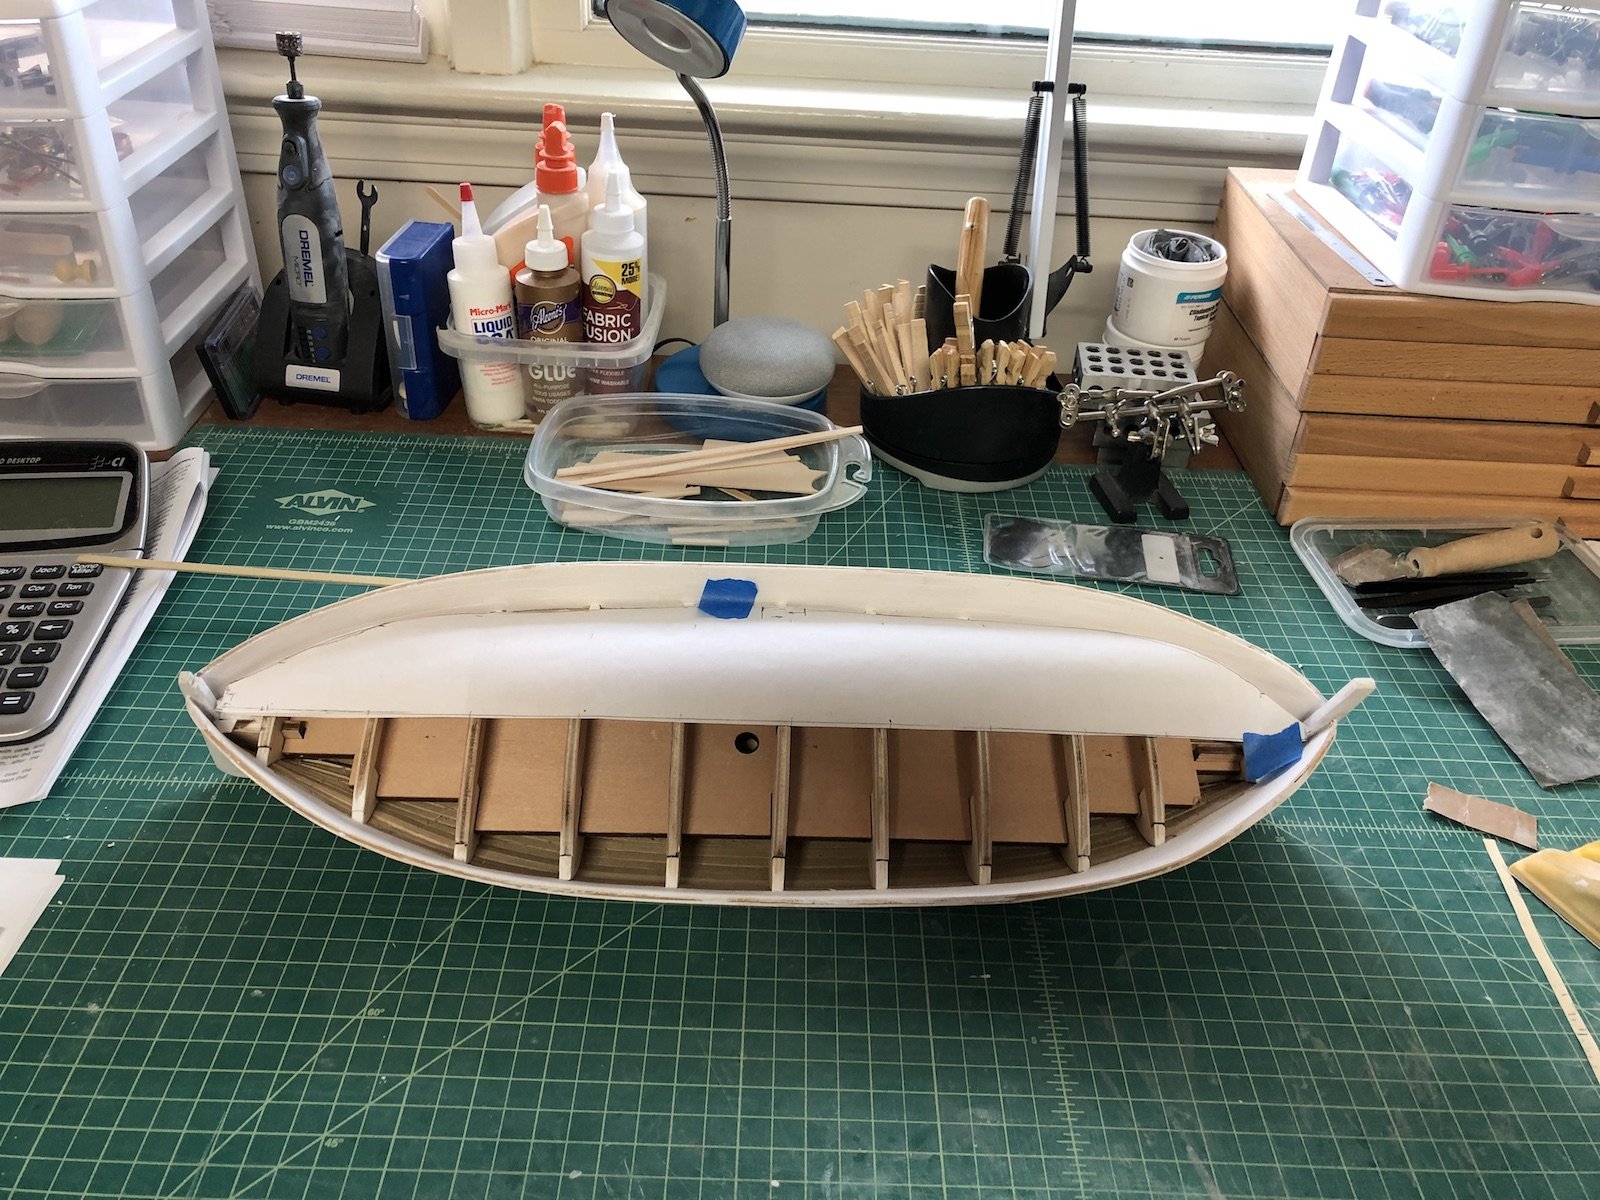
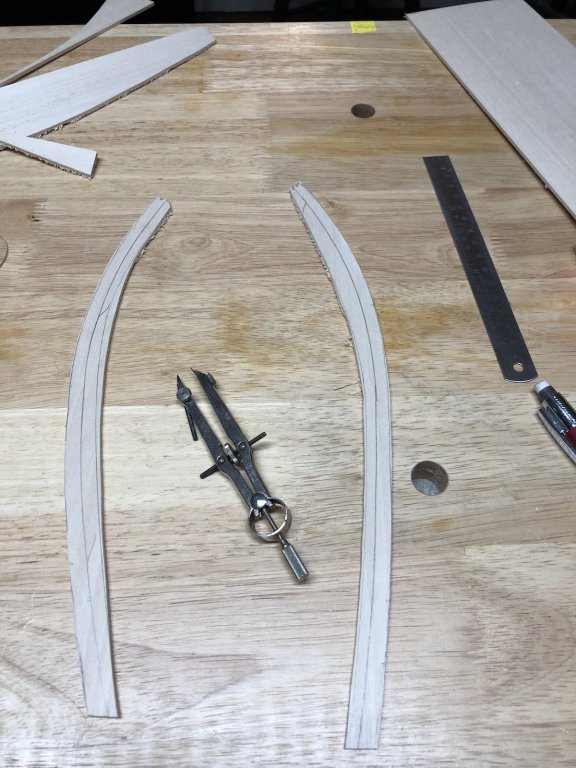
Thanks Popeye. I tried using the same template for the other side but it was off enough that it was worth while to make a new one for that side. It turned out useful for another reason too. Here are the four outer plank pieces after some oak stain, gluing them in place. I used a dab of wood glue on each frame to hold these in, which I was not sure would be secure enough. But pre-bending the planks to the frames meant that there was very little pressure needed to hold these in place so the seem pretty solid. I also painted the inside bulwarks white before gluing these in place. I taped both templates together to make an accurate plan for the deck openings. In this picture the top drawing was copied from the plans, which I blew up to the scale size of the model, which is the middle drawing. The deck shape was way off and the drawn openings were too and not by a consistent amount. So I used the bottom drawing to lay out the openings, which I will use when I cut them out after planking. There is no deck platform for this model, so I will be putting the deck planking directly on the frames. I will need to add some supports along the outer planks to hold the ends of the deck planks that don't end on a frame, which is probably almost all of them. I did the same thing on the Constitution build and it worked really well. I do need to add a couple of small filler pieces between the outer planks at the stem and stern post. I should have cut them out with these areas in place but I didn't and I didn't want to remake these pieces just for that. For all you in the states, have a great Memorial Day weekend and remember the fallen.


- 131 replies
-
- 5
-
-
- santa lucia
- panart
- (and 1 more)
-
After more sanding of the outer planks I felt I had a good fit, so I heated them wrapped in wet paper towels in the microwave, then clamped them to the frames. After they dried I marked the locations of the ends of the scarf joints on each one, then trimmed them to length. I cut a scarf joint on one of them then used it to transfer the outline to the other and cut it. After some sanding thee joint fit pretty well. Here are the planks laid in place with the scarf joint. I set those two planks aside for staining, then made the template for the other side and cut out the rough outline on the scroll saw. I will be repeating the process I used for the first two for these.

- 131 replies
-
- 4
-
-
- santa lucia
- panart
- (and 1 more)
-
Like the others have said, Ed, congratulations on a fantastic model. It has been a great pleasure following all your builds. Now I have to buy the books, even if I never try building it.
- 3,618 replies
-
- 1
-
-
- young america
- clipper
- (and 1 more)
-
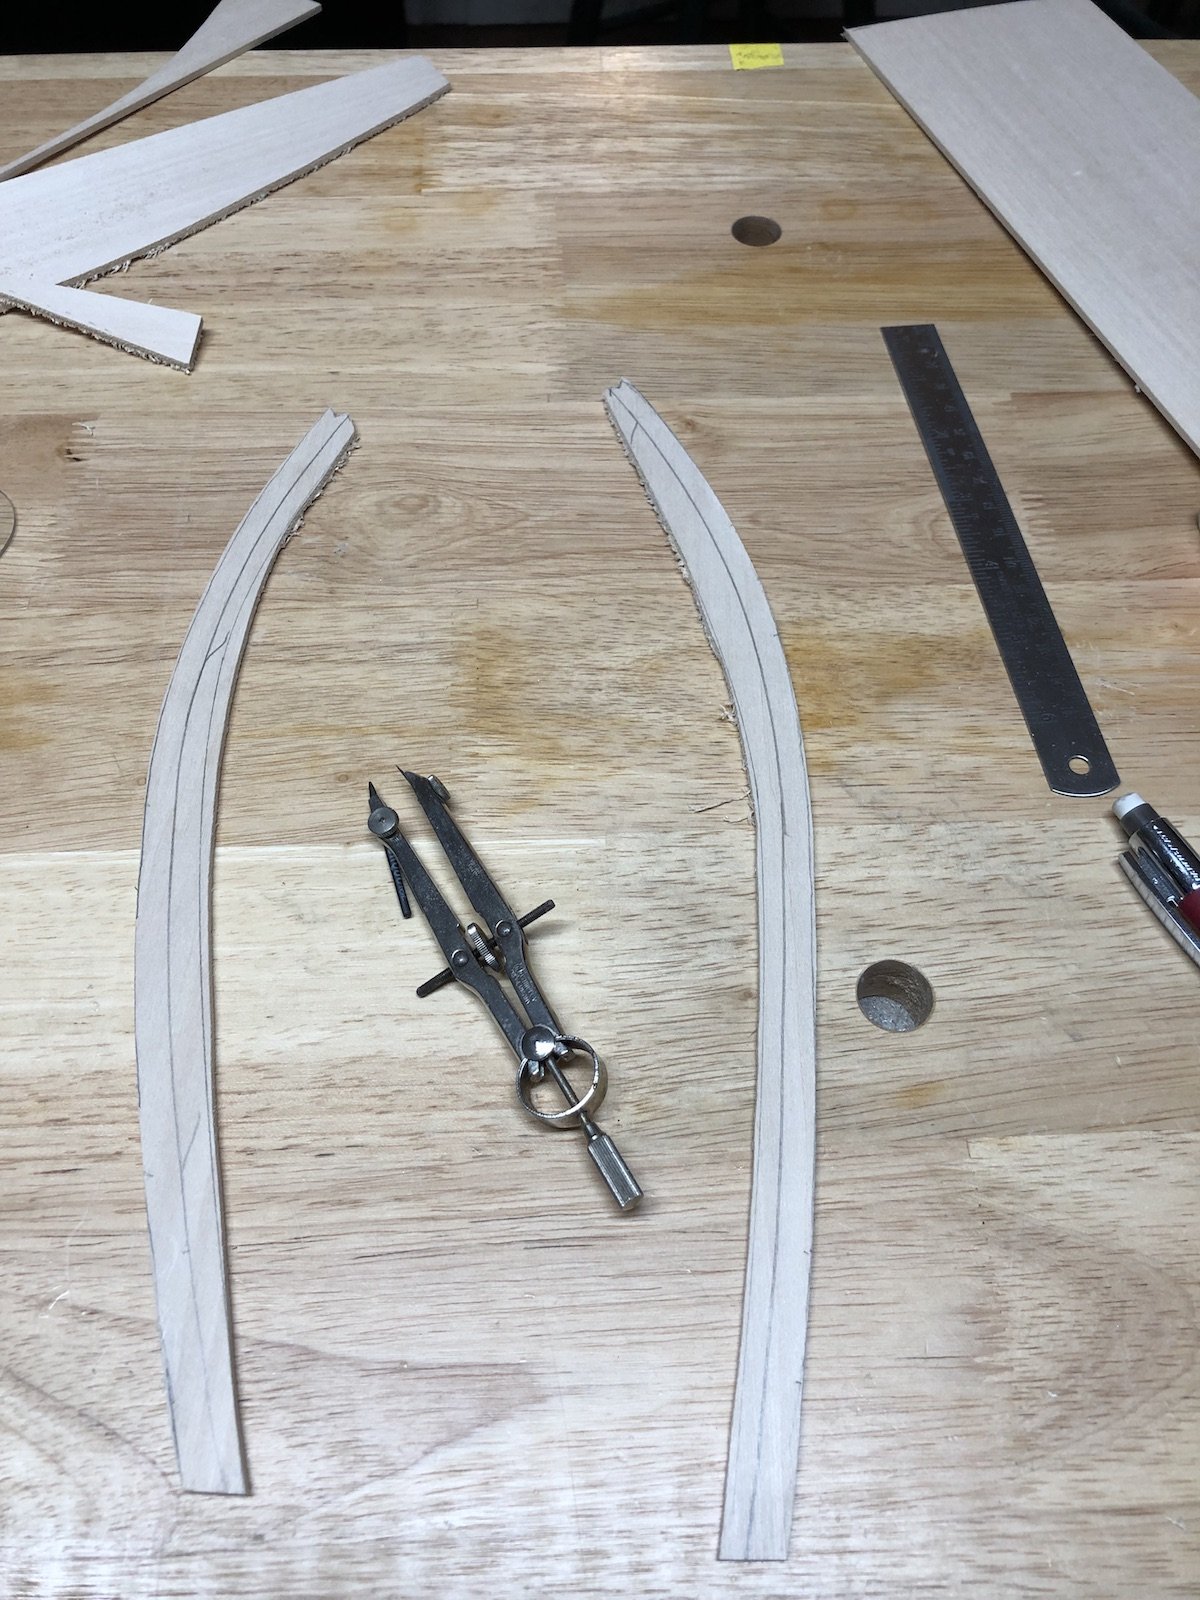
Here is the hull after another round of wood filler and another light coat of gesso. I think this is good for now. Before painting the inside planks white, I thought I should work on the outer deck planks since these will take some fitting to get right. I first made a pattern of the port side edge on a large piece of paper. I used the template to trace the edge profile to a sheet of basswood as two pieces that overlap at the frame with the mast cutout. I then cut the outer edge line on the scroll saw, leaving a 1/16" or so so I had wood to sand down. The other edge I just cut roughly so that I had more than 6mm width. The pieces were then fit into place by sanding down to the line. Once the pieces fit well, I used a compass to trace the outer edge to make a line 6mm from it. I then cut close to this line and sanded the inside edge to shape. The next step will be to add more bevel to the outside edge and then cut a scarf joint where the two pieces meet in the middle. To me that will be the hardest part of this process. However it turns out, I'll post it here.


- 131 replies
-
- 3
-
-
- santa lucia
- panart
- (and 1 more)
-
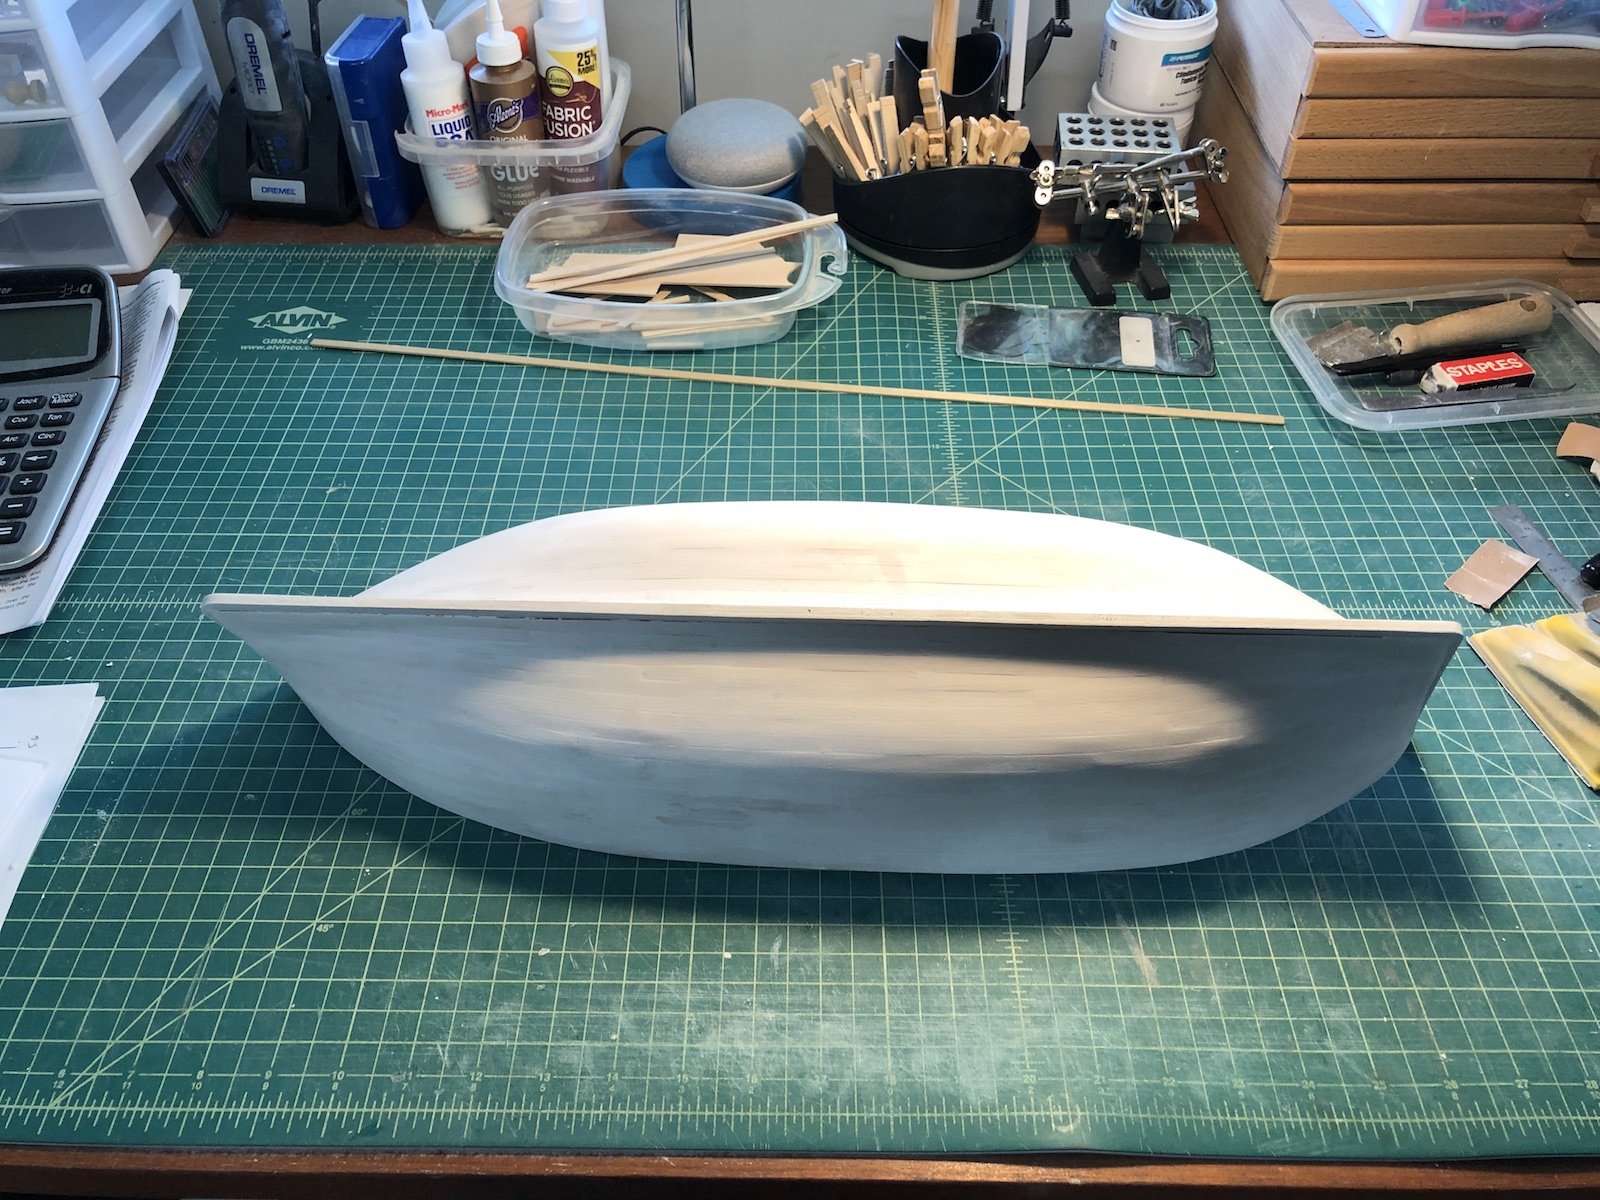
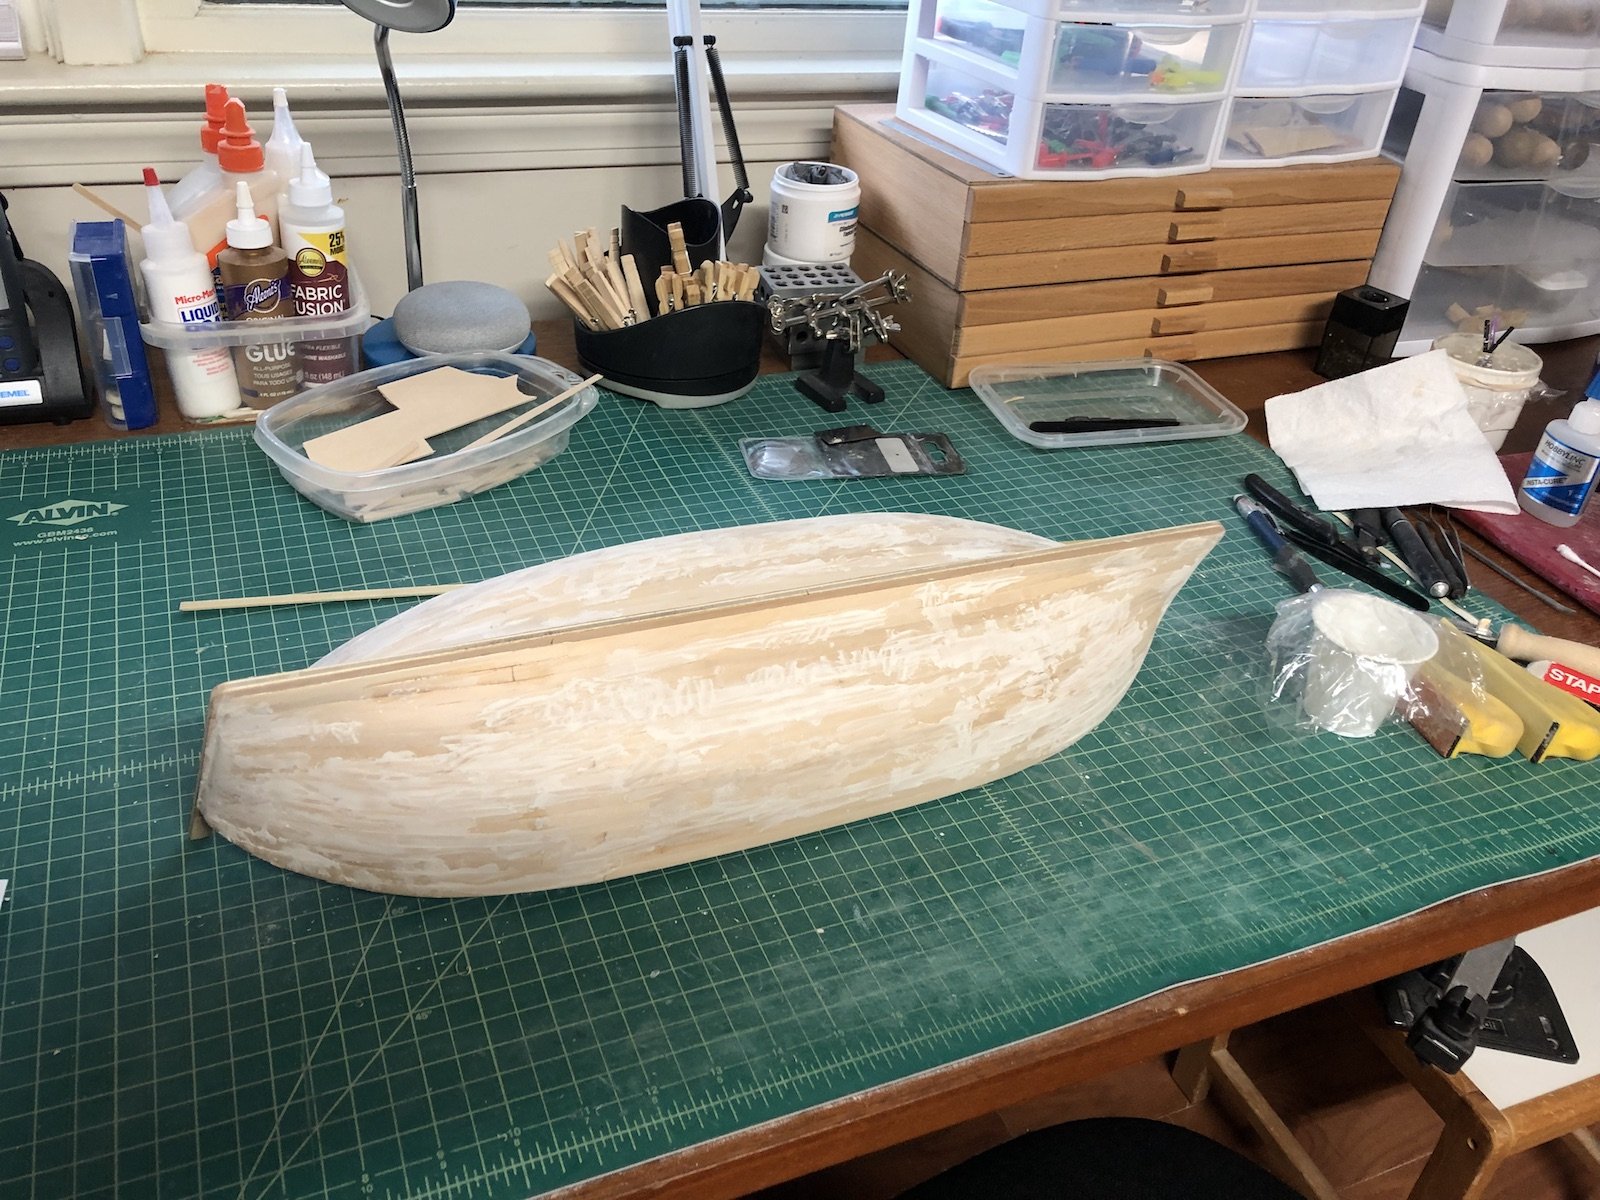
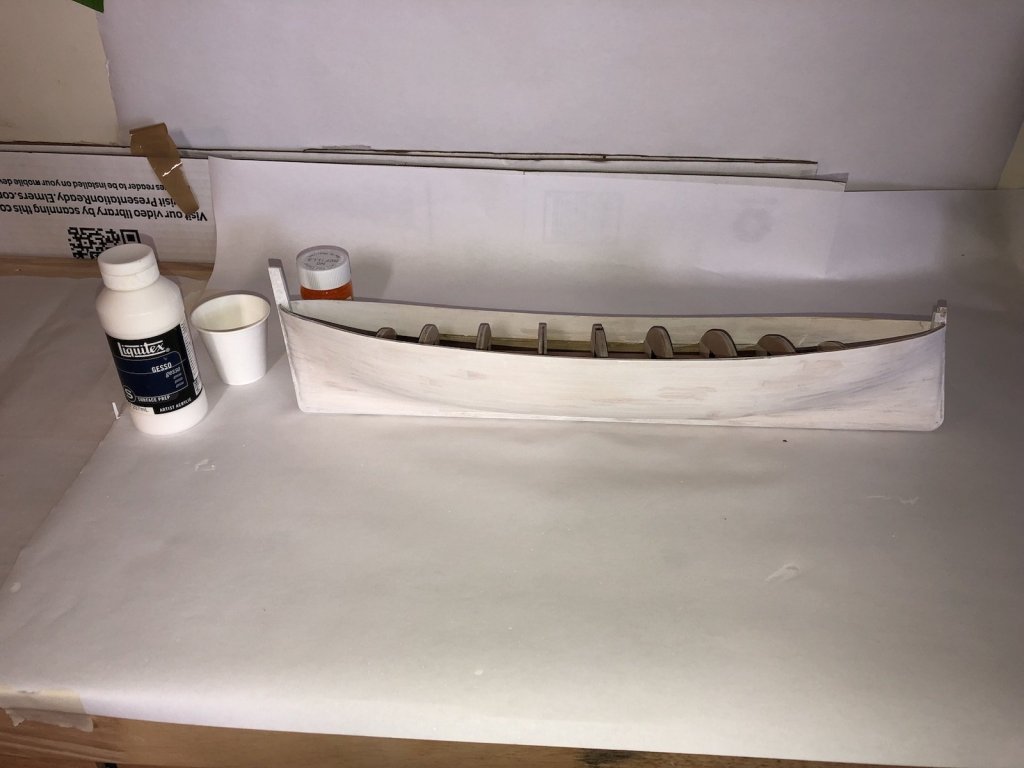
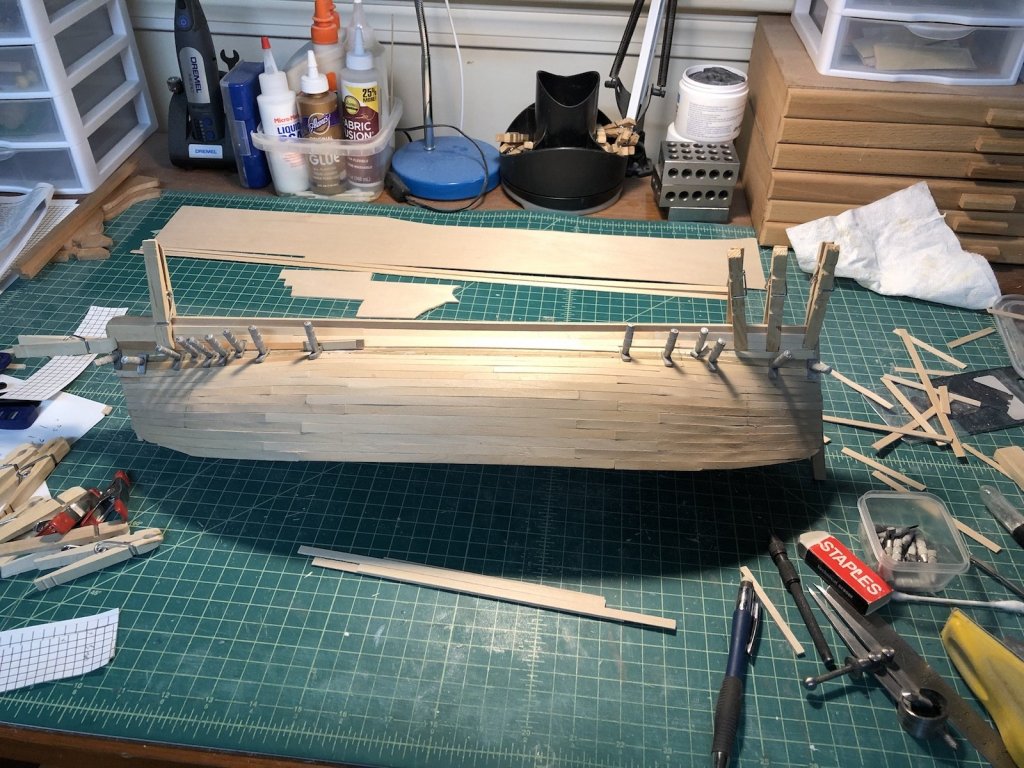
Getting further along on the hull. I took advantage of some nice warm days and sanded down the planks and wood filler outside (Back to winter temps since then, Arg!). I started with rough sandpaper to mostly get the planks to be level with each other. I then added more diluted wood filler then sanded the planks and filler with medium and fine sandpaper, until I was pleased with the smoothness of the hull. I cleaned the dust off the hull and out of the workshop as best I could, then added a coat of diluted gesso to the inside and outside planks as a primer. I was thinking of using my airbrush for this but it is just not suitable for painting large areas. I then thought about buying a can of spray primer but I eventually went with a large soft brush to apply it. I will sand it down after it dries and then do one more round of diluted wood filler, sanding and primer. I am doing this now before I plank the deck because I want to stain the deck planks and this way I can paint the inside planks at the deck before I add the deck planks, so I can get a good paint line there. If I was going to paint the deck planks I would have put them in then primed everything.
- 131 replies
-
- 3
-
-
- santa lucia
- panart
- (and 1 more)
-
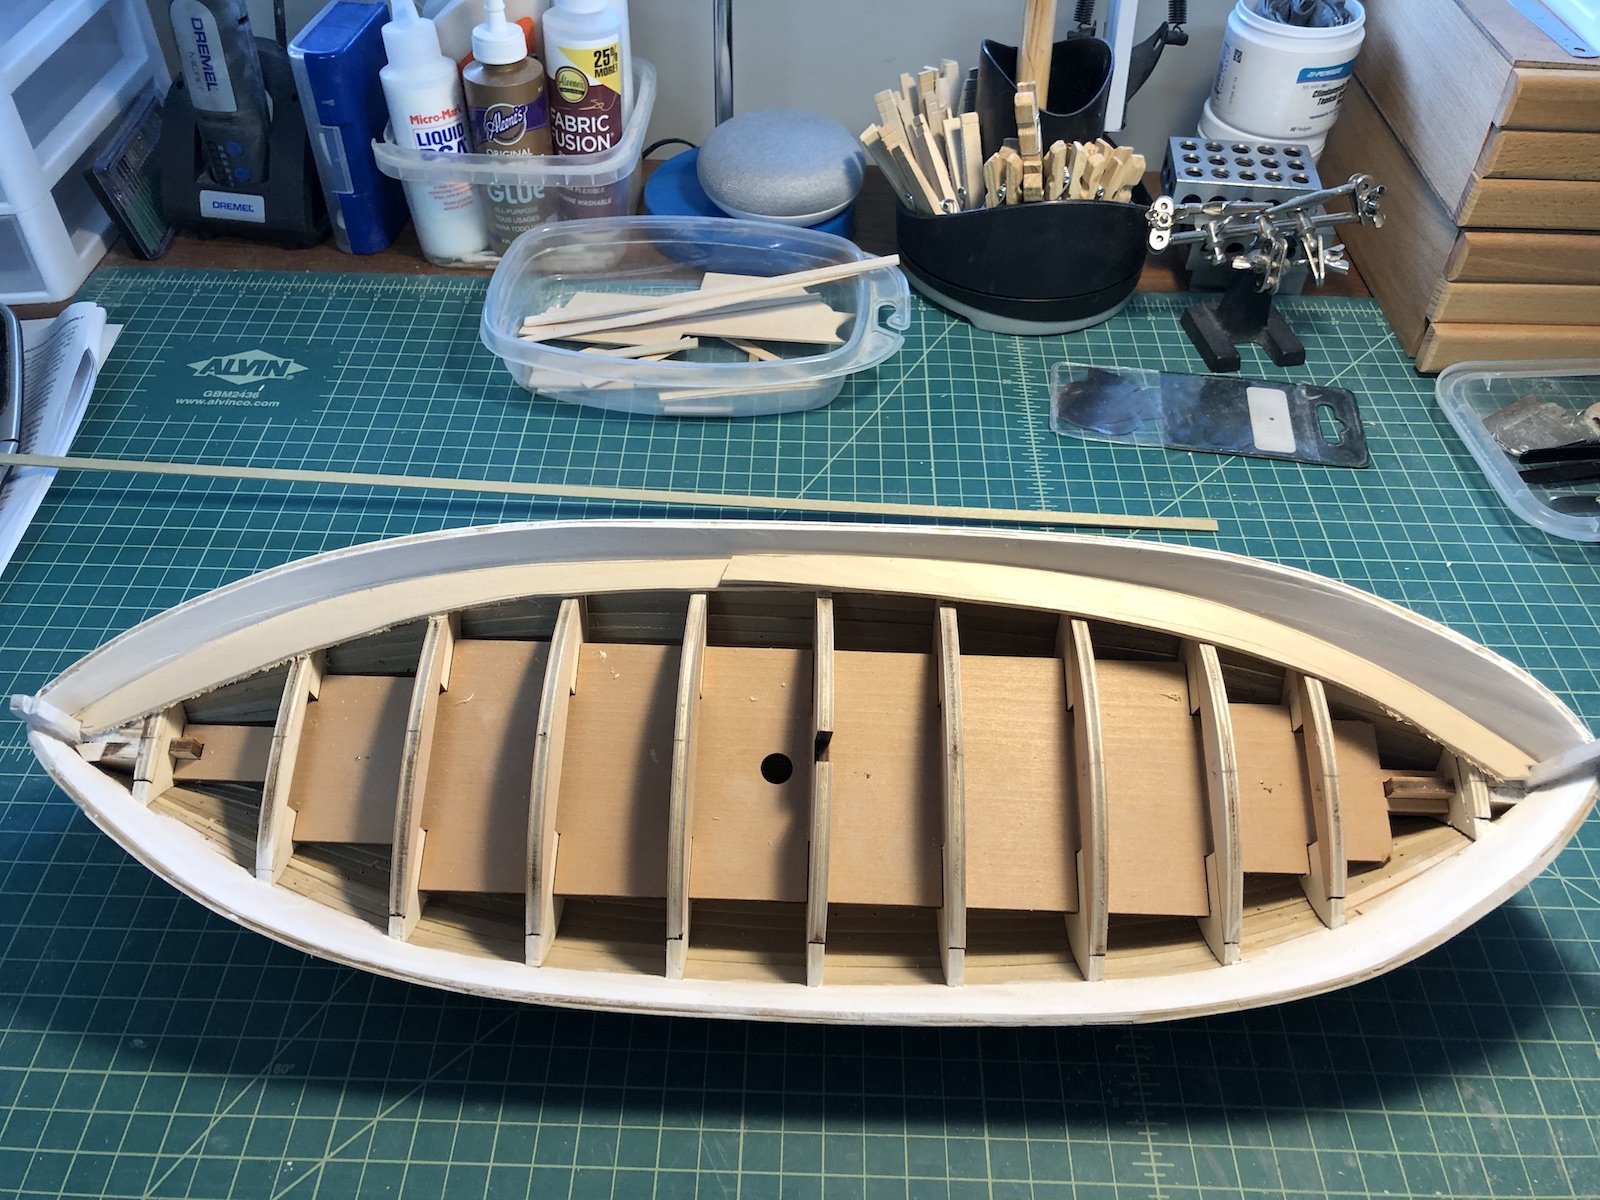
Thanks Fernando. It looks like locating the openings in the deck is going to be interesting. It's funny how they give you the dimensions of the openings but not where they are located. I think I will try copying that part of the plans and blow it up to real size. I diluted some wood filler and spread it on the gaps both inside and outside the hull. While it was drying I used my small plane to plane down the tops of the bulwarks to take out and bumps and so the cap rail can sit flat. The pieces to make the stand for the model are plywood and I didn't like seeing the layers in the edges. I used them as templates to make new stand pieces from 1/4" cherry. After test fitting them to the hull I glued the pieces together. I will add some Wipe-On-Poly later. Happy Friday everyone.


- 131 replies
-
- 5
-
-
- santa lucia
- panart
- (and 1 more)
-
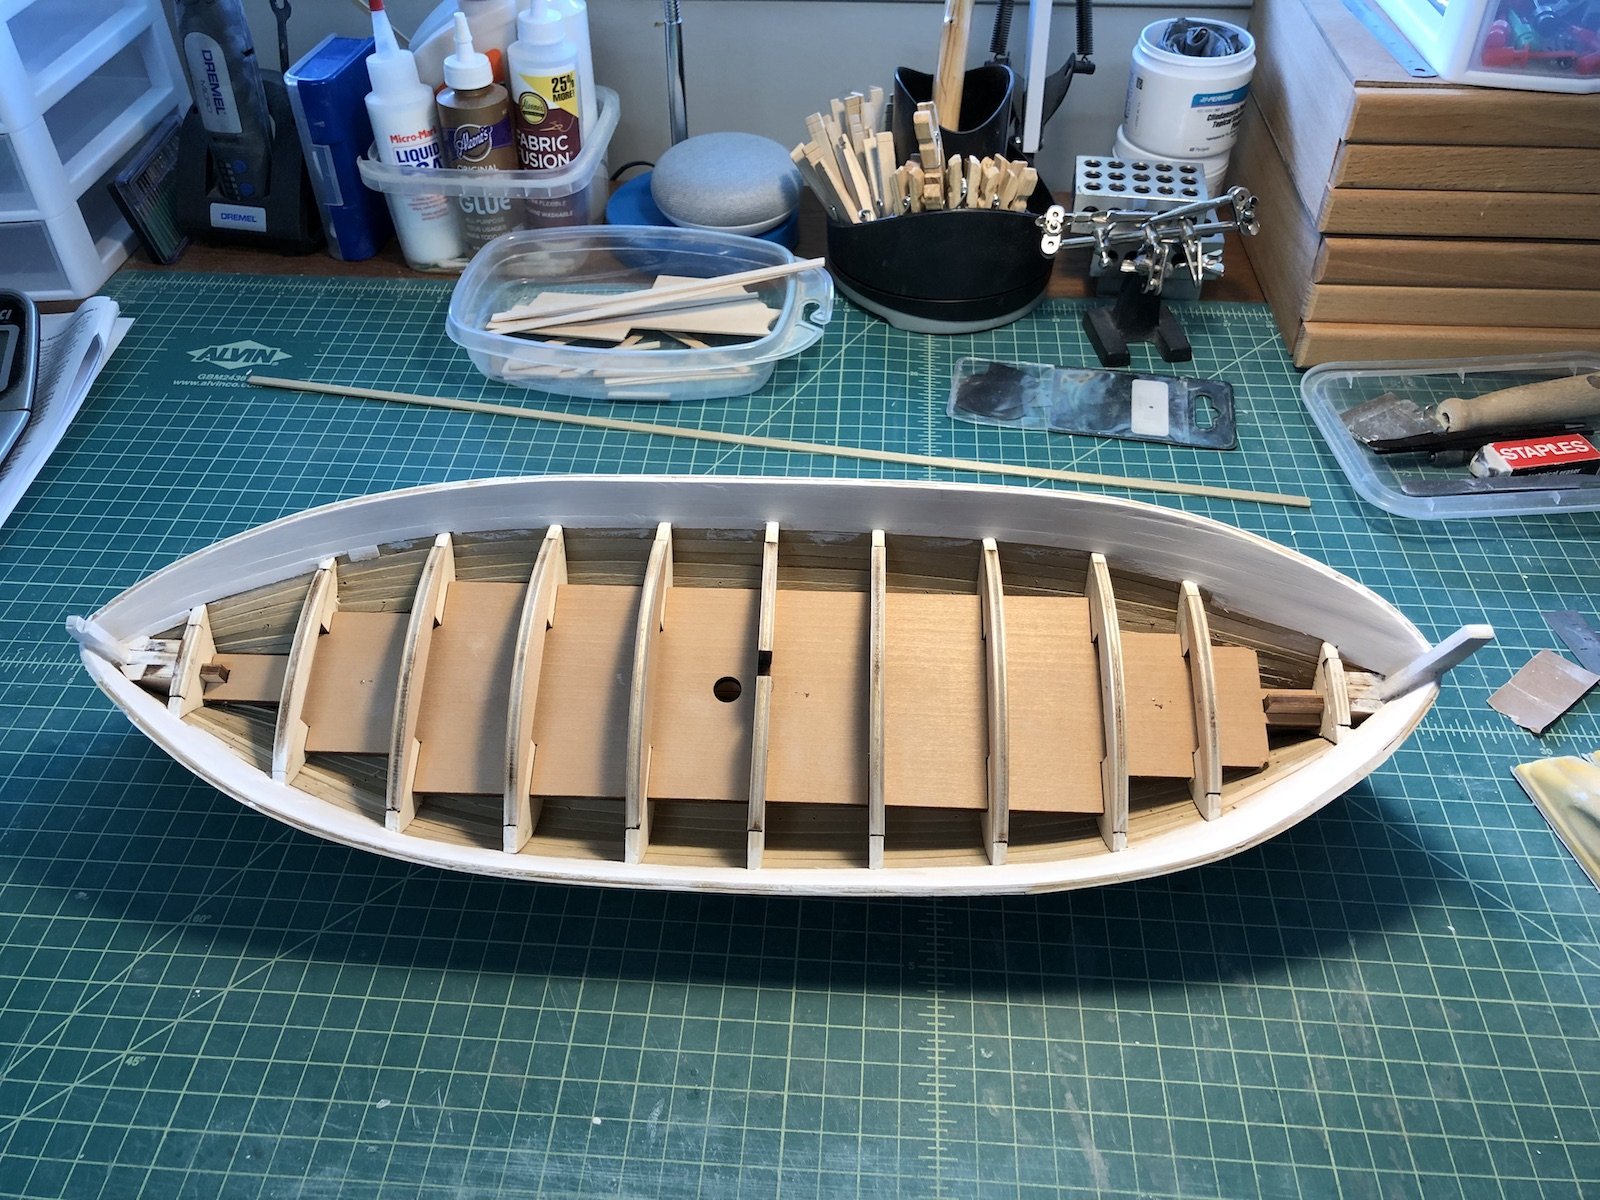
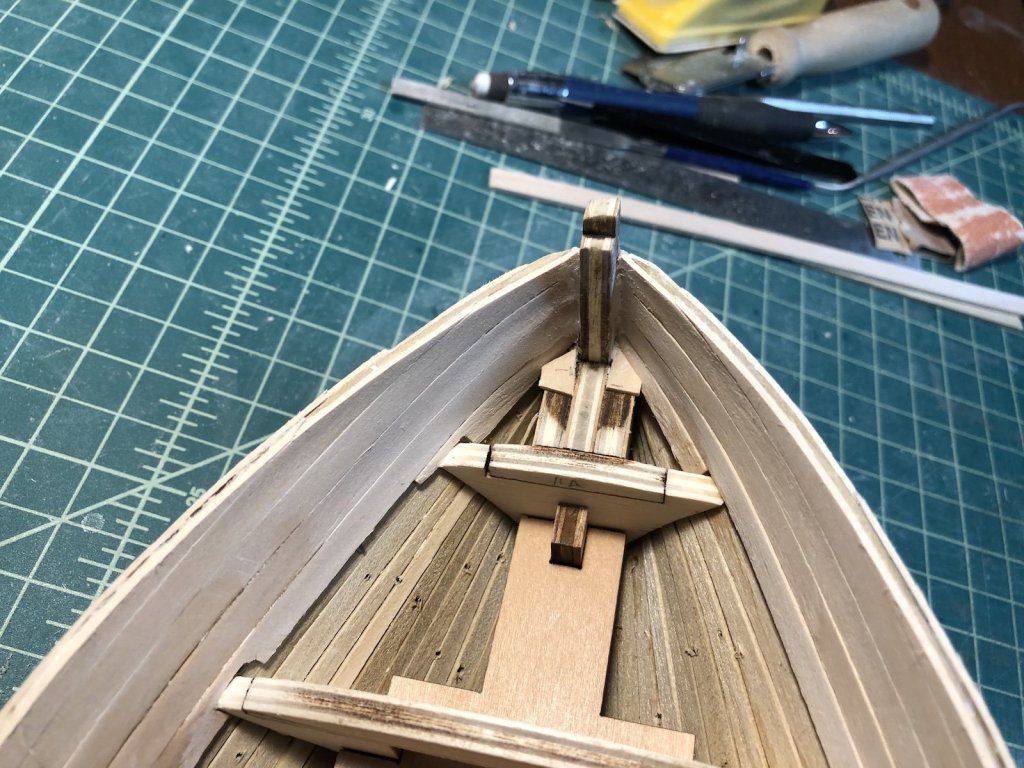
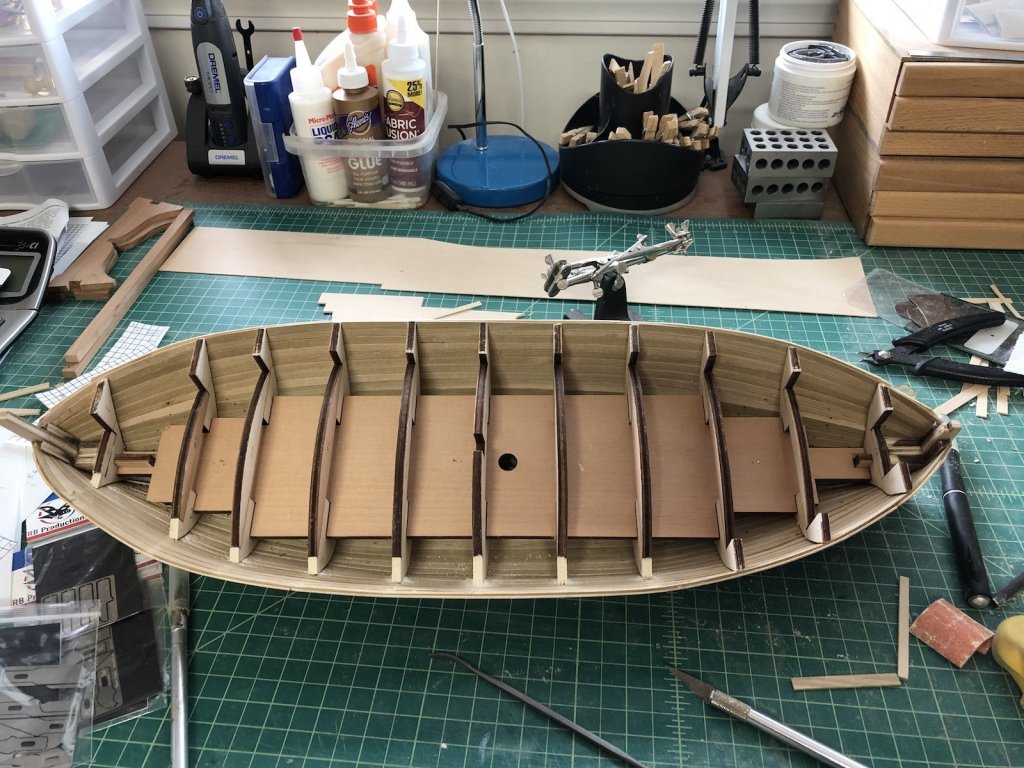
Thanks Popeye. I don't know if it is too much of a short cut but I am happy with the results. I finished planking the insides of the bulwarks and gave the planks an initial sanding. There are more planks near the stem and stern as the deck slopes down pretty severely there. I filled the inside of the stem and stern planks with a small bit of wood filler and used a riffler file to file it down. They still need a bit of finishing but I think it came out OK. For the outside planks I needed to add quite a bit of wood filler and shape it to follow the lines of the planks. It still needs more layers to blend it in, but I think it will eventually look OK once painted. I still have a lot of work to do on the outside planks to get them to look good, but it is coming along. I sanded down the tops of the bulwarks but that still needs more work so that the cap rails don't slope down one side or the other. In between sanding I have starting making cardboard (folder material) templates of the outer deck planks that fit along the inside bulwark planks. I am going to cut these out of sheet basswood, a little thicker than the deck planks. One of the plans shows this plank higher than the rest, and I think it will look good that way. One thing about this kit is that they don't really supply plans, just plan sheets with lots of drawings of the construction steps from different angles. There is a top down view of the deck to show where the openings are but no other details, for instance.
- 131 replies
-
- 4
-
-
- santa lucia
- panart
- (and 1 more)
-
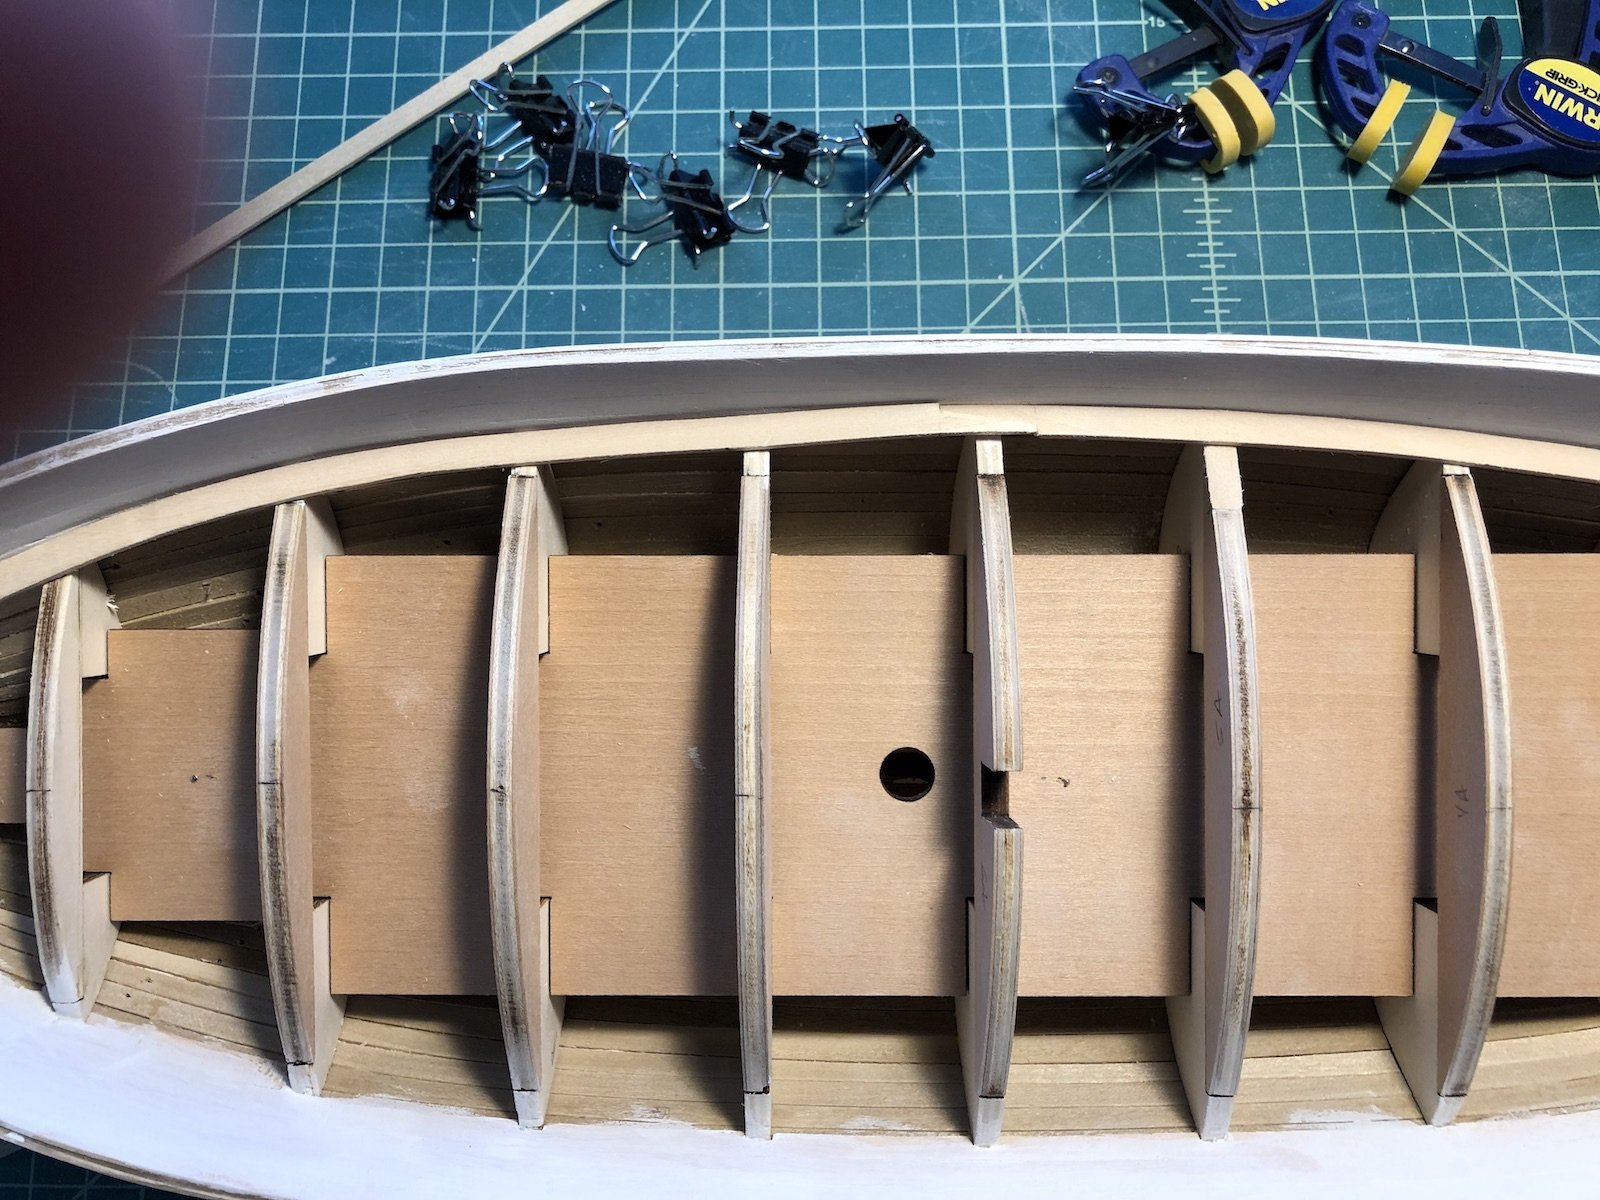
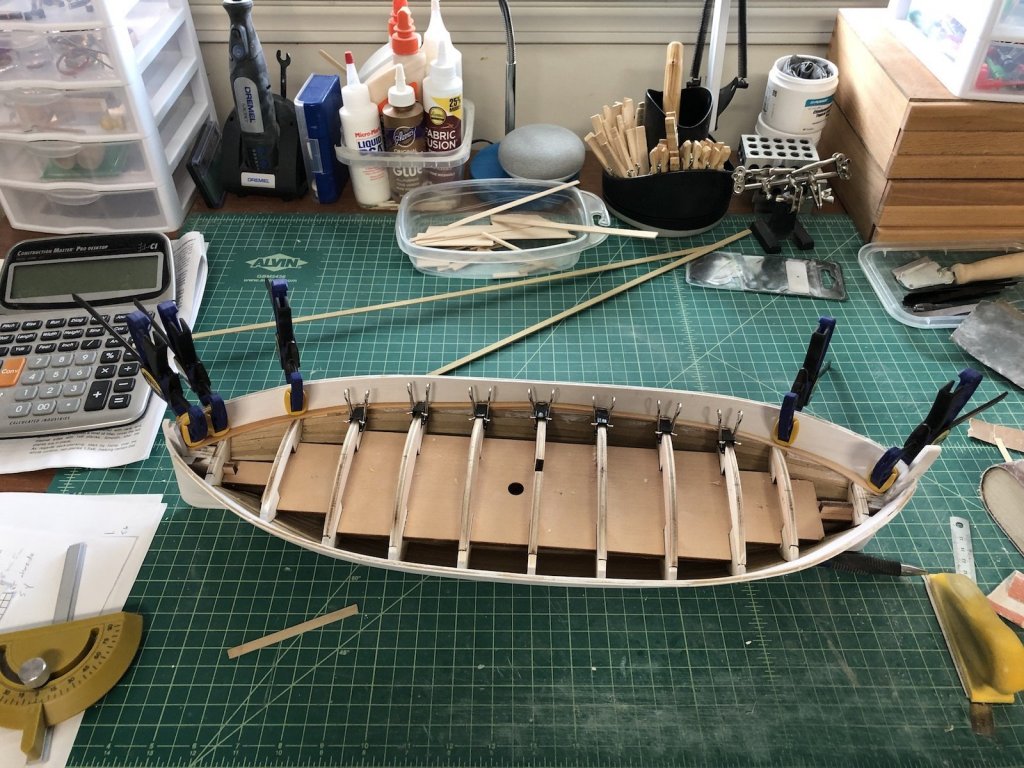
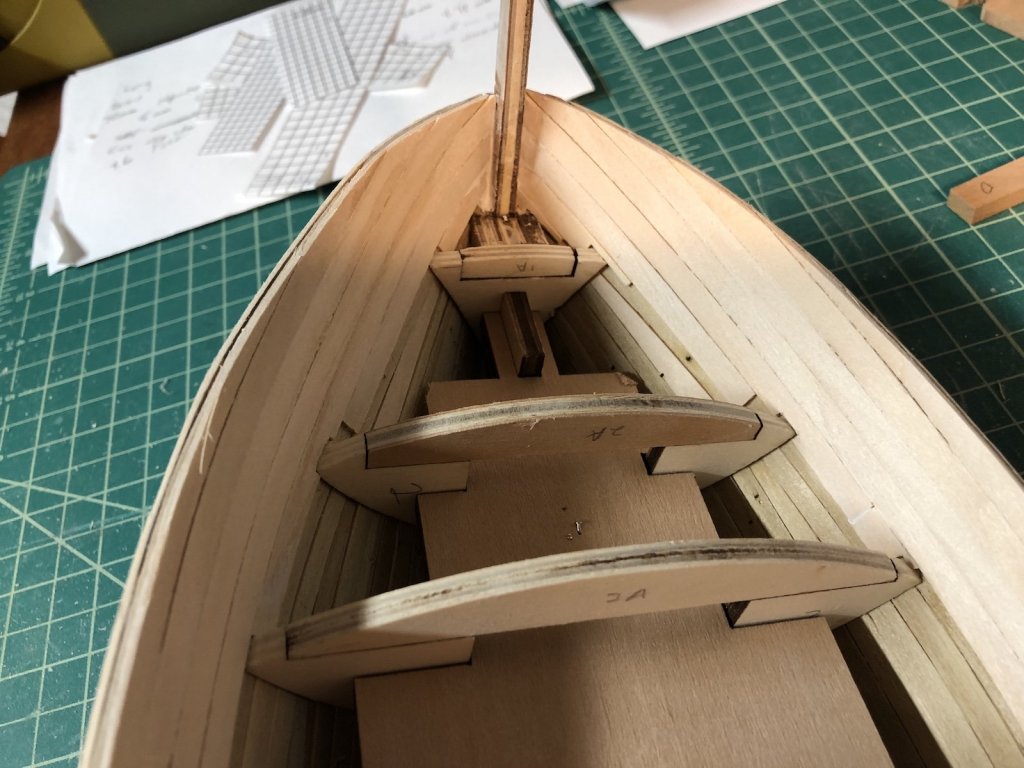
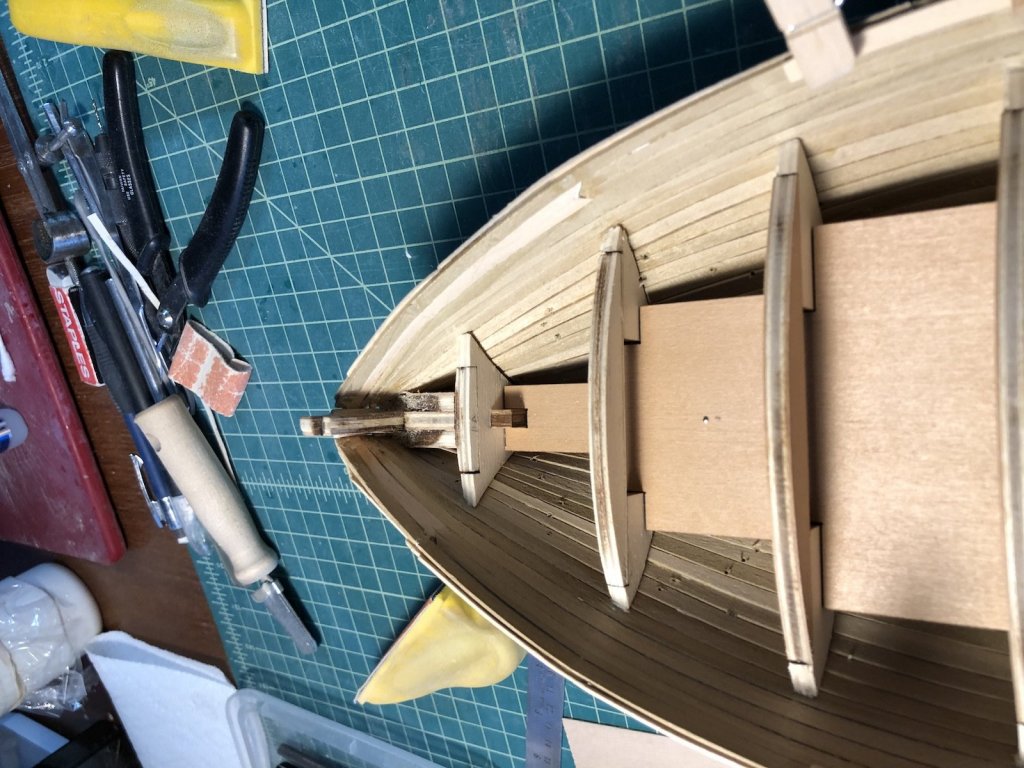
I finished cutting out and cleaning up the bulwark supports and sanded the inside planks above the frames. To remove the excess wood along the stem and stern posts, I first used a pointed grinding bit in the Dremel tool to hollow out the pieces, then a chisel and knife to clean out the rest of the wood. Of course once the support was gone the plank ends were unsupported, so I cleaned up the ends with an X-Acto saw blade then inserted small strips of wood to close the gaps. I used thin CA glue to hold them all together, then a riffler file to file the wood strips down. The inside planks will hide these wood strips, but I will have to use wood filler on the outside to cover them up. I could now start the interior planking. After some planning on how to attack this, I started by gluing plank strips along the top of the bulwarks in the middle of each side. I then temporarily clamped the plank below so it extended out past each end, which gave me the angle of the top bow and stern planks. I cut planks to fit and glued them in place. As you can see these planks do not go all the way to the stem or stern post, as that would need a very severe edge bend. Instead I am cutting them off where they intersect the top of the bulwarks with a more gentle bend. This will allow the second row of planks to fit flush to this top row. For all of you who celebrate, have a happy Easter.


- 131 replies
-
- 5
-
-
- santa lucia
- panart
- (and 1 more)
-
Nice save on the punch. Those bulwarks look great and very authentic.
-
Nice job on the quarter gallery bases and the stern windows. Those are two very tricky areas to deal with.
-
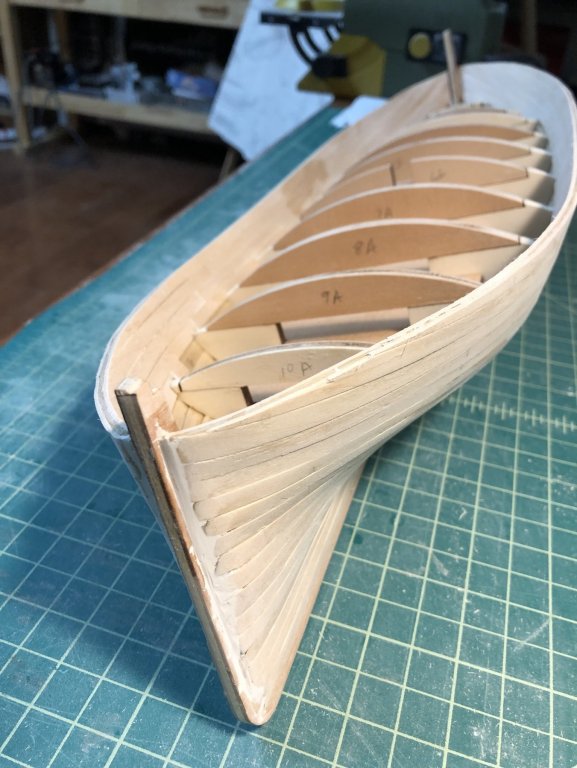
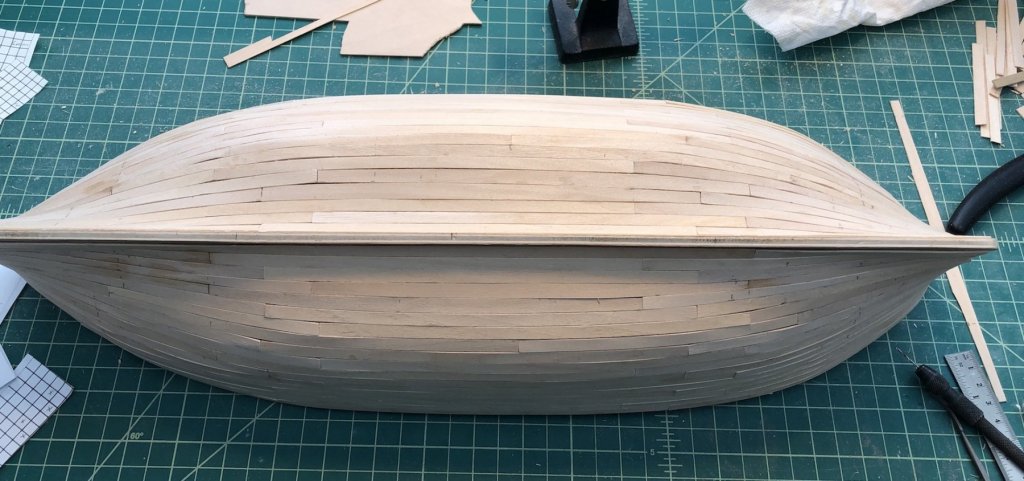
I gave the outside hull a course sanding for now. I give it a final sanding later when I am ready to apply the paint. There are still some areas that need some filling but not much. I then started removing the bulwark supports on the inside of the hull, which needs to be down before the second layer of planking can be applied there. I am using a thin X-Acto saw to cut them. I had tacked the first layer of planking to these so they break off fairly easily after they are cut. Once they are all removed, I need to file the cut areas down to make a continuous curve from the central areas of the frames. I also have to remove some wood along the stem and stern posts. Then I can add the second layer from the sheer down to these frames.

- 131 replies
-
- 5
-
-
- santa lucia
- panart
- (and 1 more)
-
Thanks guys. I just spent about a half hour filling some of the larger cracks with wood glue, then sanding over them to fill them with saw dust. It really worked great, as they virtually disappeared. I know I have tried this in the past with poorer results so I don't know what i am doing different now, but what a difference. More pics after I get the whole outer hull sanded and looking pretty.
- 131 replies
-
- 2
-
-
- santa lucia
- panart
- (and 1 more)
-
A small milestone - second planking is on. I will give it a good scraping/sanding before planking the inside bulwarks.
- 131 replies
-
- 7
-
-
- santa lucia
- panart
- (and 1 more)
-
Thanks Popeye. Almost done with the port side planking now. Two rows left to put on, then a bunch of sanding.
- 131 replies
-
- 4
-
-
- santa lucia
- panart
- (and 1 more)
-
Yes, good to see you back Jeff.