
HOLIDAY DONATION DRIVE - SUPPORT MSW - DO YOUR PART TO KEEP THIS GREAT FORUM GOING! (89 donations so far out of 49,000 members - C'mon guys!)
×


usedtosail
-
Posts
2,413 -
Joined
-
Last visited
Content Type
Profiles
Forums
Gallery
Events
Everything posted by usedtosail
-
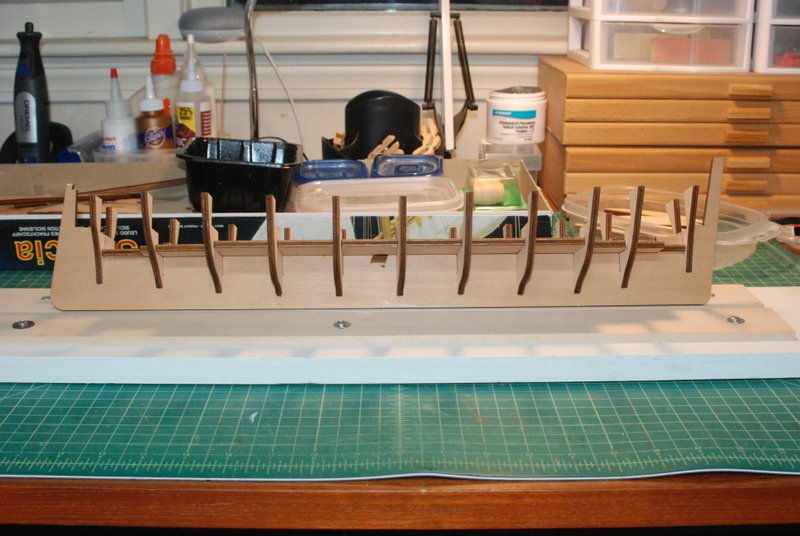
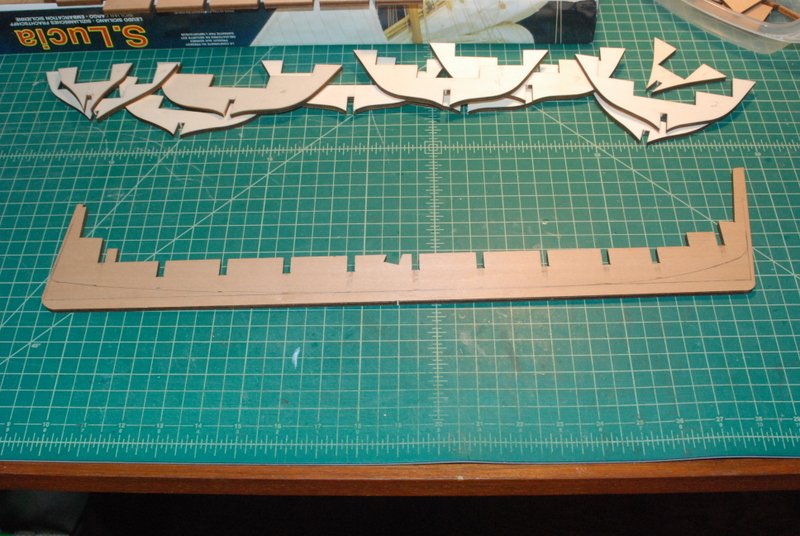
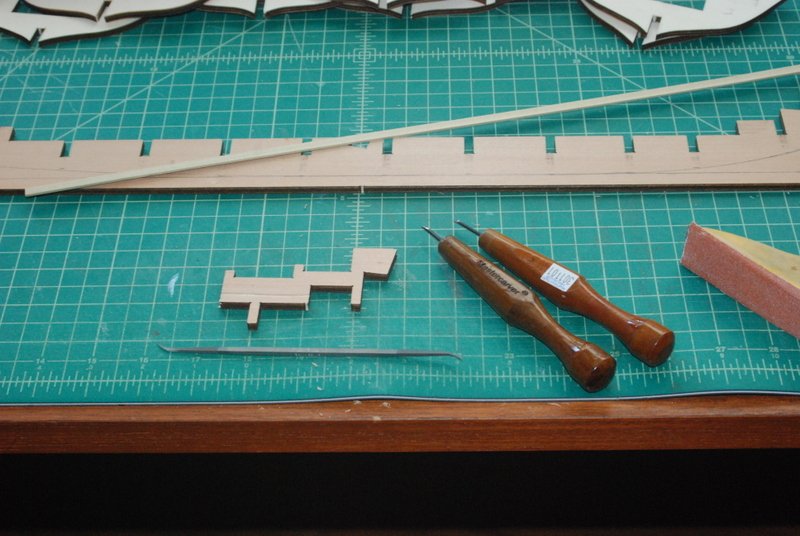
 I separated the keel, frames, and frame stiffener pieces from the laser cut sheets and dry fitted them. I am using the build board I made for the Constitution build, which holds the keel nicely. There are a few frames that are loose in the keel slots even with the stiffener in place, so I will tighten them up with some scrap wood in the slots. I marked the locations of the bottoms of the frames to define the line of the rabbet that I am going to carve into the keel. I then took the frames off the keel and used a ruler and French curve to draw the rabbet lines on both sides. Before I start carving up the keel, I practiced on some scrap from the laser cut sheet. I am using a small flat chisel to make the groove initially, then a riffler file to clean up the slot. On the areas where the line curves up at the bow and stern, I will use a large flat file to taper the wood into the rabbets. This is a double ended boat, so both the bow and stern are going to be planked like the stern normally is on a larger ship.
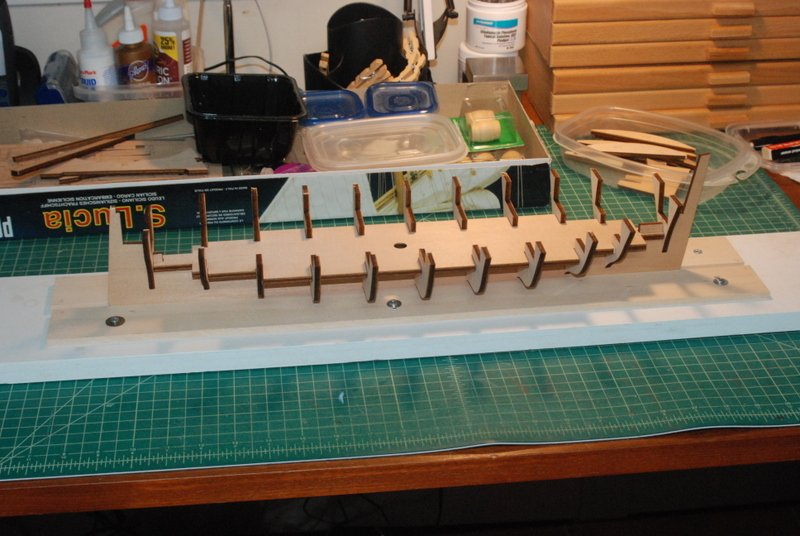
- 131 replies
-
- 6
-

-
- santa lucia
- panart
- (and 1 more)
-
Thanks Ed. Those mandrels are a nice way to accomplish this. I will have to remember to make some when I have some down time.
- 3,618 replies
-
- 2
-
-
- young america
- clipper
- (and 1 more)
-
One more question if you don't mind Ed. When you put the round band over the octagonal center section of a yard, how do you get the band to fit snug to the faces of the octagon? Thanks.
- 3,618 replies
-
- 2
-
-
- young america
- clipper
- (and 1 more)
-
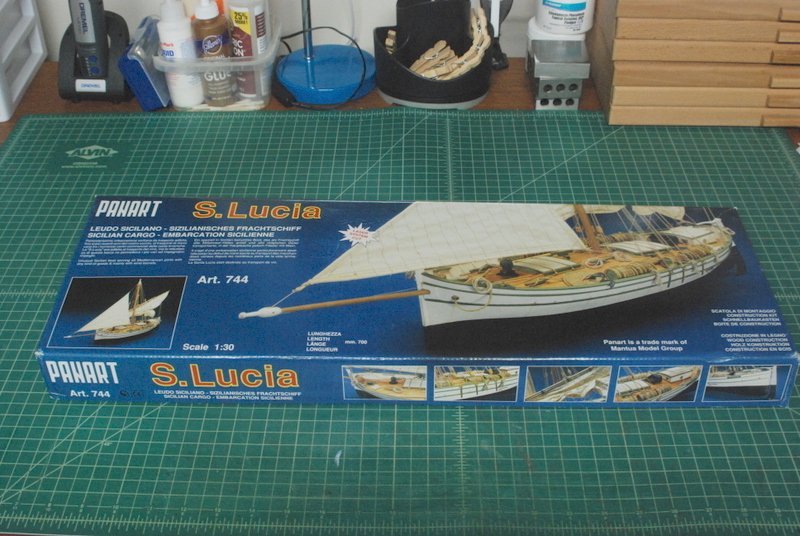
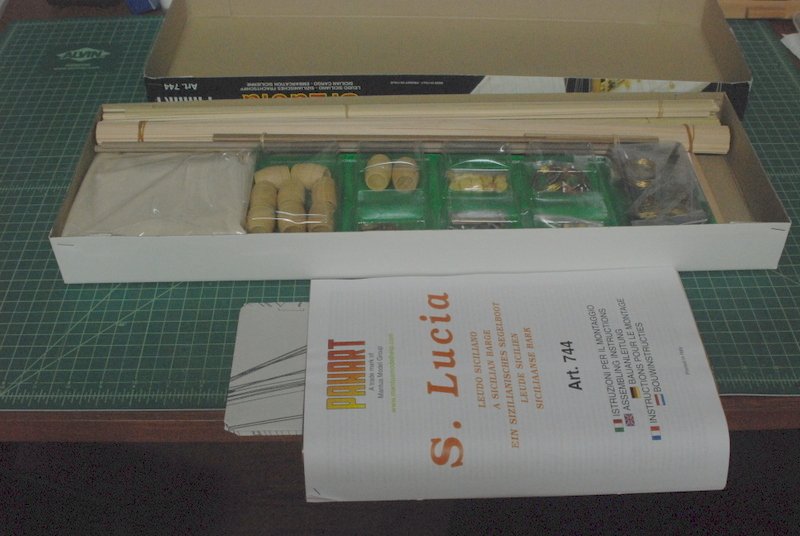
After finishing the USS Constitution, I wanted to build something just a little simpler that would not take me another 5 years to build. I had a few kits on the shelf to choose from and I was leaning toward a Cris Craft runabout as something really different. But then my son, who has recently bought his first house, asked me to build something for his mantel, and when I showed him the kits I had he liked the Santa Lucia. I got interested in this kit in the first place for a couple of reasons. First, I am half Sicilian and my grandmother on that side loved the song "Santa Lucia". Second, after seeing the build logs of this kit on this site (AnthonyUK and FernandoE), I really liked the look of the boat. I found a kit on the web at a reasonable price and bought it a few years ago. Here are some shots opening the box. I don't know how old this kit is but the wood still looks pretty good. There are a lot of brass fittings and the laser cut keel and frames looks pretty good too. The blocks are huge and very ugly, so I am going to try to make new ones or if that fails I will buy some new ones from Chuck. I know very little about this boat so I am just going to follow the limited directions in the kit and see how it goes. There are 3 sheets of plans which are all in Italian. At least the other instructions are in a bunch of languages, including English. Next up is getting the keel and frames cut out and cleaned up.
- 131 replies
-
- 8
-
-
- santa lucia
- panart
- (and 1 more)
-
K, I do believe the extra bulwarks were added sometime after 1812. I used the Hull model of the Constitution that is in the Peabody Museum in Salem, MA as a guide for the 1812 interpretation that I did, as it is a contemporary model of the ship from that period. Also, the Blue Jacket Constitution kit is an 1812 version, and has the rail just above the gun ports as shown in KHauptfuehrer's build log: I hope this helps.
-
Those parrels are tiny compared to the yards. I have to start using smaller beads.
-
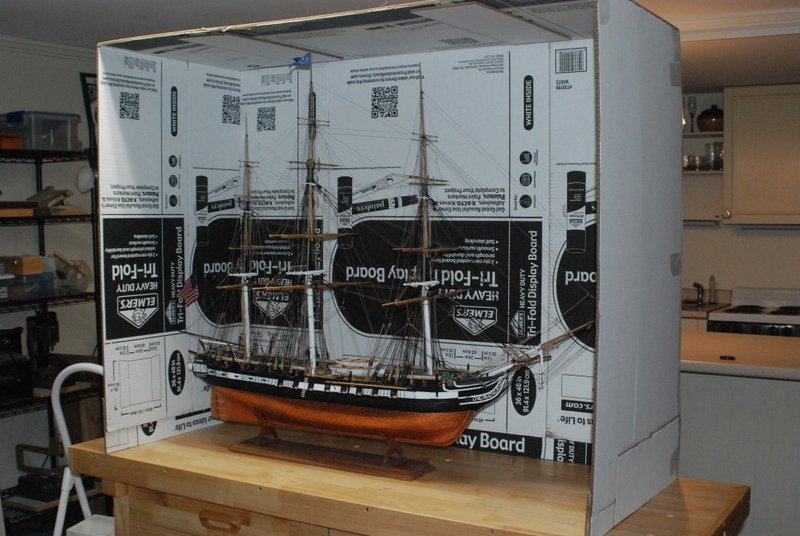
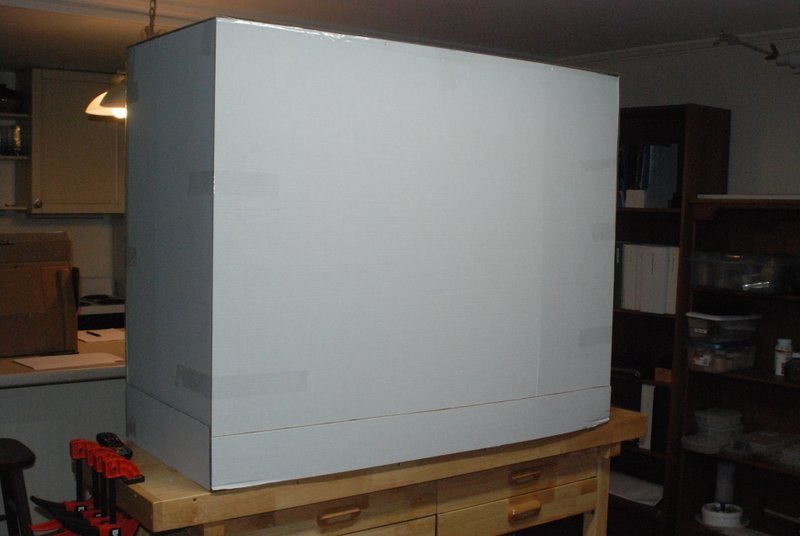
Thanks Steve. I really enjoyed documenting the build with this log, as it made me really think critically about what I was doing. I think the model came out better because of that, as well as the great advice I received along the way. A couple of final pictures for now. This is the dust cover I made from corrugated cardboard poster boards. That front cover can be opened as it is hinged at the top so I still have access to the model if I need to take measurements or show it off (ha ha). The ship will stay in here until the actual case is made in the Spring. In the mean time I am in the process of designing the case and will start a new model soon - the Panart Santa Lucia Sicilian barge. I'll start a build log for that shortly.
- 1,350 replies
-
- 11
-
-
- constitution
- model shipways
- (and 1 more)
-
When I made those fittings for the yards that Henry shows I used strips of basswood that I filed the shapes into, then cut them to length and just glued them to the yards with some spots of medium CA in between areas of wood glue. Some final filing after the glue dried and they were fine.
-
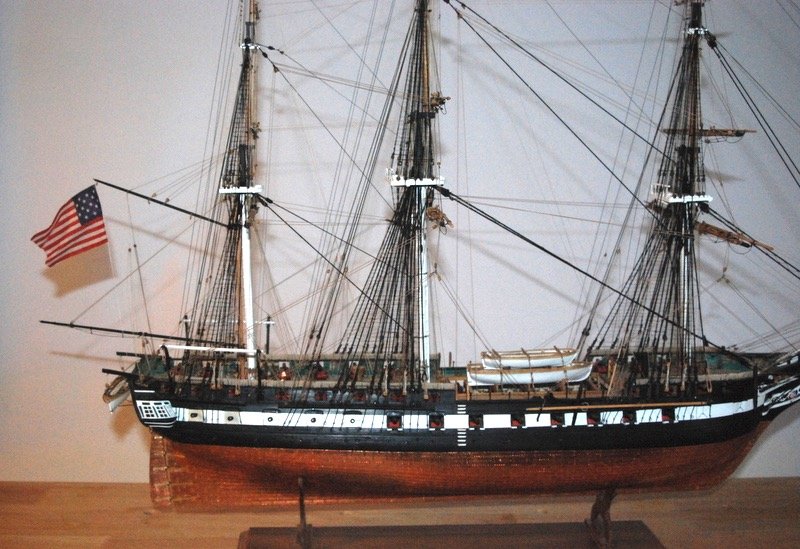
Thanks again. I have taken some better pictures and put them in the gallery. Here is one of them.
.jpg.e535ac01748e42fee8eb80e93b2e3a94.jpg)
- 1,350 replies
-
- 14
-
-

-
- constitution
- model shipways
- (and 1 more)
-
Thank you very much Chris, Michael, Steve, Fright, Geoff, Popeye, Henry, Captain Steve, Rob, Jay, Maturin, Kenneth, Tom, KMart, and Bill, and those who hit the like button. I really appreciate the comments. I have not had time yet to take good pictures but I am hoping to be able to do that this week.
- 1,350 replies
-
- 2
-
-
- constitution
- model shipways
- (and 1 more)
-
Get used to doing everything with tweezers soon. Get yourself some long ones to reach through the rigging once you start on the running rigging. Your shrouds look great.
-
I am glad that worked for you Lou. I love that sign too but can't show it to my wife, ha ha. The arches look great.
-
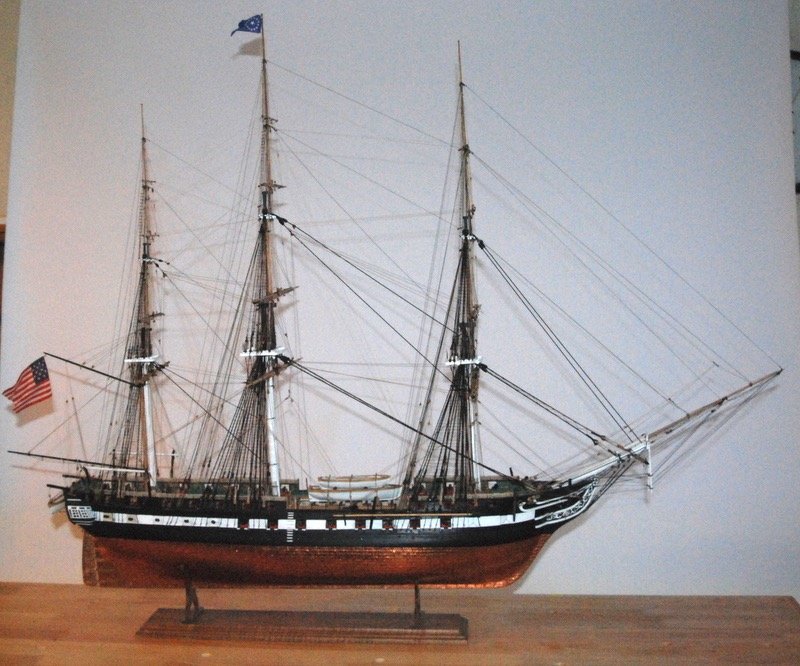
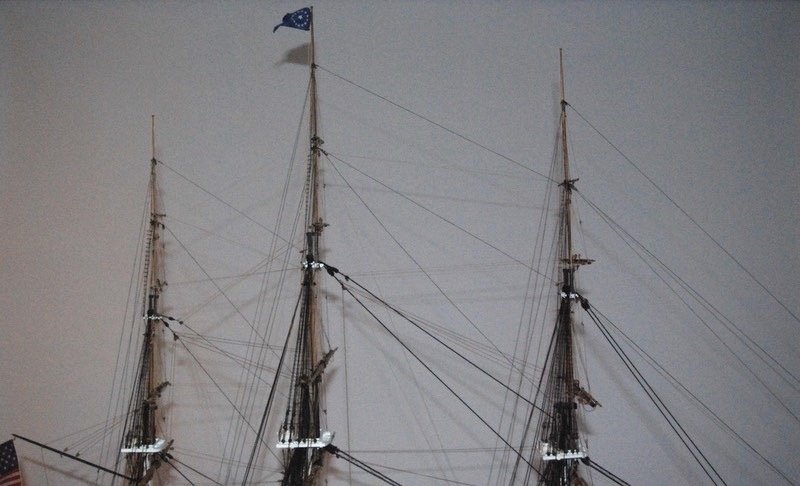
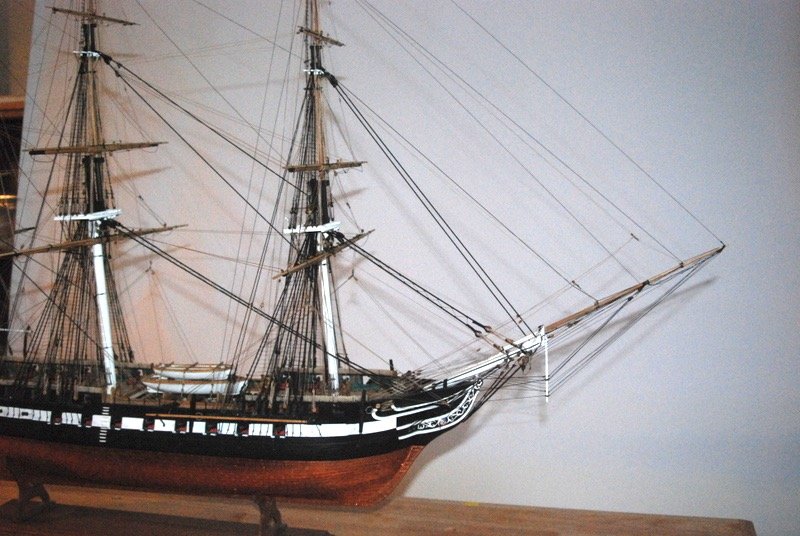
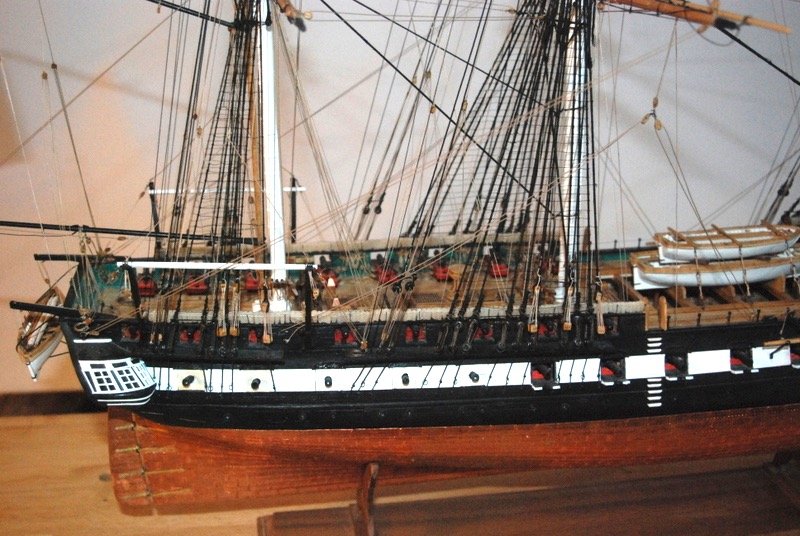
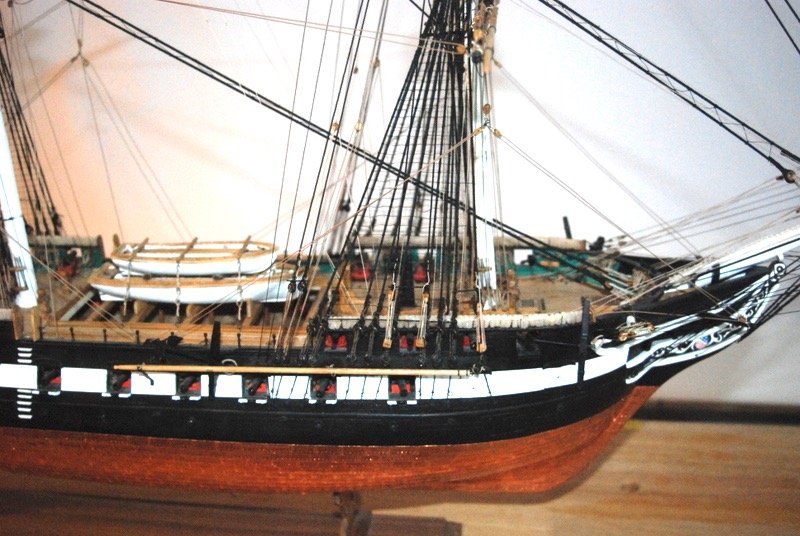
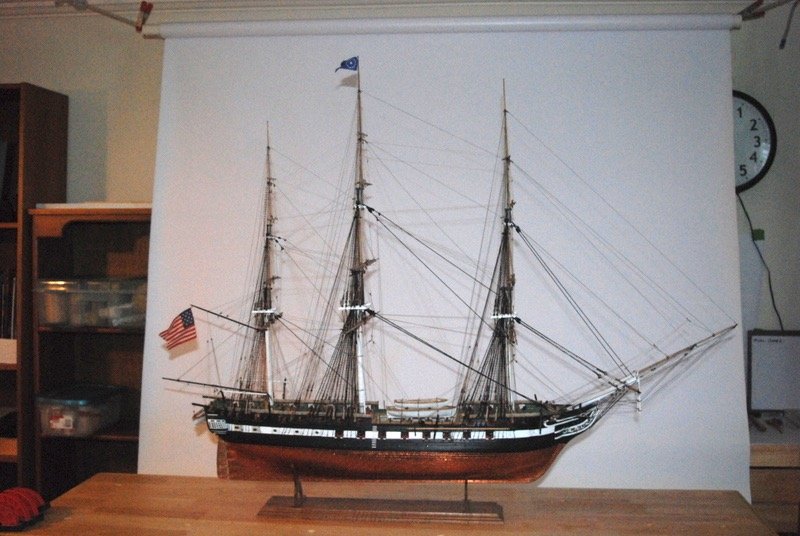
After nearly 5 years and many hours in the workshop, my Constitution is completed. In the course of building her I lost my brother and my father, so this build has been dedicated to them. I hope they were following along wherever they are. I really had fun building this kit and for $300 or so that I spent on it I sure got my money's worth. I am going to leave this build log open, as I plan to take some glamor shots of the model soon, as well as build a case for it when the weather warms up again next year. In the mean time I will build a poster board cover to keep the dust off it. Here are some quick shots I took of the completed model. I really appreciate those of you who have been following this build, especially the comments and advice. I could not have built this without the logs of those who came before me or started after me and finished before me (yes, I'm talking to you Ken). I hope this build log will be helpful for current and future builders of this great kit. Thank you all.
- 1,350 replies
-
- 26
-
-
-
- constitution
- model shipways
- (and 1 more)
-
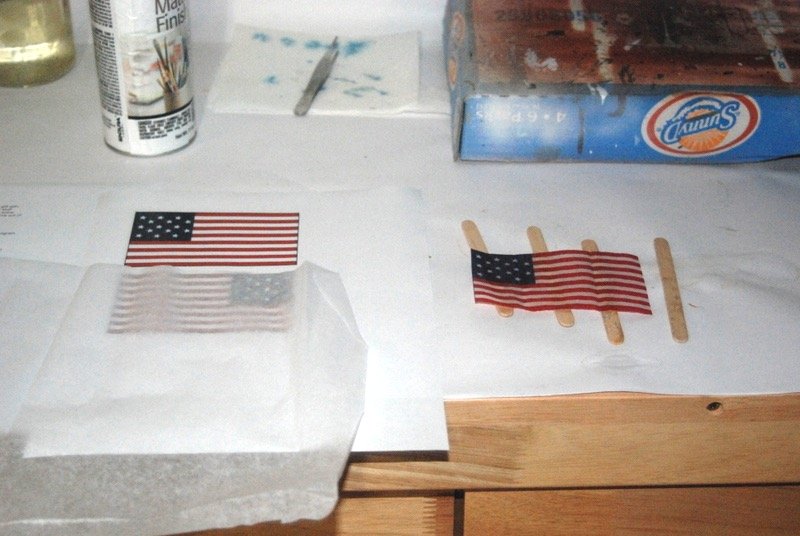
Thanks Popeye. I really enjoyed the rigging as there was so much to do, but it was very satisfying. Overall I am very happy with how she came out. The davits are all rigged and the anchors are all attached, so the last step was to make and install the flags. I am putting a large US flag from 1812 on the flag halyard on the mizzen gaff, and a blue commodore's pennant on the main mast flag halyard. I made these using white tissue wrapping paper (the kind inside present boxes) which I printed on using an ink jet printer. This is the method that Chuck uses and it works really well. After shaping them I tied them to the halyards. You can also see that I finally took the model out of the ugly but effective working stand and put it on the display stand I made a few years ago, I think. It has been stored in a plastic bag to keep the dust off it.
- 1,350 replies
-
- 10
-
-
- constitution
- model shipways
- (and 1 more)
-
Good luck with the surgery, Jon.
-
Thanks Captain and Jon and the likes. It will be 5 years in January that I have been working on this model and I am ready to complete it and move on to a new one. It is a good thing that there are others like you Jon that are continuing to build this great model. There will always be new challenges or new ways to solve old ones. Captain I just found your barge log and will be following along with it. I was able to re-strop both boom topping lift lines and the sheet block on the boom, so no need to replace any of those lines. I do have to replace the spanker outhaul since it ended up underneath the topping lift loops around the boom. I glued the metal brackets on the starboard quarter davits and it looks like they are holding well just being glued on. The rest of the rigging on the davits hold them pretty well so they don't move hardly at all. I just have to not knock into them as I finish things up.
- 1,350 replies
-
- 2
-
-
- constitution
- model shipways
- (and 1 more)
-
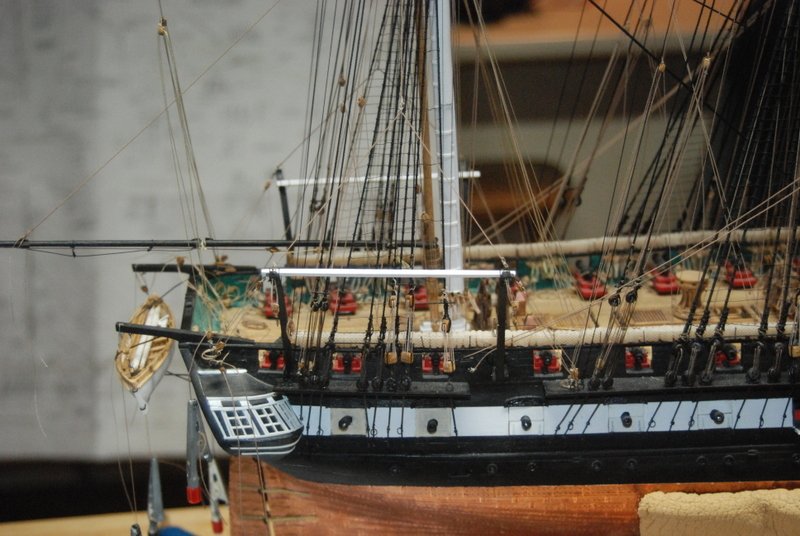
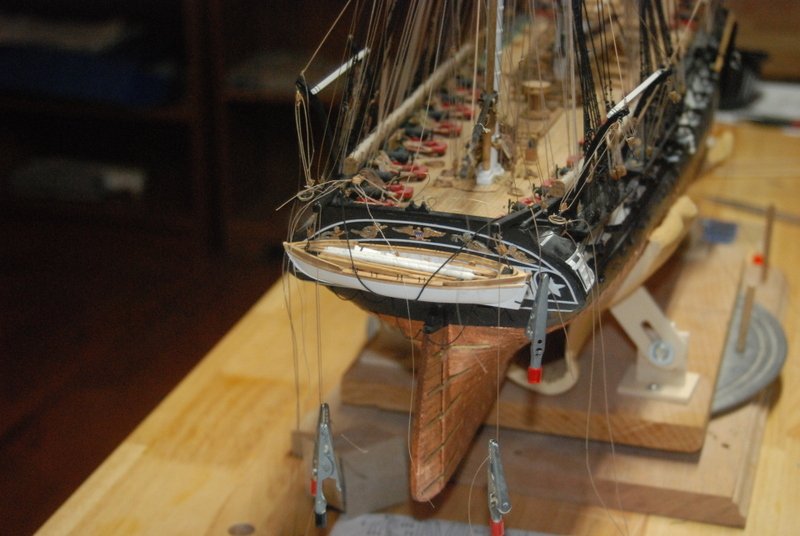
I am getting close to completion now. I am still rigging the quarter davits, but I have also started rigging the whaleboat on the aft davits and the three anchors - two at the cat heads and one on the starboard anchor brackets. I have the starboard quarter davit completely rigged, and just need to add the metal brackets to the top davit brackets. I have the port quarter davit mostly rigged, but still need to add the davit blocks and lines, and the rope coils and metal brackets. For the aft davits, I first added the davit blocks and tackle lines through the sieves on the davits, then hung the whaleboat on them using the ring bolts in the boat. I made gripes from some black thread I had, as these are straps, not ropes. This was the closest thing I had on hand to simulate these. I made larger hooks and seized them to one end of the gripes, then measured the lengths and seized a thimble to the other end. I tied a smaller line through the thimble, which I tied to cleats on the davits. I still need to tie off the davit lines to their cleats, which I am keeping pressure on with the alligator clips. In the process of doing this, I hit the boom a little too hard and popped the seizings on the topping lifts and boom sheet block. I was able to re-seize the starboard lift line around the boom, and I think I will be able to do the same with the port one. I had to re-strop the boom sheet block, which I will tie around the boom, so overall not too much rework. I may still end up re-rigging the topping lifts depend on how the repaired ones look. The two bow anchors are installed using a line that runs through the anchor ring and is tied to a cleat on the bulwarks. Inside the bulwarks, there is a line that wraps around the fluke of the anchor and is tied to two ring bolts on the waterway. The starboard side anchor has a bracket with eye bolts that the anchor will be tied to. I seized two lines to these eyebolts to tie around the anchor, and a similar line will be used inside the hull to hold the anchor fluke in place. I have the anchor hanging off the hull until I can tie it to the bracket. After these items are installed, all that is left is to make and add an 1812 US flag and do a final clean up of the model. Of course, there is still the case to make too.


- 1,350 replies
-
- 12
-
-
- constitution
- model shipways
- (and 1 more)
-
You are just traditionally outside the box. Really nice work on those manifolds.
-
Thanks Popeye, Dave and K. I just followed the planking as shown on the plans, which showed the tapering. I ended up going with the clew lines tied to the lower yards, so I finished installing the fore and main sheets and tacks. I added all of the rope coils to the belaying pins and cleats for the new lines, which was a bit challenging around the main mast because of all of the lines there. For the large cleats, I just added rope coils to the deck after gluing the loose ends of the actual lines to the deck. I am now in the process of adding the details and rigging to the quarter davits. I lashed the davit rails to the davits using the lashing shown on the plans. I also made brackets from brass strip to hold the davits up, and blackened them. I am going to wait until the davits are rigged before adding them, as I am not sure of the exact angle yet, which changes the size needed. I am also not sure the best way to attach them, as I think if I just glue them on they will come off easily if the davit its moved. I may just wait until I am ready to put the model in the case before adding them. I have been stropping the blocks needed for all of the davit rigging and will be adding the lines to the model next.

- 1,350 replies
-
- 7
-
-
- constitution
- model shipways
- (and 1 more)
-
Nice Popeye. Another build of yours to follow along. I've lost count now, but they are all terrific.
-
Gald to see you back at it Geoff. Rigging is challenging but a lot of fun too. I'm sure you will do a great job.
-
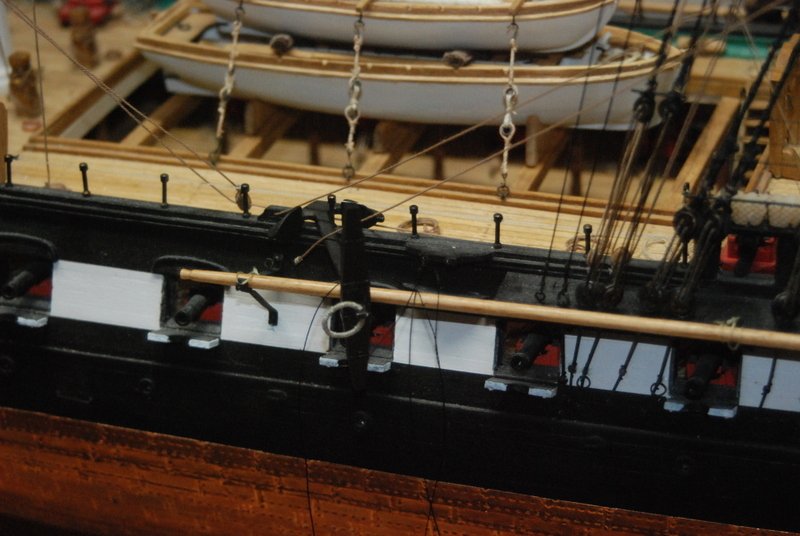
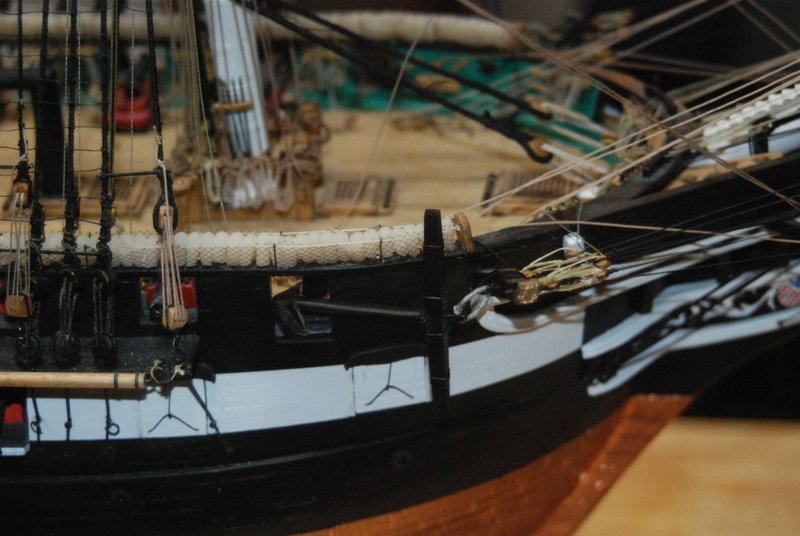
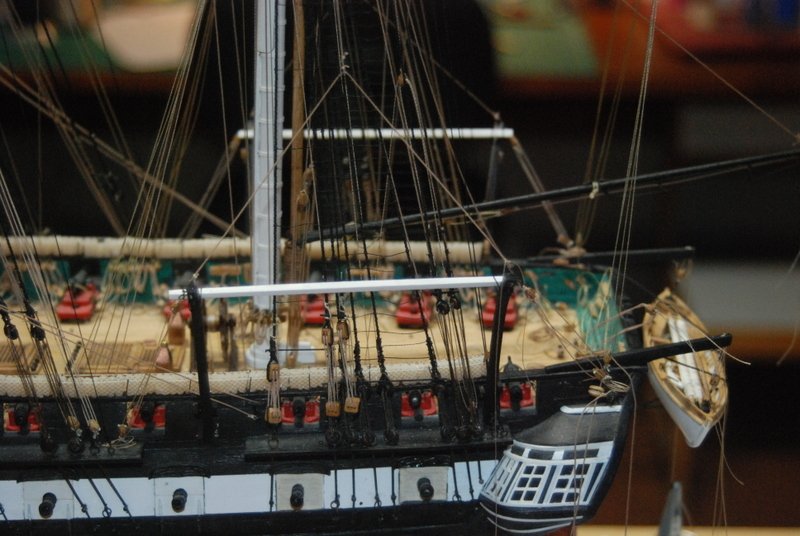
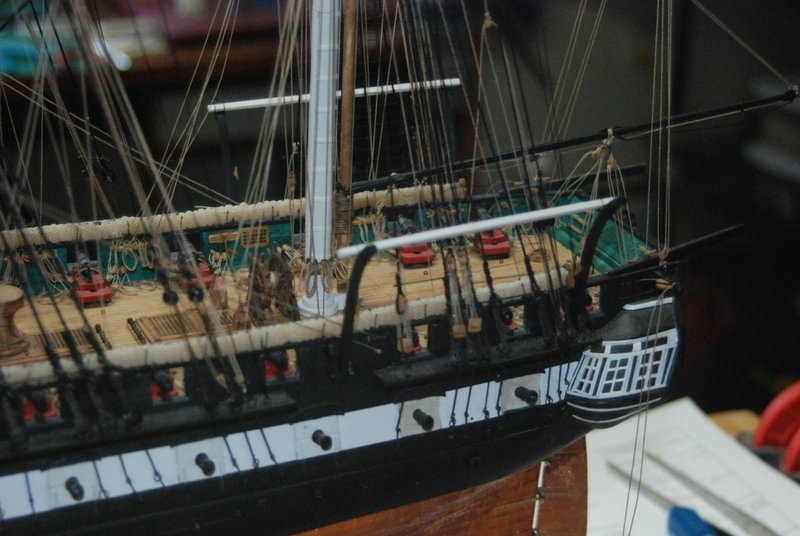
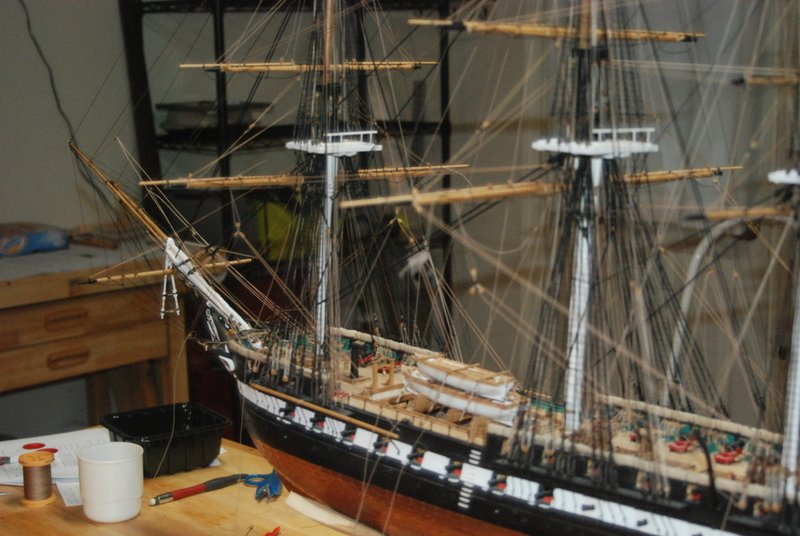
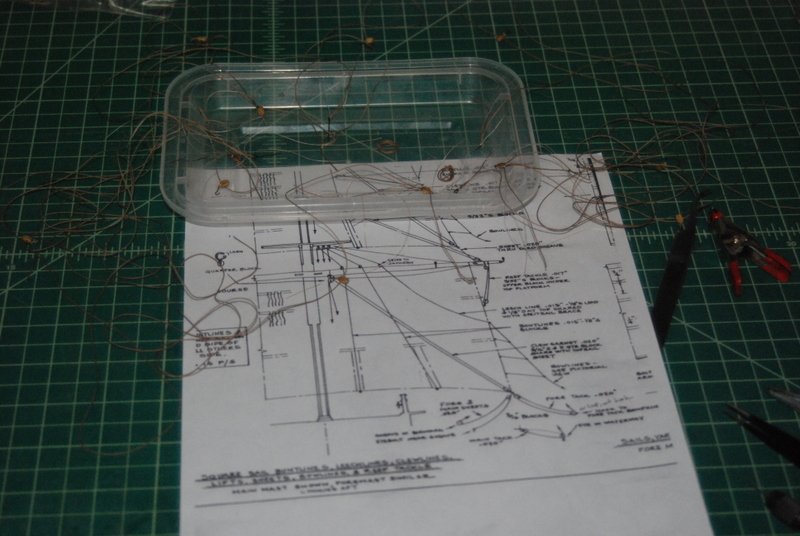
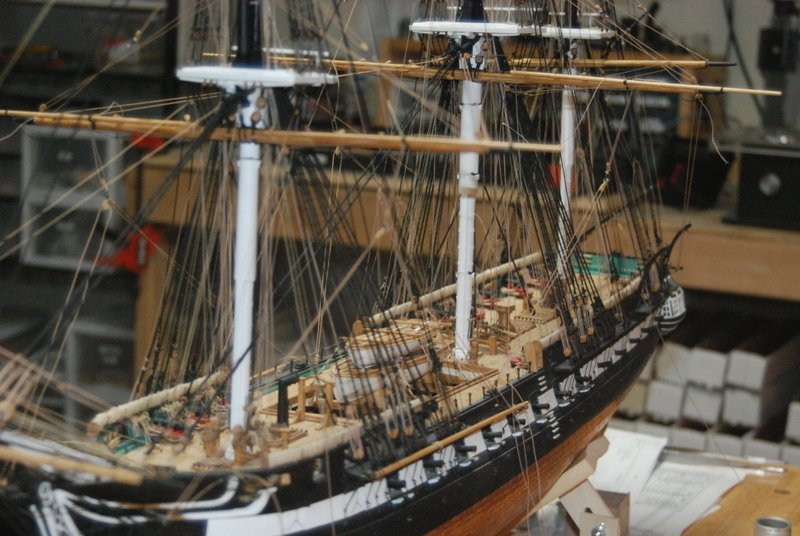
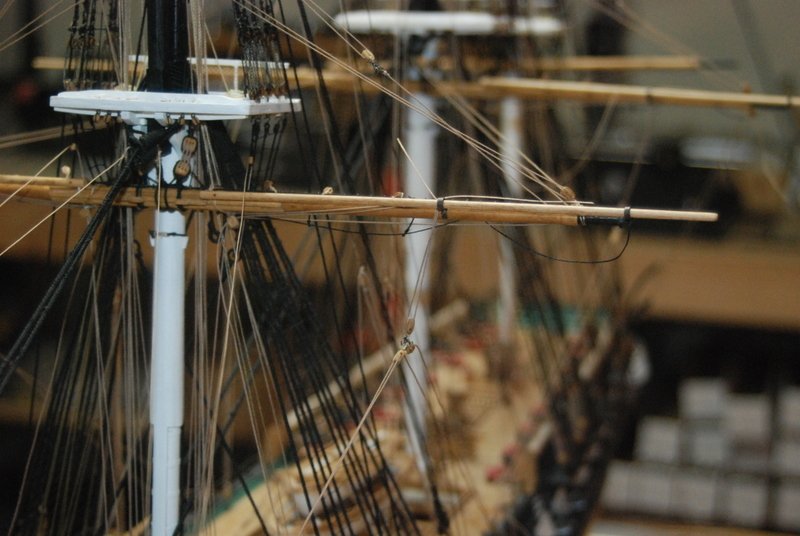
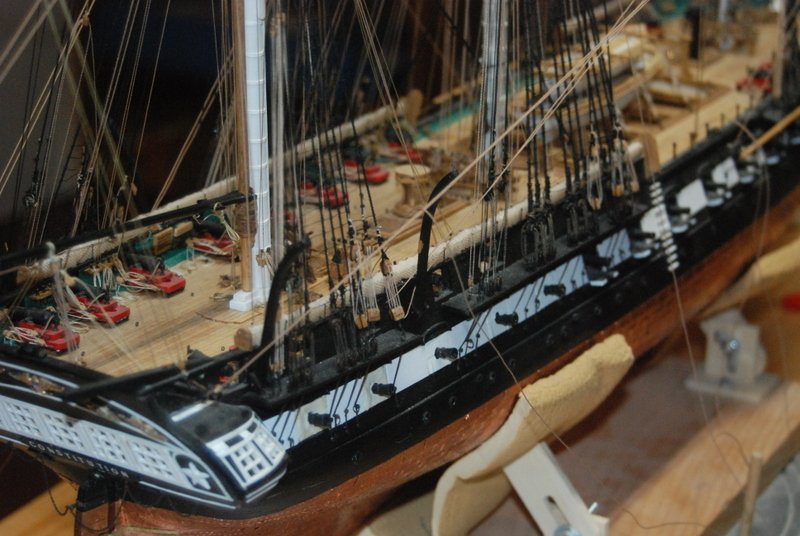
I finished adding rope coils for all the running rigging that has been installed to date. It was more trouble making them consistently then getting them in place on the belaying pins. Those long tweezers I bought last Spring really helped a lot. I had made all the ropes for the fore and main sheets and tacks in the old shop, but I had to strop blocks with hooks and loops for them. I then added the sheets and tacks to the model. Since I am not adding sails, my plan was to hook the sheet and tack blocks to the clew line blocks hanging from the main and fore yards. When I did this, the sheets were right up against the shrouds which did not look good at all. I had a couple of options at this point. One was to leave the sheets and tacks off, but since I had already made them I didn't want to do that. The instructions pretty much say to do that if no sails are attached. They also suggest attaching the clew blocks to the reef tackle blocks, which would support he clew lines along the yards. Well, I had not added reef tackle mostly since I did not have enough belaying pins for them. But this gave another idea, which is shown here dry fitted: It is hard to see in these images as it is hard to focus on individual lines, but what I did was support the clew lines further out on the yards using a simple loop of line around a jack stay stanchion. This moves the clew line block out so that the sheets and tacks are away from the shrouds and other lines close to the hull. I doubt this would have been done on the real ship, but I am only doing it for display purposes. If this is really a bad idea, please let me know and I'll try something else or leave the sheets and tacks off. Thanks. I am also installing the quarter davits which I had made a while ago. I glued the two support pieces to a piece of wire that is through them and the davit. I was able to glue them and the davit is still able to rotate in the supports. I then glued the supports to the mizzen channel and hull sides. I have the upper bracket pieces to glue on next. As you can see in this picture, the main braces and sheet get in the way of the davits rotating up and down, especially the braces. I don't know how they dealt with that on the real ship. Maybe they loosened the braces when lowering the boats on these davits? Anyway I think I can get them installed around the lines, especially since I am not putting boats on them. Thanks for looking in. The list of things to do is getting pretty short now so maybe I can finish her this calendar year - not that I am in any hurry though. I will probably have to wait until the Spring to make the case although I might be able to build some of it over the Winter. We shall see...
- 1,350 replies
-
- 7
-
-
- constitution
- model shipways
- (and 1 more)
-
Thanks Kurt. I know I have seen them on other models but I don't remember which ones. Not too many have modeled the gun deck. There are a few build logs that are in the process of doing it, so they will probably add them as well.
- 1,350 replies
-
- 1
-
-
- constitution
- model shipways
- (and 1 more)
-
You got that right, Dave. Good luck with the new project.
- 1,350 replies
-
- 1
-
-
- constitution
- model shipways
- (and 1 more)
-
That's a great project Dave. I am sorry you are on hold with the Connie, but this looks like a good diversion. Good luck with it.
- 742 replies
-
- 3
-
-
- constitution
- frigate
- (and 1 more)