usedtosail
-
Posts
2,421 -
Joined
-
Last visited
Content Type
Profiles
Forums
Gallery
Events
Everything posted by usedtosail
-
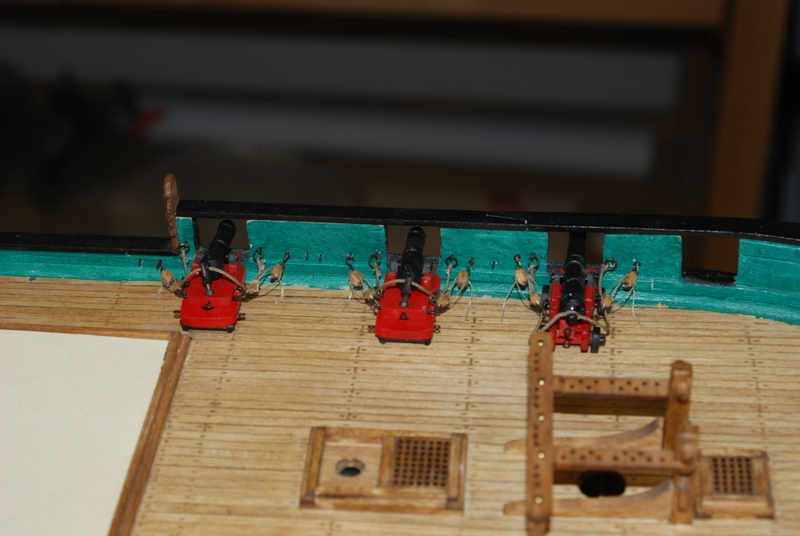
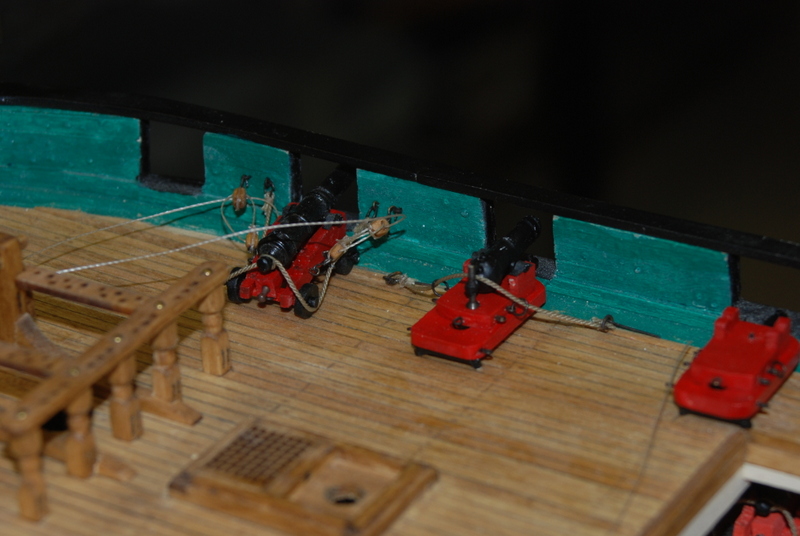
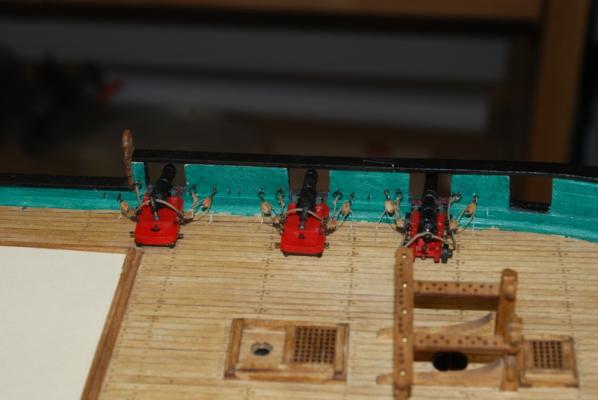
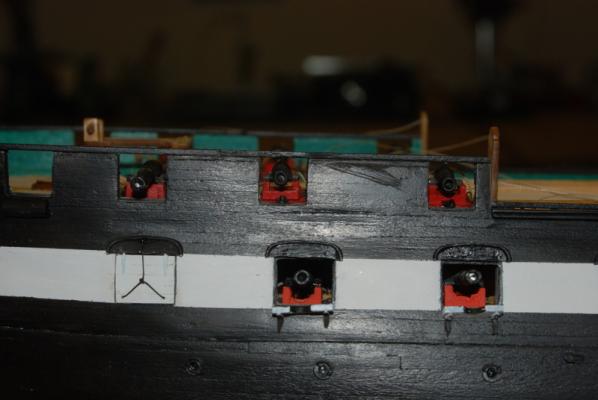
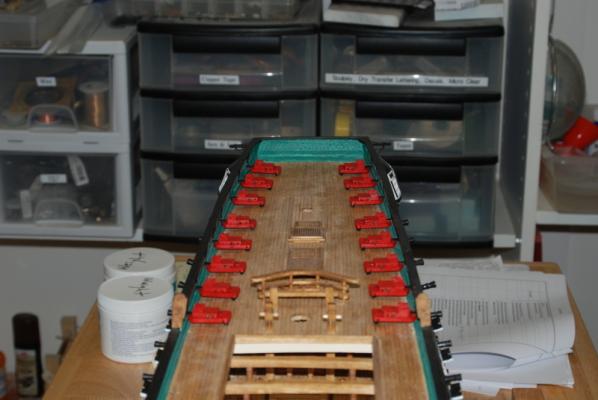
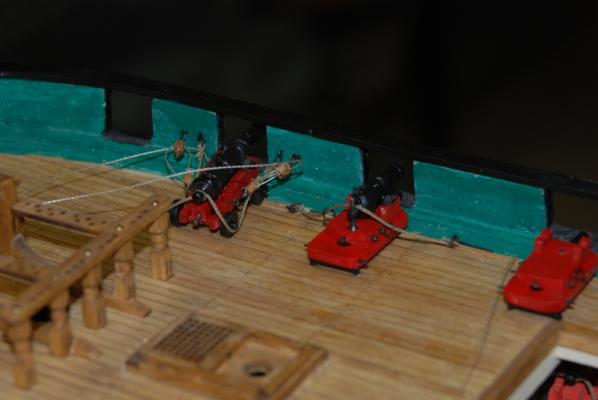
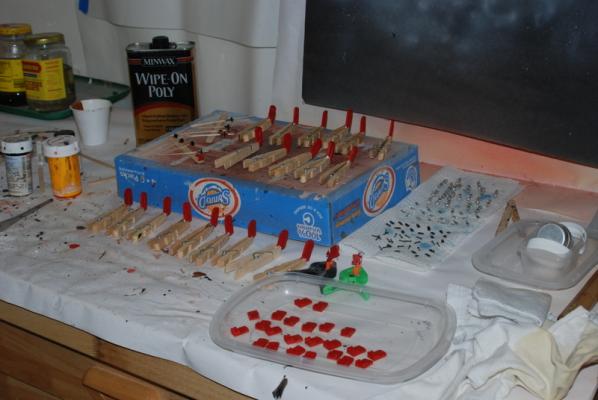
 Thanks Tim and Al, and for the likes. I finished assembling and rigging the four carronades on the fore part of the spar deck, before the waist. I first just put one set of side tackles on to make sure I would have enough room for two on each side without it looking too crowded. I glued these tackle lines to the deck and trimmed them, to get them out of the way. You can see that for the two carronades right next to the open waist, I had to add the eyebolts into the planksheer since there is no bulwark there. Now the side tackles wouldn't be there most of the time, but in hindsight I probably should have moved that gun port a bit forward so I had more bulwark on that side. Oh well, can't change it now. I then added the outer sets of side tackles. I was able to fit them all in, so I am pleased with the result. I have glued these second tackle lines to the deck but have not trimmed them yet. I also still have to add the rope coils, so I started the production line for those. 20 carronades, four side tackles each, four rope coils each = a butt load of work left to do . Here is the view from outside the hull. I still have some paint touch up to do on the carronade barrels, inside and outside the hull.
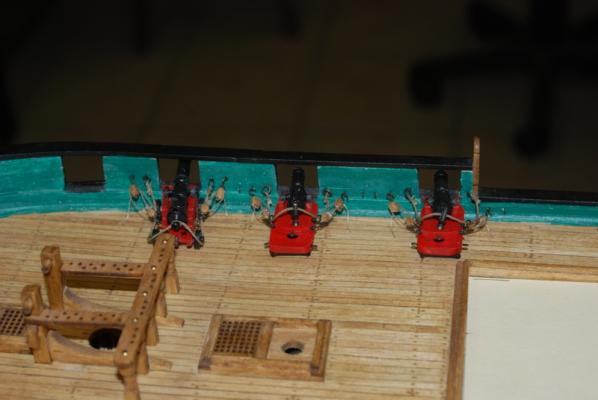

- 1,354 replies
-
- 8
-

-
- constitution
- model shipways
- (and 1 more)
-
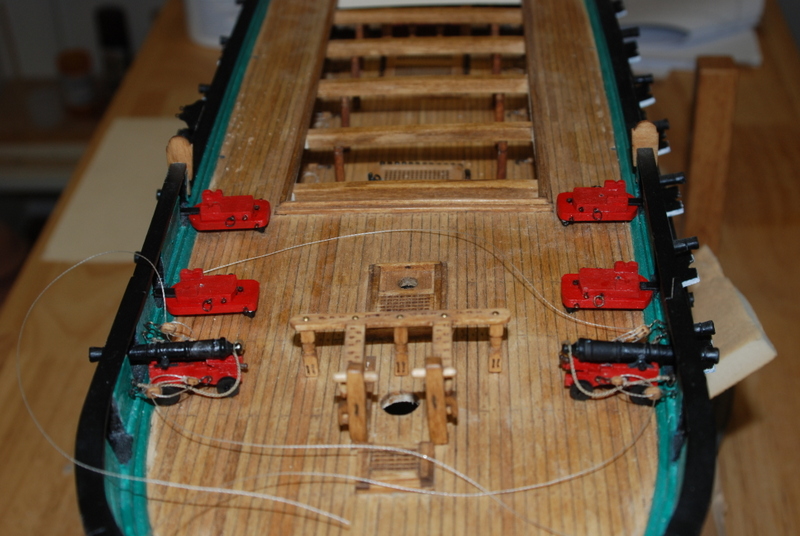
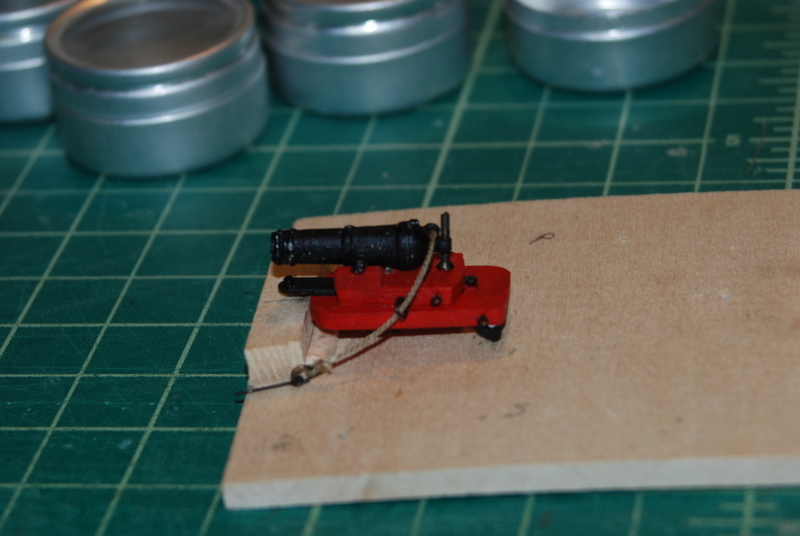
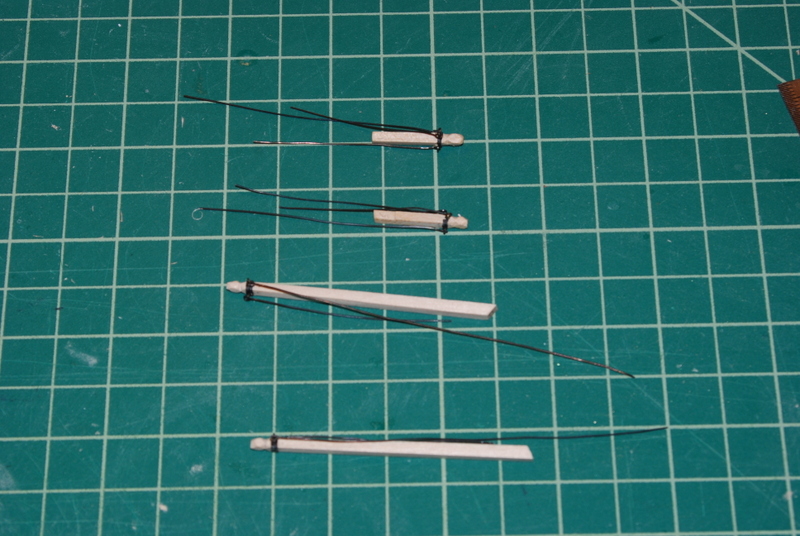
Sorry for the long time between updates, but I have been busy with work and school vacation last week. I have started assembling and rigging the spar deck guns. I am starting with the two long guns and four carronades at the bow, to see how these will look with all the rigging before continuing on with the guns after the waist. I assembled and rigged the two long guns first, since these were very similar to the guns on the gun deck. I still have to tighten up the side tackles and secure the ends to the deck. I then drilled holes through the carronade sleds and bases, into the deck, and secured a piece of wire to hold them in place. I then assembled one carronade, first by seizing a ring bolt to the end of a piece of line for the breeching rope, threading that line through the ring bolts on the sled and the ring on the barrel, then seizing another ring bolt to the other end. I then glued a brass screw in the hole I drilled into the casabel, and glued the head of the screw and the barrel trunnions to the sled. I finished it off by gluing small strips of black paper over the trunnions. Here it is placed on deck. I am in the process of making the four tackles needed to rig it. I have started to assemble the second carronade and the production line of stropping hooks to blocks for the tackles. Here are all the gun carriages on deck ready to be assembled and rigged.


- 1,354 replies
-
- 10
-
-
- constitution
- model shipways
- (and 1 more)
-
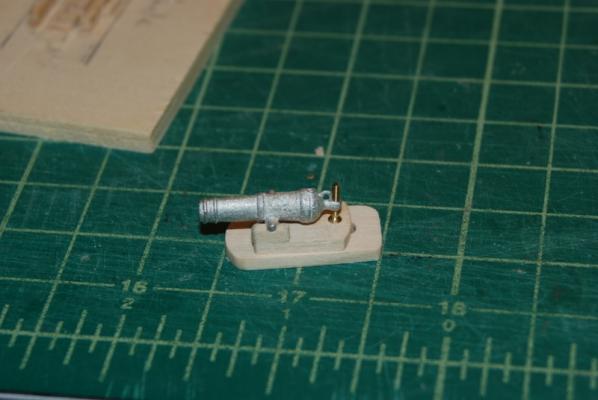
Thanks Gerty, welcome to the build. Everything is now painted and I have started the assembly of the guns. For the cannonade bases, I first installed the brackets that will hold them to the gun port sills. I made up a little jig to help me get them all the same distance from the front of the bases. I could have made it more elaborate by adding guide pieces to the sides of the brackets but this worked pretty well as is. I decided to add a small block of wood in the slots of the bases, so that I could put a wire pin through the sled, base, and into the deck, to hold the whole assembly in place. I also made a replica of the area around the spar deck gun ports to help in the assembly and rigging, like I did for the gun deck guns. Assembly of the long guns and cannonades is next up.
- 1,354 replies
-
- 6
-
-
- constitution
- model shipways
- (and 1 more)
-
Ken, I use the pre-stain all the time with basswood. It does help even out the color. I have not used it under the copper tape though. For that I use an acrylic primer or thinned Gesso and I think it helps the copper plates stick better than to bare wood.
-
Hi Greg. For the width, I either use an X-Acto knife first than a sanding block or if the taper is slight just a sanding block. For the thickness, I used a sanding block, working from the end that is the same thickness as the upper planks, to a reasonable way back to the full thickness.I think it was near the last bulkhead or so. After all the wale planks were added, I evened up the thickness again with a sanding block until they were all the same.
- 1,354 replies
-
- 2
-
-
- constitution
- model shipways
- (and 1 more)
-
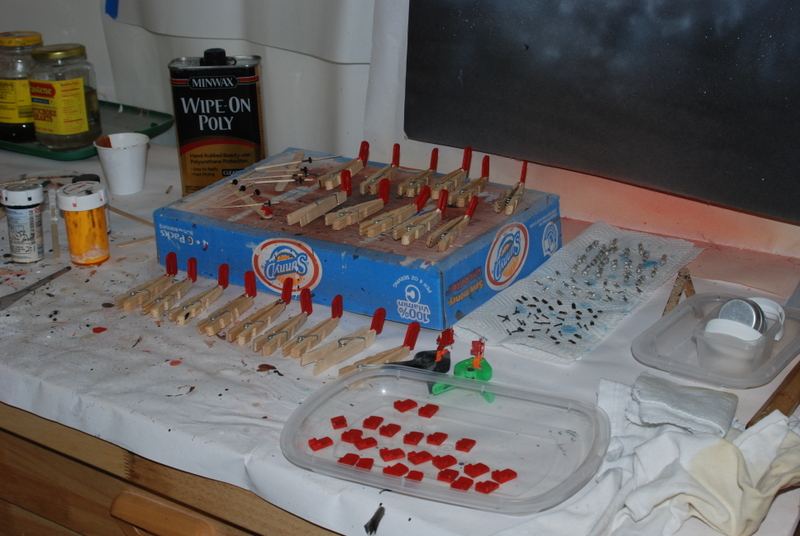
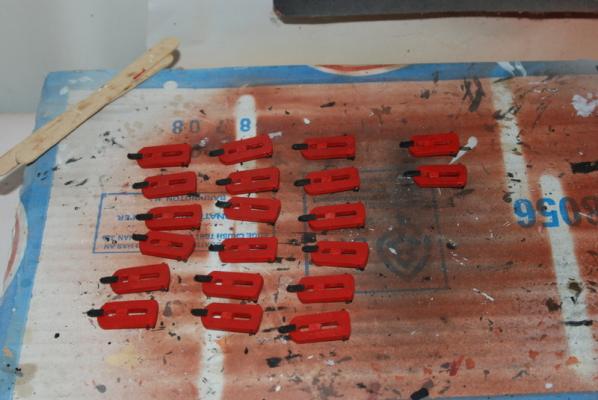
Thanks George, Al, and Popeye. It is not too tedious yet George, as there are lots of different things that need to get done, all be it 20 at a time. I am glad to see you back Al. I hope you get right into where you left off. I finished making all the hooks and ring bolts, and added the ring bolts and eyes to the sleds. I need to finish painting the barrels and trucks before I can continue assembling the carriages. This is my last week home before I start a new job on Monday. It has been fun having time to build during the day, but after this week it will be back to nights and weekends in the workshop again. At least for another 5 years or so.
- 1,354 replies
-
- 2
-
-
- constitution
- model shipways
- (and 1 more)
-
Congrats for a job well done. She looks great in the case.
- 456 replies
-
- 3
-
-
- finished
- bomb ketch
- (and 2 more)
-
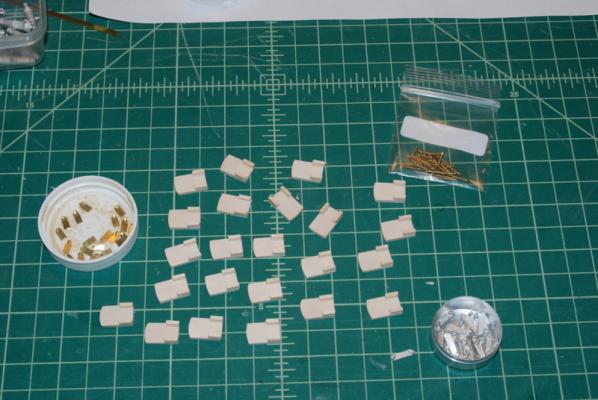
Thanks Popeye and the likes. I continue to build the pieces parts for the spar deck armament. I finished the cannonade sleds and cut the brass screws to size. I made up a small block with a hole in it that i put the screws in then cut them flush with the block, to get them all the same length. I cleaned up the metal barrels and trucks to remove the flashing, and made the two quoins for the long guns. I assembled the long gun carriages. I mixed up a new batch of bulwarks red paint for the carriages because the batch I used on the gun deck went bad. I think it is a close match. I painted the carriage parts with it and the wooden trucks black. I cleaned the metal parts with white vinegar and blackened the brackets and brass screws. I need to touch up the brackets with some paint because of the CA glue that covered some of the brass. I still need to paint the barrels and metal trucks. I am also in the process of making all of the small parts I will need for rigging the guns, like 170 hooks and 88 ring bolts.
- 1,354 replies
-
- 9
-
-
- constitution
- model shipways
- (and 1 more)
-
Cutty Sark by NenadM
usedtosail replied to NenadM's topic in - Build logs for subjects built 1851 - 1900
You can get microballoons at boating supply stores like West Marine.- 4,152 replies
-
- 4
-
-
- cutty sark
- tehnodidakta
- (and 1 more)
-
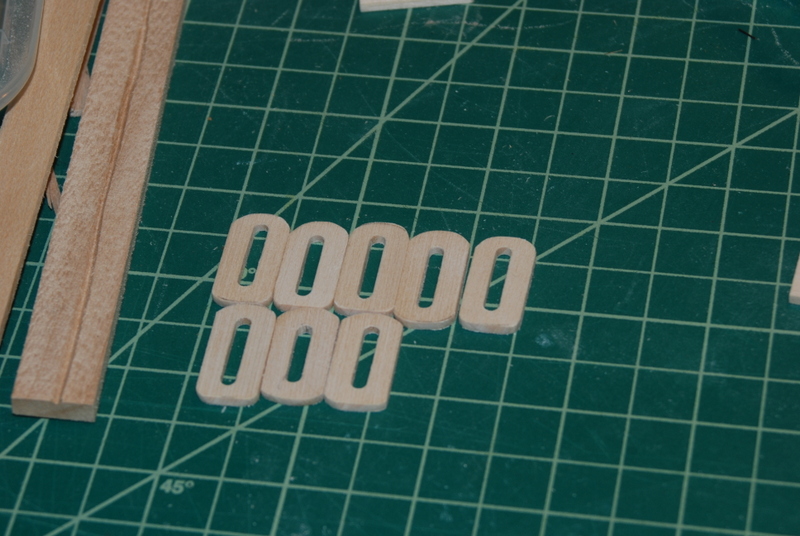
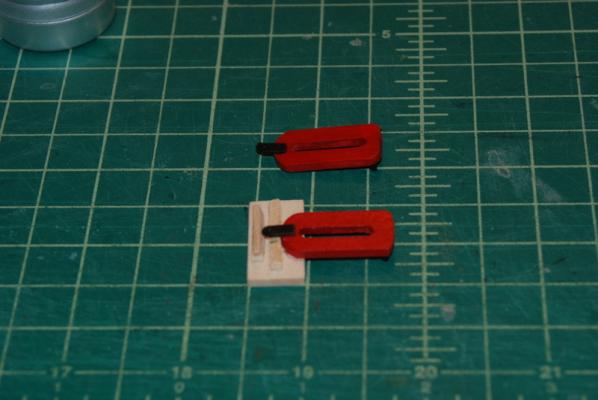
More work on the carronades. I am making the sliding part of the sleds again using pieces cut from some sheet wood and some square stock for the supports to hold the trunnions. I will file slots in these when the glue dries. You can also see the brackets I made. These will support the base in the gun port. I made them from some flat brass, then glued a small piece of brass dowel to look like the top of the pin. I should have drilled holes in the gun port sills before putting the rail on so I could actually pin these in place, but it is too late now. I will pin the bases to the deck near the gun ports, though, which will hold them in place. You can also see the new screws I ordered - flat heads and a little shorter than the ones I showed earlier. I am going to use the supplied trucks, but I am using the front trucks in the back of the base. The supplied rear trucks I am not using, as there will be no trucks in the front of the bases.
- 1,354 replies
-
- 10
-
-
- constitution
- model shipways
- (and 1 more)
-
Well said Frankie.
-
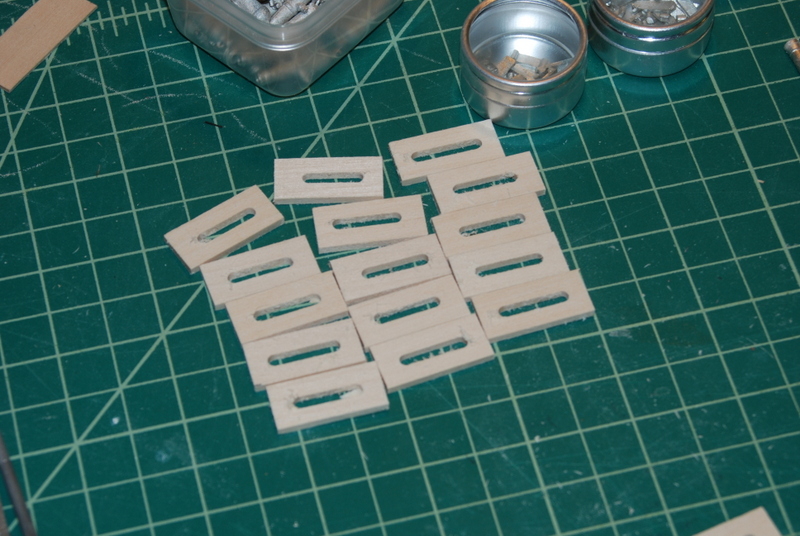
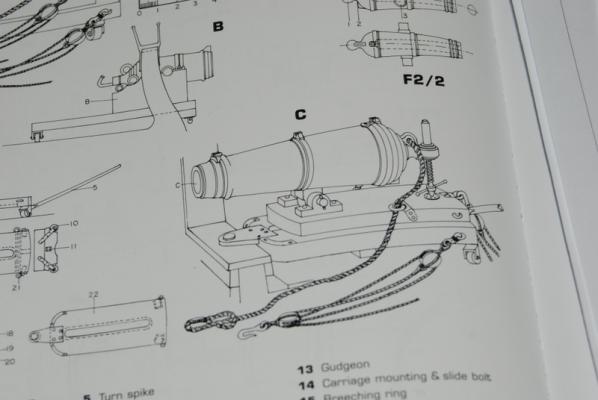
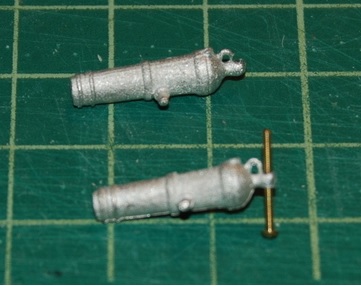
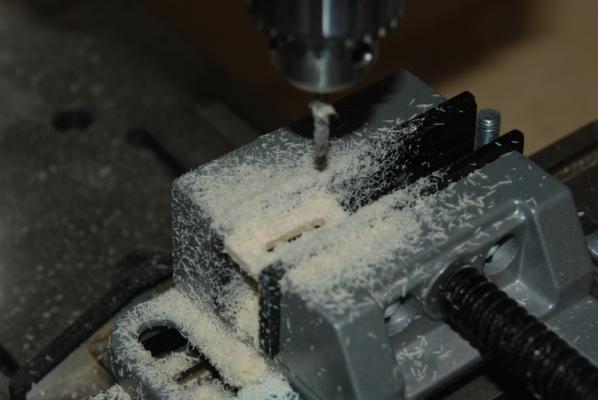
Thanks Steve. It has been great this week to have a lot of time to work on it. I am deviating again from the supplied parts, this time the carronades. On the tour of the Constitution that Popeye2Sea gave me, he pointed out how the current carronades are not that authentic and should look like these with an elevating screw. So, I took inventory of the supplied parts and decided I couldn't use the sled parts as the slot is too wide and they are too boxy, and I am not using the forward trucks because these sleds are pinned to the gun port sill and don't have trucks in the front. I will use the rear trucks, after I clean them up a bit. I can also use the barrels, but with a modification. I filed the casabels to be flat on the top and bottom, then by hand drilled holes through them for a small brass screw. These screws are 1/2" long, but I don't have enough of them so I ordered some 3/8" screws that I will use instead. They are size 00-90 diameter. I also ordered flat head screws instead of round head. I don't think I am going to drill through the screws at the base for the turning rods, as that is just too small for me. I also am making new sled parts, starting with the bases. I cut rectangular pieces to start with, then milled 1/8" slots down the center. By now you know I have an X-Y table on my drill press, which I used for this process with a 1/8" end mill bit. The X-Y table is one of the best tools I have and really makes the drill press so much more versatile. It is not the best mill though because the head turns as the height is adjusted, but I have marked the center point on the column and head so for this kind of work I can get it pretty close to square. After all the slots were cut, I rounded the ends and sanded them smooth. The mill bit did such a nice job of cutting the slot, I had very little sanding to do in them. After these I will make the slide part of the sleds.


- 1,354 replies
-
- 13
-
-
- constitution
- model shipways
- (and 1 more)
-
Also, how does that work if you can't soak the pieces in the ebonizing solution? Do you keep brushing it on until it looks right?
-
Nice work on the planking Michael. My wife calls that the mad scientist look and that's when I know I need a haircut.
-
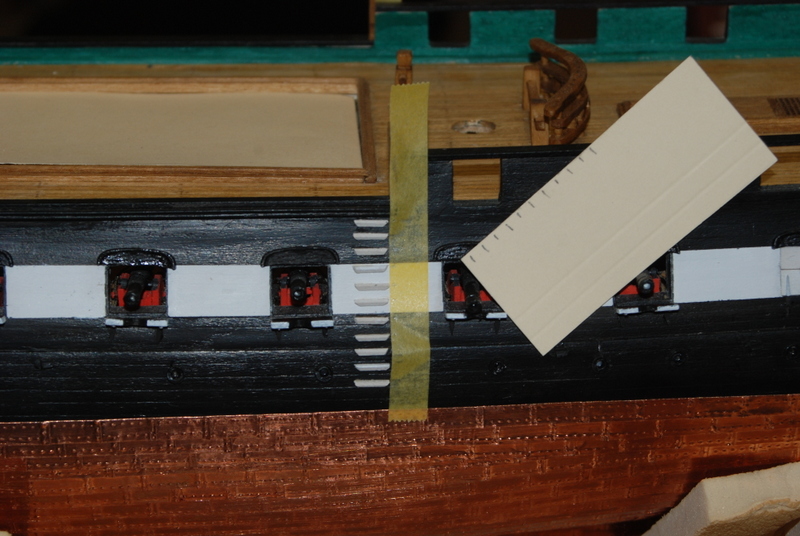
Thanks George and Greg, and the likes too. Greg - there were enough horizontal lines between the white strip and the planks that I could keep them level by eye. I was going to put another strip of tape down the other side before I started gluing them, but found it worked out better for me without it.
- 1,354 replies
-
- 3
-
-
- constitution
- model shipways
- (and 1 more)
-
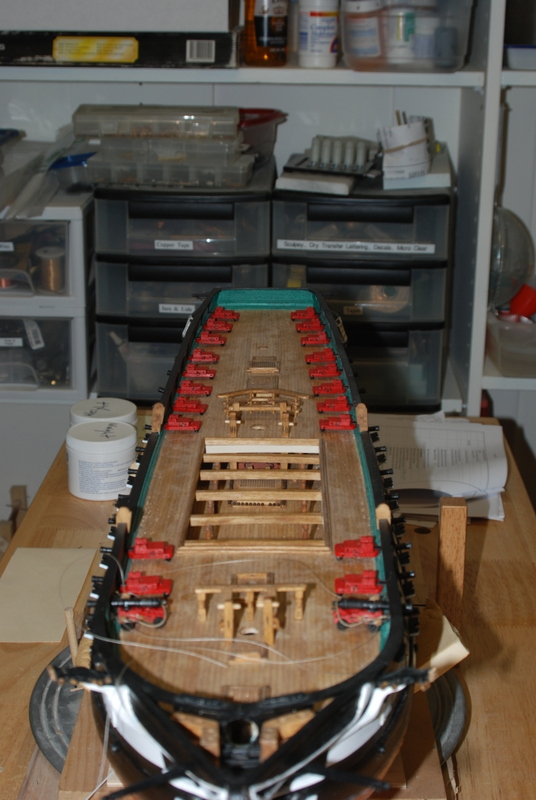
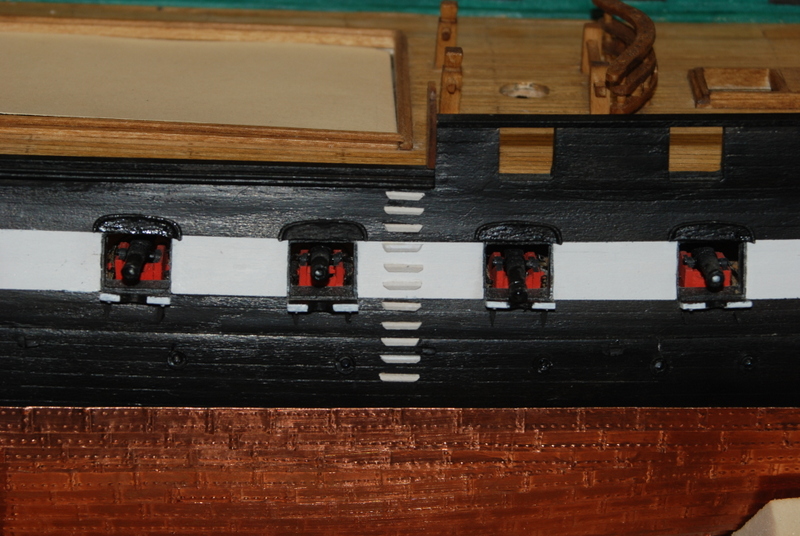
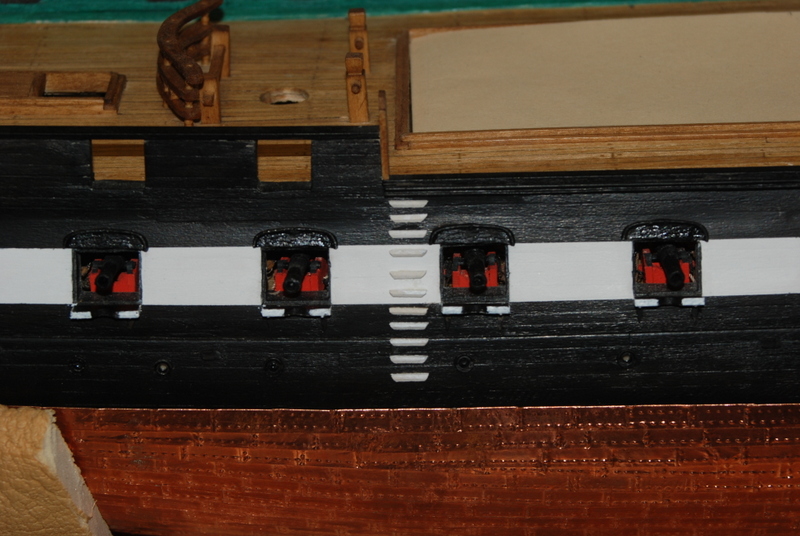
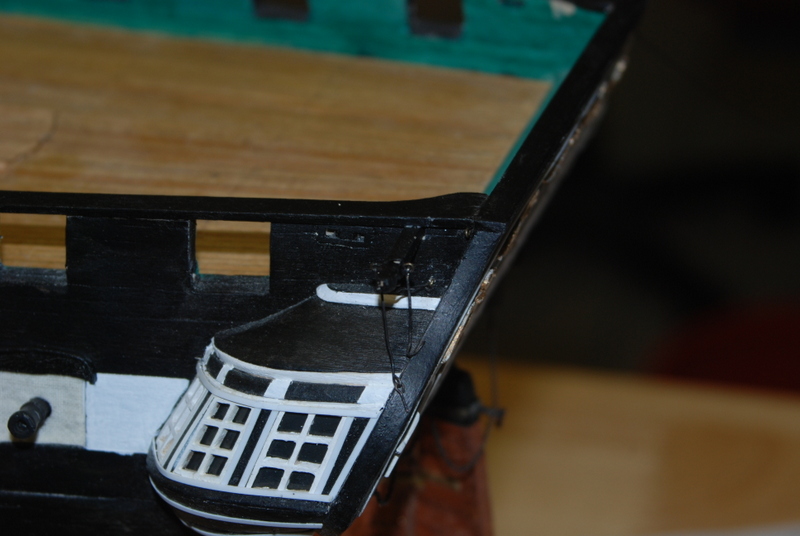
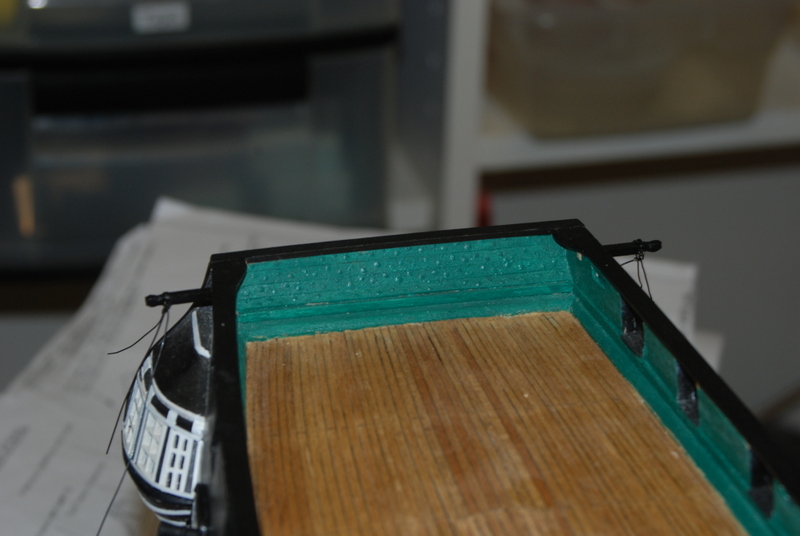
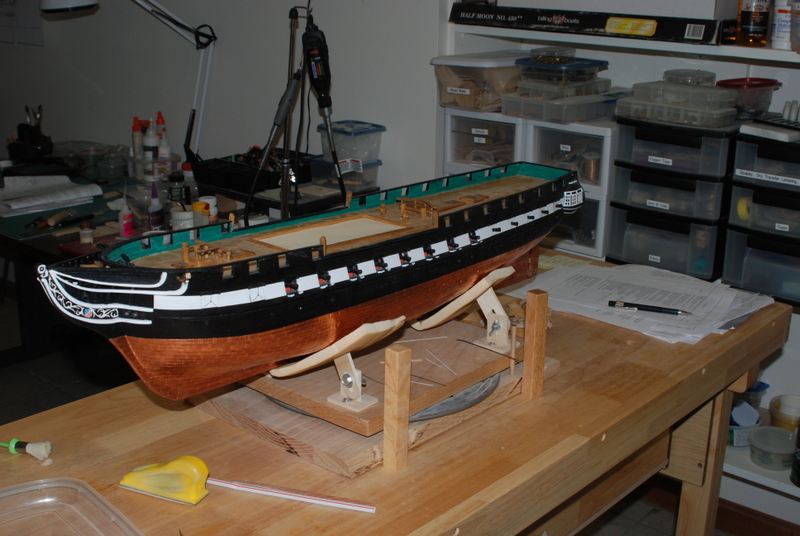
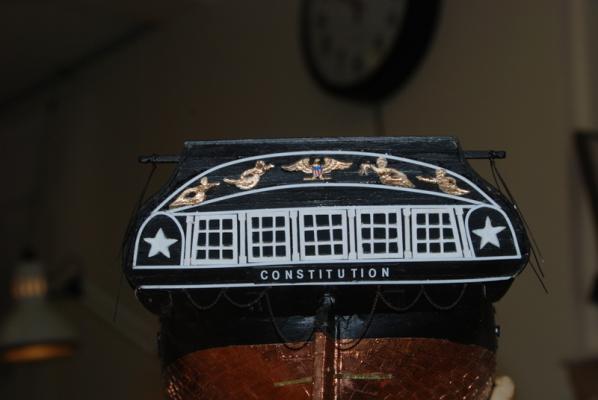
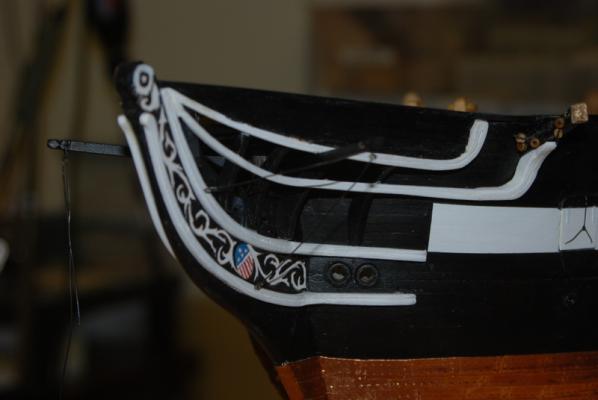
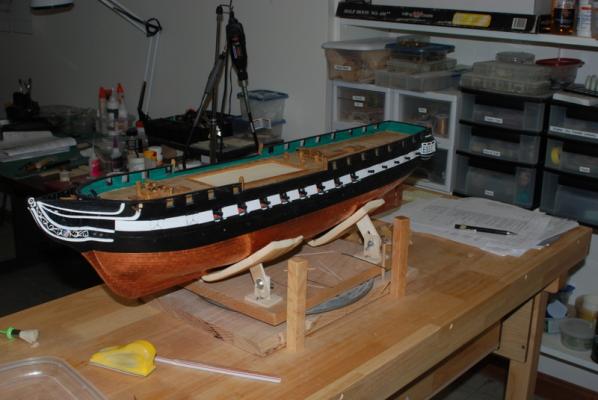
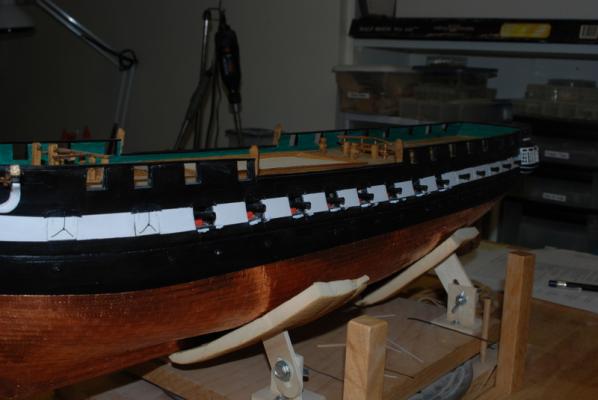
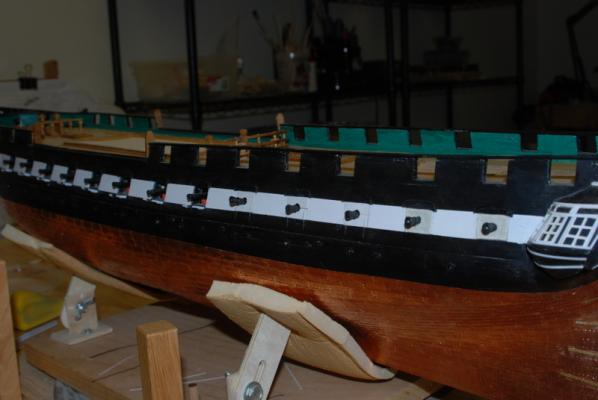
Some final work on the outer hull is done. I secured all of the support rods for the aft bumpkins into the hull, using eye bolts that I looped the ends of the wire around. A few of them I had to do in place by gluing the eye bolt in first, then wrapping and cutting the wire, instead of the easier ones where I could do the wrapping before gluing the eye bolt to the hull. There was just not a lot of room around the rail in the stern corners. It is hard to see in this picture, but the support arms are there. I then added the steps to the sides of the hull. I did this my first making a tick strip of the step locations from the waist rail. I placed a strip of masking tape down the sides at the location of one end of the step, then marked off the locations from the tick strip onto the tape. I ended up using the step that was close to the top of the wale as the reference, since I didn't want this step to be half way across the wale. I then used the tick strip to space the other steps off this one. When I glued the steps in place I lined up the edges with the masking tape, then removed the tape when they were all glued on. I was careful not to let the edge of the step overlap the tape. Here is how the port steps came out: And here are the starboard steps: That finishes the outer hull, except for the fastenings for the bowsprit rigging, which I will add when I rig the bowsprit, the channels and the stern and quarter boat davits, which I will add later. There are probably some other things that I will discover later too. Now I am going to work on the spar deck details for a while, starting with building and rigging the 20 carronades and 2 long guns that go on that deck.


- 1,354 replies
-
- 10
-
-
- constitution
- model shipways
- (and 1 more)
-
Thanks Bill. Between those and all the guns sticking out I know something is going to happen sooner or later. I just try to move around the hull very carefully these days.
- 1,354 replies
-
- 2
-
-
- constitution
- model shipways
- (and 1 more)
-
Greg, I had the same issue. My fix was to take a slice out of the sides of the carriages.
-
I like that brass gauge you used. Nice finish on the planks around the gun ports.
-
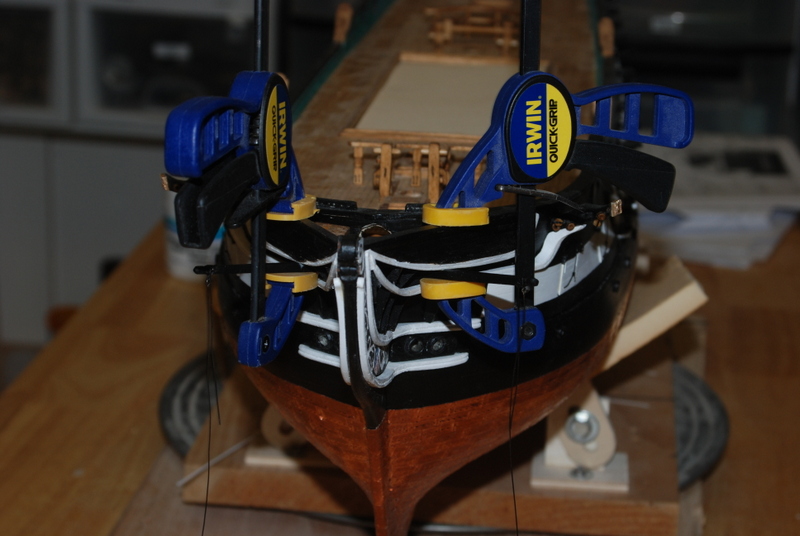
Thanks Greg and the likes too. I glued the bumpkins in place, as well as the anchor shelves and the anchor supports. The fore bumpkins seemed very vulnerable to me, so after the glue dried I drilled a hole up through the bumpkins into the middle rails, then pushed a small nail coated with medium CA into the hole. When the glue dried, I cut the nails flush with the bottom of the bumpkins and touched up the black paint at the spot. They seem much sturdier now. I then started to hook up the other ends of the support rods. I did this by bending the rod at the right length, then adding an eye bolt and forming a loop. I cut off the excess wire, drilled a hole for the eye bolt and glued it into the hole. Here is the port fore bumpkin with the supports in place. I still have to do the starboard side. The aft bumpkin supports are a bit harder, as the space is much tighter and the rail overhang makes it hard to get the support in place. I had to bend the one support I was able to get in place then try to straighten it out in place. The rear support could not be done this way at all, so I glued the eye bolt in place and made a hook on the end of the support, which I will hook onto the eye bolt when it is dry and make the loop in place. While things were drying, I made the small detail I lost on the transom from Sculpey and glued the new one in place, then touched up the gold paint on all the transom details. Hopefully I can keep from getting damaged again.


- 1,354 replies
-
- 12
-
-
- constitution
- model shipways
- (and 1 more)
-
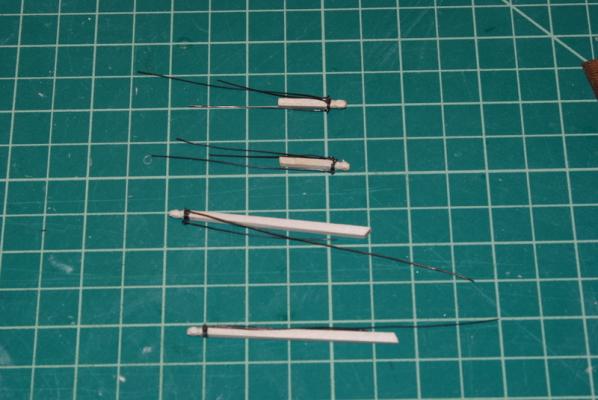
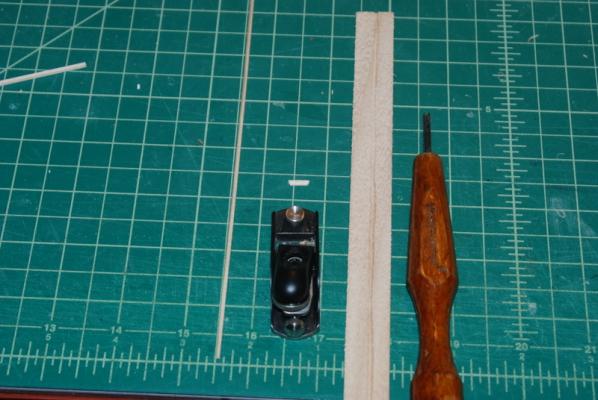
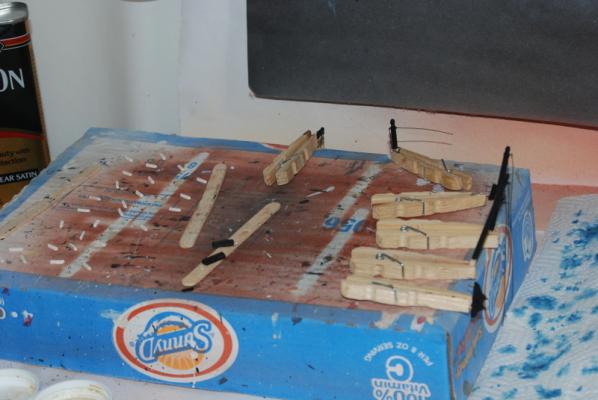
I made the four bumpkins, carving the ends like on the plans using a scalpel. I tapered the front bumpkins using the small plane my wife gave me for Christmas. It made short work of that task. I used black paper for the band around the ends and 28 gauge wire for the support rods. I made loops on the ends of the wire and hooked them to eye bolts which are glued into holes through the bands. I am hoping that I can do the same on the other ends after I install the bumpkins. I painted them black. I then made the boarding steps, using a simplification from what is shown on the plans. These are only 1/16" high, so getting three strips of wood to make them up was not an option. What I did was to make a holder for 1/16" square stock using a V gouge to make a V in a length of wood. I then placed the square stock in the groove and used the small plane to plane off one corner, giving me a profile similar to the steps on the plans. I then cut steps from this strip and sanded in the 45 degree angles on the ends. These were painted white. I also made the two "shelves" that go under the anchor ports, again using the small plane to remove two corners of a rectangular piece of wood. I also made the two anchor holders that go mid ship on the starboard side, using a manila template and the scroll saw. I added two pins to pin them to the sides of the hull and two eye bolts for straps that hold the anchor. These were all painted black. Installing the bumpkins and support rods is next up to do.
- 1,354 replies
-
- 10
-
-
- constitution
- model shipways
- (and 1 more)
-
Thanks George and Greg, and the folks who pressed the like button. George - the bottom hatches would have had a draw line straight into the gun deck, but I decided not to add it. The top lids did not have a draw line as they were removable from the inside.
- 1,354 replies
-
- 3
-
-
- constitution
- model shipways
- (and 1 more)
-
Really nice clean work, as usual with you Bob. Congratulations.
- 196 replies
-
- 4
-
-
- higaki kaisen
- woody joe
- (and 1 more)
-
I just finished the lids on the port side, so here is how they came out. Now it is on to the bumpkins. I have a few weeks off as I am between jobs, so I am looking forward to having a lot of time in the shop. Luckily I have another job lined up so I can enjoy myself.
- 1,354 replies
-
- 12
-
-
- constitution
- model shipways
- (and 1 more)