


popeye2sea
-
Posts
1,935 -
Joined
-
Last visited
Content Type
Profiles
Forums
Gallery
Events
Everything posted by popeye2sea
-
 Remember, our concept of safety was vastly different from back in the day.
 -
Is this kit back in production? When my kit hull warped after many years of storage, I was forced to buy a replacement on e-bay.
-
Your looking at the rear of the forecastle. They were quite high in those days.
-
Quarter Deck Railing composition for rigging lines
popeye2sea replied to kruginmi's topic in Masting, rigging and sails
Remember, 10 of those lines contribute no stress to the rail at all except when actually furling or reefing the sail. -
Quarter Deck Railing composition for rigging lines
popeye2sea replied to kruginmi's topic in Masting, rigging and sails
Not sure how much stress those lines would have on them. The clew, bunt, leech and reef lines would not be under strain when belayed. The others would though. But even these are for relatively light sails except for the mizzen tops'l bowlines. -
Studding sail booms were not always mounted forward of and above their respective yards. Some were mounted as you suggest and others were mounted above and behind the yard. In the mid 17th century the Dutch and the French tended to carry their stuns'l booms abaft the yard where the English carried them before the yard. The boom irons also changed around the beginning of the 18th century. The proportion of the length of the yardarms also got larger when reefs started to be taken in the the sails. The longer yard arms allowed a better lead for reef tackles. Since the Prince de Neufchatel, I believe dates to 1812. She probably carried her stuns'l booms above and before the yard.
-
You are probably right on that account
-
I think there are a couple of reasons. The first goes back to when the lower sail on the mizzen was a lateen sail. It acted more like a fore and aft sail and the lower forward part extended before the mast. The lowest square sail on the mizzen was then the topmast. Tradition then just carries on from there. The second reason is that the gap between the main and mizzen is often smaller than that between the fore and main. A full square sail for the mizzen course would 'steal the wind' or blanket the wind from the main course. It would not add that much driving force. The sails of the main and mizzen are considered after sails and balance the effort of the forward sails which are the foremast and jib sails.
-
How to avoid twisted lanyards
popeye2sea replied to Captain Al's topic in Masting, rigging and sails
One thing I noticed about your method, and it shows in your picture below, is that you seem to cross over the laniard from inside to outside. When you reeve the laniard you should always be passing from inboard out on the upper deadeye and from outboard in on the lower. The laniard should not be crossing from inboard to outboard between the deadeyes. That could be introducing some twist also. -
Interesting side note: there were two hammocks for each pair of hooks. Every crewman had his own hammock but there were two men assigned to each "space". So when one man got up he unhooked one side of his hammock to hang "folded" from a single hook while the man coming off watch "unfolded" his into the same spot. Hope that makes sense. Hard to describe, easier to show. Regards,
- 572 replies
-
- 7
-

-
- constitution
- frigate
- (and 1 more)
-
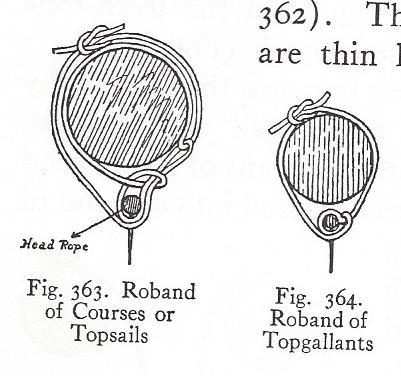
Sails are attached (bent) to the yards by robands. Depending on the era of the ship they were either bent to the yards directly or to a jackstay above the yard. There were usually two robands per sail cloth, sometimes both placed between the seams, and somtimes, one on the seam and one halfway between. The photos below show the two methods.
-
https://youtu.be/n0Q-6TCY8qk 1812 Marines musket drill It's kind of a sloppy drill. We were loading musket balls and they were supplied to us separate from the cartridge so some of us had to pull the musket ball out from pockets or where ever we could stash them while firing. Normally the ball is enclosed with the powder in a paper cartridge and the drill is much smoother with everyone in unison.
- 196 replies
-
- 3
-
-
- plastic
- soleil royal
- (and 2 more)
-
I agree. The halyard tubs that are supplied with the kit are useless for the lengths of halyard involved here. I am going to have to come up with a way to lash the halyard up in a coil against the mast Regards,
- 196 replies
-
- 2
-
-
- plastic
- soleil royal
- (and 2 more)
-
The information that I have shows that the main yard tye should be the same thickness as the shrouds and the halyard 3/4 of the tye, so it is a pretty big rope. Everyone is saying the line looks too thick, perhaps I have miscalculated the size? Main stay circumference = 1/2 the diameter of the main mast; mast diameter 0.43" / 2 = 0.215 0.215/3.14 = 0.068" dia. Main shrouds = 1/2 main stay ; .068/2 = .03" Main yard tye = 0.03" (0.76mm) Halyard = 0.02" (0.5mm) Scaled up that gives a 2" diameter rope. Still workable by hand. Please correct me now before I start rigging this whole thing incorrectly. Regards,
- 196 replies
-
- 1
-
-
- plastic
- soleil royal
- (and 2 more)
-
Looking for help building the triple sisters
popeye2sea replied to HKC's topic in Masting, rigging and sails
Where is this block used and/or what is its purpose? I have not heard of a triple sister block, and the description of a four legged stanchion for it is puzzling me. -
Still doing musket drills and demonstrations in the Navy yard. The ships upper deck is open to the public. I have the added benefit of getting into the dry dock every once in a while to check whats going on with the refit. Not much going on with my build at the moment. That pesky employment thing keeps getting in the way. Regards,
- 196 replies
-
- 3
-
-
- plastic
- soleil royal
- (and 2 more)
-
There may be a false stay set up beneath the stay. It would have an eye spliced in to its upper end that would be seized to the stay just below the mouse. The lower end could be set up with deadeyes or blocks just inboard of the stay on the bow sprit, or below the stay on the foremast. Regards
-
Mast tackles/Burton pendants in 1763 Cutter
popeye2sea replied to tkay11's topic in Masting, rigging and sails
Correct. Served over is the same as served.- 8 replies
-
- 3
-
-
- mast tackle
- burton pendant
- (and 2 more)
-
Mast tackles/Burton pendants in 1763 Cutter
popeye2sea replied to tkay11's topic in Masting, rigging and sails
The description is exactly what you see in the last diagram. A long block is much like a sister block. It looks like two single blocks end to end. In some versions the upper sheave is larger than the lower to give some clearance between the parts of the fall. A long stropped single block simply means that the strop is longer than you would find on a regular block. It is what you see for the lower block of the tackle in the last diagram. One end of the strop holds the thimble with the hook, the other end is the becket loop where the tackle fall is bent on. Hope that makes a little more sense.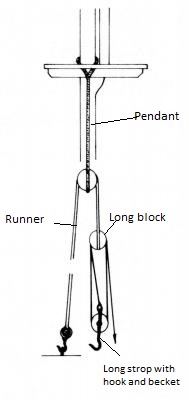
- 8 replies
-
- 4
-
-
- mast tackle
- burton pendant
- (and 2 more)
-
Does it look very lightly timbered to anyone else?
-
Thanks for the tips. Most of the early photos in my build log were taken before I got the macro/magnifier lenses. I took them by setting up a third hand device with a magnifier between the camera and the object. Then cropping out the frame of the magnifier. Admittedly very crude and lots of distortion from the cheap magnifier lens. The lighting in my work area is not the greatest. I am thinking of getting a separate lighting source just for photos. Regards,
-
I think the original images are about 4000 x 3000. I am using a Nikon D90
-
I have been using a set of Vivitar filters that magnify 1, 2, 4, and 10X in order to get macro shots of small details. Would I be better off shooting in RAW format and cropping?
-
I can't find any reference to a score block.
